

Poulan 530163808 User Manual

R
Please do not return unit to retailer.
Por favor, no devuelva el aparato al lugar de compra.
Veuillez ne pas retourner l’outil au détaillant.
1--800--554--6723
www.poulan.com
Instruction Manual
Manual de Instrucciones
Manuel d’Instructions
ENGLISH
WT200
IMPORTANT MANUAL -- Do not throw away
MANUAL IMPORTANTE -- No lo descarte
MANUEL IMPORTANT -- À Conserver
WARNING:
Read and follow all Safety Rules and Operating Instructions before
using this product. Failure to do so can result in serious injury.
ADVERTENCIA:
Lea el manual de instrucciones y siga todas las advertencias e
instrucciones de seguridad. El no hacerlo puede resultar en lesiones
graves.
AVERTISSEMENT:
Veuillez lire le manuel d’instructions et bien respecter tous les
avertissements et toutes les instructions de sécurité. Tout défaut
de le faire pourrait entraîner des blessures graves.
Electrolux Home Products
104 Warren Road
Augusta, GA 30907
CopyrightE2004 Electrolux Home Products, Inc.
530163808
2/2/04
ESPAÑOL
FRANÇAIS

SAFETY RULES
WARNING:
Safety Rules and Precautions can result in
serious injury.
KNOW YOUR UNIT
Readyour instructionmanual carefully until
S
you completely understandand can follow
all warningsandsafety rules beforeoperating the unit.
Restrict unit to users who understand and
D
will follow all warnings and safety rules in
this manual.
WARNING:
ing unit. Remove all debris and hard objects
such as rocks, glass, wire, etc. that can ricochet, be thrown, or otherwise cause injury or
damage during operation.
Use your unit as a blower for:
Sweeping debris or grass clippings from
D
drivew ays, sidewalks, patio s,etc.
Blowing grass clippings, straw,or leaves into
D
piles, around joints, or between bricks.
Use your unit as a vacuum for:
Picking up dry material such as leaves,
D
grass, small twigs, and bits of paper.
For best results during vacuum use, operate
D
your unit at high speed.
Moveslowly back andforth overthemate-
D
rial as you vacuum. Avoidforcing theunit
intoapileofdebris asthiscanclogtheunit.
Keep the vacuum tube about an inch above
D
thegroundforbestresults.
PLAN AHEAD
Always wear eye protection when operat-
D
ing, servicing, or performing maintenance
on unit. Wearing eye protection will help to
preventrocks or debris from being blown or
ricocheting into eyes and face which can
result in blindness and/or serious injury.
Eye protection should be marked Z87.
Always wear foot protection. Do not go
D
barefoot or wear sandals.
Always wearrespirator or face mask when
D
working with unit in dusty environments.
Secure hair above shoulder length.Secure
D
or remove jewelry, loose clothing, or clothing with loosely hanging straps, ties, tassels, etc. They can be caught in moving
parts.
Donot oper ateunit whenyouaretired,ill, up-
D
set, or if you are under the influence of alcohol, drugs, or medication.
Keep children, bystanders, and animals
D
away from work area a minimum of 30 feet
(10meters) whenstartingor operatingunit.
Do not point the blower nozzle in the direction of people or pets.
HANDLEFUEL WITH CAUTION,IT IS
HIGHLY FLAMMABLE
Eliminate all sources of sparks or flame (in-
D
cluding smoking, openflames, or workthat
cancausesparks)intheareaswherefuelis
mixed, poured, or stored.
Failure to follow all
Inspect area before start-
Mix and pour fuel in an outdoor area; store
D
fuel in a cool, dry, well ventilatedplace; use
an approved, marked container for all fuel
purposes.
Do not smoke while handling fuel or while
D
operating the unit.
Make sure the unit is properly assembled
D
and in good operating condition.
Do not fill fuel tank while engine is hot or
D
running.
Avoidspilling fuel or oil. Wipe up fuel spills
D
before starting engine.
Moveatleast 10 feet(3meters) awayfrom
D
fuel and fueling site before starting engine.
Always store gasoline in a container ap-
D
proved for flammable liquids.
OPERATE YOUR UNIT SAFELY
WARNING:
opening the vacuum inlet door. The engine
must be stopped and the impeller blades no
longerturningto avoid seriousinjury fromthe
rotating blades.
Inspect unit before each use for worn,
D
loose, missing, or damaged parts. Do not
use until unit is in proper working order.
Keep outside surfaces free of oil and fuel.
D
Never start or run engine inside a closed
D
room, building or other unventilated area.
Breathing exhaust fumes can kill.
To avoid static electricity shock, do not
D
wear rubber gloves or any other insulated
gloves while operating unit.
Do not set unit on any surface except a
D
clean, hard area while engine is running.
Debris such as gravel, sand, dust, grass,
etc.couldbepicked upby theairintakeand
thrown out through discharge opening,
damagingunit, property,orcausing serious
injury to bystanders or operator.
Avoiddangerous environments.Do notuse
D
in unventilated areas or where explosive
vapors or carbon monoxide build up could
be present.
Do notoverreachor use from unstablesur-
D
faces such as ladders,trees, steep slopes,
rooftops,etc.Keepfirm footingandbalance
at all times.
Never place objects inside the blower
D
tubes; always direct the blowing debris
awayfrompeople,animals,glass, andsolid
objects such as trees, automobiles, walls,
etc.Theforceof aircan causerocks, dirt,or
sticks tobe thrownor to ricochet which can
hurt people or animals, break glass, or
cause other damage.
Never run unit without the proper equip-
D
ment attached. When using your unit as a
blower, always install blower tubes. When
using your unit as a vacuum, always install
vacuum tubes and vacuum bag assembly.
Make sure vacuum bag assembly is completely zipped.
Check air intake opening, blower tubes,
D
vacuum tubes, and elbow tube frequently,
always with enginestopped andsparkplug
Stop the engine before
-- 2 --
disconnected. Keep vents and discharge
tubes free of debris which can accumulate
and restrict proper air flow.
Never place any object in the air intake open-
D
ing as this could restrict proper air flow and
cause damage to the unit.
Never use for spreading chemicals, fertiliz-
D
ers,orother substances which maycontain
toxic materials.
Toavoid spreadingfire,donot usenear leaf
D
or brush fires, fireplaces, barbecue pits,
ashtrays, etc.
Use only for jobs explained in this manual.
D
MAINTAIN YOUR UNIT PROPERLY
Have all maintenance other than the rec-
D
ommendedproceduresdescribedin theinstruction manual performed by an authorized service dealer.
Disconnect spark plug before performing
D
maintenance except for carburetor adjustments.
Use only recommended Poulan!replace-
D
mentparts;use of any otherpartsmay void
your warranty and cause damage to your
unit.
Empty fuel tank before storing the unit. Use
D
upfuel left in carburetor by starting engine and
letting it run until it stops.
Do not use any accessory or attachment
D
other than those recommended by manufacturer for use with your unit.
Donotstorethe unit or fuel in a closed area
D
where fuel vapors can reach sparks or an
openflame from hot water heaters,electric
motors or switches, furnaces, etc.
Store in a dry area out of reach of children.
D
SPECIAL NOTICE:
tions throughprolongeduse of gasolinepowered hand tools could cause blood vessel or
nerve damage in the fingers, hands, and
joints of people proneto circulation disorders
or abnormal swelling. Prolonged use in cold
weatherhasbeenlinkedtobloodvessel damagein otherwisehealthypeople. If symptoms
occur such as numbness, pain, loss of
strength, change in skin color or texture, or
loss of feeling in the fingers, hands, or joints,
discontinue the use of this tool and seek
medical attention. An antivibration system
does not guarantee the avoidance of these
problems. Users who operatepower tools on
a continual and regular basis must monitor
closely their physical conditionand the condition of this tool.
SPECIALNOTICE:
est Land and in some states, including California (Public Resources Codes 4442 and
4443),Idaho,Maine,Minnesota, NewJersey,
Oregon, and Washington: Certain internal
combustion engines operated on forest,
brush,and/orgrass coveredland in theabove
areas are required to be equipped with a
spark arresting screen, maintained in effectiveworkingorder,ortheenginemust beconstructed, equipped, and maintained for the
preventionof fire.Checkwithyourstate or local authorities for regulations pertaining to
these requirements. Failure to follow these
requirementsis aviolation of thelaw.This unit
is not factory equipped with a spark arresting
screen; however, a spark arresting screen is
available asanoptional part.If a spark arresting screen is required in your area, contact
your authorizedservice dealer for the correct
kit. Thesparkarrestingscreen,blowertubes,
andnozzles must be assembled to unit to be
in full compliance with regulation s .
Exposure to vibra-
For users on U.S. For-
ASSEMBLY
WARNING:
the impeller blades have stopped turning before opening the vacuum inlet door or attempting to insert or remove the vacuum or
blower tubes. The rotating blades can cause
serious injury. Always disconnect the spark
plug before performing maintenance or accessing movable parts.
WARNING:
assembled, check each step to insure your
unit is properly assembled and all fasteners
are secure. Follow all safety information in
the manual and on the unit.
A standard screwdriver is required for as-
D
sembly.
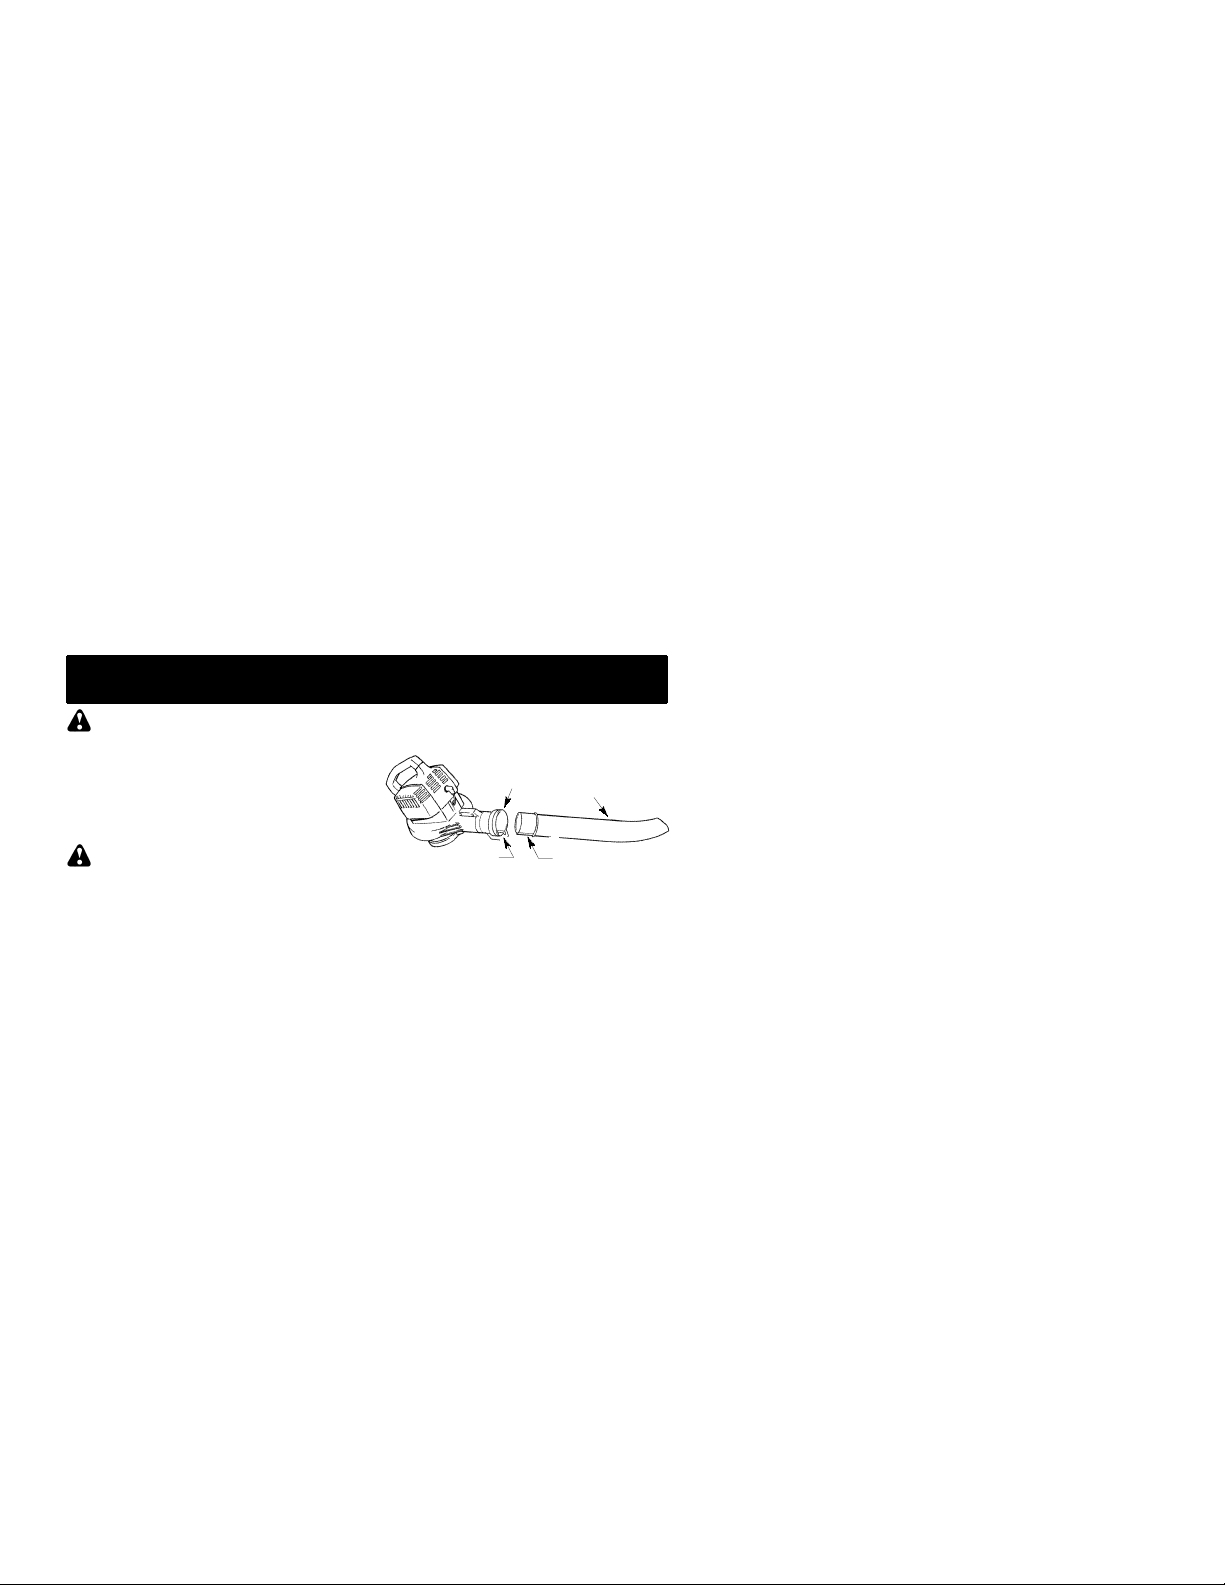
BLOWERTUBE ASSEMBLY
1. Align the rib on the blower tube with the
groove in the blower outlet; slide the tube
into place.
Stop engine and be sure
If you receive your unit
Knobmust be loose enoughto allow
NOTE:
blower tube to be inserted in blower outlet.
Loosen knob by turning counterclockwise.
2. Securethetubeby turningthe knob clockwise.
3. Toremove thetube,turntheknobcounterclockwise to loosen the tube; remove the
tube.
VACUUM BAG ASSEMBLY
1. Open the zipper on the vacuum bag and
insert the elbow tube.
2. Push the small end of the elbow tube
through the small opening in the bag.
Groove
Blower
Outlet
Blower
Tube
Rib
-- 3 --

Elbow
Tube
Zipper
Opening
Makesureedgeofthe small opening
NOTE:
is flush against the flared area of the elbow
tube, and the rib on the elbow tube is on the
bottom.
3. Closethezipper onthebag. Makesurethe
zipper is closed completely.
4. Remove blower tube from engine.
Small
Opening
Rib
Rib
4. Holdthe vacuuminlet cover openuntilupper vacuum tube is installed.
Vacuum Inlet
RetainingPost
Vacuum
Inlet
Cover
5. Placethe hooks of theuppervacuum tube
on the retaining posts of the unit.
6. Pivot the tube until it is secured to the
blower unit by the vacuum inlet latch.
Groove
5. Inserttheelbowtube intothebloweroutlet.
Make sure elbow tube rib is aligned with
the blower outlet groove.
6. Turnknob clockwise tosecureelbowtube.
VACUUM TUBE ASSEMBLY
WARNING:
the impeller blades have stopped turning before opening the vacuum inlet door or attempting to insert or remove the vacuum or
blower tubes. The rotating blades can cause
serious injury.
1. Align the lower vacuum tube as shown.
Push lower vacuum tubeinto upper vacuum tube.
Upper Vacuum
Tube
2. Insertthe tip ofascrewdriver into thelatch
area of the vacuum inlet.
Latch
Area
3. Gentlytilt thehandle of thescrewdriver toward the back of the unit to release the
latch while pulling up on the vacuum inlet
cover with your other hand.
Stop engine and be sure
Lower Vacuum Tube
Blower
Outlet
Latch Area
Vacuum
Inlet Cover
PIVOT
Inlet Cover
Latch
Hook
HOW TO CONVERT UNIT FROM
VACUUM USE TO BLOWER USE
1. Remove the vacuum tubes by inserting
the tip of a screwdriver into the latch area
of the vacuum inlet.
2. Gently tilt handle of screwdriver toward
the back of the unit to release the latch
whilepullingup onthe uppervacuumtube
with your other hand.
Latch Area
3. Remove the vacuum bag.
4. Close the vacuum inlet cover and make
sure it is latched closed.
5. Reinstall the blower tube (see BLOWER
TUBE ASSEMBLY).
-- 4 --
Retaining
Post
 Loading...