

Page 1
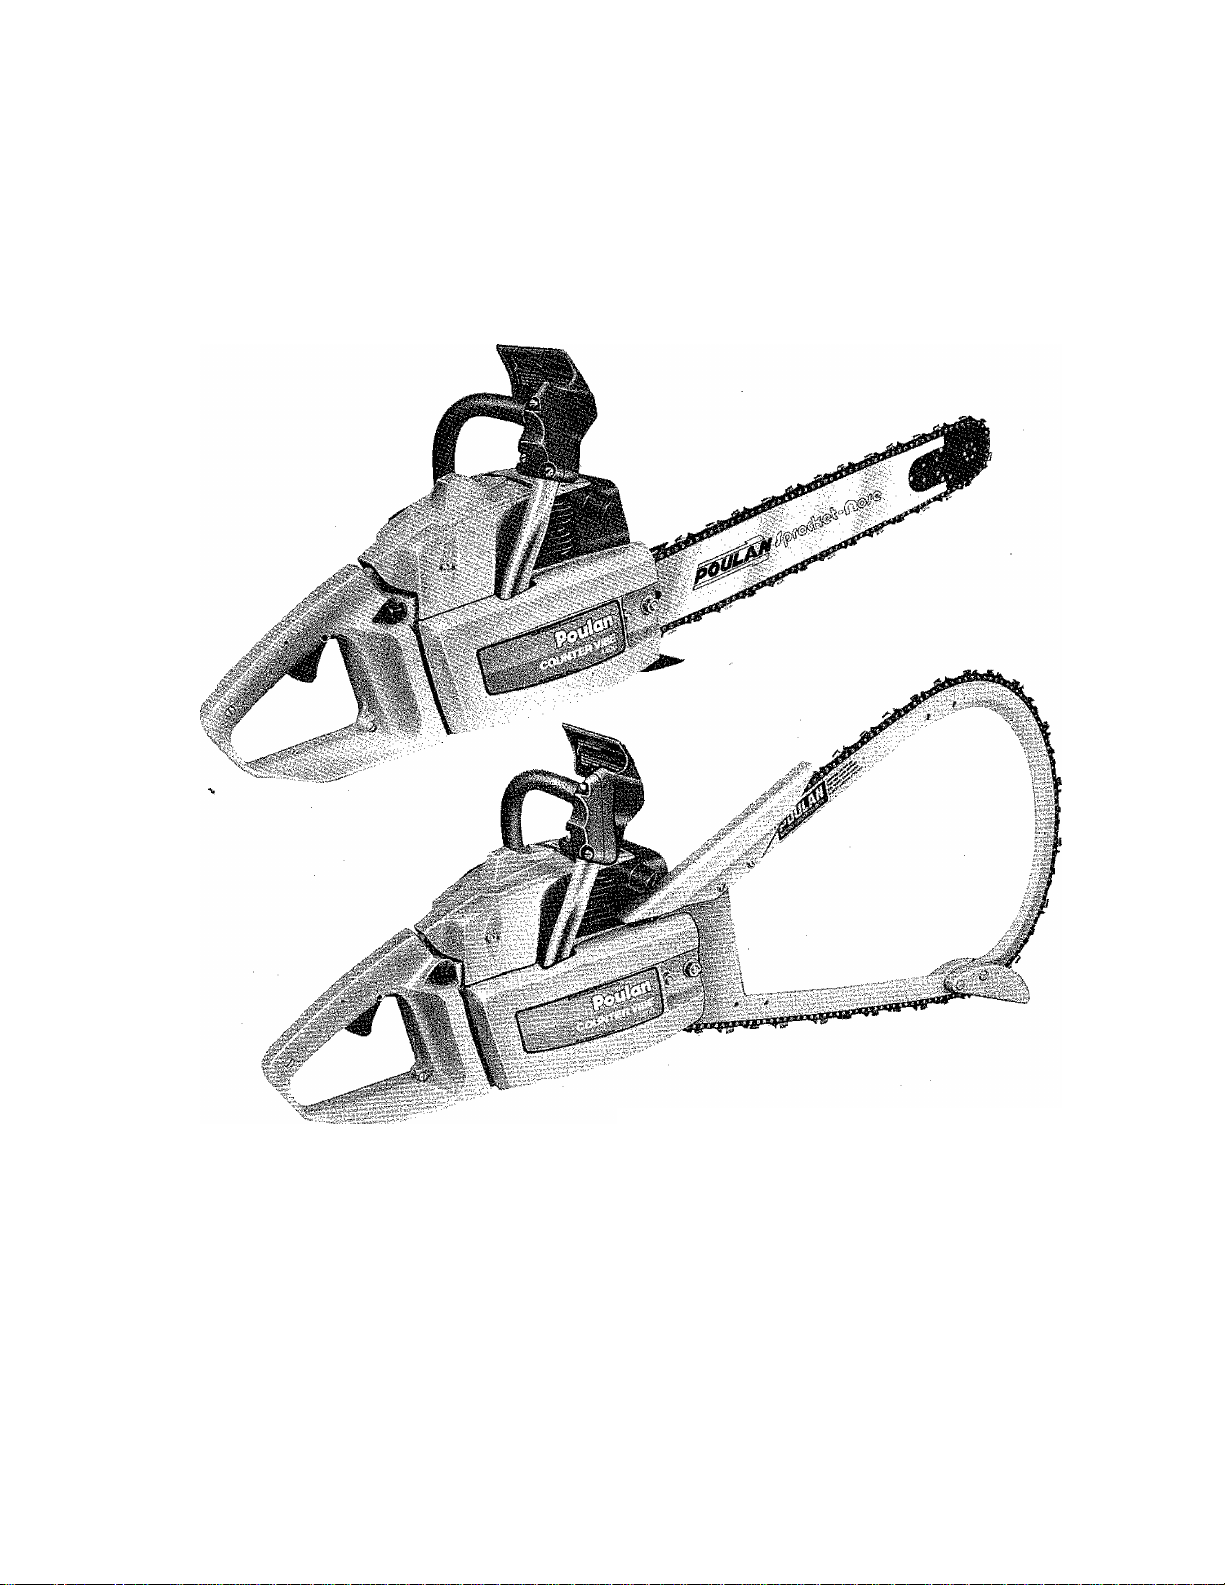
Poulan—
4400/^900/5400Counter Vibe
CAUTION:
Read Rules for Safe
Operation Carefully.
Note Special
Instructions for
Bow Saw Users.
BEAIRD-POULAN/WEED EATER
Division Emerson Electric Co.
5020 Fiournoy-Lucas Road i
Shreveport, Louisiana 71109
-----------------------------------^---------
ctiainsaw
operator’s manual
Record in the space provided below the model
number and serial number of your saw.
Model No.
Retain these numbers for future reference.
.Serial No..
Page 2

TABLE OF CONTENTS
Bar and Chain Installation . , .
Chain Adjustment
Bow Installation
Operating Instructions
Cutting Tips
Bow Cutting Tips . . . .
Felling ..............................
Bucking
Pruning and Debranching
Special Safety Center Spread ,
Replacing Drum & Sprocket .
Carburetor Adjustment ....
Chain Sharpening
Trouble Shooting
.....................
........................
..............
............................
......................
.......................
SPECIFICATIONS
MODEL
CU. IN. DISPLACEMENT
4.2 in3/69 cm3
4400
4900
4.7 in3/77cm3
SPARKPLUG Champion CJ-8 Champion CJ-8
SPARK PLUG GAP
IGNITION
MODULE AIR GAP
OILER
GUIDE BAR
CHAIN
BOW GUIDE
FUEL MIX
.023 to .027"
Solid State
.008 to .014"
Adjustable Automatic
16",20",24",27",30",32", & 36" rsn
17", 21", 25" HT
3/8" Pitch - Semi Chisel Chain
13", 14"
V2 pt. (16:1) oil/1 gal. reg. gasoline V2 pt. (32:1) oil to 2 gal. reg. gas.
MUFFLER Spark Arresting
- 3,4
■ 3,4
, 7
•4, 5
. 7
5
. 6
. 6
8, 9
. 10
, 11
. 12
. 13
5400
5.2ln3/85cm3
Champion CJ-4
CHOKE
THROTTLE rear
TRIGGER CHAIN GUARD
REPLACEABLE SPROCKET NOSE BAR
CHAIN TENSION
(Located between Bar & Spur) qIL CAP
FUEL CAP
NOTICE CALIFORNIA ONLY
It is prohibited to operate this chain saw on forest brush, or grass covered land without a properly maintained SPARK ARRESTOR
(code 4442), or to operate a chain saw without a TEMPERATURE LIMITING MUFFLER (code 4443). THIS ENGINE IS NOT
EQUIPPED from the factory with such a muffler, A kit is available from your dealer.
You must maintain the approved muffler to operate this chain saw in California. Failure to do so will subject you to a liability for a
fine.
Page 3
SAFETY FEATURES
Your new chain saw is equipped with guard link safety chain
to reduce kickback.
A hand guard is provided to protect your hand from coming in
contact with the cutting chain in the event your hand slips off
the front handlebar or you lose control of the saw. Hand
guards do not eliminate the possibility of injury as a result of
kickback or loss of control.
THIS SAW INTENDED FOR
PROFESSIONAL USE ONLY.
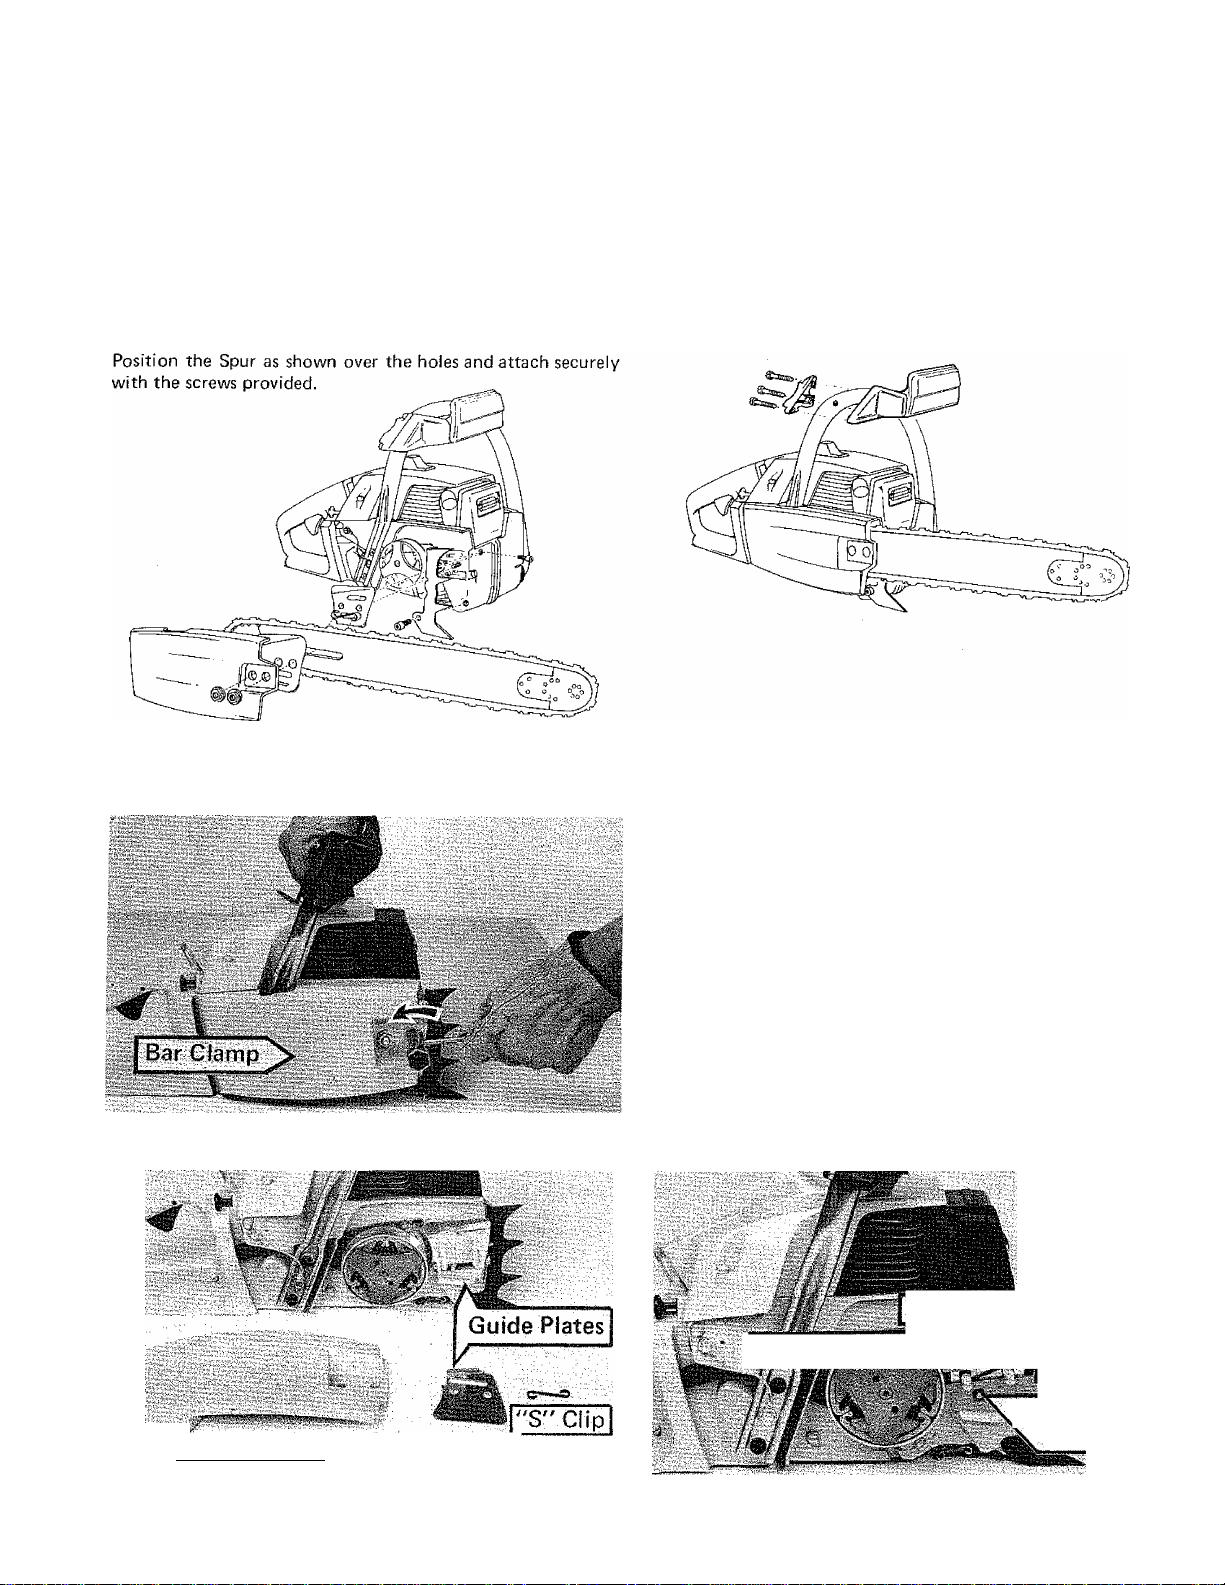
SPUR MOUNTING
HAND GUARD MOUNTING INSTRUCTIONS
1. Assemble the hand guard to the bend in the handlebar as
shown. Be sure alignment pin on guard is inserted in hole in
handlebar. Do not tighten the screws.
2. Make sure the hand guard is parallel to the handlebar.
Alternately tighten each hand guard mounting screw
maintaining an even gap between the hand guard and
mounting cap.
3. Tighten the mounting screws until the hand guard and
mounting cap are pulled together.
Caution; Screws must be tightened evenly to prevent
breakage.
Figure 1
INSTALLING THE GUIDE BAR AND SAFETY CHAIN
1. Remove the bar mounting nuts. Using the scrench packed
with your saw, loosen the nuts by turning counterclock
wise. FIGURE 1.
2. Remove the bar clamp and outer guide bar plate. (Note
position of the guide plates.) F IGURE 2.
3. Place "S" clip over the mounting studs and flush to the
inner bar plate. Now mount the slotted end of the guide bar
over the bar mounting studs and "S" clip and behind the
clutch drum. Be sure to position the bar adjusting pin into
the hole in the guide bar. FIGURE 3.
[Bar Mounting ^
Figure 2
Figure 3
Adjusting Pin
Hole
(continued}
Page 4
INSTALLING THE GUIDE BAR AND SAFETY CHAIN (con't)
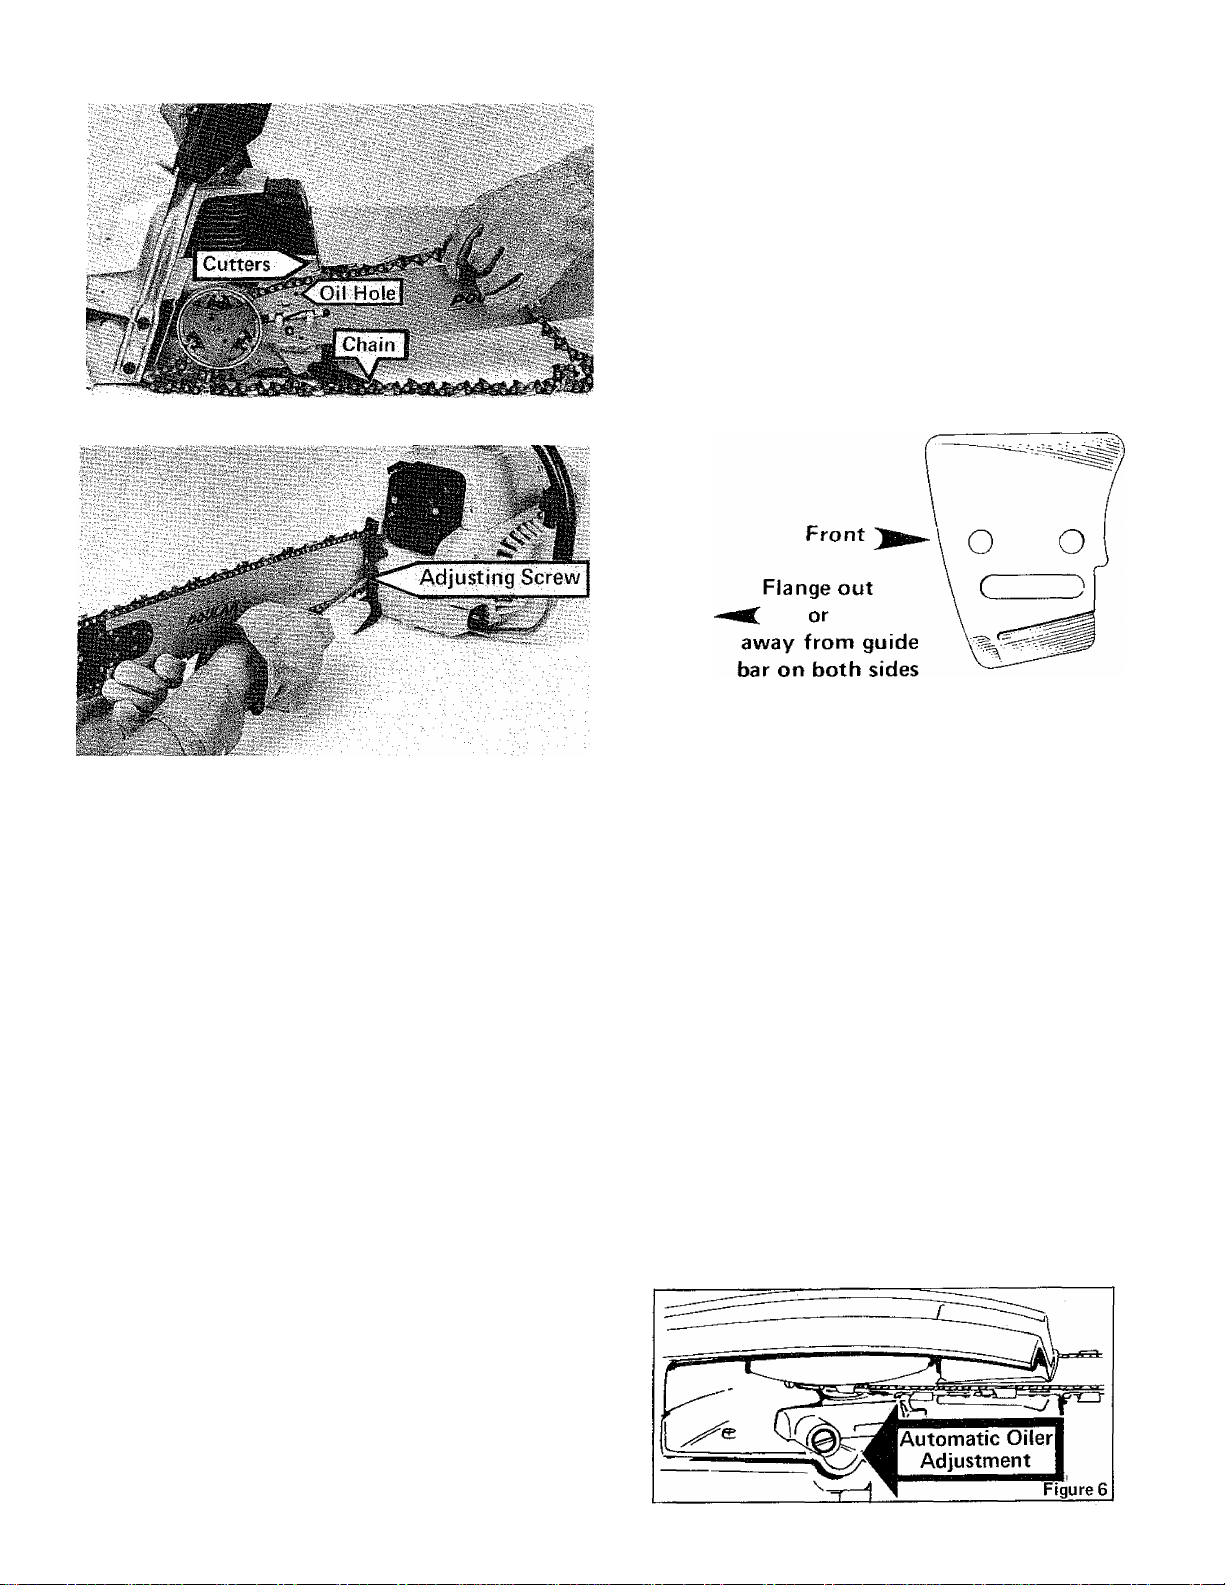
4. Place the chain over the sprocket and engage the drive link
tangs between the sprocket teeth. (Note the direction of
the chain teeth.) Starting at the top of the bar, gradually
work the chain into the groove of the bar until all the drive
links are engaged in the bar groove. FIGURE 4.
5. Replace the outer guide bar plate and bar clamp. Replace
the bar mounting nuts and tighten finger tight,
6. Holding the tip of the bar up, adjust the chain tension by
turning the bar adjusting screw clockwise. FIGURE 5.
7. When the chain is properly tensioned it will move freely but
not sag below the bar. Now tighten the bar mounting nuts
completely.
CHAIN STRETCHES WHEN USED. CHECK THE TENSION
OFTEN!
Figure 4
Figure 5
OPERATING
Before Starting
O Check the chain tension. Is the chain sharp?
O Are the handles clean of gas and oil?
O Did you fill the fuel AND oil tanks?
FUEL and OIL
Fuel Mix: 16 parts gasoline to 1 part oil {8 oz. Poulan 16:1 oil
to one gallon gasoline). (Or use Poulan 32:1 oil—2 gallons
gasoline to 8 oz. oil).
CAUTION;
When preparing fuel mixture, mix only the amount needed for
the job you are to do. Do not use fuel mixture that has been
stored longer than two (2) months. Fuel mixture stored longer
than this will cause hard starting and poor performance of
your saw. If fuel mix has been stored in your saw longer than
this time it should also be removed and filled with a fresh
mixture before using.
BAR AND CHAIN OIL: Use straight bar and chain lube above
30 Fahrenheit. If bar and chain lube is not available use a
good grade SAE 30 oil. Between 30 F and 0 F use a mixture
of 95% bar and chain lube and 5% either kerosene or# 1 diesel
fuel. For below 0 F operation increase the kerosene or diesel
fuel to 10%.
A WORD ABOUT CHAIN OILING
1. Fill the oil tank each time you fill the fuel tank. Lack of oil
on the chain will quickly ruin the bar and chain.
2. You will use at least 1/2 tank of oil for each tank of gas. If
you use less, check for a plugged oil hole in the guide bar.
Use clean oil. Do not let sawdust or dirt into the oil tank.
INSTRUCTIONS
Clean the oil cap and the area around it before removing.
Oil on the bar and chain will drip off after use. Let the saw
stand and cool off. Wipe the bottom clean before storing.
AUTOMATIC OILER: Your Poulan Chain Saw is equipped
with an automatic oiler which delivers a constant flow of oil to
the bar and chain whenever the engine is running. The
automatic oiler has an adjustment screw, to regulate the flow
of oil, located at the bottom of the bar clamp for easy access.
Turn this screw counterclockwise Jt to increase the flow,
clockwise to decrease the flow. (See Figure 6) it is
possible to run out of chain oil before running out of fuel
when operating the saw at high RPM for a long period of time,
such as when pruning and debranching. The automatic oiler
may deliver more oil than required for this type of cutting. If
there is no chain oil in the oil tank when the saw runs out of
fuel, make the following adjustment: Turn the adjustment
screw clockwise ^ X until it stops. Then turn the screw
counterclockwise %turn. REMINDER — RE-ADJUST
FLOW RATE WHEN RETURNING TO CUTTING THAT
REQUIRES MORE CHAIN LUBRICATION, SUCH AS FELL
ING AND BUCKING.
Page 5

OPERATING INSTRUCTIONS (cont'd)
STARTING
Move bystanders and obstructions well out of reach!
WARNIMG; Chain will be moving when engine starts. Make
sure chain is not touching anything before starting,
h Pull Choke Knob out.
2. Move START-STOP Switch to START position.
3. Squeeze the throttle trigger, then press the throttle detent
located on the left side of the handle.
4. Release Trigger but keep Throttle Detent depressed com
pletely. This will open throttle slightly for easier starting.
5. Set saw on ground and place right foot in lower part of
control handle.
6. Kneel on left knee, grasp Handlebar with left hand and
Starter Handle with right hand. (See Figure 7).
1. Holding saw firmly, pull briskly on Starter Rope Handle
until engine fires. (A single "pop” is sufficient).
8. After engine fires, push Choke Knob in and engine should
run on next few pulls.
9. After engine starts and runs a few seconds, give Throttle
Trigger a light squeeze and Throttle Detent will release
automatically, allowing engine to idle.
Mote: Overchoking engine will cause it to flood. Should
engine flood, repeat starting instructions with Choke
Knob pushed in until engine starts.
10. To stop engine move START-STOP Switch to STOP
position.
Check The Wind — If it is strong enough to move the top of
the tree, DON'T CUT! Come back another day!
Check The Lean — Tie a weight to a piece of string about 3
feet long. Hang the weight in your line of sight. The string
is a good vertical line to help you judge the lean of the tree.
The tree will try to fall the way it is leaning. (See Figure 8)
Check The Weight Distribution — A tree is heavier on the side
with the most limbs. It will try to fall on its heavy side.
Clear The Work Area — You need a clean area all around the
tree for good footing. Get everything out of the area where
the tree will fall. People, pets, cars, etc.
Find a Retreat Path — Know which way you are going when
the tree starts to fall. Make sure it is clear.
FELLING {Cutting down a tree)
A Small Trees -- Less than 8” across
1. If there is doubt about the direction of fall, use "notch"
method described in B.
2. Make a single felling cut on the side away from the
direction of fall. Don't cut all the way through!
3. When the tree starts to fall, stop the saw, put the saw
down and GET AWAY QUICKLY!
B
Large Trees — 8” or larger across
1. The notch is very important. The tree will try to fall
"into” the notch. (See Figure 9)
2. Make the bottom notch cut first, about 1/3 to 1/2 way
into the tree.
3. Complete the notch with the slant cut. Remove the
wedge of wood before going on.
4. The felling cut is next. Make it on the side opposite the
notch.
5. It is made 2" higher than the bottom of the notch.
6. DO NOT try to cut through to the notch.
7. As the tree starts to fall, stop the saw, put the saw down
and GET AWAY QUICKLY!
CUTTING TIPS
^ Read the safety center spread frequently. Always keep
your chain sharp.
Plan Ahead
Figure 7
Direction
of Fall
l-<|\lotch1
Figure 9
Page 6

BUCKING
Bucking is the sawing of a log or fallen tree into smaller pieces.
(See Figúrelo)
□ Use Both Hands — grip the saw firmly. (See Figure 11.)
□ Stand Uphill — a log that is cut loose will roll downhill.
□ Keep The Chain Out Of The Dirt — dirt will dull the
chain. A dull chain is unsafe.
Q Stand to the left of the saw.
How To
A In area "A", come up from the bottom 1/3 of the way.
Finish by coming down from the top. Figure 10
B In area "S", come down from the top 1/3 of the way.
Finish by coming up from the bottom. Figure 10
PRUNING AND DEBRANCHING
1 Be Careful
O Use Both Hands — keep a firm grip. (See Figure 11)
O Look Out For Kickback — don't let the tip of the bar
touch anything while the engine is running.
O Don't Cut Overhead — keep the saw below chest high, The
chain is too close to your face in this position.
2 Pruning (Cutting limbs from standing tree)
O If you must cut in a tree, do not carry a running saw while
climbing.
O Keep BothL Hands On The Saw -- keep a firm grip. Figure 11
O Be Sure Of Your Support — don't cut off balance.
O Cut Up From The Bottom, Finish Down From The Top.
3 Debranching (Cutting the limbs from a fallen tree)
O Cut On The Opposite Side Of The Tree — keep the tree
between you and the chain. (See Figure 12)
O Be Sure Of Your Footing — work slowly and deliberately.
O Look Out For Springpoles — limbs bent under pressure
will snap up at you when cut.
the tree between you and the chain!
Figure 12
Page 7

BOW INSTALLATION
To install a bow guide to a standard
guide bar model it is necessary to
modify the bar clamp and saw body as
Ref.
Part No.
No.
1 4484
44126
"44127
51053
2
51132 1
*51133
3
1325
4
1326
5 1615 2
6 625567
7
1725
1709
8
9 11276 1
22162 1 Guard (14" Bow)
*NOTE:
To use 14” bow guide and chain with .404 pitch, .062 gauge,
it is necessary to install a .404 pitch sprocket which is included
with the bow kit.
BOW ASSEMBLY IMSTRUCTIONS
1, Attach 1325 and 1326 spikes to bow guide with two {2)
625567 screws and two (2} 1615 locknuts.
2. Attach guard to bow guide with open side away from
engine, using two (2) 1709 screws and two (2) 1725
locknuts.
3, Mount inner guide bar plate, bow guide, outer guide bar
plate, chain, and bar clamp on saw making sure adjusting
pin enters hole on bow guide.
4. Install mounting nuts finger tight, adjust chain tension,
and tighten nuts.
Qty,
Req. Description
1
13" Bow Guide (3/8 Pitch)
1
14" Bow Guide (3/8 Pitch)
1
14" Bow Guide (.404 Pitch)
1
P720-80 Chain (13" Bow 3/8 Pitch)
P720-87 Chain (14" Bow 3/8 Pitch)
1
P27-79 Chain (14" Bow .404 Pitch)
1 Spike - Left
1 Spike - Right
Locknut - Va - 20
2
Screw - Va-20 X 1% Hex Head
2
Locknut - 12-24
2
Screw - 12-24 x 5/8 Hex Head
Guard (13" Bow)
Always begin cutting in the correct
entry area of the bow. Figure 13
LOOK OUT FOR KICKBACK
1. When the bow contacts an object in the danger area,
(See Fig, 13) the bow is thrown upward with considera
ble force. THIS IS KICKBACK!
2. Hold the saw firmly with both hands.
3. Don't overreach.
4. Cut only at high engine speeds.
5.
DO NOT REACH ABOVE WAIST HIGH. THE BOW IS
TOO CLOSE TO YOUR FACE IN THIS POSITION.
6.
Keep your chain sharp. A dull chain kicks back harder
than a sharp chain.
BE CAREFUL
1. DO NOT OPERATE WITHOUT THE SPIKES, GUARD,
AND HAND GUARD PROPERLY ATTACHED.
2. Be sure the spikes are in place against the log before
beginning the cut. (See Fig, 13)
3. Do not cut small limbs or brush with a bow.
4. Do not under buck with a bow. y
5. Keep the chain tight and sharp.
J
Page 8

Your Planning
and Preparation
• Do not handle or op
erate a chain saw when
you are fatigued or tired, have
been drinking alcoholic bev
erages, are on medication, or
^ are upset. You must be in
good physical condition and
mentally alert.
Always wear personal protective gear. Wear
safety footwear, protective gloves, snugfitting clothing, and eye, hearing and head
protection devices.
Use caution when handling fuel. No smok
ing when fueling or operating the saw.
Handle fuel only in open, well-ventilated
areas. Wipe up spills.
All chain saw service other than the items
listed in the operator's manual maintenance
instructions, should be performed by
competent chain saw service personnel.
> Keep the handles dry, clean and free of oil
or fuel mixture.
> Do not operate a chain saw that is damaged,
is improperly adjusted, or is not completely
and securely assembled. Keep all screws
and fasteners tight.
Move the chain saw at least 10 feet (3m)
from the fueling point, before starting the
engine.
Make sure chain is sharp and at proper
tension.
Carry the chain saw with the engine
stopped, the guide bar and chain covered
and to the rear, and the muffler away from
your body.
Conditions in Your Work Area
Do not attempt to cut If the weather is bad
— strong wind, rain, snowing, or other
adverse weather conditions. You need
good visibility, so don’t cut at night.
Operate the chain saw only in well-venti
lated areas. Don’t operate it In an enclosed,
confined area because you need room to
perform the cutting and good ventilation.
Do not start cutting until you have a clear
work area, secure footing, and a planned
retreat path from the falling tree (If you are
cutting down trees).
Do not allow other persons to be near the
chain saw when starting or cutting with the
chain saw. Keep bystanders and animals
out of the work area.
Operate the chain saw on level, solid
ground.
Do not operate the chain saw in a tree
unless you have been specifically trained
to do so.
Never carry your saw while climbing. You
need both hands for safe climbing.
Page 9

OPERATING YOUR CHAIN SAW
i Wear your protective gear.
^ Before you start the engine, make sure the
saw chain is not contacting anything.
^ Keep all parts of your body away from the
saw chain when the engine is running.
► Hold the chain saw firmly with both hands
when the engine is running. Use a firm grip
with thumbs and fingers encircling the
chain saw handles.
» Do not let the nose of the guide bar contact
a log, branch, the ground, or any other ob
struction, to help prevent kickback.
> Guard against kickback. Kickback is the
upward motion of the guide bar which
occurs when the saw chain at the nose of
the guide bar contacts an object. Kickback
can lead to dangerous loss of control of the
chain saw.
'Do not overreach. You might iose your
balance.
' Do not cut above shoulder height. Don’t
cut overhead, since you would have poor
control of the saw and the saw would be
too close to your face and body.
%
Use extreme caution when cutting small
size brush and saplings because slender
material may catch the saw chain and be
whipped toward you or puil you off
balance.
When cutting a limb that is under tension
be alert for springback, so that you will not
be struck by the limb when the tension in
the wood fibers is released.
Be sure that the saw chain stops moving
when the throttle control trigger is re
leased.
After cutting, shut off the engine before
setting the saw down.
Let the saw cool in a non-combustible
area, not on dry leaves or paper.
Wipe off oil before storing the chain saw.
Do not store your chain saw in any room
with any type open flame heater or stove.
Store the saw in a locked area or in an area
away from children.
Follow manufacturer’s sharpening and
maintenance instructions for the saw
chain.
Always do your cutting at high engine
speed.
CONTROLLING KICKBACK by Lioyd Tuggle
KICKBACK may happen when the nose or tip of the moving chain touches an object while
the saw is operating. This contact may abruptly STOP the cutting action and in some cases
may cause a lightning fast reverse REACTION, kicking the saw tip up and back. KICKBACK
has caused some operators to lose control of the saw. The cutting chain can then cause
injury if it comes in contact with any part of the body.
As a chain saw user you can take several steps to keep your cutting free from accident or
injury due to kickback.
1. By simply UNDERSTANDING and knowing about kickback you take out the element of
SURPRISE. It's the SURPRISE that really contributes to accidents.
2. Make sure your HAND GUARD is securely fastened to the handlebar AT ALL TIMES.
3. Make sure the area in which you are cutting is FREE FROM OBSTRUCTIONS such as
other trees, branches, rocks, fences, stumps, etc. Eliminate or avoid any obstructions that
your saw chain could hit while you are cutting through a particular log or branch.
4. Keep a good firm grip on the saw with BOTH hands. (Left hand completely around the
front handlebar with thumb under and the right hand completely around the rear
handle.) A FIRM GRIP can neutralize kickback and help you maintain COMPLETE
CONTROL of the saw. DON'T LET GO.
Your Poulan chain saw is a reliable and powerful cutting tool. Please use it safely and
carefully so that each cutting job is SUCCESSFUL AND SAFE. Controlling kickback is
really a partnership between you and Poulan. GOOD CUTTING.
Lloyd Tuggle, Senior Vice President, Engineering, Beaird-Poulan
Avoid
Obstructions
Clear
Working
Good Firm
Grip With
Both Hands
Page 10

REPLACING DRUM AND SPROCKET
WARWING!—Do not start engine without guide bar, chain, and bar clamp completely assembled. The clutch can come off without
the guide bar and chain completely assembled and serious injury could result.
1. Remove the cylinder cover and the high tension lead from
the spark plug to prevent accidental starting of the saw.
Figure 14.
2. Remove the bar clamp and the bar and chain. Figure 15.
3. Remove the clutch by using a hammer and punch. Position
the punch as shown in Figure 16 and tap lightly with the
hammer. The threads are LEFT HAND so a clockwise
rotation is necessary to remove.
Figure 14
Remove the clutch drum and sprocket and inspect for wear.
Replace if necessary. Inspect the clutch shoes and springs.
Replace any that are broken or worn. Figure 17. Replace
the clutch in a counterclockwise direction. Replace high
tension lead and cylinder cover.
Inspect the chain sprocket regularly for wear; a worn
sprocket will make the chain run erratically and will
shorten the life of the bar and chain. Figure 18.
Figure 17
10
Figure 15
Figure 16
A -S
Figure 18
Page 11

CARBURETOR ADJUSTMENT
(Model 4400/4900/5400)
STOP THE ENGINE ~ Make sure you are using clean, fresh
fuel mixture at the correct gasoline/oil ratio. THE AIR
FILTER MUST BE CLEAN AND FASTENED SECURELY.
The cylinder shield should be in place and fastened securely.
1. Turn the high speed and low speed mixture screws
clockwise until they stop. DO NOT TIGHTEN OR
FORCE THE SCREWS ANY FARTHER! YOU MAY
DAMAGE THE NEEDLE SEATS. Turn the high speed and
low speed mixture screws 1 full turn counterclockwise.
Figure 19.
CAUTION! THE CHAIN WILL BE MOVING DURING
THE FOLLOWING PROCEDURE.
2. Start the engine and run for a few minutes to bring it to
operating temperature.
3. Squeeze the throttle trigger and run the engine at full RPM
for approximately 3 SECONDS, then allow it to return to
idle speed.
4. If the engine will not idle after it is warm, or it idles too
fast causing the chain to move, adjust the idle speed screw.
Turn the screw clockwise to increase idle speed,
counterclockwise to decrease idle speed. The idle
speed should be set as fast as possible, without causing the
chain to move.
5. Turn the low speed mixture screw clockwise until
the engine RPM increases and then starts to decrease. Note
this setting point. Now turn the screw counterclockwise
X. until the RPM starts to decrease again. Set the low
speed mixture screw midway between these two points.
6. Squeeze the throttle trigger quickly. If the engine dies or
hesitates, turn the low speed mixture screw 1/16 turn
counterclockwise iC . Repeat this procedure until the
engine will accelerate without hesitation.
CAUTION! THE HIGH SPEED MIXTURE SCREW MUST
NEVER BE SET AT LESS THAN 7/8 TURN OPEN. A^
LEAN MIXTURE WILL CAUSE THE ENGINE TO RUN
HOT AND DAMAGE IT.
7. With the high speed mixture screw 1 full turn open, make a
test cut with the saw. If the engine fails to have power and
run smoothly during the test cut, allow the engine to return
to idle speed, and turn the high speed mixture screw 1/16
turn clockwise Make another test cut. Continue this
procedure until the engine runs smoothly and with power
in the test cut. REMINDER-NEVER SET THE HIGH
SPEED MIXTURE SCREW LESS THAN 7/8 TURN OPEN.
8. After the low speed and high speed mixture settings are
made, it may be necessary to re-adjust the engine idle
speed. Refer to step 4.
AIR FILTER
Clean the air filter after every 10 tanks of gas or every 5
hours of operation.
TO CLEAN:
1. Close choke to prevent dirt from entering carburetor.
2. Remove the cylinder cover, then remove air filter. Fig. 20.
3. Separate the two air filter halves.
4. Using a soft bristled brush such as a small paint brush,
brush away all dust or other debris from the filter.
5. Clean by soaking in a non-oily, non-flammable solvent.
6. Allow to dry.
7. Before replacing filter clean away chips, saw dust, and
other debris on surfaces filter is to be placed on.
WARNING:
Do not operate your saw without the air filter in place.
Dirt and dust in the air can be drawn in carburetor caus
ing damage to the engine.
MOUNTS:
Your saw is equipped with a counter-vibe system which
consists of 6 isolator mounts Fig. 21, Just as the shock
absorbers on a car protect you from jolts and bumps the
isolators protect the user from engine, bar and chain
vibration. Mounts should be checked daily when saw is in
operation and should be replaced when vibration appears
excessive or when mounts develop an out of round or
swollen shape. This is usually caused from being exposed
to gasoline and oil for long periods of time. IT IS
NECESSARY TO REPLACE ALL MOUNTS WHEN A
MOUNT FAILURE OCCURS.
Page 12

STARTER ROPE
If your starter rope breaks near the pulley, it can be repaired
by the following method, otherwise replace the rope:
1. Remove the fan housing.
2. Remove screw using a 3/16 alien wrench. Figure 22.
3. Lift out pulley.
4. Tie a knot in one end of the rope. Heat and flatten the knot
end to prevent knot from slipping. Heat opposite end of
rope and form a point. Feed pointed end of rope through
the pulley and under the pulley bridge. Pull the rope
through until the knot is tight against the pulley. Figure 22.
5. Pass the pointed end of the rope through the hole in the fan
housing and then the starter handle. Tie a double knot and
insert knot end of rope back into the handle. Pull the slack
out of the rope and wrap the rope on the pulley in a
clockwise direction.
6. Apply light grade silicone lubricant to the pulley bore and
place pulley back in the fan housing. Place the pulley
washer in position and secure with the pulley screw.
7. To retension the starter spring pull a loop of rope from the
pulley approximately 12 in. long. Secure the rope in the
notch in the pulley and using the rope turn the pulley
THREE TURNS counterclockwise • Release the
rope from the notch and allow to rewind slowly on pulley.
Figure 23.
8. Replace the fan housing.
GUIDE BAR MAINTENANCE
Check the condition of the guide bar often. A worn bar will
damage the chain and make cutting harder.
1. Figure 24 shows a cross-section of the guide bar. Keep the
edges square as in (1) with a flat file.
2. Rollover is shown in (2). This will cause you to press extra
hard when cutting.
3. Worn rails are shown in {3}. This occurs most often at the
guide bar nos^.
4. Uneven rails are shown in (4). This will cause the saw to cut
on an angle.
5. Keep the rails flat and square as shown in (1).
6. Grease S/N Bar before use and at least 3 times per day for
heavy use.
CHAIN SHARPENING Keep Your Chain Sharp
Dirt will dull a chain instantly. Keep the chain out of the dirt.
If the chain cuts to one side, it is dull.
Extra rough cutting is a sign of a dull chain.
Powder-like wood chips mean a dull chain.
Cutting is much easier and safer with a sharp chain.
To Sharpen
1. Set the chain tension tight. You must still be able to move
the chain around the bar.
2. Clamp the guide bar in a vise. Don't clamp the chain!
Clamp in the center of the bar.
3. Use only a 7/32" round file.
4. Sharpen all the cutters away from you first. Then turn the
saw around and sharpen the cutters on the other side.
5. Position file holder at 10° angle (Figure 25) and align the
30 file holder marks with the bar as shown in Figure 26,
6. File in ONE direction only! Figure 27.
7. Press hard! Two or three strokes should do it.
8. Always check the depth gauge with the depth gauge filing
guide after filing. If the depth gauge sticks out, file it off
with a flat file. Figure 28.
3
Worn
Rails
Align The File Holder
Figure 26
Depth Gauge
File In One Direction Only
Figure 27
12
Always Check Depth Gauges
Figure 28
Page 13

TROUBLE SHOOTING
TROUBLE
ElMGilME WONT START
ENGINE DIES
ENGINE SMOKES EXCESSIVELY
ENGINE WONT IDLE PROPERLY
CAUSE
1. Switch off,
2. Empty fuel tank.
3. Spark plug not firing.
4. Fuel not getting to carburetor.
5. Flooded engine.
6. Low compression.
1. Out of gas.
2. Dirty air filter,
3. Fouled spark plug.
4. improper carburetor adjustment.
5. Inlet needle stuck or worn.
1. Hi speed needle needs adjustment.
2. Dirty air filter,
3. Oil rich fuel mixture.
4. Inlet needle stuck or worn.
5. Crankcase sealant leaking.
1. Engine idling speed set too low.
2. Lo speed needle out of adjustment.
3. Engine idles too fast.
4. Crankshaft seal defective.
REMEDY
1. Move switch to "START" position.
2. Fill tank with correct mixture
3. Replace with new plug.
4. Remove air filter and be sure choke
lever is working. Check for dirty fuel
filter in tank. Check for kinked or
split fuel line.
5. Push choke knob in completely.
Remove and dry spark plug. Pull
starter until engine starts and clears
itself.
6. Return saw to dealer for internal
problems.
1. Fill with correct mixture.
2. Clean air filter,
3. Clean plug.
4. See carburetor adjustment page 11.
5. Replace or return to dealer for service.
1. Adjust Hi speed mixture. See page 11.
2. Clean air filter.
3. Refill with correct mixture.
4. Replace or return to dealer for service.
5. Return to dealer for service.
1. Adjust idle speed screw clockwise to
increase speed.
2. Adjust Lo speed needle - page 11.
3. Adjust idle speed screw counterclock
wise to reduce speed.
4. Return to dealer for service.
ENGINE RUNS HOT
SAW CUTS POORLY
OILER NOT WORKING OR NOT
ENOUGH OIL TO CHAIN.
CHAIN CLATTERS OR
CUTS ROUGH
CHAIN CUTS AT ANGLE
1. Wrong fuel mixture.
2. Wrong type plug.
3. Clogged air cooling passages.
4. Saw runs lean.
5. Spark arrestor or exhaust ports
plugged with carbon.
1. Dull chain.
2. Chain not sharpened properly.
3. Chain improperly adjusted.
4. Worn or damaged guide bar.
5. Chain on backwards.
6. Engine low on power.
1. Out of oil,
2. Dirty oil filter.
3. Guide bar oil hole blocked.
1. Chain too loose.
2. Depth gauges too low.
3. Worn sprocket.
4. Incorrect filing angles.
1. Damaged cutters on one side or
chain dull one side.
2. Bar rails worn.
1. Mix fuel thoroughly using recommend
ed oil and gas.
2. Replace with correct plug.
3. Clean out dirt and trash from around
flywheel and cylinder.
4. Check for air leaks, return to dealer.
5. Clean and replace.
1. Sharpen chain. See Page 12.
2. See correct procedure for filing chain -
page 12.
3. See adjustment of chain - page 3 & 4.
4. Replace with new bar.
5. See installation of chain - page 3 & 4.
6. Return to dealer for service.
1. Fill tank.
2. Clean and replace.
3. Remove bar and clean.
1. See instructions - page 3 & 4.
2. See instructions - page 12.
3. Replace with new one.
4. See instructions - page 12.
1. Resharpen making sure all cutters are
filed alike.
2. Reshape or replace. See page 12.
13
 Loading...