

Poulan 425 User Manual
IMPORTANT MANUAL Do Not Throw Awa
, J
.i-'t
OPERATOR’S MANUAL
MODELS; 425 & 505
GAS POWERED CHAIN SAW
Always Wear Eye Protection
lii
A WARNING:
This chain saw is capable of severe kickback that could result in seriow iqfiuy
to the user. Do not operate this saw un
less you have specialized trafiifinf and
experience for dealing with klddback;
Chain saws with signMcantly reduced
kickback potential are available*
POULAN PRO
Shreveport, Louisiana 71129 U.S.A.
TABLE OF CONTENTS
SPECIFICATIONS.......................................................... 2
WARNINGS & SAFETY INSTRUCTIONS .. . 3
KNOW YOUR UNIT
PREPARING YOUR SAW FOR USE.............................. 7
FUELING YOUR UNIT
Throttle Choke Knob/
Trigger Throttle
Throttle
Lock-Out
........................................................
..................................................
Handlebar
Advance
6
10
STARTING YOUR UNIT ................................................11
TYPES OF CUTTING.....................................................12
GENERAL MAINTENANCE
POULAN PRO ACCESSORIES .................................... 23
PARTS & SERVICE..................................... Back Cover
.........................................
READ
■WARNINGS & SAFETY INSTRUI HONS
Chain
a
Chain Brake
Lever
' Handle Start/Stop
FREQUENÜA
Starter
16
Switch
Rear
Handle
wp' vf IP m
Guide Bar
Bucking
Spike
SPECIFICATIONS
MODEL:
DISPLACEMENT:
SPARKPLUG:
SPARK PLUG GAP:
IGNITION: Solid State
MODULE AIR GAP: .010” to .014”
OILER: Adjustable Automatic
FUELMDC:
MUFFLER:
Champion (CJ-7Y)
425
4.1 cu.in. (65cc)
.025” (0.7mm)
Gasoiine/Oil Mixture — 40:1 (see “Fueling Your Engine”)
Temperature Limiting/Spark Arresting—USDA Approved
Fuel Cap
505
6.0 cu.in. (83cc)
Champion (CJ—7Y)
- 2 -
WARNINGS AND SAFETY INSTRUCTIONS
(See Additional Safety Instructions throughout this Manual)
GUARD AGAINST KICKBACK
Kickback is a dangerous reaction that can lead to serious
injury. Do not rely only on the safety devices provided with
your saw. As a chain saw user, you must take special safety
precautions to help keep your cutting jobs free from accident or injury.
__________________________
_______
A KICKBACK WARNING
Kickback can occur when the moving chain con
tacts an object at the upper portion of the tip of
the guide bar or when the wood closes in and
pinches the saw chain in the cut. Contact at the
upper portion of the tip of the guide bar can
cause the chain to dig into the object, which
stops the chain for an instant. The re^t is a
lightning fast, reverse reaction which kicks the
guide bar up and back toward the operator. If
the saw chain is pinched along the top of the
guide bar, the guide bar can be driven rapidly
back toward the operator. Either of these reac
tions can cause loss of saw control which can result in serious injury.
Never Reverse
Hand Positions
Figure 1
Stand To
The Left
Of The Saw
Elbow
Locked
Thumb On
Under Side
Of Handlebar
Figure 3
___
REDUCE THE CHANCE OF KICKBACK
1. Recognize that kickback can happen, ^th a
basic understanding of kickback, you can reduce
the element of surprise which contributes to acci
dents.
2. Never let the moving chain contact any ob
ject at the tip of the guide bar. Figure 1,
3. Keep the working area free from obstruc
tions such as other trees, branches, rocks, fences,
stumps, etc. Figure 2 . Eliminate or avoid any ob
struction that your saw chain could hit while you
are cutting through a particular log or branch.
4. Keep your saw Chain sharp and properly ten
sioned. A loose or dull chain can increase the
chance of kickback to occur. Follow manufacturer’s
chain sharpening and maintenance instructions.
Check tension at regular intervals with the engine
stopped, never with the engine running. Make sure
the bar damp nuts are securely tightened after ten
sioning the chain.
5. Begin and continue cutting at full throttle. If
the chain is moving at a slower speed, there is great
er chance for kickback to occur.
6. Cut one log at a time.
7. Use extreme caution when re-entering a
previous cut.
8. Do not attempt plunge or bore cuts.
9. Watch for shifting logs or other forces that could
close a cut and pinch or faU into cheun.
10. A reduced kickback guide bar and low kickback chain are available for your saw and are
strongly recommended to further reduce the hazard
of kickback.
MAINTAIN CONTROL
1. Keep a good, Brm grip on the saw with both
hands when the engine is running and don't
let go. Figure 3 . A ftrm grip can neutralize kick-
backandhelpyou maintain controloffhe saw. Keep
the fingers of your left hand encircling and jrou left
thumb under the front handlebar. Ke^your ri^t
hand completely around the rear handle whether
your are right handed or left handed. Keep your left
arm straight with the elbow locked.
2. Position your left hand on the &ont ЬапШе-
bar so it is in a straight line with your right
hand on the rear handle when making buck
ing cuts. Figure 3 . Never reverse right and left
hand positions for any type of cutting,
3. Stand with your weight evenly bidanced on
both feet.
4. Stand slightly to the left side of the saw to
keep your body from being in a direct line
with the cutting chain. Figure 3 .
5. Do not overreach. You could be drawn or thrown
off balance and lose control of the saw.
6. Do not cut above shoulder height. It is difficult
to maintain control of saw above shoulder height.
WARNINGS AND SAFETY INSTRUCTIONS (continued)
A WARNING
Because a chain saw is a high-speed wood-cutting tool» special safety precautions must be observed
to reduce the risk of accidents. Careless or improper use of this tool can cause serious injury.
Hearing
Protection
Snug
Fitting
Clothing
Safety
Shoes
Figure 4
Safety Hat
Eye Protection
Heavy Duty Gloves
KNOWYOURSAW
1. Read your operator's manual carefully until
you completely understand and can follow all safety
rules, precautions, and operating instructions be
fore attempting to operate the unit.
2. Restrict the use of your saw to adult users who
understand and can follow safety rules, precau
tions, and operating instructions found in this
manual.
PLAN AHEAD
Wear protective gear. Figi^ 4. Always use
1.
steel-toed safety footwear with-non-slip soles;
snug-fitting clothing; heavy-;-duty, non-slip
gloves; eye protection such as non—fogging, vented
goggles or face screen; an approved sal^ hard hat;
and sound barriers--ear plu^ or mufflers to pro
tect your hearing. Regular users should have hear
ing checked regularly as chain saw noise can dam
age hearing.
Keep children, bystanders, and animals a
2.
minimum of 30 feet (10 Meters) away from the
work area. Do not allow other people or animals
to be neeu: the chain saw when starting or operating
the chain saw.
Do not handle or operate a chain saw when
3.
you are fatigued, ill, or upset, or if you have
taken alcohol, drugs, or medication. You must
be in good physical condition and mentally alert.
Chain saw work is strenuous. Ifyou have any condi
tion that might be aggravated by strenuous work,
check with your doctor before operating a chain
saw.
4. Do not attempt to use your chain saw during
bad weather conditions such as strong wind, rain,
snow, ice, etc., or at night.
5. Carefully plan your sawing operation in ad
vance, Do not start cutting until you have a clear
work area, secme footing, and, if you are felling
trees, a planned retreat path.
AVOID REACTIVE FORCES
Pinch-Kickback and Pull-In occur when the
chain is suddenly stopped by being pinched,
caught, or by contacting a foreign object in the
wood. This sudden stopping of the chain results in a re
versal of the chain force used to cut wood and causes the
saw to move in the opposite direction of the chain rotation.
Pinch-Kickback drives the saw straight back toward
the operator. Pull-In pulls the saw away from the opera
tor. Either reaction can result in loss of control and possi
bly serious injury.
To avoid Pinch-Kickback:
1. Be extremely aware of situations or obstruc
tions that can cause material to pinch the top of or
otherwise stop the chain.
2. Do not cut more than one log at a time.
3. Do not twist the saw as the bar is withdrawn from
an under-cut when bucking.
To avoid Pull-Ih:
1. Always begin cutting with the engine at full
throttle and the saw housing agai^t wood.
2. Use wedges made of plastic or wood, (never of
metal) to hold the cut open.
HANDLE FUEL WITH CAUTION
1. Eliminate all sources of sparks or flame in the
areas where fuel is mixed, poured, or stored.
There should be no smoking, open flames, or work
that could cause sparks.
2. Mix nnH pour fuel in an outdoor area on bare
ground; store fuel in a cool, dry, well ventilated
place; and use an approved, marked container for
all fuel purposes.
3. Wipe up all fuel spills before starting saw.
4. Move at least 10 feet (3 meters) from the fuel
ing site before starting the engine.
5. Do not smoke while handling fuel or while
operating the saw.
6. Turn the engine off and let your saw cool in a
non-combustible area, not on dry leaves, straw,
paper, etc. Slowly remove fuel cap and refuel unit.
7. Store the unit and fuel in an area where fuel vapors
cannot reach sparks or open flames from water
heaters, electric motors or switches, furnaces, etc.
if situations occur which are not covered in this manual, use care and good judgment.
Contact your Service Dealer ifyou need assistance.

WARNINGS AND SAFETY INSTRUCTIONS (continued)
OPERATE YOUK SAW SAFELY
1. Do not operate a chain saw that is damaged,
improperly adjusted, or not completely and.
securely assembled.
2. Operate the chain saw only in outdoor areas.
3. Do not operate saw from a ladder or in a tree.
4. Position all parts of your body to the left of
the cut and away from the saw chain when
the engine is running.
5. Cut wood only, Do not cut metai, plastics, mason
ry, non—wood building materials, etc. Do not use
the saw to pry or shove away limbs, roots, or other
objects.
6. Make sure the chain will not make contact
with any object while starting the engine. Never
try to start the saw when guide bar is in a cut or kerf.
7. Use extreme caution when cutting small size
brush and saplings. Slender material can catch
the saw chain and be whipped toward you or pull
you off balance.
8. Be alert for springbuck when cutting a limb that
is under tension so you will not be struck by the
limb or saw when tension in the wood fibers is re
leased.
9. Do not put pressure on the saw at the end of a
cut. Applying pressure can cause you to lose con
trol when the cut is completed.
10. Stop the engine before setting the saw down.
11. Engage the chain brake when engine is run
ning but not involved in a cutting procedure.
MAINTAIN YOUR SAW IN GOOD
WORKING ORDER
1. Have all chain saw service performed by a qu-
. alified service dealer with the exception of the
items listed in the maintenance section of this man
ual. For example, if improper tools are used to re
move or hold the flywheel when servicing the
clutch, structural damage to the fl5rwheel can occur
and cause the flywheel to burst.
2. Keep fuel and oil caps, screws, and fasteners
securely tightened.
3. Keep the handles dry, clean, and free of oil or
fuel mixture.
4. Make certain the saw chain stops moving
when the throttle trigger is released. For cor
rection, refer to the "Trouble Shooting Chart,”
' 5. Stop the saw if chain strikes a foreign object.
Inspect unit and repair or replace parts as neces
sary,
6. Disconnect spark plug before performing
any maintenance except for carburetor adjust
ments.
7. Never modify your saw in any way. Use only at
tachments supplied or specifically recommended by
the manufacturer.
8. Always replace the chain brake immediately
if it becomes damaged, broken, or is other
wise removed.
9. Keep the vibration isolators in good condi
tion. Periodically inspect isolators for tears, rips,
or separation of the mbber portion from the metal
mountings. Have a qualified service de^er replace
the isolators if worn or damaged, if vibration in
creases, or if mounts develop an out of round or
swollen shape from exposure to gasoline and/or oil.
CARRY AND STORE YOUR SAW SAFELY
1. Hand carry your saw with the engine
stopped, the muffler away from your body,
and the guide bar and chain to the rear cov
ered preferably with a scabbard.
2. Before transporting in any vehicle or storing
in any enclosure, ¿low your saw to cool com
pletely, cover the bar and chain, and properly secure
to avoid turnover, fuel spillage, or damage.
3. Empty the fuel tank before storing the tool.
Use up the fuel left in the carburetor by starting the
engine and letting the engine run until it stops.
4. Store unit and fuel in a dry area out of the
reach of children. Do not store where fuel vapors
can: reach sparks or an open flame from hot water
heaters, electric motors or switches, furnaces, etc.
NOTICE: Refer to the Code of Federal Regulations,
Section 1910.266(5); 2.5.1 of American National
Standard Safety Requirements for Pulpwood Log
ging, ANSI 03.1-1978; and relevant state safety
codes when using a chain saw for logging purposes.
A WARNING
The following features are available for your saw
(in models equipped with 16”, 20”, and 24” 0.050
gauge bars) to help reduce the hazard of kickback; however, such features will not totally elim
inate this dangerous reaction. As a cham saw
user, do not rely only on safety devices. You most
follow all safety precautions, instructions, and
maintenance in this manual to help avoid kickback and other forces which can result in serious
injury.
_________________________
KICKBACK SAFETY FEATURES
• Position of front and rear handlebars, de
signed with distance between handles and "in line”
with each other. The spread and *ni Une” position
of the hands provided by this design work together
to give balance and resistance in oontroUmg the
pivot of the saw back toward the operator if kickback occurs.
• Chain Brake, if activated during kickback, is a de
vice to stop the chain. Do not rely on the chain
brake to protect you against injujy from kickback.
Although it may appear the chain is stopping quick
ly, it stdl may not be fast enough to provide protec
tion in the event of kickback.
• Optional Reduced—Kickback Guide Bar, de
signed with a small radius tip which reduces the size
of the kickback danger zone on the bar tip. Fig
ure 5 . A reduced—kickback guide bar has been
demonstrated to reduce the hazard of kickback.
• Optional Low-Kickback Chain, designed vrith
a contoured depth gauge and elongated guard Unk
which allows wood to gradually ride into the cutter.
Figures. Low-Kickback Chain has been demon
strated to reduce kickback significantly.
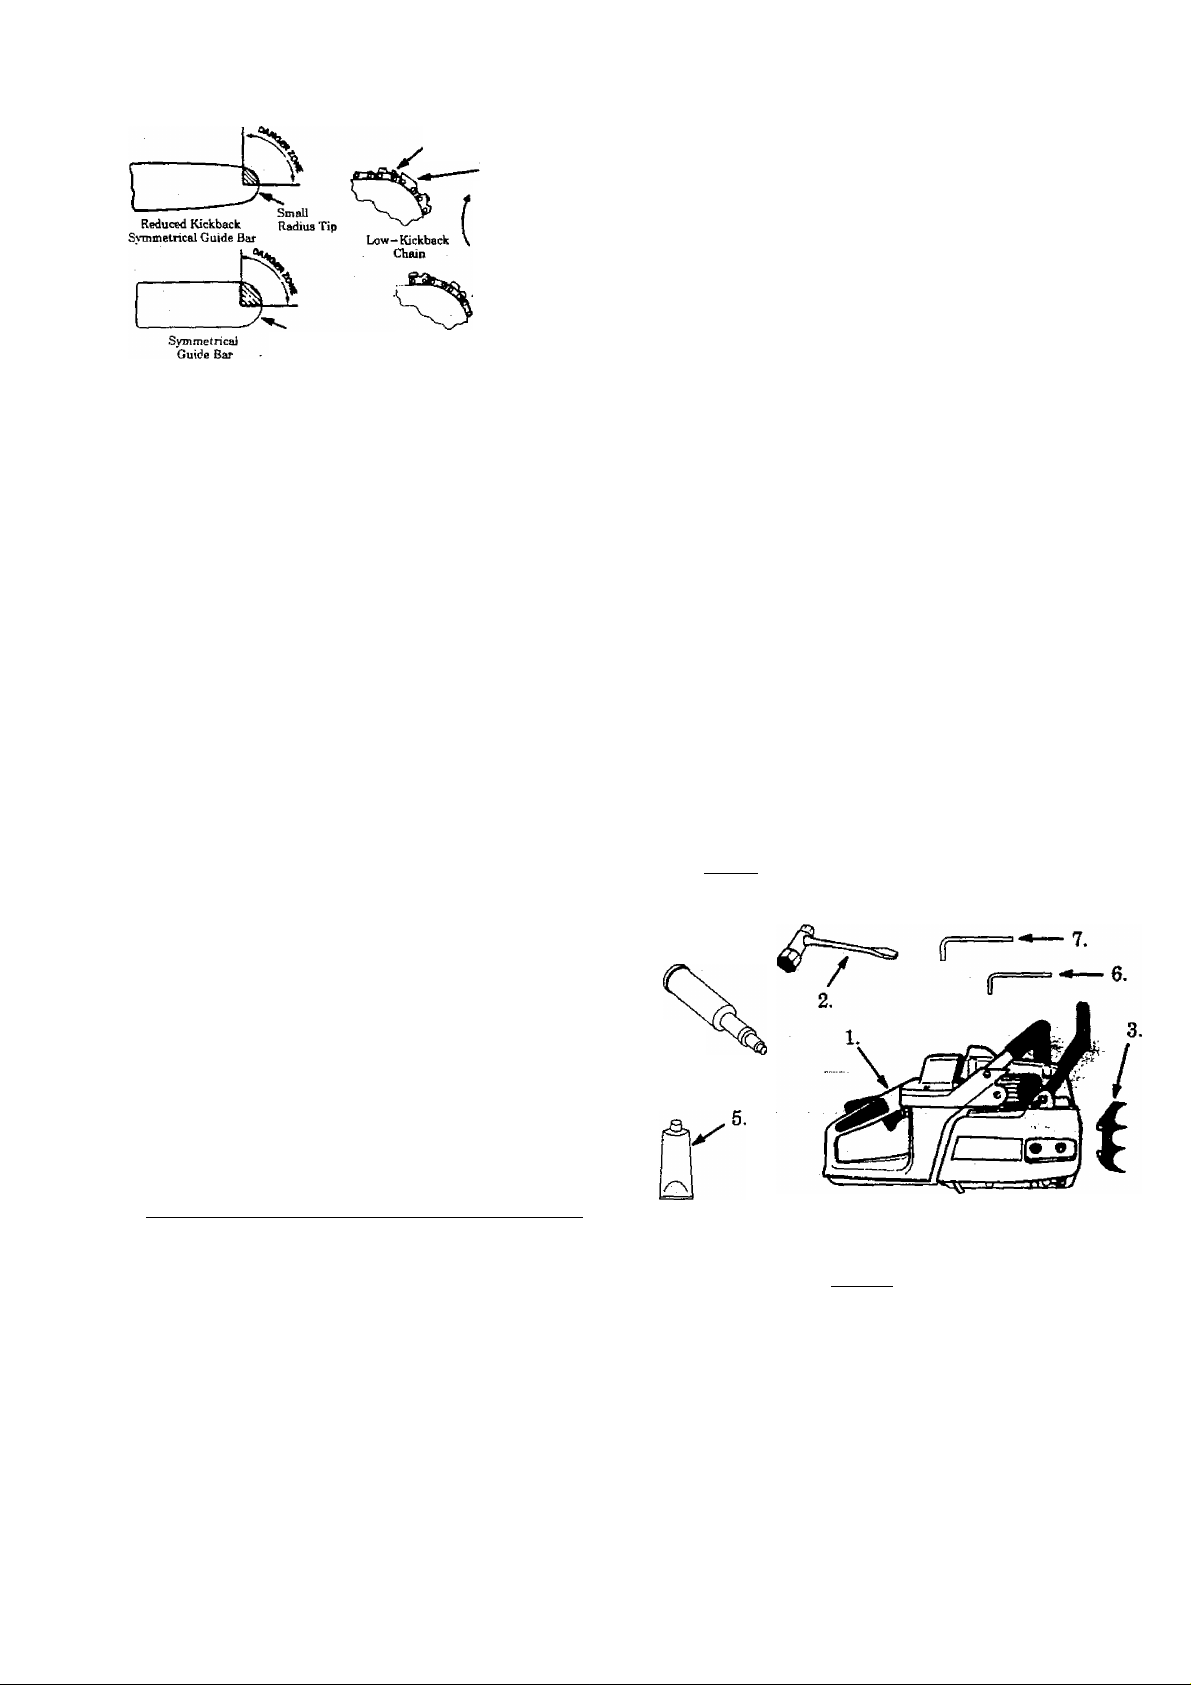
Con touted
Depth Gauge
Elongated
Guard Link
Dedecta
Kickbadc Force
And Allows Wood
To Gradually
Ride Into Cutter
Can Obstruct
Large
Radius Tip
Chain With High
Kickback Potential
Material
Figure 5
A WARNING
Do not operate the saw unless the safety devices
or their specified replacements are properly in
stalled and maintained according to the instruc
tions in this manual. Do not use any guide bar and
chain combination that is not equivalent to the
original or optional equipment. Failure to follow
these instructions can result in serious injury.
KNOW YOUR UNIT
SAVE THESE INSTRUCTIONS
STATE AND LOCAL REQUIREMENTS
For users on U.S. Forest Land and in some states, in
cluding Califomia(Public Resources Codes 4442
and 4443), Idaho, Maine, Minnesota, New Jersey,
Oregon, and Washington: Certain internal combus
tion engines operated on forest, brush, and/or grass—cov
ered lands, in the above areas, must be equipped with a
spark arrestor, maintained in effective working order, or
the engine must be constructed, equipped, and main
tained for the prevention of fire. Check with your state or
local authorities for regulations pertaining to these re
quirements. Failure to follow these requirements is a vio
lation of the law. This unit is factory-equipped with
a spark arrestor. If a spark arrestor is required in your
area, you are legally responsible for maintaining the oper
ating condition of these parts.
A. INTRODUCTION
Your saw has been designed with safety in mind and
includes the following safety features as standard
equipment: >
• Chain Brake
• Spark Arrestor
• Temperature Limiting Muffler
B.
UNPACKING INSTRUCTIONS
1. After removing the contents from the carton,
check parts against the Carton Contents Ust.
2.
Examine the parts for damage. Do not use dam
aged parts.
Notify your POULAN PRO^ dealer immedi
3.
ately if a part is missing or damaged.
• Throttle Lock-Out
• Anti- vibration System
• Chain Catcher Pin
NOTE: It is normal to hear the fuel filter rattle in
an empty fuel tank.
C. CARTON CONTENTS
KEY
NO.
1.
Powerhead
Bar Wrench
2.
3. Bucking Spike 1
4. Grease Gun
5.
Grease
Hex Wrench (4 mm)
6.
Hex Wrench (5 mm)
7.
•
Tool Bag
•
Operator's Manual (not shown)
QTY
1
1
/
4.
1
1
1
1
1
1
A WARNING
The effectiveness of a chain brake in reducing operator injuries has not yet been fully determined. We
cannot represent that a chain brake is an effective safety device to prevent or reduce the hazard of inju
ries resulting from kickback, DO NOT AS SUME THAT THE CHAIN BRAKE WILL PROTECT YOU IN THE
EVENT OF A KICKBACK. Instead use the saw properly and carefully to avoid kickback. Reduced—Kick-
back bars and Low—Kickback chains reduce the hazard of kickback and are recommended. Repairs on a
chain brake should be made by an Authorized POULAN PRO Service Dealer, Take your unit to the place of
purchase if purchased from a Servicing Dealer, or to the nearest Authorized Master Service Dealer.
SAFETY NOTICE
Exposure to vibrations through prolonged use of gasoline powered hand tools could cause blood vessel or
nerve damage in the fingers, hands, and wrists of people prone to circulation disorders or abnormal swel
lings. Prolonged use in cold weather has been linked to blood vessel damage in otherwise healthy pemiie.
If symptoms occur such as numbness, pain, loss of strength, change in skin color or texture, or loss of feel
ing in the fingers, hands, or wrists, discontinue the use of this tool and seek medical attention- An anti—vi
bration system does not guarantee the avoidance of these problems. Users who operate power tools on a
continual and regular basis must monitor closely their physical condition and the condition of this tool.
PREPARING YOUR SAW FOR USE
A. GETTING READY
1. READ YOUR OPERATOR’S MANUAL CAREFULLY
Your Operator’s Manued has been developed to help you prepare your saw for use and to understand its safe oper
ation. It is important that you read your manual completely to become familiar with the unit before you begin
assembly or attempt operation. Your POULAN PRO dealer is available to show you how to operate your saw. Be
sure to ask for his assistance.
2. HAVE THE FOLLOWING AVAILABLE:
a. Protective gloves
b. Approved, marked fuel container
c. One gallon regular unleaded gasoline
d. 3.2 oz. 2 cycle, air-cooled engine oil (See the
“Fueling Your Engine” section.)
B. ATTACHING THE SPUR
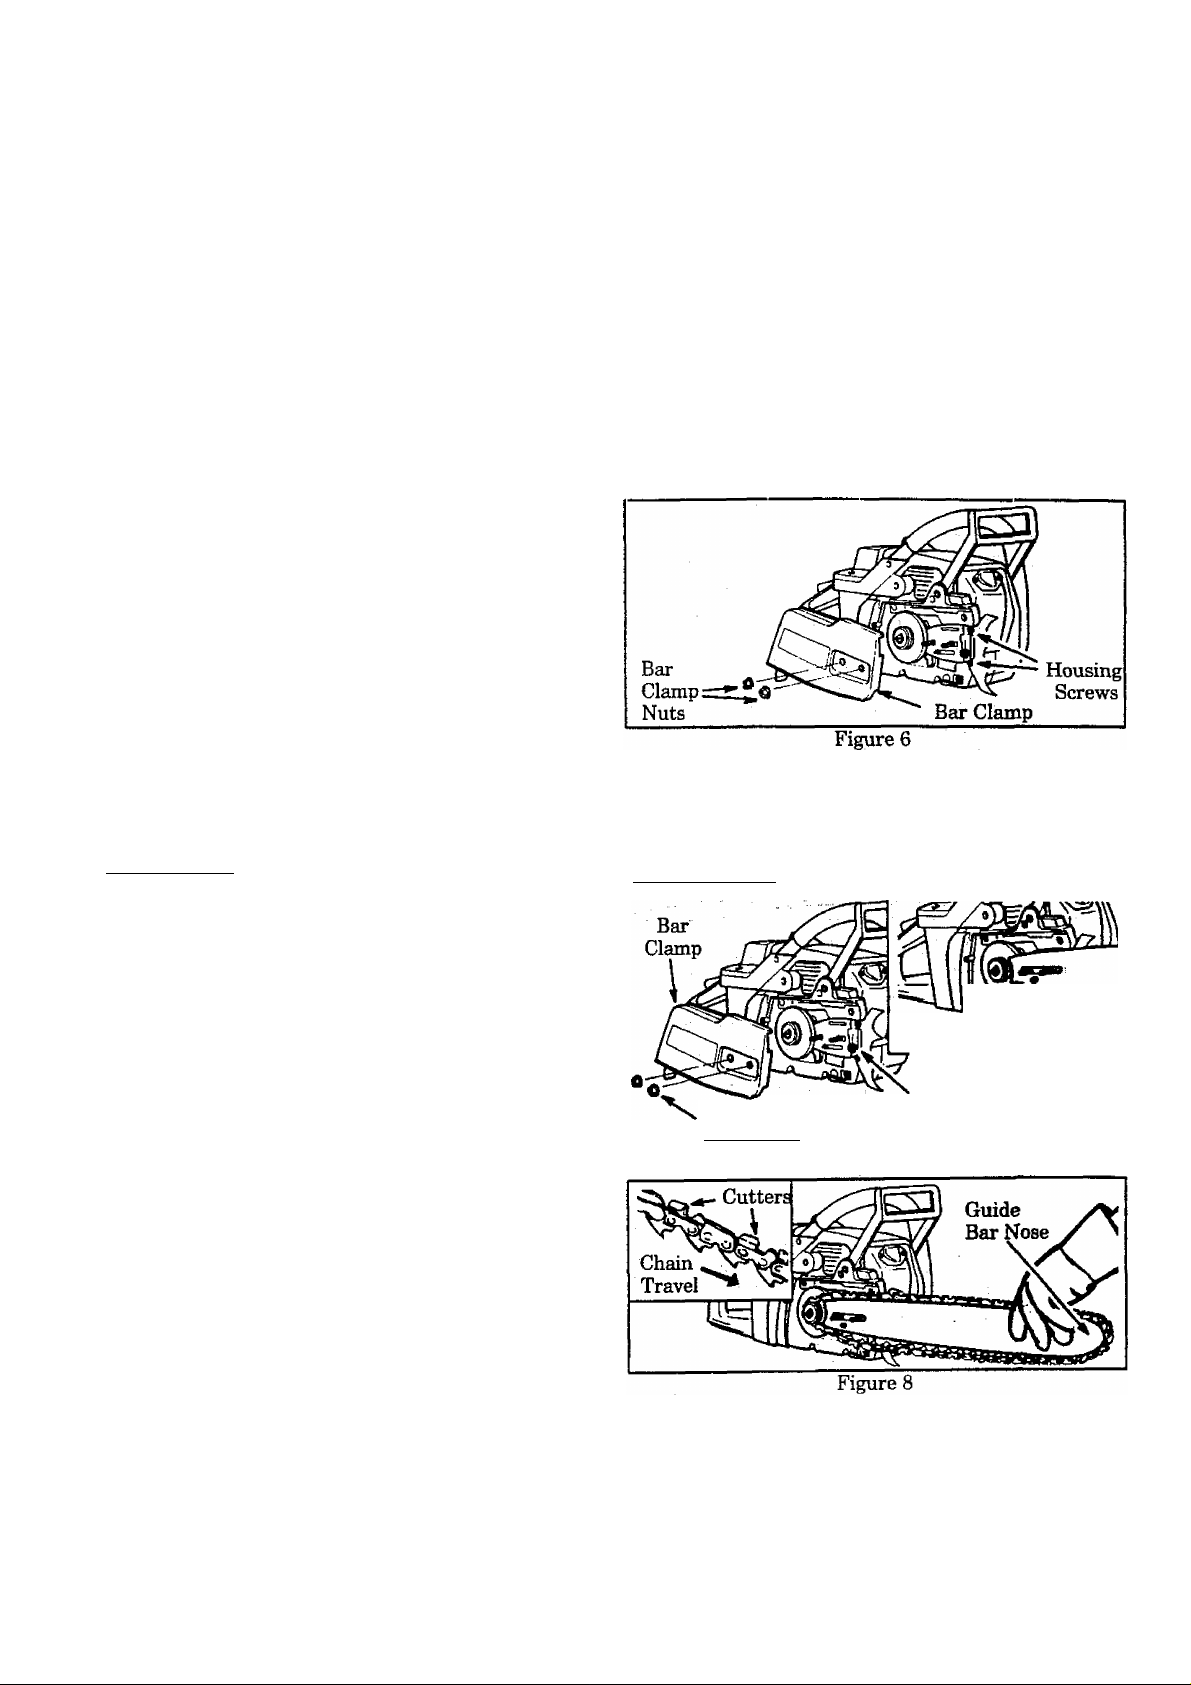
1. Set saw upright on a flat surface. Figure 6 .
2. Remove bar damp nuts and bar clamp using the
bar wrench provided with the unit. Figure 6 .
3. Remove the two housing screws shown in Fig
ure 6.
4. Align screw holes in the spur with the screw holes
on the crankcase. Figure 6 .
5. Install the housing screws removed in step 3.
Tighten evenly and securely.
C. ATTACHING THE BAÈ AND CHAIN
• See your POULAN PRO Dealer for the vari
ous bars and chains available for your tmit.
I CAUTION: I Wear protective gloves when
handling or operating your saw. The chain is
sharp and can cut you even when it is not movingl
1. Set the saw upright on a flat surface. Figure 7 .
2. Turn the adjustini^ screw counterclockwise with a
standard screwdriver to move the adjusting pin
almost as far as it will go to the rear. Figure 7 .
3. Mount the guide bar with the slotted end over the
mounting bolts and the small adjusting pin
through the small hole in the bar. Figure 7 (inset).
4. Slide the guide bar toward the rear of the saw as
far as possible.
5. Hold tne chain with the cutters facing as shown in
Figure 8 (inset).
V 6. Place the chain on the sprocket. Fit the bottom of
the drive links in the slots in the sprocket.
7. Fit the bottom of the chain drive links into the
groove on top of the guide bar, then around the
guide bar nose. Figure 8 .
8. Turn the adjusting screw clockwise with a stan
dard screw(h*iver until the chain is snug in the
guide bar groove.
9. Hold the guide bar against the saw frame and
install the bar clamp.
10. Replace the bar mounting nuts. Tighten finger
tight only.
11. Follow “Chain Tension” instructions.
Bar and Chain Oil (See the “Bar and Chain
e.
Oil” section.)
Bar Wrench
Standard Screwdriver
g-
Allen Wrench (hex)
h.
A WARNING
Do not start engine without the guide bar, chain,
and bar clamp completely assembled. Other
wise, the chain and clutch can come off resulting
in serious injury-
Bar
Clamp Nuts
________
Figure 7
_____________________
Adjusting Pin
Turn Adjusting
Screw Counterclockwise
________
-7-
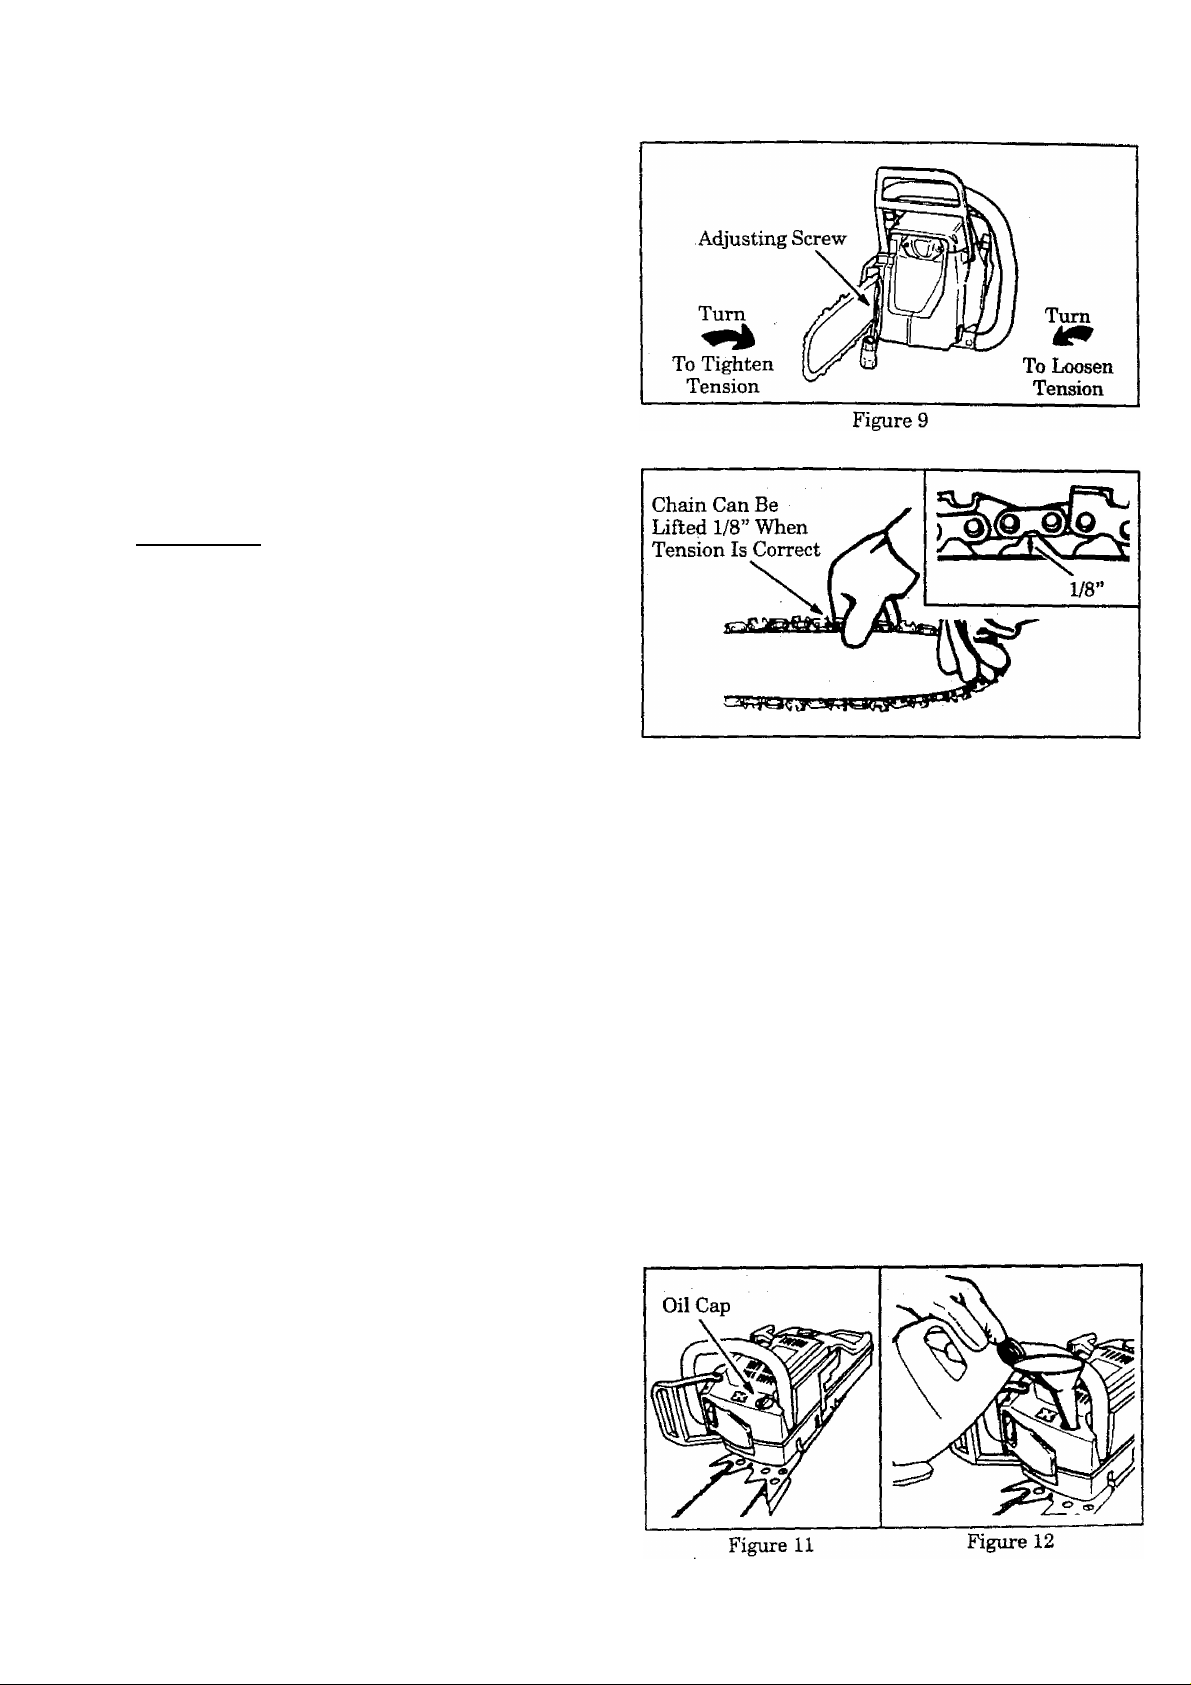
D. CHAIN TENSION
• Chain Tension is very important—
— A loose chain will wear the bar and itself.
— A loose chain can jump off bar during cutting.
~ A tight chain can break or damage the saw and/
or bar.
• The chain stretches during use, especially
when new. Check tension periodically as follows;
— each time the saw is used;
— more frequently when the chain is new;
— as the chain warms up to normal operating
temperature.
• Chain tension is correct when the chain can
be lifted about 1/8” from the Guide Bar at a point
near the middle of the bar and will move freely
around the bar.
Chain tensioning procedure:
CAUTION; I Always wear gloves when handl
ing the chain. The chain is sharp and can
cut you even when it is not moving!
1.
Lift up the tip of the guide bar and turn the adjust
ing screw clockwise until the chain does not sag
beneath the guide bar. Figure 9 .
Check the tension by lifting the chain from the
guide bar at the center of the bar. Figure 10 .
Continue adjusting the adjusting screw until the
tension is correct.
Tighten the bar clamp nuts ydth the bar wrench.
Recheck chain tension.
Figure 10
E. BAR AND CHAIN OIL
• The guide bar and cutting chain require
continuous lubrication to remain in operat
ing condition. Lubrication is provided by the
automatic oiler system when oil tank is kept filled.
- Lack of oil will quickly ruin bar and chain.
- Too little oil will cause overheating, result
ing in smoke coming from the chain and/or dis
coloration of the guide bar rails.
• Genuine POUIAN/POULAN PRO Bar and
Chain Oil is recommended to protect your
unit against excessive wear from heat and
friction, POULAN/POUIAN PRO oil resists
high temperature thinning. If POULAN/
POULAN PRO Bar and Chain Oil is not available,
use a good grade SAE 30 oil. Never use waste oil
for bar and chain lubrication.
• In freezing weather oil will thicken, making
it necessary to thin bar and chain oil with a
small amount of Diesel Fuel #1 or kerosene.
Bar ^d chain oil must be fi-ee flowing for oil sys
tem to pump enough oil for adequate lubrication.
USE THE FOLLOWING:
1.
30° or above — 100% lubricant - undiluted.
30°-0°F - 95% lubricant to 5% Diesel Fuel #1 or
kerosene
Below 0°F — 90% lubricant to 10% Diesel Fuel #1
or kerosene.
HOW TO FILL THE OIL TANK
2.
a. Stop the engine.
b. Turn saw on its side, oil cap up. Figure 11.
c. Loosen cap slowly and wait for pressure in the
tank to be released before removing the cap.
d. Fill the oil tank. Figure 12 .
e. Replace the oil cap securely.
-8-
3. IMPORTANT POINTS TO REMEMBER
Fill oil tank each time you fill fuel tank to
a.
ensure that there will be sufficient o0 for the
chain whenever you start and run the saw.
The saw will normally use about one tank
b.
of chain oil for each tank of fuel mixture.
If less oil is used, check for a plugged oil hole in
the guide bar.
Keep sawdust and debris cleaned from
c.
the oil holes in the guide bar to allow an ad
equate oil flow to the bar and chain.
Keep spilled and spattered oil wiped
d.
from the unit to avoid sawdust and de
bris build-up. Pay particular attention to
oil on the fan housing and starter assembly to
avoid overheating the en^e.
It is normal for a small amount of oil to
e.
appear under the saw ^ier the engine
stops. This is excess oil drainingfrom the bar
and chain when the saw is not in use.
 Loading...