

Poulan 331 User Manual

R
Instruction Manual
Manual de Instrucciones
Manuel d’Instructions
331
ENGLISH ESPAÑOL
For Occasional Use Only
DANGER:
Read and follow all Safety Rules and Operating Instructions before
using this product. Failure to do so can result in serious injury.
PELIGRO:
Lea el manual de instrucciones y siga todas las advertencias e
instrucciones de seguridad. El no hacerlo puede resultar en lesiones graves.
DANGER:
avertissements et toutes les instructions de sécurité. Tout défaut
de le faire pourrait entraîner des blessures graves.
Electrolux Home Products, Inc.
250 Bo bby Jones Expressway
Augusta, GA 30907
CopyrightE2002 Electrolux Home Products, Inc.
le manuel d’instructions et bien respecter tous les
530088129
FRANÇAIS
4/26/02
SAFETY RULES
WARNING:
appliances, basic safety precautions must always be followed to reduce the risk of fire and
serious injury.
DANGER:
dangerous!
including amputation or blindness to the operator and others. The warnings and safety
instructions in this manual must be followed to
provide reasonable safety and efficiency in
using the unit. The operator is responsible for
following the warnings and instructions in this
manual and on the unit. Read the entire instruction manual before assembling and using the unit! Restrict the use of this unit to persons who read, understand, and follow the
warnings and instructions in this manual and
on the unit. Never allow children to operate
this unit.
INSTRUCTION
MANUAL
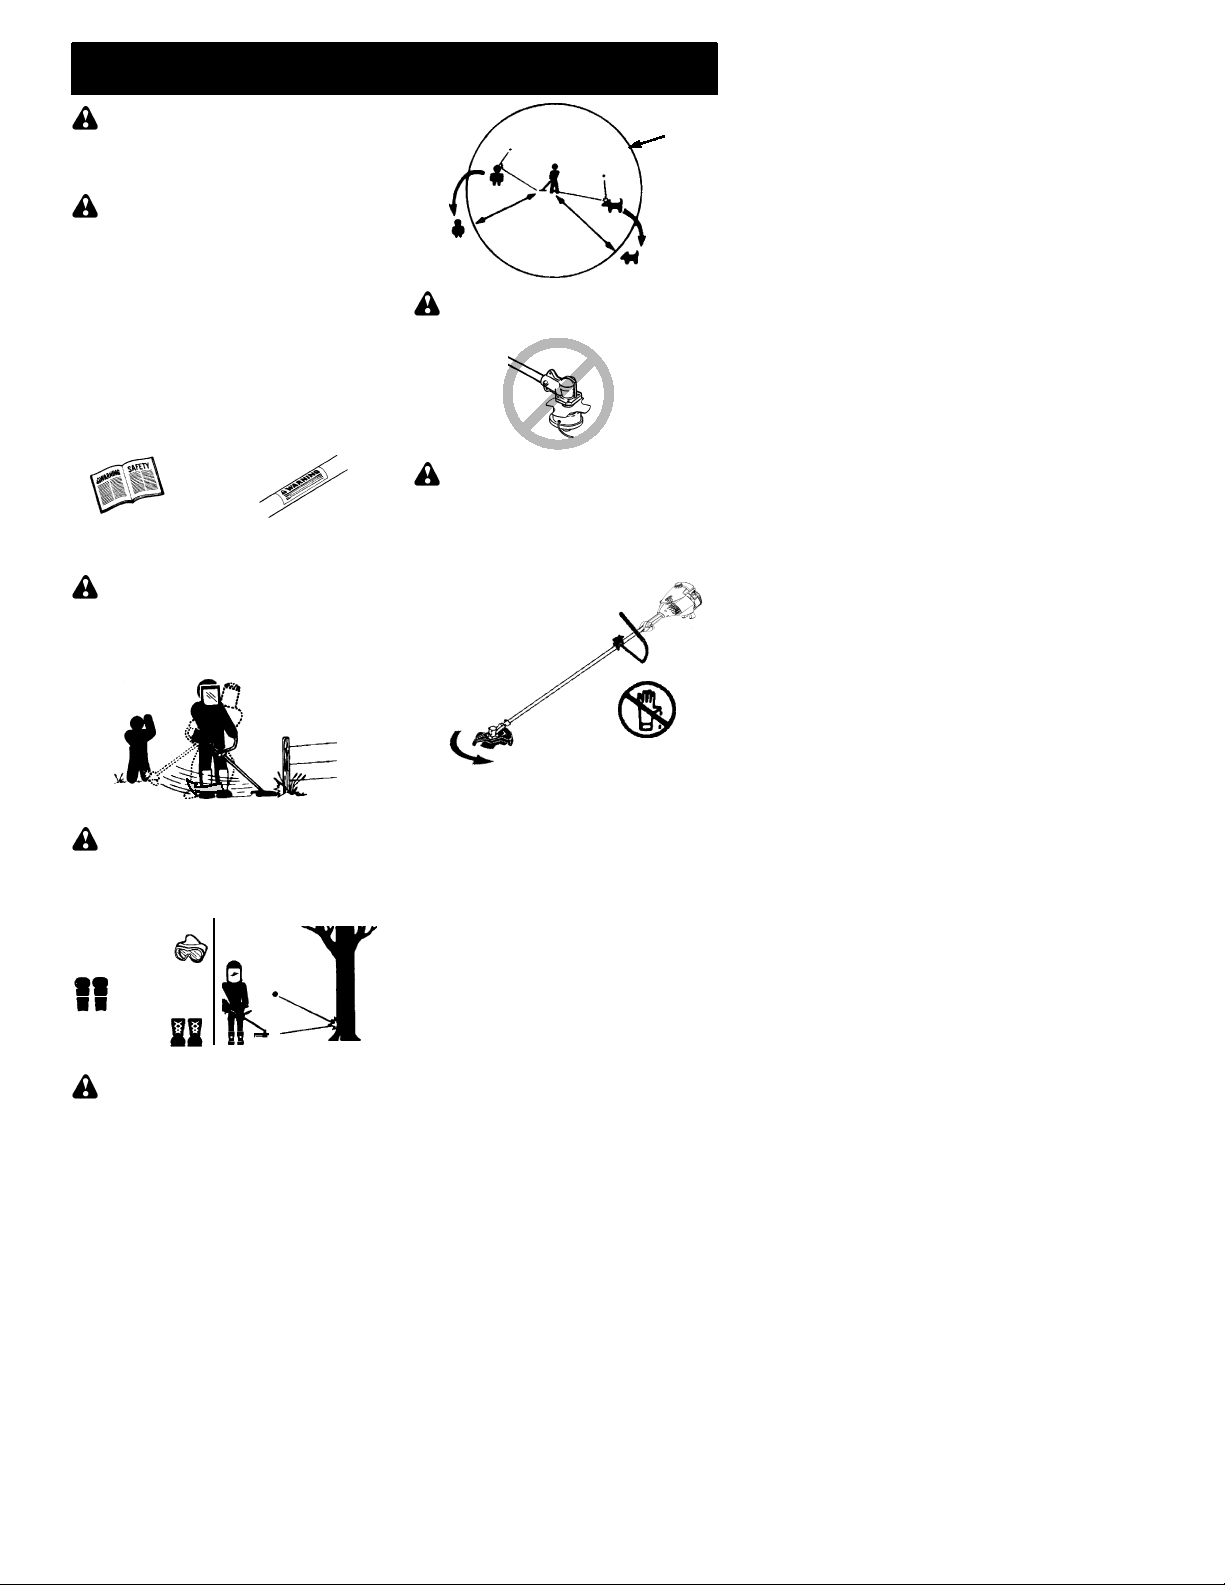
This unit can cause serious injury
DANGER:
away from material it does not cut. Blade
thrust can cause amputation of arms or legs.
Keep people and animals 50 feet (15 meters)
away.
When using gardening
This power tool can be
SAFETY INFORMATION
ON THE UNIT
Blade can thrust violently
Hazard Zone
50 Feet
(15 Meters)
WARNING:
as a fastening device for the blade.
WARNING:
spin after the throttle is released or, engine is
turned off. The coasting blade can throw objects
or seriously cut if accidentally touched. Stop the
blade by contacting the right hand side of the
coasting blade with material already cut.
Stop coasting
blade by contact
with cut material.
Do not use trimmer head
The blade continues to
WARNING:
objects violently. You and others can be
blinded or injured. Wear safety glasses and
leg protection.
ALWAYS WEAR:
Eye
Protection
Leg Guards
Boots
WARNING:
objects. Blade/Trimmer line can throw objects
violently. Others can be blinded or injured.
Keep people and animals 50 feet (15 meters)
away.
Trimmer line can throw
Thrown
Objects
Hazard zone for thrown
OPERATOR SAFETY
Dress properly. Always wear safety
S
glasses or similar eye protection when operating, or performing maintenance on your
unit. (Safety glasses are available.) Eye
protection should be marked Z87.
Always wear face or dust mask if operation
S
is dusty.
Always wear heavy, long pants, long sleeves,
S
boots, and gloves. Wearing safety leg guards
is recommended.
Always wear foot protection. Do not go
S
barefoot or wear sandals.
Secure hair above shoulder length. Secure
S
or remove loose clothing and jewelry or clothing with loosely hanging ties, straps, tassels,
etc. They can be caught in moving parts.
Being fully covered also helps protect you
S
from debris and pieces of toxic plants
thrown by spinning line/blade.
Stay Alert. Do not operate unit when you are
S
tired, ill, upset or under influence of alcohol,
drugs, or medication. Watch what you are doing; use common sense.
2

Wear hearing protection.
S
Never start or run the engine inside a
S
closed room or building. Breathing exhaust
fumes can kill.
Keep handles free of oil and fuel.
S
Always use the handlebar and a properly
S
adjusted shoulder strap with a blade (see
ASSEMBLY).
UNIT/MAINTENANCE SAFETY
WARNING:
the spark plug before performing maintenance (except carburetor adjustments).
Look for and replace damaged or loose
S
parts before each use. Look for and repair
fuel leaks before use. Keep unit in good
working condition.
Throw away blades that are bent, warped,
S
cracked, broken, or damaged in any other
way. Replace trimmer head parts that are
cracked, chipped, broken, or damaged in
any other way before using the unit.
Maintain unit according to recommended
S
procedures. Keep blade sharp. Keep cutting line at the proper length.
Use only 0.095!(2.4 mm) diameter Poulan
S
PRO"brand replacement line. Never use
wire, rope, string, etc.
Install required shield properly before using
S
the unit. Use the metal shield for all metal
blade use. Use the plastic shield for all line
trimmer use.
Use only specified blade or trimmer head;
S
make sure it is properly installed and securely fastened.
Never start engine with clutch shroud re-
S
moved. The clutch can fly off and cause serious injury.
Be sure blade or trimmer head stops turning
S
when engine idles.
Make carburetor adjustments with the low-
S
er end supported to prevent blade or trimmer line from contacting any object. Hold
unit by hand; do not use the shoulder strap
for support.
Keep others away when making carburetor
S
adjustments.
Use only recommended Poulan PROrac-
S
cessories and replacement parts.
Have all maintenance and service not ex-
S
plained in this manual performed by your authorized service dealer.
Stop unit and disconnect
FUEL SAFETY
Mix and pour fuel outdoors.
S
Keep away from sparks or flames.
S
Use a container approved for fuel.
S
Do not smoke or allow smoking near fuel or
S
the unit or while using the unit.
Avoid spilling fuel or oil. Wipe up all fuel
S
spills before starting engine.
Move at least 10 feet (3 meters) away from
S
fueling site before starting engine.
Stop engine and allow it to cool before re-
S
moving fuel cap.
Empty the fuel tank before storing or trans-
S
porting the unit. Use up fuel left in the carburetor by starting the engine and letting it
run until it stops.
Store unit and fuel in area where fuel vapors
S
cannot reach sparks or open flames from
water heaters, electric motors or switches,
furnaces, etc.
Always store gasoline in a container ap-
S
proved for flammable liquids.
CUTTING SAFETY
WARNING:
cut before each use. Remove objects (rocks,
broken glass, nails, wire, string, etc.) which
can be thrown or become entangled in the
blade or trimmer head.
Keep others including children, animals,
S
bystanders, and helpers at least 50 feet (15
meters) away. Stop engine immediately if
you are approached.
Always keep engine on the right--hand side
S
of your body.
Hold the unit firmly with both hands.
S
Keep firm footing and balance. Do not over-
S
reach.
Keep blade or trimmer head below waist
S
level. Do not raise engine above your waist.
Keep all parts of your body away from
S
blade, trimmer head, and muffler when engine is running. A hot muffler can cause serious burns.
Cut from your left to your right. Cutting on
S
right side of the shield will throw debris
away from the operator.
Use only in daylight or good artificial light.
S
Use only for jobs explained in this manual.
S
Inspect the area to be
TRANSPORTING AND STORAGE
Stop the unit before carrying.
S
Keep muffler away from your body.
S
Allow the engine to cool and secure the unit
S
before storing or transporting it in a vehicle.
Empty the fuel tank before storing or trans-
S
porting the unit. Use up fuel left in the carburetor by starting the engine and letting it run
until it stops.
Store unit so the blade or line limiter blade
S
cannot accidentally cause injury. The unit
can be hung by the tube.
Store unit out of reach of children.
S
SAFETY NOTICE:
through prolonged use of gasoline powered
hand tools could cause blood vessel or nerve
damage in the fingers, hands, and joints of
people prone to circulation disorders or abnormal swellings. Prolonged use in cold
weather has been linked to blood vessel damage in otherwise healthy people. If symptoms
occur such as numbness, pain, loss of
strength, change in skin color or texture, or
loss of feeling in the fingers, hands, or joints,
discontinue the use of this tool and seek medical attention. An anti--vibration system does
not guarantee the avoidance of these problems. Users who operate power tools on a
continual and regular basis must monitor
closely their physical condition and the condition of this tool.
SPECIAL NOTICE:
with a temperature limiting muffler and spark
arresting screen which meets the requirements of California Codes 4442 and 4443. All
U.S. forest land and the states of California,
Exposure to vibrations
This unit is equipped
3

Idaho, Maine, Minnesota, New Jersey, Oregon, and Washington require by law that
many internal combustion engines be
equipped with a spark arresting screen. If you
operate in a locale where such regulations exist, you are legally responsible for maintaining
the operating condition of these parts. Failure
ASSEMBLY
CARTON CONTENTS
Check carton contents against the following
list:
Brushcutter
S
Blade shield screws (4)
S
Cupped washer
S
Large nut for installing blades
S
Hex wrench
S
Metal shield
S
Plastic shield
S
Shoulder strap with warning
S
4--point weed blade
S
Trimmer head (assembled on unit)
S
Handlebar (assembled on unit)
S
Wing nut (screwed onto shield)
S
Container of oil
S
WARNING:
connect spark plug before performing any assembly procedures.
WARNING:
repeat all steps to ensure your unit is properly
assembled and all fasteners are secure.
Examine parts for damage. Do not use damaged parts.
NOTE:
missing or damaged, call 1-800-554-6723.
It is normal for the fuel filter to rattle in the
empty fuel tank.
Finding fuel or oil residue on muffler is normal
due to carburetor adjustments and testing
done by the manufacturer .
TOOLS REQUIRED
S
S
ADJUST AND SECURE THE HANDLEBAR
barrier portion of the handlebar must be adjusted and remain installed as shown to provide a barrier between operator and the spinning blade. The handlebar clamp must be
positioned between the arrows on the handlebar decal.
1. Lift handlebar to upright position.
If you need assistance or find parts
Hex wrench (provided)
Adjustable wrench
DANGER:
Always stop unit and dis-
If received assembled,
To avoid serious injury, the
to do so is a violation of the law. For normal
homeowner use, the muffler and spark arresting screen will not require any service. After
50 hours of use, we recommend that your
muffler be serviced or replaced by your authorized service dealer.
Handlebar
2. Rotate handlebar/clamp counterclockwise toward engine until clamp falls into
groove of base.
Handlebar
Clamp
Clamp
Knob
3. Place the handlebar in a comfortable
position.
4. Retighten handlebar by turning clamp
knob clockwise until handlebar is secure
and stationary in clamp base (clamp
knob can not be overtightened).
Handlebar
Clamp
Base
ASSEMBLY OF SHOULDER STRAP
WARNING:
and handlebar adjustments are required before
starting the engine.
1. Try on shoulder strap and adjust for fit and
balance before starting the engine or beginning a cutting operation.
2. Insert your right arm and head through
the shoulder strap and allow it to rest on
your left shoulder. Make sure the danger
sign is on your back and the hook is to the
right side of your waist.
A one-half twist is built in the shoulder
NOTE:
strap to allow the strap to rest flat on the shoulder.
3. Adjust the strap, allowing the hook to be
about 6 inches below the waist.
4. Fasten the strap hook to the clamp located
between the trigger handle and the handlebar clamp base and lift the tool to the operating position.
Proper shoulder strap
4

CONFIGURING YOUR UNIT
You can configure your unit using a cutting
head for grass and light weeds, or a weed
blade for cutting grass, weeds, and brush up
to 1/2 inch in diameter. To assemble your unit,
go to the section for the desired configuration
and follow the instructions.
ASSEMBLY INFORMATION -TRIMMER HEAD
TRIMMER
HEAD
Slot
Shield
Bracket
Wing Nut
Gearbox
Dust Cup
Remove the blade and metal shield be-
NOTE:
fore attaching the plastic shield and trimmer
head. To remove blade, push in locking lever
and hold. Rotate blade nut until the locking lever
falls into one of the grooves in the dust cup.
Continue to hold the locking lever. This will keep
the shaft from turning while loosening the blade
nut. Remove blade nut by turning clockwise.
Release locking lever. Remove both washers
and blade. To remove metal shield, loosen and
remove the four mounting screws. See ATTAC HING THE METAL SHIELD and INSTALLATIO N OF THE METAL BLADE for illustrations. Be sure to store all parts and instructions
for future use.
AT TACHING THE PLASTIC SHIELD
AND TRIMMER HEAD
WARNING:
erly installed. The shield provides partial
protection to the operator and others from the
risk of thrown objects, and is equipped with a
line limiter blade which cuts excess line to the
proper length. The line limiter blade (on underside of shield) is sharp and can cut you.
1. Remove wing nut from shield.
2. Insert bracket into slot on shield.
3. Pivot shield until bolt passes through hole
in bracket.
4. Tighten the wing nut securely.
NOTE:
the threads on the threaded shaft, remove the
covering to expose the threads. Before
installing the trimmer head, make sure the
dust cup is positioned on the gearbox as
shown below.
If your unit has a plastic cover over
The shield must be prop-
NOTE:
installed as shown in the illustration before
installing the trimmer head.
5. Push in locking lever and hold.
6. Rotate dust cup until the locking lever
7. Continue to hold in locking lever. This will
8. Thread trimmer head onto the shaft in the
9. Release locking lever.
Make sure all parts are properly
falls into one of the grooves
keep the shaft from turning while tightening the trimmer head.
direction shown on the decal. Tighten until secure.
.
Locking Lever
ASSEMBLY INFORMATION -- WEED
BLADE
WEED
BLADE
NOTE:
tic shield before attaching the metal shield
and installing one of the weed blades. To remove the trimmer head, push in locking lever
and hold. Rotate trimmer head until the locking lever falls into one of the grooves in the
dust cup. Continue to hold in locking lever.
This will keep the shaft from turning while
loosening the cutting head. To remove the
plastic shield, loosen and remove wing nut.
Pivot shield to release bracket from slot. See
INSTALLATION OF THE CUTTING HEAD
and ATTACHING THE PLASTIC SHIELD for
illustrations. Be sure to store all parts and instructions for future use. Never use the trimmer head with the metal blade installed.
Remove the trimmer head and plas-
5
 Loading...