

Poulan Pro 3300 Counter-Vibe Operator's Manual
IMPORTANT MANUAL
Do Not hrow Away.
I
i
[
WARNING:
Carefully read and follow
Safety Rules, Precautions
and Operating Instruc-
tions. Failure to do so can
result in serious injury.
\
POULANIWEED EATER
DIVISION WHITE CONSOLIDATED INDUSTRIES, INC.
Shreveport, Louisiana 71139-9329
-TABLE OF CONTENTS
Specifications .. 2
SPECIAL SAFETY SECTION. .... ...... _..... .3, 4 & 5
Know Your Chain Saw. .................. . ...... 6
Preparing Your Saw For Use.................... 7
A. Getting Ready ........ ".......... ........ . .. 7
B. Attaching The Optional Spur ................ 7
C, Attaching The Bar and Chain ............... 7
D, Chain Tension ........................... 8
E. Fueling Your Engine ....................... 9
E Bar and Chain Lubricant ..................... 10
Using Your Saw ............................ 11
A. Control Devices ......................... 11
B. Starting Instructions ..................... 11
Types of Cutting , ........................... 12
A. Basic Cutting Technique ................... 12
B. Tree Felling Techniques 12
C. Bucking . ............. :., .............. 14
D, Debranching and Pruning ................. 15
Maintenance .............. ... .............. 16
A. Guide Bar and Chain .................... 16
B. Spark Arrestor and Spark Plug : .............. 17
C. Starter Rope ............................. 18
D, Carburetor Adjustments ................... 19
E. Clutch and Drum ! Sprocket ................. 20
F. Air Filter ............................... 20
G, Storage ............................... 20
H. Trouble Shooting Chart ................... 22
I. Maintenance Chart ...................... 22
Poulan ® Accessories ......................... 23
Parts & Service ....................... BackCover
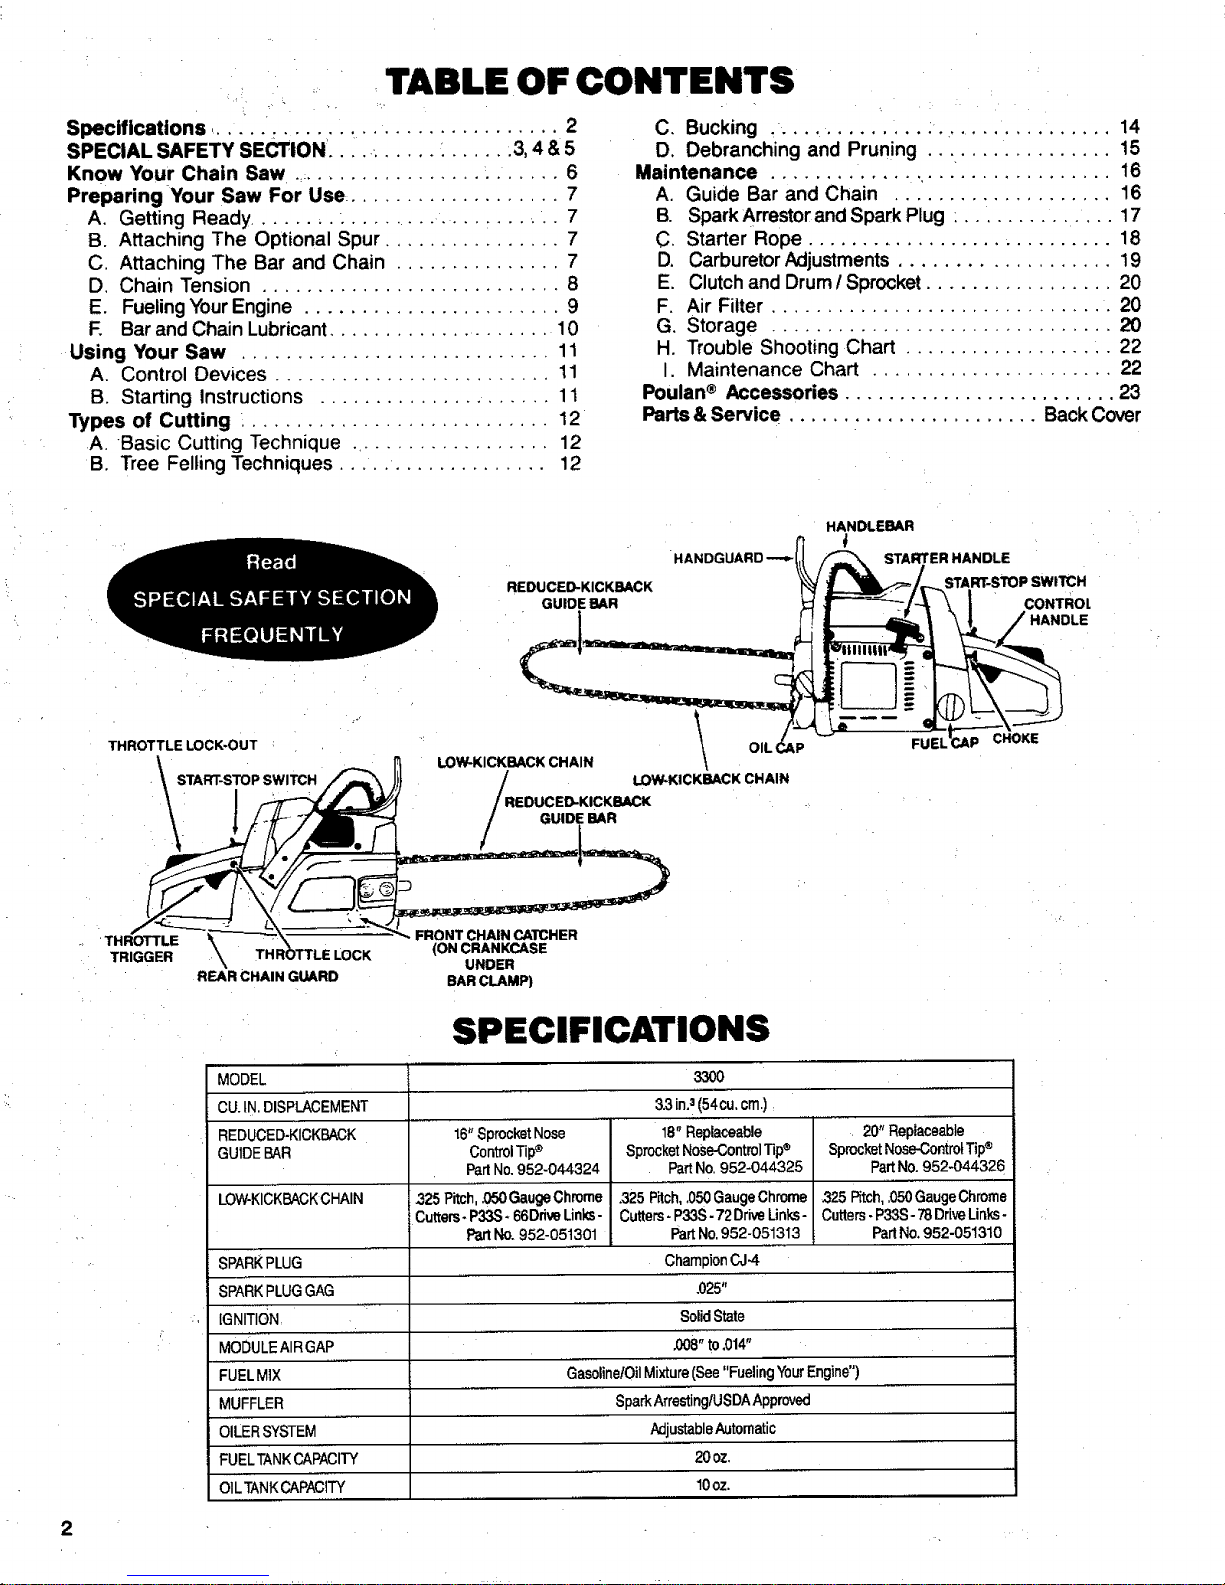
REDUCED-KICKI_CK
GUIDE BAR
HANDGUARD
HANDLEBAR
STARTER HANDLE
START-STOP SWITCH
CONTROL
HANDLE
THROTTLE LOCK.OUT
LOW-KICKBACK CHAIN \
LOW-KICKBACK CHAIN
GUIDE BAR
FUEL
CHOKE
2
' THROTTLE
TRIGGER
LOCK
REAR CHAIN GUARD
FRONT CHAIN CATCHER
(ON CRANKCASE
UNDER
BAR CLAMP)
SPECIFICATIONS
MODEL
CU.IN.DISPLACEMENT
REDUCED-KICKBACK
GUIDE BAR
LOW-KICKBACKCHAIN
SPARKPLUG
sPARKPLUGGAG
IGNITION,
MODULE AIRGAP
FUELMIX
MUFFLER
OILERSYSTEM
FUELTANKCAPACI_
O]LTANKCAP_ITY
16"SprocketNose
ControlTip®
PartNo.952-044324
325 Pitch,.050GaugeChrome
Cutters-P33S* 66DdveLinks-
PartNo. 952-051301
33OO
3.3in.a(54cu, cm.)
18"Replaceable
SprocketNose-ControlTip®
PartNo. 952-044325
.325P_ch,.0511GaugeChrome
Cutters-P33S- 72DriveUnks-
PartNo.952-051313
ChampionCJ-4
,025"
. 20" Replaceable
SprocketNose-ControlTip®
PartNo. 952-044326
,325Pitch,.050GaugeChrome
Cutters. P33S-78DriveLinks-
PartNo,952-051310
SolidState
.008"to,014"
'GasolinelOilMixture(See"FuelingYourEngine")
SparkArrestingiUSDAApproved
AdjustableAutomatic
20oz.
lOoz.
IIIII IIIIIIIIIIIIII II I I I IIIIIIIII IIIIIIII m iI_ IIIll I llllfill
SPECIAL SAFETY SECTION
ill i i i liiliii,iii,i i i,
GUARD AGAINST KICKBACK
Kickback is a dangerous reaction that can lead toserious
injury. Do not rely only on the safety devices pro-
vided with yoursaw. As a chain saw user, you must take
special safety precautions to help keep your cutting jobs
free from accident or injury.
,A KICKBACK WARNING
Kickback can occur when the moving chain contacts
anobject atthe upper portion of the tipoftheguide bar
or when the wood closes inand pinches the sawchain
inthe cut. Contactat the upper portion ofthe tipof the
guidebsrcan causethe chain to dig intothe object and
stop the chain for an instant. The result is a lightning
fast, reverse reaction which kicks the guide bar up and
back toward the operator. If the saw chain is pinched
along the top of the guide bar, the guide bar can be
driven rapidly back toward the Operator. Either of
these reactions can cause loss of saw control which
can result in serious injury.
i
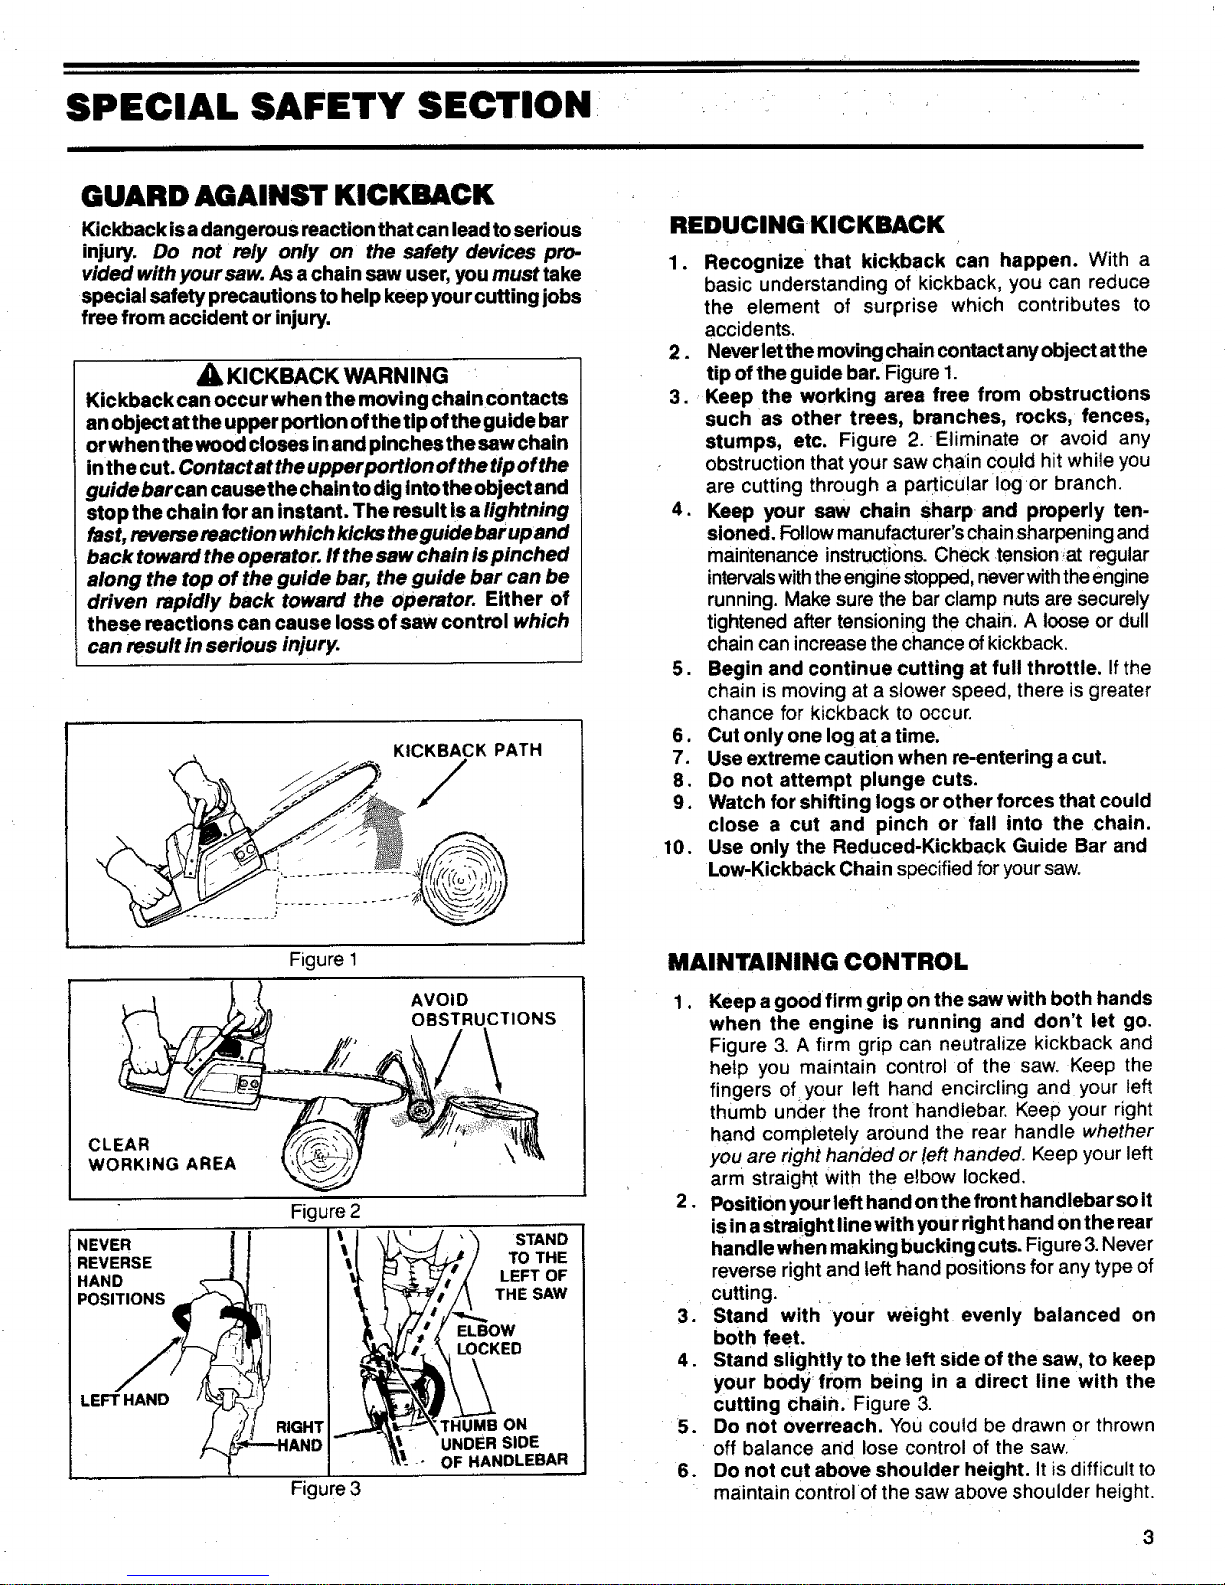
Figure I
AVOID
OBSTRUCTIONS
CLEAR
WORKING AREA
Figure 2
NEVER STAND
REVERSE TO THE
HAND LEFT OF
POSITIONS THE SAW
ELBOW
LEFT HAND
Figure 3
MB ON
UNDER SIDE
_ OF HANDLEBAR
REDUCINGKICKBACK
1. Recognize that kickback can happen. With a
basic understanding of kickback, you can reduce
the element of surprise which contributes to
accidents.
2. Never let the moving chain contact any object atthe
tip of the guide bar. Figure1.
3. Keep the working area free from obstructions
such as other trees, branches, rocks, fences,
stumps, etc. Figure 2. Eliminate or avoid any
obstruction that your saw chain could hit while you
are cutting through a particular Iogor branch.
4. Keep your saw chain Sharp and properly ten-
sioned. Followmanufacturer's chainsharpening and
maintenance instructions.Check tension_at regular
intervalswiththeenginestopped,neverwiththe engine
running. Make sure the barclamp nuts are securely
tightened after tensioningthe chain. A loose or dull
chaincan increase the chance ofkickback.
5. Begin and continue cutting at full throttle. If the
chain is moving at a slower speed, there is greater
chance for kickback to occur.
6. Cutonlyone Iogatatime.
7. Use extreme caution when re-entering a cut.
8. Do not attempt plunge cuts.
9. Watch for shifting logs or other forces that could
close a cut and pinch or fall into the chain.
Use only the Reduced-Kickback Guide Bar and
Low-Kickback Chain specifiedfor yoursaw.
10.
MAINTAINING CONTROL
1. Keep a good firm gripon the saw with both hands
when the engine is running and don't let go.
Figure 3. A firm grip can neutralize kickback and
help you maintain control of the saw. Keep the
fingers of your left hand encircling and your left
thumb under the front handlebar, Keep your right
hand completely around the rear handle whether
you are right handed or I.efthanded. Keep your left
arm straight with the e_bow locked,
2. Position your left hand on the front handlebar so it
isin a straight line with your right hand onthe rear
handle when making bucking cuts. Figure 3. Never
reverse right and left hand positionsfor any type of
cutting.
3. Stand with your weight evenly balanced on
both feet.
4. Stand slightly to the left side of the saw, to keep
your body from being in a direct line with the
cutting chain. Figure 3.
5. Do not overreach. Yo0 could be drawn or thrown
off balance and lose control of the saw.
6. Do not cut above shoulder height. It is difficult to
maintain controlof the saw above shoulder height.
3
i IIIII i iiiii I iiii ii I II
SPECIAL SAFETY SECTION (continued)
i I ii
i ,
AWARNING
Because a chain saw is a high-speed wood-cutting tool, special safety precautions must
be observed to reduce the risk of personal accidents, Careless or improper use can
cause serious injury.
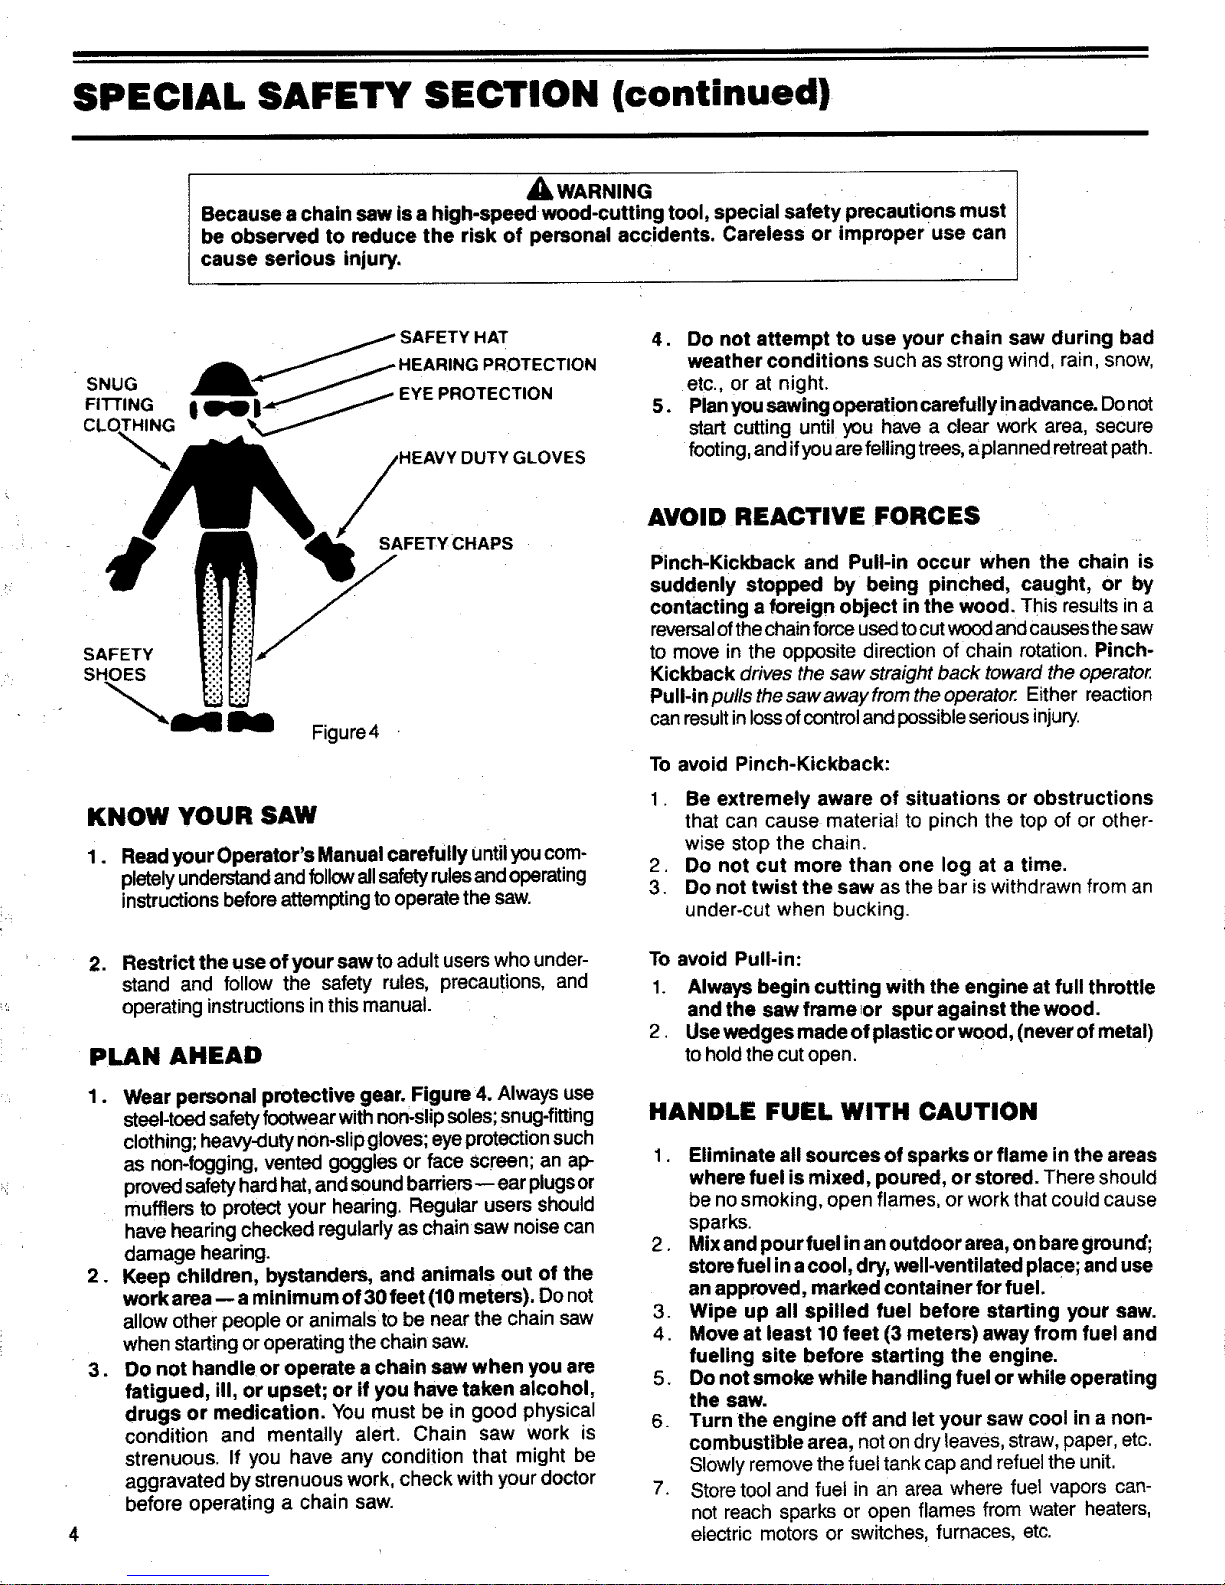
SNUG
FITTING
DUTY GLOVES
4. Do not attempt to use your chain saw during bad
weather conditions such as strong wind, rain, snow,
etc., or at night.
5. Planyou sawing operation carefully inadvance. Donot
start cutting until you have a clear work area, secure
footing,and ifyouare fellingtrees,aplanned retreatpath.
SAFETYCHAPS
Figure4
KNOW YOUR SAW
1. ReadyourOperstor's Manual carefully Untilyoucom-
pletelyunderstandand followallsafetyrulesandoperating
instructionsbeforeattemptingto operatethe saw.
4
2. Restrict the use of your saw to adultuserswho under-
stand and follow the safety rules, precautions, and
operatinginstructionsinthismanual.
PLAN AHEAD
°
.
.
Wear personal protective gear. Figure 4. Always use
steel-toedsafetyfootwear withnon-slipsoles;snug-fitting
clothing;heavy-dutynon-slipgloves; eyeprotectionsuch
as non-fogging, vented goggles or face screen; an ap-
provedsafetyhardhat,and sound barriers-- ear plugsor
mufflers to protectyour hearing. Regular users should
have hearing checked regularlyas chain saw noisecan
damage hearing.
Keep children, bystanders, and animals out of the
work area-- a minimum of 30 feet (10meters). Do not
allow other people or animals to be near the chain saw
when startingoroperating the chain saw.
Do not handle or operate a chain saw when you are
fatigued, ill, or upset; or if you have taken alcohol,
drugs or medication. Youmust be in good physical
condition and mentally alert. Chain saw work is
strenuous. If you have any condition that might be
aggravated by strenuous work, check with your doctor
before operating a chain saw.
AVOID REACTIVE FORCES
Pinch'Kickback and Pull-in occur when the chain is
suddenly stopped by being pinched, caught, or by
contacting a foreign object in the wood. This resultsin a
reversalofthe chainforce usedtocutwoodandcausesthesaw
to move inthe opposite direction of chain rotation.Pinch-
Kickback drives the saw straightback towardthe operator.
Puli-in pu//s thesaw away fromtheoperator. Either reaction
can result in lossofcontrol and possible serious injury.
To avoid Pinch-Kickback:
1. Be extremely aware of situations or obstructions
that can cause material to pinch the top of or other-
wise stop the chain.
2. Do not cut more than one log at a time.
3. Do not twist the saw as the bar is withdrawn from an
under-cut when bucking.
To avoid Pull-in:
1. Always begin cutting with the engine at full throttle
and the saw frame or spur against the wood.
2, Use wedges made of plastic or wood, (never ofmetal)
toholdthe cutopen.
HANDLE FUEL WITH CAUTION
1. Eliminate all sources of sparks or flame in the areas
where fuel is mixed, poured, or stored. There should
be no smoking, open flames, or work that could cause
sparks.
2. Mix and pourfuel in an outdoor area, on bareground;
store fuel ina cool, dry, well-ventilated place; and use
an approved, marked container for fuel.
3. Wipe up all spilled fuel before starting your saw.
4. Move at least 10 feet (3 meters) away from fuel and
fueling site before starting the engine.
5. Do not smoke while handling fuel or while operating
the saw.
6. Turn the engine off and let your saw cool in a non-
combustible area, not ondry leaves, straw, paper, etc.
Slowlyremove the fuel tank cap and refuelthe unit.
7. Store tool and fuel in an area where fuel vapors can-
not reach sparks or open flames from water heaters,
electric motors or switches, furnaces, etc.
II_ I IIIIIII I 11 11 IIIIIIIIIIIII[IIIIIIIIII IIII IIIIIIIIIIIIIIIIIIIII IIIIIII
Ill I IllIll II IIHIIIIIIIII
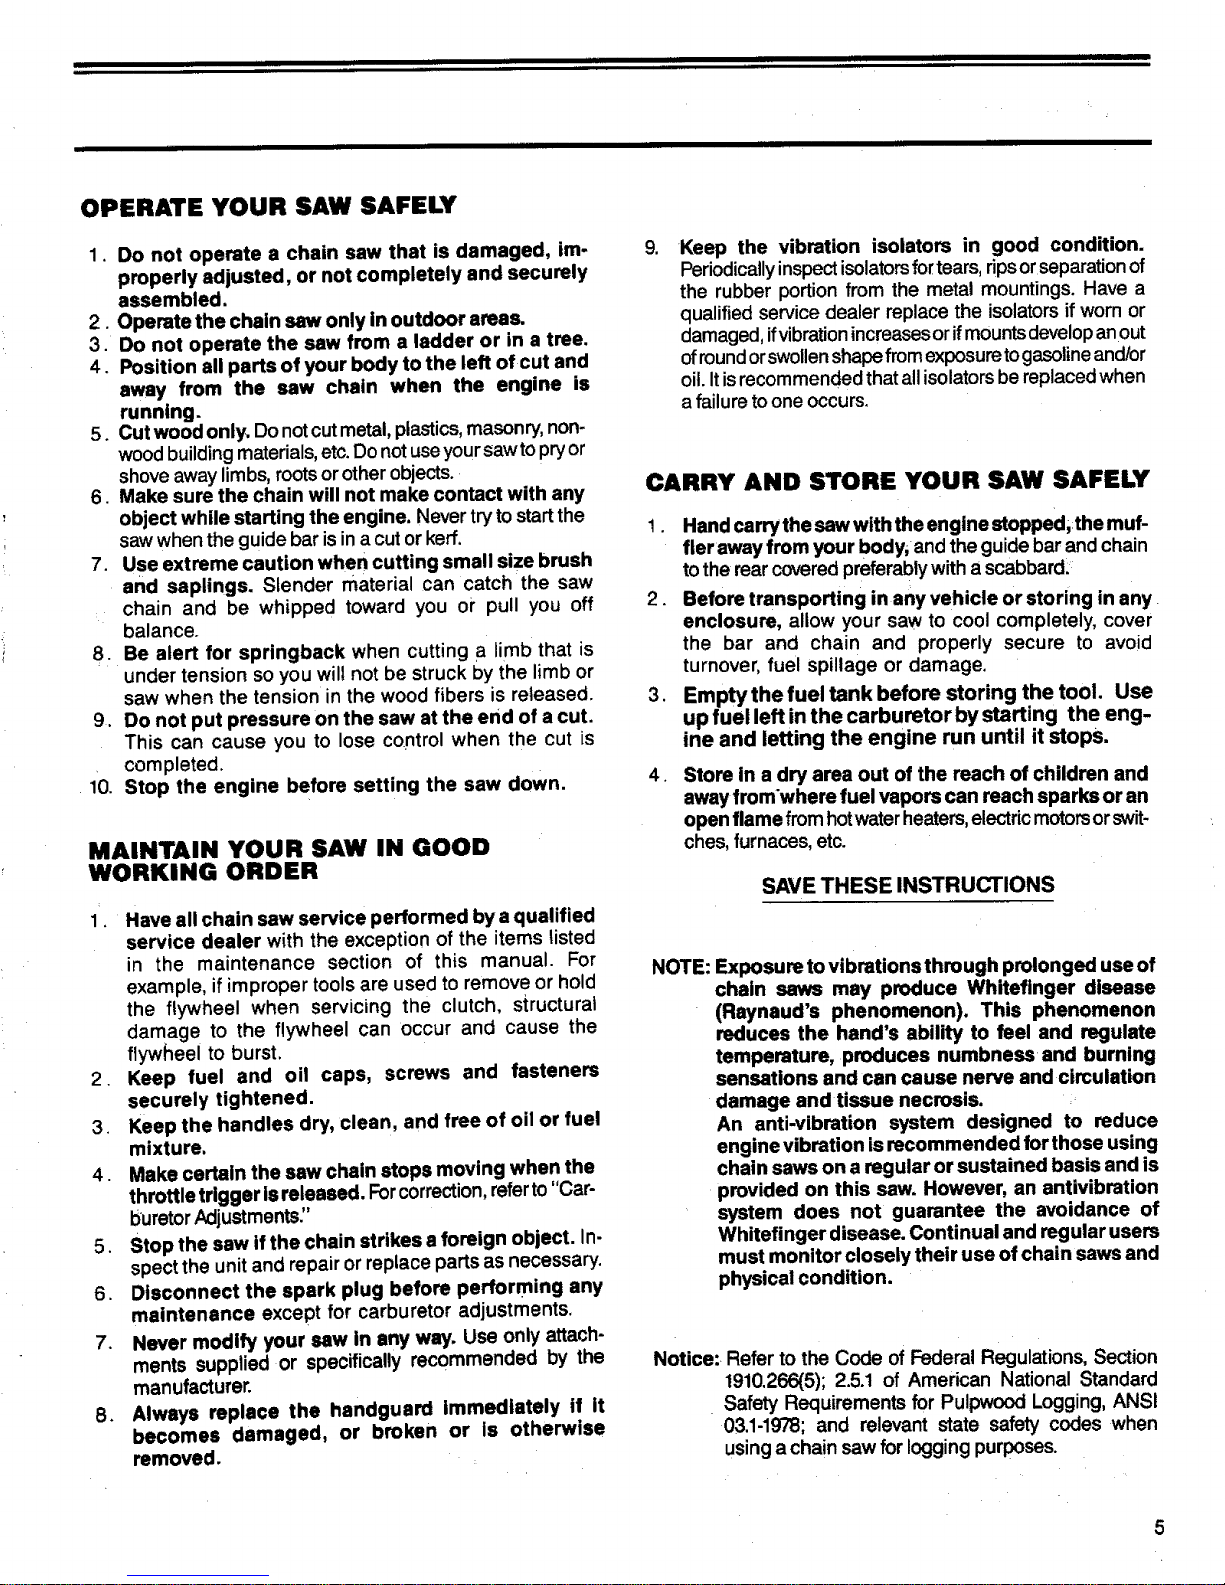
OPERATE YOUR SAW SAFELY
•10.
1. Do not operate a chain saw that is damaged, im- 9.
properly adjusted, or not completely and securely
assembled.
2. Operate the chain saw only in outdoor areas.
3. Do not operate the saw from a ladder or in a tree.
4. Position all parts of your body to the left of cut and
away from the saw chain when the engine is
running.
5. Cut wood only, Do notcutmetal, plastics,masonry, non-
woodbuildingmaterials, etc.Do notuseyour sawtopryor
shove away limbs,roots or other objects.
6. Make sure the chain will not make contact with any
object while starting the engine. Nevertry to start the
saw when the guide bar is in acut orkerr,
7. Use extreme caution when cutting small size brush
and saplings. Slender material can catch the saw
chain and be whipped toward you or pull you off
balance.
8. Be alert for springback when cutting a limb that is
under tension soyou will not be struck by the limb or
saw when the tension in the wood fibers is released.
9. Do not put pressure on the saw at the end of a cut.
This can cause you to lose control when the cut is
completed.
Stop the engine before setting the saw down. 4.
MAINTAIN YOUR SAW IN GOOD
WORKING ORDER
1. Have all chain saw service performed by a qualified
service dealer with the exception of the items listed
in the maintenance section of this manual. For
example, if improper tools are used to remove or hold
the flywheel when servicing the clutch, structural
damage to the flywheel can occur and cause the
flywheel to burst.
2. Keep fuel and oil caps, screws and fasteners
securely tightened.
3. Keep the handles dry, clean, and free of oil or fuel
mixture.
4. Make certain the saw chain stops moving when the
throttle trigger is released. Forcorrection,referto"Car-
buretorAdjustments"
5. Stop the saw if the chain strikes a foreign object. In-
spect the unit and repair or replace parts as necessary.
6. Disconnect the spark plug before performing any
maintenance except for carburetor adjustments,
7. Never modify your saw in any way. Use only attach-
ments supplied or specifically recommended by the
manufacturer.
8. Always replace the handguard immediately if it
becomes damaged, or broken or is otherwise
removed.
Keep the vibration isolators in good condition.
Periodicallyinspect isolatorsfortears,dpsor separation of
the rubber portion from the metal mountings. Have a
qualified service dealer replace the isolators if worn or
damaged, ifvibration increases orif mounts develop anout
ofround orswollen shape from exposure togasoline and/or
oil. It isrecommended that all isolators be replaced when
a failure toone occurs,
CARRY AND STORE YOUR SAW SAFELY
1. Hand carry the saw with the enginestopped,the muf-
fler away from your body, and the guide bar and chain
tothe rear coveredpreferablywith a scabbard.:
2. Before transporting in any vehicle or storing in any
enclosure, allow your saw to cool completely, cover
the bar and chain and properly secure to avoid
turnover, fuel spillage or damage,
3, Empty the fuel tank before storing the tool. Use
up fuel left in the carburetor by starting the eng-
ine and letting the engine run until it stops.
Store in a dry area out of the reach of children and
away from'where fuel vapors can reach sparks or an
open flame fromhotwaterheaters,electric motorsorswit-
ches, furnaces,etc.
SAVE THESE INSTRUCTIONS
NOTE: Exposure to vibrationsthrough prolonged use of
chain saws may produce Whitefinger disease
(Raynaud's phenomenon). This phenomenon
reduces the hand's ability to feel and regulate
temperature, produces numbness and burning
sensations and can cause nerve and circulation
damage and tisaue necrosis.
An anti-vibration system designed to reduce
engine vibration is recommended for those using
chain saws on a regular or sustained basis and is
provided on this saw. However, an antivibration
system does not guarantee the avoidance of
Whitefinger disease. Continual and regular users
must monitor closely their use of chain saws and
physical condition.
Notice: Refer to the Code of Federal Regulations, Section
I910.266(5); 2.5.1 of American National Standard
Safety Requirements for Pulpwood Logging, ANSI
03.1-1978; and relevant state safety codes when
using a chain saw for loggingpurposes.
5

,,,,m I I IIIIII'11111 II I
KNOW YOUR CHAIN SAW
iltilt ttilu ilttttttt
A. INTRODUCTION
Yoursaw has been designed with safetyinmind and
includesthe following features as standardequipment:
--Reduced-Kickback Guide Bar (Control Tip ®)
--Low-Kickback Chain (ElongatedGuard Link)
-- Spark Arrestor
--Temperature Limiting Muffler
-- Handguards
--Counter-Vibe ® Anti-Vibration System
_, WARNING
The following features are included on your saw to help
reduce the hazard of kickback, however, such features
will not totally eliminate this dangerous reaction. As a
chain saw user, do not rely only on safety devices. You
must follow all safety precautions, instructions and
maintenance in this manual to help avoid kickback and
other forces which can result inserious injury.
B. KICKBACK SAFETY FEATURES
--Reduced-Kickback Guide Bar,designedwithasmall
radiustip whichreducesthesizeofthekickback danger
zone on the bar tip. Figure 5. A Reduced Kickback
Guide Bar isone which has been demonstratedto
significantlyreduce the number and seriousnessof
kickbacks whentested inaccordancewiththe safety
requirements for gasolinepoweredchainsawsas set
by the Amedcan National Standards Institute, Inc.,
Standard B175,1- 1985.
-- Low-Kickback Chain, designed with a contoured
depthgauge andguardlinkwhichdeflectthekickback
force and allowwood togradually ride intothecutter.
Figure5. LowKickbackSaw Chain isa chain which
hasmet the kickback performance requirements of
ANSI B175.1whentestedon a representativesample
of chain saws below 3.8 cubic inch displacement
specified in ANSI B175.1-1985.(American National
Standardfor PowerTools-Gasoline PoweredChain
Saws - SafetyRequirements).
-- Handguard, designed toreducethechanceofyour left
handcontactingthechainifyour handslipsoffthefront
handlebar.
--Position of front and rear handlebars, designed
withdistancebetweenhandlesand "in line"witheach
other.Th_ spread and "in line" positionofthe hands
providedbythisdesignworktogethertogive balance
and resistancein controlling the pivotofthesawback
towardthe operatorif kickbackoccurs.
4_WARNING
Do not operate the chain saw unless the safety
devices or their specified replacements are properly
installed and maintained according to the instruc-
tions in this manual. Do not use any other guide bar
and chain comblnation that is not equivalent to the
original equipment or not certified to comply with
ANSI B175.1-1985. Failureto follow these instructions
can result inserious injury.
___..J \ ,.,=
RADIUS TIP
CONTOURED
REOUCED KICKBACK SYMMETRICAL
GUIDE ELAR LOW*KICK_K CHAIN CU_[TER
J "_==_T_ CA"06STRU_
IATERtAL
SV_ CHAIN WITH HIGH
BAR KICKIM4_K POTENTIAL
Figure5
C, STATE AND LOCAL REQUIREMENTS.
Yoursaw is equipped with a temperature limiting muf-
fler and spark arresting screen which meets the
requirements of California Codes 4442 and 4443.
All U,S. forest land and the statesof California, Maine,
Washingtonand Oregon require manyinternalcombus-
tionengines to beequipped witha spark arrestorscreen
bylaw.Other statesare enacting similarlaws.
If you operate a chain saw ina state or locale where
such regulations exist, youare legallyresponsible for
maintaining the operating condlUon of these parts.
Failure to do so is a violation of a law. See "Spark
Arrestor" Sectionfor maintenance.
D, CARTON CONTENTS
After you unpack the carton:
1. Check the contents against the list below.
2. Examine the items for damage. Do not use damaged
parts.
3. Notify your dealer immediately ff a part is missing or
damaged. It is normal to hear a fuel filter rattle in an
empty fuel tank.
NOTE: Itisnormal to hear thefuel filterrattleinan empty
fuel tank.
KEY NO. CARTON CONTENTS: QTY.
1 Power Head 1
2 Guide Bar 1
-- Loose Parts Bag (not shown) 1
-- Oil- 8 oz, can (not shown) 1
LOOSE PARTS BAG CONTENTS:
3 Chain 1
4 Screncri 1
5 Alien Wrench - 5/32" 1
-- Operator's Manual (not shown) 1
IIIIIIIIIIII I IIII I IIII IIIIII IIII IIII IIIIIIII
PREPARING YOUR SAW FOR USE
ii iiii i iiiiiiiiiiiiiiiiiiiiiiii
A. GETTING READY
1. READYOUROPERATOR'SMANUAL
Your Operator's Manual has been developed tohelp
you prepare your saw for use and to understand its
safe operation. It is important that you read your
manual completely to become familiar with the unit
before youbegin assembly or attempt operation. Your
Poulan® Dealer is available to show you how to
operate your saw. Be sure to ask for his assistance.
2. HAVE THE FOLLOWING AVAILABLE:
a. Protective gloves
b. Approved, marked, fuel container.
c. Regular gasoline, leaded or unleaded.
d. Two-cycle engine oil. See "Fueling Your
Engine"
e. Barand Chain Oil. See"Barand Chain Lubri-
cant."
f. Scrench -- provided withyoursaw.Usethe tong
end ofthe toolasaslottedscrewdriver,thesmatl
pipeend as asocketwrench,andthe largerpipe
end toremovethe spark plug.
g. Hex Wrench m providedwith yoursaw for the
fan housingscrews.
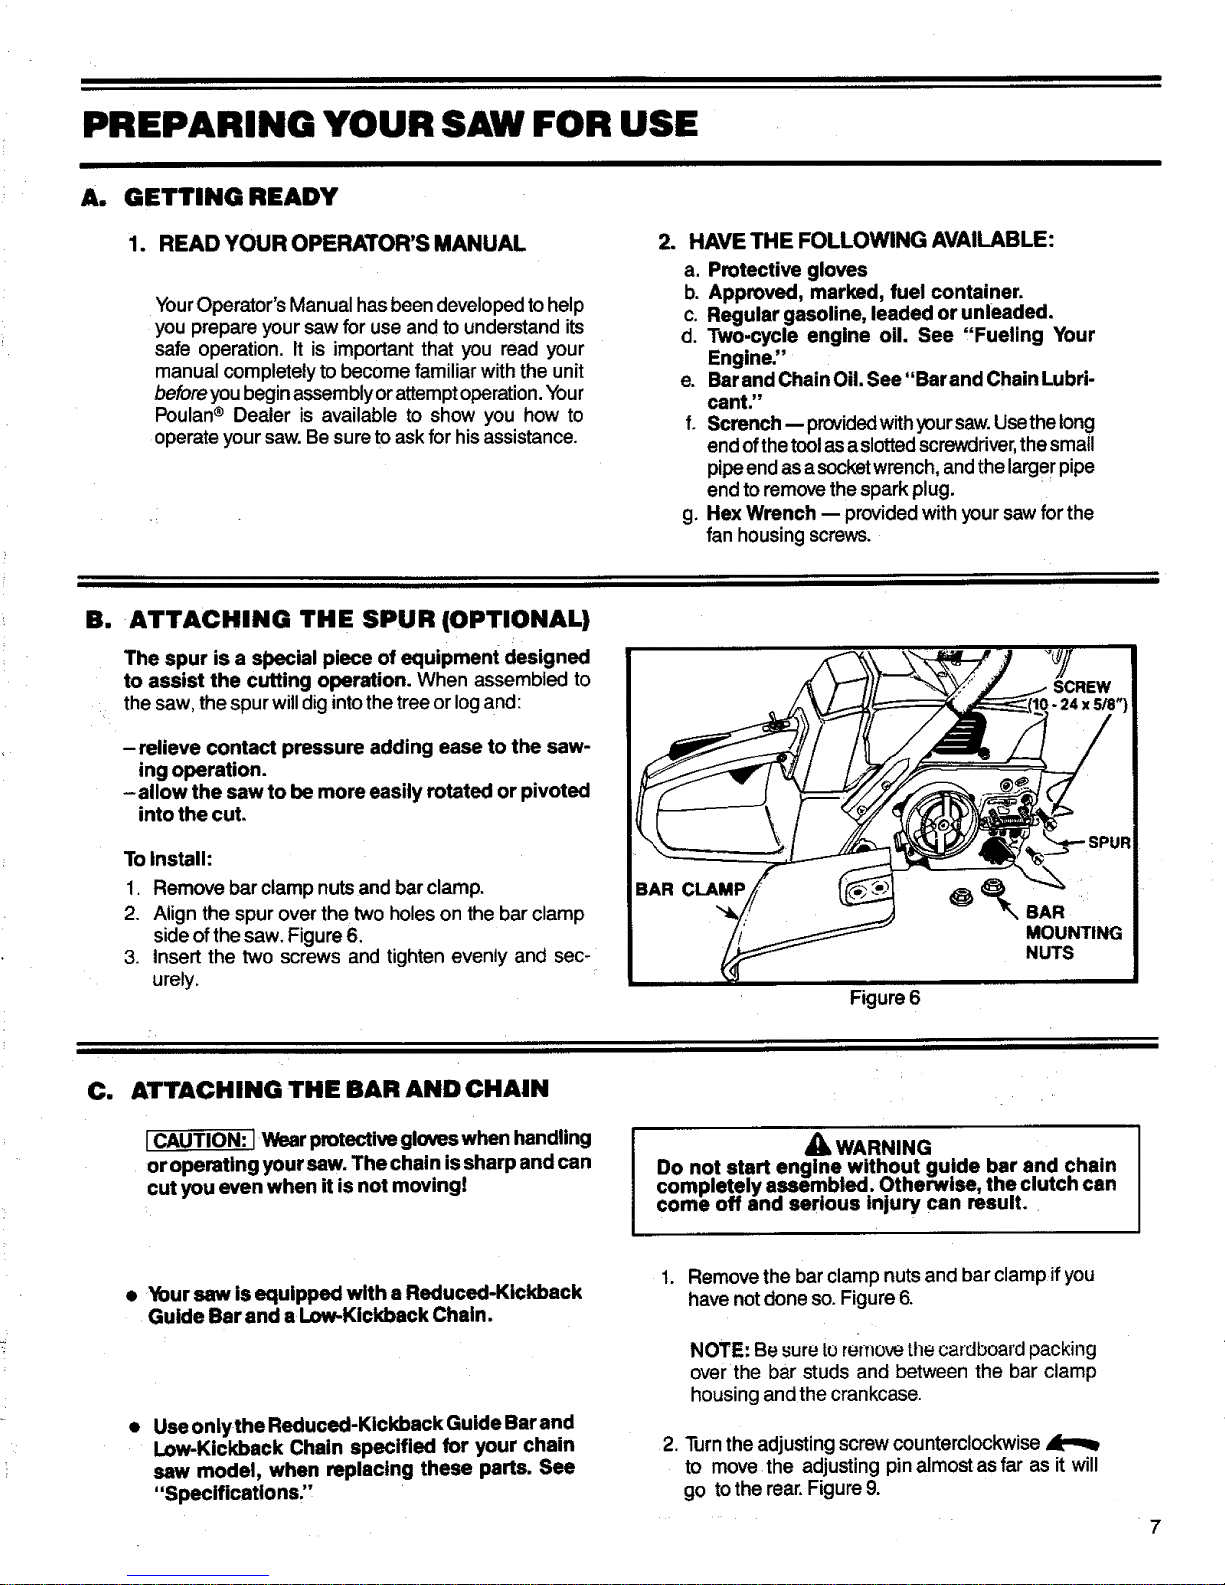
B. ATTACHING THE SPUR (OPTIONAL)
The spur is a special piece of equipment designed
to assist the cutting operation. When assembled to
the saw, the spurwilldigintothe tree orlogand:
-relieve contact pressure adding ease to the saw-
ing operation.
-allow the saw to be more easily rotated or pivoted
into the cut.
To
1
2.
.
Install:
Remove bar clamp nuts and bar clamp.
Align the spur over the two holes on the bar clamp
side of the saw. Figure 6.
Insert the two screws and tighten evenly and sec-
urely.
Figure6
ii
C. ATTACHING THE BAR AND CHAIN
ICAUTION: lWear protective gloves when handling
or operating your saw. The chain issharp and can
cut you even when it is not moving!
_WARNING
Do not start engine without gu!de bar and chain
completely assembled. Otherwise, the clutcn can
come on and serious inlury can result.
• Your saw is equipped with a Reduced-Kickback
Guide Bar and a Low-Kickback Chain.
• Useonlythe Reduced-Kickback Guide Barand
Low-Kickback Chain specified for your chain
saw model, when replacing these parts. See
"Specifications"
.
Remove the bar clamp nuts and bar clampif you
havenotdone so. Figure 6.
NOTE: Besure toremovethe cardboard packing
over the bar studs and between the bar clamp
housing and the crankcase.
2. Turnthe adjustingscrewcounterclockwise
to move the adjusting pin almost asfar as it will
go tothe rear.Figure9.
7
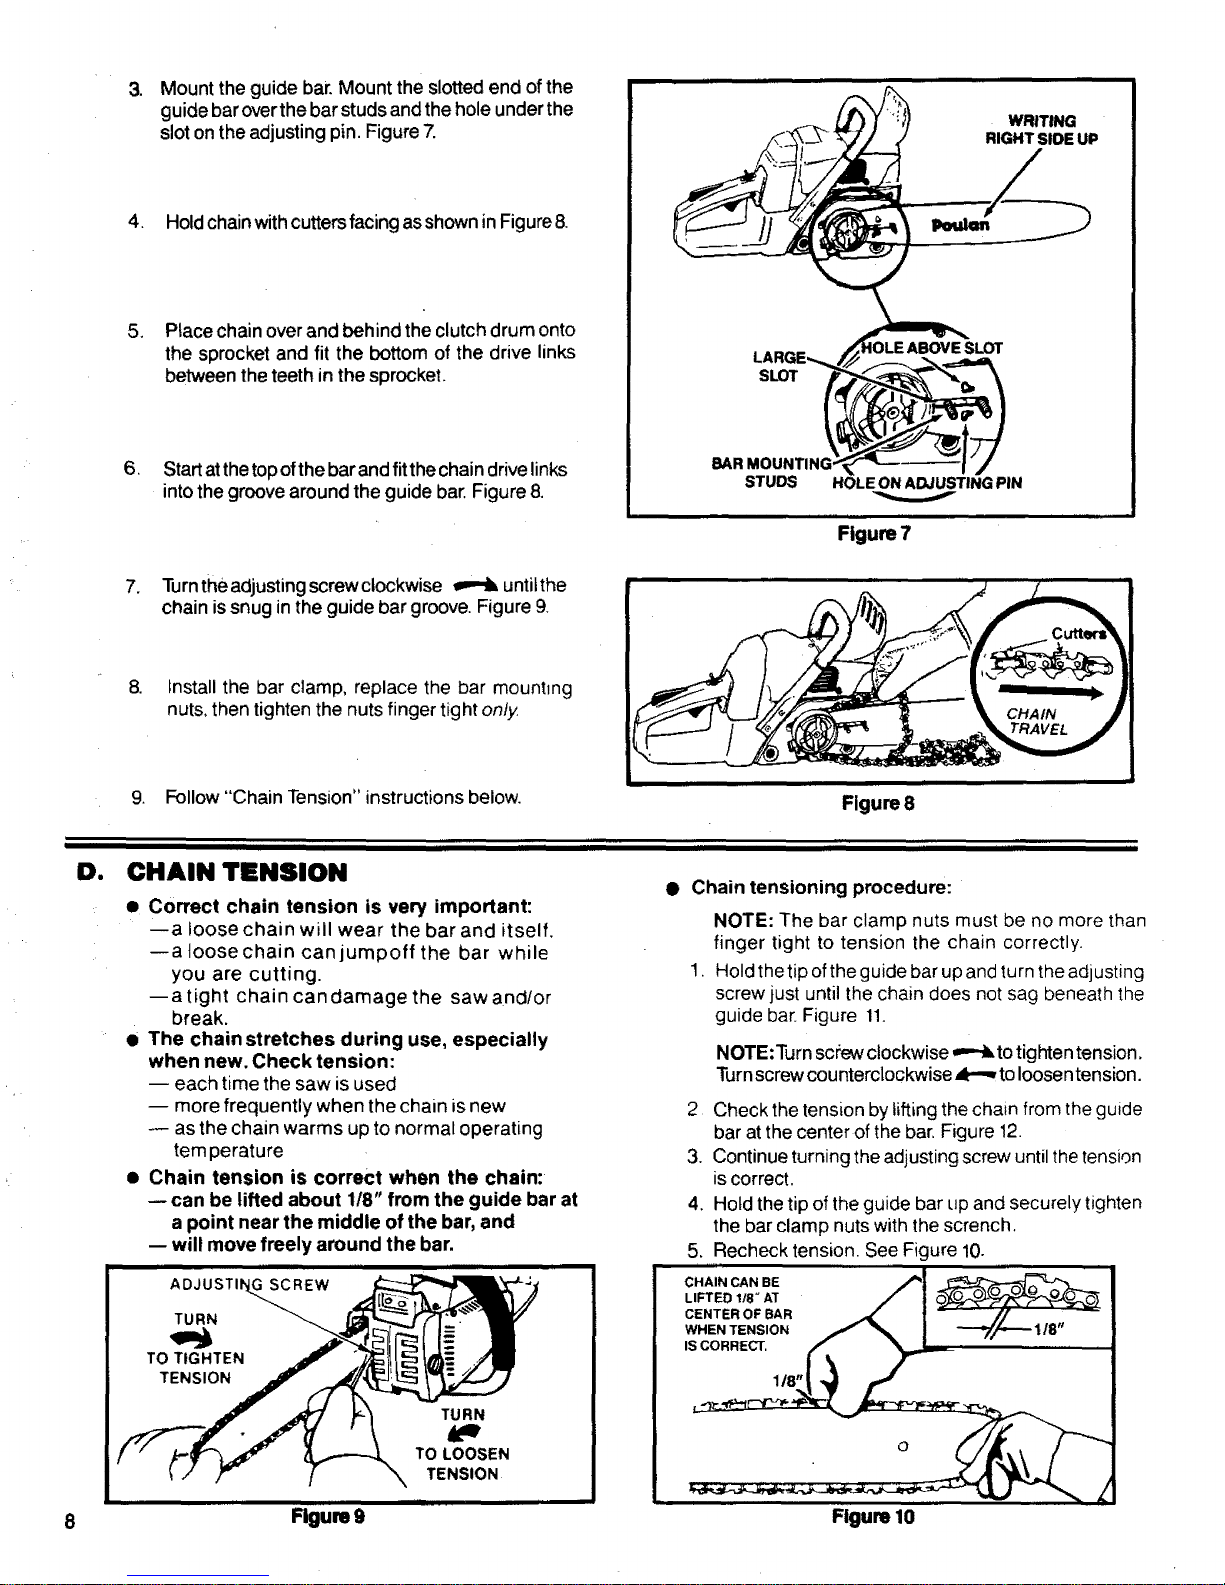
. Mount the guide bar. Mount the slotted end of the
guide bar overthe barstuds and the hole under the
slot on the adjusting pin. Figure 7.
4. Hold chain with cutters facing asshown in Figure8.
.
,
Place chain over and behind the clutch drum onto
the sprocket and fit the bottom of the drive links
between the teeth in the sprocket.
Start atthetop ofthe barandfitthe chain drive links
into the groove around the guide bar. Figure 8.
SLOT
BAR MOU_
STUDS
iiiil,,,,,i
WRITING
RIGHT SlOE UP
HOLE ON ADJUSTING PIN
Figure 7
.
,
Turnthe adjusting screw clockwise _ until the
chain is snug inthe guide bar groove. Figure 9.
Install the bar clamp, replace the bar mounhng
nuts, then tighten the nuts finger tight only
9. Follow "Chain Tension" instructions below.
i,,i i iii
Figure8
D. CHAIN TENSION
• Correct chain tension is very important:
--a loose chain will wear the bar and itself.
--aloosechain canjumpoff the bar while
you are cutting.
-- a tight chain can damage the saw andlor
break.
• The chain stretches during use, especially
when new. Check tension:
-- each time the saw is used
-- more frequently when the chain isnew
as the chain warms up to normal operating
temperature
• Chain tension is correct when the chain:
-- can be lifted about 1/8" from the guide bar at
a point near the middle of the bar, and
-- will move freely around the bar.
iiiii i
TO TIGHTEN ._i
7
if'__ _ TO LOOSEN
/ _ TENSION
m . ii i [11 i
Figure 9
• Chain tensioning procedure:
NOTE: The bar clamp nuts must be no more than
finger tight to tension the chain correctly.
1. Hold the tip ofthe guide barup and turn the adjusting
screw just until the chain does not sag beneath the
guide bar. Figure 11.
NOTE:Turn screw clockwise _ to tighten tension.
Turnscrew counterclockwise A---to loosen tension.
2 Check the tension by lifting the chain from the guide
bar atthe center of the bar. Figure 12.
3. Continue turning the adjusting screw until the tension
is correct.
4. Hold the tip of the guide bar up and securely tighten
the bar clamp nuts with the scrench.
5. Recheck tension. See Figure 10.
CHAIN CAN BE _1
LIFTED !18" AT _- t O_'_""¥'x'._-.O-_
CENTER OF BAR A(" | - // - --
WHEN TENSION /_ ! _-_../_ 1/8"
IS CORRECT. _ _
..... 1/8"_,L.'_
Figure 10
 Loading...