

Page 1
pottery barn kids
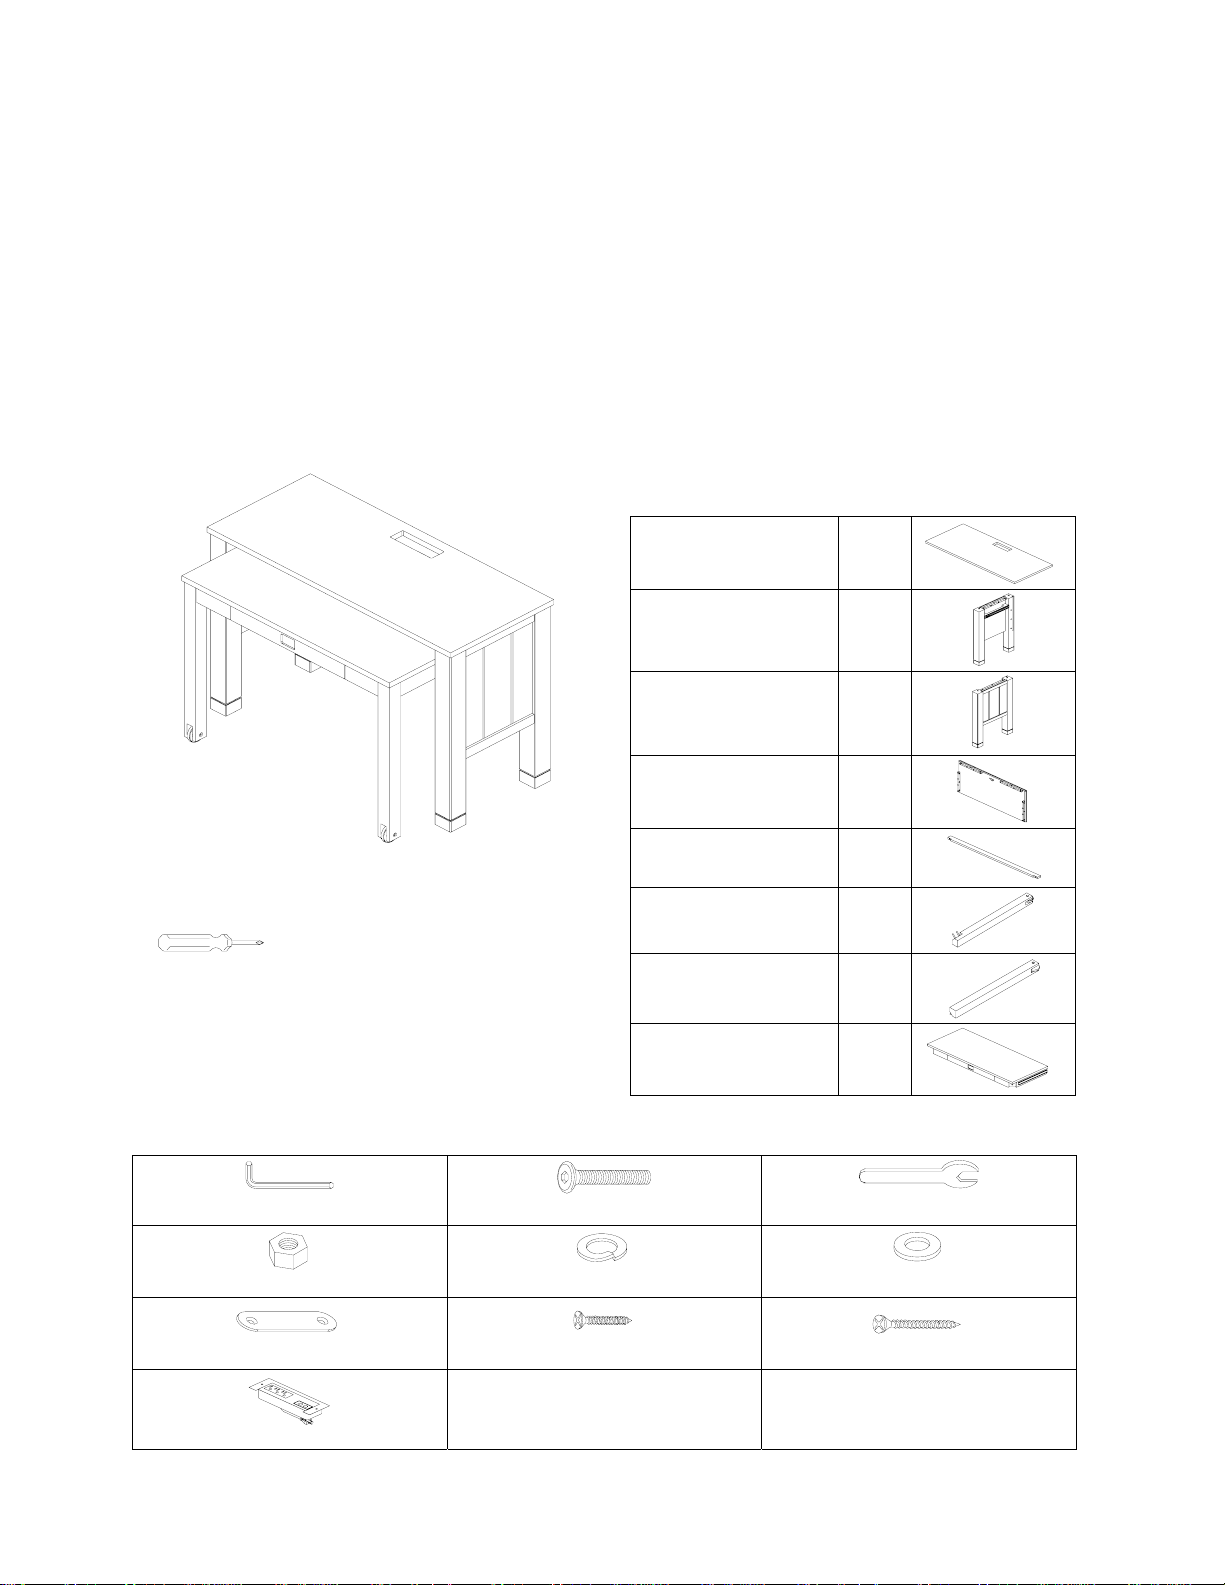
RILEY DESK
PRE-ASSEMBLY:
• Read all instructions before beginning assembly. The illustrations provided allow for easier assembly when
used in conjunction with the asse mbly instruction s.
• For your safety and ease, assembly by two adults is recommended.
• Remove all parts and hardware from the box and lay out on a clean, carpeted, or scratch-free work surface.
Use care as some parts or hardw a re may ha ve sharp points or edges.
• Do not dispose of any contents until assembly is completed to avoid accidentally discarding small parts or
hardware.
• Use the parts and hardware list to identify and separate each of the pieces included.
• Note: Do not fully tighten all bolts until all parts are in place. Failure to follow these instructions may cause
the bolts to misalign during assembly.
• The use of power tools for assembly is not recommended. Power tools can damage hardware or split wood.
PARTS INCLUDED:
TOOLS REQUIRED:
Philips Screwdriver (Not included)
OPTIONAL PARTS:
Riley Platform Twin Bed (sold separately)
HARDWARE INCLUDED:
(A) Large Desktop
(B) Left Side Panel
(C) Right Side Panel 1pc
(D) Rear Panel 1pc
(E) Stretcher 1pc
(F) Left Leg 1pc
(G) Right Leg 1pc
(H) Small Desktop 1pc
1pc
1pc
(I) Allen Key with Ball Tip – 1pc
(L) M8 Nut – 4pcs
(O) Mending Plate – 2pcs
(R) Cordset – 1pc
(J) Allen Bolt M6 x 30mm – 20pcs
(M) Spring Washer – 4pcs
(P) Short Wood Screw 3x12mm – 4pcs
Page - 1 - 5
(K) Open Wrench – 1pc
(N) Flat Washer – 4pcs
(Q) Long Wood Screw 3x20mm – 2pcs
Page 2
ASSEMBLY INSTRUCTIONS:
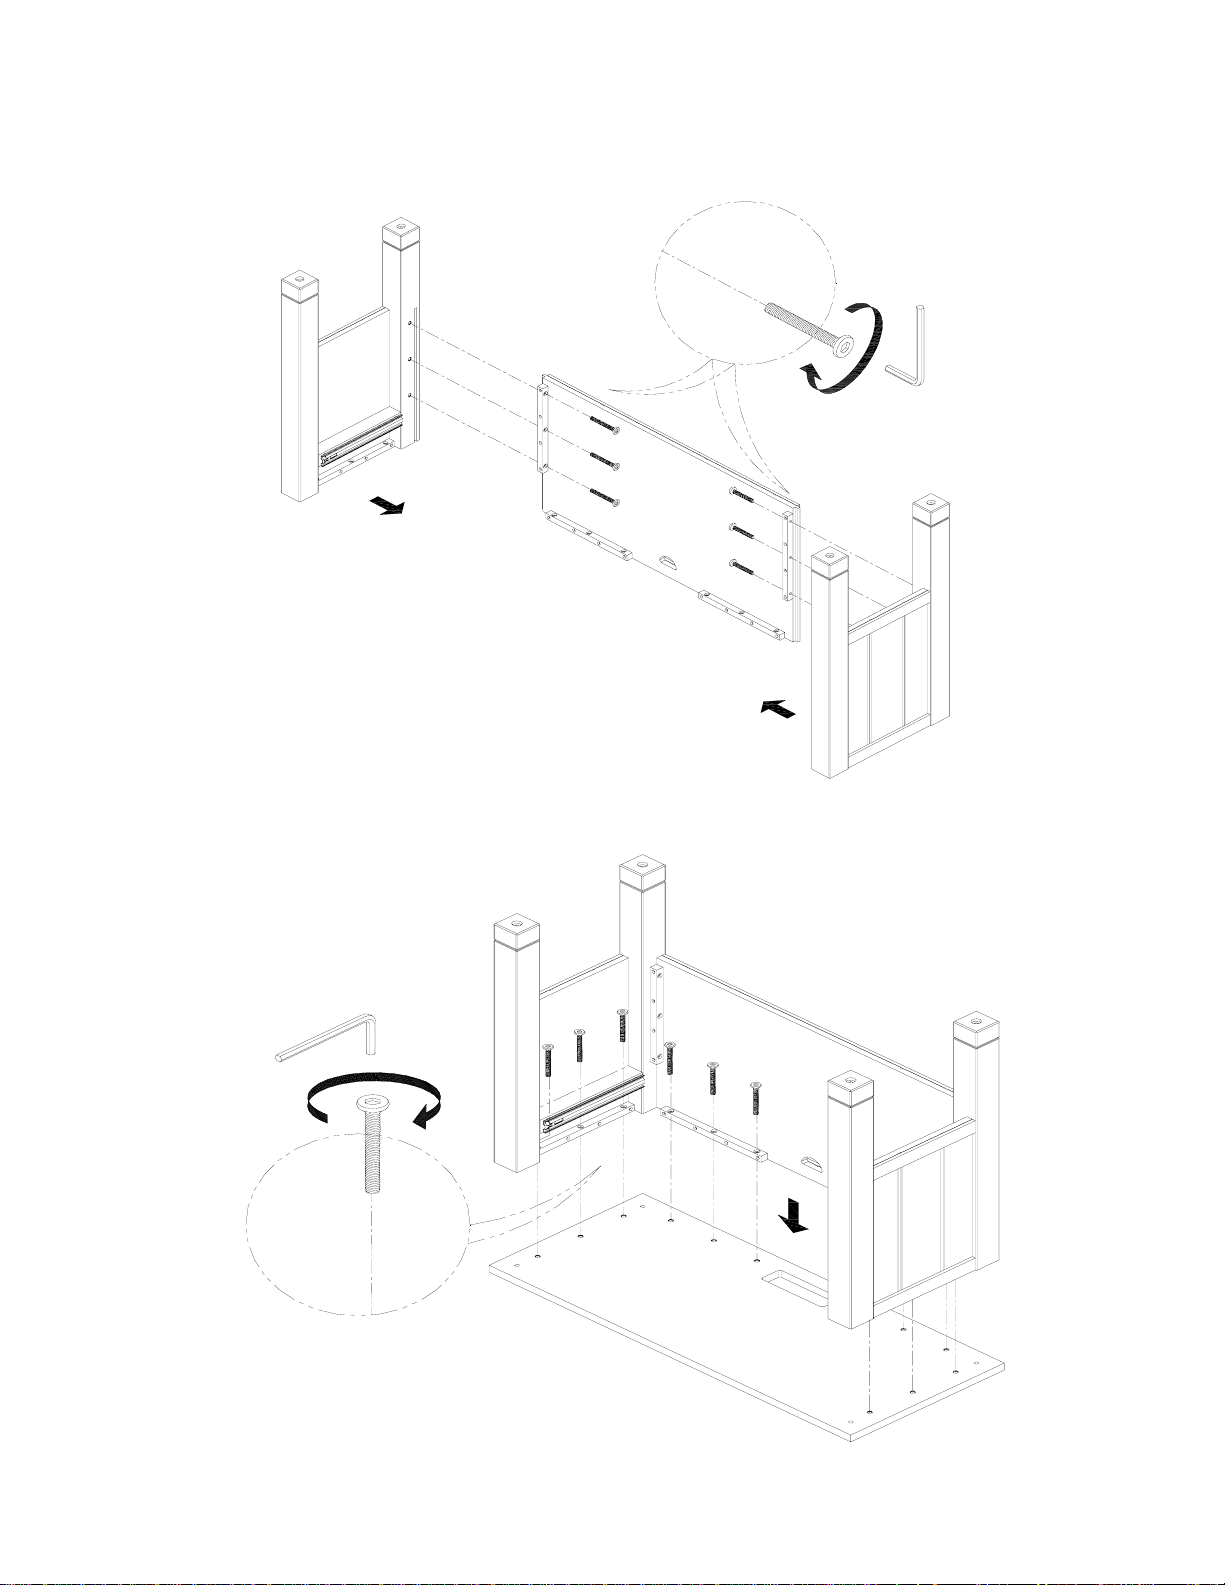
1. Align and attach the Left/Right Side Panel (B&C) to the Rear Panel (D). Insert (6) Allen Bolt (J) through
pre-drilled holes on the Rear Panel (D) into the insert nuts located on Left/Right Side Panels, securing
with the Allen Key (I). Please do not fully tighten at this point.
J.
I.
C.
E.
D.
B.
2. Place the assembled piece on the Large Desktop (A). Insert (12) Allen Bolts (J) through the pre-drilled
holes on the assembled piece into the insert nuts located on the Desktop (A) and secure with the Allen
Key. Do not fully tighten at this point.
I.
J.
Page - 2 - 5
A.
Page 3

3. To connect the Stretcher (E) to the assembled piece, insert (1) Allen Bolt (J) through the pre-drilled
hole on the Stretcher (E) into the insert nut located on front post of the Right Side Panel securing with
the Allen Key (I). Repeat the remaining Allen Bolt with the other end.
4. Turn the assembled piece in upright position. Check all alignments and tighten all bolts.
I.
J.
E.
5. Place the Short Desktop (H) on a soft, carpeted work place. Align the Left Leg (F) to the pre-drilled
holes on the corner block. Slide a Flat Washer (N), Spring Washer (M) and Nut (L) into each leg bolt on
the other side, securing with the Wrench (K). Repeat with the Right Leg (G). Make sure the wheels are
facing straight forward.
N.
M.
F.
L.
K.
G.
H.
Page - 3 - 5
Page 4

6. To connect the assembled inner desk piece to the outer desk piece, align and connect the metal glide
on one side first and then the other side. After metal glides on both sides are aligned and connected,
push the inner desk all the way in. Pull the inner desk out again to ensure the inner desk is well
connected and functions well.
Note: If the inner desk is misaligned, please pull/push the metal glide triggers located on both sides and
pull gently to release the inner desk from the outer desk.
7. Secure the Cordset (R) to the Desk with (2) Long Wood Screws (Q), using a Philips screwdriver.
8. Check Alignments and secure all bolts. Adjust the levelers located on bottom of the legs to keep the
desk level if needed.
R.
Page - 4 - 5
Page 5

9. To connect the Desk to a Riley Platform Twin Bed, if desired, align Bed and Desk as shown. Place (2)
Mending Plates (O) over the pre-drilled holes on legs of the Desk and Riley Platform Twin Bed, and
secure with (4) Short Wood Screws (P), using a Philips screwdriver.
O.
P.
CARE INSTRUCTIONS:
• Dust often using a clean, soft, dry lint-free cloth.
• Blot spills imm ediately, and wi p e wi t h a clean, damp, cloth.
• We do not recommend the use of chemical cleansers, abrasives, or furniture polish on our lacquered
finish.
Thank you for your purchase.
stores | catalog | www.potterybarnkids.com
USA 1.800.290.8181
Page - 5 - 5
 Loading...