

Page 1

1
P
ottery barn kids
MADELINE WALL SYSTEM HUTCH
PRE
-
ASSEMBLY
:Please read
all instructions before beginning assembly.
T
he illustrations provided allow for easier assembly
when used in conjunction with the assembly instructions.
For your safety, assembly by
two
adults is recommended.
Remove all parts and hardware from box and lay out on a carpeted or scratch
-
fee work surface, as this will
avoid damaging any parts during assembly.
T
he shipping box provides and ideal work surface. Do not
dispose of any contents
until assembly is completed to avoid accidentally discarding email parts or
hardware.
U
se the parts and hardware lists to identify and separate each of the pieces included.
N
ote: do not fully tighten all bolts until all parts are in place.
F
ailure to foll
ow these instructions may cause
the bolts to
misalign
during assembly.
I
f using power tools to aid in assembly please use caution.
P
ower tools can damage hardware or split wood
.
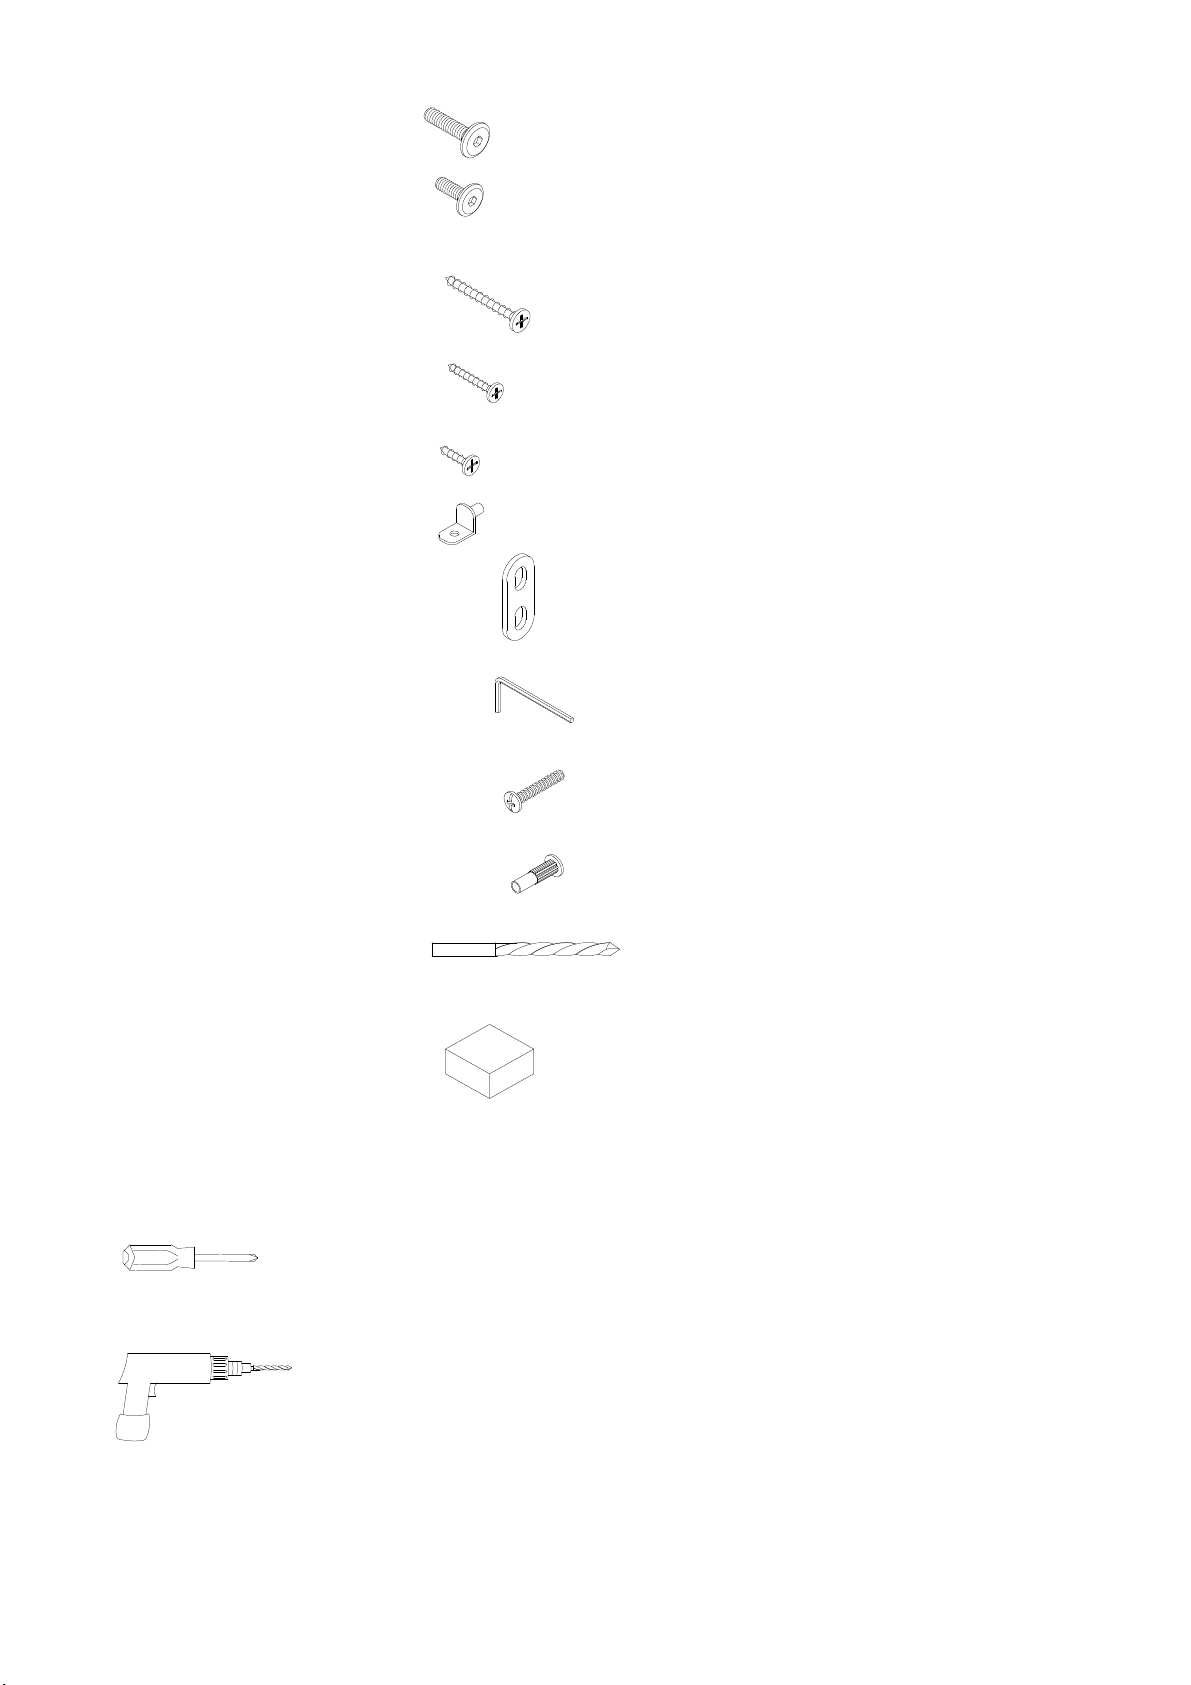
PARTS INCLUDED:
(A)
Toppanel(1)(B)
Leftsidepanel(1)(C)
Right
s
idepanel(1)(D)
Front
r
ail(1)(E) Upper
b
ackrail (1)
(F) Bottom
b
ackrail (1)
(G) B
ackp
anel (1)
(H) Hutch
s
helf (2)
Page 2
2
HARDWARE ENCLOSED:
(I)L
ongbolt 1/4
”
x15x25mm
(4)(J)Short bolt
1/4
”x15x13mm
(4)(K)Screw
8x30mm(6)(L) Screw 6
x19mm (22)
(M) Screw 6x15mm (8)
(N) Shelf
s
upport
5x13
x1.5mm (8)
(O)
Mounting
p
late
51x20x3mm
(2)(P)Allen
key4
x74x29mm
(1)(Q) Sleeve
s
crew 4x9.5x32mm (2)
(R)
Sleeve
nut4x9.5x28mm
(2)(S) 5x83mm Drill bit (1)
(T)
Wood
b
lock 50x50x19mm (1)
TOOLS REQUIRED FOR ASSEMBLY:
(1)
Phillips Head Screwdriver
,
not
included
(1)
Power
Drill,not included (note: hand drill may be used)
Page 3

3
ASSEMBLY INSTRUCTIONS:
1.
Fix the front rail (D)
,
Upper
b
ackrail
(E) and
Bottom
b
ackrail
(F) to the
Lefts
idepanel
(B) using Screw
8x30mm
(K) as shown.
2.
Repeat the same steps to
Right
s
idepanel(C)
.43.
Page 4

Insert
the
Toppanel (A) to the
L
eftsidepanel (B) and
R
ightsidepanel (
C)
using the
Long
b
olt
1/4”x15x25mm
(I) and Allen Key
as shown.
4.
Attach the
B
ackpanel (G) to
L
eft and
R
ight side panel using Screw 6
x19mm
(L) as shown.
5.Insert
two piece
s
Shelf
(H) to the
H
utch using Shelf support
5x13x1.5mm (N) an
d Screw 6x15mm (M)
as shown.
Page 5

5
6.
Carefully
raise the
H
utch and set onto the
t
op of the
B
ase,attach the
Mounting
p
late (
O
) using
4pcs
Short
b
olt
1/4
”x15x13mm
(J) as shown.
7.
Open the
d
oor of Base
c
abinet
.Attach the Drill Bit (
S
) to the Power Drill (not included). Drill to bore through the
partially
-
drilled holes on the
side panels of the
Base cabinet
and
Hutch
from the insides of the
p
ieces
.
Hold and
press the
W
ood block (
T
) on the opposite side of the ho
le being drilled to prevent
any breakage or dam
age
when
drilling.
Keep hands away from moving drill bit.
Drill (
4
) pre
-
drilled holes in the
Base cabinet
and2in
Hutch
.
Page 6

6
8.
Bring all the pieces together
. Align the pre
-
drilled h
oles on each piece.
F
ix the
H
utch
using
Sleeve screw
4x9.5x32mm
(Q)
and
Sleeve
Nut
4x9.5x28mm
(R
) as
shown. T
ighten the two pieces together.
R
epeat with
remaining
for the Base Cabinet
.Assembly is complete.
T
hank you for your purchase
.
stores | catalog | www.potterybarnkids.com
 Loading...