

Page 1

Page
1/3
CATALINA
EXTRA WIDE
CHANGING TABLE TOPPER
!
WARNING
:
FALL HAZARD
-
To prevent death or serious injury
from falls, always keep child within arm’s reach.
Read all instruction before use of the changing table. KEEP INSTRUCTION FOR
FUTURE USE.
Be
fore each use check the changing table for damage, loose parts or sharp edges. DO
NOT use the changing table if it is damaged or broken.
Set up this table to be level, stable, and structurally sound.
This changing table may be used with or without a pad. T
he only pad approved for
use with it is the Contour Changing Pad available for purchase from pottery barn kids.
This pad is designed to be used in a space of at least 810 mm x 400 mm (32 inches x
16 inches). If used, place it within the
rail-bounded changi
ng area of the changing
table.
NEVER LEAVE THE CHILD UNATTENDED and always use the restraining
system.
This Changing table is intended for use with children weighing up to
30
pounds.
Important Safety Message:
Use only vendor
-
supplied hardware to assemb
le. Using unauthorized hardware could
jeopardize the structural integrity of the item
PRE
-
ASSEMBLY:
Please read all instructions before beginning assembly.
For your safety and ease, assembly by two adults is recommended.
Remove all parts and hardware from
box and lay out on a carpeted or scratch
-
free work surface, as
this will avoid damaging any parts during assembly. The shipping box provides an ideal work
surface. Do not dispose of any contents until assembly is completed to avoid accidentally discarding
small parts or hardware.
Use the parts and hardware lists to identify and separate each of the pieces included.
Note: Do not fully tighten all bolts until all parts are in place. Failure to follow these instructions
may cause the bolts to misalign during
assembly.
The use of power tools for assembly is not recommended. Power tools can damage hardware or split
wood.
PARTS INCLUDED: HADRWARE ENCLOSED:
(A) Changing Table Topper
–
1 pc
(B) Mending Plate
–
2 pcs
(C) Bolt J
F
4 x 10
–
6 pcs
NOTE:
(D) Anti
–
Tip Kit
–1This Topper should be used in conjuction with
the Dresser (SOLD SEPARATELY)
NOTE:
Installation of A
nti Tip Kit is required. Please
Refer to separate page
for contruction.
TOOLS REQUIRED
:
Phillips Head Screwdriver (not included)
Than
k you for your purchase
Stores | catalog |
www.potterybarnkids.com
pottery barn
kids
Page 2
Page
2/3
A
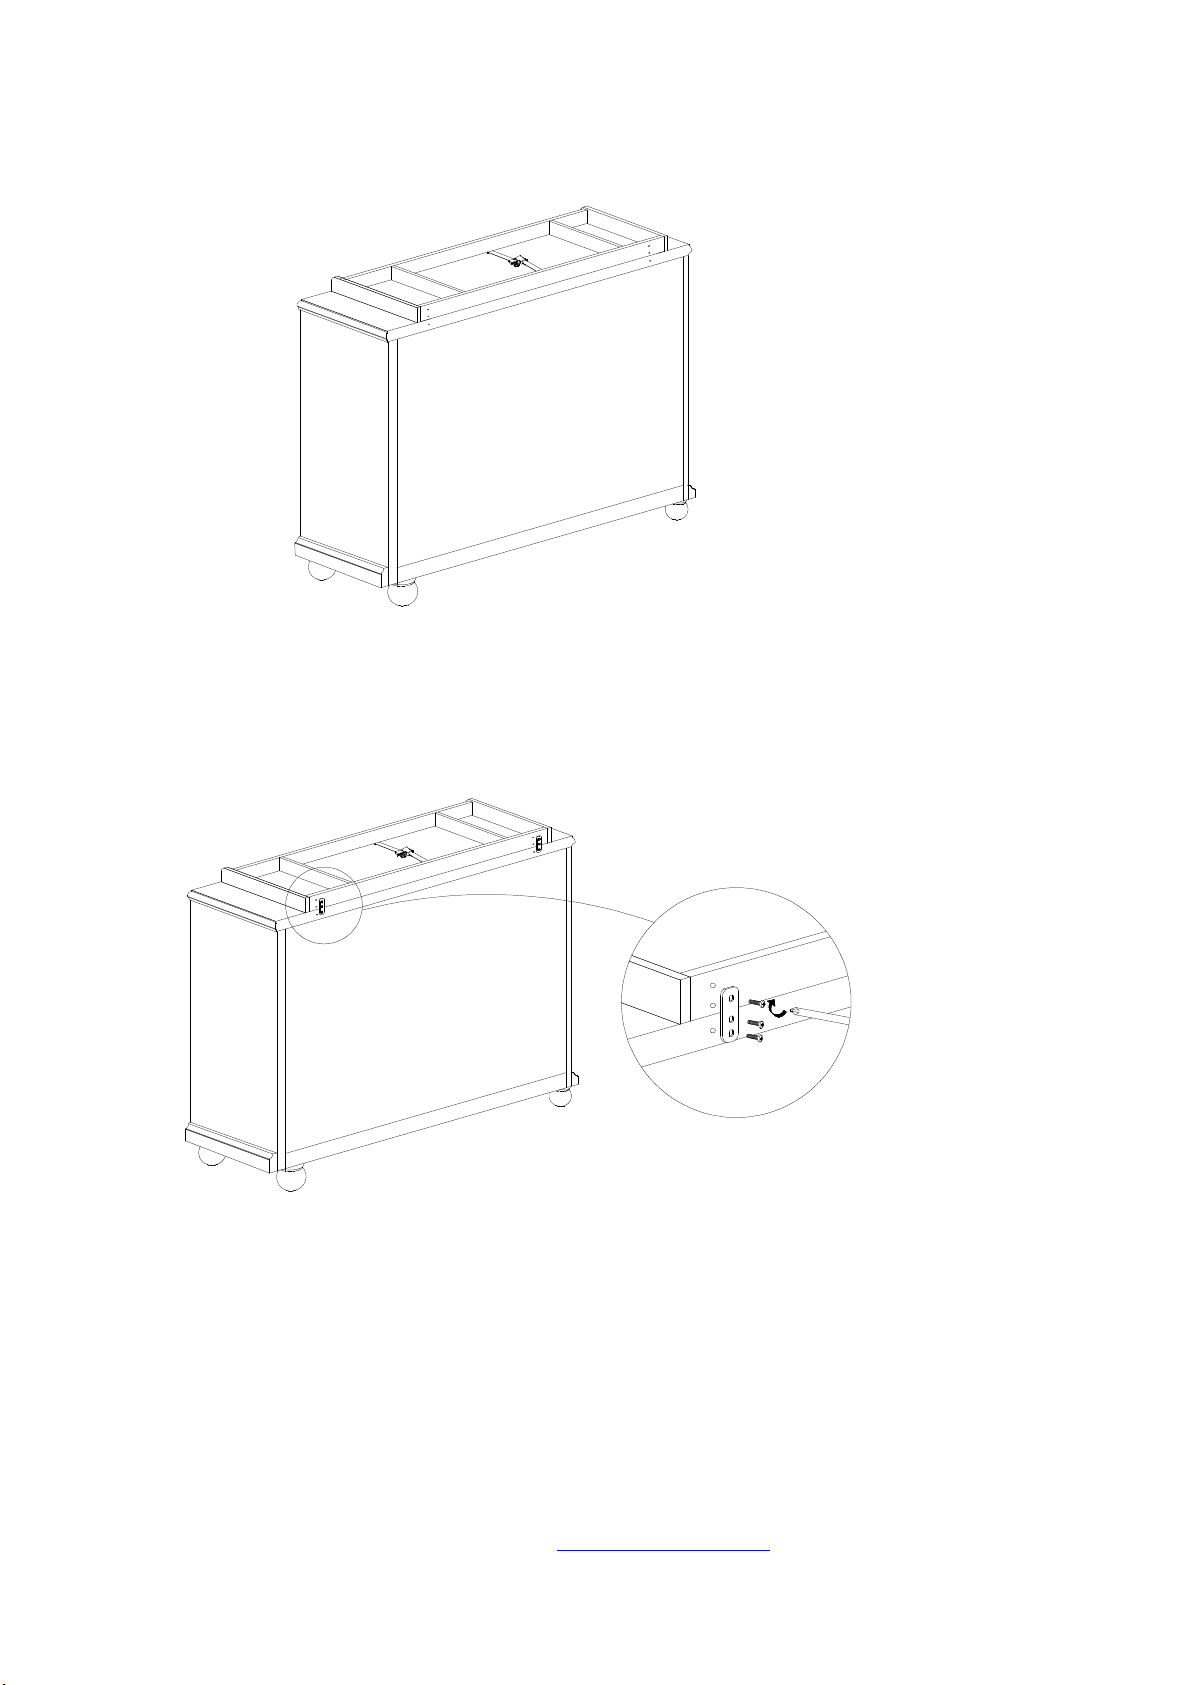
ssembly Instructions:
1.
Carefully place
the Changing Table Topper (A) on top of the
Catalina
Dresser (SOLD SEPARATELY),
taking care not to
scratch or otherwise damage the dresser top.
as shown in Figure 1.
2.Attach each of the manding plate (B) to the pre
-
drilled hole located on either side of back of the Topper and
Dresser. Fasten each manding plate wi
th (3) Bolt J
F
4x10 (D) using a philips head screwdriver (not included), as
shown in Figure 2.
3.
Please follow the separate instruction to secure the changing table to wall using tipping
-
restraint kit included.
4.
Assem
bly complete.
Thank you for your purchase
Stores | catalog |
www.potterybarnkids.com
B
Figure
2CFigure 1
A
Page 3

Page
3/3
RESTRAINING SYSTEM INSTRUCTION:
1.
Gently place baby onto table across restraining strap.
2.
Adjust the strap through
single bar slide so that it fit’s baby’s body.
3.
To fasten insert the buckle as shown in Figure 3.
4.
To release press inward on tabs as shown in Figure
4.
CARE INSTRUCTIONS:
Dust often using a clean, soft, dry lint
-
free cloth
.Blot spills immediately, and wipe with a clean, damp, cloth.
We do not recommend the use of chemical cleansers, abrasives, or furniture polish on our lacquered finish.
Parents should ensure a safe environment for the child by checking regularly, before p
lacing the child in the
product, that every component is properly and securely in place.
Thank you for your purchase
Stores | catalog |
www.potterybarnkids.com
Figure
3
Figure
4
 Loading...