

Page 1

It provides simple, straighorward instrucons for your TV service.
From how to use your Remote Control to Video On Demand, this guide will help you get the most out of
Should you have any quesons that aren’t answered here, simply call us at 405.997.5201.
your Interacve TV service quickly and easily.
Live Connecte d .
Page 2

Congratulations! And welcome to a whole new Interactive TV Experience.
A world of exciting choices awaits you with hundreds of channels, high-denition programming,
DVR service, Video On Demand and Media Sharing options.
To help you make the most of this experience and get you started quickly and easily, we have
developed this User Guide. It’s everything you ever wanted to know about your TV service with
easy, step-by-step instructions and tips.
If there is any way we can make your TV experience more enjoyable or answer any further questions,
please call us at 405.997.5201.
Page 3

Table of Contents
Functions of the Remote Control ...............................................................4
How to Navigate and Use the Menu Screen ........................................5
How to Use the Interactive Program Guide .........................................6
How to the Use the Program Info Screen .............................................7
How to Search for a Program .................................................................... 8
How to use DVR Services* ................................................................... 9-22
Controlling Live TV ........................................................................................9
How to Use Video On Demand ........................................................23-27
How to Use Parental Controls ..........................................................28-31
How to Customize Your Guide ............................................................... 32
How to Set Up a Favorite Channels List ........................................33-34
How to Change Your TV Settings .................................................... 35-36
Viewing Caller ID Information on your TV ......................................... 37
Programming the Remote Control ................................................38-39
Troubleshooting ......................................................................................... 40
Notice of Customer Rights and Information ..............................41-43
BLUE CAPS
refer to buttons on your remote control.
RED CAPS
refer to names on your TV screen.
Table of Contents
*You must subscribe to DVR service for this section.
3
Page 4
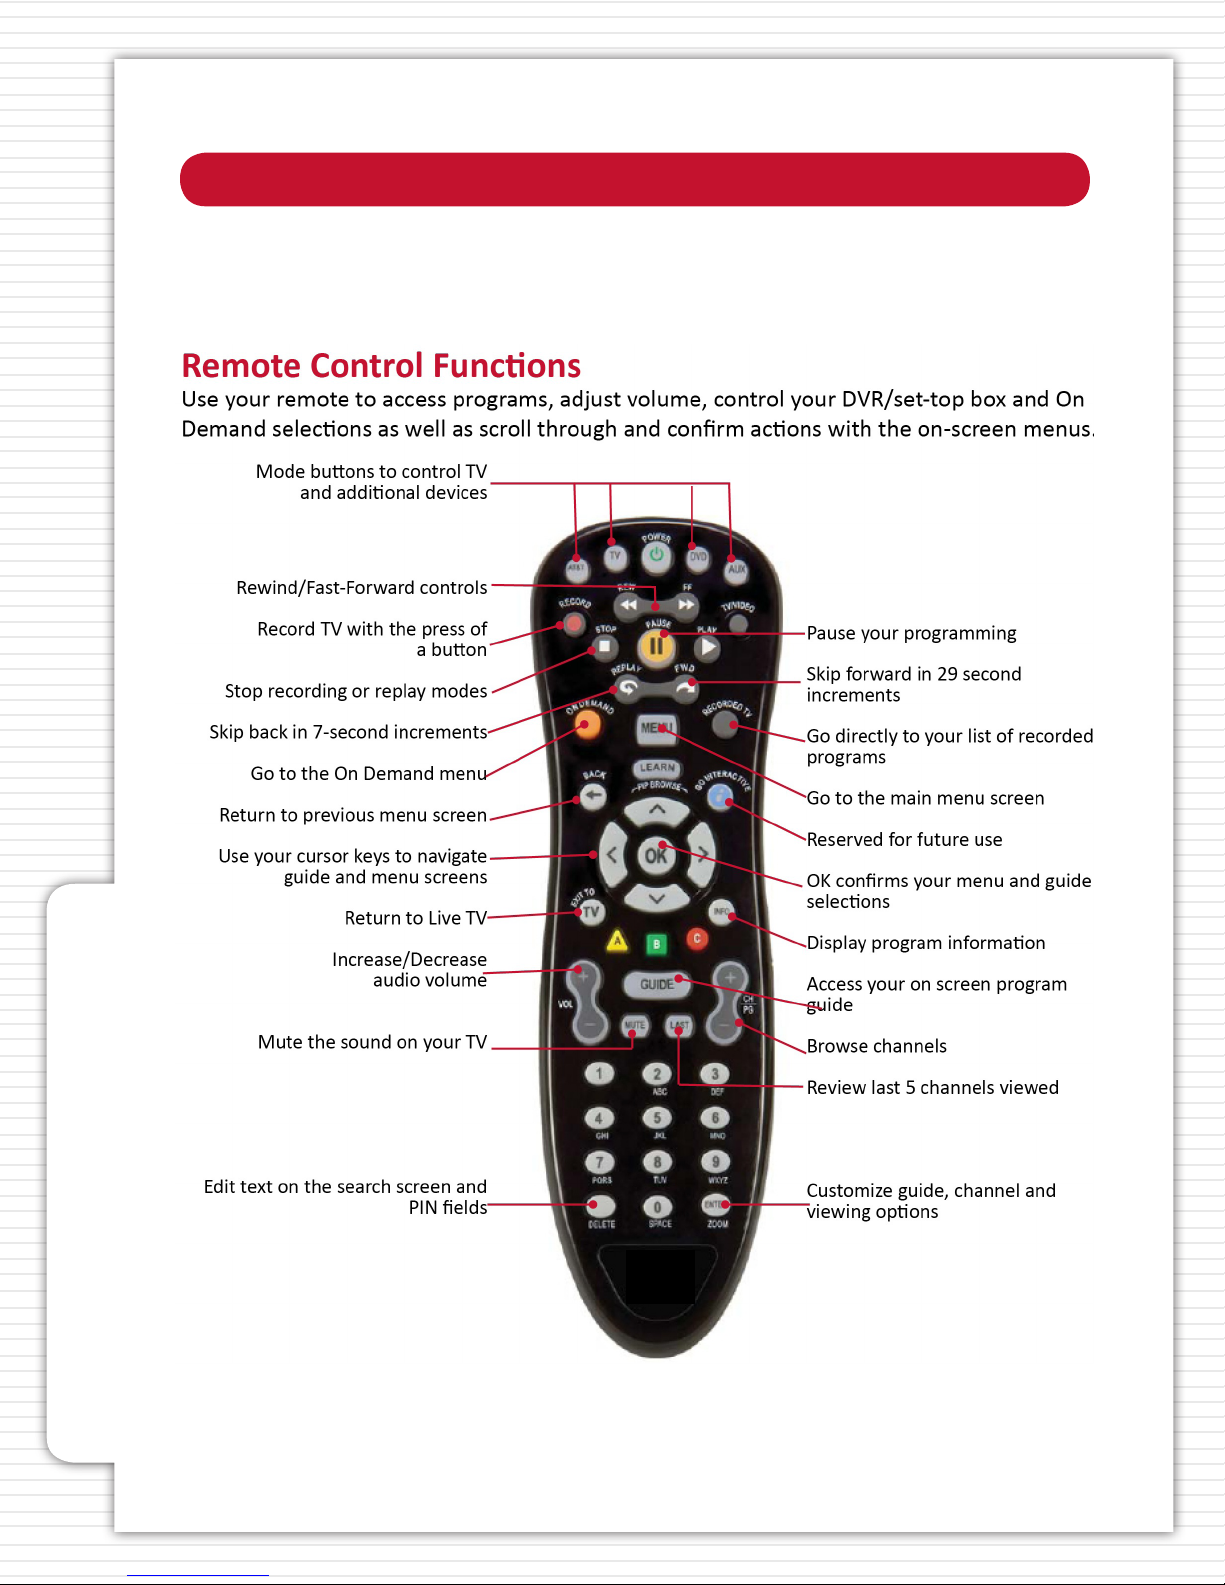
Your Remote Control
Your Remote Control
4
Page 5
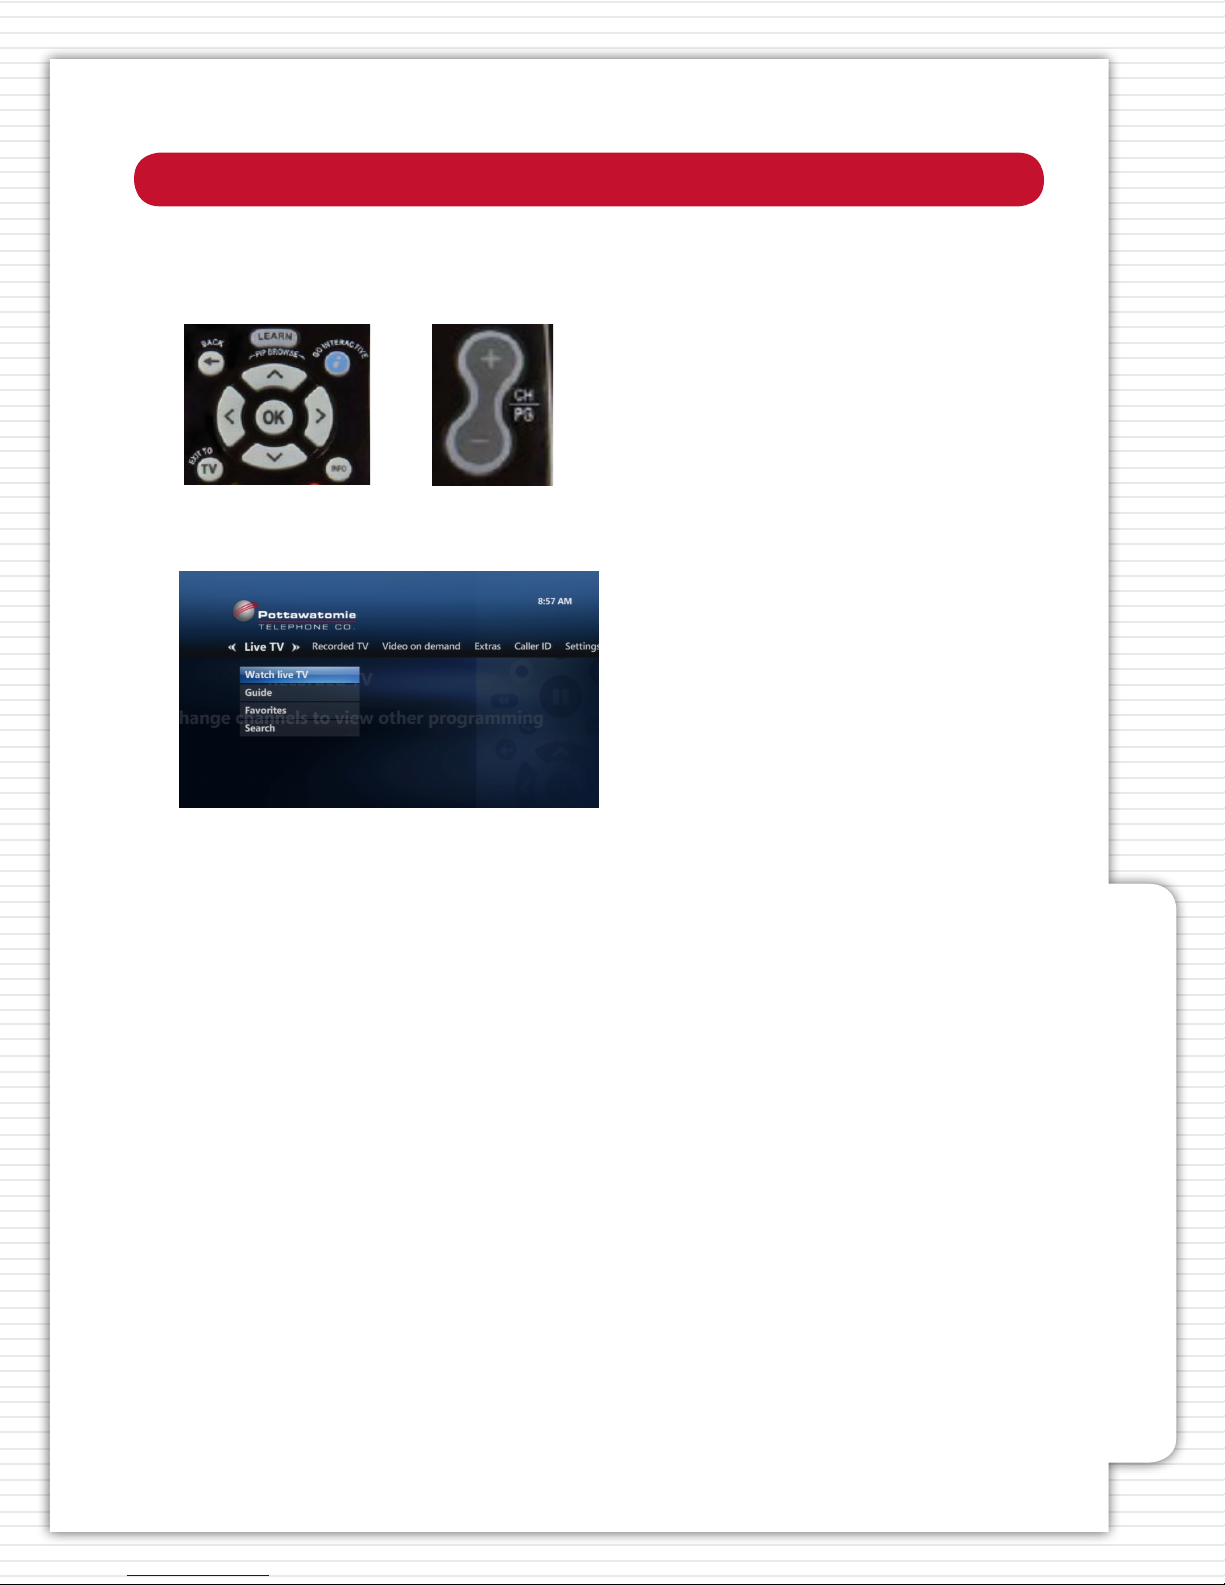
How to Navigate and Use the Menu Screens
Use the ARROW BUTTONS and/or the CH/PG buttons, then press OK on your remote control to
navigate through the menus and screens and select programs.
The Menu screen provides access to the features of your TV service.
1. Press MENU. The MENU SCREEN appears.
2. Press the RIGHT ARROW and LEFT ARROW buttons to highlight a heading, such as LIVE TV, on
the horizontal menu bar.
3. Press the UP ARROW and DOWN ARROW buttons to highlight an item, such as GUIDE, under
the heading.
4. Press OK to select the item.
5. Press BACK to return to the previous screen.
6. Press EXIT TO TV at any time to return to TV viewing.
How to Navigate and Use the Menu Screens
5
Page 6
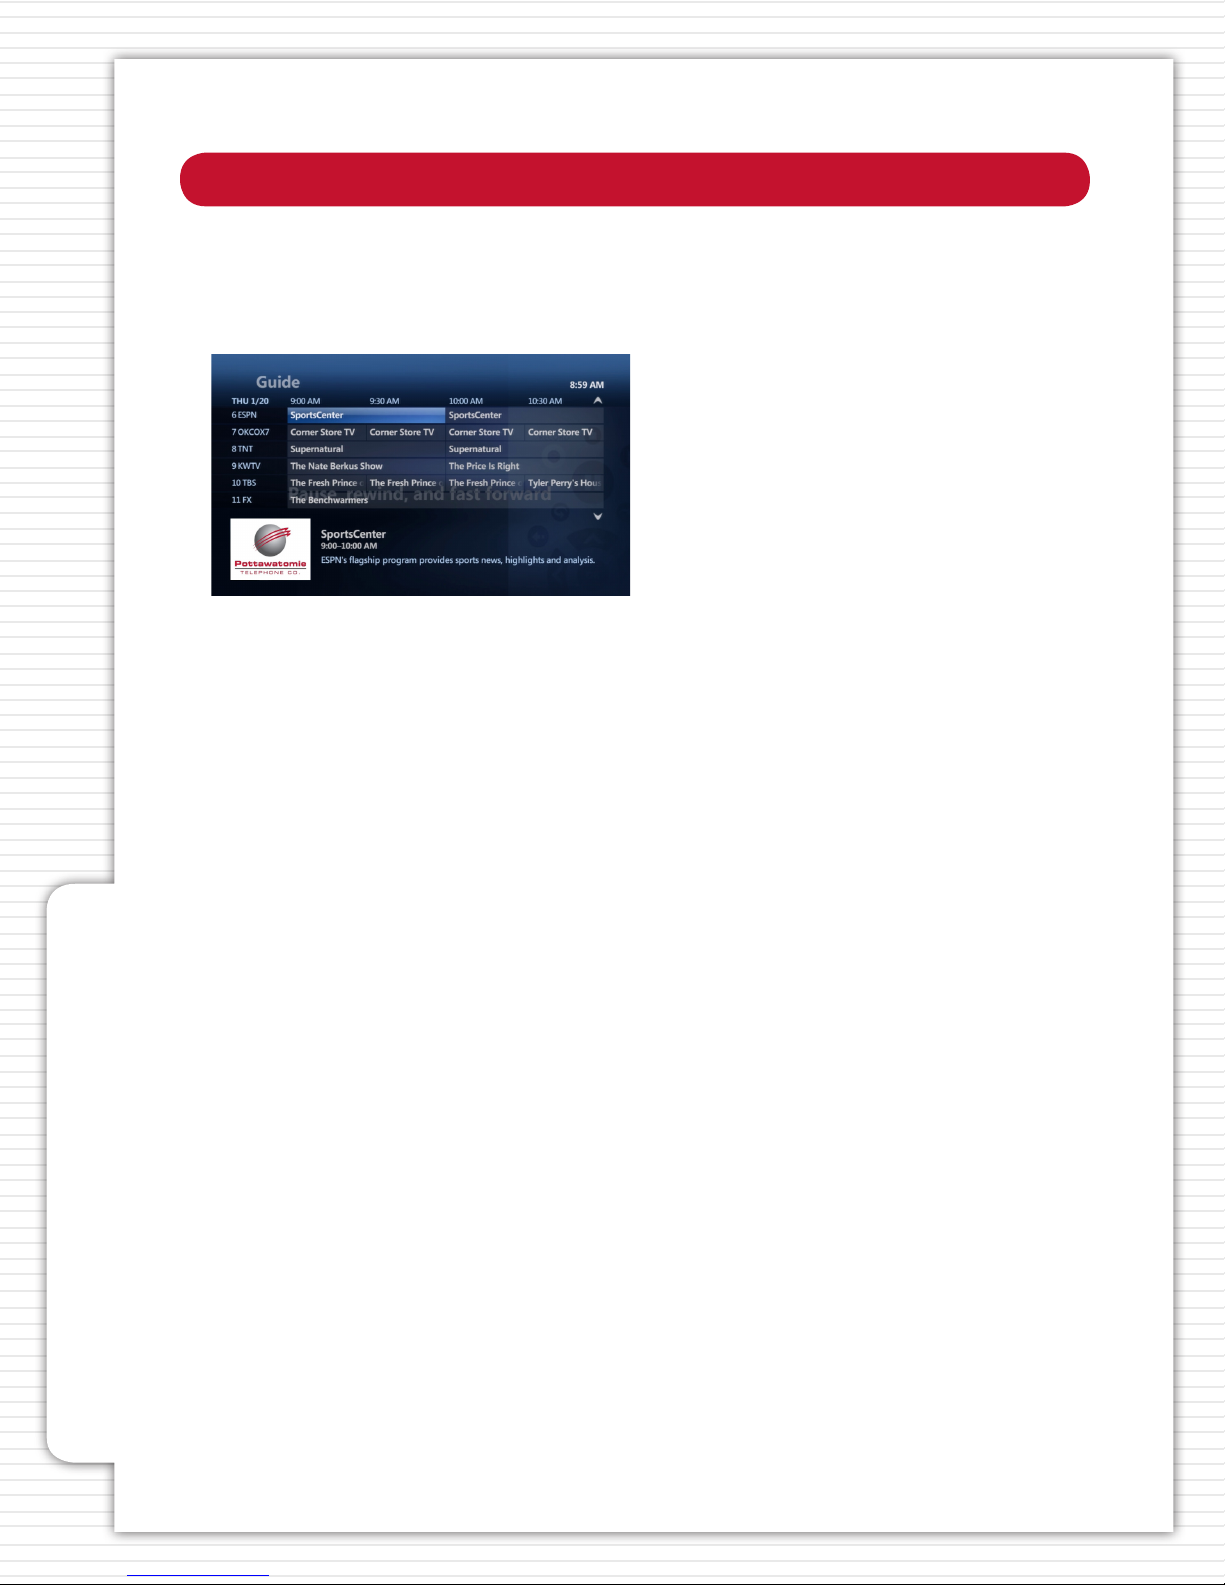
How to Use the Interacve Program Guide
THE INTERACTIVE PROGRAM GUIDE
The Interactive Program Guide, referred to simply as the ‘Guide,’ is easy to use and helps you
quickly nd your favorite shows.
1. Press GUIDE.
2. Press the UP ARROW and DOWN ARROW or CH/PG to scroll vertically through the Guide. You can
press the CH/PG button to go through a whole page of the Guide at a time.
3. Press the RIGHT ARROW and LEFT ARROW buttons to scroll horizontally through the Guide to
see what is playing at a later time.
How to Use the Interacve Program Guide
4. Highlight the program you want and press OK. If the program is currently available, it will begin
playing. If the program is on at a later time, a Program Info screen will appear with options to
choose from.
5. Press EXIT TO TV at any time to return to TV viewing.
6
Page 7
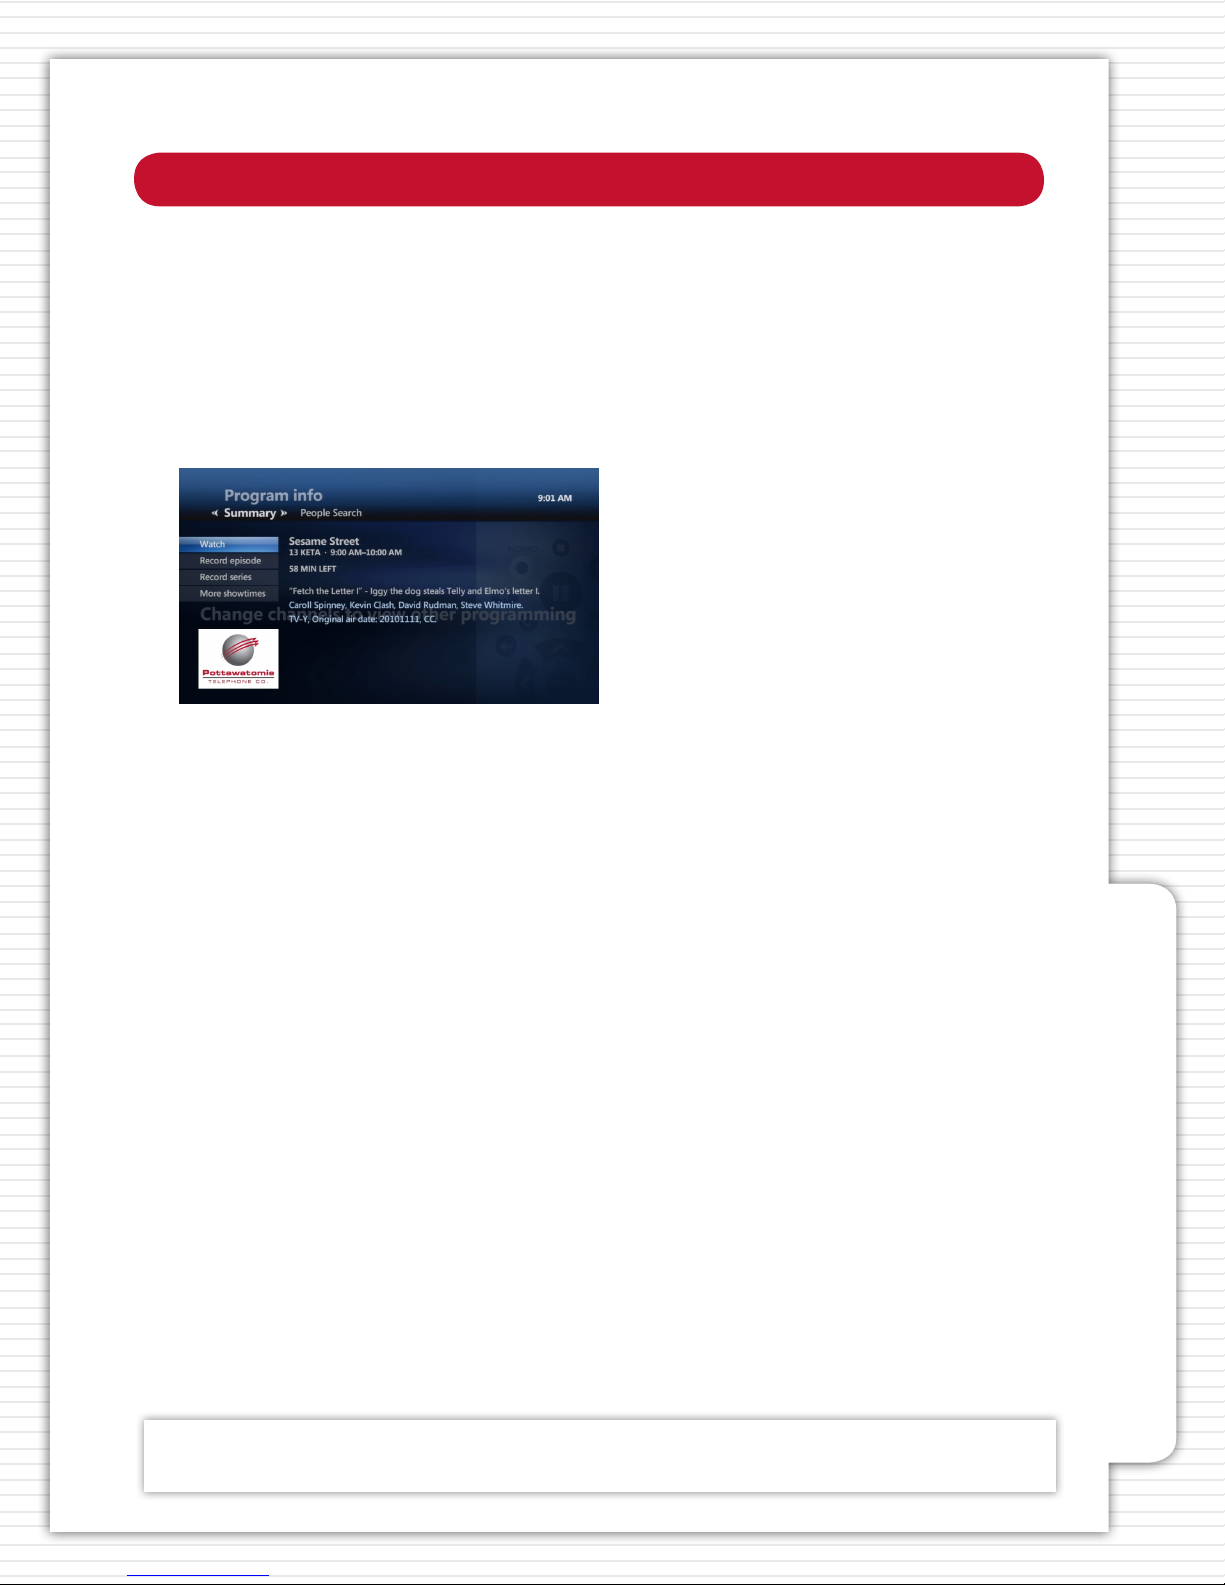
How to Use the Program Info Screen
The PROGRAM INFO SCREEN displays information about programs in the Guide, and provides
access to a variety of options related to the program.
1. Press GUIDE.
2. Press the UP ARROW and DOWN ARROW or CH/PG to highlight the program you’re interested in.
3. Press INFO and the PROGRAM INFO SCREEN appears.
4. Under the SUMMARY heading, highlight one of the following options and press OK:
• WATCH - To tune to the program if it is currently on.
• *RECORD EPISODE - To record the program. This option will only appear if you have DVR
service. See HOW TO USE DVR SERVICE for more information.
• *RECORD SERIES - To record the series for this program. This option will only appear if you have
DVR service. See HOW TO USE DVR SERVICE for more information.
• RENT - To rent the program. This option appears if you are in the Program Info screen for a
Video On Demand movie or Pay Per View event. See HOW TO USE VIDEO ON DEMAND for
more information.
5. Press the RIGHT ARROW button on the horizontal menu bar to view additional details of the
program. Use the UP ARROW and DOWN ARROW buttons and press OK to select additional
information.
QUICK TIP:
If you want to nd out more about the program you are currently watching, just press the INFO button on your remote
control, then EXIT TO TV to return to TV viewing.
*You must subscribe to DVR service for this section.
How to Use the Program Info Screen
7
Page 8
How to Search for a Program
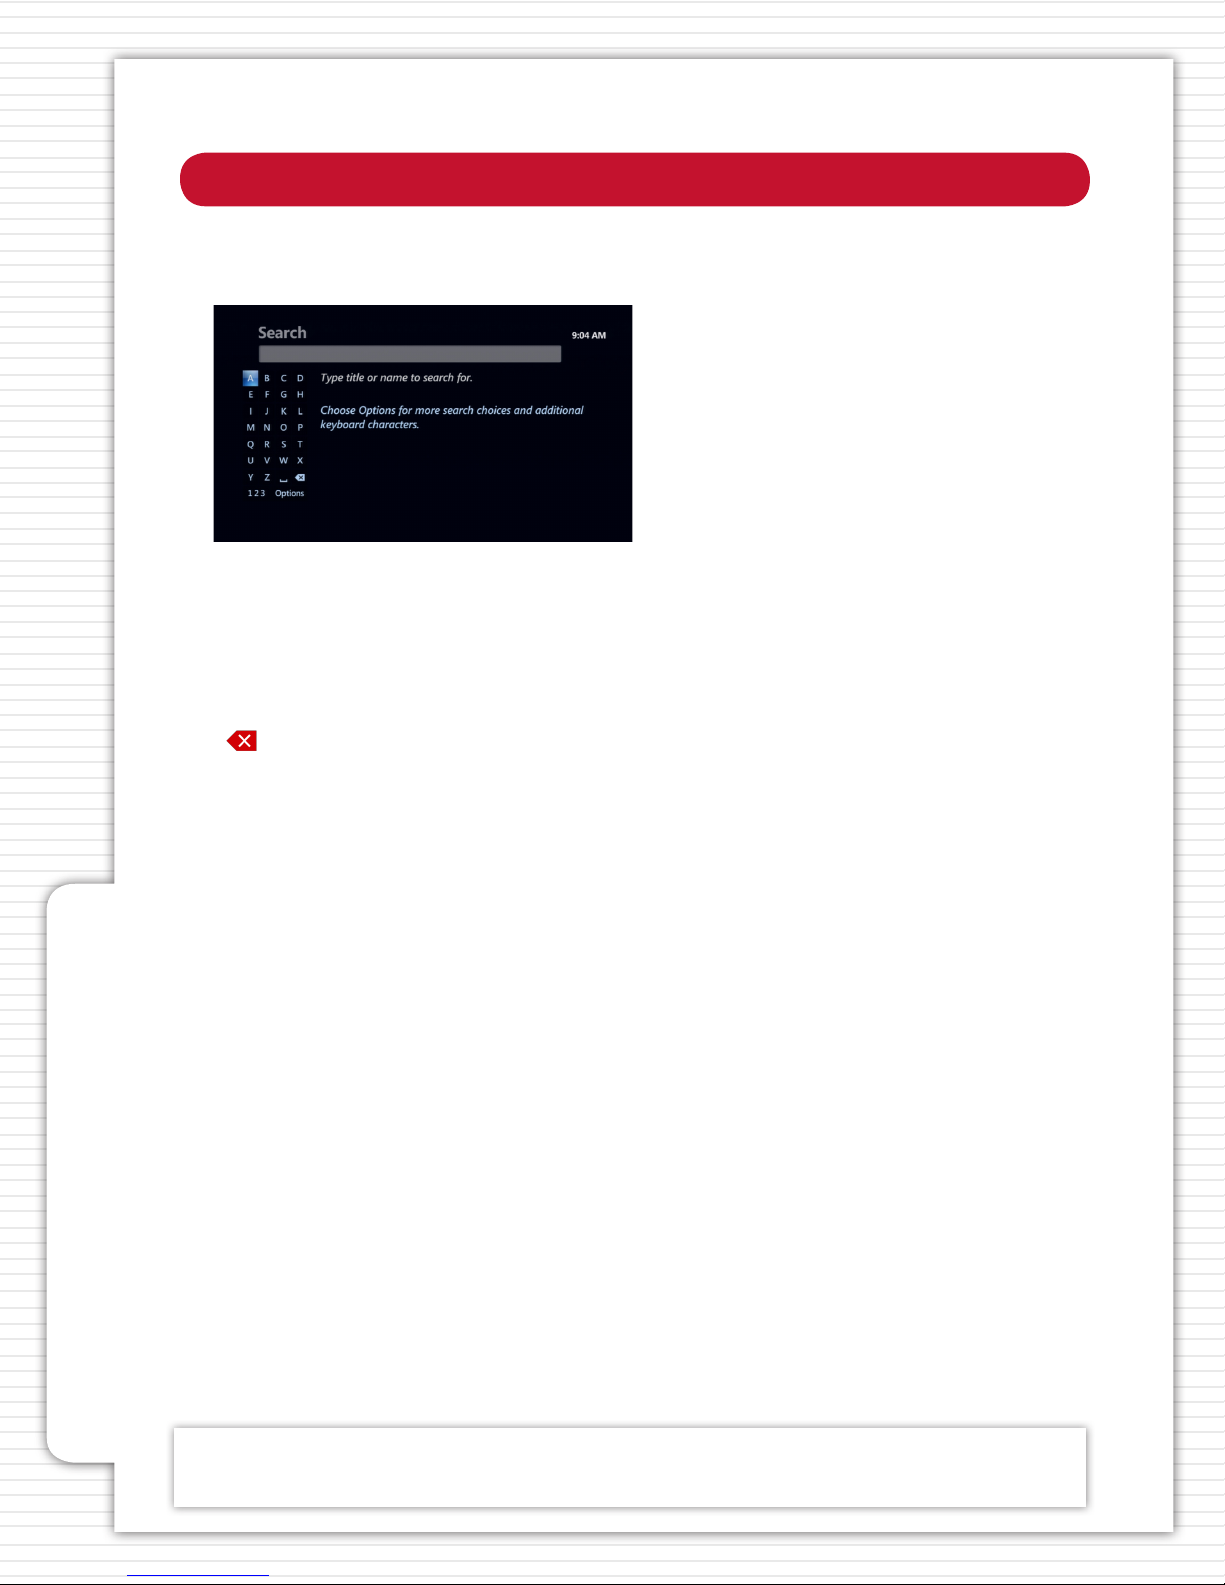
You can use the search function when you know the title of the program you want to watch, or the
name of the person, such as an actor or director, involved in the program.
1. Press MENU.
2. Under LIVE TV , highlight SEARCH, and press OK. These options appear on the SEARCH SCREEN:
• ALPHABETIC KEYPAD - Highlight and select the letters to search for the program or person you
are looking for.
• [____] To add a space in between words you are searching for.
• To delete a letter/number.
How to Search for a Program
• 123 To activate the numeric keypad to search by number.
• OPTIONS To narrow down your search by ltering your results.
3. To begin your search, use the ARROW BUTTONS to highlight the rst letter or number you are
searching for, then press OK. On the right hand side of your screen, a list of programs or names
that contain the letter you entered will appear (rst letter of a word).
4. To narrow down your search, continue to enter letters/numbers as in step 3. Or, highlight
OPTIONS and press OK. You can lter your results in the following ways:
• ALL RESULTS - Displays people, program titles, and Video On Demand programs that match the
search text.
• TITLES - Displays program titles and Video On Demand programs that match the search text.
• VIDEO ON DEMAND - Displays only Video On Demand programs that match the search text.
• PEOPLE - Displays only people who match the search text.
5. Once you see the title of the program or name in the box on the right, use the ARROW BUTTONS
to highlight it, then press OK.
• If you select a program title, details of the program will appear. To watch a program currently
on, highlight the program and press OK. To schedule a recording of the program, see HOW TO
USE DVR SERVICE.
• If you select a person’s name, programs featuring that person will appear. To watch a program
currently on, highlight the program and press OK. To schedule a recording of the program, see
HOW TO USE DVR SERVICE.
6. Press EXIT TO TV at any time to return to TV viewing.
QUICK TIPS:
A quick way to access search options is to press the ENTER/ZOOM button on your remote while the search menu is open.
8
Page 9
How to Use DVR Service*
With DVR Service (Digital Video Recording), you can control live TV and recorded programs.
LIVE TV
Only available on the main DVR Set-Top Box
If you subscribe to DVR, your DVR will create a temporary recording of the channel you are
watching. This feature is called a “buer”. Your DVR will buer up to 1.5 hours of programming and
will continue until you either:
(1) switch to another channel (at which time it will begin buering the program you just tuned to
and remove the previous program stored in the buer) or
(2) turn o your set-top box (the buer is then cleared).
You can control Live TV using the same control buttons that you use to pause, fast-forward, and
rewind Video On Demand.
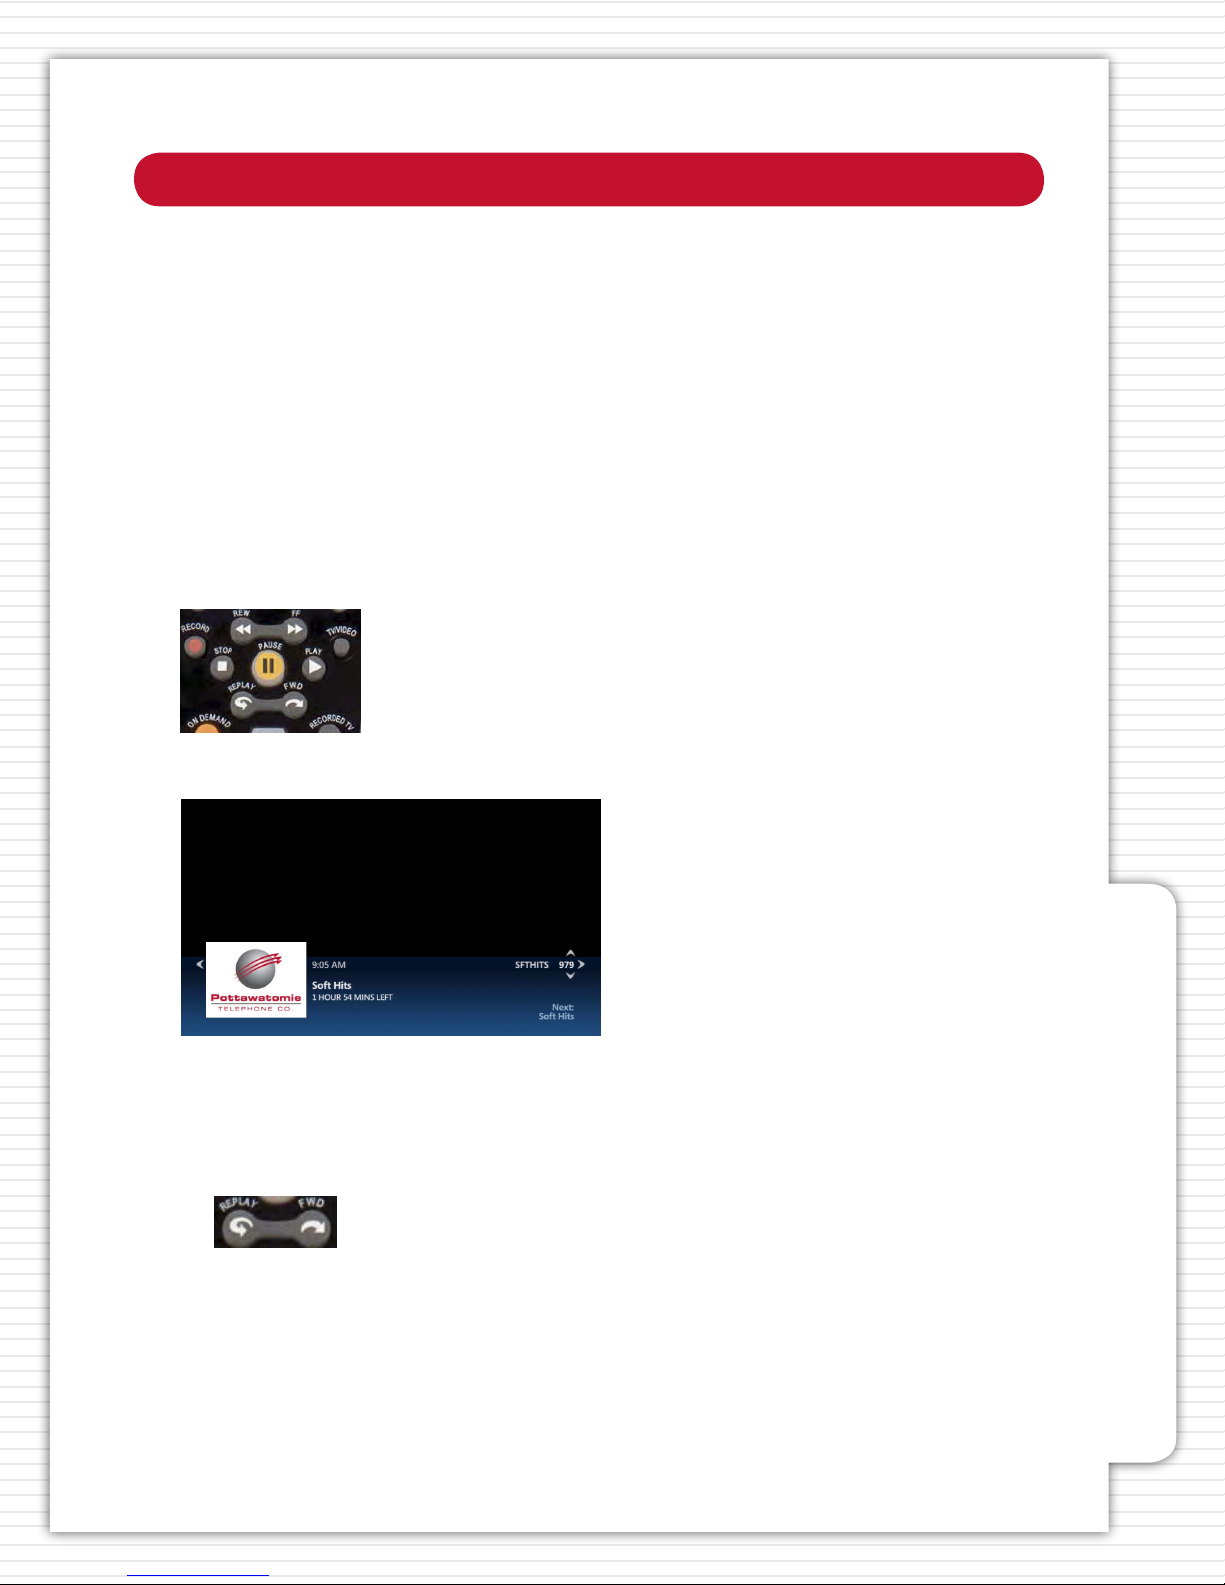
While watching a Live TV program, your actions are shown on a status bar at the bottom of your
screen.
Live TV Options
• Pause a Live Program: Press PAUSE to freeze the program. Press PLAY to resume watching at
normal speed.
• Rewind or Fast-Forward a Live Program: Press REW or FF up to three times to increase the speed. Or
use the REPLAY and FWD buttons to jump forward and back in short segments.
• The status bar at the bottom of your screen will indicate where you are in the program. You
can only Fast-Forward up to the point of the Live TV program. Press PLAY to resume watching
at normal speed.
• Catch up to the Live TV Program: When you pause or rewind a Live TV program, you can return to
the point of Live programming at any time by pressing the FWD button on your remote control.
How to Use DVR Service
6. Press PLAY at any time to bring up the status bar.
*You must subscribe to DVR service for this section.
9
Page 10
How to Use DVR Service*
WHOLE HOME DVR
If you have more than one set-top box in your home, you can record and watch your programs on
any set-top box, enabling the freedom to view and record television in any room of your home.
While watching a recorded program on any set-top box, you can pause, stop, rewind, and fastforward the recording. Whole Home DVR allows to you watch any recorded programming, on any
set-top box, in the home network.
RECORDING SINGLE TV PROGRAMS
With DVR service, you can record current shows, schedule future shows to be recorded, and watch
the recorded shows at any time. You can record an individual show or a series of episodes that
occur at regular intervals.
RECORDING A SINGLE PROGRAM YOU ARE CURRENTLY WATCHING
While watching Live TV, you can record the program you are watching until its scheduled end time,
or add extra time at the end to ensure that the whole program records.
1. Press RECORD. The message “Recording” appears briey on the screen. The Record light on your
set-top box lights up and remains on while the program is recording.
To control when the recording ends:
How to Use DVR Service
1. Press INFO.
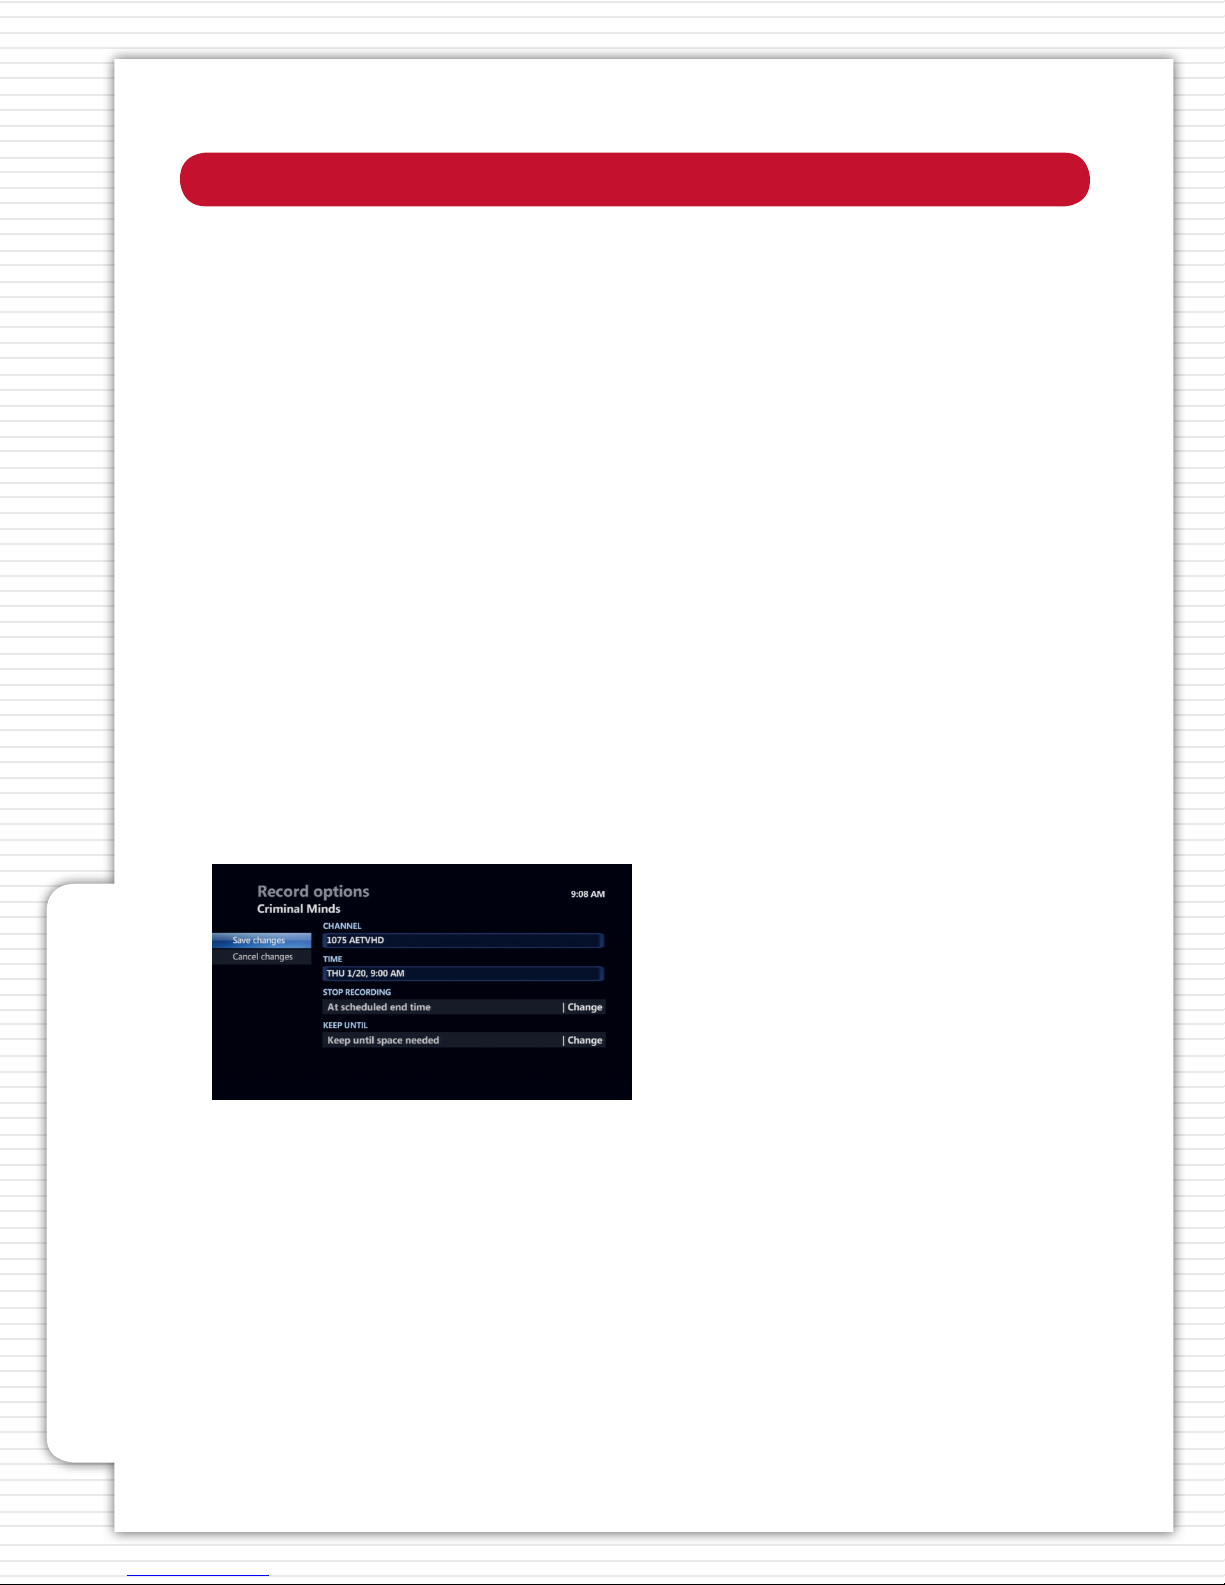
2. Highlight RECORD OPTIONS, and press OK. The RECORD OPTIONS SCREEN appears.
3. Highlight the text under STOP RECORDING, and press OK.
4. Highlight one of the following options and press OK:
• At scheduled time
• 5 minutes after
• 15 minutes after
• 30 minutes after
• 1 hour after
• 2 hours after
• 3 hours after
Or highlight CANCEL CHANGES and press OK to keep your current setting.
5. Highlight SAVE CHANGES, and press OK.
10
*You must subscribe to DVR service for this section.
Page 11

How to Use DVR Service*
CHANGING HOW LONG THE RECORDING WILL BE STORED
1. Press RECORDED TV.
2. Press the RIGHT ARROW button to highlight BY DATE or BY TITLE, and press OK.
3. Highlight the program you want, and press OK.
4. Highlight the text under KEEP UNTIL, and press OK.
5. Highlight one of the following options, and press OK:
• SPACE NEEDED - Automatically erases the program when space is needed for a new recording.
• ERASE - Stores the program until you choose to erase it.
• DON’T CHANGE - Choose this option and press OK to keep your current setting.
STOPPING THE RECORDING OF THE PROGRAM YOU ARE WATCHING
1. Press STOP while watching a Live TV program. A message appears to enable you to stop or continue
recording.
2. Highlight STOP RECORDING, and press OK. The message RECORDING STOPPED appears.
Or, highlight KEEP RECORDING, and press OK.
DETERMINING IF THE PROGRAM YOU ARE WATCHING IS RECORDING
There are several ways to determine whether a program, that is currently playing, is recording.
• Press the INFO button. The program will have a red dot beside the program if it is recording.
• Or, press GUIDE. Programs that are recording will have a red dot beside them.
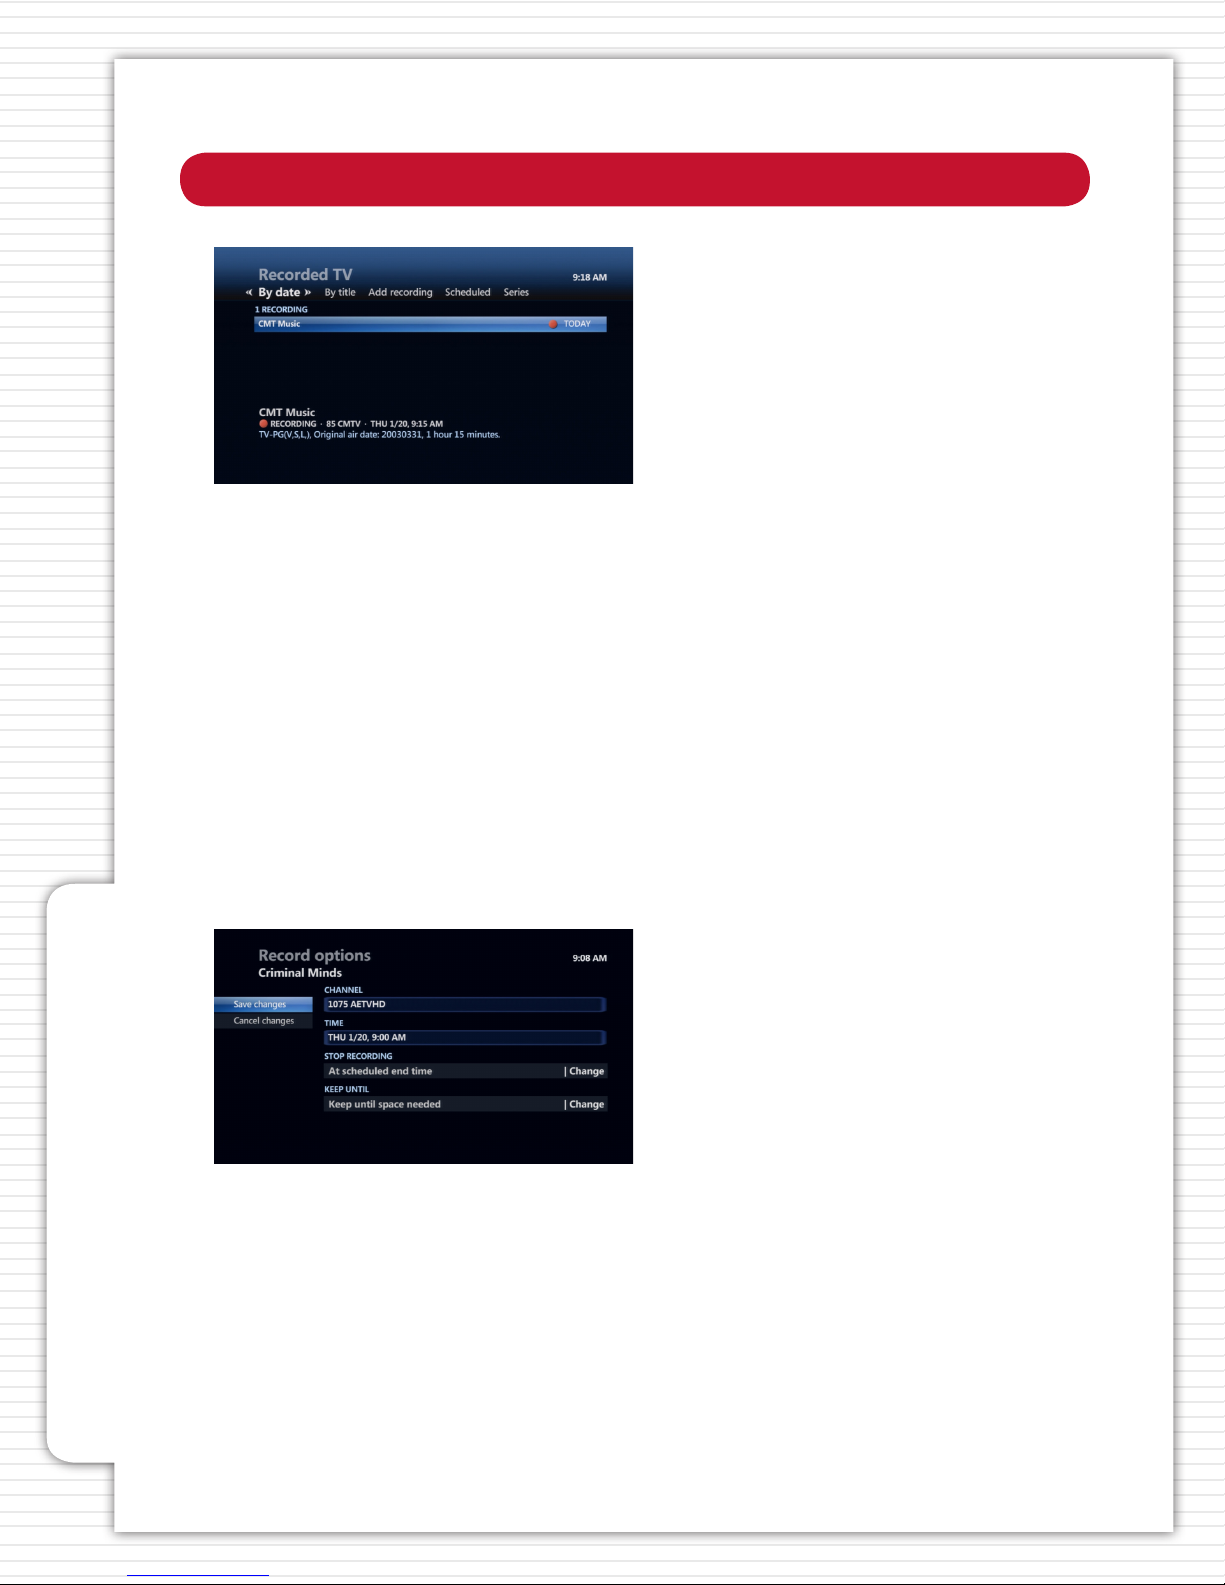
• Or, press RECORDED TV. The RECORDED TV SCREEN displays the title of a recorded program as
soon as it begins recording, with a red dot beside the title.
How to Use DVR Service
QUICK TIP:
Pressing the RECORD button twice while highlighting a program in the guide schedules a Series Recording. Three
overlapping dots will appear. See HOW TO RECORD A SERIES for more information.
*You must subscribe to DVR service for this section.
11
Page 12
How to Use DVR Service*
• Or, look at the record light on the set-top box. If the red light is on, the DVR is recording a
channel. However, this does not mean it is recording the channel you are currently watching.
RECORDING A SINGLE PROGRAM USING THE GUIDE
You can use the Guide to schedule a recording of a program that is currently showing or one that
will be shown in the future.
1. Press GUIDE.
2. Use the ARROW BUTTONS or CH/PG to highlight a program that you want to record.
12
3. Press RECORD. A red dot will appear by the program to indicate the program is now scheduled
to record.
To control when the recording ends:
1. Press INFO.
2. Highlight RECORD OPTIONS, and press OK. The RECORD OPTIONS SCREEN appears.
How to Use DVR Service
3. Highlight the text under STOP RECORDING, and press OK.
4. Highlight one of the following options and press OK:
• At scheduled time
• 5 minutes after
• 15 minutes after
• 30 minutes after
• 1 hour after
• 2 hours after
• 3 hours after
Or highlight CANCEL CHANGES and press OK to keep your current setting.
5. Highlight SAVE CHANGES, and press OK. A RECORDING SCHEDULED message appears briey on your
screen.
*You must subscribe to DVR service for this section.
Page 13
How to Use DVR Service*
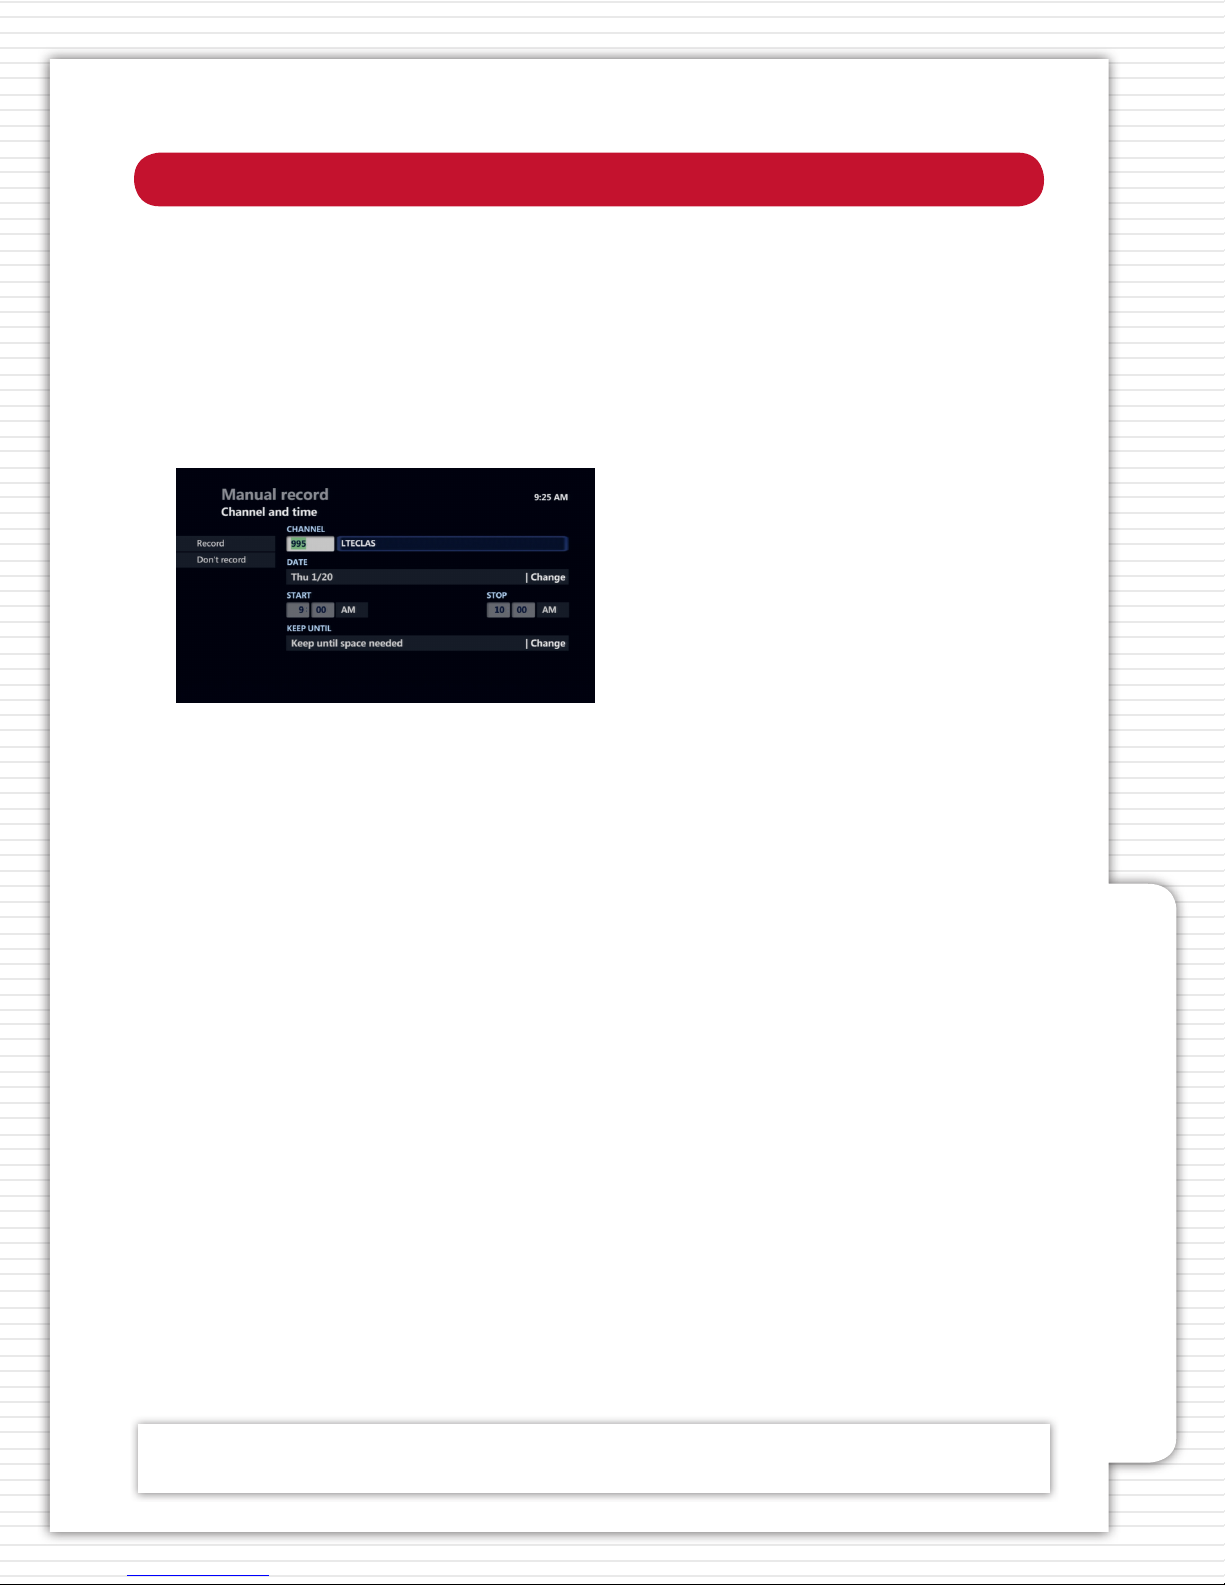
RECORDING A SINGLE PROGRAM BY CHANNEL, DATE, AND TIME
You can schedule a recording manually by specifying the channel, date, time, and duration. You
can only schedule single recordings of single programs using this screen, not a series.
1. Press RECORDED TV.
2. Press the RIGHT ARROW button to highlight ADD RECORDING.
3. Highlight CHANNEL and TIME, and press OK. The MANUAL RECORD SCREEN appears.
4. Highlight the TEXT ENTRY BOX under CHANNEL. Use the NUMERIC KEYPAD on your remote
to enter the channel you want to record.
5. Highlight the TEXT ENTRY BOX under DATE, and press OK. Highlight the DATE you want,
press OK.
6. Highlight the TEXT ENTRY BOX under START. Use the NUMERIC KEYPAD on your remote to enter
the time you want the recording to start. Press OK to change to AM or PM.
7. Highlight the TEXT ENTRY BOX under STOP. Use the NUMERIC KEYPAD on your remote to enter
the time you want the recording to end. Press OK to change to AM or PM.
8. To change how long you want to keep the recording, highlight the text under KEEP UNTIL, and
press OK. You can select one of the following options:
• SPACE NEEDED - Automatically erases the program when space is needed for a new recording.
• ERASE - Stores the program until you choose to erase it.
9. Highlight the setting you prefer and press OK. Or, highlight DON’T CHANGE and press OK to
keep your current setting.
10. To activate your settings, highlight RECORD, and press OK. Or, highlight DON’T RECORD and
press OK to choose not to record.
How to Use DVR Service
QUICK TIP:
When you schedule a program to be recorded, the recording completes even if your TV and set-top box are o. This
applies to both scheduled recordings, as well as when you press the RECORD button while watching Live TV.
*You must subscribe to DVR service for this section.
13
Page 14
How to Use DVR Service*
HOW TO RECORD A SERIES
DVR service also allows you to record recurring programs, such as episodes in a series. Once
scheduled, a series recording occurs until cancelled.
1. Press GUIDE.
2. Use the ARROW BUTTONS or CH/PG to highlight the program you want to record.
3. Press RECORD twice. A red dot appears on the rst press, and three overlapping dots appear on
the second press. This indicates that a series is set to record. Your DVR service will now record that
program at the same time on the same day each week for the time shown in the Guide.
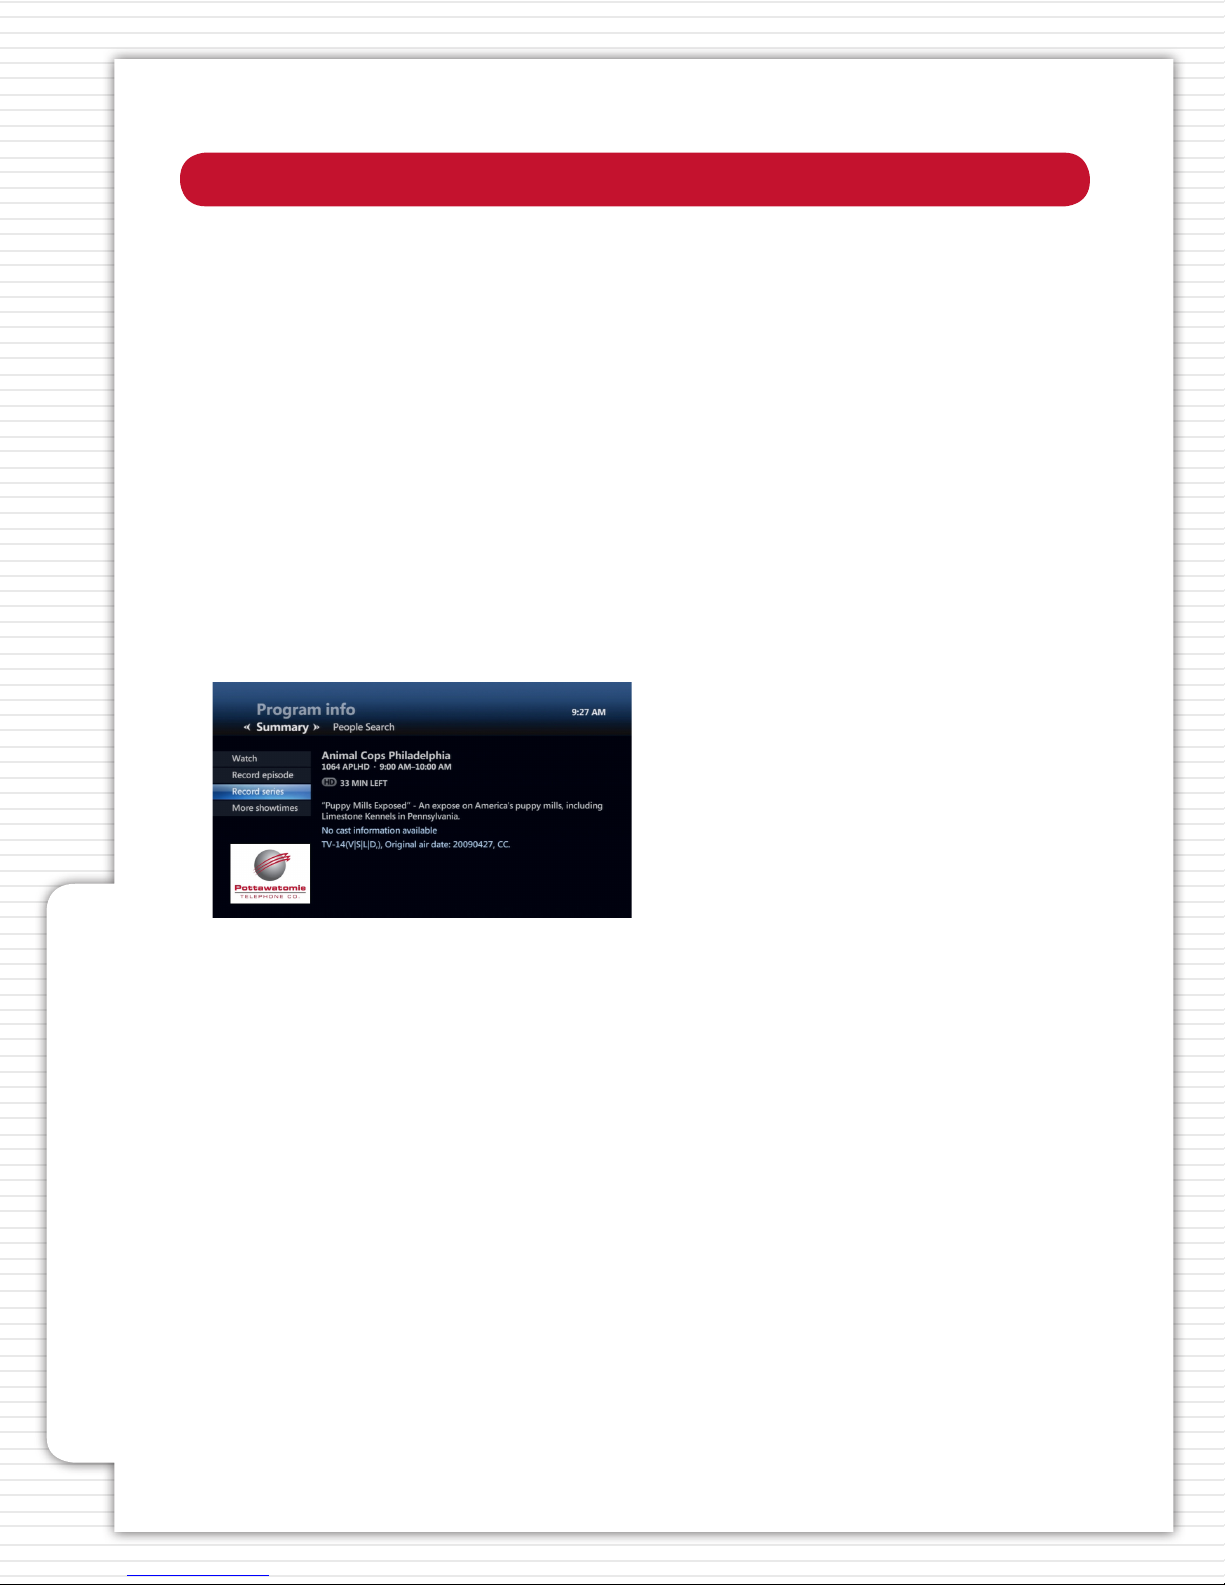
RECORDING A SERIES USING THE PROGRAM INFO SCREEN
1. Press GUIDE.
2. Use the ARROW BUTTONS or CH/PG to highlight the program you want to record.
3. Press INFO. The PROGRAM INFO SCREEN appears.
14
How to Use DVR Service
4. On the PROGRAM INFO SCREEN, highlight RECORD SERIES, and press OK. The RECORD SERIES
SCREEN appears.
5. To change the time of recording, highlight the TEXT UNDER TIME, and press OK. Highlight one of
the following options and press OK:
• ANY DAY, AROUND XX:XX AM/PM - Records programs any day of the week, as long as they
occur at or near the same time as the selected episode.
• ANY DAY, ANY TIME - Records programs any day of the week at any time.
• ANY DAY, ANY TIME, ONCE PER DAY - Records programs any day and time, but records only one
episode per day.
You can also select DON’T CHANGE to keep current settings.
6. To change the type of recording, highlight the text under SHOW TYPE, and press OK. Highlight
one of the following options, and press OK:
• FIRST RUN and RERUN - Records rst-run and all subsequent reruns of this program.
• FIRST RUN ONLY - Records rst-run episodes, but will not record reruns.
*You must subscribe to DVR service for this section.
Page 15

How to Use DVR Service*
RECORDING A SERIES, CONTINUED
7. To add extra time to ensure that you record each entire episode, highlight the text under STOP
RECORDING and press OK:
• At scheduled time
• 5 minutes after
• 15 minutes after
• 30 minutes after
• 1 hour after
• 2 hours after
• 3 hours after
Or highlight DON’T CHANGE and press OK to keep your current setting.
8. To activate your settings, highlight RECORD, and press OK.
CANCELING SCHEDULED RECORDINGS
The easiest way to cancel a single or series recording is by using the Guide. Individually scheduled
recordings are marked by a red dot, and series recordings are marked by three overlapping dots.
1. Press GUIDE.
2. Use the ARROW BUTTONS or CH/PG to highlight the program you want to cancel recording.
3. If the program is an individually scheduled recording (shown by a single red dot), press RECORD
twice. The rst press changes the program to a series recording (three overlapping dots), and
the second press cancels the recording (the dots disappear). A RECORDING CANCELED message
appears on the screen.
4. If the program is a series recording (three overlapping dots), press RECORD once. This cancels
the entire series recording, and the dots disappear from the Guide. A RECORDING CANCELED
message appears on the screen.
RESOLVING RECORDING CONFLICTS
Your set-top box can record a limited number of programs at a time. Recording conicts occur
when you try to schedule more than the allowable recordings at a time. The next section will
detail how to resolve recording conicts.
How to Use DVR Service
*You must subscribe to DVR service for this section.
15
Page 16
How to Use DVR Service*
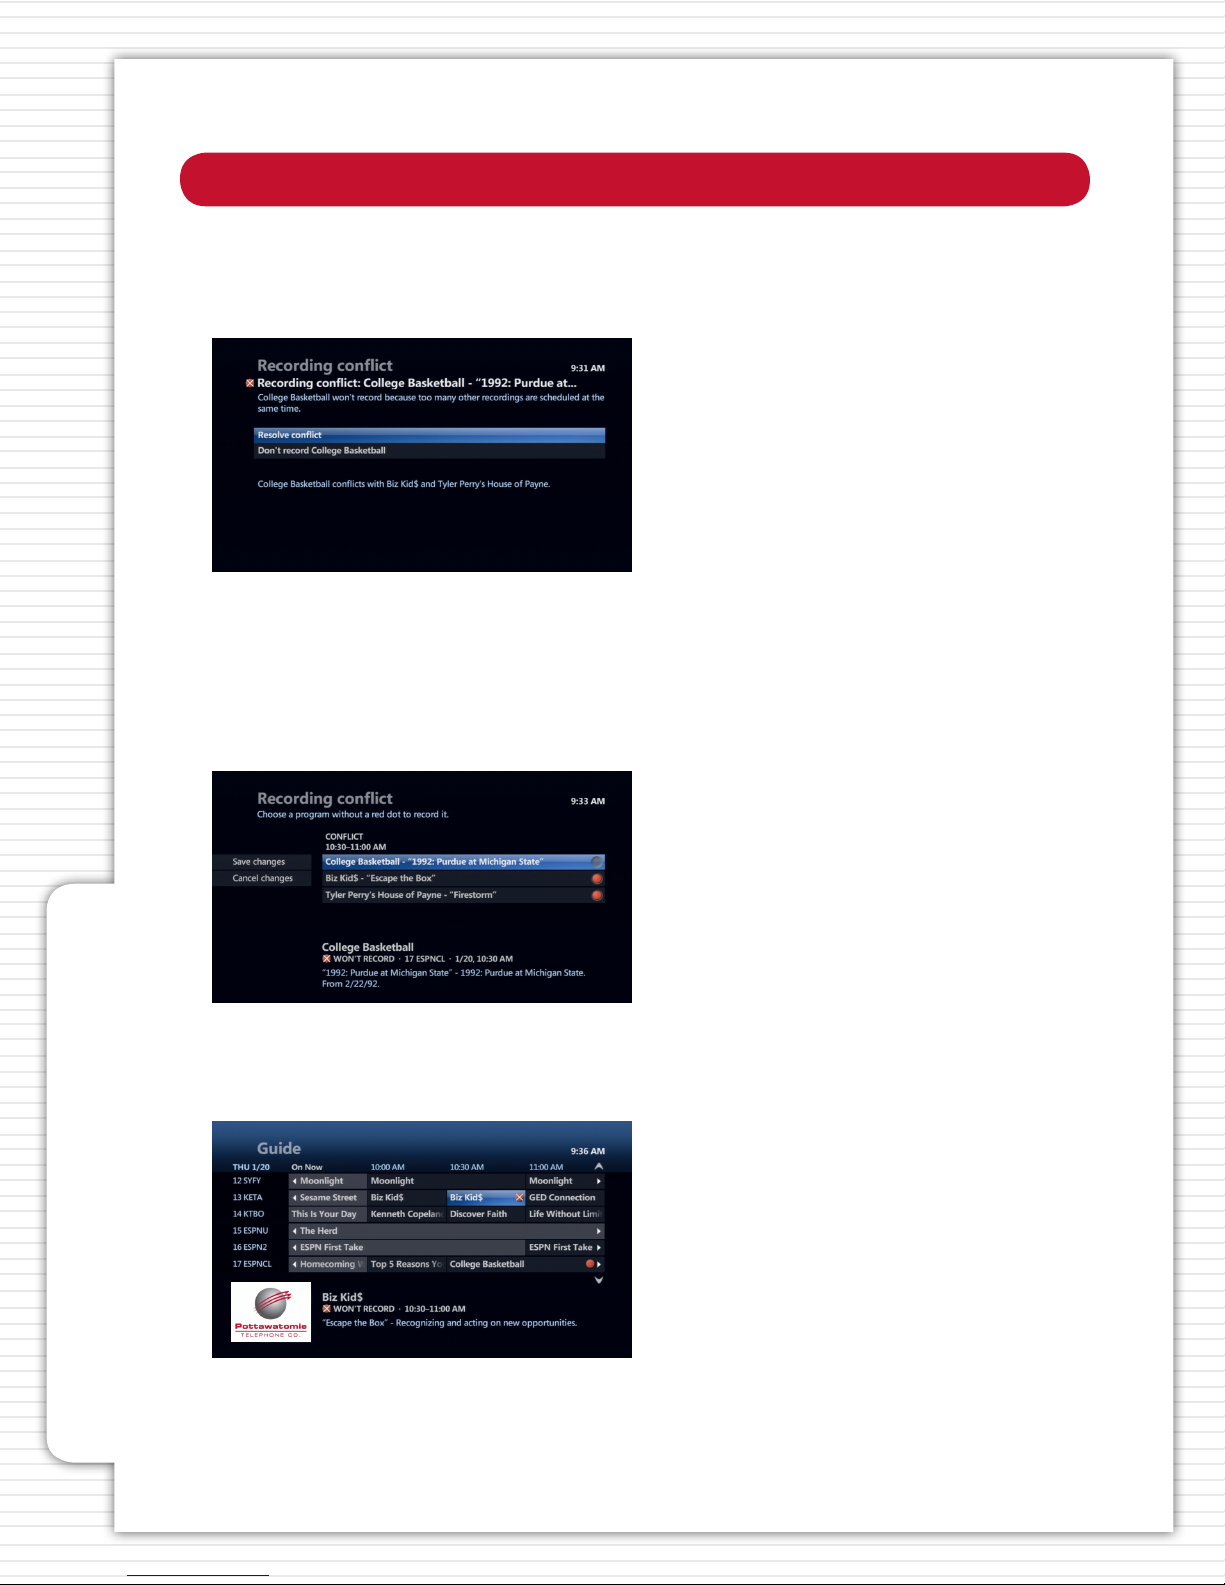
RESOLVING CONFLICTS FOR A SINGLE RECORDING
When an individual recording conicts with one or more previously scheduled recordings, a
RECORDING CONFLICT screen alerts you to the problem.
1. To cancel recording the program that caused the conict, highlight DON’T RECORD (Program
Name), and press OK. Highlight CANCEL RECORDING, and press OK. Or, highlight DON’T CANCEL
and press OK if you do not want to cancel the recording.
2. To resolve the conict by changing which programs will be recorded, highlight RESOLVE
CONFLICT and press OK.
3. Highlight the program you want to record and press OK.
How to Use DVR Service
The program(s) scheduled to be recorded will be marked with a red dot. When you select one
program to record, the program or programs beneath it will have their red dots removed.
4. To save your settings, highlight SAVE CHANGES and press OK.
After you resolve the conict, a conict icon (the crossed-out red dot) appears in the Guide by
each overridden program. This noties that the program has been scheduled, but will not be
recorded. If the conict resolves (for example a conicting show is cancelled or moved), the
overridden show will be recorded.
*You must subscribe to DVR service for this section.
16
Page 17
How to Use DVR Service*
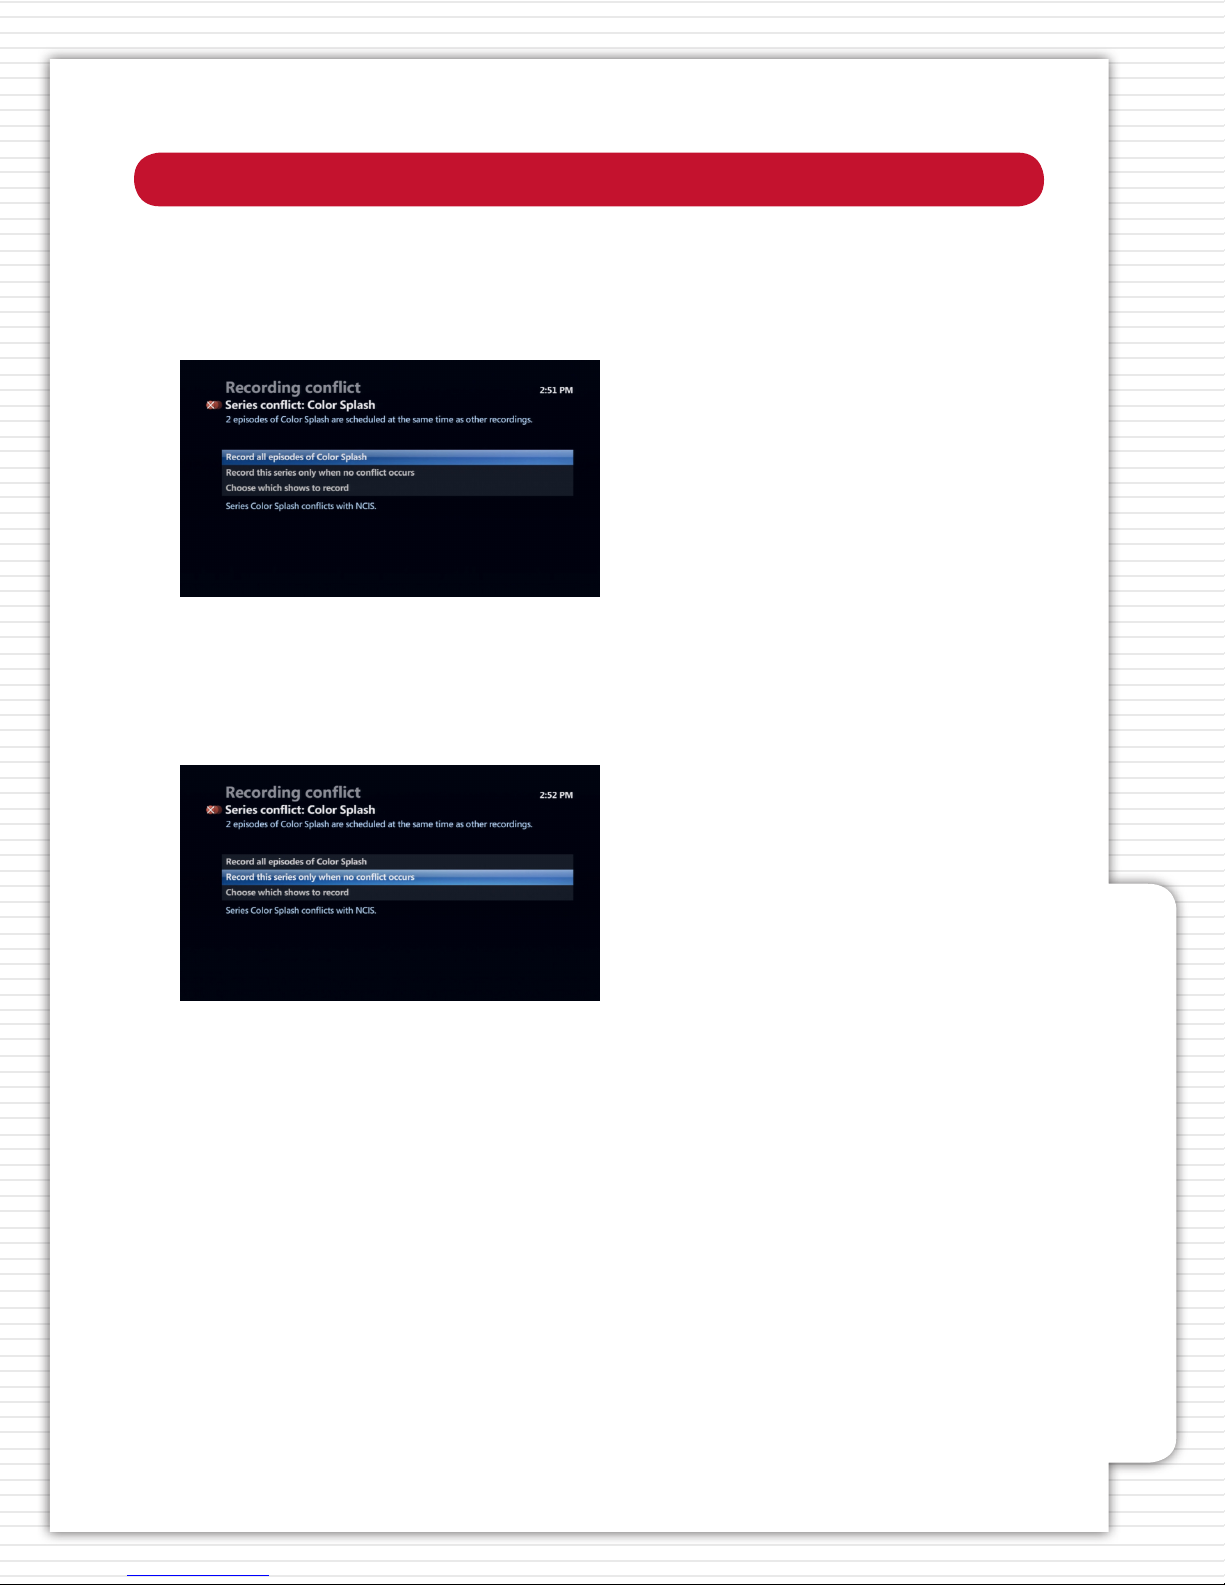
RESOLVING CONFLICTS FOR A SERIES RECORDING
When episodes of a series recording conict with previously scheduled recordings, a RECORDING
CONFLICT SCREEN enables you to choose how to resolve the conict.
To record all episodes of the series and override recordings that conict:
1. Highlight RECORD ALL EPISODES OF (Series Name) and press OK.
The recordings of episodes for this particular series will override any previously scheduled
recordings that were conicting. A conict icon appears in the Guide by each overridden program.
To record only those episodes that do not conict with previously scheduled recordings:
1. Highlight RECORD THIS SERIES only when no conict occurs, and press OK.
Episodes that conict with previously scheduled recordings are not recorded. The previously
scheduled recordings occur as planned.
To manually choose which episodes will record:
1. Highlight CHOOSE WHICH SHOWS TO RECORD, and press OK. You will see a list of all the
conicting episodes of the new series.
*You must subscribe to DVR service for this section.
How to Use DVR Service
17
Page 18
How to Use DVR Service*
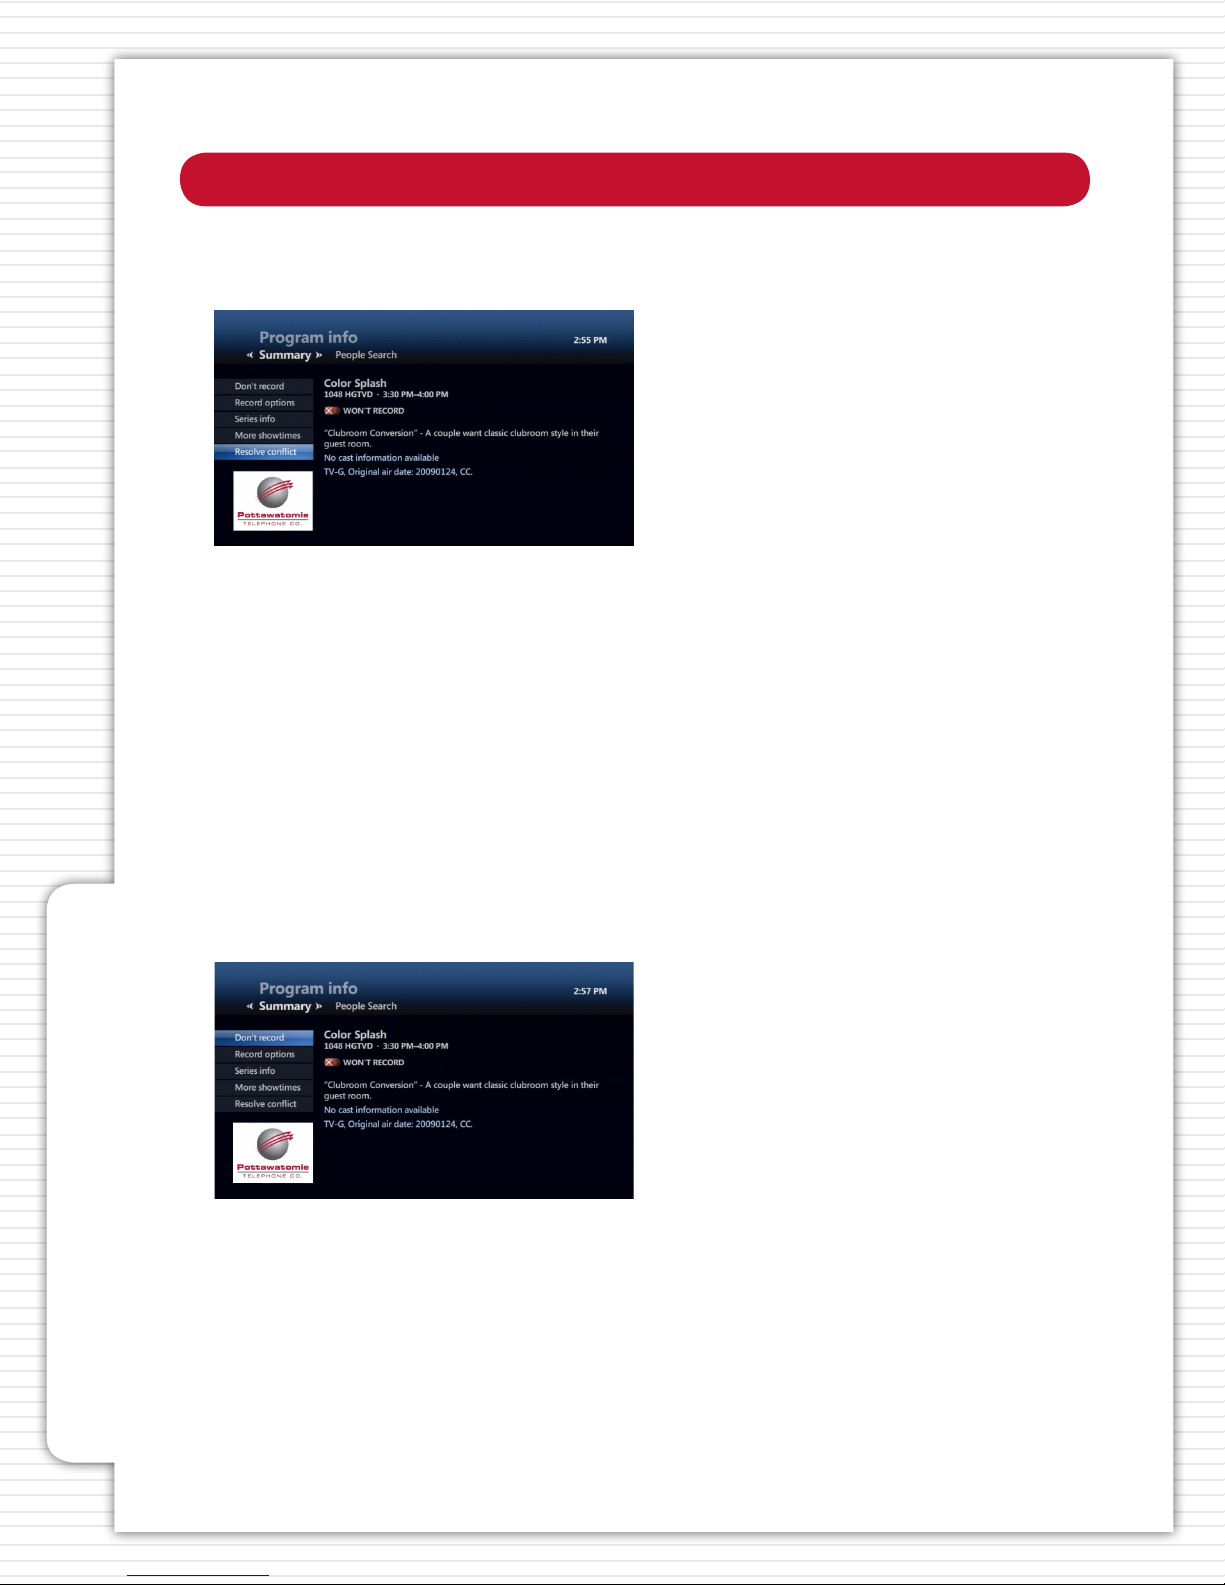
2. To record one of the conicting episodes, highlight the program you want to record, and press
OK. The PROGRAM INFO SCREEN will appear with information on that program.
3. Highlight RESOLVE CONFLICT, and press OK. The RECORDING CONFLICT SCREEN appears, listing
the conicting recordings.
4. Highlight the program you want to record, and press OK. The program(s) scheduled to be
recorded will be marked with a red dot. When you select one program to record, the program(s)
beneath it will have their red dot(s) removed.
5. Highlight SAVE CHANGES, and press OK. A SERIES RECORDING SCHEDULED message appears
briey on your screen.
How to Use DVR Service
RECORDING OR CLEARING AN OVERRIDDEN SINGLE RECORDING
An individual conict icon (the crossed out red dot) in the Guide marks an individual recording
that was cancelled in favor of another recording.
When you select the overridden recording in the Guide, the PROGRAM INFO SCREEN appears. You
can handle an overridden recording in one of the following ways:
• Leave it as is.
• If you cancel the recording conict ‘winner’, the overridden recording will be scheduled for
recording. The conict icon will turn back into a red dot.
• Record the overridden program in place of the previous conict winner.
• Clear the conict icon so the overridden program is not recorded even if you cancel the
previous conict winner.
18
*You must subscribe to DVR service for this section.
Page 19
How to Use DVR Service*
RECORDING OR CLEARING AN OVERRIDDEN SINGLE RECORDING, CONTINUED
1. Press GUIDE.
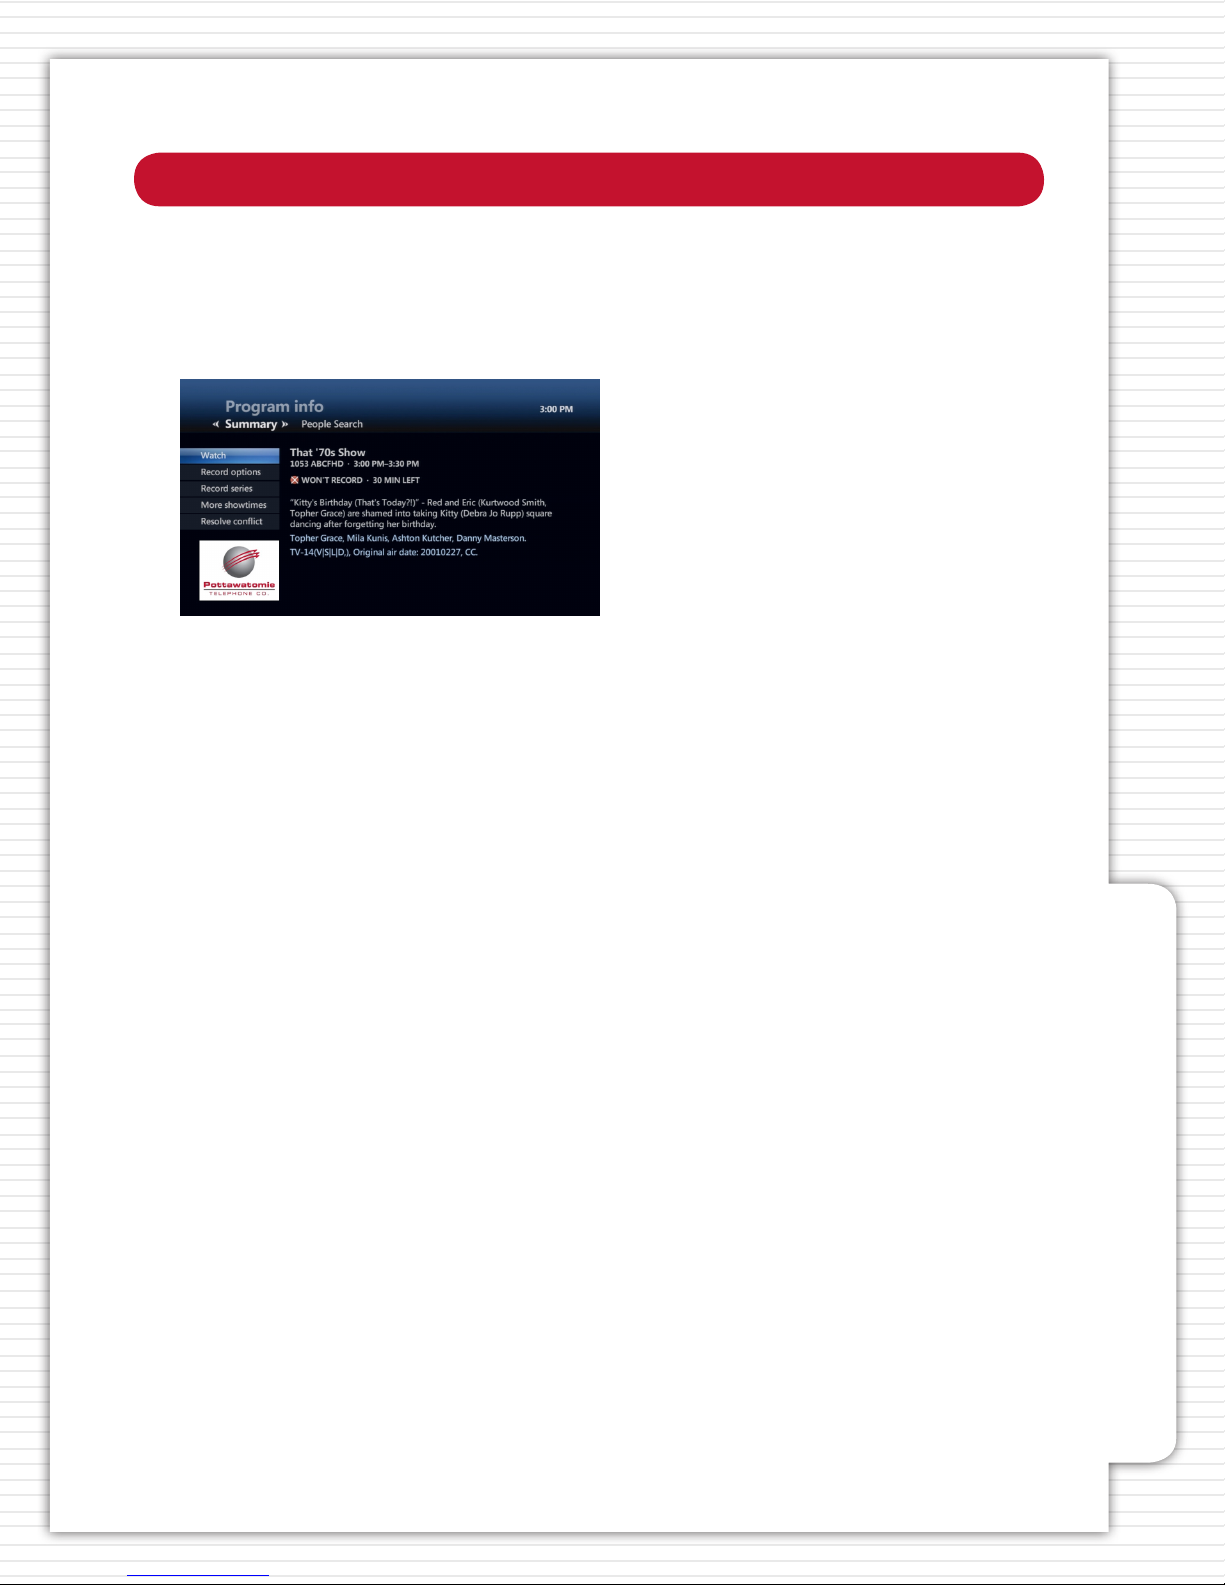
2. Use the ARROW BUTTONS or CH/PG to highlight the overridden program, and press OK. A
PROGRAM INFO SCREEN appears.
3. To record an overridden program instead of the previous conict winner, highlight RESOLVE
CONFLICT, and press OK. A SCHEDULING CONFLICT SCREEN appears. Highlight the overridden
program, and press OK. The recording for the overridden episode overrides the recording for the
previous conict winner.
4. Select SERIES INFO in the PROGRAM INFO SCREEN.
5. Or, to clear the conict icon, highlight TRY AGAIN LATER, and press OK. The conict icon
disappears from the Guide.
RECORDING OR CLEARING AN OVERRIDDEN SERIES RECORDING
A series conict icon (crossed out, three overlapping red dots) in the Guide marks a series episode
that was cancelled in favor of another recording. When you select an overridden series episode in
the Guide, a PROGRAM INFO SCREEN appears.
You can handle an overridden series episode in one the following ways.
• Leave it as is.
• If you cancel the conict winner later, the overridden series episode is rescheduled for the
recording.
The conict icon reverts to overlapping red dots.
• Record the overridden series episodes in place of the previous conict winner.
• Clear the conict icon the cancel the entire series recording.
1. Press GUIDE.
2. Use the ARROW BUTTONS or CH/PG to highlight the overridden episode, and press OK. A
PROGRAM INFO SCREEN appears.
3. To record an overridden series episode instead of the previous conict winner, highlight
RESOLVE CONFLICT, and press OK. The recording for the overridden episode overrides and cancels
the recording for the previous conict winner.
How to Use DVR Service
4. Or, to cancel a series recording, highlight CANCEL SERIES, and press OK. In the conrmation
screen, highlight CANCEL SERIES, and press OK. The entire series recording is cancelled. All series
conict icons for it are cleared. This does not erase episodes that were previously recorded.
*You must subscribe to DVR service for this section.
19
Page 20
How to Use DVR Service*
VIEWING A LIST OF SCHEDULED RECORDINGS
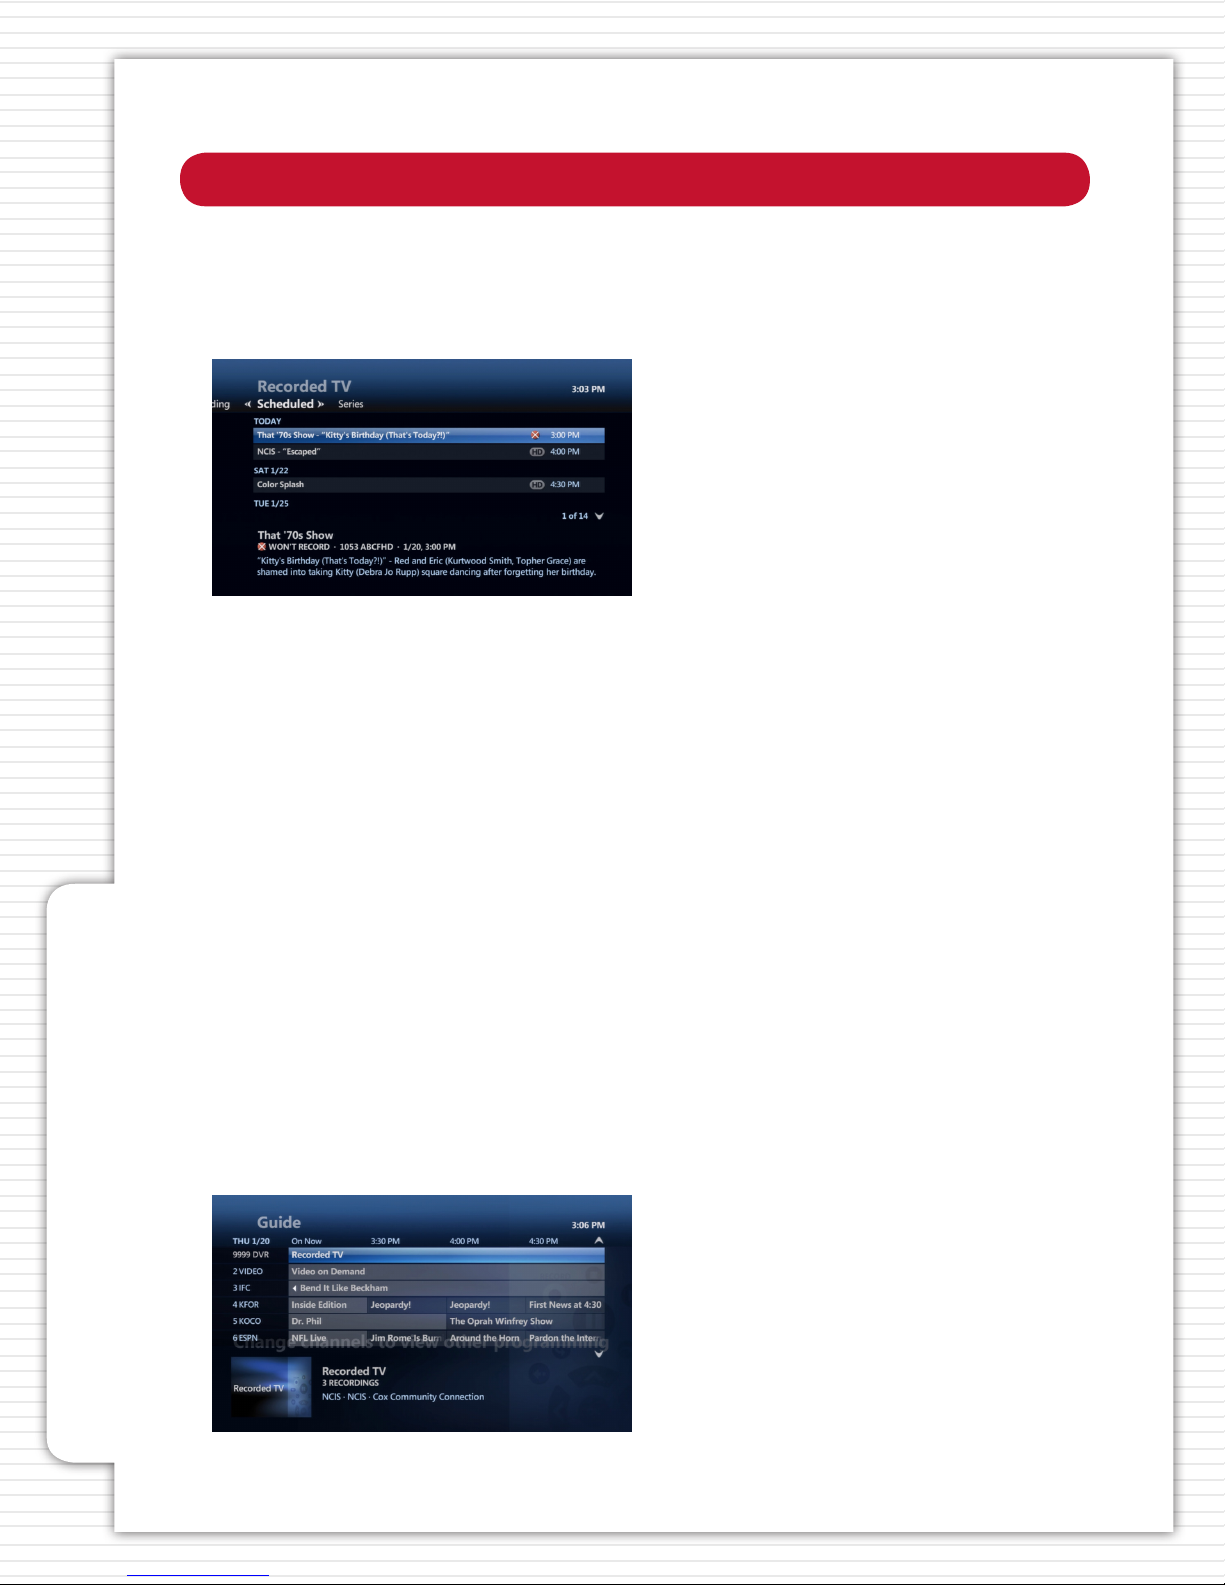
Use the RECORDED TV SCREEN to view a list of programs that are scheduled to be recorded.
1. Press RECORDED TV. The RECORDED TV SCREEN appears.
2. Press the RIGHT ARROW button to highlight SCHEDULED on the horizontal menu bar. The
RECORDED TV SCREEN now lists all upcoming recordings in the order in which they will be
recorded.
3. Use the ARROW BUTTONS or CH/PG to scroll through the list.
How to Use DVR Service
VIEWING A LIST OF SCHEDULED SERIES RECORDINGS
You can view a list of the series that you have scheduled to record.
1. Press RECORDED TV. The RECORDED TV SCREEN appears.
2. Use the RIGHT ARROW button to highlight SERIES on the horizontal menu bar. The RECORDED
TV SCREEN lists the series scheduled to record.
3. Use the ARROW BUTTONS or CH/PG to scroll through the list.
USING THE RECORDED TV CHANNEL
You can also access RECORDED TV through channel 9999 in your Guide. You can tune to the
channel and away from the channel, just as you would any other channel, to access your
recordings.
20
*You must subscribe to DVR service for this section.
Page 21
How to Use DVR Service*
PLAYING A RECORDED PROGRAM
After you have recorded a program, you can watch it whenever you want.
1. Press RECORDED TV. The RECORDED TV SCREEN lists your available recordings by date, from the
most recently recorded programs to the oldest.
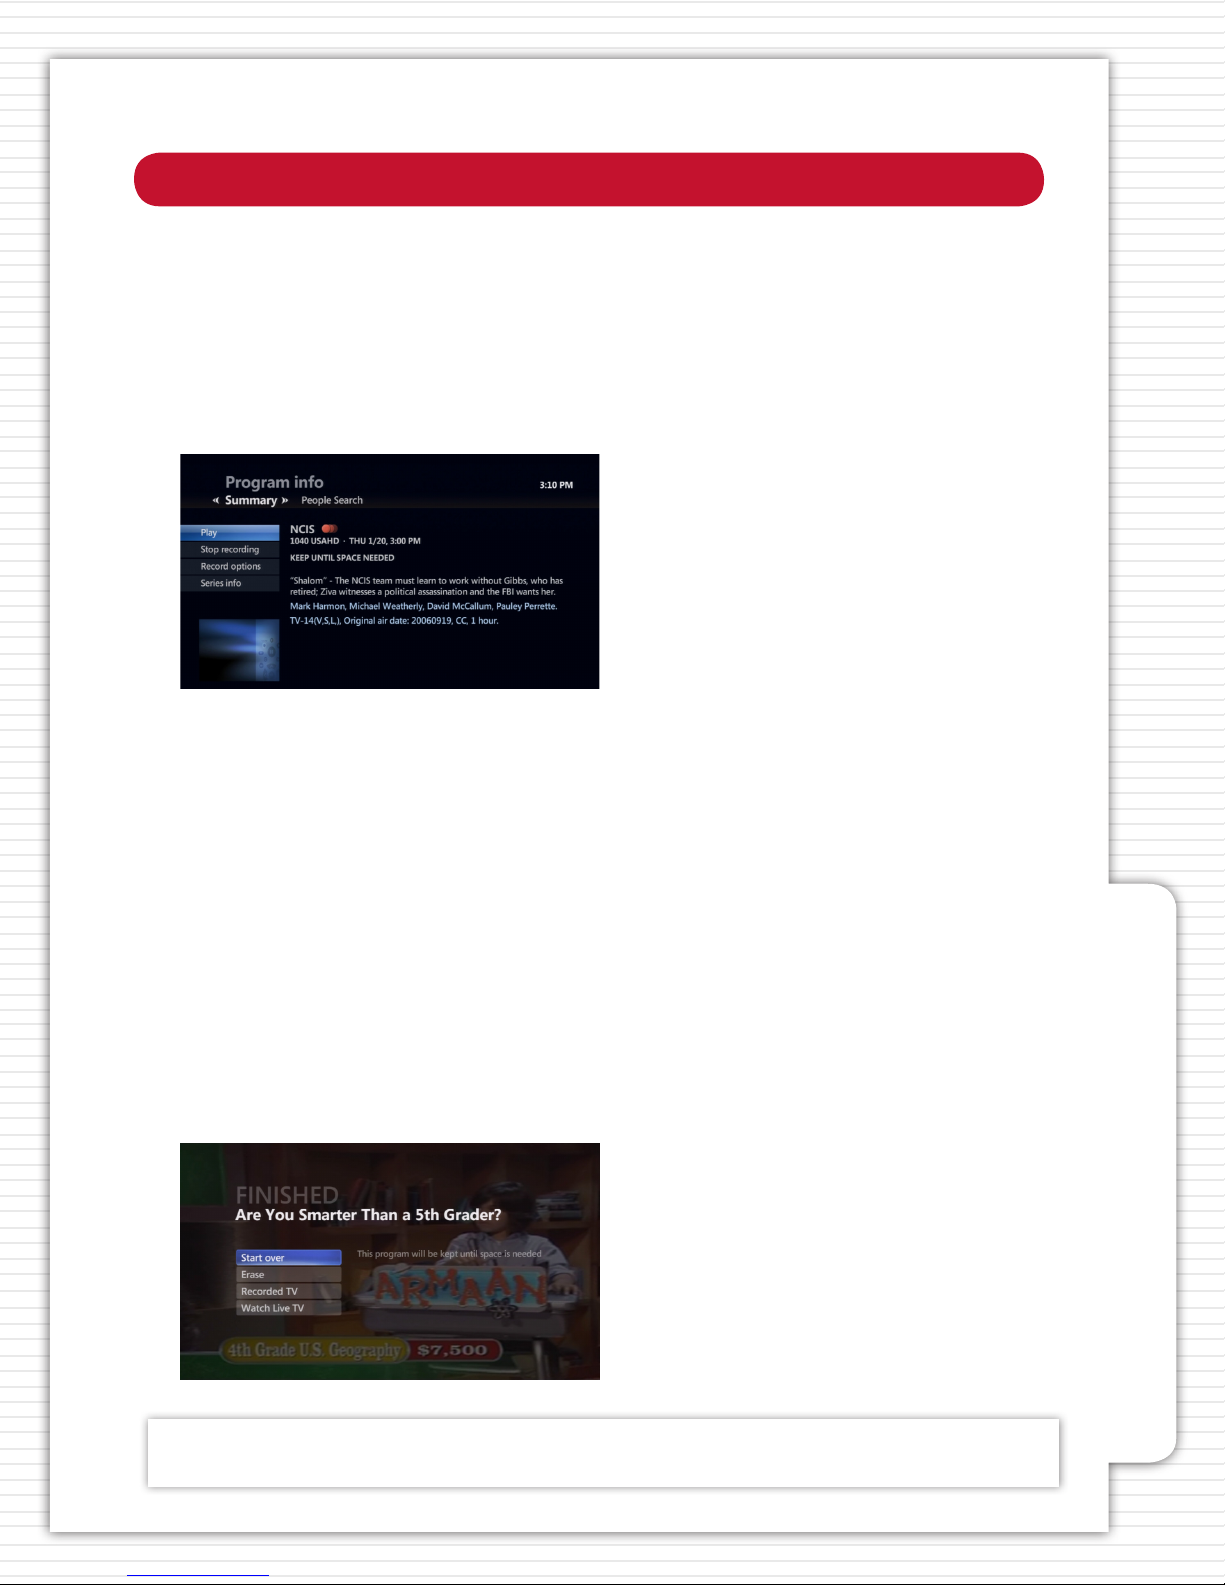
2. Highlight the RECORDED SHOW that you want to watch, and press OK. The PROGRAM INFO
SCREEN appears.
3. In the PROGRAM INFO SCREEN:
• Highlight PLAY, and press OK to play the recording from the beginning.
• If you stopped watching the recorded program and want to begin watching again from where
you left o, highlight RESUME PLAY, and press OK.
• If you stopped watching the recorded program and want to start over again, highlight START
OVER, and press OK.
CONTROLLING PLAYBACK
You can control recorded TV using the same playback control buttons that you use to pause,
rewind and fast-forward Video On Demand programs. See CONTROLLING LIVE TV for more
information.
WHAT TO DO WHEN A RECORDING FINISHES PLAYING
When a recording nishes playing, it stops and displays the FINISHED SCREEN.
How to Use DVR Service
QUICK TIP:
To see a list of the recordings in alphabetical order, press the RIGHT ARROW BUTTON to highlight BY TITLE on the
horizontal menu bar.
*You must subscribe to DVR service for this section.
21
Page 22

How to Use DVR Service*
Highlight one of the following options, and press OK.
• START OVER - The program will replay from the beginning.
• ERASE - The program will be removed from your DVR.
• RECORDED TV - Displays a list of your recordings.
• WATCH LIVE TV - Brings you back to the last channel you were watching.
STOPPING A RECORDED PROGRAM
You can stop a recording at any time by pressing the STOP button on your remote control.
Highlight one of the following options, and press OK.
• RESUME PLAY - The program will continue to play from the point at which you pressed STOP.
• START OVER - The program will replay from the beginning.
• ERASE - The program will be removed from your DVR.
• RECORDED TV - Displays a list of your recordings.
• WATCH LIVE TV - Brings you back to the last channel you were watching.
How to Use DVR Service
ERASING AN EXISTING RECORDING
A program you record remains in your Recorded TV library until you erase it or until the set-top
box erases old recordings to make space for new recordings (which you can determine for yourself
- see CHANGING HOW LONG THE RECORDING WILL BE STORED for more information). You can
erase a recorded program manually to make room for new recordings.
1. Press RECORDED TV.
2. Highlight the recorded program you want to erase, and press OK. The PROGRAM INFO SCREEN
appears.
3. Highlight ERASE, and press OK. A CONFIRMATION message appears.
4. Highlight ERASE again, and press OK. This erases the program permanently. You cannot recall it.
You can also select DON’T ERASE to avoid erasing the program.
22
*You must subscribe to DVR service for this section.
Page 23
How to Use Video On Demand
Video On Demand allows you to rent movies without leaving the comfort of your couch. You’ll
never have to return a movie again, or pay another late fee. With Video On Demand you can:
• Watch the movies you rent as many times as you want, whenever you want, usually within
a 24-hour rental window. The amount of time in the rental window can vary based on the
program.
• Easily rewind, fast-forward, and pause your movies; no extra equipment needed.
• Instantly access our movie library with your remote control. Our library is continually updated
with new and exciting movies and programs.
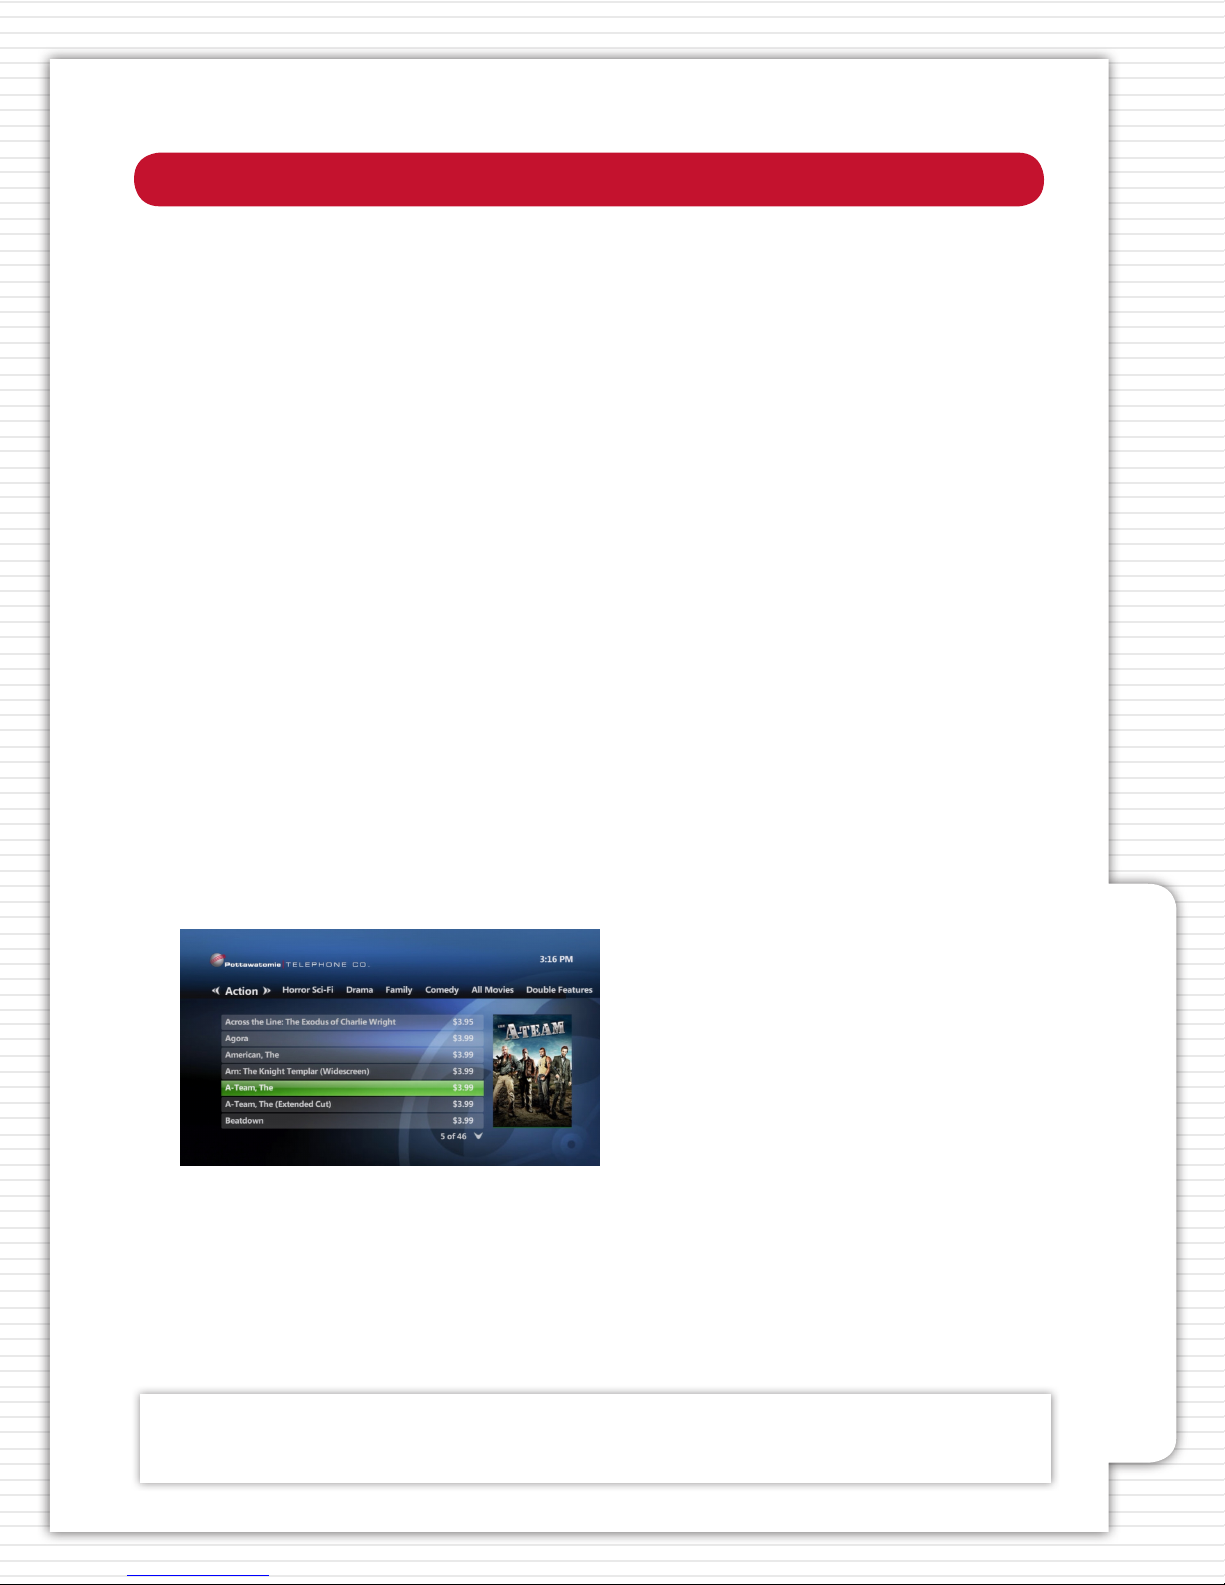
The VIDEO ON DEMAND SCREEN provides a simple online storefront that makes it easy to nd and
rent video programs.
1. Press ON DEMAND. The VIDEO ON DEMAND SCREEN appears with the following categories:
CURRENT RENTALS - If you have rented a Video On Demand movie(s) within the past 24 hours,
it will display here.
MOVIES ON DEMAND - Displays subcategories, including genres.
EVENTS - Displays specialty programming.
FREE ON DEMAND - Displays content available at no charge.
HD - Displays what’ s available in high-denition.
2. Press the RIGHT ARROW button to highlight a video category, and then the DOWN ARROW
button to highlight a genre or subcategory, and press OK.
3. Highlight the video you want, and press OK.
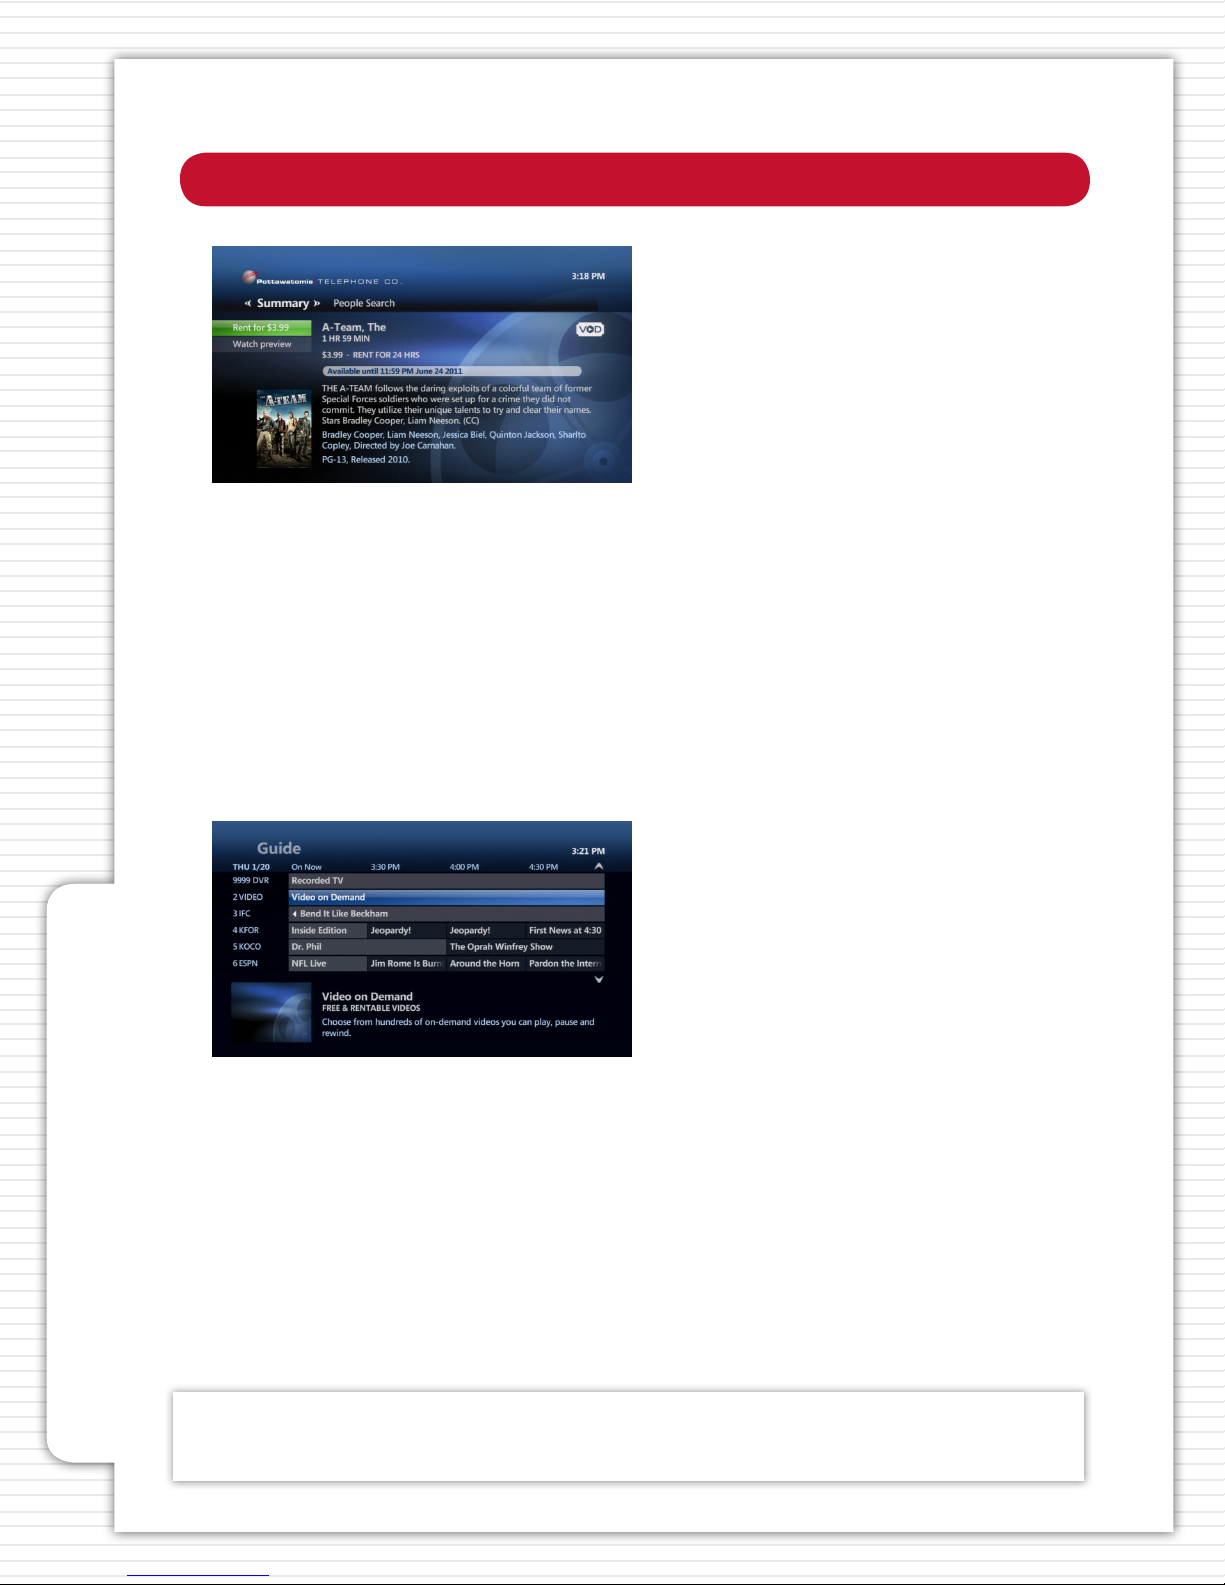
4. A PROGRAM INFO SCREEN appears and enables you to do the following:
• RENT THE VIDEO - To purchase a video rental.
• WATCH PREVIEW - To watch a preview of the video, free of charge.
• PEOPLE SEARCH - Located on the horizontal menu bar, this will reveal more about the people
involved in the video.
How to Use Video On Demand
QUICK TIP:
If a video is locked by Parental Locking, enter your PIN to unlock the video. The video will remain unlocked until you n-
ish the video or until you tune to another program. See HOW TO USE PARENTAL LOCKING for more information.
23
Page 24
How to Use Video On Demand
5. To rent the video, highlight, “RENT FOR $___”, and press OK.
6. To conrm your selection, highlight RENT, and press OK.
The video will begin playing immediately.
USING THE VIDEO ON DEMAND CHANNEL
You can also access VIDEO ON DEMAND through channel 2 in your Guide. You can tune to and
away from the channel, just as you would any other channel, to access any current rentals.
How to Use Video On Demand
PLAYING VIDEOS THAT YOU HAVE RENTED
You can play your rented video anytime within the stated rental window.
1. Press VIDEO ON DEMAND. The Current Rentals screen will appear.
2. Highlight the video you want to watch, and press OK.
3. Highlight PLAY, and press OK.
QUICK TIP:
If you had previously paused the video before it was nished, the video resumes from where it left o. To restart the
video from the beginning, press STOP, highlight START OVER, and press OK.
24
Page 25
How to Use Video On Demand
CONTROLLING VIDEOS
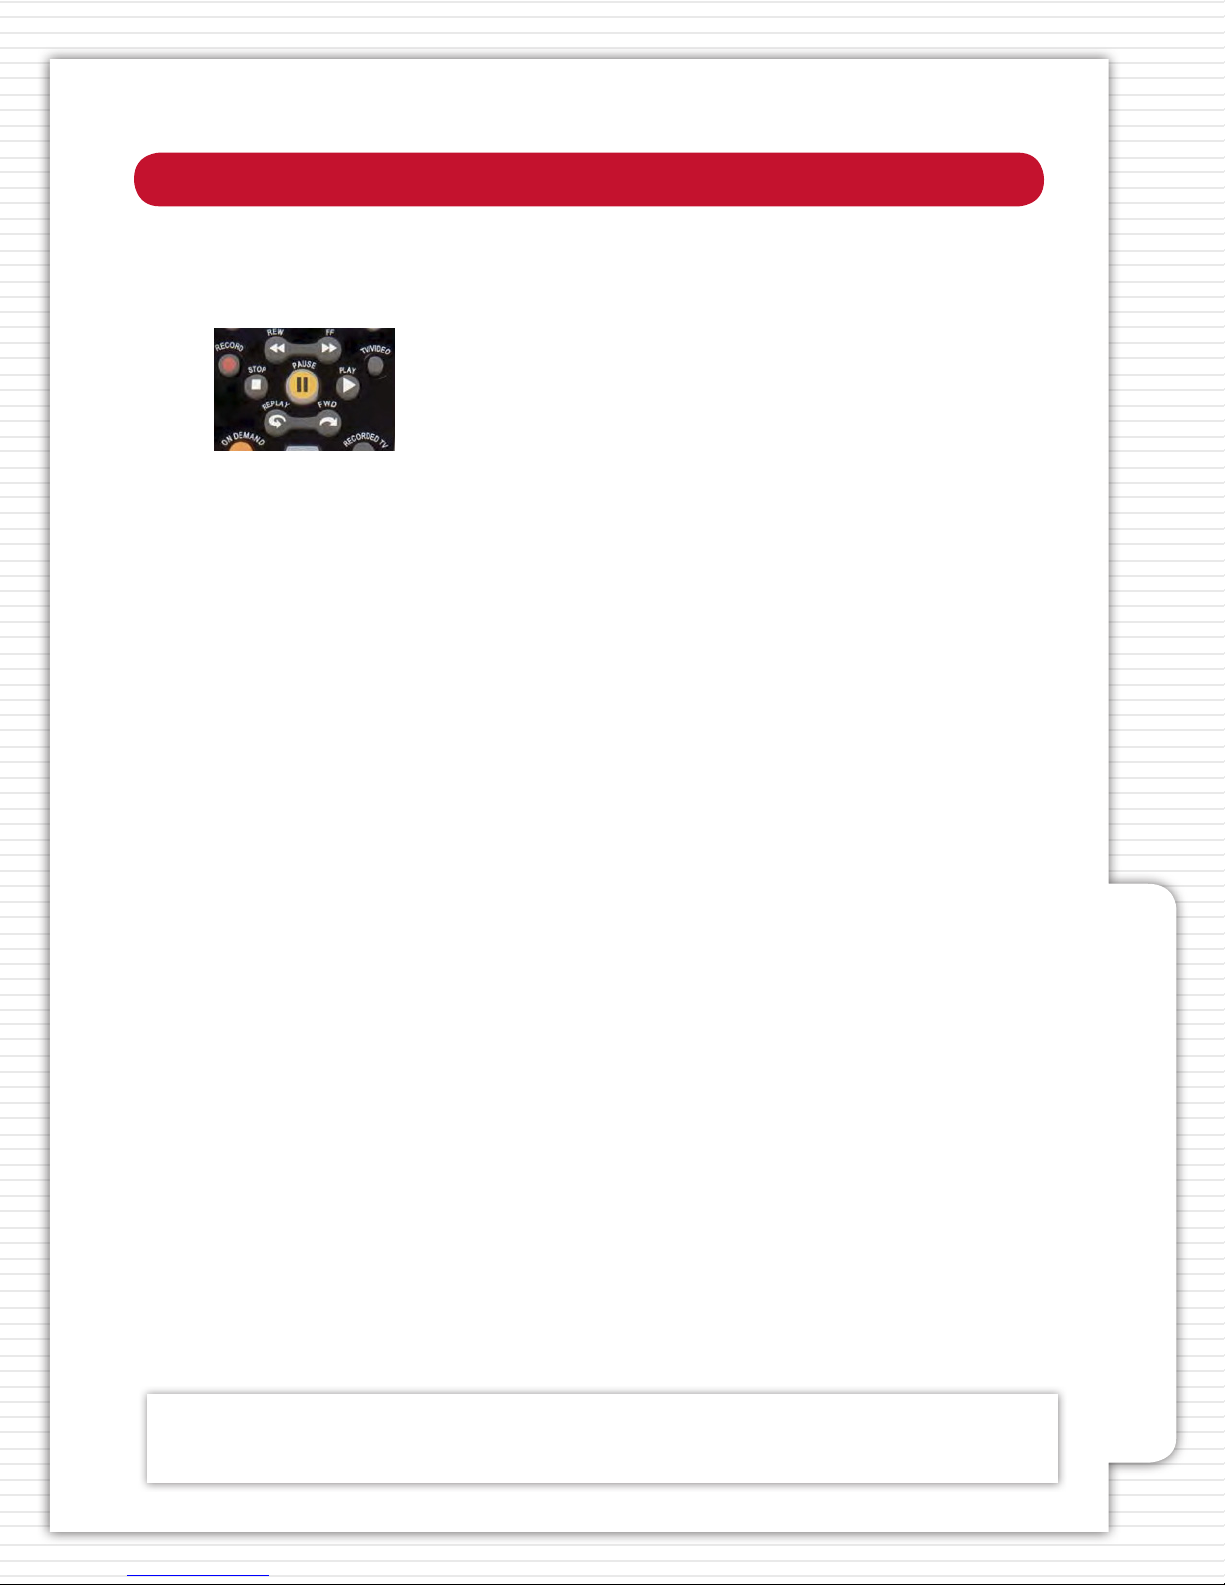
You can pause, rewind, and fast-forward videos using your remote control.
There are dierent results for some of the buttons depending on which button was pressed
previously.
1. Press PAUSE to freeze the video. Press PLAY to start playing again.
2. Press STOP. Highlight one of the following options and press OK:
RESUME PLAY - The program will begin playing from the point at which you pressed STOP.
VIDEO ON DEMAND - Takes you back to the main Video On Demand screen.
START OVER - Replays the rented program from the beginning.
WATCH LIVE TV - Tunes to the last channel you were on before watching the rented program.
3. Press REW or FF to rewind or fast-forward through the video. Press REW or FF once, twice or
three times to rewind or fast-forward at increasing speeds.
4. Press FWD or REPLAY to skip forward or backward in short segments.
WHAT TO DO WHEN A VIDEO ON DEMAND PROGRAM FINISHES
When a rented video nishes playing, the FINISHED SCREEN appears. Highlight one of the
following options and press OK.
VIDEO ON DEMAND - Takes you back to the main Video On Demand Screen.
START OVER - Replays the rented program from the beginning.
WATCH LIVE TV - Tunes to the last channel you were on before watching the rented program.
How to Use Video On Demand
QUICK TIP:
If the video is locked by parental locking, enter your PIN to unlock the video. The video will remain unlocked until you
nish the video or tune to another program. See HOW TO USE PARENTAL LOCKING for more information.
25
Page 26
How to Use Video On Demand
PAY-PER-VIEW EVENTS
Pay-per-view (PPV) service gives you front row seating to some of the best live TV events from
mixed martial arts and wrestling, to hockey and other special events without leaving the comfort
of your couch. The PPV features allow you to rent live event programs using the Interactive
Program Guide (“Guide”) or while watching a channel in full screen.
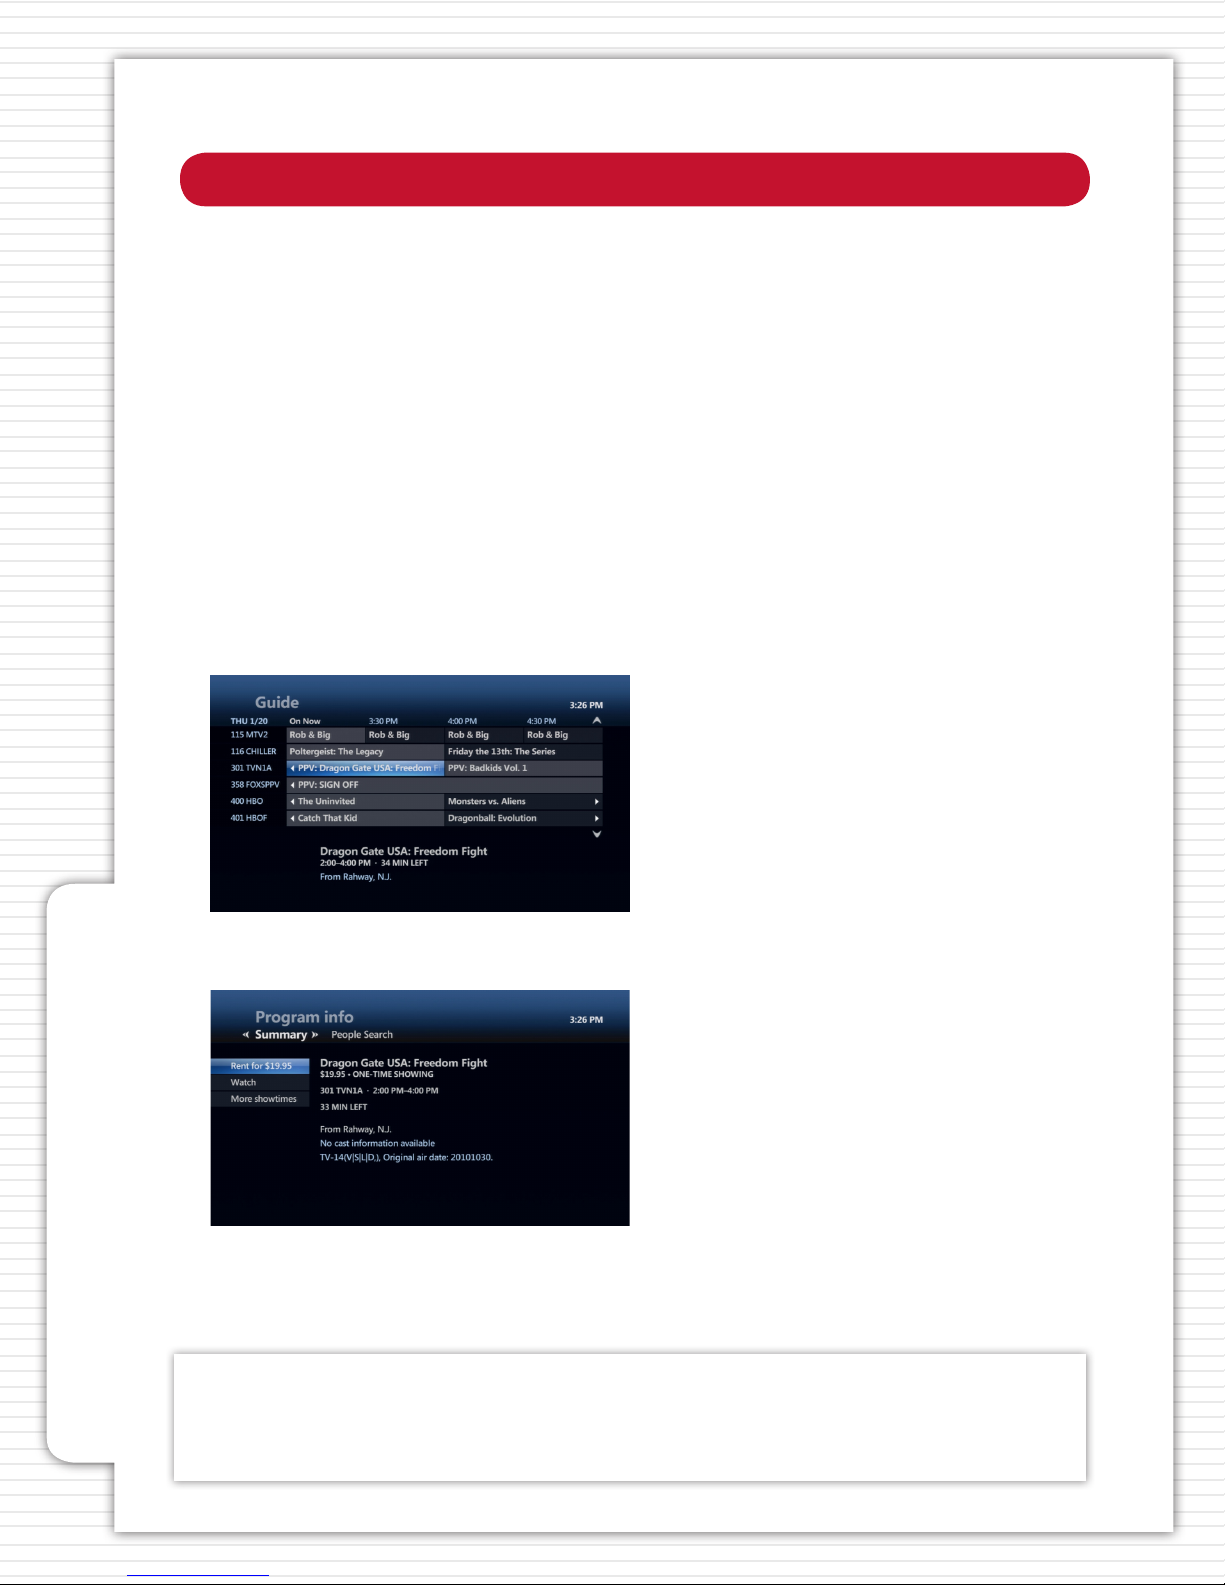
USING THE GUIDE TO RENT AND RECORD PAY-PER-VIEW EVENTS
Pay-per-view events appear as channels 301 and 358 in the Guide.
1. Press GUIDE.
2. Use the ARROW BUTTONS to move through the listings to the channels containing the PPV
event you want to rent.
The PPV events appear in the scheduled time slot along with event details.
3. Press INFO to display the PROGRAM INFO SCREEN.
How to Use Video On Demand
QUICK TIPS:
• After renting a PPV event, you must wait until its scheduled time before you can watch it.
• You can record the event at its scheduled time and watch it whenever you want after that.
• You are charged for a rented PPV event even if you do not watch it.
26
Page 27

How to Use Video On Demand
4. With RENT FOR highlighted, press OK.
If you have set rental locks using the Parental Controls feature, the lock screen appears. To unlock
the event, press OK, enter your rental locking PIN, select UNLOCK THIS PROGRAM, and then press
OK.
If you don’t want to rent the event, select DON’T RENT to exit and you will return to the PROGRAM
INFO SCREEN. Press EXIT TO TV to return to live TV.
5. A conrmation message appears and your video begins to play.
WATCHING PAY-PER-VIEW EVENTS
A PPV event starts and ends at a specic time. Unless you have recorded the event, you can watch
it only during that time slot.
CONTROLLING A PAY-PER-VIEW EVENT
If you subscribe to DVR service, once you have tuned to a PPV event you can pause and control it
like any other live TV program.
RECORDING A PAY-PER-VIEW EVENT WHILE WATCHING THE CHANNEL
1. Tune to the channel for the PPV event that you want to record.
2. Press the RECORD button on your remote control.
• If the event is not yet playing and you are watching the graphic or preview that precedes it,
the message RECORDING SCHEDULED appears. The event will record during its time slot.
• If the event is playing, the message RECORDING appears, and the event begins recording
immediately.
How to Use Video On Demand
27
Page 28
How to Use Parental Controls
Some programming contains explicit adult content, scenes of violence and coarse language. With
Parental Locking, you can easily block material that you think is inappropriate for family viewing
by setting a PIN that viewers must enter in order to view blocked content. In addition, parental
locking also prevents viewing the program in ‘Picture In Picture’ mode.
GETTING READY TO USE PARENTAL LOCKING
Your Parental Locking Settings will only be eective on the TV you set them up on. You will have to
set up your Parental Locking Settings on each TV if you have more than one set-top box.
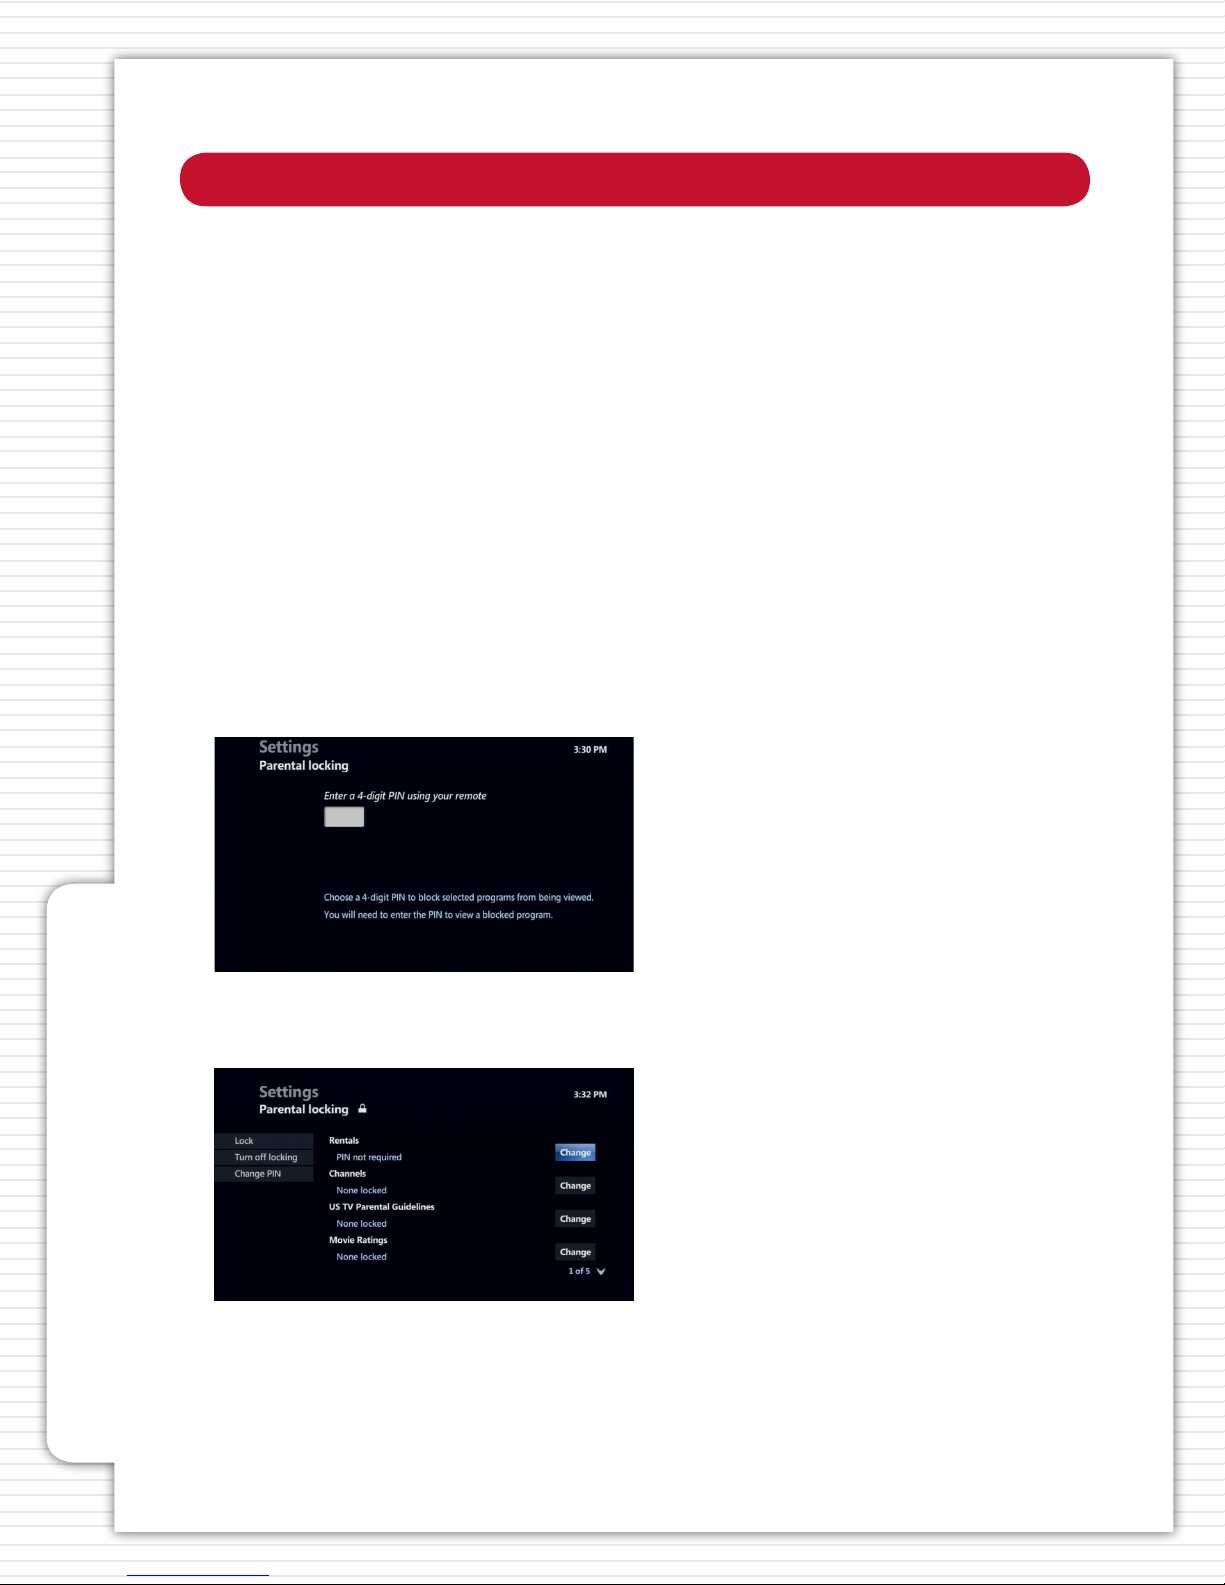
To open the Parental Locking Settings screen:
1. Press MENU.
2. Press the RIGHT ARROW button to highlight SETTINGS on the horizontal menu bar.
3. Highlight PARENTAL CONTROLS, and press OK.
4. Highlight PARENTAL LOCKING, and press OK.
5. Use the NUMERIC KEYPAD to enter a four-digit PIN.
How to Use Parental Controls
Note: If you made an error, press DELETE to erase the previously typed digit.
If a PIN has already been set, enter your previously set PIN. The PARENTAL LOCKING SETTINGS SCREEN
appears.
6. Using the PARENTAL LOCKING SETTINGS SCREEN, you can do the following:
• Lock specic channels.
• Lock TV and Movie ratings.
• Lock unrated movies and TV programs.
• Change a PIN
28
Page 29
How to Use Parental Controls
LOCKING SPECIFIC CHANNELS
Viewers can be required to enter a PIN to view specic channels. Locked channels still appear in
the Guide, unless removed. Viewers will need to enter a PIN in order to watch the locked channel.
1. Open the PARENTAL LOCKING SETTINGS SCREEN as described in GETTING READY TO USE
PARENTAL LOCKING.
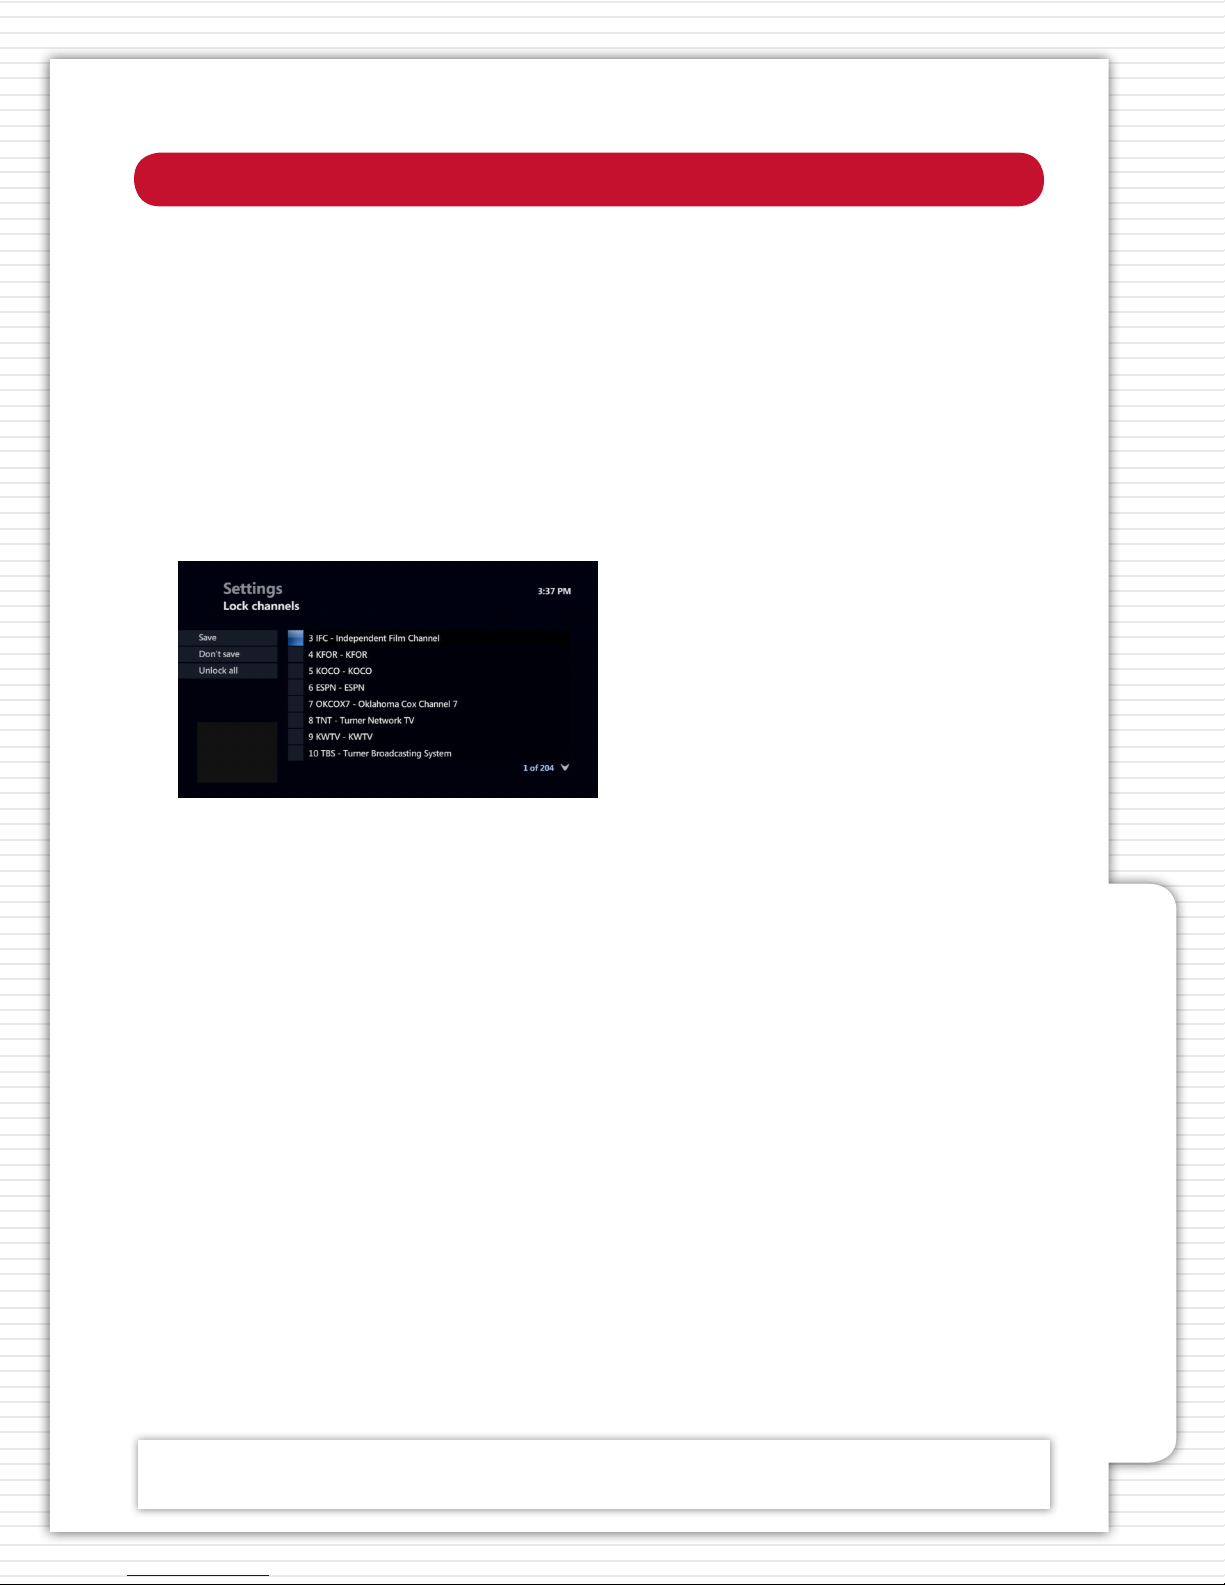
2. Press the DOWN ARROW button to highlight CHANNELS, and press OK. The LOCK CHANNELS
SETTINGS SCREEN appears, showing a list of all channels (both locked and unlocked channels).
• If a channel is unlocked, no lock icon is shown.
• If a channel is already locked, a lock icon is shown.
3. Press the RIGHT ARROW button to move to the channel listing.
4. Use the UP ARROW and DOWN ARROW buttons or CH/PG to highlight the channel that you
want to lock or unlock, and press OK to change the lock setting:
• To unlock all channels, highlight UNLOCK ALL, and press OK.
• To view only the locked channels, highlight VIEW LOCKED ONLY, and press OK.
• To restore the full list of locked and unlocked channels, highlight VIEW ALL CHANNELS, and
press OK.
5. To save your changes, highlight SAVE, and press OK. You can also select DON’T SAVE to exit from
this screen without saving your changes.
6. If you have nished setting up parental locking, highlight LOCK, and press OK.
LOCKING TV AND MOVIE RATINGS
Viewers can be required to enter a PIN to view movies and TV programs with a specic rating.
1. Open the PARENTAL LOCKING SETTINGS SCREEN as described in GETTING READY TO USE
PARENTAL LOCKING.
2. Use the UP ARROW and DOWN ARROW buttons to highlight TV PARENTAL GUIDELINES or MOVIE
RATINGS.
How to Use Parental Controls
QUICK TIP:
You may have to press the EXIT TO TV button on your remote, and then enter your PIN to unlock a locked program.
29
Page 30

How to Use Parental Controls
LOCKING TV AND MOVIE RATINGS, CONT.
A lock icon appears next to the lowest locked rating and all the ratings above that ratings. Viewers
cannot view programs with that rating, or any higher rating, without entering the correct PIN.
3. Use the UP ARROW and DOWN ARROW buttons to highlight the LOWEST RATING that you want
to lock and press OK until a lock icon appears next to that rating and all ratings above it.
4. To unlock all ratings, highlight UNLOCK ALL, and press OK to all the lock icons disappear.
5. To save your changes, highlight SAVE, and press OK. You can also select DON’T SAVE to exit from
this screen without saving your changes.
6. If you have nished setting up parental locking, highlight LOCK, and press OK.
LOCKING UNRATED MOVIES AND TV PROGRAMS
Viewers can be required to enter a PIN to view videos and other programs that are not rated.
1. Open the PARENTAL LOCKING SETTINGS SCREEN as described in GETTING READY TO USE
PARENTAL LOCKING.
How to Use Parental Controls
2. Use the ARROW BUTTONS buttons to highlight the CHANGE option for unrated content.
3. Press OK. The lock UNRATED CONTENT SCREEN appears.
4. Press the RIGHT ARROW button to highlight the LOCK UNRATED PROGRAMMING option, and
press OK until a lock icon appears.
NOTE: To unlock unrated programming, press OK until no lock icon is shown.
5. To save your changes, highlight SAVE, and press OK. You can also select DON’T SAVE to exit from
this screen without saving the changed setting.
6. If you have nished setting up parental locking, highlight LOCK and press OK.
30
Page 31

How to Use Parental Controls
CHANGING YOUR PIN
1. Open the PARENTAL LOCKING SETTINGS SCREEN as described in GETTING READY TO USE PARENTAL
LOCKING.
2. Use the ARROW BUTTONS buttons to highlight the CHANGE PIN, and press OK.
3. Use the NUMERIC KEYPAD to enter a four-digit PIN, and then enter the PIN again to conrm it.
4. If you have nished setting up your new PIN, highlight LOCK, and press OK.
WATCHING A LOCKED PROGRAM
You can unlock a currently playing program by specifying the correct PIN.
1. From the LOCKED PROGRAM SCREEN that appears, press OK.
2. Enter your four-digit PIN using the Use the NUMERIC KEYPAD.
3. Highlight UNLOCK, and press OK.
To remain on the locked program screen without unlocking the program, highlight DON’T
UNLOCK, and press OK.
LOCKING RENTALS
1. Press MENU.
2. Press the RIGHT ARROW button to highlight SETTINGS.
3. Highlight PARENTAL CONTROLS, and press OK.
4. Highlight RENTAL LOCKING, and press OK. Enter the PIN you have previously set.
5. Press the RIGHT ARROW button to highlight RENTAL LOCKING, and press OK. A lock icon appears
next to Rental Locking.
6. To unlock rentals, press OK again to clear the lock icon.
7. To save your settings, highlight SAVE, and press OK. You can also select DON’T SAVE to exit from
this screen without saving the changed setting.
How to Use Parental Controls
31
Page 32

How to Customize Your Guide
With this feature, you can remove channels from appearing in the Guide.
1. Press MENU.
2. Press the RIGHT ARROW button to highlight SETTINGS.
3. Highlight TELEVISION, and press OK.
4. Highlight CUSTOMIZE CHANNEL GUIDE, and press OK.
Channels that are currently displayed in the Guide have a check mark in front of them. Channels
that are not currently displayed in the Guide do not have a check mark in front of them.
5. Use the UP ARROW and DOWN ARROW or CH/PG to go through the list of channels. You can do
the following:
• To hide a channel that is currently in the Guide, highlight the channel, and press OK. The check
mark disappears from the check box.
• To make a hidden channel reappear in the Guide, highlight the channel, and press OK. A check
mark will appear in front of the channel.
• To make all channels appear in the Guide, highlight CHECK ALL, and press OK. Check marks
appear in all the check boxes.
How to Use Customize Your Guide
• To display hidden channels, highlight VIEW UNCHECKED, and press OK.
• To restore the entire list, highlight SHOW ALL, and press OK.
6. To save your settings, highlight SAVE, and press OK.
You can select DON’T SAVE to exit from the screen without saving changed settings.
QUICK TIPS
• The Video On Demand and DVR Channels (2 and 9999) cannot be deleted from the Guide.
• Your customized Guide will only be eective on the TV you set them up on. You will have to set up your customized
Guide on each TV if you have more than one set-top box.
32
Page 33
How to Set Up a Favorite Channels List
You can create your own Favorite Channels List that only contains the channels you like to watch,
making it easy to nd your favorite programs.
1. Press MENU.
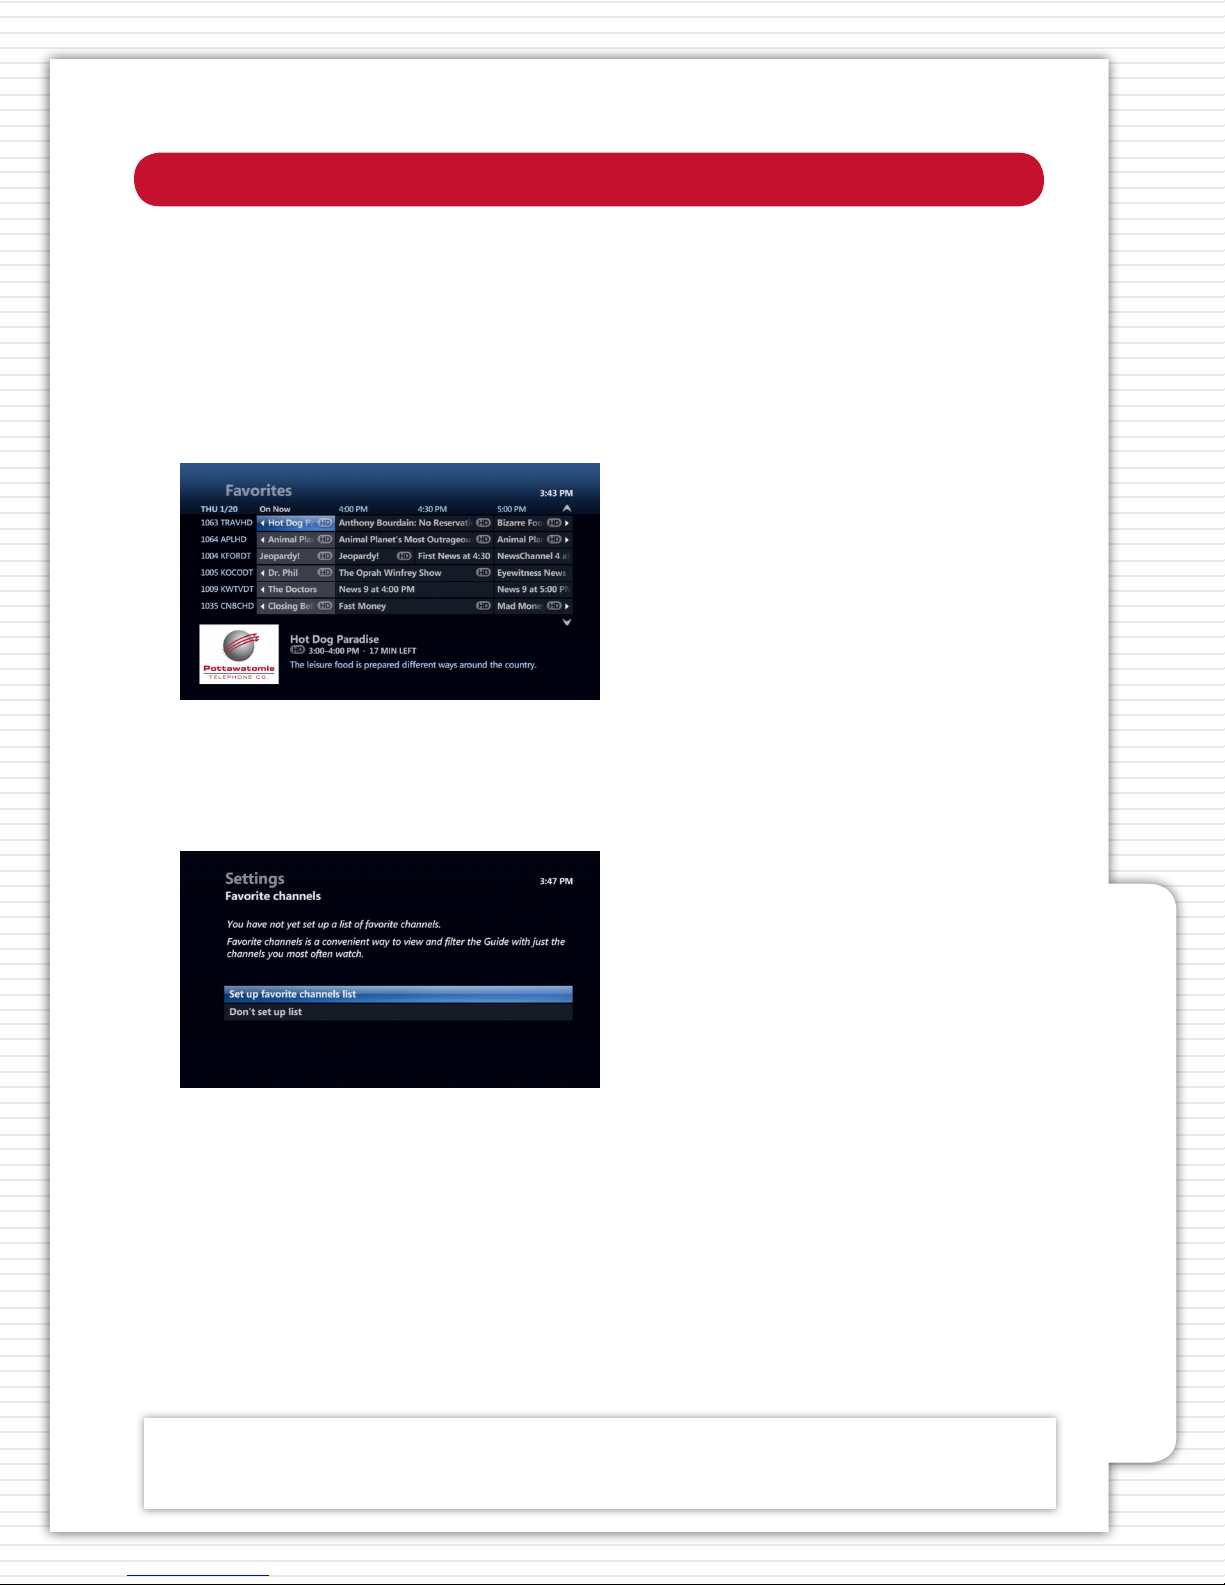
2. Under LIVE TV, highlight FAVORITES, and press OK.
• If you have already set up Favorites the FAVORITES SCREEN appears. Use it just like a regular
Guide. To change your Favorites, see HOW TO CHANGE YOUR FAVORITE CHANNELS LIST.
• To hide a channel that is currently in the Guide, highlight the channel, and press OK. The check
mark disappears from the check box.
• If you have not yet set up Favorites, a SETTINGS SCREEN appears that enables you to set up
your Favorites.
3. Highlight SET UP FAVORITE CHANNELS LIST, and press OK. The FAVORITE CHANNELS SETTINGS
SCREEN will appear, showing all the channels that are available.
Channels in your Favorite Channels List have a check mark in front of them.
Channels that are not in your Favorite Channels List do not have a check mark in front of them.
QUICK TIP:
Your Favorite Channels List will only be eective on the TV you set them up on. You will have to set up your Favorite
Channels List on each TV if you have more than one set-top box.
How to Set Up a Favorite Channels List
33
Page 34

How to Set Up a Favorite Channels List
HOW TO SET UP A FAVORITE CHANNELS LIST, CONT.
4. Press the UP ARROW and DOWN ARROW buttons or CH/PG to scroll through the list of channels.
You can do the following:
• To include a channel in your Favorite Channels List, highlight the channel, and press OK. A
check mark appears in the check box.
• To remove a channel from your Favorite Channels List, highlight the channel, and press OK.
The check mark disappears from the check box.
• To reset your Favorite Channels List, highlight UNCHECK ALL, and press OK. All the boxes
become unchecked.
• To only show the channels in your Favorite Channels List, highlight VIEW CHECKED, and press
OK.
• To restore the list of all channels, highlight VIEW ALL, and press OK.
5. To save your settings, highlight SAVE, and press OK. You can highlight DON’T SAVE and press OK
to exit from the screen without saving your settings.
HOW TO CHANGE YOUR FAVORITE CHANNELS LIST
1. Press MENU.
2. Press the RIGHT ARROW button to highlight SETTINGS.
3. Press the DOWN ARROW button to highlight TELEVISION, and press OK.
How to Set Up a Favorite Channels List
4. Highlight SETUP FAVORITES, and press OK.
5. Follow steps 4 and 5 in the previous section to change your Favorite Channels List.
34
Page 35
How to Change TV Sengs
You can view and customize the features of your TV service.
CHANGING THE SCREEN ASPECT RATIO AND RESOLUTION
Changing the screen aspect ratio changes the screen dimensions for the video image and for the
TV screens.
1. Press MENU.
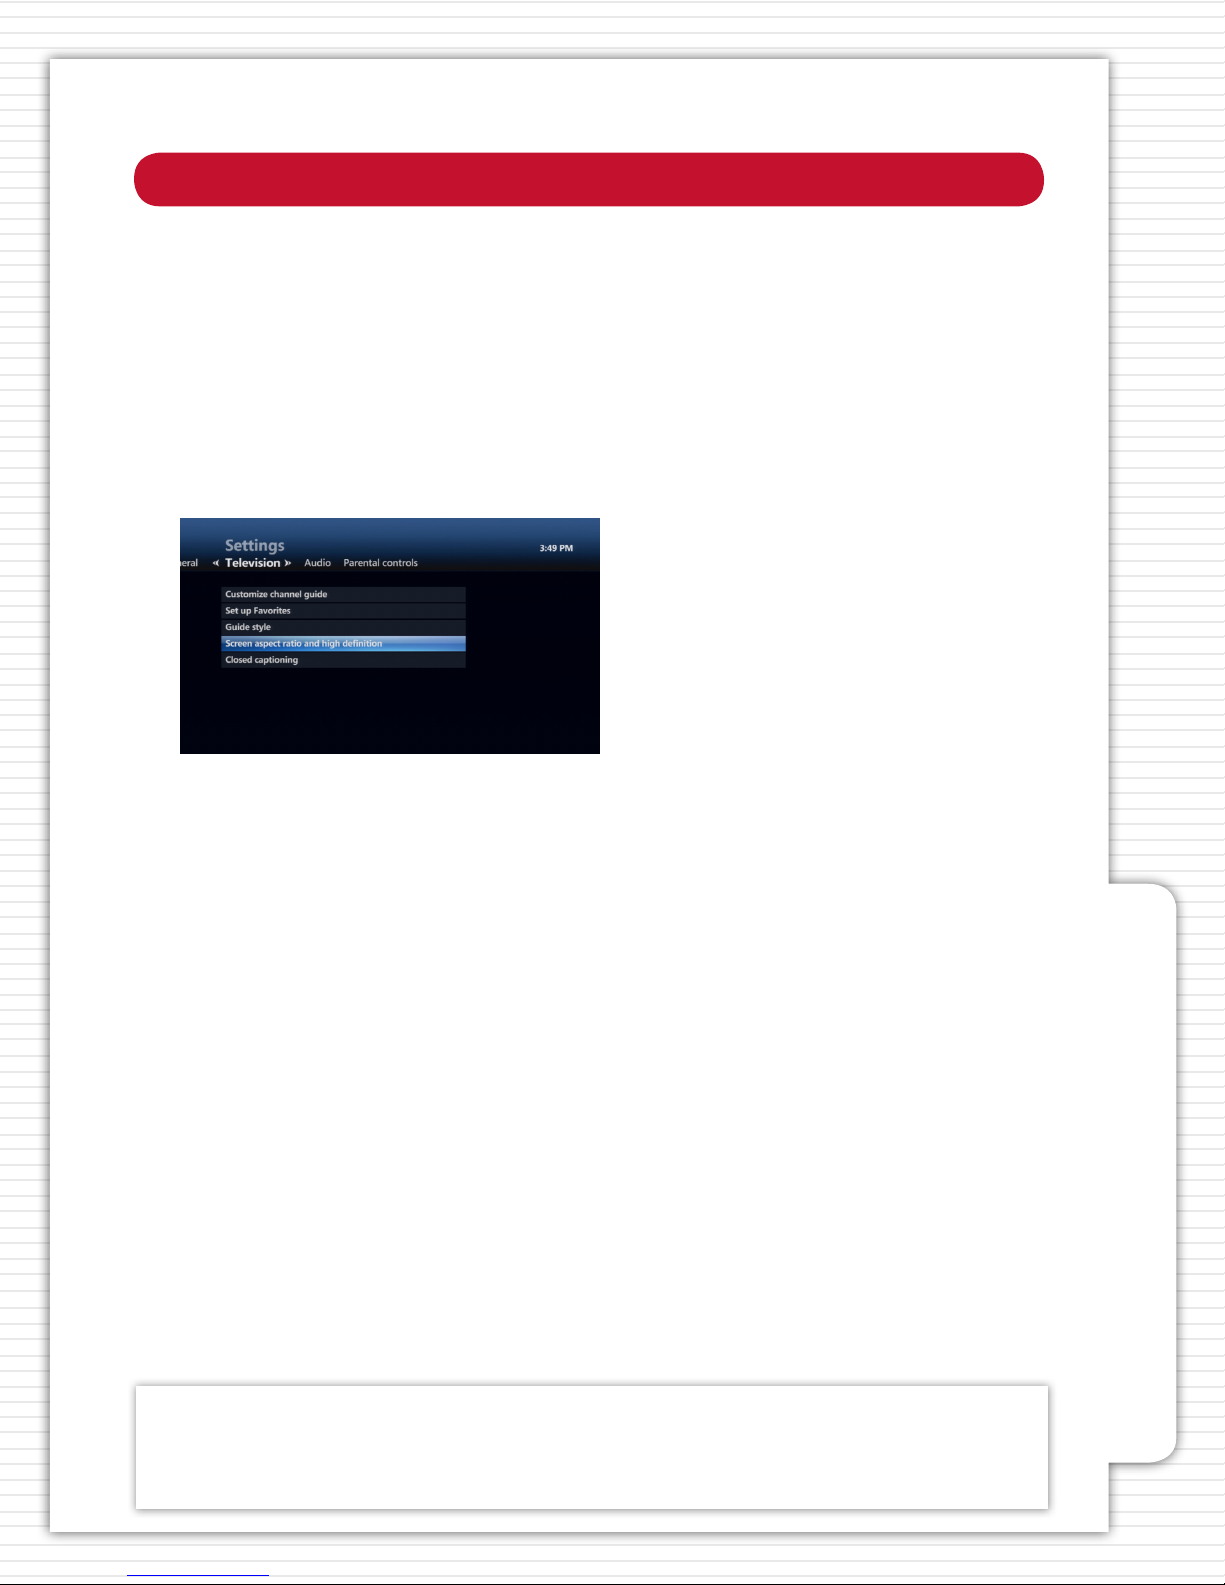
2. Press the RIGHT ARROW button to highlight SETTINGS on the horizontal menu bar.
3. Highlight TELEVISION, and press OK.
4. Highlight SCREEN ASPECT RATIO and HIGH DEFINITION, and press OK. The SCREEN ASPECT
RATIO AND HIGH-DEFINITION SCREEN appears.
5. Highlight the ASPECT RATIO and RESOLUTION that you want and press OK to activate.
• 4:3 STANDARD DEFINITION - Used for ordinary television.
• WIDESCREEN STANDARD DEFINITION - Used if you have a wide-screen (16:9 aspect ratio) that
does not display in high-denition.
• 720p HIGH DEFINITION - Used if you have a wide-screen TV that displays images 720 pixels
wide.
• 1080i HIGH DEFINITION - Used if you have a wide-screen TV that displays images 1080 pixels
wide.
6. Highlight CONTINUE, and press OK. You can also select CANCEL CHANGES and press OK to exit
from this screen without changing the aspect ratio.
How to Change TV Sengs
QUICK TIP:
To change aspect ratio of SD programming on a HDTV, press the ZOOM/ENTER BUTTON while watching a television
program. A sub-menu will appear allowing you to select dierent aspect ratios including normal, stretch and zoom.
This aspect ratio will aect all SD channels until it is changed again.
35
Page 36
How to Change TV Sengs
TURNING SYSTEM SOUND EFFECTS ON AND OFF
As you press buttons on your remote control, sound eects, such as beeps and clicks, are heard.
You can turn these sound eects on and o as you choose.
1. Press MENU.
2. Press the RIGHT ARROW button to highlight SETTINGS on the horizontal menu bar.
3. Highlight GENERAL, and press OK.
4. Highlight SYSTEM SOUND EFFECTS, and press OK.
5. Highlight PLAY SOUND EFFECTS or MUTE SOUND EFFECTS, and press OK.
6. Highlight SAVE, and press OK. You can also select DON’T SAVE and press OK to exit from this
screen without changing the sound eects setting.
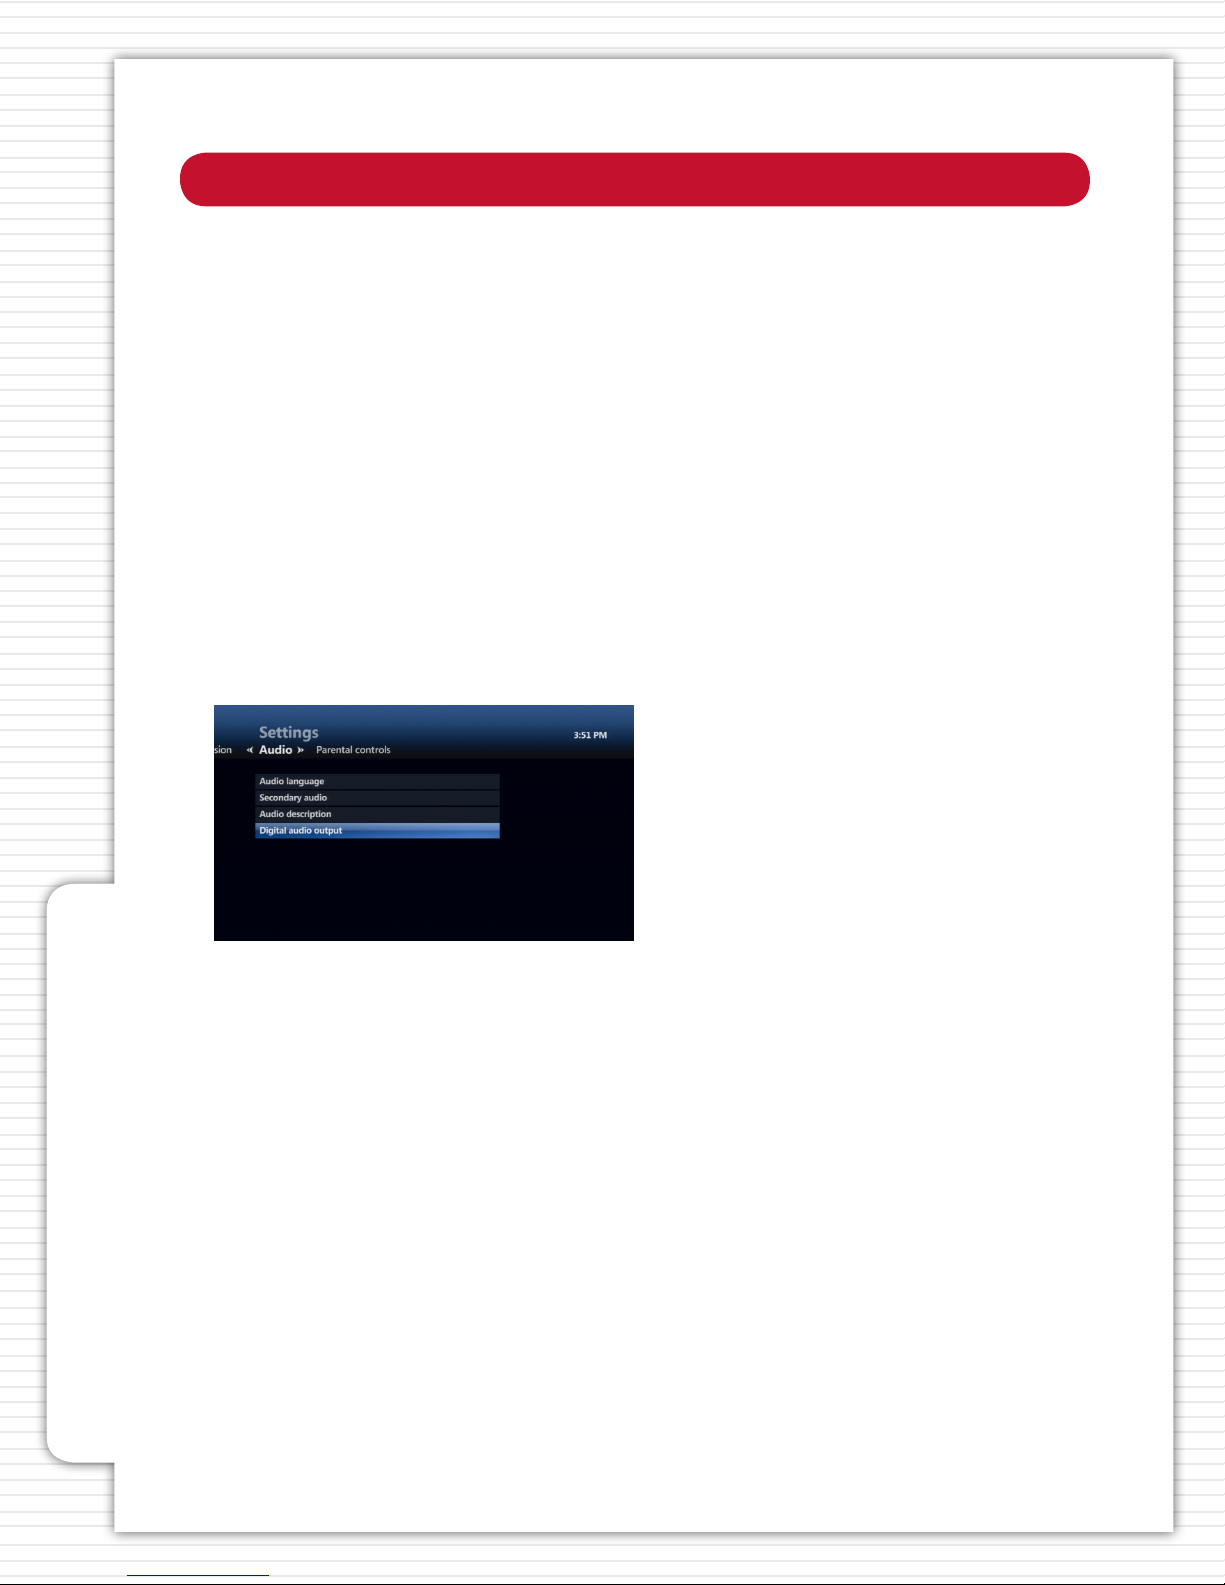
TO ACTIVATE DIGITAL AUDIO (DOLBY 5.1 OR AC3)
1. Press MENU.
How to Change TV Sengs
2. Highlight SETTINGS.
3. Highlight AUDIO.
4. Highlight DIGITAL AUDIO OUTPUT and press OK.
5. Highlight SURROUND SOUND and press OK.
6. Highlight SAVE, and press OK.
36
Page 37
Caller ID On Your TV
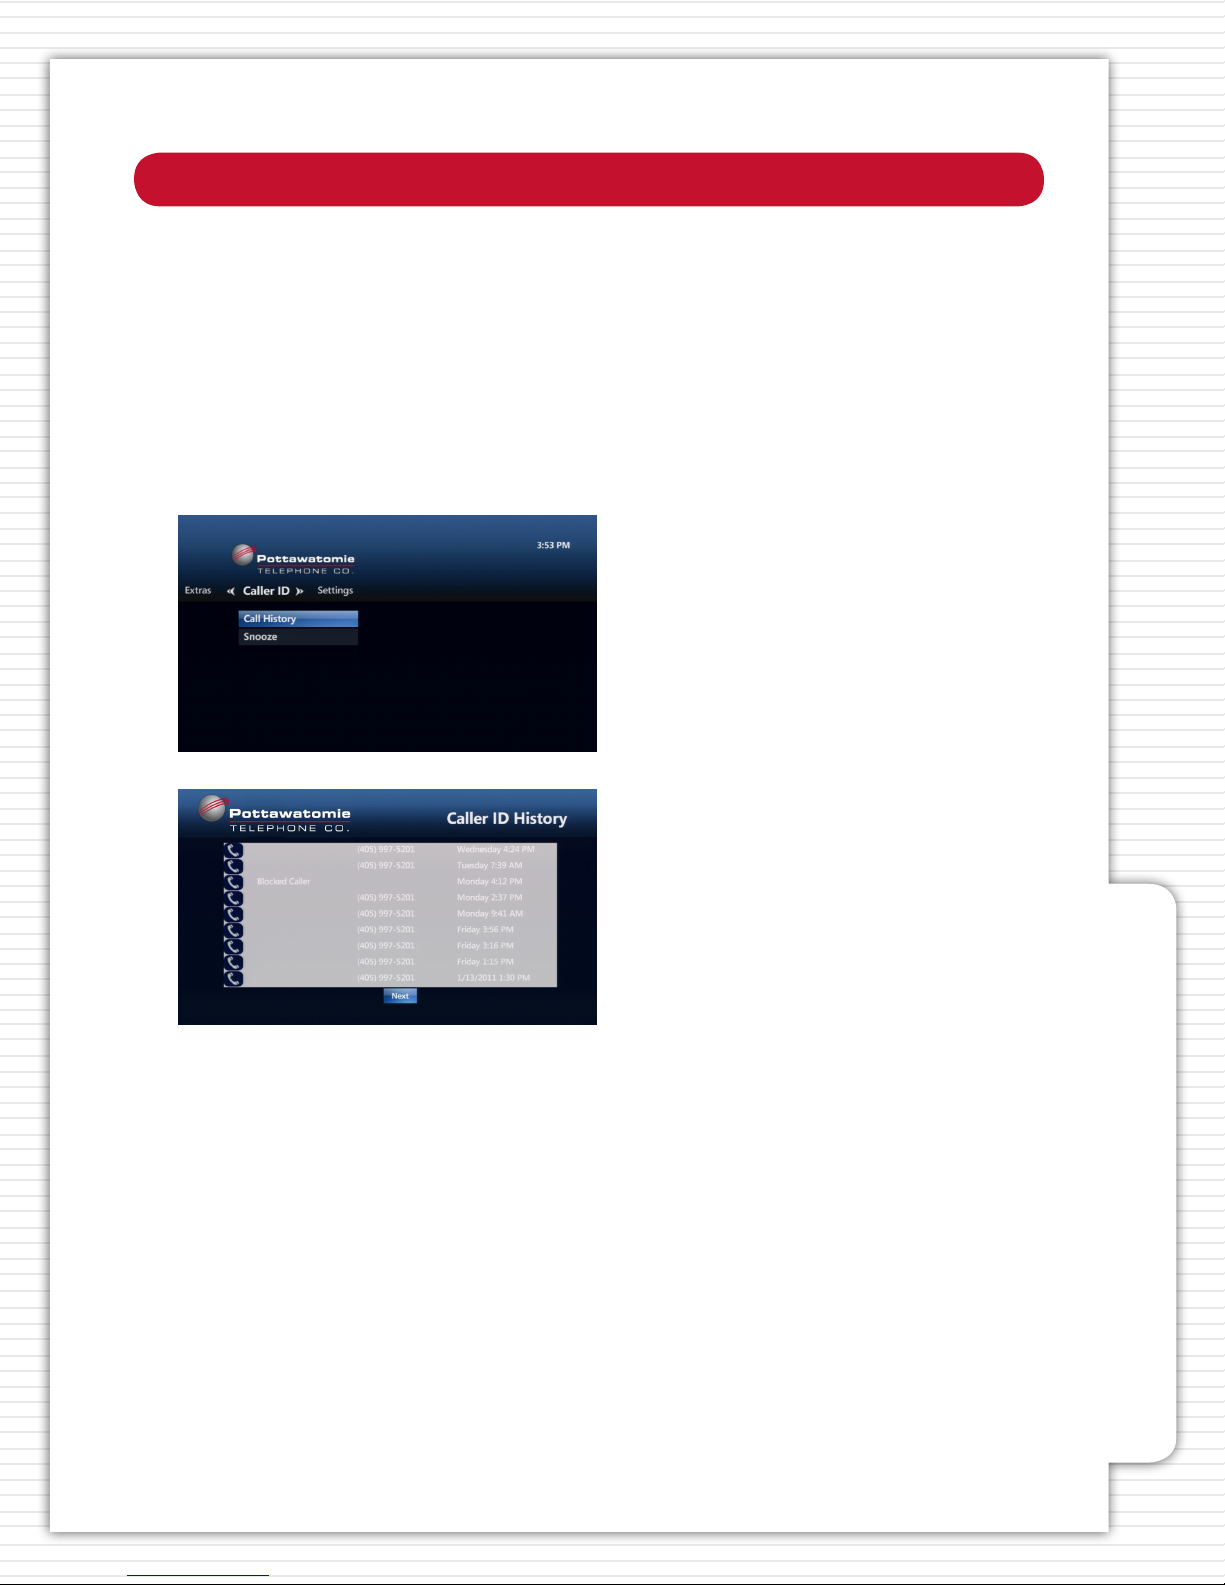
If you have Caller ID on your Pottawatomie home phone, you can see the name and number of
who is calling right on your TV screen. Take the call or wait until your show is nished. To nd out
more, or to subscribe to Caller ID, call us at 405.997.5201.
VIEWING YOUR CALLER ID HISTORY
1. Press CALLER ID.
2. USE the UP/DOWN ARROW button to select CALL HISTORY and press OK.
Caller ID On Your TV
37
Page 38

Programming the Remote
The remote control will only control the device which is selected by the appropriate mode key
(STB, TV, DVD, and AUX). The mode key light for the selected device ashes each me a valid key
is pressed. In order to control other devices with your remote control, you need to tell the remote
control what types of devices you have.
The instrucons below take you through the steps needed to do this. The volume controls will
control your Set Top Box (STB) unl the TV device mode is setup. The channel controls will always
control your STB.
To use your remote control for TV, you will need to setup the TV mode key to control the devices
using either the Manual or Search procedures below.
Use the following steps to setup the TV mode key:
1. Power on the device you want to program and locate the 4-digit code from the code list.
2. Press and hold the mode key (TV) and while holding it pressed, press the OK key for one second.
3. Release both keys, all of the mode keys will ash then the selected mode key light will stay lit.
4. Enter the 4-digit code by pressing the numerical keys (0-9). The selected mode key light will blink
for each digit entry and will remain o aer the entry of the fourth digit - indicang a successful
setup.
5. Point the remote control at the selected device and press the power key once. The device
should turn o. If the device stayed on, repeat the steps 2 thru 5 trying each code for your brand
unl you nd the correct code.
To use the remote control for your Set Top Box, press the STB mode key.
Programming the Remote
NOTE: If an invalid code is entered or no key is pressed at all for 30 seconds, the mode key light
ashes for 3 seconds and turns o. The remote control returns to normal operaon and you will
need to start over from step 2 to setup the device.
To search for a parcular device code for the TV:
1. Turn on the device you want to control and point the remote at that device.
2. Press and hold the mode key (TV) and while holding it pressed, press the OK key for one second.
3. Release both keys, all of the mode keys will ash then the selected mode key light will stay lit.
4. Press the power buon repevely unl the selected device turns o. Once your device has
turned o, press OK to save the code.
5. To indicate a successful setup, the selected mode key will turn o and you are ready to setup
another device by following steps 1 thru 4 of this secon.
38
Page 39

Remote Control TV Codes
TV
Abex 0185
Acme 0010
Admiral 0020 0226 0001
Advent 0116 0176 0922
Adventura 0174
Aiko 0058
Aiwa 0195 0196 0227 0269
Alleron 0051
Amark 0020
Amtron 0053
Akai 0105 0002 0077 1137
1138 0254 1105 1113 1139
Anam National 0053 0003
0025 0042 0193
AOC 0004 0005 0009
1009 0014 0156 0175 0187
Apex 0214 0216 0215 1132
Archer 0020
Aspect 0059
Audiovox 0053 1019 1117
Axion 0177
Bang & Olufsen 0190
Belcor 0004
Bell & Howell 0031 0049 0000
0001
Benq 0081 0083 0101
Bluesky 1155 0144
Bradford 0053
Broksonic 0147 0135 0310
Brokwood 0004
Candle 0004 0009 0174 0008
Capehart 0175
CCE 1153
Celera 0214
Celebrity 0002
Centrios 0169
Centurion 0009
Cetronic 0042
Changhong 0214 0401
Cineral 0058 0144
Citizen 0004 0009 0053 0105
0109 0189 0135 0001 0008
0042 0058
Clairtone 0014
Classic 0214 0401 0042
Coby 1091 1124
Color Voice 0010
Colortyme 0004 0009 0010
Concerto 0004 0009
Concierge 0121
Contec/Cony 0053 0012 0014
0042
Cornea 0050
Craig 0053 0042
Crosley 0062
Crown 0053 0042
Curtis Mathes 0031 0105
0130 0004 0009 0000 0049 0109
0358 0001 0015
CTX 0020
CXC 0053 0042
Cybervision 0144
Daewoo 0130 0004 0009 0100
0005 0138 0043 0140 0039 0444
0080 0042 0058 0017 0010 0126
0018 0127 0019
Daytron 0004 0009
Dell 0209 0028 0132
Diamond Vision 0210 0948
0092
Digimate 1017
Digistar 1019 0165 0118 0116
0167 0132 1020 1151 1152
Dimensia 0031 0000
Disney 0158 0135
Dukane 0059 0072
Dumont 0121 0004
Durabrand 0189 0135 0153
0217 0157 1135
Dynasty 0042
Elektra 0001
Electroband 0002 0014
Electrohome 0004 0009
0254 0003 0022
Elite Video 0197
Emerson 0004 0009 0044
0135 0049 0051 0189 0053 0147
0039 0130 0210 0456 0040 0041
0042 0021 0023 0024 0179 0045
0025 0027 0030 0032 0034 0035
Envision 0004 0009 0074 1009
ESA 0189
Fisher 0049 0110 0268
0180 0012
Fujitsu 0197 0051 1006
Funai 0051 0189 0053
0227 0456 0042
Futuretec 0053 0042
Gateway 0046
GE 0031 0107 0164 0004
0009 0044 0054 0000 0342 0003
0125 0015 0022 0052 0087
Gibralter 0121 0004
Goldstar 0004 0009 0005
0227 0338 0012 0057 0080 0156
Gradiente 1013 0004 0153
1160 1159
Grundy 0051 0053
Guestvision 0201
Gvision 1005
Haier 0081 0216 0217
0157 1147
Hallmark 0004 0009
Harley Davidson 0153
Harvard 0053
Hewlett Packard 1015 1004
Hisense 0073 0182 0216 1016
Hitachi 0088 0059 0142 0060
0072 0004 0009 0091 1002 0001
0012 0061 0137 0139 0141 0179
Hyundai 1134
ILO 0198 1070 1024
1023 0146 0189 1139
IMA 0053
Innity 0062 0288
In Focus 0000
Initial 1070 0146 1085 1109
Insignia 0103 0189 0217 0135
0133 0116 0167 1148 0456 0029
Integra 0181
Inteq 0121
Janeil 0174
JBL 0062
JCB 0002
JC Penney 0031 0004
0005 0009 0105 0107 0109 0054
0000 0087 0008 0012 0015 0022
0030 0052
Jensen 0004 0009 0133
JVC 0060 0026 0197 0069
0160 0247 0923 0012 0065 0067
Kawasho 0004 0009 0002
Kaypani 0175
KEC 0042 0053
Kenwood 0004 0009
KLH 0214
Kloss Novabeam 0068 0174
Kogi 1005
Konka 0053 0011 0016 0047
0066 0103 0412 0413 0029
KTV 0053 0014 0021 0042
Kurazai 0001
Lasonic 0210 0948
Legend 0116
LG 0004 0009 0005 0132
0227 0338 0012 0057 0080 0156
Liquidvideo 0177 0168
Lloyd 0153
Lodgenet 0031 0202 0000
0037
Loewe 0211 0062
Logik 0031 0000 0001
Luce 0055
Luxman 0004 0009
LXI 0031 0004 0009 0049
0062 0107 0109 0000 0227 0015
Magnasonic 0051
Magnavox 0062 0004
0009 0183 1133 0008 0068
Majestic 0031 0000 0001
Marantz 0062 0181 0004 0009
Maxent 0046
Medion 0213 0198 0158
Megatron 0004 0009 0059
MEI 0014
Memorex 0004 0009
0049 0051 0135 0031 0000 1007
MGA 0004 0005 0009 0051
0012 0022 0141 0180
Midland 0031 0121 0054 0107
Mintek 0146
Minutz 0052
Mitsubishi 0005 0151
0051 0004 0009 0022 0141 0180
Monivision 0036
Montgomery Ward
Moteva 0049 1013
0227
Motorola 0020 0003
MTC 0004 0005 0009
Multitech 0053
Multivision 0084
Myron & Davis 0212
NAD 0004 0009 0109 0185
NEC 0181 0004 0005 0009
NET-TV 0046 0124
Nexxtech 1052 0167
Nikei 0042
Nikko 0004 0009 0058
Niko 1143
Norcent 0216 0043 0056
NTC 0058
Olevia 1027 1012 1140 1142
Oncommand 0201
Onking 0042
Onwa 0053 0042
Optimus 0170 0185
0141
0031 0001 0000
0003 0010 0095 0141
0070
0001
0075 0141
0268 0310 0001
0015
0105 0109 0014
1156
Optoma 1028
Optonica 0020 0095
Orion 0121 0135 0035
Panasonic 0171 0148
0054 0170 0062 0003 0070
Philco 0062 0004 0005 0009
0183 0011 1158 0068 0075 0141
0003 0008
Philips 0062 0204 0184 0205
0207 0004 0189 0183 0199
0200 0081 1149 1154 0003 0008
0068 0075 0086 0087 0141
Philips-Magnavox 0062 0204
0207 0183 0226 0288
Pilot 0004
Pioneer 0185 0181 0072 0004
0009 0090 0179
Piva 1075
Planar 1007
Polaroid 0182 0173 0133 1019
1136 0029
Portland 0004 0005 0009 0138
Precision 0166
Price Club 0105
Prima 1019 0165 0116 0167
Princeton Graphics 0020 0099
Prism 0054
Proscan 0031 0107 0015 0162
Proton 0192 0004 0009 1010
0093 0175 0186
Protron 1017 1157
Proview 1025 1026 1027
Pulsar 0121 0004
Quasar 0171 0148 0054 0170
0062 0003 0070
Radio Shack 0031 0004
0048 0049 0053 0170 0009 0227
0342 0000 0012 0041 0042 0095
RCA 0031 0004 0048 0054
0094 0100 0102 0107 0129 0191
0005 0009 0000 0162 0163 0003
0015 0022 0096 0113 0125 0179
0187 0188
Realistic 0031 0004
0048 0049 0053 0170 0009 0000
0227 0012 0041 0042 0095
Rhapsody 0014
Runco 0121 0181 0111
Sampo 0124 0046 0004 0009
0175 0012
Samsung 0105 0077
0076 0109 0007 0009 0004 0005
0172 0012 0015 0080 0104 0106
Samsux 0009
Samtron 0105
Sansui 0135
Santeca 0194
Sanyo 0049 0097 0110 0004
0012 0108 0180
Sceptre 0149 1132
Scotch 0004 0009
Scott 0004 0009 0051 0053
0024 0035 0042
Sears 0031 0062 0049 0051
0105 0004 0009 0107 0109 0110
0189 0000 0112 0079 0394 0456
0012 0015 0180
Selectron 1022 1020
Semp 1001
Sharp 0079 0123 0063 0020
0004 0009 0226 0266 0006 0095
Shogun 0004
Signature 0031 0000
Simpson 0008
Sonic 0014
Sony 0128 0013 0002 0071
Sova 1003 1095
Soyo 1130 1131
Soundesign 0004 0009
0051 0053 0008 0042
Spectra 0210
Spectravision 0203
Squareview 0189
SSS 0004 0053 0042
Starlite 0053
Star Sight 0064
Supra 0004 0082
Superscan 0112 0079
0130
Supersonic 0944
Supremacy 0174
Supreme 0002
SVA 0216 0212
0176
Sylvania 0062 0004
0009 0135 0189 0183 0008 0068
Symphonic 0053 0189
0163
Syntax 1027 1140 1142
Tandy 0020
Tashiko 0153
Tatung 0081 0198 0003
Technics 0054
Techwood 0004 0009
Teknika 0031 0004 0005 0009
0051 0053 0105 0109 0170 0000
0174 0001 0008 0012 0042
Telecaption 0117
Telerent 0031 0000 0001
Tera 0004 0186
Tevion 0198
TMK 0004 0009
Toshiba 0159 0178 0109 0120
0181 0105 0049 0095 0170 0012
Totevision 0153
Trutech 1029 1145 1121
Universal 0052 0087
Victor 0060
Vidtech 0004 0005 0009
Viewsonic 0046 0072
Viking 0174
Viore 1018
Vizio 0081 1011
Wards 0031 0062 0004 0005
0009 0051 0000 0068 0075 0087
0095 0119 0052 0001 0008 0024
Westinghouse 0143 0114
White Westinghouse 0100 0130
0138 0136 1008 0227 0080
Yamaha 0170 0004 0005 0009
Zenith 0121 0009 0050 0078
0091 0138 0059 0131 0038 0111
0134 0153 0064 0004 0135 0023
1021
0122
0001 0023
0380 0152
0456
0075 0141 0161
0227 0456 0024
0054
0117 0141
1014 1144
1146
0039 0001 0058
HDTV
Sony 0071 0152
Mitsubishi 0146 1024
Proscan 0000
RCA 0031 0000
Samsung 0105
Dell 0209 0028 0132
Zenith 0121 0091 0111
Daewoo 0100
Philips 0205 0204 0208
Sampo 0124
Apex 0215
Hitachi 0088
JVC 0160
Panasonic 0170 0171
Sharp 0063
LCD TV
NET-TV 0124
Sharp 0079 0020 0004 0009
Benq 1150
Hitachi 1002
Sylvania 1141
Magnavox 0204 1133
Panasonic 0148
Philips 0206 0208
Polaroid 0182 0173 0133 1019
Samsung 0007 0085
Sony 0128 0013 0152
Toshiba 0159 0178 0105
Viewsonic 1144 1019
0074 1016 0198 1024 0168 0177
Zenith 0050 0059 0078
PLASMA TV
Acer 0081 0083
Fujitsu 0197 1006
Gateway 0046
Hitachi 0059 0072
LG 0050
Magnavox 1133
NEC 0181
Panasonic 0170
Pioneer 0072 0090
RCA 0000
Samsung 0076 0077
Toshiba 0170 0181
Viewsonic 0046 1019
Zenith 0131
PROJECTION TV
Hitachi 0059 0091 0061 0088
0060 0072 0137 0139 0141 0179
Pioneer 0185 0181
Sony 0002 0128 0013 0071
Toshiba 0109 0117 0141
Panasonic 0171 0054
JVC 0060 0069
LG 0155
Mitsubishi 0051
Samsung 0007 0105
Zenith 0091
0006 0095 0122
1136
1025 1026
0050 0198
* All codes are 4-digit codes.
Remote Control TV Codes
39
Page 40

Troubleshoong
Problem Possible Soluon
Cannot turn on my digital box
The digital box does not initialize
No picture or poor picture quality
Troubleshoong
• Try pressing the front panel power button on
your digital box.
• Make sure that all your power cords are
completely inserted into a power outlet.
• Ensure that your TV set is plugged into a working power outlet.
• If the digital box is plugged into a power bar
or surge protector, make sure that the power
bar is on and has not tripped. If it has tripped,
press the reset button on the power bar to
restore power.
• If the digital box is connected to a switched
electrical outlet, make sure that the switch is
on.
• If the green LED light at the front of the digital
box lights up, your box is now working.
• Check to ensure that your modem or router
is operating and that all cords are properly
connected.
• Turn the power on the digital box o and on.
• Check to ensure that your TV is set to the right
video input.
• Ensure that the TV channel is set to the
appropriate channel to match the settings on
your digital box and VCR/DVD (Video 1, 2, etc.) .
• Check the back of your digital box and any
additional devices to ensure that all cables are
rmly connected.
• Make sure all connections are made according
to the appropriate conguration.
The digital box does not respond to my remote
control
40
• Check the batteries in your remote.
• Press the STB button at the top of the remote.
• Change channels using the buttons on your
digital box. If this works, check the remote
control batteries.
• Note if the buttons light up when you press
them. If not, check the remote batteries.
• If your remote works with your TV digital
box but not with your TV or VCR/DVD, try
re-programming the remote control using
the codes in the remote control user guide
available on our website at potelco.com.
• Ensure there is a clear path between the
remote control and the equipment. If
necessary, clean the infra-red receivers.
Page 41

Noce of Customer Rights
Poawatomie Telephone Co. (PTC) thanks you for your business. As your local service provider, we
consider it a privilege to live and serve in this community. PTC demonstrates our commitment to
our community through a variety of “back to the community” services. Our renewed commitment
to you also includes our promise that you can always count on us for knowledgeable, friendly
service. Clear communicaon is not only the result of our quality service, it is the foundaon
of our long lasng relaonship with our customers. We invite you to stop by our oce, or call
us, and you will receive a one-on-one response from one community member to another.
We want to hear your comments or concerns about changes in television programming, service, rates
or other issues. Your feedback helps us provide beer services and products for our customers.
By Phone: 405.997.5201 or 800.522.3221
Online: www.potelco.com
Our Oce: 300 West Main St., Earlsboro, OK 74840
Noce of Customer Rights
Live Connecte d .
41
Page 42

Consumer Rights
Personally idenable informaon that we maintain related to our subscribers will be disclosed without prior wrien or electronic consent of subscribers only if:
1. it is necessary to render, or conduct legimate business relang to the services that are provided
to you
2. such disclosure is required by law or legal process as described below
Disclosure of informaon to governmental enes and other legal processes:
Federal law requires us to disclose personally idenable informaon to a governmental enty or
other third party pursuant to a court order. If the court order is sought by a governmental enty,
the Cable Act requires that you be aorded the opportunity to contest in court any claims made in
support of the court order sought. At such a proceeding, the Cable Act requires the governmental
enty to oer clear and convincing evidence that the subject of the informaon sought would be
material evidence in the case. In addion, pursuant to an administrave subpoena, state welfare
agencies may obtain the names and addresses of individuals as they appear in the subscriber records
of cable companies with respect to those who owe, or are owed, welfare support. Such informaon
may be obtained without a court order and does not require that a subscriber be given noce of and
the opportunity to contest the disclosure.
Noce of Customer Rights
Access to Records
Under the Cable Act, you have the right to inspect our records that contain personally idenable
informaon about you and correct any errors in such informaon. If you wish to inspect our records,
please nofy us in wring and an appointment at our local business oce will be arranged promptly
during our regular business hours. If you have any quesons concerning your privacy or PTC’s policy
as stated in this pamphlet, please call us at: 405.997.5201 or 800.522.3221.
Outages & Disconnects
Credit for service outages:
We regret any loss of service. However, in the event you are without all basic or any premium service
for a period of 24 consecuve hours or more, because of a system outage, we will – at your request –
credit your account a prorated amount for the loss of service.
Disconnecng services:
If you’re planning to move or disconnect your TV service, it’s important to call our oce to let us know
as soon as possible.
42
Page 43

Privacy Disclosure
Collecon and use of personally idenable informaon:
In order that we may provide service to you and operate eciently, we collect the following types
of informaon: your name, home and work address, telephone numbers, social security number,
and credit informaon. Depending on the services we provide to you, our records also may include
informaon on billing, payment, damage and security deposits, maintenance and repairs, the service
opons you have chosen, and the number of set-top boxes or other digital TV equipment installed
in your home. We also keep records of research concerning subscriber sasfacon with the service,
which are obtained from subscriber interviews and quesonnaires. Addionally, we may request a
record of whether you rent or own your home in the event that landlord permission is required prior
to installing our video facilies.
The personally idenable informaon described in the preceding paragraph is used for purposes such
as the following: to make sure you are billed properly for the services you receive; to send you pernent
informaon about PTC; to improve the quality of service; to answer quesons from subscribers such
as troubleshoong; to ensure compliance with relevant law and contractual provisions; and for tax
and accounng purposes.
Billing
PTC Digital TV service is billed monthly, one month in advance. You are responsible for the cost of
repairs to any wiring within the home. Inside wire maintenance plans are available. Please contact
customer service for more details. All bills are due on the 1st and delinquent on the 15th. All customers
are encouraged to pay their bill in a mely manner. If payment is not received by the 15th, a reminder
noce will be sent and your service will be subject to disconnecon. If service is disconnected, a
reconnect fee will be charged to resume service.
Payment opons:
PTC oers several opons to pay your bill; all of which are free and designed for your convenience.
We accept payment by mail, phone, or in person in the form of check, credit card, or checking/savings
account bank dra.
Green billing:
You may also choose to “go green” and enroll in our E-bill program using our website. With E-bill you
can review your bill each month and enroll in automac monthly payments using a credit card or bank
dra. Just visit www.potelco.com to enroll in our E-bill program or call customer service for more details. Again, all of these opons are free to you.
Noce of Customer Rights
43
Page 44

PO Box 66
300 W Main St. Earlsboro, OK 74840
405.997.5201 or 800.522.3221
www.potelco.com
Full User Guide Rev. Mar. 2011
 Loading...