

Page 1
User Manual
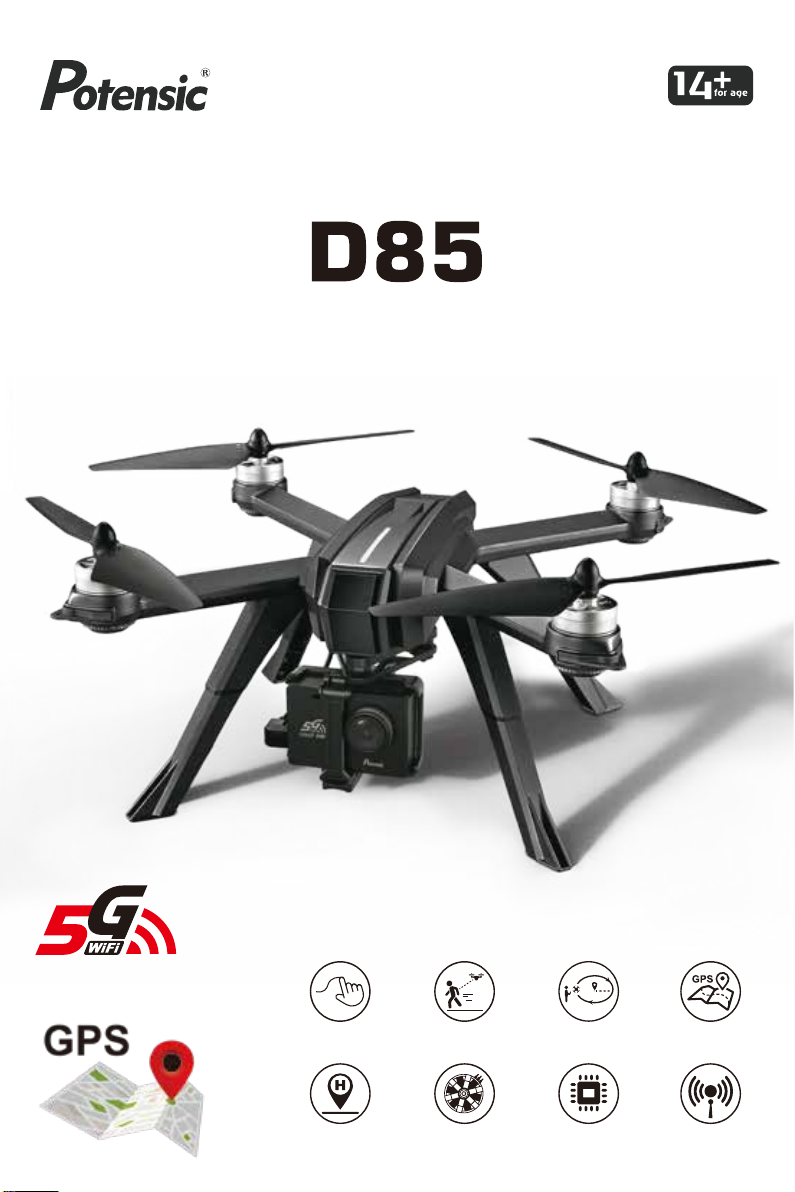
Farther.Faster.Clearer
(This camera works with 5G WIFI only.
Please make sure that your device
supports 5G WIFI.)
One key to Return
Brushless motor
(2204 1500KV)
Point of interestTapFly Follow me
Independent ESC
(stuck and high-temperature protection)
GPS Positioning
2.4GHz two-way
communication
(weak signal alarm, low voltage alarm)
Page 2

Important statement and safety guidelines
Thank you for purchasing Potensic product. Please read this manual carefully before use and retain it for
future reference.
It should be retained for future reference.
Important statement
● This aircraft is not a toy, but hobby grade model. It should be assembled and operated properly. Pilot
must operate this aircraft in safe way. Improper operation may cause injury or property damage.
● This aircraft is applicable for pilots aged 14+ who are with skilled flying experience.
● Users are in full charge of proper operating this aircraft. Manufacturer and dealers disclaim any
responsibility for damages caused by misuse.
● Keep the small accessories away from kids to avoid accident.
Flight safety guidelines
Hobby grade radio control aircraft is somewhat considered to be the item with the most potential danger.
Users should firmly uphold the principle of “safety comes first”. Never fly the aircraft near airports,
above crowds or in zones storing dangerous goods and realize operator's responsibility towards
accidents caused by improper operations.
● Stay away from obstacles, crowds, power lines, trees or waters
Always choose a wide open area for every flight, well away from people and property. Never fly directly
over people or animals. Please don't fly in such bad weather conditions as high temperature, snow,
strong wind (≥level 5), rain or fog. Maintain a 7ft (2m) distance from the aircraft when taking off and
landing.
● Keep the aircraft in dry environment
The aircraft is composed by sophisticated electronic components and mechanical parts. To avoid
damages on the mechanical and electronic components, please keep the aircraft in dry environment
and use clean cloth to wipe the surface and keep it clean.
● Practice flying together with skillful pilot
Beginners are suggested to practice flying together with skillful pilot’s guidance. Do not fly alone.
-1-
Page 3

● Bear proper operation and safe flight guidelines in mind
Please take a careful look at the manuals before flights for important information of product functions
and operation tips, and learn how to use the accessory, safe flight always comes first. Stay informed
of and abide strictly by relevant local laws and regulations. Keep away from any non-flight zones and
respect other people's privacy.
● Safe flying
Please make sure you are in good shape mentally before every flight. Fly the aircraft as per your flying
experience. Never fly under influence of alcohol or drugs. Keep the remote controller at least 20 cm
away from your body when flying the aircraft.
● Keep distance from a flying aircraft
Never use your hands to touch a flying aircraft under any circumstance. Don’t approach and touch a
landed aircraft before its propellers are completely locked.
● Keep away from heat source
The aircraft is made of metal, fiber, plastic, electronic component and other material. Please keep it
away from the heat source to avoid deformation or even damage caused by sun exposure and high
temperature.
● Environmental protection requirements
To protect our blue planet, please recycle the aircraft as per local laws and regulations.
Product profile
Product configuration
Package includes
Aircraft X1 High landing gear X4
Propeller changing tool X1
Extra Propellers A/B X2
Power adaptor X1
Camera X1
Technical parameter of the aircraft
Diagonal: 310mm Overall height: 150mm
Gross weight: about 610g (with undercarriage, battery, camera and high landing gear)
Brushless motor: 2204 1500KV
Camera mount X1
Remote controller X1
Charging converter X1
Battery X1
Maximum flying time: about 19 minutes
-2-
Screwdriver X1
Balance charger X1
Mobile phone holder X1
Battery: 7.4V 2800mAh
Page 4
Product assemble
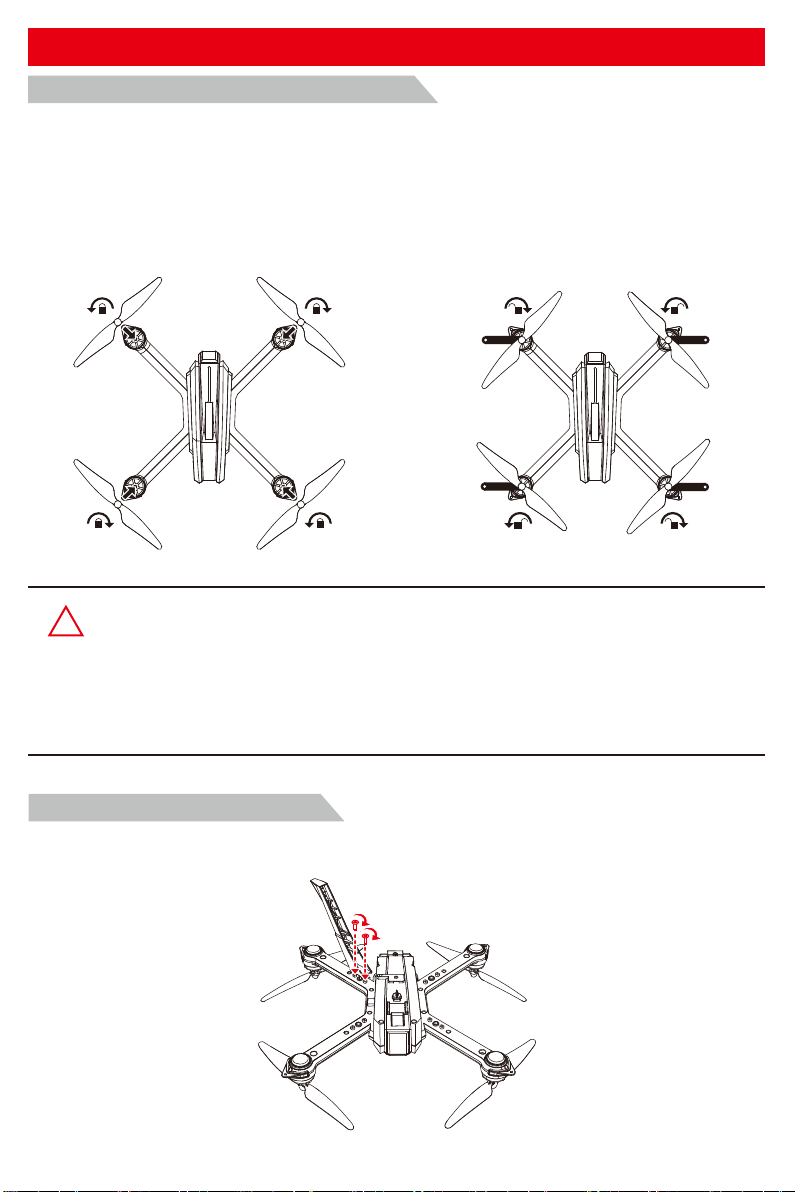
How to attach and detach the propellers
● Attach the propellers:
Install propeller A and propeller B on the corresponding motor shaft and fix the rotor propellers tightly by
rotating them as per the “lock” direction showed on the propellers (indicated as Pic. 1).
●Detach the propellers:
Fix the brushless motor by rotor propellers changing tool and then rotate and remove the propellers as
per the “unlock” direction showed on the propellers (indicated as Pic. 2).
A
A
B
B
Pic. 1 Pic. 2
● Please make sure that the clockwise and the counter-clockwise propellers are installed on
!
the correct motors, because the aircraft will not fly normally for wrong propellers installation.
● Be careful when installing the propellers, as they are a little sharp.
● Please use MJX propellers for this aircraft.
● Extra propellers can be ordered additionally.
B
B
A
A
A
A
B
B
B
B
A
A
High landing gear installation
Insert the high landing gear plug into the socket locating at the bottom of the aircraft, align the 2 screws
positions and fix the high landing gear by screwing clockwise.
-3-
Page 5
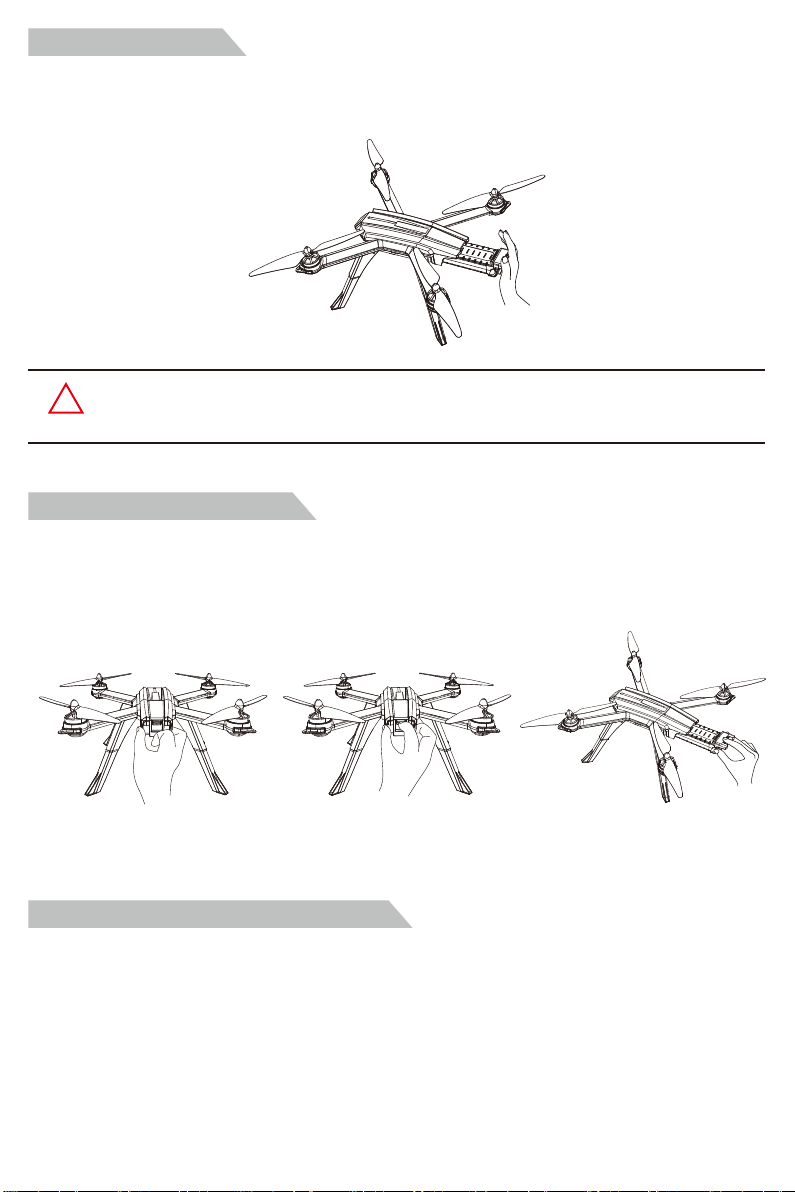
Battery installation
Slide the battery into the battery compartment at the rear of the aircraft by pushing with appropriate
force, the aircraft will make beep sounds with LED lights flashing. Please make sure that the battery
is installed firmly before flying.
Attention: The battery should be installed firmly, failure to do so may affect the flight safety
!
of your aircraft. The aircraft may crash due to power-cut during the flight.
How to remove the battery
Step 1. Put your thumb and middle finger on the designated position (indicated as Pic.1);
Step 2. Press the elastic buckle at the rear of the battery with your index finger, and pull backward with
appropriate force, then the battery will be removed (indicated as Pic. 2-3).
To avoid slipping, please keep your finger and your aircraft dry and clean.
Pic.1
Pic.2
Pic.3
How to charge the battery of aircraft
How to charge the battery with charging device A:
Step 1. Make sure that the power adaptor is connected with the power outlet (indicated as Pic. 1);
Step 2. Connect the balance charger to the power adaptor (indicated as Pic. 2);
Step 3. Insert the white plug of the charging converter face up into the socket of the balance charger
(indicated as Pic. 3);
Step 4. Slide the charging converter onto the battery from the middle position and insert the pins into
the battery plug to start charging (indicated as Pic. 4).
Full charging time takes about 7 hours.
-4-
Page 6
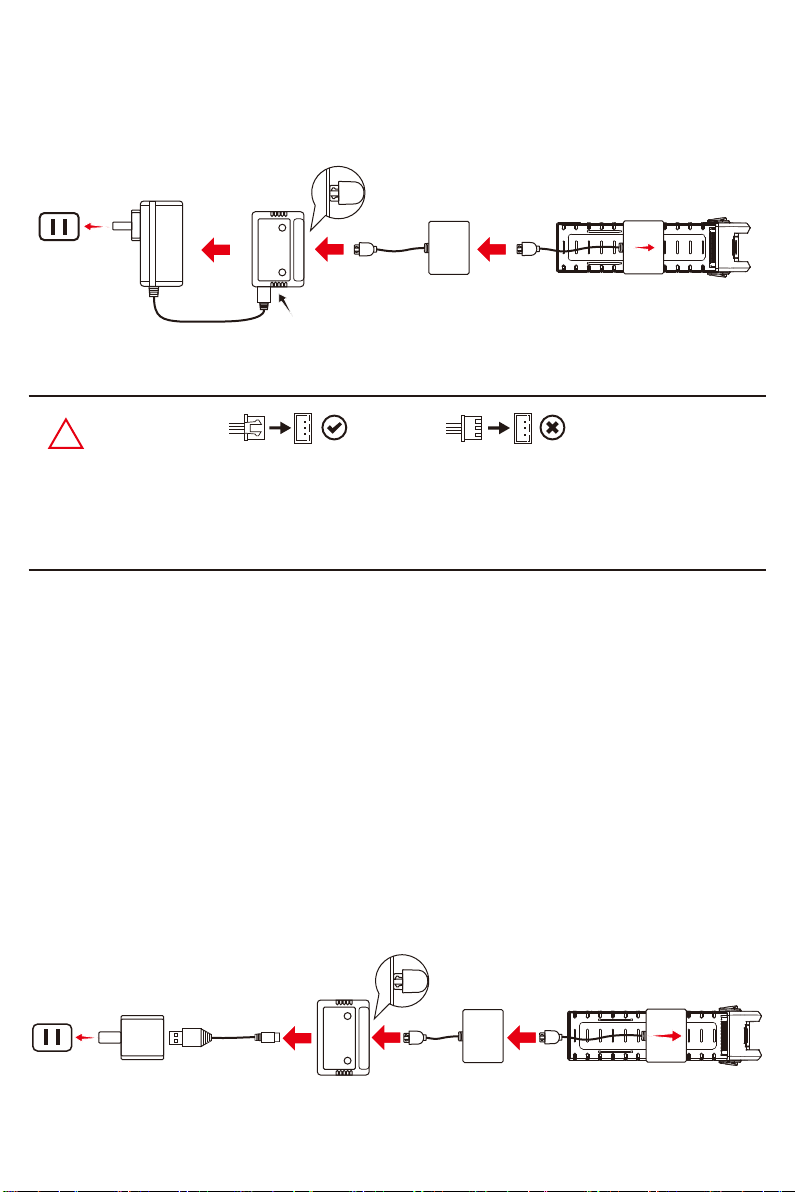
● When charging is proceeding, the green light keeps flashing and the red light keeps solid on;
● When charging is finished, both of the green light and red light keep solid on;
● If the battery and charging converter is not connected with the balance charger, but the balance
charger is connected with the power adaptor, the red light keeps solid on and the green light is off;
● Once there is any malfunction, the red light will be solid on and the green light will keep flashing
rapidly.
Charging converter BatteryPower adaptor Balance charger
Pic. 1 Pic. 2
Warm tips:
!
Pic. 3
Pic. 4
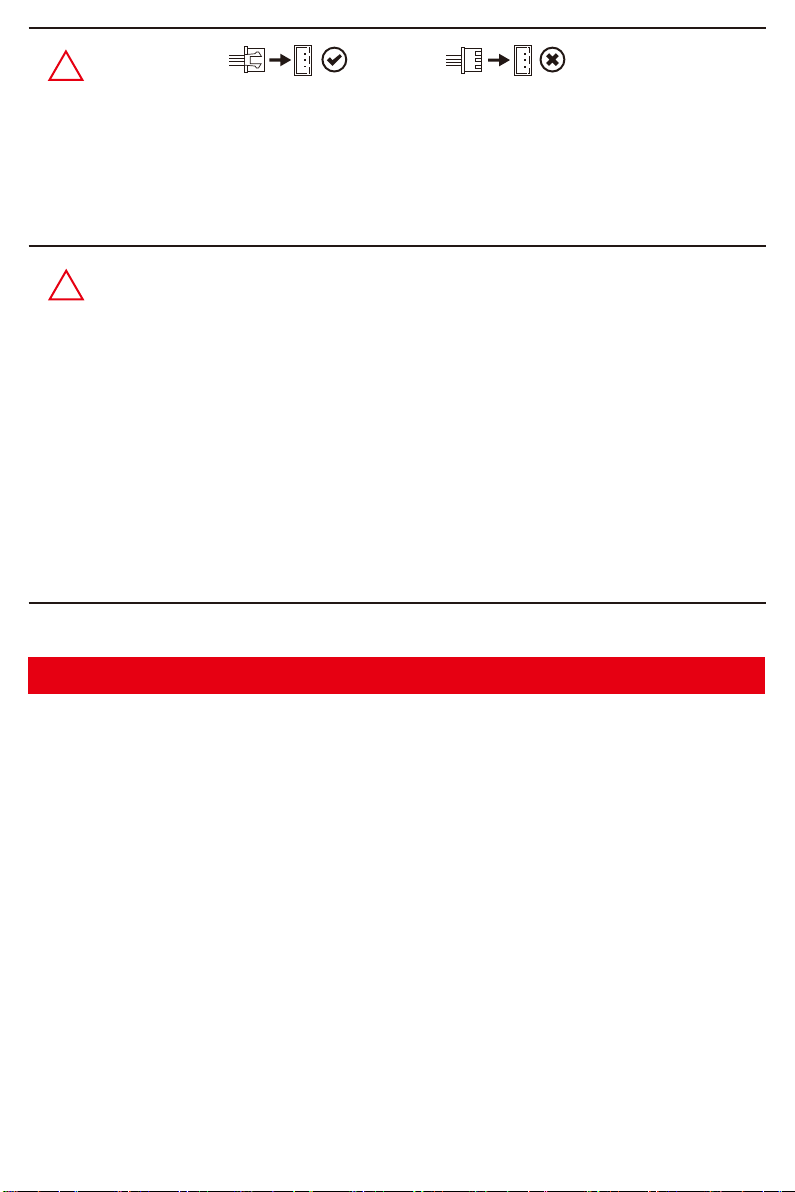
●The battery plug should be connected correctly with face up (but not upside down) when
plug into the balance charger; Failure to do so will result in battery cannot charge or charger
damaged.
●We recommend using 5V-2A adaptor for charging.
How to charge the battery with charging device B:
Step 1: Make sure that the power adaptor is connected with the power outlet (indicated as Pic. 1);
Step 2: Connect the balance charger to the power adaptor by plug-in the USB cable accordingly
(indicated as Pic. 2);
Step 3: Insert the white plug of the charging converter face up into the socket of the balance charger
(indicated as Pic. 3);
Step 4: Slide the charging converter onto the battery from the middle position and insert the pins into
the battery plug to start charging (indicated as Pic. 4).
Full charging time takes about 7 hours.
● When charging is proceeding, the green light keeps flashing and the red light keeps solid on;
● When charging is finished, both of the green light and red light keep solid on;
● If the battery and charging converter is not connected with the balance charger, but the balance
charger is connected with the power adaptor, the red light keeps solid on and the green light is off;
● Once there is any malfunction, the red light will be solid on and the green light will keep flashing
rapidly.
USB
Power adaptor
(not included)
Pic. 1 Pic. 3 Pic. 4 Pic. 5
Pic. 2
Charging converter BatteryUSB cable Balance charger
-5-
Page 7
Warm tips:
!
●The battery plug should be connected correctly with face up (but not upside down) when
plug into the balance charger; Failure to do so will result in battery cannot charge or charger
damaged.
●We recommend using 5V 1-2A adaptor for charging.
●It’s not suggested to charge by computer.
●Need adult supervision when this aircraft is being played by children.
!
●Only batteries of the same or equivalent type as recommended are to be used.
●Insert batteries with correct polarity.
●Rechargeable batteries are to be removed from the aircraft before being charged.
●Rechargeable batteries are only to be charged under adult supervision.
●Exhausted batteries are to be removed from the aircraft.
●The supply terminals are not to be short-circuited.
●The charging line to be used with the product should be regularly examined for potential
hazard, such as damage to the cable or cord, plug, enclosure of other parts and that in the
event of such damage, the product must not be used until that damage had been properly
removed.
Camera & Camera mount installation
Mounted on Potensic original 5G WIFI camera and install “Potensic-M2” APP on mobile device, your
aircraft will be capable of flying in the intelligent flight modes: Follow Me, Point of Interest and Waypoint
flight.
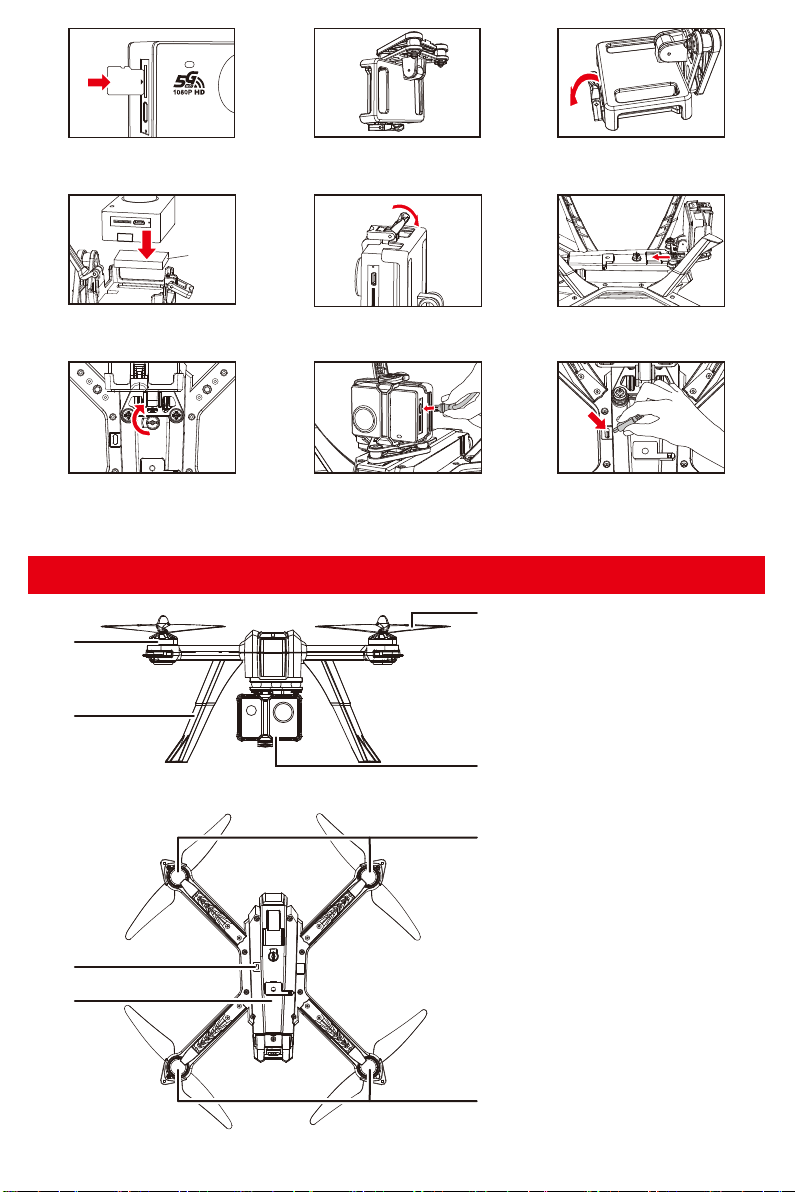
Step 1. Insert the TF card(not included) into the card slot at the left side of the camera (Pic. 1);
Step 2. Take out the camera mount (Pic 2);
Step 3. Release the locked buckle of the camera mount; put the EVA pad at the bottom of camera
mount; then install the camera with the lens facing up (Pic. 3-4);
Step 4. Lock the buckle of the camera mount after the camera is installed firmly (Pic. 5);
Step 5. Attach the camera mount (with camera facing up) to the aircraft by slide-in firmly; then lock
the buckle at the bottom of the battery compartment (Pic. 6-7);
Step 6. Insert the “7” shaped plug of the USB cable into the socket at the left side of the camera
(Pic. 8);
Step 7. Insert the other plug of the USB cable into the socket locating at the bottom of the aircraft
(Pic. 9).
● Warm Tips: There are 2 pcs of EVA pad included. One is thin and the other one is thick. Please check
your camera's dimension and choose proper EVA pad before installing your camera.
-6-
Page 8
TF CARD
Pic. 1 Pic. 2 Pic. 3
EVA
soft
pad
Pic. 4 Pic. 5 Pic. 6
Pic. 7 Pic. 8 Pic. 9
Major parts of the aircraft
[1]
[2]
[3]
[1] Brushless motor
[2] High landing gear
[3] Propeller
[4] Camera/Camera mount
[4]
[5]
[6]
-7-
[7]
[8]
[5]
USB aerial camera port
[6] Battery compartment
[7] Front light
[8]
Rear light
Page 9
Major parts of the remote controller
[6]
[1]
[2]
[3]
[4]
[5]
[13]
A B A B
OFF ON
Mode
[7]
[8]
[9]
[10]
[11]
[12]
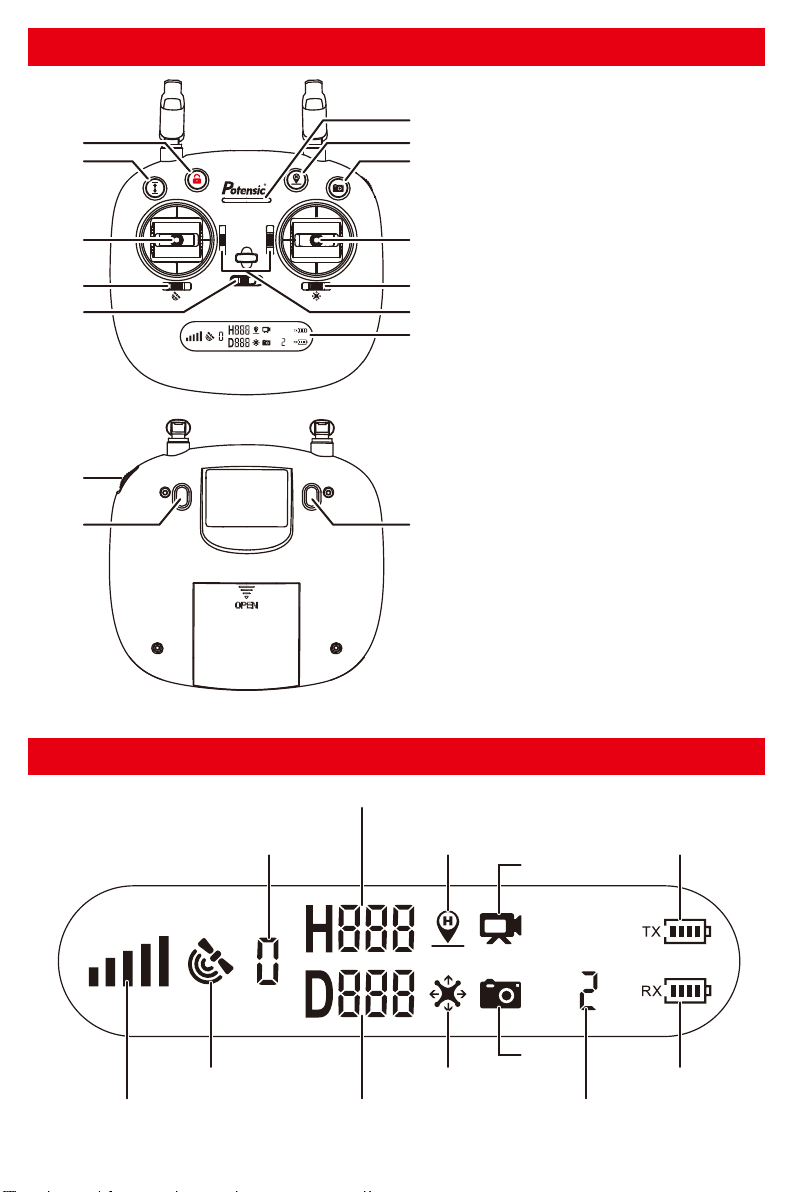
[1] One key to take off / land
[2] One key to take off / land
[3] Left stick
[4] Gesture/ GPS mode switch
[5] Power switch
[6] Power indicator
[7] One key to return
[8] Photo/shooting
[9] Right stick
[10] Headless mode switch
[11] Null button
[12] LCD screen
[14]
L1 L2
[15]
[13] Null button
[14] Null button
[15] Null button
LCD screen
Altitude against Home Point
Return-to-Home
Satellite Amount
(RTH)
Video
Mode
Photo
GPS Mode
Signal Strength Remote Controller
Distance against Home Point
Headless Mode
Throttle Mode
-8-
Remote Controller
Battery Level
Aircraft Battery Level
Page 10
How to install the battery of remote controller
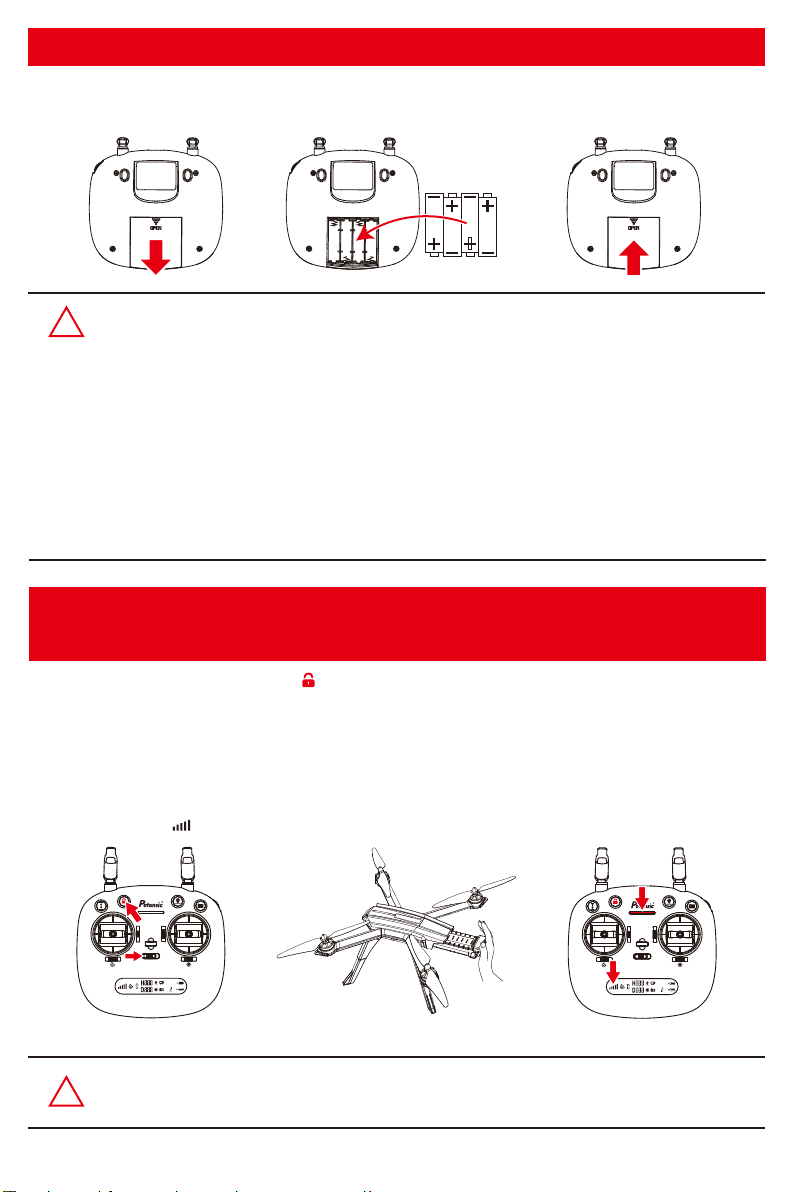
Open the battery cover of the transmitter, insert 4*AA batteries following the polarity indicators ( Picture
below, battery is not included)and then close it.
L1 L2
●Insert batteries with correct polarity.
!
●Non rechargeable batteries are not to be charged; the transmitter need 4*AA batteries for
L1 L2
L1 L2
work.
●Do not mix old and new batteries.
●Do not mix alkaline, standard (carbon-zinc), or rechargeable (nickel-cadmium) batteries.
●Rechargeable batteries are to be removed from the aircraft before being charged.
●Rechargeable batteries are only to be charged under adult supervision.
●Exhausted batteries are to be removed from the aircraft.
●The supply terminals are not to be short-circuited.
How to connect the signal of the aircraft with the
remote controller
Step 1: Keep pressing the red button “ ” and turn on the remote controller (indicated as Pic. 1).
Please release it when the remote beeps and make sure that the indicator light on it flashes
quickly. It means the remote controller is under signal connection status.
Step 2: Power on the aircraft. The aircraft will make beep sounds with front and rear lights flashing and
will automatically link to the remote controller. Once the remote controller sends out a long beep
sound and the indicator light of the remote controller turns from flashing to solid on and the
signal icon “ ” is shown on the LCD screen, it means that signal connection is succeeded.
A B A B
OFF ON
Mode
A B A B
OFF ON
Pic. 1 Pic. 2 Pic. 3
● Signal connection is done once for all if the remote controller is not linked to other aircraft.
!
● Set the connection one by one to avoid signal connection error.
-9-
Mode
Page 11
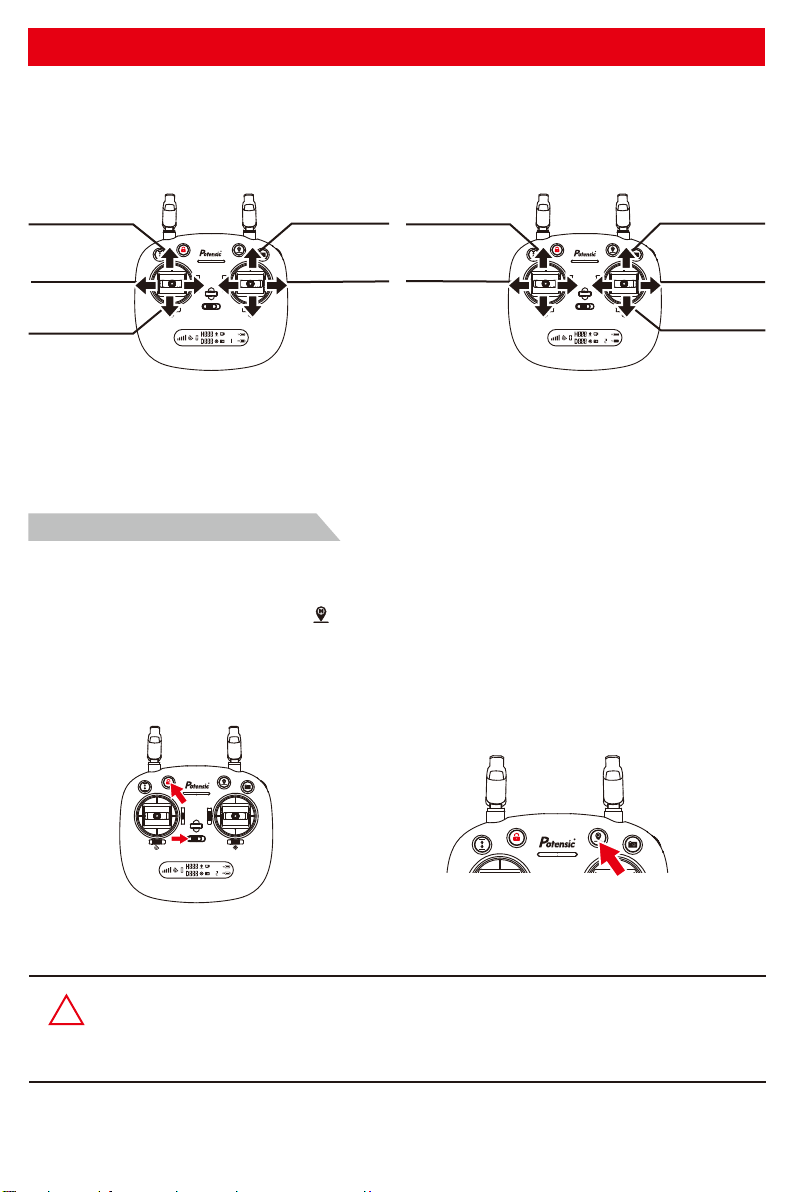
Throttle mode switch
Left hand throttle and right hand throttle are available for option at the remote controller. User can
choose different control stick mode as per operation habit. There are 2 stick modes that could be found
as below:
Forward control
Rotate Clockwise /
Counterclockwise
Backward control Backward control
OFF ON
Mode
Throttle control
Leftward/Rightward
flight control
Mode 1
Throttle control
Rotate Clockwise /
Counterclockwise
OFF ON
Mode
Mode 2
Forward control
Leftward/Rightward
flight control
How to change throttle mode
Step 1. Keep pressing the red button and turn on the remote controller at the same time , the remote
controller is under signal connection status (indicated as pic.1);
Step 2. Keep pressing the RTH button “ ” for 3 seconds to choose the throttle control mode (indicated
as pic.2). The throttle control mode will change according to each press. The mode number is
shown on the LCD screen. The throttle control mode is set at mode 2 by default.
A B A B
OFF ON
Mode
Pic. 1 Pic. 2
Attention: To change the stick mode of the remote controller, please make sure that the
!
remote controller is under signal connection status (the indicator light keep
flashing). If not, the stick mode could not be changed.
-10-
Page 12
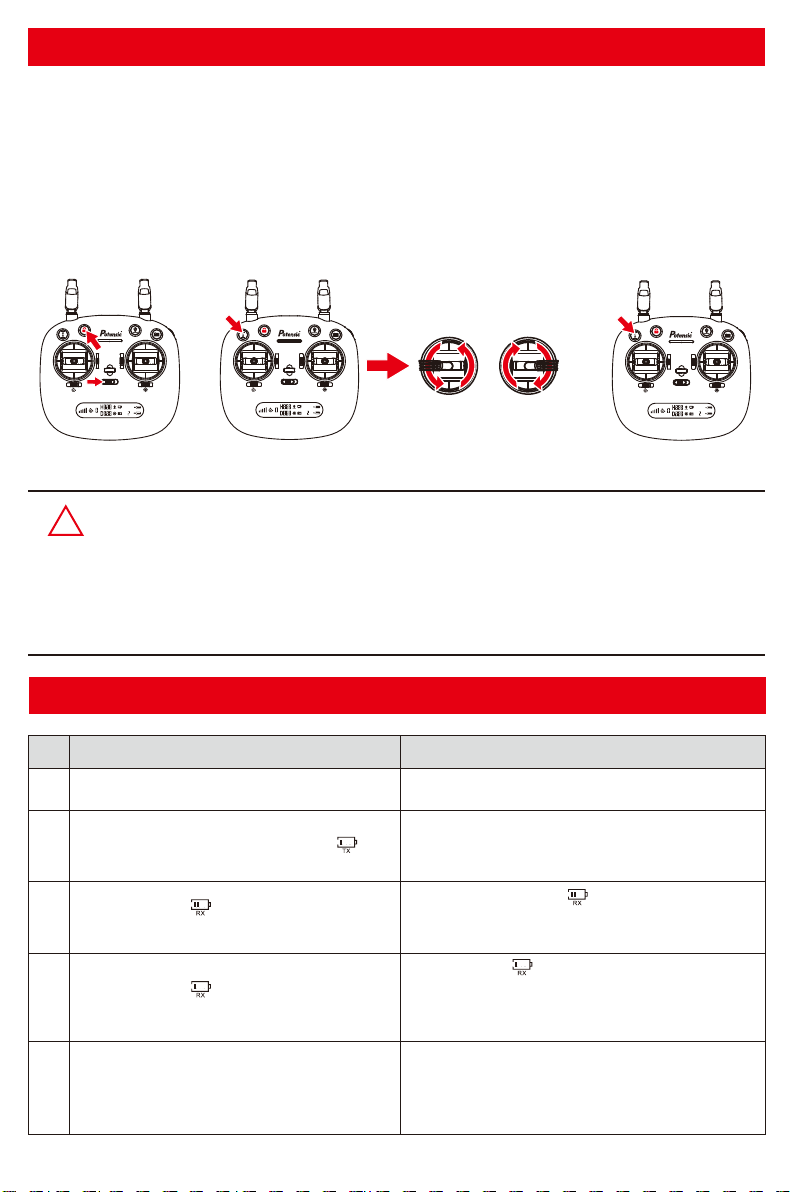
Remote controller control stick calibration
Step 1. Keep pressing the red locking button and turn on the remote controller (indicated as pic.1)
at the same time;
Step 2. Press the calibration button for 3 seconds, the remote controller will make 3 beep sounds and
the indicator light of the remote controller turns from flashing quickly to slowly. Then maximum
rotate both of the left and right control stick to any direction for 2 circles (indicated as pic.2);
Step 3. Then, again, press the calibration button for 3 seconds. The remote controller will send out 3
beep sounds and the indicator light of the remote controller turns from flashing slowly to quickly,
which means that the control stick calibration is completed (indicated as pic.3).
A B A B
OFF ON
Mode
A B A B
OFF ON
Mode
Pic. 1 Pic. 2 Pic. 3
Warm tips: All remote controllers have been calibrated when manufacturing.
!
Remote controller calibration is requested only if pilots find that the remote
controller control sticks are not working normally.
Attention: Please do not power on your aircraft when calibrate the control stick for the
remote controller.
Remote controller status indicator
No.
Indicator lights flash quickly.
1
Indicator lights flash slowly with steady beep..
beep sound and the battery legend “ ”on
2
LCD screen flashing.
Battery legend “ ” on LCD screen is as
3
shown, with steady beep..beep...beep sound.
Battery legend “ ” on LCD screen is as
4
shown, with steady long beep sound.
Signal strength on LCD screen is less than
two grids or no displaying; and the remote
5
controller makes steady beep...beep...beep
sound.
Remote controller status
Description
The remote controller is under signal connection
status.
The remote controller is in low voltage status.
Please change a full charged battery.
Battery is running out “ ” ; the aircraft will return
when the altitude is over 100m or the distance is
over 300m.
Battery is low “ ” ; the aircraft will return when
the altitude is over 15m or the distance is over
15m; if either the flying altitude or flying distance
is less than 15m, the aircraft will land to the spot.
1.The distance between aircraft and remote
controller is so long that the signal is weak.
2.The battery of drone is removed after it
connects to the remote controller.
A B A B
OFF ON
Mode
-11-
Page 13
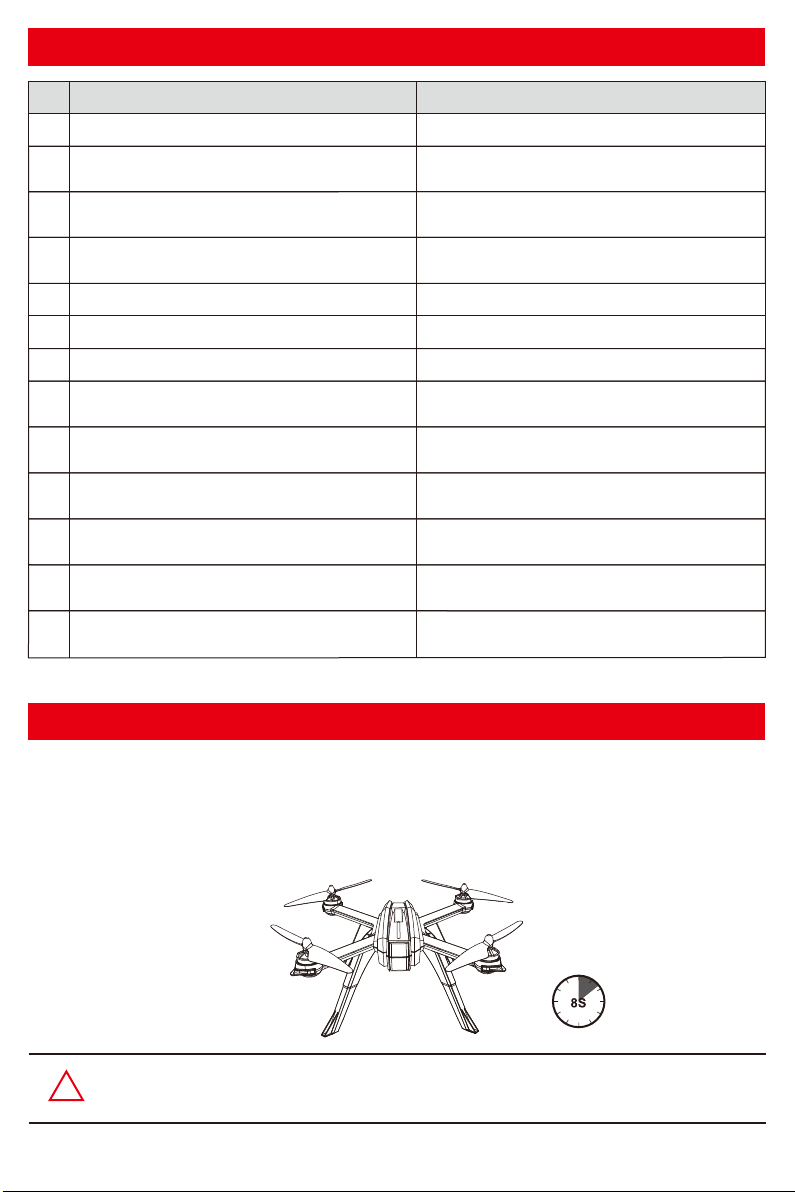
Aircraft status indicator
No.
1 Aircraft 2.4GHz disconnected.
Front and rear lights flash yellow rapidly.
Front and rear lights flash red, green and
2
Front lights glow solid red, rear lights glow
3
4
5
Front and rear lights flash green rapidly.
Front and rear lights flash yellow alternatively.
6
Front and rear lights flash green alternatively. Aircraft is in compass vertical calibration.
7
8
9
10
11
12
13
Front light glows solid red, rear light
Front light glows solid red, rear light
Front and rear lights flash once, stop
Front and rear lights flash twice, stop
Front and rear lights flash three times, stop
Front and rear lights flash fourth times, stop
Indicator status Meanings
yellow alternatively.
solid yellow.
Front light glows solid red, rear
light glows solid green.
flashes red slowly.
flashes red rapidly.
for 1.5 second.
for 1.5 second.
for 1.5 second.
for 1.5 second.
Aircraft is in initialization detection status.
No GPS signal, aircraft is in gesture mode.
Good GPS signal, aircraft is preparing
Aircraft is in gyroscope calibration status.
Aircraft is in compass horizontal calibration.
Aircraft is nearly low voltage, 1/4
Aircraft is in low voltage, only 1/6
Something wrong with the gyroscope.
Something wrong with the barometer.
Something wrong with the compass.
Something wrong with the GPS module.
for GPS mode.
battery level left.
voltage left.
Aircraft initialization detection
After signal connection, the aircraft enters into initialization detection procedure with front and rear
lights flashing red, green and yellow alternatively. Make sure that the aircraft is set on a flat and still
surface for the initialization detection. The aircraft initialization detection takes about 8 seconds. Once
the remote controller sends out "Di Di" sounds and the aircraft front and rear lights flash yellow
alternatively, initialization detection is completed.
Attention: Make sure that the aircraft is set on a flat and still surface for the initialization
!
detection.
-12-
Page 14
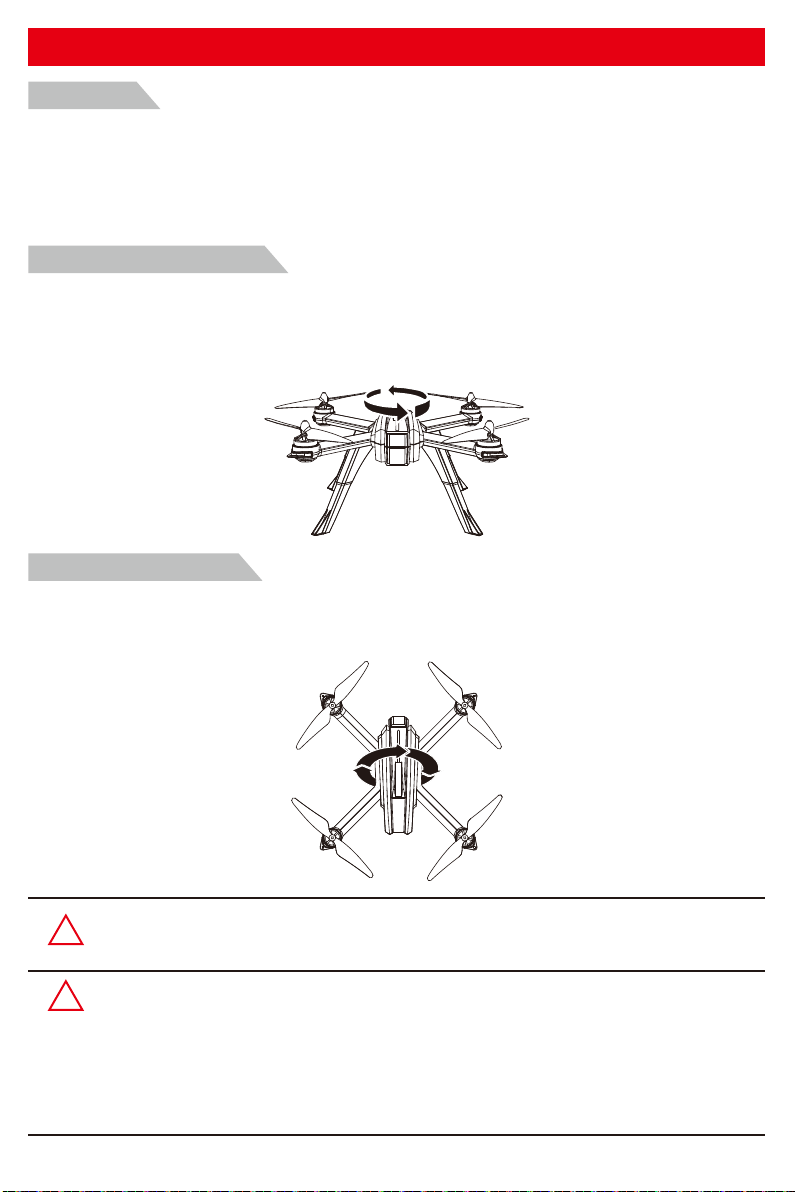
Aircraft compass calibration
Attention:
1. Compass calibration should be performed after successful aircraft initialization detection.
2. Aircraft compass calibration should be done for every flight. That is to say, if changing new battery
or the battery is reinstalled, compass calibration should be done again.
Two steps of compass calibration:
Step 1: Horizontal calibration
After successful aircraft initialization detection, the aircraft front and rear lights flash yellow
alternatively. Hold the aircraft horizontally and rotate it 360 degrees along the central axis for
about 3 circles. The aircraft front and rear light will change from flashing yellow alternatively to
flashing green alternatively when horizontal calibration is completed.
Step 2: Vertical calibration
Hold the aircraft with head up, and rotate it 360 degrees along the central axis for about
3 circles until the front and rear lights of the aircraft change from flashing to solid on, the
compass calibration is successful.
Attention: To fly at GPS mode, please choose an open and wide space for the flight, and
!
make sure that the satellite amount is over 7.
● Please do not calibrate the compass in strong magnetic area, such as magnetic field,
!
parking place or construction areas with underground reinforcement.
● Please do not carry magnetic materials with you (such as keys, cell phones, etc) when
calibrating compass.
● Please keep away from big metal when calibrating compass.
-13-
Page 15
Gyroscope calibration
After the aircraft and the remote controller are banded, set the aircraft on flat ground and follow the
indication photo as below to calibrate the gyro. Once the aircraft front lights turn from flashing to solid
on, it means that the gyro calibration is succeeded.
A B A B
OFF ON
Mode
● The gyroscope calibration has been done by factory default. Gyroscope calibration is no
!
need to be performed unless the aircraft can not exit the aircraft initialization detection
procedure while the aircraft initialization detection is finished.
● Please make sure to set the aircraft on horizontal surface when performing calibration,
failure to do this will affect the flight.
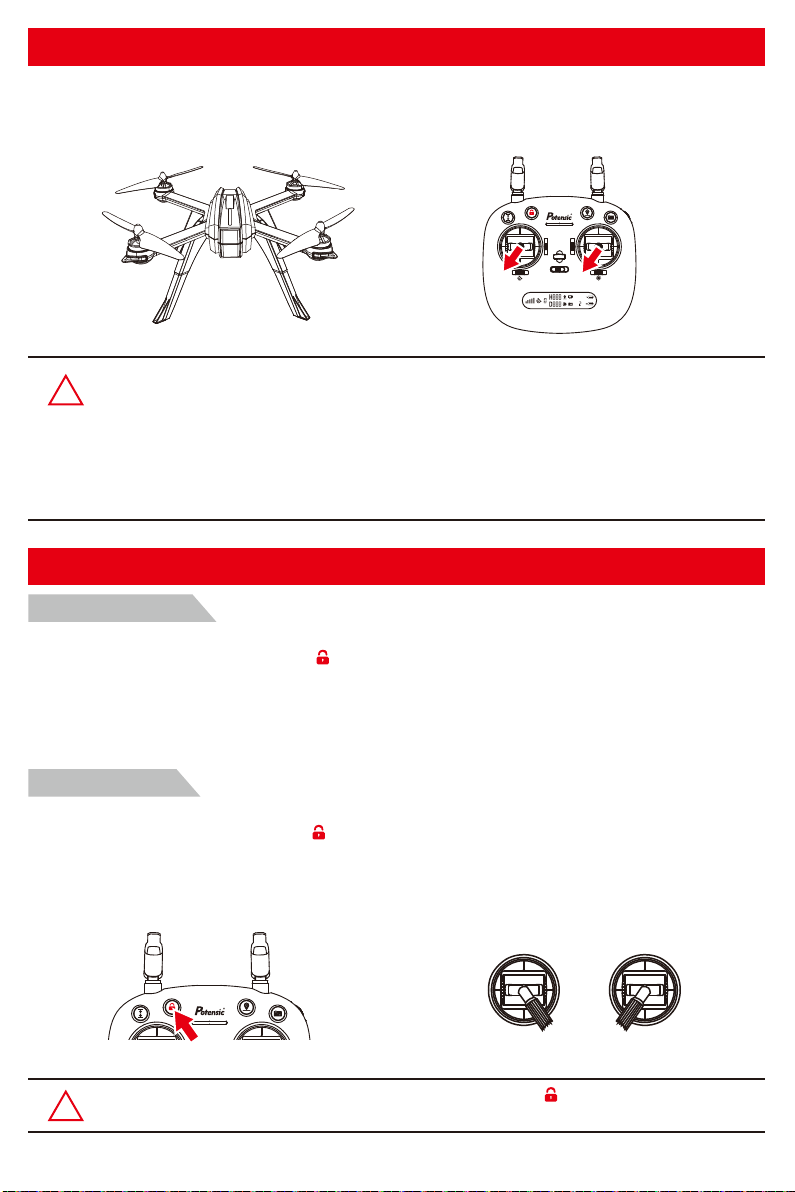
How to lock and unlock the aircraft
Unlock the aircraft:
There are 2 ways to unlock the aircraft that you can find it below:
●Method 1: Short-press the red button “ ” (indicated as Pic. 1). The motors rotate and the aircraft
is unlocked.
●Method 2: Push the left stick to lower right corner and the right stick to the lower left corner at the
same time (indicated as Pic. 2) to unlock the aircraft.
Lock the aircraft:
There are 2 ways to lock the aircraft that you can find it as below:
●Method 1: Long-press the red button “ ” (indicated as Pic. 1) for 3 seconds, the motors will stop
rotating immediately and the aircraft is locked.
●Method 2: After the aircraft lands on the ground, pull down the throttle stick to the bottom position
and keep for 3 seconds, the motors will stop rotating and the aircraft is locked.
Pic. 1 Pic. 2
Warm tips:Please do not lock the aircraft by pressing the “ ” button directly during the
!
flight, or the aircraft will be crashed.
-14-
Page 16
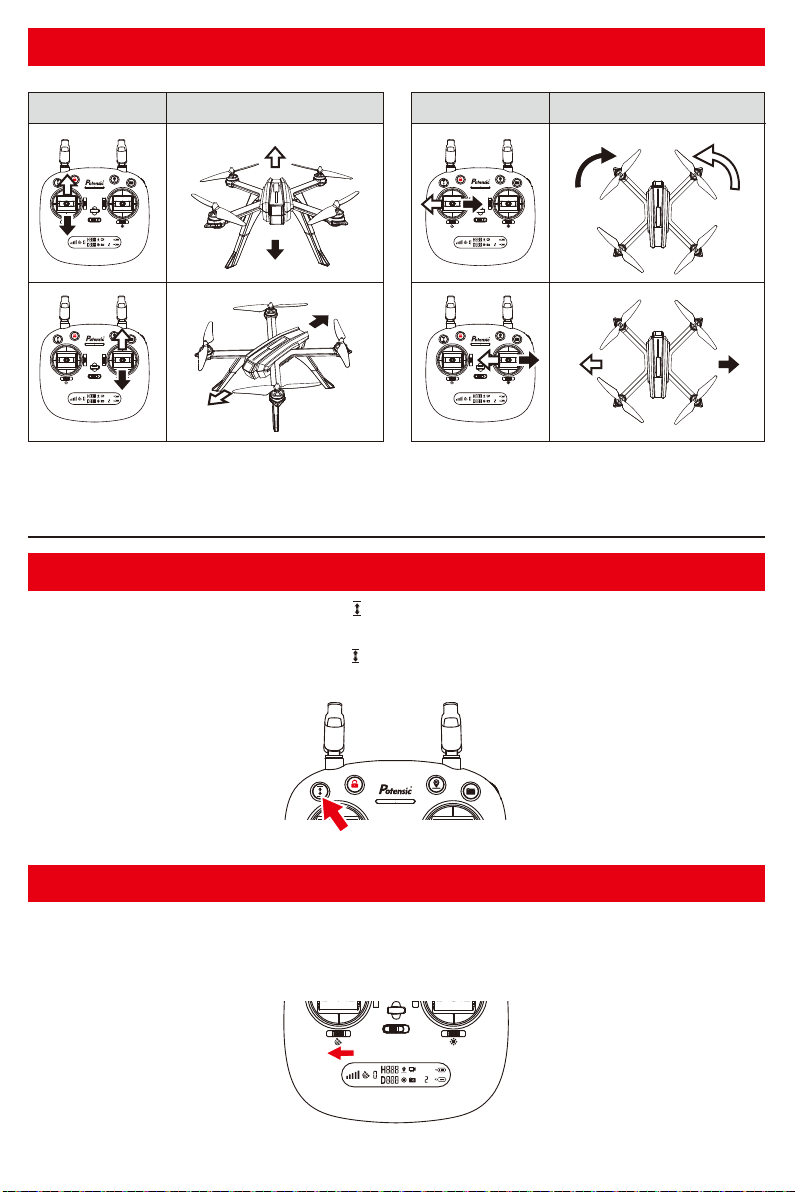
Operate the aircraft
Remote controller Aircraft Remote controller Aircraft
Up
Rotate clockwise
Rotate
counterclockwise
Front
OFF ON
Mode
Down
Backward
OFF ON
Mode
Rear
Leftward flight
Front
OFF ON
Mode
OFF ON
Mode
Rear
Forward
Rightward flight
Flight mode
One-key takeoff/landing
● After the aircraft unlocked, short-press the “ ” button (indicated as below), the aircraft will
automatically takeoff and hover at 1.5m altitude.
● When the aircraft is flying, short-press the “ ” button (indicated as below), the aircraft will
automatically land on the ground.
Gesture mode
Slide the button to position “A” (indicated as below), the aircraft is in Gesture mode that GPS is not
used for positioning, and the aircraft only uses the barometer to maintain altitude. The aircraft will not
fly with precise positioning and hovering. Gesture mode requests pilot with good skill.
A B A B
OFF ON
Mode
-15-
Page 17
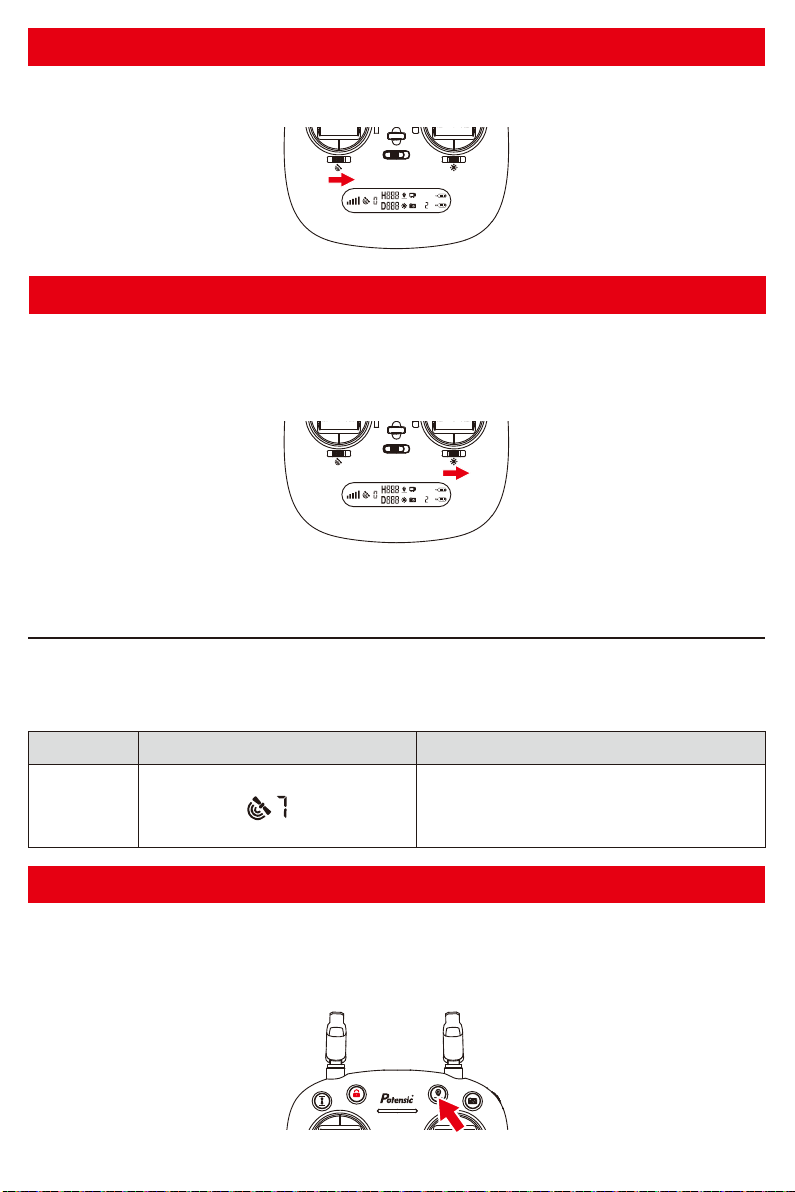
GPS mode
Slide the button to position “B” (indicated as below), the aircraft is in GPS mode and can precisely
position and hover by the assistance of the GPS module.
A B A B
OFF ON
Mode
Headless mode
Slide the Headless mode switch button to position “B” (indicated as below); the aircraft enters into
headless mode. When the aircraft is in headless mode, you’re required to position the aircraft in such a
way that its front is your front before the aircraft takes off. Then, when you take off the aircraft with the
aircraft pointing to the front, you can give up worrying about orientation during flight.
A B A B
OFF ON
Mode
Return-To-Home (RTH)
The Return-to-Home(RTH) procedure brings the aircraft back to the last recorded Home
Point. There are 3 types of RTH procedures: smart RTH, failsafe RTH and low battery RTH.
The following sections describe them in detail.
Home Point
GPS
The Home Point is the location at which the aircraft
takes off. A strong GPS Signal must be presented
for the aircraft to record the Home Point.
Description
Smart RTH
If the GPS signal is available (more than 7 satellites is presented) and the Home Point is recorded
previously, press this button, the aircraft will fly back to the Home Point. During the smart RTH, you
can use the remote controller to guide the aircraft around obstacles. You can press the RTH button
again to exit RTH procedure and regain control of the aircraft.
-16-
Page 18
Failsafe RTH
If the GPS signal is available (more than 7 satellites is presented) and the Home Point is recorded
previously. Failsafe RTH will be triggered if the remote controller signal is lost for more than 6 seconds,
the flight-control system will control the aircraft automatically and the aircraft will fly back to the last
recorded Home Point. You can regain control of the aircraft by press the RTH button if the remote
controller signal is recovered.
● During the Failsafe RTH procedure, the aircraft can not avoid obstacles.
!
● The aircraft cannot Return-to-Home if the GPS signal is weak (satellite amount
is less than 7).
● If there is no GPS signal and the remote controller signal lost for more than 6
seconds, the aircraft will not Return-to-Home but descend slowly until land to the
ground and lock the aircraft.
Low voltage RTH
When the aircraft rear lights flash red slowly, battery icon “ ” is shown on the LCD screen, and
steady beep, beep, beep..., beep, beep, beep sound is heard. At this moment, as long as the aircraft
flying altitude is over 100 meters or the flying distance is over 300 meters, the aircraft will automatically
fly back to the Home Point.
When the aircraft rear lights flash red slowly, battery icon “ ” is shown on the LCD screen, and
steady beep.., beep..., beep sound is heard. At this moment, as long as the aircraft flying altitude is
over 15 meters or the flying distance is over 15 meters, the aircraft will automatically fly back to the
Home Point. If the aircraft flying altitude is less than 15 meters or the flying distance is less than 15
meters, the aircraft will automatically land to the ground.
Attention: When aircraft is in low voltage RTH status you can not regain control of the
!
aircraft by pressing the RTH button.
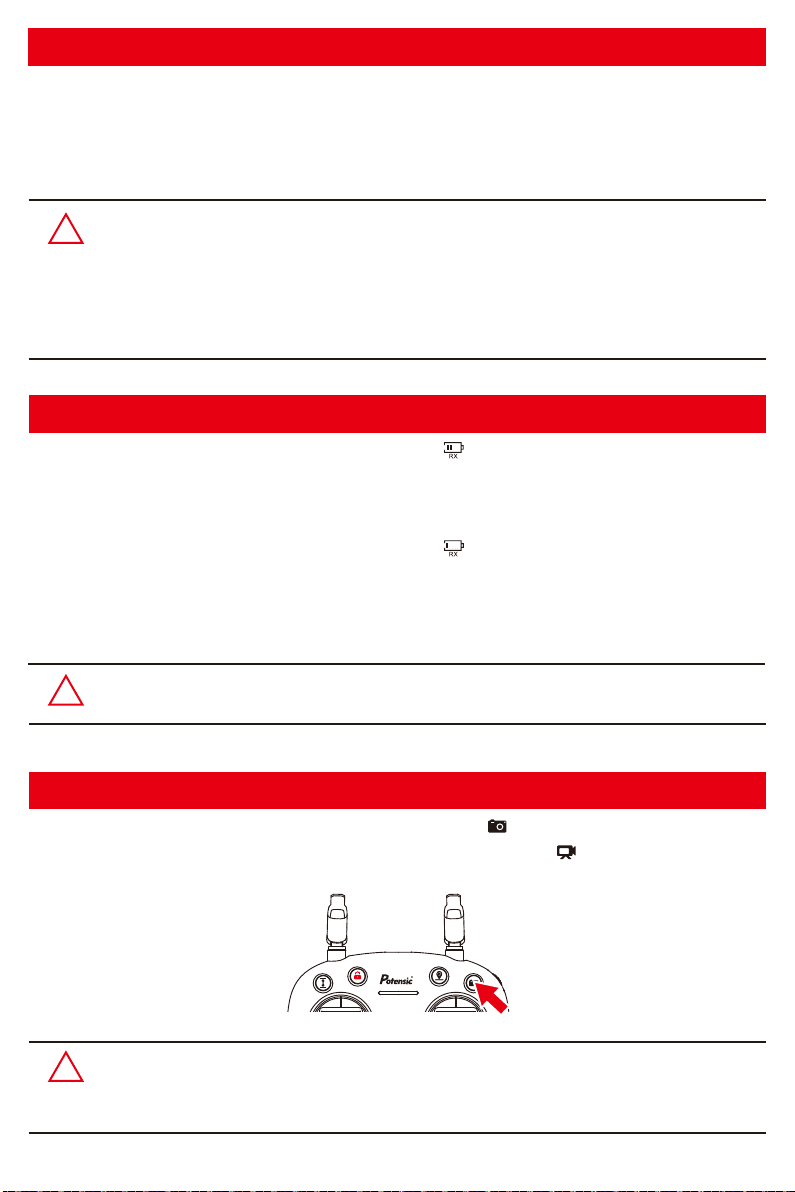
Photo/Video
Short-press the button indicated as below and the camera icon “ ” on the LCD screen flashes once,
the camera takes one photo; Long-press the same button, the video icon “ ” on the LCD screen
flashes slowly, the camera is taking video. Long-press again to exit shooting.
Attention: When the aircraft is not inserted with TF card or the TF card is malfunction,
!
photos and videos taking can not be done by pressing the button of the remote
controller, but by the icon on the APP interface.
-17-
Page 19
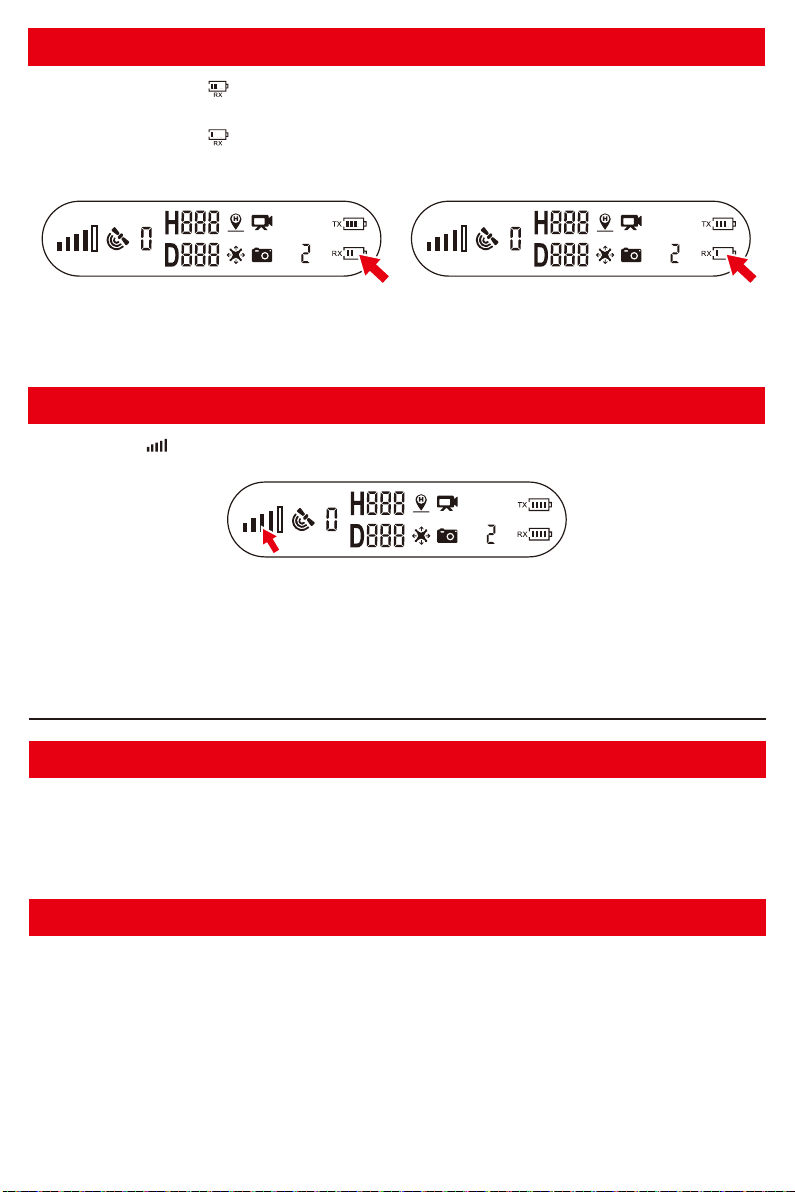
Low voltage warning
●When the battery icon “ ” is shown on the LCD screen, and the aircraft front lights glow solid on
and the rear lights keep flashing slowly, it means that the battery of aircraft is nearly low voltage.
●When the battery icon “ ” is shown on the LCD screen, and the aircraft front lights glow solid on
and the rear lights keep flashing rapidly, it means that the battery of aircraft is in low voltage.
ModeMode
Pic. 1 Pic. 2
Signal strength indicator
Signal strength “ ” shows the strength of the received signal. The more, the better.
Mode
Prepare the flight
Before you take off, check and make sure that
1. The aircraft and the remote controller are full charged.
2. The propellers are installed correctly.
3. The motors work normally after unlocking.
Basic flight operation steps
1. Connect the remote controller with the aircraft and then proceed aircraft initialization detection.
2. Aircraft compass calibration.
3. Unlock the aircraft after the gyro detection of the aircraft is completed.
4. Pull up the throttle stick then the aircraft takes off, and control the aircraft flight by left/right stick.
5. Pull down the throttle stick to the bottom position and keep for 3 seconds to lock the aircraft.
6. Pull out the battery from the aircraft and then turn off the remote controller.
-18-
Page 20
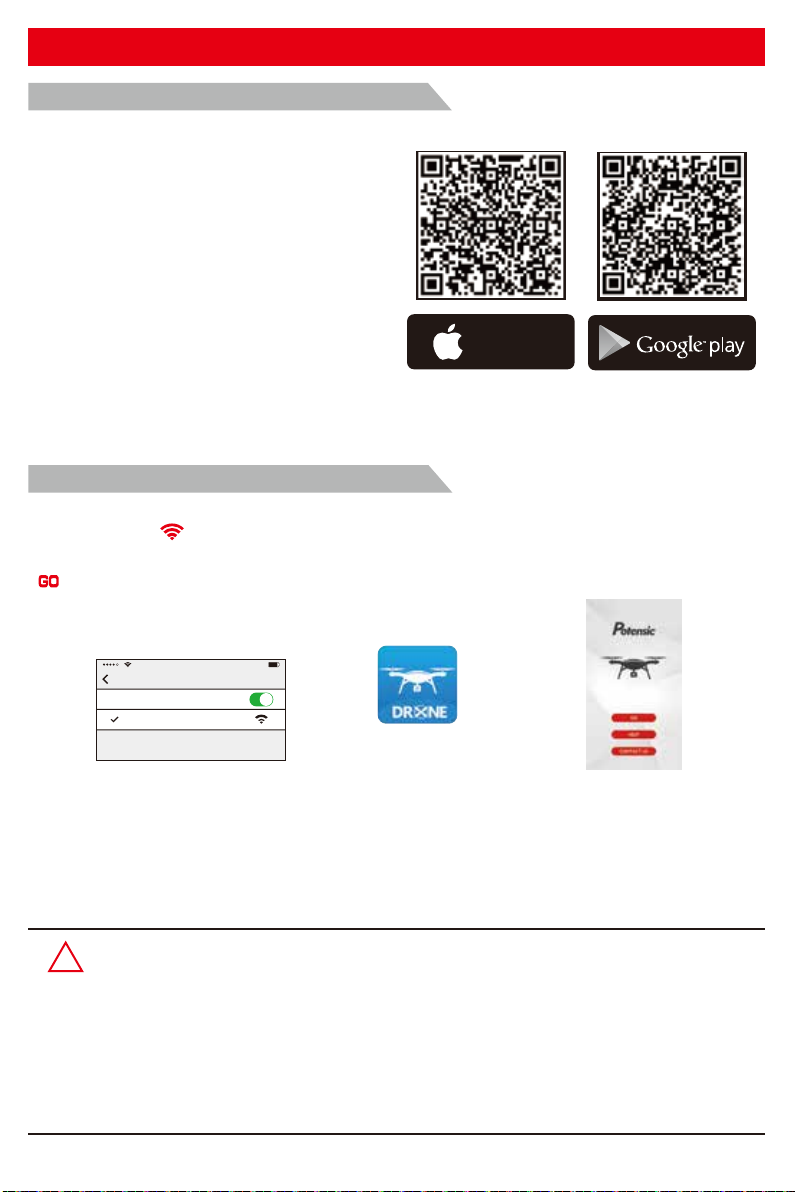
FPV software download and installation
Where to download “Potensic-M2” APP
● For Apple IOS system, please turn to
Apple store, search “Potensic-M2” or scan
the QR code at right side to download
the software.
● For Android system, please turn to
Google play, search “Potensic-M2” or
scan the QR code at right side to
download the software.
How to link the “Potensic-M2” to the camera:
Power on the aircraft , then enter phone settings option. Turn on WiFi, find drone**** on the list and
connect it. When “ ” legend is shown, it means WiFi connecting is successful. Exit settings and
tap “Potensic-M2” APP at your mobile device, then select your aircraft model on the home page; click
“ ” to enter into the real-time image transmission interface.
Available on the
App Store
ANDROID APP ON
Setting
Wi-Fi
drone****
Potensic-M2
Connect WIFI
Tap “Potensic-M2” App
Photos and video saving feature:
1. If the camera is without TF card, videos and photos will be saved at the APP.
2. If the camera is with TF card, videos and photos will be saved at the TF card.
3. Videos and photos in the TF card can be downloaded to the APP.
Attention:
!
●Please make sure that your mobile device supports 5G WIFI before linking Potensic-M2
to your device.
●Mounted the “Potensic-M2” APP on your mobile device and connect “Potensic-M2” to the
camera, your aircraft will be capable of flying in the intelligent flight modes: Follow Me,
Point of Interest and Waypoint flight.
●Beginners are suggested to press “Help” button to learn about the camera operation
method.
-19-
GO
Click “ ”
Page 21
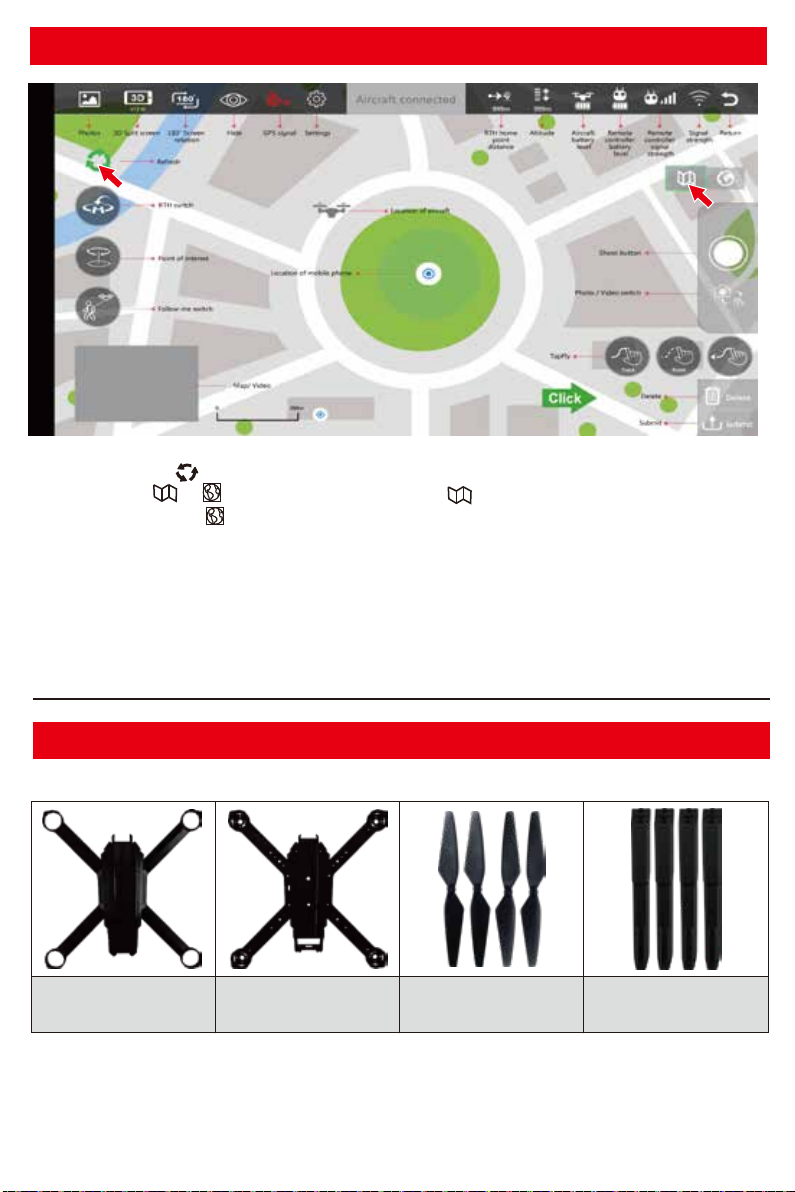
App New Function
1. Refresh button “ ”on left: Please click this button to refresh image if it freezes up during flight.
2. Maps button “ ” “ ” on right: Plane Imagery Map “ ” It shows position and place name only.
Satellite Imagery maps “ ”: It shows scene. These two maps could be switched freely during flight.
Besides, please update Google Maps APP before connecting drone to phone.
Product components
Basic parts
Upper cover
B3PROV201 B3PROV202 B3PROV203 B3PROV204
Main frame Propeller A/B High landing gear
-20-
Page 22
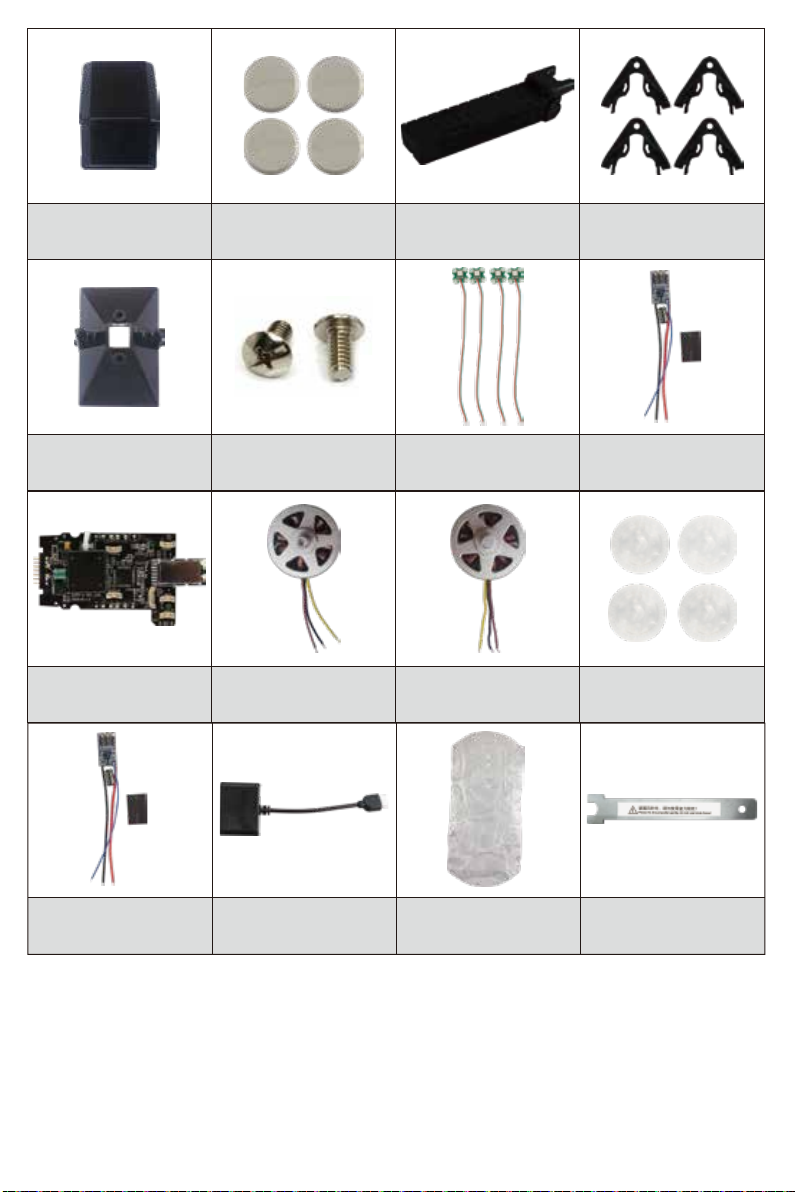
LED light parts
B3PROV205
Lamp cover of the
front and rear light
B3PROV206 B3PROV207
Battery
Plastic plug
B3PROV208
LED Light holder
B3PROV209 B3PROV210
Flight-control board
B3PRO08
B3PRO13
Screws pack
Clockwise motor
B3PRO09
Charging converterRear ESC parts
Front/Rear light bar
B3PRO06
Counter-clockwise motor
B3PRO10
Interleaving paper
B3PRO16B3PRO14
Front ESC parts
B3PRO07
Transparent plastic part
B3PRO11
Propeller changing tool
B2P10
-21-
Page 23
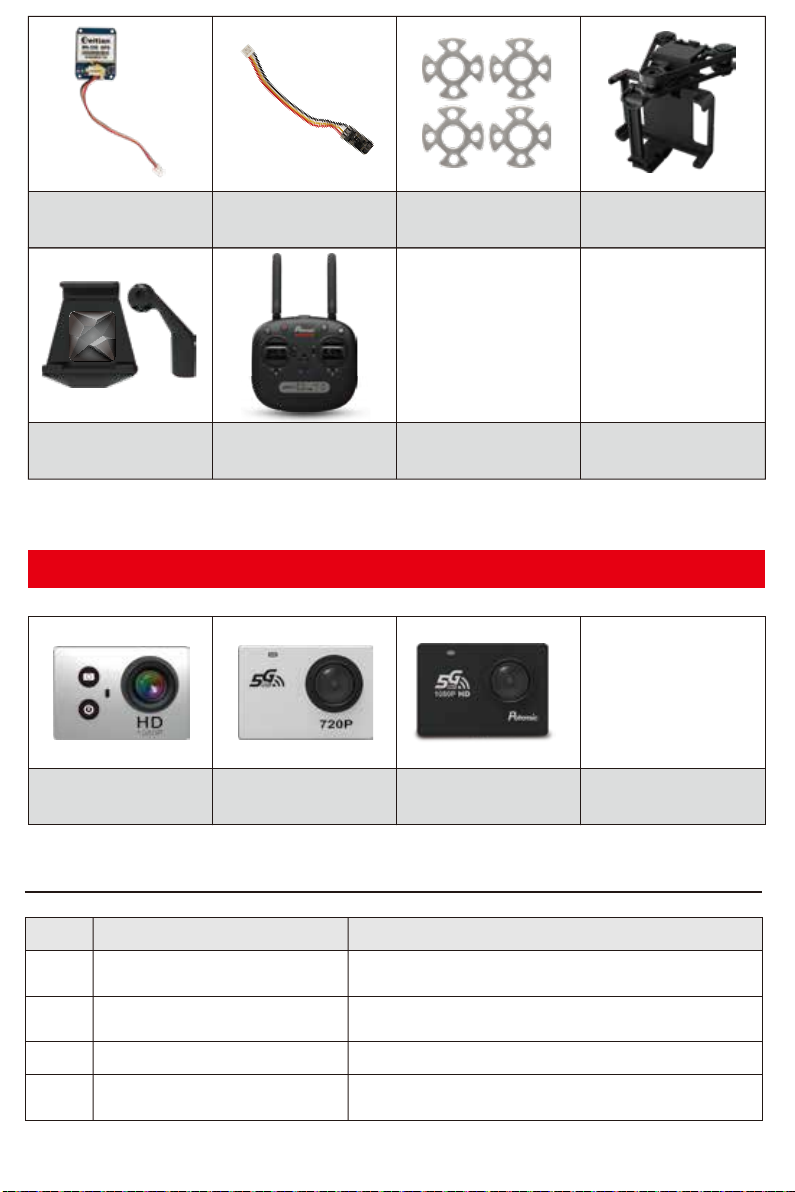
GPS Module
B2C008
Compass
B2C011
Heat sink
B80018
Camera mount
G6000
Mobile phone holder
C5000S
Remote controller
GR6221A
Optional accessories
FHD Recording Camera
C4000
5G WIFI Camera
Trouble shooting
No.
1
2
3
4
Phenomenon Solution
The lights are flashing quickly.
The aircraft can’t be kept balance
after taking off and lean one side.
The aircraft is shaking fiercely. The rotor propellers are out of shape, change the propellers.
The aircraft fails to unlock and the
rear lights flash slowly.
720P HD
C5000
1080P FHD
5G WIFI Camera
C6000
The Gyro of the aircraft is under signal detecting condition, set
the aircraft to any flat surface.
Lay the aircraft in the flat surface or flat ground and proofread
the gyro of the aircraft again.
The battery is under low power status, please charge the
battery to full.
-22-
Page 24

Note:
a) Changes or modifications not expressly approved by the party responsible for compliance could
void the user's authority to operate the equipment.
b) This equipment has been tested and found to comply with the limits for a Class B digital device,
pursuant to part 15 of the FCC Rules. These limits are designed to provide reasonable protection
against harmful interference in a residential installation. This equipment generates, uses and can
radiate radio frequency energy and, if not installed and used in accordance with the instructions,
may cause harmful interference to radio communications. However, there is no guarantee that
interference will not occur in a particular installation. If this equipment does cause harmful
interference to radio or television reception, which can be determined by turning the equipment off
and on, the user is encouraged to try to correct the interference by one or more of the following
measures:
— Reorient or relocate the receiving antenna.
— Increase the separation between the equipment and receiver.
— Connect the equipment into an outlet on a circuit different from that to which the receiver is
connected.
— Consult the dealer or an experienced radio/TV technician for help.
MADE IN CHINA
 Loading...