

Page 1
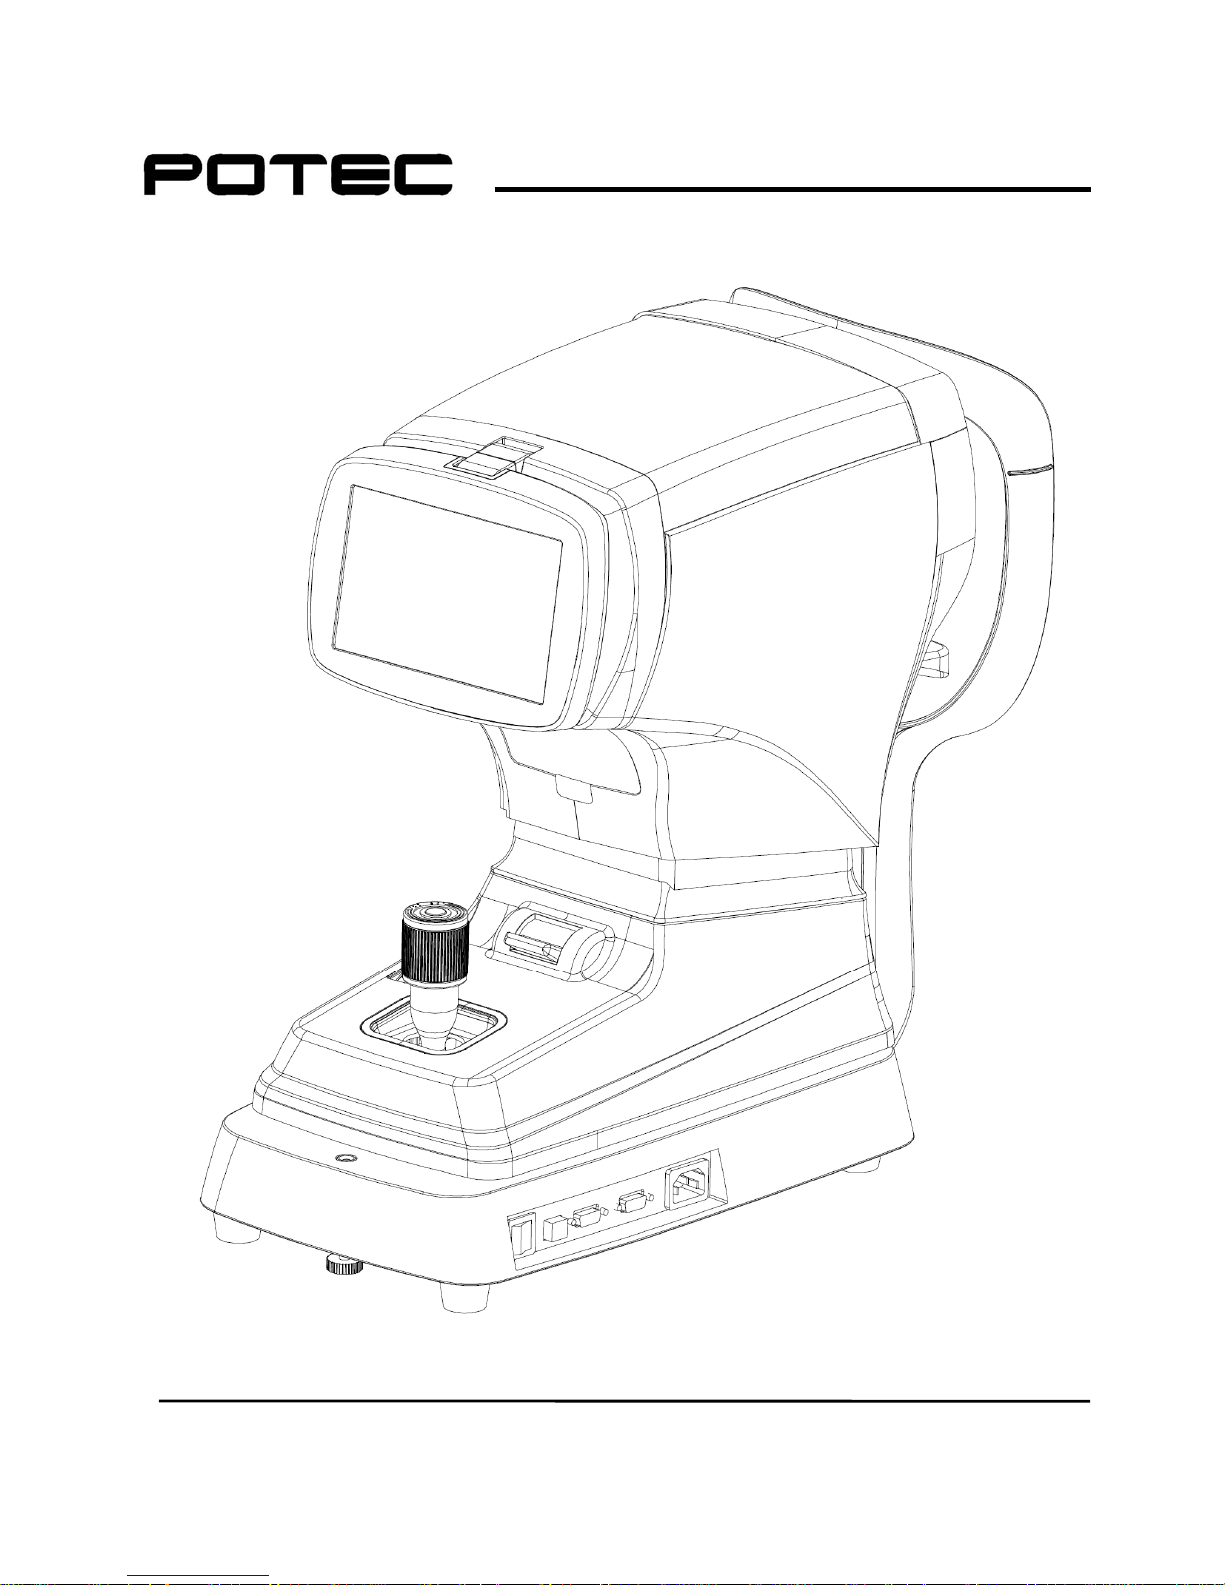
OPERATION MANUAL
AUTO REF-KERATOMETER PRK-8000
Revision 1.0
www.potec.biz
2016.10 Before using the instrument, be sure to read this manual thoroughly.
Page 2

Page 3

- i -
IMPORTANT NOTICE
This product may malfunction due to electromagnetic waves caused by portable personal
telephones, transceivers, radio-controlled toys, etc. Be sure to avoid having objects such as,
which affect this product, brought near the product.
The information in this publication has been carefully checked and is believed to be entirely
accurate at the time of publication. POTEC assumes no responsibility, however, for possible
errors or omissions, or for any consequences resulting from the use of the information
contained herein.
Upon request, circuit diagrams, component part lists, descriptions, calibration instructions, or
other information will be provided to assist service personnel to repair parts of the equipment
that are designated by POTEC as repairable by service personnel.
POTEC reserves the right to make changes in its products or product specifications at any
time and without prior notice, and is not required to update this documentation to reflect such
changes.
© 2016 POTEC Co., Ltd.
40-4, Techno 2-ro, Yuseong-gu, Daejeon, 34015 Korea
All rights reserved.
Under copyright laws, this manual may not be copied, in whole or in part, without the prior written
consent of POTEC.
Page 4
- ii -
SAFETY INFORMATION
Accessory equipment connected to the analog and digital interfaces must be certificated
according to the respective IEC standards (e.g. IEC 60950-1 for data processing equipment
and IEC 60601-1 for medical equipment). Furthermore all configurations shall comply with
the system standard EN 60601-1:2006, Clause 16. Everybody who connects additional
equipment to the signal input part or signal output part configures a medical system, and is
therefore responsible that the system complies with the requirements of the system standard
IEC 60601-1:2005, Clause 16. If in doubt, consult the technical service department or your
local representative.
For U.S.A
Do not make any changes or modifications to the equipment unless otherwise specified in the
manual.
If such changes or modifications should be made, you could be required to stop operation of
the equipment.
For EU Countries
The following mark, the name & address of the EU Representative shows compliance of the
instrument with Directive 93/42/EEC.
EU Representative:
Medical Device Safety Service GmbH
Schiffgraben 41, D-30175
Hannover, Germany
Page 5
- iii -
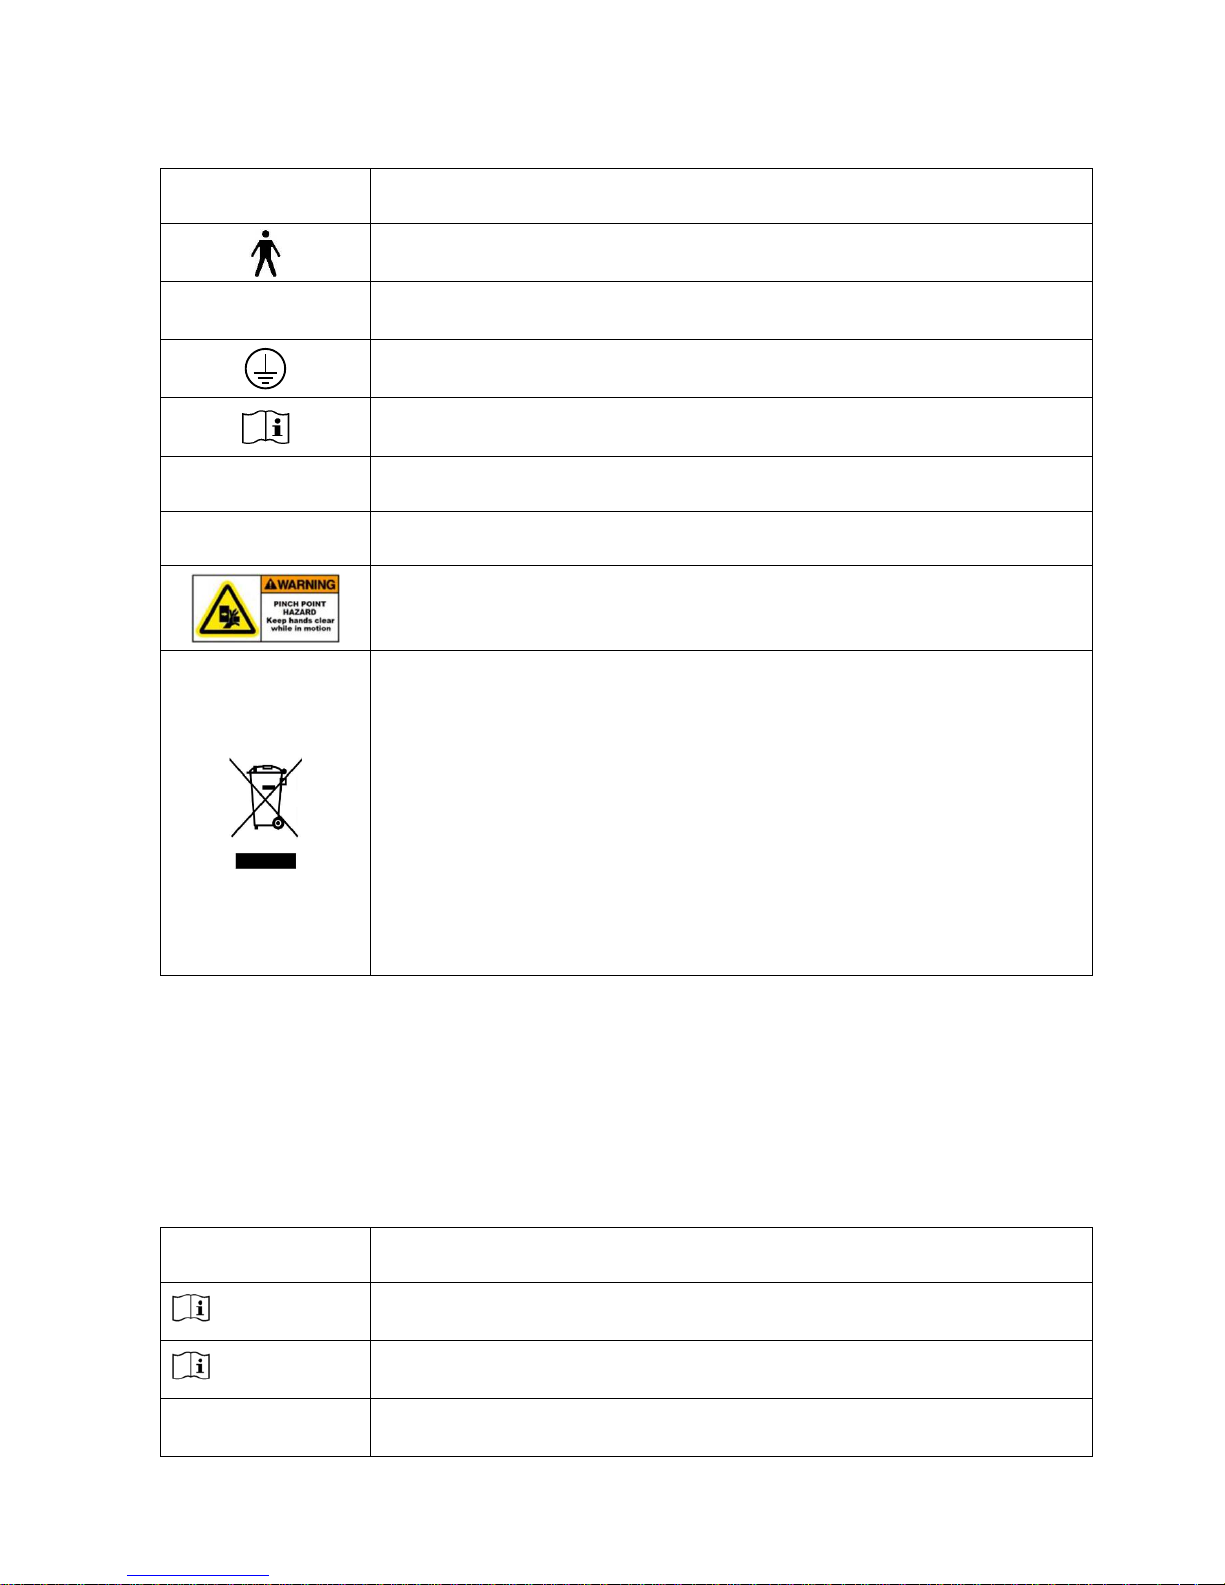
Symbols marked on the Instrument
Symbol Description
TYPE B Applied Part
~
Alternating current
Protective earth (ground)
Refer to operating instructions
O
Off (power: disconnect to the mains)
I
On (power: connection to the mains)
Do not place your hand or fingers between the stage and base. Also
ensure that the examinee does not place his/her hand or fingers there
either. Otherwise, hand or fingers may be hurt.
Disposal of your old appliance
z When this crossed-out wheeled bin symbol is attached to a
product it means the product is covered by the European Directive
2002/96/EC.
z All electrical and electronic products should be disposed of
separately from the municipal waste stream via designated
collection facilities appointed by the government or the local
authorities.
z The correct disposal of your old appliance will help prevent
potential negative consequences for the environment and human
health.
z For more detailed information about disposal of your old
appliance, please contact your city office, waste disposal service
or the shop where you purchased the product
General Safety Information
If you see any warnings or cautions printed on the warning labels, follow the safety
instructions in this manual. Ignoring such cautions or warnings while handling the product
may result in injury or accident. Be sure to read and fully understand the manual before using
this product.
Keep this manual in easy-to-access place.
Meaning of Caution Sign
Caution Sign Description
WARNING
This indicates a potentially hazardous situation which could results in
death or serious injury to you or others.
CAUTION
This indicates hazardous situations which may result in minor injury to
you or others, or may result in machine damage.
This is used to emphasize essential information. Be sure to read this
information to avoid incorrect operation.
NOTE
Page 6

- iv -
WARNING
Only operate the instrument with the power supply indicated on the
rating plate. Otherwise, it may result in fire or electric shock.
WARNING
Be sure to turn OFF the power switch before connecting or
disconnecting the cables. Also, do not handle them with wet hands.
Otherwise, you may get an electric shock that may result in death or
serious injury.
WARNING
Never disassemble or modify this instrument because it may result in
fire or electric shock. Also, since this instrument incorporates highvoltage parts and other hazardous parts, touching them may cause
death or serious injury.
WARNING
Should any of the following occur, immediately turn OFF the power
switch, unplug the power cable from the AC outlet, and contact the
dealer or the agent who/where you purchase this instrument.
z When there is smoke, strange odor or abnormal sound.
z When liquid has been spilled into the instrument or a metal object
has entered through an opening.
z When the product has been dropped or its housing damaged.
WARNING
To avoid the risk of electric shock, this equipment must only be
connected to supply mains with protective earth.
CAUTION
This instrument is shipped with a grounding type power cable.
To reduce the risk of electric shock, always plug the cable into a
grounded power outlet.
CAUTION
Ensure that the examinee has not placed his/her hand or fingers under
the chin rest. Otherwise, hand or fingers may be hurt.
CAUTION
Wipe the forehead rest with ethanol or glutaraldehyde solution to
disinfect it each time a different examinee uses it, in order to prevent
infection.
CAUTION
Change the chin rest paper each time the examinee changes in order
to keep the chin rest clean.
CAUTION
Do not place your hand or fingers between the stage and base. Also
ensure that the examinee does not place his/her hand or fingers there
either. Otherwise, hand or fingers may be hurt.
CAUTION
Do not use the device simultaneously with other electronic equipment
to avoid electromagnetic interference with the operation of the device.
CAUTION
Do not use the device near, on, or under other electronic equipment to
avoid electromagnetic interference with the operation of the device.
CAUTION
Do not use the device in the same room with other equipment such as
life-support equipment, other equipment that has major affects on the
life of patient an results of treatment , or other measurement or
treatment equipment that involve small electric current.
CAUTION
Do not use the device simultaneously with portable and mobile radio
frequency communication systems because it may have an adverse
effect on operation of the device.
CAUTION
Do not use cables and accessories that are not specified for the device
because that may increase the emission of electromagnetic waves
from the device or the system and decrease the immunity of the device
to electromagnetic disturbance.
Page 7
- v -
CAUTION
Do not position the equipment to make it difficult to operate the
disconnection device. (Appliance coupler or separable plug)
CAUTION
Do not placed the multiple socket-outlet for PRK-8000 system on the
floor in order to prevent liquid penetration and damage to the product.
CAUTION
PRK-8000 system shall not be connected with additional multiple
socket-outlets or extension cords in addition to a designated single
multiple socket-outlet.
CAUTION
Maximum permissible load of each socket-outlet used for the PRK8000 system, shall not be less than 100VA.
CAUTION
If non-medical electrical equipments (e.g. Video monitor, IT equipment,
etc.) that are connected with the PRK-8000 are, directly connected to
the wall socket-outlets, high touch current may flow since the earth
continuity is not ensured.
CAUTION
Multiple socket-outlet should be a grounding-type . and complied with
IEC 60884-1.
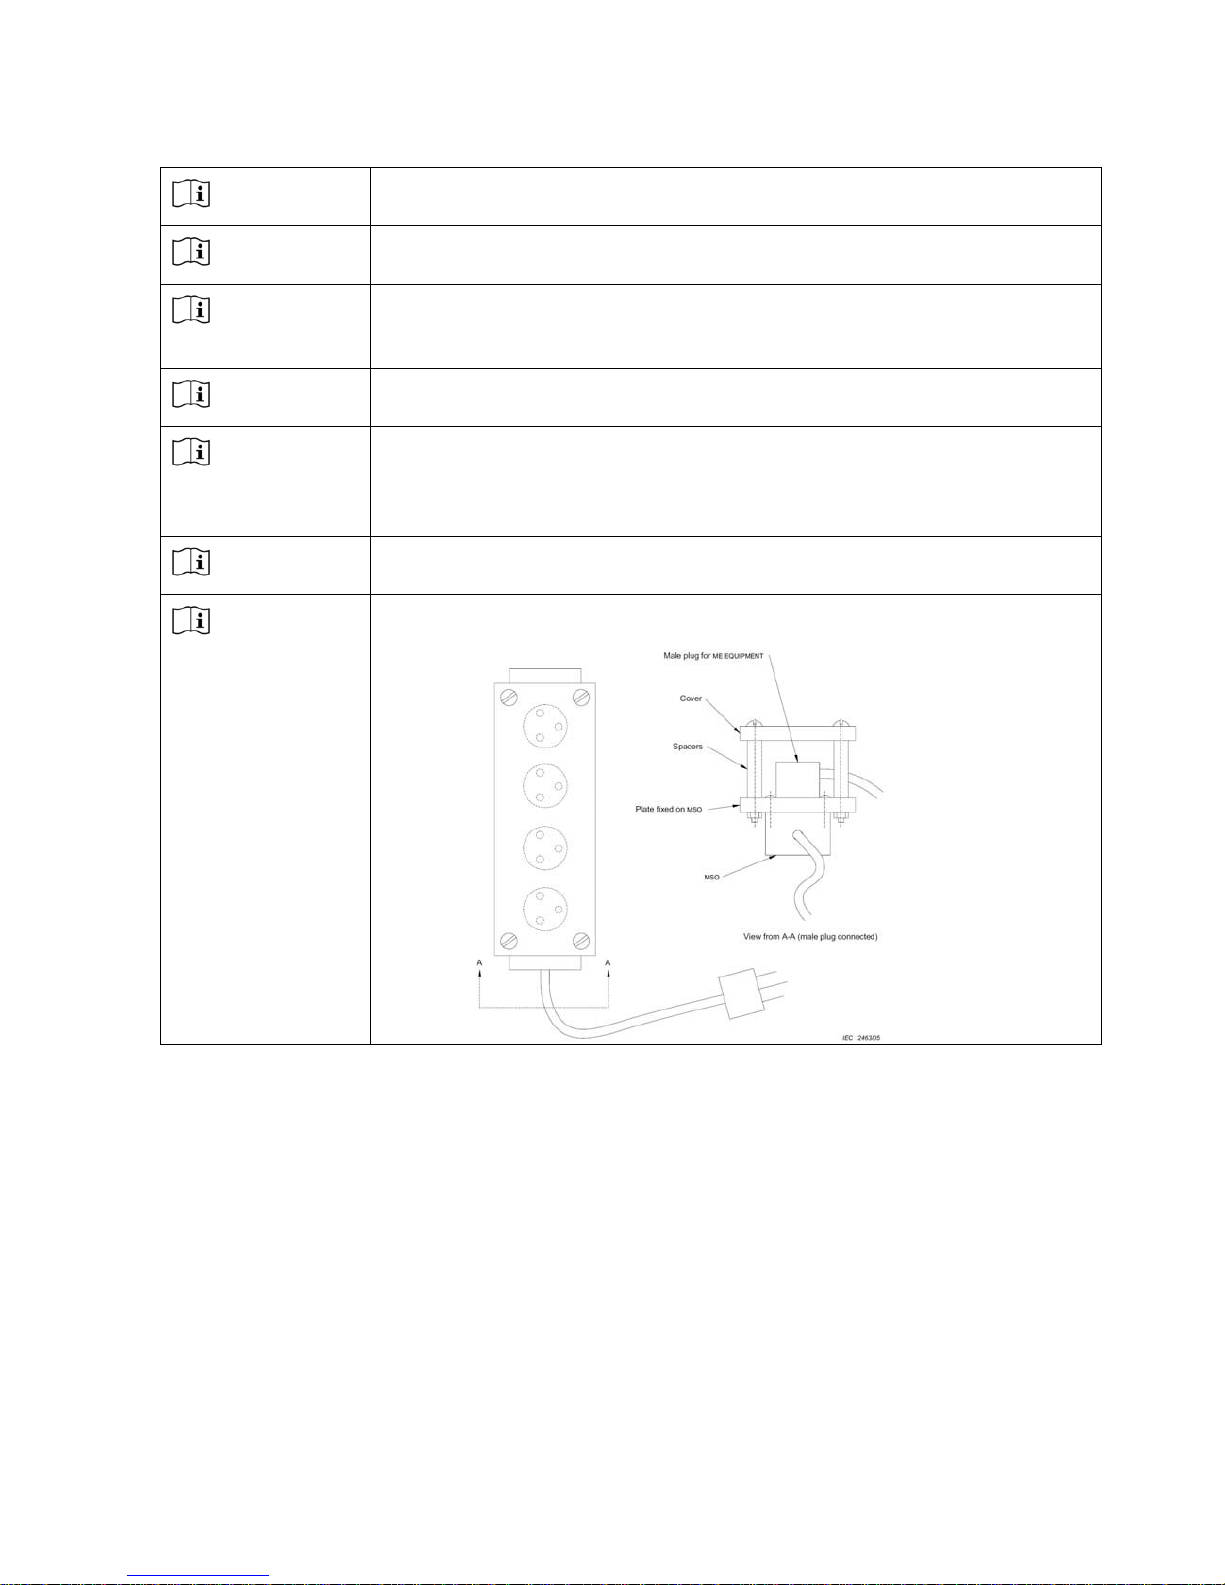
CAUTION
Connection of the plug shall be possible only by using the tool.
(Refer to the figure below.)
Page 8

PRK-8000 Operation Manual
CONTENTS
IMPORTANT NOTICE ····················································· ⅰ
SAFETY INFORMATION ················································· ⅱ
1. Features ··································································· 1
2. Notes for Using the Instrument ········································· 2
3. Description ································································ 3
3.1 Main Unit ···························································································· 3
3.2 Operation Panel ····················································································· 5
3.3 Rotating the Monitor ············································································· 6
4. Practicing through Model Eye ········································· 7
5. Measurement ······························································ 9
5.1 Continuous Keratometry and Refractometry [K/R Mode] ··································· 10
5.2 Refractometry [REF Mode] ······································································ 15
5.3 Keratometry [KER Mode] ········································································ 17
5.4 Contact Lens Base Curve Measurement [CLBC mode] ····································· 19
5.5 Peripheral Keratometry [K(P) Mode] ···························································· 20
6. Other Modes ································································ 23
6.1 Semi-Auto Eye Tracking ······································································· 23
6.2 Measuring Cornea Diameter [SIZE Mode] ···················································· 24
6.3 Observe image obtained by Retroillumination [ILLUM Mode] ··························· 27
6.4 DISPLAY Mode ·················································································· 30
6.5 SETUP Mode ······················································································· 31
7. Self Inspection and Maintenance ······································· 38
7.1 Before Calling a Service Person ································································· 38
7.2 Replacement ······················································································· 40
7.3 Cleaning ···························································································· 40
7.4 When Moving the Instrument ··································································· 40
7.5 Service Information ················································································ 41
8. Classifications and Specifications ····································· 42
8.1 Classifications ····················································································· 42
8.2 Specifications ······················································································· 43
9. Components ······························································ 44
Page 9

PRK-8000 Operation Manual
- 1 -
1. Features
(1) Various Measurements Supported
Not only the usual refractometry and keratometry, but also corneal diameter and base
curve of contact lens can be measured with this one instrument. Thus, measurements
of eye and prescriptions for glasses and contact lenses can be made more efficiently.
(2) Wide Dioptric Measurement Range
Because the PRK-8000 covers a wide measurement range, from -30D to +25D, even an
examinee with strong myopia can be measured.
(3) More Accurate Measurement
You can measure more accurately because foggy method of the eye fixation target
makes the examinee’s eye comfortable.
(4) Pupil Distance(PD) can be measured.
(5) Customized Specifications
You can change the measurement modes, delete unnecessary modes, and/or change
order for printing results. By rotating the monitor, you can see the screen from multiple
directions.
(6) User-friendly operation features
You can easily operate the product with touch screen.
(7) Easy Connection with Other Equipments
This instrument is designed to connect other equipments using RS-232 or USB
communication..
(8) External VGA Monitor Display Supported
You can connect VGA monitor for the external display
(9) Economic printing mode
Letter size and arrangement, depending on the mode of printing adjusted to the paper,
can be saved.
(10) Eye image save function
Eye images (Identified in the ILLUM mode) are stored on your PC through USB
communication.
* Special PC application and USB drivers are provided.
(11) Semi-Auto Eye Tracking
Detect the pupil position of the patient and automatically adjusts the height of the
measuring head.
Page 10

PRK-8000 Operation Manual
- 2 -
2. Notes for Using the Instrument
(1) Do not hit or drop the instrument. The instrument may be damaged if it receives a
strong impact. The impact can damage the function of this instrument. Handle with
care.
(2) Exposure to the direct sunlight or too bright indoor lights can influence on the result of
accurate measurement.
(3) If you want to connect this with other equipments, consult the dealer.
(4) Sudden heating of the room in cold areas will cause condensation on the protective
glass in the measurement window and on optical parts inside the instrument. In this
case, wait until condensation disappears before performing measurement.
(5) Keep clean the objective glass of the examinee side. If it is stained with other
substance, it may effect on error or inaccurate measurements.
(6) Don’t press the “TOUCH BUTTON” on LCD monitor by nail or sharp object. It may
make scratch on the surface of LCD.
(7) Disconnect the power supply and consult the dealer in case there is smoke, strange
odor or noise on working.
(8) Don’t use organic solution such as alcohol, thinner, benzene, etc. to clean the surface
of this instrument. It may damage the instrument.
(9) When moving this PRK-8000, fix the stage by using stage holding knob, always check
if the power supply is off, and then lift the bottom of the unit with both hands.
(10) If you leave PRK-8000 without using for certain period, disconnect the power supply
and protect the unit with dust cover.
(11) Giving an excessive force when rotating the monitor may cause a malfunction.
Page 11
PRK-8000 Operation Manual
- 3 -
3. Description
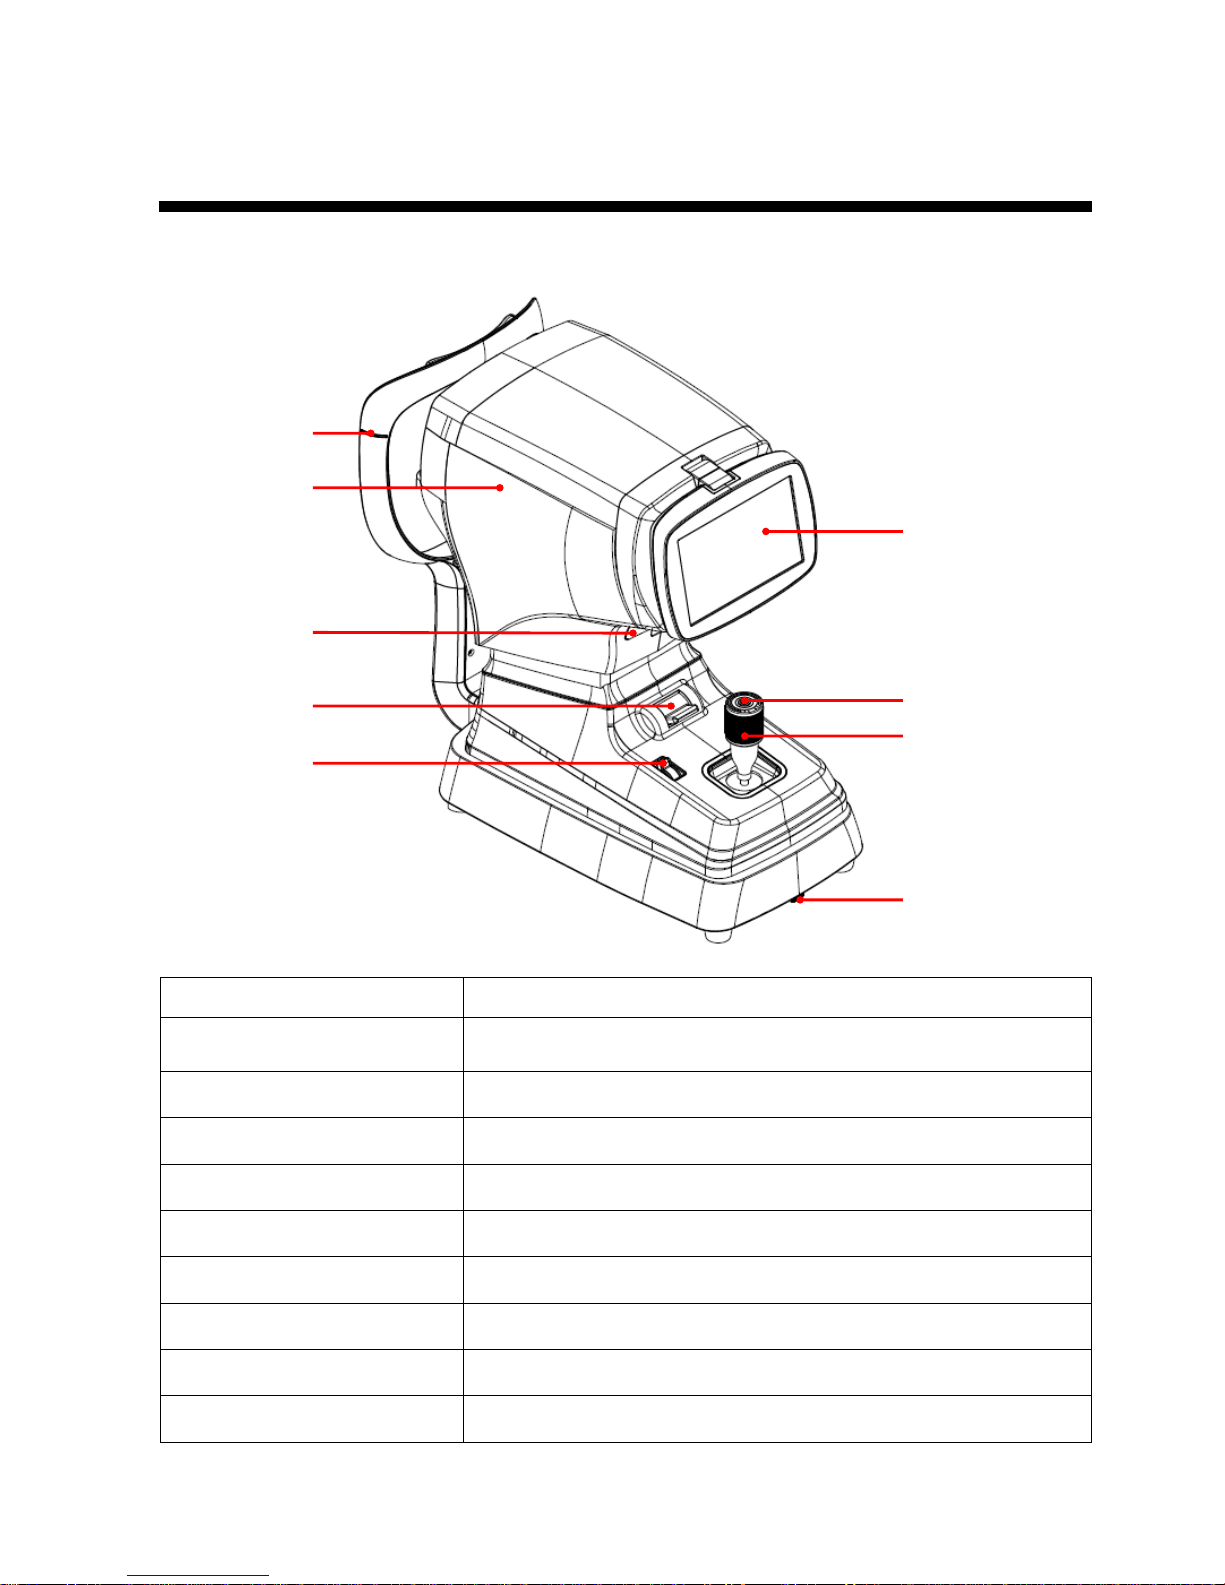
3.1 Main Unit
Name Function
① Height Adjustment mark
Align the height of the examinee’s eye with this mark by adjusting
the height of chin rest.
② Measurement Head
Unit that performs measurement.
③ Printer Print the measured result.
④ Stage Holding Lever
Holds the movement of stage (sliding table).
⑤ Chinrest Lever Align the height of chin rest up and down.
⑥ Monitor Monitor that displays Measurement and SET Modes displays.
⑦ Measuring button
Press this button for measurement.
⑧ Operation Lever
Use this lever for alignment and focusing.
⑨ Clamping bolt
Makes the system stage fixed.
②
③
①
⑤
④
⑦
⑥
⑧
⑨
Page 12
PRK-8000 Operation Manual
- 4 -
② ③ ① ⑤ ④
⑦
⑧
⑥
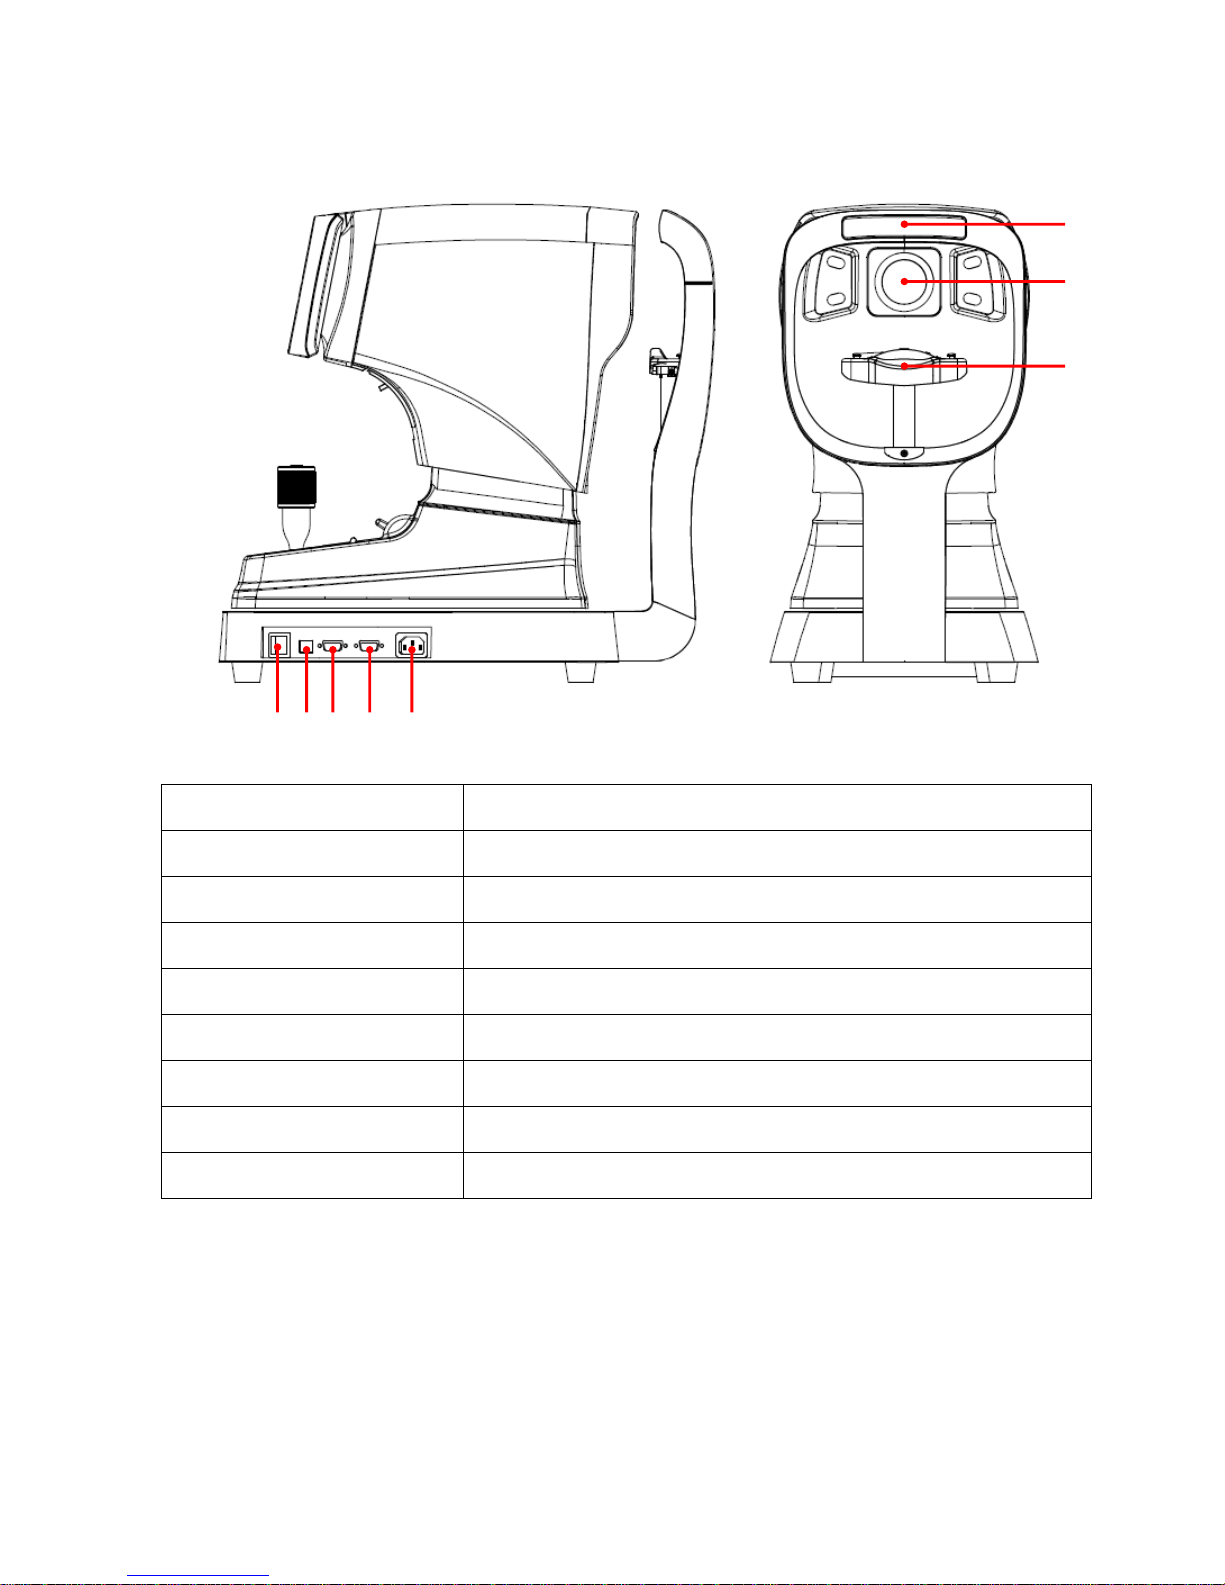
Name Function
① Power switch Switch for turning power ON and OFF
② USB USB connector for other instruments
③ RS-232 RS-232 connector for other instruments
④ Video Output Connector for the VGA monitor cable
⑤ Power supply connector
Connector for the power supply cable
⑥ Forehead Rest rubber
Place the examinee’s forehead against this rest
⑦ Measurement window
Window for the examinee to look into for measurement
⑧ Chin Rest
Place the examinee’s chin on this rest
If you want to connect the input / output signal ports and other devices that must meet IEC standards
(IEC60950 IT equipment, IEC60601 medical equipment)
If in doubt should contact POTEC or your authorized distributor.
Page 13
PRK-8000 Operation Manual
- 5 -
3.2 Operation Panel
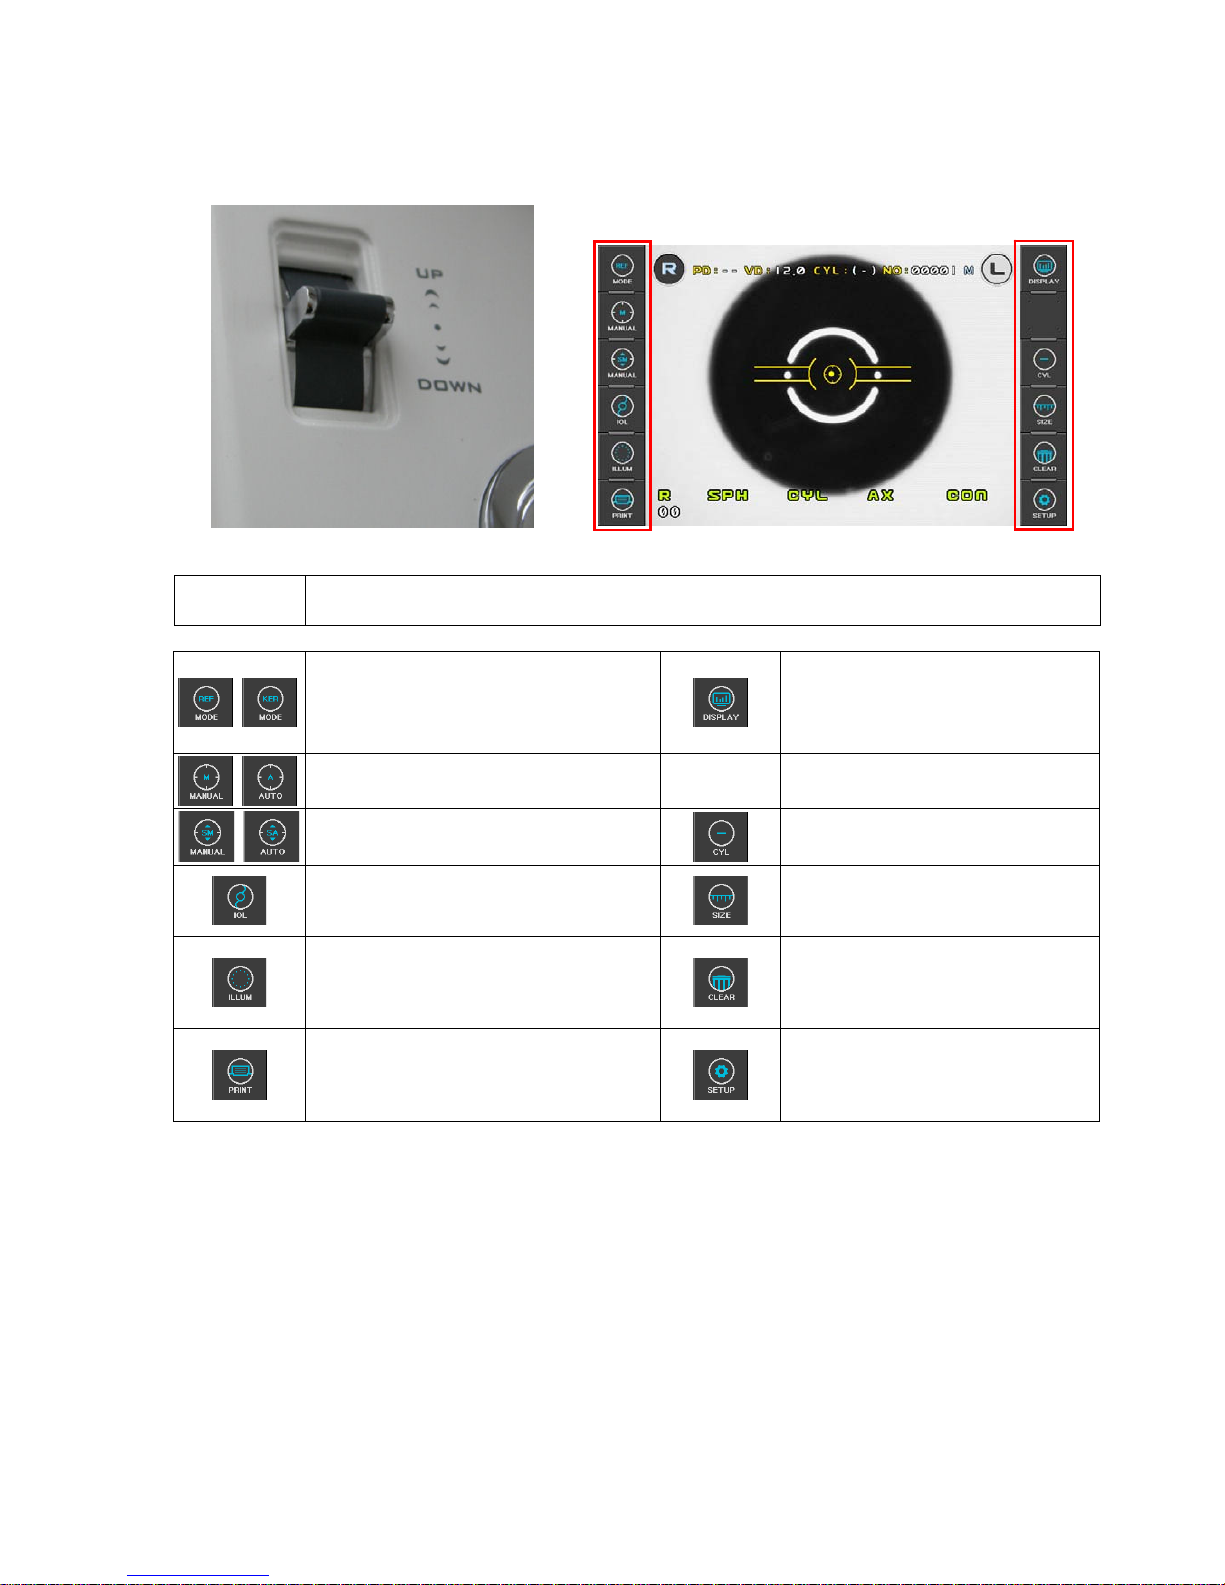
CHINREST LEVER Touch Button
CHINREST
LEVER
This Lever is for raising/lowering the chin rest. Press “up” lever in order to raise and “down”
lever to lower the chin rest.
Press this button in order to change
measurement mode.
Press this button in order to enter
DISPLAY Mode, where you can
see measurement data stored in
memory
Press this button in order to start manual
or automatic measurement.
- -
Press this button in order to OFF/ON
semi-automatic eye tracking
Press this button in order to change
CYL form.
Press this button when the examinee’s
eye is difficult to measure due to cataract
or examinee with intraocular lens (IOL).
Press this button in order to enter
SIZE Mode, where you can measure
the diameter of cornea, etc.
Press this button in order to enter RET
(Retroillumination) Mode, where you can
observe the image obtained by
retroillumination.
Press this button to clear all stored
data in memory.
Press this button in order to print or
transfer the measurement.
Press this button in order to enter
SETUP Mode, where you change all
the settings about measurements,
printouts etc.
Page 14
PRK-8000 Operation Manual
- 6 -
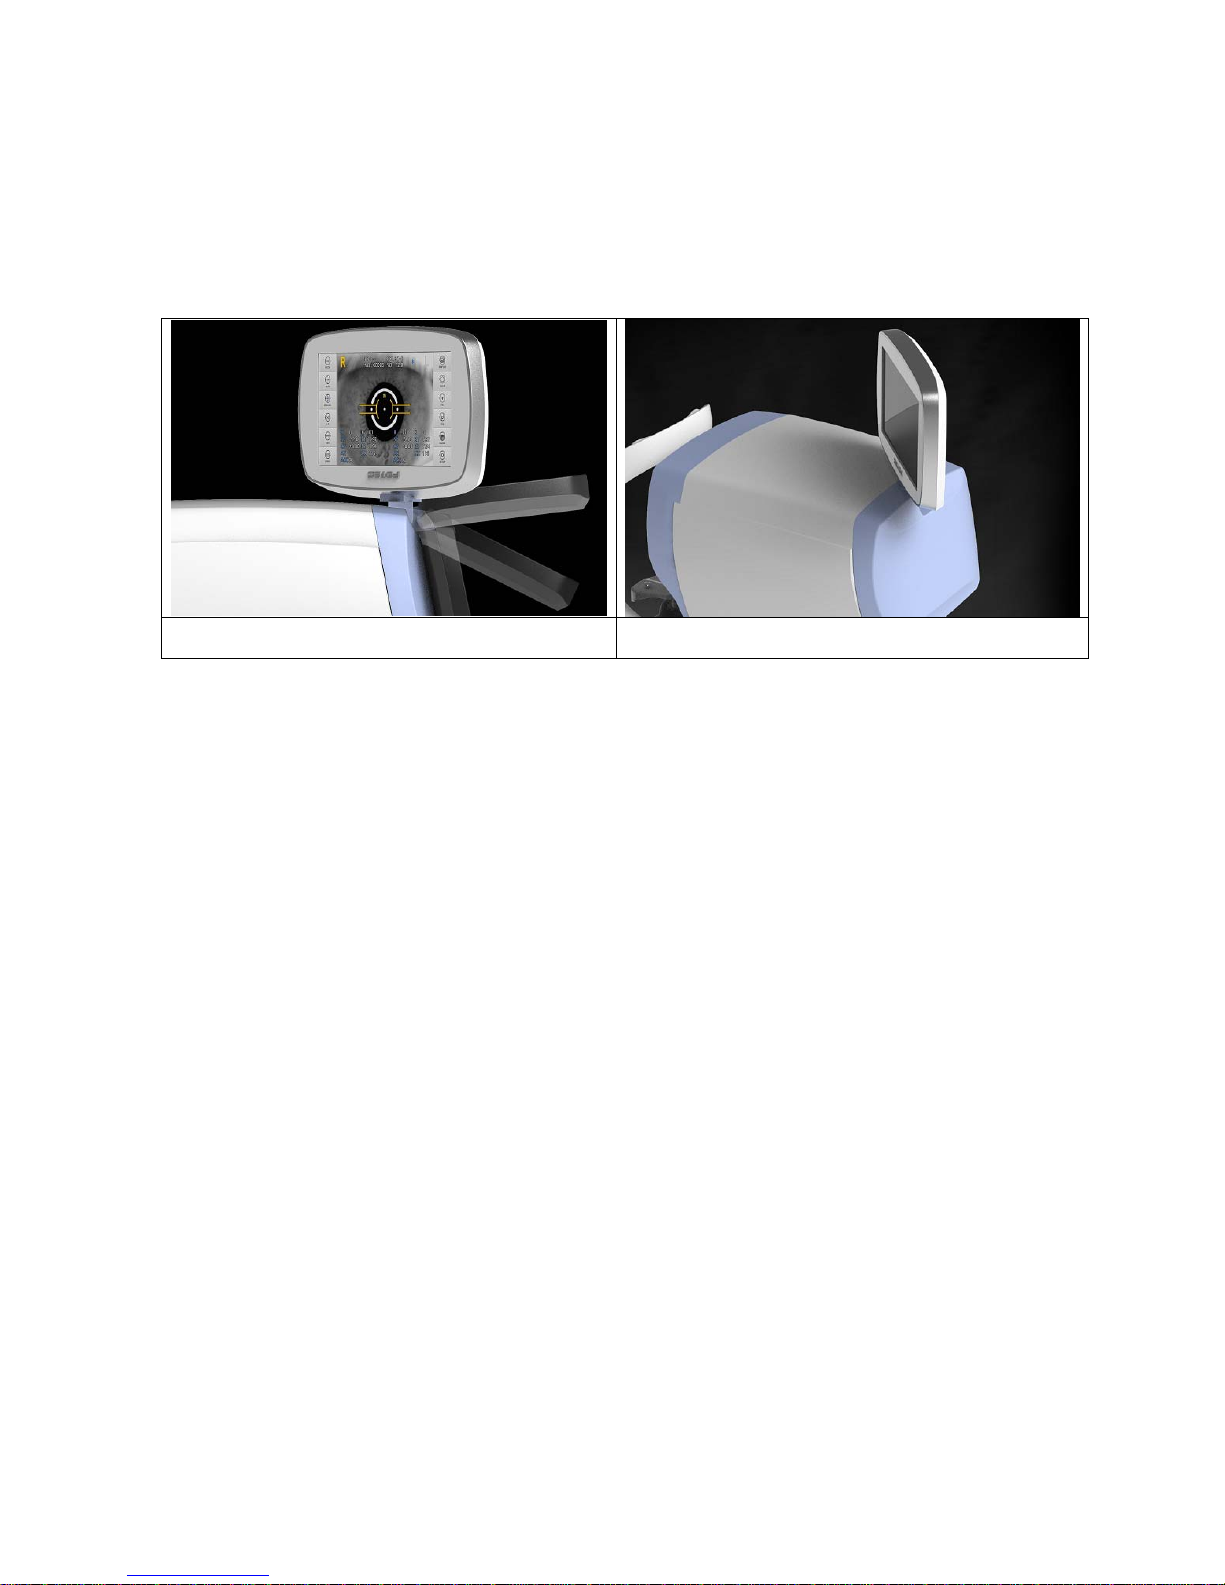
3.3 Rotating the Monitor
By rotating the monitor, you can view the screen from various directions. When you rotate the
monitor, hold both sides of the monitor then rotate smoothly given the power. Forcibly
rotating may cause a malfunction.
Tilting: Up and Down Rotation: Left and right 90 degrees
Page 15
PRK-8000 Operation Manual
- 7 -
4. Practicing through Model Eye
Practice measurement by using the accessory Test Model Eye before doing the actual
measurement.
(1) Turn ON the power
Turn ON the power switch of the instrument.
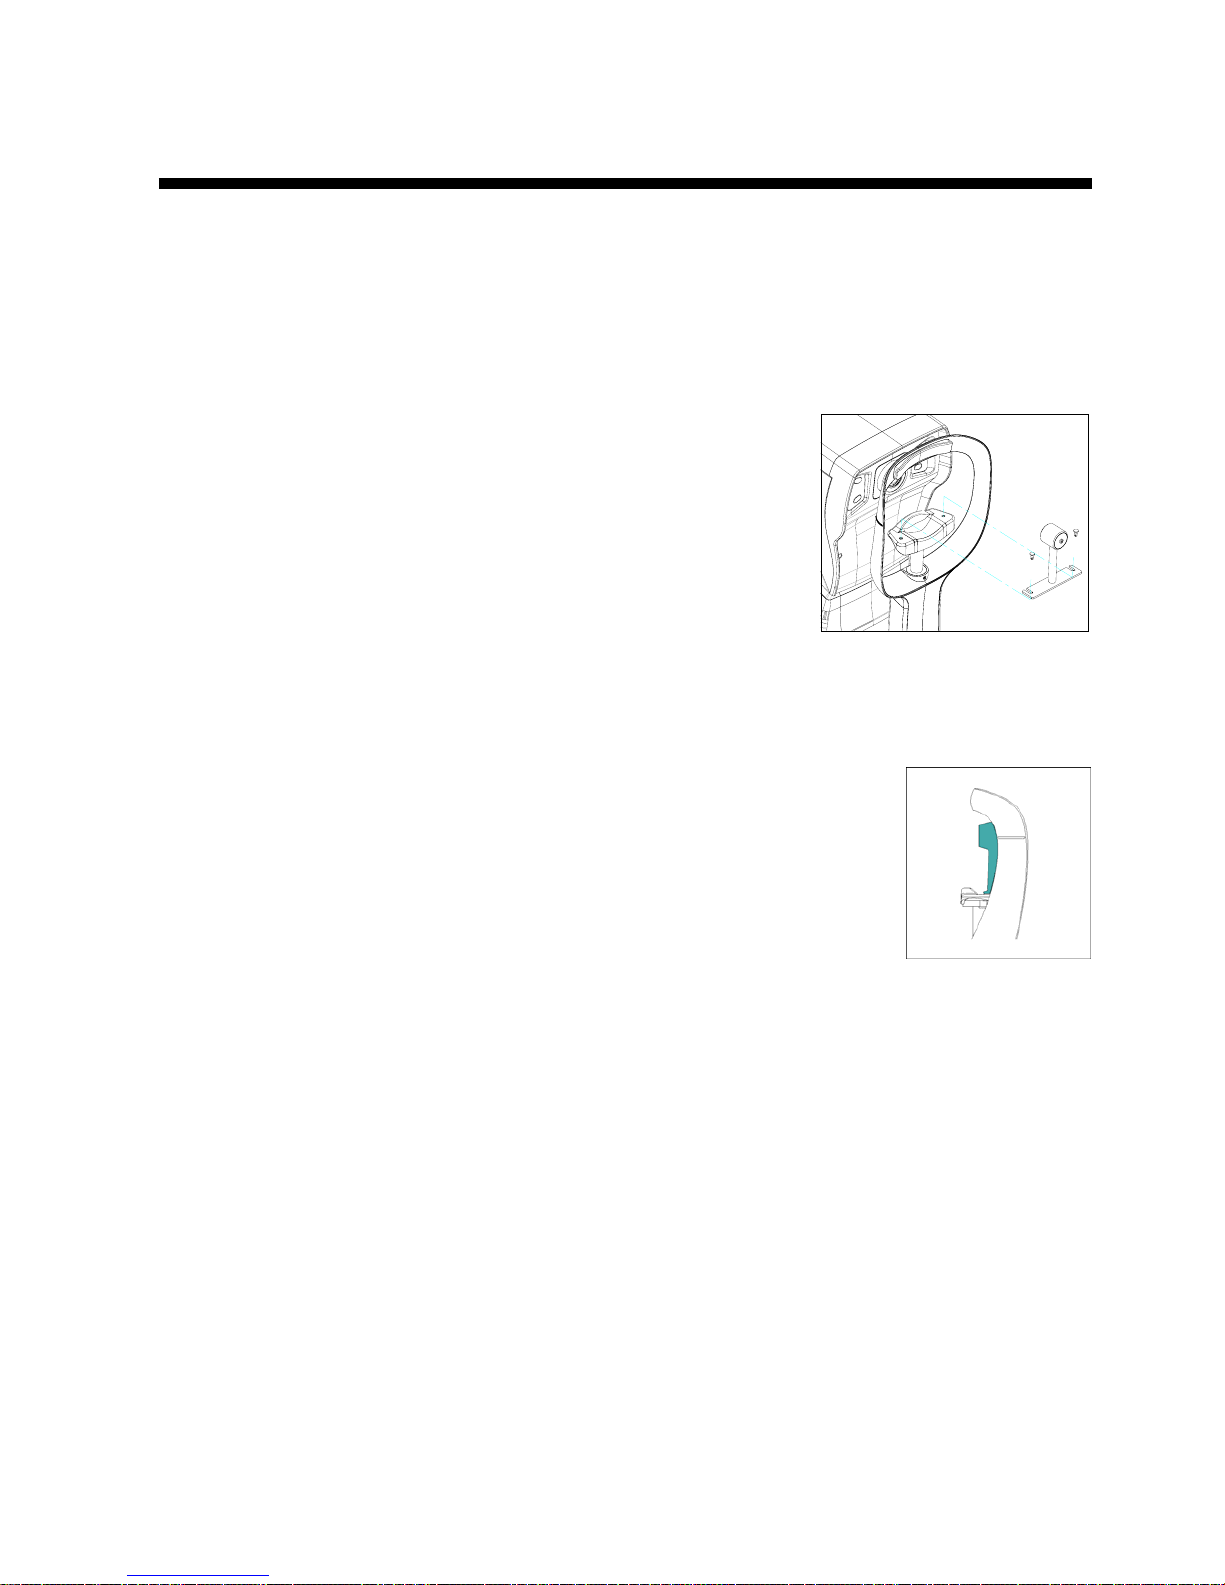
(2) Attach the model eye
Remove the chin rest paper and align the holes on the
base of the model eye with the holes on the chin rest. And
insert pins.
(3) Release stage lock
Turn the stage holding knob in counterclockwise direction to release the stage lock.
(4) Adjust height of Test Model Eye
Adjust the height of the chin rest by pressing “CHINREST LEVER” so
that the Test Model Eye is aligned with the “Height Adjustment
mark” on the face rest.
(5) Enter K/R or REF Mode.
If neither “K/R” nor “REF” is displayed on the monitor, press MODE button until either
one is displayed.
Page 16
PRK-8000 Operation Manual
- 8 -
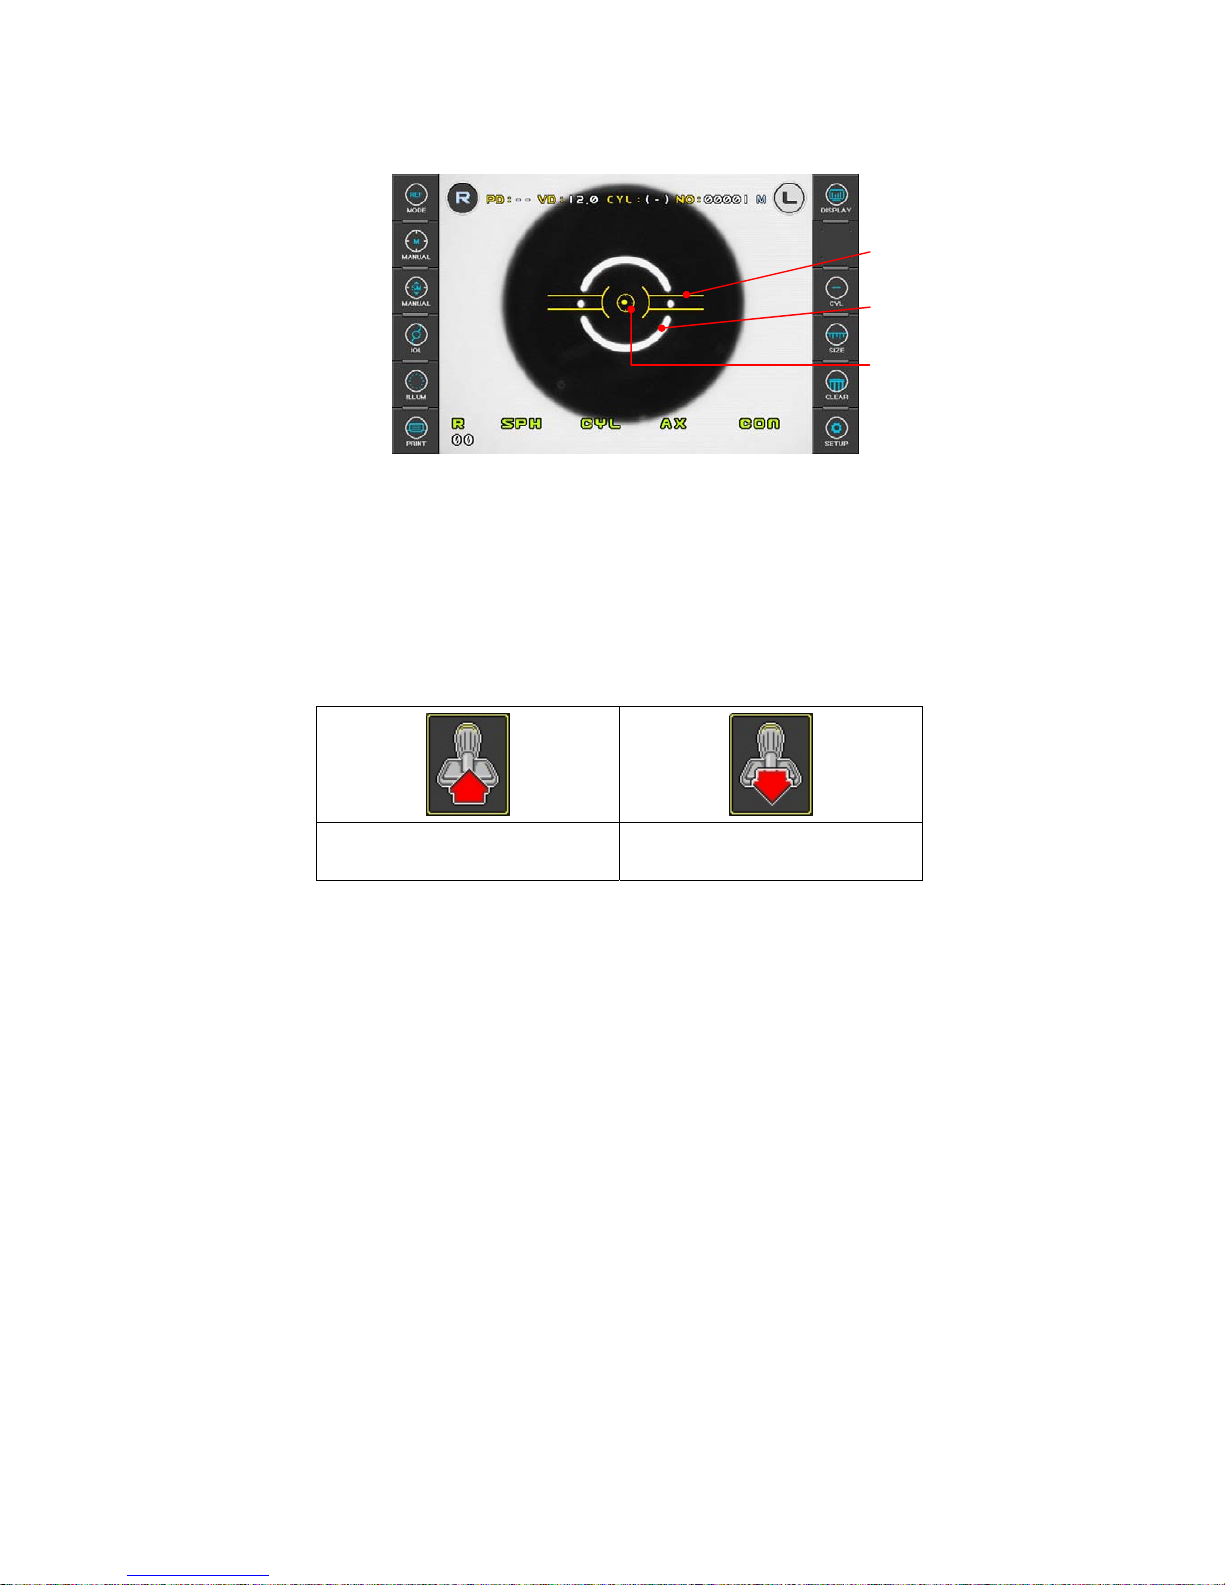
Mire Image
Outer Alignment Mark
Inner Alignment Mark
(6) Adjust the position and focus on the model eye
Looking at the monitor, incline the operation lever toward the model eye until a bright
dot appears near the Inner Alignment Mark. Place the Bright Dot in the center of
Inner Alignment Mark. If position cannot be adjusted just by inclining the operation lever,
slide the lever in the direction required.
Focus on the model eye by inclining the operation lever forward and backward so that
the Mire Ring image is displayed clearly on the monitor. The focus is correct, the color
of the aiming mark changes to yellow color.
z Guide image
In the focus away from
Æ Tilt the lever to patient
That closer focus
Æ Tilt the lever to operator
(7) Measurement
z Manual measurement
(a) Adjust the position and focus on the model eye like the procedure (6).
(b) Press the Measuring button . At this point, if measurement is failed with
messages like ERROR, repeat the procedure (a) and press the Measuring
button again.
(c) Check whether diopter value is measured or not. Diopter value is recorded in
the bottom area of the model eye. If you are not satisfied with the measured
value, measure in the same way and check again.
z Automatic measurement
Continuous measurement starts automatically and will be performed 3 times
or 5 times.
(a) Press the AUTO button on the operation panel.
(b) Adjust the position and focus on the model eye like the procedure (6) at
previous page.
(c) When the Bright Dot enters the Inner Alignment Mark and model eye is in focus
properly, measurement starts automatically.
(d) Execute the procedures (c) of manual measurement.
Page 17
PRK-8000 Operation Manual
- 9 -
Power ON
DISPLAY Mode
DISP
button
EXIT
button
SETUP Mode
SETUP
button
EXIT
button
SIZE Mode
SIZE
button
EXIT
button
ILLUM Mode
ILLUM
button
EXIT
button
REF Mode
MODE
button
KER Mode
MODE
button
K/R Mode
MODE
button
CLBC Mode
MODE
button
K(P) Mode
MODE
button
IOL Mode
IOL
button
EXIT
button
5. Measurement
WARNING
Should any of the following occur, immediately turn OFF the power
switch, unplug the power cable from the AC outlet, and contact the
dealer or the agent who/where you purchase this instrument.
z When there is smoke, strange odor or abnormal sound.
z When liquid has been spilled into the instrument or a metal object
has entered through an opening.
z When the product has been dropped or its housing damaged.
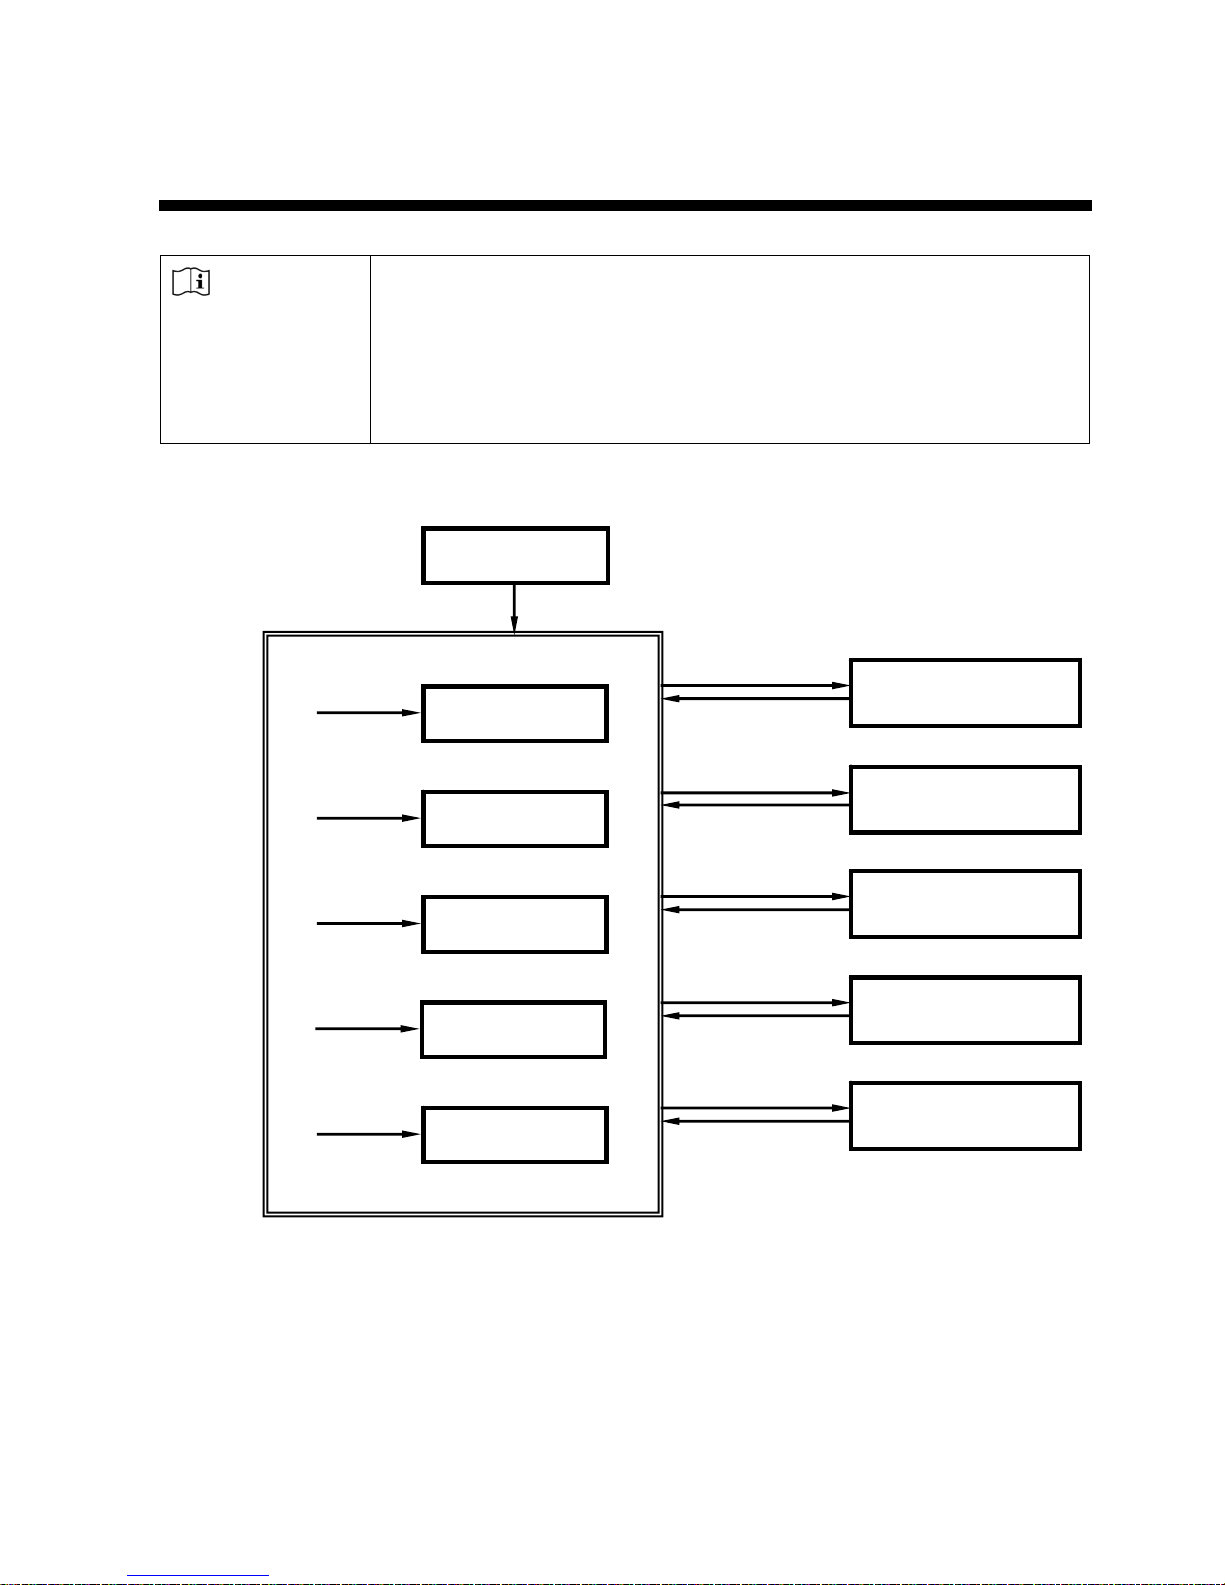
Relation between buttons and modes
NOTE: IOL button will be enabled at K/R mode and REF mode only. If IOL
button is pressed, IOL measurement will be performed and pressed
again to render the basic measurement.
Page 18
PRK-8000 Operation Manual
- 10 -
5.1 Continuous Keratometry and Refractometry
[K/R Mode]
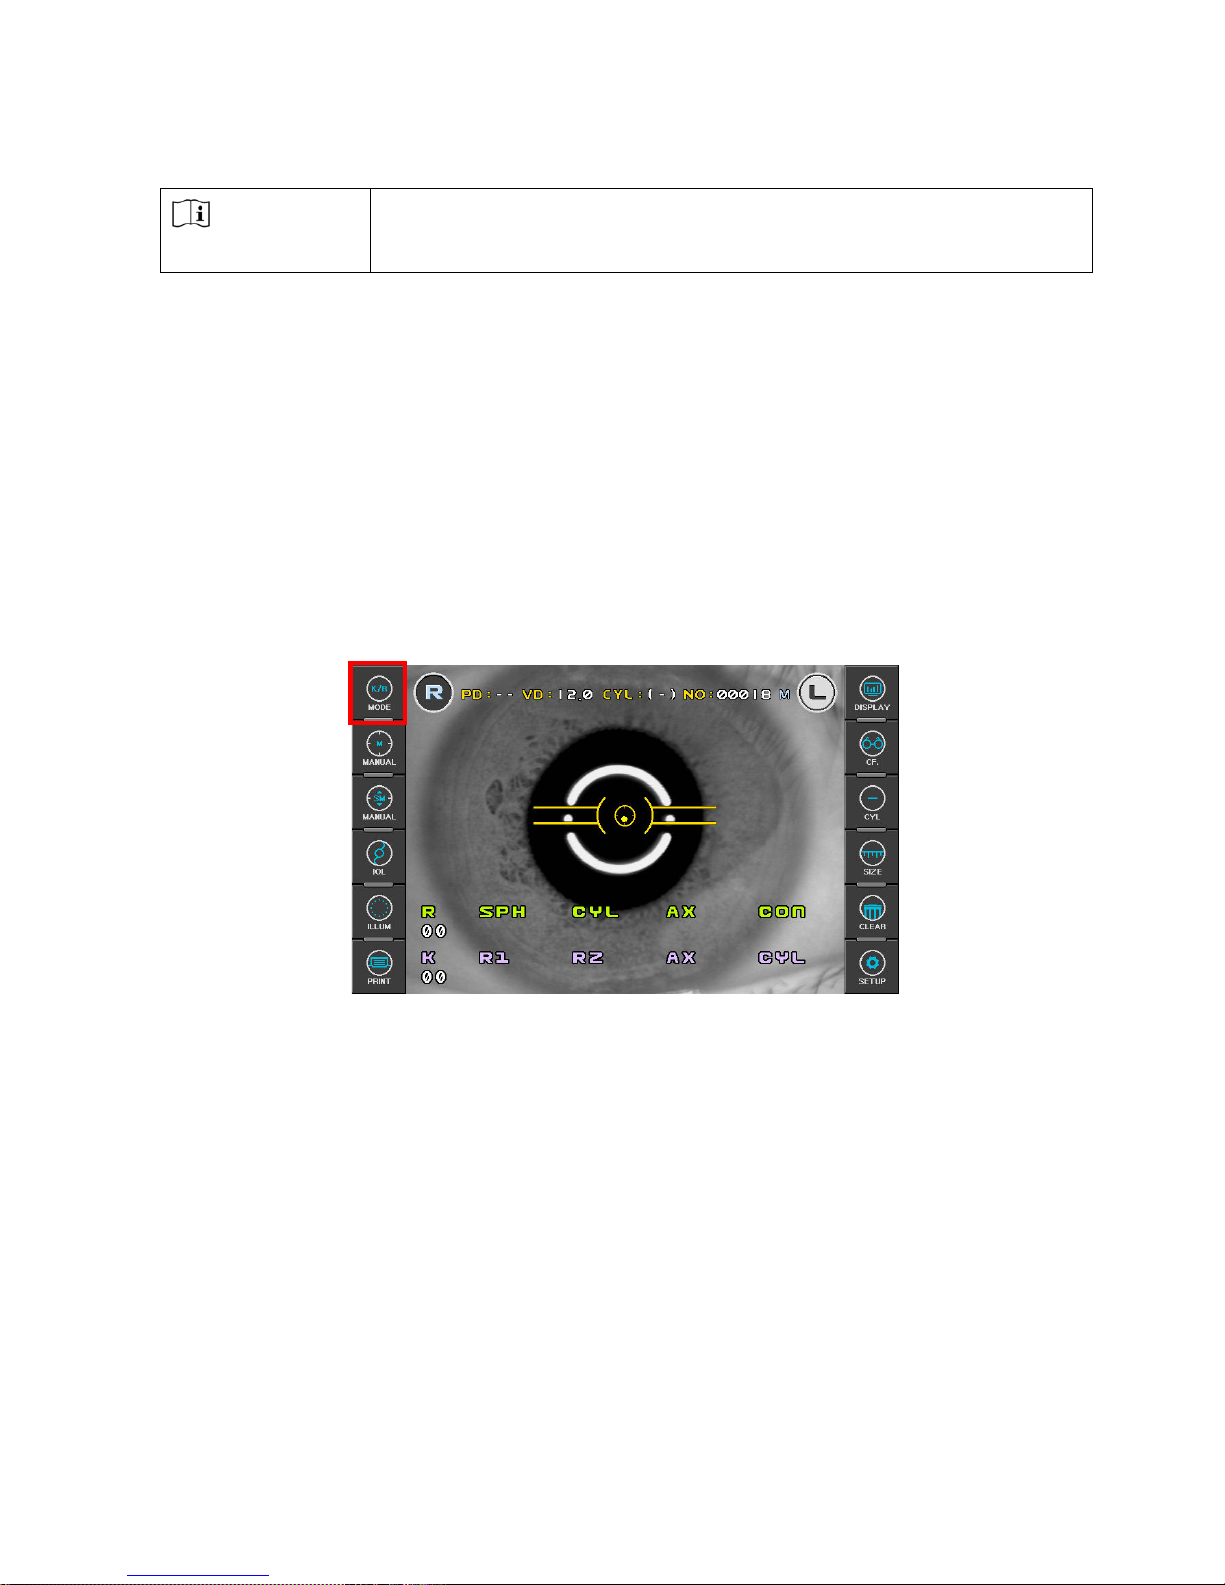
In the K/R mode, refractometry is automatically performed after keratometry.
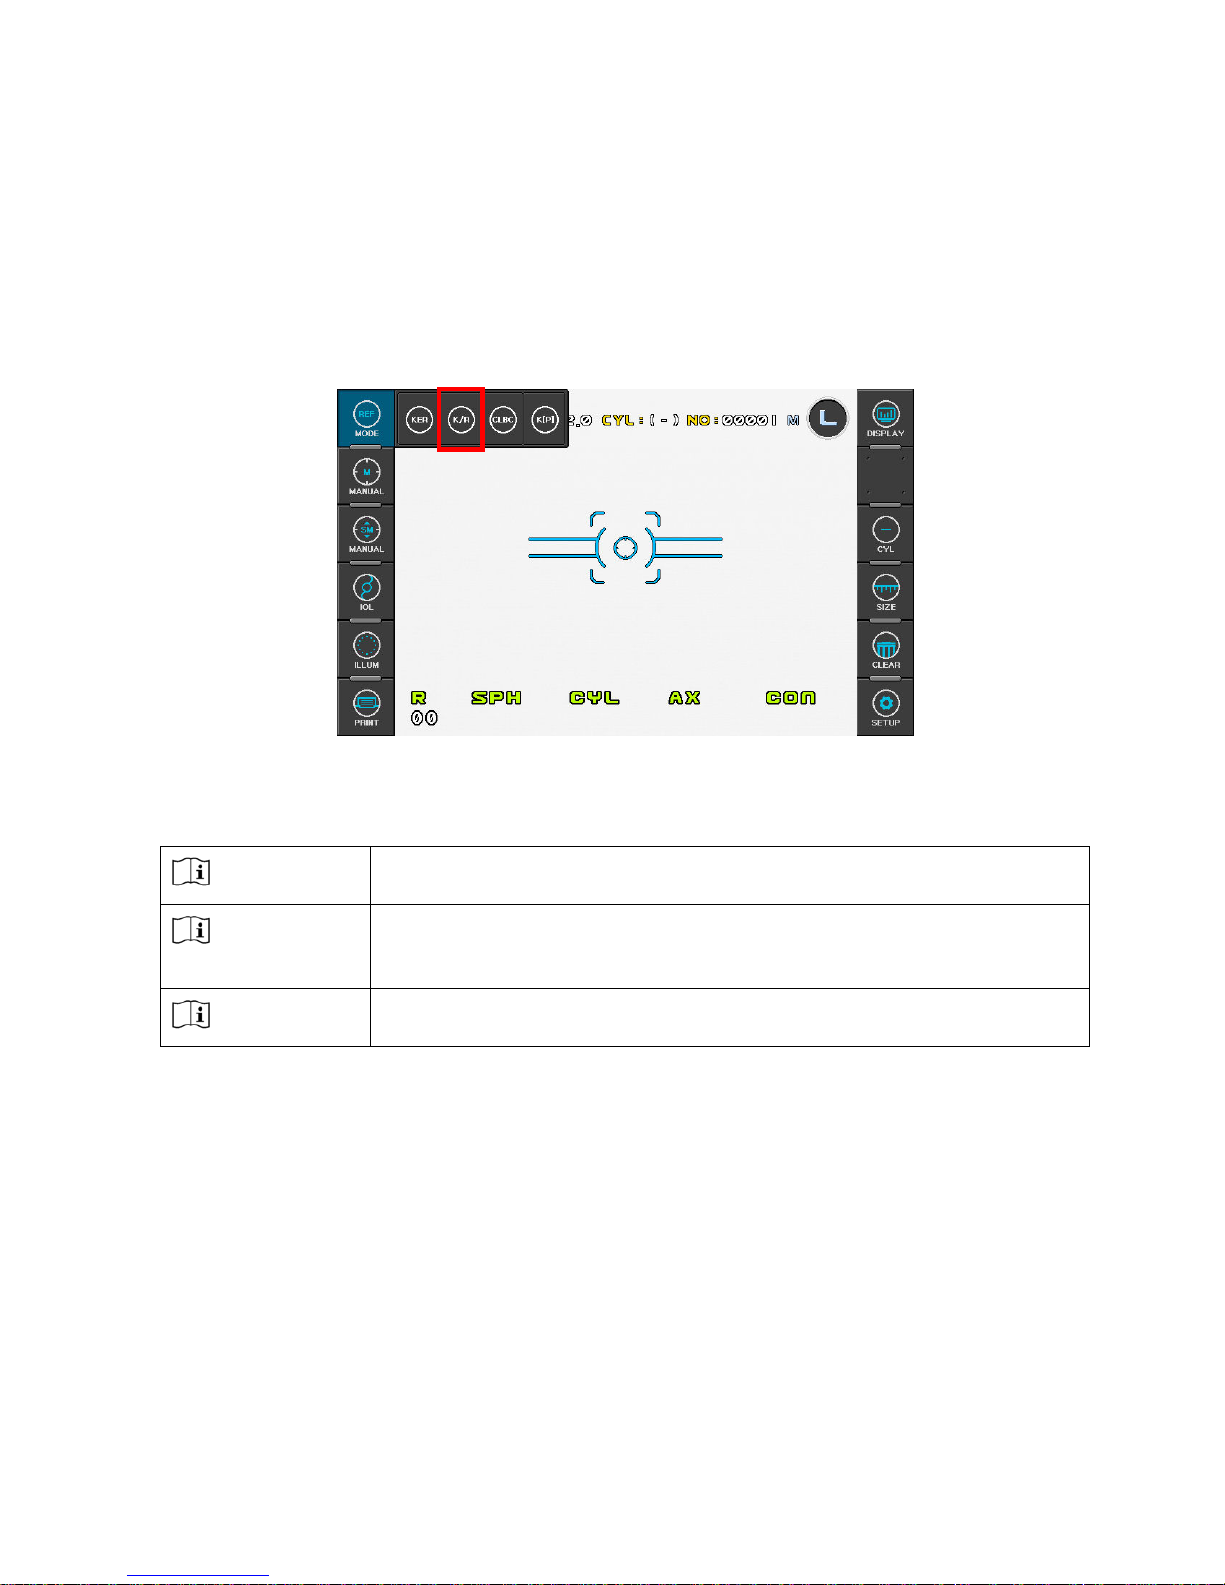
(1) Enter K/R Mode
Press MODE button on the left side of the display, and then select “K/R”.
(2) Adjust height of examinee’s eye.
CAUTION
Ensure that the examinee has not placed his/her hand or fingers
under the chin rest. Otherwise, hand or fingers may be hurt.
CAUTION
Wipe the forehead rest with ethanol or glutaraldehyde solution to
disinfect it each time a different examinee uses it, in order to prevent
infection.
CAUTION
Change the chin rest paper each time the examinee changes in order
to keep the chin rest clean.
Have the examinee sit and place his/her chin and forehead against the chin rest and
forehead rest.
Adjust the height of the chin by pressing “CHINREST LEVER” so that the eye of the
examinee is aligned with the height adjustment mark on the face rest.
Page 19
PRK-8000 Operation Manual
- 11 -
(3) Perform alignment and Focusing
CAUTION
Do not place your hand or fingers between the stage and base. Also
ensure that the examinee does not place his/her hand or fingers there
either. Otherwise, hand or fingers may be hurt.
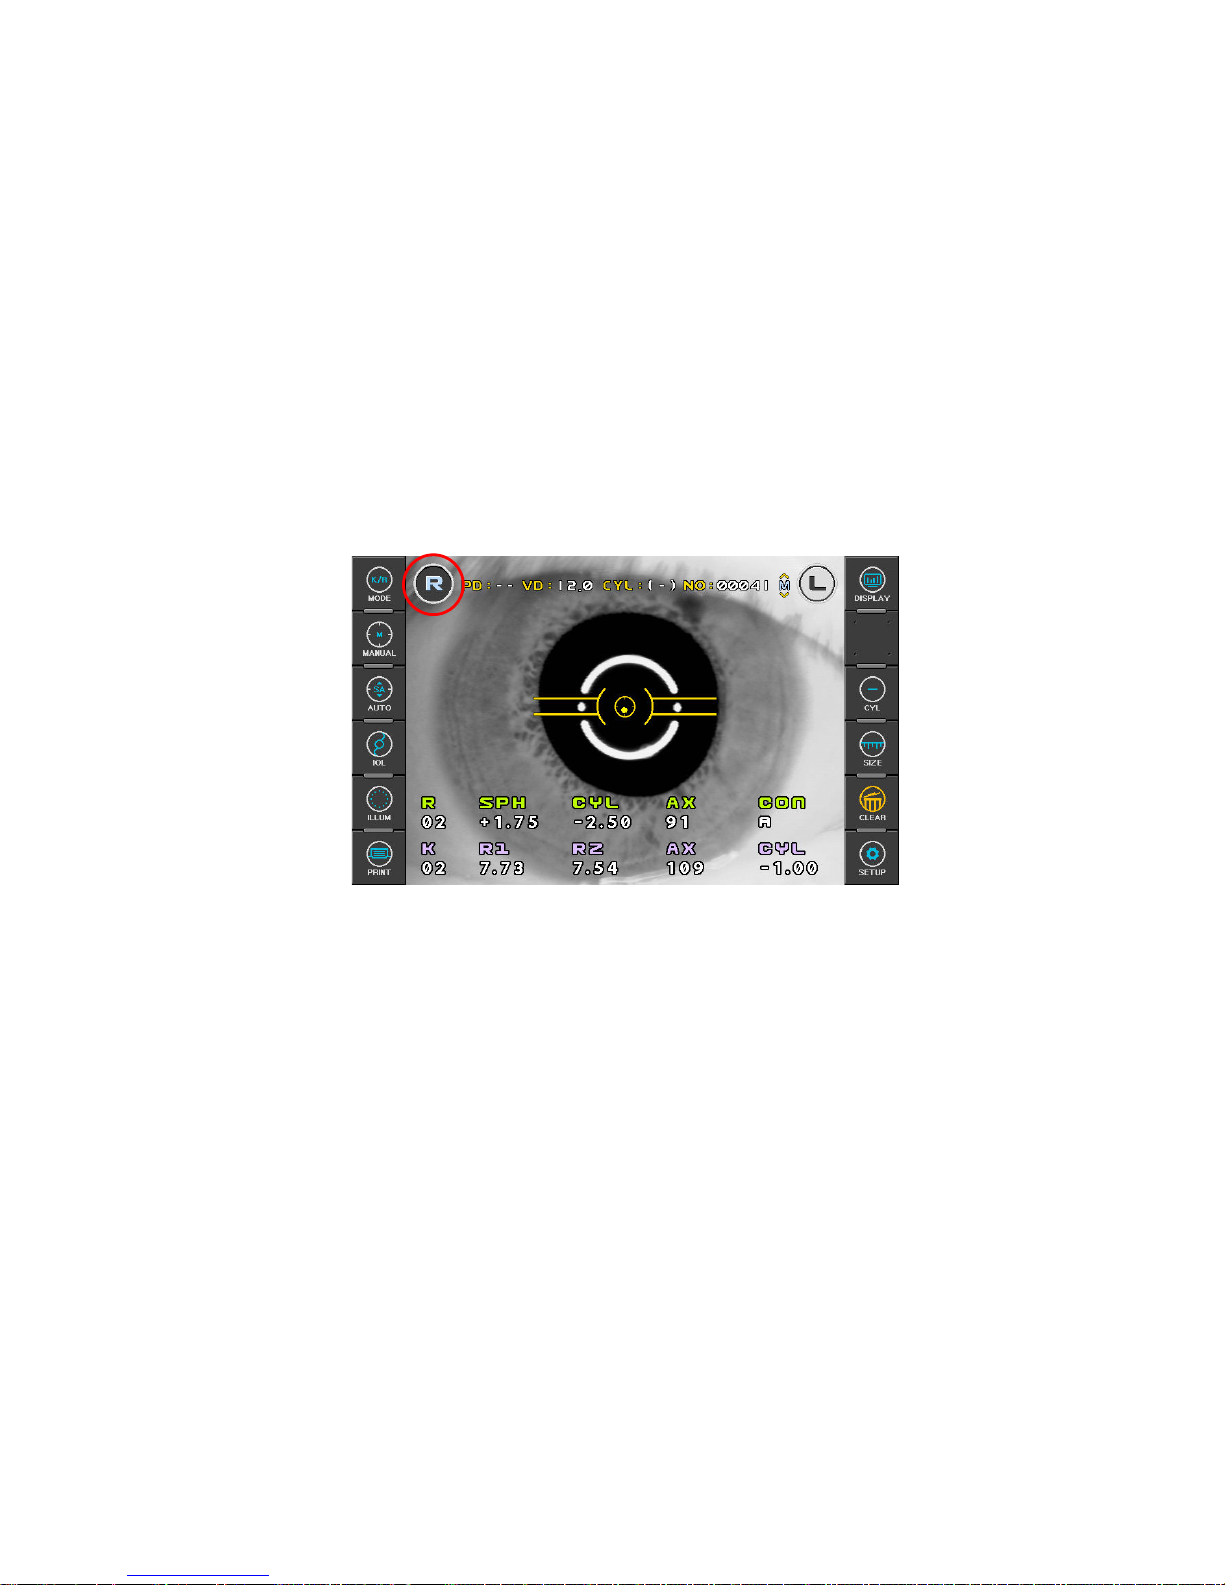
Slide the operation lever to the left so that the right eye of the examinee is displayed on
the monitor.
Ask the examinee to look at the red roof in the center of the scene (eye fixation target).
Looking at the monitor, check that image of the mire ring is not obscured by the upper
eyelid. If it is covering the ring, instruct the examinee to keep his/her eye opened wide
until measurement ends. Or help them open the eye wider by lifting up his/her upper
eyelid lightly with your fingers.
Looking at the monitor, incline the operation lever to right or left, and turn the operation
lever so the pupil is concentric with the inner alignment mark. If the pupil is large, align it
with the outer alignment mark.
Focus on the mire image by inclining the operation lever forward and backward. The
focus is correct, the color of the aiming mark changes to yellow color.
NOTES:
① Slide stage to the forward/backward and right/left if you are unsatisfied with
the operation lever control.
② If the alignment marks and the pupil are not concentric, instruct the examinee
to look at the red roof at the center of the picture. Otherwise, measurement
error may occur due to aberration.
Page 20
PRK-8000 Operation Manual
- 12 -
(4) Measurement
Press the Measuring button.
Measurement will be continuously performed when the Measuring button is kept
pressed.
z The newest measured results will be displayed on the monitor.
z In case of the continuous measurement, the result of previous measurement will be
displayed.
z If you change setting for REF/KER of SETUP Mode, you can select the vertex
distance.
z If you change setting for REF/KER of SETUP Mode, you can change display format
of CYL value.
z When measured results are displayed, changing for REF/KER of SETUP Mode
renders each cornea measured result of R1/R2/AX Æ K1/K2/AX Æ AR/CY/AX
displayed in turn.
NOTES:
① There can be error if the Outer Alignment Mark and the pupil is eccentric.
② There may be some aberration to the measurement value due to the
eccentricity or inclination of lens, or deformation of cornea after surgery.
③ Reliability of the measurement with IOL switch turned ON may be low.
Page 21
PRK-8000 Operation Manual
- 13 -
(5) Repeated measurement
Measurement could be repeatedly performed if necessary.
z The newest result will be displayed on the monitor whenever measured.
z Maximum of 10 newest data items for both right and left eyes will be stored in
memory except error data. And those data can be showed in the DISPLAY mode
window.
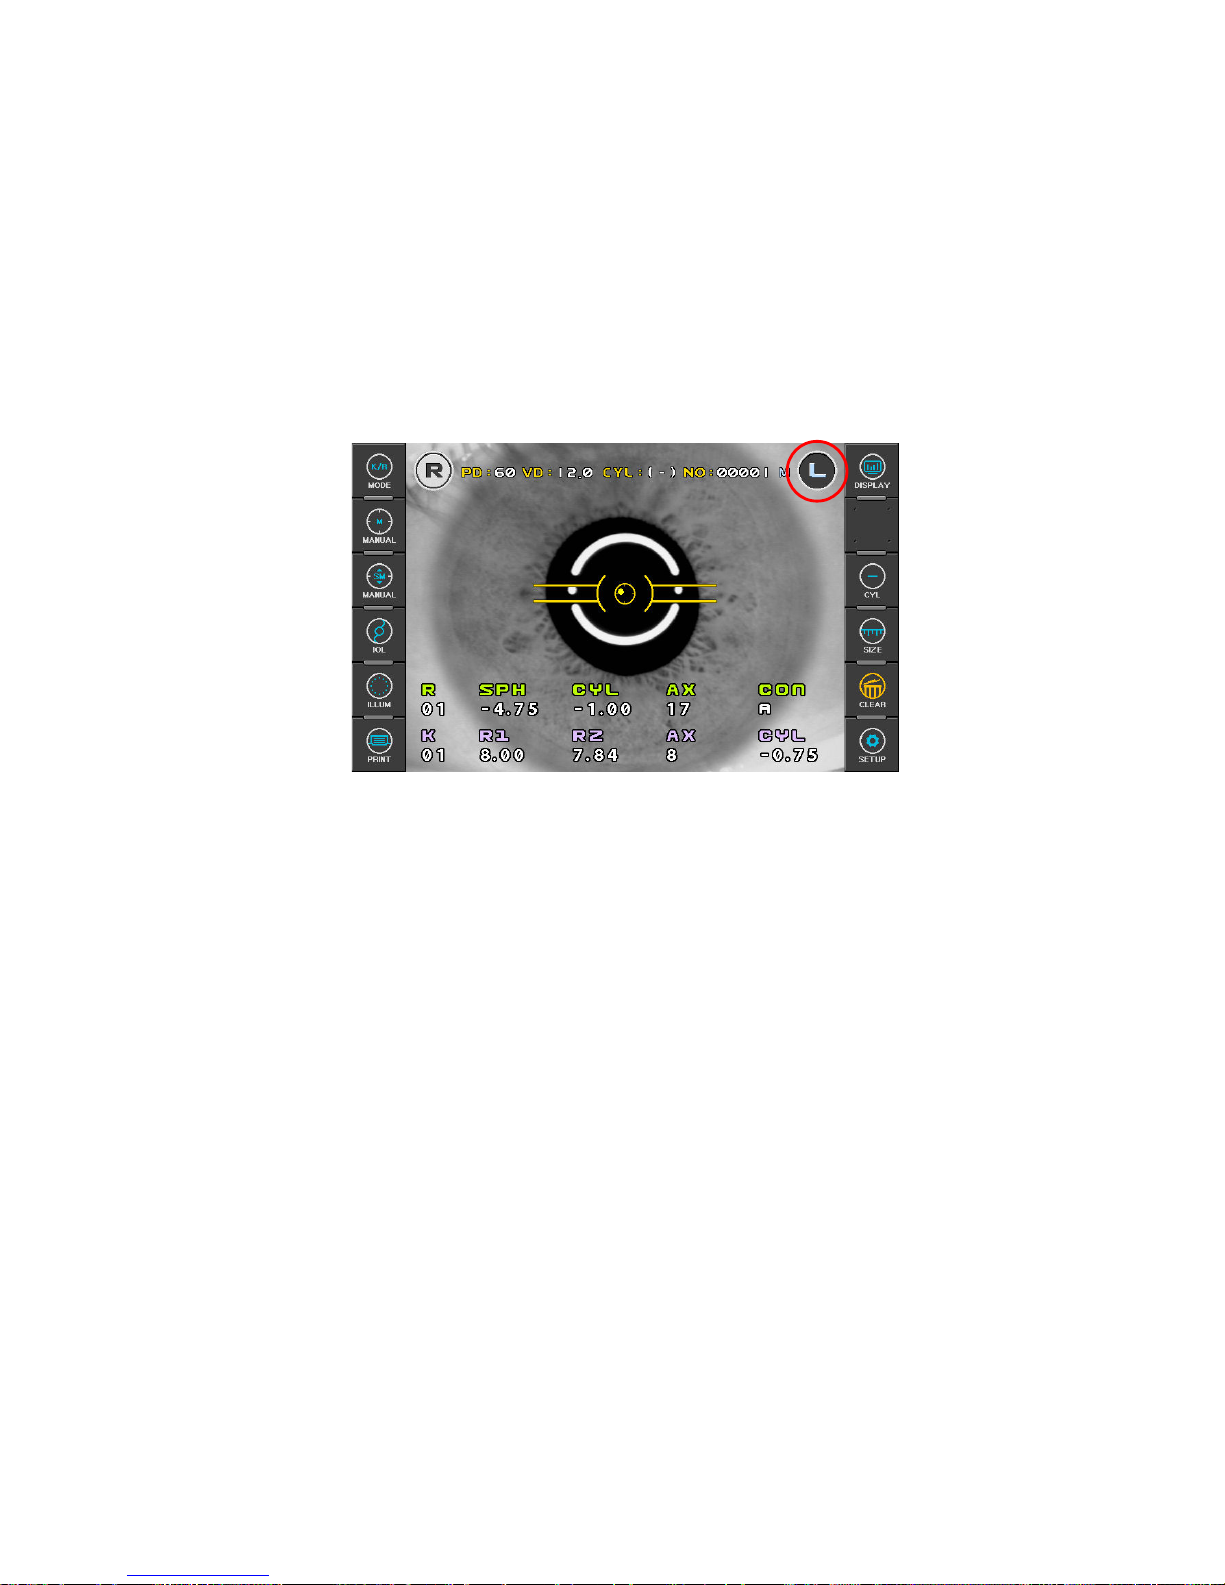
(6) Measure the Other Eye.
Slide the stage to the right side and measure the left eye.
z After both eyes are measured, pupil distance(PD) will be displayed on the monitor.
z If stage is slid to the right eye again without pressing the PRINT button, the last
measurement will be displayed. And when measuring button is pressed, the new
value will be added to them.
NOTES: Safety information about infrared light radiation for measurement
As light sources for measurement, this instrument adapted two type of infrared LED. It was
chosen to satisfy the amount of energy exiting from the instrument never exceed the limit
value recommended by the international standard ISO 15004. This condition is satisfied even
when the instrument is operating at maximum light intensity and maximum aperture!
(Maximum intensity is the highest brightness the instrument is capable of delivering, including
the highest brightness achievable if overvoltage is provided)
Detailed radiation information at normal usage of this instrument is like bellows.
① Keratometry @ 770nm (LED type IWL-BR30F):
- Output < 0.03 mW/cm
2
(Group 1 limit≤20mW/cm
2
for unweighted corneal and lenticular infrared radiation
irradiance, EIR-CL @ wavelength of 770 to 2500nm, acc. To ISO15004-2:2007,
5.4.1.4);
② Refractometry @ 880nm (LED type HE8807SG):
- Output < 0.15 mW/cm
2
(Group 1 limit≤0.7mW/cm
2
for weighted retinal visible and infrared radiation
thermal hazard, EVIR-R @ wavelength of 380 to 1400nm, acc. To ISO15004-2:2007,
5.4.1.6 a);
Page 22
PRK-8000 Operation Manual
- 14 -
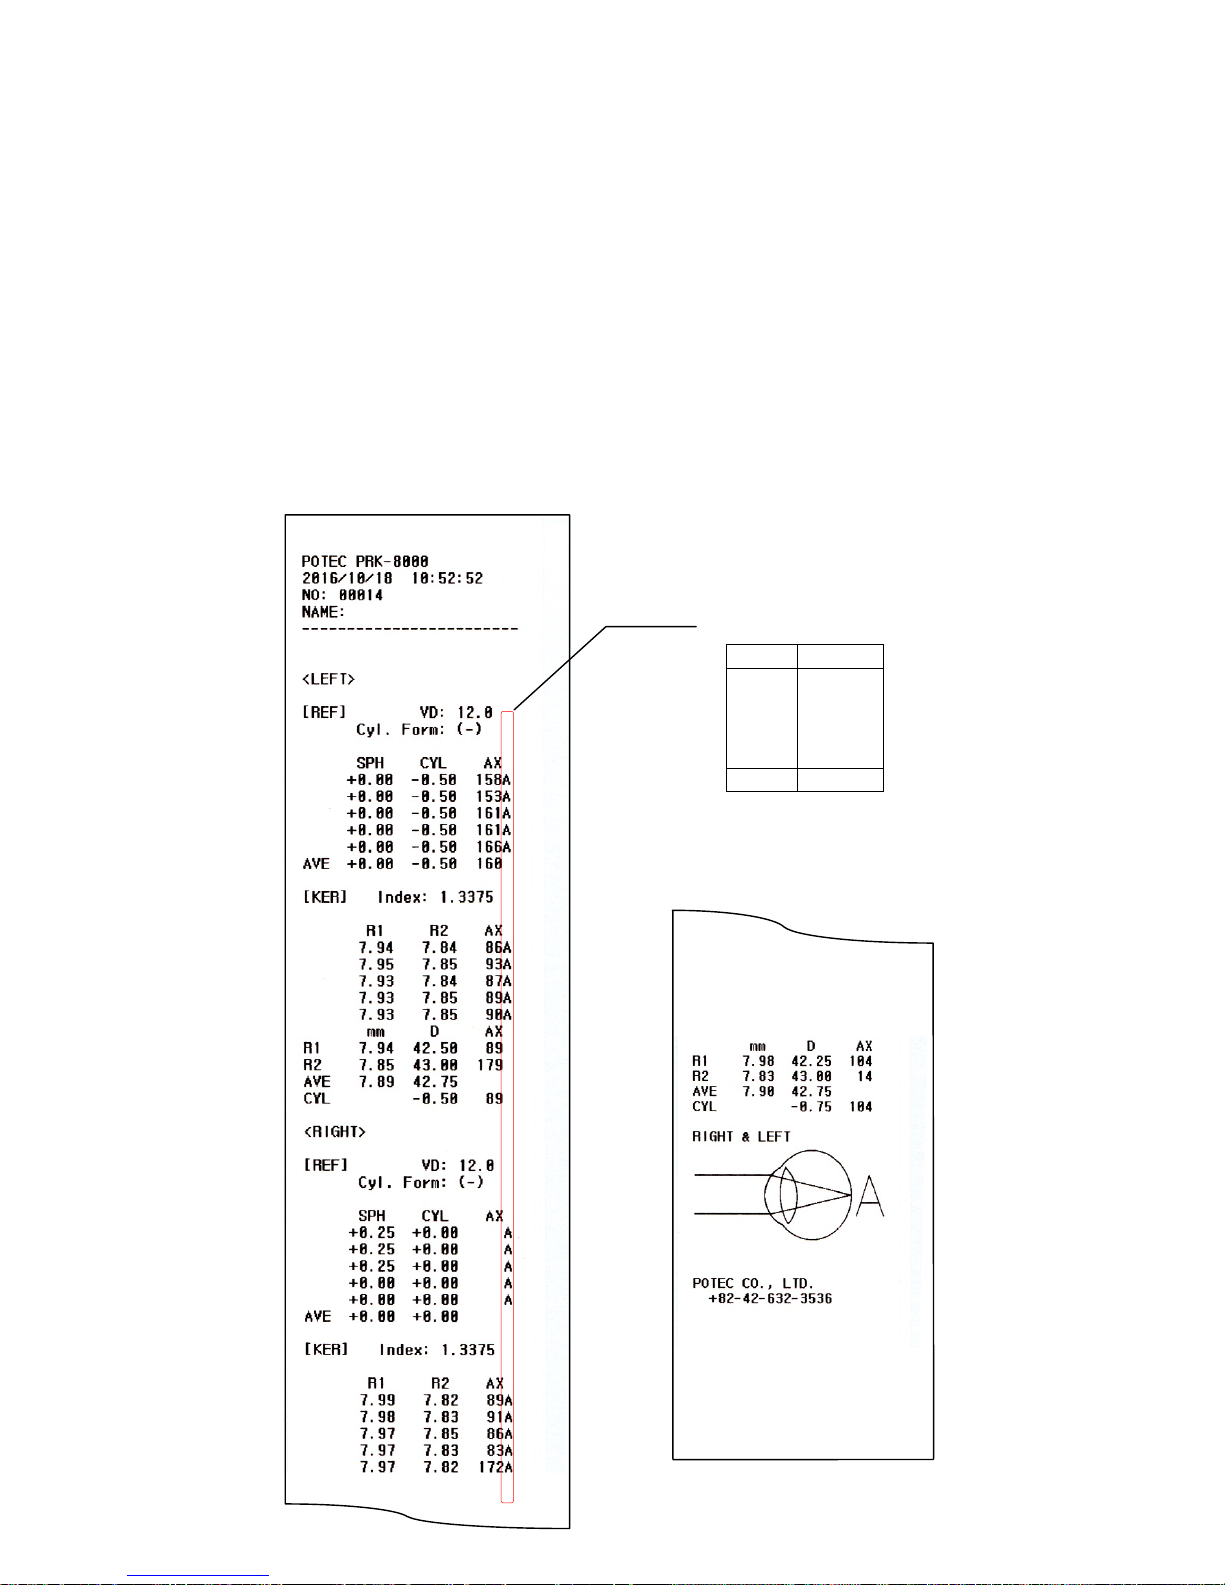
(7) Print
Press the Print button.
The selected data in the SETUP mode will be printed. (See page 31).
Lift the printing paper from one side and give it a sharp tug to tear it off after printing is
completed.
Fill the name of the examinee in the NAME box if necessary.
NOTES:
① Results will be erased after printing/transfer is performed.
② It is recommended that a hard copy of the printouts be made if you wish to
store it for a long time, because printouts on the thermal paper are apt to
deteriorate.
< example of printout >
Confidence of Result
Level Quality
A (High)
B
↕
C
D
(Low)
F (Fail)
Page 23
PRK-8000 Operation Manual
- 15 -
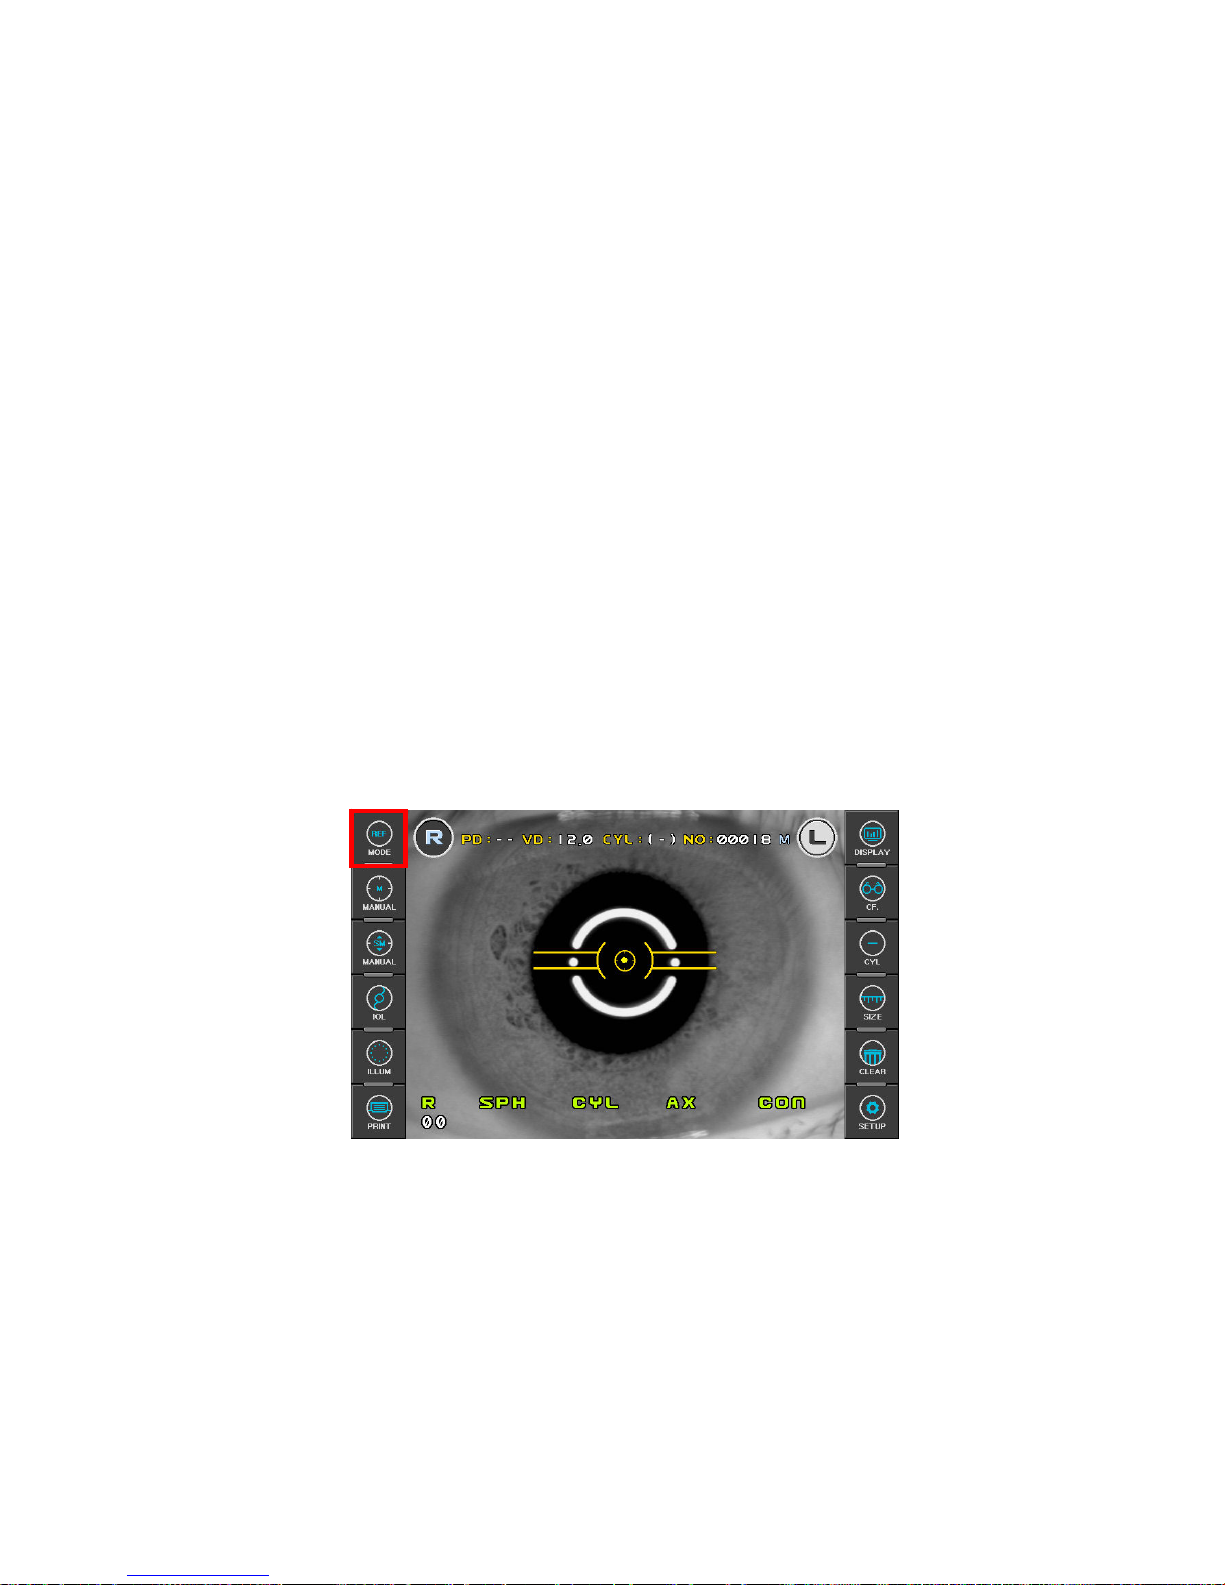
5.2 Refractometry [REF Mode]
Only refractometry can be performed in the REF mode.
(1) Enter REF Mode
Press MODE button on the left side of the display, and then select “REF”.
(2) Follow the same procedure (2) of the Continuous Keratometry and Refractometry [K/R
Mode].
(3) Perform alignment and Focusing
Align the pupil and alignment marks, and focus on the mire image by using the
operation lever. The focus is correct, the color of the aiming mark changes to yellow
color.
(4) Measurement
Press the measuring button .
Measurement will be continuously performed when the measuring button is kept
pressed.
z If you change setting for REF/KER of SETUP Mode, you can select the vertex
distance.
z If you change setting for REF/KER of SETUP Mode, you can change display format
of CYL value.
NOTES:
① There can be error if the Outer Alignment Mark and the pupil is eccentric.
② There may be some aberration to the measurement value due to the
eccentricity or inclination of lens, or deformation of cornea after surgery.
Page 24
PRK-8000 Operation Manual
- 16 -
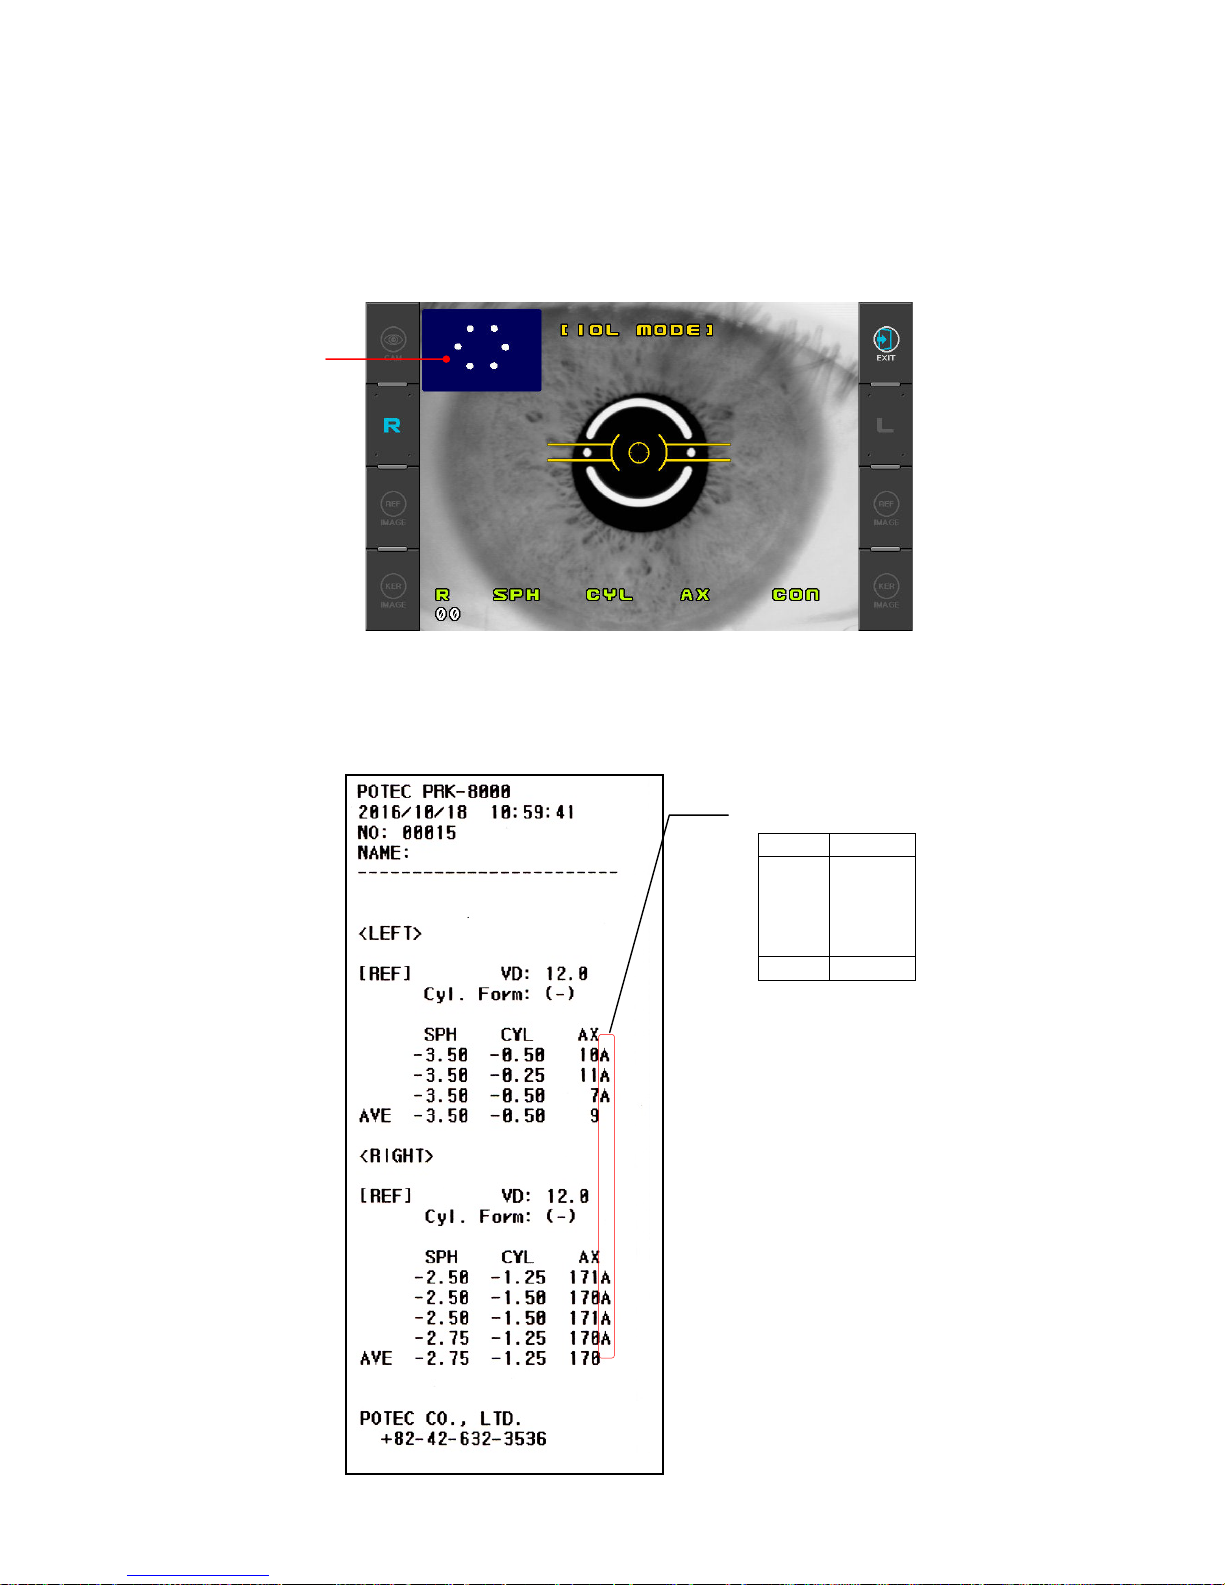
③ If error occurs or the measurement value is instable during the REF
measurement, follow as the below instructions.
¾ Click the IOL button then REF Image is shown on the monitor.
¾
Make the six circles seen clearly by moving the operation lever.
¾
Measure the REF by clicking the measurement button.
(5) Follow the same procedure (5)~(7) of the Continuous Keratometry and Refractometry
[K/R Mode].
< example of printout >
Confidence of Result
Level Quality
A (High)
B
↕
C
D (Low)
F (Fail)
굴
절측정
이미지
Page 25
PRK-8000 Operation Manual
- 17 -
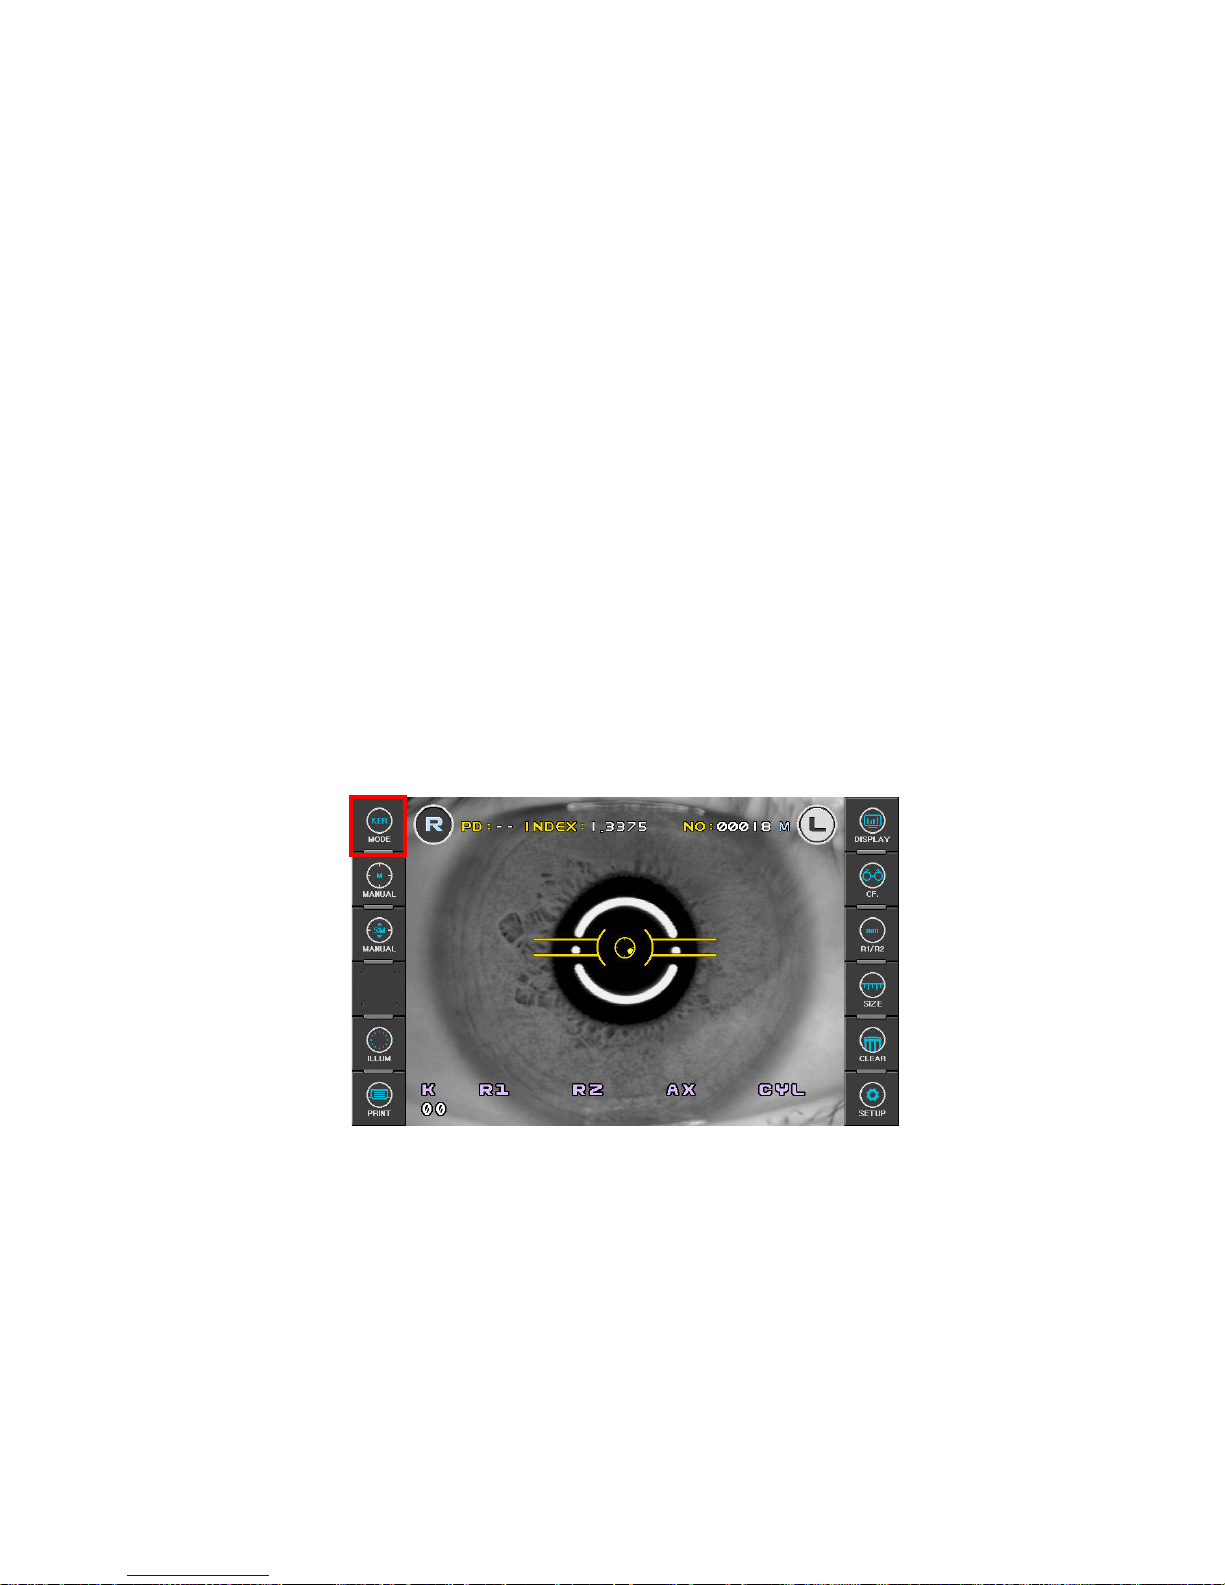
5.3 Keratometry [KER Mode]
Only the radius of curvature of the cornea can be measured in KER Mode.
NOTES: Don’t measure the base curve of contact lens in this mode.
Measurement error will occur when it is measured in KER mode.
(1) Enter KER Mode.
Press MODE button on the left side of the display, and then select “KER”.
(2) Follow the same procedure (2) and (3) of the Continuous Keratometry and
Refractometry [K/R Mode].
(3) Measurement
Press the Measuring button .
Measurement will be continuously performed when the Measuring button is kept
pressed.
z The measured results will be displayed on the monitor.
z In case of the continuous measurement, previous measured result will be displayed.
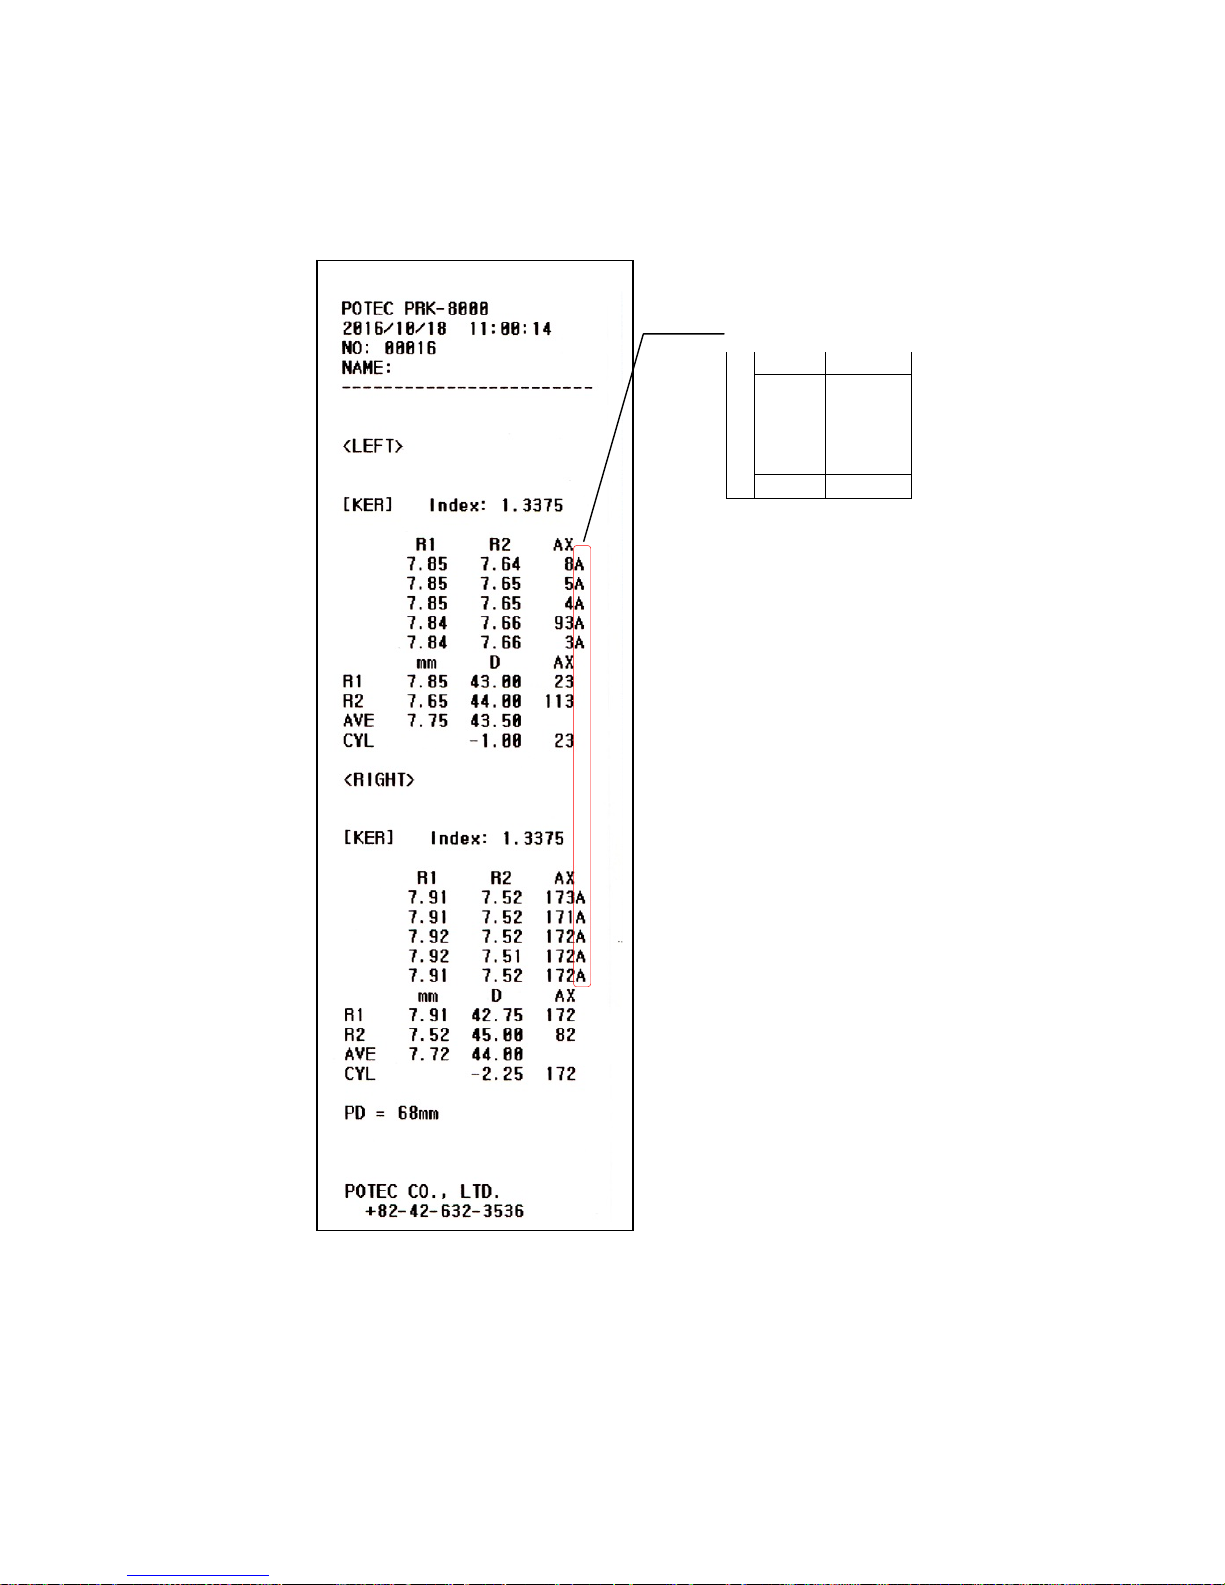
z When measured results are displayed, changing for REF/KER of SETUP Mode
renders each cornea measured result of R1/R2/AX Æ K1/K2/AX Æ AR/CY/AX
displayed in turn.
Page 26
PRK-8000 Operation Manual
- 18 -
(4) Follow the same procedure (5)~(7) of the Continuous Keratometry and Refractometry
[K/R Mode].
< example of printout >
Confidence of Result
Level Quality
A (High)
B
↕
C
D
(Low)
F (Fail)
Page 27
PRK-8000 Operation Manual
- 19 -
5.4 Contact Lens Base Curve Measurement
[CLBC mode]
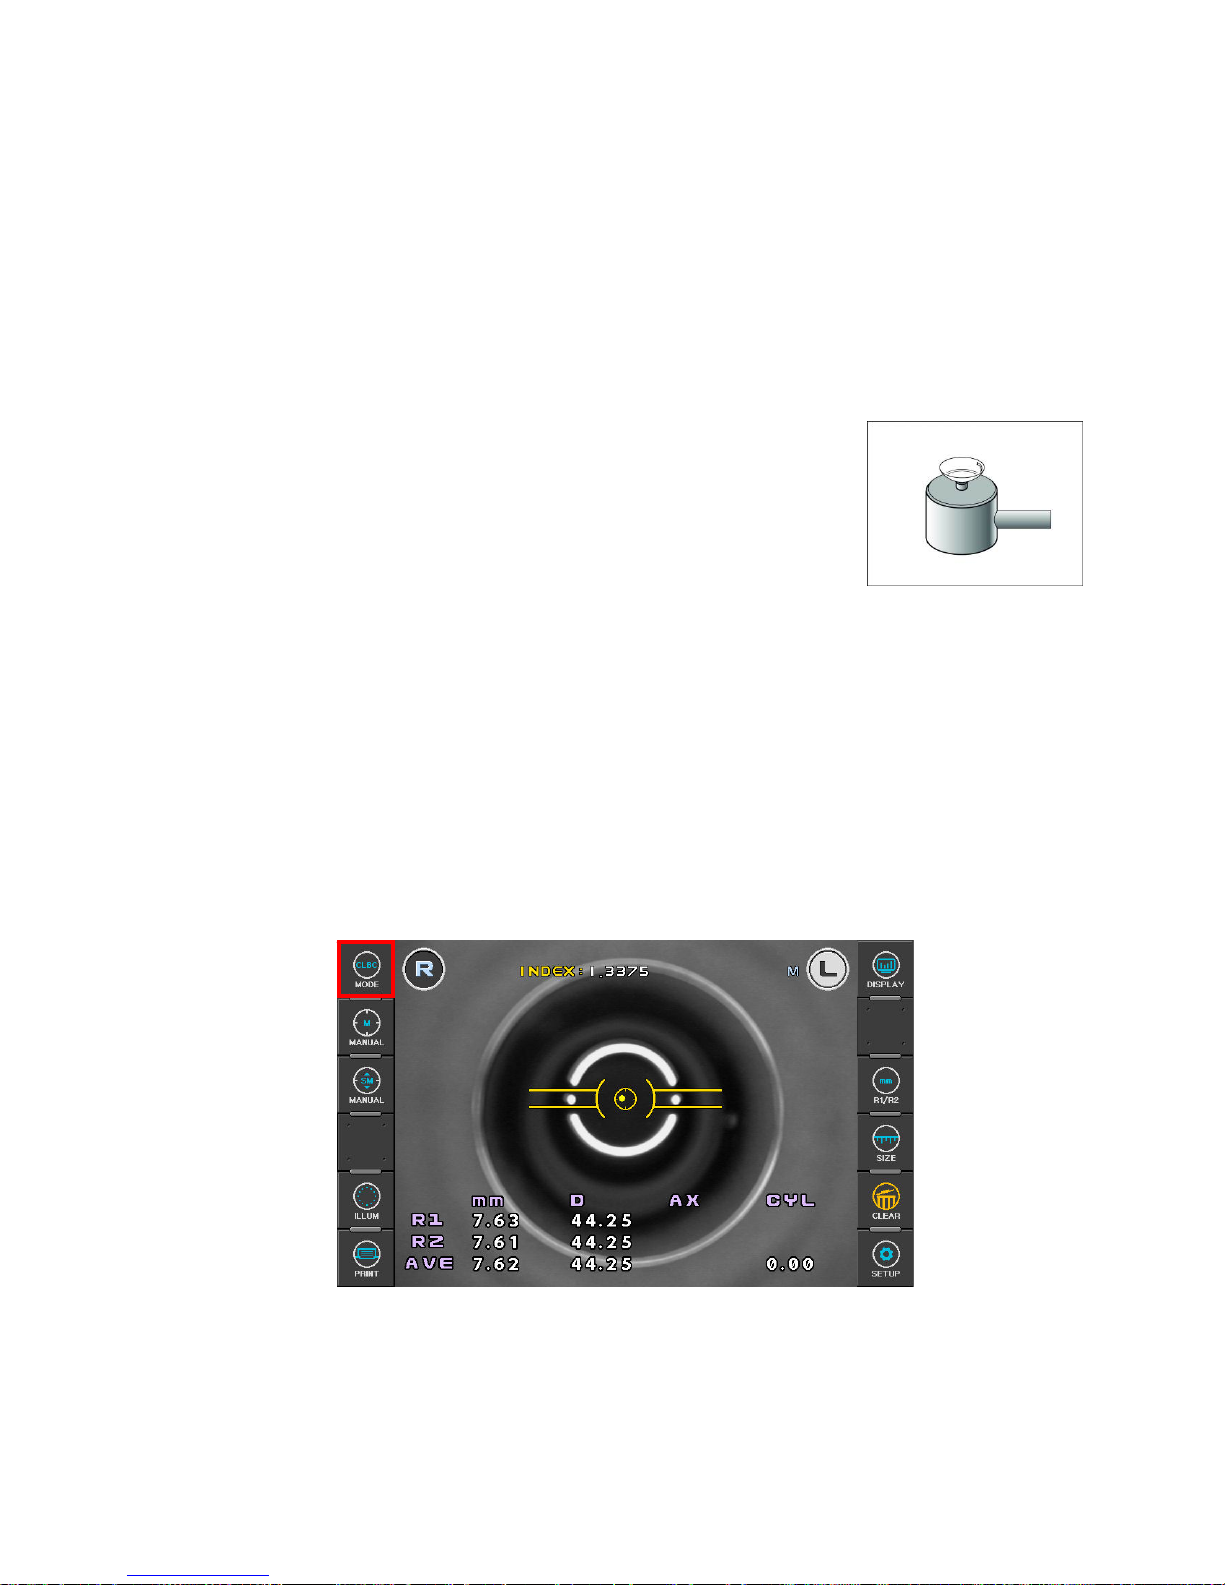
Base curve (posterior curve) of hard contact lens can he measured in the CLBC Mode.
(1) Enter CLBC Mode
Press MODE button on the left side of the display, and then select “CLBC”.
(2) Attach Contact Lens.
Put water in the concave section of contact lens holder at
backside of the TEST Model Eye and place the contact lens on
the holder with the concave surface facing upward. Contact
lens is attached by surface tension. Take care that the contact
lens is not attached inclined. Also, take care that there are no
bubbles behind the contact lens.
(3) Attach the TEST Model Eye.
Remove the chin rest paper. Fix the model eye attached with contact lens using pin.
Place the contact lens to face the measurement window.
(4) Perform alignment and Focusing
Align alignment marks and mire image.
Then, focus on the mire image.
(5) Measurement
Press the Measuring button .
Measured results will be displayed on the monitor.
(6) Print
Press the PRINT button.
Page 28
PRK-8000 Operation Manual
- 20 -
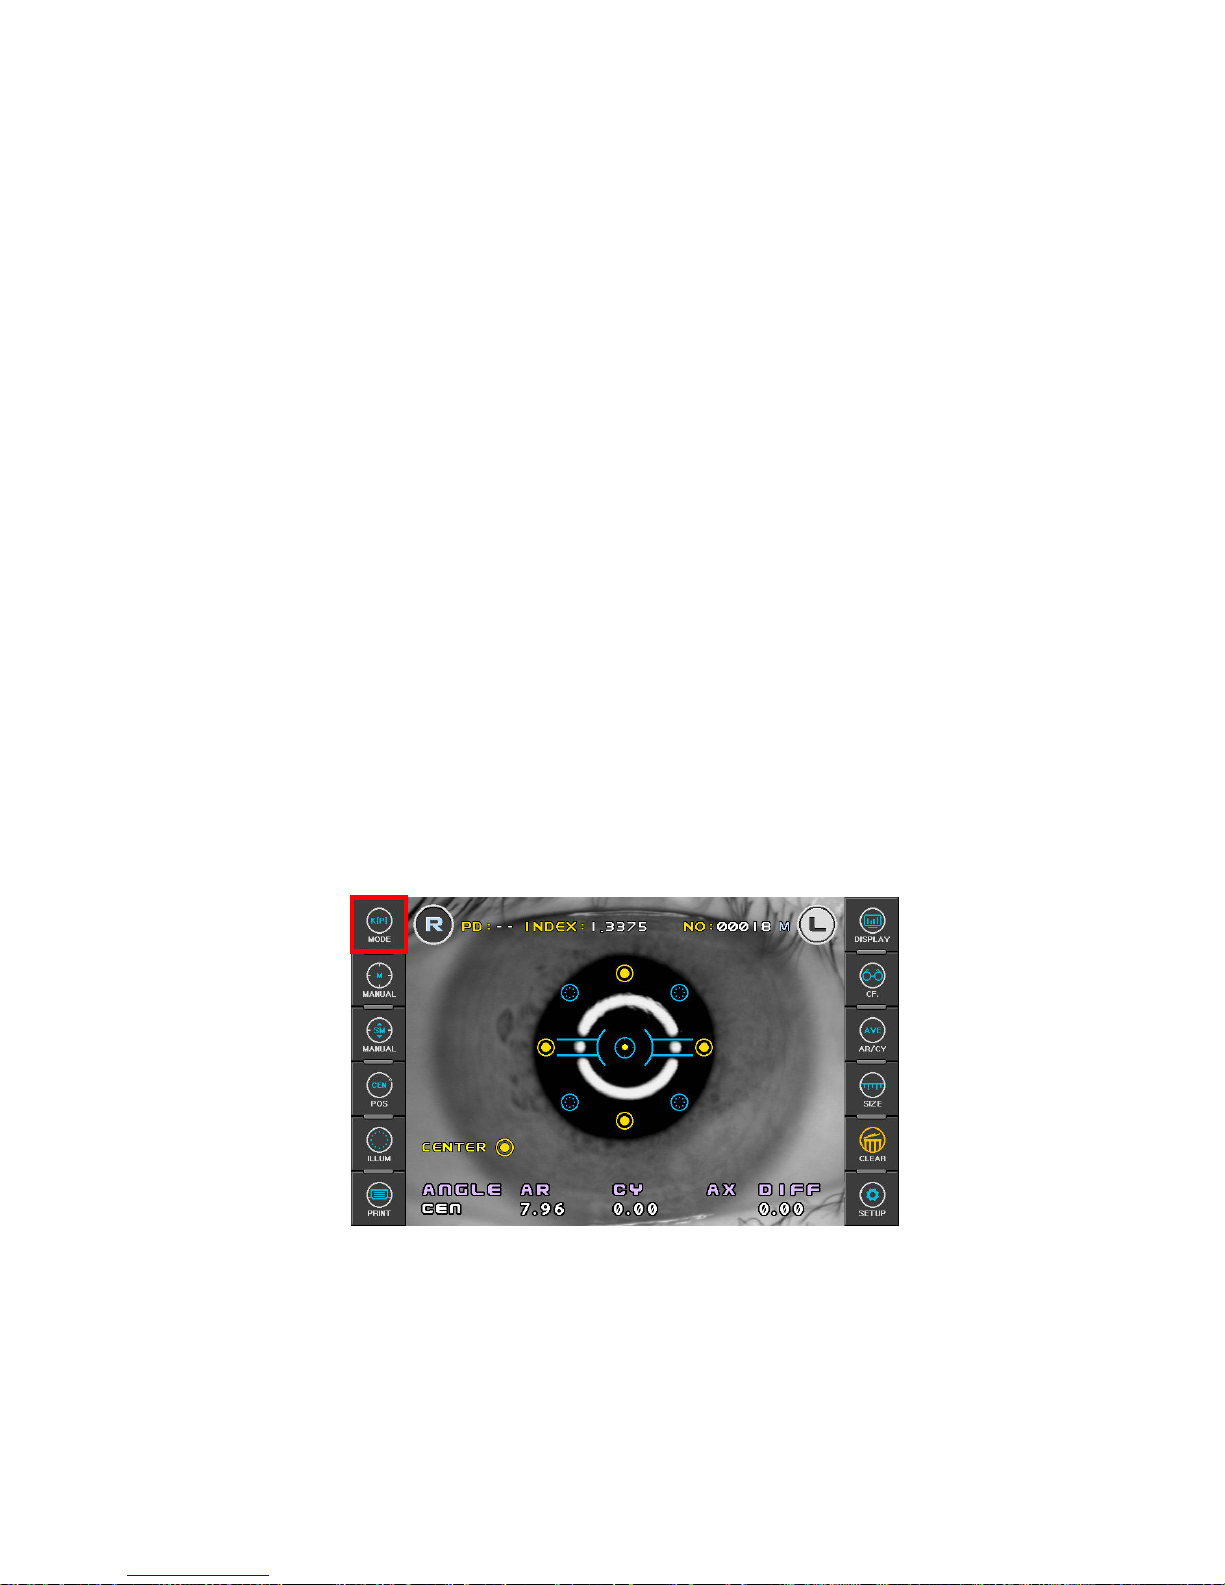
5.5 Peripheral Keratometry [K(P) Mode]
In K(P) Mode, peripheral corneal curvatures can be measured by having the examinee look
at the peripheral eye fixation lamps. Measuring the corneal periphery will help you examine
irregular astigmatism, and also determine a better fitting for a contact lens.
There are two modes for lighting the peripheral eye fixation lamps:
AUTO Mode: After measuring the center of cornea, four peripheral eye fixation lamps
light automatically in turn according to the corneal astigmatism axis.
MANU Mode: Peripheral eye fixation lamp to be lit can be selected from eight positions
by pressing the touch screen.
When you enter this mode after measuring the center of cornea in K/R or KER Mode, or if
you measure the center first after entering this mode, you will automatically enter AUTO
Mode first.
(1) Enter K(P) Mode.
Press MODE button on the left side of the display, and then select “K(P)”.
(2) Follow the same procedure (2) and (3) of the Continuous Keratometry and
Refractometry [K/R Mode].
Have the examinee look at the lit peripheral eye fixation lamp. Blinking circle on the
monitor show the lamp at the examinee’s side is lit in order to make measurement.
Looking at the monitor, align the mire image and alignment mark, and focus on the mire
image by using the operation lever.
(3) Measurement
After ensuring that the positioning and focusing are proper, press measuring button .
[AUTO Mode]
After each measurement, the target at the position to be measured next blinks
automatically on the monitor. Each time, have the examinee look at the lamp, perform
alignment and focusing, and then measure.
If the center area has not been measured yet, the target on the left side of the word
“CEN” on the monitor will be blink. Have the examinee look at the red roof in the center
of the scenery, and measure.
If “ERR” is displayed as a result of measuring the center, peripheral eye fixation lamp
Page 29

PRK-8000 Operation Manual
- 21 -
will not light until the center is measured properly.
Change to MANU Mode as required.
[MANU Mode]
You can enter MANU Mode by pressing the touch screen. As you select one from eight
target positions, the position of blinking target changes. Select the target, perform
alignment and focusing, and measure.
z Only the value of the last measurement will be displayed on the monitor. You
cannot see any one of the previous measurements even if you select the target
which has already been measured by pressing the touch screen. Enter DISPLAY
Mode if you wish to see the result of measuring other parts. (See chapter 6)
NOTES:
① Once you have entered MANU Mode, you must end the measurement, press
PRINT button, and start a new measurement in order to return to AUTO Mode.
② Eccentricity (“E” and “EQ”) will not be calculated unless the center of cornea
is mesured.
(4) Repeat the measurement as required.
Measure the same eye for a second time as required.
(5) Measure the other eye.
Measure the other eye in the same manner.
Page 30
PRK-8000 Operation Manual
- 22 -
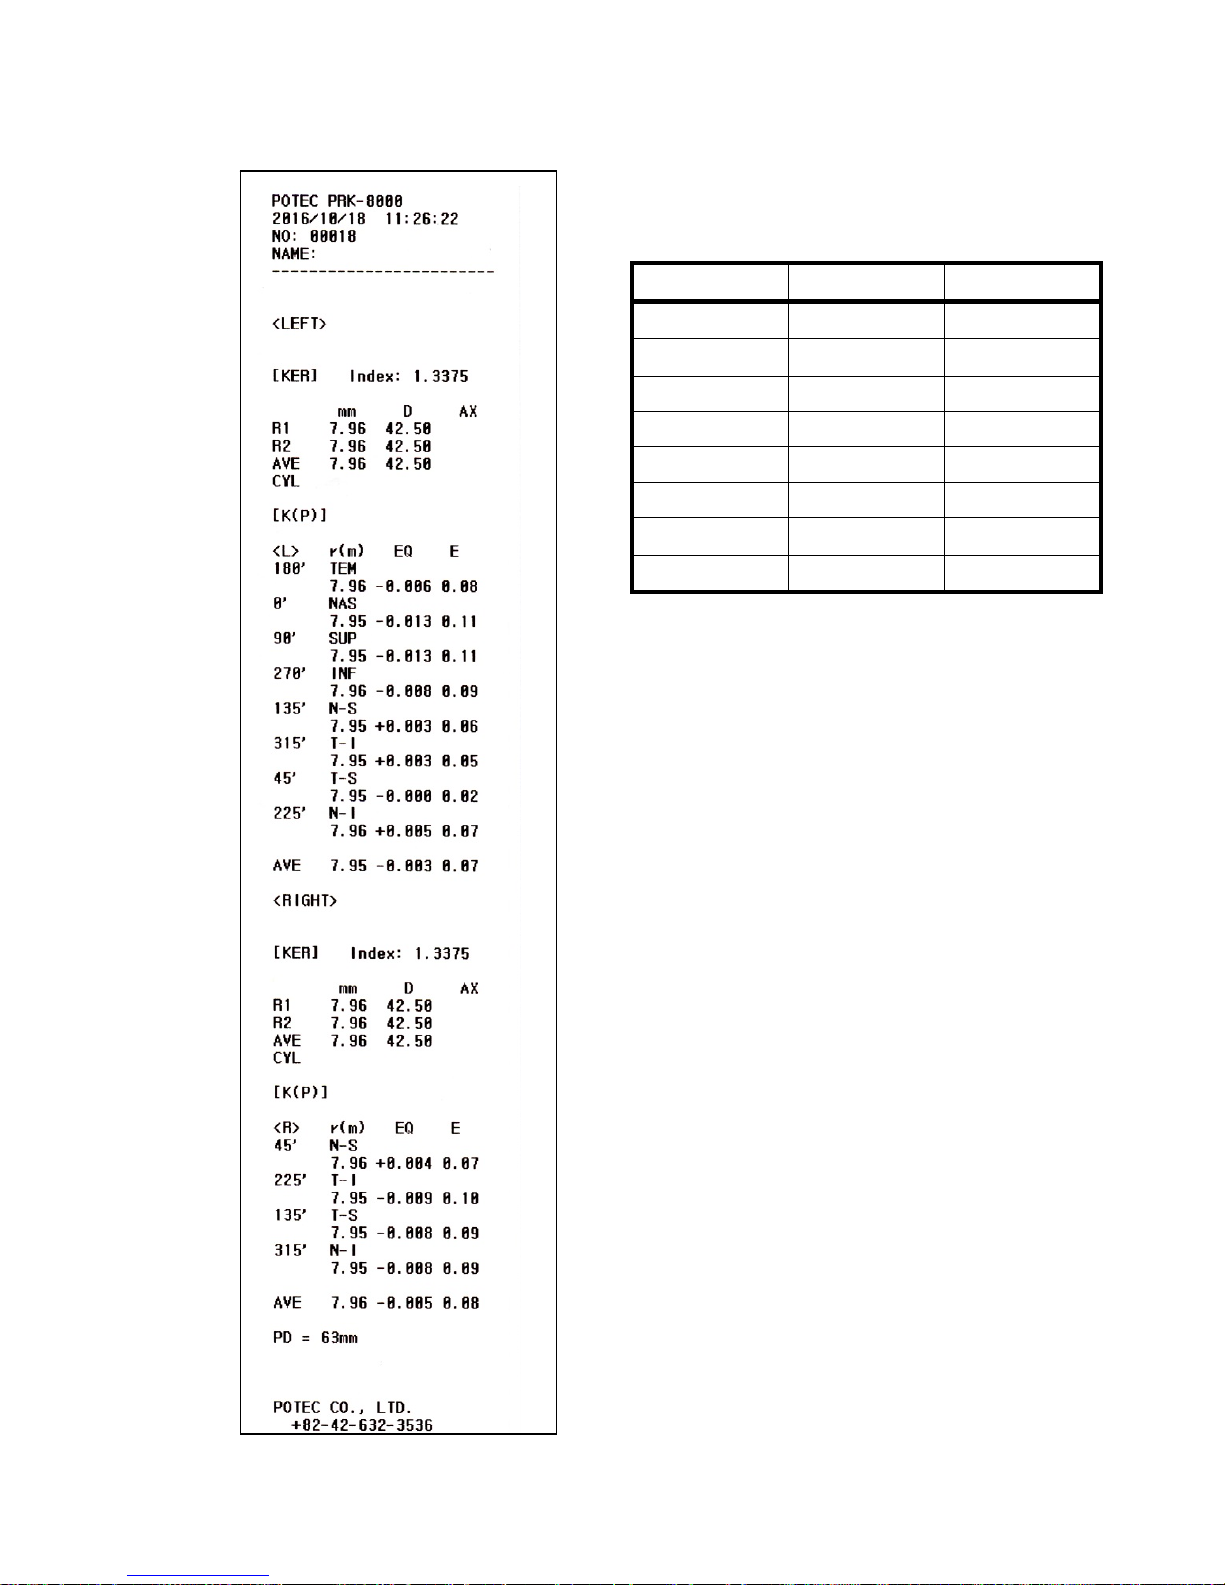
< example of printout >
r(m): Radius of curvature on measured
meridian
EQ: Quadrate of eccentricity on measured
meridian(If the peripheral radius of
curvature is larger than the center,
+sign will be displayed. If it is smaller, sign will be displayed.)
E: Eccentricity on measured meridian
Right Eye Left Eye Symbol
0’ 180’ NAS
45’ 135’ N-S
90’ 90’ SUP
135’ 45’ T-S
180’ 0’ TEM
225’ 315’ T-I
270’ 270’ INF
315’ 225’ N-I
Page 31
PRK-8000 Operation Manual
- 23 -
6. Other Modes
6.1 Semi-Auto Eye Tracking
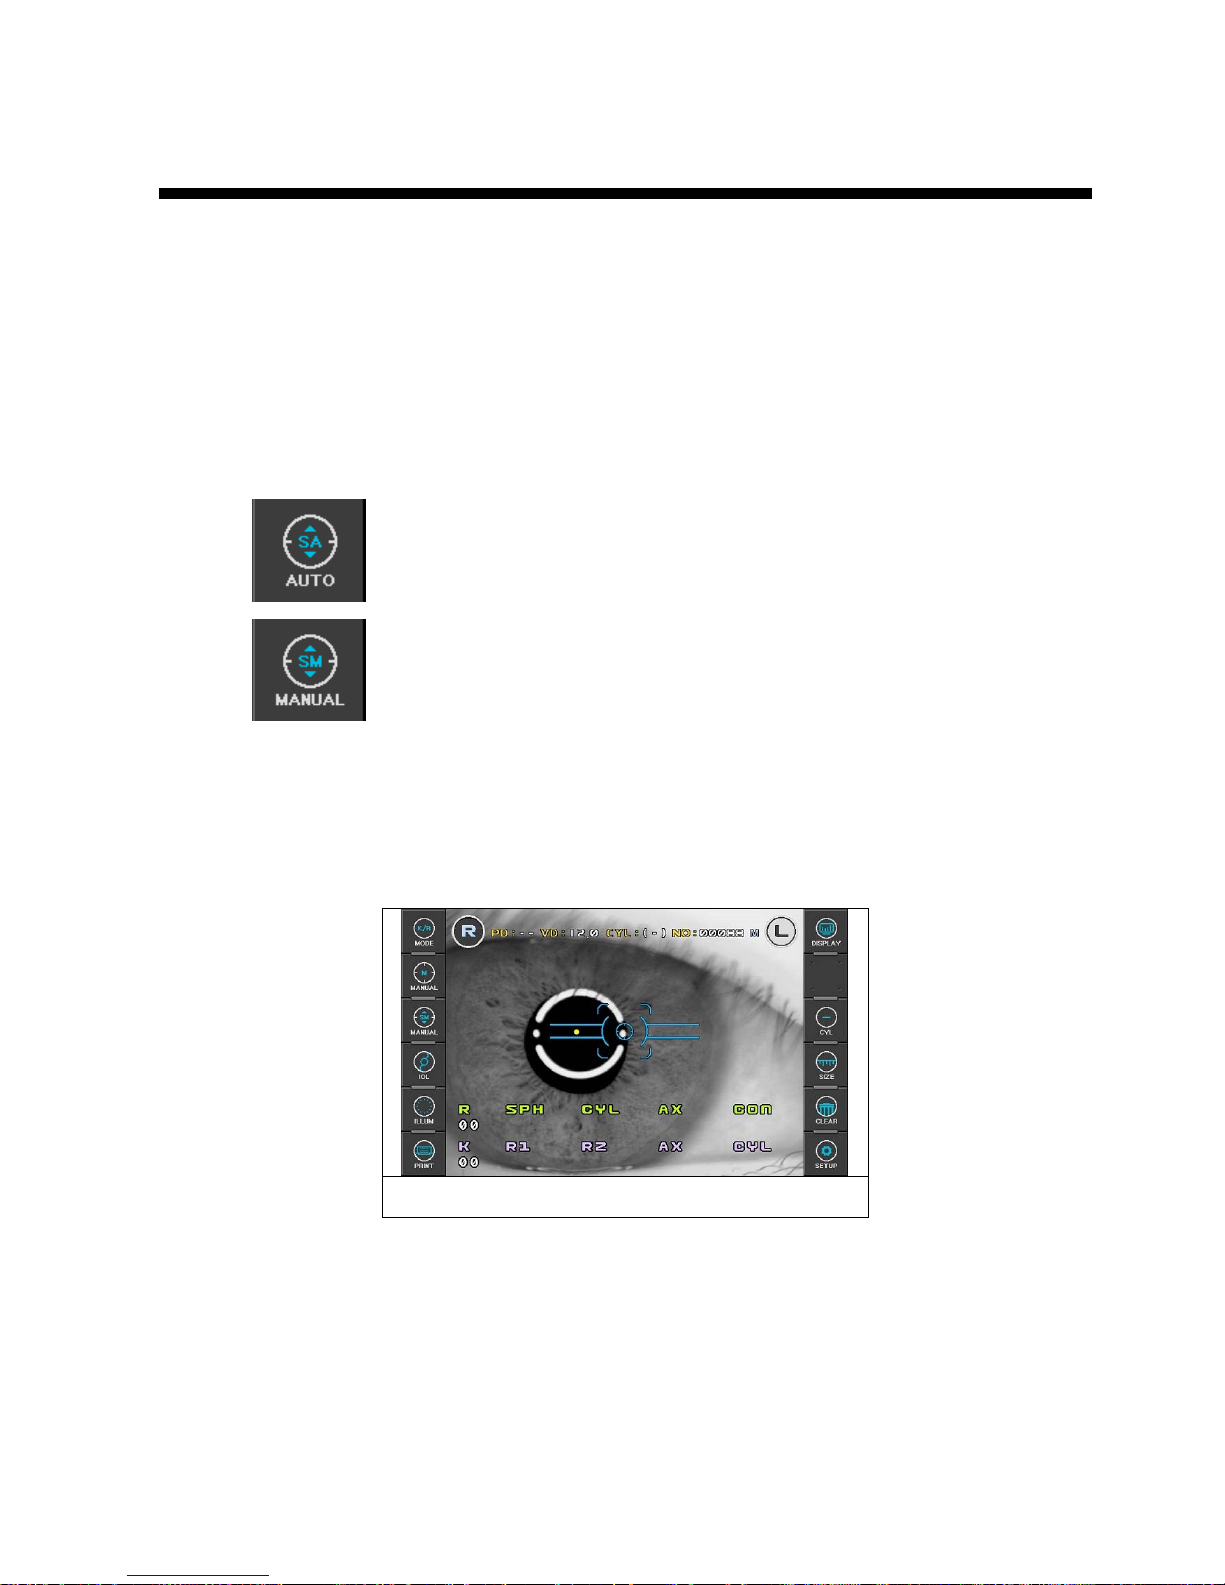
Identifying the pupil position of the examinee, optical head moves automatically to fit the
height of the pupil.
(1) ON/OFF semi-automatic eye tracking
If you press ‘3rd button’ on the left side of the display, semi-automatic eye tracking is
enabled or disabled.
: semi-automatic eye tracking is enabled state
: semi-automatic eye tracking is disabled state
(2) Focusing
In the measurement screen, adjust the focus so that the yellow dot appears in the
center of the pupil. When semi-automatic eye tracking is enabled state, if the pupil
position is detected the optical head height is automatically adjusted.
Pupil detection
NOTE: can be used for semi-automatic operation function Î REF, KER, K/R, CLBC, K(P) MODE
Page 32
PRK-8000 Operation Manual
- 24 -
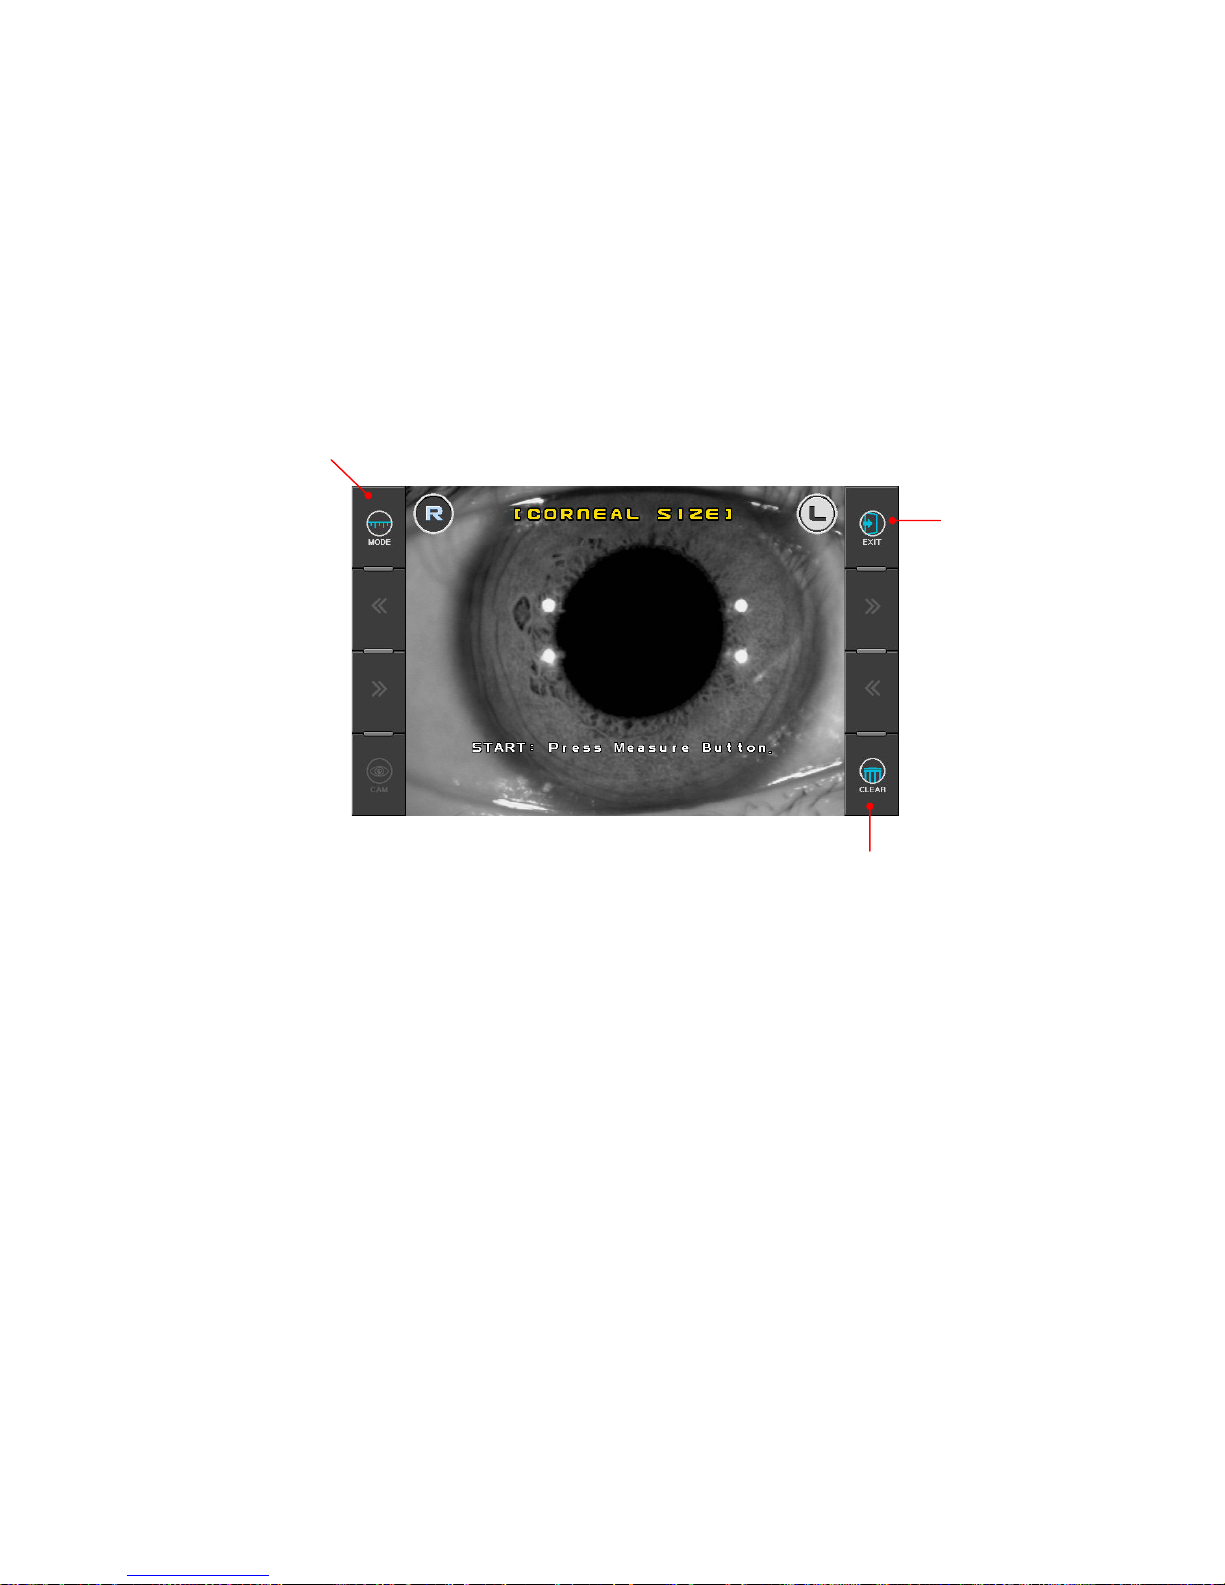
6.2 Measuring Cornea Diameter [SIZE Mode]
Diameter of cornea can be measured in SIZE Mode for prescribing contact lens.
The size of pupil can also be measured to see how much it is dilated, and the size of contact
lens can be measured without having the examinee remove it.
(1) Enter SIZE Mode.
Press SIZE button in the Measurement Mode. Press Exit button in order to go out SIZE
Mode.
Change the mode (“[CORNEAL SIZE]”Î “[PUPIL SIZE]”Γ[PD]”)
(2) Positioning and Focusing
Ask the examinee to look at the red roof of the eye fixation target.
Control operation lever to align the pupil between the two vertical bars
z If the diameter of contact lens is going to be measured, focus on the edge of lens.
z If the diameter of pupil is going to be measured, focus on the iris.
Exit of the
SIZE Mode
Unfreeze the image and delete the results
Page 33
PRK-8000 Operation Manual
- 25 -
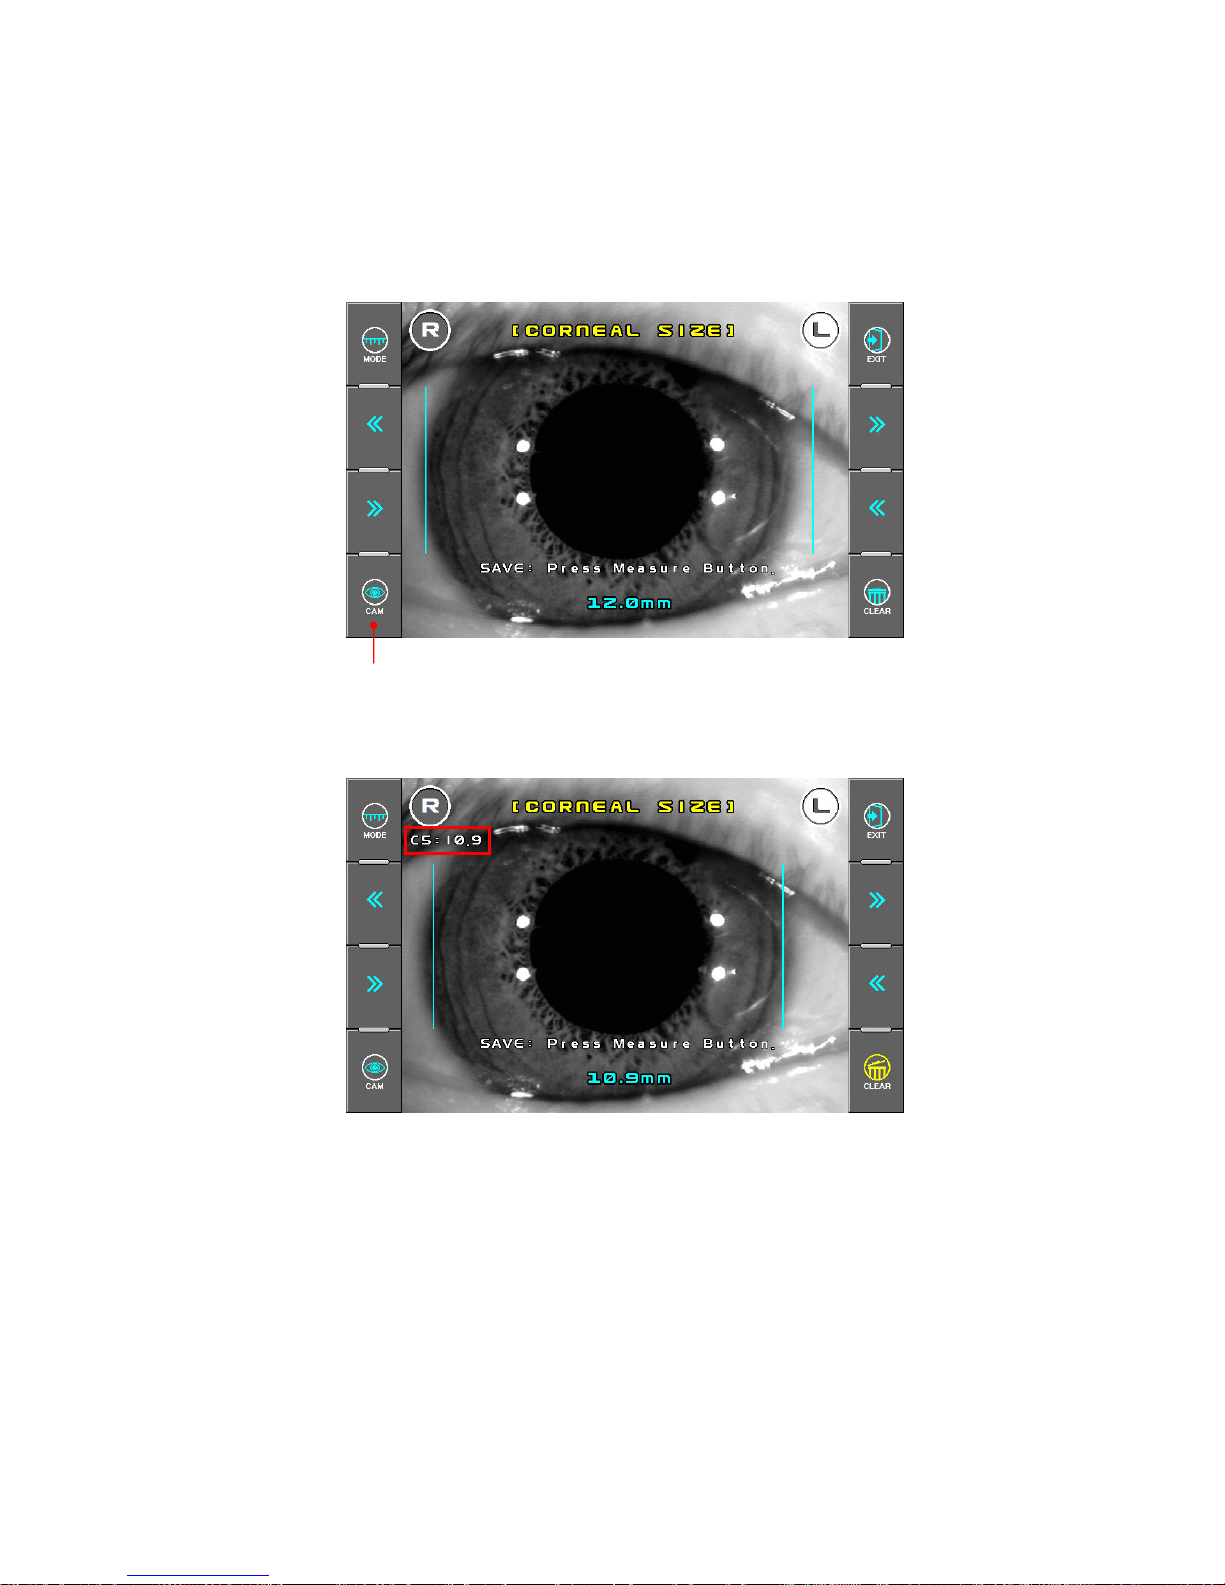
(3) CORNEAL SIZE Measurement
Press the measuring button to pause the window.
If the frozen image is not clear, you can unfreeze the image by pressing the CAM button.
To move the vertical bar by pressing the “>>” button or “<<” button.
The measured value will be displayed on the monitor. When you press the Measuring
button, it will save the measured value
Unfreeze the image
Page 34
PRK-8000 Operation Manual
- 26 -
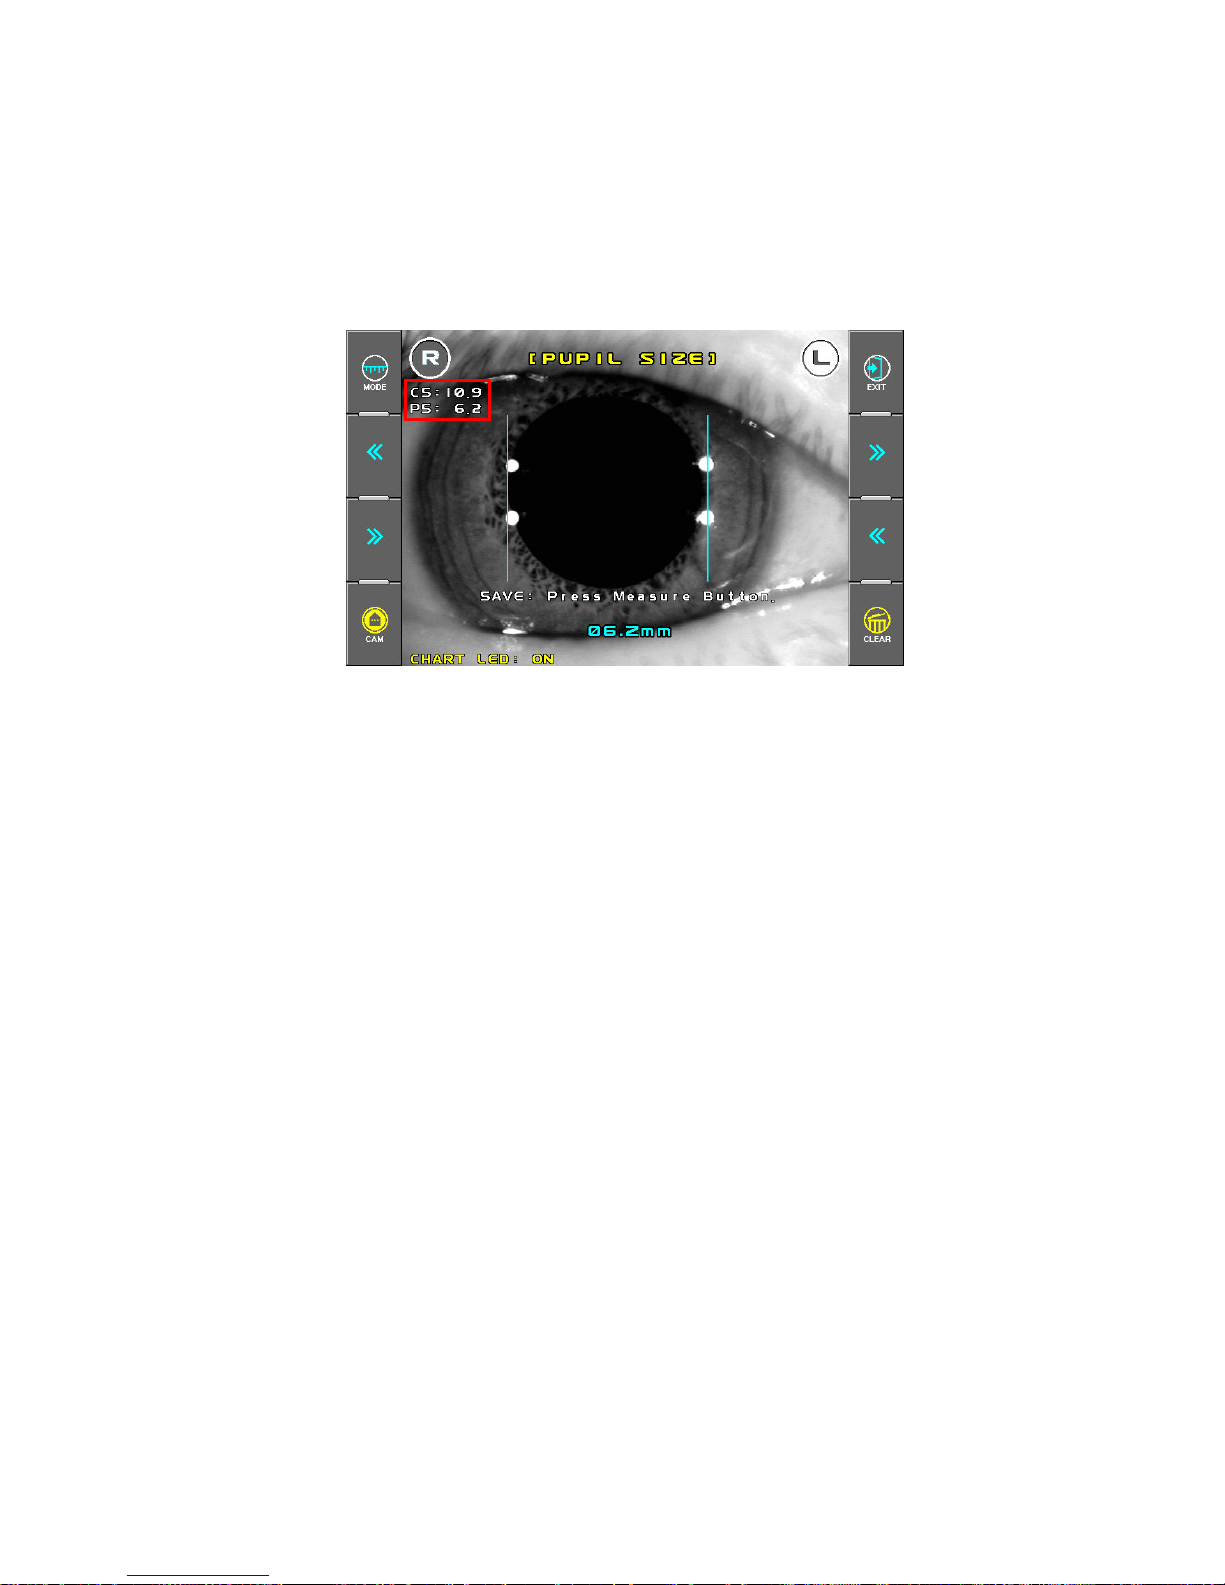
(4) PUPIL SIZE Measurement
Press the Mode button to select Pupil Size mode.
Press the measuring button to pause the window.
If the frozen image is not clear, you can unfreeze the image by pressing the CAM button.
To move the vertical bar by pressing the “>>” button or “<<” button. Also only need to
drag your finger across the screen to move the vertical bar.
The measured value will be displayed on the monitor. When you press the Measuring
button, it will save the measured value
(5) PD Measurement
Press the Mode button to select PD mode.
After proper alignment of the right eye and left eye, press the measuring button each
time
When the measurement is complete, the PD is displayed on the screen.
(6) Print
Press the Exit button Î The screen returns to the measurement screen.
Press the Print button Î The result of corneal diameter, pupil diameter, PD will be
printed as each item.
Page 35
PRK-8000 Operation Manual
- 27 -
6.3 Observe image obtained by Retroillumination
[ILLUM Mode]
By directing a light into the pupil, you can observe the condition of cataract or scratches on
contact lens on the monitor in ILLUM Mode.
Maximum of ten images for each eye can be displayed and stored in one display. When
measuring more then 10 times, the oldest image is erased.
You can select an image and display it in a magnified size.
You can upload an image and display it in a magnified size to a computer.
(1) Enter ILLUM mode.
Press ILLUM button in the Measurement MODE. Press Exit button in order to go out
ILLUM mode.
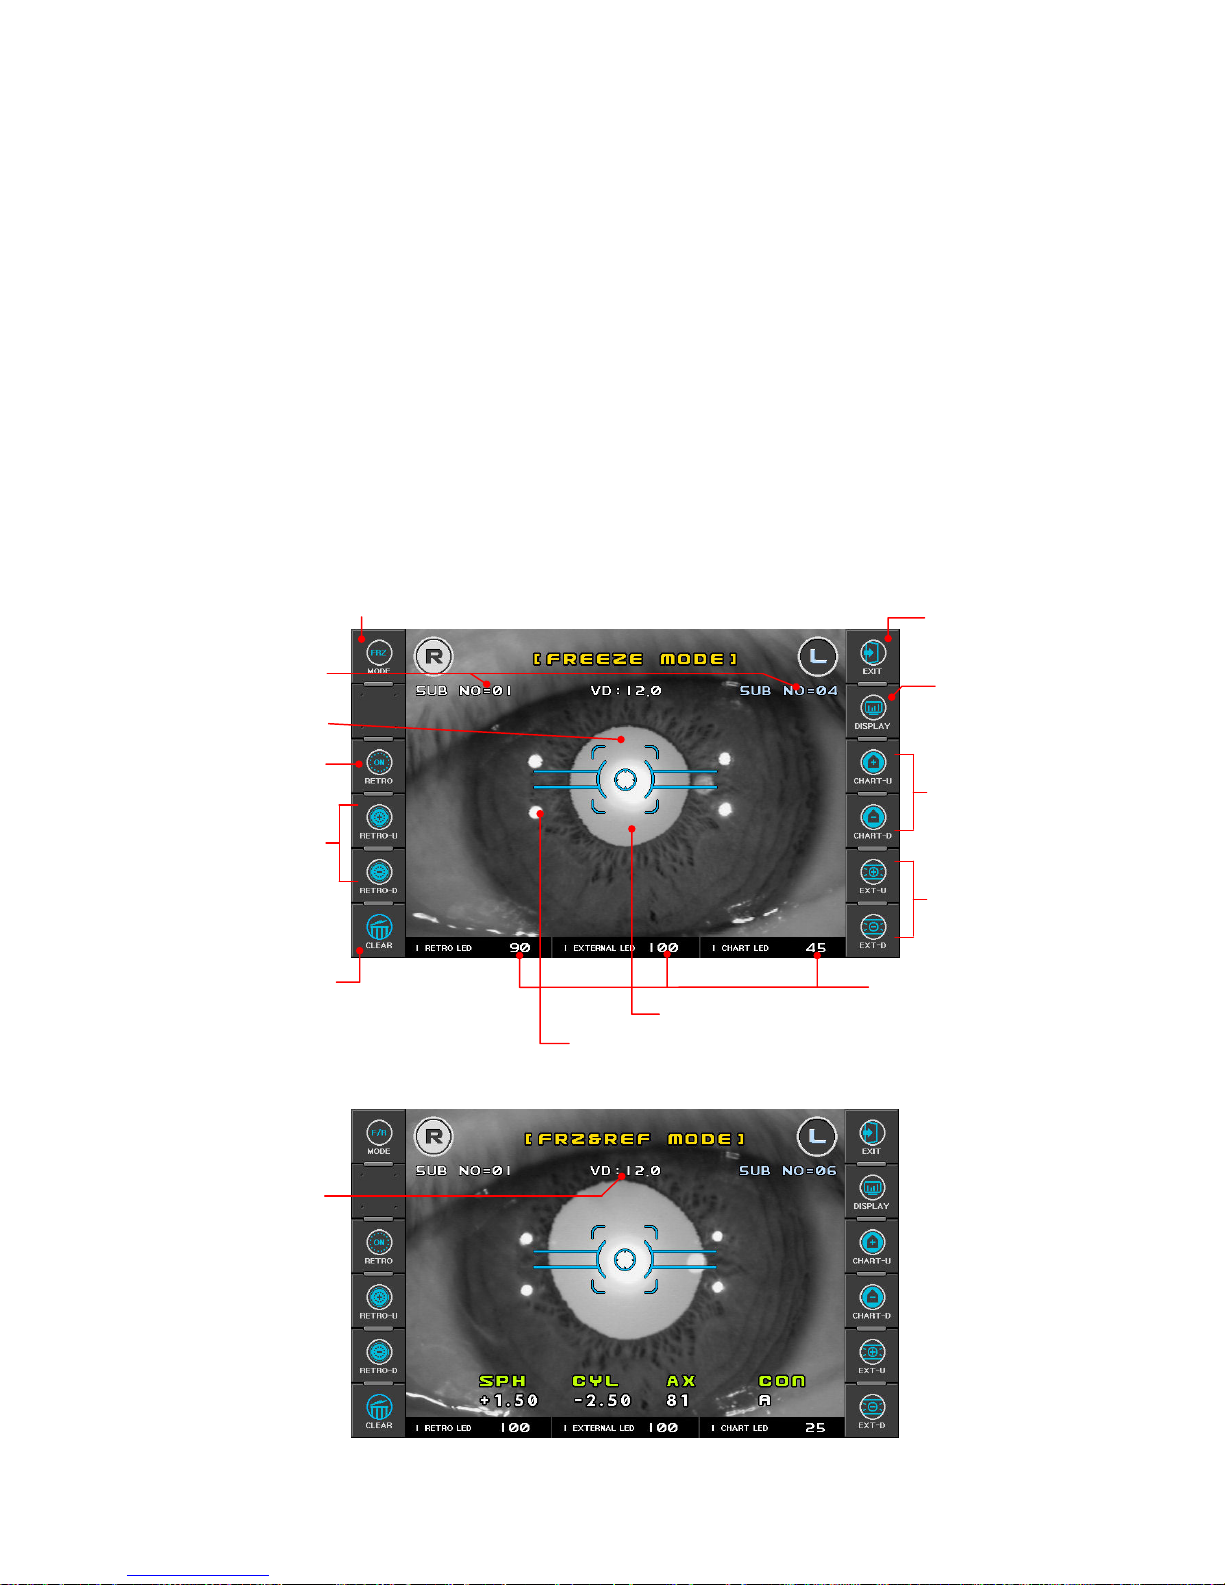
[Freeze Mode Display]
[Freeze/Ref Mode Display]
Press DISP button
to enter menu display
Light for retroillumination reflected from retina
End of the ILLUM Mode
Pupil
change the amoun
t
of RETRO LED
Sub. Number
Light source
Change the mode (“Freeze ⇔ Frz/Ref”)
Vertex distance
Light for eye front illumination reflected from cornea
Press CLEAR button
to clear the image
change the amoun
t
of Chart LED
change the amoun
t
of EXT-ILM LED
ON/OFF
RETRO LED
Page 36
PRK-8000 Operation Manual
- 28 -
(2) Ready for Observation
Ask the examinee to look at the red roof of the eye fixation target.
See procedure (3) of the Continuous Keratometry and Refractometry [K/R Mode].
(3) Observation
z Adjust the amount of light of each light source so the image can be seen clearly.
Press one of buttons for each light source on the side of display. The light source is
adjustable from 0 to 100. If it is set to 0, the light turns off.
¾ RETRO LED: The observation light source
¾ CHART LED: Inside Fixed target light the patient sees
¾ EXTERNAL LED: A light that turns around the eyes
z Position the light for retroillumination reflected from cornea to a part that is not
opaque by using the operation lever. If the light is directed from the edge of the pupil,
it will be easier to observe the image. Focus on the image.
z After confirming that the image is focused, press measuring button. The image will
freeze.
z Because the LED light in ILLUM mode is more brighter then normal measurement
mode, if you observe a long period of time it can give stress in the eye of the
examinee.
z In the RETRO LED ON status, if there is no operation for more than 30 seconds, the
RETRO LED will be OFF automatically.
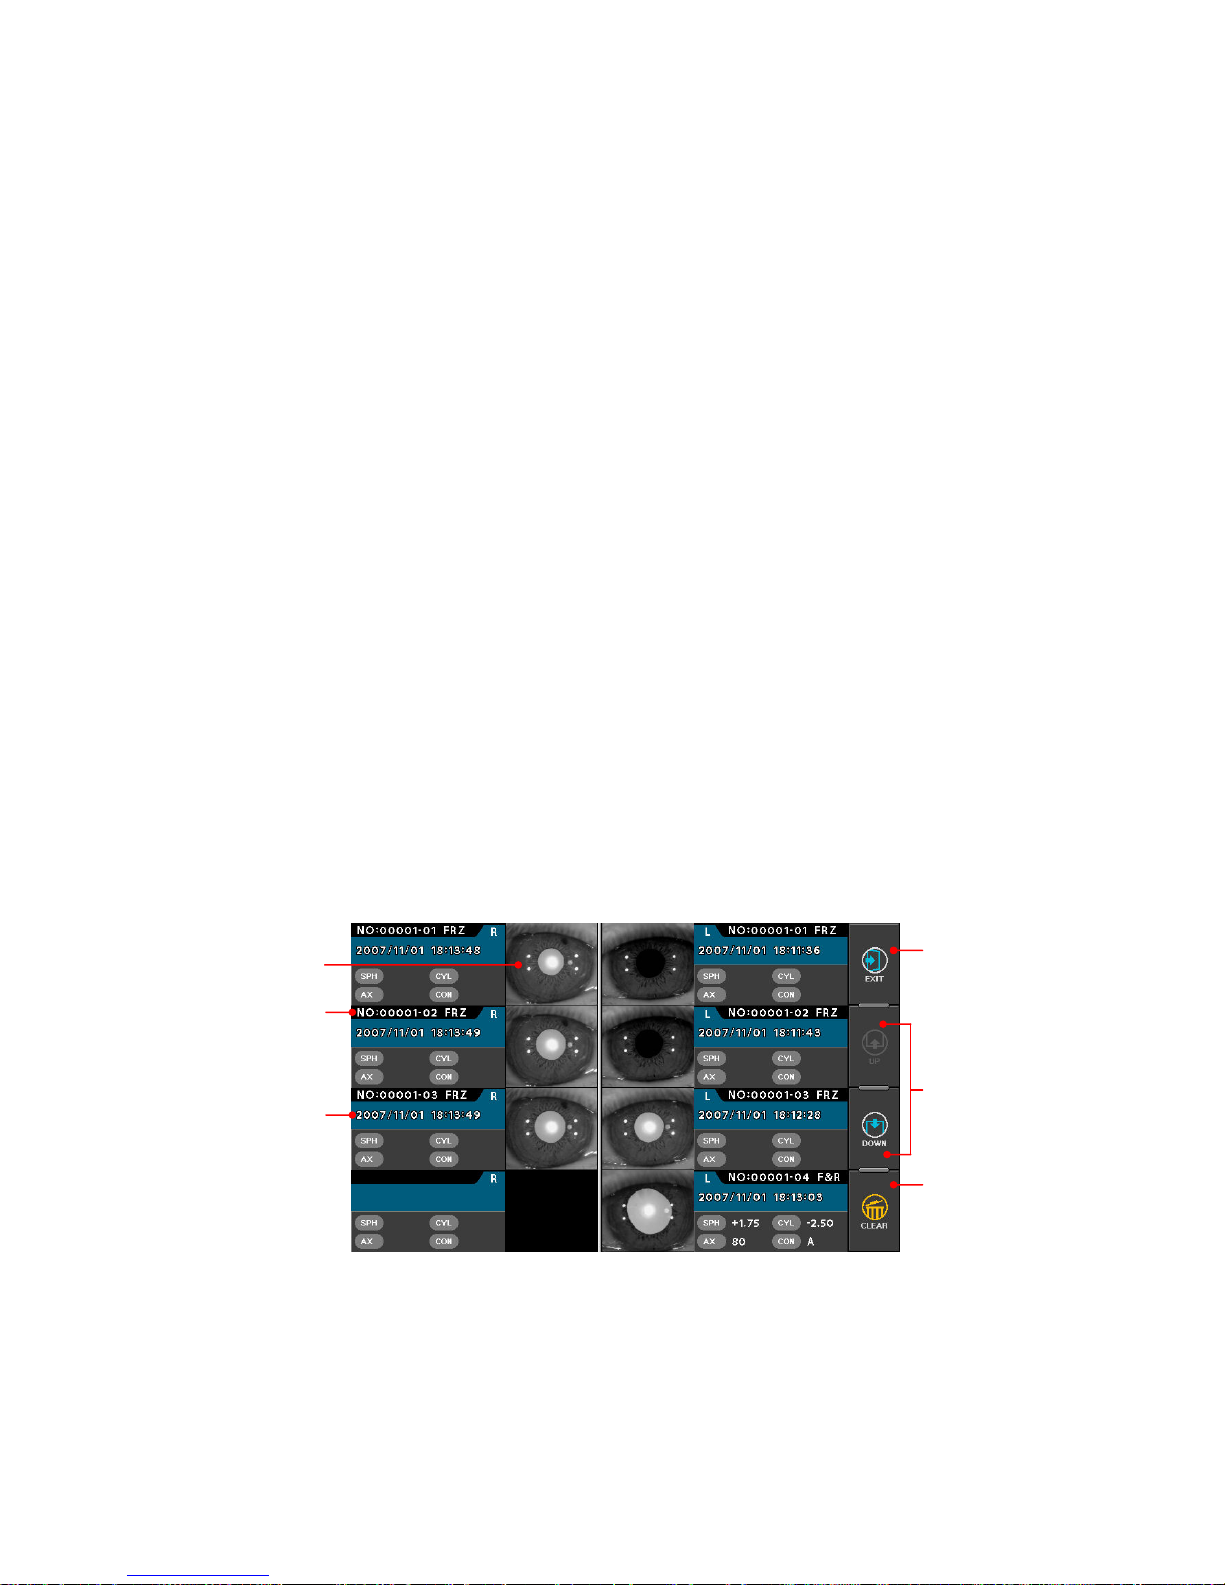
(4) Displaying of stored Image
z Press DISP button in observation display. Images stored in memory will be
displayed.
[Menu Display]
z When you press the Image button, selecting Image will be displayed.
Images of eye
Change Images
of eye
Serial number – Sub number
Date & Time o
f
the selected image
End of the
Display Mode
Clear stored Image
& Measurement
result
Page 37
PRK-8000 Operation Manual
- 29 -
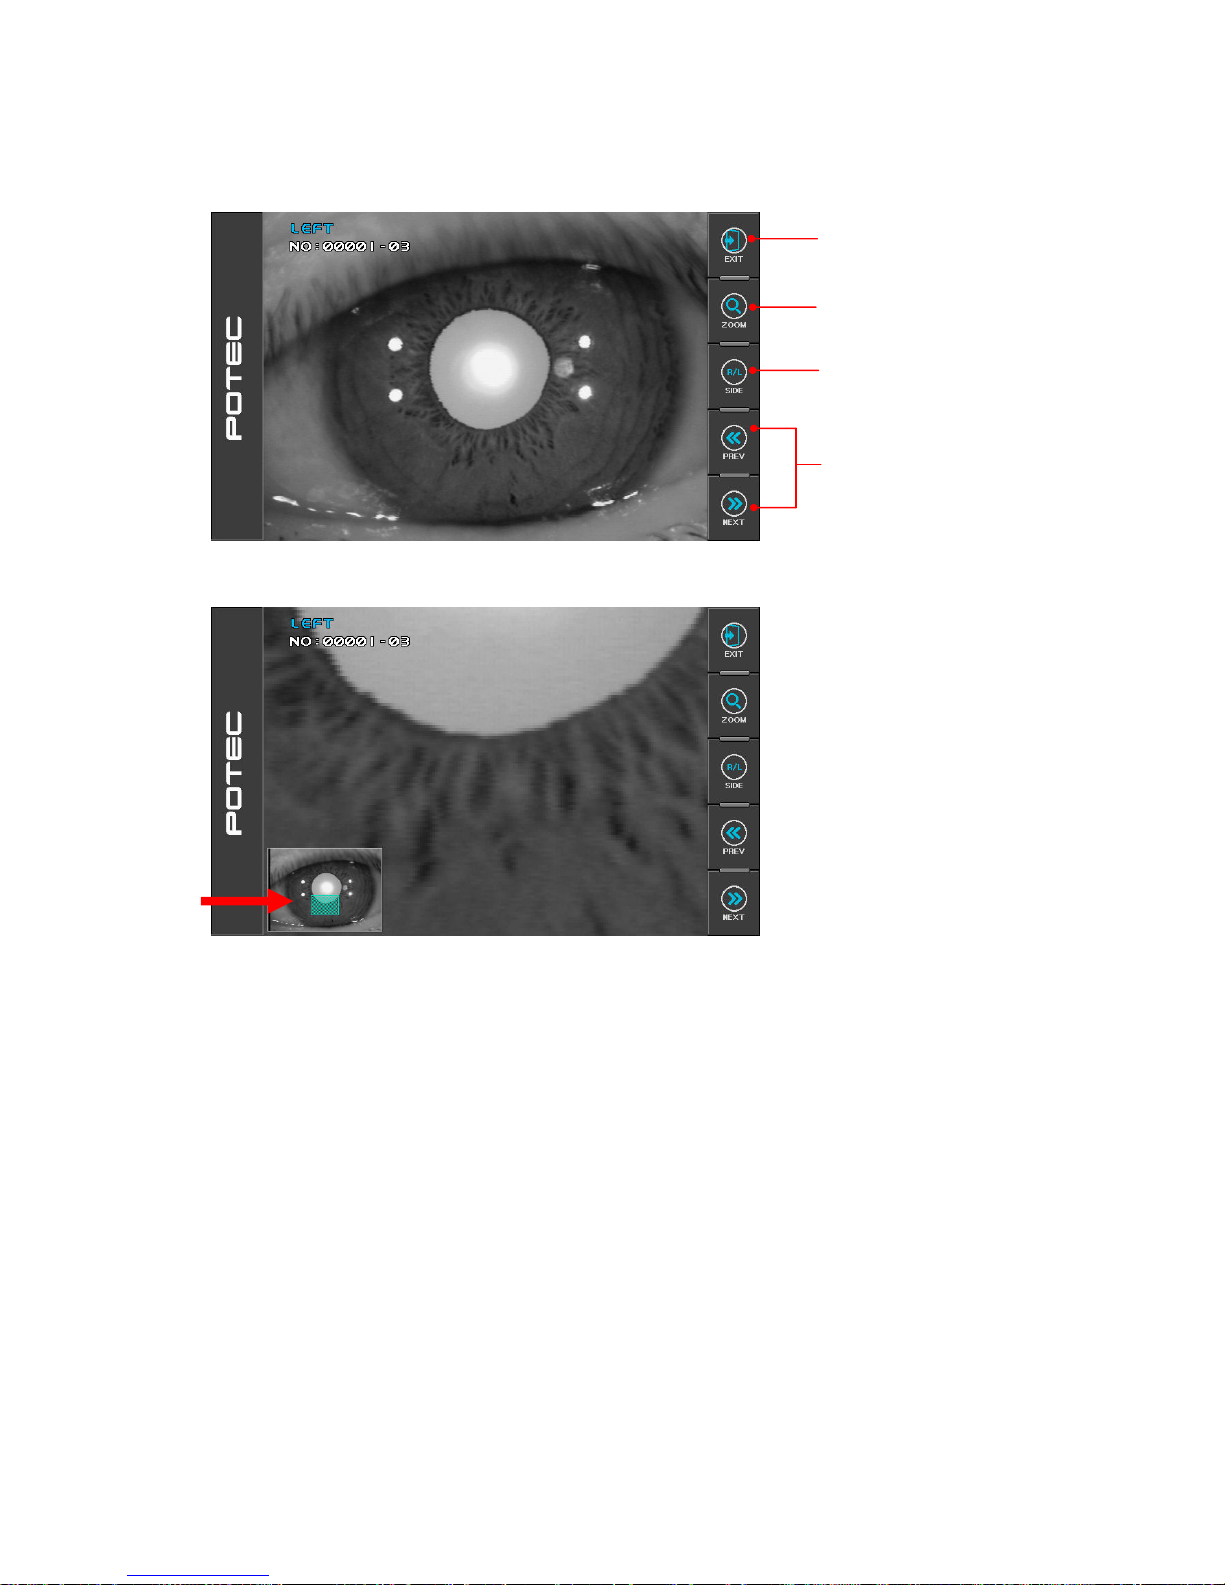
[Standard Size Display / Double Size Display]
z In the enlarged image screen, the image can be moved by dragging the lower left
image.
End of the Select Image Mode
Display in standard size
or double size
Change Images of eye
Right/Left side eye
Page 38
PRK-8000 Operation Manual
- 30 -
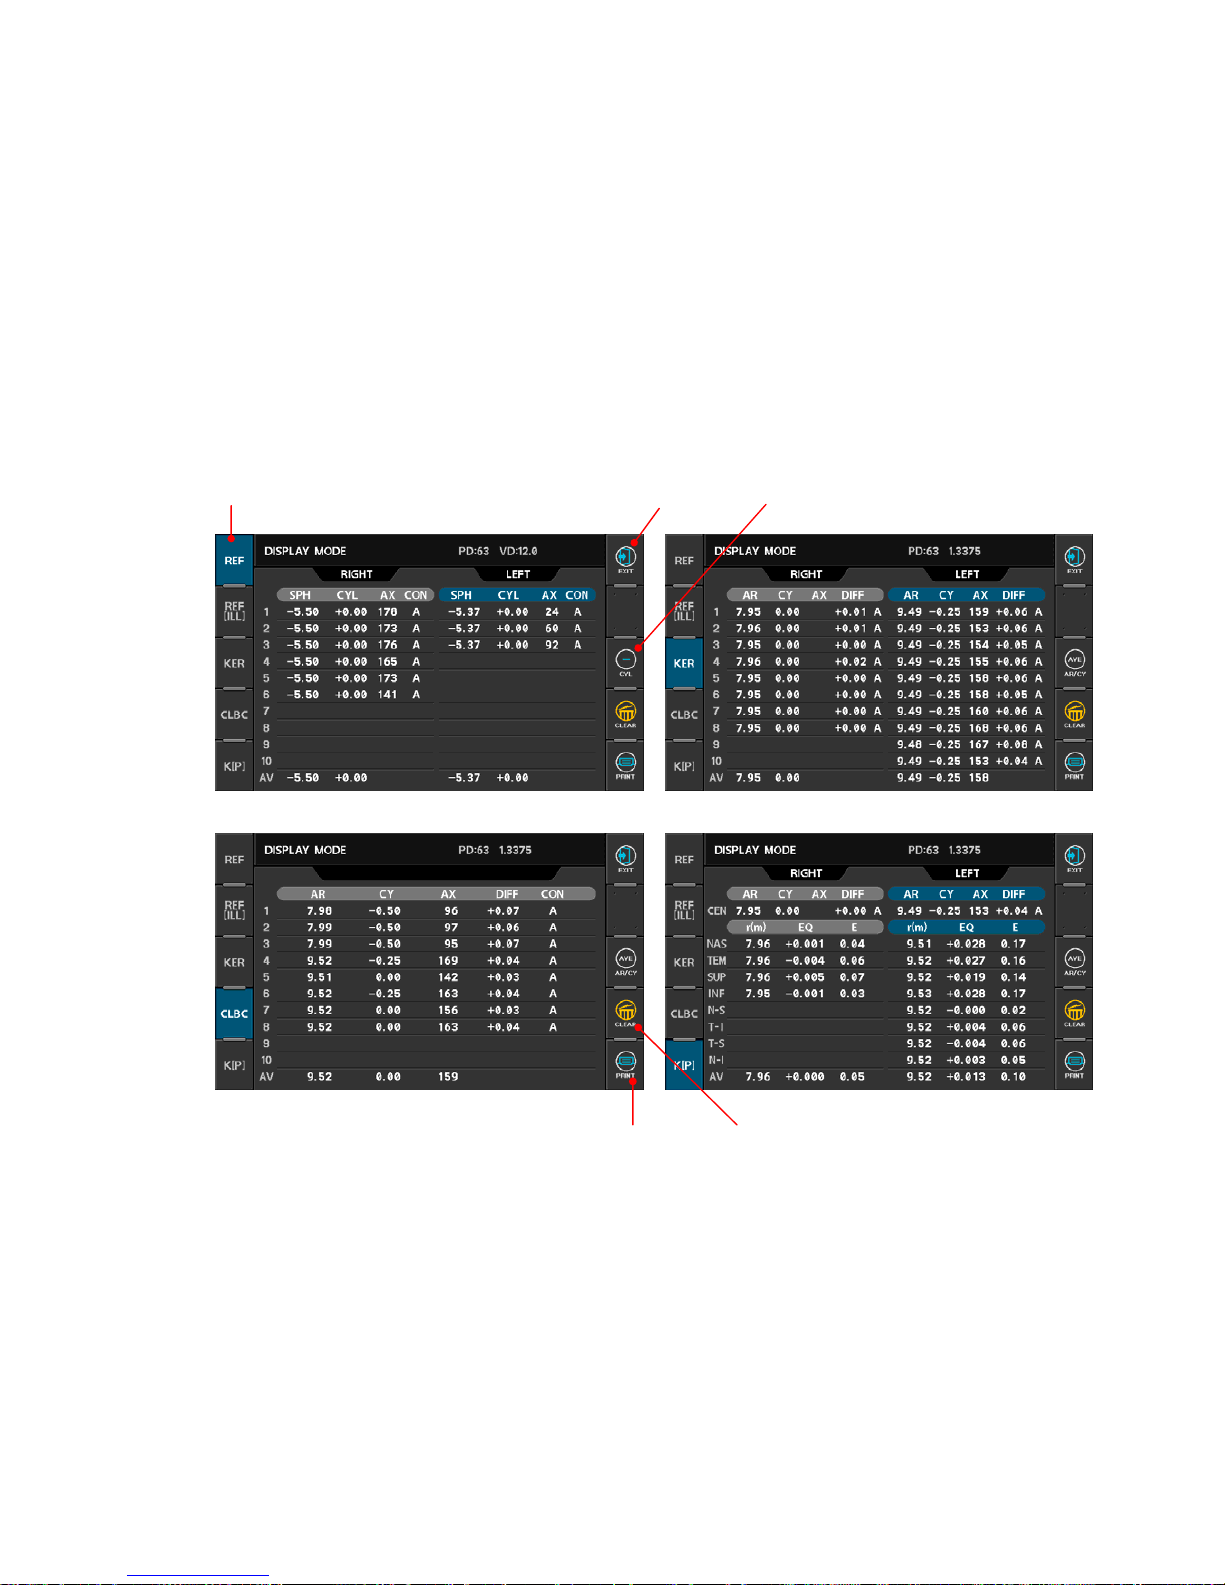
6.4 DISPLAY Mode
The stored data (maximum 10 data for each eye) in memory can be displayed in this mode.
To enter DISPLAY Mode, press DISP button in the Measurement Mode. Press EXIT button in
order to go out DISPLAY Mode.
NOTES:
① Press one of four tab buttons on upper side of display. Result of selected
page will be displayed.
② Press PRINT button to print the stored data.
③ Press CLEAR button to clear all stored data in memory.
<REF screen> <KER screen>
<CLBC screen > <K(P) screen>
Mode
select
CLEAR
button
EXIT
change Cylinder Form
PRINT
button
Page 39
PRK-8000 Operation Manual
- 31 -
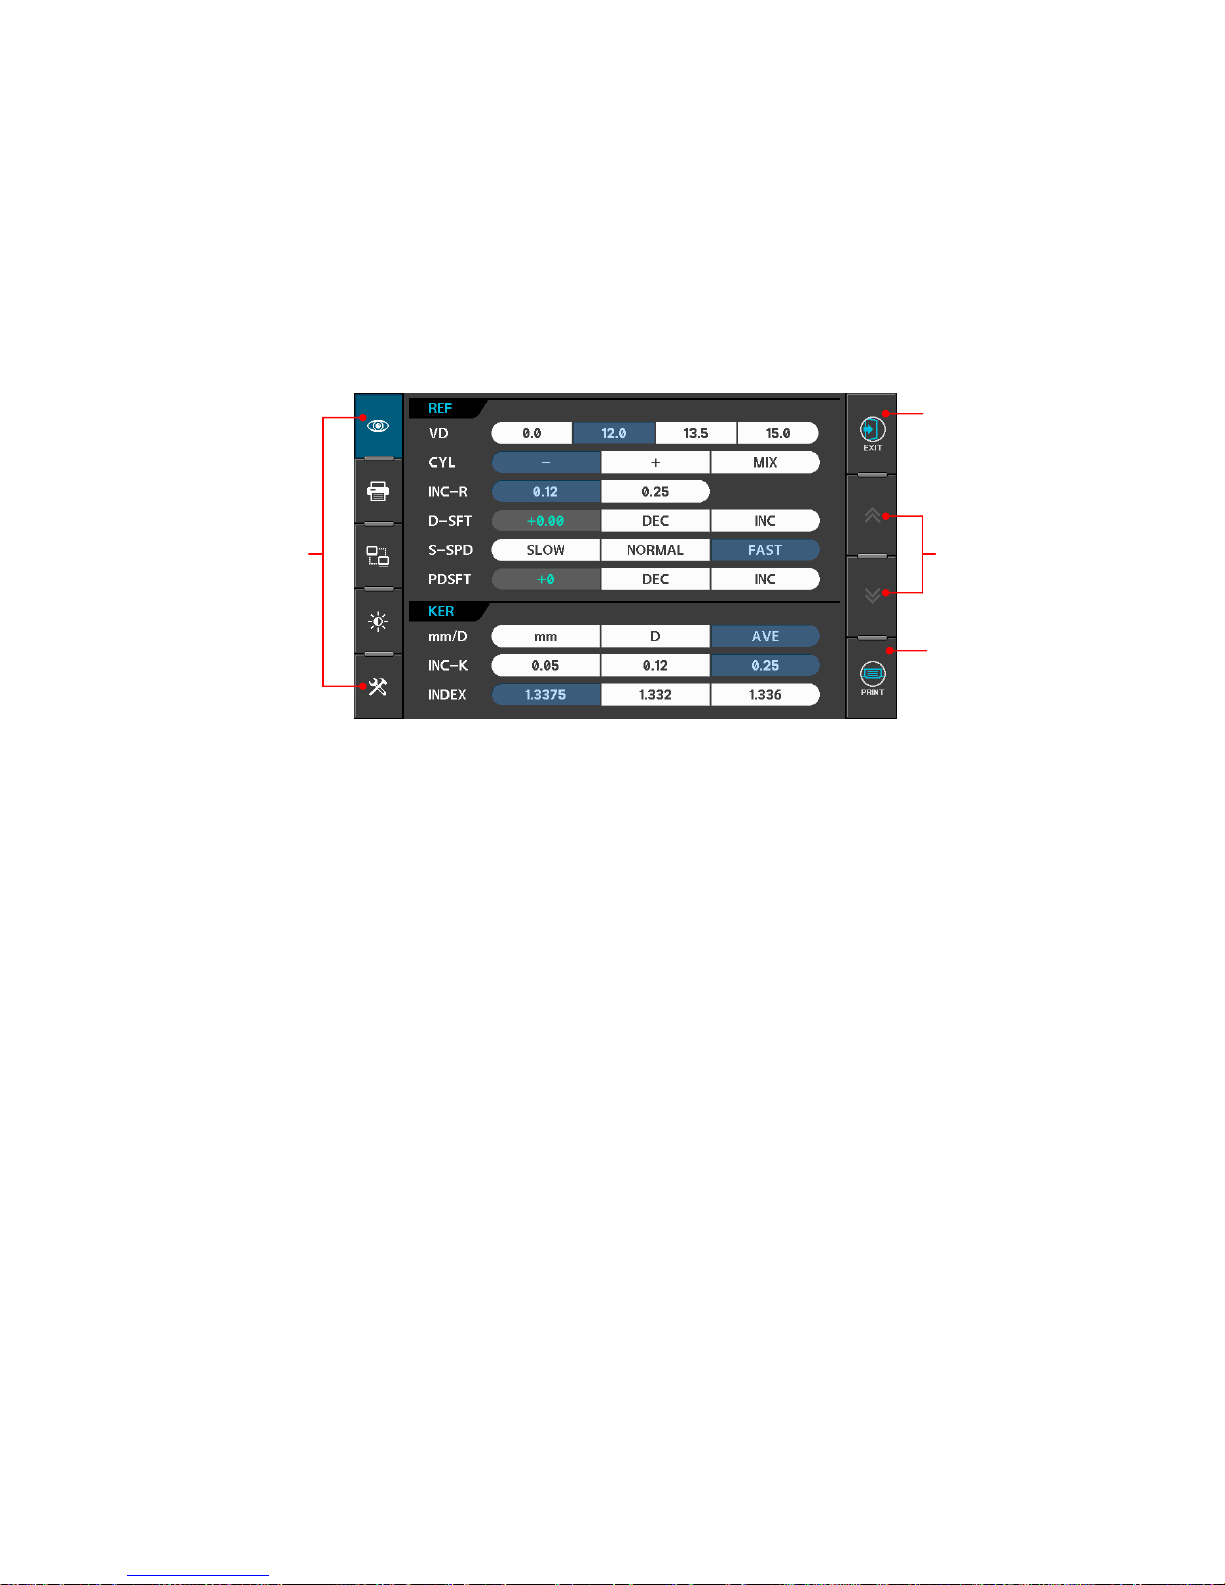
6.5 SETUP Mode
Change all the settings about measurements, printouts etc.
Press SETUP button in Measurement Mode. Setting item for REF/KER will be displayed.
Press EXIT button in order to return to Measurement Mode. Some of the setting items
consists of the two pages, the conversion page is available.
(1)
REF/KER
[How to change Setting Items]
Press one button on the left side of display.
[How to Change the Item]
Pressing any button on display yields the selection of related item.
[How to Change the Contents]
Press any un-pressed button on display. The selected button will be displayed in
pressed button and the content will be changed.
NOTE: There are some contents to be changed in the other way. And such
procedures will be instructed under the description of each item.
[How to Enter the Measurement Mode]
Press EXIT button to quit the SETUP mode and enter the Measurement mode.
[Items for REF]
VD Vertex distance
CYL Cylinder form
INC-R Increment of sphere and cylinder
D-SFT Diopter Shift of Sphere
Press INC or DEC button to change the value of sphere by 0.12.
S-SPD Adjustment for Fogging speed
PDSFT Value Shift of Pupil Distance
Press INC or DEC button to change the value of Pupil Distance.
Change the Page
PRINT Button
Change the Item
Page 40

PRK-8000 Operation Manual
- 32 -
[Items for KER]
mm/D Form of displaying result of keratometry
mm R1 ················· Radius of curvature on minimum meridian
R2 ················· Radius of curvature on maximum meridian
AX ················· Axis on maximum meridian
D K1 ················· Refractive power on minimum meridian
K2 ················· Refractive power on maximum meridian
AX ················· Axis on minimum meridian
AVE AR ················· Average radius of curvature
CY ················· Corneal astigmatism
AX ················· Axis of corneal astigmatism
INC-K Increment of corneal power and astigmatism
INDEX Corneal equivalent refractive index
Page 41
PRK-8000 Operation Manual
- 33 -
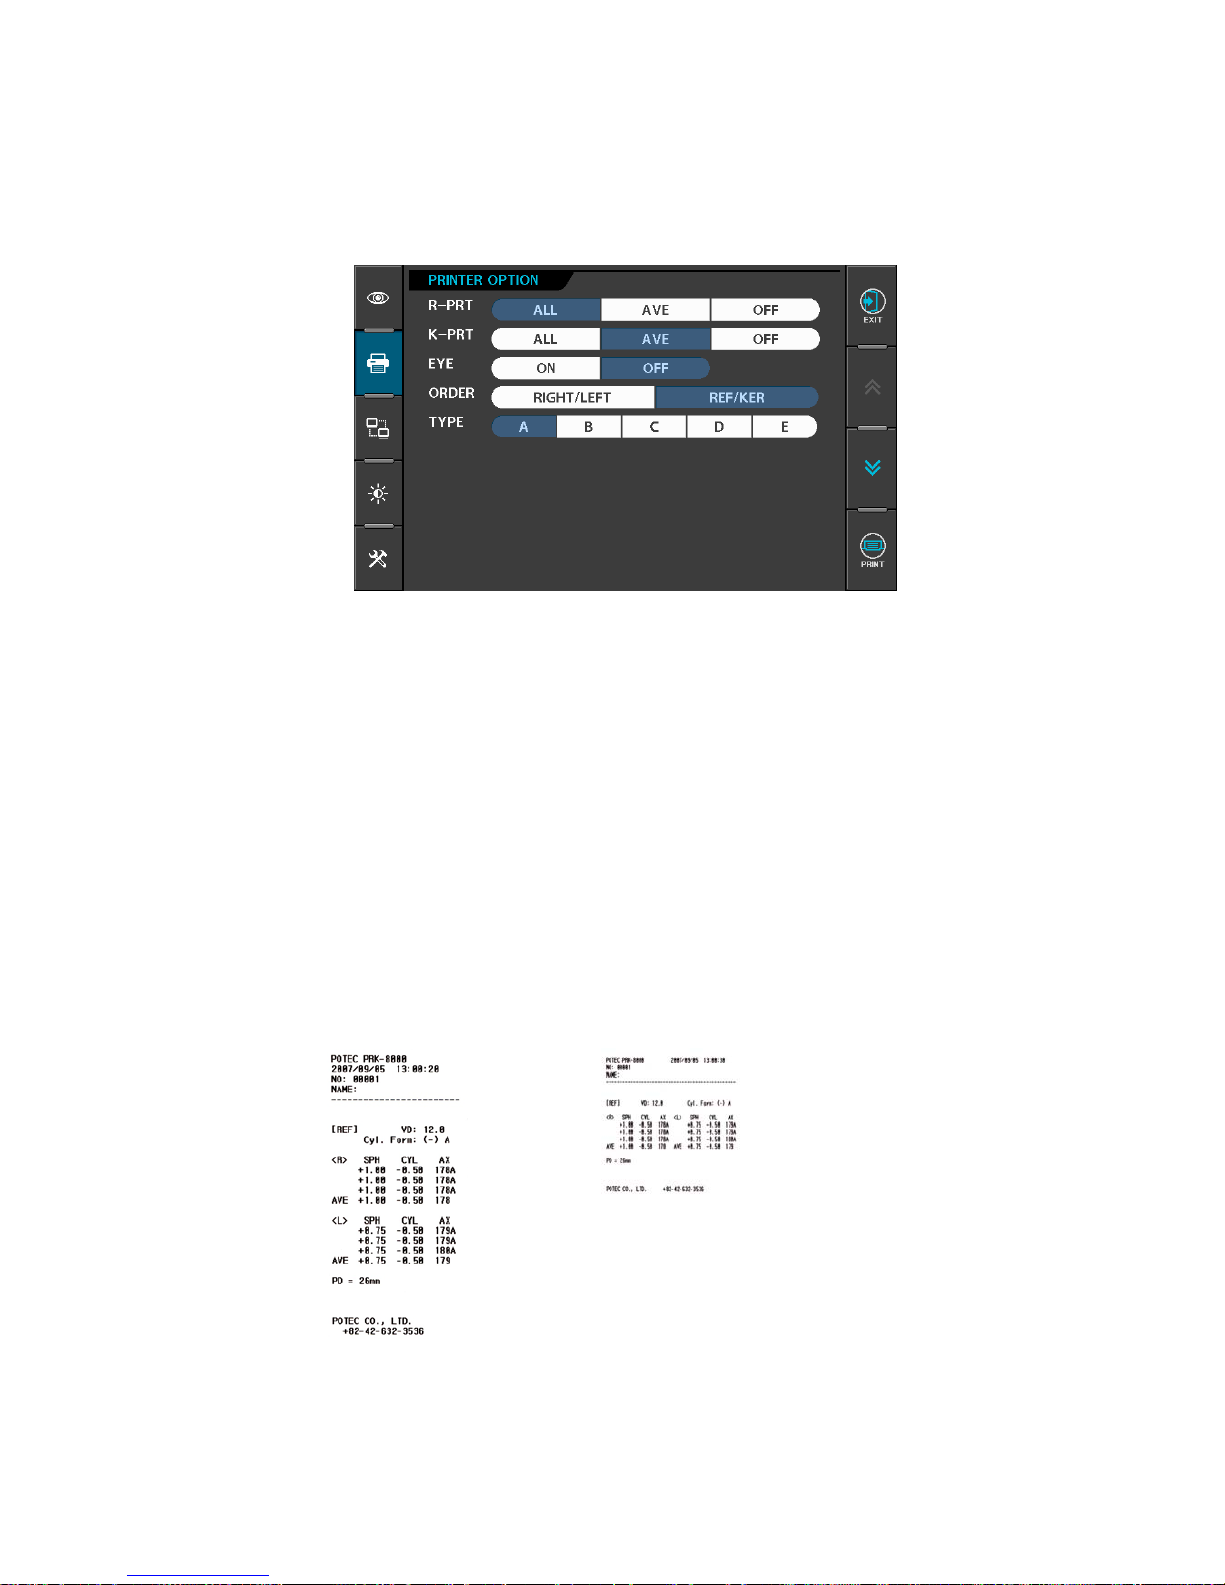
(2) Printouts
Print setup consists of 2 pages. You can move the page by pressing the page up/down
button.
[ page1: Print Format ]
[Items]
R-PRT Result of Refractometry to be printed out
ALL: Maximum of the 10 newest measurements and an average value for each eye.
AVE : Average values only
OFF: Not printed.
K-PRT Result of Keratometry to be printed out
ALL: Maximum of the 10 newest measurements and an average value for each eye.
AVE : Average values only
OFF: Not printed.
EYE ON: A sketch of eyeball and refraction diagram to the results of
refractometry are printed.
OFF: Not printed.
ORDER Order of displaying the date
TYPE Print economy mode
[ TYPE : E ]
[ TYPE : A ]
Page 42
PRK-8000 Operation Manual
- 34 -
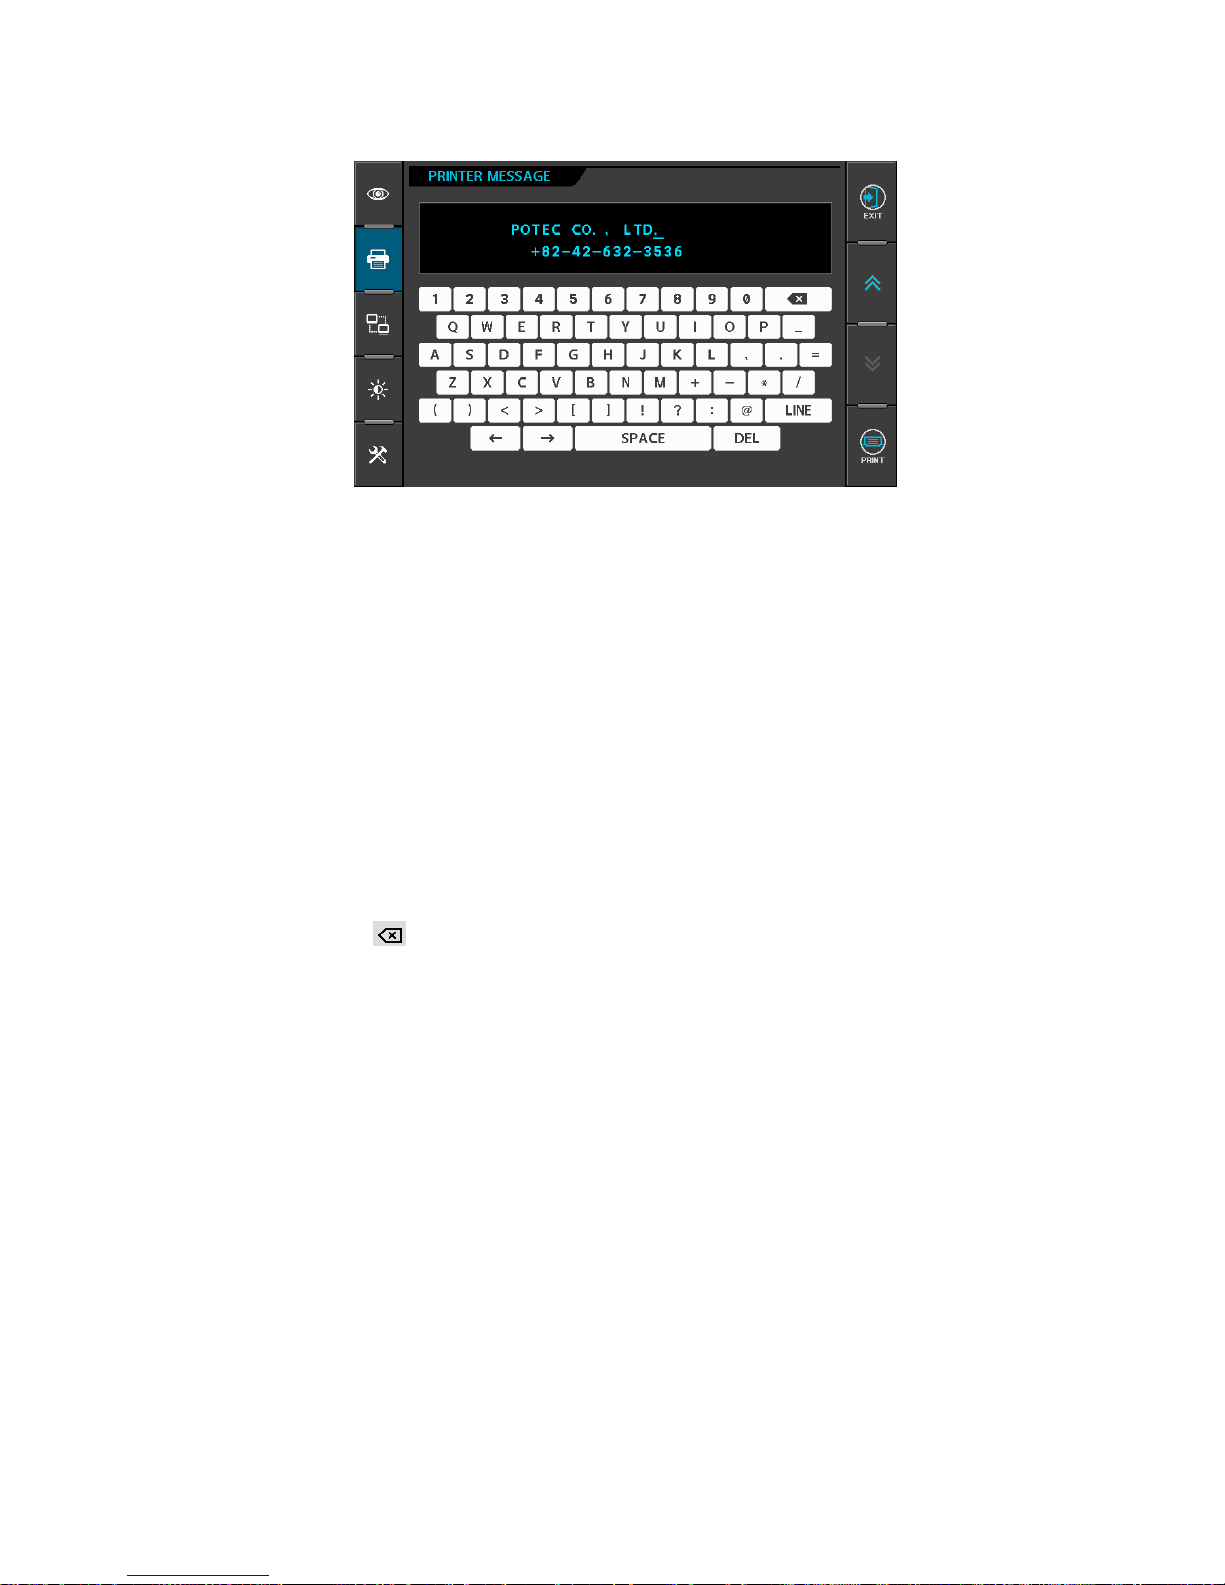
[ page2: Messages for Internal Printer ]
Enter a message to be printed out with the results of measurement using the internal
printer in this window.
You can enter a messages in 24 characters × 2 lines.
[Cursor Position]
The cursor blinking in the upper area represents the input position.
Press LINE button to change the row of the blinking cursor.
Pressing “»” or “¼” button yields the right and left change of the position of the cursor.
[Input of Messages]
Press any one of alphanumeric buttons to add character in the position of the blinking
cursor.
[Deletion of Messages]
If you press the DEL button, the character of blinking cursor will be deleted.
If you press the button, the character in front of the blinking cursor will be deleted.
Page 43
PRK-8000 Operation Manual
- 35 -
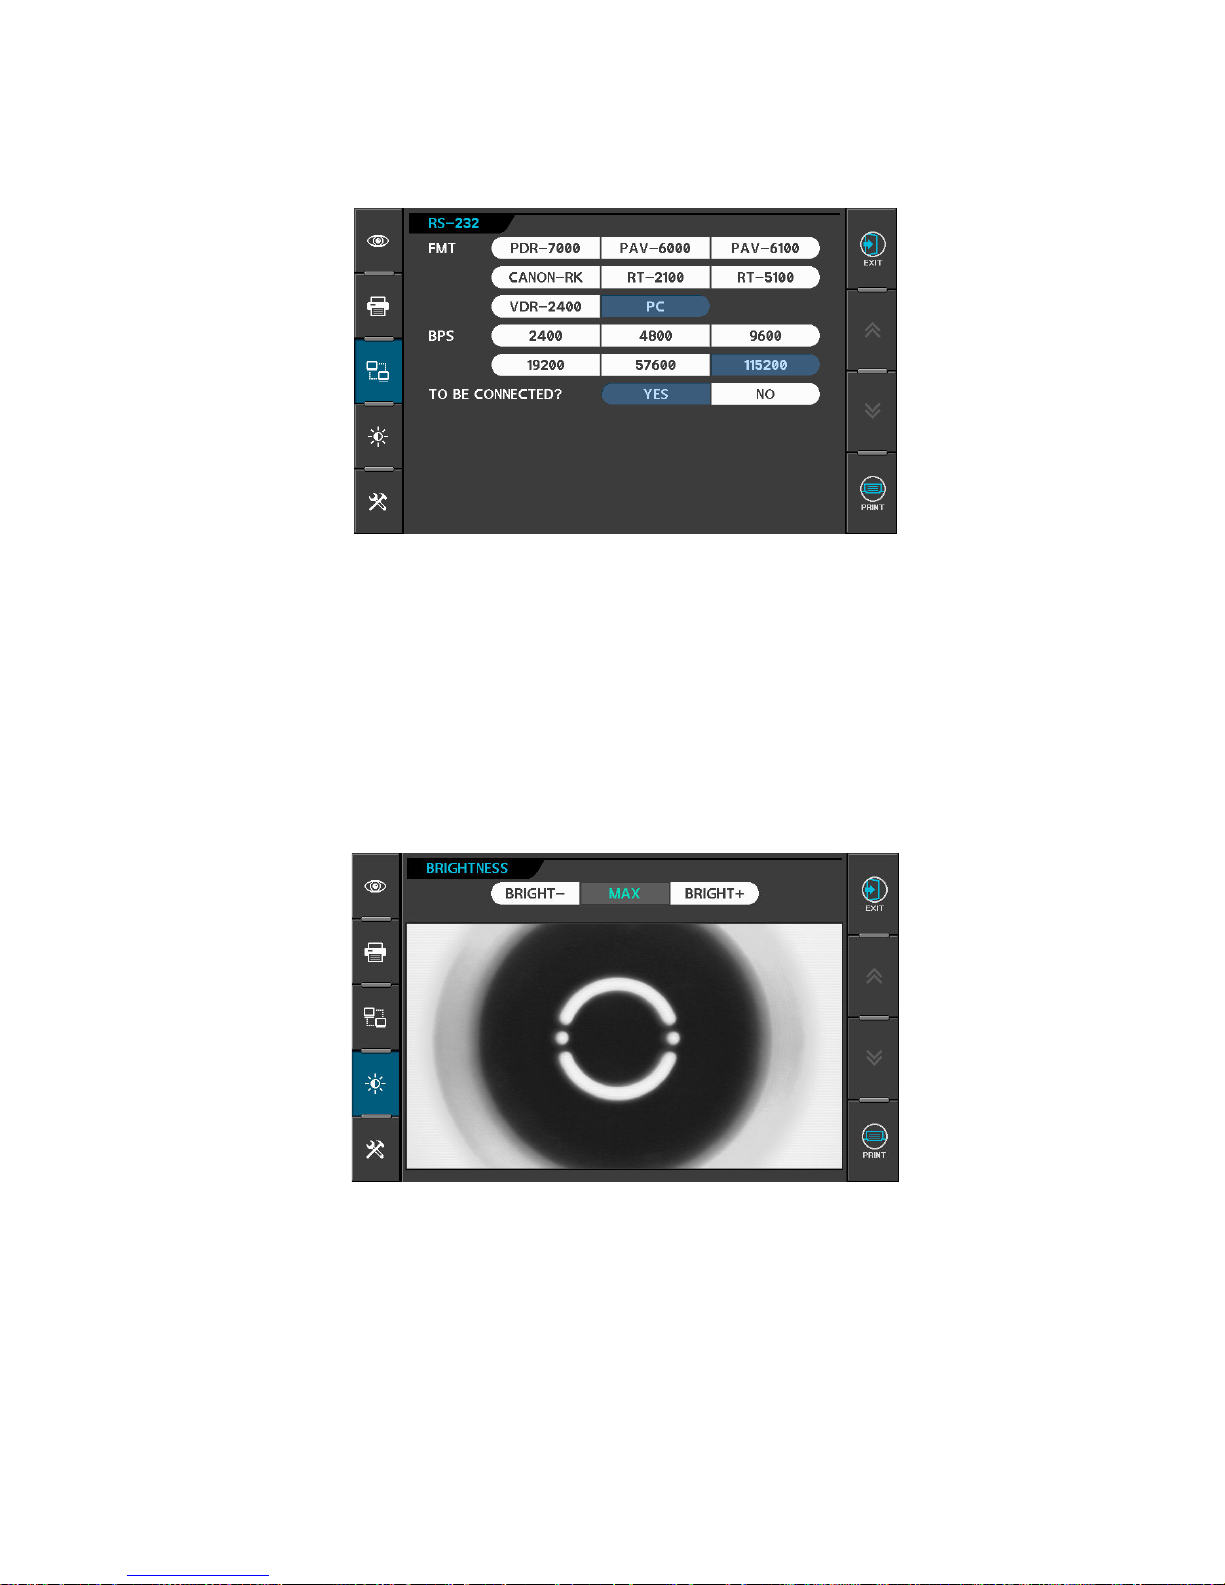
(3) Communication
[Items]
FMT RS-232 data format
PDR-7000, PAV-6000, PAV-6100, CANON-RK, RT-2100, RT-5100,
VDR-2400, PC
BPS RS-232 data transfer speed
2400, 4800, 9600, 19200, 57600, 115200
(It is only possible to select the ‘BPS’ in PC mode.)
(4) Adjust Brightness
Adjust the brightness of monitor.
Press “BRIGHT-” or “BRIGHT+” button to adjust the brightness of monitor (1~23).
Page 44
PRK-8000 Operation Manual
- 36 -
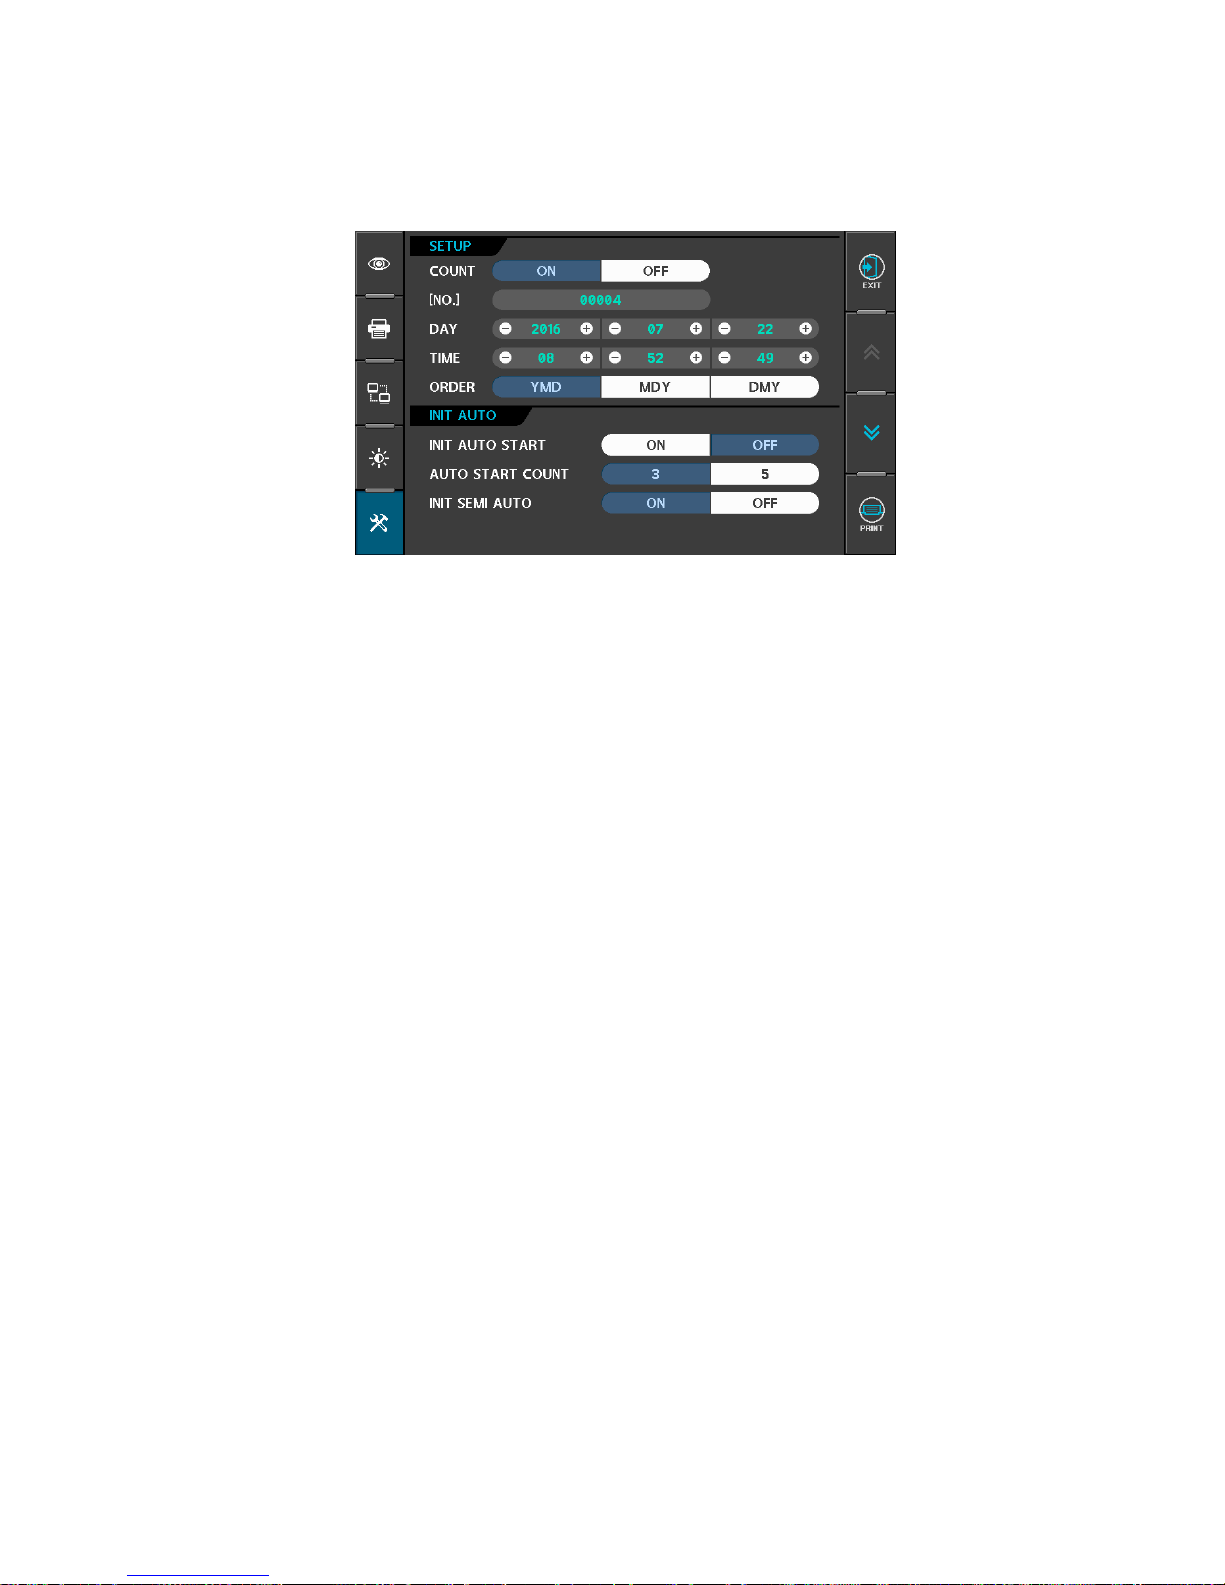
(5) Instrument settings
Instrument setup consists of 2 pages. You can move the page by pressing the page
up/down button.
[ page1 ]
[Seral Number, Date and time]
COUNT To select whether using the serial number or not.
[NO.] Setting of the serial number
Pressing DEC or INC button renders the serial number to be decreased or
increased by “1”.
Pressing INPUT button enables you input number from Dialog Box.
DAY Date
Pressing ‘-’ or ‘+’ button renders the related item to be decreased or increased
by “1”.
2001 ~ 2099 : Year
01 ~ 12 : Month
01 ~ 31 : Day
TIME Time
Pressing ‘-’ or ‘+’ button renders the related item to be decreased or increased
by “1”.
00 ~ 23 : Hour
00 ~ 59 : Minute
00 ~ 59 : Second
ORDER Order of displaying the date
[Auto Measurment]
INIT AUTO START
OFF: Manual start after power ON
ON: Automatic start after power ON
AUTO START COUNT
3: Continuous measurement starts automatically and will be performed 3 times.
5: Continuous measurement starts automatically and will be performed 5 times.
INIT SEMI AUTO
OFF: When the power is turned on, it makes semi-automatic eye tracking is disabled state.
ON: When the power is turned on, it makes semi-automatic eye tracking is enabled state.
Page 45
PRK-8000 Operation Manual
- 37 -
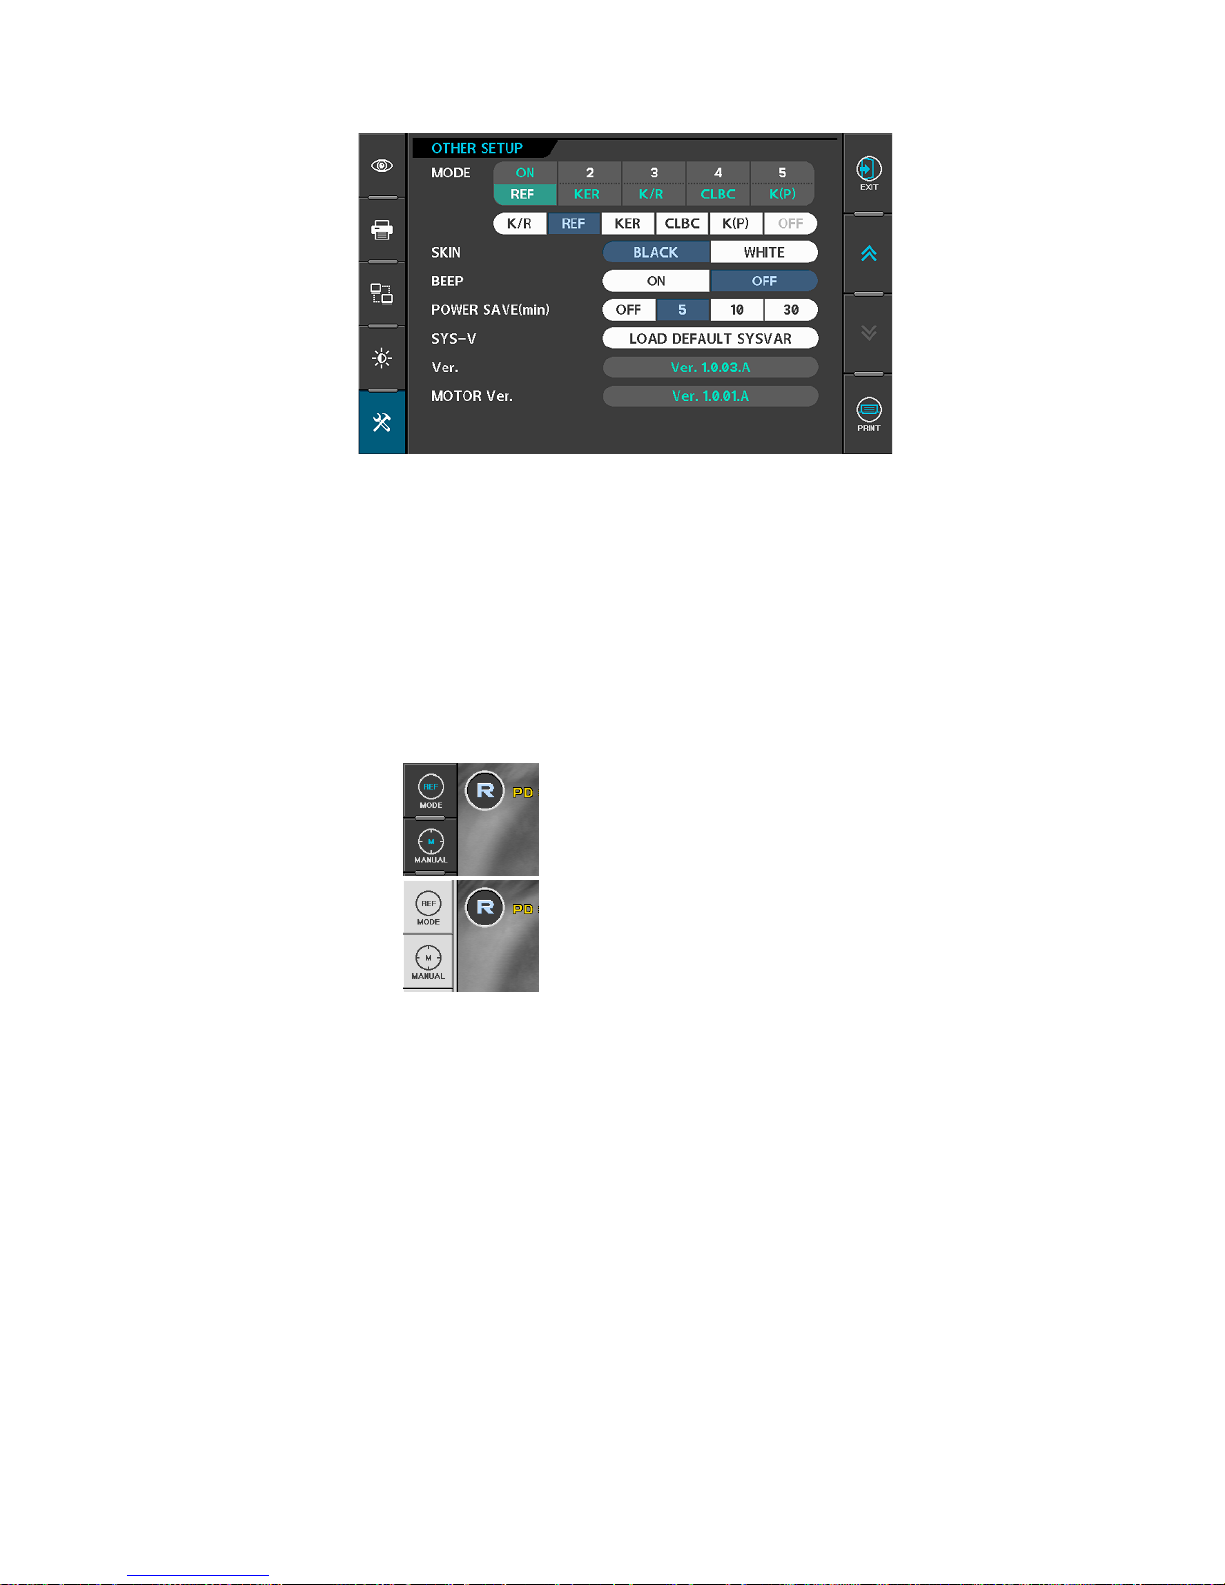
[ page2 ]
[Measuring Modes, etc.]
MODE Assigns order of Measurement Modes “REF, KER, K/R, CLBC, K(P)” and
delete unnecessary modes.
1: First mode that is displayed when power is turned ON. It cannot be
set to “OFF”.
2~5: Second modes and after.
z Assign First Measurement Mode and after.
z If you want to delete unnecessary modes, delete from last(5th) one.
SKIN: Set the background color of menu button.
Color changes will apply from then exit the SETUP mode.
BLACK: Set menu background color to black.
WHITE: Set menu background color to white.
BEEP
ON: Enable BEEP sound in measurement mode.
OFF: Disable BEEP sound.
POWER SAVE TIME (min)
OFF: Disable Power Save Function.
5: Enter Power Save Mode if there is on operation by operator about 5 minutes.
10: Enter Power Save Mode if there is on operation by operator about 10 minutes.
30: Enter Power Save Mode if there is on operation by operator about 30 minutes.
SYS-V
If you press the “LOAD DEFAULT SYSVAR” button, the system variable will
be initialized.
Ver.
It displays the version of the Software that is currently applied to the product.
MOTER Ver.
It displays the version of the MOTOR control Software that is currently applied
to the product.
Page 46

PRK-8000 Operation Manual
- 38 -
7. Self Inspection and Maintenance
7.1 Before Calling a Service Person
Warning messages will be displayed on the monitor if some problems occur. It might be
operation errors or problems of the machine.
In this case, refer the following instructions.
If the function is still not salvaged or recovered, disconnect the power supply and consult the
dealer.
(1) Message When Power On.
Message Cause Remedy
REF/KER CCD CHECK...
Internal error
Turn OFF the power switch and turn
on again after 10 seconds.
If the message appears again,
consult the dealer.
REF MOTOR ORIGIN... FAILED
INVALID SETUP DATA - REF Internal Setup Data for
Refractometry is invalid.
Consult the dealer.
INVALID SETUP DATA - KER Internal Setup Data for Keratometry
is invalid.
Consult the dealer.
(2) Message On Measuring
Message Cause Remedy
ERROR
Alignment is improper
Measure after aligning the pupil and the
Alignment Mark properly.
Eyelid or eyelashes are covering the pupil.
Instruct the examinee to open his or her eyes
wide, or lift up the eyelid lightly with your fingers
and measure again
When the pupil is smaller than the Outer
Alignment Mark.
The minimum pupil diameter that can be
measured is 2.0 mm. Although it is possible to
measure in the bright place, don’t expose
examinee’s eyes to the direct sunlight or too
bright indoor lights to prevent the contraction of
the pupil.
When the examinee has some illness like
cataract.
Observe the eye in RET Mode. If cataract is not
severe, measurement can be performed in the
IOL mode.
Examinee has IOL(intra-ocular lens)
implanted.
Measure in the IOL mode.
When the Mire Image is odd shaped
because of tears.
Instruct the examinee to open and close his or
her eyes several times and measure again.
Page 47

PRK-8000 Operation Manual
- 39 -
ERROR When the Mire Image is not clear because
the cornea is dry.
Instruct the examinee to open and close his or
her eyes several times and measure again.
Examinee has strong irregular astigmatism
or corneal disease.
Impossible to measure
+ OUT Sum of SPH and CYL of examinee’s eye is
over +25D.
Impossible to measure
Radius of curvature is over 13.0mm.
Objective glass in the measurement window
is dirty
Clean the glass
- OUT Sum of SPH and CYL of examinee’s eye is
over -30D.
Impossible to measure
Radius of curvature is under 5.0mm.
Objective glass in the measurement window
is dirty
Clean the glass
C OUT Astigmatism is over 10D. Impossible to measure
Corneal stigmatism is over 15D.
Objective glass in the measurement window
is dirty.
Clean the glass
(3) Message On Printing
Message Cause Method to deal with
No Print Data There is no measurement data Print after measurement
PRINTER PAPER EMPTY No printing paper Load a roll of printing paper.
Page 48

PRK-8000 Operation Manual
- 40 -
7.2 Replacement
7.1.1 Printing Paper
Replace the roll of printing paper as soon as possible if the red line appears in the paper.
(1) Press the printer button to open the printer cover.
(2) Remove the used paper.
(3) Install a roll of new paper into the printer housing and close the printer cover.
(4) At this time, the printer detects the change of paper, and cuts the paper approximately
‘2cm’ for initializing paper settings.(It takes about 3 seconds to complete.)
7.1.2 Chin Rest Paper
(1) Pull out the two pins on the chin rest.
(2) Insert the pins into the holes on the chin rest paper. More than 50 sheets of paper can
be attached.
(3) Insert the pins straight into the holes on the chin rest.
7.1.3 Fuses
(1) Turn off the power.
(2) Remove the power cord from the electrical inlet.
(3) Insert flatblade screwdriver into notches in the fuseholder cover. Then turn the
screwdriver countclockwise.
(4) Replace the fuses and reset the fuseholder cover in its original positions.
Fuse rating: T3.15A 250V
7.3 Cleaning
(1) Basically, keep this instrument clean. Don’t use volatile object, thinner or benzene, etc.
(2) Polish each part with a dry cloth containing detergent solution.
7.4 When Moving the Instrument
(1) Turn OFF the power switch.
(2) Disconnect the power cable.
(3) Close the stage holding dial in the clockwise direction.
(4) Move this machine holding the lower part of the mains to keep horizontally.
Page 49
PRK-8000 Operation Manual
- 41 -
7.5 Service Information
(1) Repair
If problem cannot be solved even after taking the measures indicated in section 7.1,
contact POTEC representative or distributor for repair.
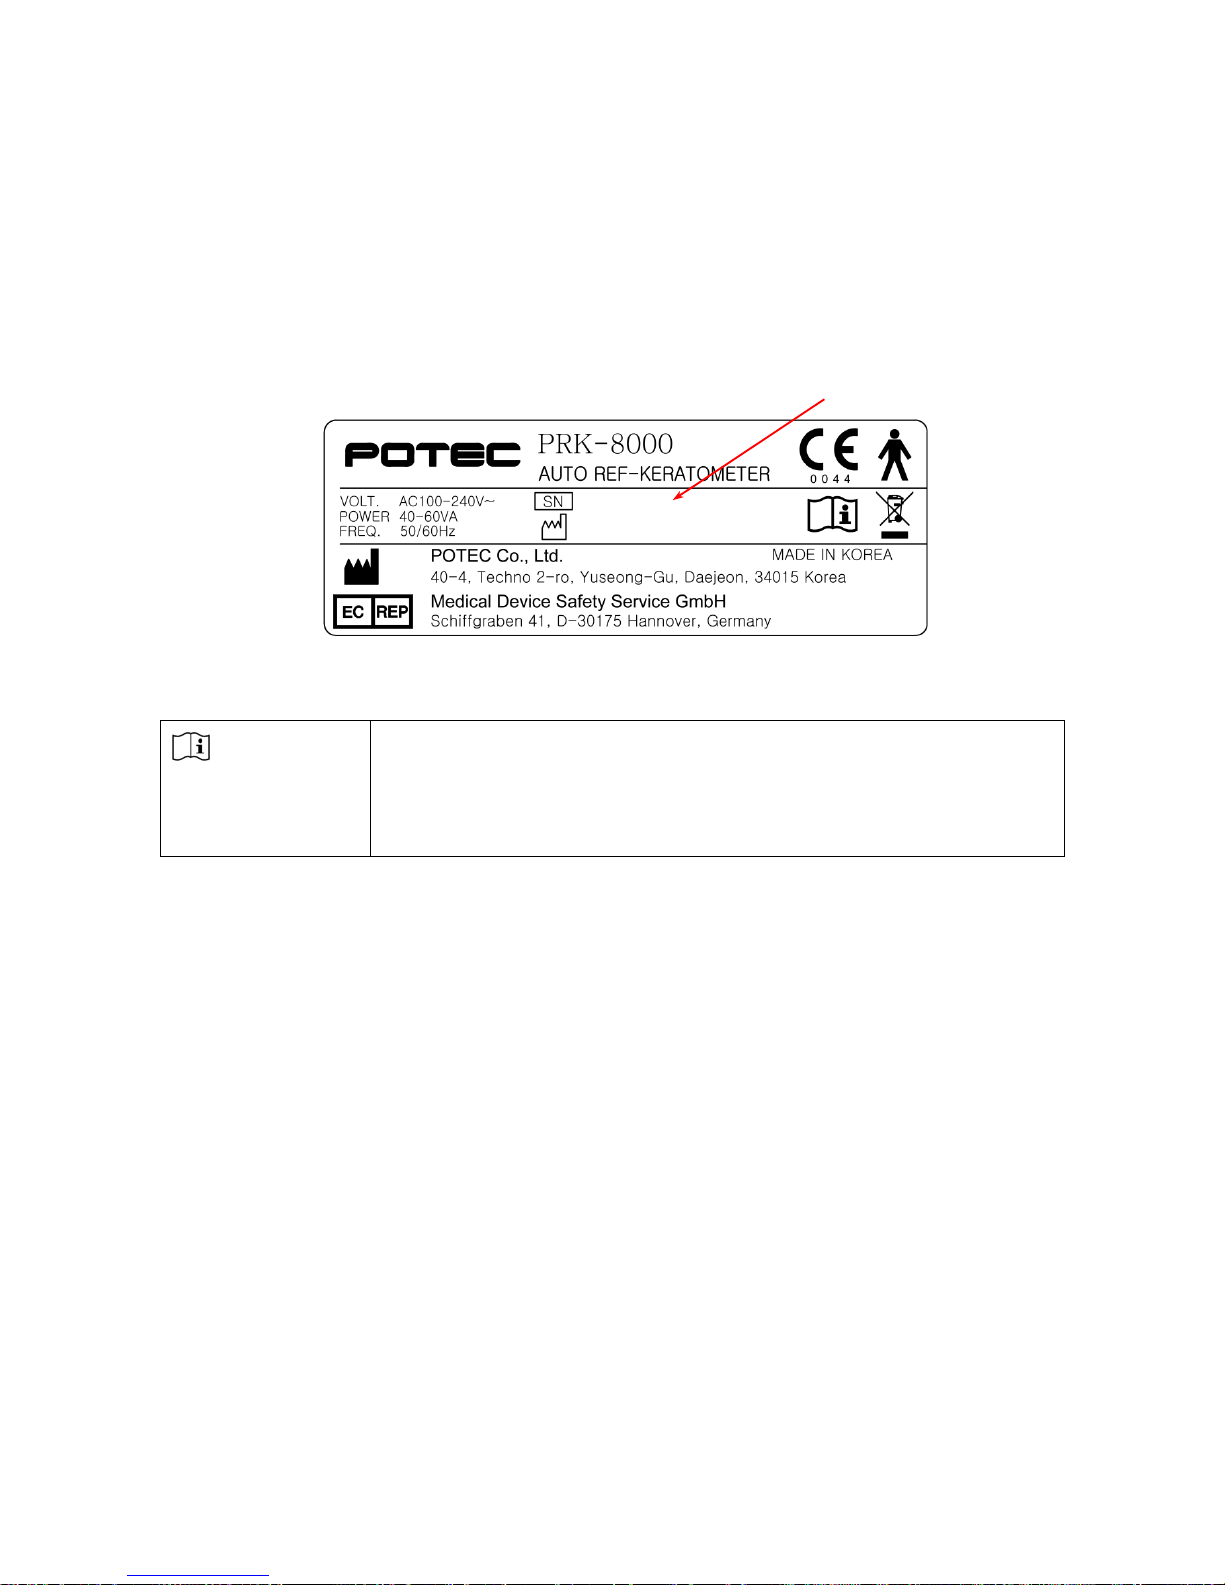
Please refer to the name plate and let us have the following information:
Name of the instrument: PRK-8000
Serial Number: 7-digit characters indicated on the name plate
Phenomenon: In detail
(2) Disposal of the instrument
CAUTION
This instrument incorporates a lithium battery, which may pollute
the environment if the instrument is abandoned.
Please ask a professional waste disposal company to handle
disposal, or contact POTEC representative or distributor before
disposing of the instrument.
K8FH05A
2016
Serial Number
Page 50

PRK-8000 Operation Manual
- 42 -
8. Classifications and Specifications
8.1 Classifications
Classification of equipment: Class Ⅰ
Applied part of equipment: TYPE B Applied Part(Chinrest & Headrest)
Protection against electric shock: Class Ⅰ
Protection against harmful ingress of water: Ordinary (IPX0)
Method of sterilization: Not applicable
Stability of use in an Oxygen Rich Environment: Not suitable
Mode of operation: Continuous operation
Page 51

PRK-8000 Operation Manual
- 43 -
8.2 Specifications
Refractometry
Vertex Distance (VD) 0.0, 12.0, 13.5, 15.0 mm
Sphere Power (SPH) -30.00 ~ +25.00 D (at the vertex distance of 12 mm)
(Increments selectable between 0.12 and 0.25 D)
Cylinder Power (CYL) 0.00 ~ ±10.00 D
(Increments selectable between 0.12 and 0.25 D)
Axis (AX) 1 ~ 180˚ (Increments: 1˚)
Cylinder Form -, +, MIX
Minimum Pupil Diameter Ø 2.0 mm
Keratometry
Radius of Curvature 5.0 ~ 13.0 mm (Increments: 0.01 mm)
Corneal Power 25.96 ~ 67.50 D (n = 1.3375)
(Increments selectable from 0.05, 0.12, 0.25 D)
Corneal astigmatism 0.00 ~ -15.00 D
(Increments selectable from 0.05, 0.12, 0.25 D)
Axis 1 ~ 180˚ (Increments: 1˚)
Pupil Distance (PD) 10 ~ 88 mm
Corneal Diameter 2.0 ~ 14.0 mm (Increments: 0.1 mm)
Working range of auto-tracking
Up and down ±16mm
Working range of auto-shooting
Up and down ±0.13mm or less
Memory of Data 10 measured value for each right and left eye
Internal Printer Thermal line printer with Auto-Cutter function
Monitor 7-inch TFT LCD monitor (800x480 pixels, tiltable/swivel)
Environmental requirements
Operation
Temperature: +10 to +40℃
Humidity: 30 to 85% RH
Atmospheric pressure: 70 to 106 kPa
Storage and Transportation
Temperature: -10 to +55℃
Humidity: 10 to 95% RH
Atmospheric pressure: 50 to 106 kPa
Power supply AC100-240V, 50/60Hz
Power consumption 40 ~ 60 VA
Size
Approximately 260(W) × 500(D) × 450(H) mm
Weight Approximately 20kg
Page 52

PRK-8000 Operation Manual
- 44 -
9. Components
PRK-8000 Main Unit ······································································· 1
Operation Manual ·········································································· 1
Power Supply Cable ······································································· 1
Test Model Eye ············································································· 1
Chin Rest Paper ············································································ about 100 sheets
Printing Paper ··············································································· 2 rolls
Dust Cover ··················································································· 1
Optional Accessories
Chin Rest Paper ············································································· 500 sheets
Printing Paper ··············································································· 10 rolls
 Loading...