

Page 1

TouchKit
TouchScreen Controller
User Manual
for Windows 9X / ME
Version: 3.4.0
TouchKit Manual for Win9X/ME v3.4.0
0
Page 2

CONTENT
CHAPTER 1. TOUCH PANEL CONTROLLER........................................................... 2
1.1 CONTROLLER..................................................................................................................................... 2
1.2 SPECIFICA TIONS AND FEATURES ........................................................................................................ 2
CHAPTER 2. INSTALLING TOUCHKIT.......................................... .... ........ .... .... ........4
CHAPTER 3. CONFIGURATION UTILITY AND RIGHT BUTTON EMULATOR....... 8
CHAPTER 4. MONITOR ROTATION SETTING ......................................... ........ .... ..23
4.1 ROTATING DISPLAY BY WAY OF NVIDIA OR ATI DRIVER .................................................................. 23
4.2 ROTATING DISPLAY BY WAY OF PIVOT............................................................................................. 24
CHAPTER 5. UNINSTALLING TOUCHKIT...............................................................27
TouchKit Manual for Win9X/ME v3.4.0
1
Page 3

Chapter 1. Touch Panel Controller
This touch panel controller provides the optimal performance of analog resistive
touch panels for 5 wire models. It communicates with PC system directly through
RS232, PS/2 or USB connector. Users can see how superior the design is in
sensitivity, accuracy and friendly operation. The touch panel driver emulates mouse
left and right button function and supports operation systems including Microsoft
Windows 95 / 98 / ME /NT4 / 2000 / XP / XP Tablet PC Edition, Windows CE 2.12 /
3.0 / .NET, Linux, iMac and DOS.
1.1 Controller
Interface
5-wire
Table 1. Cont r ol l e r s ma t ch with different inte r f a ces
RS232 USB PS/2
Ready Ready Ready
1.2 Specifications and Features
Specifications
Power requirements +5VDC ( Maximum 100mA, typical 70mA,
50mV peak to peak maximum ripple )
Operating temperature 0 to 50
Storage Temperature -40 to 80
Relative Humidity 95% at 60
Protocol RS232 Model: 9600 bauds, None parity, 8 data bits
and 1 stop bit
USB Model: USB 1.1 Low speed
PS/2 Model: PS/2 mouse
Resolution 2048 X 2048
Report rate RS232 Model: Max. 160 points/sec
USB Model: Max. 160 points/sec
PS/2 Model: Max. 140 points/sec
Response time Resistive: Max. 35 ms
Capacitive: Max. 20 ms
Pin out definition 5 wire model: UL, UR, COM, LR, LL
Panel resistance 5 wire resistive model: 50 ~ 200 ohm
( pin to pin on drive layer )
Regulatory Approvals FCC-B, CE
TouchKit Manual for Win9X/ME v3.4.0
2
Page 4

Table 2. Specifications for TouchKit controller
Features
Calibration Fast full 4 points position
Compensation Accurate 25 points linearity compensation.
Draw Test Position and linearity verification
Language Support 10 languages for Windows
Advanced Feature 1. Support monitor / display rotation
2. Support multiple monitor / display
3. Support QVGA and Half-VGA function
4. Support edge compensation
5. Support constant touch
Controller Setting 1. Support multiple controllers
2. Dynamical add / remove controllers
3. Change Controller interface without rebooting.
Mouse Emulator 1. Right / Left button emulation
2. Normal / Click on touch / Click on release mode
3. Auto right button
Sound Notification 1. Sound option (No Sound / Touch Down / Lift Up)
2. Frequency adjustment
3. Duration adjustment
Double Click 1. Configurable double click speed
2. Configurable double click area
OS support 1. Windows 95 / 98 / ME / NT4 / 2000 / XP /
Windows XP Tablet PC Edition
2. Windows CE 2.12 / 3.0 / .NET
3. Linux ( RedHat / Fedora / Mandrake /
Suse / YellowDog )
4. iMac. OS9.X / OSX
5. MS-DOS:
Support display resolution:
320x200, 640x200, 640x350, 640x480, 800x600,
1024x768 and 1280x1024
COM port support 1. Support COM 1 ~ COM 256 for Windows and
Linux
2. Support CO M 1 ~ COM 8 for DOS
Table 3. Features for TouchKit software
TouchKit Manual for Win9X/ME v3.4.0
3
Page 5
Chapter 2. Installing TouchKit
TouchKit is software, which contains drivers for the touch panel controllers. For the
specified communication connectors, RS232, PS/2 and USB, and the other two
utilities:
• Touch Tray support
This utility is for emulating the right and left button of mouse through the touch
panel. Users can toggle between right or left mouse buttons by this utility.
• Configuration support
The calibration and draw test of touch panel are done through this utility. Users
can add or remove new RS-232, PS/2 or USB touch panel devices.
Follow these steps to install TouchKit.
1. Put the TouchKit CD to CD-ROM.
2. Change directory to Win9X_ME
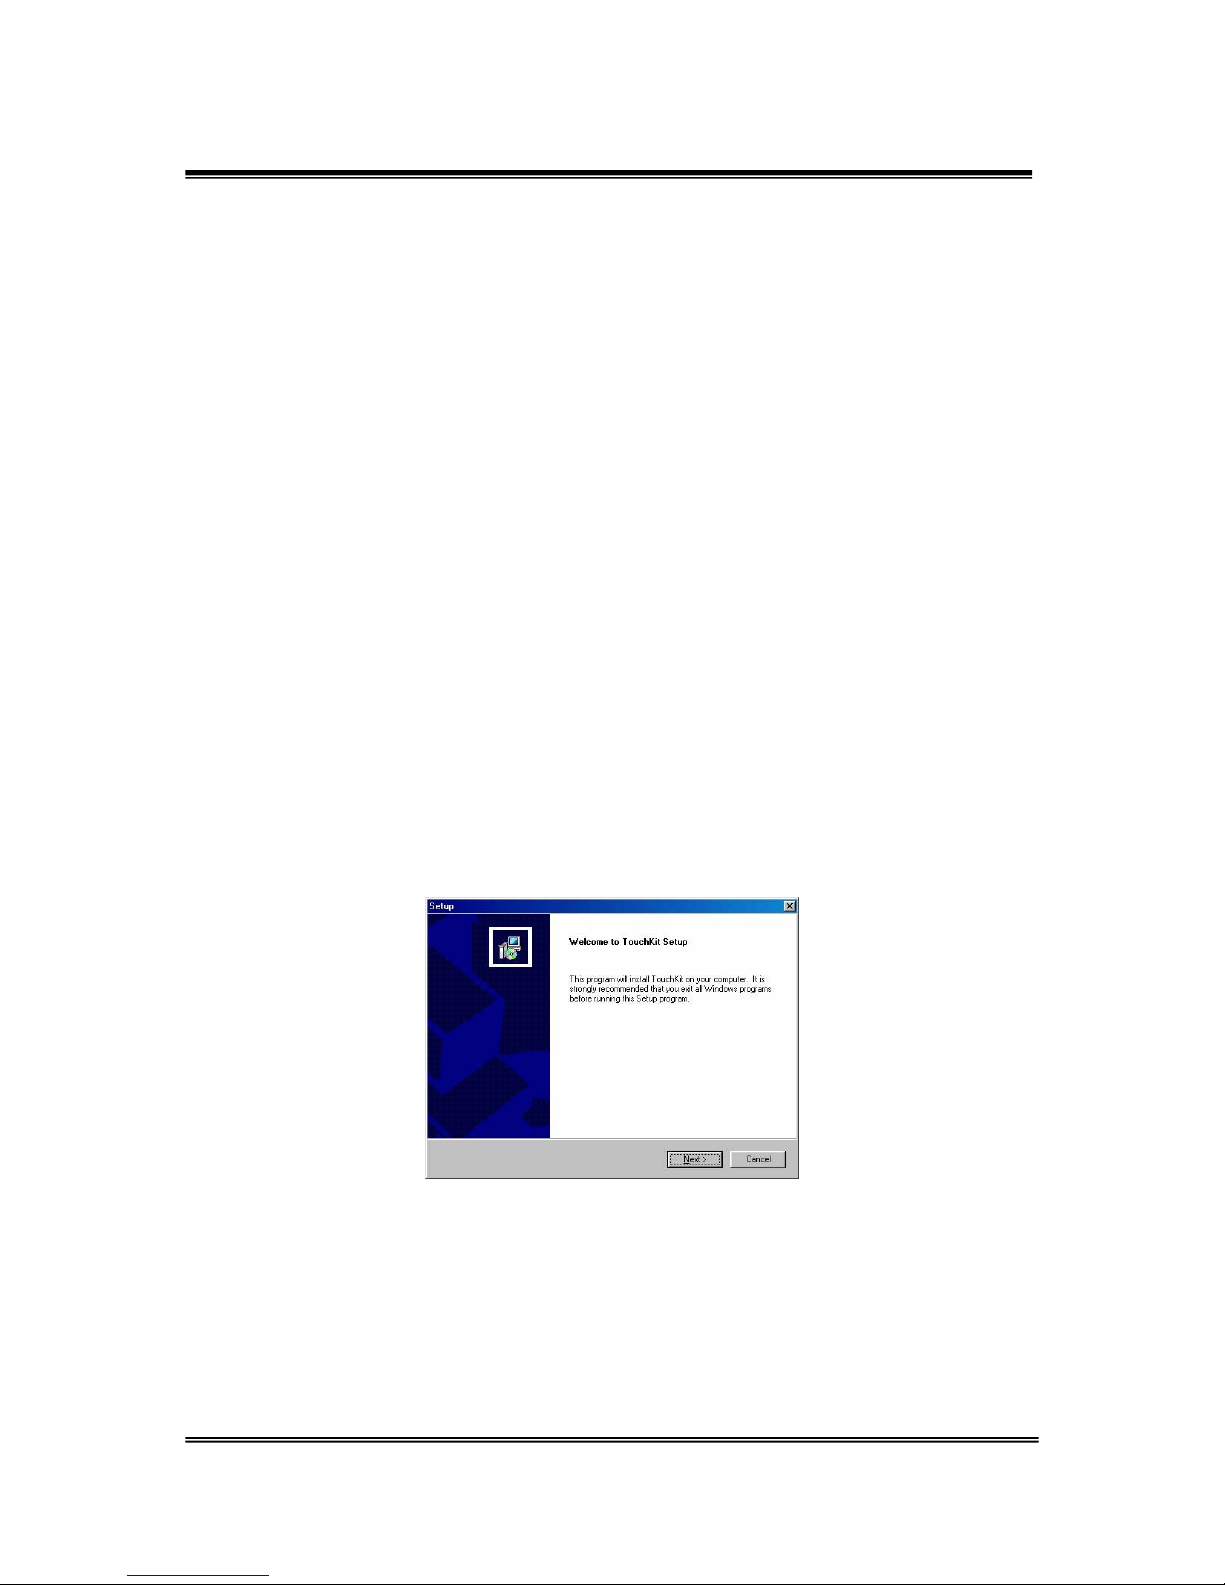
3. Double click Setup.exe, the windows installation program will then start to run.
Notice DO NOT plug in the USB controller before the installation has been
finished.
4. Click [Next >] button to continue installation.
TouchKit Manual for Win9X/ME v3.4.0
4
Page 6
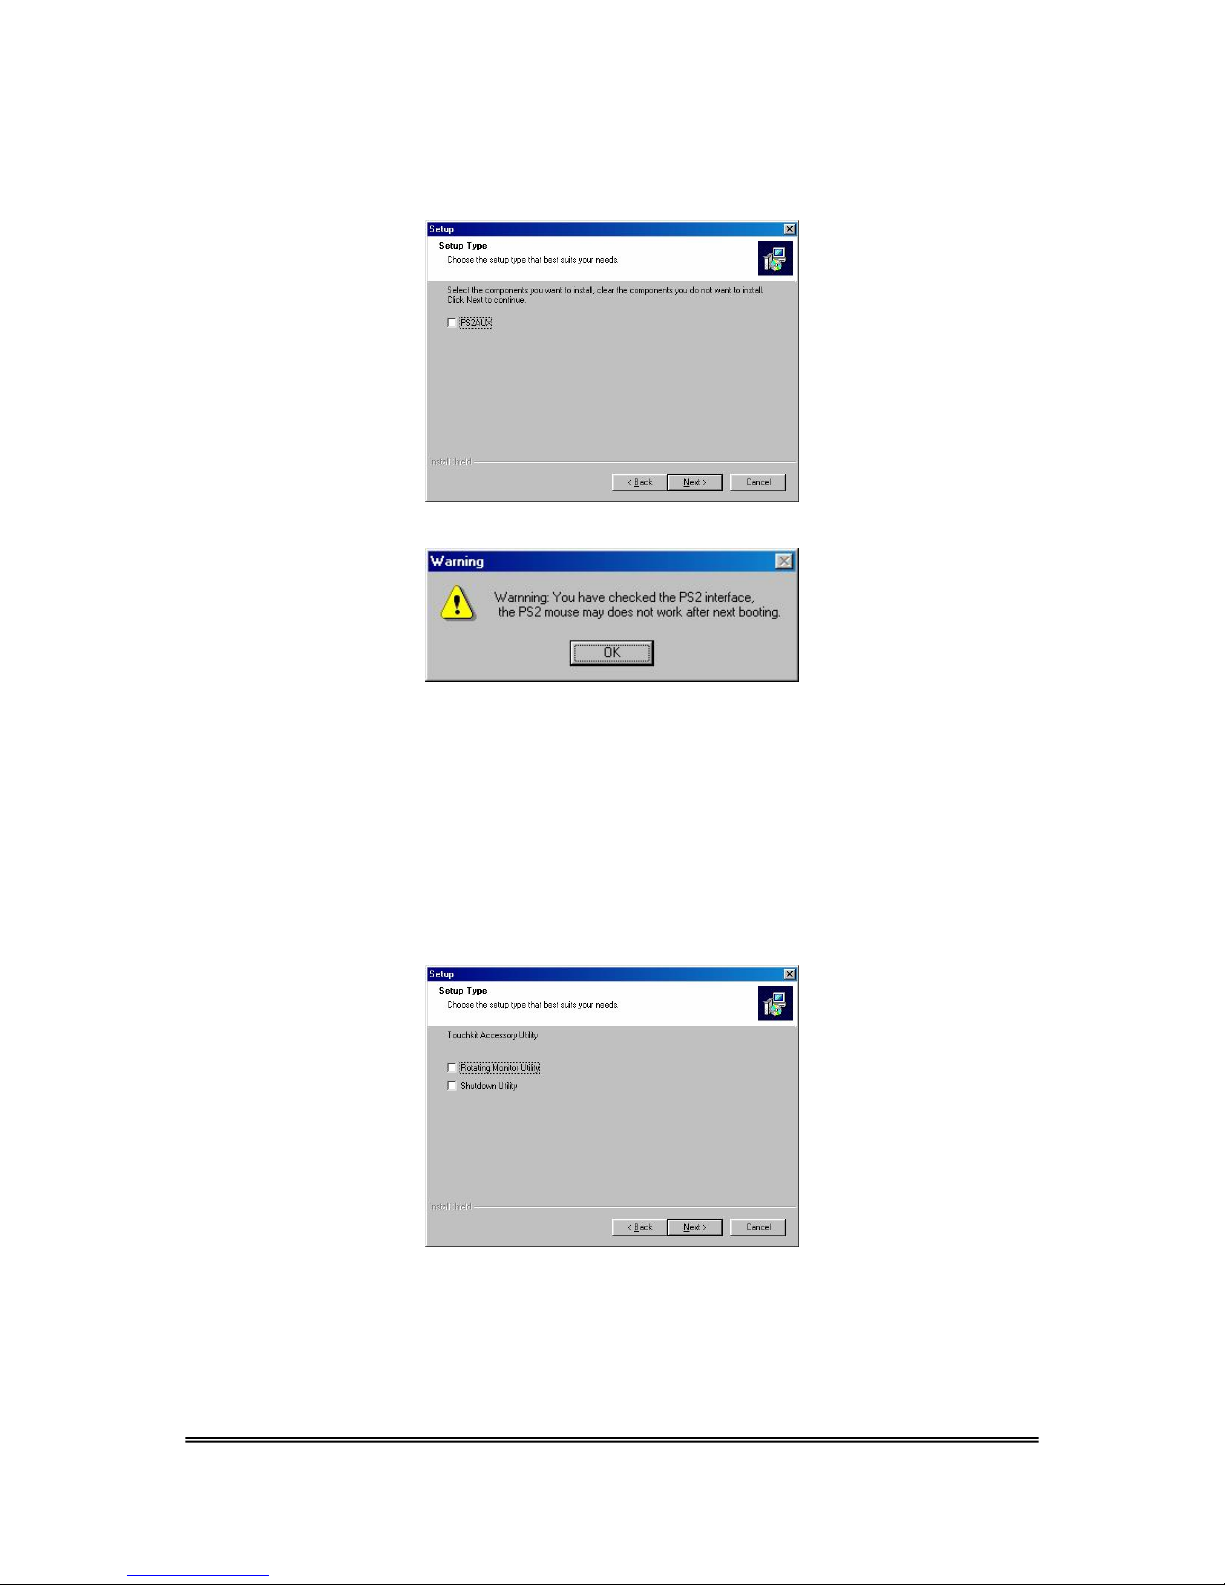
5. Then check the check box if PS/2 touch controller is to be installed. The default
is unchecked. Then Press [Next >] to continue installation.
System will give you a warning, if user checks the PS2AUX check box,
6. Choose the setup type that best suits your needs. There are two TouchKit
accessory utilities to choose from, Rotation Monitor Utility and Shutdown
Utility. Users can install the utility they want by checking the box. Press [Next >]
to continue installation.
TouchKit Manual for Win9X/ME v3.4.0
5
Page 7
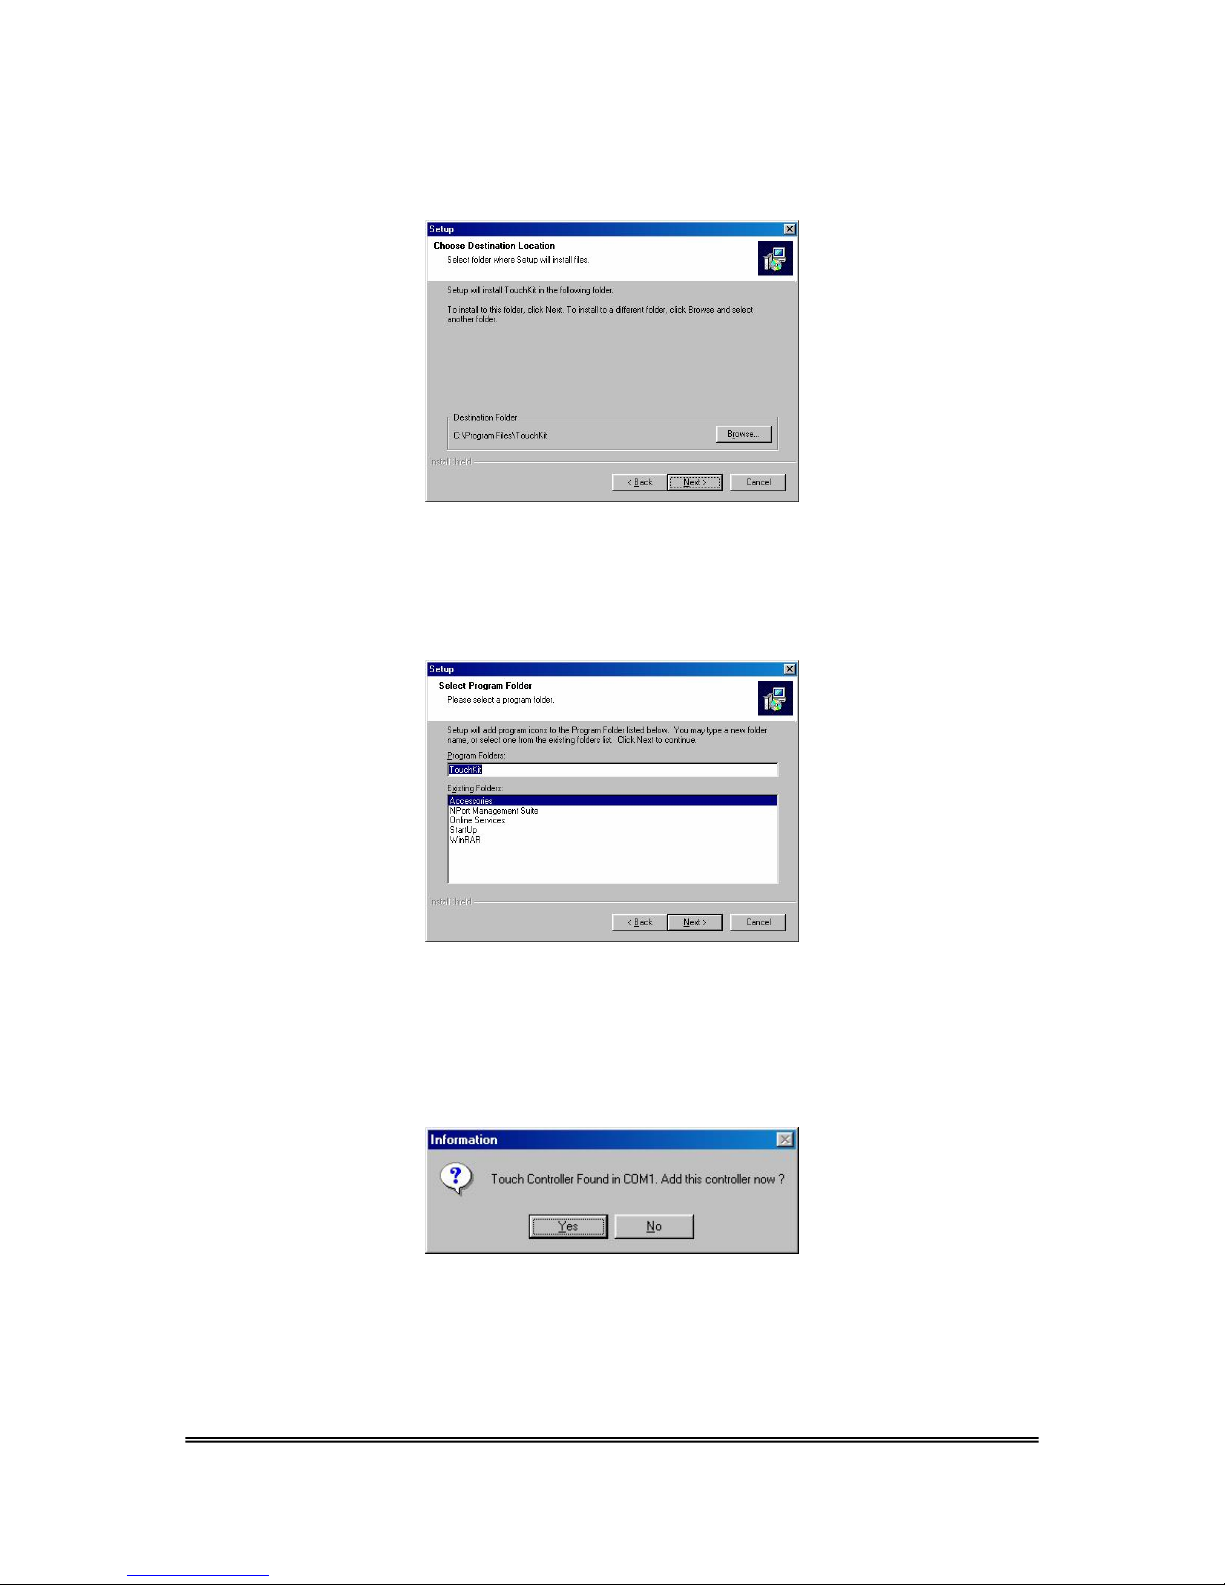
7. Select the appropriate folder where set-up files will be installed. Then Press
[Next >] to continue installation.
8. Then type in the name of program folder for TouchKit or press [Next >] to
continue. There will be a default name for it.
During driver installation, the setup program will scan COM port for RS232
Touchkit controller. Once the controller was scanned, the setup program will
display the following dialog
Click Yes to add the controller on the specified COM port automatically.
TouchKit Manual for Win9X/ME v3.4.0
6
Page 8
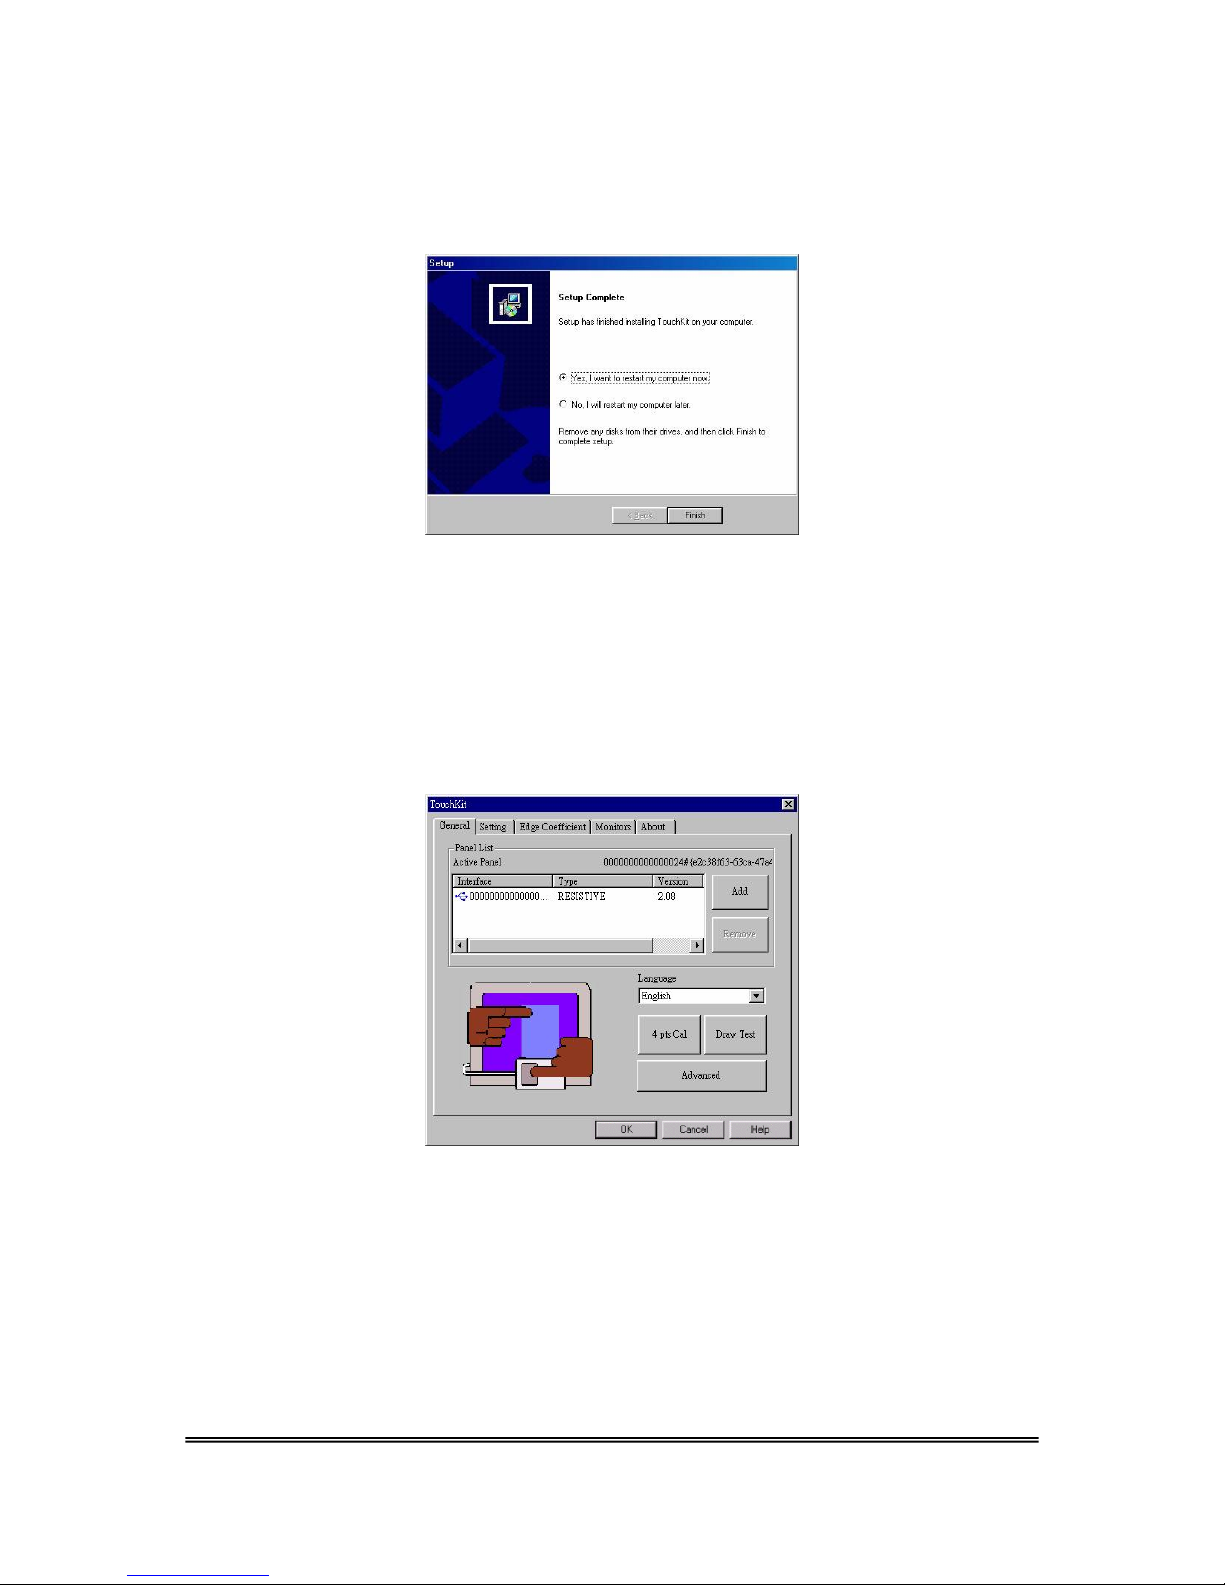
9. Windows will copying files once that is done it will request to re-boot computer.
Press [Yes >] to re-boot immediately or [No >] to re-boot later. The installation
will not be finished until system re-boot.
10. Setup is complete. After TouchKit installation, the USB device will be found
automatically as soon as it is plugged into the computer. Then users can see the
new device on the application program window. And, the program will remove the
USB Device automatically as soon as it is unplugged. ( USB device is not
supported for Windows95 )
TouchKit Manual for Win9X/ME v3.4.0
7
Page 9
Chapter 3. Configuration Utility and Right Button Emulator
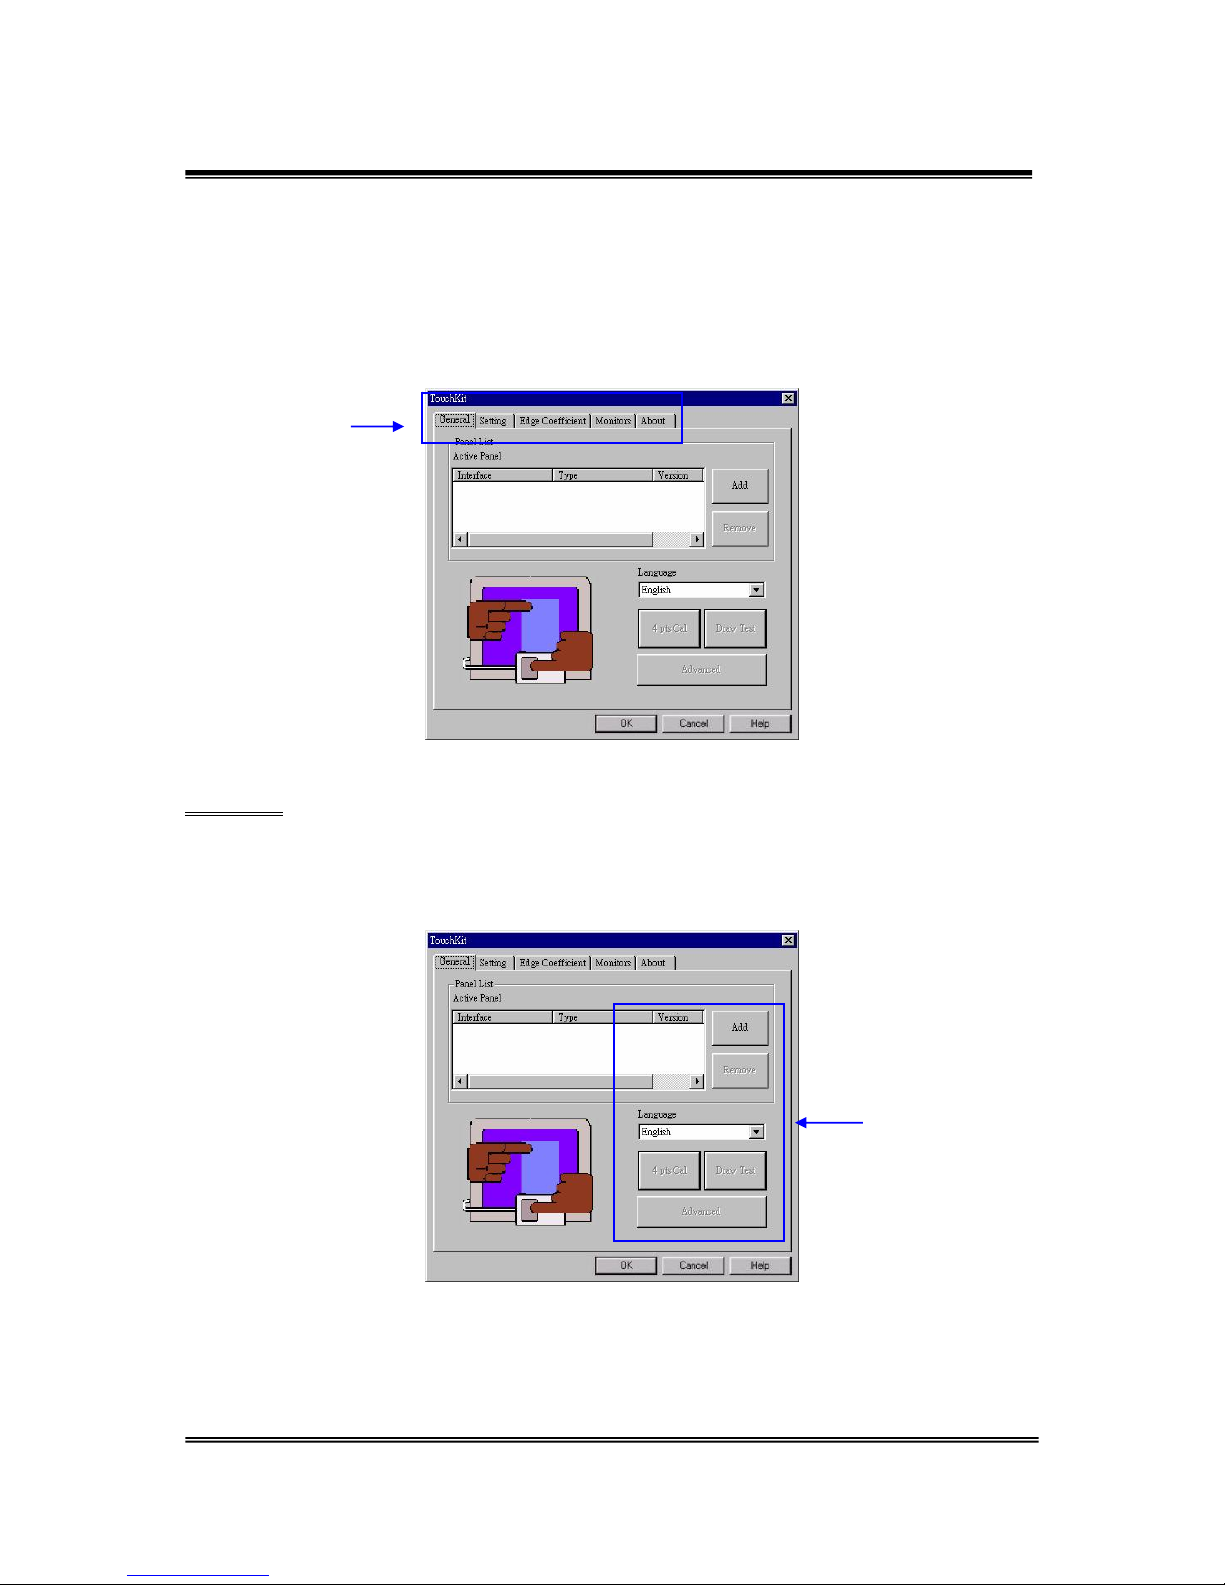
There are five property pages in TouchKit utility, they are General, Setting, Edge
coefficient, Monitors and About. Each property page contains different functions
for users to make adjustments. Therefore, users can easily manage all the TouchKit
controllers through the TouchKit utility.
Functional Group Tab
General
General property page contains the functions of language selection, devices add/
remove, 4 points calibration, Draw test and Advanced.
TouchKit Manual for Win9X/ME v3.4.0
General Function
8
Page 10
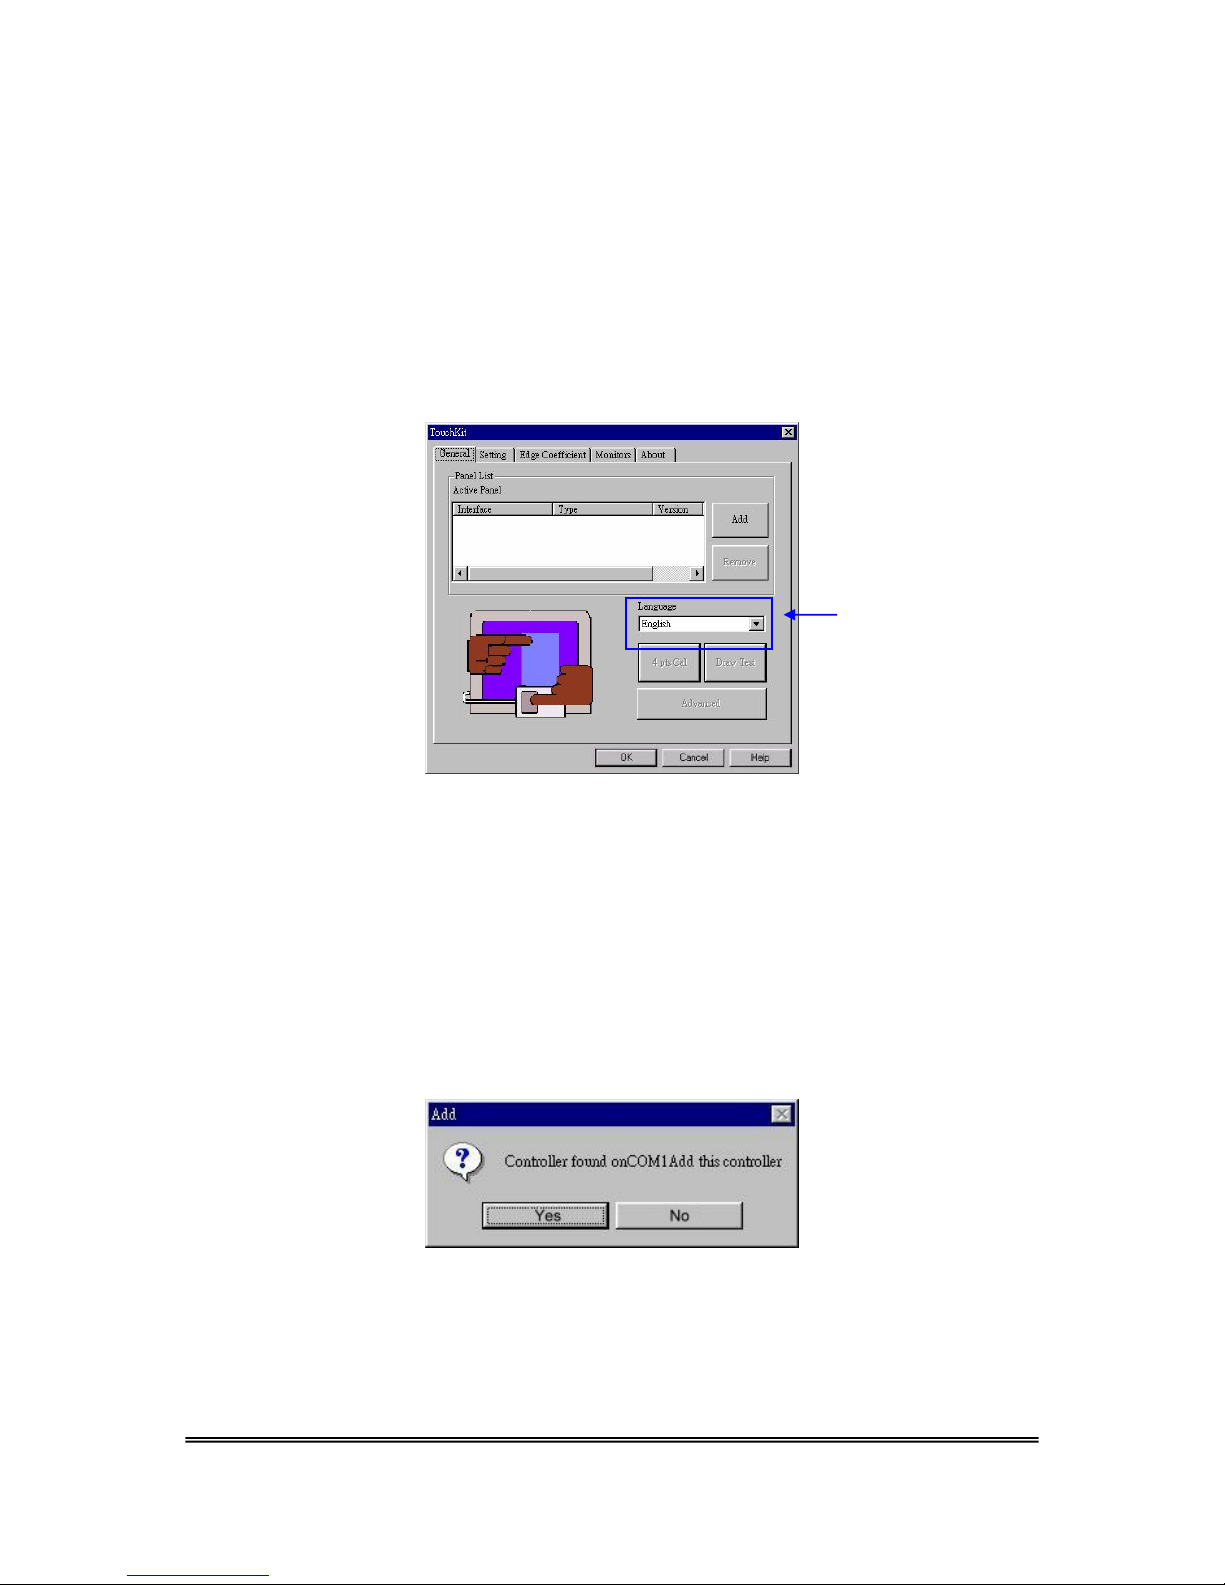
<Language>
TouchKit supports multi-language user interface. Users could select native
language that is compatible to operation system support. For example, if the
operation system is a traditional Chinese version, users could see the normal
display words under the traditional Chinese and English mode. There are ten
different languages, English, Traditional Chinese, Simplified Ch ine se , French,
Spanish, German, Japanese, Italian, Korean and Dutch supported in this
feature of TouchKit.
Note to select the
compatible language first.
Select the compatible language first or users may not see the normal display of
each button.
<Add> / <Remove>
Please check the touch panel devices (including its controller) are equipped well,
then click [Add] button to add all of those RS-232 and PS/2 devices to the Panel
List dialogue box.
There is one devices found. Press [Yes] to continue.
TouchKit Manual for Win9X/ME v3.4.0
9
Page 11
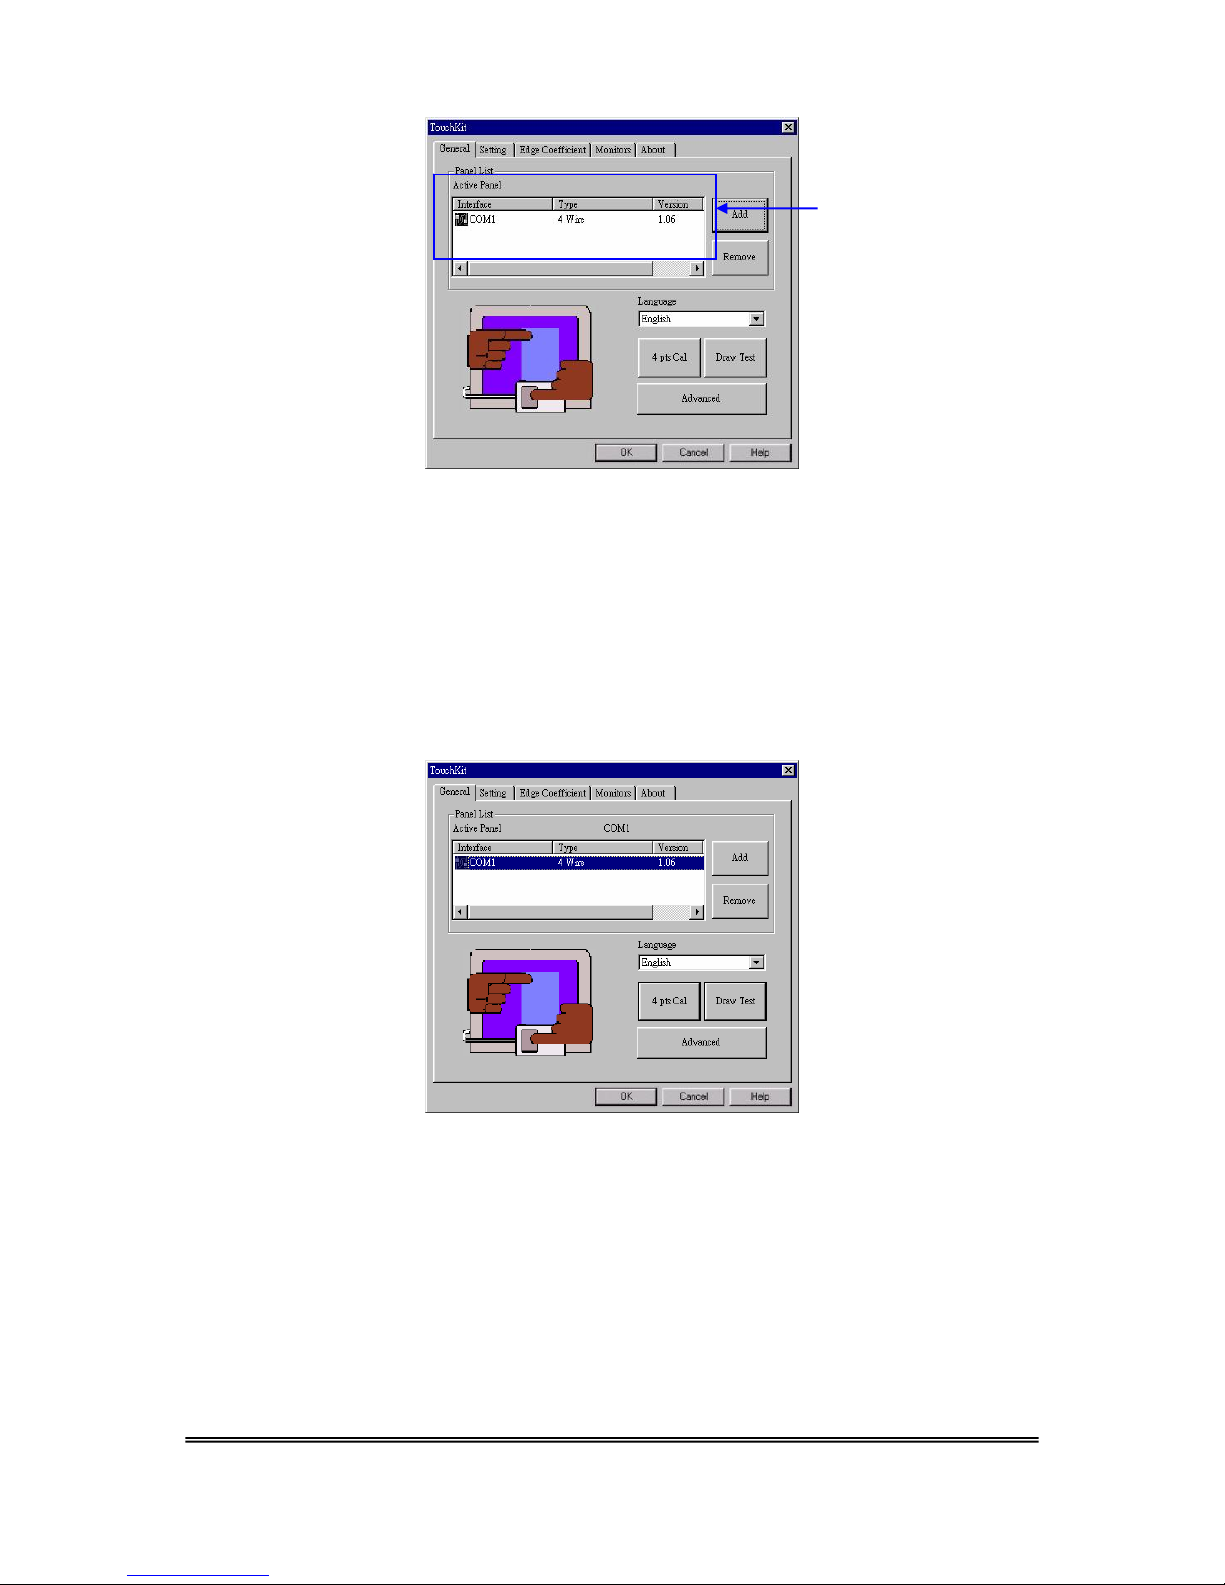
Device is found in COM1
The controller is displayed on the Panel List box. Users can get interface type,
firmware version and baud rate for each controller.
If more than one device is added select the proper device from the panel list
window.
The one selected will activate the panel, and remember to do the calibration
before starting to use touch panel.
The USB touch controller will be added automatically as soon as it is plugged into
the computer. Then users can see the new device on the application program
window. And, the program will remove the USB touch controller automatically as
soon as it is unplugged. ( USB device is not supported for Windows95 )
TouchKit Manual for Win9X/ME v3.4.0
10
Page 12
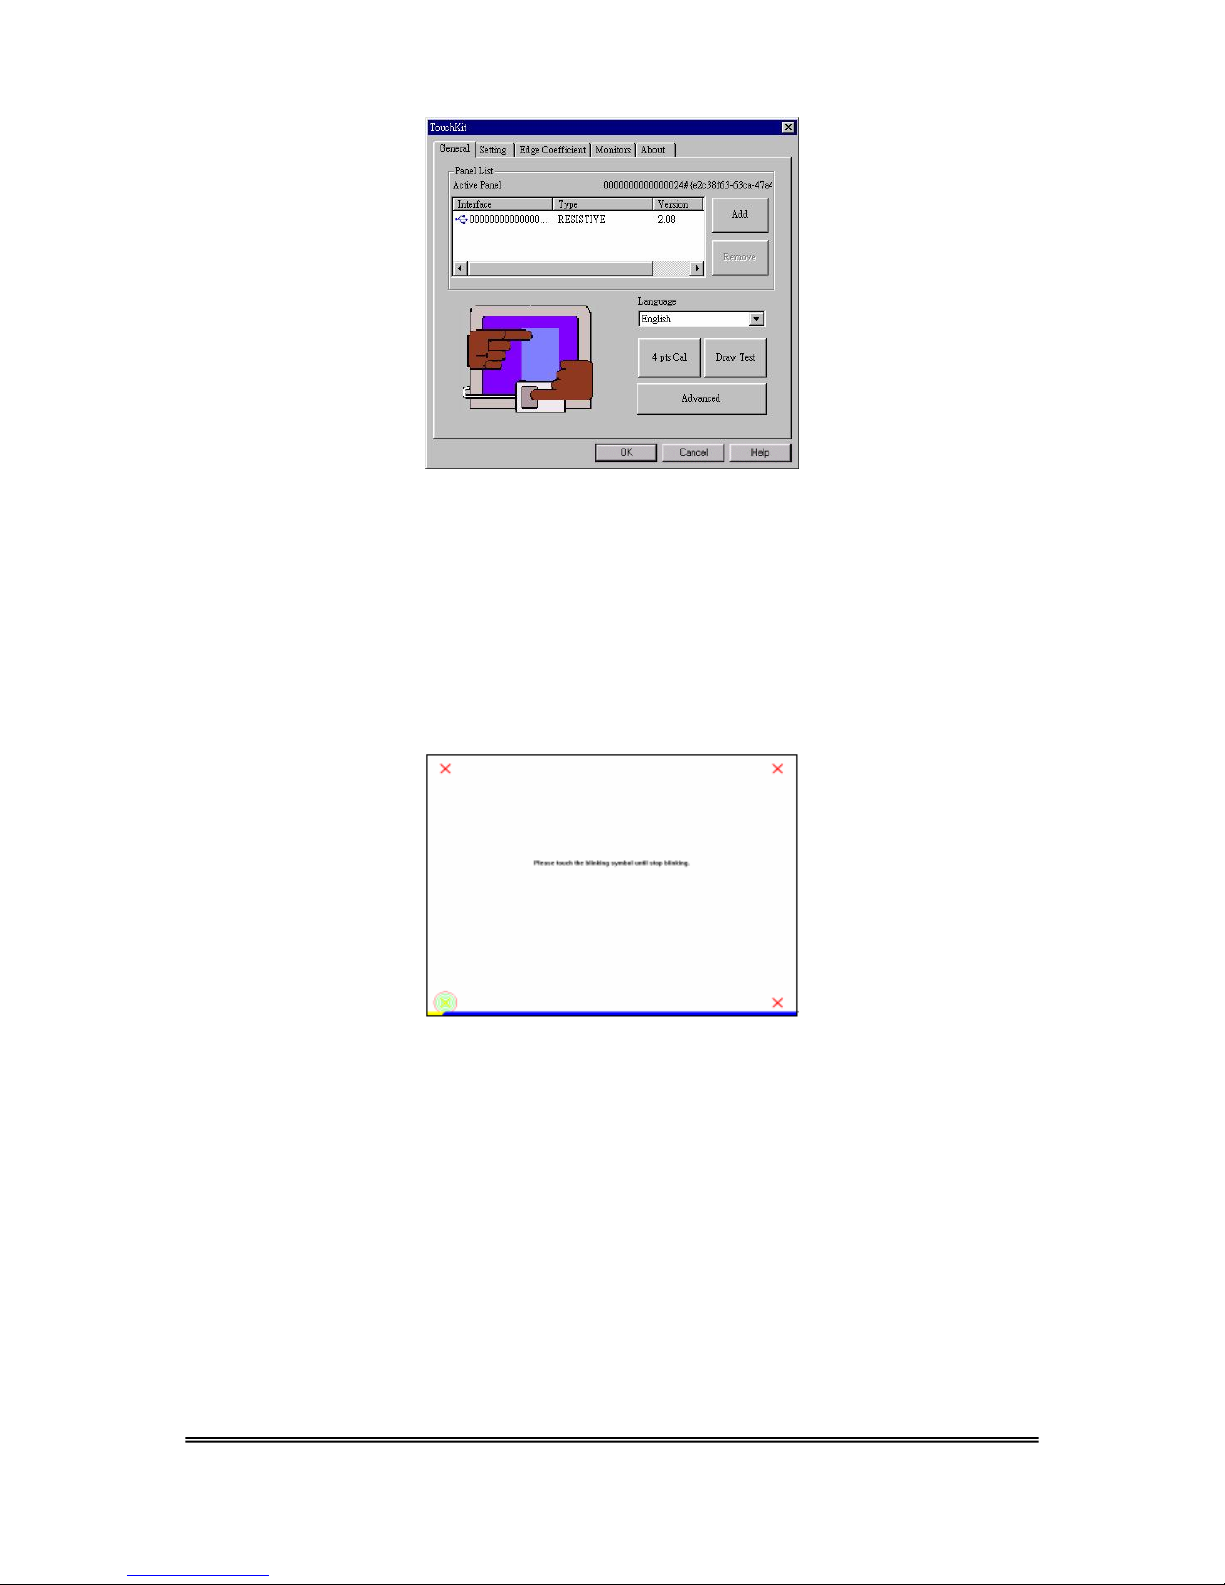
There are three buttons, [4pts Cal] [Draw Test] [Advanced], at the lower section of
the General property page.
<4pts Cal>
Correct 4 point locations on screen with the panel. Press [4 pts Cal], screen
displays as f oll ow s.
Touch the blinking symbol on panel until it beeps or it stops blinking.
TouchKit Manual for Win9X/ME v3.4.0
11
Page 13
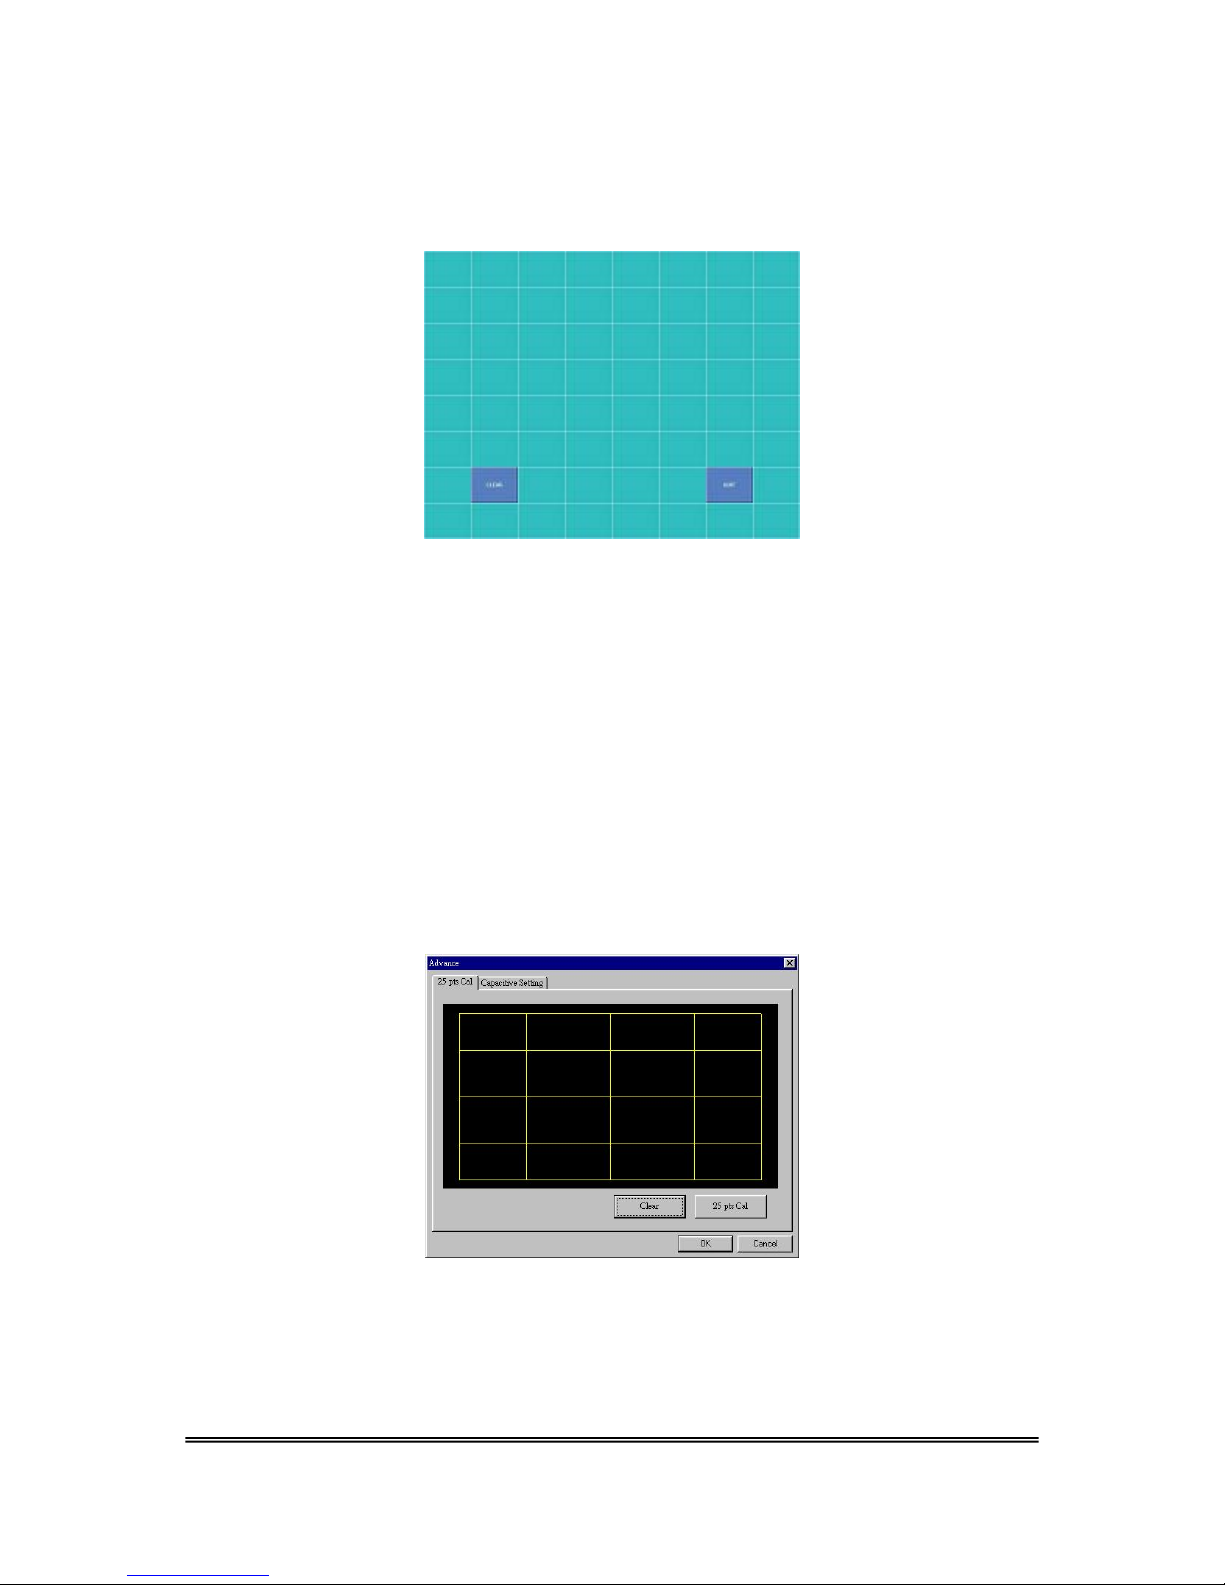
<Draw Test>
Test the drawing position related to the display screen on panel.
Click on the [Draw Test] button. There will be a blue square display showing.
In drawing test window, users can click [Clear] button to clear the window. Also,
users can click [Quit] or press mouse right button to quit from the drawing test.
In drawing test window, users can verify the panel linearity, calibration capability,
and drawing line quality.
<Advanced>
Touchkit provides a more accurate 25 points calibration. In addition, Touchkit
provides controller setting for capacitive touch sensor. If the capacitive controller
is selected, a capacitive setting property page appears on the advanced sheet. In
general a 25 point calibration is not needed.
Press [Clear] to clear the previous calibration records.
TouchKit Manual for Win9X/ME v3.4.0
12
Page 14
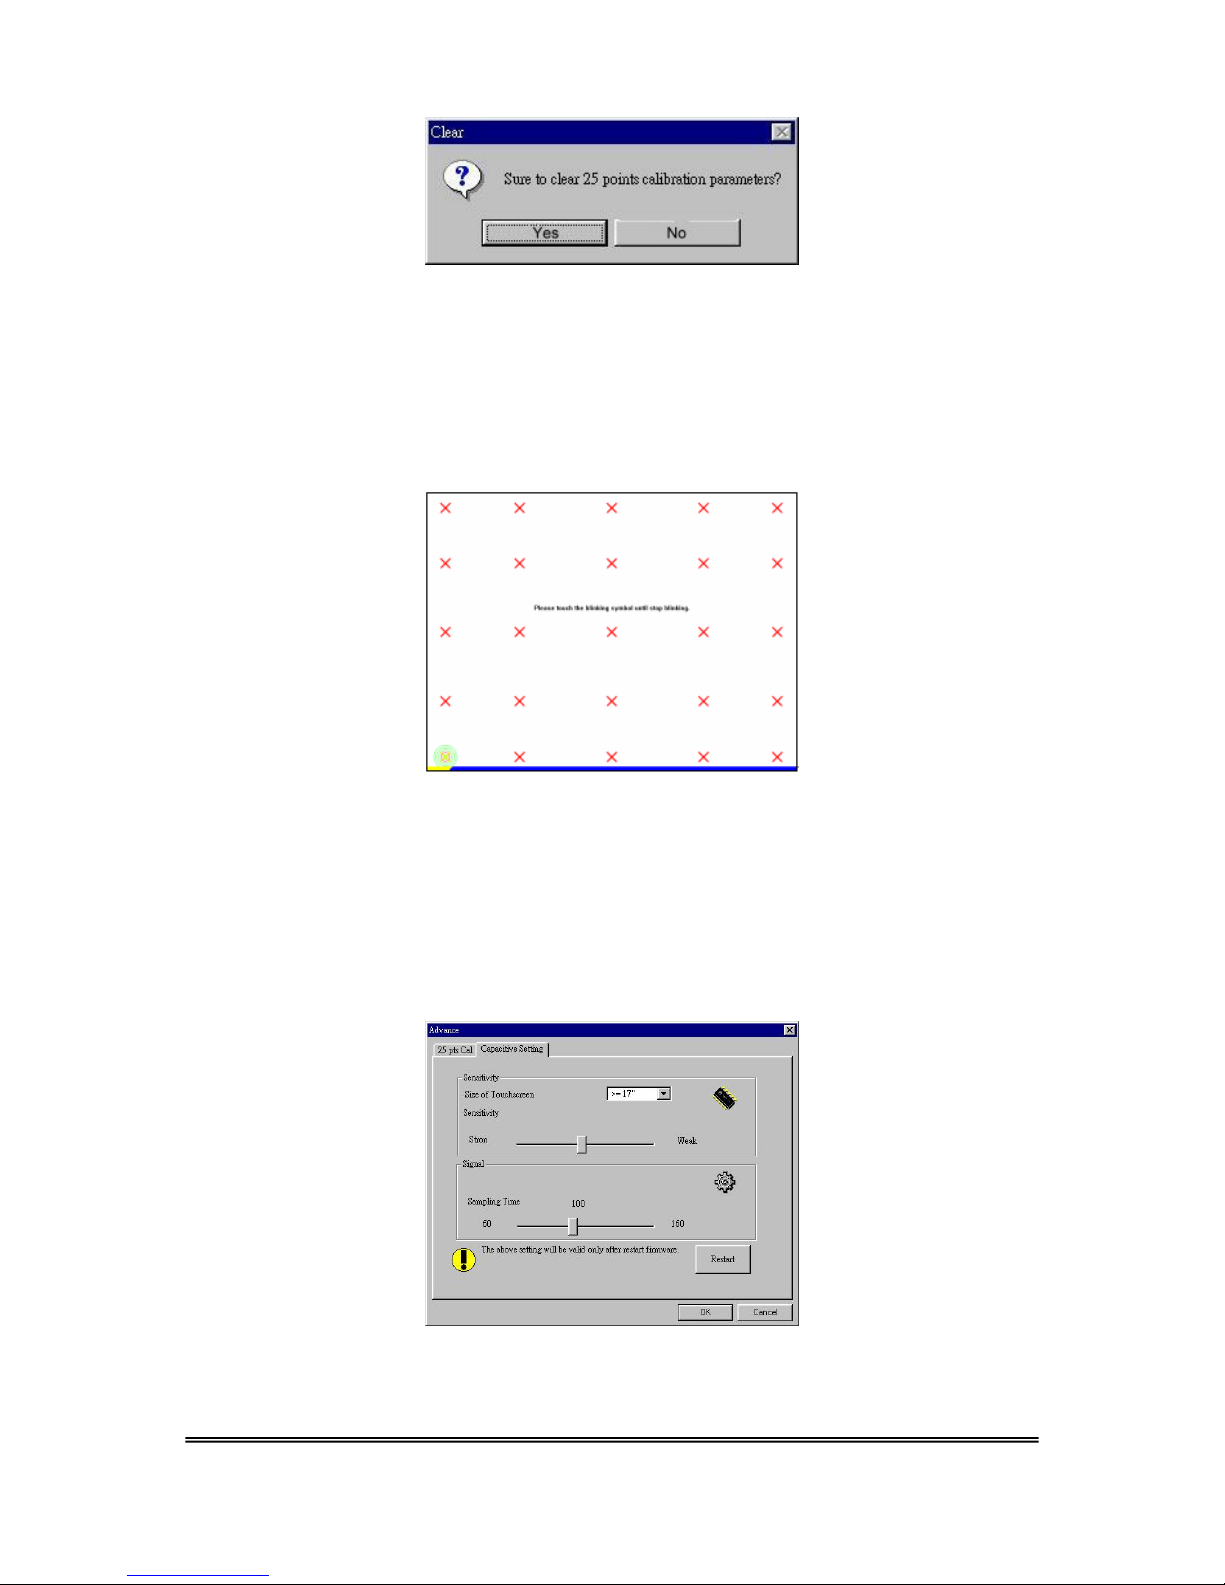
Press [Yes] to clear previous records. The new record will become default record.
Press [25ptCal] to do 25 points calibration. Calibrate the 25 point locations on
screen using the touch panel.
Touch the blinking symbol on panel until it beeps or stops blinking.
After the calibration, the new record will overwrite the old one.
If the selected controller is capacitive type, there will be an extra property page for
capacitive settings adjustment shown as below:
Please select property size of capacitive screen first, and press [Restart]
TouchKit Manual for Win9X/ME v3.4.0
13
Page 15
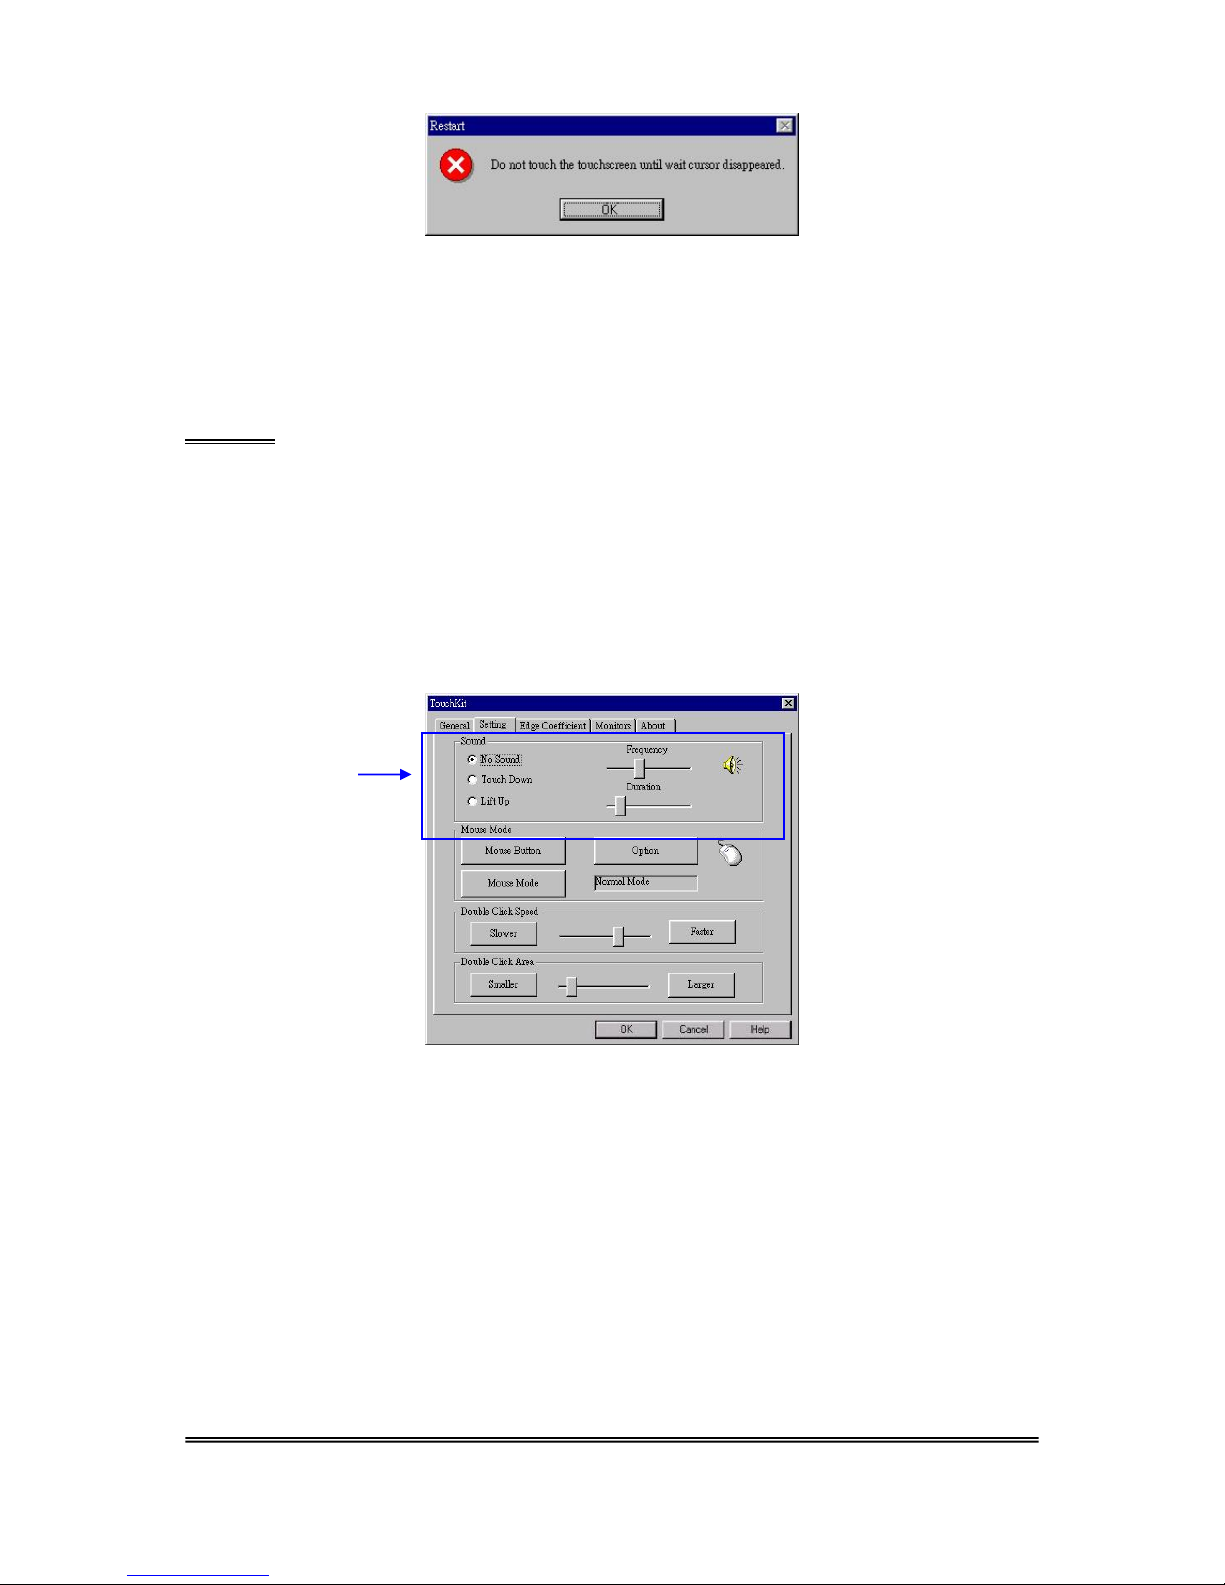
The capacitive controller will restart, DO NOT touch the screen before the warning
message disappears
Warning: Do not adjust the sensitive and sampling time without RD help
Setting
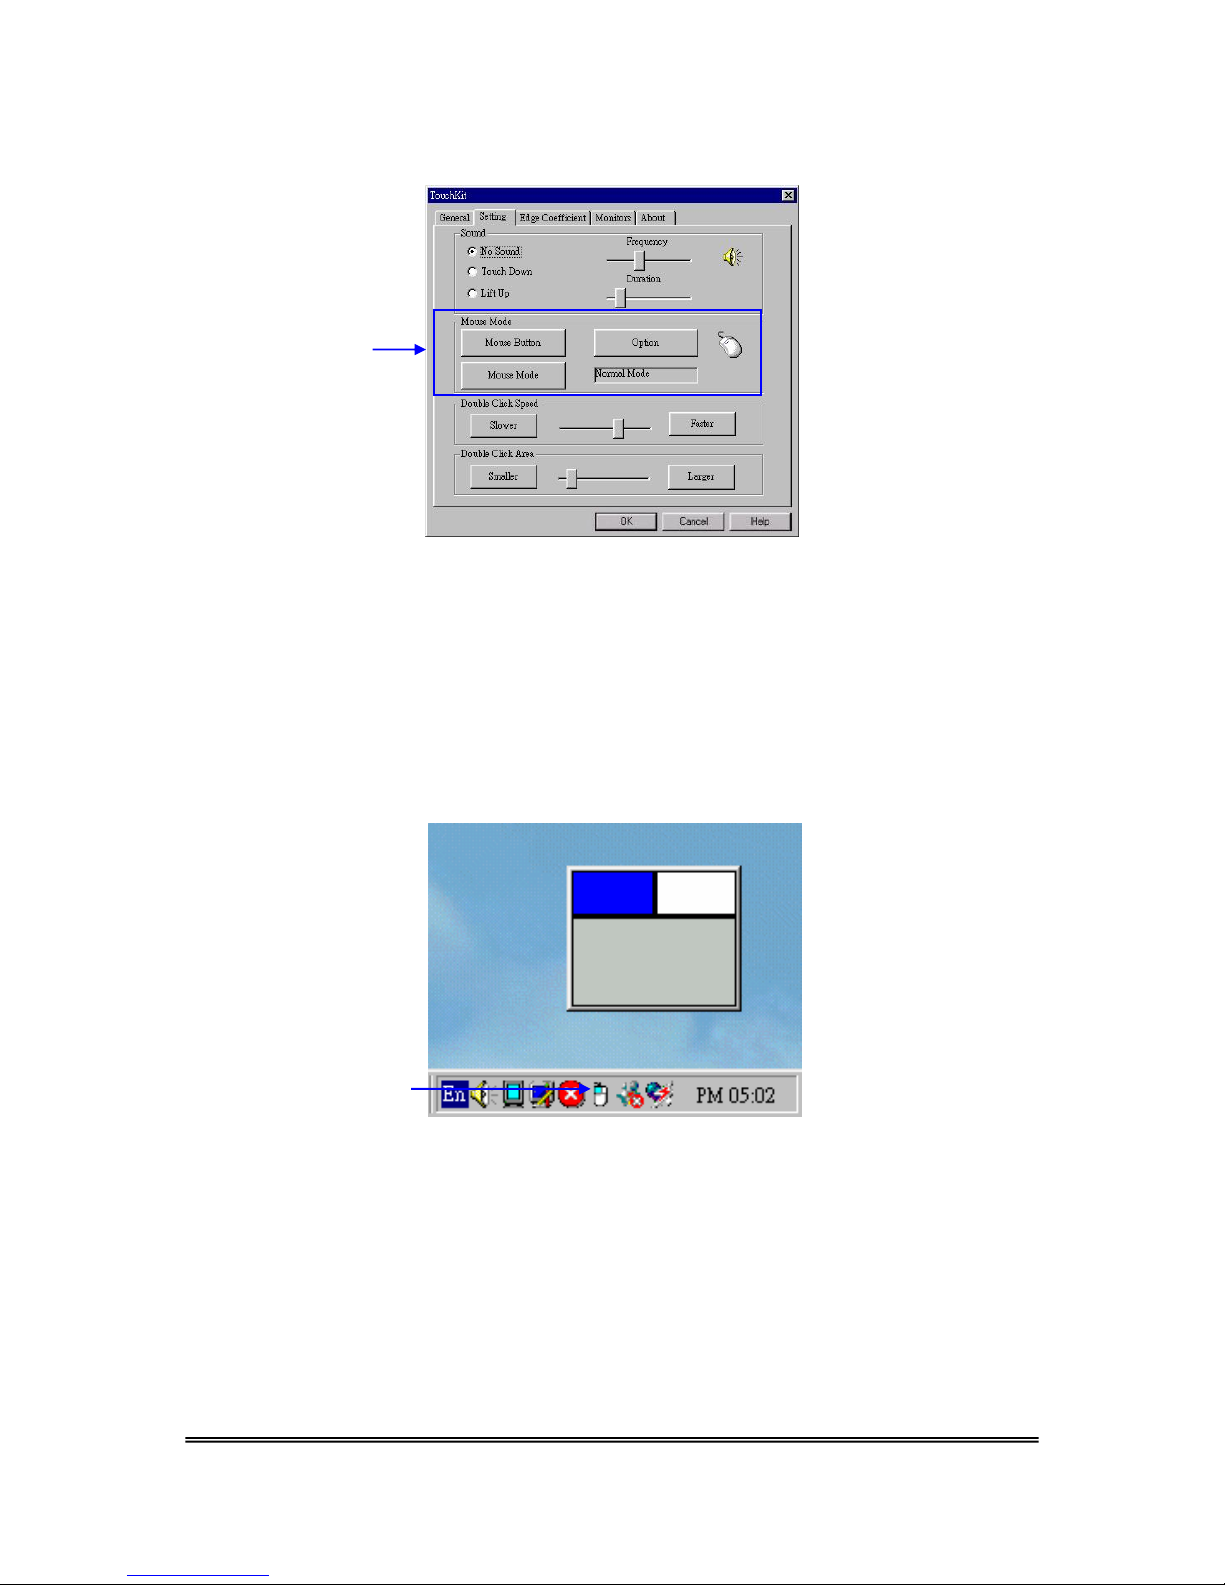
There are three functional groups in the Settings property page, the upper section of
the property page is the sound option; the middle section is Mouse Mode; and the
lower section is Double Click Adjustment.
The Sound options provide users the click feedback while touching the panel.
Select preferred option first.
Sound options
<No Sound>
Users could choose to make no sound while using the touch panel.
<Touch Down>
The system will make a sound while touching the panel.
<Lift Up>
The system will not make any sound until finger leaves the touch panel.
<Frequency>
Sound frequency, drag the cursor from left(low) to right(high).
<Duration>
Sound duration, drag the cursor from left(short) to right(long).
TouchKit Manual for Win9X/ME v3.4.0
14
Page 16
The Mouse Mode provides users different operating options. They are as follows:
Mouse Mode
<Mouse Button>
Click it to show / hide Touch Tray on the right bottom corner of the desktop. The
touch panel system starts with the computer booting, and a mouse icon show s in
the taskbar.
Users can choose show or hide Touch Tray from the mouse icon in the taskbar.
Just click the mouse icon to choose show or hide.
Touch Tray
Change right / left button by clicking the upper small rectangular box of Touch
Tray. Blue area expresses what button has been selected.
TouchKit Manual for Win9X/ME v3.4.0
15
Page 17
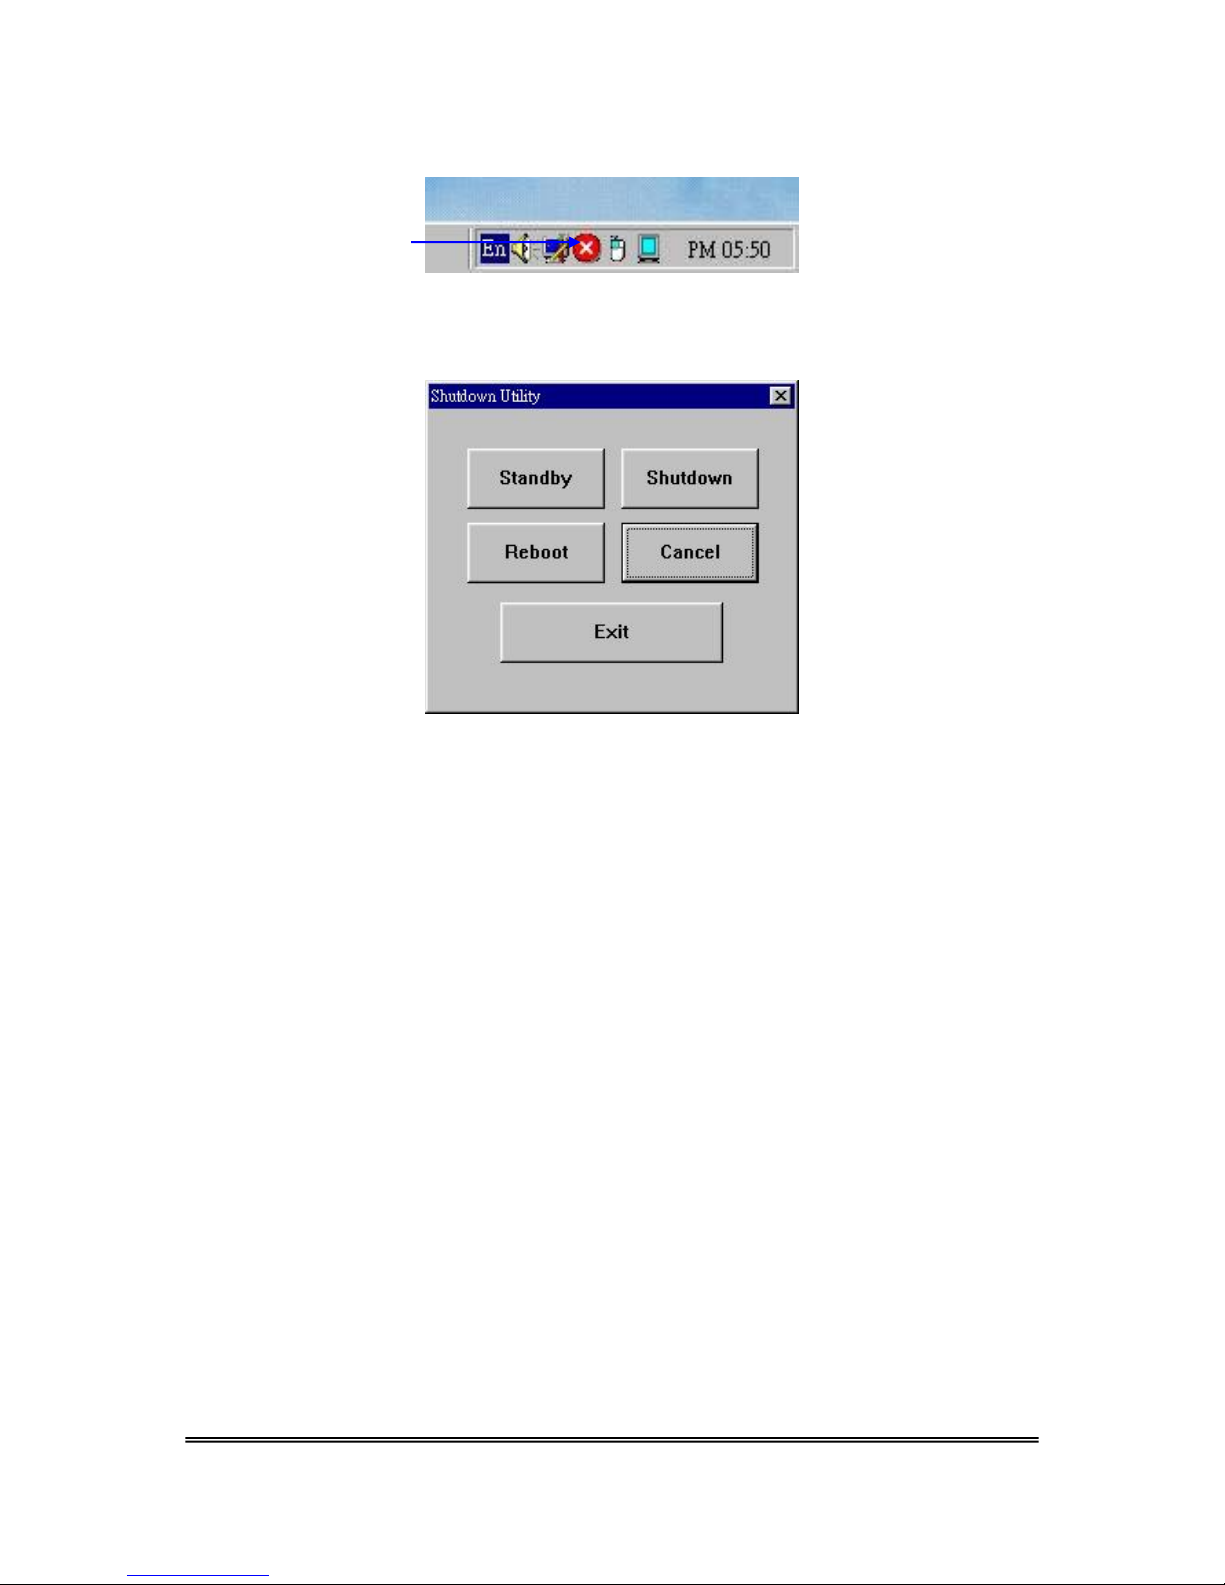
<Shutdown utility>
Shutdown utility
Click on shutdown utility in the task bar
Shutdown utility dialog
There are five modes in shutdown utility for users convenience.
[Standby] to enter standby mode that saves power consumption.
[Shutdown] to turn off PC.
[Reboot] to restart PC.
[Cancel] to escape from the Shutdown utility dialog.
[Exit] to disable the Shutdown utility.
Please notice that Windows NT does not support this function.
<Mouse Mode>
There are three kinds of mouse modes,
[Normal Mode]
It provides all the mouse functions, including the dragging function.
[Click on Touch]
Click action is executed as soon as users touch the panel.
[Click on Release]
Click action will not be executed until finger leaves the panel.
TouchKit Manual for Win9X/ME v3.4.0
16
Page 18
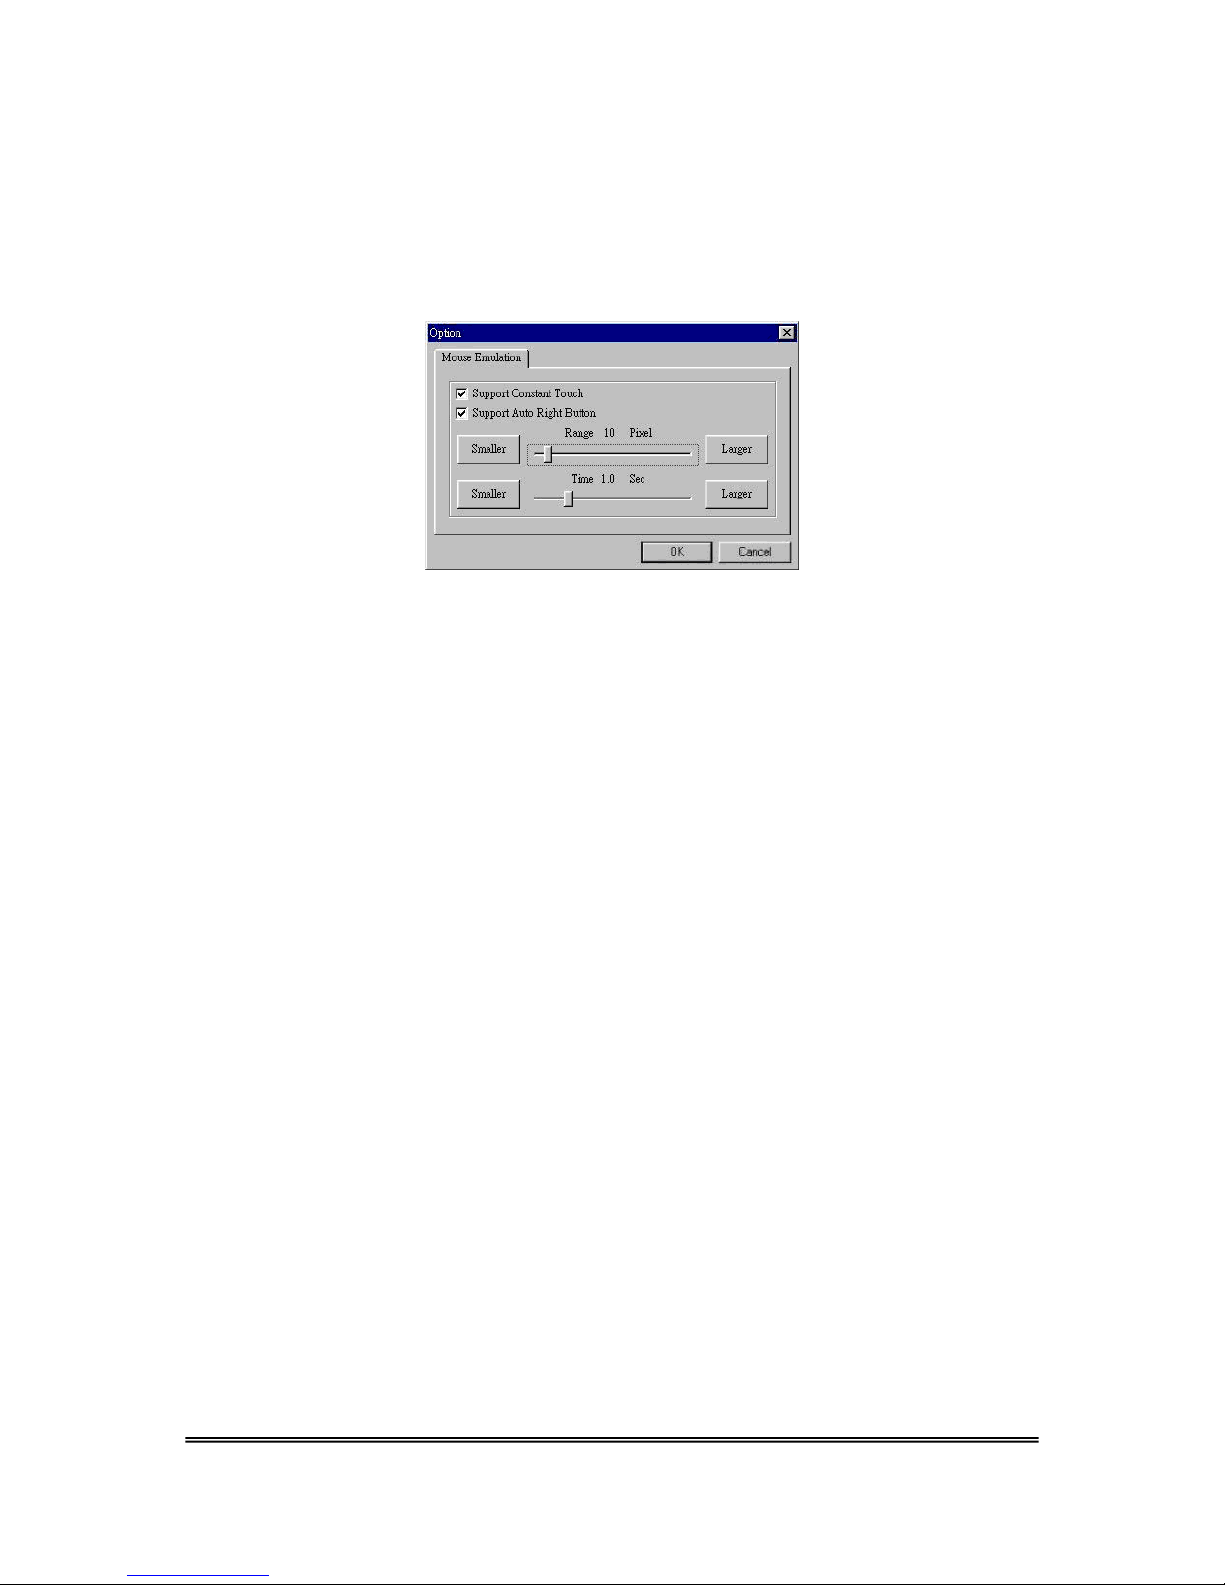
<Option>
Touchkit provides an option for advanced Mouse Emulation settings. When the
Option button is pressed, a setting property sheet will pop up. Support Constant
Touch and Support Auto Right Button check boxes are shown in the property
sheet to enable / disable Constant touch and Auto right button support.
[Constant Touch]
Enable Constant Touch to force driver to stop reporting touch point when the
movement is within the range which users can adjust. Therefore, the user can
see a stabilized cursor instead of a chattering cursor when users touch the
same point with unwanted noise.
[Auto Right Button]
Enable Auto Right Button to force driver to report a right click mouse
event to OS when users touches the panel to an extended time. User no
longer needs to touch the right button in the Touchtray to activate a right
click. This feature makes it easy to do right click with the touchscreen.
<Cursor Visibility>
Cursor visibility function allows users to hide the cursor on the display. Please go
to Start / Control Panel / Mouse / Pointers / Scheme, and choose TouchKit
Hide Cursor. Press [Apply] to make setting change, press [OK] to escape the
property page.
TouchKit Manual for Win9X/ME v3.4.0
17
Page 19
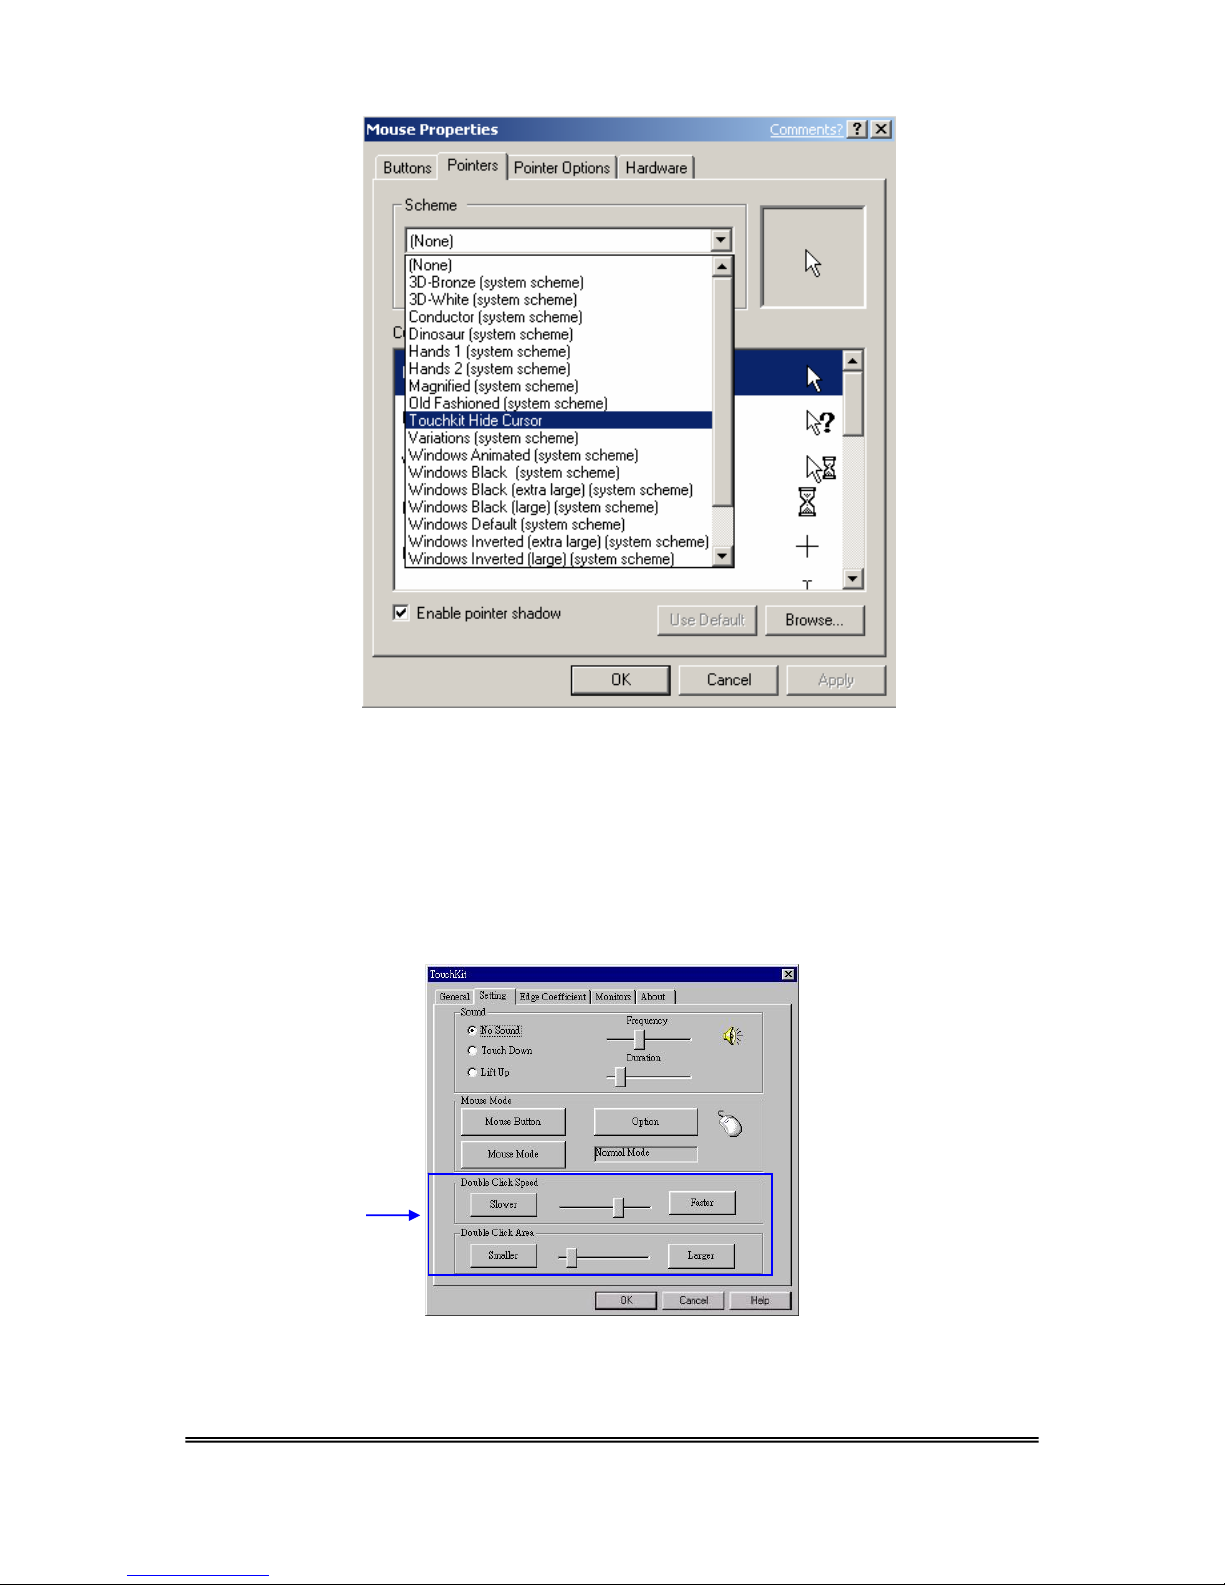
If users want to cancel the function of TouchKit Hide Cursor, do the steps again
and choose the other scheme.
Double Click adjustment provides users the ability to set up the tolerance while
double clicking.
Double Click Adjustment
<Double Click Speed>
TouchKit Manual for Win9X/ME v3.4.0
18
Page 20
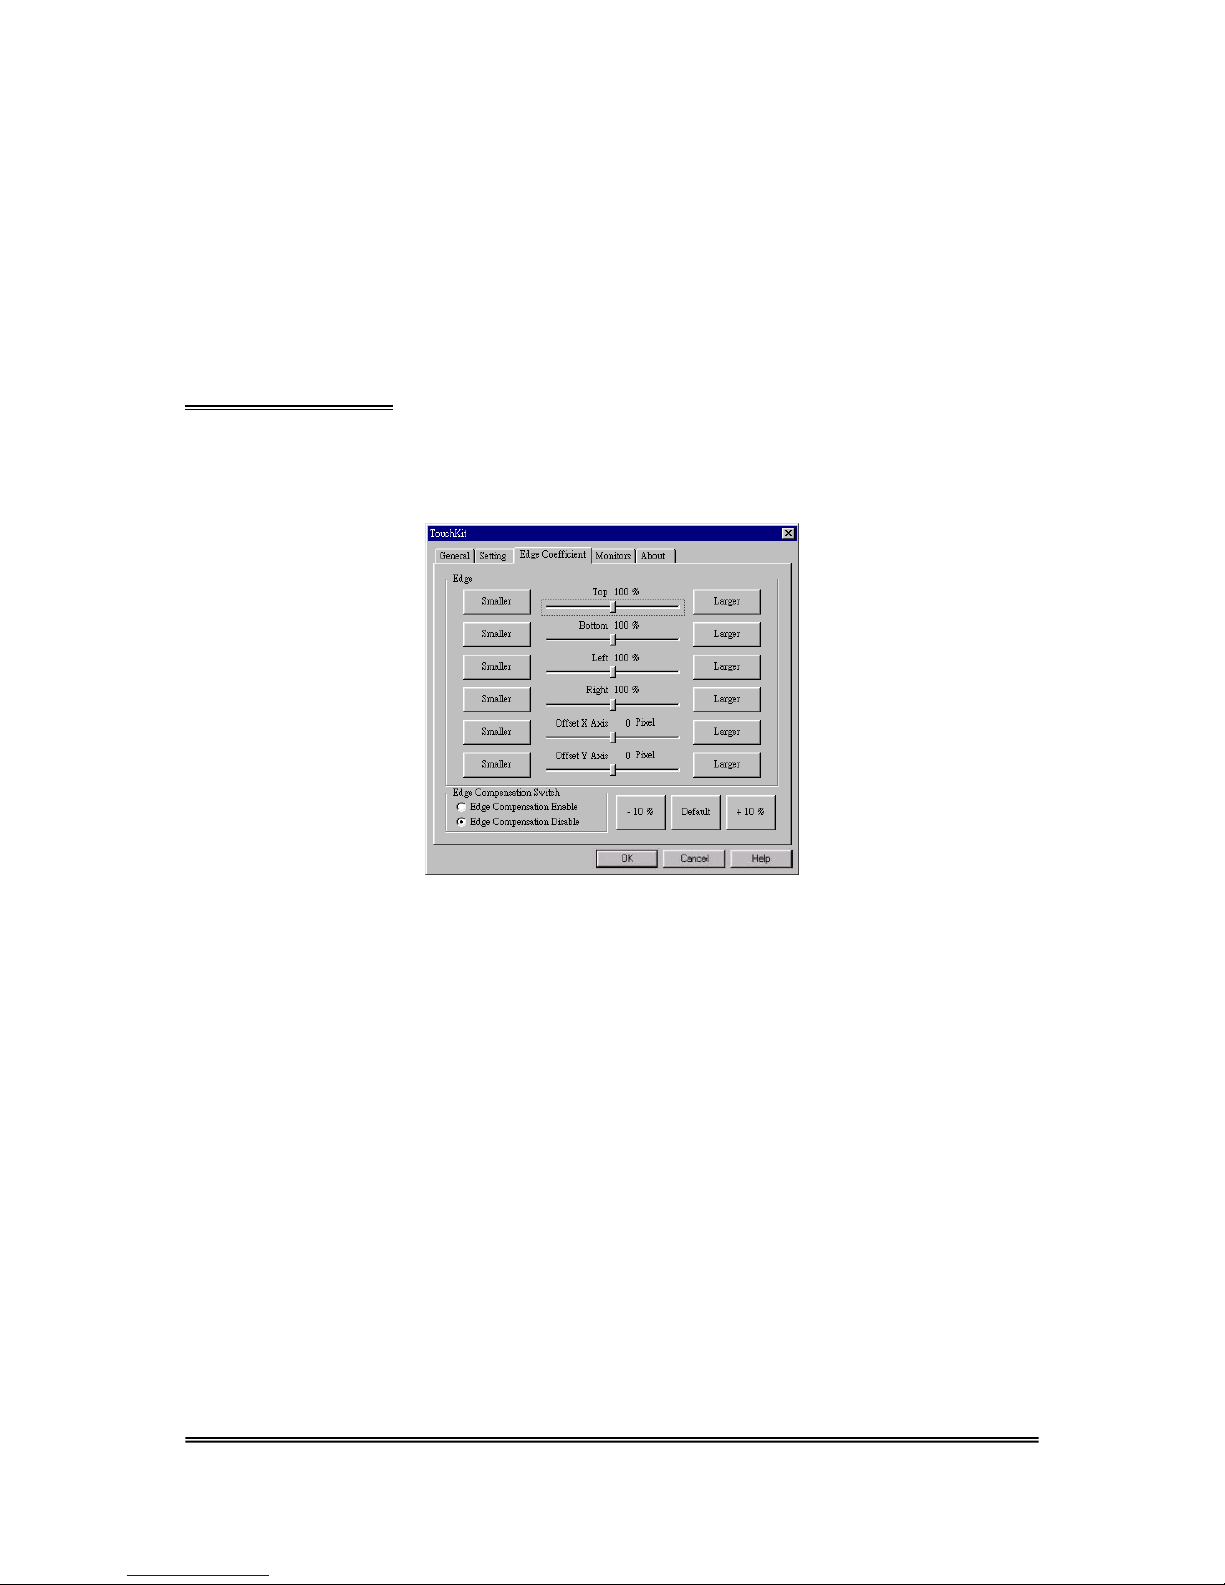
Double Click Speed is the double click response time for Windows system. Users
can adjust the proper speed for easy double clicking using the touch panel.
<Double Click Area>
Each touch area has its own touch tolerance. If the Double Click Area is set to
<Smaller>, the panel will be very sensitive to small movements. If users set it to
<Larger>, it tolerates larger point movement while staying on a fixed point.
Edge Coefficient
Edge Coefficient property page contains the functions of Edge Compensation for
Top, Bottom, Left, Right, X Axis and Y Axis.
In some case, if it is difficult to touch items at the edges of the touch panel, users can
set adjustment to reach the edges of the screen image.
<Top>
Set the Edge to <Smaller>, TouchKit will reduce the horizontal position of the
top edge. Set the Edge to <Larger>, TouchKit will extend the horizontal position
of the top edge.
<Bottom>
Set the Edge to <Smaller>, TouchKit will reduce the horizontal position of the
bottom edge. Set the Edge to <Larger>, TouchKit will extend the horizontal
position of th e b ot tom edge.
<Left>
TouchKit Manual for Win9X/ME v3.4.0
19
Page 21
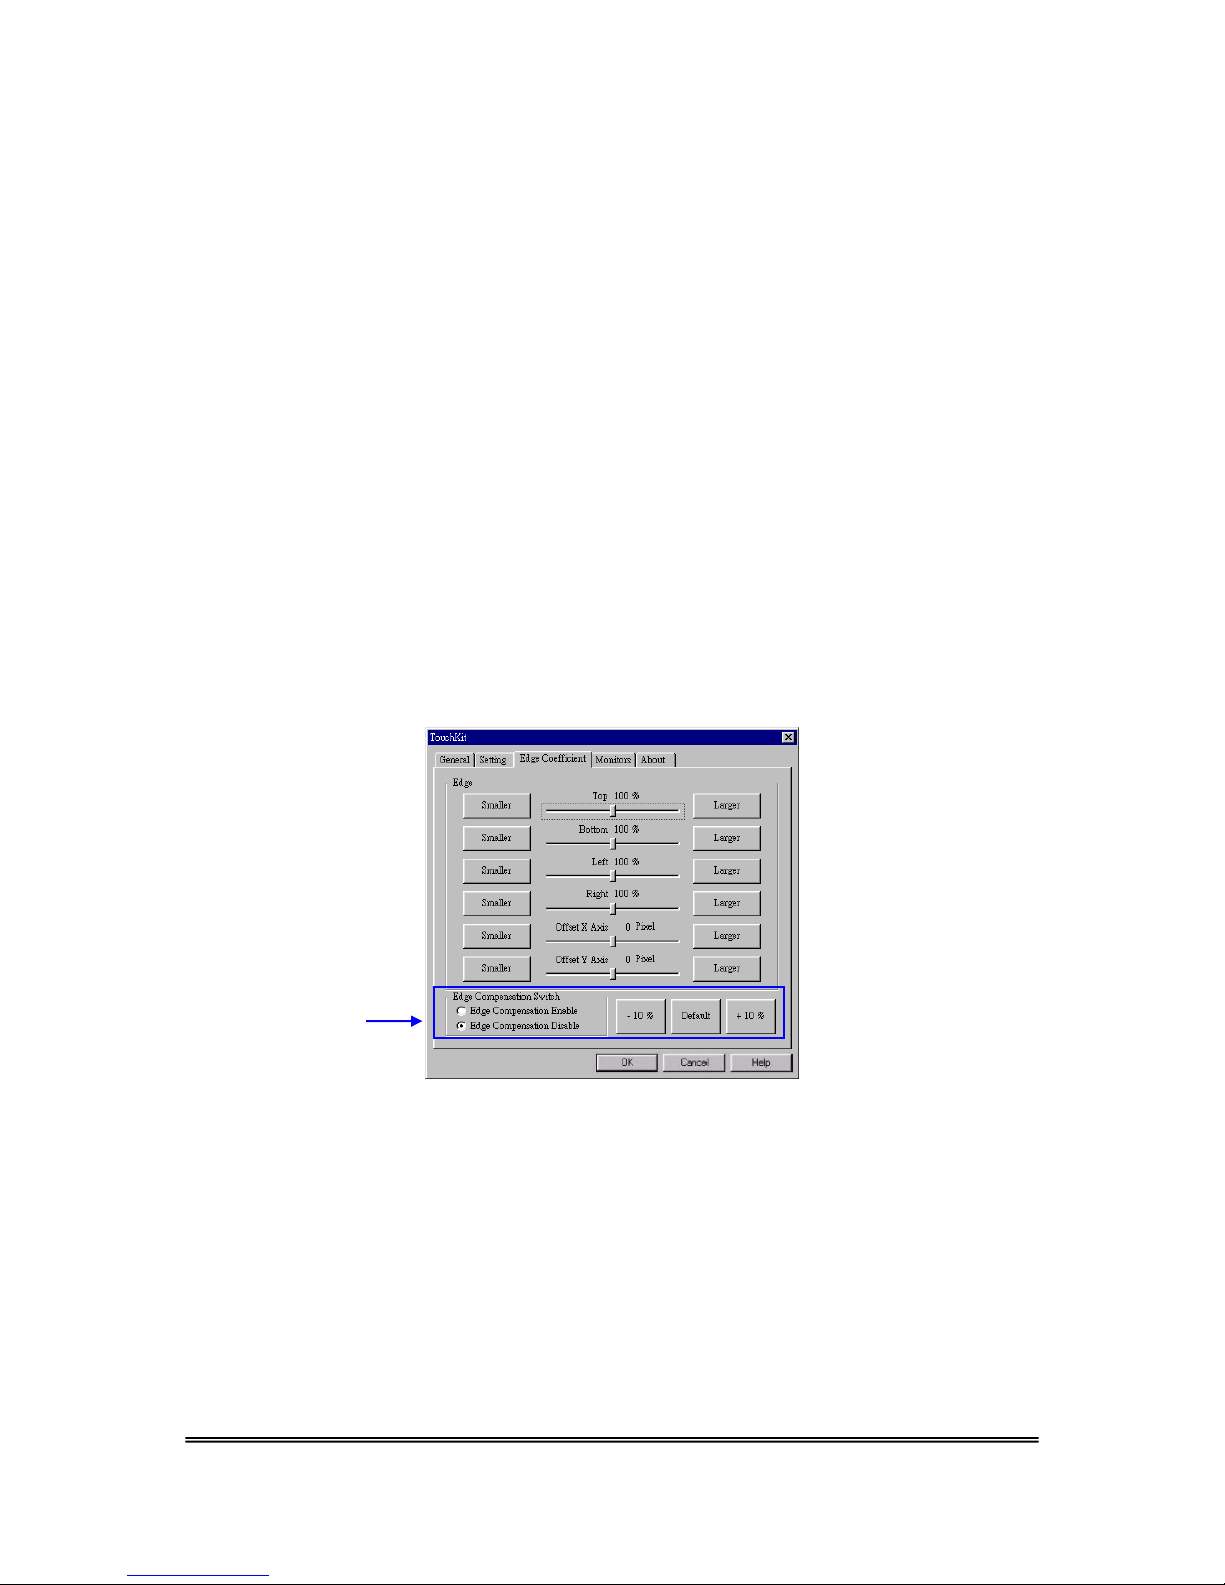
Set the Edge to <Smaller>, TouchKit will reduce the vertical position of the left
edge. Set the Edge to <Larger>, TouchKit will extend the vertical position of the
left edge.
<Right>
Set the Edge to <Smaller>, TouchKit will reduce the vertical position of the right
edge. Set the Edge to <Larger>, TouchKit will extend the vertical position of the
right edge.
<Offset X Axis>
Set the Offset X Axis to <Smaller>, cursor will be moved a pixel of X Axis to left.
Set the Offset X Axis to <Larger>, cursor will be moved a pixel of X Axis to right.
<Offset Y Axis>
Set the Offset Y Axis to <Smaller>, cursor will be moved a pixel of Y Axis to top.
Set the Offset Y Axis to <Larger>, cursor will be moved a pixel of Y Axis to
bottom.
Edge Compensation Switch
<Edge Compensation Switch>
Users can choose Edge compensation Enable / Disable from left bottom corner
of Touchkit Utility.
Using +10% and -10% buttons to adju st the edge. If users press +10% button,
the top, bottom, left and right edges will extend 10% of orientation to touch screen,
and the cursor will be moved 10 pixel of X and Y Axis to right and top. If users
press -10% button, the top, bottom, left and right edges will contract 10% of
TouchKit Manual for Win9X/ME v3.4.0
20
Page 22
orientation to touch screen, and the cursor will be moved 10 pixel of X and Y Axis
to left and bottom.
If users want the value back to the default value, choose Default button.
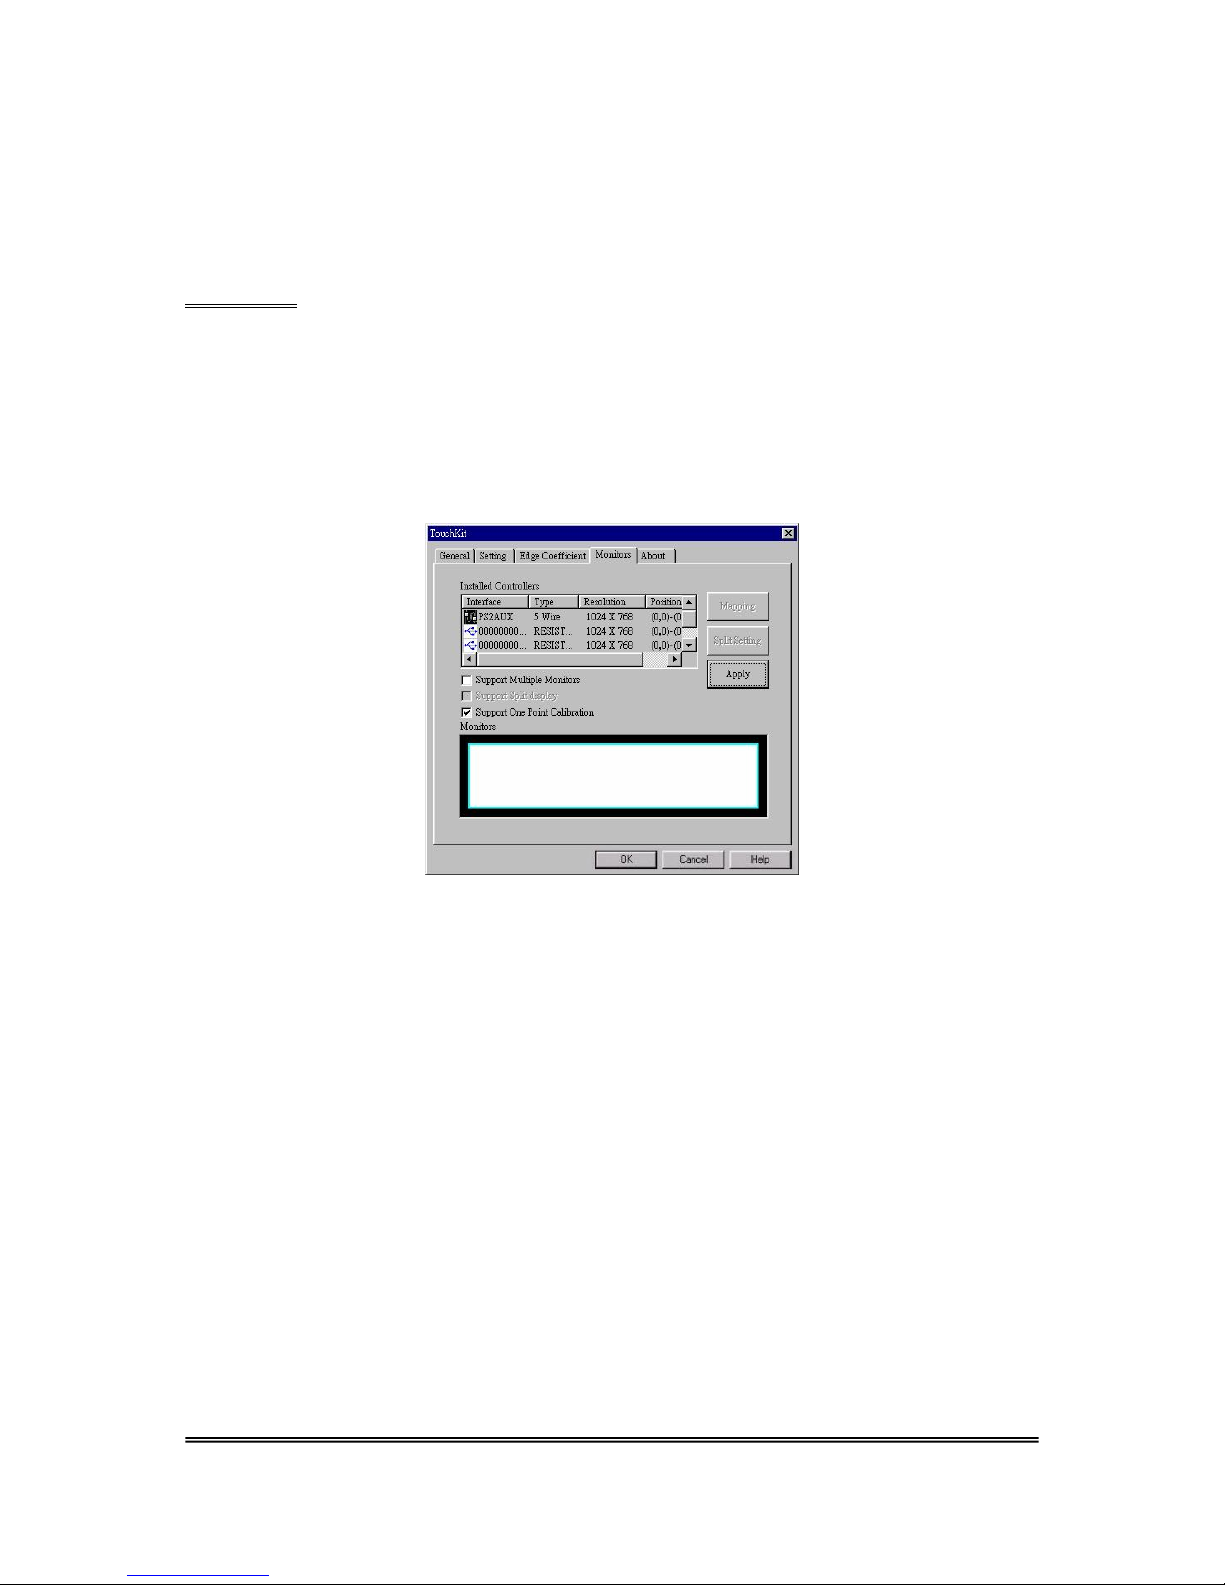
Monitors
There are three functions in this property page, and they are Multiple Monitors,
Split Monitor and One point Calibration.
<Multiple Monitors>
To configure the mapping relationship between the monitors and the touch panels,
select the monitor page as below.
Set the check box (Use Multiple Monitors) to enable multiple monitor mapping.
Uncheck this box will disable multiple-monitor configuration, all of the touch panel
controllers will be mapped to the primary monitor. The gray shadow area is the
selected monitor controller/panel. The button [Mapping] is used to find the
mapping relationships between the monitors and touch panel controllers. Press
the [Mapping], the software will guide users to touch th e corresponding monitor
to obtain the mapping relationship.
TouchKit Manual for Win9X/ME v3.4.0
21
Page 23
After finish monitor mapping, Press [Apply] to apply the mapping relation.
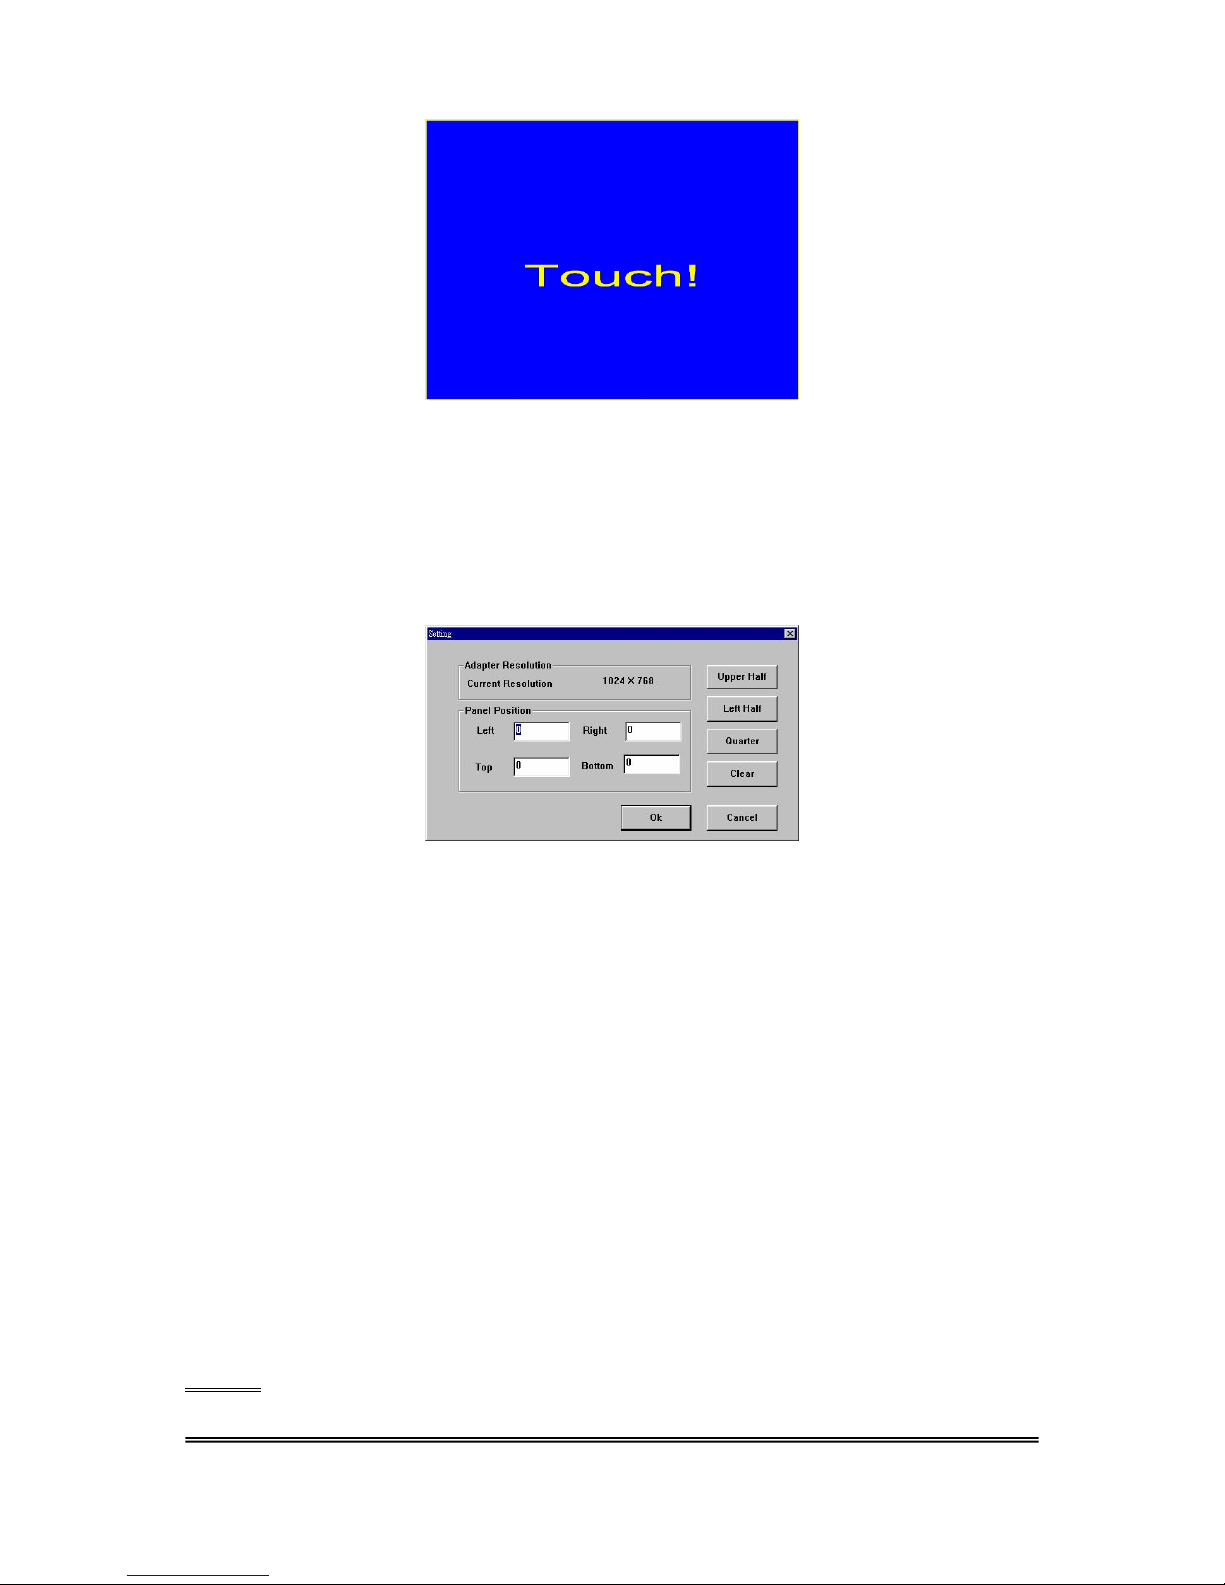
<Split Monitors>
To use the Split Monitor function, users need to select which controller you want
to launch this function, then check the Multiple Monitors box and Split Monitor at
the same time. Press the [Split Setting] button to set up the activate area.
It shows the current resolution of display and users can set up the active area by
inputting the value by yourself or use the default button [Upper Half], [Left Half]
or [Quarter]. The default value of panel resolution should be full screen as Left: 0 ,
Right: 0, Top: 0 and Bottom: 0.
<One Point Calibration>
TouchKit utility provides a fast tool to identify the touchscreen orientation when
the monitor display is rotated by 90 degrees. Enable this One Point Calibration
feature, Touchtray wil l pop up One Point Ca libration tool for users to identify
and correct the touchscreen / monitor orientation whenever the monitor is
rotated by 90 degrees. Disabling this feature, has Touchtray not pop up One
Point Calibration tool. Then, the user has to do four points calibration to correct
the orientation whenever the monitor is rotated.
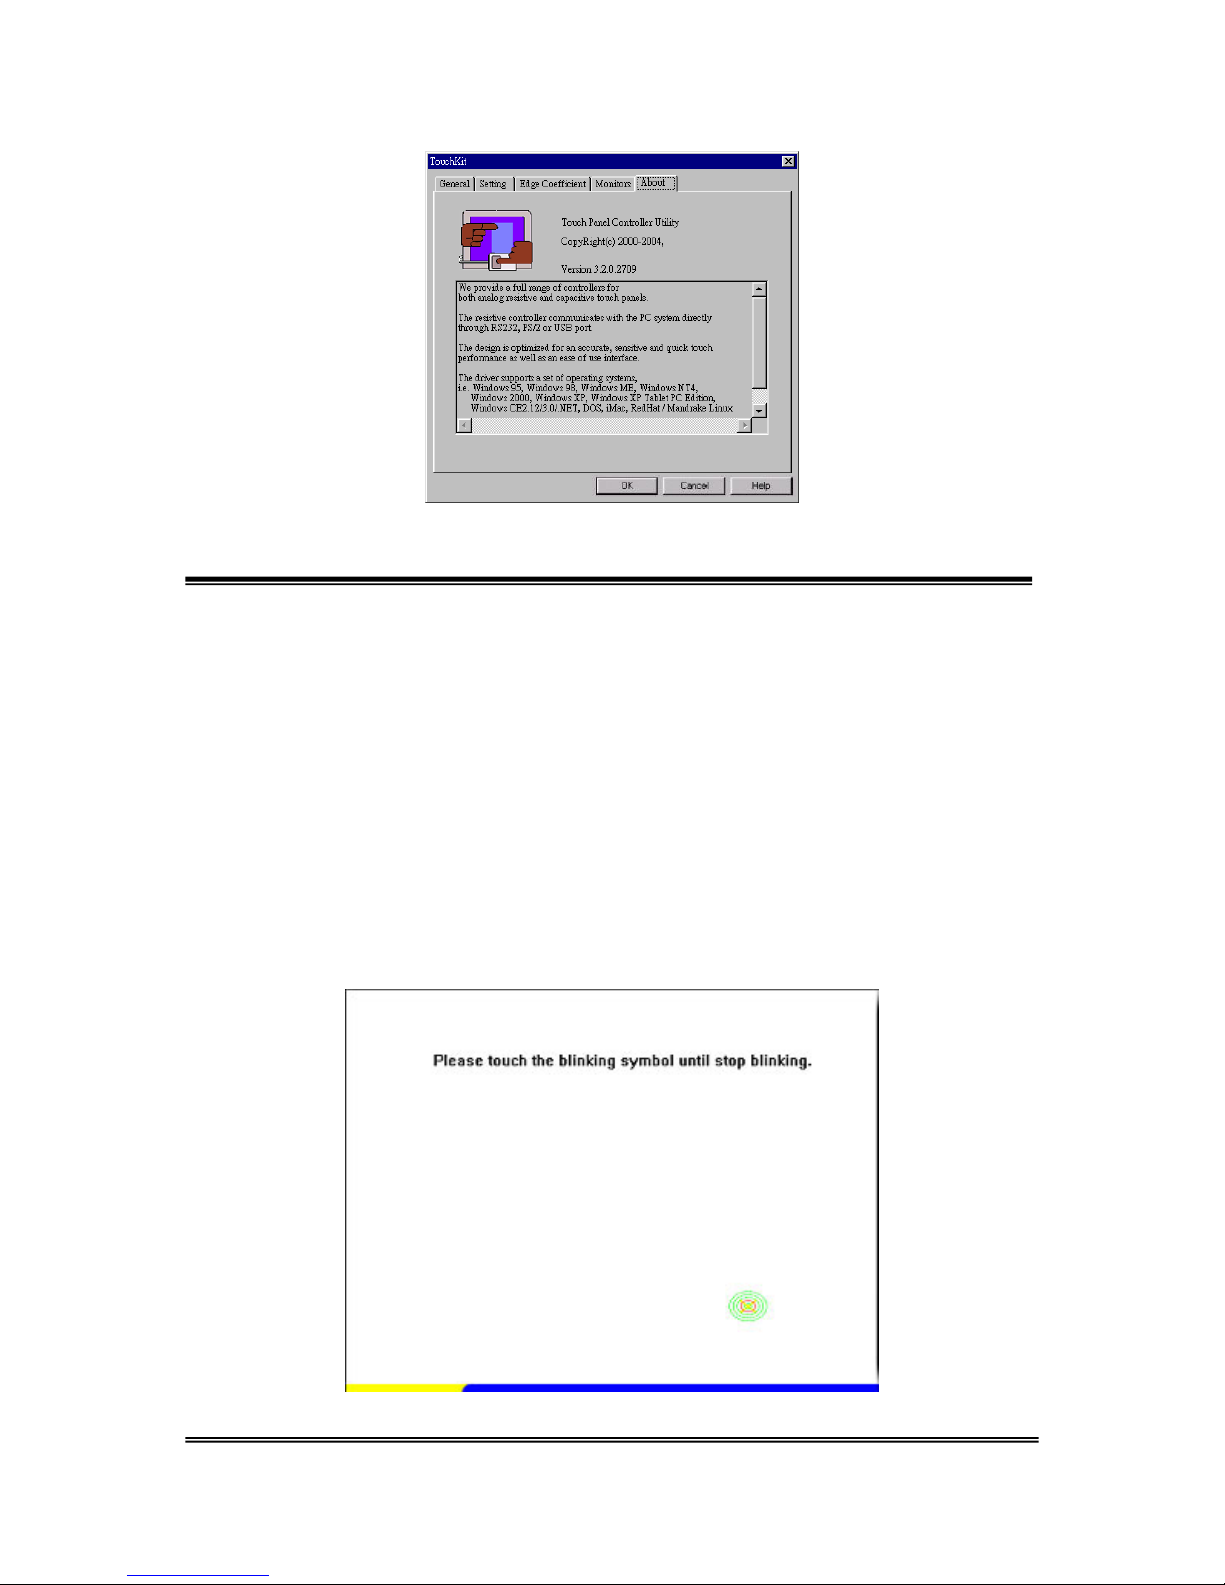
About
TouchKit Manual for Win9X/ME v3.4.0
Information about TouchKit.
22
Page 24
Chapter 4. MONITOR ROTATION SETTING
TouchKit driver package for Windows 98/ME/2000/XP provides two easy ways to
rotate the touch panel while the display is rotated.
z Rotating display by way of nVidia or ATI driver
z Rotating display by way of Pivot.
4.1 Rotating display by way of nVidia or ATI driver
1. After activating the rotation of nVidia or ATI driver, there will be one blinking
symbol like the following picture. Touch near the blinking symbo l until it stops
blinking, and the touch panel will rotate itself.
TouchKit Manual for Win9X/ME v3.4.0
23
Page 25

One touch blinking symbol adjustment
2. However, 180 degree rotation of touch panel can not be done in one step, users
need to rotate 90 degrees twice.
4.2 Rotating display by way of Pivot
There are two ways to rotate the display by way of Pivot.
z Rotating display by way of Pivot hotkey or function menu
z Rotating display by way of RotTray icon provided by TouchKit.
< Rotating display by way of Pivot hotkey or function menu >
1. To ro tate the display, please install Pivot pro 6.05 first. Then reboot PC to activate
Pivot.
2. There will be a pivot icon in the task bar. Users can click on it, and users can
choose four angles: 0 degree, 90 degree, 180 degree, 270 degree to rotate the
display.
3. After choosing the angle users want to rotate, there will be one blinking symbol
showing as the following picture. Touch this blinking symbol until it stops blinking,
and the touch panel will rotate itself.
TouchKit Manual for Win9X/ME v3.4.0
One touch blinking symbol adjustment
24
Page 26
4. However 180 degree rotation of touch panel can not be done in one step, users
need to rotate 90 degree twice.
< Rotating display by way of RotTray icon provided by TouchKit>
1. To ro tate the display, please install Pivot pro 6.05 first. Then reboot PC to activate
Pivot.
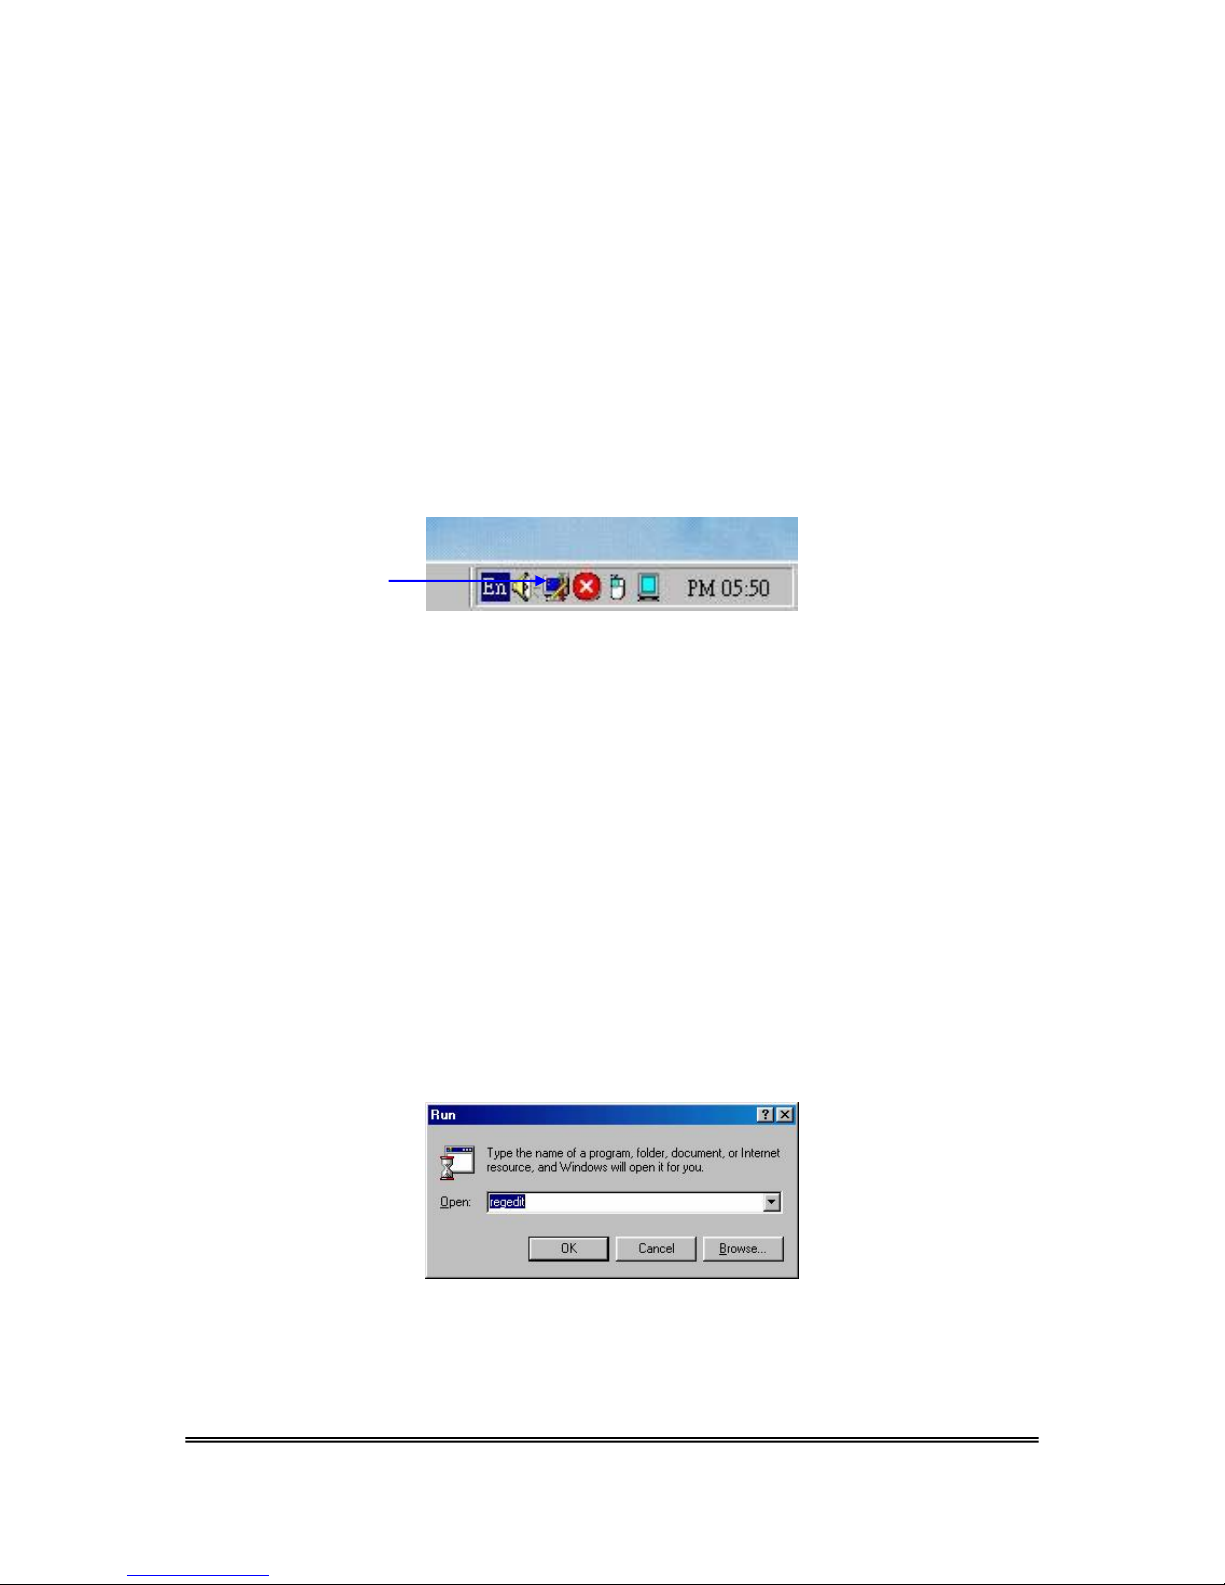
2. Users will see RotTray icon in the task bar.
RotTray
RotTray icon
3. Clicking on RotTray, it will call Pivot to rotate the display and touch panel 90
degree at the same time. Clicking it again, it will rotate another 90 degree to 180
degree. Every click on RotTray, display will rotate clockwise. Recalibration and
one symbol adjustment won’t be necessary anymore.
4. However this version of RotTray is design for Pivot pro 6.05. If users want to use
older version of Pivot, like Pivot 5.1, users need to amend the value of windows
registry. The next step is an example for setting Pivot 5.1 on Win98.
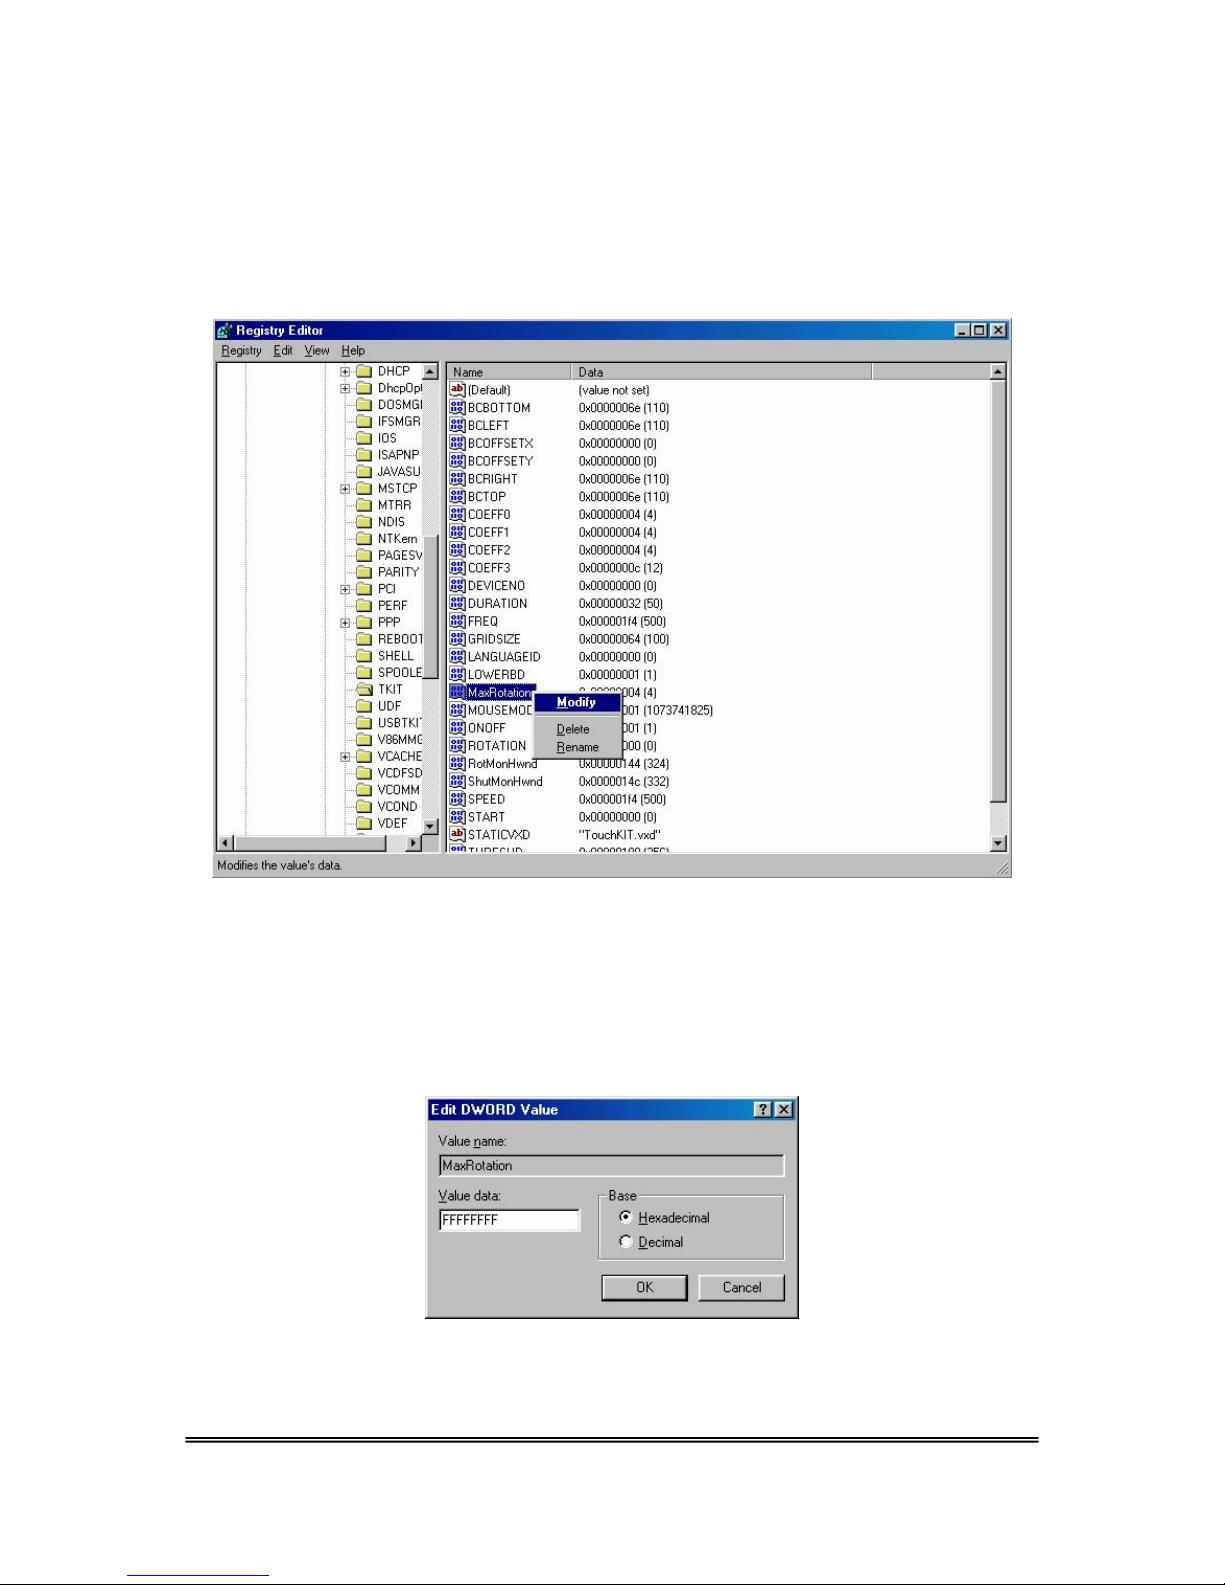
5. Go to Start / Run, and execute regedit.
TouchKit Manual for Win9X/ME v3.4.0
Press [OK] to exe cute
25
Page 27
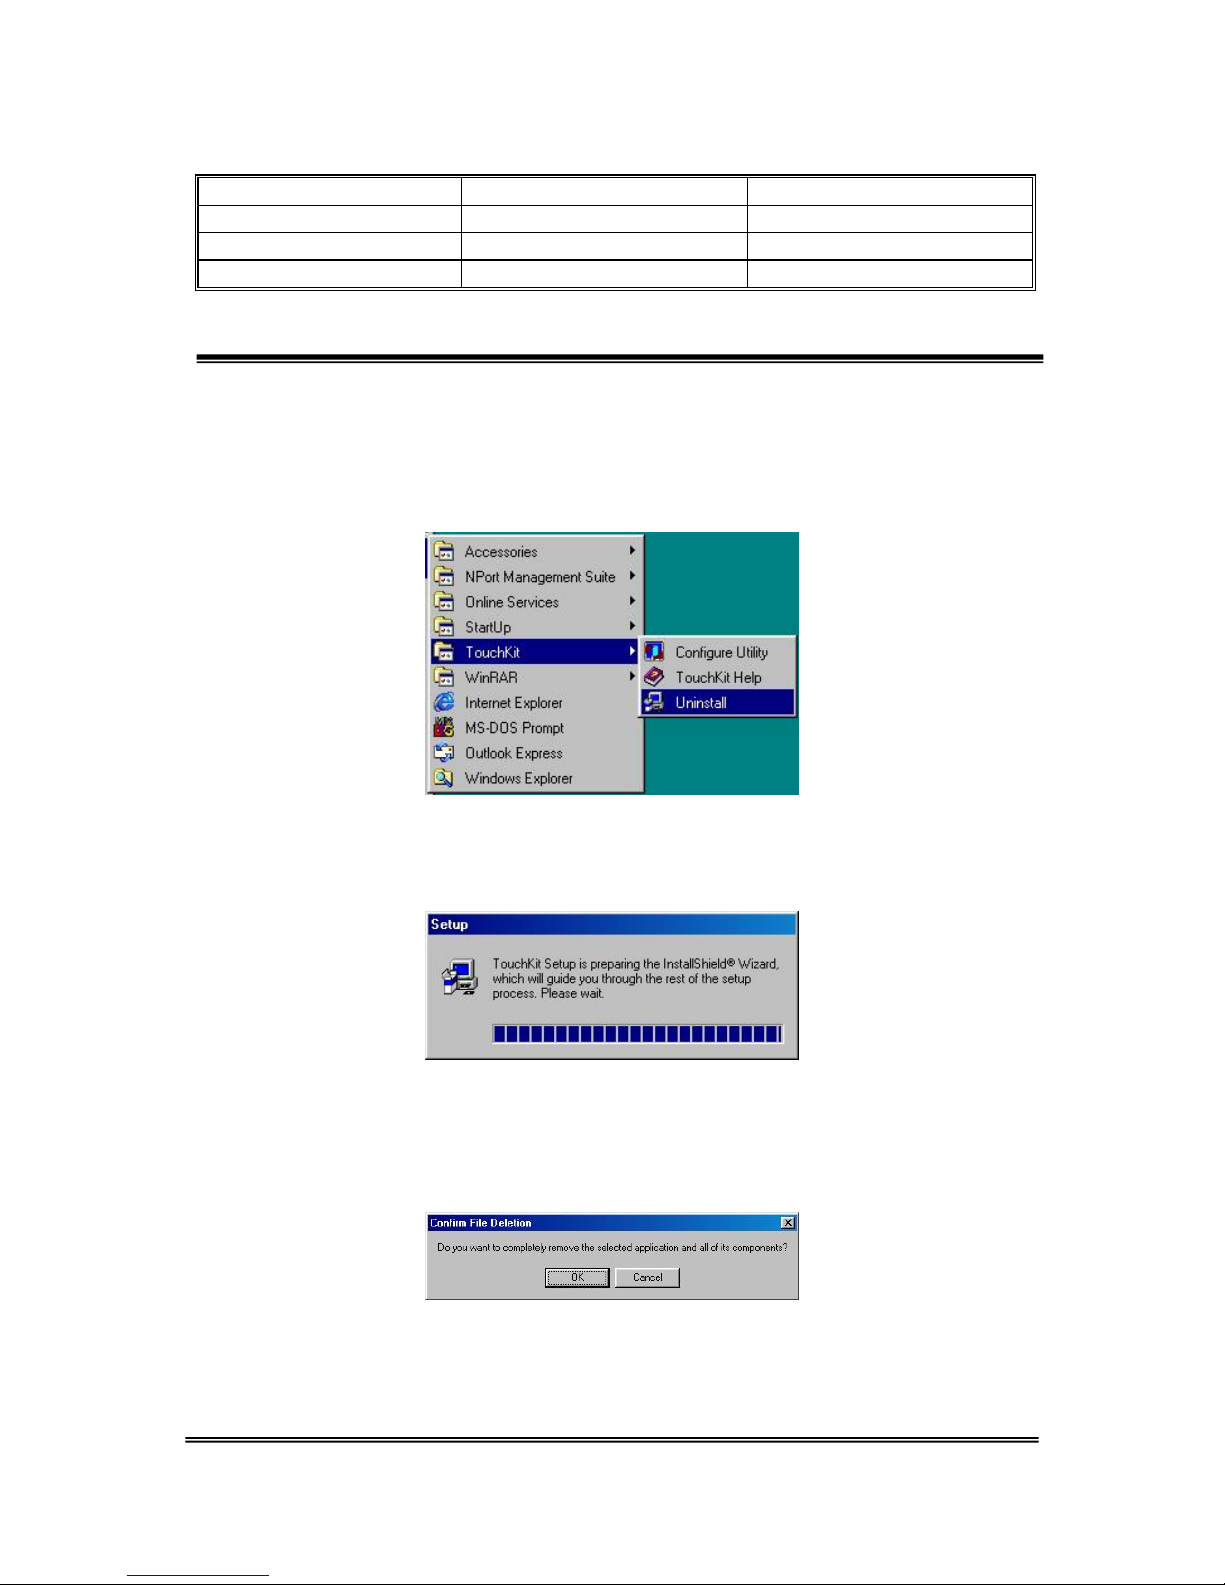
6. For Windows 95/98/ME OS, The Registry Editor will show as the follow picture.
Then go to
HKEY_LOCAL_MACHINE\System\CurrentControlSet\Services\VxD\TKIT.
Right click on the MaxRotation, and choose Modify.
Right click on MaxRotation to Modify Value data
7. Choosing the Hexadecimal Base, and replace the value data “4”(default) with
“FFFFFFFF”.
Pressing [OK] to confirm.
TouchKit Manual for Win9X/ME v3.4.0
26
Page 28
8. Here bellow are the value data for different version of Pivot:
Version of Pivot Available Angle Value Data
Pivot pro 6.05 0, 90, 180, 270 4 (default)
Pivot 5.1 0, -90 FFFFFFFF
Other Version 0, 90 2
Chapter 5. Uninstalling TouchKit
Follow these steps to uninstall TouchKit.
1. Go to Start / Programs / TouchKit / Uninstall, and execute it.
2. TouchKit setup dialog appears, and prepares to uninstall.
3. Confirm dialog, press [OK] to start un-installation; [Cancel] to cancel un-
installation.
TouchKit Manual for Win9X/ME v3.4.0
27
Page 29
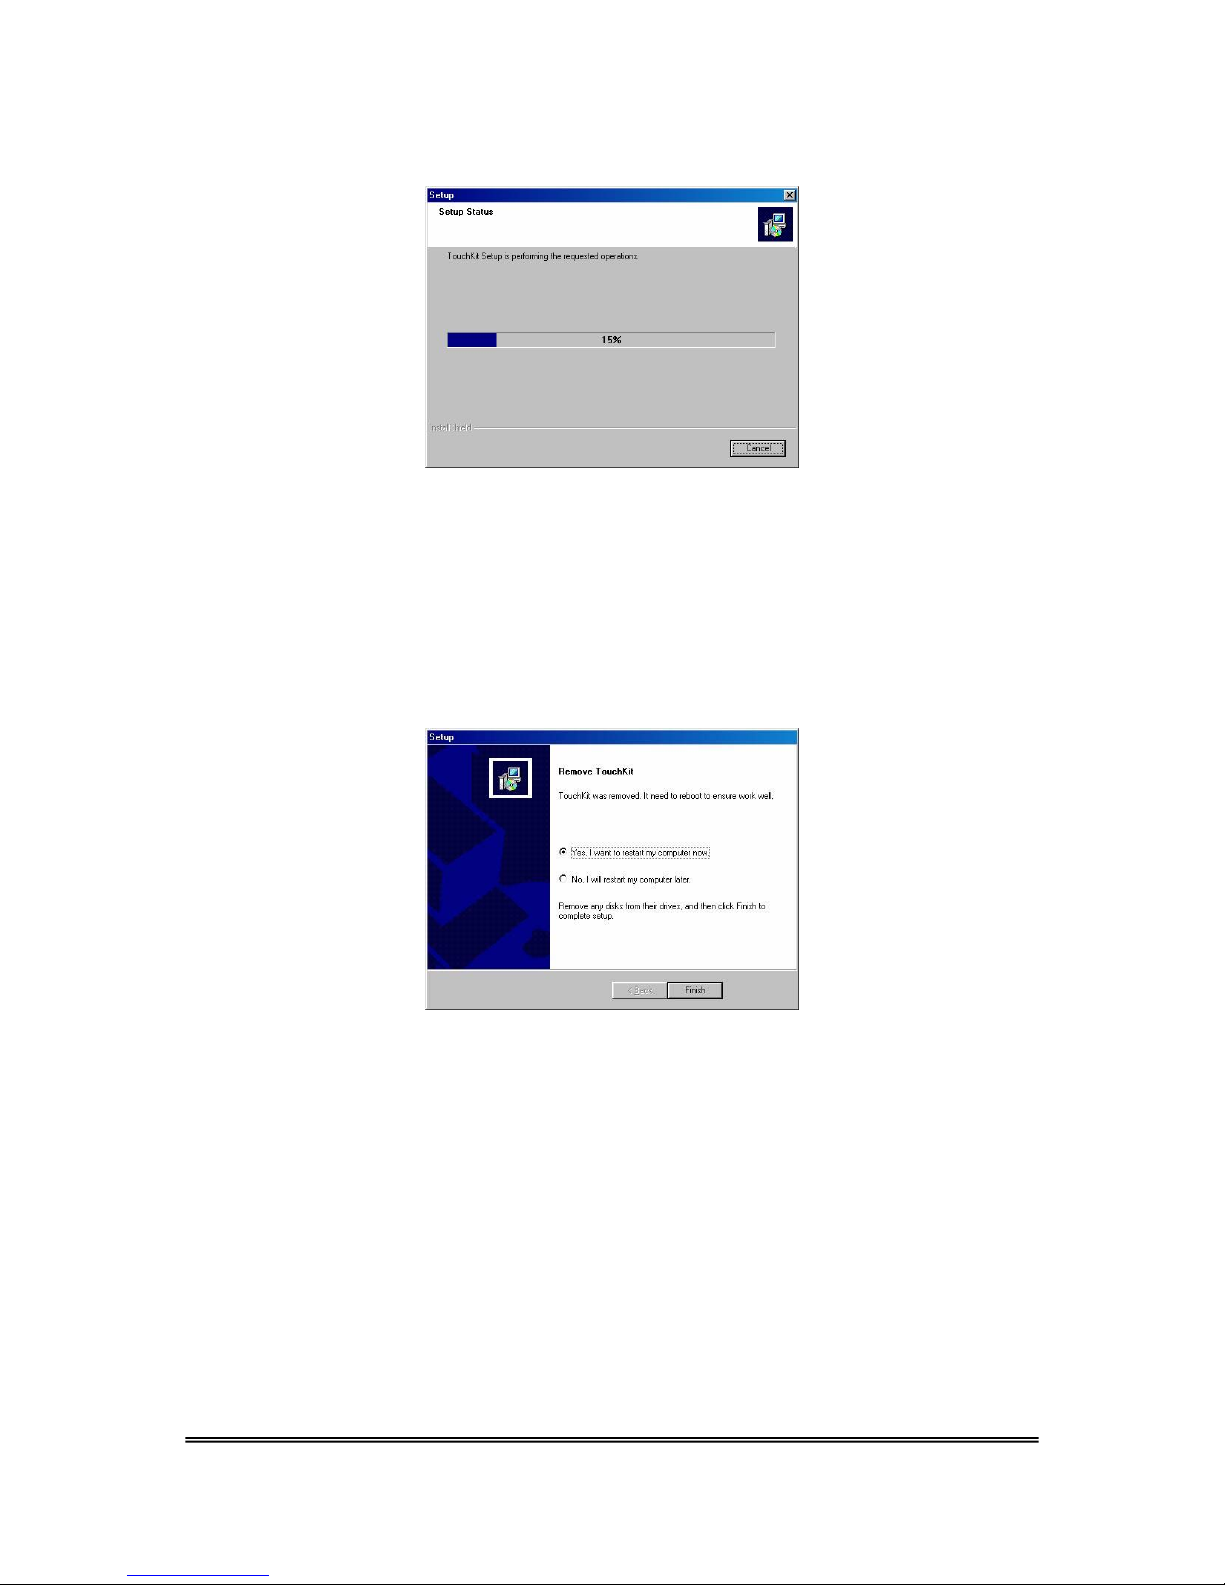
4. Start to uninstall TouchKit.
If users do not want to uninstall TouchKit at this moment, press [Cancel] to
terminate the uninstall process.
5. TouchKit will not be removed until system re-boots. Press [Yes] to re-boot
immediately or [No] to re-boot later.
TouchKit Manual for Win9X/ME v3.4.0
28
 Loading...