

POS-X EVO-SG1-AD Quick Start Manual

1234123413
1234123413
Note: Refer to your user’s guide for information about cleaning your
device.
For localized language versions of this document, go to
www.youjieaidc.com .
Getting Started
Turn computer’s power before connecting the scanner, then
power up the computer once the scanner is fully connected.
Power Supply Assembly (if included)
Connecting the Scanner
USB:
Keyboard Wedge:
Reading Techniques
The view nder projects an aiming
beam that should be centered over the
bar code, but it can be positioned in any
direction for a good read.
Hold the scanner over the bar code,
press the button, and center the aiming
beam on the bar code.
The aiming beam is smaller when the
scanner is closer to the code and larger
when it is farther from the code. Hold
the scanner close to smaller bar codes,
and farther away from la
rge bar codes
to get a proper read.
If the bar code is highly re ective (e.g., laminated), you may need to
tilt the scanner at an angle so the bar code can be scanned.
Trigger
The following bar codes will allow you to use the scanner in Manual
Trigger - Normal Mode (need to press the button to read) or
Presentation mode (the scanner is activated when it “sees” a bar
code).
Manual Trigger - Normal
(Default)
Add Code ID Pre
to all Symbologies
Scan the following bar code if you wish to add a Code ID pre
x to all
symbologies at once.
Note: For a complete list of Code IDs, see the User’s Guide for your
product at our website, www.youjieaidc.com.
Add Code ID Pre x To All Symbologies
(Temporary)
Programming the Interface
Scan one of the following bar codes to program your interface.
USB IBM SurePos
Keyboard Wedge
I
BM PC AT and Compatibles with
CR su
x
Connecting the Scanner
USB:
Keyboard Wedge:
Reading Techniques
The view nder projects an aiming
beam that should be centered over the
bar code, but it can be positioned in any
direction for a good read.
Hold the scanner over the bar code,
press the button, and center the aiming
beam on the bar code.
The aiming beam is smaller when the
scanner is closer to the code and larger
when it is farther from the code. Hold
the scanner close to smaller bar codes,
and farther away from la
rge bar codes
to get a proper read.
If the bar code is highly re ective (e.g., laminated), you may need to
tilt the scanner at an angle so the bar code can be scanned.
Presentation Mode
Add Code ID Pre
to all Symbologies
Scan the following bar code if you wish to add a Code ID pre
x to all
symbologies at once.
Note: For a complete list of Code IDs, see the User’s Guide for your
product at our website, www.youjieaidc.com.
Function Code Transmit
When this selection is enabled and function codes are contained
within the scanned data, the scanner transmits the function code to
Add Code ID Pre x To All Symbologies
(Temporary)
Programming the Interface
Scan one of the following bar codes to program your interface.
USB IBM SurePos
(USB Handheld Scanner)
Interface
Keyboard Wedge
I
BM PC AT and Compatibles with
CR su
x
USB IBM SurePos
(USB Tabletop Scanner)
Note: Refer to your user’s guide for information about cleaning your
device.
For localized language versions of this document, go to
www.youjieaidc.com .
Getting Started
Turn computer’s power before connecting the scanner, then
power up the computer once the scanner is fully connected.
Power Supply Assembly (if included)
Connecting the Scanner
USB:
Keyboard Wedge:
Reading Techniques
The view nder projects an aiming
beam that should be centered over the
bar code, but it can be positioned in any
direction for a good read.
Hold the scanner over the bar code,
press the button, and center the aiming
beam on the bar code.
The aiming beam is smaller when the
scanner is closer to the code and larger
when it is farther from the code. Hold
the scanner close to smaller bar codes,
and farther away from la
rge bar codes
to get a proper read.
If the bar code is highly re ective (e.g., laminated), you may need to
tilt the scanner at an angle so the bar code can be scanned.
Trigger
The following bar codes will allow you to use the scanner in Manual
Trigger - Normal Mode (need to press the button to read) or
Presentation mode (the scanner is activated when it “sees” a bar
code).
Su x
If you want a carriage return after the bar code, scan the Add CR
bar code . To add a tab after the bar code, scan the Add Tab
bar code. Otherwise, scan the Remove Su bar code to
remove the su
xes.
Manual Trigger - Normal
(Default)
Presentation Mode
Add CR Su
x
Add Code ID Pre
to all Symbologies
Scan the following bar code if you wish to add a Code ID pre
x to all
symbologies at once.
Note: For a complete list of Code IDs, see the User’s Guide for your
product at our website, www.youjieaidc.com.
Function Code Transmit
When this selection is enabled and function codes are contained
within the scanned data, the scanner transmits the function code to
the terminal. Charts of these function codes are provided in your
User’s Guide. When the scanner is in keyboard wedge mode, the
scan code is converted to a key code before it is transmitted.
Add Code ID Pre x To All Symbologies
(Temporary)
Enable
(Default)
Disable
Programming the Interface
Scan one of the following bar codes to program your interface.
USB IBM SurePos
(USB Handheld Scanner)
Interface
Keyboard Wedge
I
BM PC AT and Compatibles with
CR su
x
USB Keyboard (PC)
USB IBM SurePos
(USB Tabletop Scanner)
Interface
USB Keyboard (Mac)
USB Japanese Keyboard (PC)
Reading Techniques
The view nder projects an aiming
beam that should be centered over the
bar code, but it can be positioned in any
direction for a good read.
Hold the scanner over the bar code,
press the button, and center the aiming
beam on the bar code.
The aiming beam is smaller when the
scanner is closer to the code and larger
when it is farther from the code. Hold
the scanner close to smaller bar codes,
and farther away from la
rge bar codes
to get a proper read.
If the bar code is highly re
ective (e.g., laminated), you may need to
tilt the scanner at an angle so the bar code can be scanned.
Programming the Interface
Scan one of the following bar codes to program your interface.
Keyboard Wedge
I
BM PC AT and Compatibles with
CR su
x
YJ4600-QS Rev A
6/12
Note: Refer to your user’s guide for information about cleaning your
device.
For localized language versions of this document, go to
www.youjieaidc.com .
Getting Started
Turn computer’s power before connecting the scanner, then
power up the computer once the scanner is fully connected.
Power Supply Assembly (if included)
Connecting the Scanner
USB:
Keyboard Wedge:
Reading Techniques
The view nder projects an aiming
beam that should be centered over the
bar code, but it can be positioned in any
direction for a good read.
Hold the scanner over the bar code,
press the button, and center the aiming
beam on the bar code.
The aiming beam is smaller when the
scanner is closer to the code and larger
when it is farther from the code. Hold
the scanner close to smaller bar codes,
and farther away from la
rge bar codes
to get a proper read.
If the bar code is highly re ective (e.g., laminated), you may need to
tilt the scanner at an angle so the bar code can be scanned.
Standard Product Defaults
Trigger
The following bar codes will allow you to use the scanner in Manual
Trigger - Normal Mode (need to press the button to read) or
Presentation mode (the scanner is activated when it “sees” a bar
code).
Add Code ID Pre
to all Symbologies
Scan the following bar code if you wish to add a Code ID pre
x to all
symbologies at once.
Programming the Interface
Scan one of the following bar codes to program your interface.
Keyboard Wedge
Reading Techniques
The view nder projects an aiming
beam that should be centered over the
bar code, but it can be positioned in any
direction for a good read.
Hold the scanner over the bar code,
press the button, and center the aiming
beam on the bar code.
The aiming beam is smaller when the
scanner is closer to the code and larger
when it is farther from the code. Hold
the scanner close to smaller bar codes,
and farther away from la
rge bar codes
to get a proper read.
If the bar code is highly re ective (e.g., laminated), you may need to
tilt the scanner at an angle so the bar code can be scanned.
Programming the Interface
Scan one of the following bar codes to program your interface.
USB IBM SurePos
(USB Handheld Scanner)
Interface
Keyboard Wedge
I
BM PC AT and Compatibles with
CR su
x
USB IBM SurePos
(USB Tabletop Scanner)
Interface
USB IBM SurePos
(USB Handheld Scanner)
Interface
Reading Techniques
The view nder projects an aiming
beam that should be centered over the
bar code, but it can be positioned in any
direction for a good read.
Hold the scanner over the bar code,
press the button, and center the aiming
beam on the bar code.
The aiming beam is smaller when the
scanner is closer to the code and larger
when it is farther from the code. Hold
the scanner close to smaller bar codes,
and farther away from la
rge bar codes
to get a proper read.
If the bar code is highly re
ective (e.g., laminated), you may need to
tilt the scanner at an angle so the bar code can be scanned.
Programming the Interface
Scan one of the following bar codes to program your interface.
USB IBM SurePos
(USB Handheld Scanner)
Interface
Keyboard Wedge
I
BM PC AT and Compatibles with
CR su
x
USB Keyboard (PC)
USB IBM SurePos
(USB Tabletop Scanner)
Interface
USB Keyboard (Mac)
USB IBM SurePos
(USB Handheld Scanner)
Interface
USB Keyboard (PC)
Reading Techniques
The view nder projects an aiming
beam that should be centered over the
bar code, but it can be positioned in any
direction for a good read.
Hold the scanner over the bar code,
press the button, and center the aiming
beam on the bar code.
The aiming beam is smaller when the
scanner is closer to the code and larger
when it is farther from the code. Hold
the scanner close to smaller bar codes,
and farther away from la
rge bar codes
to get a proper read.
If the bar code is highly re ective (e.g., laminated), you may need to
tilt the scanner at an angle so the bar code can be scanned.
Programming the Interface
Scan one of the following bar codes to program your interface.
USB IBM SurePos
(USB Handheld Scanner)
Interface
Keyboard Wedge
I
BM PC AT and Compatibles with
CR su
x
USB Keyboard (PC)
USB IBM SurePos
(USB Tabletop Scanner)
Interface
USB Keyboard (Mac)
USB Japanese Keyboard (PC)
USB HID Bar Code Scanner
USB IBM SurePos
(USB Handheld Scanner)
Interface
USB Keyboard (PC)
USB Japanese Keyboard (PC)
Note: Refer to your user’s guide for information about cleaning your
device.
For localized language versions of this document, go to
www.youjieaidc.com .
Getting Started
Turn computer’s power before connecting the scanner, then
power up the computer once the scanner is fully connected.
Power Supply Assembly (if included)
Connecting the Scanner
USB:
Keyboard Wedge:
Reading Techniques
The view nder projects an aiming
beam that should be centered over the
bar code, but it can be positioned in any
direction for a good read.
Hold the scanner over the bar code,
press the button, and center the aiming
beam on the bar code.
The aiming beam is smaller when the
scanner is closer to the code and larger
when it is farther from the code. Hold
the scanner close to smaller bar codes,
and farther away from la
rge bar codes
to get a proper read.
If the bar code is highly re ective (e.g., laminated), you may need to
tilt the scanner at an angle so the bar code can be scanned.
Trigger
The following bar codes will allow you to use the scanner in Manual
Trigger - Normal Mode (need to press the button to read) or
Presentation mode (the scanner is activated when it “sees” a bar
code).
Su x
If you want a carriage return after the bar code, scan the Add CR
bar code . To add a tab after the bar code, scan the Add Tab
bar code. Otherwise, scan the Remove Su bar code to
remove the su
xes.
Manual Trigger - Normal
(Default)
Presentation Mode
Add CR Su
x
Remove Su
x
Add Tab Su
x
Add Code ID Pre
to all Symbologies
Scan the following bar code if you wish to add a Code ID pre
x to all
symbologies at once.
Note: For a complete list of Code IDs, see the User’s Guide for your
product at our website, www.youjieaidc.com.
Function Code Transmit
When this selection is enabled and function codes are contained
within the scanned data, the scanner transmits the function code to
the terminal. Charts of these function codes are provided in your
User’s Guide. When the scanner is in keyboard wedge mode, the
scan code is converted to a key code before it is transmitted.
Add Code ID Pre x To All Symbologies
(Temporary)
Enable
(Default)
Disable
Programming the Interface
Scan one of the following bar codes to program your interface.
USB IBM SurePos
(USB Handheld Scanner)
Interface
Keyboard Wedge
I
BM PC AT and Compatibles with
CR su
x
USB Keyboard (PC)
USB IBM SurePos
(USB Tabletop Scanner)
Interface
USB Keyboard (Mac)
USB Japanese Keyboard (PC)
USB HID Bar Code Scanner
Connecting the Scanner
USB:
Keyboard Wedge:
Reading Techniques
The view nder projects an aiming
beam that should be centered over the
bar code, but it can be positioned in any
direction for a good read.
Hold the scanner over the bar code,
press the button, and center the aiming
beam on the bar code.
The aiming beam is smaller when the
scanner is closer to the code and larger
when it is farther from the code. Hold
the scanner close to smaller bar codes,
and farther away from la
rge bar codes
to get a proper read.
If the bar code is highly re ective (e.g., laminated), you may need to
tilt the scanner at an angle so the bar code can be scanned.
Presentation Mode
Add Tab Su
x
Add Code ID Pre
to all Symbologies
Scan the following bar code if you wish to add a Code ID pre
x to all
symbologies at once.
Note: For a complete list of Code IDs, see the User’s Guide for your
product at our website, www.youjieaidc.com.
Function Code Transmit
When this selection is enabled and function codes are contained
within the scanned data, the scanner transmits the function code to
the terminal. Charts of these function codes are provided in your
User’s Guide. When the scanner is in keyboard wedge mode, the
scan code is converted to a key code before it is transmitted.
Add Code ID Pre x To All Symbologies
(Temporary)
Enable
(Default)
Disable
Programming the Interface
Scan one of the following bar codes to program your interface.
USB IBM SurePos
(USB Handheld Scanner)
Interface
Keyboard Wedge
I
BM PC AT and Compatibles with
CR su
x
USB Keyboard (PC)
USB IBM SurePos
(USB Tabletop Scanner)
Interface
USB Keyboard (Mac)
USB Japanese Keyboard (PC)
USB HID Bar Code Scanner
Mobile Phone Read Mode
When this mode is selected, your scanner is optimized to read bar
codes from mobile phone or other LED displays. However, the speed
of scanning printed bar codes may be slightly lower when this mode
is enabled.
Hand Held Scanning - Mobile
Phone
Data Format Editor Instructions
The following are abbreviated instructions for entering a data format.
For complete instructions refer to your User’s Guide, available at our
website, www.youjieaidc.com.
1. Scan the Enter Data Format symbol.
2. Primary/Alternate Format: scan 0 for Primary Format
3. Terminal Type: scan 099 f or any terminal type
4. Code I.D.: scan 99 for any bar code type
Programming Chart
0
1
A
9
8
Presentation Scanning - Mobile
Phone
Data Format Editor Instructions
The following are abbreviated instructions for entering a data format.
For complete instructions refer to your User’s Guide, available at our
website, www.youjieaidc.com.
1. Scan the Enter Data Format symbol.
2. Primary/Alternate Format: scan 0 for Primary Format
3. Terminal Type: scan 099 f or any terminal type
4. Code I.D.: scan 99 for any bar code type
5. Length: scan 9999 for any length bar code.
6. Editor commands: use t
he Programming Chart that follows.
7. Scan Save to sav
e your entries.
Programming Chart
0
2
1
A
B
9
8
Reading Techniques
The view nder projects an aiming
beam that should be centered over the
bar code, but it can be positioned in any
direction for a good read.
Hold the scanner over the bar code,
press the button, and center the aiming
beam on the bar code.
The aiming beam is smaller when the
scanner is closer to the code and larger
when it is farther from the code. Hold
the scanner close to smaller bar codes,
and farther away from la
rge bar codes
to get a proper read.
If the bar code is highly re ective (e.g., laminated), you may need to
tilt the scanner at an angle so the bar code can be scanned.
to all Symbologies
x to all
Add Code ID Pre x To All Symbologies
(Temporary)
Programming the Interface
Scan one of the following bar codes to program your interface.
Keyboard Wedge
I
BM PC AT and Compatibles with
CR su
x
1
2
3
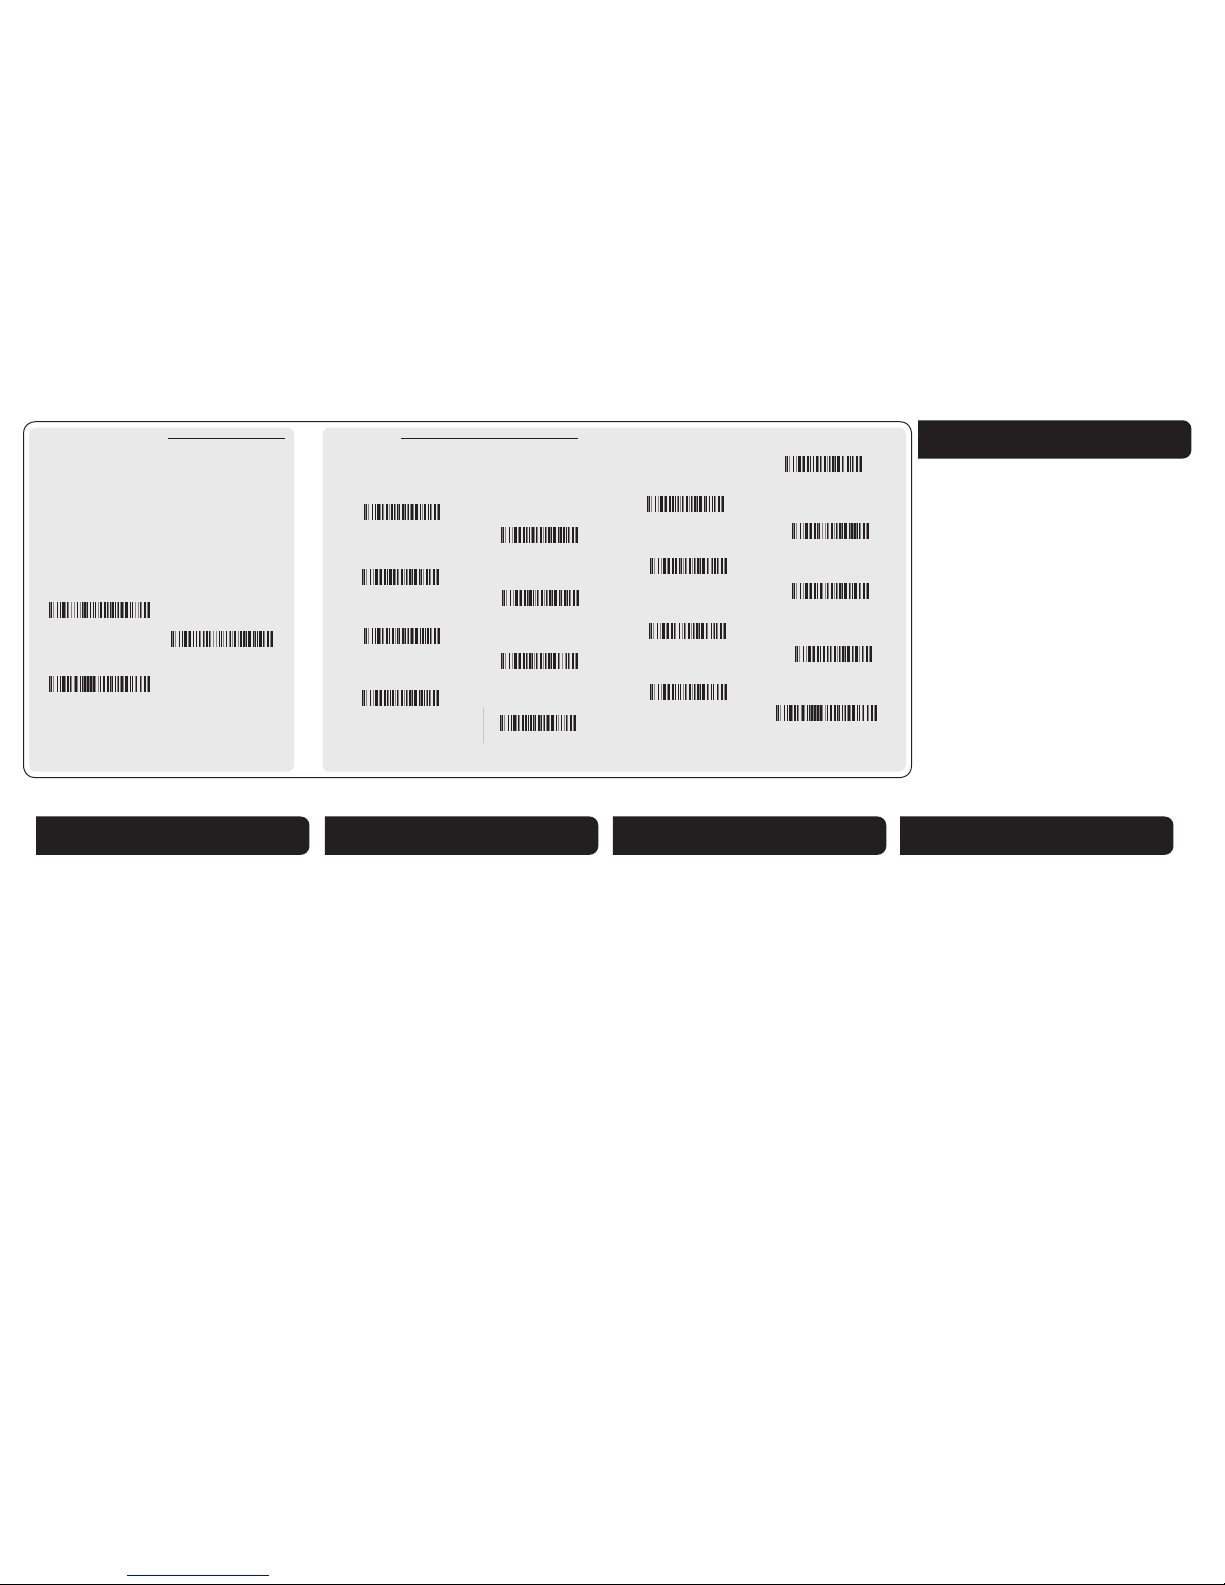
GETTING STARTED READING TECHNIQUE SCANNER SETTINGS
Turn the computer OFF.
Connect the scanner
USB plug into a USB
port on the computer.
The scanner projects an aiming beam that should be
centered over the bar code for optimal performance.
Hold the scanner closer to small codes and farther
away from larger codes for best results.
TRIGGER MODE: Scan the code below to activate
the manual trigger mode. In this mode, the scanner
will only activate when the trigger is pulled.
Scan the appropriate barcode below to add a
Carriage Return or Tab, or remove all suxes.
Scan the appropriate barcode below for the desired
interface.
Scan the barcode below to reset the scanner to all
factory defaults.
Scan the barcode below to add a Code ID prex to
all symbologies
Scan the barcodes below to optimize scanning on
mobile phones or other backlit LED devices.
Note: For a complete list of Code IDs, see the Owner’s
manual at www.pos-x.com/downloads
Note: To turn o Mobile Phone Read Mode, scan the
desired mode in the “SCAN MODE” section.
PRESENTATION MODE: Scan the code below to
activate the presentation mode. In this mode, the
scanner will automatically “see” a barcode and scan
it.
SCAN MODE
SUFFIXES INTERFACE PROGRAMMING
RESET DEFAULTS
CODE ID PREFIX
MOBILE PHONE READ MODE
Turn the computer ON.
www.pos-x.com | 360.738.8433 | support@pos-x.com
POINT OF SALE SIMPLIFIED
QUICKSTART GUIDE
EVO 2D BARCODE SCANNER
EVO-SG1-AD
Download the full owner’s manual:
www.pos-x.com/downloads
document version 1.0
The following are abbreviated instructions for entering a data
format. For compete instructions, refer to your Owner’s Manual,
which can be downloaded from www.pos-x.com/downloads.
1. Scan the Enter Data Format code.
2. Primary/Alternate Format: Scan “0” for Primary Format.
3. Terminal Type: Scan “099” for any bar code type.
4. Code ID: Scan “00’ for any bar code type.
5. Length: Scan “9999” for any length bar code.
6. Editor commands: Use the “CODE BYTES” section.
7. Scan Save to save your entries.
The codes below are used to enter numeric values for various
settings explained throughout this quickstart guide and the
Owner’s Manual.
Customer Support Center
360.738.8433 | 800.790-8657 | support@pos-x.com
Corporate Headquarters
POS-X Inc.
1975 Midway Lane Suite O
Bellingham, WA 98226
info@pos-x.com
Tel: 360.738.8433
Fax: 360.738.3495
Main URL
www.pos-x.com
Full Owner’s Manual
www.pos-x.com/downloads
Limited Warranty Length
3 years from date of purchase (please see Complete Terms and
Conditions for limitations)
In the case that a product becomes defective, POS-X oers the
choice of one of the following options:
2-Day Advance Exchange
To minimize downtime in the unlikely event of equipment
diculties, POS_X will ship a comparabel replacement unit
via 2-Day Shipping prior to receiving the defective unit. A
refundable credit card pre-authorization is required for 2-Day
Advance Exchange.
Depot Repair
Ship the defective unit to POS-X and our trained technicians
will repair the unit, usually with one-day turnaround time, then
return the unit to you.
Complete Terms and Conditions
www.pos-x.com/warranty
KEEPING YOUR SCANNER CLEAN
1. DISCONNECT THE SCANNER FROM THE COMPUTER/POWER
SUPPLY!
2. Wearing latex (or similar) gloves, Use Isopropyl alcohol lightly
applied to a microber towel to gently clean the housing
and front plastic.
DO NOT use ammonia, soap, or acid-based cleaners as they can
cause permanent damage to the unit.
POS-X reserves the right to make changes in specications
and other information contained in this document without
prior notice, and the reader should in all cases consult POS-X
to determine whether any such changes have been made.
The information in this publication does not represent a
commitment on the part of POS-X. POS-X shall not be liable
for technical or editorial errors or omissions contained herein;
nor for incidental or consequential damages resulting from the
furnishing, performance, or use of this material. This document
contains proprietary information that is protected by copyright.
All rights are reserved. No part of this document may be
photocopied, reproduced, or translated into another language
without the prior written consent of seller.
© 2012 All rights reserved.
DATA FORMAT EDITING CODE BYTES
Data Format Editor Instructions
The following are abbreviated instructions for entering a data format.
For complete instructions refer to your User’s Guide, available at our
website, www.youjieaidc.com.
1. Scan the Enter Data Format symbol.
2. Primary/Alternate Format: scan 0 for Primary Format
3. Terminal Type: scan 099 f or any terminal type
4. Code I.D.: scan 99 for any bar code type
5. Length: scan 9999 for any length bar code.
6. Editor commands: use t
he Programming Chart that follows.
7. Scan Save to sav
e your entries.
Enter Data Format
Programming Chart
0
2
1
3
A
B
C
9
8
0
8
8
0
2
4
A
B
C
9
8
B
D
9
A
B
C
9
8
Programming Chart
0
1
9
8
9
Programming Chart
0
2
1
4
3
5
A
B
C
D
9
8
A
B
C
D
E
9
8
0
2
A
9
8
A
9
8
0
2
4
6
A
B
C
D
E
9
8
B
D
F
9
Programming Chart
0
2
1
3
A
B
9
8
B
9
Programming Chart
0
2
1
4
3
5
6
7
A
B
C
D
E
F
9
8
A
B
C
D
E
F
9
8
Save
Data Format Editor Instructions
The following are abbreviated instructions for entering a data format.
For complete instructions refer to your User’s Guide, available at our
website, www.youjieaidc.com.
1. Scan the Enter Data Format symbol.
2. Primary/Alternate Format: scan 0 for Primary Format
3. Terminal Type: scan 099 f or any terminal type
4. Code I.D.: scan 99 for any bar code type
5. Length: scan 9999 for any length bar code.
6. Editor commands: use t
he Programming Chart that follows.
7. Scan Save to sav
e your entries.
Enter Data Format
Clear All Data Formats
Save
Programming Chart
0
2
1
4
3
5
6
A
B
C
D
E
9
8
Clear All Data Formats
Programming Chart
0
2
1
4
3
A
B
C
D
9
8
TECHNICAL ASSISTANCE
LIMITED WARRANTY NOTES
PREVENTIVE MAINTENANCE
DISCLAIMER
 Loading...