

Page 1
Posture Pump® Model 2500 Instructions
PP
EENNTATA
VV
EC EC
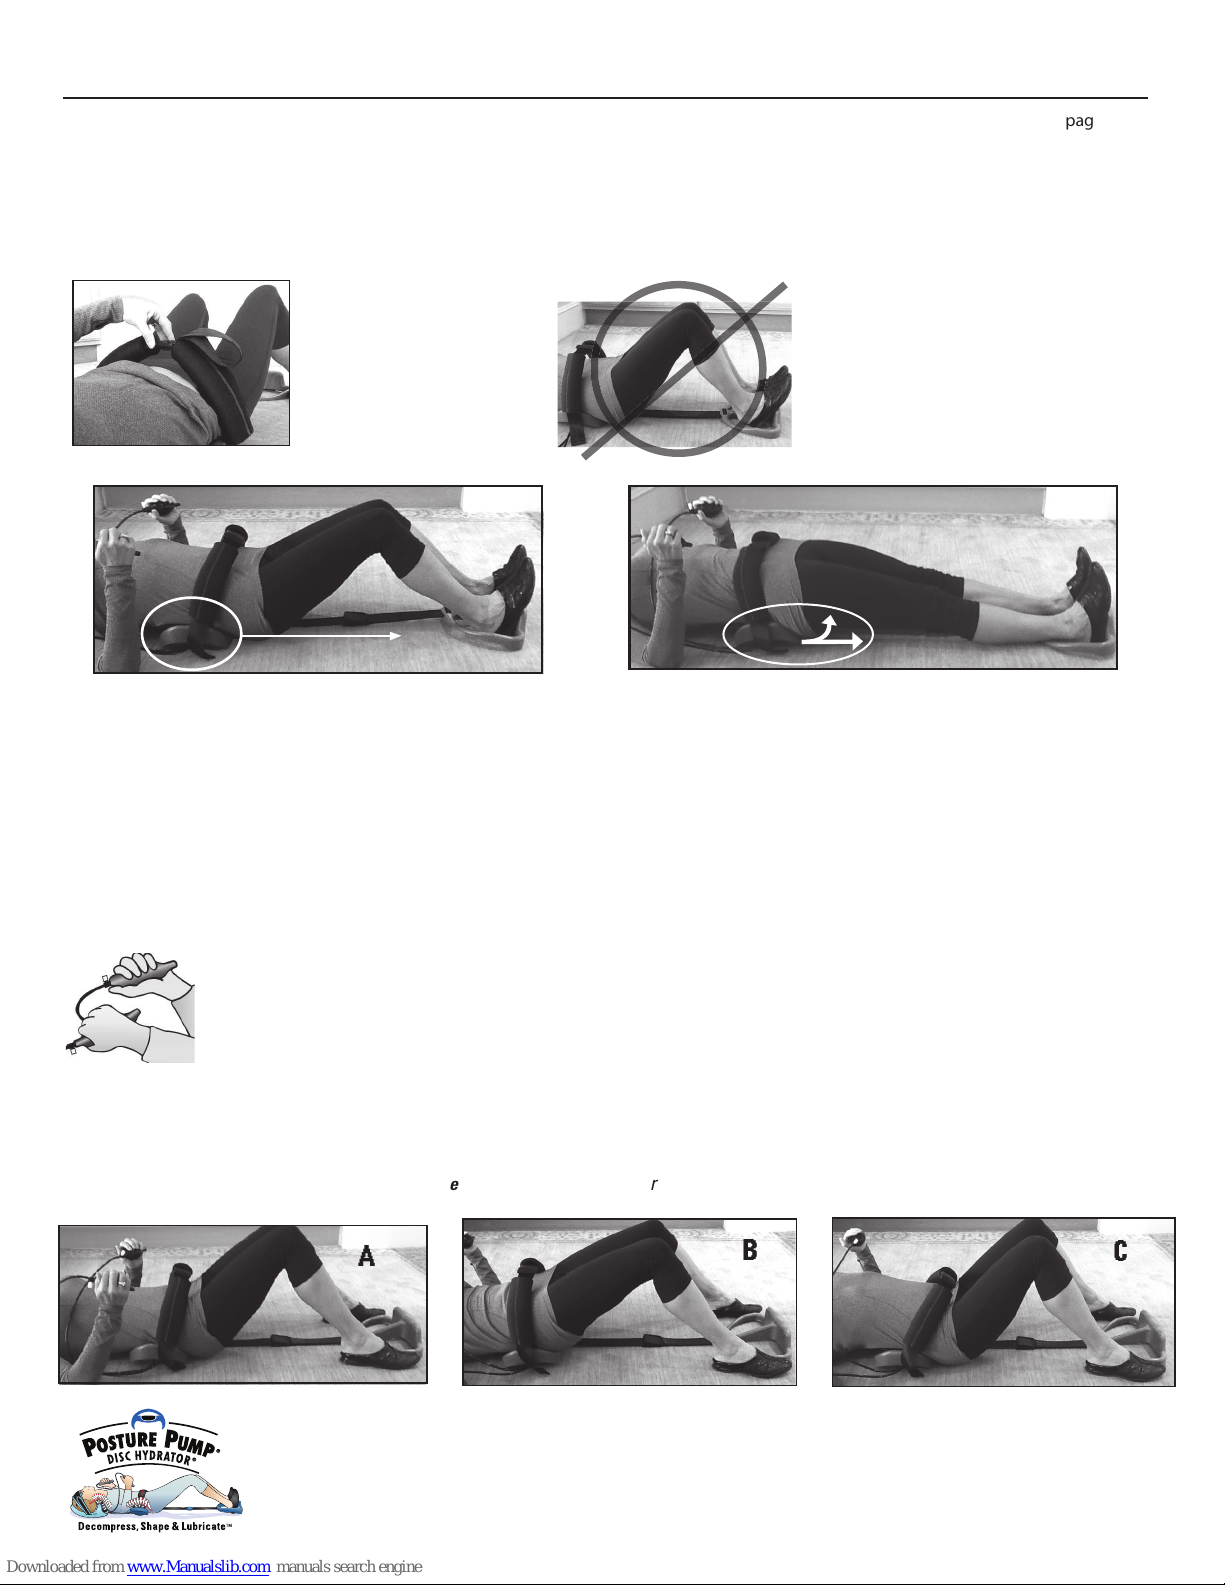
Foot-Unit belt too short,
legs bent too much
NEVER ADJUST PELVIC BELT OR FOOT-UNIT
BELT SO TIGHT THAT LEGS CANNOT BE
EASILY EXTENDED OR SO THAT PELVIC BELT
CAUSES PAIN.
Proper adjustment knees slightly bent.
THIS BELT SHOULD NOT
BE TIGHT WHEN FASTENED.
TRAINING INSTRUCTIONS
CAUTION: CAREFULLY READ AND ADJUST THE PELVIC AND FOOT-UNIT BELTS PER "ADJUSTING THE PELVIC PULL"
INSTRUCTIONS ON THE FOLLOWING PAGES BEFORE TRAINING SESSION BEGINS.
Proper Set-up Recap:
1. Grasp the two hand pumps, squeeze each pump separately to confirm which one operates lowest air cell and
inflate lowest air cell first to a firm comfortable level, never to the point of pain. (Usually 1-9 complete pumps)
2. Inflate upper air cell to an equally comfortable level. (Usually 1-9 complete pumps)
3. Squeeze both pumps at the same time. (Usually 1-5 more pumps)
Note: To release air cells simply push down air release button on hand pumps.
TRAINING INSTRUCTIONS:
A
B
C
page 1 of 6
With heels pushed out and up and legs extended, Back-Unit has
now slid below buttocks, lifting buttocks up and off the ground.
Foot-Unit will also be lifted about 1 inch off the ground.
NOTE:
• Final adjustments to belts may need to change if heel thickness of shoes changes. Always wear shoes!
• Use Penta Vec® Model 2500 on a comfortable firm surface.
• For the more sensitive low back person, we recommend using Penta Vec® on your bed/mattress when first starting.
• Use Penta Vec® to hydrate the discs daily or as recommended by your health care professional. Even a 3-5 minute workout is beneficial.
• Consult your health care professional before beginning any exercise program.
4. With your knees bent and feet firmly on the ground (A), rock pelvis up and back toward belly button using your abdominal muscles to
lift buttocks (B). Then rock downward using back muscles and allow lower back to gently stretch over air cells, lowering buttocks to floor (C).
Gently rock back and forth 3-5 times or more.
(See photos A, B, and C)
Never rock Back-Unit with Neck-Unit inflated (if so equipped).
®
Call 800-NECK PRO (632-5776) • 714-847-8607
www.posturepump.com • email: [email protected]
Posture Pro, Inc.,16421 Gothard St., Ste. D, Huntington Beach, CA 92647
Copyright 2015 POSTURE PRO, Inc. U.S. Patent Numbers 5,713,841 • 5,906,586 • D508,566S
• 8,734,372 • 8,764,693 • 7,060,085,B2 • 8,029,453,B2 Other patents pending. Consult your health
care professional before beginning. Prices and colors subject to change without notice.
Posture Pump
®
products are not designed to diagnose or cure disease.
Posture Pump® Model 2500 Instructions
P
ENTA
V
EC
TRAINING INSTRUCTIONS (continued)
5C
5D
9A
9B
5. Then with both feet in the Foot-Unit and knees bent slightly (see 5A), gently and gradually straighten legs pushing with your heels against the
Foot-Unit (see 5B). The Back-Unit will now slide down from your lower back toward your pelvis and buttocks (usually 1-4 inches). Hold this
position for approximately 30 to 60 seconds; then relax your legs and slide forward so Back-Unit is again under the small of your back and gently
rock forward (see 5C) and back.(see 5D)
NOTE: Now is the time to make final adjustments to the pelvic and foot belts.
Ta ke care to adjust the belts so that you feel a gradual, comfortable pull.
NEVER operate unit with foot belt adjusted so short that legs cannot
easily straighten or waist belt worn so tight that it causes pain!
6. Repeat step 5 several times with Back-Unit inflated to a comfortable level or deflate air cells
by pushing down on both air release buttons at the same time and repeat steps 1-5 as desired.
7. On your last repetition extend Foot-Unit and hold for up to 8 minutes maximum. (see 7A)
Gradually work up to this 8 minute goal over several training sessions, never extend legs
for more than 1 minute in initial training session!
8. Relax your legs and slide forward so Back-Unit is again under the small of your back.
Gently rock forward, back and forward a few times. (see above pics 5C, 5D, 5C).
9.
Deflate both air cells approximately half way. Release Pelvic Belt from waist and remove feet from Foot-Unit. Move the Back-Unit toward
mid and upper back - position 3 (see 9A) and gently stretch arms over head (see 9B) to decompress the middle and upper back. Perform this
movement several times as you slide and roll over Back-Unit. Gently roll off exerciser and onto your left or right side slowly and carefully
before risin
g.
• Gradually increase your air cell inflation as comfort permits.
• Use Penta Vec
®
to hydrate the discs daily or as recommended by your health care professional. Even a 3-5 minute workout is beneficial.
* Placing a cold gel pack over one of the air cells, usually the lowest pouch, is recommended to speed recovery from stiffness and discomfort. Cover gel
pack with cloth; never place gel pack directly against skin! Chronic stiffness and discomfort may take several days to adequately subside. If discomfort
persists consult your health care professional.
**Just like performing any new exercise, an aggressive workout with Posture Pump
®
equipment can temporarily make you sore. To reduce this occurrence,
inflate the exerciser at lower levels, and keep your workouts under 10 minutes for the first two weeks. This will allow your body to gradually adapt to a more
aggressive workout.
page 2 of 6
5B
7A
5A
®
Call 800-NECK PRO (632-5776) • 714-847-8607
www.posturepump.com • email: sales@posturepump.com
Posture Pro, Inc.,16421 Gothard St., Ste. D, Huntington Beach, CA 92647
Copyright 2015 POSTURE PRO, Inc. U.S. Patent Numbers 5,713,841 • 5,906,586 • D508,566S
• 8,734,372 • 8,764,693 • 7,060,085,B2 • 8,029,453,B2 Other patents pending. Consult your health
care professional before beginning. Prices and colors subject to change without notice.
Posture Pump
®
products are not designed to diagnose or cure disease.
Page 2
Posture Pump® Model 2500 Instructions
PP
EENNTATA
VV
EC EC
TRAINING INSTRUCTIONS (continued)
5C
5D
9A
9B
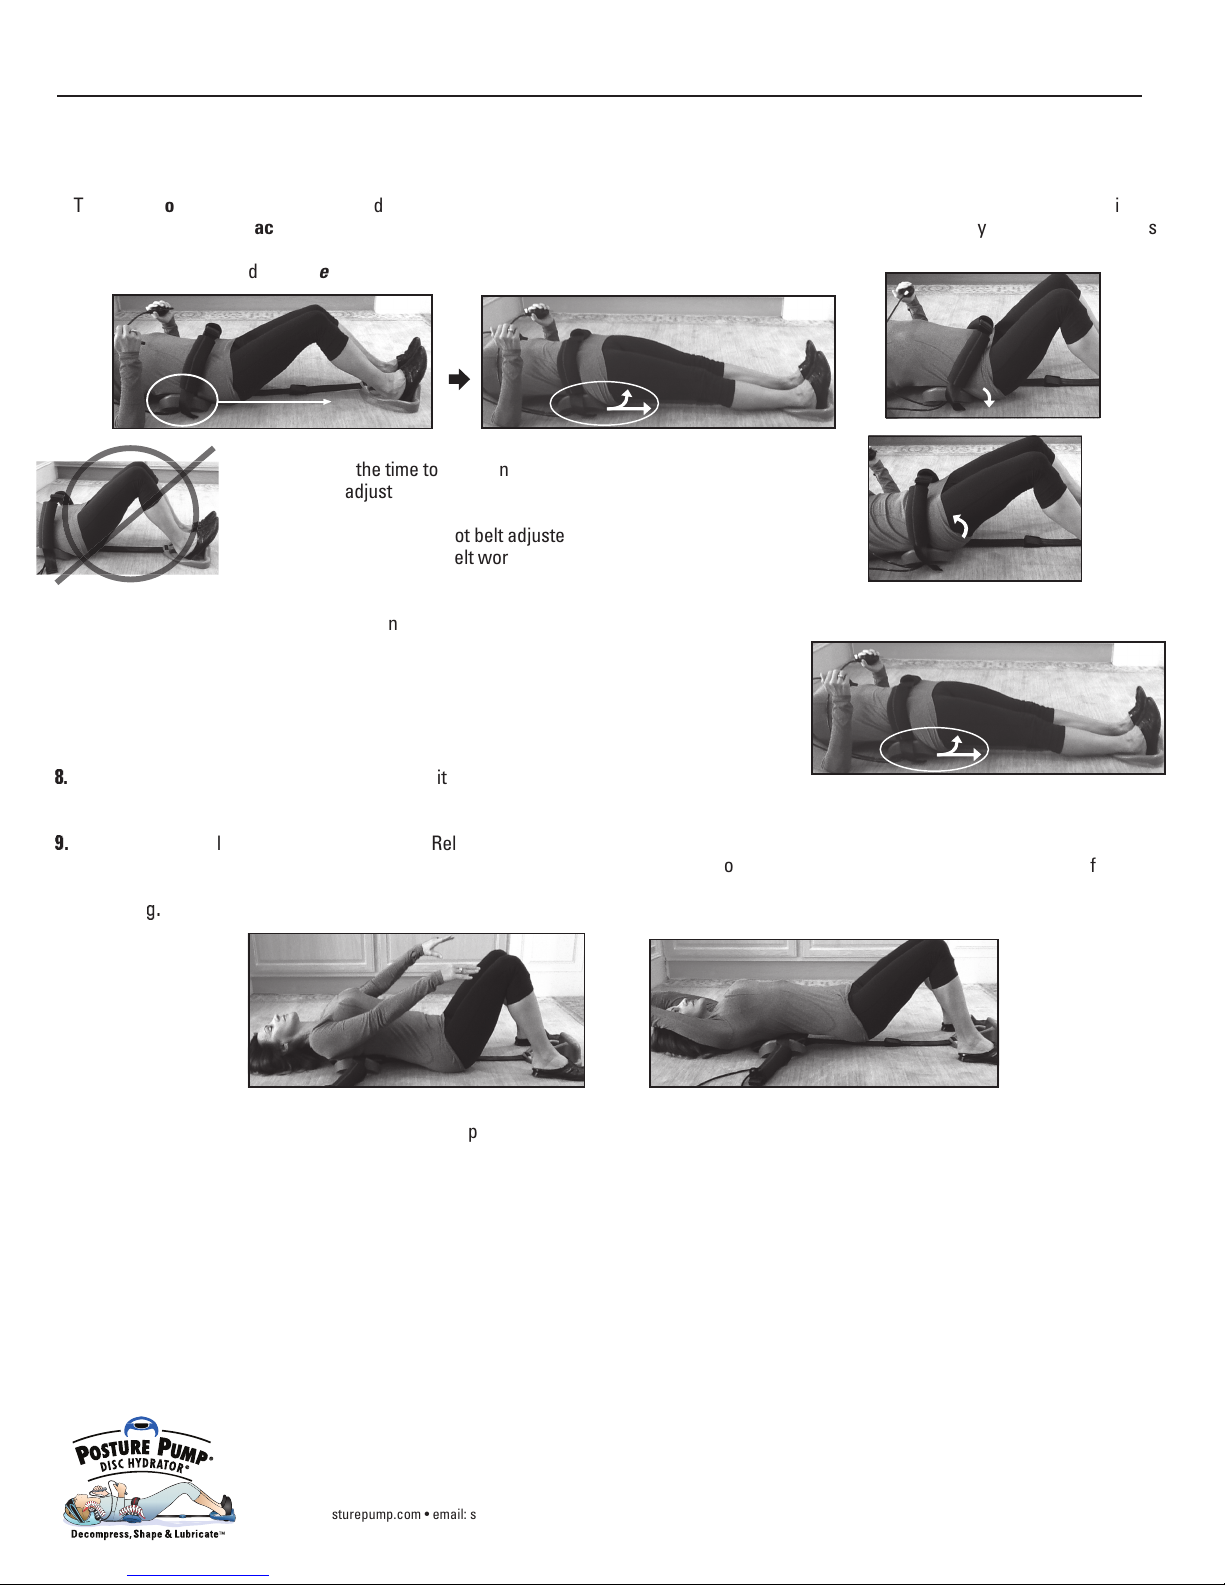
5. Then with both feet in the Foot-Unit and knees bent slightly (see 5A), gently and gradually straighten legs pushing with your heels against the
Foot-Unit (see 5B). The Back-Unit will now slide down from your lower back toward your pelvis and buttocks (usually 1-4 inches). Hold this
position for approximately 30 to 60 seconds; then relax your legs and slide forward so Back-Unit is again under the small of your back and gently
rock forward (see 5C) and back.(see 5D)
NOTE: Now is the time to make final adjustments to the pelvic and foot belts.
Ta ke care to adjust the belts so that you feel a gradual, comfortable pull.
NEVER operate unit with foot belt adjusted so short that legs cannot
easily straighten or waist belt worn so tight that it causes pain!
6. Repeat step 5 several times with Back-Unit inflated to a comfortable level or deflate air cells
by pushing down on both air release buttons at the same time and repeat steps 1-5 as desired.
7. On your last repetition extend Foot-Unit and hold for up to 8 minutes maximum. (see 7A)
Gradually work up to this 8 minute goal over several training sessions, never extend legs
for more than 1 minute in initial training session!
8. Relax your legs and slide forward so Back-Unit is again under the small of your back.
Gently rock forward, back and forward a few times. (see above pics 5C, 5D, 5C).
9.
Deflate both air cells approximately half way. Release Pelvic Belt from waist and remove feet from Foot-Unit. Move the Back-Unit toward
mid and upper back - position 3 (see 9A) and gently stretch arms over head (see 9B) to decompress the middle and upper back. Perform this
movement several times as you slide and roll over Back-Unit. Gently roll off exerciser and onto your left or right side slowly and carefully
before risin
g.
• Gradually increase your air cell inflation as comfort permits.
• Use Penta Vec
®
to hydrate the discs daily or as recommended by your health care professional. Even a 3-5 minute workout is beneficial.
* Placing a cold gel pack over one of the air cells, usually the lowest pouch, is recommended to speed recovery from stiffness and discomfort. Cover gel
pack with cloth; never place gel pack directly against skin! Chronic stiffness and discomfort may take several days to adequately subside. If discomfort
persists consult your health care professional.
**Just like performing any new exercise, an aggressive workout with Posture Pump
®
equipment can temporarily make you sore. To reduce this occurrence,
inflate the exerciser at lower levels, and keep your workouts under 10 minutes for the first two weeks. This will allow your body to gradually adapt to a more
aggressive workout.
page 2 of 6
5B
7A
5A
®
Call 800-NECK PRO (632-5776) • 714-847-8607
www.posturepump.com • email: [email protected]
Posture Pro, Inc.,16421 Gothard St., Ste. D, Huntington Beach, CA 92647
Copyright 2015 POSTURE PRO, Inc. U.S. Patent Numbers 5,713,841 • 5,906,586 • D508,566S
• 8,734,372 • 8,764,693 • 7,060,085,B2 • 8,029,453,B2 Other patents pending. Consult your health
care professional before beginning. Prices and colors subject to change without notice.
Posture Pump
®
products are not designed to diagnose or cure disease.
Page 3
1. Grasp the two
hand pumps, squeeze each pump
separat
ely to confirm whi
ch one
operates
lowes
t air cell
and
inflate l
owest ai
r cell first
to a
firm comfortable
level, nev
er to the
point of pai
n.
(Usu
ally
1-9 compl
ete pum
ps)
2. Infl
ate upper ai
r cell to an equall
y comfortable
level.
(Usually
1-9 complete pum
ps)
3. Squ
ee
ze bo
th p
umps a
t
the same tim
e.
(Usu
ally 1-5 more pumps)
No
t
e:
T
o re
le
ase
a
ir ce
ll
s sim
ply p
ush down
air release butt
on on
hand pumps.
4. With yo
ur kn
e
e
s b
e
n
t a
n
d f
eet firmly on the
ground, rock pelvis u
p and back
tow
a
rd b
e
lly bu
tt
on
using
yo
ur abdominal m
uscles to lift butt
ocks. Then rock
do
w
nw
a
rd
u
sing
bac
k mu
sc
les and allow low
er back to gent
ly stretch over air
c
e
lls, lo
w
e
ring
b
u
tto
cks t
o
f
lo
or
. Gently ro
ck back and fort
h 3-5 times or more. (S
e
e
illu
s
t
rations
E
&
F)
Po
sture
P
ump®
Mod
el
2
5
0
0
Instr
uc
tio
ns
REF
ER
TO
"
CAU
TI
ON
S"
BE
L
OW
BE
F
ORE
BEGI
NN
I
N
G
T
RAI
NI
NG
p
a
g
e
3
of
6
®
PP
EENN
TATA
VV
EC
C
AUTIONS – A
p
p
l
y to
a
l
l P
o
stu
r
e
Pu
m
p
®
Eq
u
ip
m
e
n
t
W
A
R
M
U
P
RO
U
T
I
NE
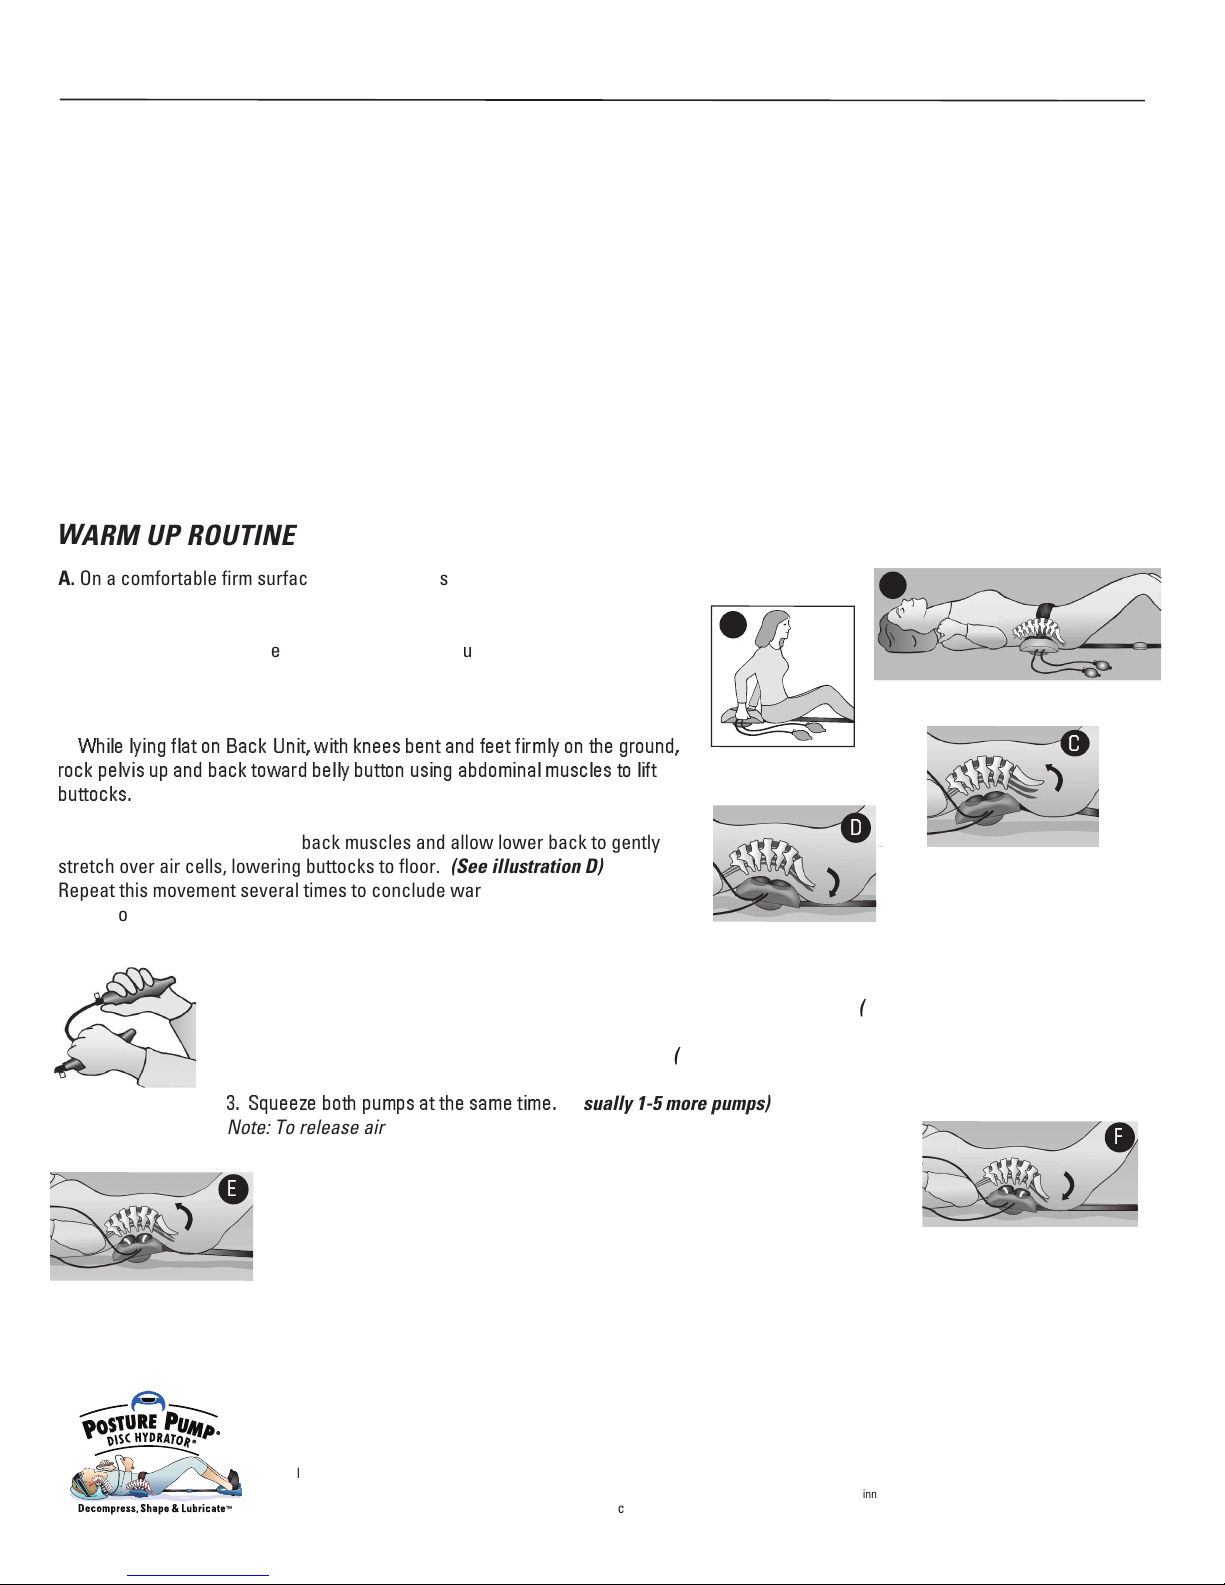
A.
On a
comf
ortable firm sur
face, i
n a seated pos
ition, sli
de deflated Back
-Uni
t (black t
ubing
will be
to your r
ight sid
e) agai
nst low
back and
butt
ocks.
(S
ee il
lus
tratio
n A)
B.
Gentl
y lean back and
over deflated Back-
Uni
t. Butt
ocks sho
uld ha
ng off e
dge
of Back-Uni
t. Move the Back-Unit
slightly up or down,
lef
t or right
to loc
ate
the
most cent
ered and comf
ortable posit
ion f
or you.
(S
e
e ill
ustration B)
C
.
While lying
flat o
n Ba
ck-Unit
, with
knees be
nt a
n
d fe
e
t firmly on t
he grou
nd,
rock pel
vis up and back to
w
ard bell
y button
using
abdom
inal m
uscles to
lift
butto
cks.
(S
e
e il
lustra
tion C
)
D.
Then rock downw
ard using
back
muscles and
all
ow low
er back
to gentl
y
stretch over ai
r cells, lowering
butt
ocks to
floor.
(S
e
e il
lustra
tion D)
R
epeat t
his movement
several tim
es to concl
ude war
m-up routine.
N
ever r
ock Back
-Unit
with N
eck-Unit inflated (
if so equipped)
.
A
D
Ne
ve
r
ro
c
k Bac
k-Unit w
it
h
Neck-Unit i
nflated (
if so equipped)
.
Call
800-NECK PRO (63
2-577
6) • 714-84
7-8607
www
.posturepump.com •
email:
sales
@posturepump.co
m
Post
ure Pro,
Inc.,16421
Gothard
St., Ste. D
, Hunti
ngton
Bea
ch,
CA
92647
E
F
C
Copyrig
ht 2
015
POSTURE PRO, Inc. U.
S. Patent Numbers
5,7
13,8
41 •
5,90
6,586
• D
508,5
66
S
• 8,7
34,37
2 •
8,76
4,69
3
• 7,
060,0
85,B
2 • 8
,029,
453,B
2
Other pa
tents pending
. Consul
t yo
ur h
ealth
car
e pr
ofession
al b
efore be
ginning
. Pr
ices
and col
ors
subj
ect to
change without notice.
Posture Pump
®
pro
ducts ar
e not design
ed to di
agnose o
r cu
re d
isea
se.
B
IMPORTANT: Posture Pump®is proven in MRI and x-ray studies to provide high level disc expansion and spinal shaping. We recommend that it
be used with the guidance of a healthcare professional. If the user tolerates the selected unit then user is to carefully follow cautions and instructions below.
CAUTIONS – Apply to all Posture Pump®Products
1. Read instructions completely before using and follow all cautions.
. Do not use this unit without first consulting your doctor. Specific
2
joint, nerve, disc, vascular and other disorders or weaknesses
can be aggravated and worsened.
3. Do not use if you have implanted spinal hardware.
4. Do not use if you are pregnant.
5. Do not use if you are injured.
6. Never inflate unit to the point of pain.
7. Never cover up or block off open ends of hand pump
(Safety Release Valve).
8. Never reposition your body when neck unit is inflated (if so equipped)! When using neck
unit and back unit together, always apply the back unit first. When all movement with
back unit is complete, apply neck unit. Completely deflate neck unit and release
head restraint before moving back unit.
9. If so equipped with neck unit and Comfort Visor
lightly moisten inside padded area to help it adhere & mold to the shape of your head.
10. If pain results during treatment, discontinue use immediately and consult your doctor.
11. An aggressive workout with the Posture Pump
If so, reduce the intensity and duration of your treatment.
12. Keep unit out of the reach of children at all times.
TM
restraint is slipping off forehead,
®
may temporarily cause soreness.
Page 4
page 4 of 6
Posture Pump® Model 2500 Instructions
®
PP
EENNTATA
VV
EC EC
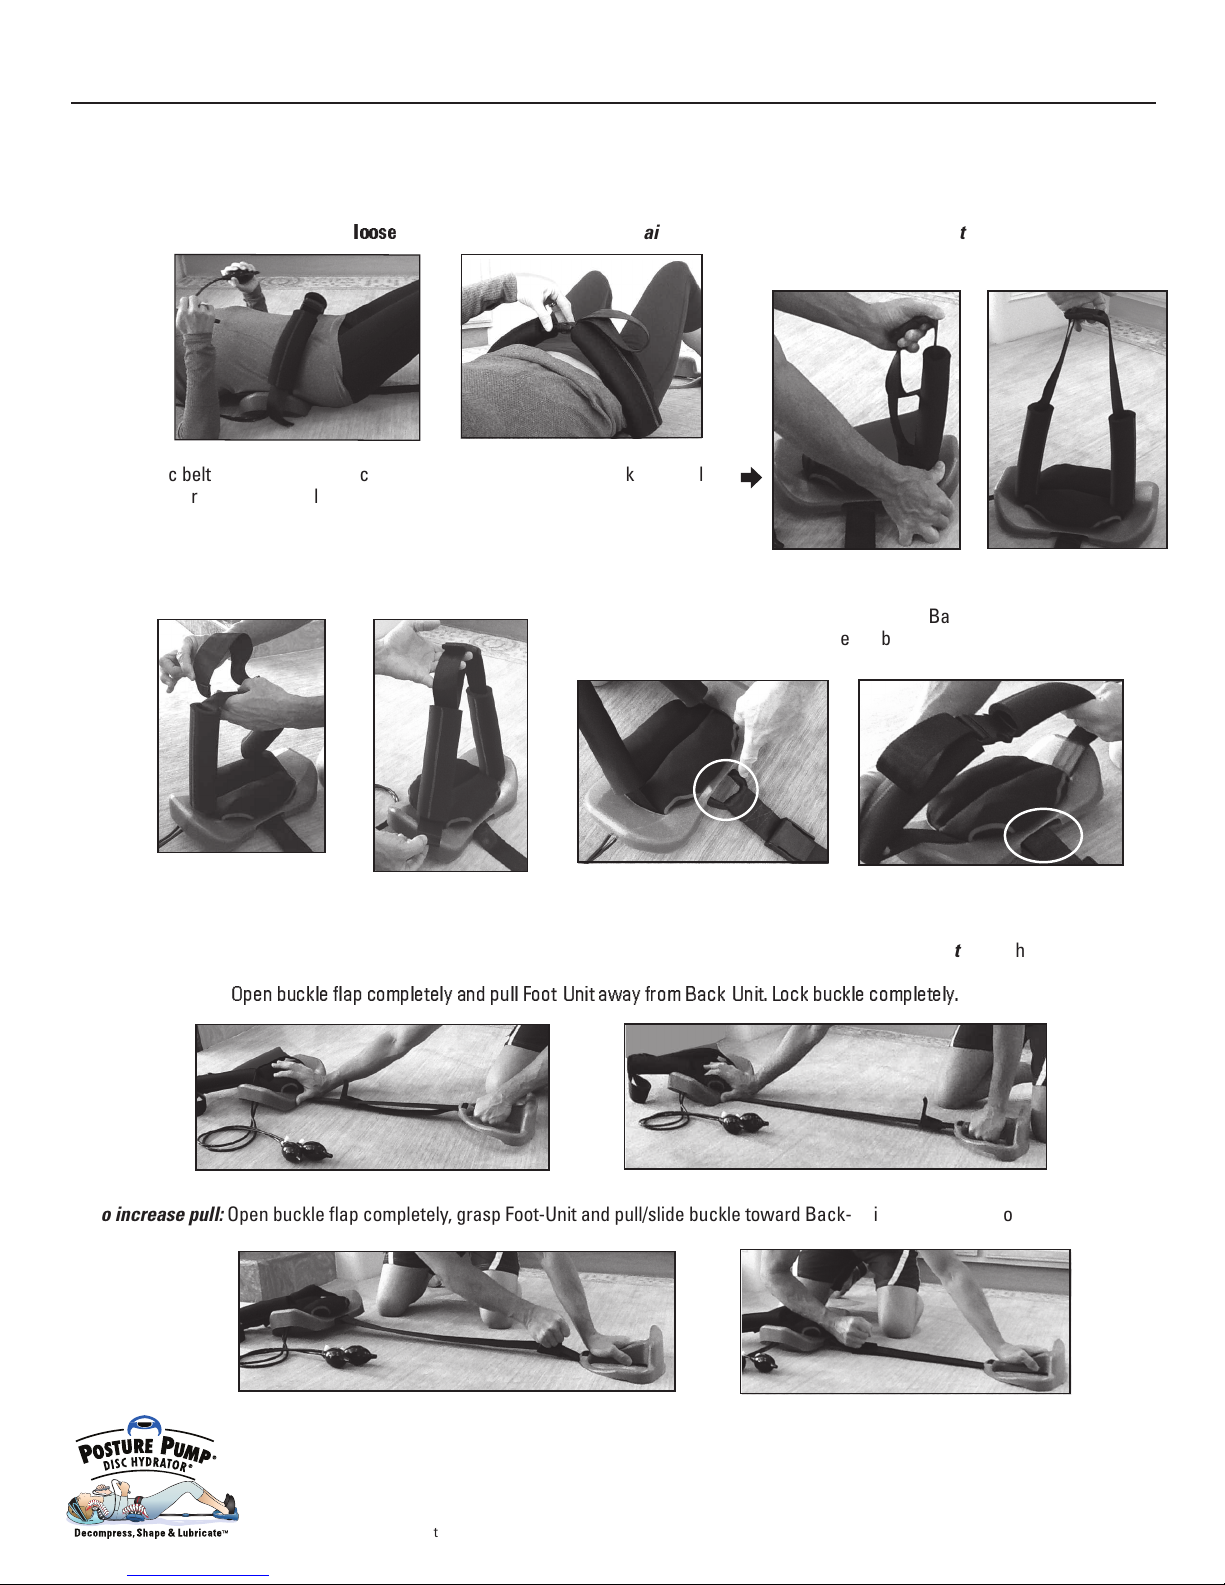
Foot-Unit Belt
The further apart Back and Foot-Unit are from each other the less the pelvic pull; the closer they are together the tighter the pull.
a) To decrease pull:
Open buckle flap completely and pull Foot-Unit away from Back-Unit. Lock buckle completely.
b) To increase pull: Open buckle flap completely, grasp Foot-Unit and pull/slide buckle toward Back-Unit. Lock buckle completely.
3. Tuck excess pelvic belt into right hip pad if desired.
Note: If belt connections are protruding from Back-Unit opening,
simply pull right and left sides of pelvic belt away from each
other before making adjustments.
Adjusting the pelvic pull
Pelvic Belt
1. The pelvic belt is adjusted slightly loose around the pelvis, below the waist and belly button. This belt should not be tight when fastened!
2. After pelvic belt adjustment, the buckle may be off center. Center buckle by pulling
the buckle toward the center. Slide hip pads along belt to make room if necessary. If
pelvic belt becomes twisted also use this maneuver to untwist by pulling the belt all the
way to the right and all the way to the left (several times) until belt becomes untwisted.
Call 800-NECK PRO (632-5776) • 714-847-8607
www.posturepump.com • email: [email protected]
Posture Pro, Inc.,16421 Gothard St., Ste. D, Huntington Beach, CA 92647
Copyright 2015 POSTURE PRO, Inc. U.S. Patent Numbers 5,713,841 • 5,906,586 • D508,566S
• 8,734,372 • 8,764,693 • 7,060,085,B2 • 8,029,453,B2 Other patents pending. Consult your health
care professional before beginning. Prices and colors subject to change without notice.
Posture Pump
®
products are not designed to diagnose or cure disease.
Page 5
page 5 of 6
Posture Pump® Model 2500 Instructions
PP
EENNTATA
VV
EC EC
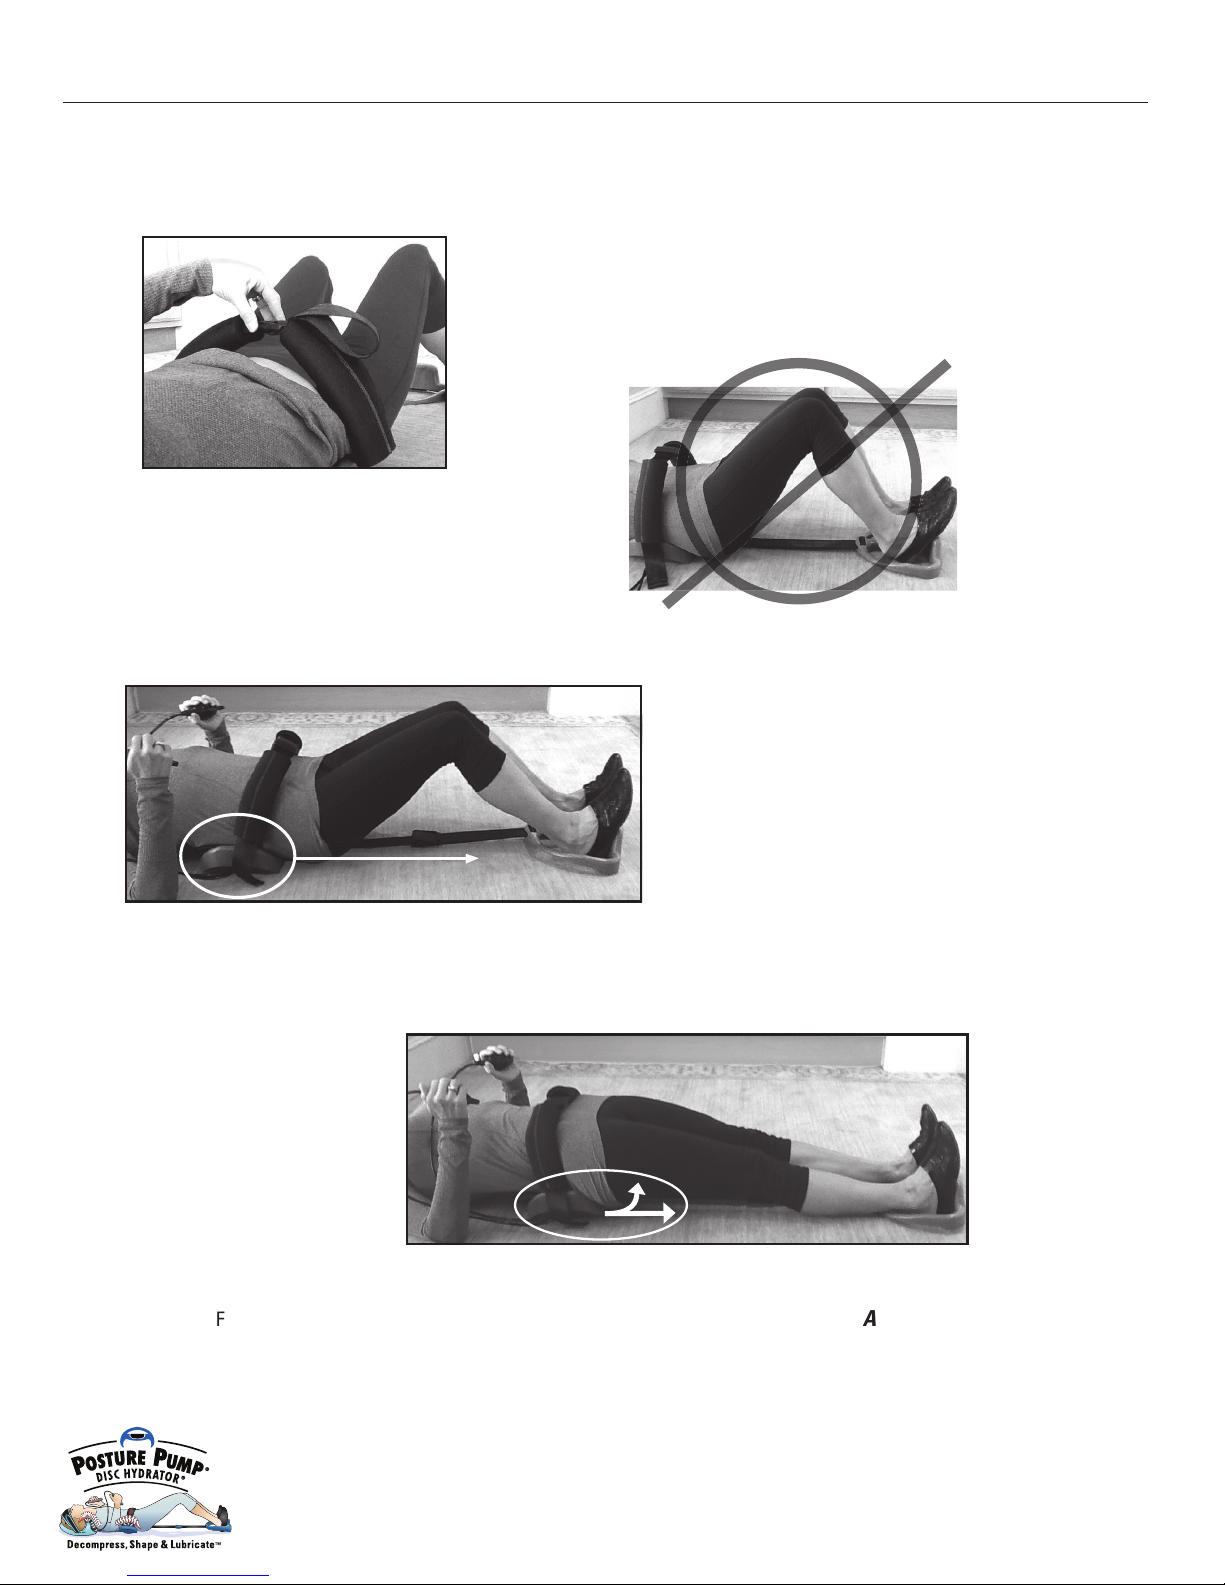
Foot-Unit belt too short, legs bent too much
N
EVER ADJUST PELVIC BELT OR FOOT-UNIT BELT
SO TIGHT THAT LEGS CANNOT BE EASILY EXTENDED
OR SO THAT PELVIC BELT CAUSES PAIN.
Proper adjustment knees slightly bent.
THIS BELT SHOULD NOT BE TIGHT WHEN FASTENED.
NOTE: Final adjustments to belts may need to change if heel thickness of shoes changes.
Always wear shoes!
With heels pushed out and up and legs extended, Back-Unit has
now slid below buttocks, lifting buttocks up and off the ground.
Foot-Unit will also be lifted about 1 inch off the ground.
®
Call 800-NECK PRO (632-5776) • 714-847-8607
www.posturepump.com • email: [email protected]
Posture Pro, Inc.,16421 Gothard St., Ste. D, Huntington Beach, CA 92647
Copyright 2015 POSTURE PRO, Inc. U.S. Patent Numbers 5,713,841 • 5,906,586 • D508,566S
• 8,734,372 • 8,764,693 • 7,060,085,B2 • 8,029,453,B2 Other patents pending. Consult your health
care professional before beginning. Prices and colors subject to change without notice.
Posture Pump
®
products are not designed to diagnose or cure disease.
Page 6
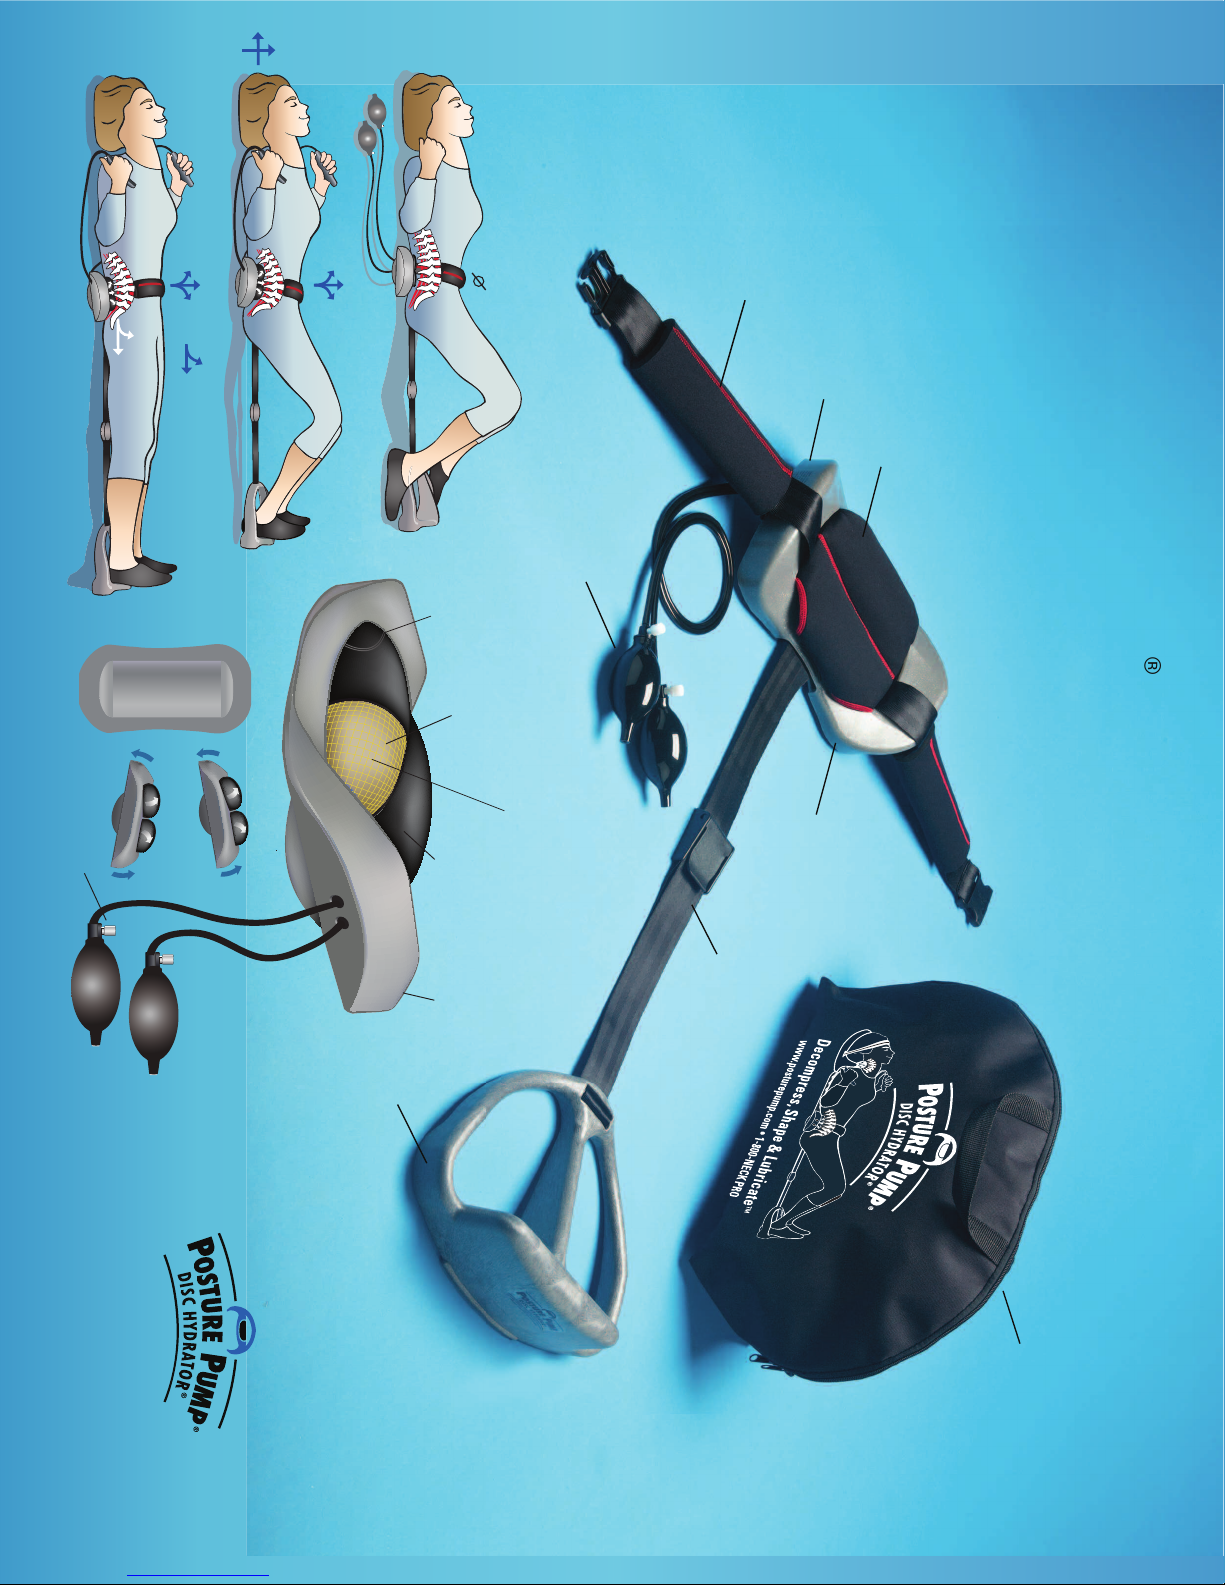
Pelvic Belt System
(X-axis pelvic belt system)
Back-Unit Frame
Rocking mechanism built in
(on bottom of frame)
Dual patient controlled
hand pumps with easy
push button release
Two uniquely angled air cells with neoprene
covers create multi-vectored force and
Expanding Ellipsoidal Decompression (EED®)
Carrying case
Posture Pump
(Model 2500)
PPEENNTATAVVECEC
ª
®
Foot-Unit Belt
(Y-axis pelvic belt system)
creates simultaneous bi-vectored
TM
traction along the Y and X-axis
Delivers 5 simultaneous force vectors into the lower spine. Simply stated, the Penta Vec™ 2500,
lifts and expands the lumbar spine while the sacrum and pelvis are rotated up and translated away.
The feeling is one of lightness and freedom from the monotonous compressive coiling
in the lower discs and joints
Top View
Curved bottom allows
for rocking motion
Bottom View
Dual manual controlled
hand pumps
Outside bladder
fabric 100%
neoprene,
waterproof, flexible
Inside bladder fabric
100% expandable
"ballistic" nylon
Exclusive bladder
stitching allows for
greater expanding
flexibility
Frame material:
engineered high
impact "ABS".
Made to last.
Push button
air release valves
Exclusive patented dual air cell pouch
allows for independent angled joint separation
Z
Y
+Z
-X
+X
+Z
-X
+X
-X
-Y
= EED®
(+)
= EED® + Bi-Vectored
Traction
Bi-Vectored
TM
Pelvic Traction Pedal (with the lower spine
under Expanding Ellipsoidal Decompression (EED®), the
lumbosacral/pelvic region is gently though powerfully translated
along the Y-axis and around the X-axis and simultaneously
rotated and unwound on the X-axis. T his unique blend of five
simultaneous force vectors cannot be manually duplicated.
page 6 of 6
Call 800-NECK PRO (632-5776) • 714-847-8607
www.posturepump.com • email: [email protected]
Posture Pro, Inc.,16421 Gothard St., Ste. D, Huntington Beach, CA 92647
Copyright 2015 POSTURE PRO, Inc. U.S. Patent Numbers 5,713,841 • 5,906,586 • D508,566S
• 8,734,372 • 8,764,693 • 7,060,085,B2 • 8,029,453,B2 Other patents pending. Consult your health
care professional before beginning. Prices and colors subject to change without notice.
Posture Pump® products are not designed to diagnose or cure disease.
 Loading...