

Posture Pump Disc Hydrator Instructions Manual

Posture Pump®Disc Hydrator®Instructions
Stop! Read This First!
Posture Pump® is a serious spinal health product recommended by doctors to thousands of patients throughout the USA and other
countries. It is not a massage device or an “occasional use” product! Keep Posture Pump® on your bed, night stand or a place where you can USE IT
OFTEN. Take it with you on trips. Just minutes on the Posture Pump
THE JOINTS and PROMOTE PROPER POSTURE.
During the first week, as the natural shape of your neck and back is strengthened, you may experience normal discomfort and soreness. As with any
new exercise, THIS IS NORMAL. Skip a few days if you must, but STICK WITH IT! DON’T QUIT! Think of Posture Pump® as you would your toothbrush. Just as your toothbrush protects your teeth, let Posture Pump® strengthen and lubricate your neck and back. Like working oil into a rusty hinge,
use Posture Pump
eck and back discomfort, stiffness, stress and to fall asleep easier.
n
®
after long periods of holding your head, neck and back in uncomfortable positions. Many use it just before bedtime to relieve head,
Be Flexible! . . . Stand Taller! . . . Look & Feel Younger!
®
will reinforce your neck and back’s NATURAL CURVED SHAPE, LUBRICATE
Arrow from ear
canal should line
up with center
of shoulder.
Check yours!
Help Prevent the Hump with Posture Pump® and Avoid Stooped Posture as you age.
“Computer Neck”
Forward Head Carriage:
The most common cause of
neck and upper back fatigue
and tension.
Nothing works like
Posture Pump
Driving Stress:
Low back, middle back
and neck tension and
stiffness.
®
. Nothing!
Forward-Flexed
Neck Positions:
Force the natural curve
out of the neck and
promote poor posture.
Side-Flexed
Neck Positions:
Cause stiffness
and spasm.
Use Posture Pump® regularly
as directed and carefully
follow directions and cautions
Shoulder and
Upper Back Tension
.
”Telephone Neck”
Call Posture Pro, Inc, 1-800-632-5776 (USA) or (714) 847-8607 for questions www.posturepump.com sales@posturepump.com
Copyright 2015 POSTURE PRO, Inc. •
Consult your health care professional before beginning. Prices and colors subject to change without notice.
16421 Gothard St., Ste. D, Huntington Beach, CA 92647 •
Six months manufacturer warranty with proof of purchase.
U.S. Patent Numbers 5,713,841 • 5,906,586. • D508,566S • 7,060,085,B2 •
1
Posture Pump®products are not designed to diagnose or cure disease.
8,029,453,B2 • 8,734,372 • 8,764,693
Other patents pending.
Revisions 3-4-15
Posture Pump®Model 4100 Series (4100-S • 4100-SX • 4100-D)
CAUTIONS – A pply to all Posture Pump®Products
IMPORTANT: Posture Pump®is proven in MRI and x-ray studies to provide high level disc expansion and spinal shaping. We recommend that it
be used with the guidance of a healthcare professional. If the user tolerates the selected unit then user is to carefully follow cautions and instructions below.
1. Read instructions completely before using and follow all cautions.
2. Do not use this unit without first consulting your doctor. Specific
joint, nerve, disc, vascular and other disorders or weaknesses
can be aggravated and worsened.
3. Do not use if you have implanted spinal hardware.
4. Do not use if you are pregnant.
5. Do not use if you are injured.
. Never inflate unit to the point of pain.
6
7. Never cover up or block off open ends of hand pump
(Safety Release Valve).
8. Never reposition your body when neck unit is inflated! When using neck unit and
back unit together, always apply the back unit first. When all movement with
back unit is complete, apply neck unit. Completely deflate neck unit and release
head restraint before moving back unit.
. If Comfort Visor
9
rea to help it adhere & mold to the shape of your head.
a
TM
estraint is slipping off forehead, lightly moisten inside padded
r
10. If pain results during treatment, discontinue use immediately and consult your doctor.
11. If your back is sensitive or extremely stiff, first use the unit on your bed/mattress.
As your flexibility increases, you may wish to graduate to a flat, firm surface.
12. An aggressive workout with the Posture Pump
®
may temporarily cause soreness.
If so, reduce the intensity and duration of your treatment.
13. Keep unit out of the reach of children at all times.
Posture Pump®Disc Hydrator®Deluxe Full Spine Series
P
osture Pump
pumps and inflate, rock and deflate as instructed below. Leave unit inflated to a comfortable level on the last repetition and perform the same procedure on neck unit without rocking.
Relax with both units inflated for up to 15 minutes. Please read and follow all cautions and instructions before beginning. Always perform the warm-up
routine below before
Warm-Up Routine: Begin by slowly turning your head and
neck side-to-side 5 times; then tilting your head and neck forward and backward 5
times; then leaning the head and neck side-to-side 5 times.
comfortably into neck cradle. Move lower unit Elliptical Back Rocker™ slightly
up or down, left or right, to locate the most comfortable and centered
position for you.
®
i
s fun and easy to use! Lie over unit as shown below, making sure you are comfortable, centered and head restraint is firmly applied. Grasp the 2 lower back hand
beginning the training session.
(Unit will elongate to fit taller users by stretching the
ttachment pad and/or adjusting the
a
lower unit.)
A. On a comfortable firm surface, in a seated
A
position, slide deflated unit against low back
and buttocks. (Illustration A)
B. While grasping lower portion of unit, gently lean
your back and neck over deflated unit. Buttocks
should hang off edge of lower unit; neck should fit
C. While lying flat on unit with knees bent and feet firmly on
the ground, begin to rock lower portion of
Elliptical Back Rocker™ by rocking pelvis up and
back toward belly button using abdominal muscles
to lift buttocks. Then rock downward using back
muscles, allowing your lower back and abdominal muscles
to gently stretch over air cells and lowering buttocks to
(Illustration B)
Velcro
®
traps above
s
B
C
D
floor. Repeat this movement several times to conclude
warm-up routine. (Illustrations C & D)
Posture Pump®Disc Hydrator®Deluxe Full Spine Training Session
10. Using your abdominal and pelvic muscles gently rock back and forth 3-5 times
repeating actions of section C above.
See Illustrations E & F)
(
11. Deflate air cells by pushing down on both pump buttons at the same time.
12. Repeat steps 7 through 11 several times leaving unit inflated to a comfortable
level on the last repetition.
.
13. Keeping the back unit inflated to a comfortable level, make sure your neck is still
centered on the neck cradle (using your index fingers to measure) and strap should
remain snug.
14. Grasp the hand pump that operates the neck air cell(s) and slowly pump unit up
to your own comfort level; never to the point of pain. (Model 4100-S usually 1 to 7
complete pumps; Model 4100-SX between 1–9 complete pumps; Model 4100-D
usually 2 to 12 complete pumps. Pump less times during first week of use.
(Pump is equipped with automatic air release valve, limiting inflation.) Never
cover up or block off open ends of hand pump.
15. Wait 10 seconds, then release all air by pushing the manual air release button on
the pump. Repeat this workout 10 to 15 times, leaving neck air cell(s) inflated at a
comfortable level on last repetition.
16. With all air cells now inflated to comfortable levels, allow your entire spine to
®
stretch over inflated air cells keeping your buttocks on the ground. Relax on inflated
unit for 1 to 5 minutes on first session. Gradually work
up to a maximum goal of 15 minutes by adding a few
G
minutes to each training session or as directed by your
healthcare professional. Inflate unit at lower levels the
first week, thus reducing soreness commonly caused by
aggressive workouts.
17. Completely deflate all air cells (neck first), and release velcro straps from forehead
and remove Comfort Visor
(See Illustration G)
TM
. Gently bring knees to chest one at a time for 5 seconds
each. Then bring both knees to chest and hold for 5 seconds. Gently roll off unit and on
to your left or right side slowly and carefully without turning your head. When you are
free from the unit and standing or sitting in an upright position, gently and slowly repeat
warm-up routine to acclimate your neck muscles to the weight of your head.
18. Never rock unit while the neck unit is inflated.
19. Keep unit near bed or night stand and repeat the above treatment daily or at least 3
times per week to help relieve tension, stress and fatigue and to reinforce your
natural neck and back curves while lubricating the joints. Many users find this unique
workout, just before bedtime, allows them to fall asleep easier.
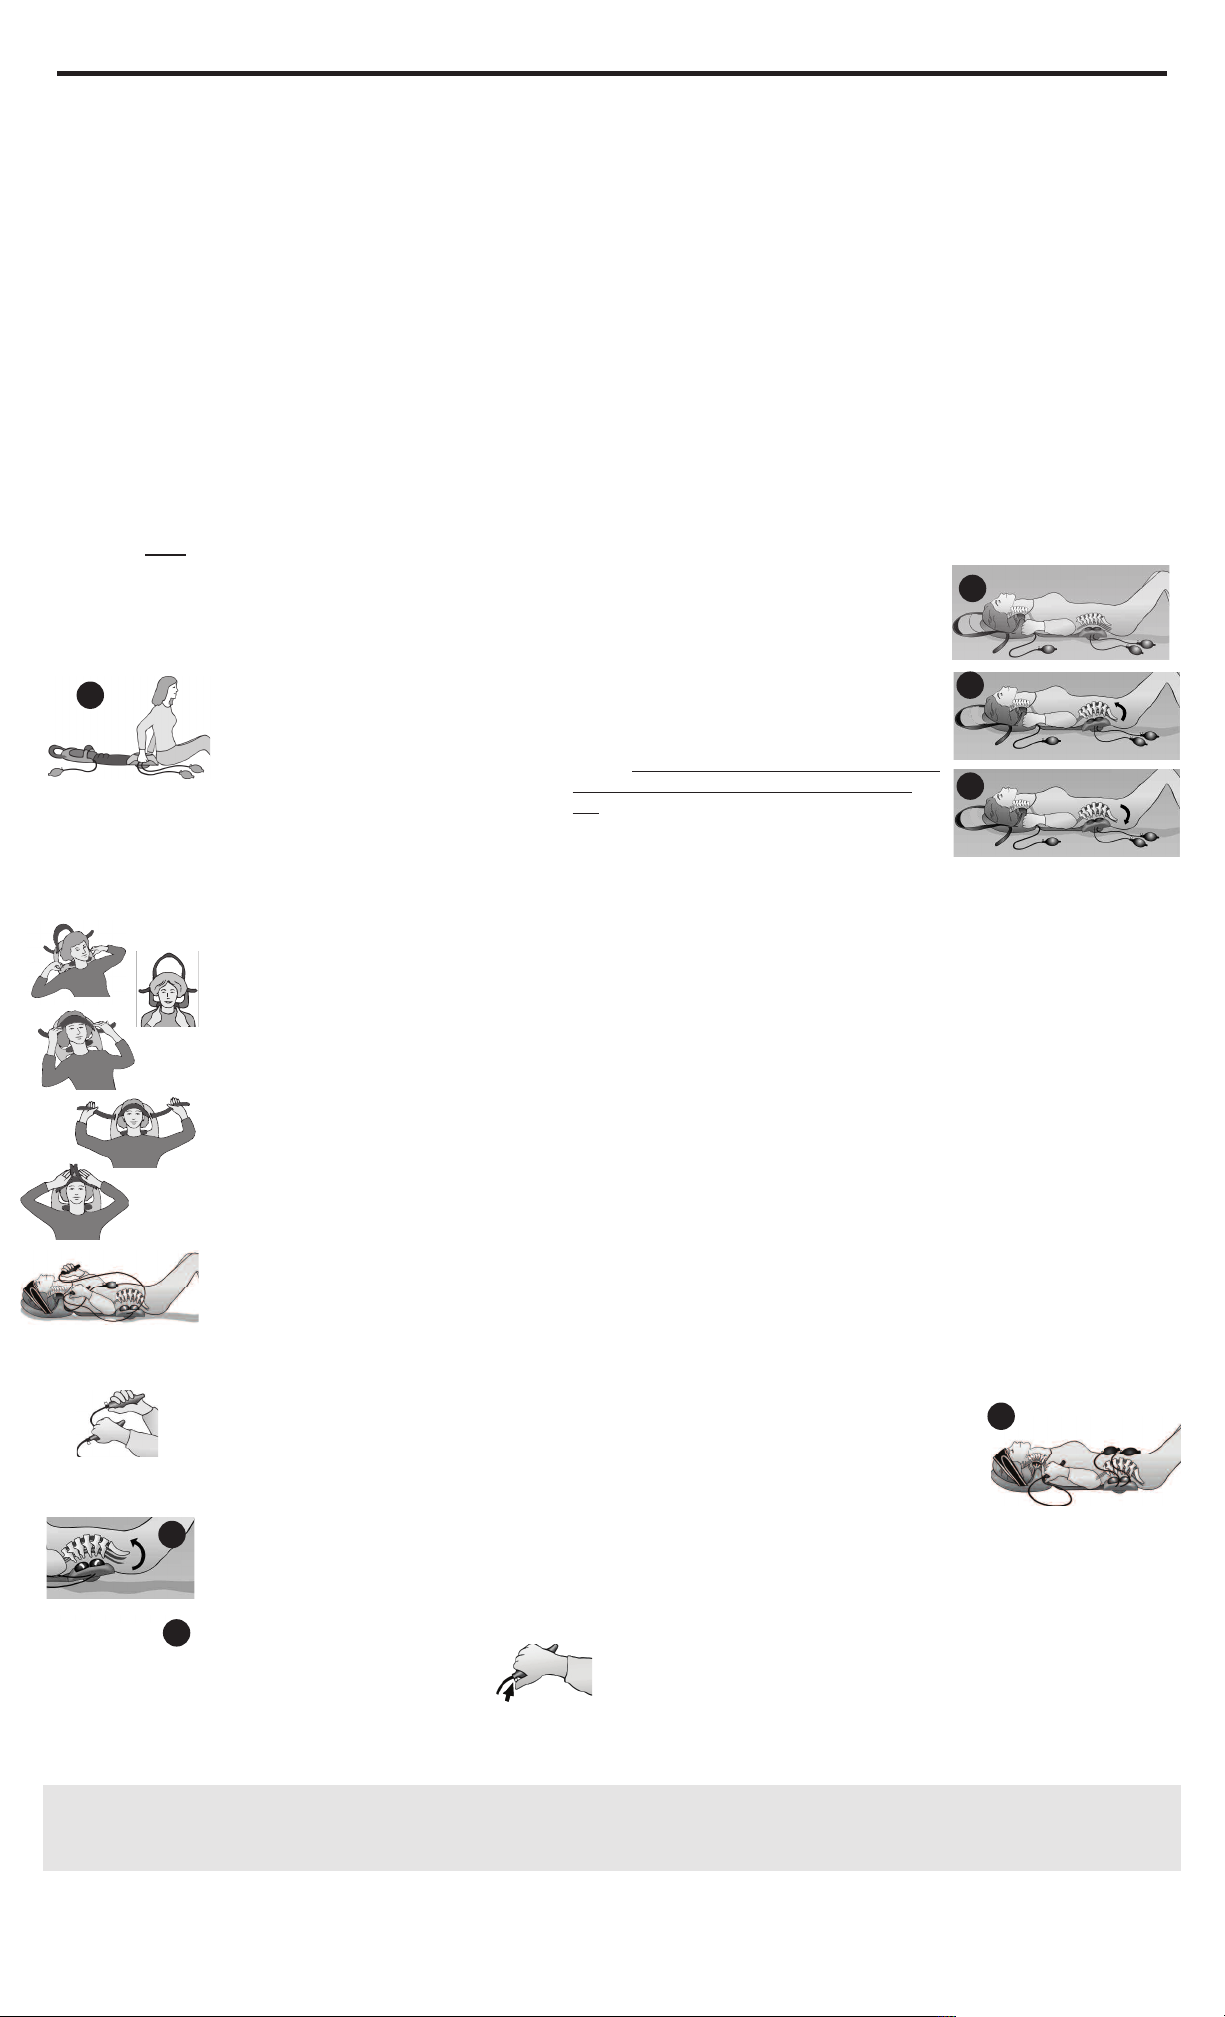
Left hand is
upper air cell
Right hand is
lowest air cell
1. After warm-up routine, place deflated unit on a comfortable, firm
surface. Deflate air cell(s) by pushing the button on the pump
and squeezing air cell(s). With Comfort Visor
TM
untangled at back of unit, slide and center unit under the back of your
neck, snugly against your shoulders and upper back.*
2. Center your neck on neck cradle measuring with index
fingers.*
(see illustration)
3. Apply Comfort VisorTMby centering it across your
forehead. While holding it there with fingers, lightly tighten
one side at a time until snug and centered.* Allow it to slide
back toward hairline as you pull all slack out of Comfort
TM
Visor
ends equally while holding frame down with fingers.
Comfort Visor
TM
will mold to the shape of your forehead
as it slides back. Reposition until it feels secure and
comfortable.
shorter necks locate Comfort VisorTMin forward slots. For larger
size locate Comfort VisorTMin back slots.
4. Hold back of unit down with tips of index fingers or thumbs
and further tighten Comfort Visor
(see illustrations) Note: For smaller heads and
TM
if necessary. (see illustration)
5. Press ends of Comfort VisorTMstraps across the Velcro
forehead section. Comfort VisorTMshould be as snug as possi-
ble without lifting up the back of the unit and may be tightened
further after the first repetition.
during application on some surfaces. THIS IS NORMAL.)
(Back of frame may lift slightly
6. Leaving neck pump on chest/stomach area for easy access,
grasp the two hand pumps that work lower unit; lowest air cell
pump in your right hand, upper air cell pump in your left
E
hand. (Squeeze each pump separately to confirm lowest air
cell pump is in right hand.)
7. Inflate lowest air cell with right hand pump to a firm comfortable level, never to the point of pain.
F
pumps)
(Usually 1-5 complete
8. Inflate upper air cell with left hand pump
to an equally comfortable level.
complete pumps)
(Usually 1-5
9. Squeeze both pumps at the same time. (Usually 1-3 more
pumps)
forehead restraint
Note: Placing a cold gel pack over one of the air cells, usually the lowest pouch, is recommended to speed recovery from stiffness and discomfort. Chronic stiffness and discomfort may take 30-60 days or more to adequately subside. If
pain results during treatment, discontinue use immediately and consult your healthcare professional. Cover gel pack with cloth; never place gel pack directly against skin! Just like performing any new exercise, an aggressive workout with
Posture Pump
* If you are not snug, comfortable and centered on the inflated neck bladder or back bladders, or if it seems to inflate unevenly, completely deflate all air cells, remove forehead restraint, then re-center yourself on the unit and reapply the
forehead restraint.
®
can temporarily make you sore. To reduce this occurrence, inflate unit at lower levels and keep your workouts under 10 mins for the first 2 weeks. This will allow your body to gradually adapt to a more aggressive workout.
To contact Posture Pro, Inc, call 1-800-632-5776 (USA) or (714) 847-8607. Fax (714) 375-4183 www.posturepump.com sales@posturepump.com
Copyright 2015 POSTURE PRO, Inc. •
Other patents pending. Consult your health care professional before beginning. Prices and colors subject to change without notice.
16421 Gothard St., Ste. D, Huntington Beach, CA 92647
U.S. Patent Numbers 5,713,841 • 5,906,586 • D508,566S • 7,060,085,B2 •
Posture Pump®products are not designed to diagnose or cure disease.
2
8,029,453,B2• 8,734,372 • 8,764,693
 Loading...