

Page 1

User Guide
3068 and 3078 Letter Opener
Version A 04/2016
20160428
Page 2

TABLE OF CONTENTS
3068 Serial Numbers Above:
PM2680300
PM1680300
3078 Serial Numbers Above:
PM2780100
PM1780100
Safety ............................................................................................................................ Page 2
Before You Start ................................................................................................... Page 3-4
Packaging Recommendations ....................................................................... Page 4
Setting Up ................................................................................................................ Page 5-6
Turning on the Machine ..................................................................................... Page 7
Variable Speed ........................................................................................................ Page 7
Using the Touchscreen ...................................................................................... Page 7
Settings ........................................................................................................................ Page 8
Factory Reset .......................................................................................................... Page 8
Feed Settings ...................................................................................................... Page 9-10
Batch Counter ........................................................................................................ Page 11
Statistics ................................................................................................................... Page 12
Envelope Feeding ................................................................................................ Page 13
Troubleshooting ................................................................................................... Page 14
Specications ........................................................................................................ Page 15
Model 3068 and 3078 User Guide
Page 2
Page 3

SAFETY
Warnings
• Disconnect the power supply before performing any maintenance.
• Before connecting the system to the electrical supply, ensure that the system is suitable for the local mains
voltage. Refer to the serial plate on your system for voltage requirements.
Precaution
The general process of automated document handling can sometimes create a build up of static electricity. Therefore we
recommend that the following measures are taken to reduce the side effects of any electrostatic charge.
• Make sure that you operate the system within the recommended temperature and humidity conditions.
• Make use of antistatic mats where appropriate.
• If necessary, make use of an ionizer to reduce static charge build up in the room where the system is located.
Please contact your supplier for further information.
Safety Precautions
• Only competent, trained personnel should operate this system. If non-trained personnel do operate this
system,the manufacturer will not accept responsibility for any resulting accidents or injuries.
• Only skilled persons, who are aware of the risks involved, may open the protective covers. For safety reasons,
the system will not function when the safety covers are open.
• Keeplonghair,ngers,jewelry,etc.awayfromrotatingandmovingparts.
• The power connection must be easily accessible, preferably close to the system. For safety reasons, it is
essential that the system is connected to a socket outlet that has a protective earth (ground) connection.
• Over current protection in the equipment also relies on the branch circuit protection (max. 20 A).
• The following part(s) is (are) considered the equipment disconnect device(s):
- Power supply cord plug or appliance coupler.
Country Specic Conditions
Denmark
In Denmark, certain types of Class 1 appliances may be provided with a plug that does not provide an adequate earth
(ground) connection when inserted into a Danish socket outlet. Make sure the system has a good functioning connection
that has protective earthing (the plug and socket outlet must match).
Japan
• Establish an earth (ground) connection before connecting the mains plug to the power supply.
• First disconnect the power supply before removing the earth (ground) connection.
Model 3068 and 3078 User Guide
Page 3
Page 4
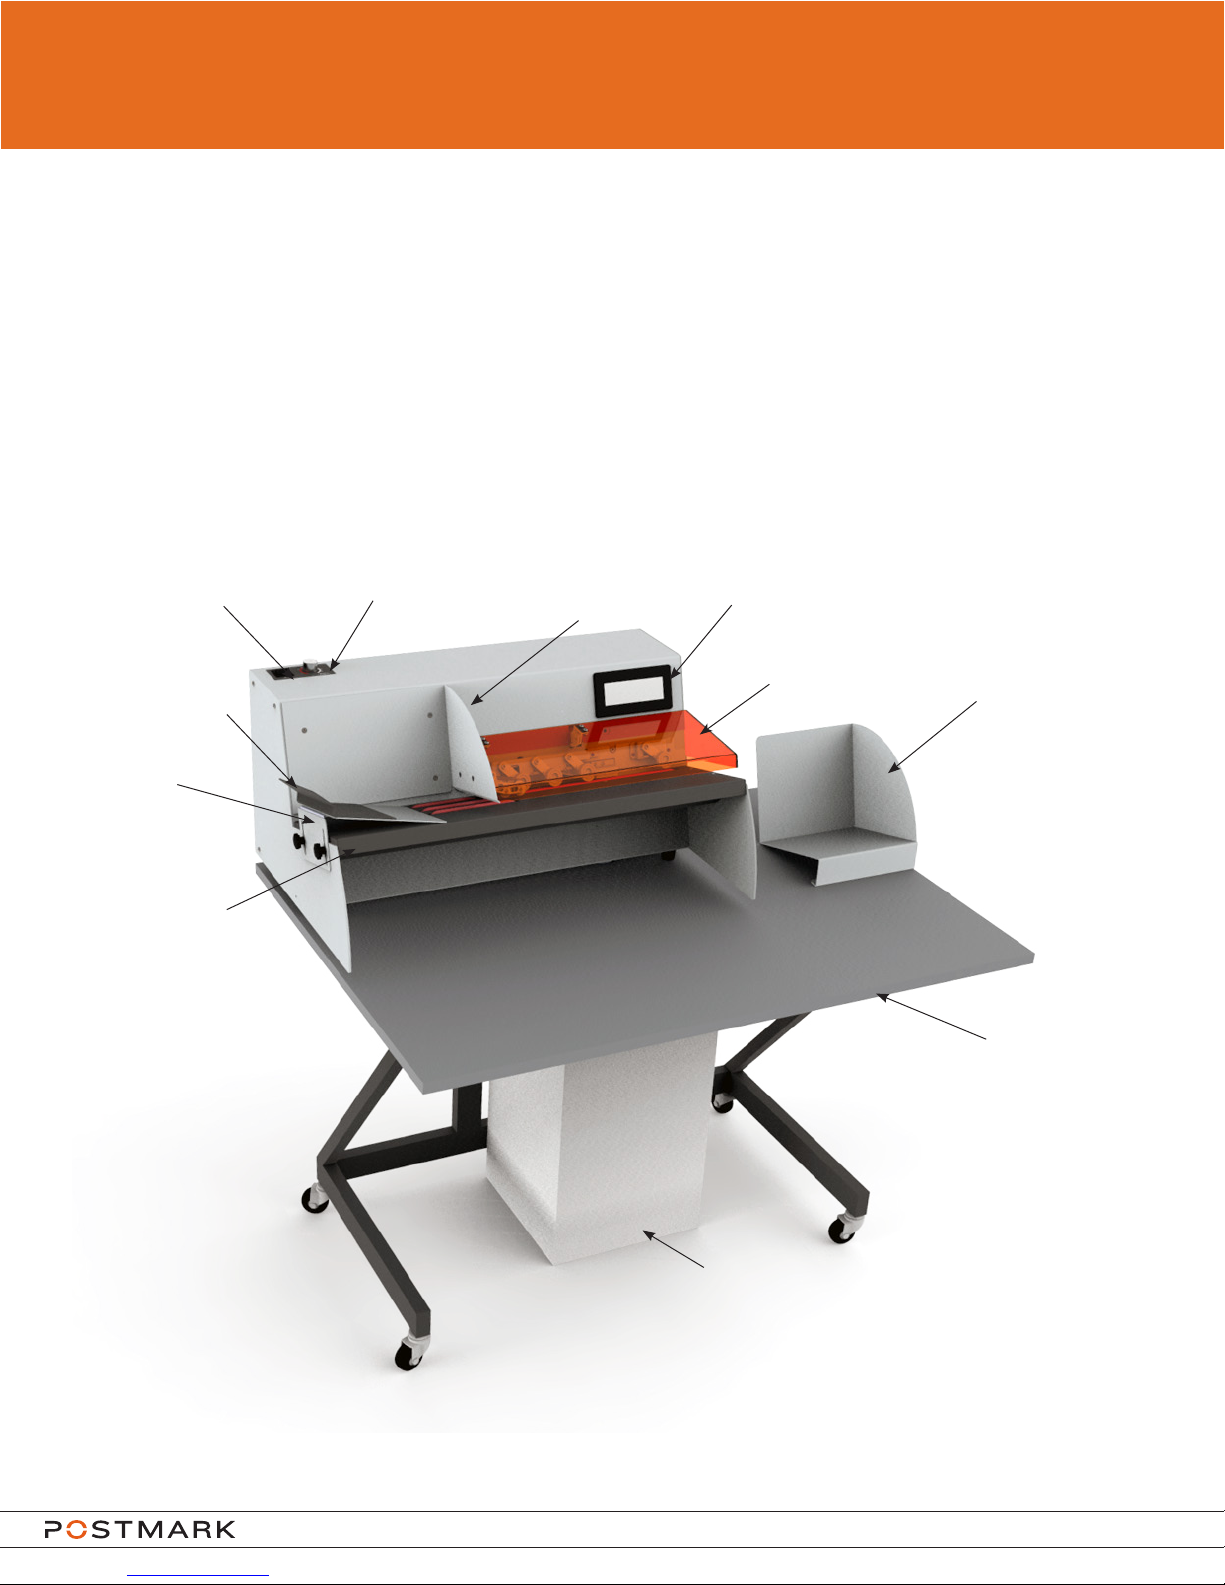
BEFORE YOU START
Introduction
The 3068 and 3078 are high speed milling cutter letter openers for processing incoming mail. The system:
• Feeds envelopes
• Counts envelopes
• Opens envelopes
• Stacks envelopes
The letter openers can be fed continuously with stacks of envelopes without having to stop the machine.
The 3068 and 3078 are equipped with a milling cutter opener for clean and consistent cutting.
3068 Machine Layout
On/Off
Support
Guide
Ramp
Base
Feed Plate
Speed Control
Hopper
Touch Screen
Track Cover
Receiving Tray
Table and
Stand
Waste Bin
Model 3068 and 3078 User Guide
Page 4
Page 5
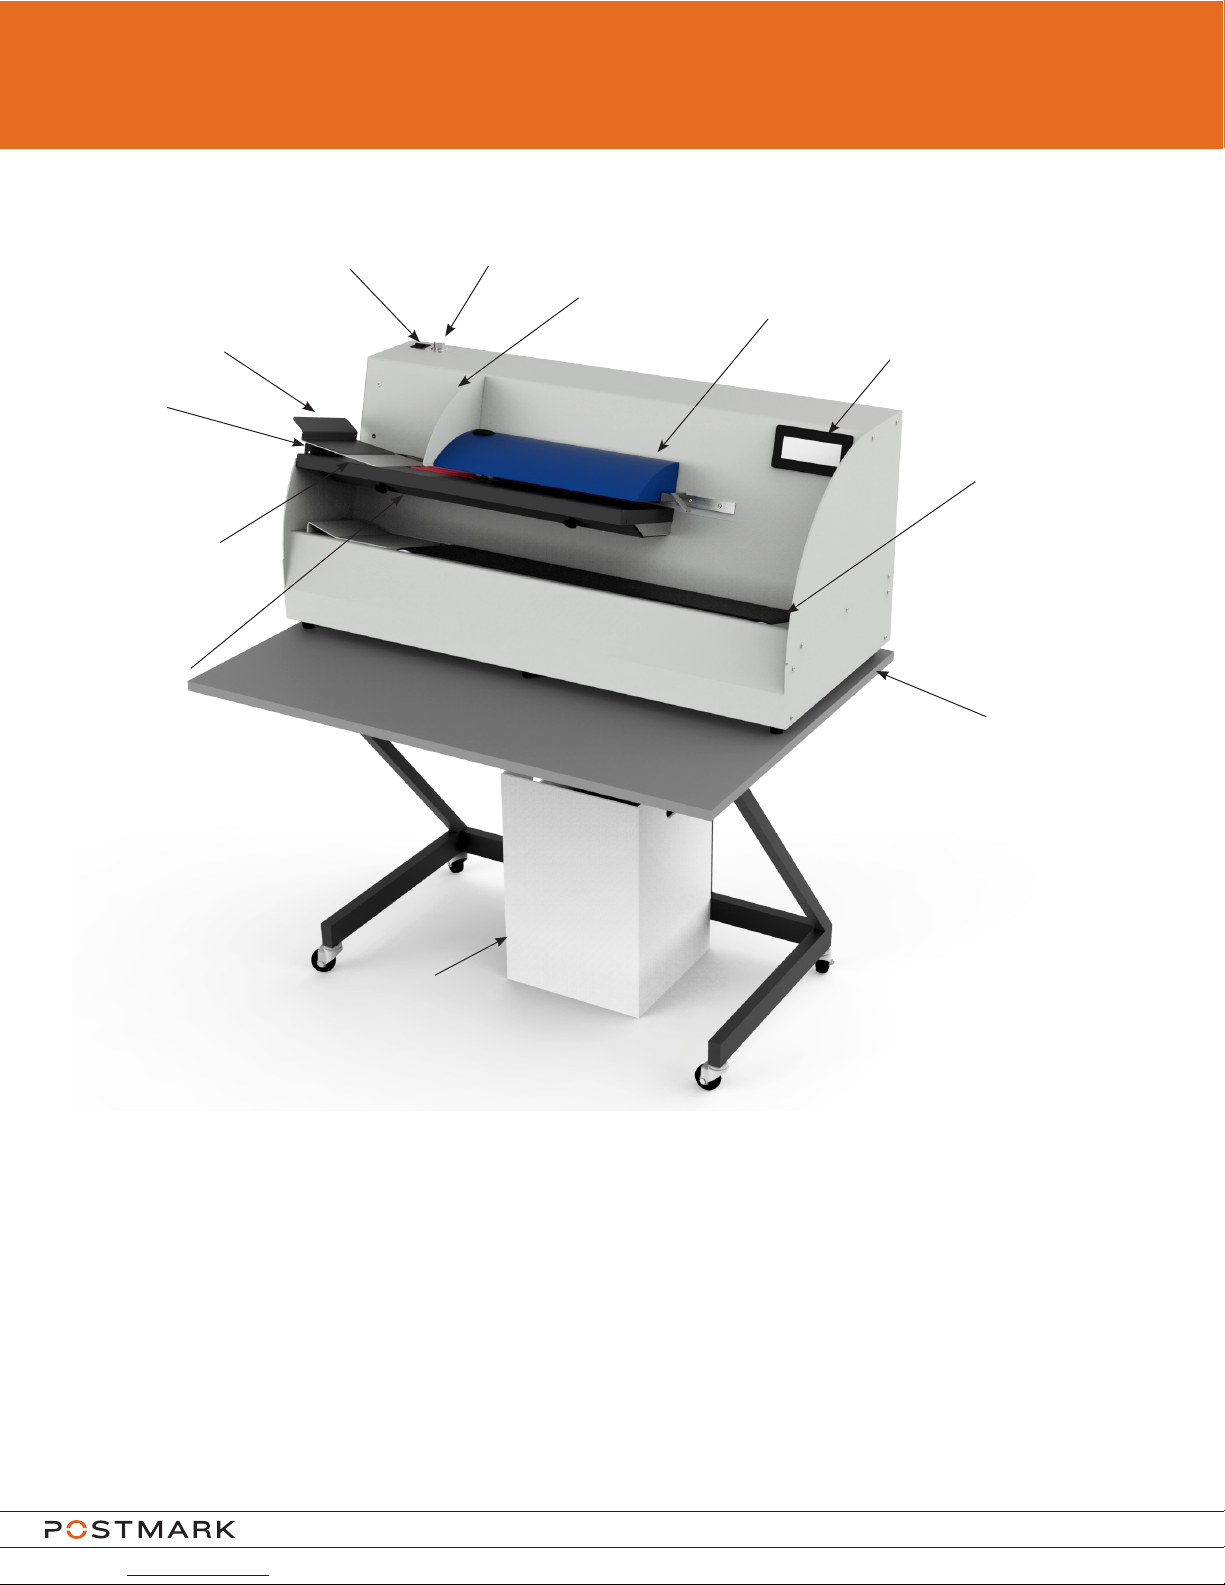
BEFORE YOU START
3078 Machine Layout
Support
Guide
Ramp
Base
Feed Plate
Transport
Bar Cover
On/Off
Speed Control
Hopper
Track Cover
Touch Screen
Reverse Flow Conveyor
Table and
Stand
Waste Bin
PACKAGING RECOMMENDATIONS
If packaging needs to be disposed of please follow local guidelines for recycling and waste
disposal.
Ensure that the table top and waste bin are not discarded. They can be found at the very
bottom of the packaging under the metal stand.
Model 3068 and 3078 User Guide
Page 5
Page 6
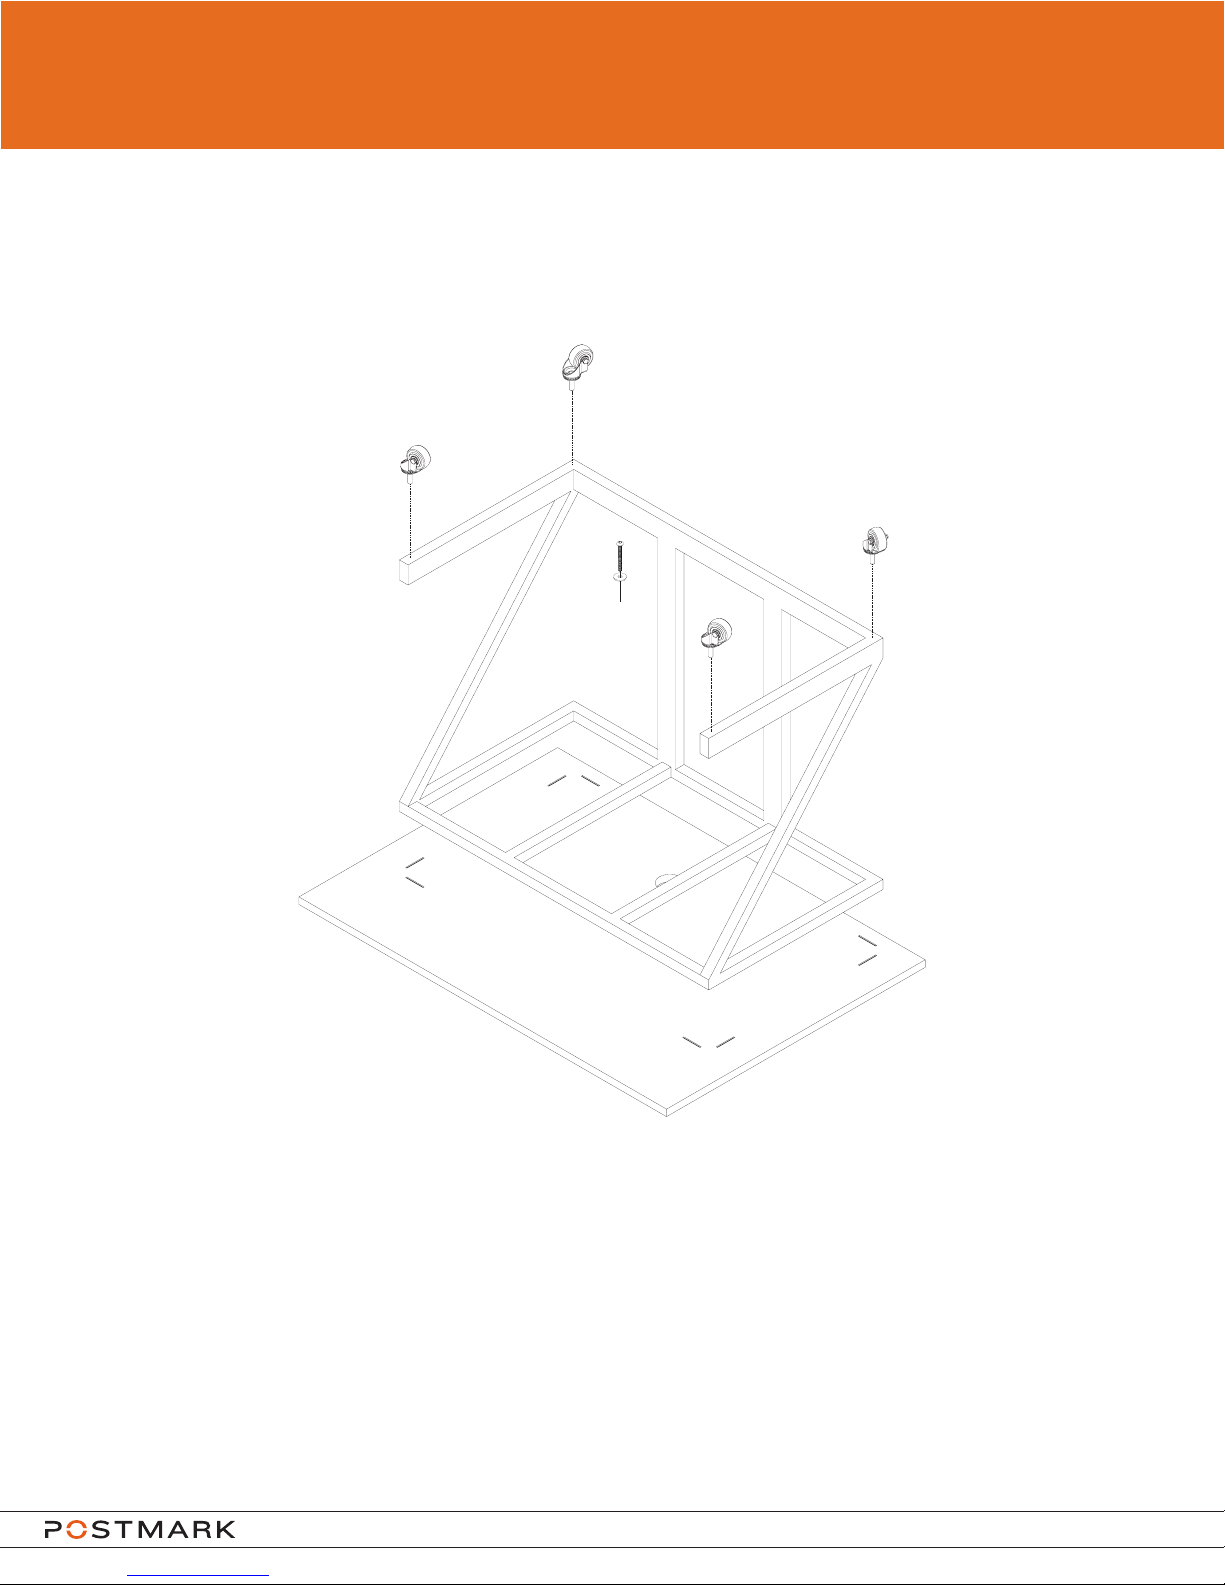
SETTING UP
The3068and3078letteropenerswillneedsomesetupbeforetheycanbeused.Pleasend
the following illustrations for instruction on assembling the table and stand, installing the waste
tube, and placing the waste bin.
x6
Thread the four included wheels into the bottom of the metal stand as shown in the above
illustration.
Line up the metal stand with the four corner marks located on the bottom of the table top. Using
the 6 provided screws and washers, thread screws through the metal stand into the threaded
inserts on the table top. Tighten screws using the provided Allen key.
Model 3068 and 3078 User Guide
Page 6
Page 7
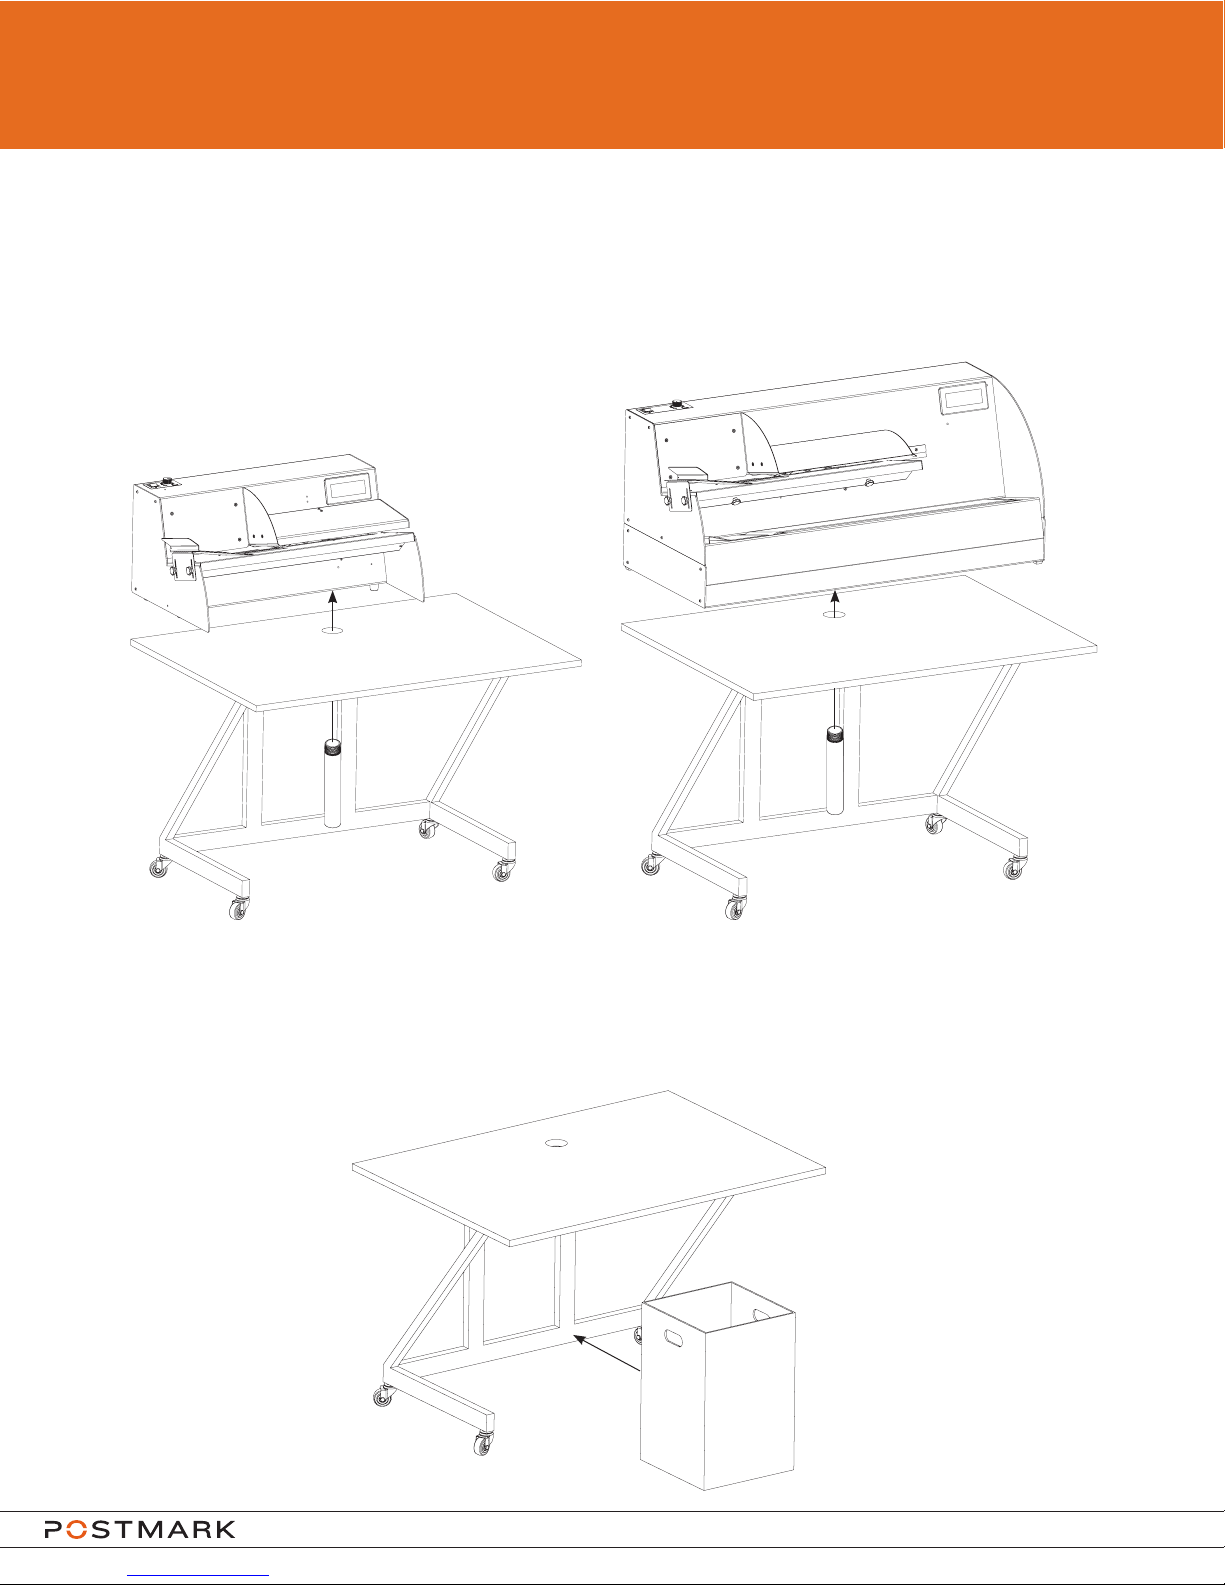
SETTING UP
Place the machine on top of the table as shown in the following illustrations.
Once the machine has been placed in the correct position on the table, thread the included
grey waste tube from the underside of the table through the chassis into the milling cutter.
3068 3078
Assemble waste bin and place under the machine so it is centered under the waste tube as
shown in the below illustration.
Be sure to empty the waste bin frequently.
Model 3068 and 3078 User Guide
Page 7
Page 8
OPERATION
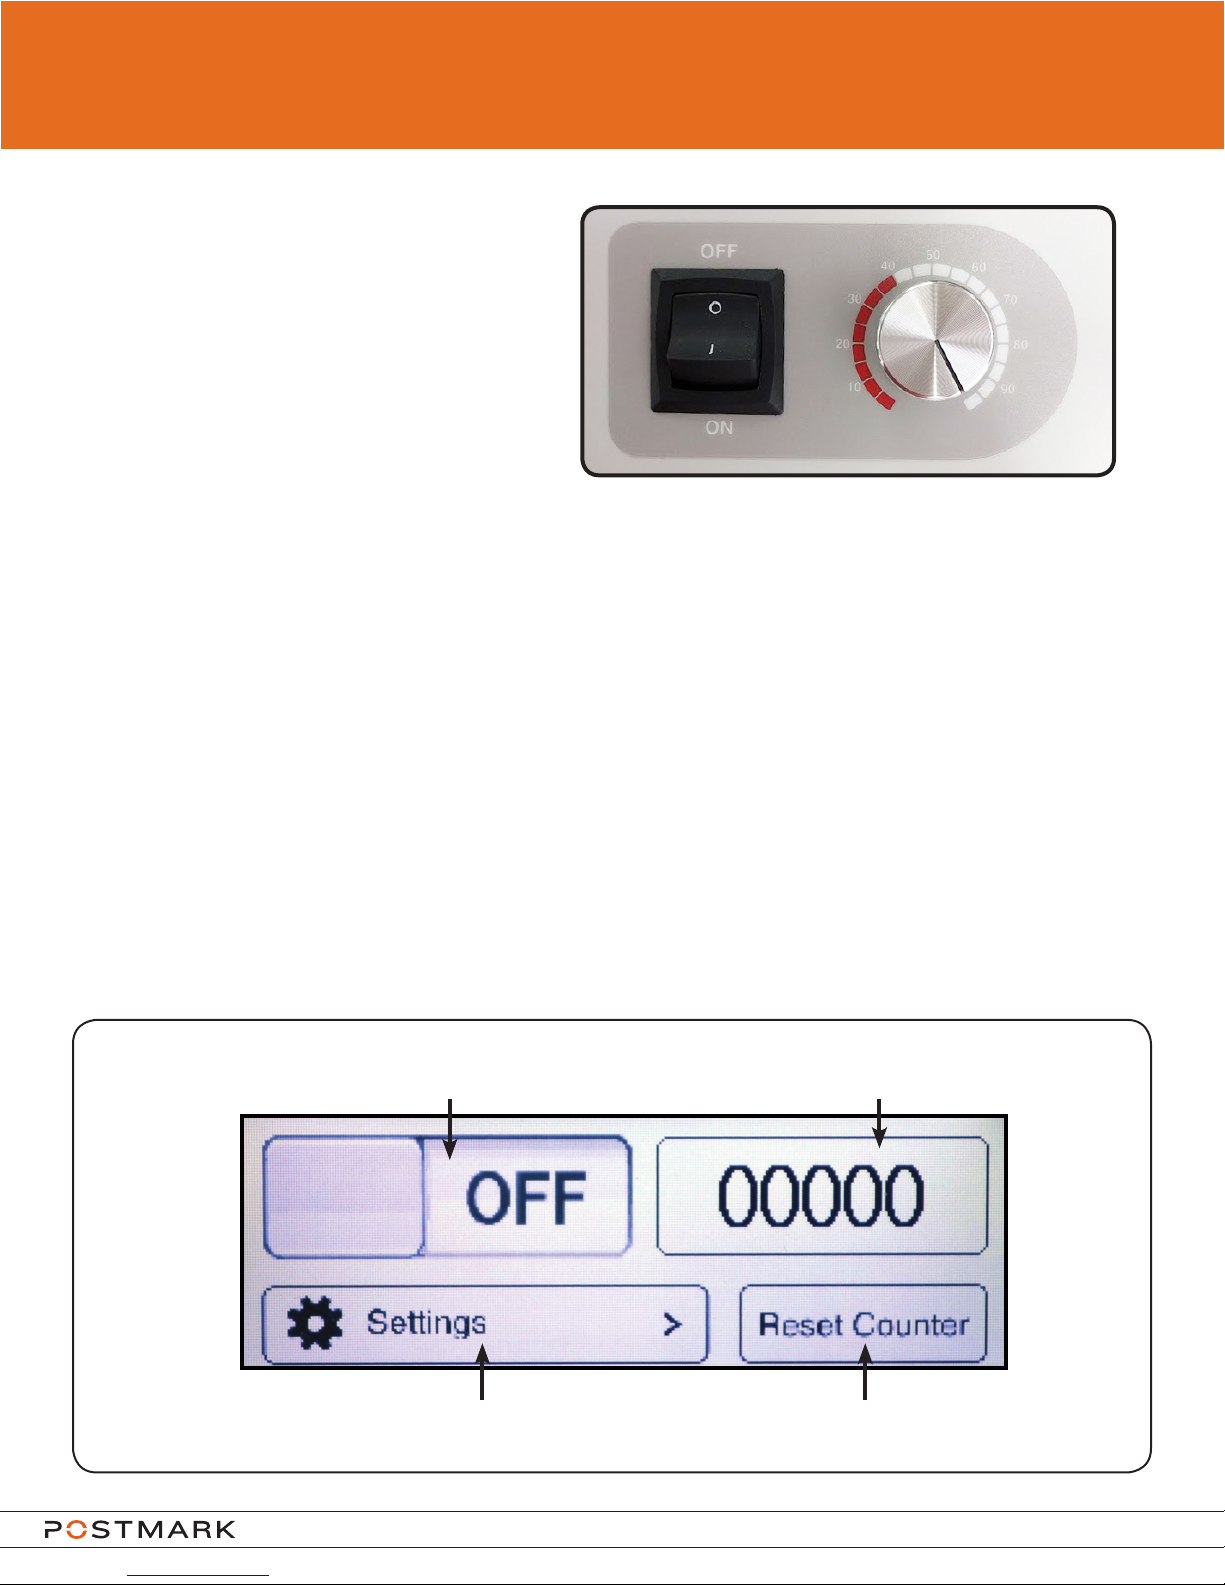
Turning on the machine
Plug in the power cord.
To turn the power on press down “l”.
To turn the power off press down “O”.
Variable Speed
The model 3068 and 3078 letter openers are equipped with variable speed which allows the
changing of the machine speed which changes the feed rate of envelopes. The speed can be
adjusted from 0-100% by turning the knob to the right of the power button.
Please note that envelopes may not open correctly when speed is below 40% which is
indicated by the red zone on the label. Speeds lower than 40% should only be used for feeding
and counting with the milling cutter turned off.
USING THE TOUCH SCREEN
The Home Screen
The home screen is displayed a few seconds after turning on the machine.
The button to start or stop the machine is located on the home screen as well as the resettable
counter. The counter will count media as it exits the track. When the reset button is pressed, the
counter value will reset to 0.
To start or stop the machine, press here
please note that the button will display the current state of the machine
Displays current count
To reset the counter, press hereTo access settings, press here
Model 3068 and 3078 User Guide
Page 8
Page 9
OPERATION
Settings
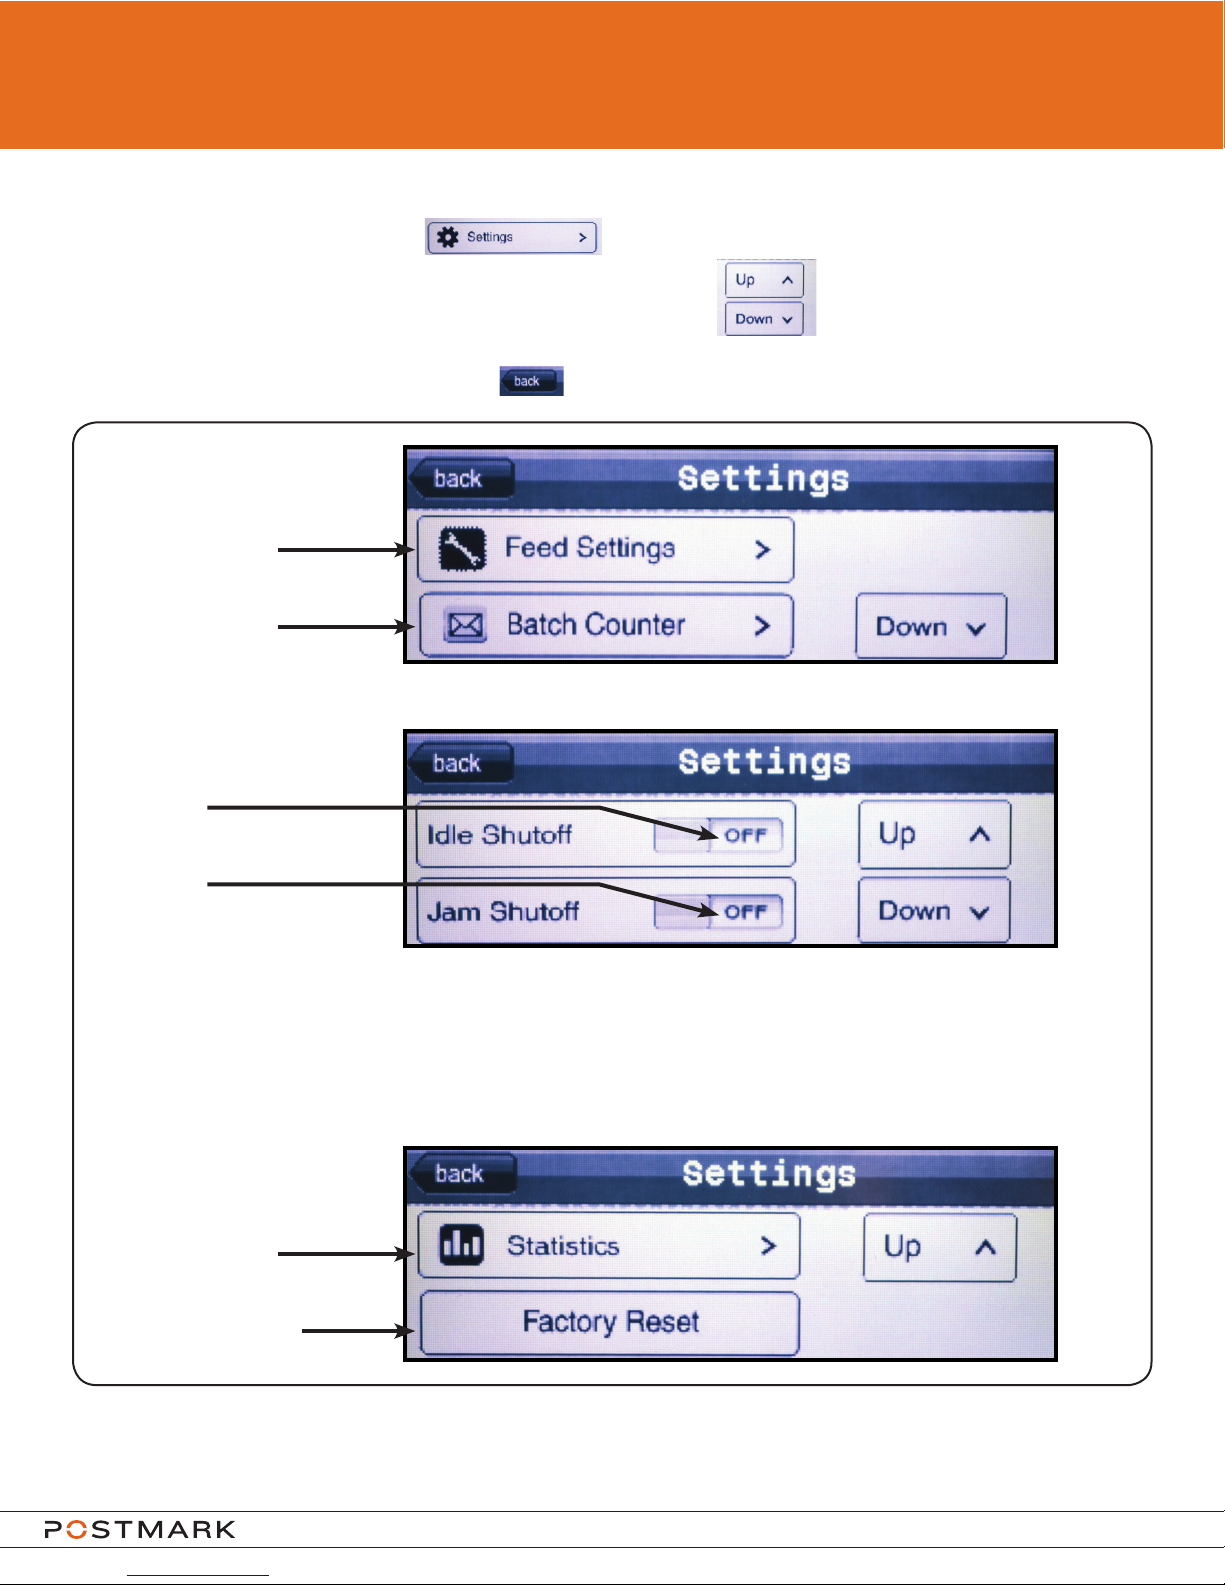
To access the settings, press the on the home screen.
There are three pages of settings. To change pages, use the buttons on the right of the
screen.
To return to the home screen, press the button in the top left corner of the screen.
To access the feed settings
menu, press here
To access the batch counter
menu, press here
Settings
Page 1
To toggle idle shutoff,
press here
Settings
To toggle jam shutoff,
Page 2
press here
Idle shutoff and jam shutoff are set on by
default factory settings.
Jam Shutoff will stop the belts only if a jam is detected as the envelope is exiting the main feed
track. If a jam occurs elsewhere, the machine will not shutoff with this feature.
Idle Shutoff will stop the belts if the machine has idled without feeding media for more than 1
minute.
To access the statistics
menu, press here
Settings
Page 3
To restore software to factory
defaults, press here
Pressing “Factory Reset” will reset the touchscreen software to factory defaults. Pressing this will
not reset any values in the statistics section of the software, only values that can be changed by the
operator.
Model 3068 and 3078 User Guide
Page 9
Page 10
OPERATION
Using the touch screen
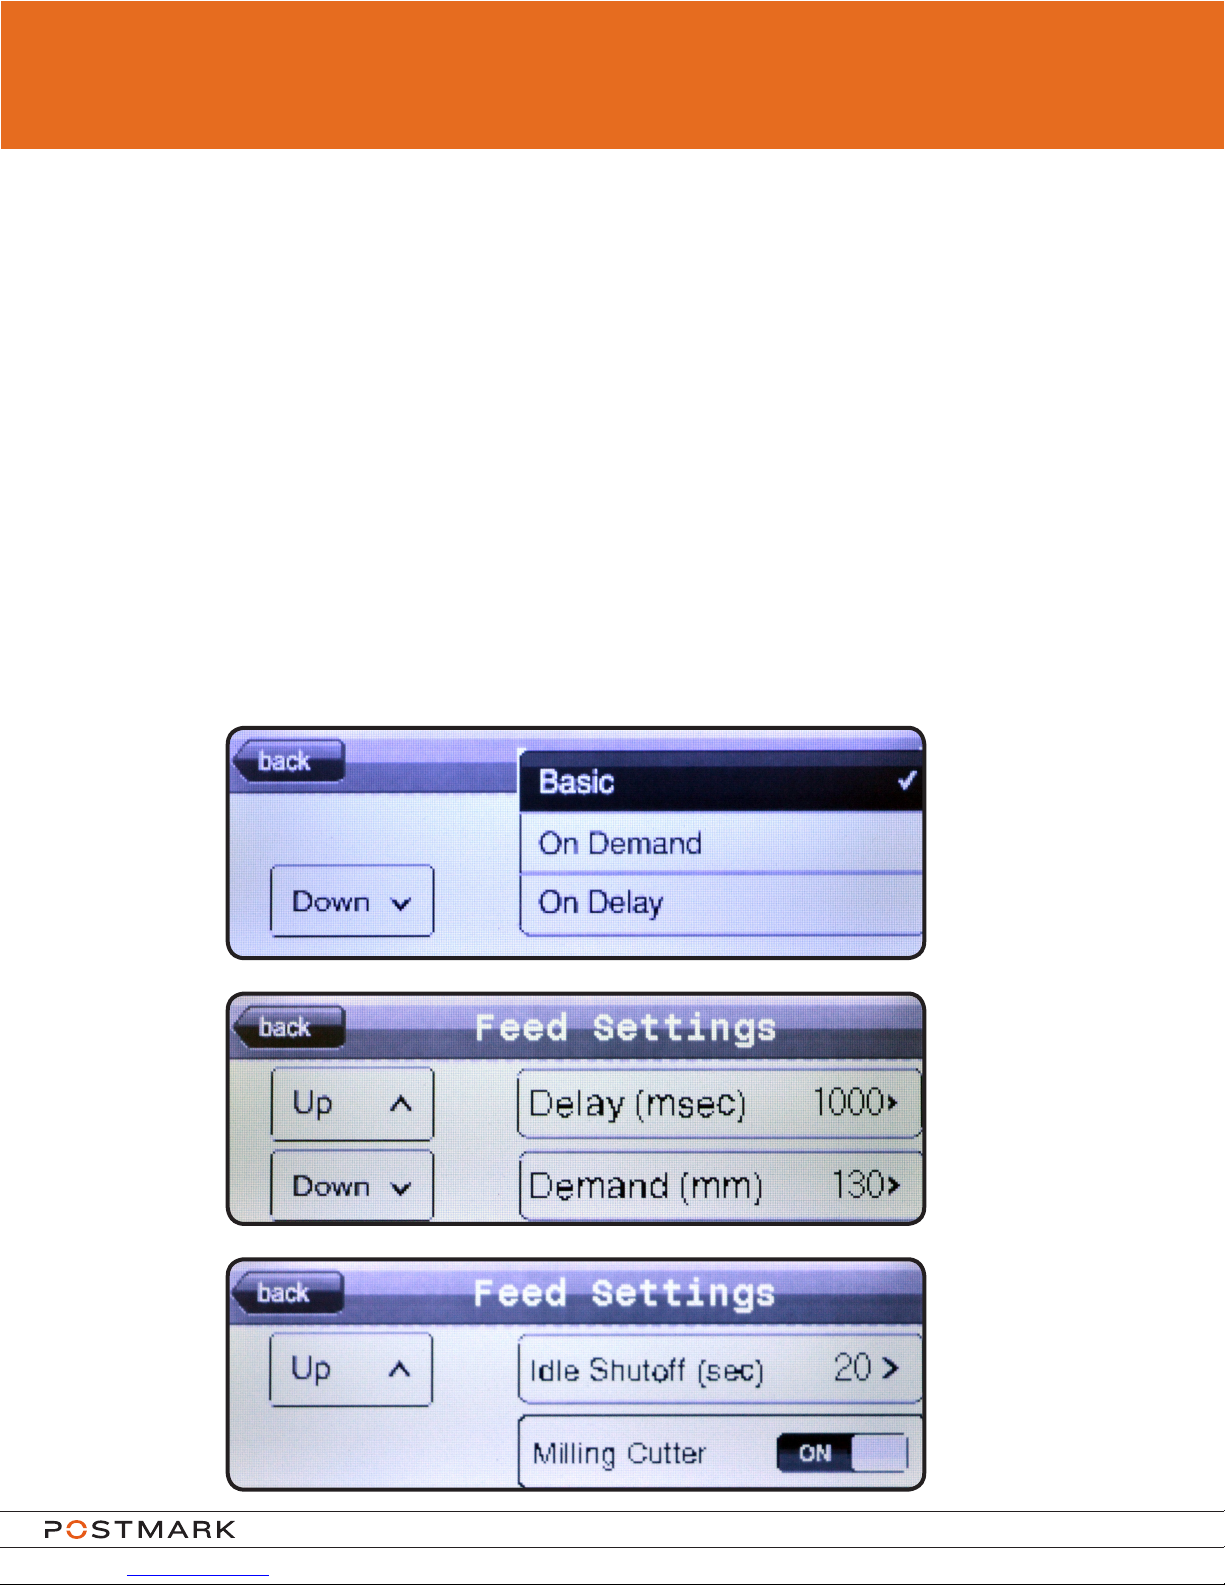
Feed Settings
The 3068 and 3078 letter openers are equipped with three different feed modes: Basic, On
Demand, and On Delay.
The Basic feed setting will consistently feed and count envelopes.
The On Demand feed setting will stop the belts before an envelope exits the machine. Once
the envelope is removed from the machine, the next envelope will move to the same position.
This position can be set by adjusting the demand value in mm, which adjusts the amount of
overhang the envelope has on the exit end of the feed plate. This mode can be used for feeding
into other mail processing equipment or if an operator wants to extract documents as the mail
is opened. Please note that variable speed is disabled when the On Demand feed setting is
enabled.
The On Delay feed setting will feed one envelope per set amount of time. The set amount
of time between envelopes is set in milliseconds and has a maximum value of 10,000
milliseconds (10 seconds). This mode can be used to increase counter accuracy or to allow
time for a visual inspection by an operator.
Feed Settings Page 1
Feed Settings Page 2
Feed Settings Page 3
Model 3068 and 3078 User Guide
Page 10
Page 11
OPERATION
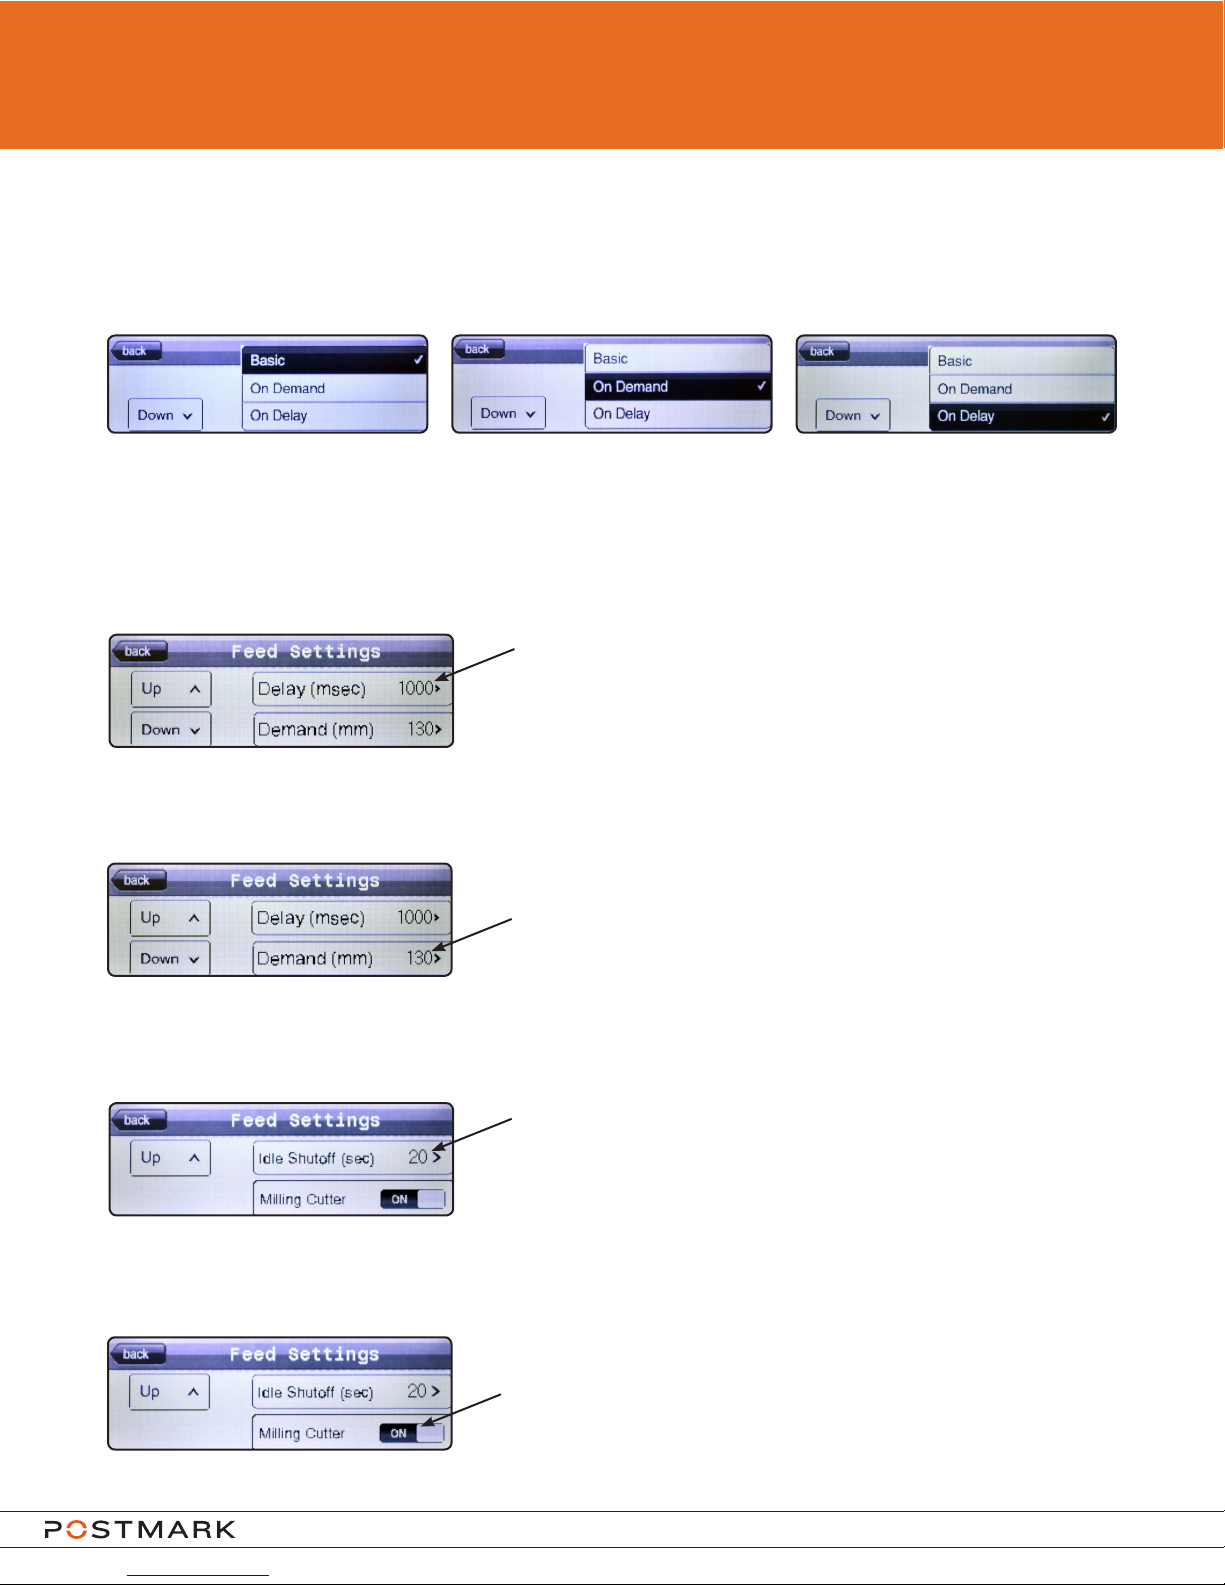
Feed modes can be changed on feed settings page 1 by pressing on the desired feed mode.
The selected feed mode will be highlighted with a tick mark as shown below:
Basic Selected On Demand Selected On Delay Selected
Use the up and down buttons on the left side of the screen to navigate between the three feed
settings pages.
To adjust the value for On Delay, press the number next to “Delay (msec)” on feed settings
page 2.
After pressing the On Delay value, a keypad will appear
allowing for the number to be changed. The number
must be equal to or between 1 and 10,000 milliseconds.
To adjust the value for On Demand, press the number next to “Demand (mm)” on feed settings
page 2.
After pressing the On Demand value, a keypad will
appear allowing for the number to be changed. The
number must be equal to or between 30 and 400
millimeters.
The 3068 and 3078 letter openers are equipped with an idle shutoff which will stop the
machine after a set time if no envelopes are being processed. To adjust the value for the idle
shutoff, press the number next to “idle shutoff (sec)” on feed settings page 3.
After pressing the idle shutoff value, a keypad will
appear allowing for the number to be changed. The
number must be equal to or between 20 and 600
seconds.
The milling cutter can be turned off so the machine can be used without opening envelopes as
they are processed through the machine. To turn off the milling cutter, press the switch next to
“Milling Cutter” on feed settings page 3.
The switch indicates the current status of the milling
cutter. To turn the milling cutter back on, touch the
switch again until it displays “ON”.
Model 3068 and 3078 User Guide
Page 11
Page 12
OPERATION
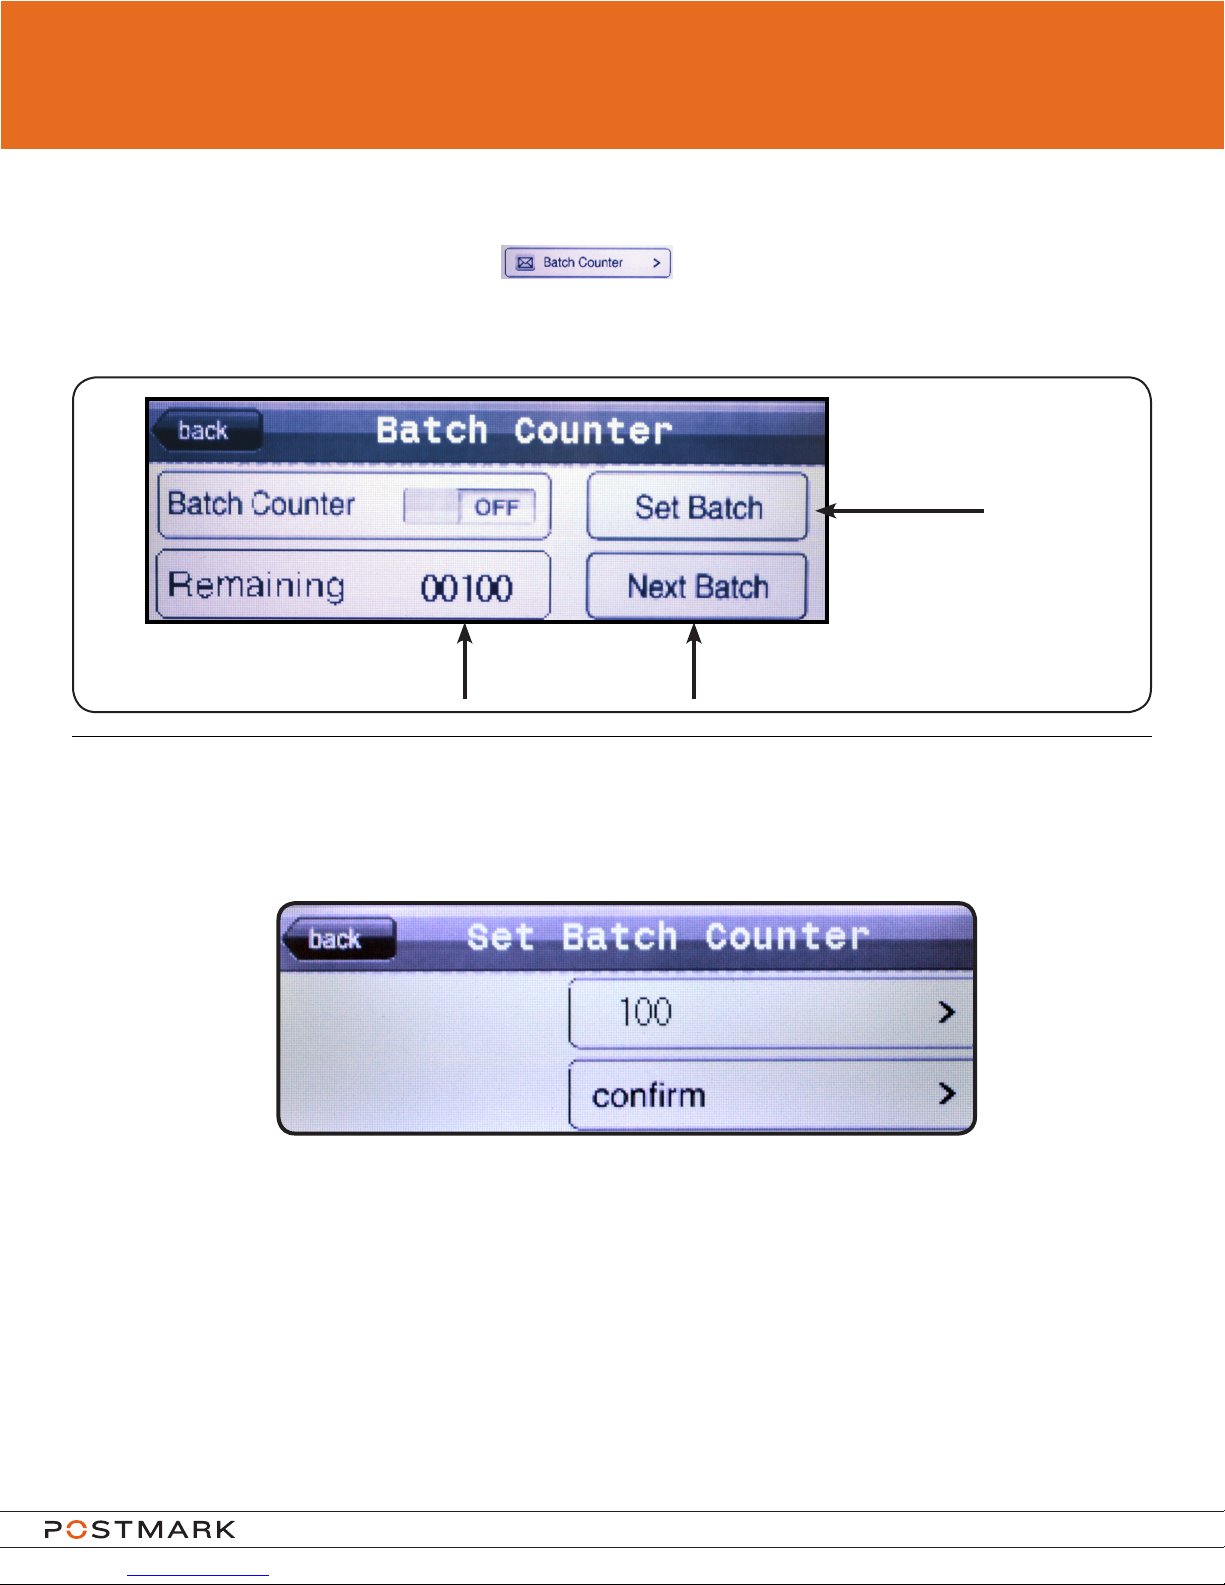
Batch Counter
To access the Batch Counter, press the on page one of settings.
The batch counter is used to stop the machine after a certain number of pieces have been ran
through. The number of pieces can be set on the batch counter screen shown below.
To change batch amount
press here
Displays remaining
amount in batch
To set the batch value, press the set batch button in the upper right hand corner of the batch counter
screen. The following screen will appear:
Batch Counter User Entry
The number in the top box is the current batch counter value. To change this value, press on the
number. After pressing on the number, a keypad will appear allowing for the number to be changed.
The batch counter can be set equal to or between 1 and 10,000. Once the value has been entered,
presstheconrmbuttontosetthebatchcountervalue.
To Start the machine and batch
counter, press here
Model 3068 and 3078 User Guide
Page 12
Page 13
OPERATION
Using the touch screen
Statistics
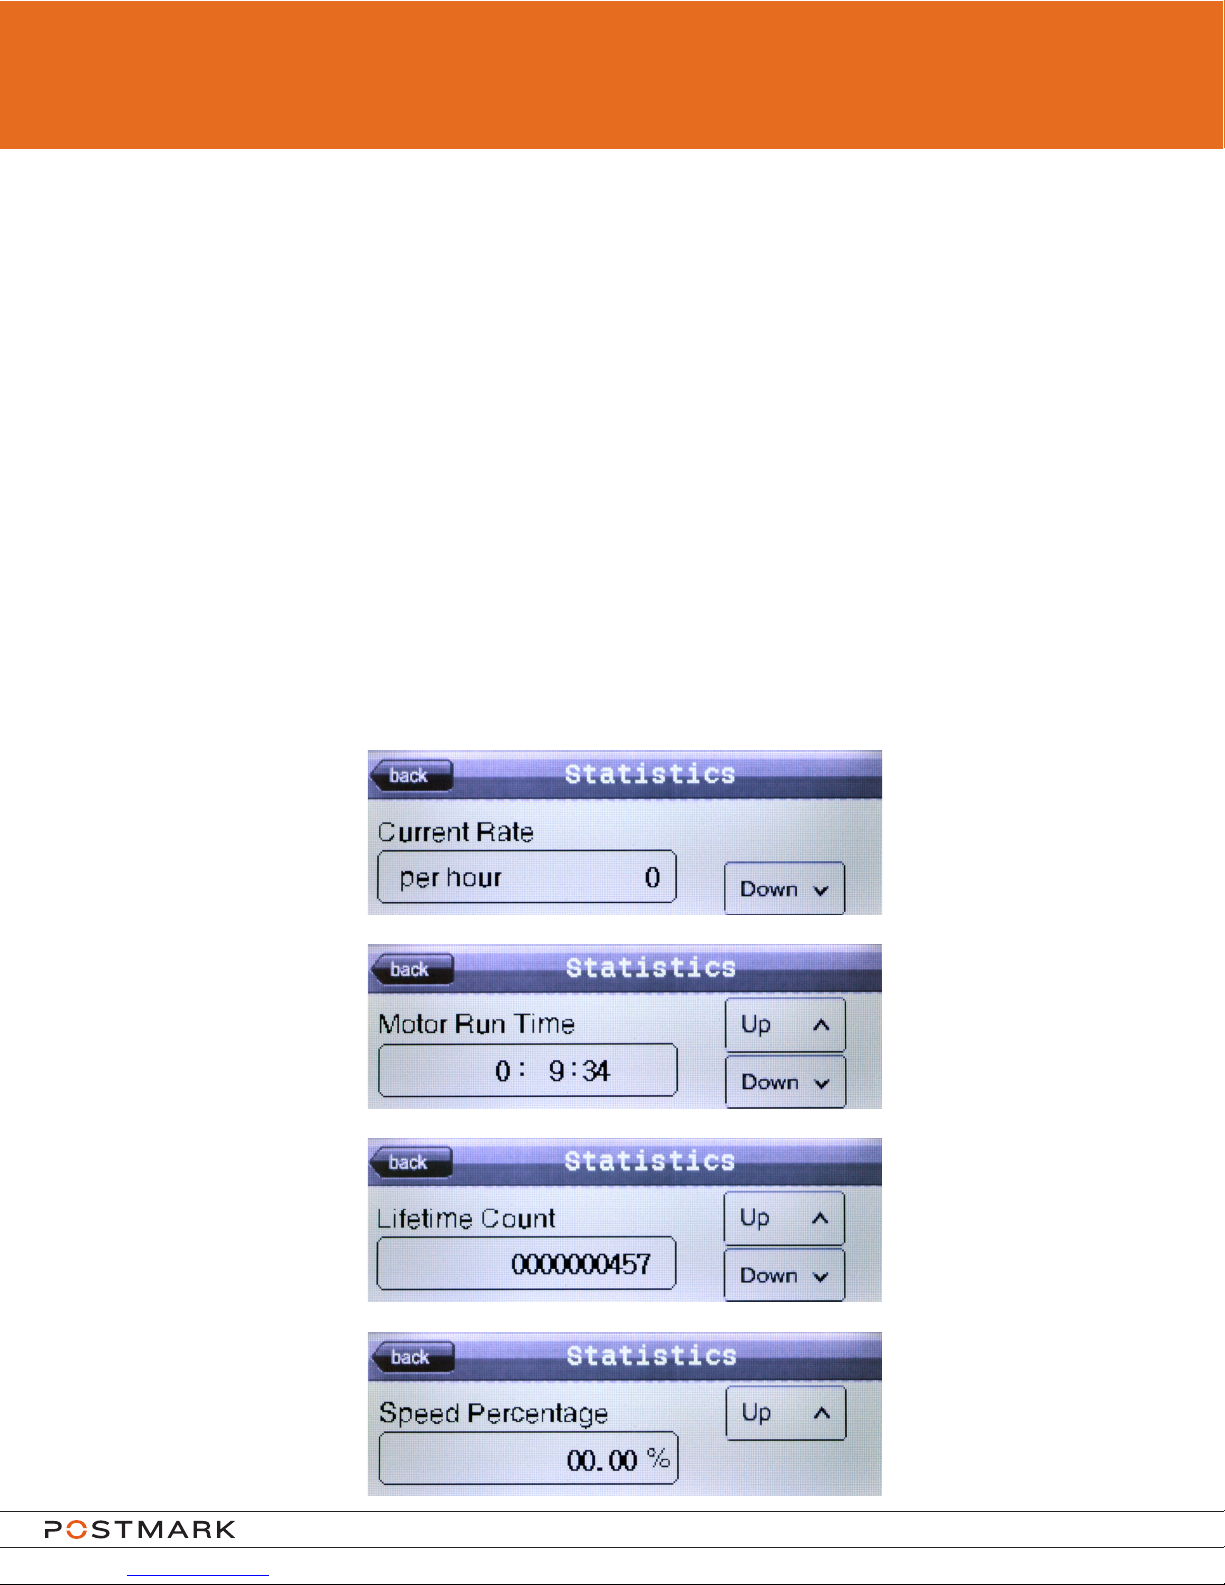
Statistics can be accessed by pressing the statistics button on page 2 of the settings.
Use the up and down buttons on the right side of the screen to navigate between the four
statistics pages.
Current Rate displays the number of envelopes being fed per hour. The machine must be
feeding envelopes to see this value.
Motor Run Time shows the time that the main drive motor has run from the time of initial
installation.
Lifetime Count shows the number of envelopes that have gone through the machine from time
of initial installation.
Speed Percentage shows the current speed percentage of the motor which is controlled by the
variable speed knob. The machine must be running to see this value.
Model 3068 and 3078 User Guide
Page 13
Page 14
ENVELOPE FEEDING
Envelopes are best fed when presorted by size and thickness thus insuring a consistent
feeding.
• Positiontheenvelopesotheapisfacingyouandisawayfromthebackofthehopper.
• Press the start button on the touchscreen to start the machine.
• Placetheenvelopesontothefeedingtrackmakingsurethattheyareushagainstthebackofthe
hopper.
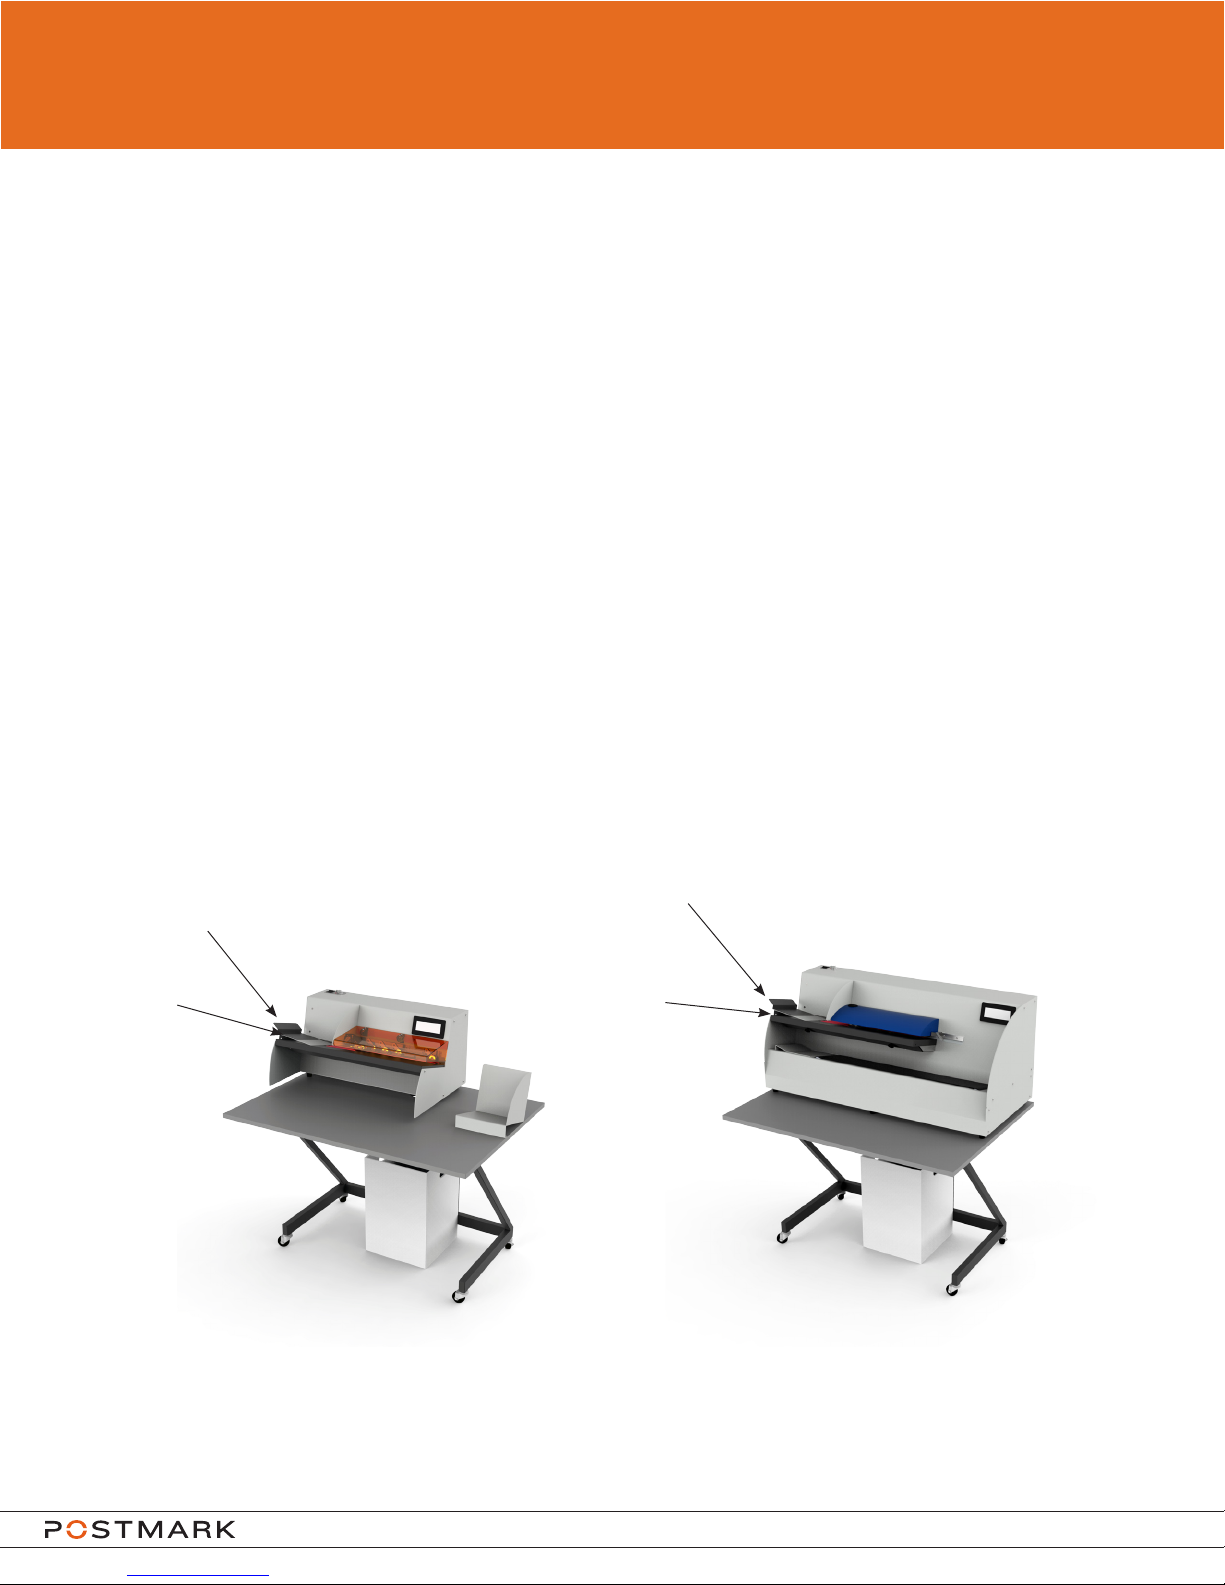
Thesupportguideandrampbasecanbeusedtohelpfeeddifcult,oddshaped,orverythin/
thick envelopes.
The support guide is magnetic and can be positioned in different locations on the feed plate or
on the ramp base depending on envelope sizes.
Support
Guide
Ramp
Base
3068
Support
Guide
Ramp
Base
3078
Model 3068 and 3078 User Guide
Page 14
Page 15

TROUBLESHOOTING
If the Machine Does Not Start, Do As Follows:
1. Check that the power cord is plugged in and that the power is on at the socket and on the
machine.
2. Check that the transport bar cover is closed (3078 only).
3. Check that the track cover is pushed down tightly.
4. Ensure that the variable speed knob is not set below 40%.
5. Using the touchscreen, perform a factory reset.
6. Uplug machine and check fuse located in the main socket, by pulling out the fuse tray.
If the machine still does not start, contact your service organization.
If An Envelope Becomes Jammed In the Machine
1. Turn off machine, and unplug the power cord.
2. Lift track cover.
3. Remove jammed envelopes and clear any remaining mail from belts by gently removing the
envelope from left to right.
4. Replace track cover and re-stack mail on the feed plate.
5. Plug in machine, restart.
For all other service and repairs, contact your service organization.
Model 3068 and 3078 User Guide
Page 15
Page 16

SPECIFICATIONS
3068
Dimensions: Basic Unit
Length: 1070mm (42”)
Depth: 750mm (30”)
Height: 1065mm (42”)
Weight: approximately 72.5kg (160lb)
Power source: as written on the type label
230VAC / 50Hz 3.00A
120VAC / 60Hz 5.00A
Noise level: Standby - 63dB
Operating - 78dB
Material: Paper envelopes
Maximum thickness: 6mm (0.24”)
Maximum size: 260 x 330mm (10.2” x 13.0”)
Dimensions: Basic Unit
Length: 1070mm (42”)
Depth: 750mm (30”)
Height: 1195mm (47”)
Weight: approximately 104kg (230lb)
Power source: as written on the type label
3078
Relative Humidity Ambient Temperature
Environmental Storage: 20% rH to 80% rH -15°C to 60°C (5°F to 140°F)
Environmental Operating: 15% rH to 80% rH 10°C to 40°C (50°F to 104°F)
230VAC / 50Hz 3.00A
120VAC / 60Hz 5.00A
Noise level: Standby - 63dB
Operating - 78dB
Material: Paper envelopes
Maximum thickness: 6mm (0.24”)
Maximum size: 260 x 330mm (10.2” x 13.0”)
Model 3068 and 3078 User Guide
Page 16
 Loading...