

Page 1
1
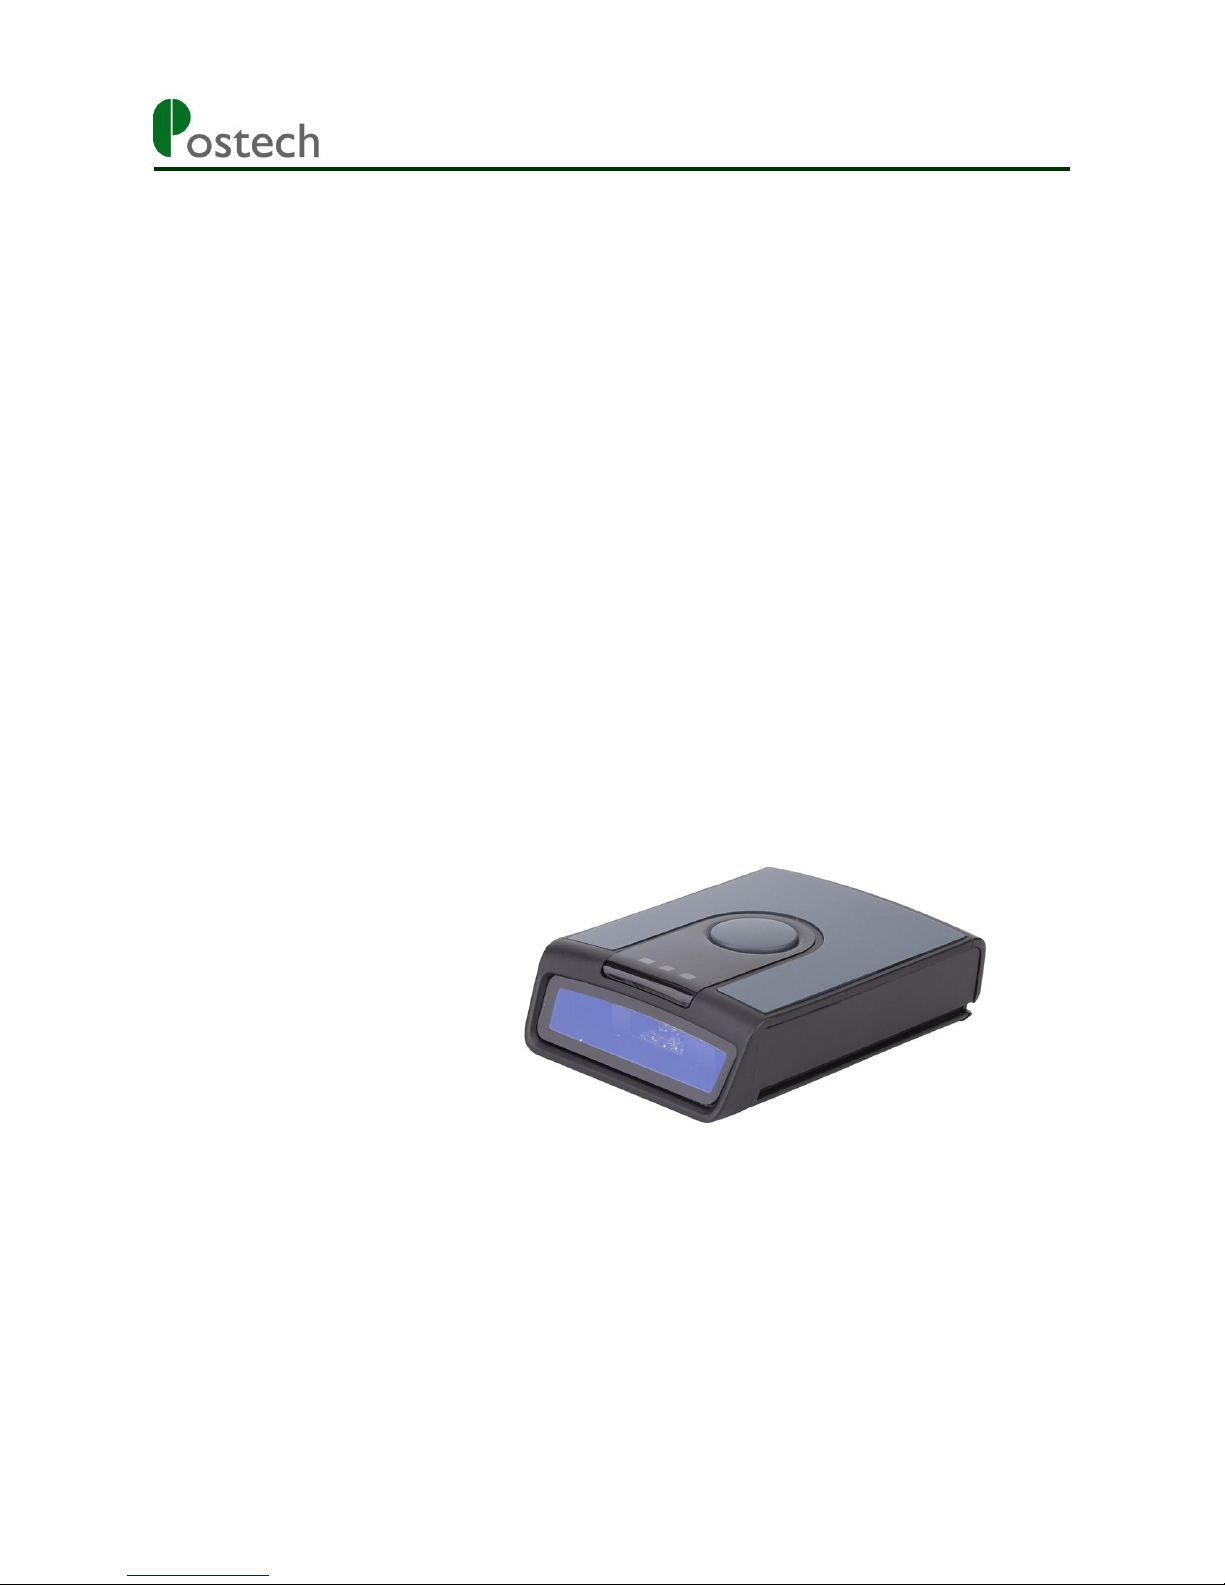
MS3391-L
Mini Barcode Reader
User Manual
Page 2

2
Table of Contents
Mode settings......................................................................................................................
Bluetooth Mode....................................................................................................................................
HID Mode for IOS........................................................................................................................
HID Mode for Windows...............................................................................................................
SPP Mode for Windows................................................................................................................
HID Mode for Android...............................................................................................................
SPP Mode for Android................................................................................................................
Instruction for BIM.....................................................................................................................
USB Mode..........................................................................................................................................
USB Virtual COM Mode....................................................................................................................
U Disk Mode.......................................................................................................................................
Format Settings...........................................................................................................................
U Disk with Bluetooth Mode.............................................................................................................
U Disk with USB Mode.....................................................................................................................
Scanner Settings...................................................................................................................
Language Settings..............................................................................................................................
Date and Time Settings......................................................................................................................
Data Format Settings..................................................................................................................
Separator Symbol Settings.........................................................................................................
Time/date modifications............................................................................................................
Other Settings.....................................................................................................................................
Prefix/Suffix Settings.................................................................................................................
Numeric Barcode for Settings....................................................................................................
Buzzer Volume Settings.............................................................................................................
ID Settings..................................................................................................................................
Other...........................................................................................................................................
Disk Format........................................................................................................................
Restore Default Settings.....................................................................................................
View Software Version.......................................................................................................
Barcode Settings...................................................................................................................
LED and Buzzer Descriptions.............................................................................................
3
336
9
141617
25
26
27
27
28
30
31
31
32
323334
35
35
36
37
37
38
38
38
38
39
41
Page 3
Mini Barcode Scanner HID Mode for IOS
3
Mode Setting
This Mini barcode scanner has six modes: Bluetooth mode, USB Mode, USB virtual COM Mode, U
Disk Mode, U Disk with Bluetooth Mode, U Disk with USB mode.
● Bluetooth mode
1. HID mode for IOS
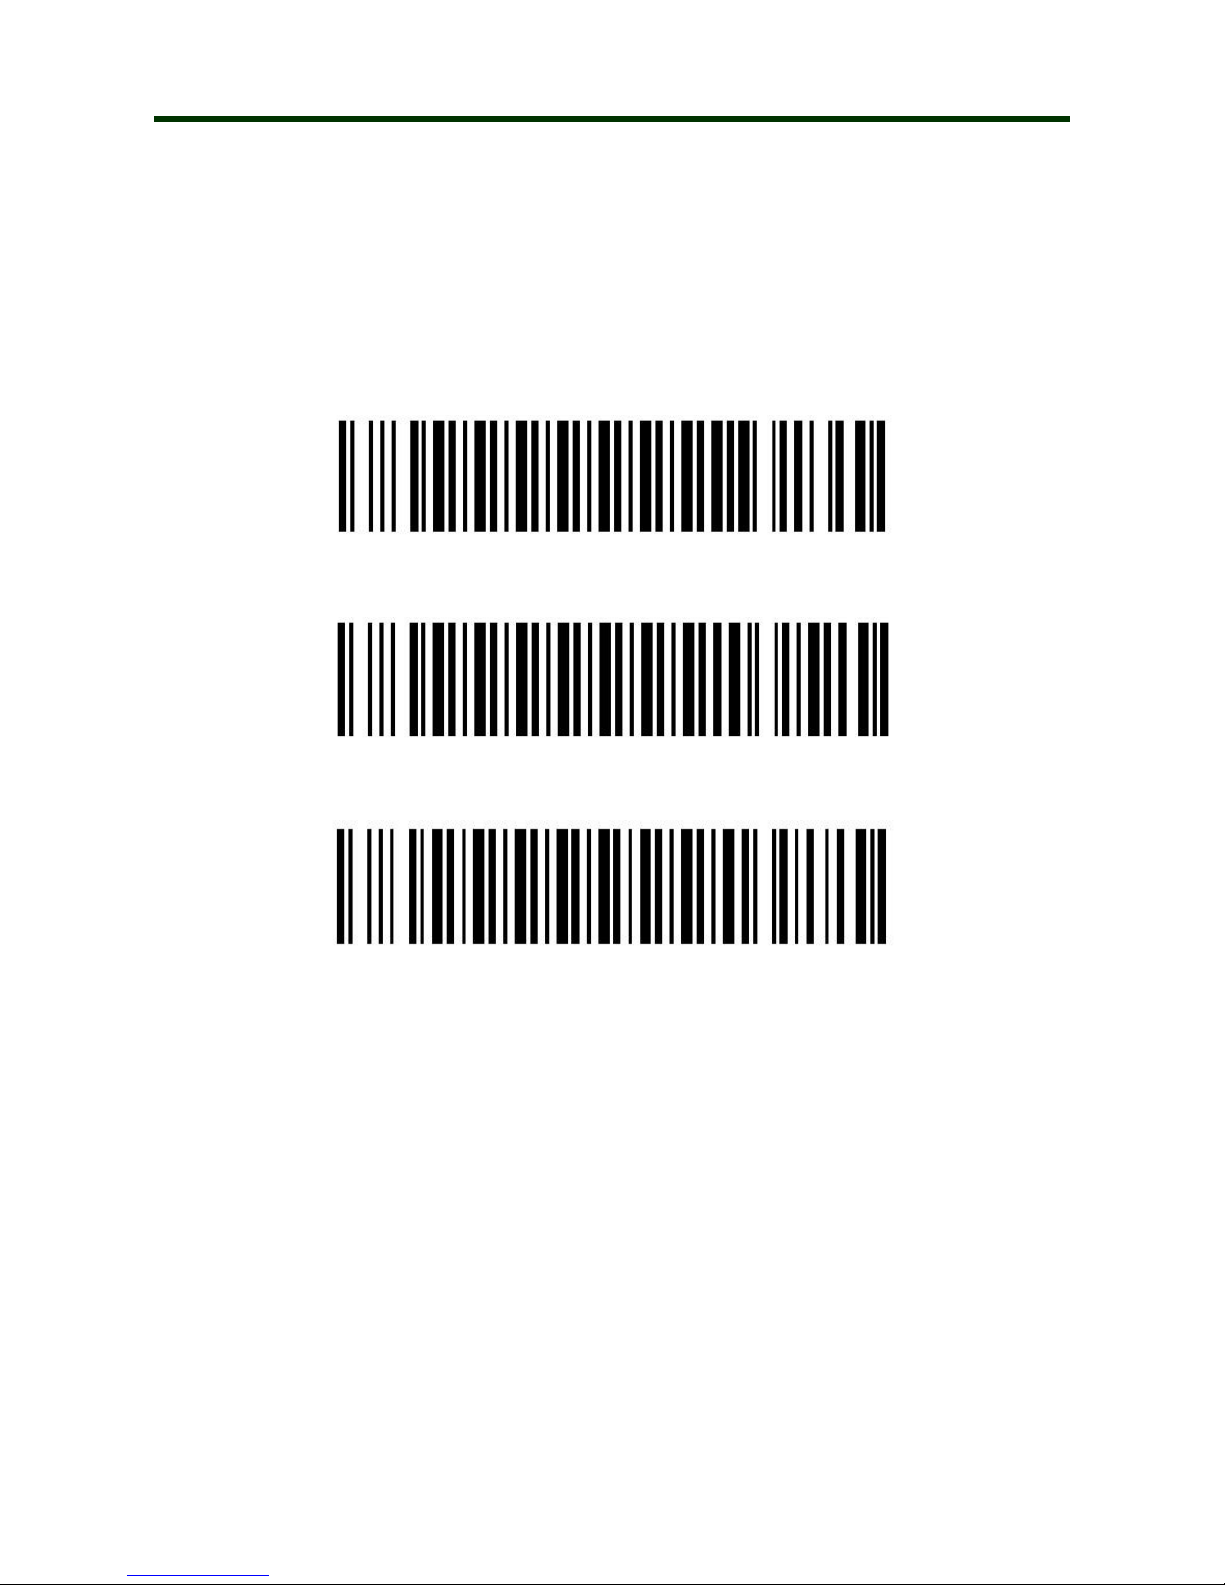
(1) Turn on the barcode reader, and read below barcodes sequence, the blue LED will flash
rapidly.
Bluetooth HID Mode
Bluetooth Pairing Mode
Bluetooth Output Mode
(2) Enable the bluetooth of IOS device to pair with the barcode reader. After the pairing is
successful, you can use it in Notes/office files or other cursor blinking position. (Please follow
the steps below)
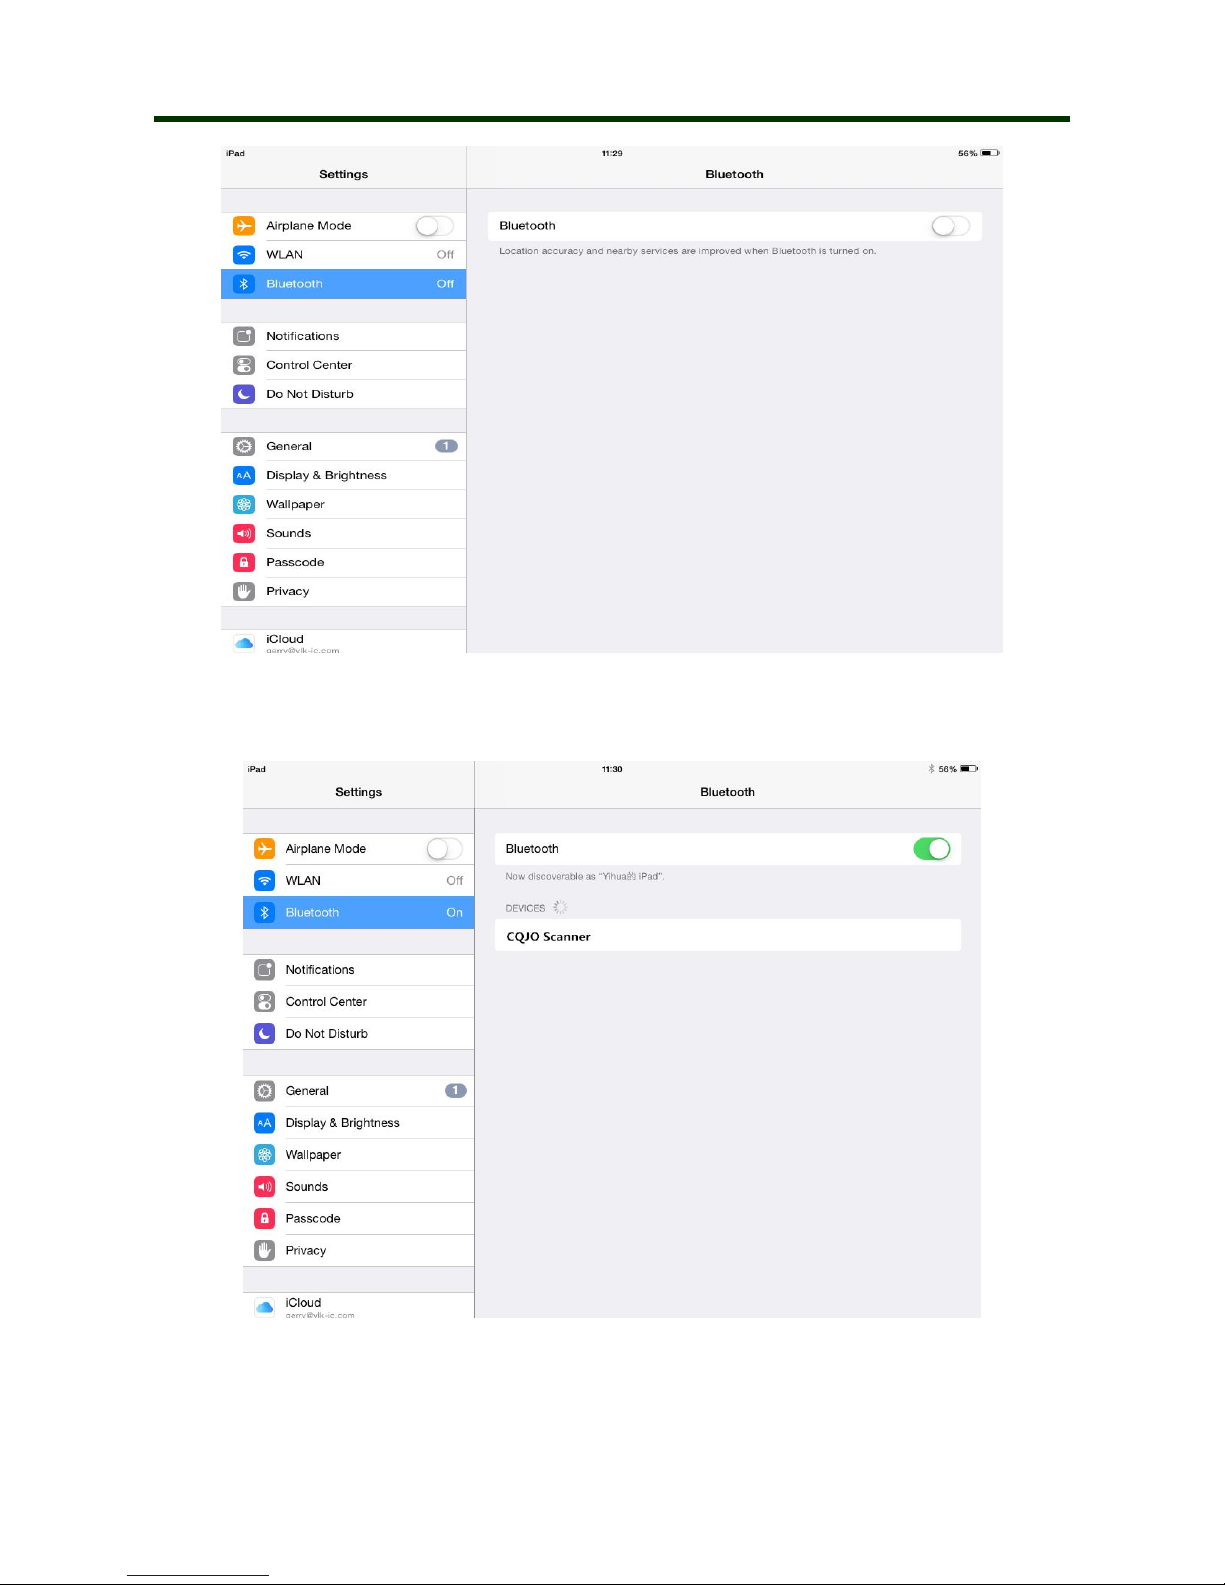
①Turn on the ipad, and find out the bluetooth option.
Page 4
Mini Barcode Scanner HID Mode for IOS
4
②
Enable bluetooth, and the ipad will search automatically. After the searching is finished,
click the scanner’s name(CQJO Scanner) to connect
.
Page 5
Mini Barcode Scanner HID Mode for IOS
5
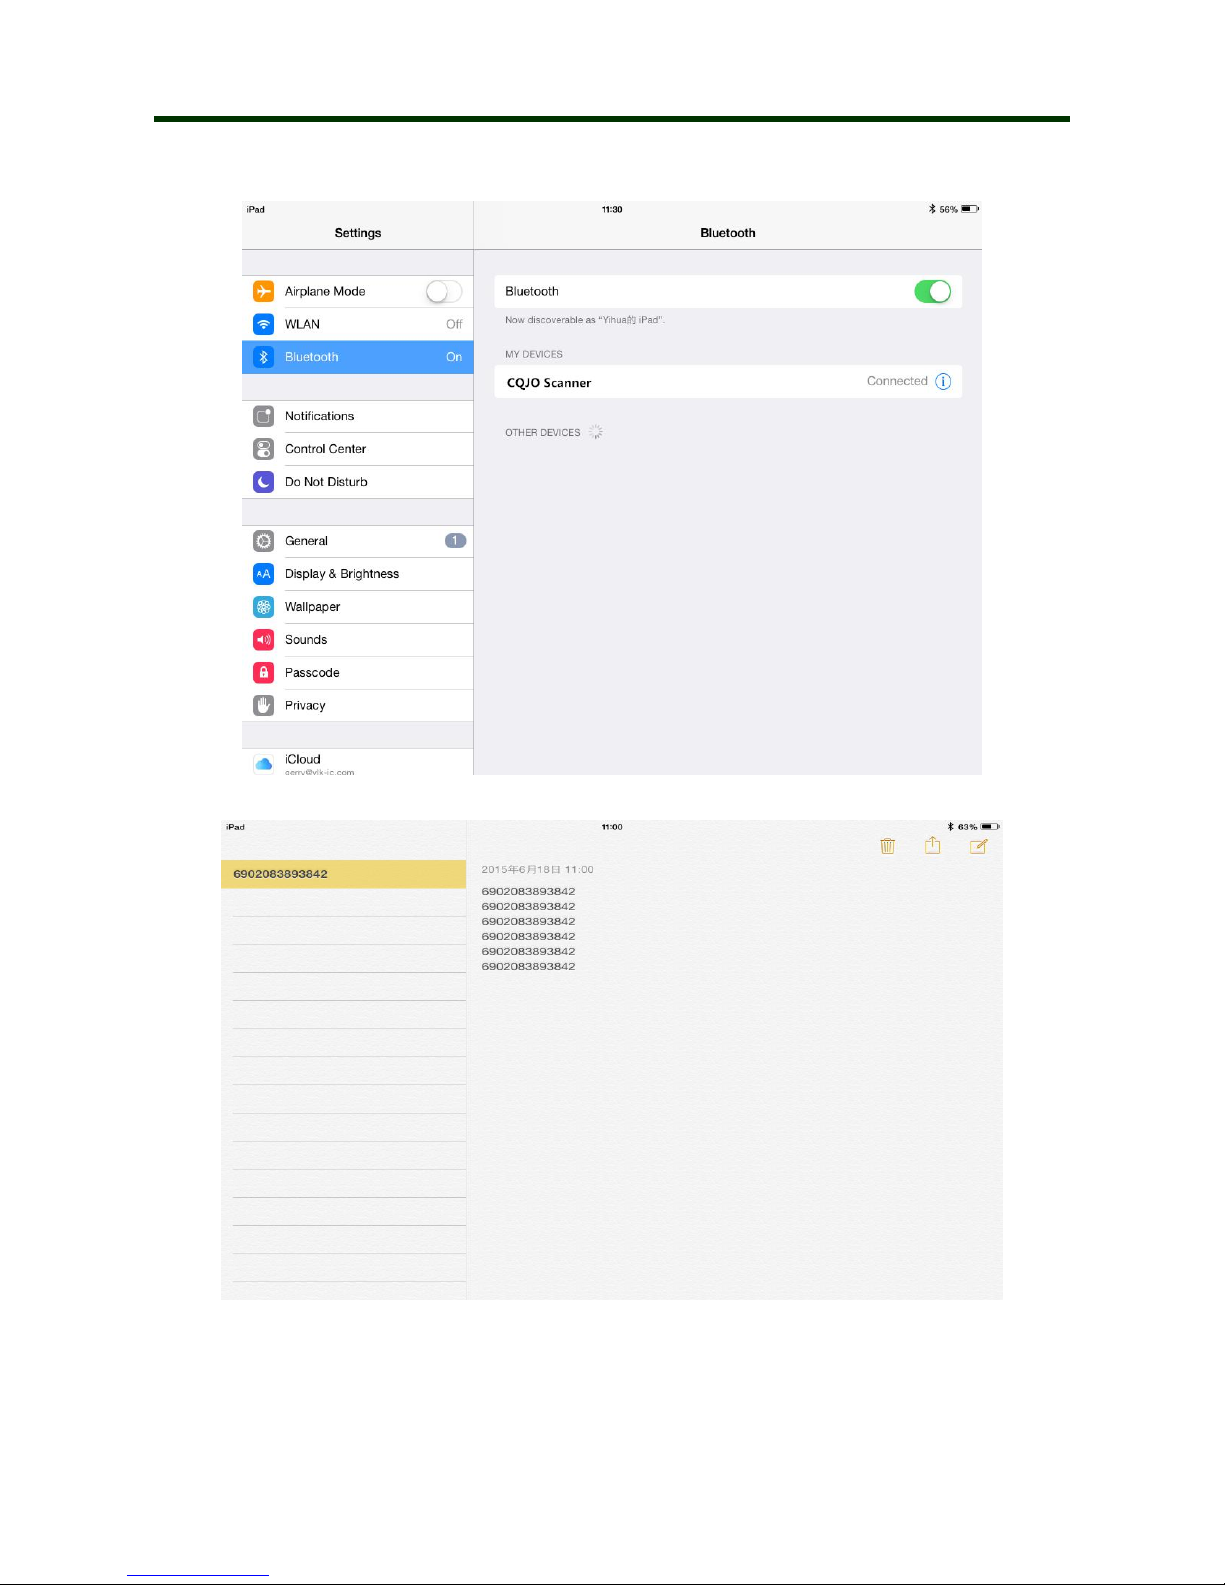
③After the connection is successful, the blue LED on the scanner will be off. Then you can
use it in Notes/office files or other cursor blinking position.
Note: In android system, If the soft keyboard can not display, you need to switch the hardware
physical keyboard to OFF status. In IOS system, you can also click trigger button for four times to
hide and display soft keyboard for IOS.
Page 6
Mini Barcode Scanner HID Mode for Windows
6
2. HID mode for Windows
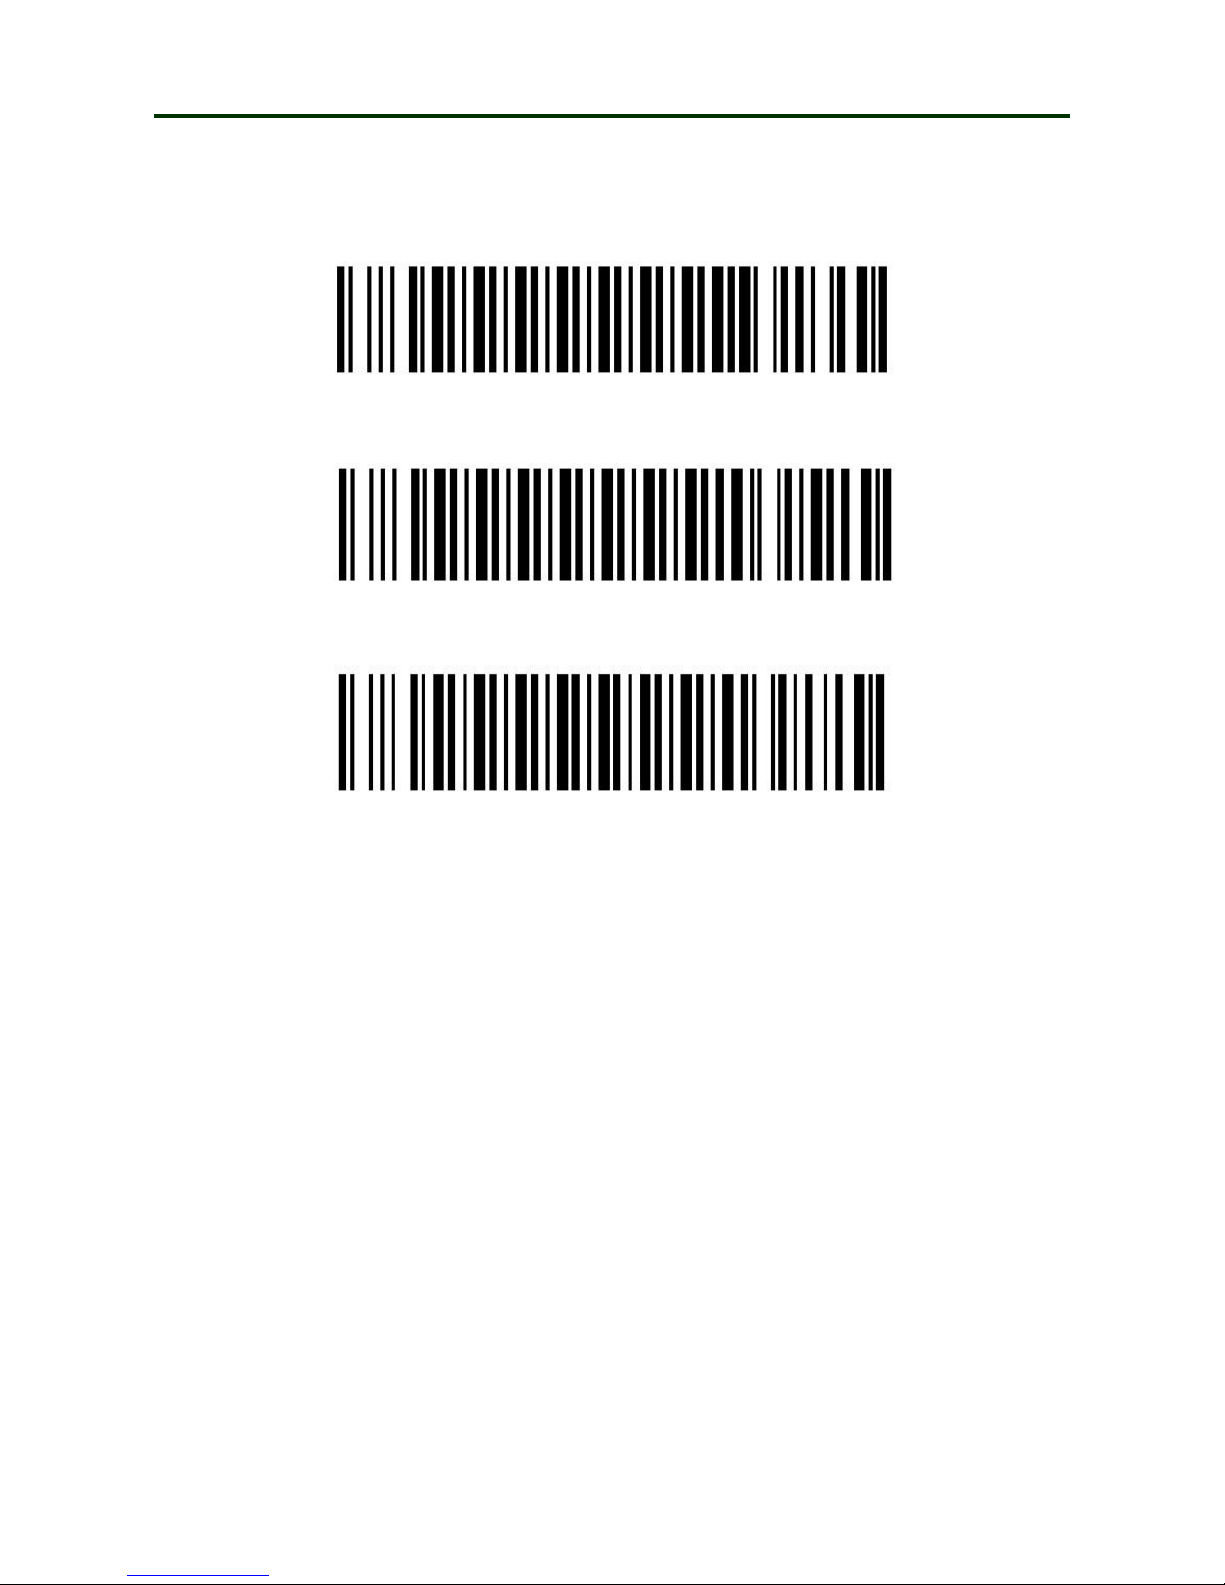
(1) Turn on the barcode reader, and read below barcodes sequence, the blue LED will flash
rapidly.
Bluetooth HID Mode
Bluetooth Pairing Mode
Bluetooth Output Mode
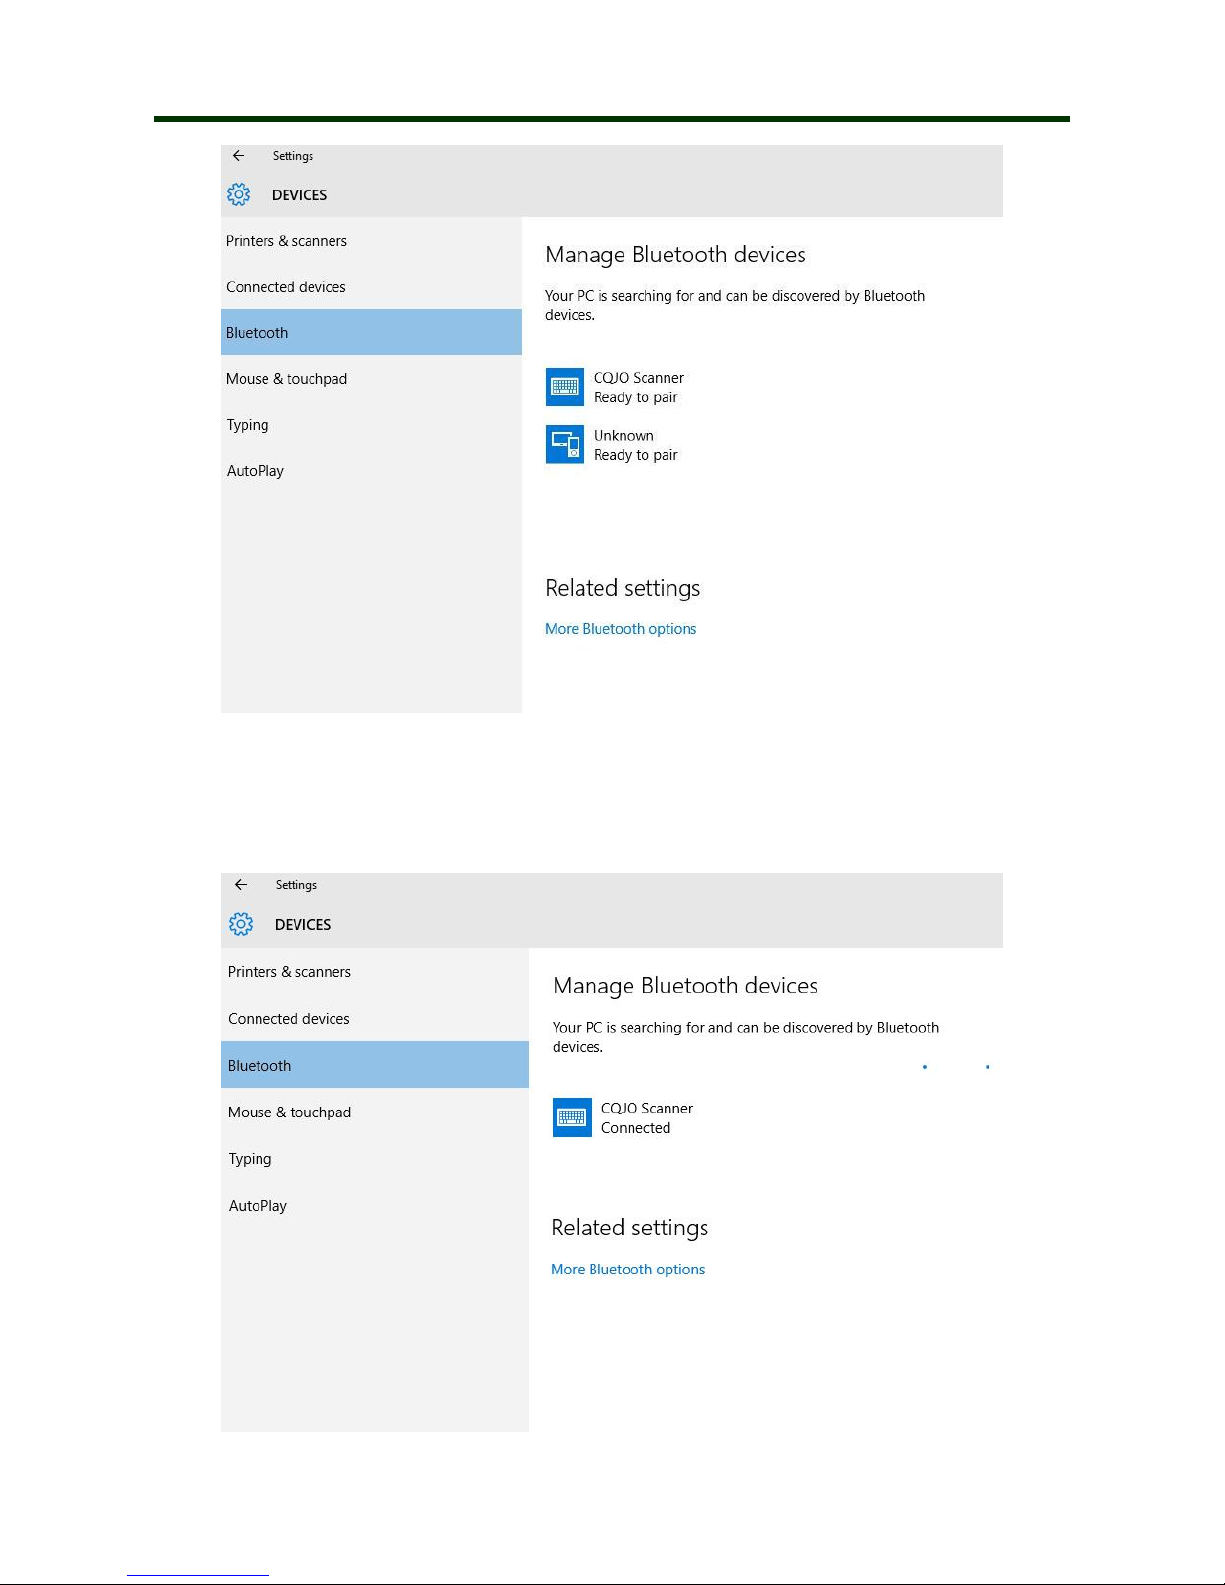
(2) Find out the bluetooth option in the computer, and the Windows device will search
automatically. After the searching is finished, click the scanner’s name (CQJO Scanner) to
connect.
Page 7
Mini Barcode Scanner HID Mode for Windows
7
(3) Computer will display “Dose the passcode on CQJO Scanner match this one?”, click “Yes”.
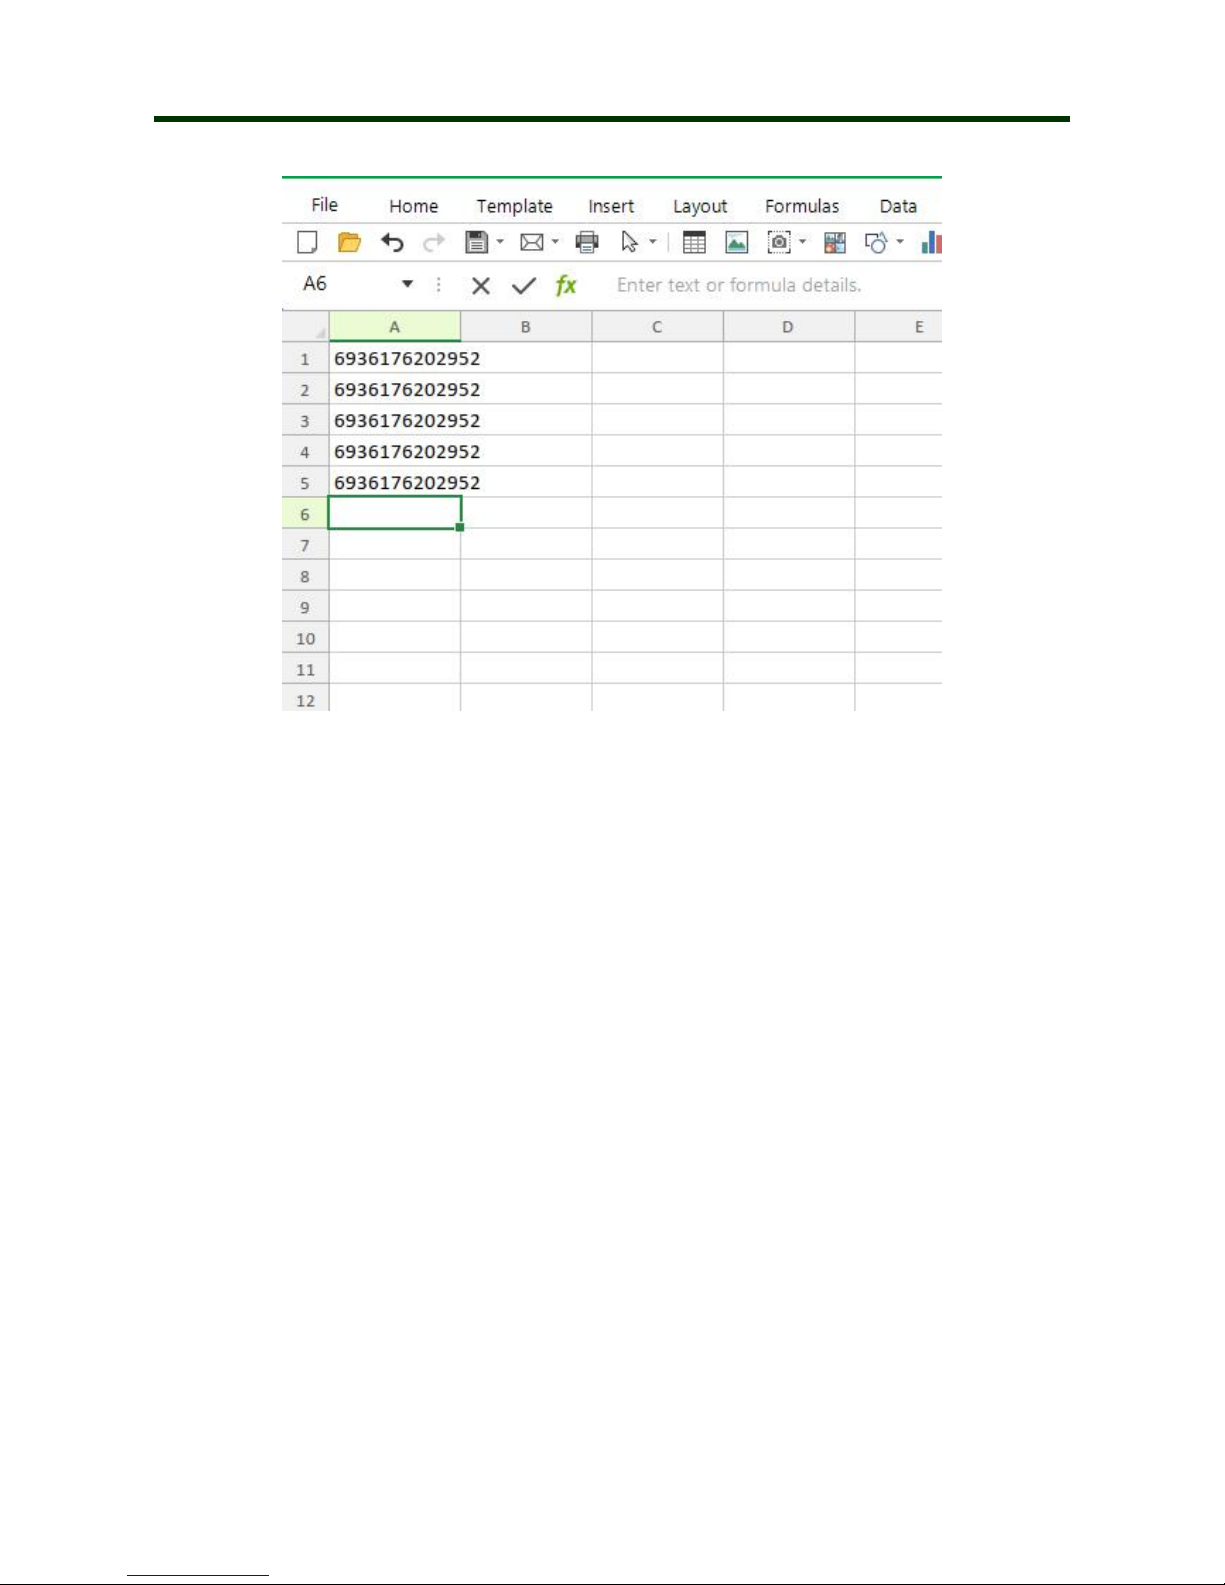
(4) The connection is successful, the blue LED on the scanner will be off. Then you can use it
in Notes/office files or other cursor blinking position.
Page 8
Mini Barcode Scanner HID Mode for Windows
8
Page 9
Mini Barcode Scanner SPP Mode for Windows
9
3. SPP mode for Windows
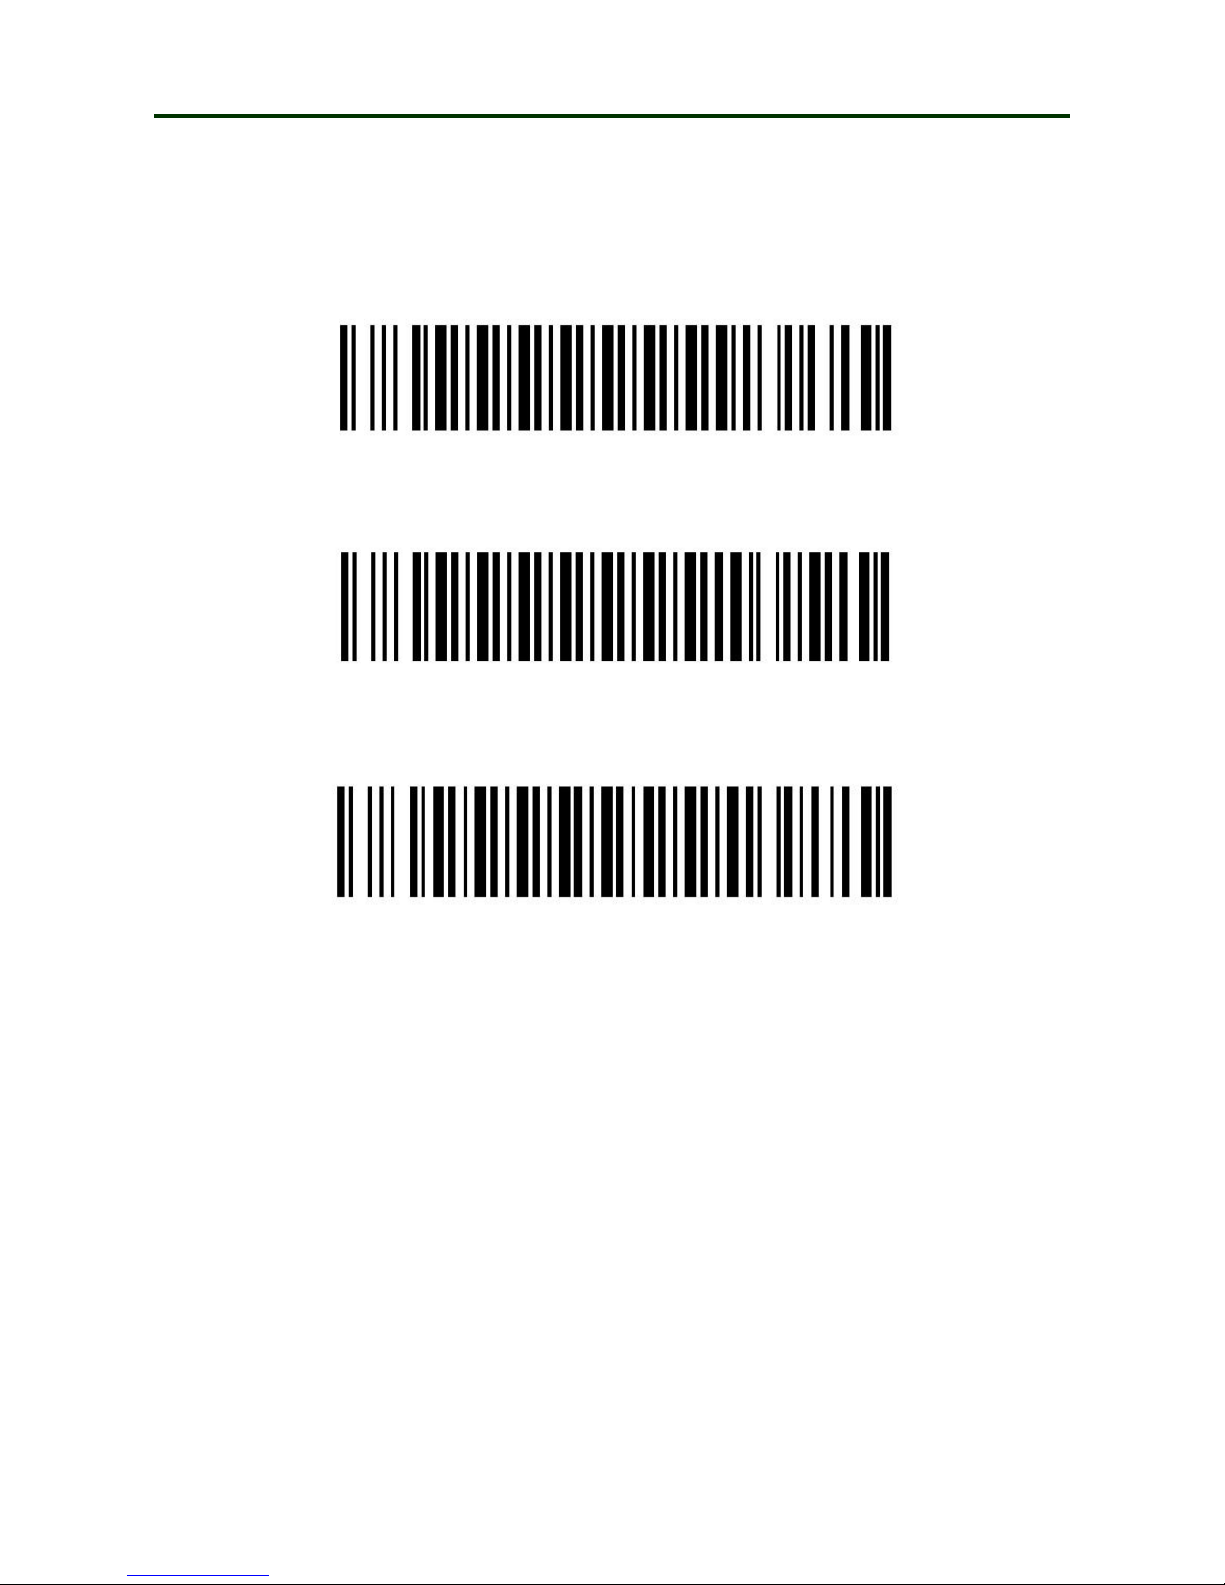
(1) Turn on the barcode reader, and read below barcodes sequence, the blue LED will flash
slowly.
Bluetooth SPP Mode
Bluetooth Pairing Mode
Bluetooth Output Mode
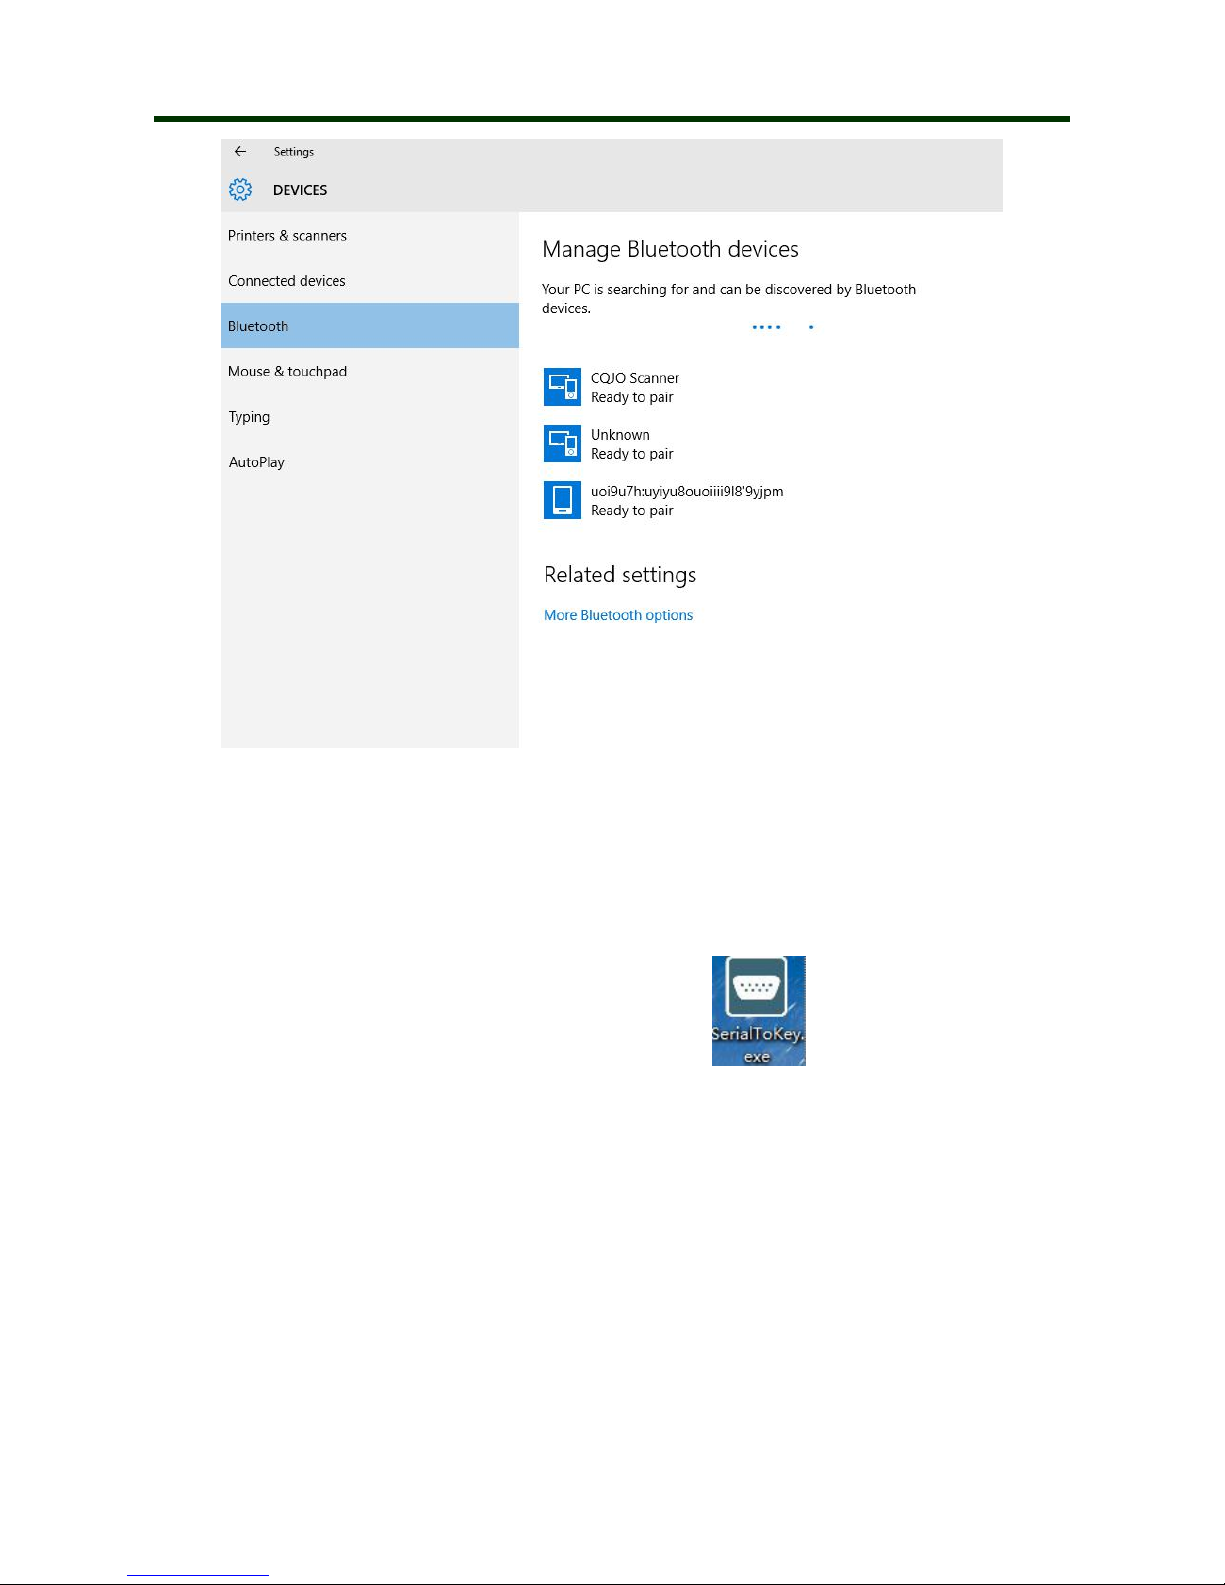
(2) Find out the bluetooth option in the computer, and the Windows device will search
automatically. After the searching is finished, click the scanner’s name (CQJO Scanner) to
connect.
Page 10
Mini Barcode Scanner SPP Mode for Windows
10
(3) Computer will display “Dose the passcode on CQJO Scanner match this one?”, click “Yes”.
(4) The connection is finished, now you need a software to help connection. Please
download the software from our website (www.posunitech.com).
Page 11
Mini Barcode Scanner SPP Mode for Windows
11
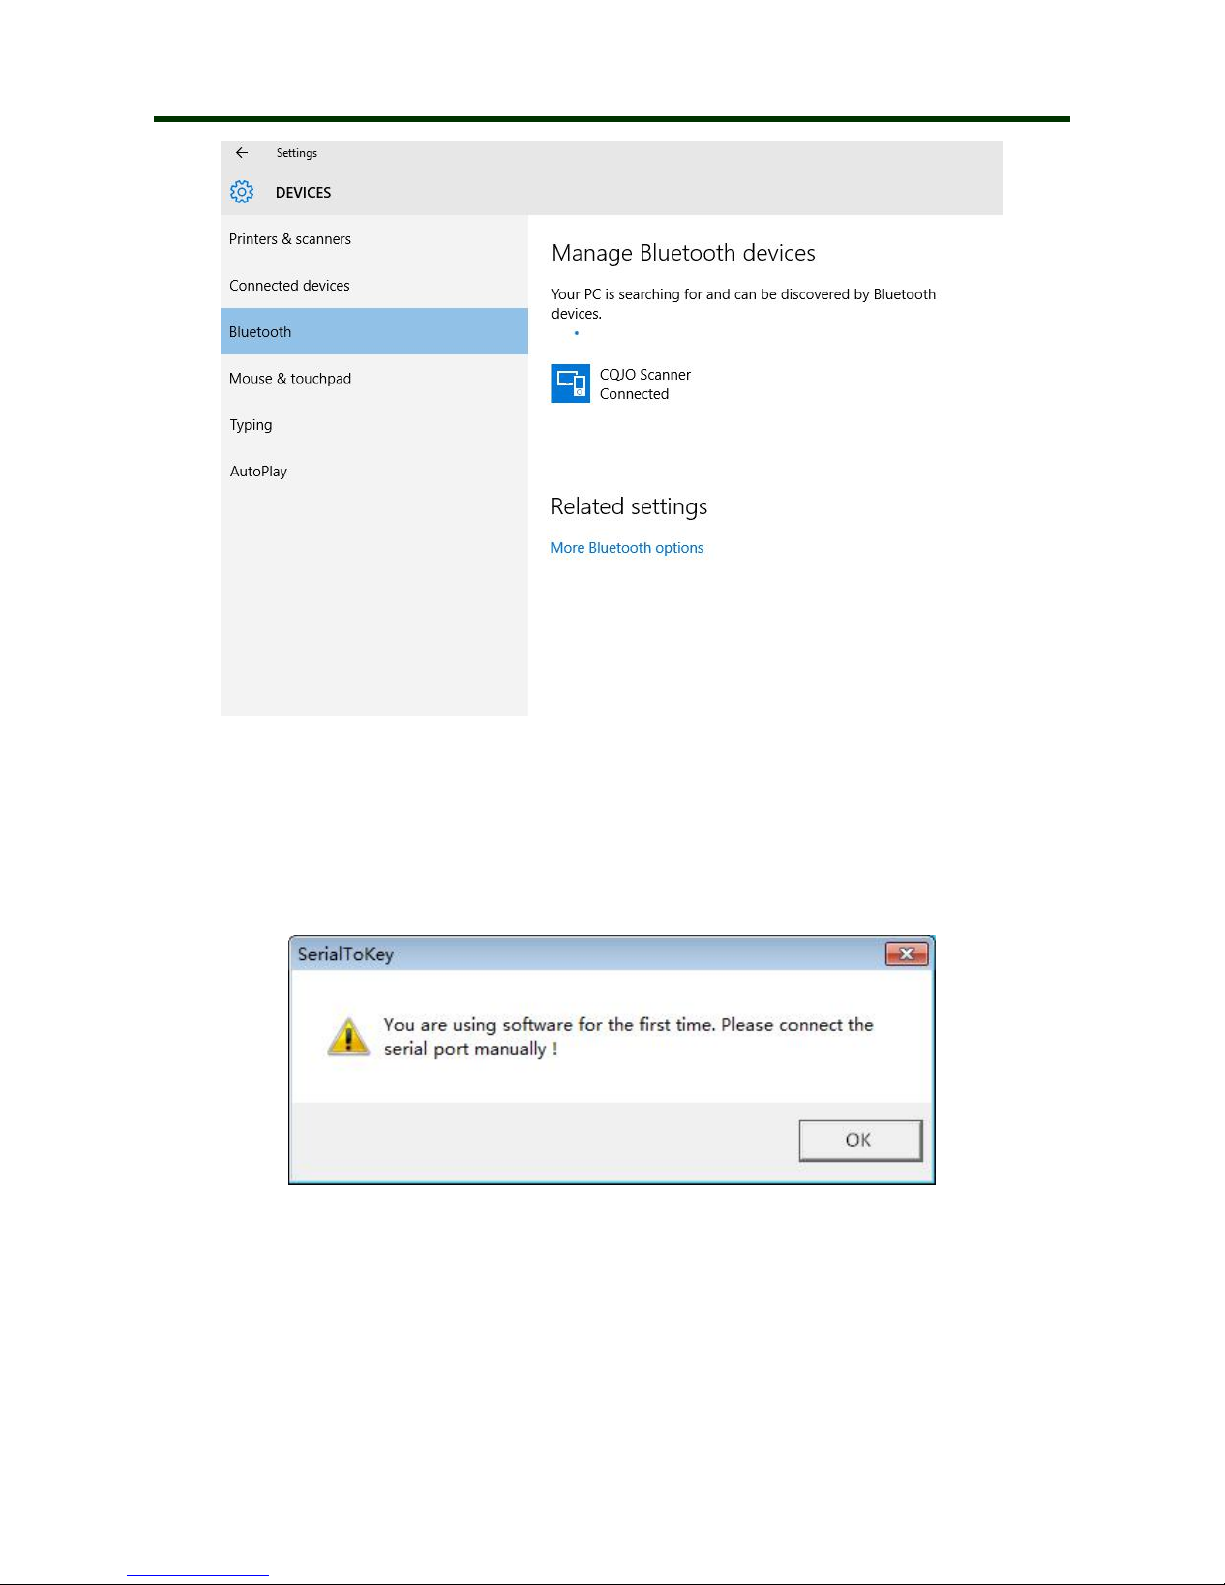
(5) Turn on the software “SerialToKey”, it will show that “You are using software for the first
time. Please connect the serial port manually!”, shown in the below picture. Please click
OK.
Page 12
Mini Barcode Scanner SPP Mode for Windows
12
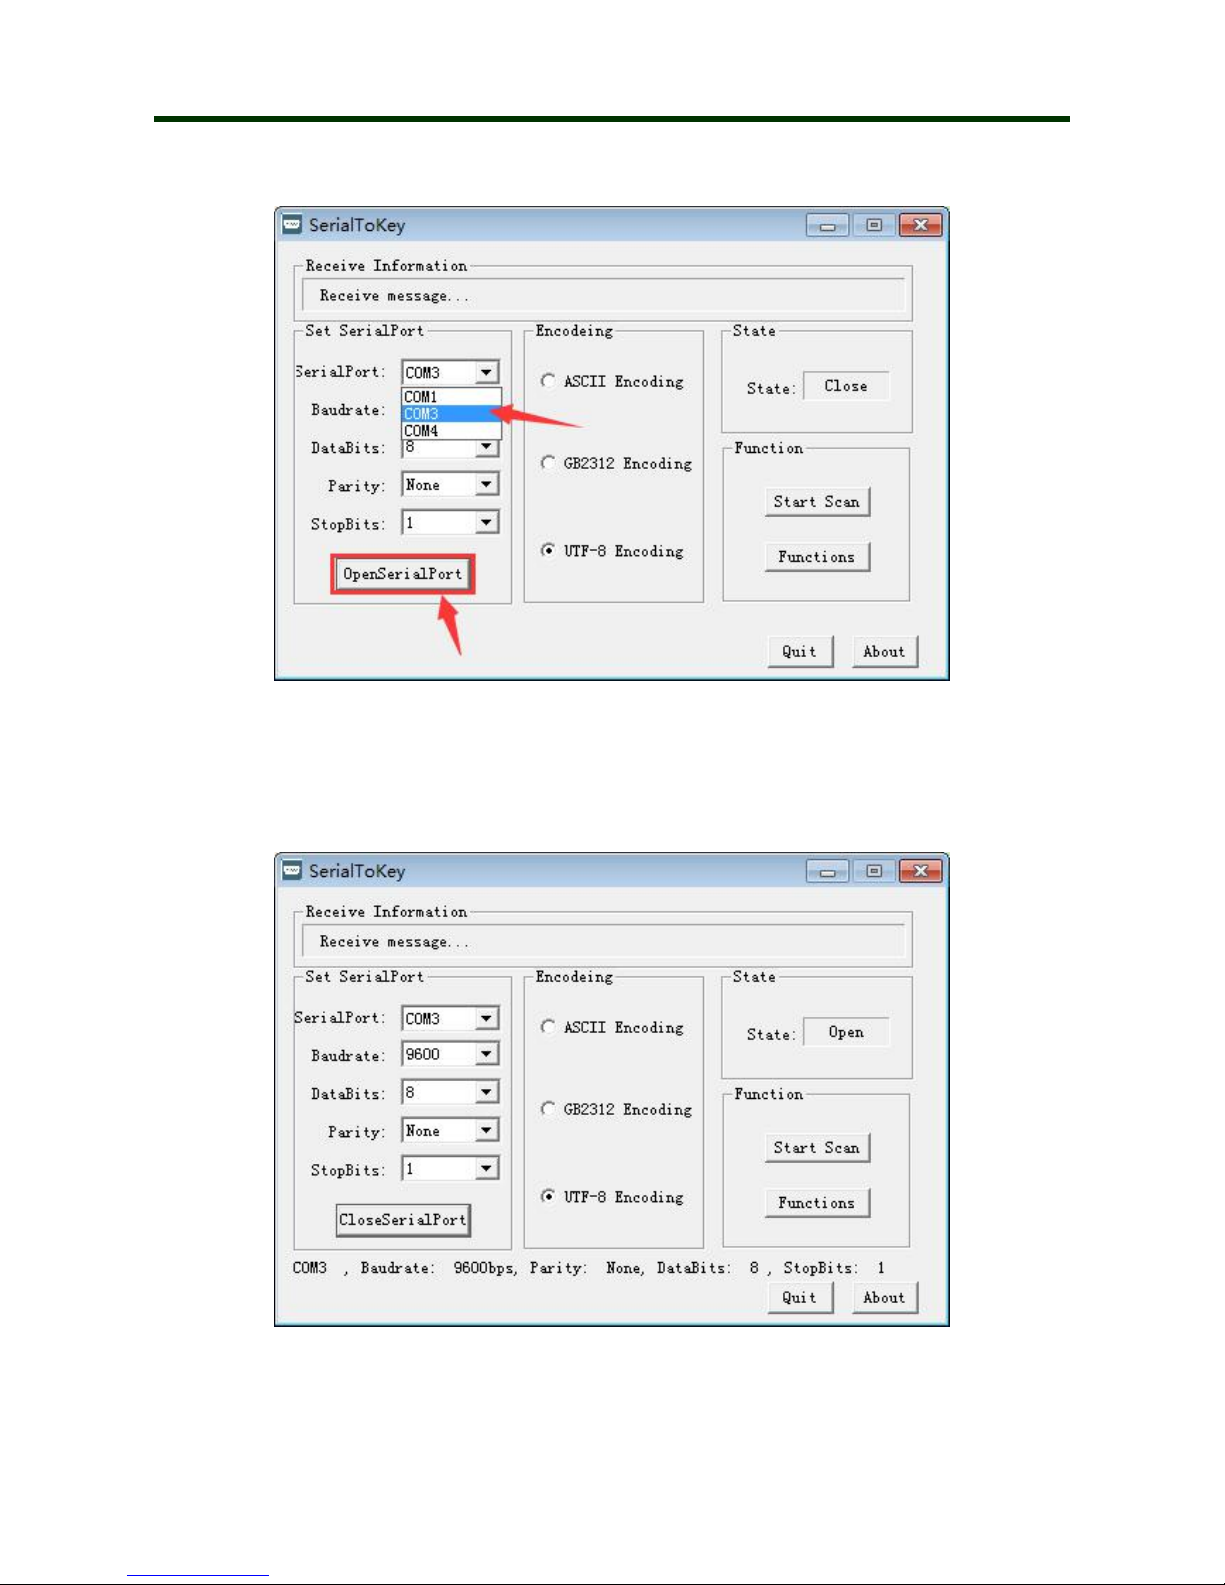
(6) Please select opposite "SerialPort" number (for example: COM3), and click
"OpenSerialPort".
(7) Scanner blue LED light off when connection succeed.
Page 13
Mini Barcode Scanner SPP Mode for Windows
13
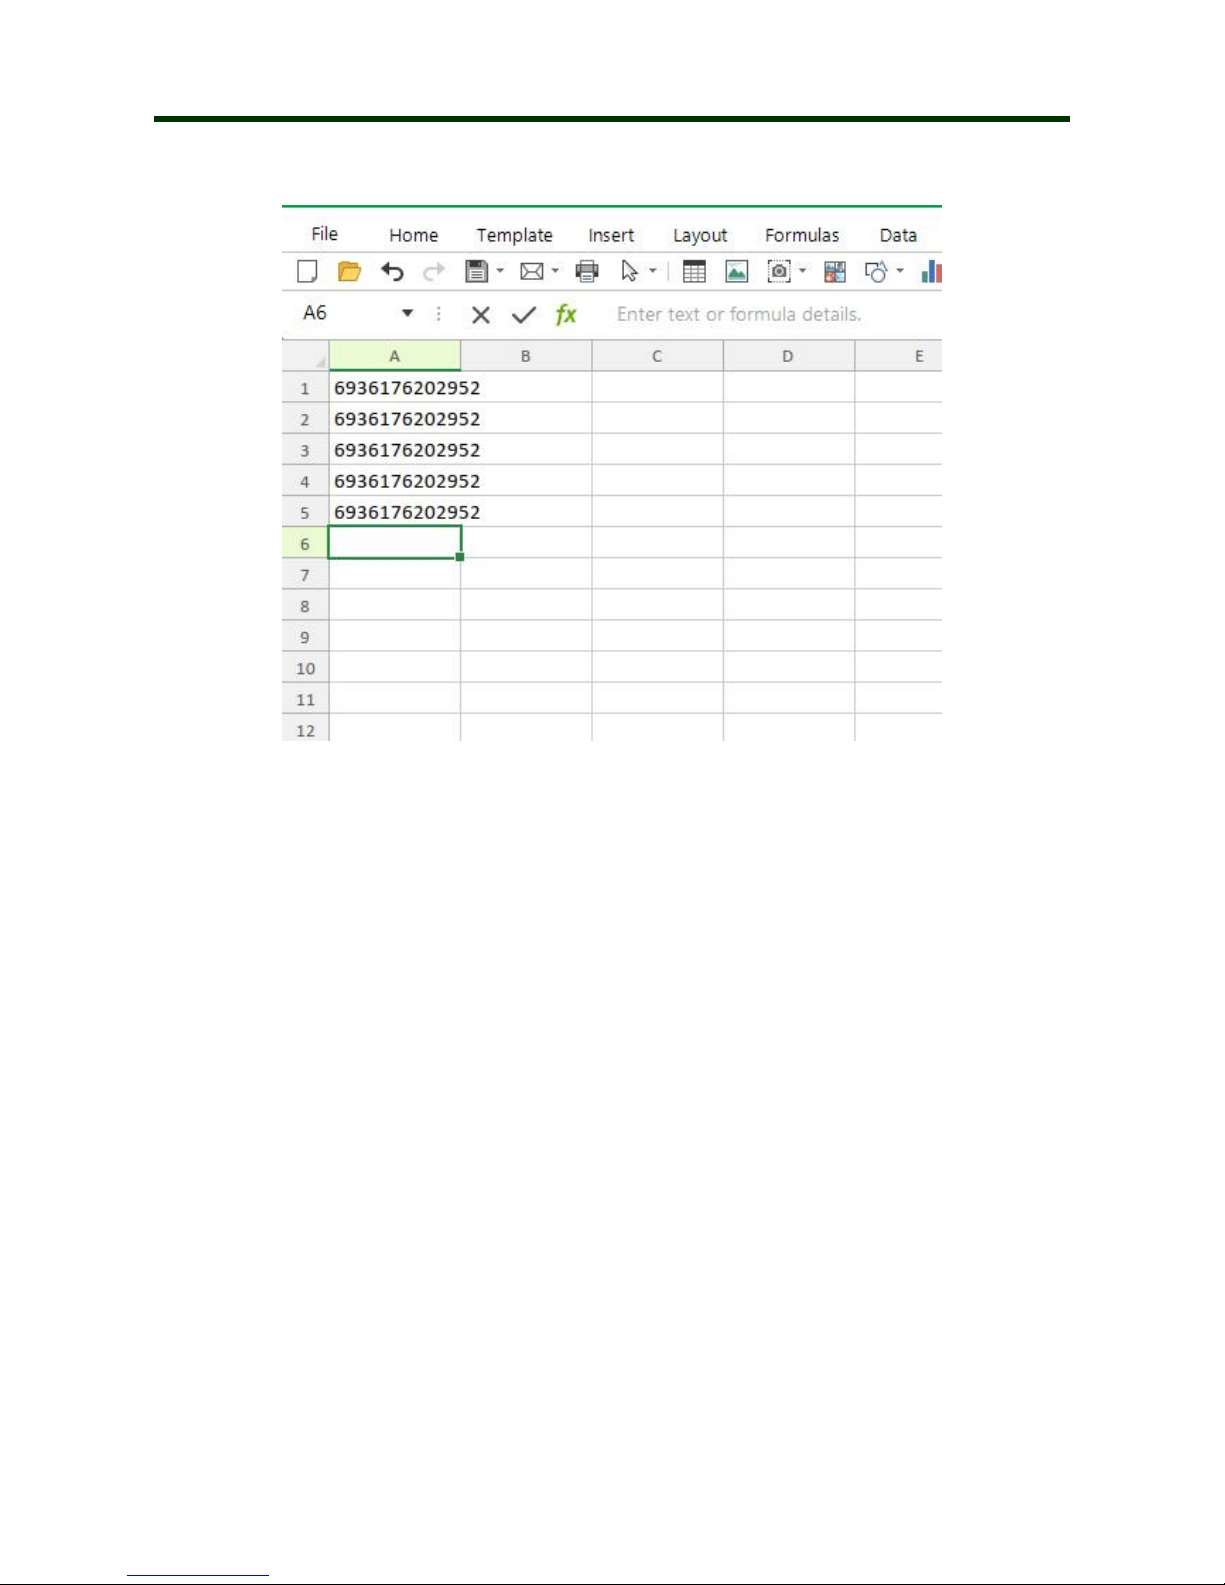
(8) Now you can open Notes/office files or other cursor blinking position, when scan a
barcode by scanner, the data will transfer to the document.
Page 14
Mini Barcode Scanner HID Mode for Android
14
3. HID mode for Android
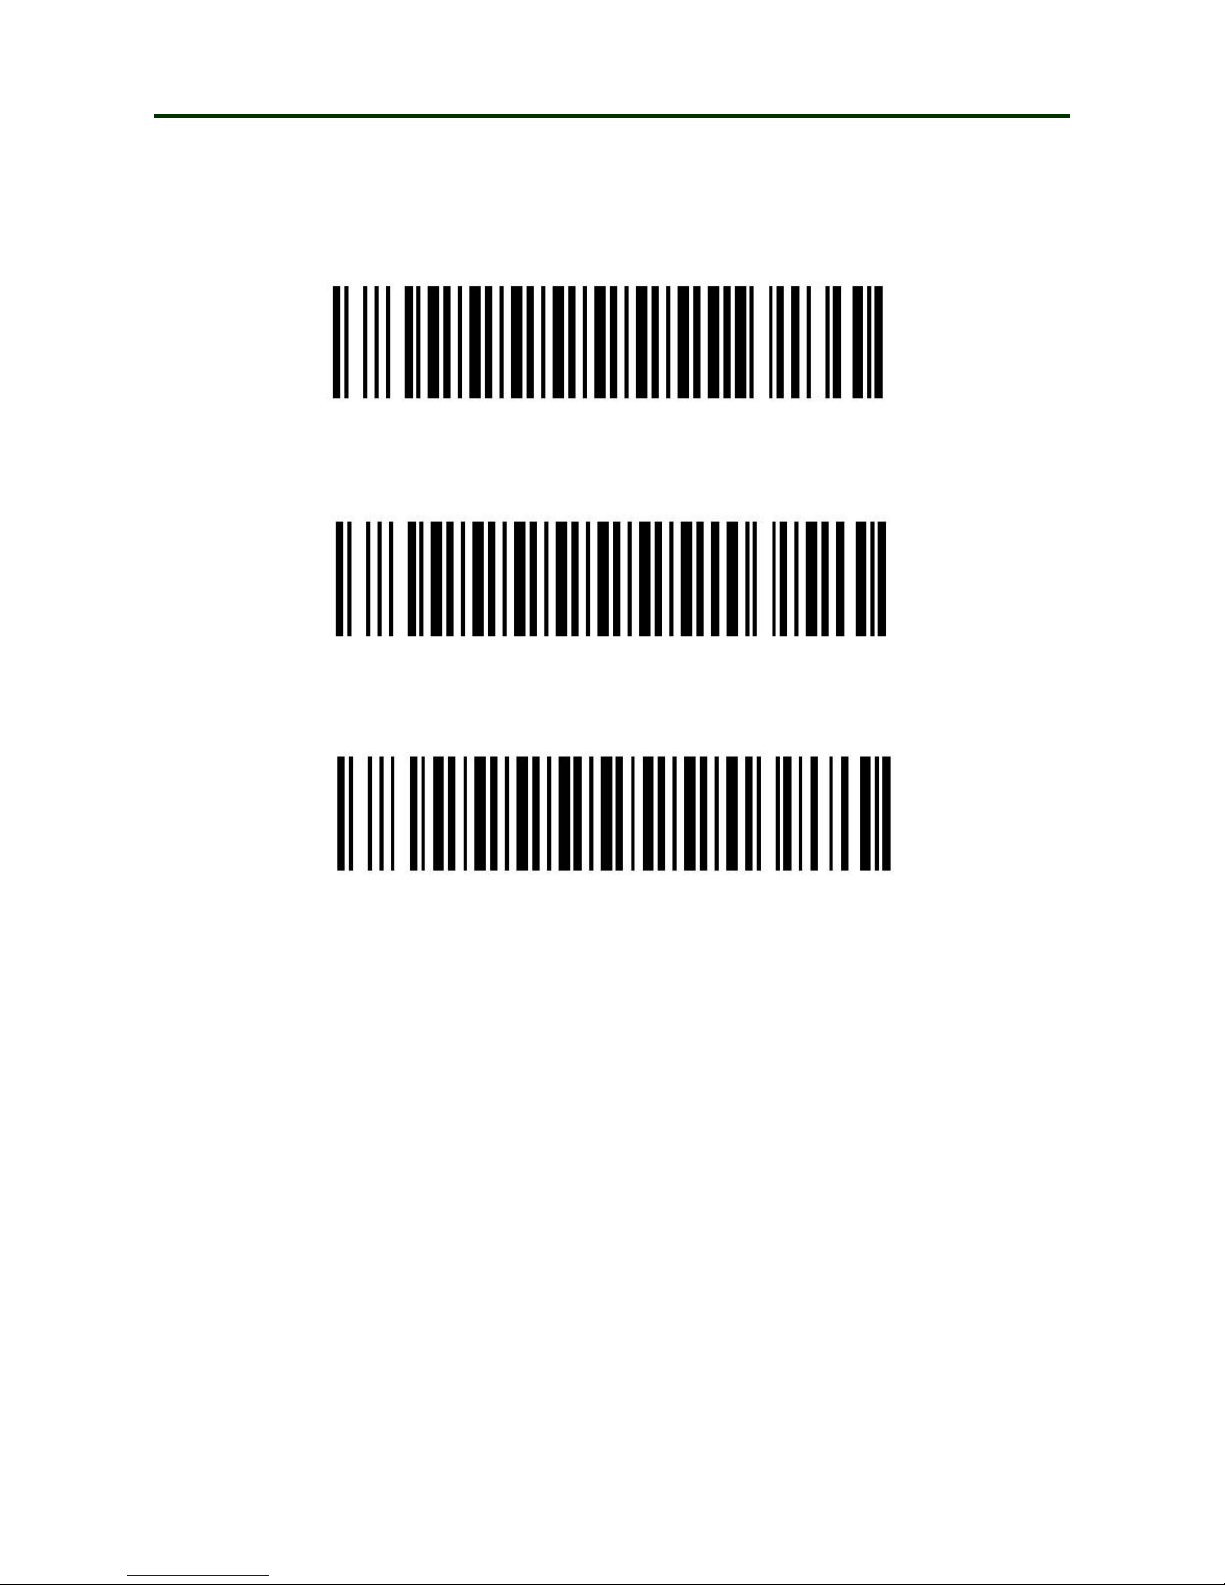
(1)
Turn on the barcode reader, and read below barcodes sequence, the blue LED will flash
rapidly.
Bluetooth HID Mode
Bluetooth Pairing Mode
Bluetooth Output Mode
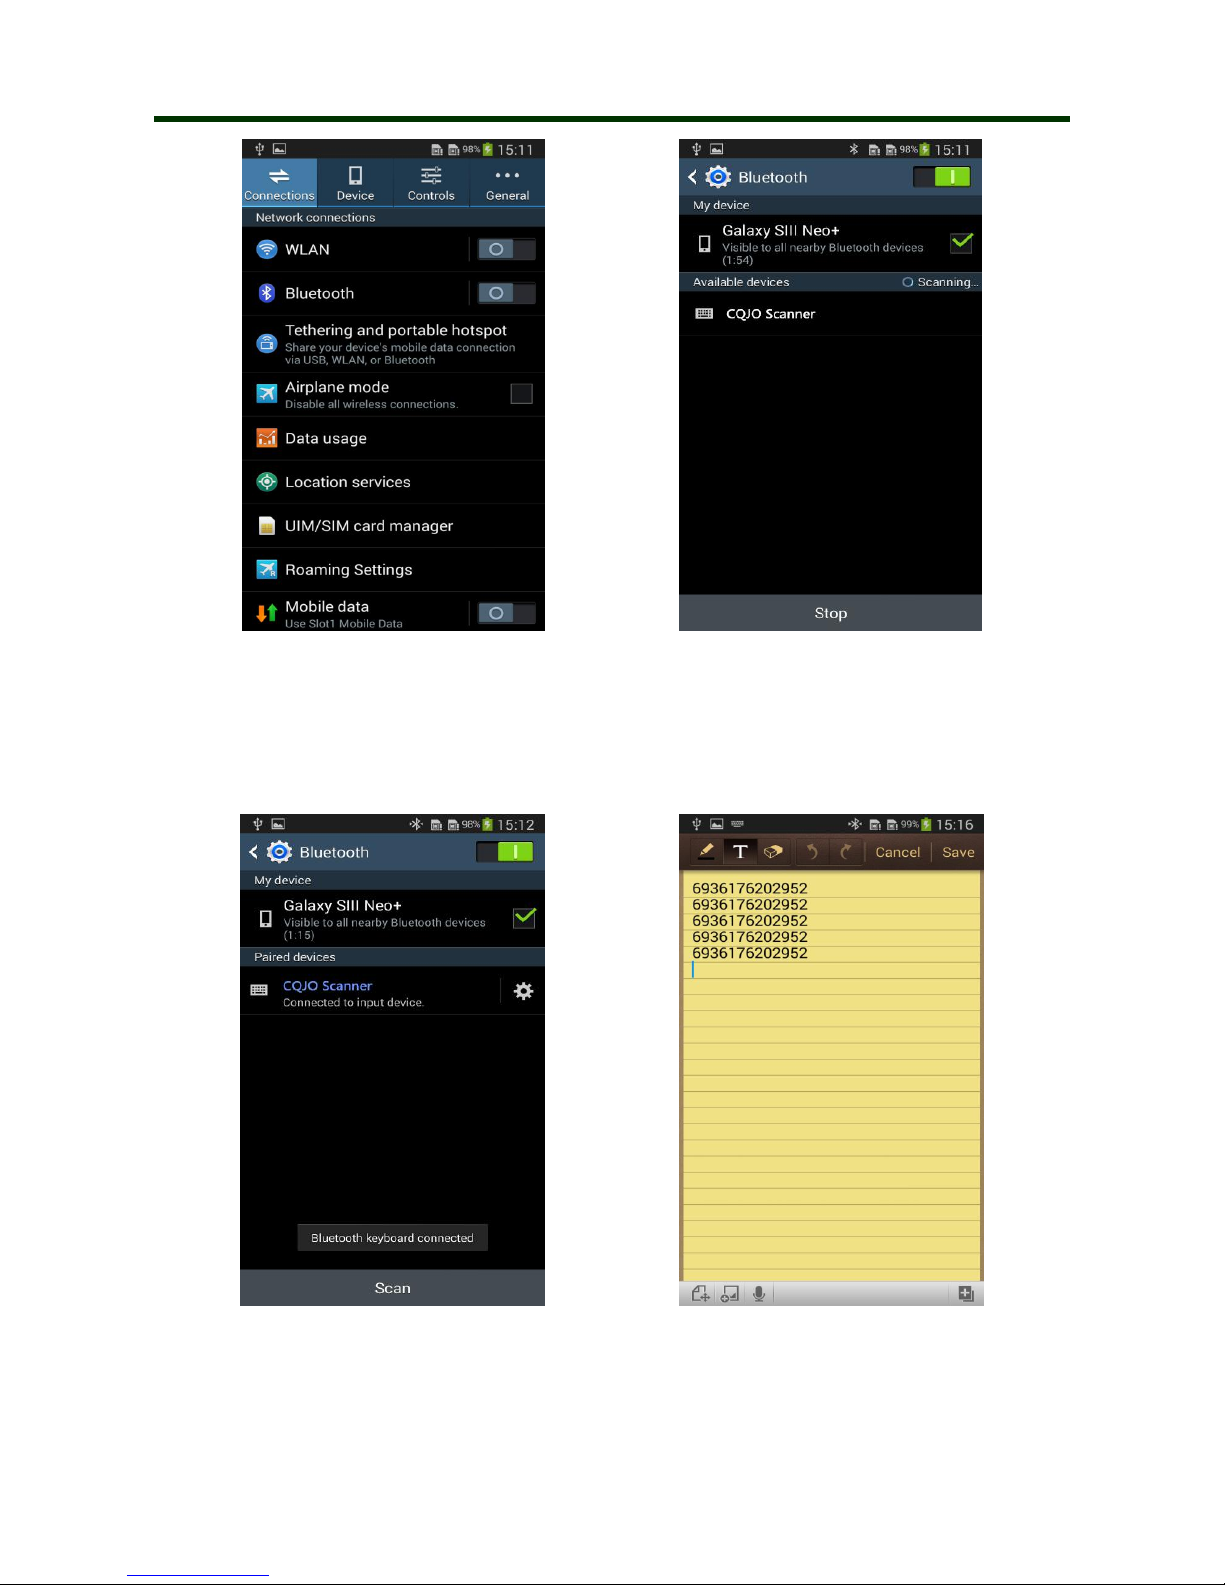
Enable the bluetooth of Android device to pair with the barcode reader. After the pairing is
successful, the blue LED on the scanner will be off. Please follow the steps below.
①Find out bluetooth icon for Android device, shown in “The 1st” picture. Click to enter and
enable bluetooth, and the Android device will automatically searching, shown in “The 2nd”
picture.
Page 15
Mini Barcode Scanner HID Mode for Android
15
The 1st The 2nd
②After the search is completed, click scanner’s name(CQJO Scanner) to connect, then
“Bluetooth keyboard connected” will display on the soft keyboard, and the blue LED on
the scanner will be off, the connection is successful, shown in “The 3rd” picture. Now, you
can use it in Notes/office files or other cursor blinking position, shown in “The 4th”
picture.
The 3rd The 4th
Page 16
Mini Barcode Scanner SPP Mode for Android
16
5. SPP mode for Android
Due to some Android device can’t support Bluetooth HID protocol very well. It can not connect
bluetooth scanner with HID mode. In general, Android support SPP protocol very well.
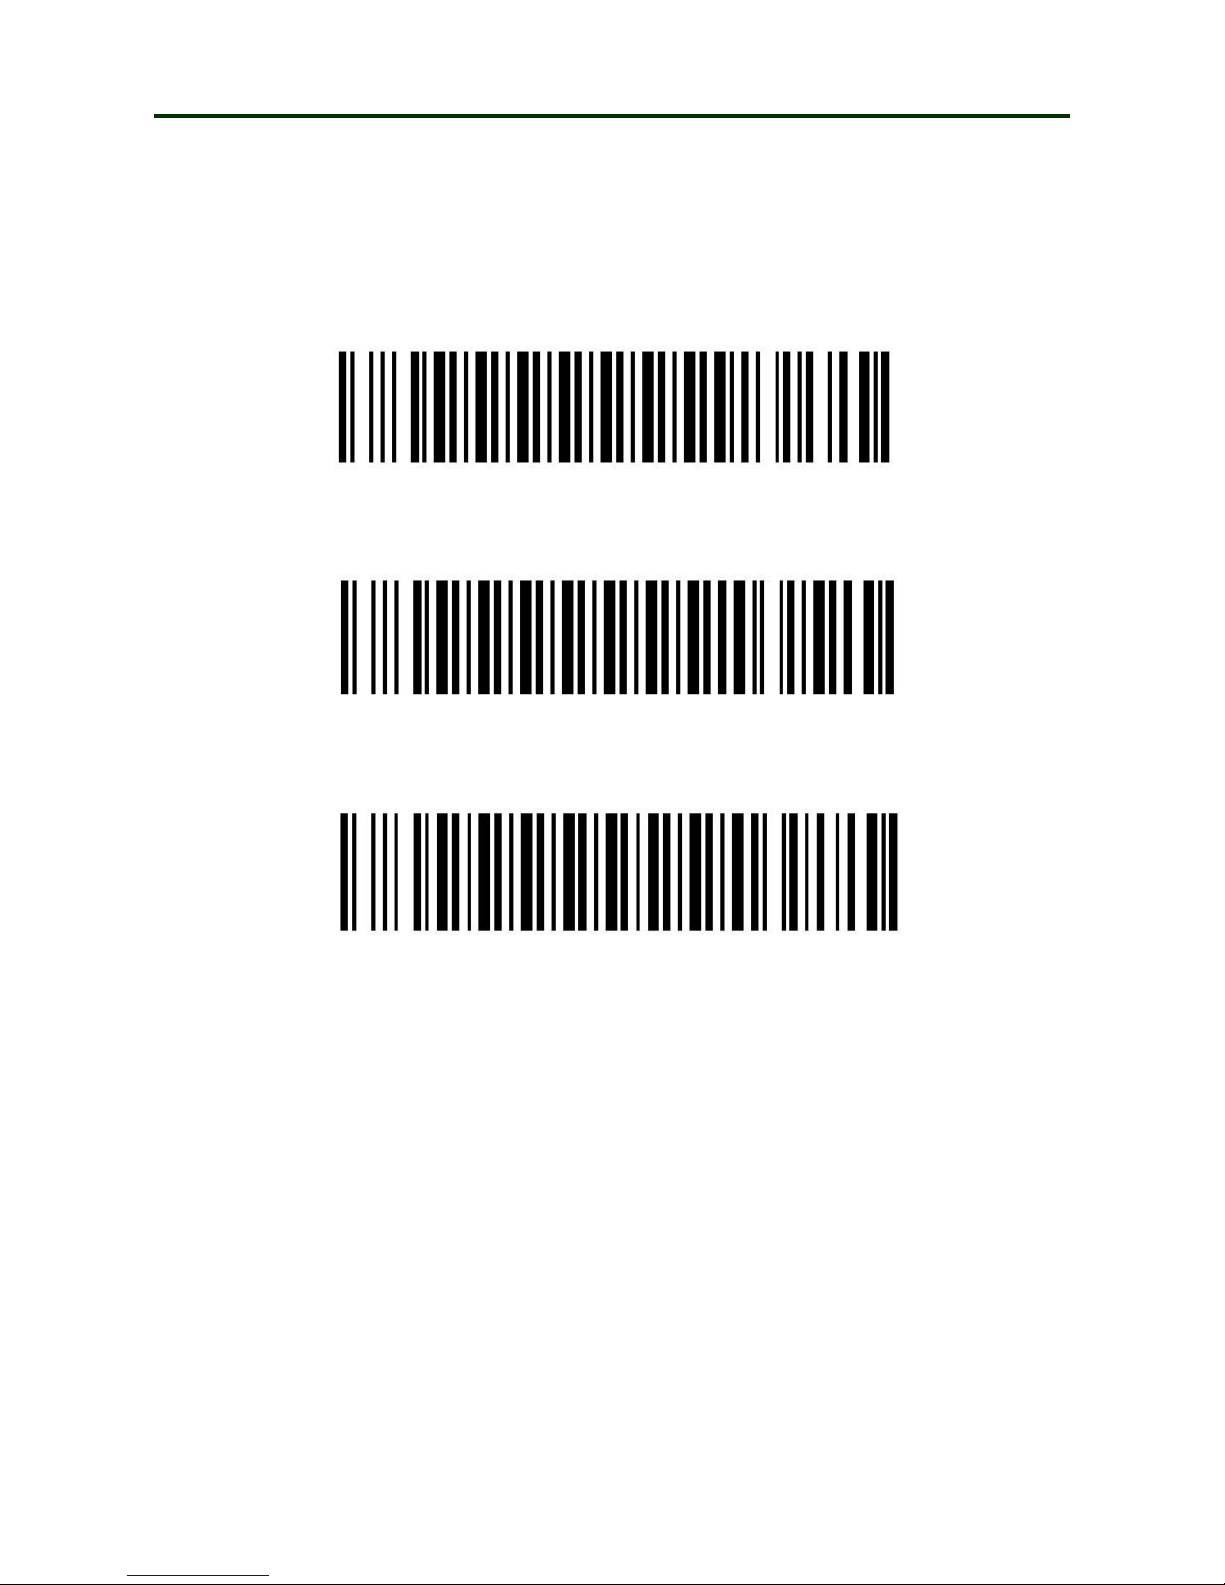
(1)
Turn on the barcode reader, and read below barcodes sequence, the blue LED will flash
slowly.
Bluetooth SPP Mode
Bluetooth Pairing Mode
Bluetooth Output Mode
(2)
Please download the BIM (Bluetooth Input Method) to android device from our website, or
get it from our sales, then install BIM to your smartphone and run it. And then please
follow the wizard to connect barcode scanner to finish the connection.
After the connection is successful, the blue LED on the scanner will be off.
Page 17
Mini Barcode Scanner Instruction for BIM
17
(3)
User manual for Bluetooth Input Method (BIM) in Android device
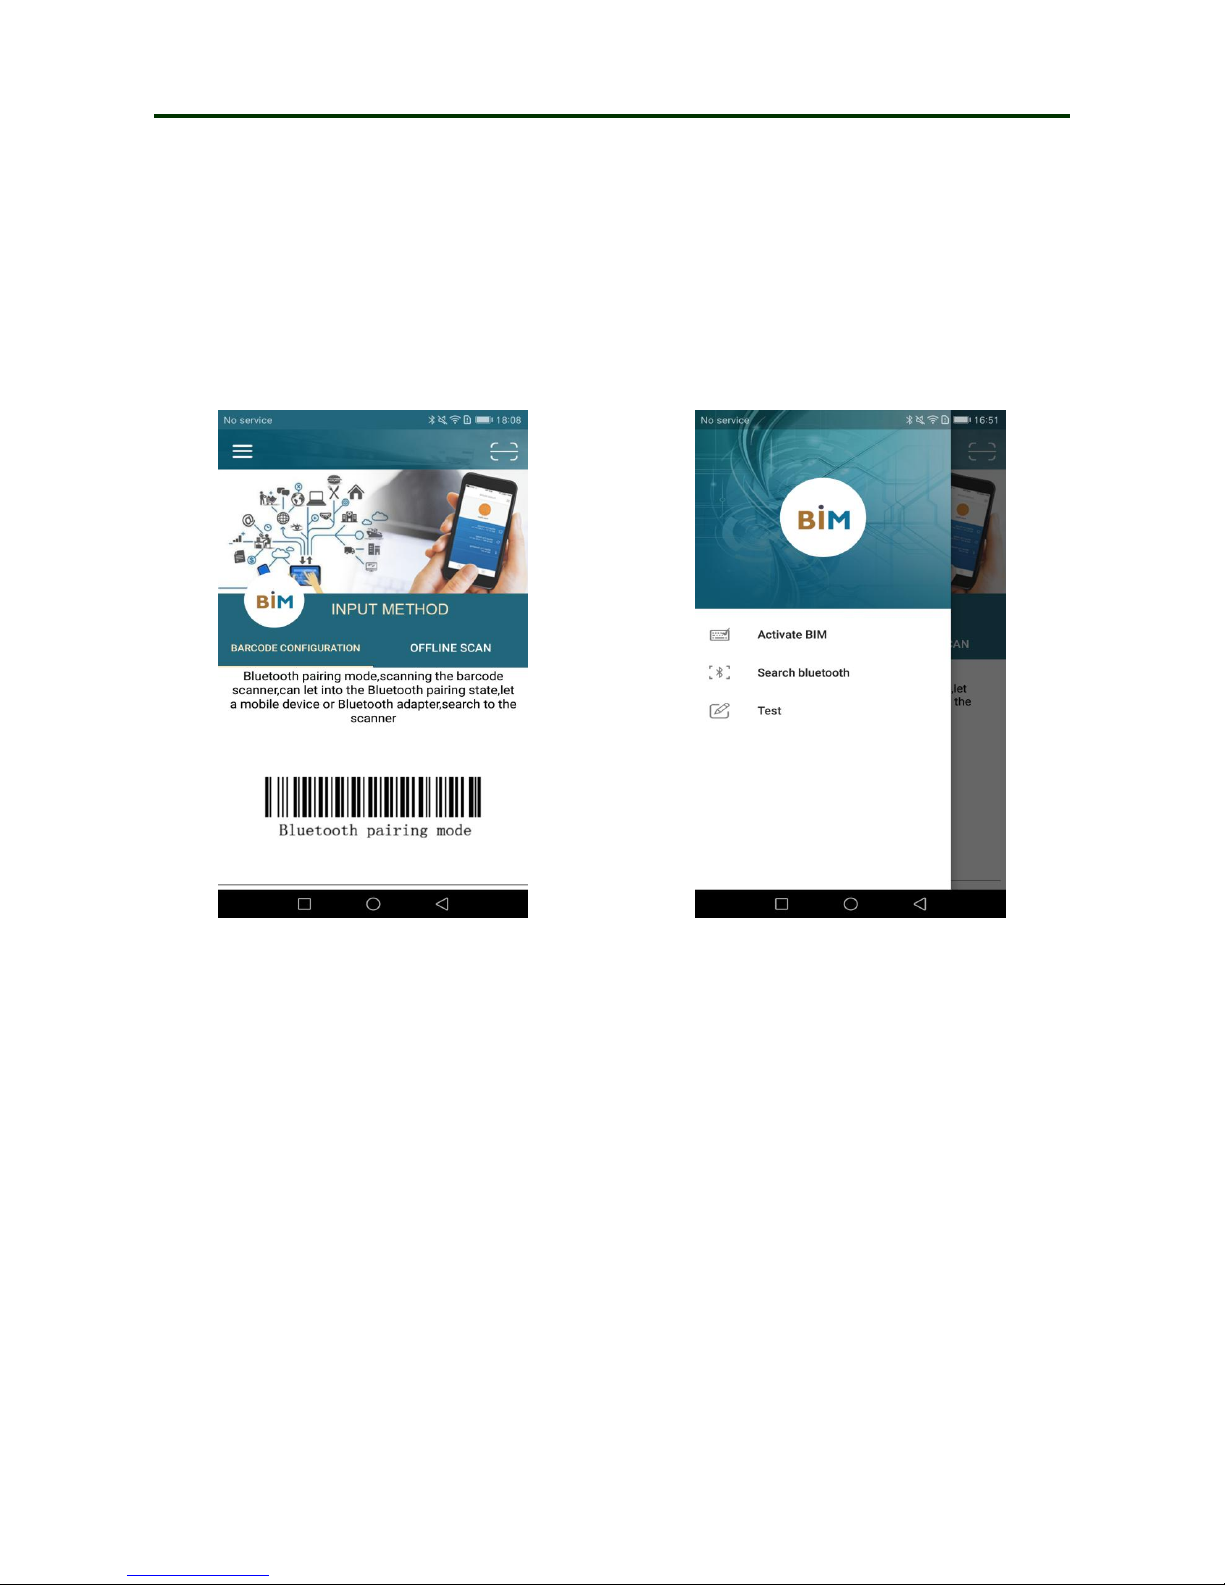
1. Please download the software BIM.apk from our website and install it to your smartphone, open
the BIM, shown in “The 5th” picture.
2. Now you have two methods to connect scanner, please follow the steps below:
Way 1:
①Click the menu key in the upper left corner, complete the following steps in order in the
pop-up window, shown in “The 6th” picture.
The 5th The 6th
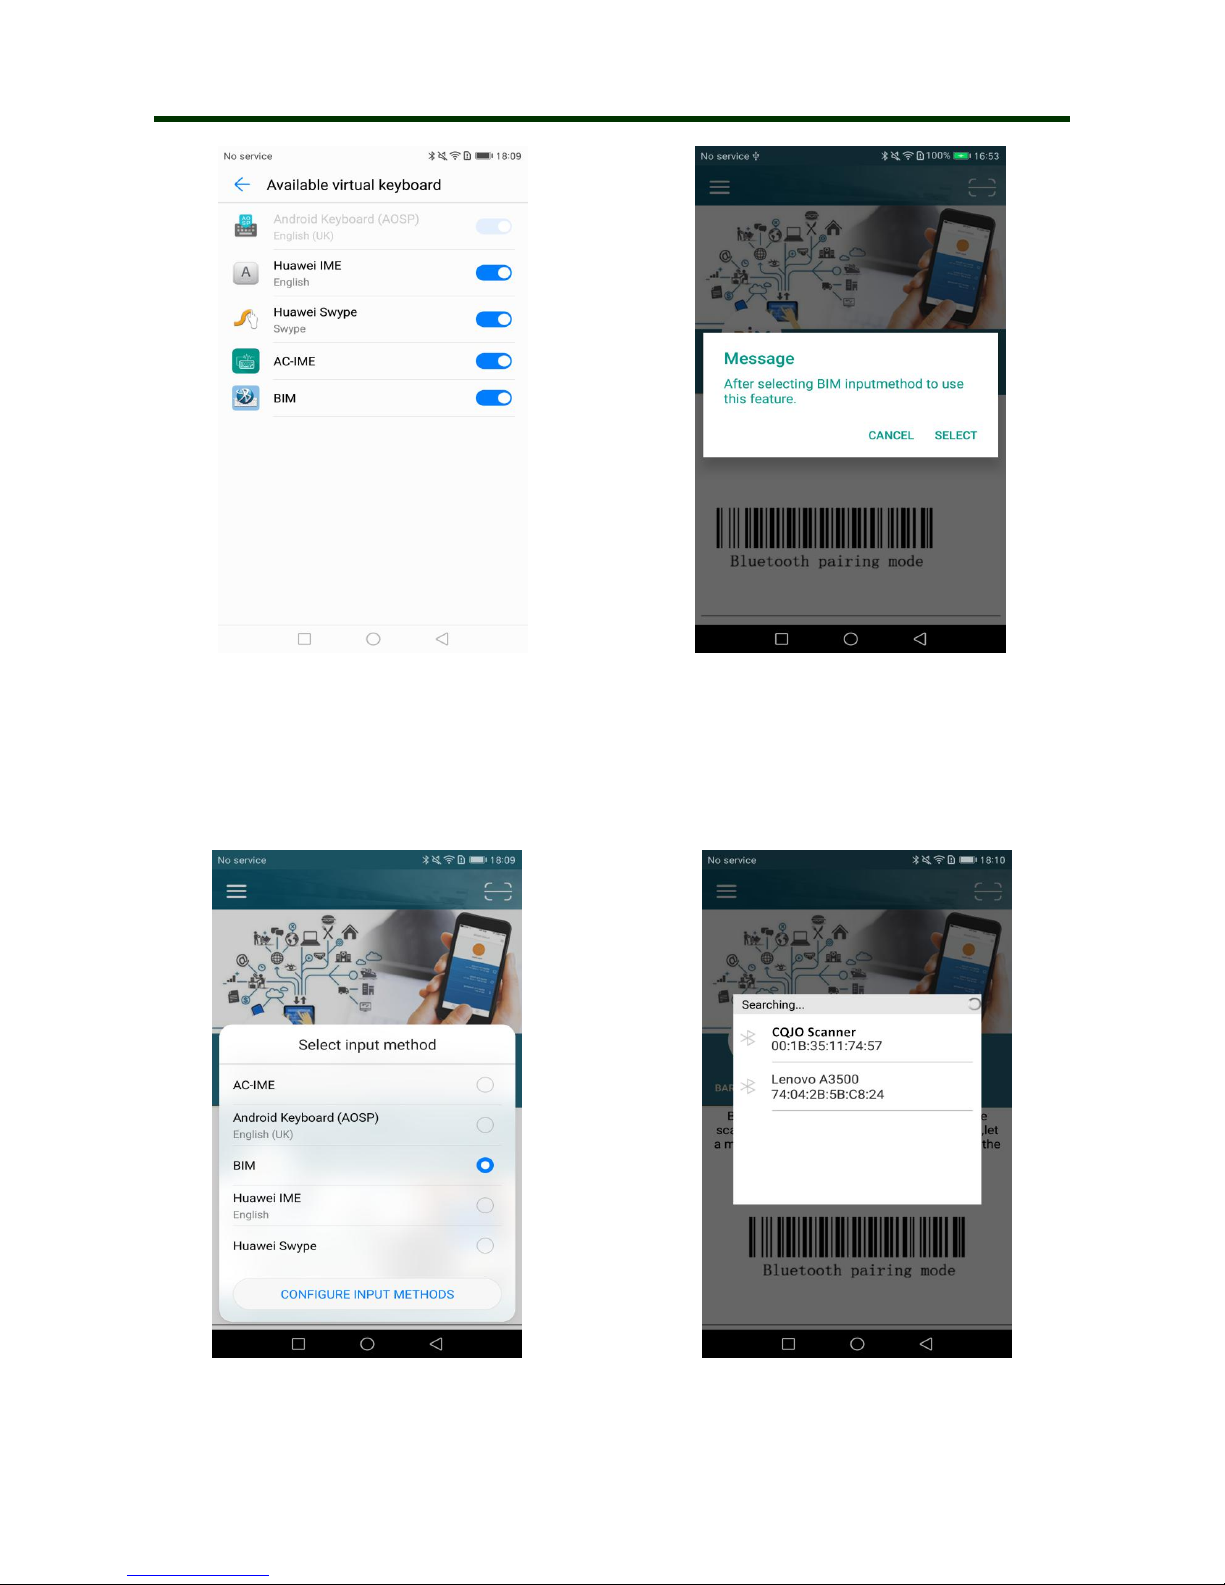
②Click “Activate BIM”, and then add BIM input method in picture "the 7th".
③Click “Search bluetooth” in “The 6th” picture, shown as “The 8th” picture, please select
inputmethod, click “SELECT”.
Page 18
Mini Barcode Scanner Instruction for BIM
18
The 7th The 8th
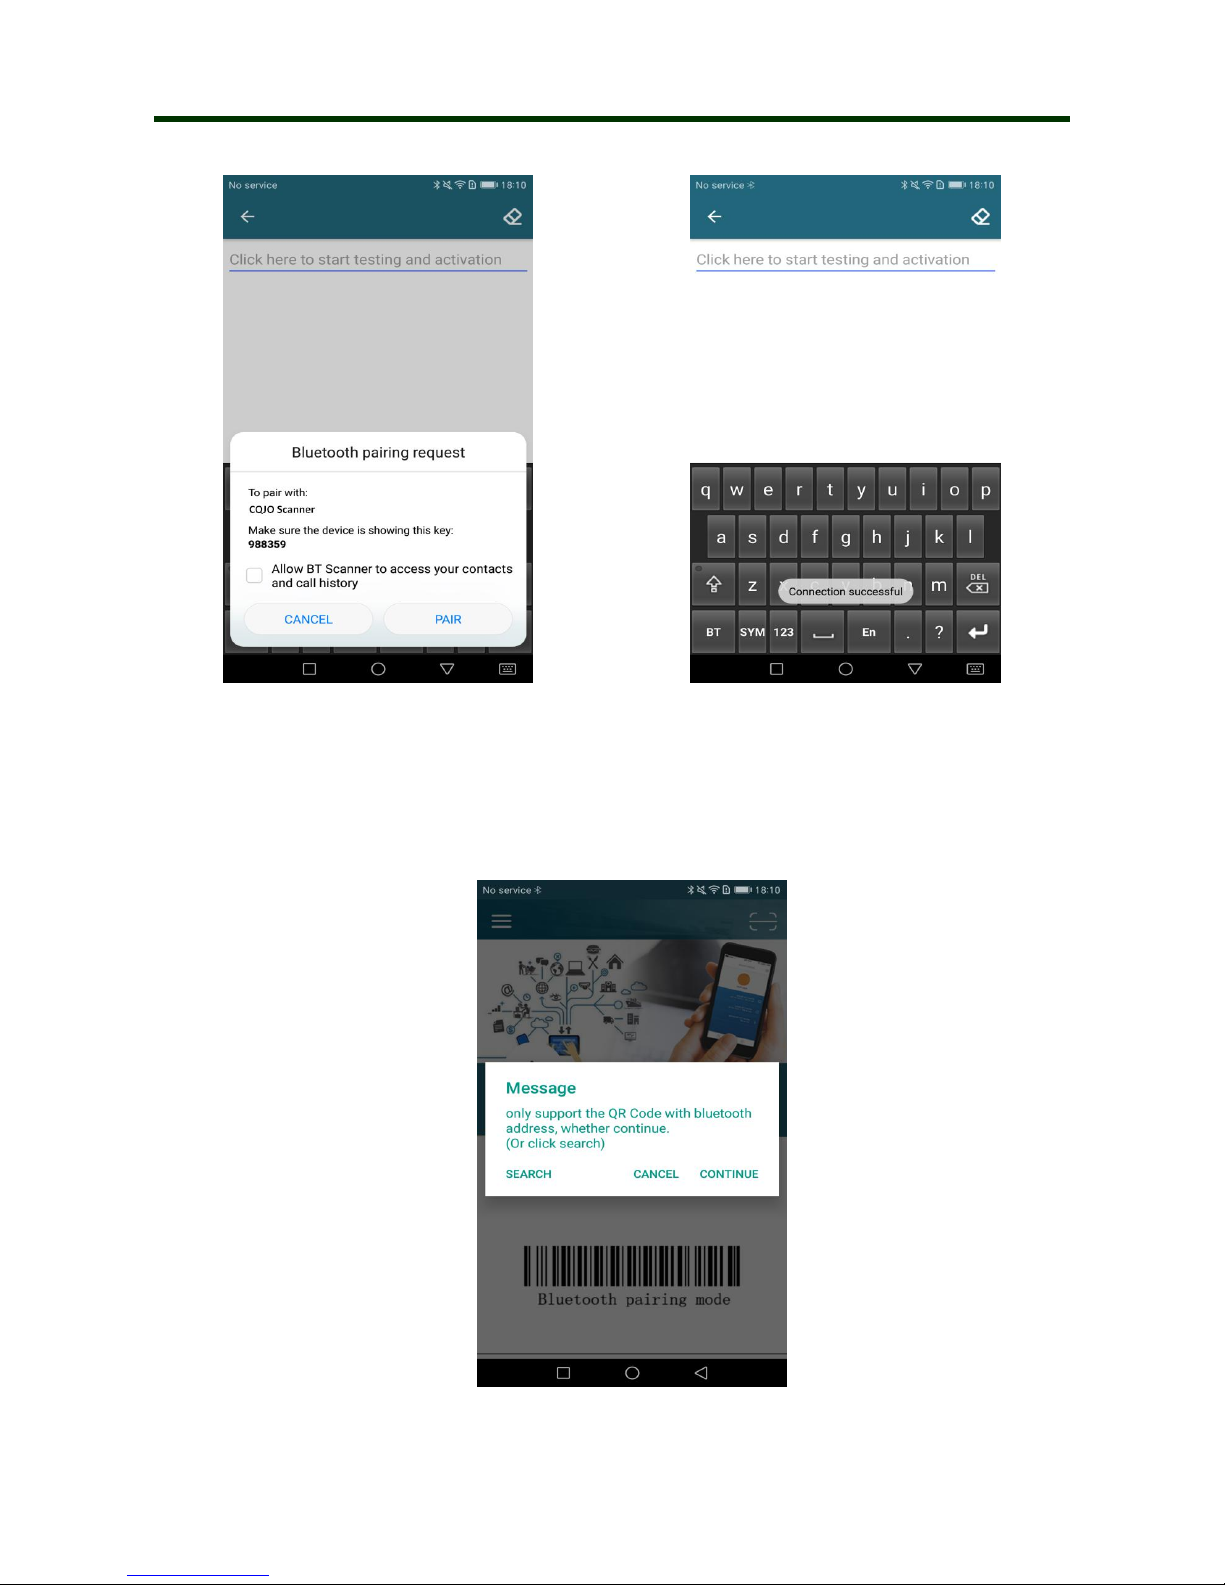
④Choose the BIM in “The 9th” picture, and then the interface automatically pops up the
Bluetooth search window, shown in “The 10th” picture, select scanner’s name to connect. The
interface will pop up matching information (988359 is a randomly assigned password), click “PAIR”
to complete the match, shown in “The 11th” picture.
The 9th The 10th
⑤Connection successful! shown in “The 12th” picture. The blue LED on the scanner will be
Page 19
Mini Barcode Scanner Instruction for BIM
19
off.
The 11th The 12th
Way 2:
①
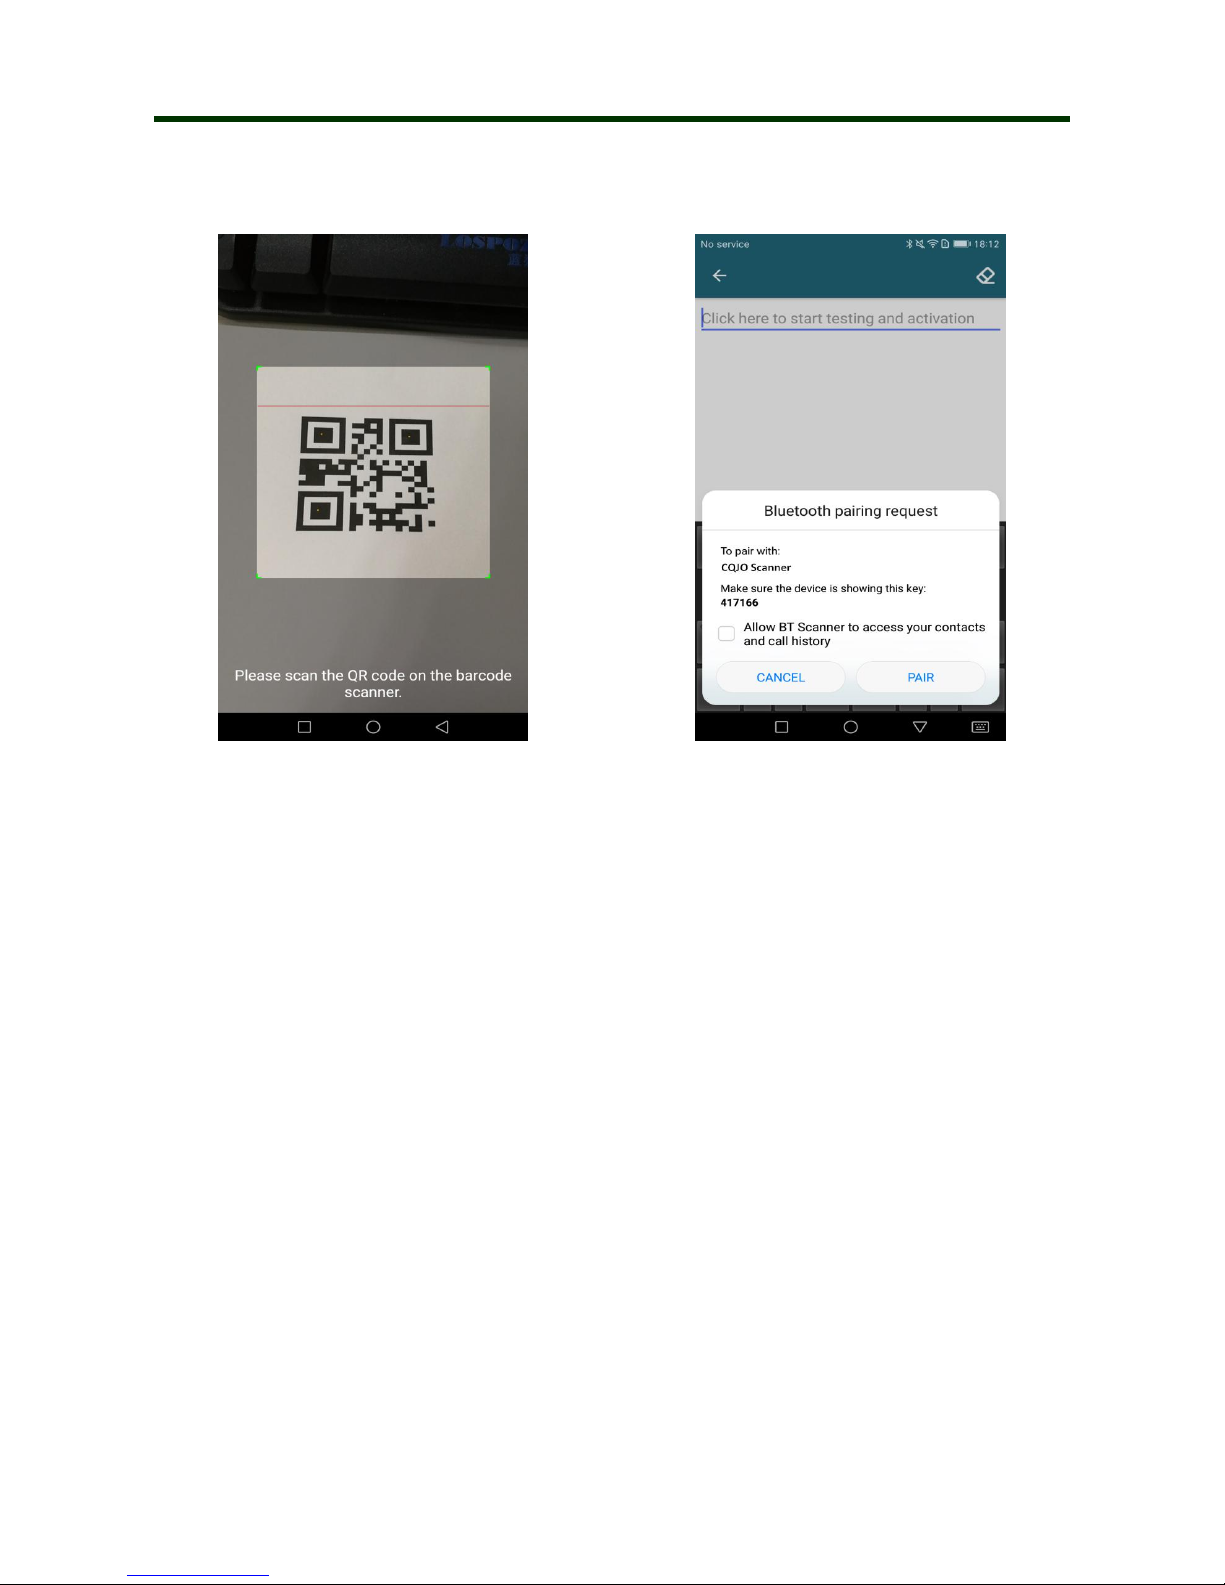
If you have Bluetooth address two-dimensional code of a scanner, please click the scan frame
in the upper right corner in “The 5th” picture, and click “CONTINUE” in “The 13th” picture. Please
scan the Bluetooth address code, shown as “The 14th” picture.
The 13th
Page 20
Mini Barcode Scanner Instruction for BIM
20
②The interface will pop up matching information, click “PAIR” to complete the match. Shown
in “The 15th” picture.
The 14th The 15th
③It will show “Connection successful”, the blue LED on the scanner will be off. Now you can
scan the barcode to the text box or notepad, word..., shown in “The 16th” picture.
Note: If it doesn’t connect automatically, click “BT” in “The 11th” picture, and click
“Connect”.
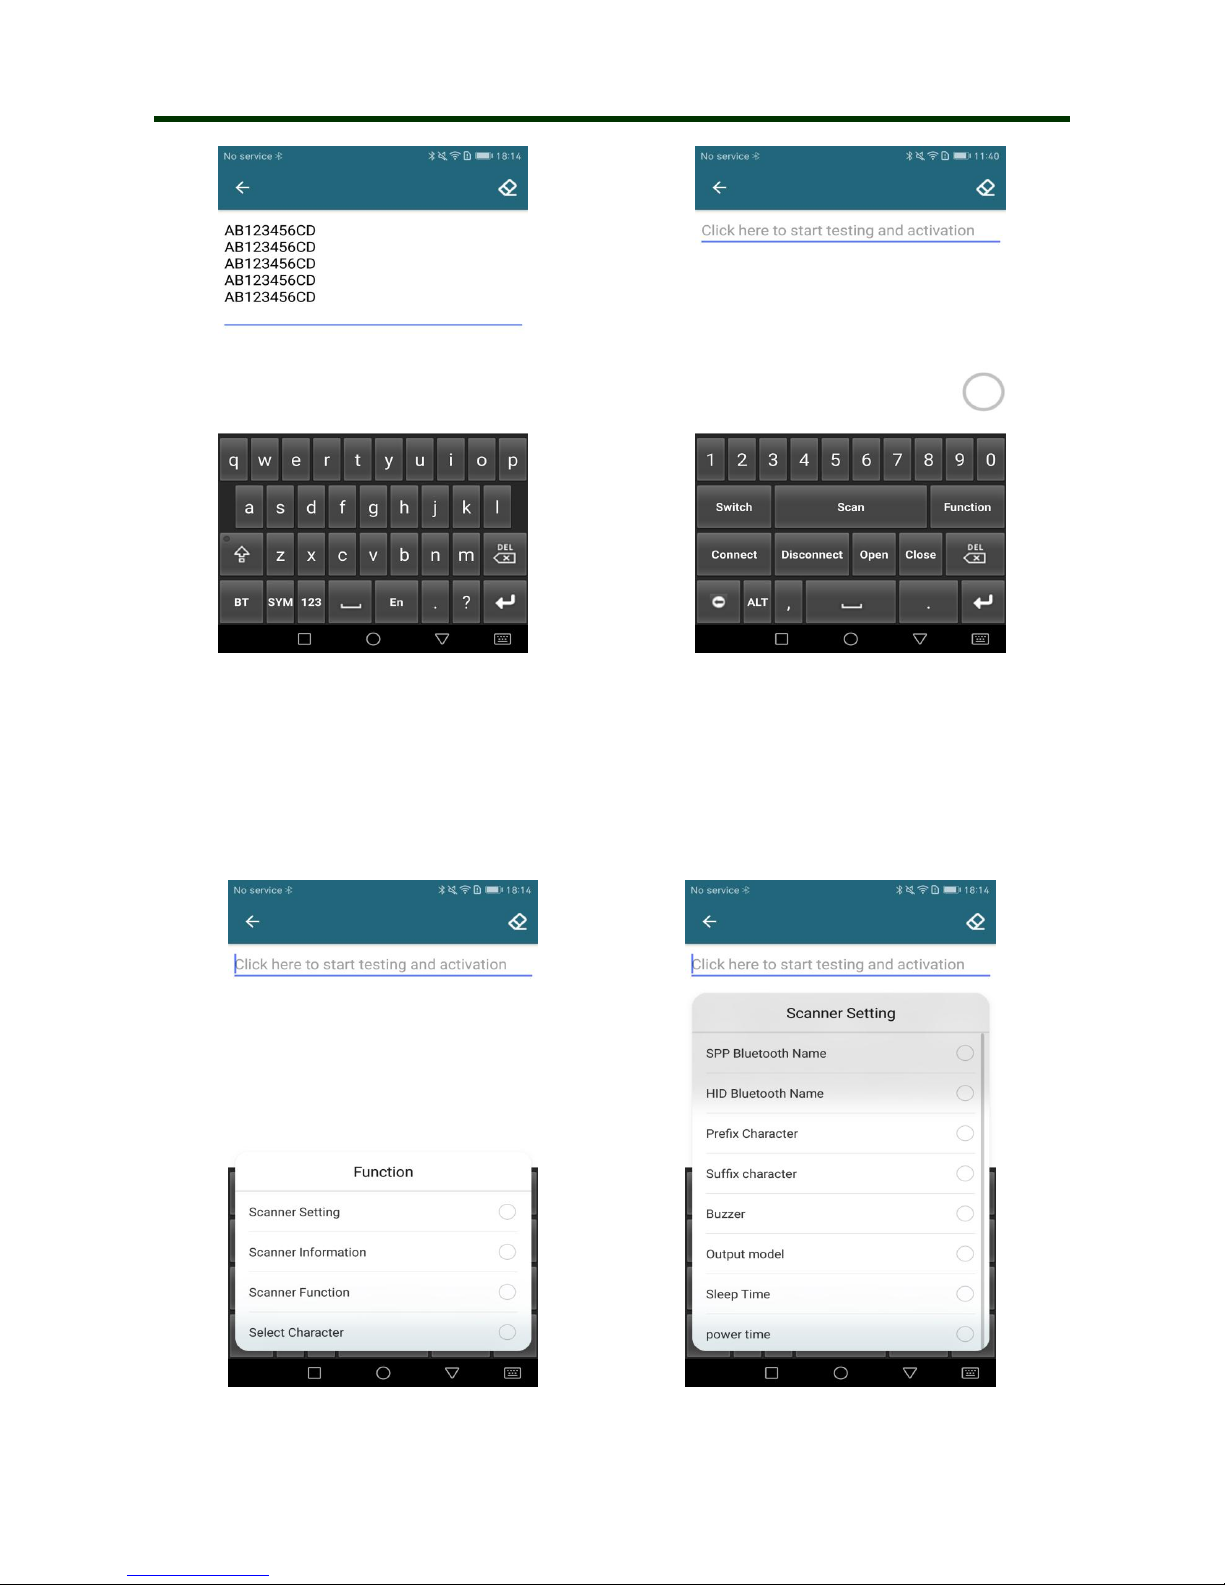
3. Click “BT” in the lower left corner in “The 16th” picture, shown as “The 17th” picture, click
“Open”/ “Close” to turn on / off the suspension button, you can click on the white circle to scan
barcode. Click “Swith”, you can view all the scanners that have been paired, and replace the scanner
at will.
Page 21
Mini Barcode Scanner Instruction for BIM
21
The 16th The 17th
4. You can configure the barcode reader via the “Function” in the picture “The 17th”.
5. Click “Scanner Setting” in “The 18th” picture, you can set bluetooth name/prefix Character/suffix
character/buzzer/output model and sleep time of the barcode reader, please check “The 19th” picture.
Note: When you configure the barcode reader, please make sure the scanner in active mode, the
method is: click the scan button on the barcode reader every 2-3 seconds, but don’t read any
barcodes.
The 18th The 19th
Page 22
Mini Barcode Scanner Instruction for BIM
22
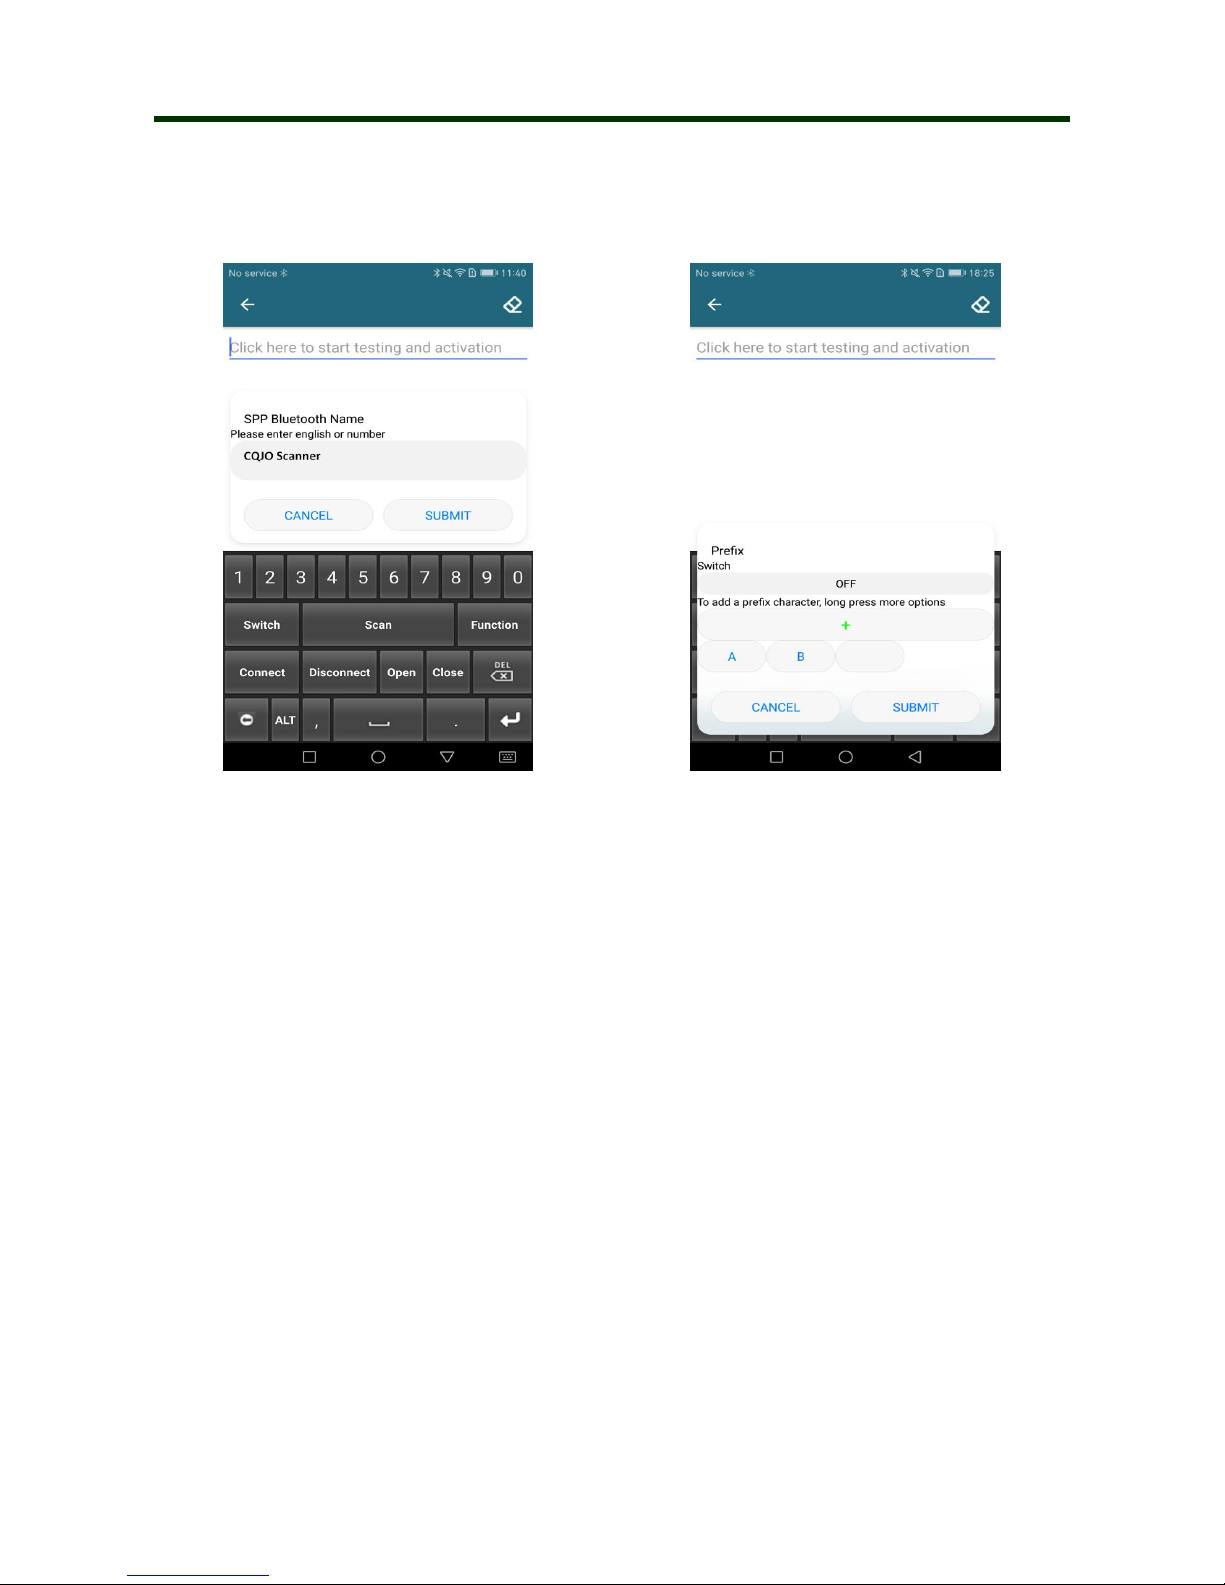
6. SPP Bluetooth Name: Click “SPP Bluetooth Name”, and enter the required set of Bluetooth name
in the pop-up window, click “SUBMIT”, shown in “The 20th” picture.
7. HID Bluetooth Name: The method is same as SPP Bluetooth Name.
The 20th The 21th
8. Prefix character: Please click “Prefix Character” option in “The 19th” picture, and click”+” in the
pop-up window, shown in “The 21th” picture. Now click the text-box behind “A” “B”(“A” “B”is
default setting of the product, and you can press the character to delete it.).
Note: The prefix is turned off by default, please make sure the prefix is opened when setting the
character.
Page 23
Mini Barcode Scanner Instruction for BIM
23
The 22th The 23th
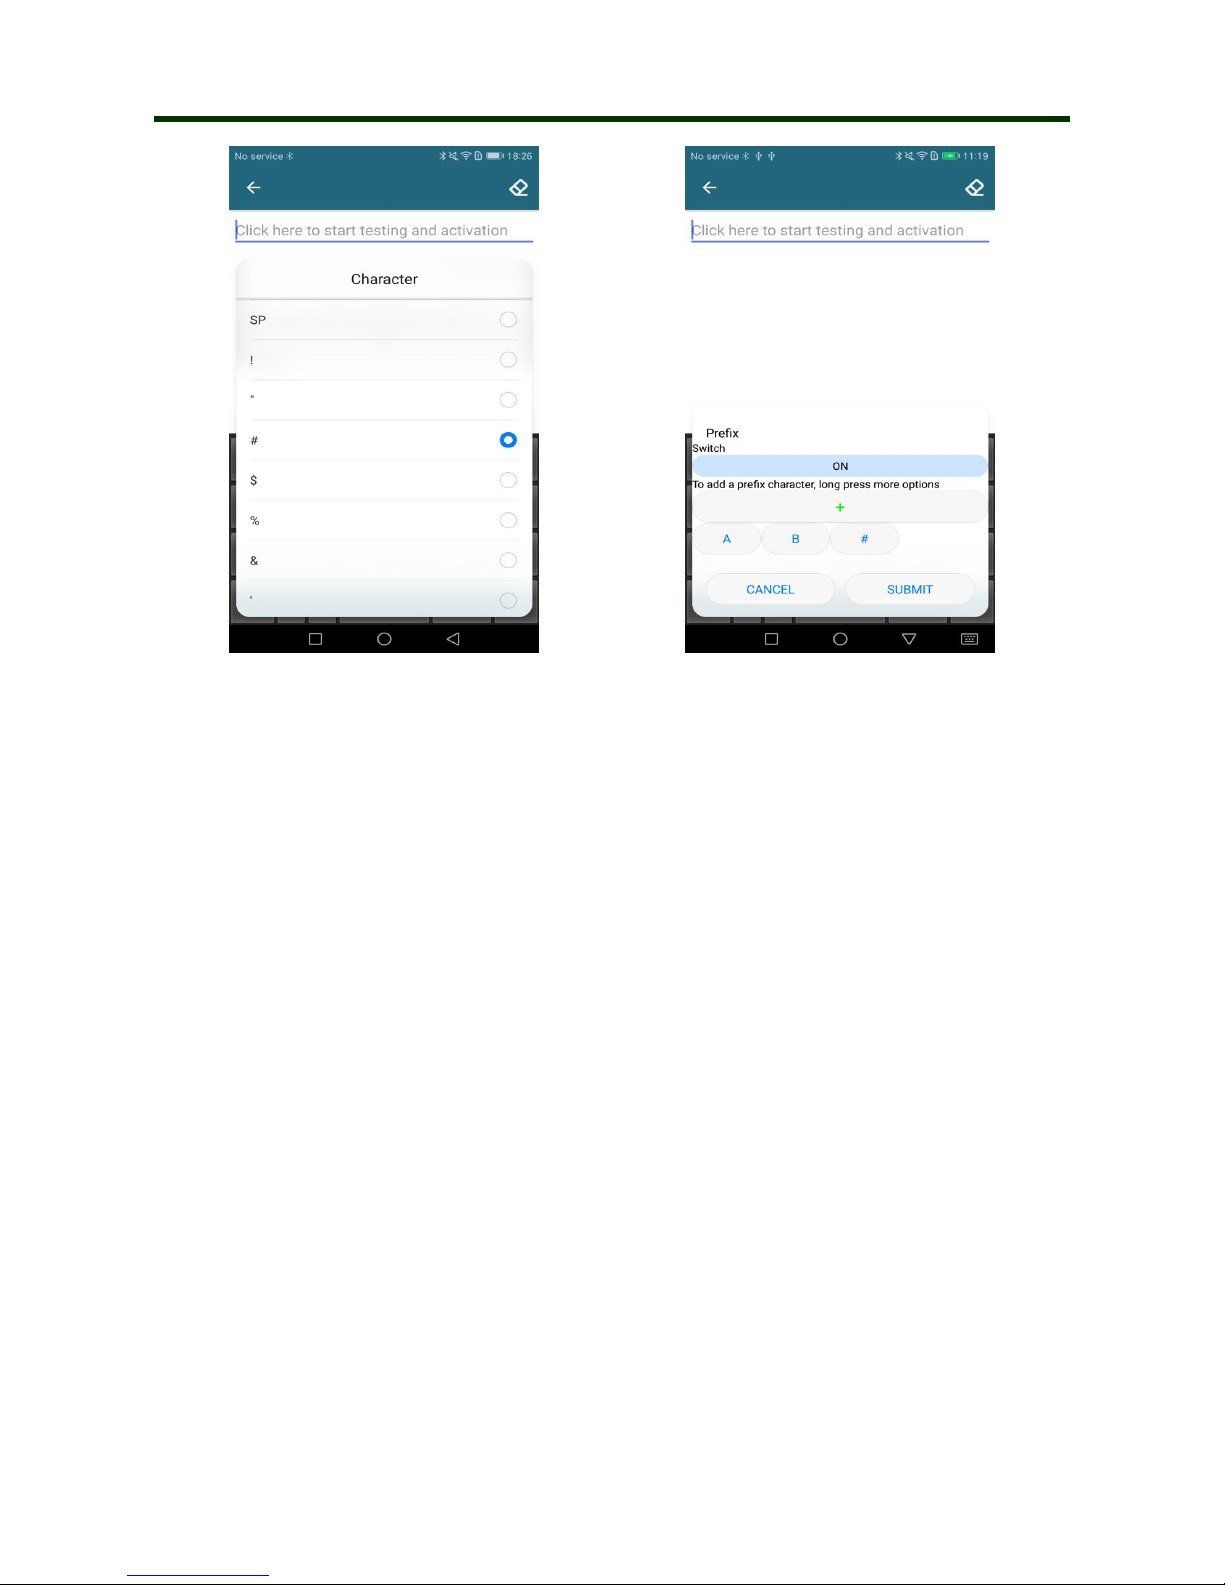
9. Choose the symbol required in picture “The 22th”, and enable Prefix, shown in “The 23th”
picture, then click “SUBMIT”, the setting is finished. The same method to set Suffix. Note: The
default suffixes are CR and LF, please put your suffix in front of the default suffix.
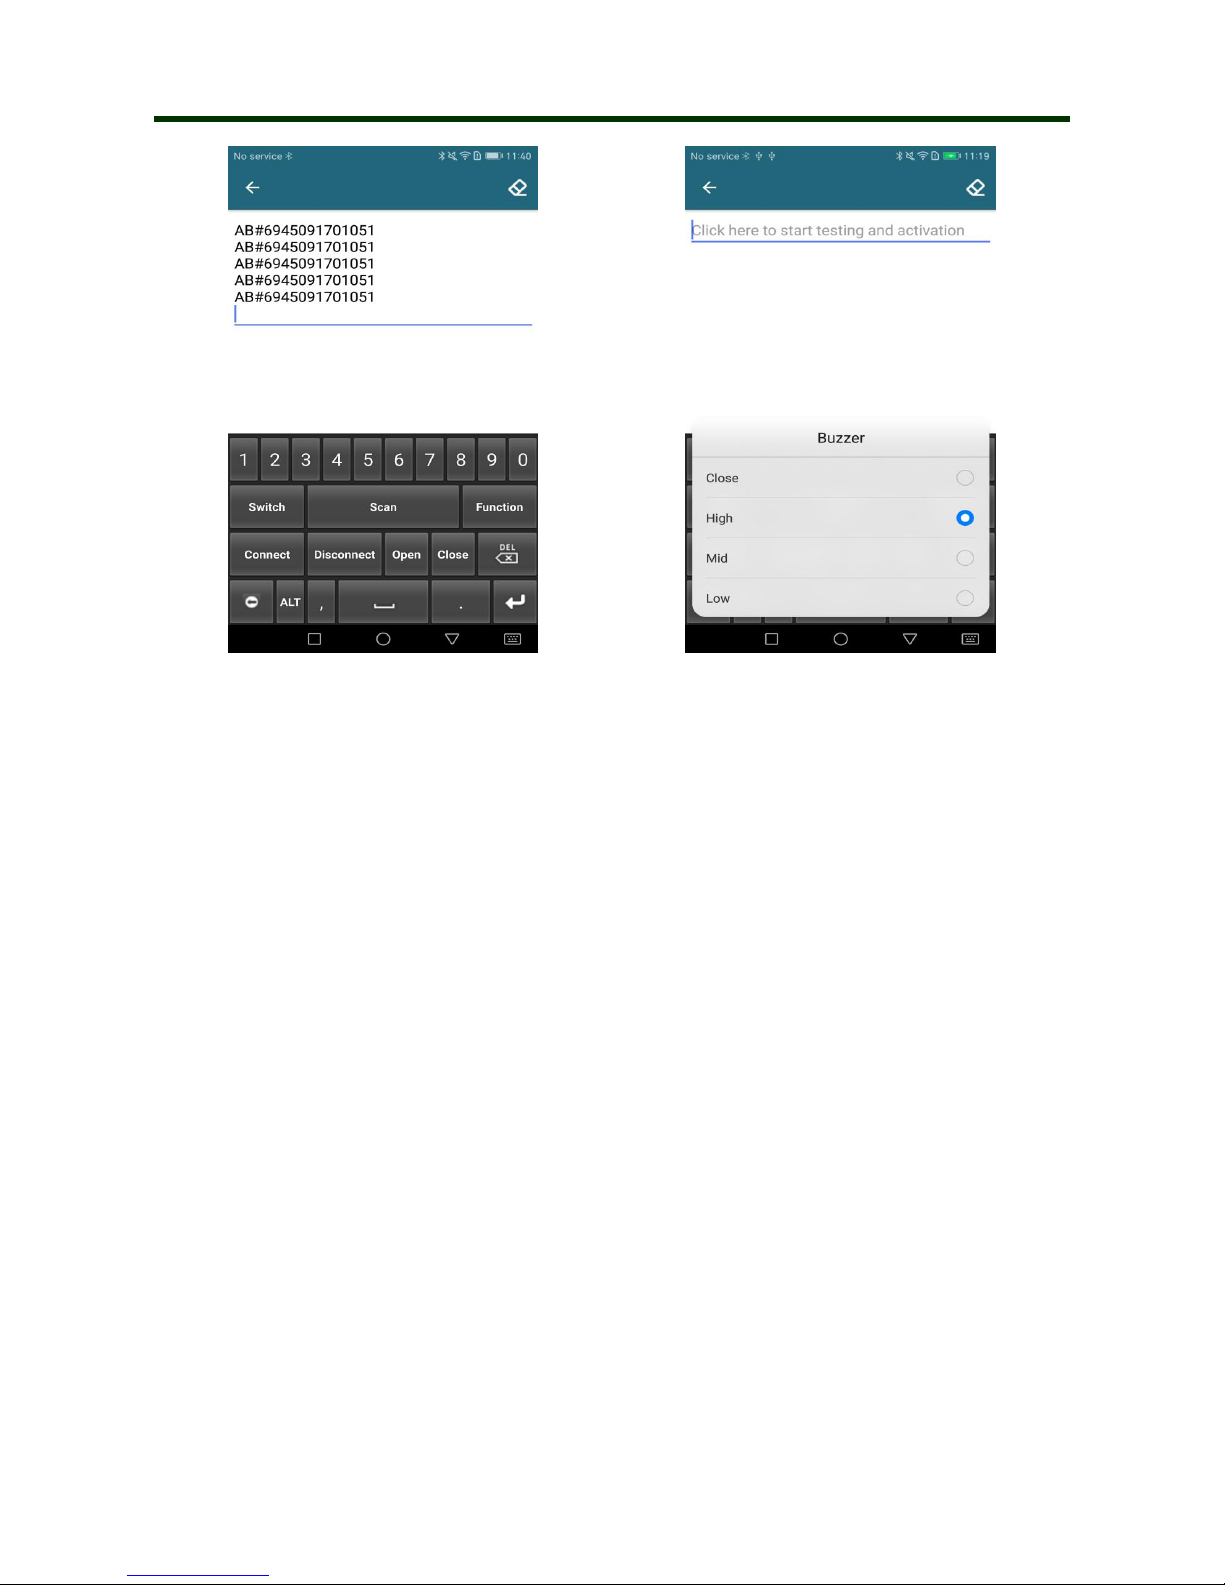
10. Now you can scan a barcode, shown in “The 24th” picture.
Page 24
Mini Barcode Scanner Instruction for BIM
24
The 24th The 25th
11. Buzzer: Click “ Buzzer”, and choose Volume required, shown in “The 25th” picture.
Page 25
Mini Barcode Scanner USB Mode
25
●
USB Mode
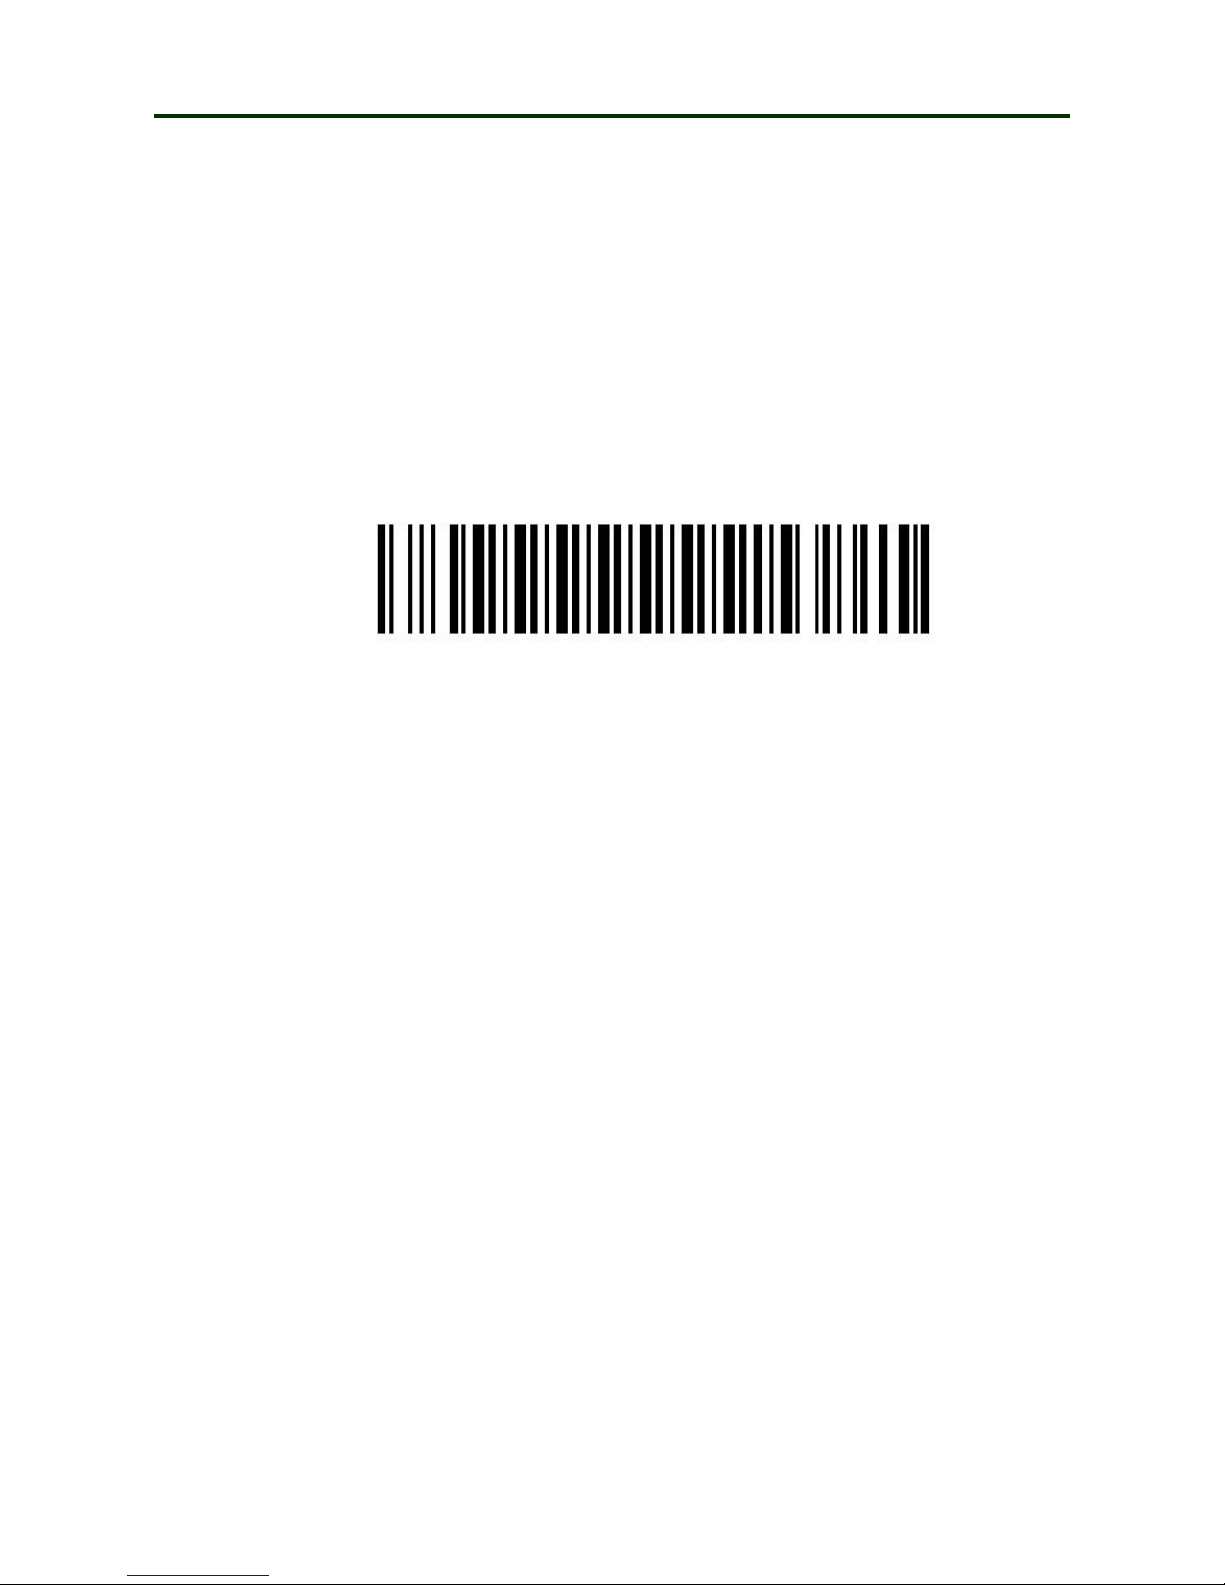
If you want to connect scanner via USB cable, you need to set scanner in USB mode. Please
follow the steps below
:
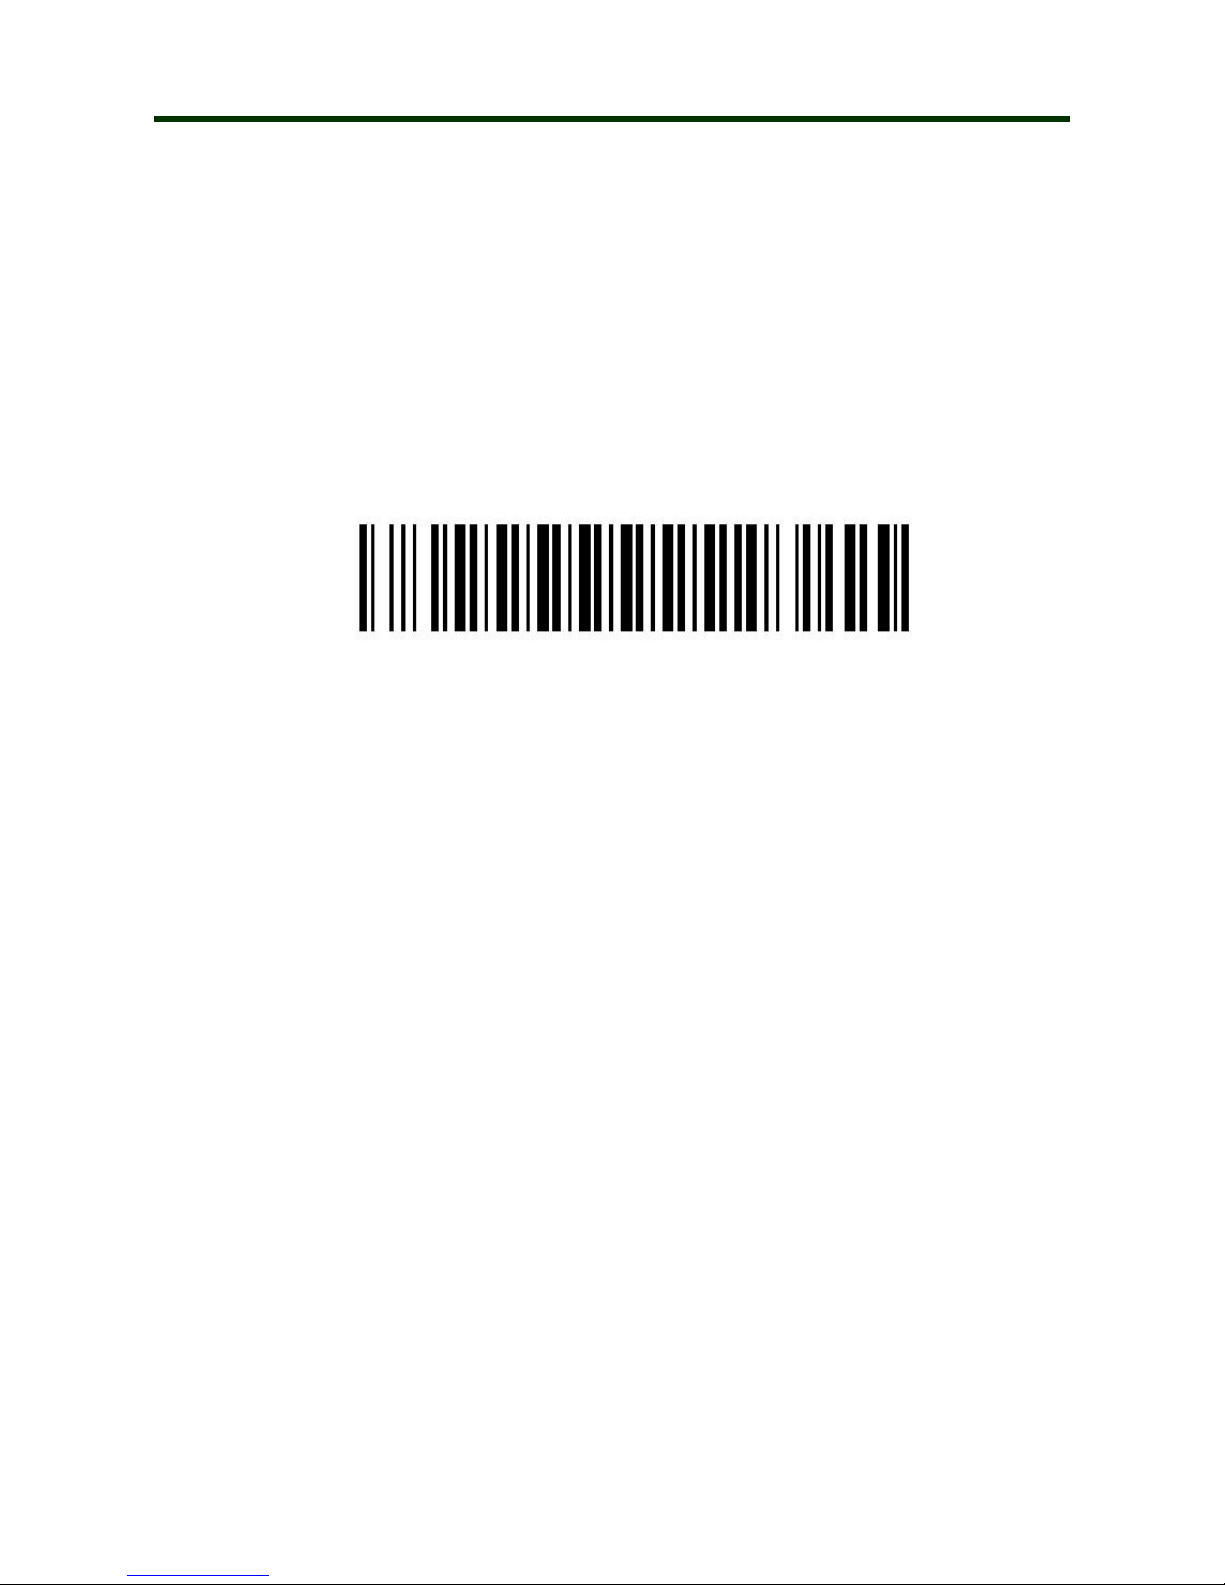
1. Turn on the barcode reader, and read the barcode “USB output mode”
2. Connect scanner with computer/Android device through the USB/OTG cable.
3. Buzzer beeps for three times, and yellow LED lights flash for three times, means the
connection is successful, now you can use it in Notes/office files or other cursor blinking
position.
USB Mode
Page 26
Mini Barcode Scanner USB virtual COM Mode
26
●
USB virtual COM Mode
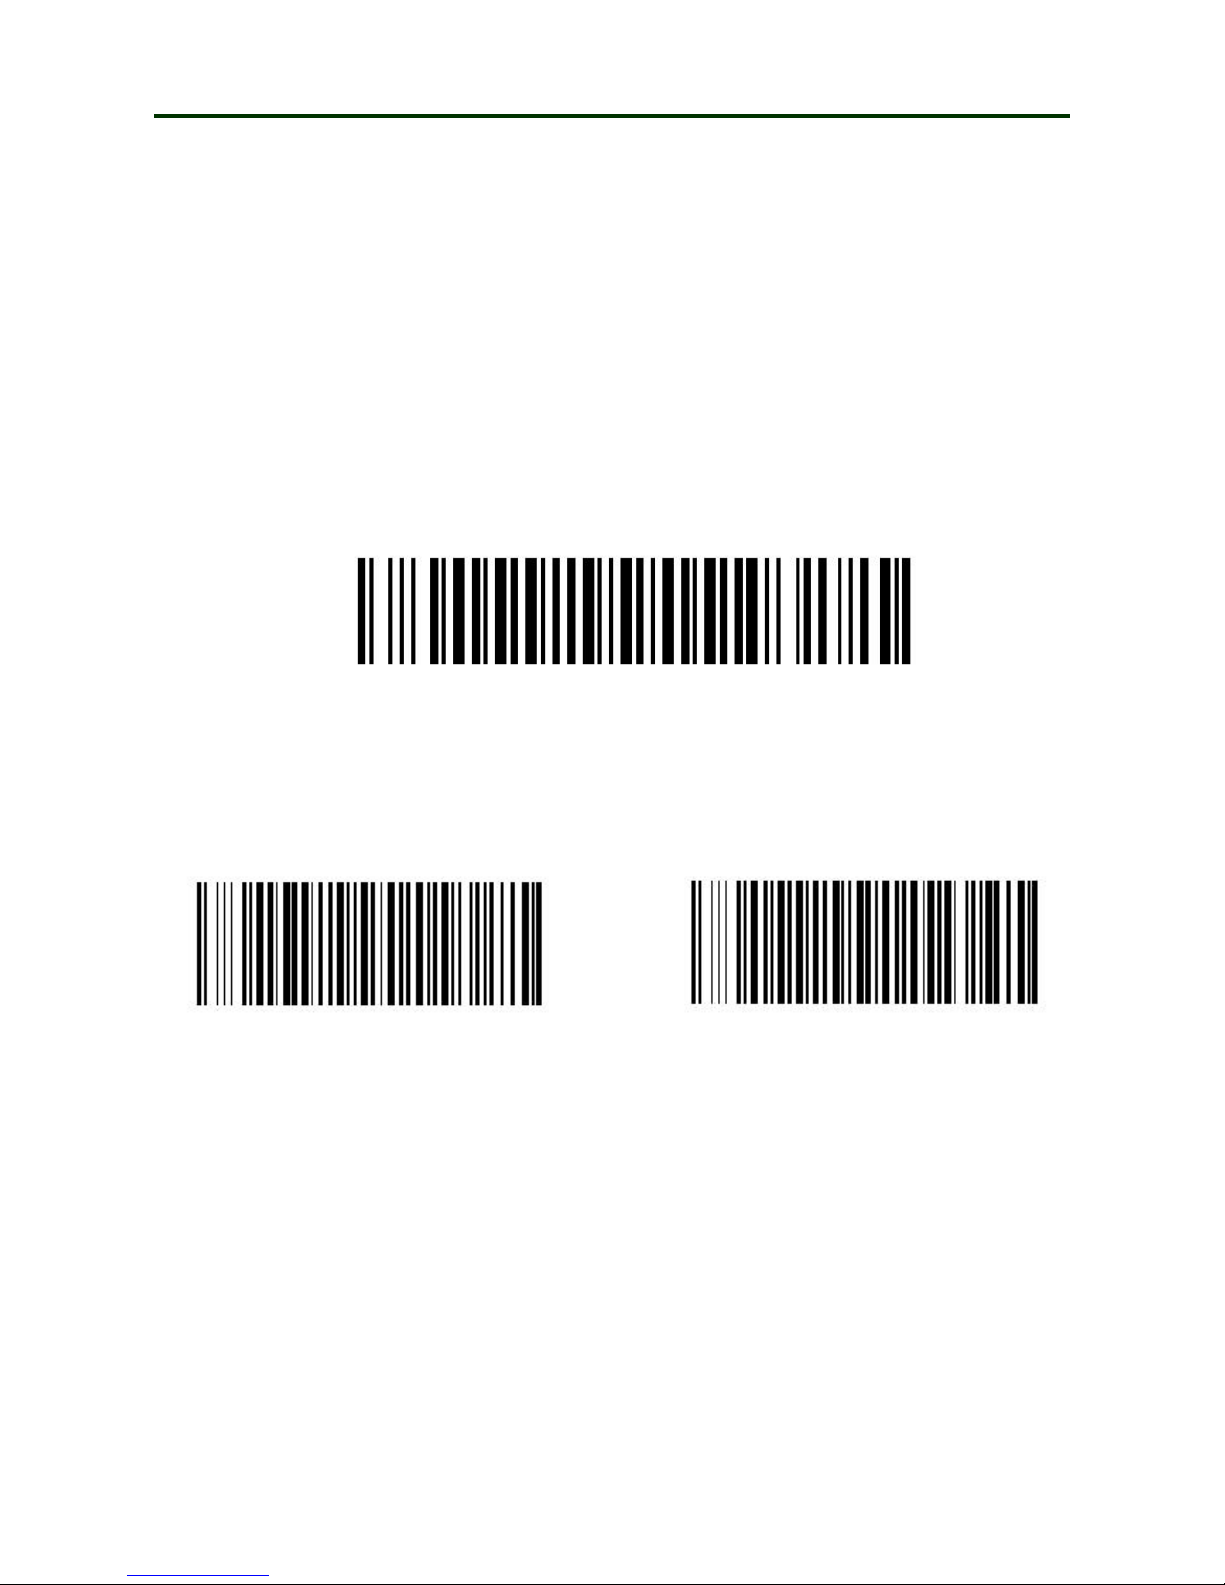
Please download “Serial assistant software” from the Internet to the computer, and follow the
steps below:
1.Turn on the barcode reader, and read the barcode “USB virtual COM mode”, then connect
scanner with computer through the USB cable.
2. View the“Device manager” in the computer, and find scanner port, click right mouse
button, then select “update driver software”, install it.
3. Please double click the icon to open the Serial assistant.
4. Select the COM port in the software(please look at the COM port on the computer’s
Device manager).
5. Next, you can scan barcode to the software dialog box.
USB virtual COM Mode
Page 27
Mini Barcode Scanner U Disk Mode
27
●
U Disk Mode
Please read the barcode below, you will get a Disk. and you can store barcode data by .CSV
or .TXT format.
1. Turn on the barcode reader, and read “U Disk mode”.
2. Please scan the barcode “Format setting” .CSV/.TXT.
3. Now you can scan the barcode required, while the barcode data will be saved in the
scanner as a file.
4. Connect scanner with computer/Android device through USB/OTG cable, then you can
view or copy the data to your computer.
U Disk Mode
Format Setting
:
.CSV Format .TXT Format
Page 28
Mini Barcode Scanner U Disk with Bluetooth Mode
28
●
U Disk with Bluetooth Mode
In this mode, the barcode scanner will be used as a bluetooth barcode reader, meanwhile, the
barcode data will be stored in the scanner as a file. You can connect the scanner with computer
via USB line, and transfer the stored data to computer.
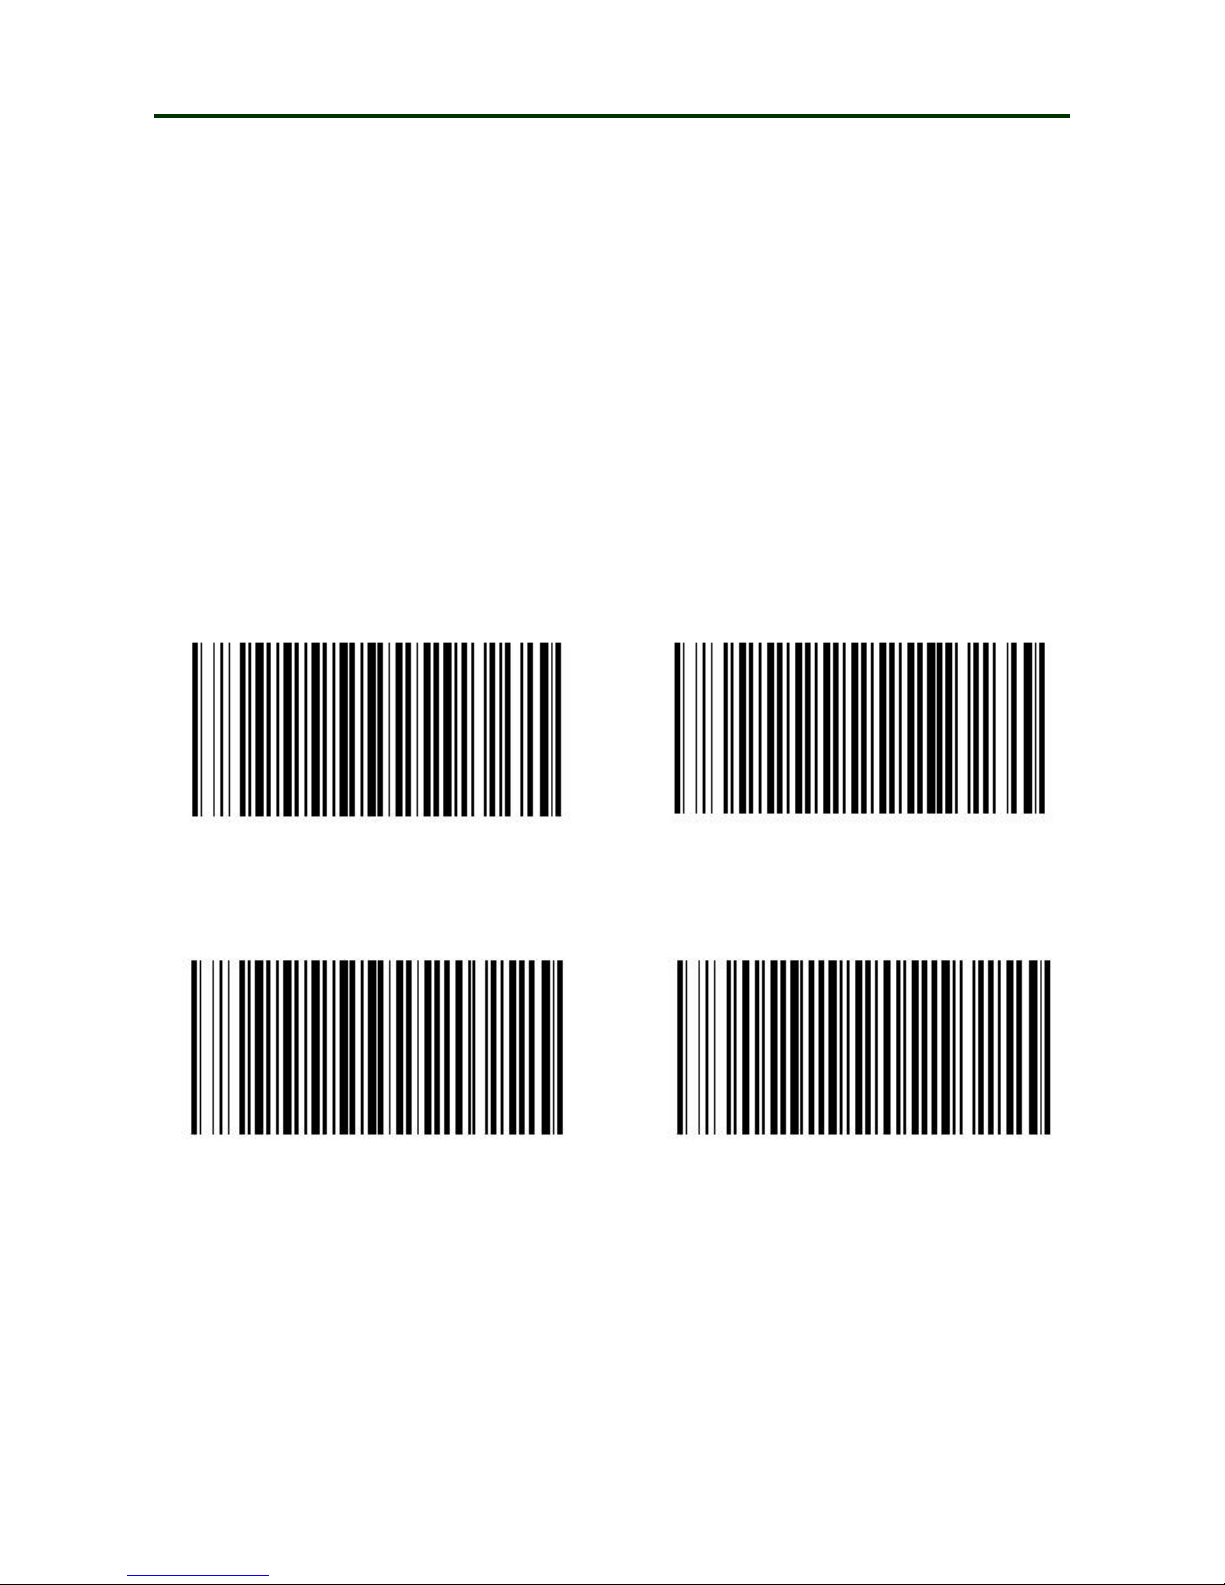
1. Turn on the barcode reader, and read below barcodes sequence: Bluetooth HID/SPP
mode, Bluetooth pairing mode, U Disk and Bluetooth output mode, the blue LED will
flash.
2. Please scan the barcode “Format setting” .CSV/.TXT, then enable bluetooth of IOS
/Android /Windows device, pair the barcode reader, Refer to the "Bluetooth output
mode" step, connect the scanner with device.
3. Now you can use it in Notes/office files or other cursor blinking position.
4. Connect the scanner with computer/Android device through USB/OTG cable, there is a
U disk access showing on the computer, then you can copy the stored barcode data from
scanner to your computer.
Bluetooth SPP Mode Bluetooth HID Mode
Bluetooth Pairing Mode U Disk with Bluetooth Mode
Page 29
Mini Barcode Scanner U Disk with Bluetooth Mode
29
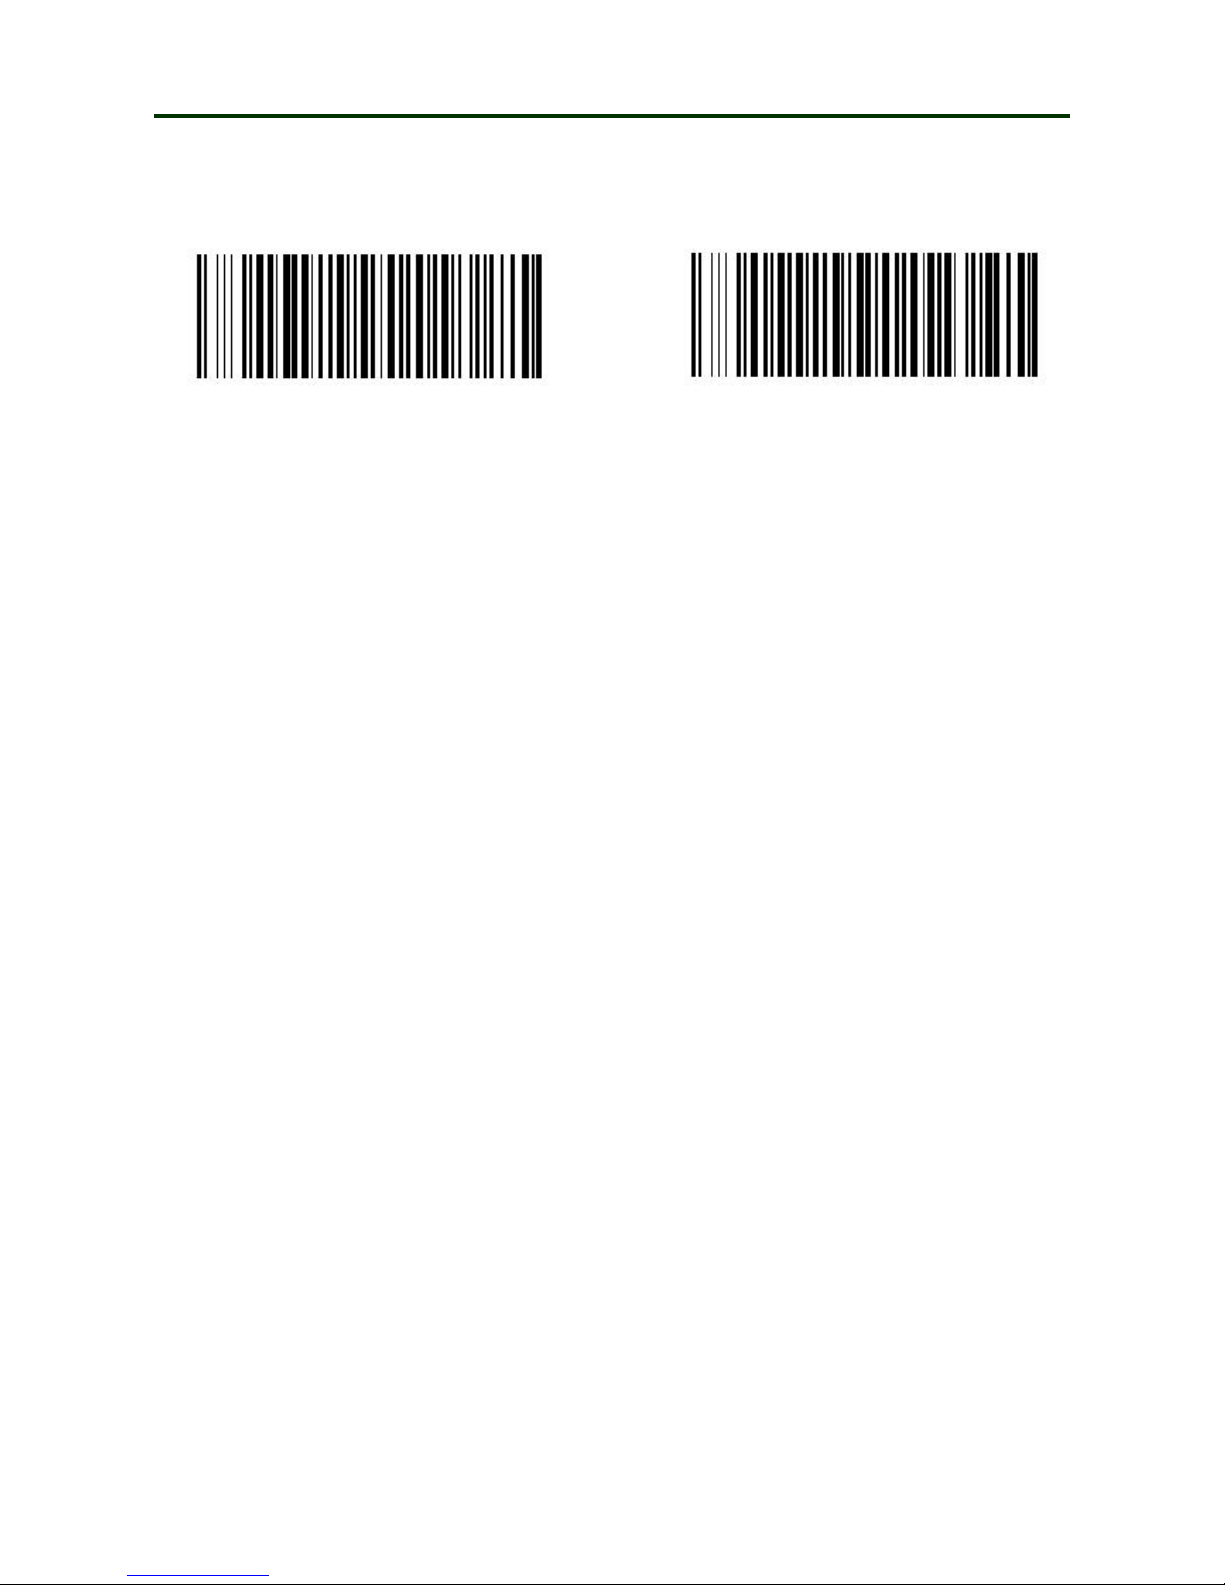
Format setting
:
.CSV Format .TXT Format
Page 30
Mini Barcode Scanner U Disk with USB Mode
30
●
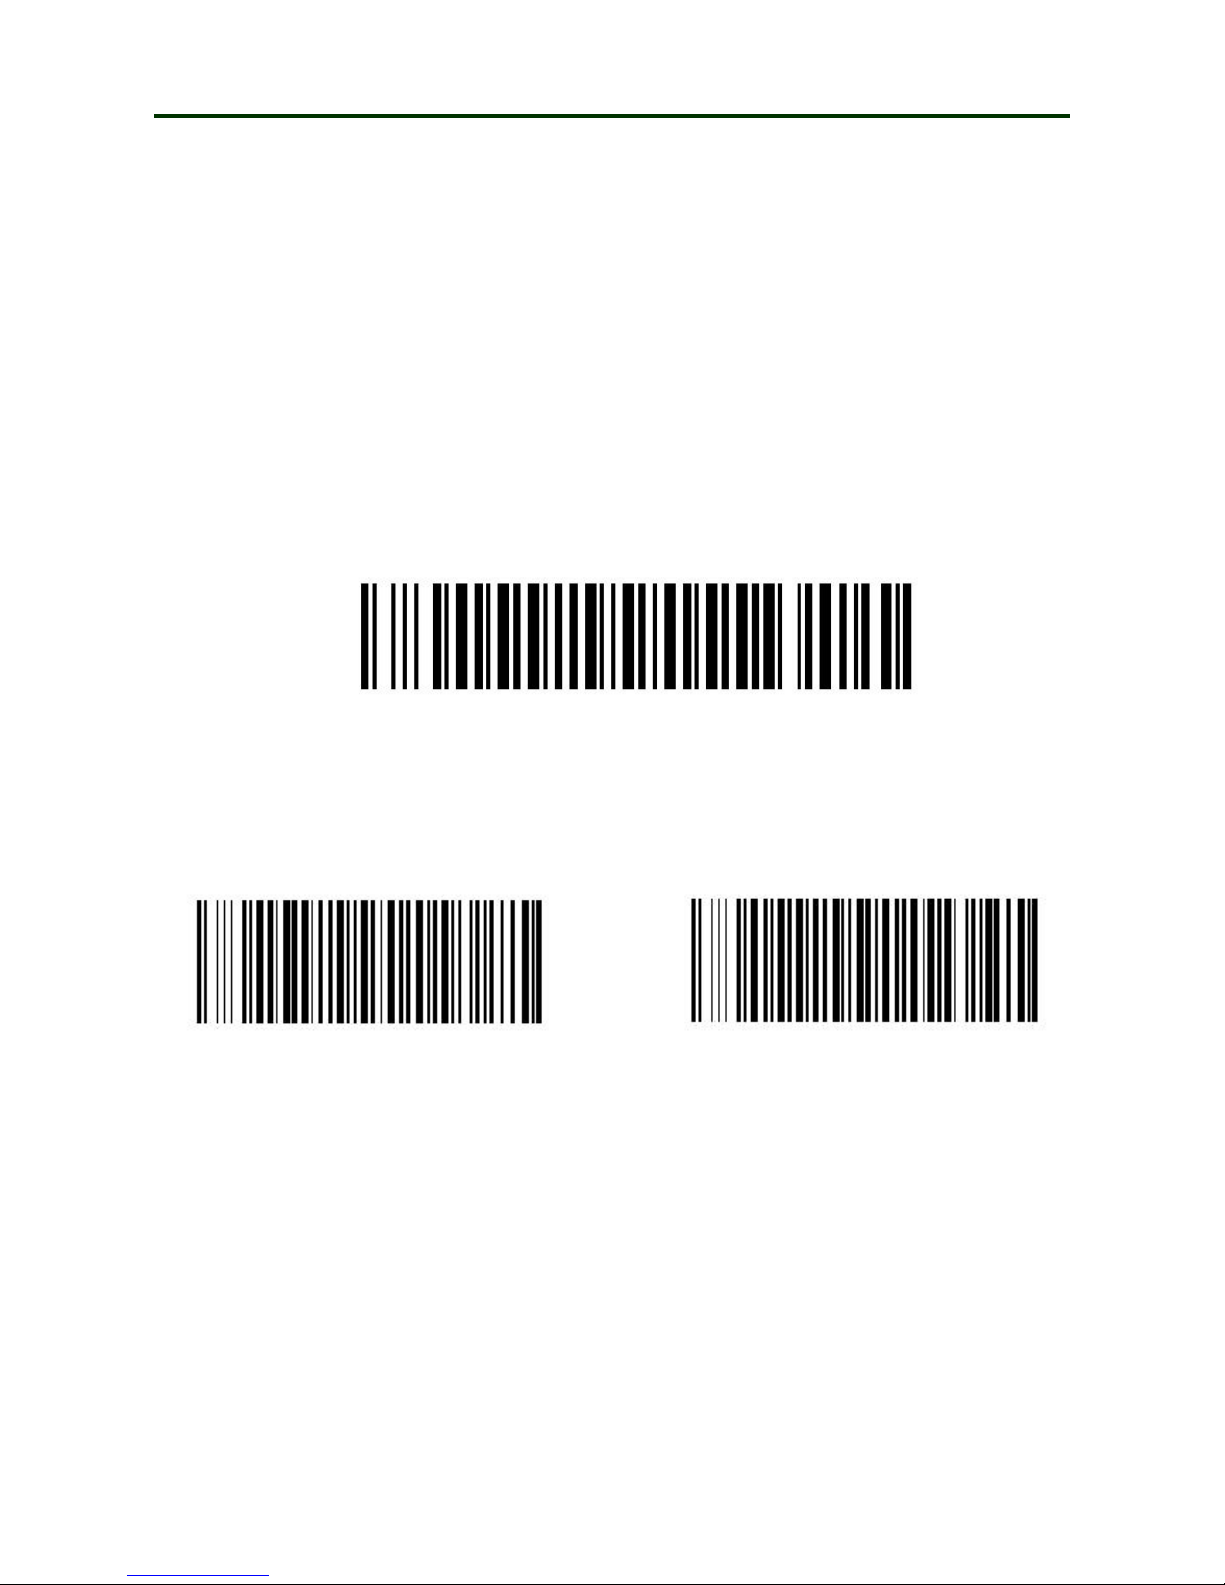
U Disk with USB Mode
In this mode, the barcode scanner will be used as a normal USB barcode reader, meanwhile, the
barcode data will be stored in the scanner as a file. Then you can connect the scanner with
computer via USB cable, and transfer the stored data to the computer.
1. Turn on the barcode reader and read the barcode below.
2. Please scan the barcode “Format setting” .CSV /.TXT , then connect the scanner with
the computer/Android device through USB/OTG cable, there is a U disk access showing
on the computer, Buzzer will beep for three times.
3. Now you can use it in Notes/office files or other cursor blinking position.
4. Please disconnect the scanner from USB cable.
5. Connect the scanner with computer via USB cable again, then you can copy the barcode
data to computer.
U Disk with USB Mode
Format setting
:
.CSV Format .TXT Format
Page 31
Mini Barcode Scanner Language Settings
31
Scanner Settings
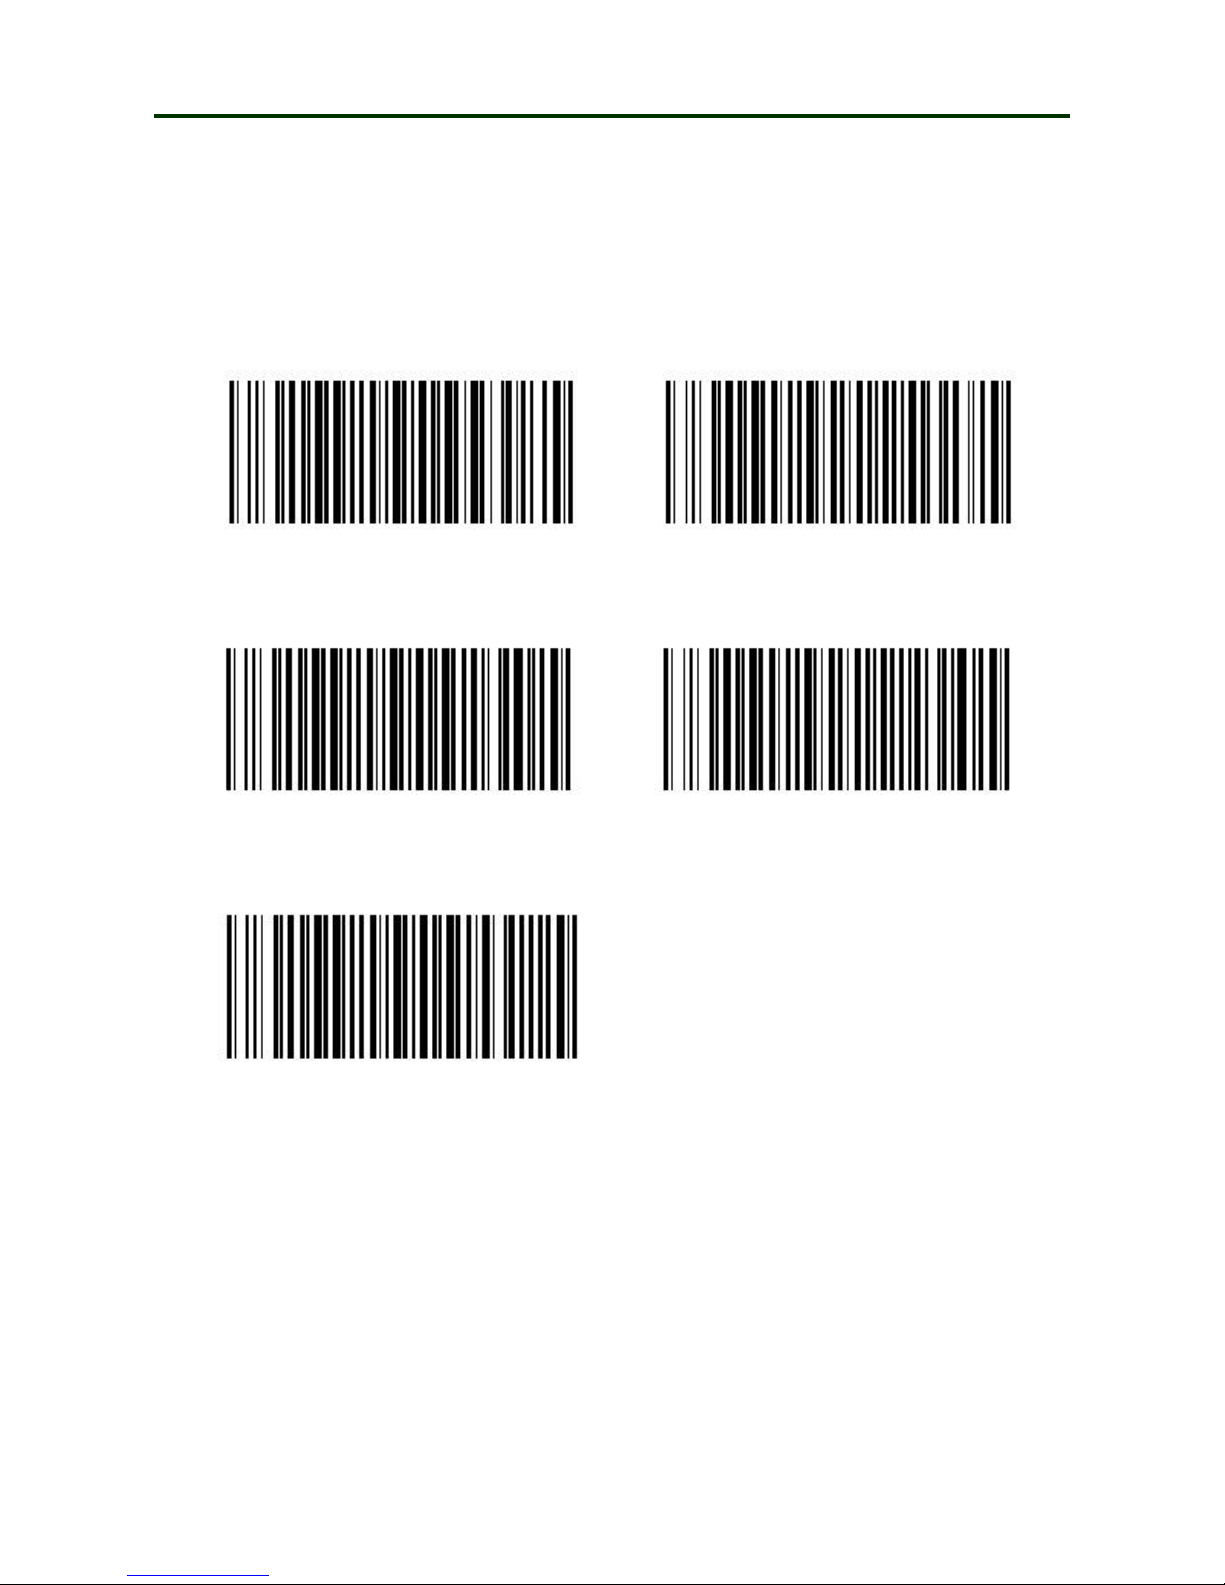
● Language Settings(used in USB output mode)
This barcode scanner has five languages for your selection, and you need to switch the computer
input method to the same. Please scan the barcodes below.
USA_Language French_Language
German_Language Italy_Language
Spanish_Language
Page 32
Mini Barcode Scanner Date and Time Settings
32
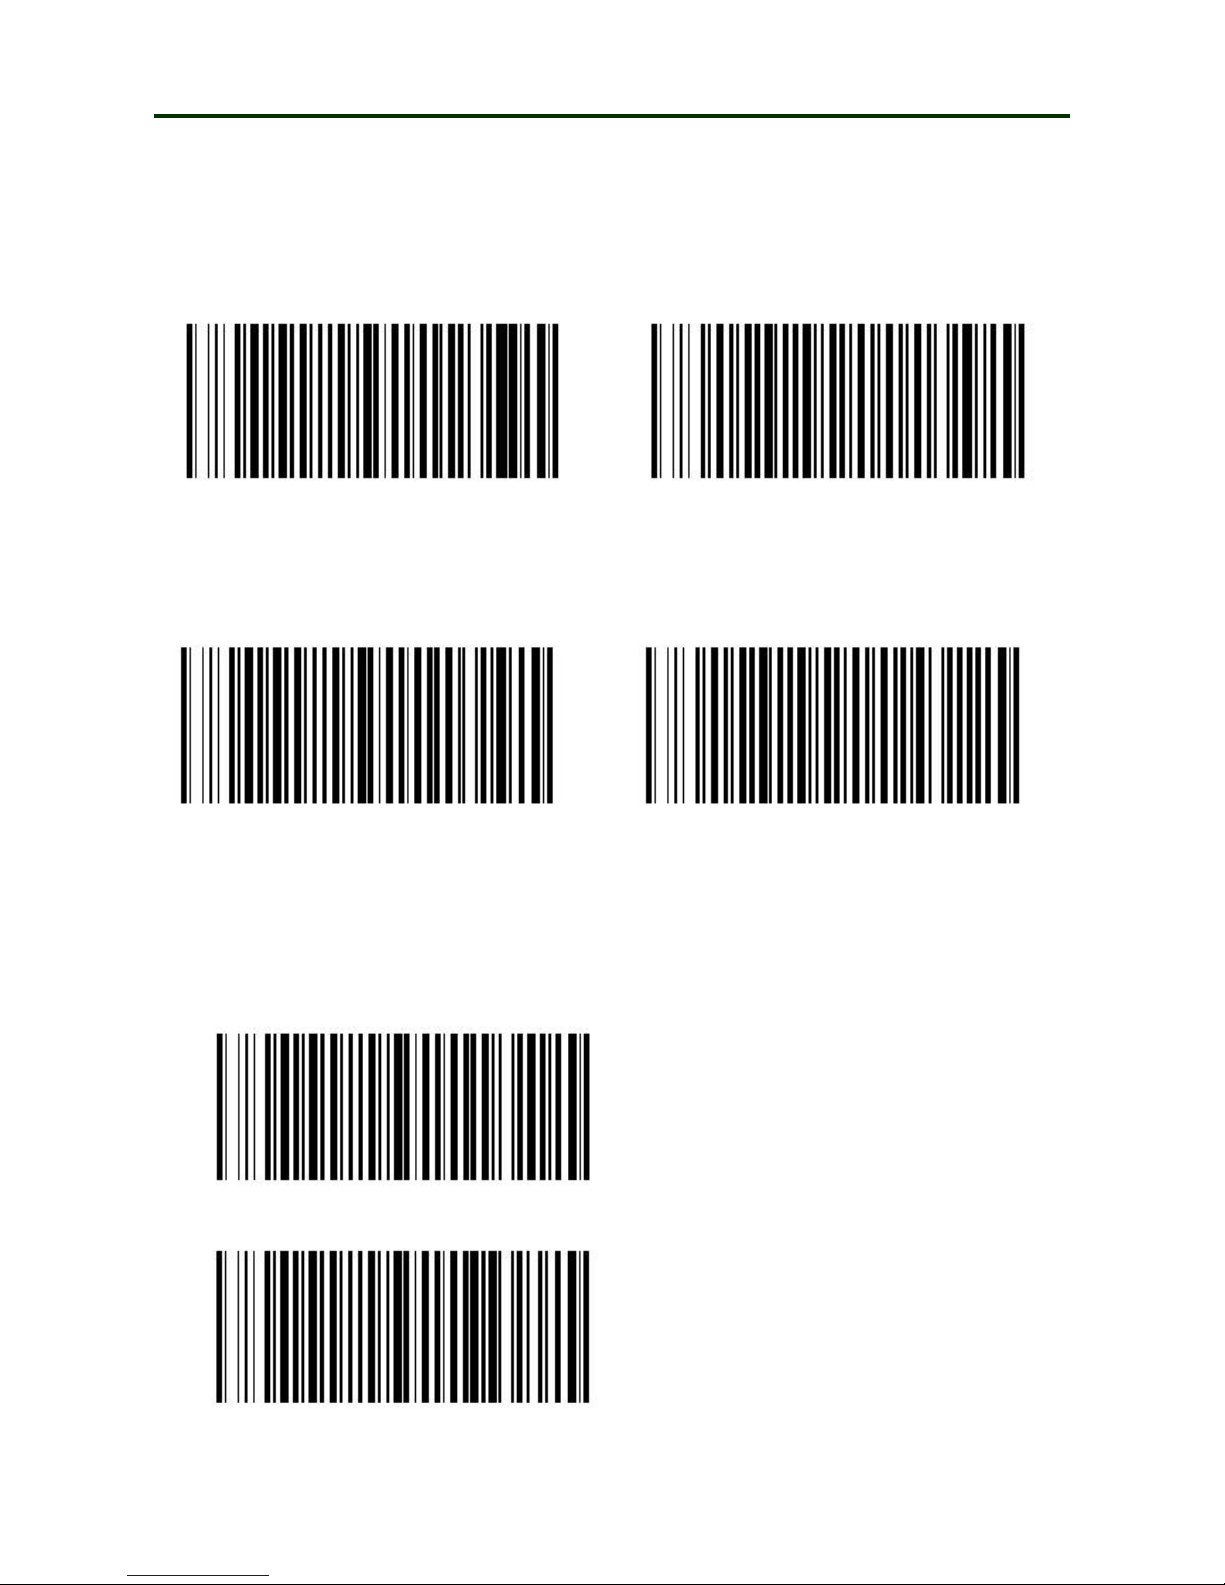
● Date and Time settings
Please scan the barcode below, you can set the Date and Time
:
Date Enable Date Disable
Time Enable Time Enable
Date format settings
:
Date format 1: m/d/y
For example: 01/23/2011
Date format 2: d/m/y
For example: 23/01/2011
Page 33
Mini Barcode Scanner Date and Time Settings
33
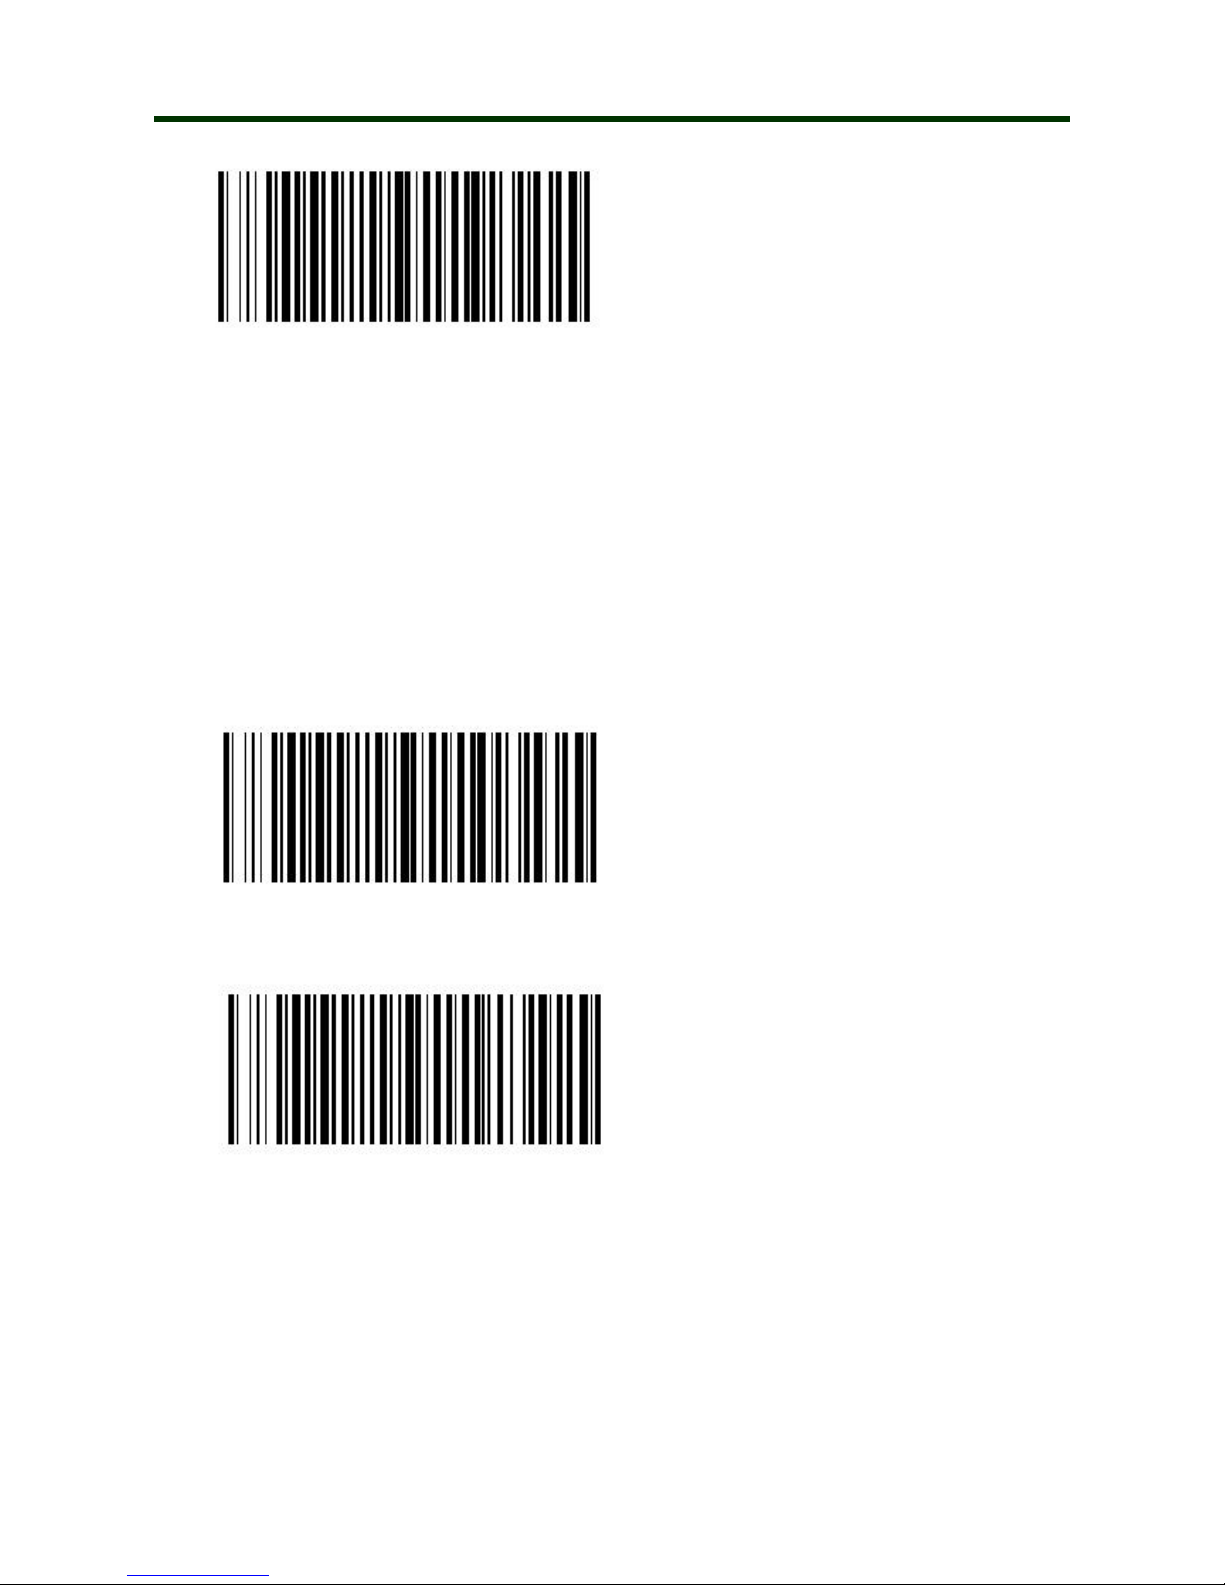
Setting separative sign between Barcode data、Date and Time
:
Character_Seg “,”
For example:
01/23/2011,12:34:56,ABCD
Character_Seg “ ”
For example:
01/23/2011 12:34:56 ABCD
Date format 3: y/m/d
For example: 2011/01/23
Page 34
Mini Barcode Scanner Date and Time Settings
34
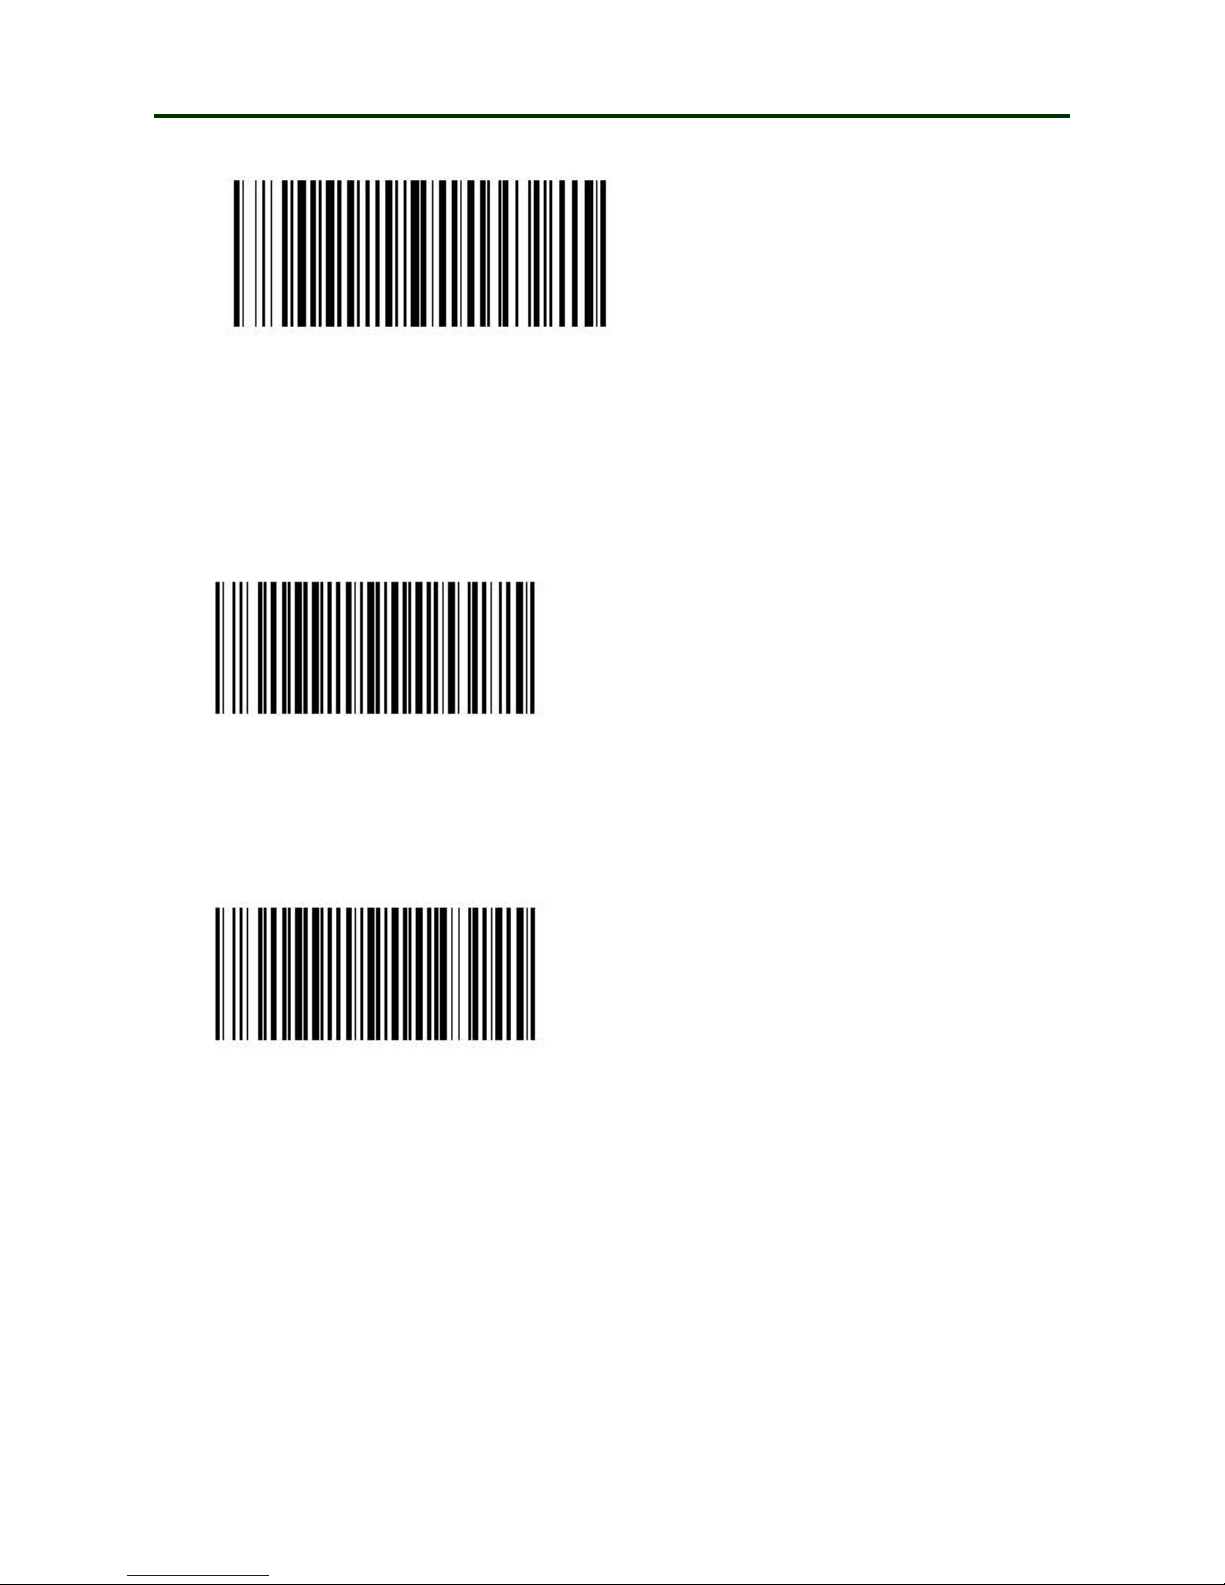
Date and Time setting
:
Set Date
Set Time
Character_Seg “;”
For example:
01/23/2011;12:34:36;ABCD
The step: Please scan the barcode
“Set Date”, and then, scan the digital
barcodes as yy/mm/dd.
For example: 2011/01/25
Scan barcode: 1 1 0 1 2 5
The step: Please scan the barcode
“Set Time”, and then, scan the
digital barcodes as hh/mm/ss. Time
format: 24hr clock.
For example: 3:25:30 PM
Scan barcode: 1 5 2 5 3 0
Page 35
Mini Barcode Scanner Other Settings
35
● Other settings:
(1)
Prefix and Suffix setting
:
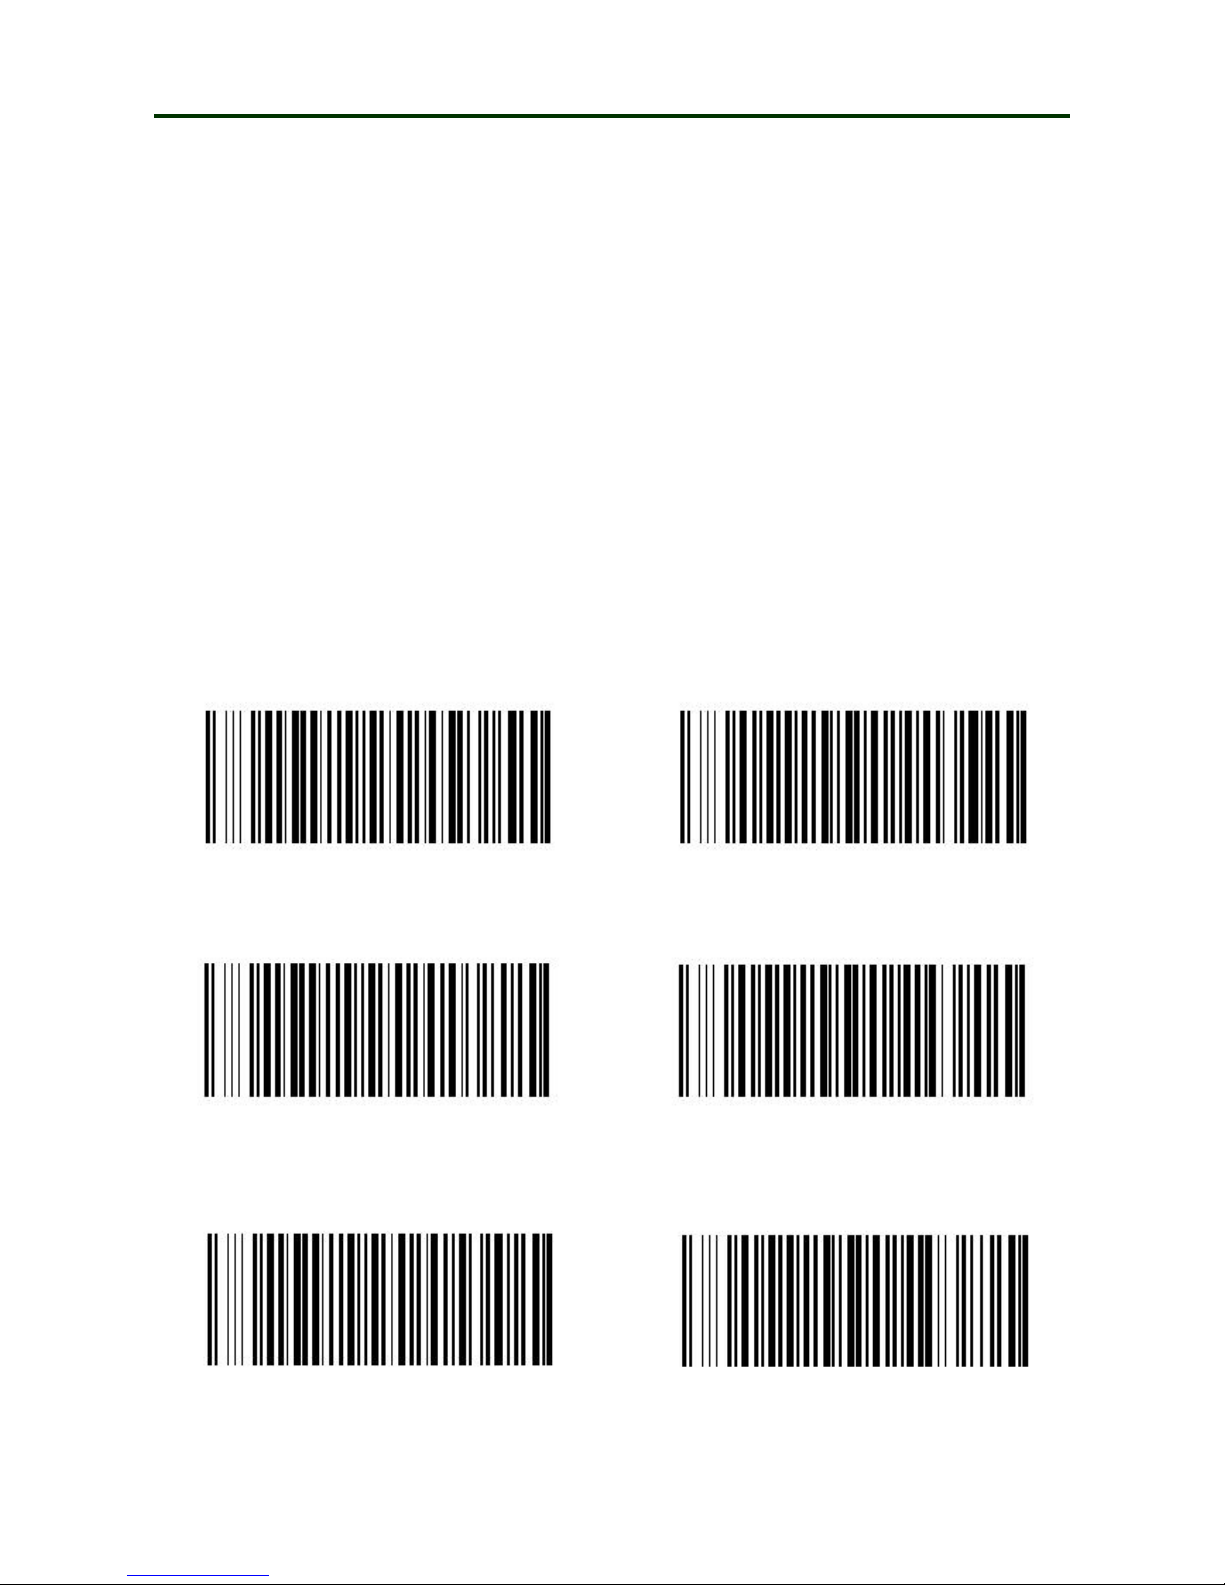
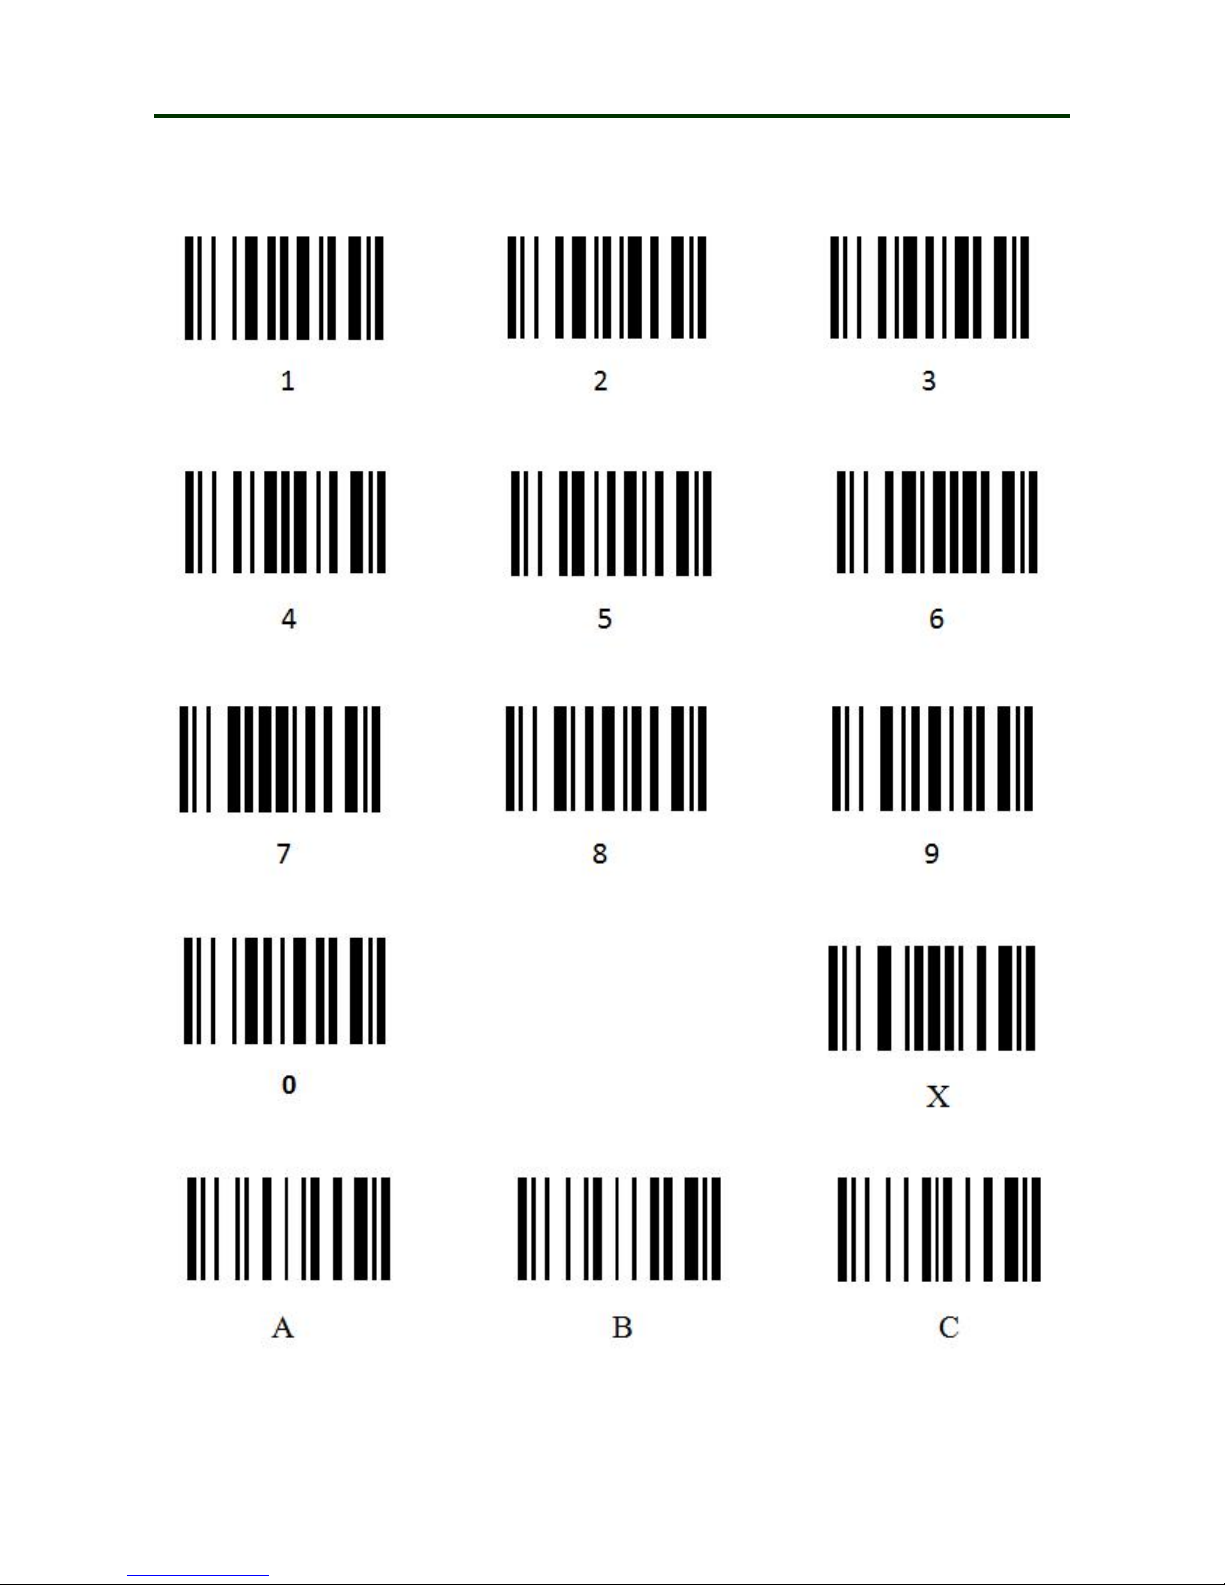
Read the barcode “Set Prefix” or “Set Suffix” below, and scan the hexadecimal number
corresponding according to the ASCII table, and then, scan X as ending. Please refer to
Numeric barcode.
For example: Add the prefix “ # ”
The steps: 1. Turn on the barcode reader, and read the barcode “Set Prefix”.
2. In the ASCII table, the hexadecimal number is 23 for “#”, scan the 2 , 3 and
X in the numeric barcode.
3. Scan the barcode “Enable Prefix”, and then connect the scanner with
computer through “USB output mode”( or modes as needed).
4. The setting is finished (the same method to suffix setting).
Set Prefix Set Suffix
Enable Prefix Disable Prefix
Enable Suffix Disable Suffix
Page 36
Mini Barcode Scanner Other Settings
36
Numeric barcode for settings
:
Page 37
Mini Barcode Scanner Other Settings
37
(2)
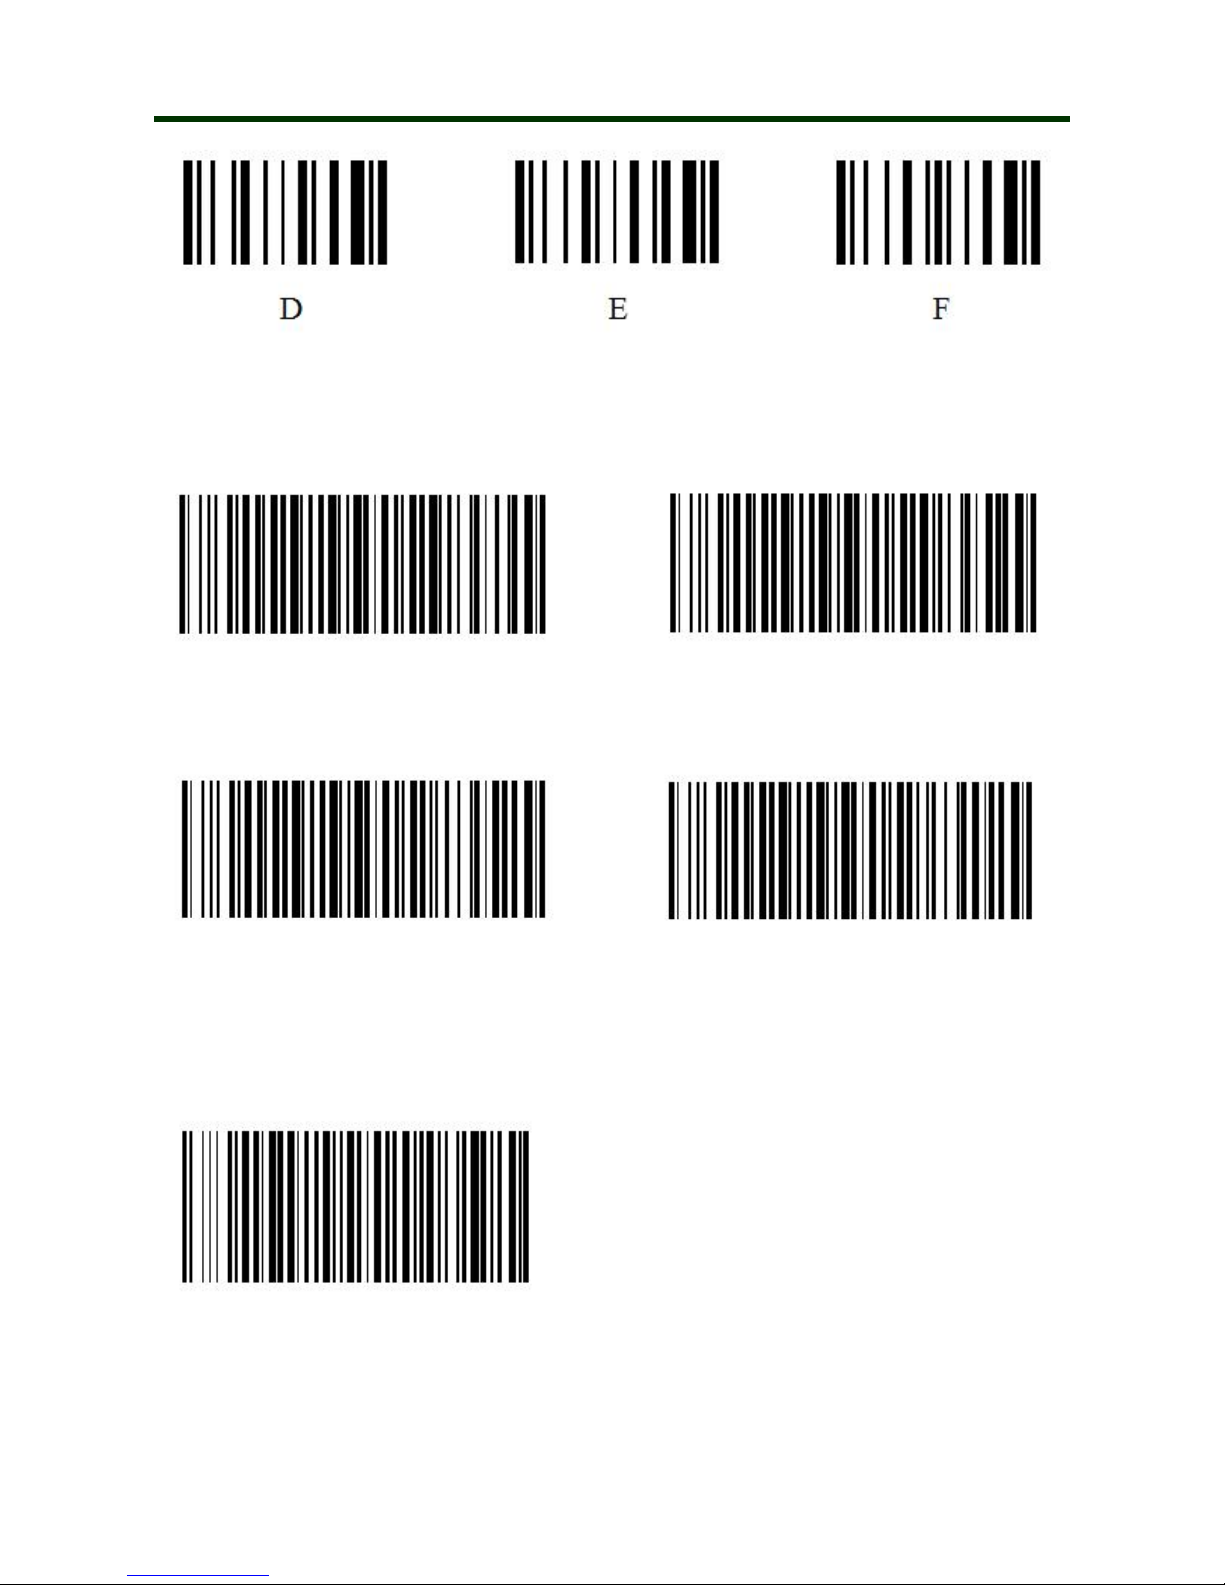
Buzzer Volume setting
:
Beep Off Beep High
Beep Middle Beep Low
(3)
ID setting:
Set ID
The ID number of the barcode scanner
has 6 digits, the first, scan the barcode
“Set ID”, and then scan the numeric
barcode.
Page 38
Mini Barcode Scanner Other Settings
38
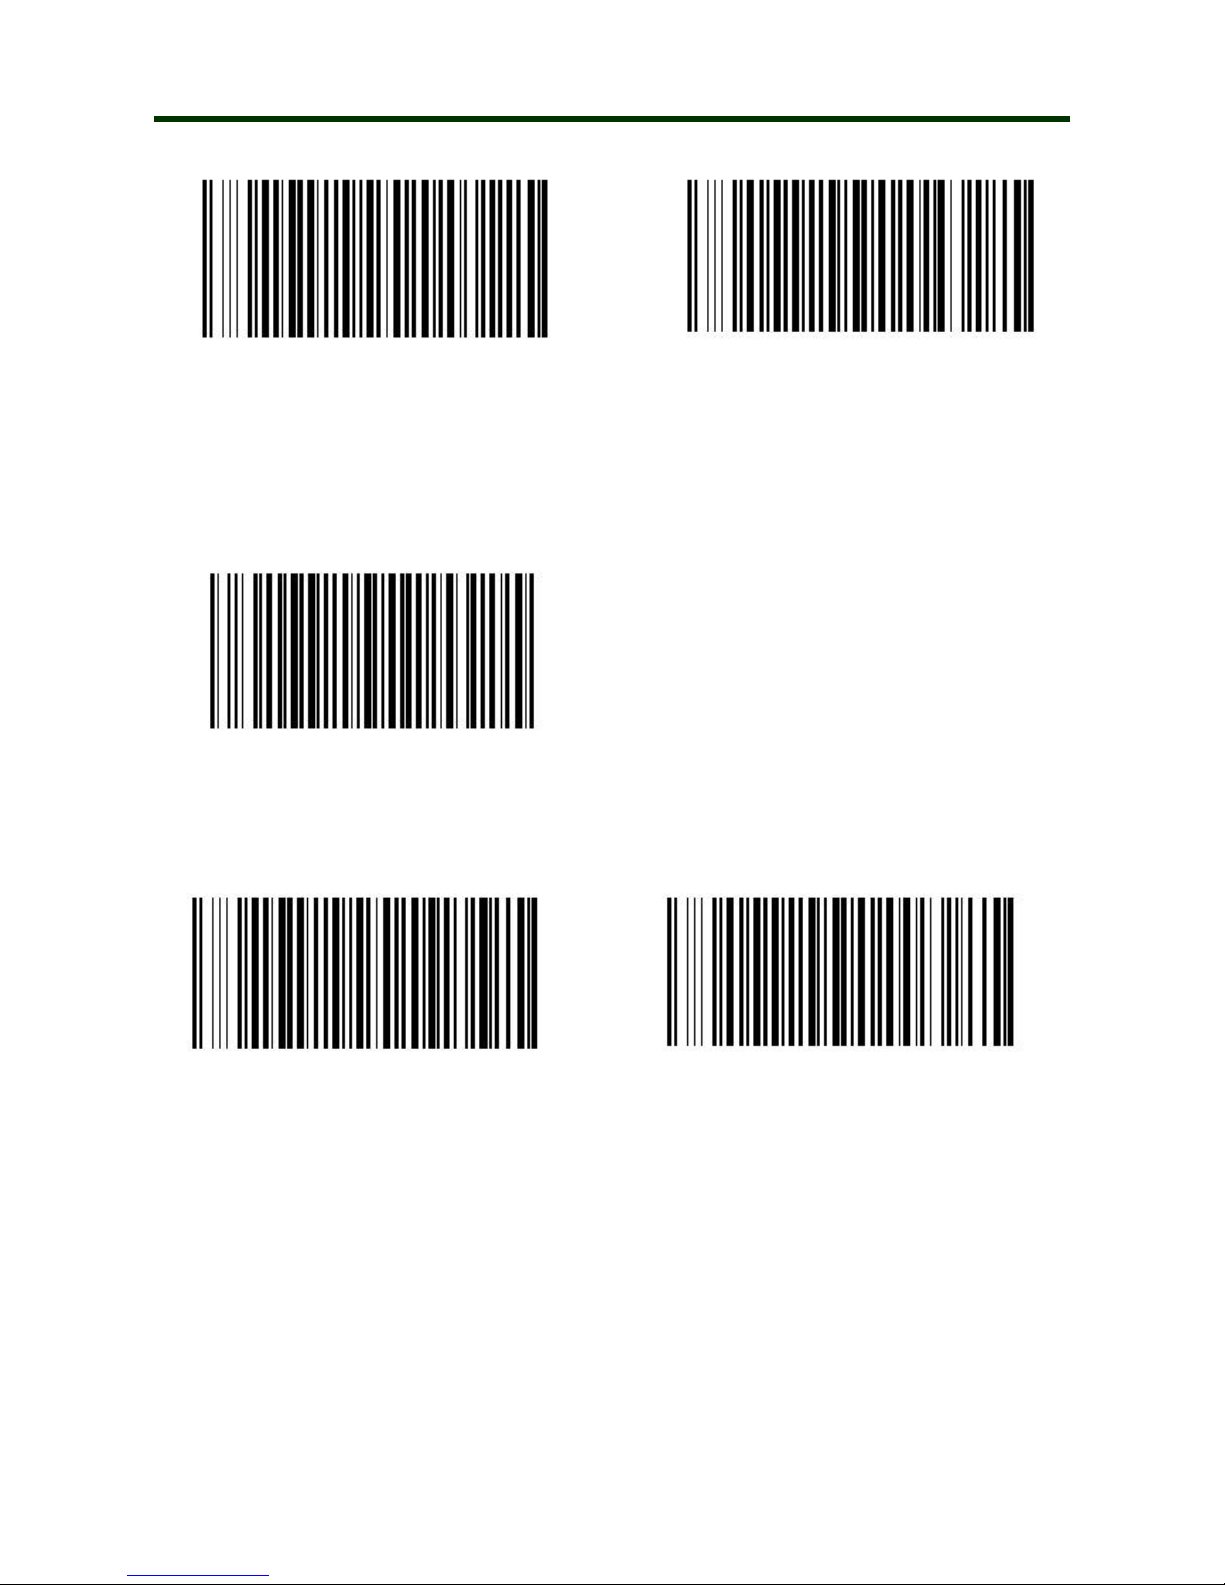
ID On ID Off
(4)
Other settings
:
Disk Format
Restore Default Setting View Software Version
Scan the barcode “Disk Format”,
all of the data in the U disk will
be deleted.
Page 39
Mini Barcode Scanner Barcode Settings
39
Barcode Settings
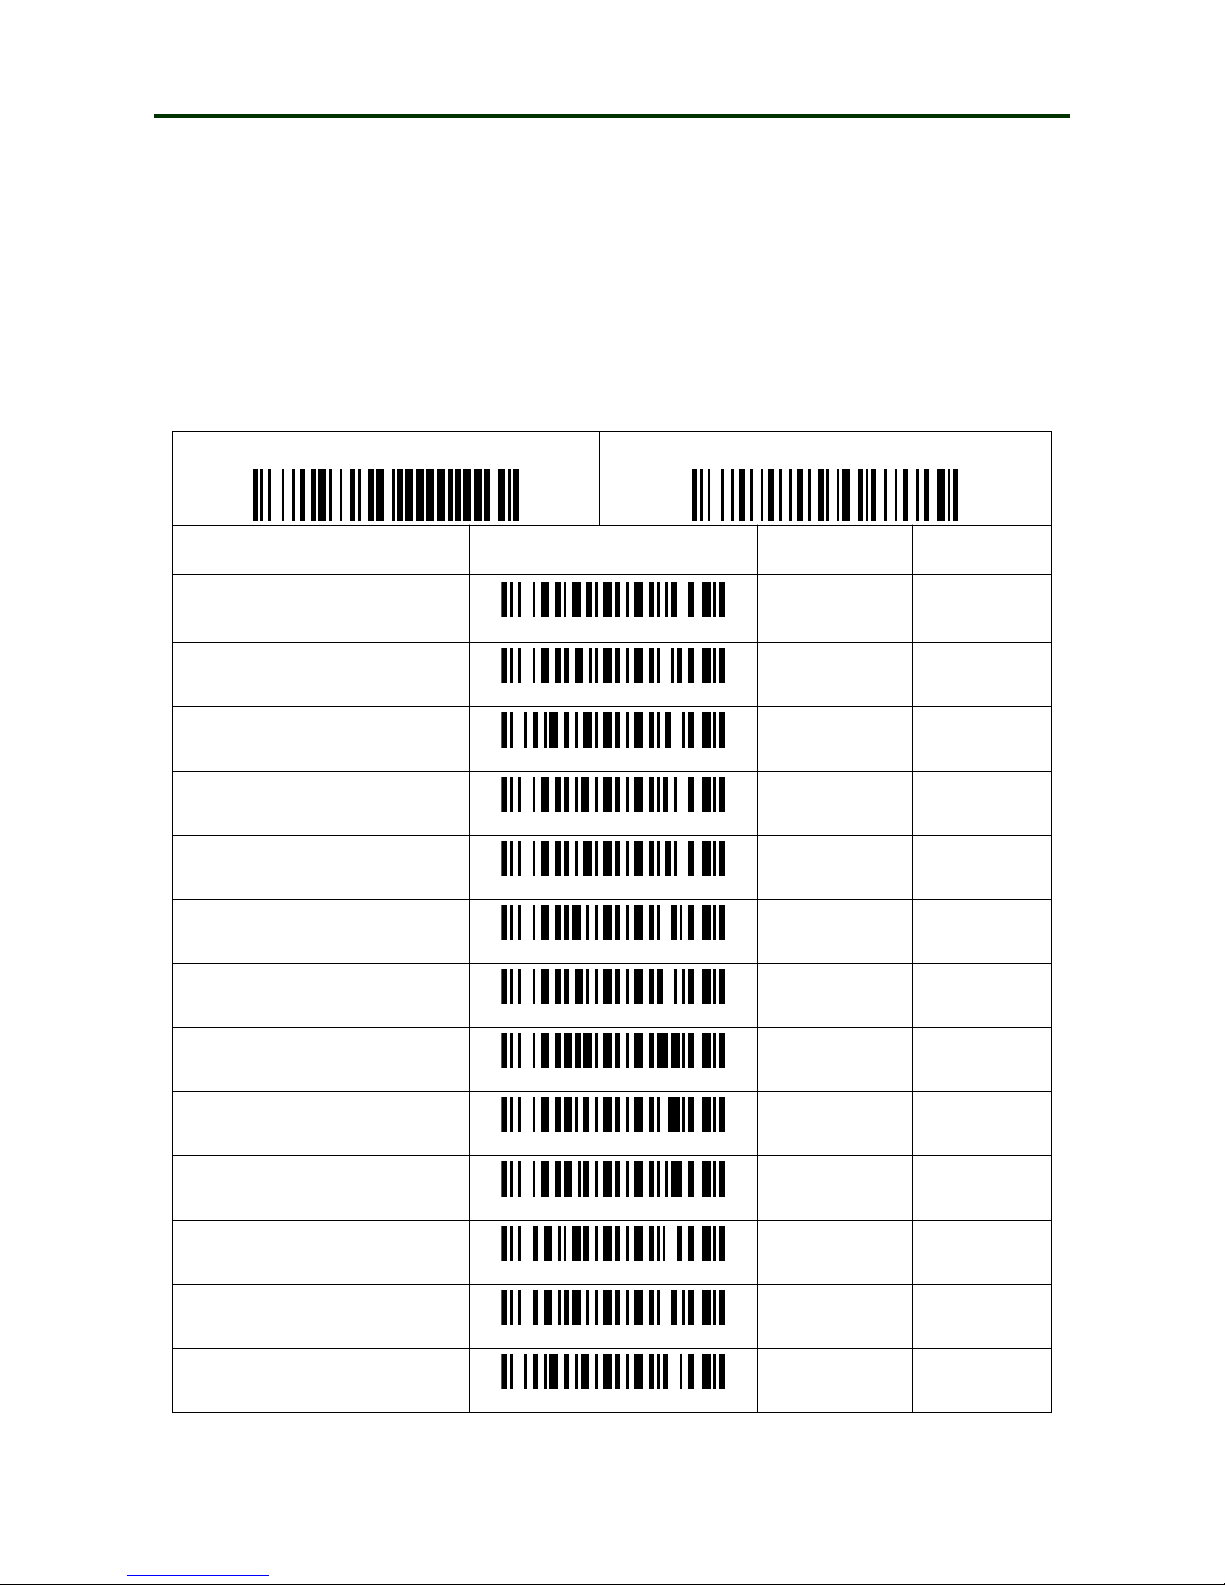
The barcode scanner can read different type of barcode, please follow the steps below(* is the default
setting for the product).
For example: Enable UPC-A
The steps: 1. Please read the barcode “Set up”.
2. Read the barcode “1101”.
3. Scan the numeric barcode 0 and 1(Refer to the numeric barcode in page 26).
4. Scan the barcode “End”.
Set up
End
Barcode name
Parameter name
Para. option
Para. value
UPC-A
1 1 0 1
Disable
Enable
00
01*
UPC-E
1 2 0 1
Disable
Enable
00
01*
UPC-E1
3 4 0 1
Disable
Enable
00
01*
EAN-13(ISBN/ISSN)
1 3 0 1
Disable
Enable
00
01*
EAN-8
1 4 0 1
Disable
Enable
00
01*
Code 39
(code 32,Trioptic Code 39)
1 5 0 1
Disable
Enable
00
01*
Interleaved 2 of 5
1 6 0 1
Disable
Enable
00
01*
Industrial 2 of 5
1 7 0 1
Disable
Enable
00*
01
Matrix 2 of 5
1 8 0 1
Disable
Enable
00
01*
Codabar
1 9 0 1
Disable
Enable
00
01*
Code 128
2 0 0 1
Disable
Enable
00
01*
UCC/EAN 128
2 5 0 1
Disable
Enable
00
01*
ISBT 128
3 3 0 1
Disable
Enable
00
01*
Page 40
Mini Barcode Scanner Barcode Settings
40
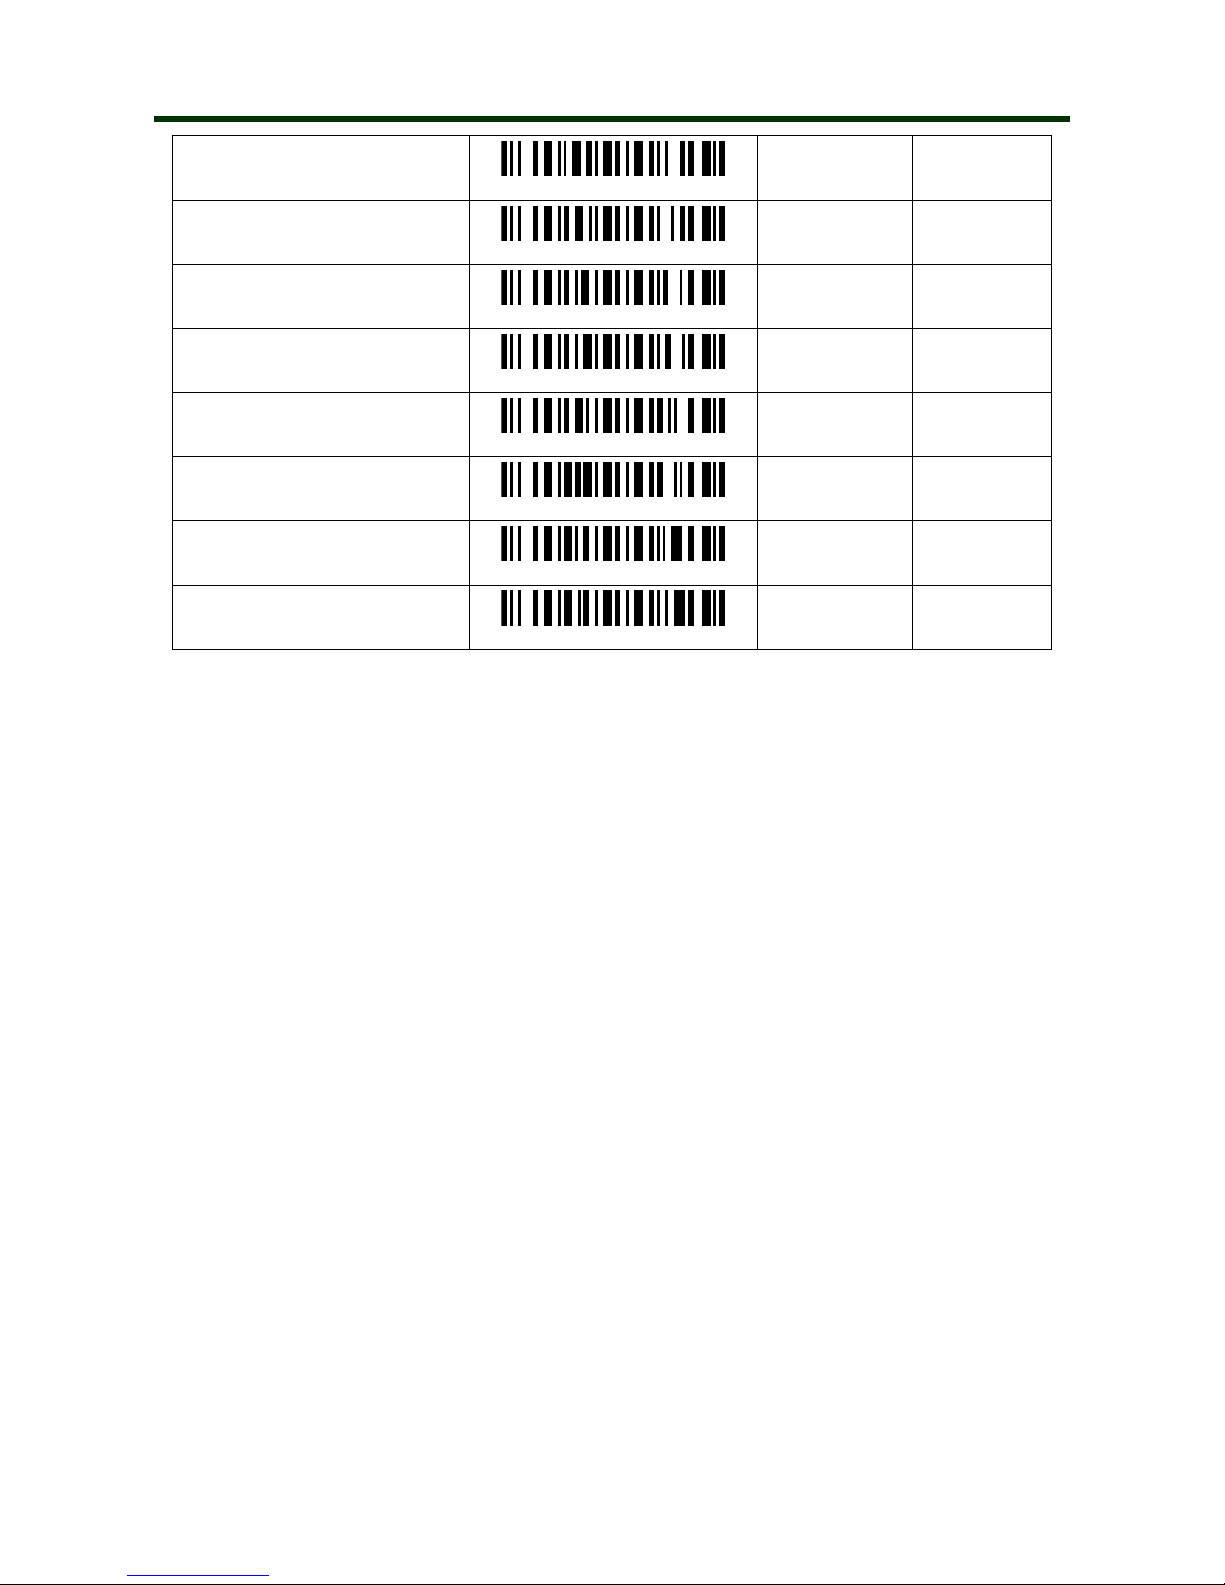
Code 93
2 1 0 1
Disable
Enable
00
01*
Code 11
2 2 0 1
Disable
Enable
00*
01
MSI/Plessey
2 3 0 1
Disable
Enable
00*
01
UK/Plessey
2 4 0 1
Disable
Enable
00
01*
China Post
2 6 0 1
Disable
Enable
00
01*
GS1 DataBar
(GS1 DataBar Truncated)
2 7 0 1
Disable
Enable
00
01*
GS1 DataBar Limited
2 8 0 1
Disable
Enable
00
01*
GS1 DataBar Expanded
2 9 0 1
Disable
Enable
00
01*
Page 41
Mini Barcode Scanner LED and Buzzer Descriptions
41
Led and buzzer descriptions
Led and buzzer descriptions
Meaning of representative
Green light flashing (buzzer ringing)
Decode success
Green light flash continuously (scan standby)
Low battery alarm
Red LED light
In charging
Red light goes out (when charging)
Charging is finished
Blue LED flash slowly
Bluetooth pairing mode of SPP
Blue LED flash rapidly
Bluetooth pairing mode of HID
Blue light goes out (In bluetooth pairing mode)
Pairing successful for bluetooth
Green LED flash three times, buzzer sound three
Connection of USB or U Disk mode is successful
Buzzer 500MS long beep, Yellow LED flashing
Memory is full
 Loading...