

Page 1
www.post.lu
CloudPBX
User Guide
Page 2

Page 3
3
Chapter 1 : Getting Started
Before you use your phone, you may wish to take a few moments to become familiar with its
features and user interface. In this chapter, you’ll learn about your phone’s components, the
screen layout, and how to use the touchscreen. You’ll also learn how to clean the touchscreen
and configure your phone remotely using the Polycom Web Configuration Utility.
Note : Accessing Features and Options
As you read this guide, keep in mind that certain phone features are configurable by your
system administrator or determined by your phone environment. As a result, some features
may not be enabled or may operate dierently on your phone. The examples and figures
in this guide may not directly reflect what displays or is available on your phone screen.
Phone Keys and Hardware
Page 4

4
Reversible tab
Secures the handset in the cradle when your phone stand is
positioned at a high angle. To secure the handset, remove the
tab, reverse it so the protrusion points up, and re-insert it. Then,
position the handset so the protrusion on the tab fits into the
slot on the handset.
Provides ringer and hands-free (speakerphone) audio output. Speaker
Enables you to enter numbers, letters, and special characters.
You can also use the dialpad keys to select menu items that
have index numbers.
Dialpad
The connector on the left side of your phone that enables you
to attach a laptop cable lock to your phone so you can secure
it to a desktop.
Security slot
Enable you to :
USB ports
Ŕ"UUBDIB64#ŤBTIESJWFTPZPVDBOSFDPSEDBMMTVQEBUF
the background picture on your phone, set up a screen
saver, or use your phone as a digital picture frame.
Ŕ"UUBDIB64#IFBETFU
Message Waiting IndicatorMessage Waiting
Indicator
Feature Description
Page 5
5
Home / Lines key Press from any screen to display Home view. From Home
view, press to display other phone views. If your phone is
idle, press to display Lines view.
The screen is touch-sensitive. Tap to select and highlight screen
items. To scroll, touch the screen, and swipe your finger up, down,
right, or left.
Touchscreen
Enables you to place and receive calls through a headset. The
key glows green when an analog headset is activated, and blue
when a USB or Bluetooth headset is activated.
Headset key
Enables you to place and receive calls using the speakerphone.
The key glows green when activated.
Speakerphone key
Mutes local audio during calls and conferences. The key glows
red when activated.
Mute key
Adjust the volume of the handset, headset, speaker, and
phone’s ringer.
Volume keys
Transmits sound to other phones. Microphone
Feature Description
Page 6
6
Your phone has four main views: Home, Calls, Active Call, and Lines view (the default).
Phone Views
To change views :
For Home view, press .
For Home view, press to display either Lines, Calls, or Active Call view.
To switch between Lines view and either Calls or Active Call view, swipe the screen to
the right or left.
TroubleShooting : Why Can’t I Access a Certain View ?
The views you can access depend on the number of calls your phone has, and if your phone
has an active call. If your phone is idle, you can access Home and Lines view. If your phone
has one call only — and it’s active — you can access Home, Lines, and Active Call view. If your
phone has multiple calls, or one held call, you can access Home, Lines, and Calls view.
At the top of each view is a status bar, shown next. The status bar shows the date and time,
and — depending what view you’re in — your phone line, and icons that you can tap to access
messages or recent calls. If your phone has information you should know about, icons and/or
messages will scroll, together with the date, under the time display. If you have a VVX 600,
additional icons may display in the status bar, such as the DND (Do Not Disturb) and Warning
icon, that you can tap.
Status bar in other views Status bar in Home views
Tap to see recent calls
Tap to access messages
Tap to see Favorites
Page 7
7
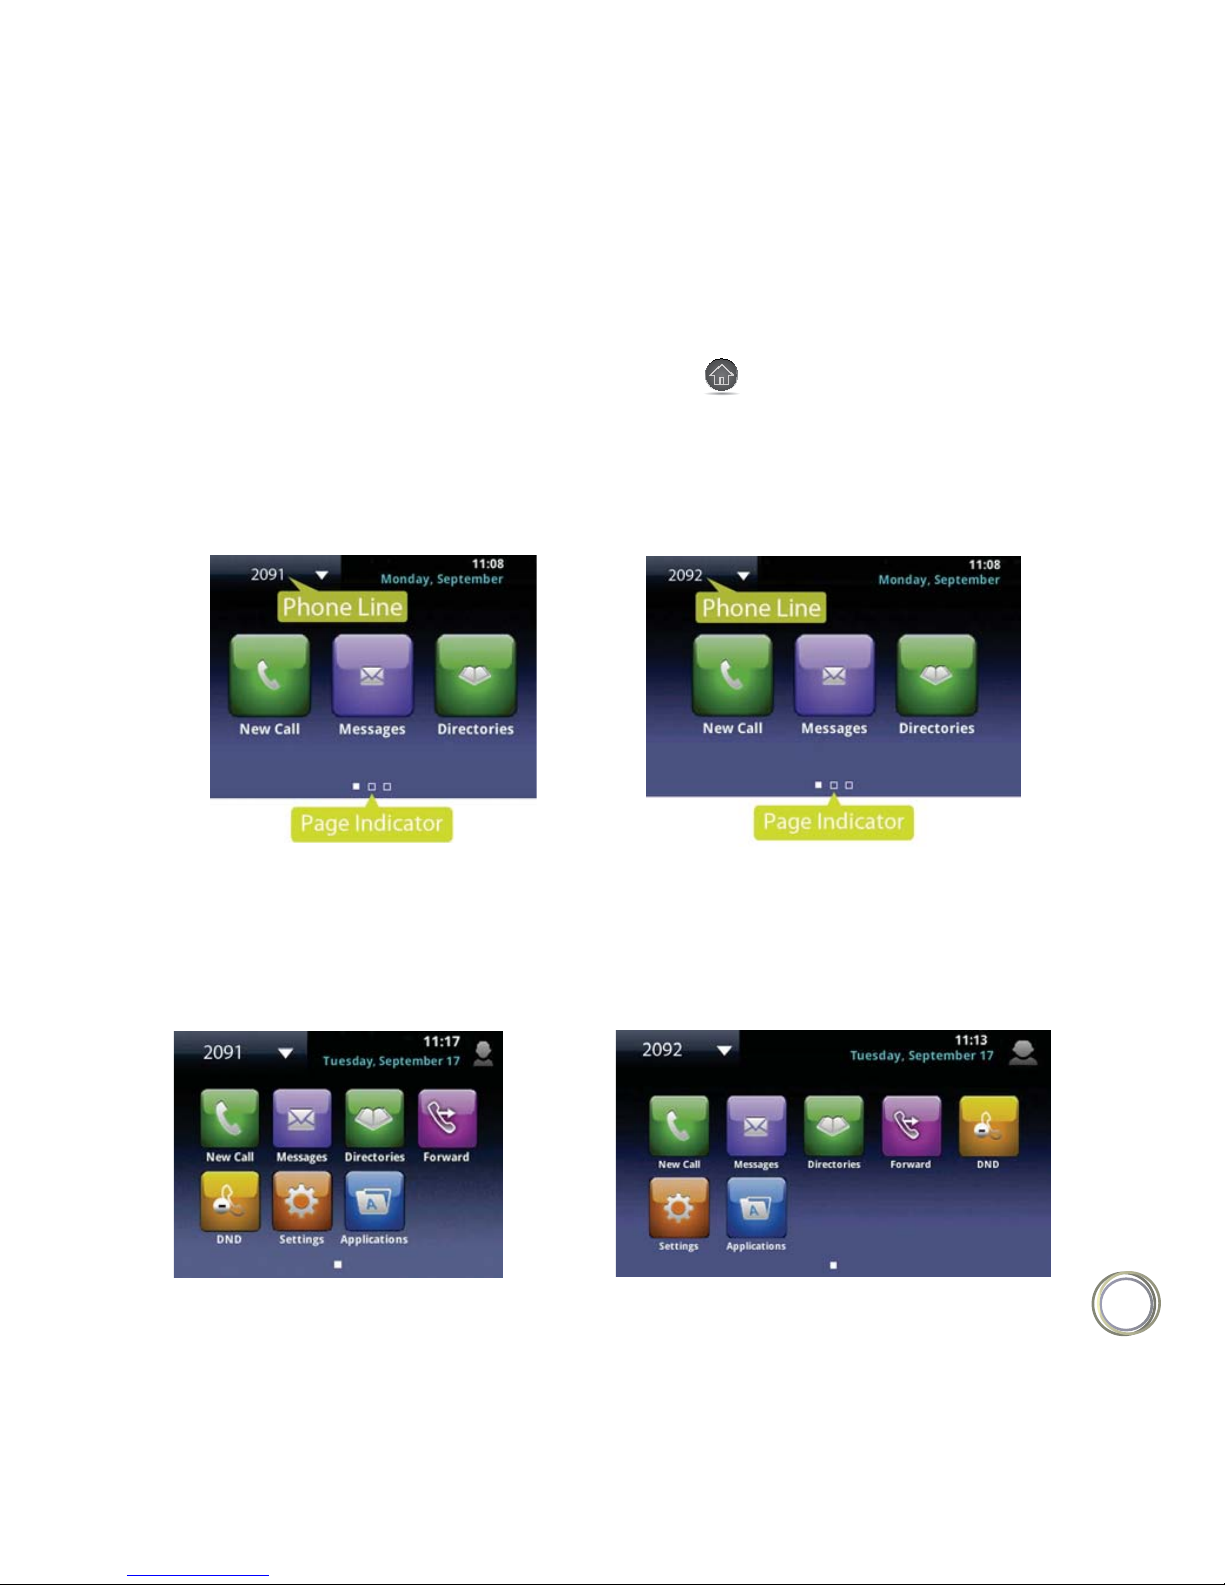
You can display Home view (shown next) by pressing . Home view displays your phone
line, and icons you can tap to access phone features, settings, and information. At the bottom
of Home view is a Page Indicator that you can press and hold to control how many icons
Home view displays.
Home View
VVX500
VVX600
To show all Home view icons (shown next), press and hold the Page Indicator shown above.
Press and hold the Page Indicator again to view fewer icons.
VVX500
VVX600
Page 8
8
User Tip : Displaying Additional Home View Icons
Instead of pressing the page Indicator to view additional Home view icons, swipe the screen
right or left.
Home view displays the following icons :
New Call — Tap New Call to display the Dialer so you can place a call.
Messages — Tap Messages to access your voicemail.
Directories — Tap Directories to access your Contact Directory and Recent Calls list.
You may also be able to access a Corporate Directory and Buddy Status List if they’re
set up on your phone.
Forward — Tap Forward to set up forwarding options for incoming calls.
DND — Tap DND to toggle DND (Do Not Disturb) on or o. When DND is enabled,
your phone won’t ring and incoming calls will go to voice mail.
Settings — Tap Settings to access phone features and settings to customize your phone.
Additional icons may include :
Applications — Tap Applications to access a menu of custom applications. See your
administrator for information about any specific applications listed in this menu.
Calendar — Tap Calendar to show a calendar with your meeting details. Using the
Calendar feature, you can join meetings directly from your phone.
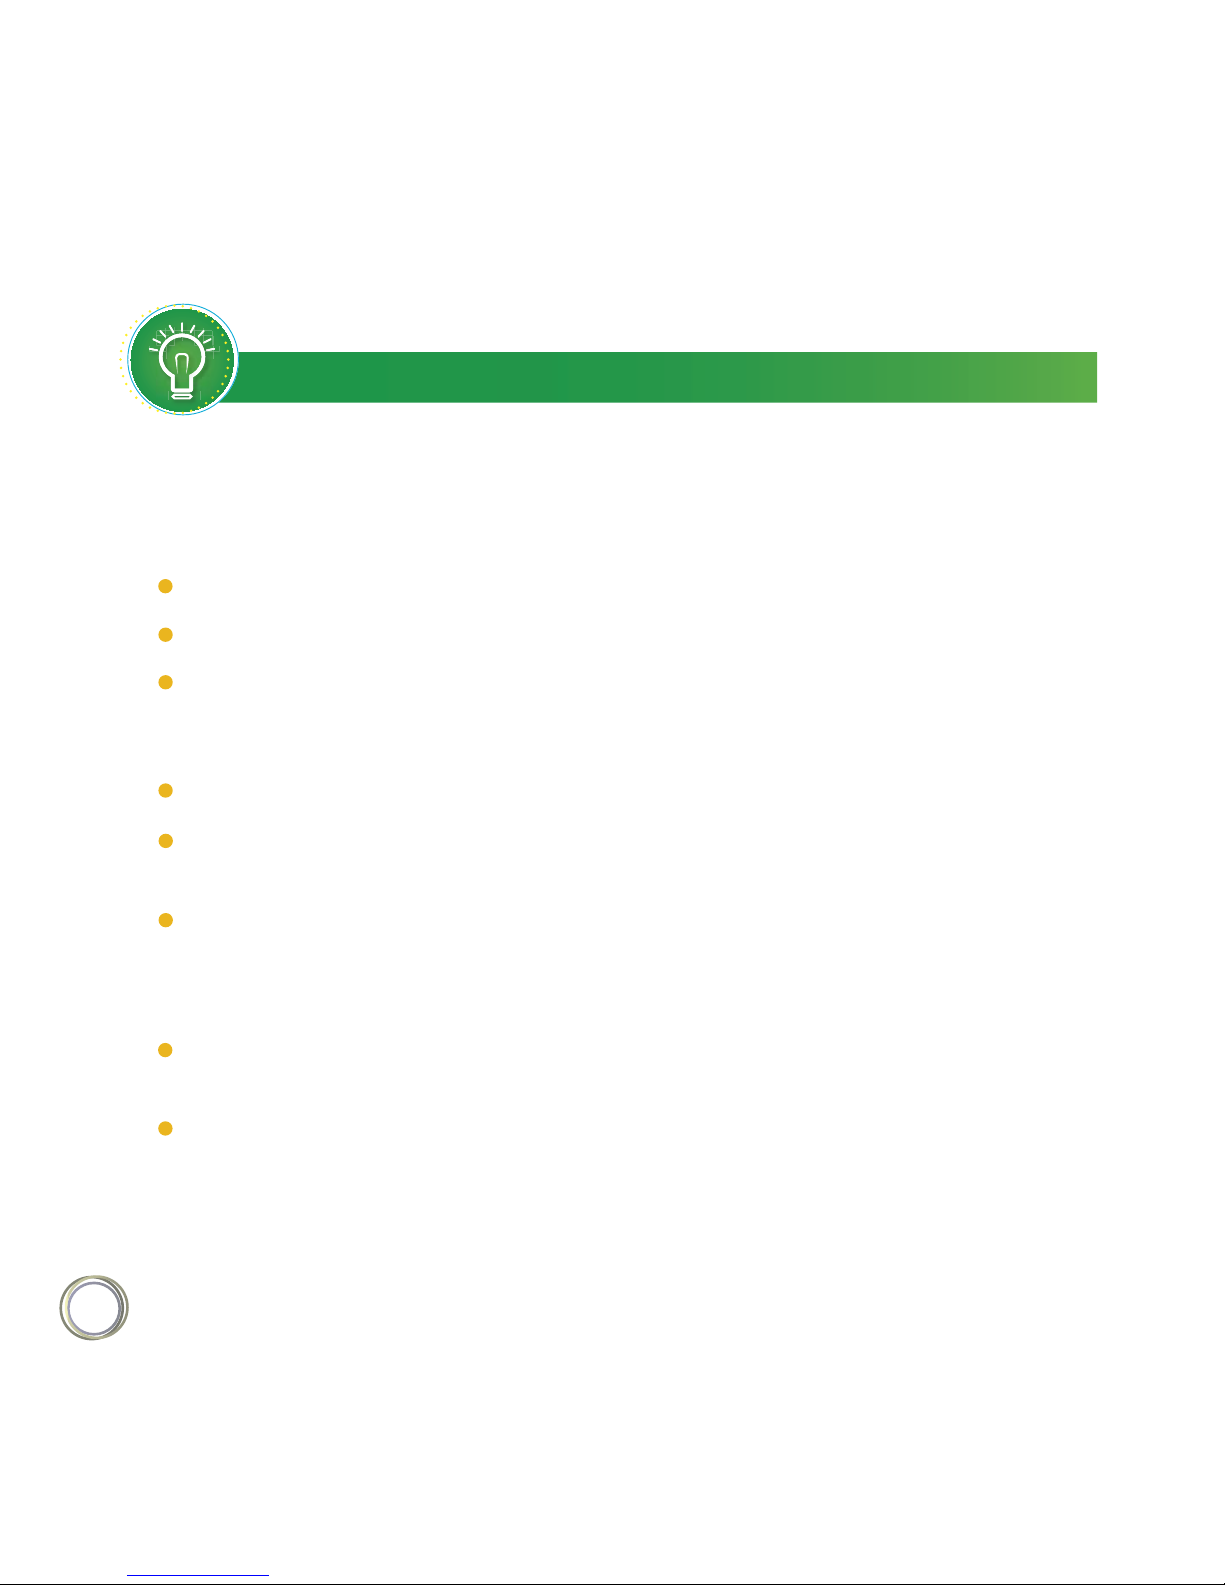
From Home view, tap the phone line to display additional phone lines that may be set up for
your phone, and favorites (shown next). From this screen, tap a phone line to open the Dialer,
or tap a favorite to dial the favorite. To display the Home view icons again, tap Close.
Page 9
9
VVX500
VVX600
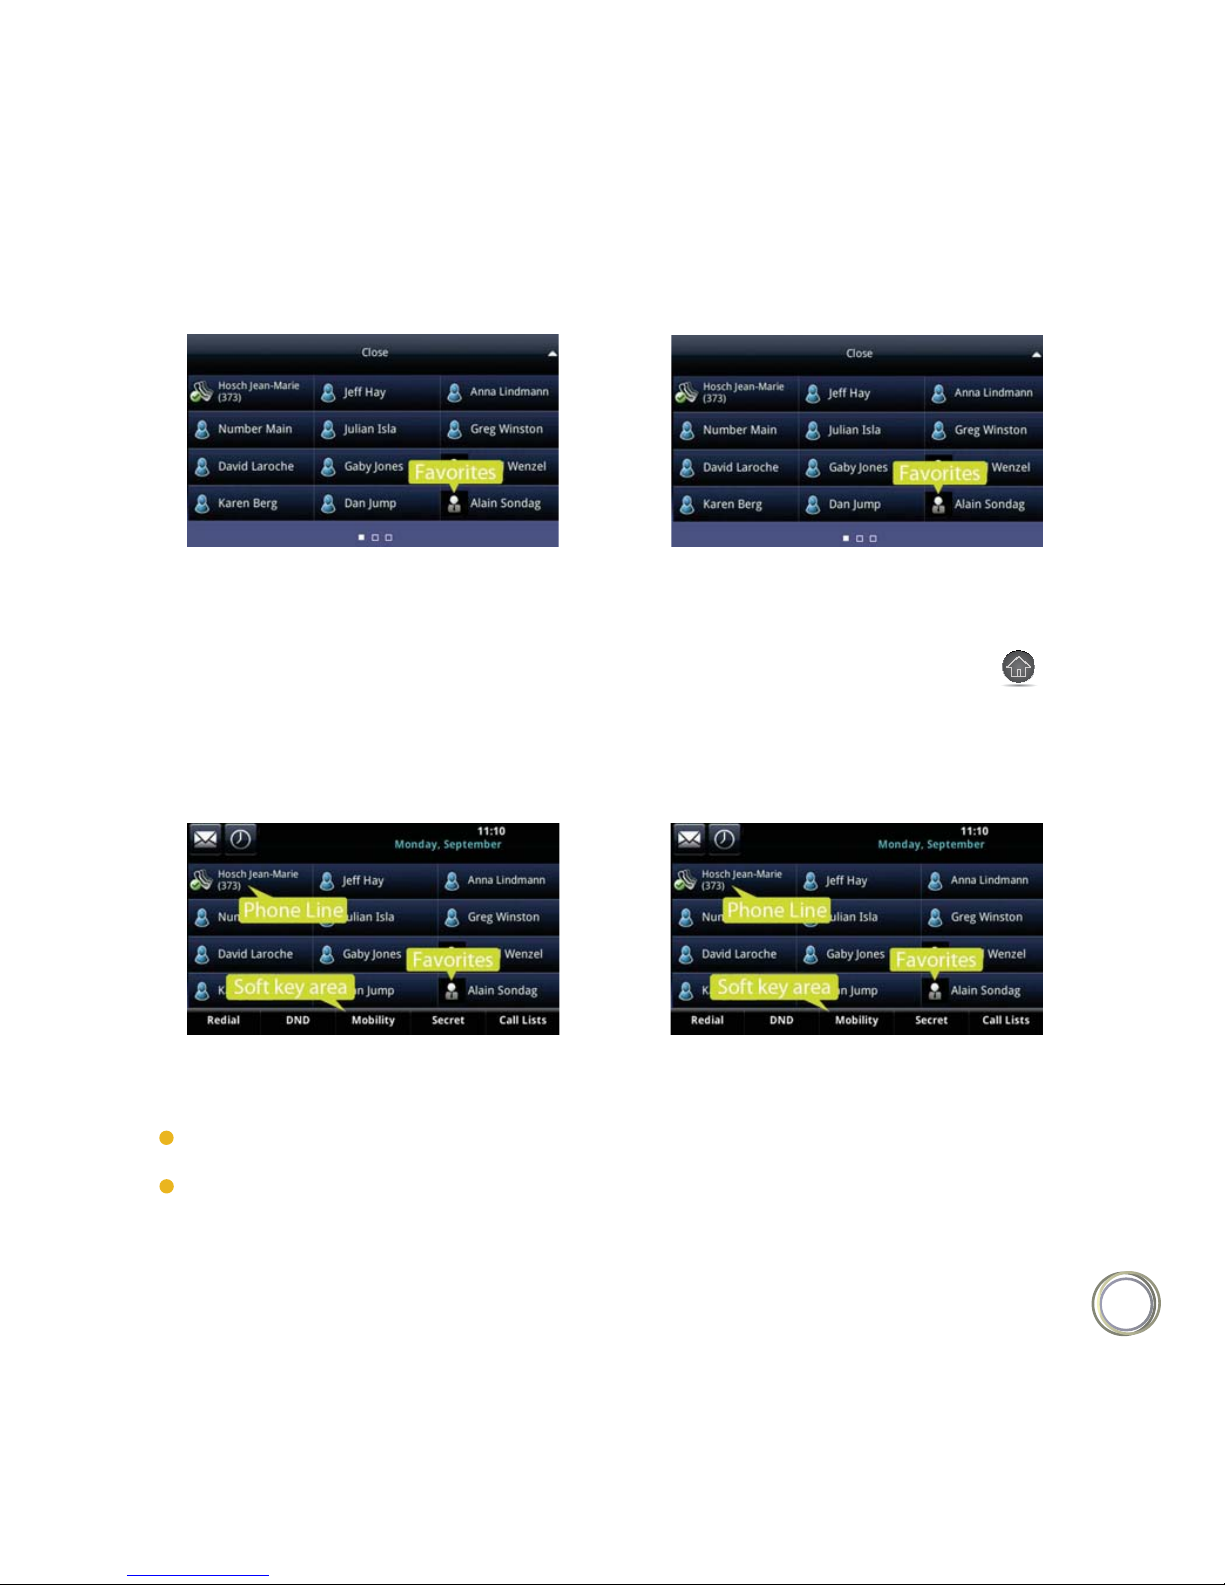
Lines view (shown next) is your phone’s default display. To display Lines view, press from
Home view.
Lines View
Lines view displays your phone line(s), your favorites, and soft keys in the soft key area.
VVX500
VVX600
If your phone is idle, you can :
Tap a phone line to access the Dialer.
Swipe to switch between Lines view and the Idle Browser (if available).
If your phone has calls, the phone line indicates the number of calls you have, and if they’re
active or held. If the phone line has an active call, a green bar displays, as shown in the following
Page 10

10
VVX 500 example. If the phone line has one or more held calls, a flashing red bar displays,
as shown in the following VVX 600 example. To display your call(s), press and hold the
phone line, or swipe the screen.
VVX500
VVX600
Note : Why Can’t I Access the Idle Browser ?
If your phone has calls, you can’t access the File Browser. To access the Main Browser,
tap Applications from Home view. For information about the Idle and Main Browsers see
Using the Browser.
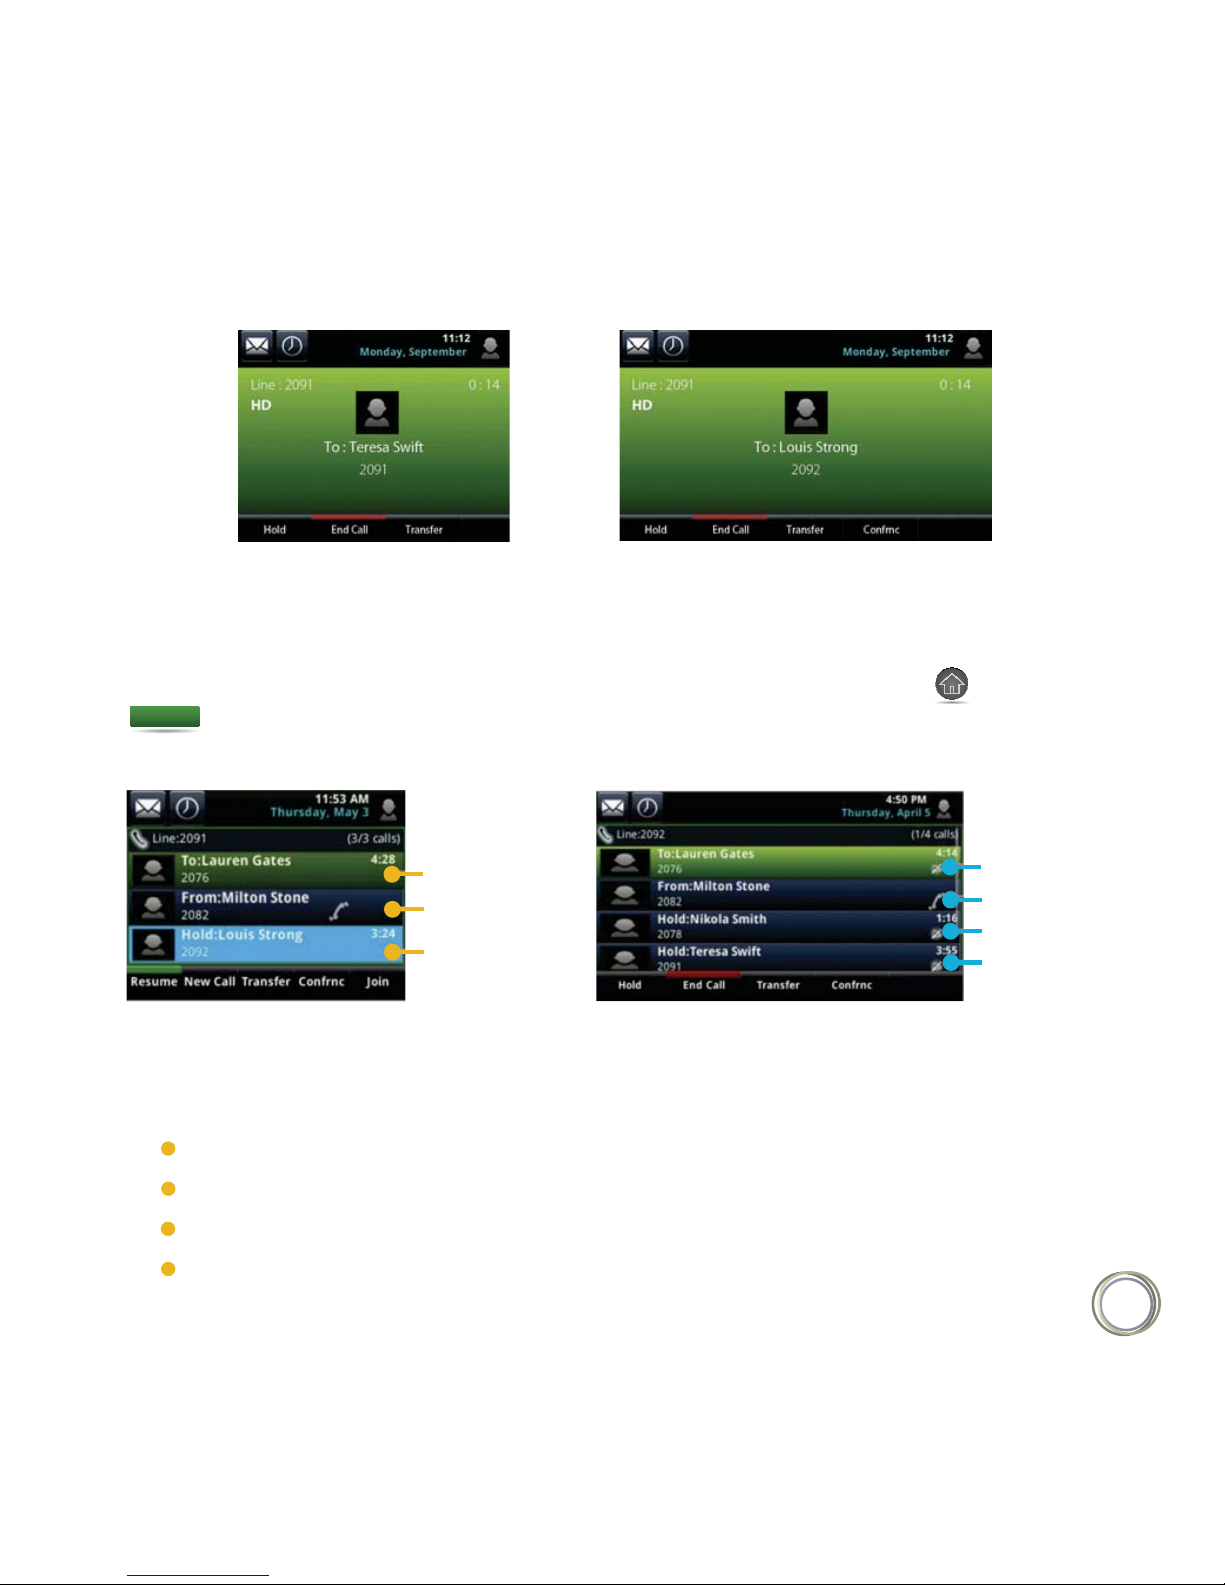
If you have only one call in progress — and it’s active (has audio) — you can access Active Call
view (shown next). If you’re in Home view, you can display Active Call view by pressing , or
tapping in the status bar. To switch between Lines and Active Call view, swipe the screen
right or left.
Active Call view displays the name and number of the person you’re talking with and the
duration of the call. From Active Call view, you can manage the call: hold, end, or transfer
it, or set up a conference call with the person you’re talking with and another party.
Active Call View
< Calls
Page 11
11
VVX500
VVX600
You can access Calls view (shown next) if your phone has multiple calls in progress, or you have
one held call. If you’re in Home view, you can display Calls view by pressing , or tapping
in the status bar. To switch between Lines and Calls view, swipe the screen right or left.
Calls View
VVX500
VVX600
Scroll to see all your calls. If your phone has multiple lines, calls display under the associated line
Dark green — Active call.
Dark blue — Incoming and held calls.
Bright green — Active call is highlighted.
Bright blue — Incoming or held call is highlighted.
< Calls
Active
Incoming
Held and
highlighted
Active and
highlighted
Incoming
Held
Held
Call color indicates status :
Page 12
12
Note : What Does a Highlighted Call Indicate ?
How Do I Highlight a Call ?
A highlighted call is either bright green or blue. Tap an active call to make it bright green,
or tap a held call to make it bright blue. The soft keys apply to the highlighted call.
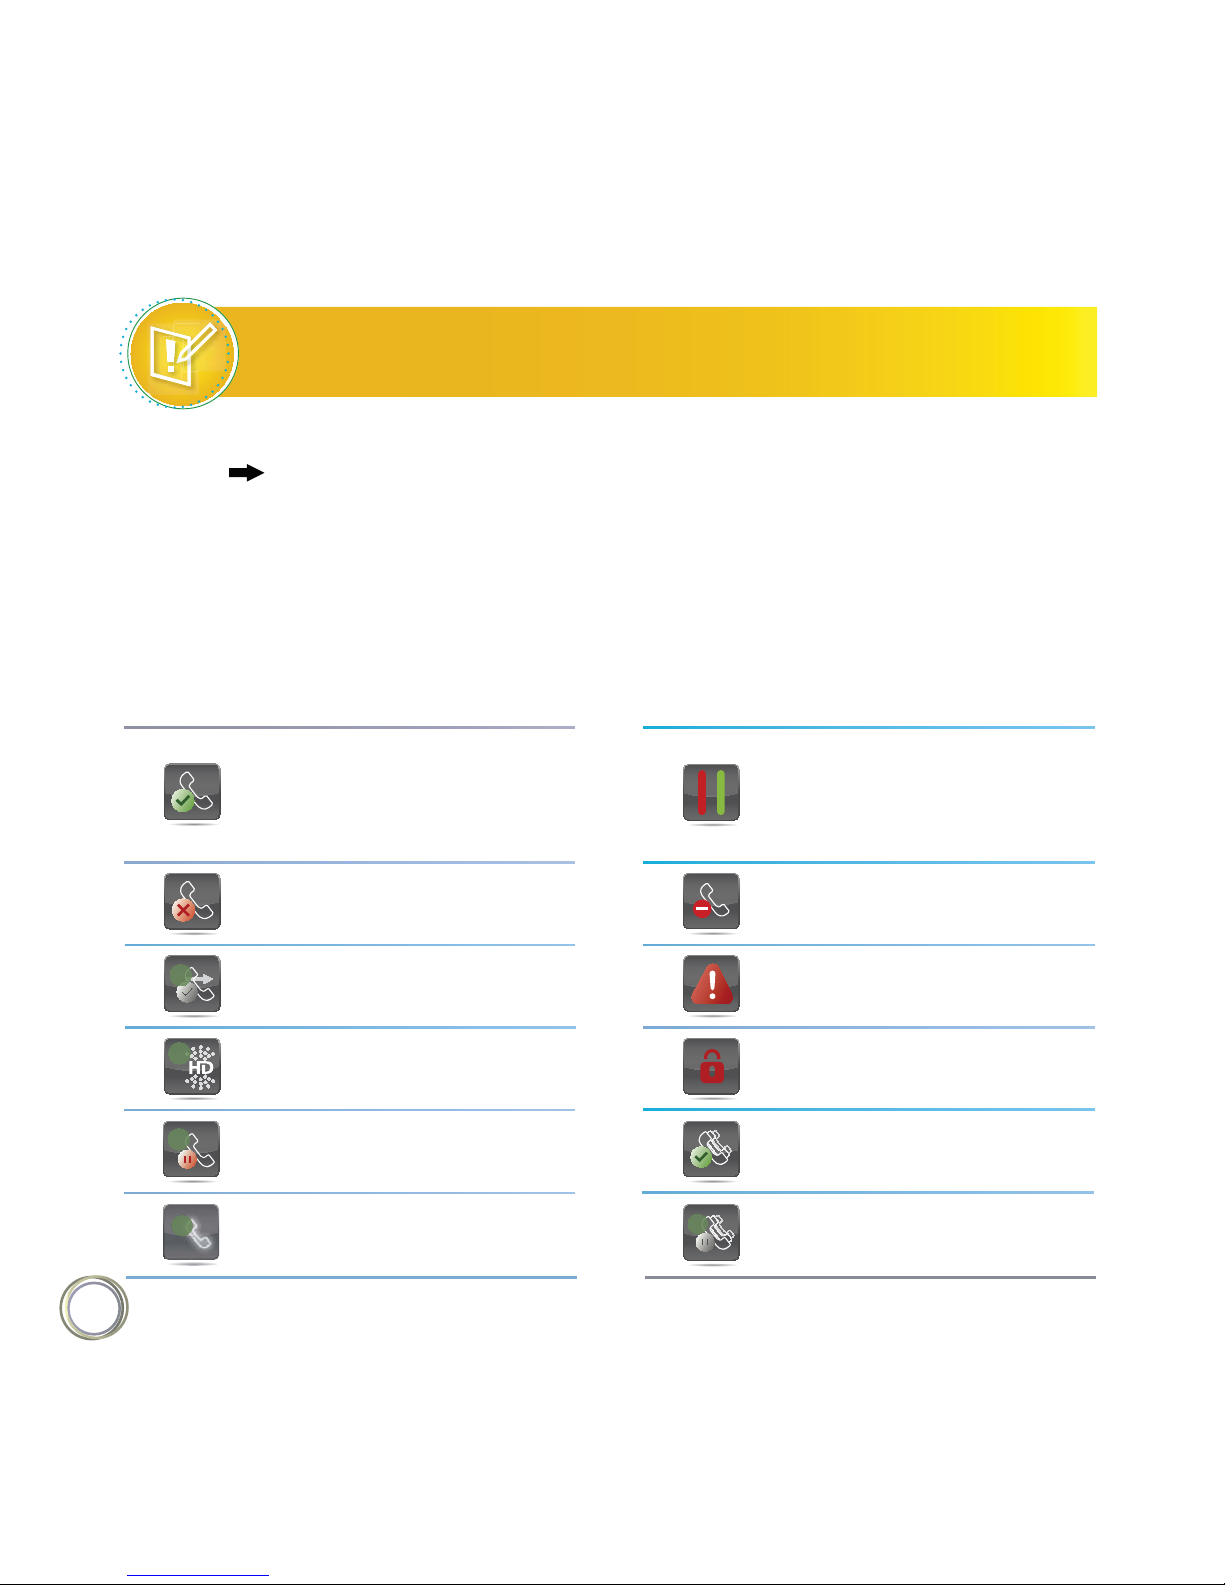
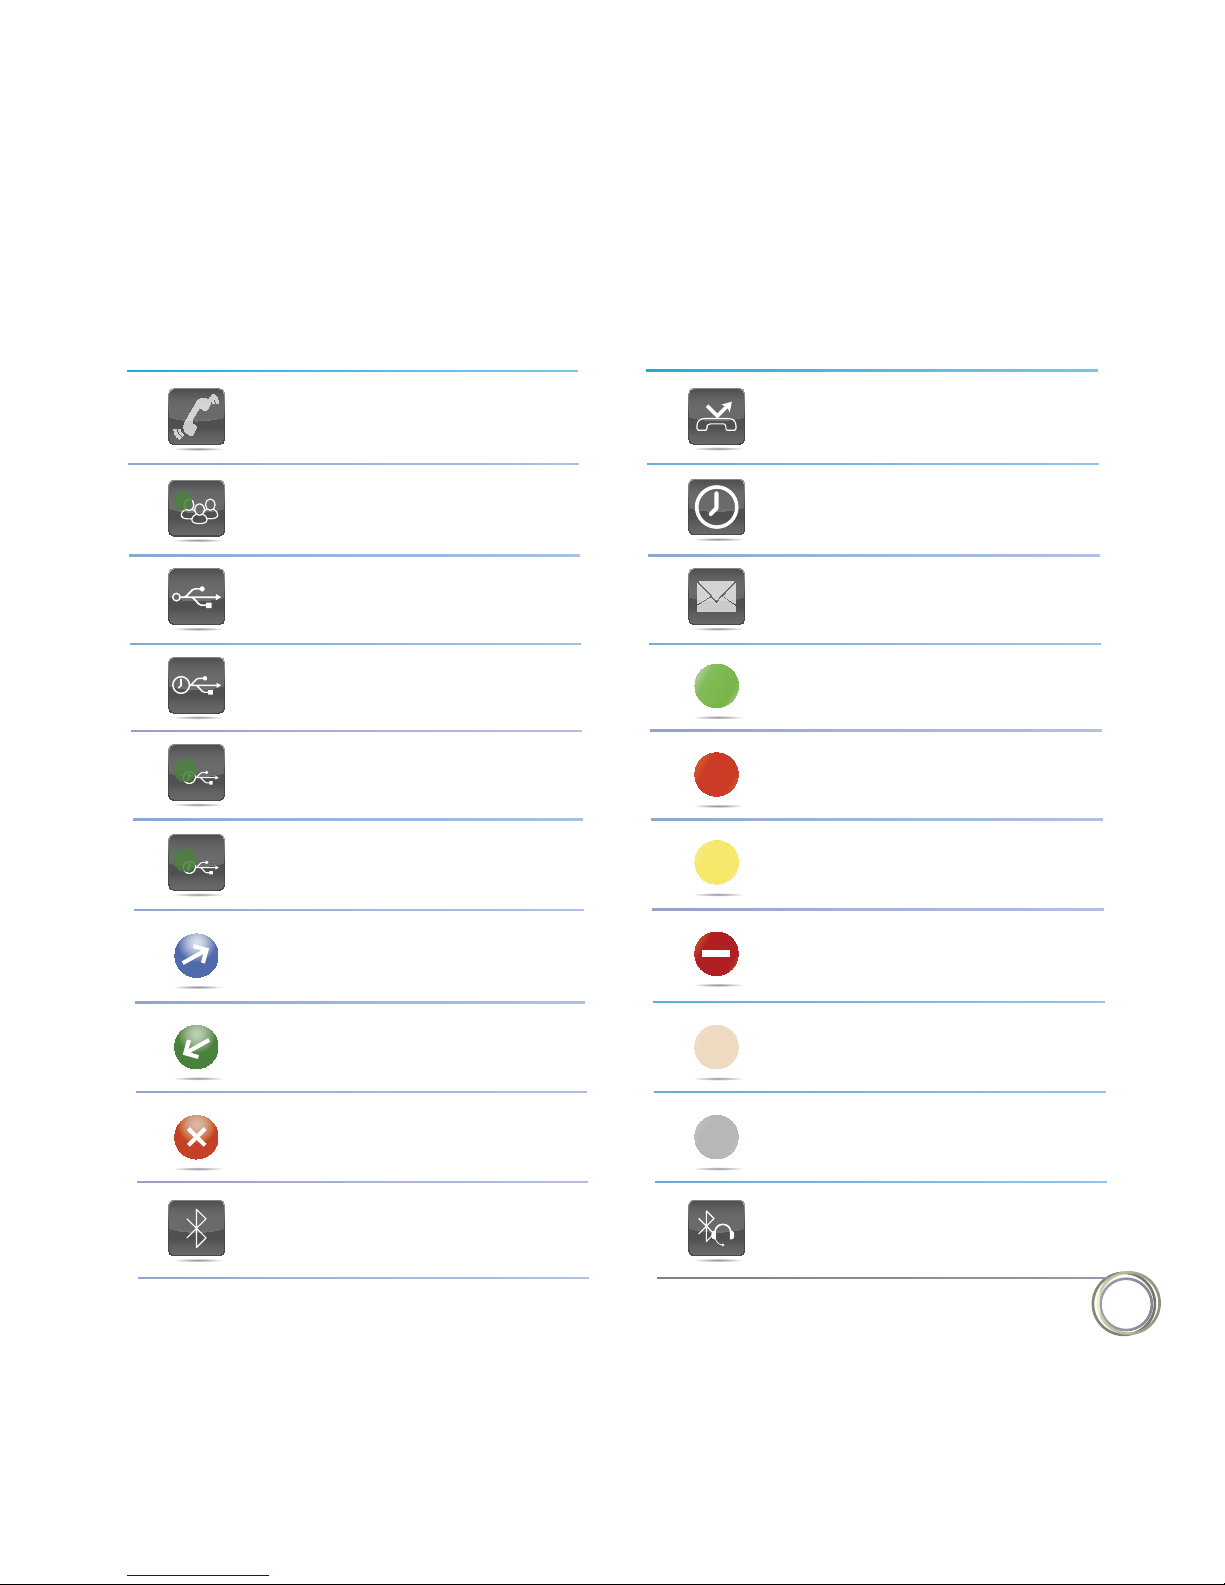
The following icons and indicators symbolize phone, call, or buddy/contact status, or indicate
that a feature is enabled. You can tap certain icons to access information or features.
Understanding Phone Icons and Status Indicators
Registered line
Icon Description
Status indicators in Lines
view. A flashing red bar
indicates held calls. A green
bar indicates an active call.
Icon Description
Unregistered line
Do Not Disturb enabled
Placing a call
Phone warning
Active call using Polycom
HD voice
Login credentials invalid
Shared lineHeld call
Shared line with a held callIncoming call
1
1
1
1
1
Page 13
13
Call forwarding is enabledIncoming call
Tap to access recent callsActive conference
Tap to access messagesUSB flash drive attached
Presence status ( Available)
Recording in progress or
paused (VVX 500 only)
Presence status (Busy)
Recording paused
(VVX 600 only)
Presence status (Away)
Recording in progress
(VVX 600 only)
Presence status
(Do Not Disturb)
Placed call
Presence status
(Oine)
Received call
Presence status
(No information)
Missed call
Bluetooth headset paired and
connected (VVX 600 only)
Bluetooth available
(VVX 600 only)
Icon Description Icon Description
1
P
R
Page 14
14
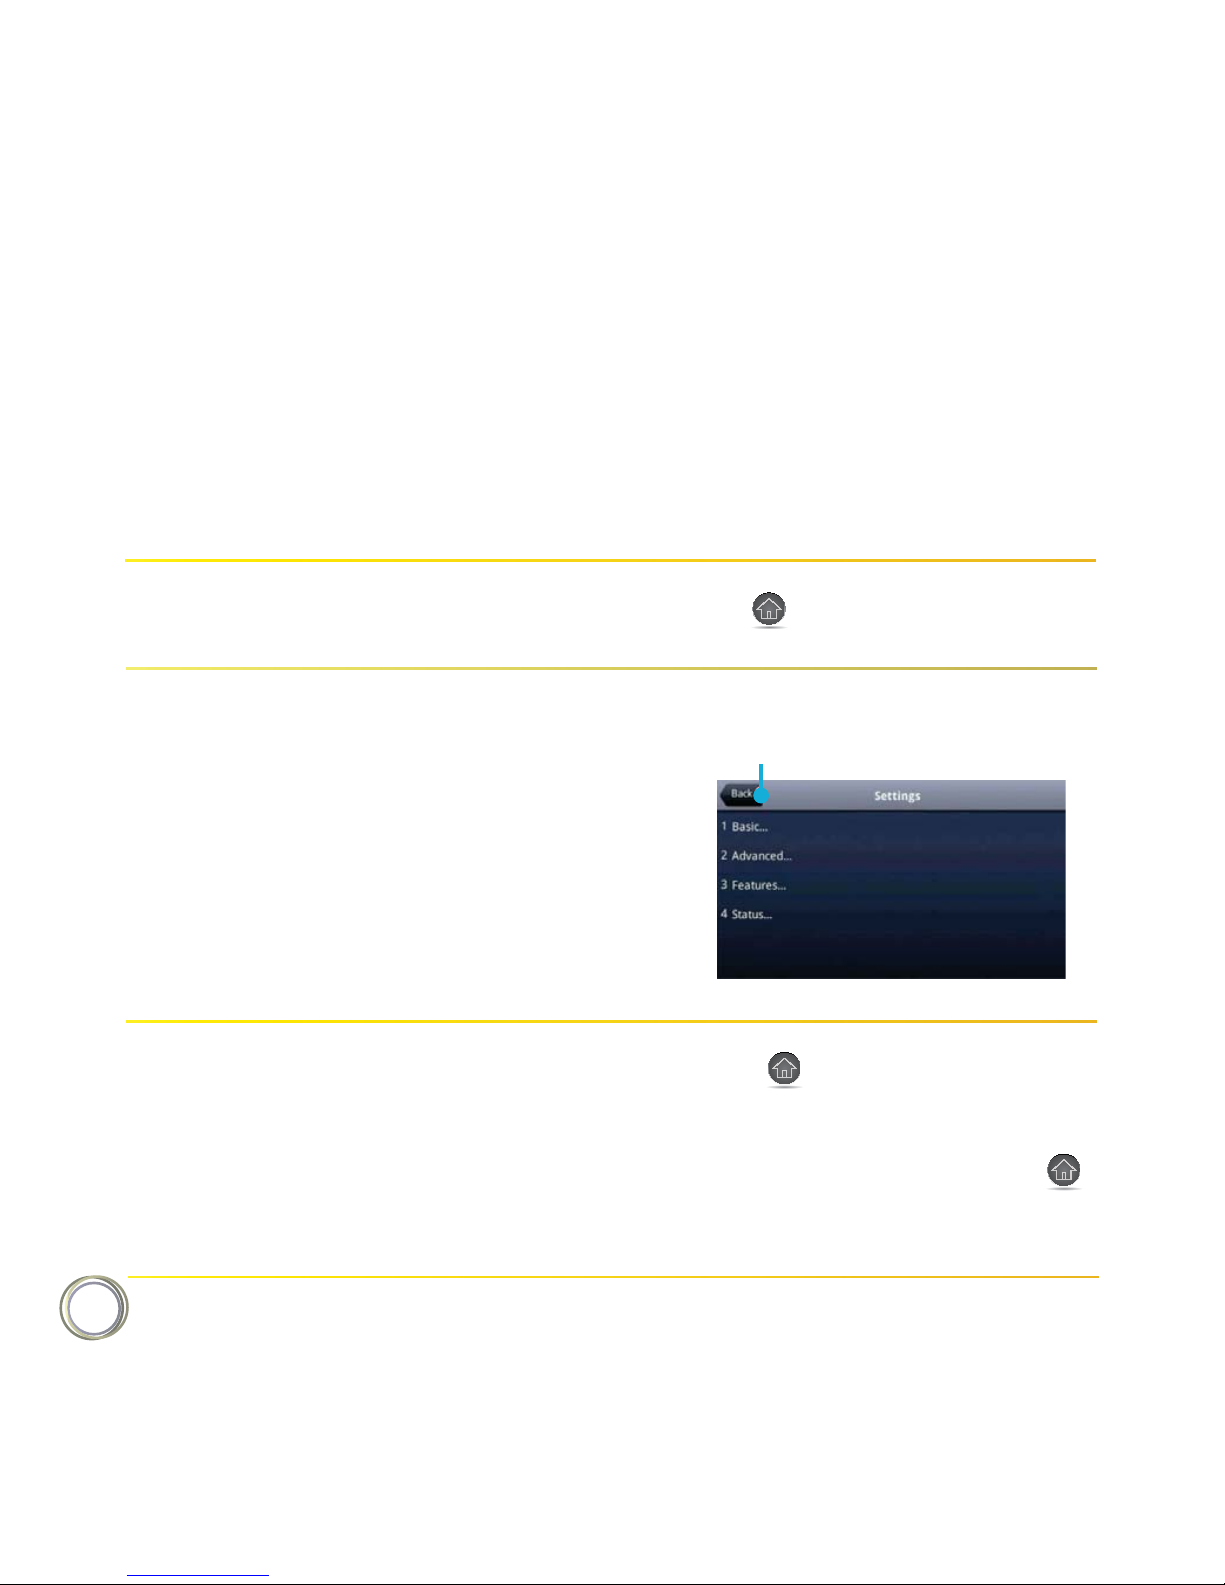
The following table shows you how to navigate your phone’s screens, as well as select and
highlight options.
Navigating Your Phone Interface
Press .Return to Home view from any screen
Tap Back, as shown next.Return to the previous screen
If you want to... Do this...
Tap to go back to the previous menu
Ŕ1SFTTUPEJTQMBZBEJŢFSFOUWJFXSwitch phone views
Ŕ4XJQFUPTXJUDICFUXFFOUXPWJFXT
Ŕ*GZPVōSFJO)PNFWJFXBOEQSFTT
the Idle Browser may display. Swipe the
screen to display Lines view.
Page 15
15
If you want to... Do this...
Tap .Close an option box without selecting
anything
Tap the icon, soft key, menu item, or
option. If an item in a list has a number
next to it, you can press the corresponding
number on the dialpad to select the item.
Select an icon, soft key, menu item,
or option
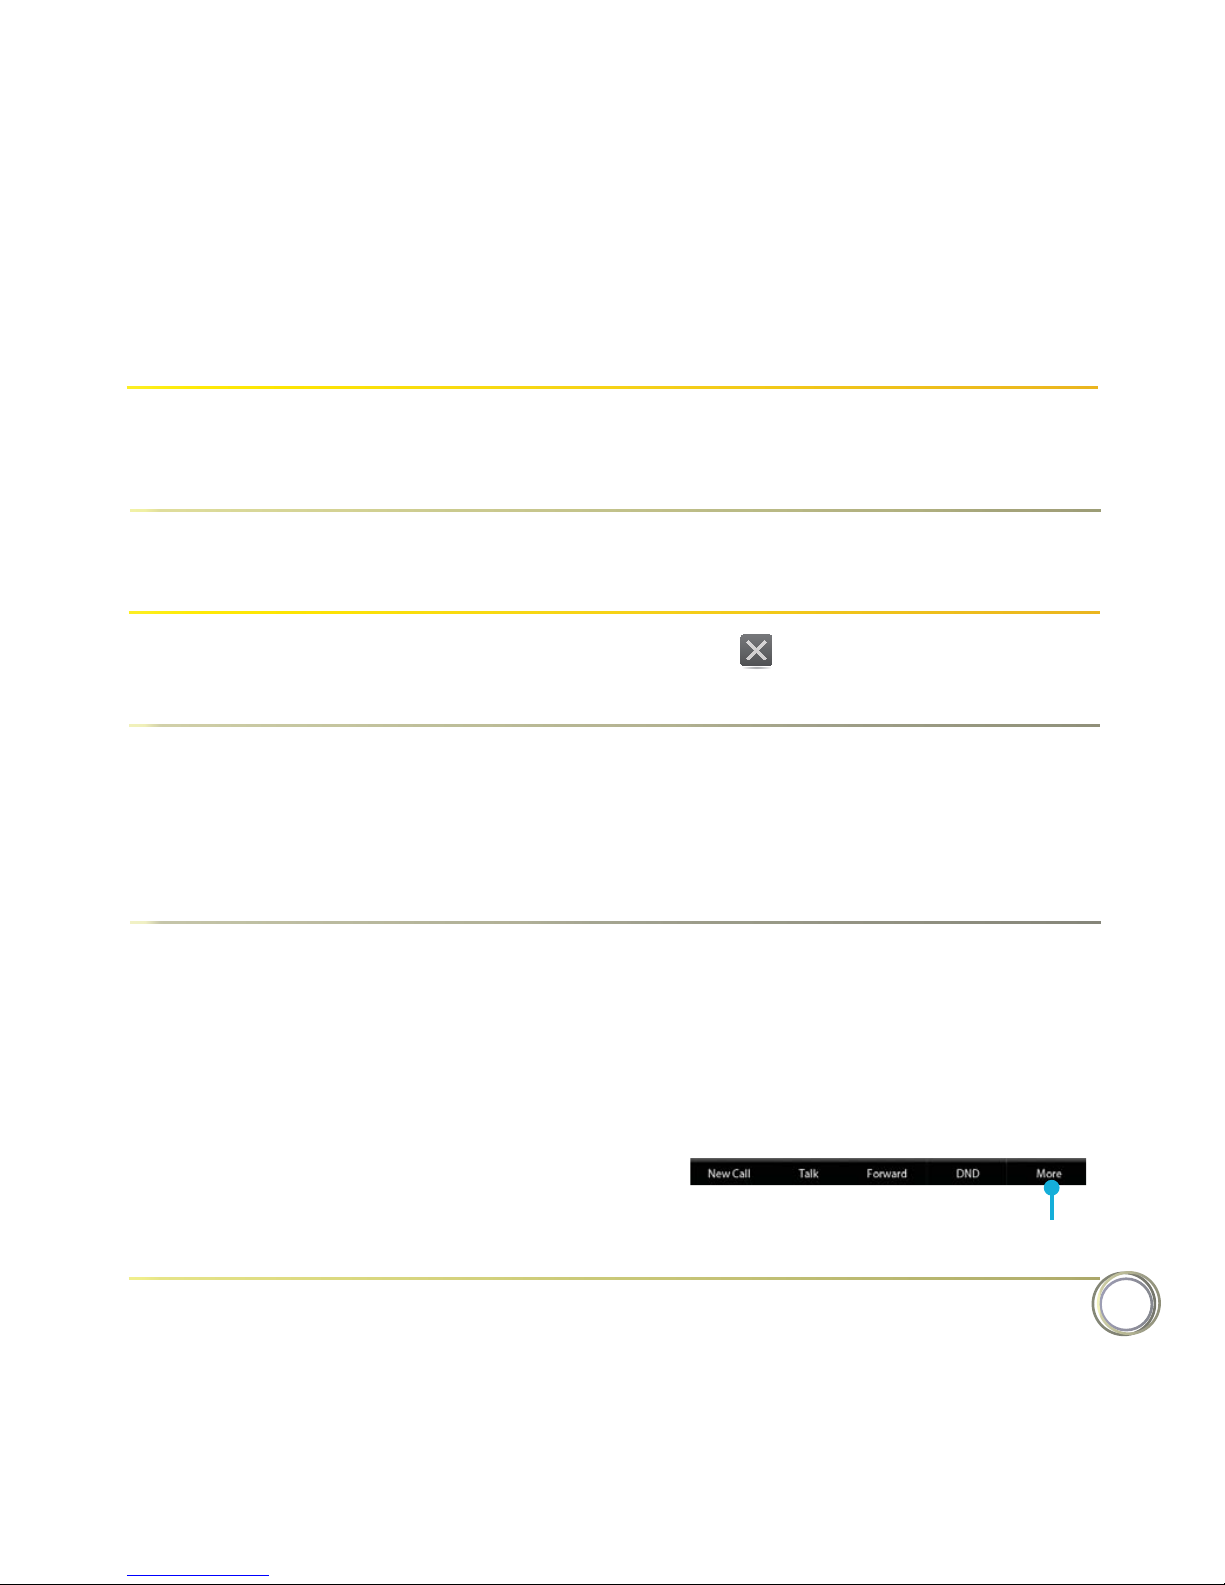
If a More soft key displays in the far-right
of the soft key area (as shown next),
there are additional soft keys available,
but you can’t see them. Tap More to
view the additional soft keys.
Select a soft key that’s not in view
Tap to see more soft keys.
Tap the menu item or option. Select a menu item or option
Tap a call to highlight it. The soft keys
apply to the highlighted call.
Highlight calls in Calls view
Page 16

16
Chapter 2: Using Basic Features
Now that you’re familiar with your phone’s user interface and how to interact with it, you’re
ready to perform basic phone tasks that you’ll use on a daily basis. At the end of this chapter,
you’ll become expert at handling multiple calls at one time, manipulating incoming and
active calls, and accessing directories and lists so you can perform tasks quickly and eciently.
Calling, answering, holding, and ending calls
Ignoring, rejecting, forwarding, and transferring calls
Setting up conference calls
Enabling Do Not Disturb
Listening to voicemail
Handling Directories, Recent Calls, and Favorites
Customizing ringtones
Controlling phone volume
Using headsets
Managing shared lines
In this chapter, you’ll learn about :
Your phone can handle multiple calls at a time. However, only one active call — the call that has
audio associated with it — can be in progress at any given time. In addition to the active call,
your phone may have multiple other calls that are either held, or in an incoming or ringing state.
Your administrator can set up your phone to have up to 12 lines (for the VVX 500) or 16 lines
(for the VVX 600). Lines can have unique extension numbers, or they can have the same
extension number as other lines.
How Your Phone Handles Calls
Page 17

17
Using the handset
Using the speakerphone
Using a headset
You can place and answer calls in these ways :
During a call, you can alternate between handset, headset, or speakerphone modes by picking
up the handset, or pressing or . For example, if you’re using the handset, you can
switch to headset mode by pressing , or switch to speakerphone mode by pressing .
When you’re in speakerphone mode, glows green. When you’re in headset mode,
glows green if an analog headset is connected, and blue if a USB headset is connected. If
both an analog and USB headset are connected, the USB headset will be used.
User Tip
All incoming calls display in an Incoming Call window, as shown next.
Answering Calls
To use the handset, pick up the handset.
To use the speakerphone, press or tap Answer.
To use your headset, press .
In this chapter, you’ll learn about :
If you’re already in handset, speakerphone, or headset mode, tap Answer, and the phone
will automatically use the mode you’re in
Page 18
18
If you don’t answer the call within 10 seconds, the Incoming Call window disappears, and
either Home or Calls view displays, as shown next. The view that displays depends if your
phone last displayed Home or Lines view.
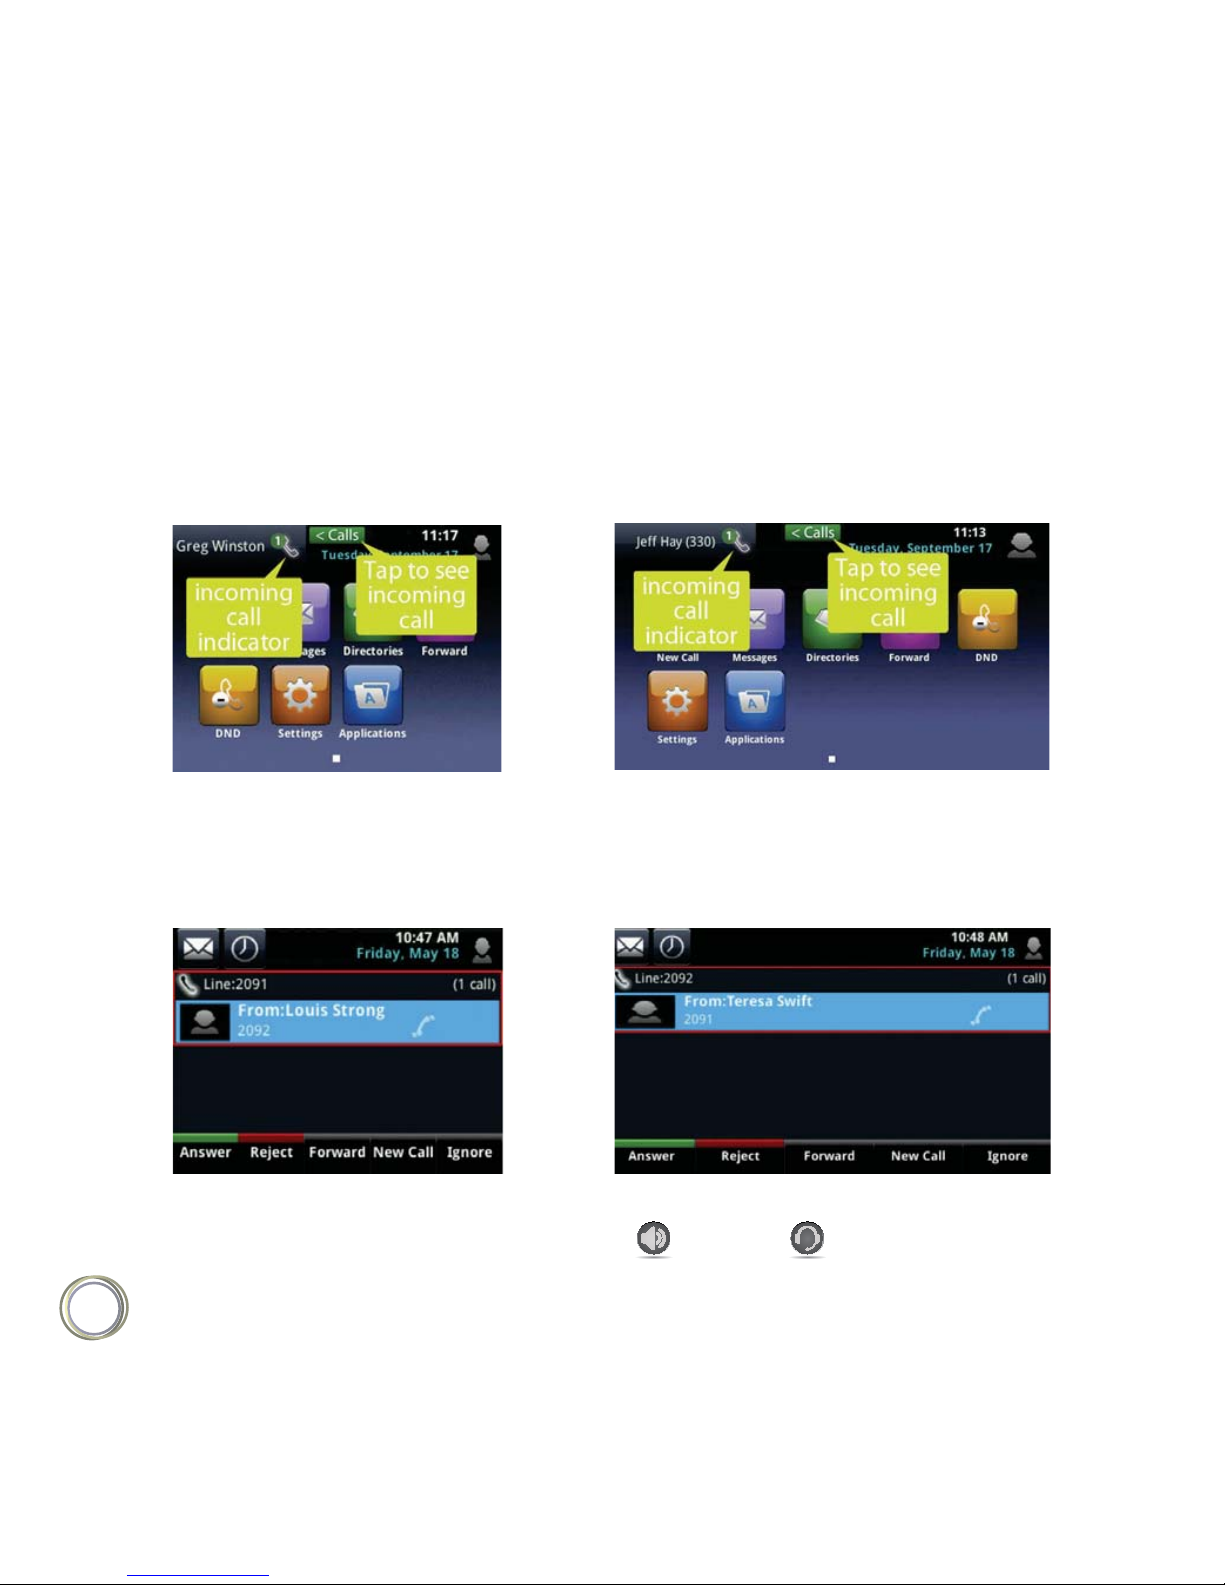
Incoming call from Home view :
VVX500
VVX600
Incoming call from Calls view :
VVX500
VVX600
To answer the call, pick up the handset, press , or press . Or, from Calls view, tap
Answer to use the speakerphone.
Page 19
19
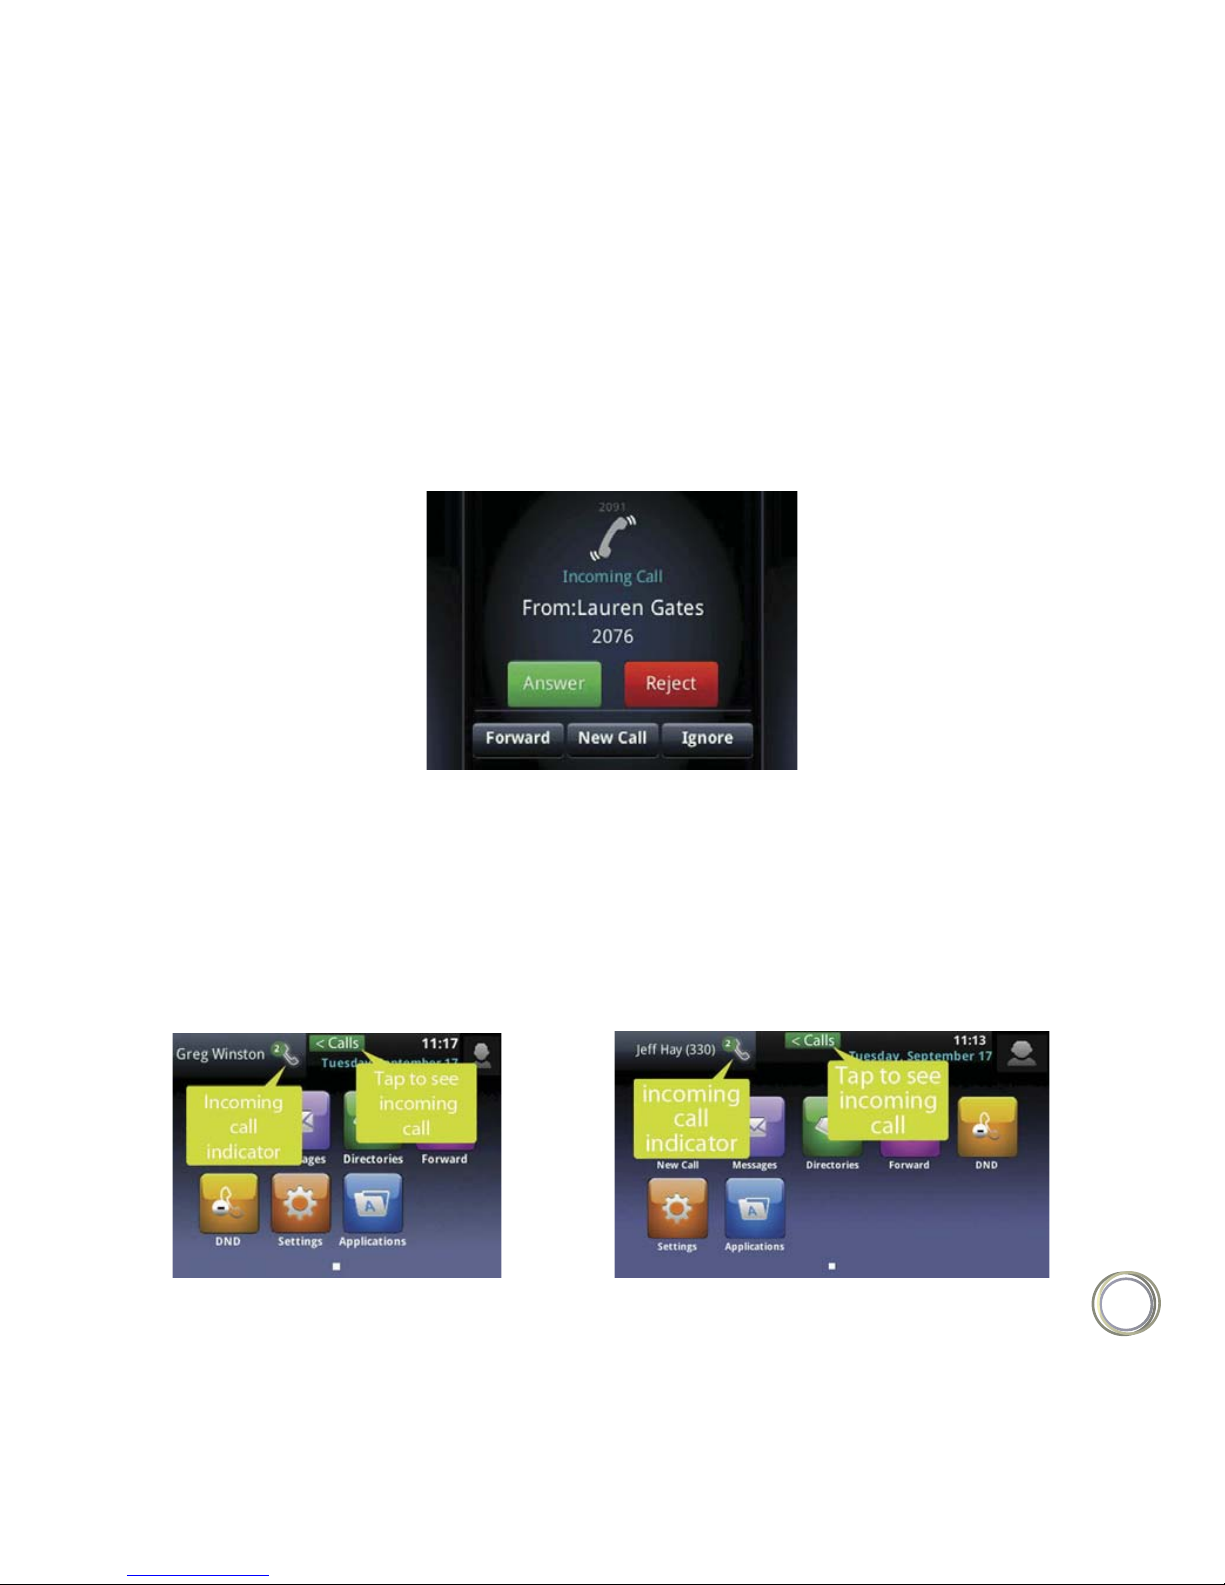
If you have a call and an incoming call arrives on the same or a dierent line, a call waiting
tone beeps, and the Incoming Call window displays, as shown next. To Answer the call, tap
Answer. The call you were in is held.
Answering Another Call
If you don’t answer the call within 10 seconds, the Incoming Call window disappears, and
either Home or Calls view displays, as shown next.
Incoming call from Home view :
VVX500
VVX600
Page 20
20
Incoming call from Home view :
VVX500
VVX600
Incoming call
To answer the call from Home view, tap to display Calls view. To answer the call
from Calls view, tap the incoming call if it’s not already highlighted, and tap Answer.
< Calls
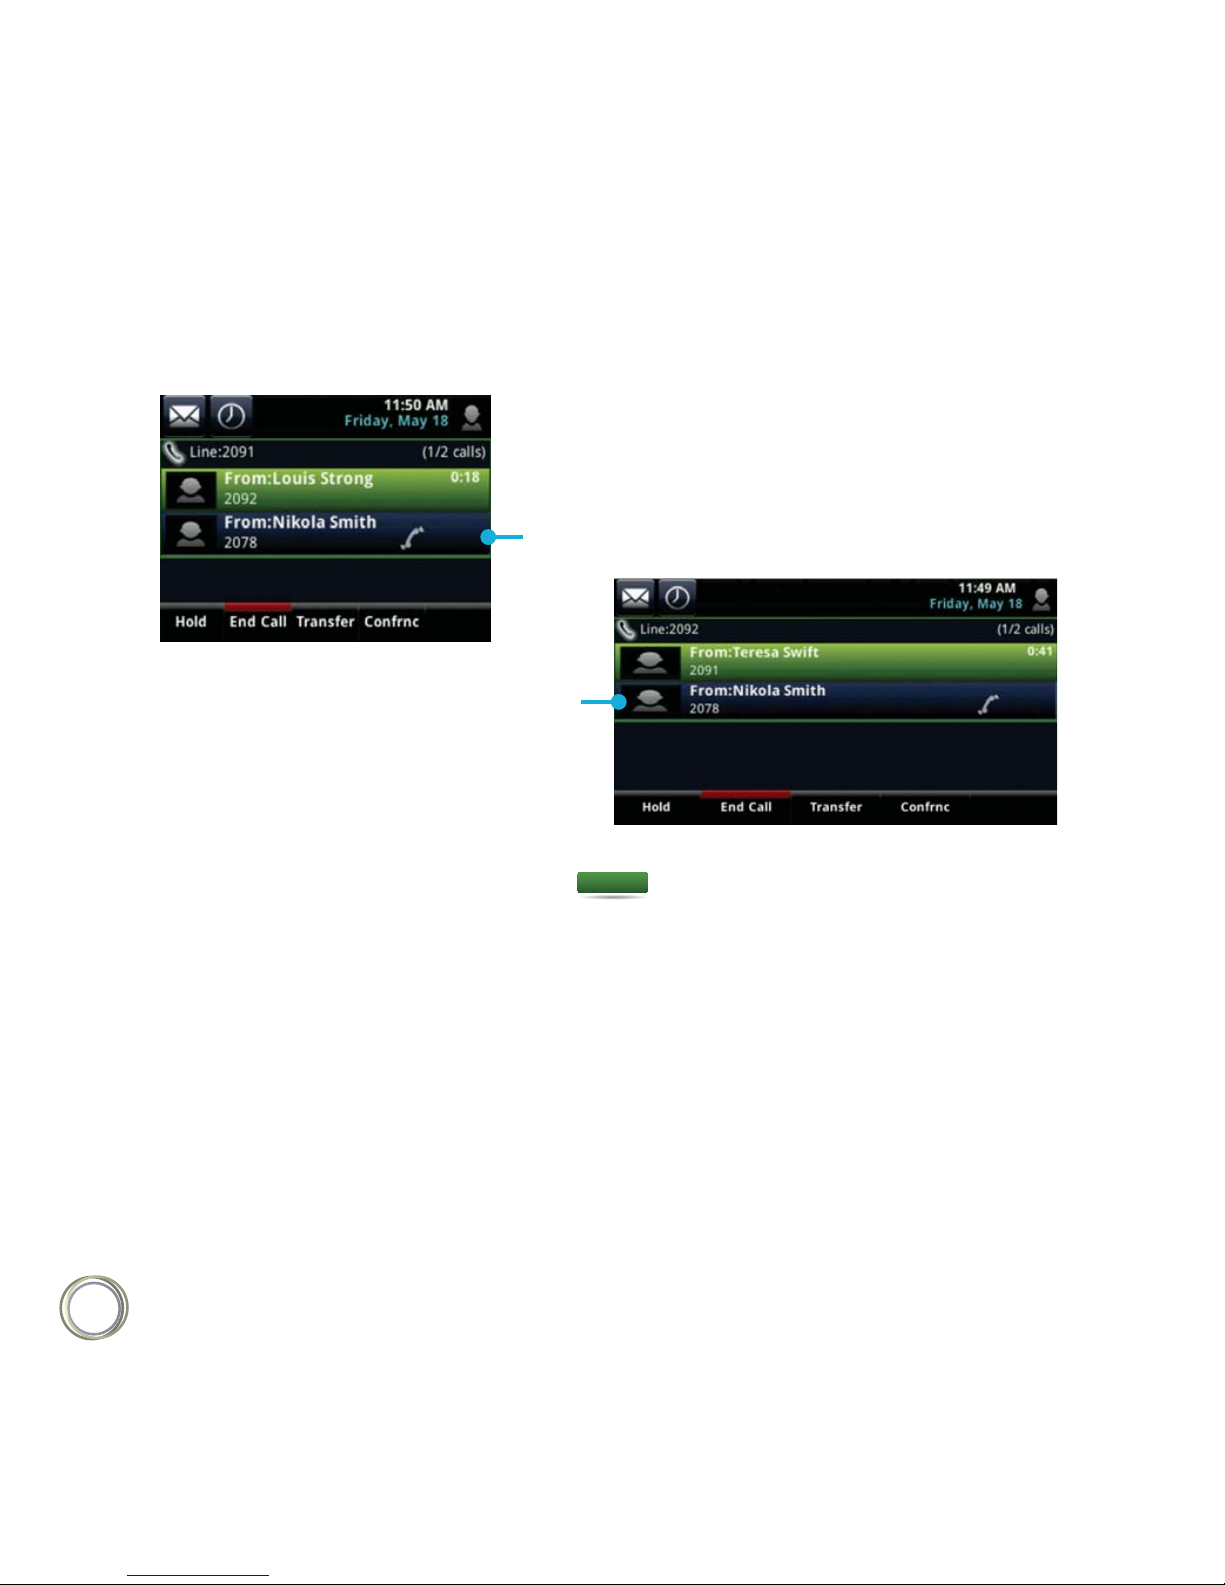
You can easily manage multiple calls from Lines and Calls view. To switch between the two
views, swipe the screen.
Lines view shows you each line on your phone, and how many calls each line has, as shown
next. A green bar indicates a line with an active call. A flashing red bar indicates a line with
one or more held calls. In the example on the left, line 2091 has two calls (one active, one
held), and line 2095 has one held call. The soft keys apply to the phone line that has the
blue border (line 2091). To display the calls for a particular line, press and hold the phone line.
Managing Multiple Calls
Incoming call
Page 21

21
VVX500 VVX600
If you tap a phone line that doesn’t have an active call, the most recent call on that line will
become active. The current call will be held.
Swipe the screen to display Calls view. Calls view displays all the calls for each phone line,
as shown next. All the calls for a phone line display under the associated phone line. Scroll
up or down to see all your lines and calls.
VVX500
VVX600
Held call
on 2095
Held call
on 2095
Calls on
2091
Calls on
2091
To manage a call, tap a call to highlight it. Then, tap one of the soft keys to hold, resume,
end, or transfer the highlighted call, or set up a conference with the highlighted call.
Page 22

22
User Tip : Navigating Back to Calls View
If you navigate away from your call(s), tap (shown next) to see Active Call or Calls view.
< Calls
Tap to see Active Call or Calls view
You can place a call using the handset, speakerphone, or headset. You can dial the number
first, and then choose the method — by picking up the handset, pressing , or pressing
— or choose the method first, and then dial the number.
Placing Calls
Manually, from the Dialer
Automatically, by tapping a favorite in Home or Lines view
Automatically, from your Favorites list, Recent Calls list, or Contact Directory.
You can place calls in these ways :
The Dialer displays a list of previously-placed calls. Tap one of the entries to automatically
enter it. Or, start entering a number. As you enter numbers, the Dialer displays a list of similar numbers, as shown next. Tap a match to automatically enter it.
Calling from the Dialer
Page 23

23
display if you have an active call.)
Ŕ*GZPVSQIPOFJTJEMFTUBSUFOUFSJOHBQIPOFOVNCFS
Ŕ1JDLVQUIFIBOETFUPSQSFTTPS5IJTNFUIPEPOMZXPSLTJGZPVEPOōUIBWF
VVX500 VVX600
Ŕ'SPN)PNFWJFXUBQNew Call.
Ŕ'SPN-JOFTPS$BMMTWJFXUBQUIFNew Call soft key. (The New Call soft key won’t
To display the Dialer, do one of the following :
an active call.
Ŕ*O-JOFTWJFXUBQBQIPOFMJOFUIBUEPFTOōUIBWFBOZDBMMT
When you access the Dialer, an active call is held.
Ŕ&OUFSUIFOVNCFSBOEUIFOQJDLVQUIFIBOETFUQSFTTPSUBQPSQSFTT
. Or
Ŕ*GZPVōSFBMSFBEZJOIBOETFUTQFBLFSQIPOFPSIFBETFUNPEFFOUFSUIFOVNCFSBOE
tap .
To call from the Dialer :
Page 24

24
In addition to the Dialer, you can place calls from the Recent Calls list, Favorites list, or your
Directory. Or, you can quickly call a favorite from Home or Lines view.
Placing Calls from Favorites, Lists, and Directories
From Home view, tap Directories, and tap Recent Calls.
From the Dialer, tap Recent.
From Lines, Calls, or Active Call view, tap .
To call from the Recent Calls list :
1) Access your Recent Calls list by doing one of the following :
2) From the Recent Calls list, tap the person you want to call. The call is automatically placed.
To call from your Favorites list :
1) From Home view, tap New Call.
2) From the Dialer, tap Favorites.
3) From your Favorites list, tap the favorite you want to call. The call is automatically placed.
To call from your Directory :
From Home view, tap Directories, and tap Contact Directory. Or
From Home view, tap New Call, and tap Directory.
1) Access your directory by doing the following :
2) From your Directory, tap the contact you want to call.
Page 25

25
3) From the contact’s information screen, tap the contact’s phone number. The call is
automatically placed.
To dial the last number you called, open the Dialer. The first number in the list is the last
call you placed.
Redialing Numbers
To redial a number :
1) From the Dialer (shown next), tap the first
number in the list.
2) Place the call.
Last placed call
To quickly end an active call, replace the handset, or press or . Or, from Active Call,
Lines, or Calls view, tap End Call. If you’re in Calls view, be sure to highlight the call first.
Ending Calls
Note : How Do I End a Held Call ?
A call must be active to end it. To end a held call: From Calls view, tap the held call to
highlight it, tap Resume, and then tap End Call.
Page 26

26
You can connect an analog and/or USB headset to your phone. If an analog headset is connected
and in use, glows green. If a USB headset is connected and in use, glows blue. If
both an analog and USB headset are connected, the USB headset will be used. If two USB
headsets are connected, the headset you connected first will be used.
If you use a headset, you can set up your phone so that all calls use your headset
(see Enabling
Headset Memory Mode)
. If you use a headset that supports electronic hookswitch (EHS),
you can use the controls on your headset to answer and end calls. In addition, you may be
able to mute calls and control volume from your headset.
If you have a VVX 600, your phone supports Bluetooth headsets. If your system administrator
enables Bluetooth capability for your phone, you can use a Bluetooth device to handle
calls. If a Bluetooth headset is connected and in use, glows blue. If analog, digital, and
Bluetooth headsets are connected to your phone at one time, the Bluetooth headset will be
used. To use a Bluetooth headset, see
Using Bluetooth Headsets with Your VVX 600 Phone.
Using Headsets
If you have a VVX 600 phone and your system administrator enables Bluetooth capability,
you can use a Bluetooth headset with your phone to handle calls. To use your Bluetooth
headset with your phone, you need to turn on the Bluetooth option on your phone, and
then pair and connect your Bluetooth device with your phone.
This section shows you how to turn Bluetooth on, and how to pair and connect your Bluetooth
headset. It also provides general information on how to use your Bluetooth headset with
your phone, and how to disconnect and remove your Bluetooth headset from your phone.
Turning On the Bluetooth Option
Before you can use a Bluetooth headset with your phone, you need to turn on the Bluetooth option.
Using Bluetooth Headsets with Your VVX 600 Phone
Page 27

27
When Bluetooth is turned on, the Bluetooth icon ( ) displays in the status bar, as shown
next. After you turn on the Bluetooth option, you can pair and connect your Bluetooth headset.
Indicates Bluetooth is on
To turn on the Bluetooth option on your phone :
1) From Home view, tap Settings > Basic > Bluetooth Settings > Bluetooth Radio. The
Bluetooth Radio screen displays, as shown next.
2) To turn Bluetooth on, tap On. The message Turning BT radio on / Please wait displays.
The Bluetooth icon ( ) displays in the status bar. You may have to wait several seconds for
the icon to display. When the icon displays, you can pair and connect your Bluetooth headset.
Pairing and Connecting Bluetooth Headsets
Before you use your Bluetooth headset, you need to pair and connect it with your phone.
You can pair up to four Bluetooth headsets with your phone; however, only one headset
can be connected at a time.
Page 28

28
Note : Pairing and Connecting Bluetooth Headsets
The following instructions are intended as a guide, and may not specifically apply to your
Bluetooth device. You can usually find instructions for your headset on the device manufacturer’s
Web site.
TroubleShooting : Why Don’t the Bluetooth
Settings Display on My Phone?
If the Bluetooth settings don’t display on your phone, check that your administrator has
enabled the Bluetooth feature on your phone. If the feature is enabled, make sure you have
turned the Bluetooth option on
(see Turning On the Bluetooth Option).
To pair and connect your Bluetooth headset with your phone :
1) Turn your Bluetooth headset on and place the headset in discovery mode. To place your
headset in discovery mode, refer to your headset documentation.
2) From Home view, tap Settings > Basic > Bluetooth Settings > Manage BT Headsets.
A list of all paired and connected headsets displays, as shown next.
Bluetooth icon — indicates that the headset is paired but not connected.
Bluetooth/Headset icon — indicates that the headset is both paired and connected.
The icon next to each headset indicates headset status :
In the following example, the first headset is paired but not connected, and the second
headset is both paired and connected.
Page 29

29
Paired headset
Paired and connected headset
3) Do one of the following :
If your headset is listed, but it’s just paired and not connected (that is, it has next
to it), go to step 5 to connect it. Or
If your headset isn’t listed, find the headset by tapping Scan. Make sure your headset
is in discovery mode before you tap Scan. The message Place device in discoverable
mode reminds you to do this. Refer to your headset documentation for information
on how to place your headset in discovery mode.
All the nearby devices in discovery mode will be added to the list, as shown next. A red icon
displays next to each unpaired headset.
Unpaired headsets
Page 30

30
4) Tap the headset you want to pair and tap Add to begin the pairing process. An Adding
device message displays. After your headset is added, the Manage BT Headsets screen
displays. Your headset will be paired, but not connected, as shown next.
Note : Why Doesn’t My Headset Pair Automatically ?
If your headset is an older model, you may have to enter a password (for example, 0000)
before the headset can pair with your phone.
5) Tap the headset you want to connect, and tap Connect. A Connecting device message
displays.
After your headset connects, a headset attached message displays, and your headset model
will display next to the Bluetooth/Headset icon — the icon that indicates that your
headset is both paired and connected (shown next).
Page 31

31
The Bluetooth/Headset icon will also
display in the status bar, as shown next. If you tap
the icon, the Bluetooth Settings screen displays.
Indicates that a Bluetooth headset
is paired and connected
Handling Calls with Your Bluetooth Headset
You can now use your headset to handle calls.
Use the headset to handle calls, including muting and adjusting call volume.
Initiate and end calls on your headset by pressing , or using a control on the headset.
Switch to handset or speakerphone mode during a headset call by picking up the handset
or pressing .
If your Bluetooth headset is turned on, and paired and connected with your phone, you can :
If a Bluetooth headset is paired and connected, and then you turn the headset o, the message
Headset removed displays. The headset won’t be connected anymore, but it will still be
paired. When you turn the headset back on, the message Headset attached displays, and
the headset will be connected again — indicating that you can use it to handle calls.
Page 32

32
Disconnecting and Removing Your Bluetooth Headset
You can disconnect your headset from your phone, but still keep it paired. When you disconnect
a headset, it remains paired so you can easily connect it to your phone again.
You can also remove your headset, so it’s no longer paired or connected. When you remove
your headset, it won’t display in the Manage BT Headsets screen. To connect it back to your
phone, you’ll need to scan for the device, add it, and connect it again.
To disconnect your headset :
Your headset remains paired to your phone, but is no longer connected. To connect it to
your phone again, tap Connect.
From Home view, tap Settings > Basic > Bluetooth Settings > Manage BT Headsets.
From the Manage BT Headsets screen, tap your headset, and tap Disconnect.
Timesaver : How to Quickly Connect and Disconnect
Your Headset
You can quickly disconnect your headset by turning your headset o. When you turn it o,
the message Headset removed displays. When you turn your headset back on, the headset
will be connected again.
To remove your headset :
1) From Home view, tap Settings > Basic > Bluetooth Settings > Manage BT Headsets.
2) From the Manage BT Headsets screen, tap your headset, and tap Remove.
Your headset is removed from the list and is no longer paired or connected with your phone.
Page 33

33
Responding to Incoming Calls
Temporarily ignore the call before answering it.
Reject the call so it goes directly to voicemail.
Forward the call to another person.
While your phone rings, you can do the following :
Ignoring Incoming Calls
Ignore or silence a call to stop your phone from ringing. Even though the call is ignored,
your phone will still display the incoming call notification so you can still answer the call.
To ignore or silence a call :
From the Incoming Call window, tap Ignore (for private lines) or Silence (for shared lines).
The Incoming Call window disappears, your phone stops ringing, and either Home or Calls
view displays.
Rejecting Incoming Calls
Reject a call to stop your phone from ringing and send the call directly to voicemail. Calls
you reject display in your Recent Calls list. Rejecting calls is not available for shared lines.
To reject an incoming call :
From the Incoming Call window, tap Reject. You can also reject an incoming call from
Lines and Calls view.
The call goes directly to voicemail.
Page 34

34
Forwarding Incoming Calls to Another Person
While your phone rings, you can forward the call to another person.
To forward an incoming call to another person :
1) While your phone rings, tap Forward.
2) From the Call Forwarding screen, enter the forwarding number, and tap Forward.
During Calls
When you’re in a call, you can do the following :
Hold the call.
Transfer the call to another person.
Set up a conference call with the person you’re talking with and another person.
Holding Calls
You can place any active call on hold. A held call displays in Home, Lines, and Calls view
as follows :
VVX500
Page 35

35
VVX600
To hold a call :
From Active Call, Lines, or Calls view, tap Hold. If you’re in Calls view, be sure to highlight
the call first.
To resume a held call :
Do one of the following :
From Lines view, tap Resume. If there’s more than one held call on the line, the last call
that you held will be resumed. If you have multiple lines and you tap Resume, the last call
that you held — on either line — will be resumed. Or
From Calls view, tap the call to highlight it, and tap Resume.
Transferring Calls
When you transfer a call to another person, you have the option to talk to the person before the
transfer completes. If your phone supports a blind transfer, you can automatically transfer
a call without talking to the other person. The call is automatically transferred after you dial
the number you’re transferring the call to.
Page 36

36
To transfer a call :
1) From Active Call, Lines, or Calls view, tap Transfer. The active call is held.
2) From the Dialer, place a call to the person you want to transfer the call to.
User Tip : Accessing Your Directories and Favorites
When You Transfer a Call
Instead of entering or selecting a number from the Dialer, you can select a directory entry
or a favorite to transfer the call to :
To transfer to a directory entry: After you tap Transfer, press , tap Directories, and
then tap Contact Directory or Corporate Directory. Search for the person, and then
call them.
To transfer to a favorite: After you tap Transfer, tap Favorites, and tap the favorite you
want to call.
3) When you hear the ring-back sound, connect and talk with the person, and then tap
Transfer. To cancel the transfer before the call connects, tap Cancel.
To perform a blind transfer :
1) From Active Call, Lines, or Calls view, tap Transfer. The active call is held.
2) From the Dialer, tap Blind, and place a call to the person you want to transfer the call to.
If you don’t see Blind, tap More (at the top of the screen), and tap Blind.
Page 37

37
User Tip : Accessing Your Directories and Favorites
When You Transfer a Call
Instead of entering or selecting a number from the Dialer, you can select a directory entry
or a favorite to transfer the call to :
To transfer to a directory entry: After you tap Blind, press , tap Directories, and then
tap Contact Directory or Corporate Directory. Search for the person, and then call them.
To transfer to a favorite: After you tap Blind, tap Favorites, and tap the favorite you
want to call.
The call automatically transfers to the person you specified.
Timesaver : Completing a Transfer
If you’re using a handset, complete a transfer by replacing the handset.
Setting Up and Handling Conference Calls
You can set up a conference call with two other people. Depending on your phone system,
you may be able to add more than two people to your call; ask your system administrator
for the maximum number. Just as with other calls, you can hold and resume conference
calls. In addition, you’ll have the option to split a conference call — end the conference and
place the people you were talking with on hold.
User Tip : Tips for When You’re in Conference Calls
When you’re in a conference call :
Page 38

38
Use the handset or a headset if you’re in an open environment.
Mute your microphone when you’re not speaking, especially in noisy environments.
Avoid tapping the microphone or rustling papers near the microphone.
Speak in your normal voice without shouting.
Setting Up Conference Calls
There are two ways to set up a conference: the conventional way — by calling two people and
using the Confrnc soft key — or joining two existing calls using the Join soft key.
To set up a conference call :
1) Call the first person.
2) From Active Call, Lines, or Calls view, tap Confrnc. The active call is held.
3) Using the Dialer, call the second person.
4) When the second person answers, tap Confrnc to join everyone in a conference.
The Active: Conference screen displays, as shown next.
User Tip : Tips for When You’re in Conference Calls
If your phone has an active call and one held call — on the
same or a dierent line — tap Join from either Lines or Calls
view to automatically create a conference call. The conference
call takes place on the line from which you handled the last
active call.
Page 39

39
Holding and Resuming Conference Calls
When you place a conference call on hold, you place the other two people in the call on hold.
No one in a held conference call can hear each other. To hold just one person, see
Managing
Conference Call Participants.
From Active Call, Lines, or Calls view, tap Hold. If you’re in
Calls view, be sure to highlight the conference first. The other
two people in the conference are held. The following example
shows a held conference in Calls view.
To place a conference call on hold :
To resume a held conference call :
From Lines or Calls view, tap Resume.
Ending Conference Calls
To end a conference, and your connection to the other people, tap End Call. By default,
when you tap End Call, the other two people remain connected. However, your system
administrator may have set up your phone so that all connections end.
To end a conference call :
From Active Call, Lines, or Calls view, tap End Call.
The conference call ends. By default, the other two people remain connected.
Page 40

40
Splitting Conference Calls into Two Held Calls
When you split a conference, you end the conference and place the other two people on
hold. You can split an active or held conference call.
To split a conference call :
From Active Call, Lines, or Calls view, tap Split.
The conference call ends. By default, the other two people are held.
Forwarding All Calls to Another Person
You can set up your phone to forward all calls to another number, even if the Do Not Disturb
feature is enabled. Call forwarding is not available on shared lines.
User Tip : Forwarding Calls on a Call-by-Call Basis
You can choose to forward a call as your phone rings. For more information on forwarding
calls on a call-by-call basis, see
Forwarding Incoming Calls to Another Person.
Note : All Forwarding and Microsoft Lync Server
If your phone is configured to work with Microsoft Lync Server, your call forwarding options
will be dierent than those described below. For more information on forwarding calls with
Microsoft Lync, see Using Polycom Phones with Microsoft Lync Server Quick User Guide,
available by navigating to your phone’s Web page from the
Business Media Phones Support page
Page 41

41
To forward all calls to another person :
1) From Home view, tap Forward. (You can also tap Settings from Home view, and tap
Features > Forward, or if your phone is idle, tap Forward from Lines view.)
2) From Active Call, Lines, or Calls view, tap Confrnc. The active call is held.
3) From the Forwarding Type Select screen, tap the forwarding type you want :
Always — To forward all incoming calls.
No Answer — To forward all unanswered incoming calls.
Busy — To forward calls that arrive when you’re already in a call.
4) Enter the forwarding number, and tap Enable. If you selected the No Answer option,
you can enter the number of rings before your phone forwards the call. A value of 2
is recommended.
The forwarding number you chose scrolls in the status bar, as shown next.
The number calls will be forwarded to
Indicates forwarding is
enabled on line 2092
If a phone line is idle, Lines view displays the forwarding icon, next to the phone line, as
shown next.
Page 42

42
To disable call forwarding :
1) From Home view, tap Forward.
2) If your phone is set up with multiple lines, tap the line to disable forwarding for.
3) From the Forwarding Type Select screen, tap the forwarding type to disable, and tap Disable.
Using Do Not Disturb
Enabling Do Not Disturb (DND) stops your phone from ringing and sends all incoming calls
directly to voicemail. All calls you receive while DND is enabled are logged to your Recent
Calls list.
When you enable Do Not Disturb, the following happens :
The Do Not Disturb icon, , displays in the status bar, as shown next. For VVX 500
phones, the icon scrolls under the time display. For VVX 600 phones, the icon displays
at the far right of the status bar, next to other icons that you can tap.
Indicates DND is enabled Indicates DND is enabled. Tap to disable DND.
VVX500 VVX600
If your phone is idle, the Do Not Disturb icon, , displays next to your phone line
in Lines view, as shown next. If you have new messages or forwarding enabled, the
messages or forwarding icon will display instead.
Page 43

43
VVX500 VVX600
The DND icon in Home view, , changes to as shown next.
VVX500 VVX600
Note : Do Not Disturb and Shared Lines
Enabling Do Not Disturb on shared lines disables ringing only. You’ll still see a visu al notification
of the call and have the option to answer the call
Page 44

44
TroubleShooting : Why Don’t the Bluetooth
Settings Display on My Phone?
If you’ve set your presence status to Do Not Disturb, as well as enabled DND for your phone,
the message My Status : Do Not Disturb will scroll under the time display, and the DND icon
won’t display in the status bar
To toggle Do Not Disturb on and o :
From Home view, tap DND. Or, if your phone is idle, tap DND from Lines view.
Timesaver : A Quick Way to Disable DND on the VVX 600
To turn DND o, tap , located in the status bar.
Using Do Not Disturb with Multiple Lines
By default, the Do Not Disturb feature applies to all lines on your phone. However, your
phone may be set up so that you can enable the feature on a per-line basis.
To enable or disable Do Not Disturb for a particular line :
1) From Home view, tap DND.
2) From the Line Select screen, tap the line to enable or disable Do Not Disturb on
3) From the Do Not Disturb screen, tap Enable or Disable.
Page 45

45
User Tip : Automatically Enabling or Disabling
Do Not Disturb for All Lines
To automatically enable Do Not Disturb for all lines, tap Set All. To automatically disable the
feature for all lines, tap Clear All.
Listening to Voicemail
Your phone may indicate new voicemail messages by the following :
A message counter in Home view, as shown next. The counter indicates the number
of new messages you have.
VVX500 VVX600
A message counter in the status bar (shown next). The counter displays on the Message
icon, . If you have new messages, the Message icon also displays next to the phone
line in Lines view, as shown next.
Page 46

46
VVX500 VVX600
A flashing Message Waiting Indicator, located at the top-right of your phone.
An audible alert (if your phone is on-hook).
To listen to voicemail messages :
1) On the status bar, tap , and tap Message Center. Or, from Home view, tap Messages,
and tap Message Center.
2) If multiple lines are configured on your phone, the Line Select screen displays. Tap the
line that has the message.
3) From the Messages screen, tap Connect and follow the prompts.
Viewing Recent Calls
Your phone maintains a Recent Calls list — a list of missed, received, and placed calls. Each list
can hold up to 100 entries.
From the Recent Calls list (shown next), you can :
Sort, order, and filter calls. By default, the list displays all call types (missed, placed, and
received), with the most recent call displaying first, as shown next.
Remove certain calls from the list.
Page 47

47
Tap a call record to view call details and manage the call.
Tap a call record to automatically call the person.
Tap to sort/order calls Tap to filter calls
Tap to remove certain
calls from the list
Tap to manage a call
Tap a call record
to automatically
call the person
Icons display next to a call to indicate the call type :
Placed calls display.
Received calls display.
Missed calls display.
To view your Recent Calls list :
From Home view, tap New Call, and tap Recent. You can also access recent calls by
tapping Directories from Home view, and tapping Recent Calls.
Timesaver : Quickly Accessing the Recent Calls List
To quickly access recent calls, tap in Lines, Calls, or Active Call view as shown next.
Tap to see recent calls
Page 48

48
To manage a call record :
1) From your Recent Calls list, tap next to a call record.
2) From the call details screen, shown next, you can:
Tap Dial to call the person.
Tap Save to add the person to your Contact Directory. If the person is already in your
Contact Directory, but isn’t a favorite, Add to Favorites displays instead. Tap Add to
Favorites to automatically make the person a favorite.
Tap to delete the call from the list
Tap to edit the phone number before you dial the person
Tap to go back to
your recent calls list
Tap to call the person
Tap to save the person to your
Contact Directory
Tap to edit the phone
number before calling
Tap to remove the
call from the list
To customize the list :
From your Recent Calls list (shown next), tap to sort and order calls, and tap
to filter calls for specific lines.
When you sort calls by the time of the call, you can order calls in ascending (oldest
call first) or descending (most recent call first) order.
Page 49

49
When you sort calls by call name, you can order calls in ascending (alphabetical) or
descending (reverse-alphabetical) order.
When you filter calls, you can choose to display only missed, received, or placed calls.
Or, you can choose to display all call types (the default).
Note : About Filtered Call Lists
You can’t save your filtered call list results. If you filter your Recent Calls list so that only a
certain call type — for example, only missed calls — display, the next time you display the
list, all call types (the default filter) will display.
Tap to filter callsTap to sort/order calls
To remove certain calls from the list :
From your Recent Calls list, tap . You can
remove a specific call type, all calls, or just the
calls that display on the screen.
Working with Your Contact Directory
You can store a large number of contacts in your phone’s local Contact Directory (shown next).
Contact your administrator for the exact number.
Page 50

50
From your local Contact Directory, you can :
View contact information.
Search for contacts.
Dial contacts.
From your local Contact Directory, you can :
Add contacts.
Update contact information.
Delete contacts
Note : Accessing a Corporate Directory
A Corporate Directory may be available on your phone. If you have access to a Corporate
Directory, you can dial people in the Corporate Directory, as well as save them to your
Contact Directory. For more information, see Working with a Corporate Directory.
To view your Contact Directory :
Tap Directories from Home view, and tap Contact Directory. Or
Tap New Call from Home view, and tap Directory.
From your Contact Directory, scroll to view contacts or enter search criteria to find one.
To view contact information :
From your Contact Directory, tap the contact. The contact’s information screen, including
the contact’s name and phone number, displays (as shown next). Additional information —
such as a job title, label, or email address — may also display.
Page 51

51
To search for a contact :
1) From your Contact Directory, tap Search.
2) From the Search screen, enter search criteria
and tap Search. If you’re using the onscreen
keyboard, tap before you tap Search.
A list of search results is displayed. Tap Return to
display your Contact Directory again.
To dial a contact :
1) From your Contact Directory, tap the contact you want to call.
2) From the contact’s information screen (shown next), tap the contact’s phone number.
+
To add a contact :
1) From your Contact Directory, tap .
Tap to call the person
Page 52

52
2) From the Add Contact screen, enter contact information :
Note : Directory Fields are Set by Your Administrator
Your phone may not display all contact fields. For more information, see your administrator.
The only required field is the Contact field — the contact’s phone number.
For First Name, enter the contact’s first name.
Tap Last Name, and enter the contact’s last name.
Tap Contact, and enter the contact’s phone number.
The phone number must be unique, and can’t already exist in the directory. If you
save an entry with a non-unique phone number, the entry won’t be saved.
Tap Job Title, and enter the contact’s job title, such as Manager.
Tap Email, and enter the contact’s email address.
Tap Favorite Index, and enter a favorite index number.
The number can be any unused value, up to a maximum value of 9999. A contact
that has a favorite index number will automatically display in your Favorites list. For
more information about favorites, see
Managing Favorites.
Tap Label, and enter a label for the contact such as, Marketing.
If you specify a label, the label will be the first item that displays for the contact on the
Directory screen, and in your Favorites list if the contact is a favorite.
Tap Ring Type, and select the ringtone you want to use for the contact.
Page 53

53
ŔTap Divert Contact, and enter the phone number of the third party you want this
contact’s calls sent to.
Tap Auto Reject, and enable or disable the setting. The default setting is Disabled.
Tap Auto Divert, and enable or disable the setting. The default setting is Disabled.
If enabled, each time the contact calls, the call will be directed to the third party you
specified in the Divert Contact field.
Tap Watch Buddy, and enable or disable the setting. The default setting is Disabled.
If enabled, you can monitor the contact’s status. For more information on monitoring
status, see
Using Buddy Lists.
Tap Block Buddy, and enable or disable the setting. The default setting is Disabled
If enabled, the contact can’t monitor your status. For more information on monitoring
status, see
Using Buddy Lists.
3) Tap Save.
Timesaver : Quickly Accessing the Recent Calls List
You can automatically save a recent caller to your directory. From your Recent Calls list,
tap next to the call record. From the call information screen, tap Save. The Add Contact
screen displays, with the name (if specified) and contact fields populated. Enter additional
information, if desired, and tap Save.
If a Corporate Directory is available on your phone, you can add contacts from the Corporate
Page 54

54
Directory to your Contact Directory. For information on how to update your Contact Directory
in this way, see
Working with a Corporate Directory.
To update a contact’s information :
1) From the Contact Directory, tap the contact you want to update.
2) From the contact’s information screen, tap .
3) From the Edit Contact screen, update the contact’s information.
4) Tap Save.
To delete a contact :
1) From your Contact Directory, tap the contact you want to delete.
2) From the contact’s information screen, tap . A confirmation message displays,
confirming that you want to delete the contact. Tap Yes or No.
Working with a Corporate Directory
You may have access to portions of a Corporate Directory. You can’t update your Corporate
Directory; your administrator determines which contacts you can see.
From the Corporate Directory, you can do the following :
Search for contacts.
Dial contacts.
Add contacts to your local Contact Directory.
Page 55

55
To view the Corporate Directory :
Tap Directories from Home view, and tap Corporate Directory. By default, a blank
search screen displays. To view entries, search for a person.
User Tip : Saving Corporate Directory Search Results
You can save your last search results, so that the next time you view the Corporate Directory,
the results of your last search will display. To save Corporate Directory search results, tap
Settings from Home view, and tap Basic > Preferences > Corporate Directory > View
Persistency. From the View Persistency screen, tap Enabled. The next time you view Corporate
Directory, your last search results will display.
To search the Corporate Directory :
From the Corporate Directory, perform a quick search or an advanced search :
To perform a quick search, enter the first few characters of the contact’s first or last
name (depending on how the directory is organized), and tap Submit. Or
To perform an advanced search, tap AdvFind. From the Advanced Find screen, enter
your search criteria, and tap Submit.
The screen displays a list of contacts, starting with the most successful matches. To view
information for the contact, tap View. To erase all your search criteria and enter new criteria
before you submit your search, tap Clear.
To dial a Corporate Directory contact :
1) From the Corporate Directory, search for the contact you want to dial.
2) From the search results, tap the contact, and tap Dial.
Page 56

56
To add a contact to your local Contact Directory :
1) From the Corporate Directory, search for the contact you want to add to your Contact
Directory.
2) From the search results, tap the contact’s record, and tap View.
3) From the contact’s information screen, tap Save.
Only the first name, last name, and phone number are saved. You may want to go to the Contact
Directory to see if the contact was saved correctly and to add additional contact information.
Controlling What is Heard
You can change what you hear by doing the following :
Updating the incoming call ringtone.
Updating a contact’s ringtone.
Changing the speaker volume.
Changing the ringer volume.
Muting the microphone.
Changing where you hear sound eects.
Updating the Incoming Call Ringtone
A simple way to personalize your phone is to change your phone’s ringtone. You can even
pick unique ringtones for the dierent lines on your phone.
Page 57

57
To select an incoming call ringtone for your phone or a line :
1) Tap Settings from Home view, and tap Basic > Ring Type.
2) If multiple lines are configured on your phone, tap the line you want to apply a new
ringtone to.
3) From the Ring Type screen, tap the ringtone you want. To hear the ringtone before you
change it, tap Play. The default ringtone is Low Trill.
Updating a Contact’s Ringtone
You might find it helpful to select unique ring tones for the various contacts in your Contact
Directory. In this way, you can quickly identify callers as your phone rings.
To select a ringtone for a contact :
1) From your Contact Directory, tap the contact whose ringtone you want to change.
2) From the contact’s information screen, tap .
3) From the Edit Contact screen, tap Ring Type, tap the ringtone you want, and then tap .
User Tip : Listening to a Ring Tone Before You Save It
To listen to a ring tone before you save it, tap the ring type and tap .
4) From the Edit Contact screen, tap Save.
Page 58

58
Changing the Speaker Volume
To change the volume of what you hear during a call, press one of the Volume keys, ,
while you’re in a call.
-+
Changing the Ringer Volume
To change the volume of the incoming call ringtone, press one of the Volume keys, ,
while your phone is idle or ringing.
-+
Muting the Microphone
Mute the microphone so other parties can’t hear you. Microphone Mute applies to all modes
(handset, headset, and speakerphone). You can still hear all other parties when you mute
the microphone.
To mute the microphone :
During a call (including a conference call), press .
The Mute key glows red. The other parties can’t hear you. To disable Mute, press again.
Choosing Where You Hear Sound Eects
You can choose whether you hear sound eects—all phone sounds except call audio — from
the handset, headset, or speaker. For example, you can configure your phone to ring on your
headset, instead of the speaker. By default, you hear all sound eects from the speaker.
To choose where you hear sound eects :
1) Tap Settings from Home view, and tap Basic > Preferences > Audible Ringer.
Page 59

59
2) From the Audible Ringer screen, select where you want to hear sound eects:
To hear sound eects only from the phone’s loudspeaker, tap Speaker.
To hear sound eects only from the handset, tap Handset.
To hear sound eects only from the headset, tap Headset.
To hear sound eects only from the device you’re currently using to hear call audio,
tap Active. The default destination is Speaker.
Managing Favorites
Favorites are the contacts in your Contact Directory that you call most often. To make a
contact a favorite, you need to assign a contact a favorite index number. You do this from
the Contact Directory.
Contacts that have a favorite index number display , as shown next.
Indicates a contact
is a Favorite
All your favorites display in your Favorites list. A
smaller number of Favorites (11 for the VVX 500
and 15 for the VVX 600) display in Lines view and
from Home view.
Page 60

60
The following figure shows a sample Favorites list.
VVX500 VVX600
The following figure shows your favorites in Lines view. Favorites display under the phone line(s).
VVX500 VVX600
Favorites also display from Home view, as shown next.
VVX500 VVX600
Page 61

61
Favorites display consecutively, according to their index number. The contact with the lowest
number displays first. To reorder your favorites, assign the contact a dierent index number.
To see your Favorites list :
Tap New Call from Home view, and tap Favorites.
To see your favorites from Home view :
From Home view, tap the phone line.
To see your favorites from Lines view :
From Home view, press . If the idle browser displays, swipe the screen to see
Lines view.
To make a contact a Favorite :
From your Contact Directory, tap the contact. From the contact’s information
screen, tap Add to Favorites. Or
From your Recent Calls list, tap next to a call record. From the call details screen,
tap Add to Favorites.
The contact will now have a green star next to their name when you view the contact from
the Contact Directory or the Recent Calls list.
User Tip : Manually Assigning a Favorite Index
Number when You Make a Favorite
After you tap Add to Favorites, a dialog displays asking if you want to automatically accept the
next available index number, or manually enter your own. Tap Yes to automatically accept an index
number, or tap Edit Index to enter a unique index number. You can enter a number up to 9999.
Page 62

62
To quickly call a favorite :
From your Favorites list, or from Home or Lines view, tap the favorite you want to
call. The call is automatically placed.
To reorder your favorites :
1) From your Contact Directory, tap the contact.
2) From the contact’s information screen, tap .
3) From the Edit Contact screen, tap Favorite Index, and enter a new favorite index number.
4) Tap Save.
To delete a favorite :
1) From your Contact Directory, tap the contact.
2) From the contact’s information screen, tap .
3) From the Edit Contact screen, tap Favorite Index, and delete the favorite index number.
4) Tap Save.
User Tip : Quickly Deleting a Favorite
Tap From Lines view, press and hold the favorite until the contact’s information screen
displays. Then, the contact will remain in your directory, but will no longer be a favorite.
Page 63

63
Working with Shared Lines
If your phone shares a line with other phones, an incoming call to the shared line will cause
all phones to ring. The call can be answered on any of the phones. You can transfer, hold,
or set up a conference with calls on shared lines.
If you have an incoming call on a shared line, you can stop your phone from ringing by
tapping Silence. Even though the phone doesn’t ring, the call’s visual notification will still
display and you’ll still have the option to answer the call.
In Lines view, the following icons and status indicators display for shared lines, depending
if the line is idle, has an active call, or has a held call :
Shared Line Status Icon and Status Indicator
Status Indicator
Idle
Active call
Held call
(No indicator)
Solid green
Flashing red
Note : Unsupported Features on Shared Lines
Call Forwarding is not available on shared lines.
Enabling Do Not Disturb on shared lines disables ringing only. You’ll still see a visual
notification of the call and have the option to answer the call.
Page 64

8002 8004
www.post.lu
By printing this
brochure on paper
from controlled
forest management,
POST actively
supports sustainable
development.
 Loading...