

Page 1

1
Possio PM80 User´s Manual
Page 2

2
Contents
Important
Connection and power
Getting started . . . . . . . . . . . . . . . . . . . . . . . . . . . . . . . . . . . . . . . . . . . . 7
Connection . . . . . . . . . . . . . . . . . . . . . . . . . . . . . . . . . . . . . . . . . . . . . . 7
Power . . . . . . . . . . . . . . . . . . . . . . . . . . . . . . . . . . . . . . . . . . . . . . . . . . 7
Message handling
Sending faxes . . . . . . . . . . . . . . . . . . . . . . . . . . . . . . . . . . . . . . . . . . . . 10
Receiving faxes . . . . . . . . . . . . . . . . . . . . . . . . . . . . . . . . . . . . . . . . . . . 11
Copying . . . . . . . . . . . . . . . . . . . . . . . . . . . . . . . . . . . . . . . . . . . . . . . . 12
Erasing the document memory . . . . . . . . . . . . . . . . . . . . . . . . . . . . . . . 13
SMS Printing . . . . . . . . . . . . . . . . . . . . . . . . . . . . . . . . . . . . . . . . . . . . 13
Paper handling. . . . . . . . . . . . . . . . . . . . . . . . . . . . . . . . . . . . . . . . . . . 14
Settings
Date and Time . . . . . . . . . . . . . . . . . . . . . . . . . . . . . . . . . . . . . . . . . . . 16
Fax number . . . . . . . . . . . . . . . . . . . . . . . . . . . . . . . . . . . . . . . . . . . . . 16
Fax resolution . . . . . . . . . . . . . . . . . . . . . . . . . . . . . . . . . . . . . . . . . . . 17
Fax ECM – Error Correction Mode. . . . . . . . . . . . . . . . . . . . . . . . . . . . . 17
Infrared function. . . . . . . . . . . . . . . . . . . . . . . . . . . . . . . . . . . . . . . . . . 17
Power down time-out. . . . . . . . . . . . . . . . . . . . . . . . . . . . . . . . . . . . . . 17
Speaker volume . . . . . . . . . . . . . . . . . . . . . . . . . . . . . . . . . . . . . . . . . . 18
Infrared function
Printer for Nokia Communicator . . . . . . . . . . . . . . . . . . . . . . . . . . . . . 19
Printer for Windows 95/98 . . . . . . . . . . . . . . . . . . . . . . . . . . . . . . . . . . 19
Infrared modem connection . . . . . . . . . . . . . . . . . . . . . . . . . . . . . . . . . 20
Card phone
PIN code . . . . . . . . . . . . . . . . . . . . . . . . . . . . . . . . . . . . . . . . . . . . . . . 21
Fax collection from mailbox. . . . . . . . . . . . . . . . . . . . . . . . . . . . . . . . . 21
Page 3

3
Automatic SMS message printing . . . . . . . . . . . . . . . . . . . . . . . . . . . . . 22
Special characters . . . . . . . . . . . . . . . . . . . . . . . . . . . . . . . . . . . . . . . . 22
Voice calls with Ericsson GC25 . . . . . . . . . . . . . . . . . . . . . . . . . . . . . . 22
Satellite version
To send a fax in the Inmarsat MINI-M system . . . . . . . . . . . . . . . . . . . . 23
To send a fax with Thrane & Thrane satellite phone T3060 . . . . . . . . . 23
Indicators, keys, signals
Indicators . . . . . . . . . . . . . . . . . . . . . . . . . . . . . . . . . . . . . . . . . . . . . . . 25
Keys . . . . . . . . . . . . . . . . . . . . . . . . . . . . . . . . . . . . . . . . . . . . . . . . . . . 26
Audio signals . . . . . . . . . . . . . . . . . . . . . . . . . . . . . . . . . . . . . . . . . . . . 29
Reports
Event log . . . . . . . . . . . . . . . . . . . . . . . . . . . . . . . . . . . . . . . . . . . . . . . 31
List SMS messages . . . . . . . . . . . . . . . . . . . . . . . . . . . . . . . . . . . . . . . . 31
Troubleshooting. . . . . . . . . . . . . . . . . . . . . . . . . . . . . . . . . . . . . . . . . . 32
Error codes
Transmission . . . . . . . . . . . . . . . . . . . . . . . . . . . . . . . . . . . . . . . . . . . . 33
Reception. . . . . . . . . . . . . . . . . . . . . . . . . . . . . . . . . . . . . . . . . . . . . . . 34
General network commands
Network fax services . . . . . . . . . . . . . . . . . . . . . . . . . . . . . . . . . . . . . . 35
SAFETY INSTRUCTIONS . . . . . . . . . . . . . . . . . . . . . . . . . . . . . . . . . . . 38
Licence and Warranty
Limited User License . . . . . . . . . . . . . . . . . . . . . . . . . . . . . . . . . . . . . . 39
Limited Warranty . . . . . . . . . . . . . . . . . . . . . . . . . . . . . . . . . . . . . . . . . 40
Warranty Conditions . . . . . . . . . . . . . . . . . . . . . . . . . . . . . . . . . . . . . . 41
Disclaimer . . . . . . . . . . . . . . . . . . . . . . . . . . . . . . . . . . . . . . . . . . . . . . 42
Acknowledgement . . . . . . . . . . . . . . . . . . . . . . . . . . . . . . . . . . . . . . . . 42
Notices . . . . . . . . . . . . . . . . . . . . . . . . . . . . . . . . . . . . . . . . . . . . . . . . 43
Page 4
4
Important
Read this before using your Possio Messenger
PLEASE MAKE SURE THAT YOUR PM80 IS CHARGED FOR AT LEAST
TWO HOURS BEFORE USING IT FOR THE FIRST TIME.
TO CHARGE THE PM80 IN VEHICLES
USE ONLY POSSIO ORIGINAL CHARGER 12/24 V DC
The included charger is for 230V only.
Use only original battery chargers and AC/DC converters. Use of any other battery
chargers and/or AC/DC converter with the Possio Messenger may be dangerous and
may invalidate your warranty.
Make sure that 12/24V DC Charger is installed with proper connections and plentiful
airflow when permanently fitted.
Page 5
5
Dear PM80 Owner,
Thank you for purchasing a Possio PM80. You should carefully read the Safety Instructions, the
Limited User Licence, the Limited Warranty, and the Notices contained in this booklet before
using your Possio PM80. Save this booklet for future reference.
The Possio PM80 can always print selected parts of the Quick Guide by pressing the r- key
and selecting the parts you wish to print. The Quick Guide is also available on the Internet at
www.possio.com.
Improvements and changes to this booklet and the Quick Guide, necessitated by misprints
and inaccuracies or by improvements and changes to programs and/or equipment, may be
made by Possio AB at any time and without prior notice. Such improvements and changes will
however be incorporated into new editions of this booklet and the Quick Guide. This information is also available on the Internet at www.possio.com.
Copyright notice
© Possio International AB, 1999. This booklet contains or refers to proprietary information that
is protected by copyright. All rights reserved. POSSIO is a registered trademark of
Possio International AB.
This manual may not be copied, photocopied, reproduced, translated or converted to any
electronic or machine-readable form in whole or in part without prior written approval of
Possio International AB.
Fifth edition: January 1999
QPRM 00075/01 Rev: E
Possio International AB
P.O. Box 7105
SE-187 12 TÄBY
SWEDEN
Page 6

6
Page 7
7
Connection and power - r b
Getting started
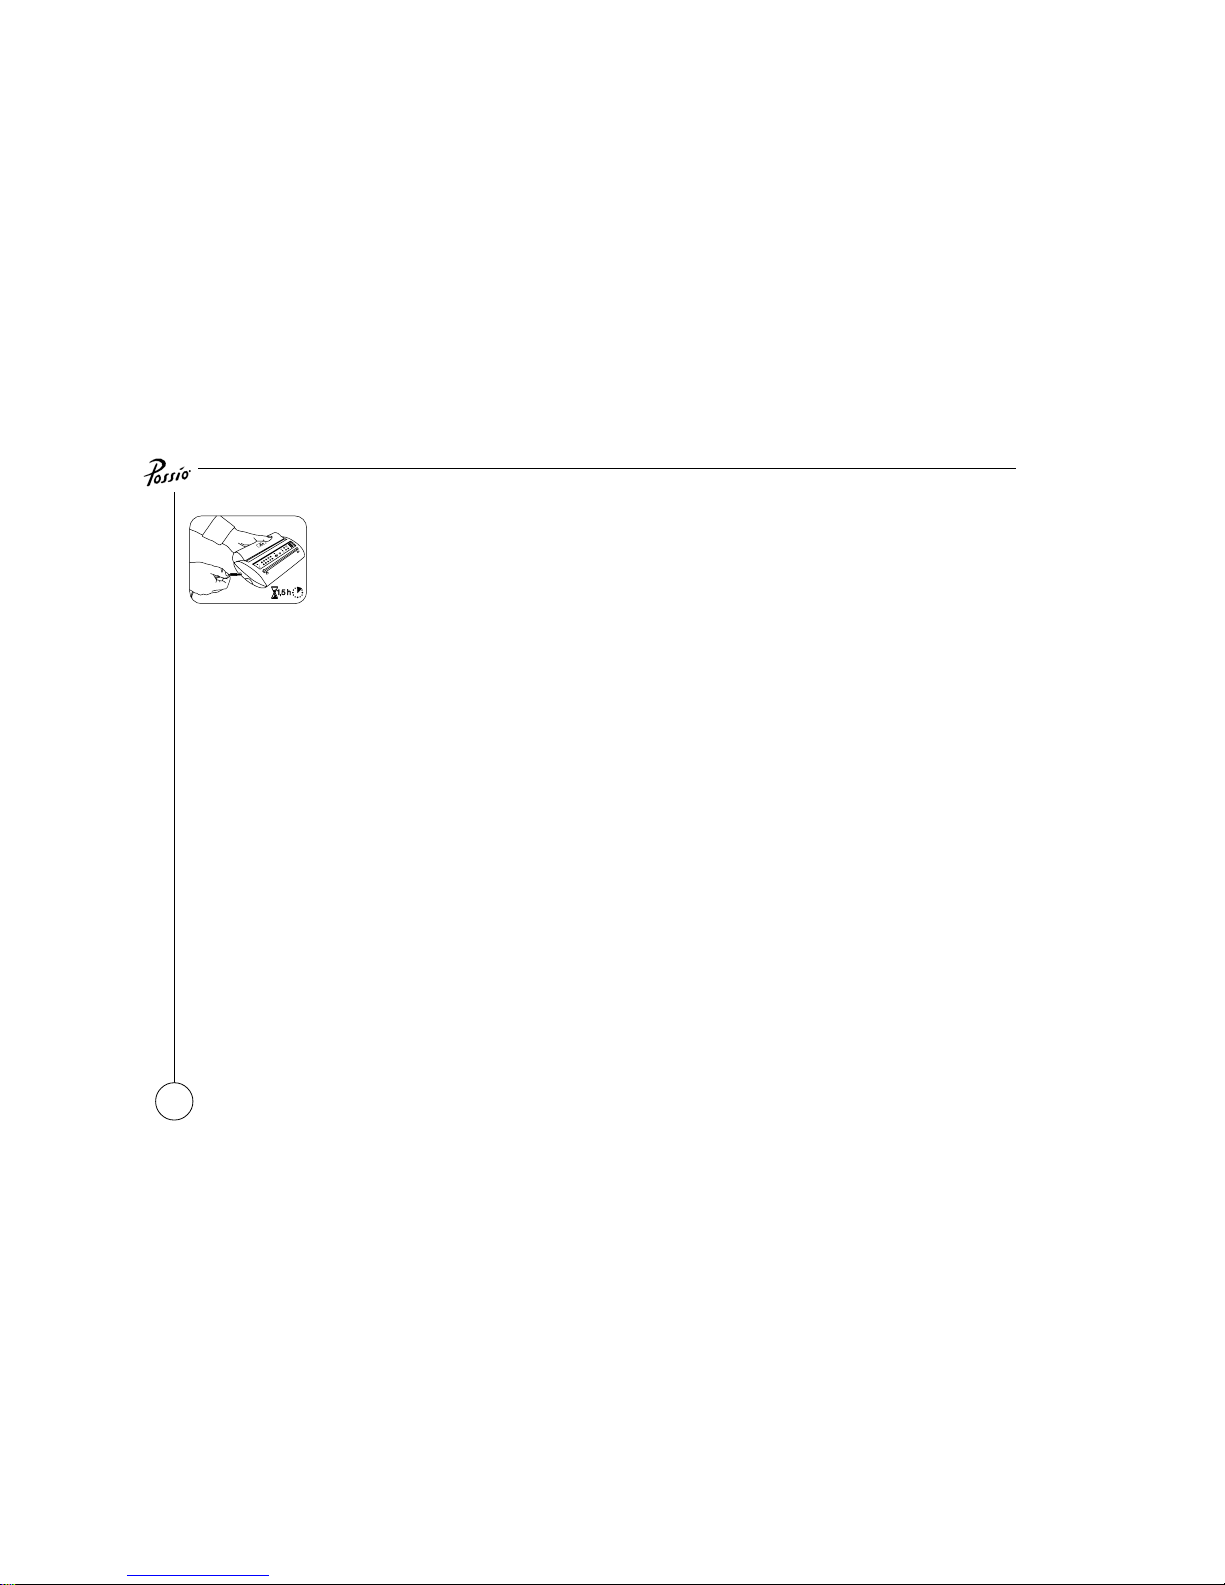
Please make sure that your PM80 is charged for at least two hours before using it for the first time.
Connection
In order to operate, your Possio PM80 needs a cellular telephone with PC card, Infrared modem or a Card Phone. Your GSM subscription must have a fax service activated. Generally in
this manual “cellular phone” refers to one of the three connecting methods mentioned.
To connect
With a cellular phone and PC Card
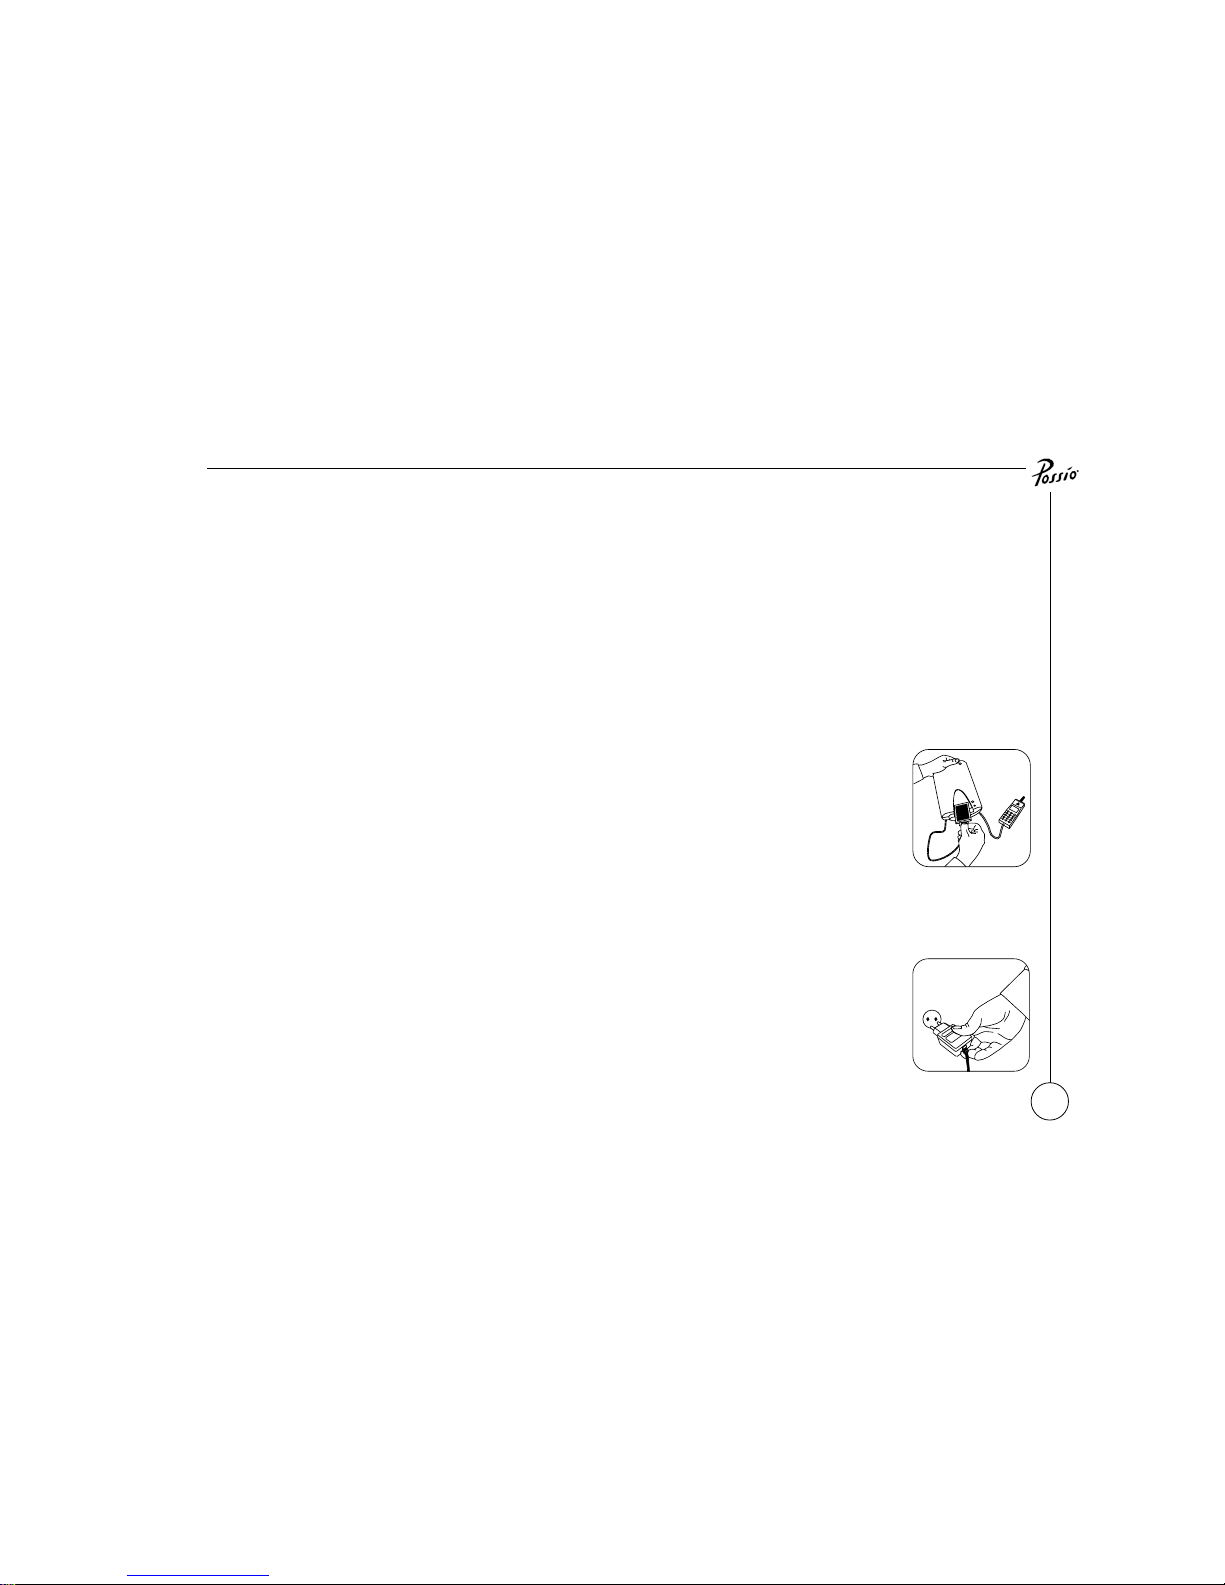
Insert the PC card upside-down into the slot at the bottom of PM80. Connect the PC card to
your cellular telephone. Start by turning on the cellular phone, then switch PM80 on.
With a Card Phone
Insert the Card Phone upside-down into the slot at the bottom of the PM80. For further information on Card Phone features see section Card Phone P.21.
With a cellular phone with IrDA connection
Please refer to your phone’s manual on how to activate the infrared port on your phone. For
further information on IR-features see section Infrared function P.19.
Power
The PM80 has a powerful internal battery. The battery is charged by plugging the charger into
the socket on the left-hand side of the PM80.
Page 8
8
Power supply
When using the original PM80 charger the PM80 is automatically switched on and charged.
You will hear a “doiing” sound at power-on, and then the “flute” sound indicating that the
PM80 is ready to communicate.
The PM80 is always switched on when connected to its charger.
When disconnected from the charger, the PM80 can still operate using its internal battery.
If it has been inactive for 20 minutes the PM80 will automatically enter a power saving standby mode. The green n-indicator will blink at 5 second intervals. The PM80 is reactivated by
pressing any key for a minimum of 5 seconds. The power down time can be changed, see
Settings P.16.
Note 1: If the PM80 does not switch On when connected to the charger, then disconnect the charger and press the
a-key and the x-key simultaneously, then reconnect to the charger.
Note 2: The battery is fully charged after 4 hours.
Note 3: The battery has a capacity of 4-5 days in stand-by mode.
Note 4: If you do not wish to use the PM80 for a lengthy period you should switch it off completely to avoid
unnecessary charging of the battery.
Page 9

9
To switch on using the internal battery
To switch PM80 on: Press the b-key and the x-key simultaneously for at least 2 seconds.
To activate the PM80 after it has entered stand-by mode:
Press any key for at least five seconds, or until the PM80 is lit.
To switch off
To switch off the PM80: Press the a-key and the x-key simultaneously. Disconnect the
charger if connected.
Low battery warning
When the battery charge drops below 20%, the v-indicator will blink and a warning signal
will sound. Connect the PM80 to its original charger as soon as possible to avoid any loss of
data.
Settings such as date and time will always be maintained by the PM80´s internal back-up
system.
Page 10
10
Message handling - r c
Sending faxes
Sending a fax message with the PM80 is done in two steps: Scanning and Transmitting.
Scanning
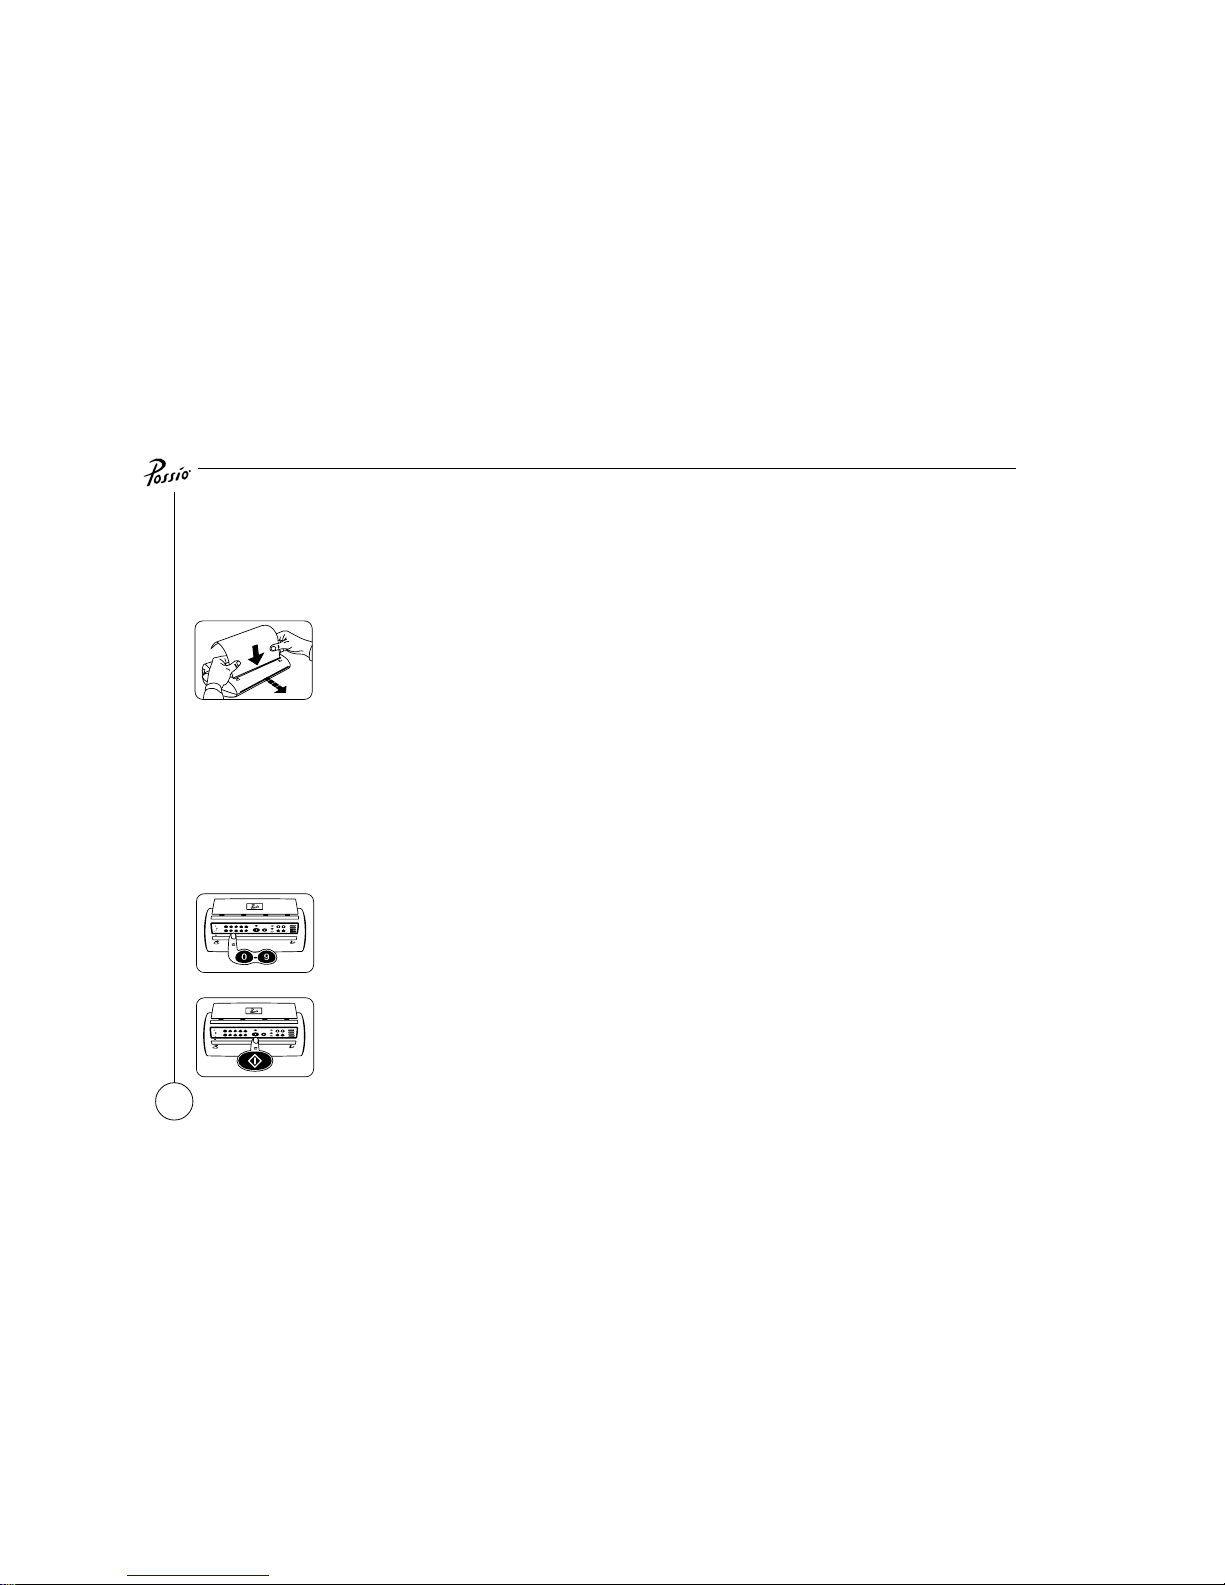
Hold the document with both hands and insert it firmly into the scanner slot. (Document text
facing the PM80 as shown on symbol)
The PM80 makes a clicking and grabs the document after a short delay and quickly scans it.
Repeat the procedure for each page of the document.
Note 1: The time between the scanning of pages must be less than one hour.
Note 2: Unsuccessfully transmitted pages remain in the document memory and no additional pages can be scanned
in. The Error sound is heard when a new page is inserted into the scanner slot. Either send pages or erase the
document memory. (See “Erasing the Document Memory” P.13.)
Note 3: If PM80 stops scanning due to low battery level, the paper can only be released after the PM80 has been
recharged by pressing m and p.
Note 4: Scanned documents which have not been sent remain in the document memory for two hours.
Dialling
Dial the desired fax number, including the area code, on the PM80 and start transmission by
pressing the t-key on the PM80.
To re-dial the last number, press t for a minimum of two seconds.
The cellular telephone now makes the connection and the first part of a transmission report is
printed. Transmission of the pages begins after a few seconds. During transmission you will
hear a clicking sound.
Page 11

11
When transmission is completed, the PM80 will print the remaining part of the transmission
report. This tells you if all your pages were successfully transmitted, or if an error occurred and
the transmission was unsuccessful. It also gives details on battery level, time, signal strength,
speed, duration and resolution.
Note: To generate the + sign for international access; press the x-key, before dialling the country code.
Successful transmission
The transmission report will print “Result: OK”. Successfully transmitted pages are automatically erased from the document memory.
Unsuccessful transmission
Unsuccessfully transmitted pages remain in the document memory for one hour. You can retry
sending these pages to the last number dialled by pressing the t-key for more than two
seconds.
Receiving faxes
In cellular telephony fax messages are often temporarily stored in the network pending forwarding to the cellular fax number.
At a time that is convenient for you, connect your cellular phone or card phone to the PM80.
Access the message service centre in the way defined by your network operator in order to
initiate the forwarding and reception of your fax messages.
Receiving faxes
The PM80 will automatically receive and print incoming fax messages when switched on.
When reception is completed the call is disconnected. To save transmission costs, the call
may end before the PM80 has finished printing.
Page 12

12
If the fax reception is not successfully completed a reception report will be printed.
Note: If your network and handset support “Speech then fax”, you can start fax transmission during a voice call by
pressing the t-key. At this point, if no document has been scanned in, fax reception will begin. However,
if the document memory contains a scanned document, fax transmission will start.
Fax Polling / Retrieve
To request fax polling of a remote fax number press p followed by the poll number.
Note: For international access you can generate the + by pressing the x- key before dialling the poll number
(including country code).
Out of paper
If you run out of paper while receiving a message, the PM80 will stop printing. Change the
paper roll as described in Paperhandling. Continue printing by pressing m.
Copying
You can make copies of scanned documents. After copying, the document can be transmitted
if desired.
To copy
Scan the document as for sending. Access the Main Menu by pressing the m-key. Select
Copying by pressing the a-key.
A copy of the document is then printed. You can print a number of copies of a document one
after the other without erasing it.
Page 13

13
Erasing the document memory
To erase
Press the red s-key for at least two seconds. The scanned document will be erased from the
document memory and the “crash sound” will be heard.
Note: The document memory will be automatically erased if you do not attempt to send the document within two
hours.
SMS Message Printing
Incoming SMS messages will be printed automatically if supported by your modem.
For automatic printing of SMS from a Card Phone see Automatic SMS message printing.
Generally stored SMS messages on the SIM-card can be printed by pressing m followed by cc.
Note: Printing an SMS message will automatically erase the message from the SIM card.
Please refer to our Internet Homepage, www.possio.com, for the latest information on SMS
message printing on your specific cellular phone and modem.
Page 14
14
Paper handling - r d
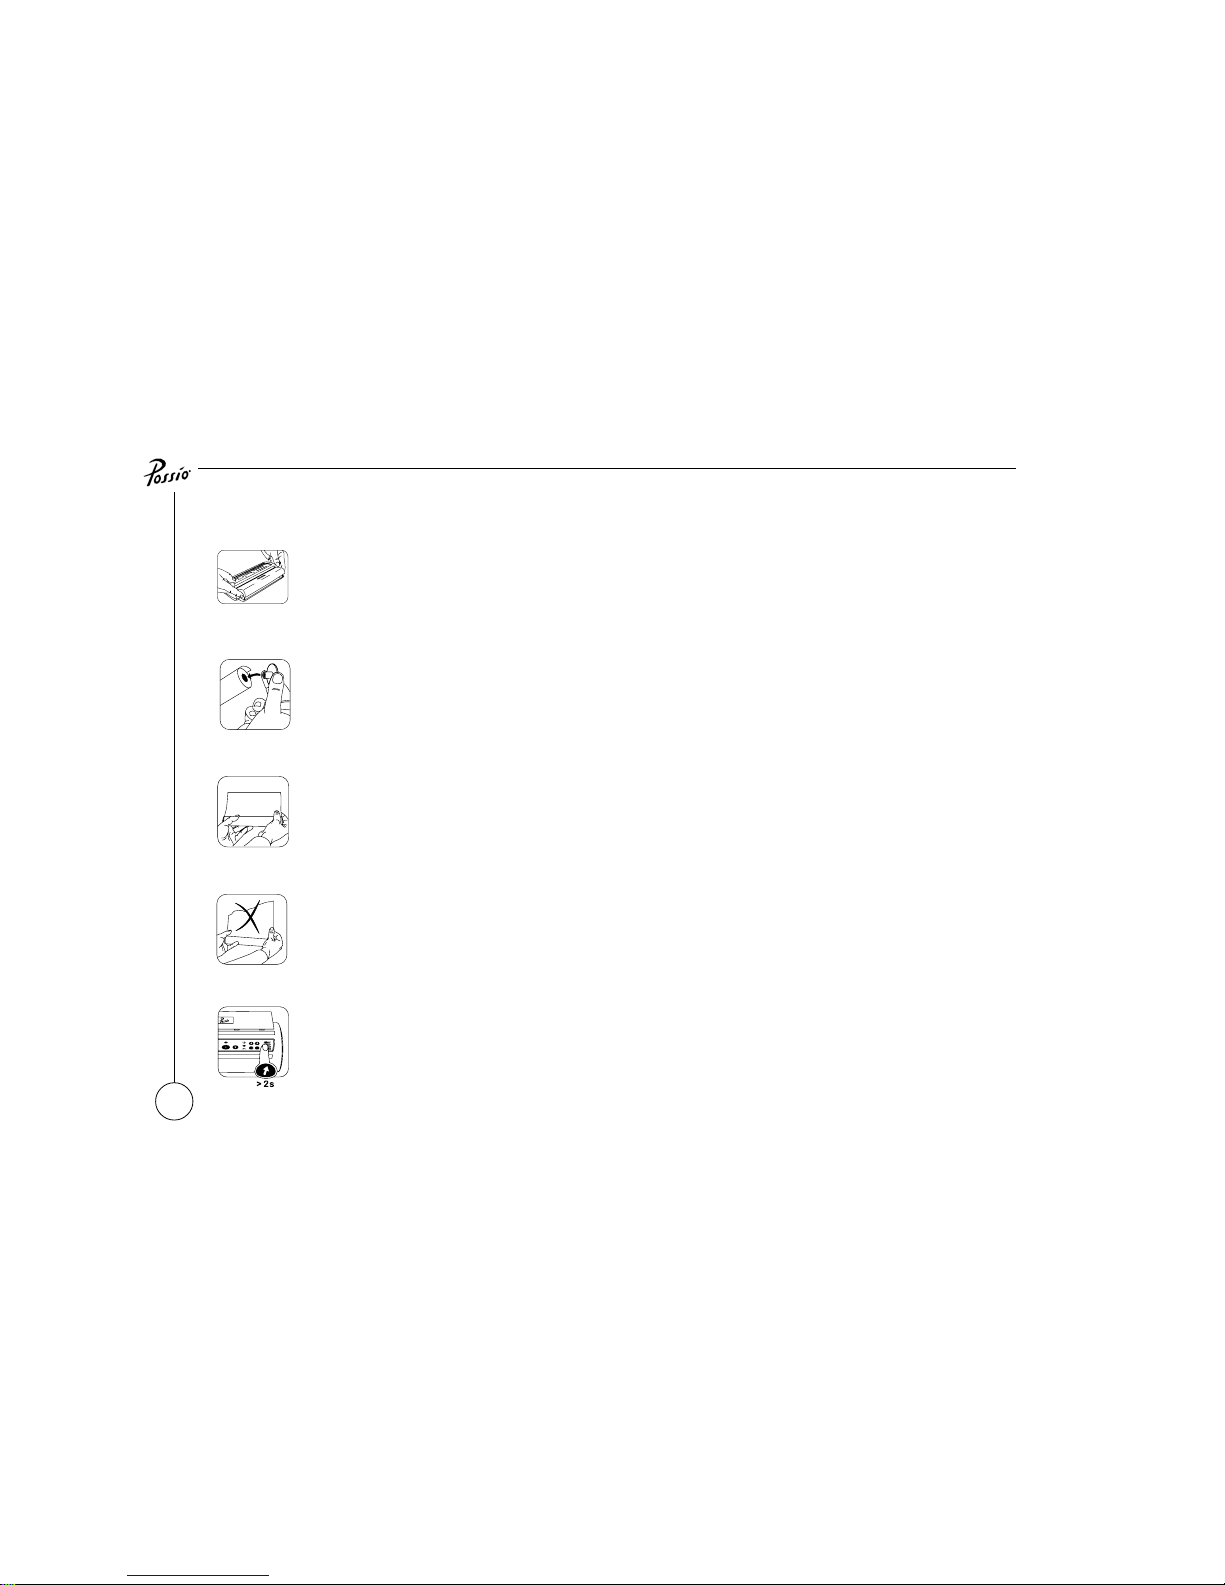
The thermal paper roll is placed under the rear top lid. The roll is held in position by two
plastic wheels.
IMPORTANT: RE-USE THE PLASTIC WHEELS FOR THE NEW PAPER ROLL!
To load a new paper roll
Remove the lid by pressing the two flanges on the sides, then lift it off.
Remove the old core roll. Move the plastic wheels onto the new roll.
Ensure that the paper edge is even and straight. Make sure that the PM80 is switched on.
Unroll some paper and place the roll behind the PM80. Insert the edge into the paper entry slot.
Press the x-key for at least 2 seconds to feed paper. The PM80 will feed paper until you
release the key. If the paper misfeeds, it can be fed in reverse by pressing p.
On the outer side of the plastic wheels there are two metal levers to release the pressure of the
printing head. Press them firmly towards you, then adjust and centre the paper by pulling it out
if necessary. Then insert the paper roll into its cradle.
Replace the rear top lid and your PM80 is ready for use!
Confirm that the new paper roll is in place by pressing the document key m.
Page 15
15
Paper jam
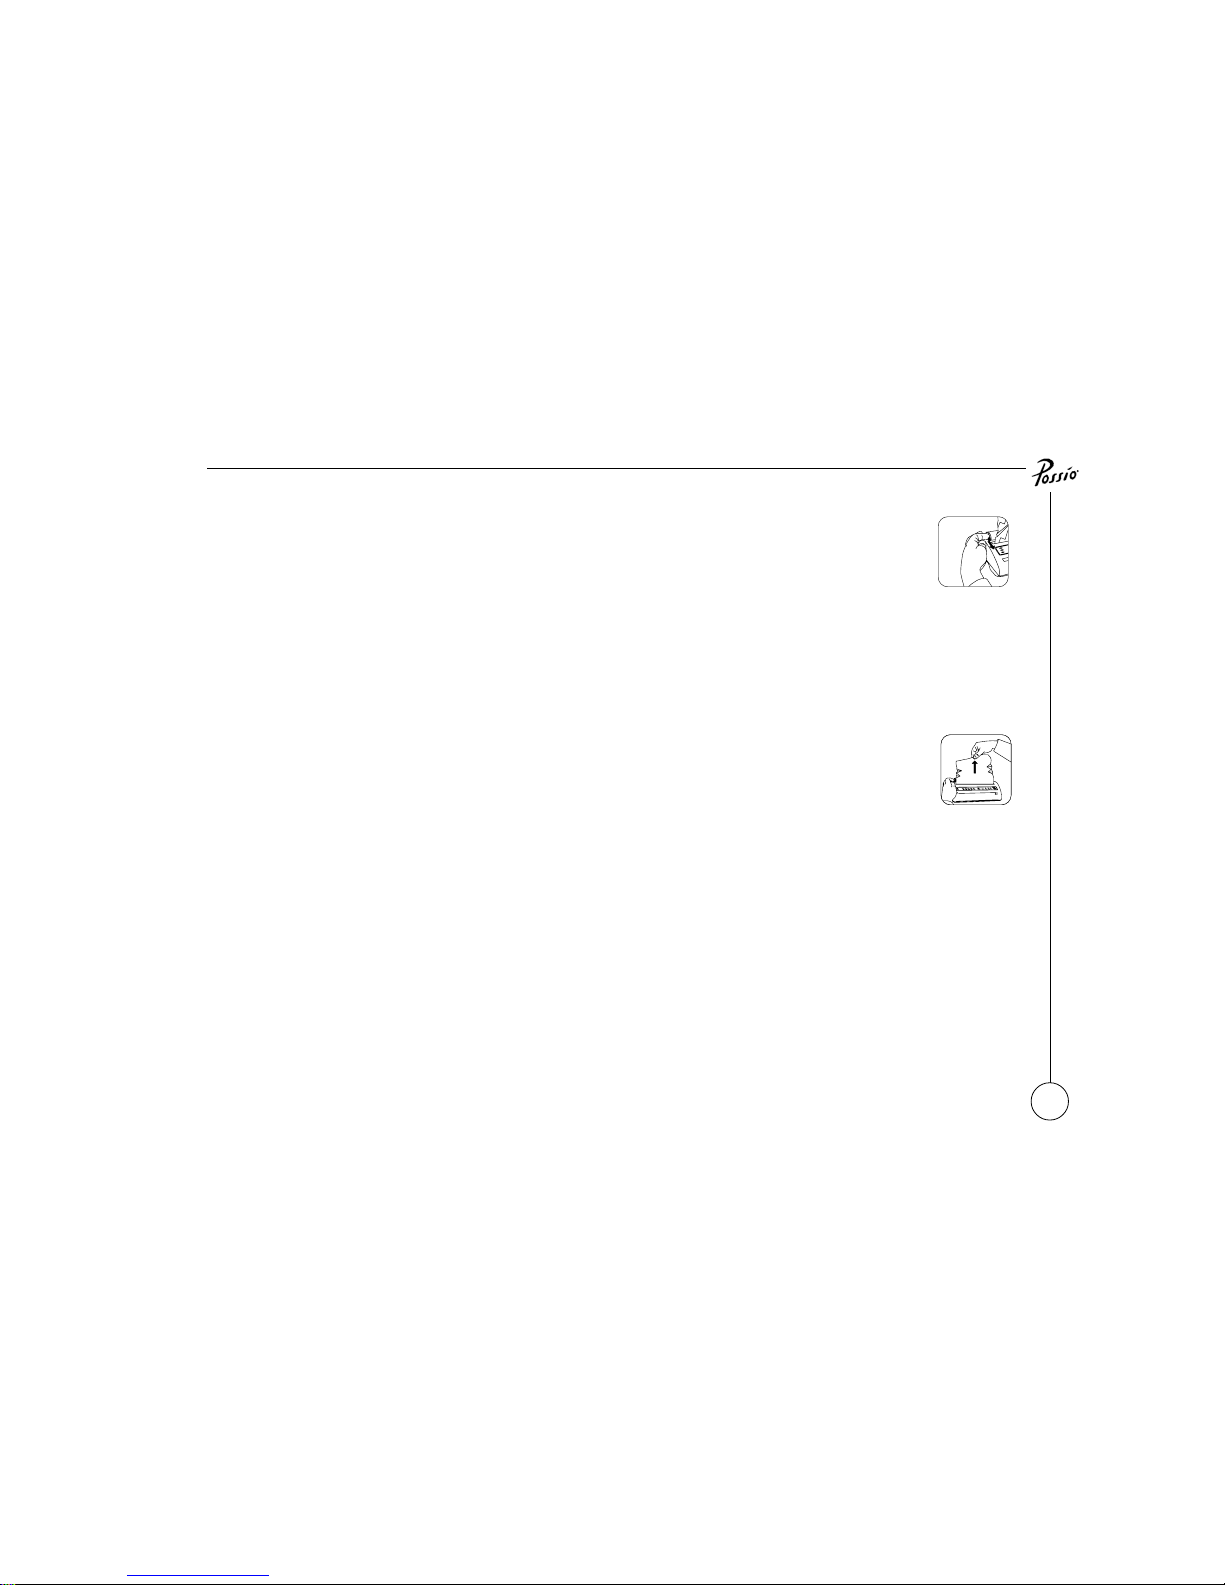
If you experience a minor paper jam try reversing the paper feed. While pressing the p-key,
remove the paper roll, release the metal levers and pull out the paper.
If your PM80 suffers a severe paper jam, please switch it off immediately. Contact your local
dealer or support centre for help.
Note: Never attempt to cut the PM80, insert foreign objects into it, or repair it yourself. Doing so will invalidate
your warranty.
Tearing the paper
Grasp the paper and tear it off towards you and against the edge.
For a straight edge, tear firmly from one side to the other. Practice makes perfect! It is easier to
tear the paper if the end is not too short. Use the x-key to feed more paper.
Note: Remember that you cannot pull the paper yourself, unless you release the printing head by pulling the levers
under the lid towards you.
Page 16

16
Settings - m b
All settings made by the user will be retained as new default values. You can change your
settings at any time
Date and Time - m bb
Before you start transmitting faxes you can set the date and time.
To set the current date and time, access the Main Menu by pressing the m-key and select
Settings, Date and Time. The current date and time is then printed. Enter the correct date and
time in the format shown in the printed example. Use the p- key as a separator. Finish by
pressing the t-key. The new date and time setting is printed.
Confirm by pressing the t-key or revert to the previous setting by pressing the s-key.
Fax number - m bc
You can also personalise your Possio PM80 by entering your own fax number. This information is included in the identity line at the top of each transmitted page. It is automatically
inserted on your transmitted or copied pages.
To set your own fax number, enter the Main Menu by pressing the m-key and select Settings
and Fax number. The current fax number is printed.
Enter your cellular fax number. Use the x-key for +, and the p-key as separator. Finish by
pressing the t-key. The new fax number setting is printed.
Press the t-key to confirm or press the s-key to revert to the previous setting.
Page 17

17
Fax resolution - m bd
Fax transmissions can take place at two levels of resolution, Standard or Fine. It is always the
sending fax that determines the resolution. For normal text documents Standard resolution is
quite sufficient. Fine resolution can be selected for documents containing fine details. The
PM80 default setting is Standard resolution.
To set fax resolution, enter the Main Menu by pressing the m-key and select Settings and then
Fax resolution. The current fax resolution is now printed. Select Standard or Fine.
Note: Fine resolution necessarily takes up more memory space and also takes longer to scan in and transmit.
Fax ECM – Error Correction Mode - m be.
This feature is not implemented in all modems or by all Operator Networks. You are advised to
check with your modem manufacturer and Network Operator whether they support this service. You can also find information about your modem and handset at our Internet support site,
www.possio.com
PM80 can activate an error correction mode (ECM) for sending and receiving faxes. This may
cause transmission to take a little longer.
To activate ECM enter the Main Menu by pressing mand then be.
Infrared function - m bf
Please refer to the section: Infrared function.
Power down time-out - m bg
The PM80 uses a sleep (stand-by) mode to extend the battery life. Since PC cards and modems
draw battery power they are disconnected in sleep mode.
Page 18

18
The default power down time is 20 minutes of inactivity. To wake the PM80 from sleep mode,
press any key for a minimum of 5 seconds.
THE PM80 CANNOT SEND NOR RECEIVE FAXES WHEN IN SLEEP MODE.
The battery has enough capacity to support most PC cards or modems for up to 9 hours.
The time before the PM80 enters power-saving mode can be changed. To set the time, enter
the Main Menu by pressing the m-key and select Settings, Power Down Time-out.
Enter a new value between 1 and 540 minutes and press t.
Note: The PM80 will NOT enter sleep mode while connected to its charger.
Speaker volume - m bh
The speaker volume can be set under “Settings” by choosing option h, Speaker volume.
Adjust the volume by pressing p and x (0-8). Confirm by pressing t.
Page 19

19
Infrared function - m bf
The PM80 can be used as a printer with the Nokia Communicator or any computer equipped
with IrDA and Windows 95/98 Operating System.
The infrared communication port is located on the left hand side of the PM80, next to the
charger connector.
Cellular phones with built-in modem and an infrared port can also communicate with the
PM80 (using IrDA), if compatible. In this case a PC card and cable are not necessary in order
to transmit and receive faxes.
When using the infrared port, make sure the distance between the PM80 and the phone or
computer is short (max. 30 cm) and free of obstacles. Also try to avoid strong lamps and bright
sunlight. When both devices are activated and in contact, the k-indicator lights up. When
the PM80 is searching for an infrared connection the k-indicator blinks.
Printer for Nokia Communicator
To activate the PM80 as a printing device for the Nokia Communicator, select the Main Menu
with the m-key, and then Settings, Infrared function, and finally the option for the Nokia
Communicator.
Printer for Windows 95/98
From the Possio Web site www.possio.com you can download a printer driver for Windows
95/98. Install the driver following the instructions in the included read-me file and the instructions for installing a new printer in Windows.
You must also activate your computers infrared port according to the instructions by your
manufacturer.
Page 20

20
When this is done, activate the PM80 by selecting the Main Menu by pressing m-key and
then Settings, Infrared function and finally the option for Windows 95/98.
You can now print from your computer and use the Possio as your mobile printer.
There are two ways you can use the Possio PM80 with a computer: (1) as a printer to print
documents, and (2) as document memory for outgoing fax messages. To use the latter feature,
choose the “Print to Memory” option. Your document will be transferred to the PM80 and can
be sent as a fax direct from the PM80 document memory.
Infrared modem connection
To activate the PM80 for IR cellular phones, select the Main Menu with the m-key and then
Settings, Infrared function, and finally the option for infrared modem connection.
Make sure that the infrared port on your handset is activated.
Page 21

21
Card Phone
NOKIA Card Phone and Ericsson GC25.
The Ericsson GC25 requires a different lower plastic casing for the PM80 in order to accommodate the Ericsson GC25 card. The lower casing can be purchased from your distributor.
PIN code
If the security PIN code is activated on the SIM card when inserted, the PM80 will ask you for
a four-digit code. Enter your code followed by t.
Using quick/speed dialling numbers
The PM80 can use fax numbers stored as phonebook entries 1–9 on the SIM card. Use a
cellular telephone to program the entries on the SIM card. The PM80 cannot store or move
these entries.
To use a quick dial number, press the number b to j of the required phonebook entry. Keep
the number depressed until o and q light up.
You can also dial the number by selecting b to j and pressing t to activate a fax call.
Collecting faxes from mailbox
Example:
The sequence you normally use for collecting any received faxes from your mailbox can be
stored on your SIM Card. For example, it could be entered on your handset as:
134y0611 (where 134 is the number of your fax mailbox, y06 indicates a pause of six seconds, 1 means print fax, and 1 means print fax to your GSM fax number).
Page 22
22
Check with your network operator for the correct sequence for your own subscription.
Note: The sequence should be stored as one of the phonebook entries 1–9 on the SIM card and can then be
accessed with keys b-j on the PM80. For example, if your sequence is stored as entry 1, press the b key
for at least two seconds to start the sequence. The sequence will stop automatically when completed.
Automatic SMS message printing
When the PM80 is activated, all SMS messages sent to your cellular number will be automatically printed on the PM80. No special action is needed on your part.
Special characters
Key First Dialling character If not first
x + Pause
p Polling Wait
m Main Menu #
r Quick Guide
y
t Re-dial Send
Voice call with Ericsson GC25
The Ericsson GC25 is also capable of making and receiving voice calls when used with its
portable hands free. Just dial the number and press the green start key t. End your phone
call by pressing the red stop key s.
Make sure the document memory is empty before attempting to make a voice call.
Page 23

23
Satellite version
Always connect the PC card and cables to the satellite phone and make sure all necessary
settings have been made, then connect the phone to the satellite. Switch on the PM80 by
pressing the keys x and b simultaneously for 2 seconds.
When the o indicator is blinking the PM80 is ready to send and receive faxes. When the o
is steady, the PM80 is transmitting or receiving a fax.
To send a fax in the Inmarsat MINI-M system
Scan the document into the memory.
DIAL 00 (Do not use the + sign, + works only in GSM), the country code and the correct fax
number and then press the menu key m and finally press Start t. ( What happens is that
the menu key generates the #-sign in the dialling sequence which is necessary for Inmarsat
Mini-M communication.)
To send a fax with Thrane & Thrane satellite phone T3060
Scan the document into the memory.
Option 1.
Dial the fax number on the handset and select the 2nd key and fax (key 4). When the call is
initiated, press the start key-t on the Possio.
Option 2.
Dial the following sequence on the Possio PM80: br followed by 00, the country code and
fax number, the menu key m and finally Start t. (Entering br is equivalent to pressing
the 2nd key and fax (key 4).
Page 24

24
To receive a fax
The PM80 will print all incoming faxes automatically when connected. Do not press any key
while receiving or sending a fax.
Note: At the date of printing, Possio recommends only the Psion Dacom V.34 Gold Card as PC card.
Page 25

25
Indicators, keys, signals
Indicators
The PM80 has seven green and red indicator lights. The indicators can be off, on (steady), or
blinking on and off.
q Temporary Wait, red
Lights up when the PM80 is waiting for an ongoing activity to be completed. Example: When
the PC card is inserted, this indicator will light up briefly while the PC card is being configured.
The indicator is off when the PM80 is in idle state or operating.
Note: The PM80 will not accept any key-pressing whilst the q Temporary Wait indicator, is lit.
o Communication Status, green
Blinks when the PM80 is ready to communicate and is steady during communication.
n Power Status, green
Blinks every 2 seconds when the internal battery is in use. Steady when the charger is connected. Blinks at 5 second intervals in stand-by mode.
v Battery Status, red
Blinks when the remaining power in the battery is below 20%. Connect the charger to recharge the battery. The indicator is steady while charging. It is off when the battery is fully
charged.
Note: The Possio PM80 cannot receive or transmit fax messages when the battery power is below 10%. You are
advised not to use your PM80 with less than 20% battery power. The battery level can be checked at the start
of the event log. To print the event log, press the m key followed by cb.
Page 26

26
u Document Memory, green
Blinks once for each page scanned into the document memory. Off when there are no pages in
the document memory.
Pages with pictures and drawings will inevitably take more memory space. When the document memory is full, documents will just be fed through the scanner and will not be scanned.
Note: Will only flash up to 5 times (pages). However, you can still scan up to 20 pages of text.
l Paper sense and Receive Memory, red
Steady if the paper has run out. Blinks if the PM80 has pages yet to be printed. If necessary,
continue printing by pressing the m-key.
k Infrared activity, green
Blinks when IrDA is activated and searching. Steady when the PM80 is connected to another
device via the infrared port.
Keys
There are 16 keys on the PM80 keypad. They are either numeric or symbol keys.
The numeric keys
There are ten numeric keys, a to j. They are used for dialling and for making selections
from the menus stored in the PM80.
The symbol keys
The PM80 has six symbol keys.
Page 27

27
t The Start key
The Start key is used to start transmission. Pressing for more than two seconds will redial the
number automatically.
The Start key also confirms an entered setting or PIN Code.
s The Stop key
The Stop key stops scanning, copying, transmitting and printing. When pressed for more than
two seconds it also erases a scanned document from memory.
When copying multipage documents the Stop key will stop printing the current page. After a
pause of five seconds the PM80 will then start printing the following page, unless the Stop key
is pressed a second time during the pause.
The Stop key will also take you out of the menu structure and back to default mode.
r The Help key
The Help key accesses the Quick Guide. When this key is pressed, the PM80 prints the Index
to the Quick Guide.
When pressed in numeric entry mode r generates a y.
m The Menu key
The Menu key is used to access the menus for settings, reports and selections. When it is
pressed, the PM80 prints the main menu with the available choices.
The Menu key is also used to continue printing a fax message that has been interrupted.
The Menu key is also used to make PM80 useable after the paper roll has been changed.
Page 28

28
When pressed in numeric entry mode m generates a #.
p The Down Arrow key
The Down Arrow key is used to reverse feed the printer. A jammed document can be fed in
reverse by pressing this key for more than one second.
The Down Arrow key is also used for Fax Polling and Retrieval. The key should be pressed
before entering the poll number. Start polling by pressing the green Start key.
This key can also be used to feed the scanner if necessary. Choose Main Menu and then Feed
Scanner.
x The Up Arrow key
This key is used as a shift key to switch the PM80 on and off when operating with the internal
battery.
To switch on: Press the b key and the x key simultaneously for at least two seconds.
(Connecting the charger will automatically switch PM80 on)
To switch off: Press the a key and the x key simultaneously at least two seconds.
(Will only work with the charger disconnected)
The Up Arrow key is also used for feeding the paper into the printer. Press it for 2 seconds and
the PM80 will feed paper until the key is released.
It is also used to generate the + sign for the international access code. Press before dialling the
fax number.
Page 29

29
Audio Signals
The PM80 has a built-in speaker to give audio feedback about its operations. The volume can
be adjusted under “Settings” by choosing option h - Speaker Volume.
“Doiing”
This sound is heard when the PM80 is switched on.
“Flute”
The “flute” sound with two ascending notes means that the PM80 has configured the PC card
or Infrared device.
If you hear the “flute” sound with two descending notes, the PC card or Infrared device has
been disconnected.
“Click”
The symbol keys always make a click sound when pressed. If you do not hear the click you
have not pressed firmly enough, or else the PM80 is not ready to receive your command or is
not switched on. You will also hear a click when you insert a document into the document
scanner.
A “clicking” sound will be heard while the PM80 is transmitting a fax message.
“Tones”
The numeric keys produce tones when pressed. If you do not hear the tones, you have not
pressed the key firmly enough, or the PM80 is not ready for dialling.
Page 30

30
“Error-sound”
When a problem occurs in an activity you may hear the surprised “Aohh!”. Restart the PM80
and try again.
“Crash”
This sound indicates that all documents scanned into the memory have been erased.
Page 31

31
Reports - m c
Event log - m cb
For the purposes of technical service an event log can be printed. It shows details of communications between the PM80 and the PC card or Infrared modem.
To print the event log, enter the Main Menu by pressing the m-key and select Reports, Event
Log.
You can interrupt the printing of the Event log by pressing the s-key.
List SMS messages - m cc
The PM80 can print SMS (Short Message Service) messages. Most PC cards and modems
support this feature. You can check the compatibility of your handset, PC card and IR modem
on our Internet homepage: www.possio.com
The PM80 will print incoming SMS messages automatically if connected. Once an SMS message has been printed on the PM80 it is automatically deleted from your SIM card.
SMS messages stored on your SIM card (or received when not connected to the PM80) can be
printed by pressing m cc.
Page 32

32
Troubleshooting - r e
If you are experiencing problems with your PM80, please be sure to follow this checklist for
troubleshooting before contacting your support centre.
1 Check with your Network Operator that you have a fax number activated.
2 Make sure that you have sufficient signal strength and that you are within GSM range.
3 Check if the battery charge level in the Event log (m cb) is more than 20%.
4 See the Possio Internet support site www.possio.com for a list of compatible modems
and cellular phones.
5 Make sure that the PC card or IR modem is properly connected.
6 Check the software version of the PM80 and the modem in the Event log. Restart your
PM80 with the modem connected to it and look for the modem response on the line
above Modem command: ‘AT+FREV?’. Check with the compatibility list at the Possio
Internet support site if the software is compatible. If not, contact your local dealer or
distributor for a software update.
7 If possible, try using different types of mobile phones, modems, Network Operators and
PM80s. This may help to isolate and locate the error in a communication problem.
Page 33

33
Error codes - r f
These explanations and solutions to the error codes could be of assistance to you when solving a problem.
The compatibility list referred to below can be found on our Internet support site:
www.possio.com
Transmission
Communication error
1 Check your signal strength and try again
2 A non compatible PC card or PC card s/w. Check our compatibility list
3 Possible network error
Call set-up failure
1 Check your signal strength and try again
2 Bad connection to PC card – turn your PM80 off, reinsert the PC card and try again
3 A non-compatible PC card or PC card s/w. Check our compatibility list
4 The receiver might be busy - try again
5 No answer - try again
6 A possible network error
No connection established
1 The receiver might be busy - try again
2 No answer - try again
3 Check whether the receiver got all pages
Page 34

34
Fax negotiation failure
1 A communication error - try again
2 Check your signal strength and try again
3 A non-compatible PC card or PC card s/w. Check our compatibility list
4 A possible network error
Document transmission failure
1 Check whether the receiver got all pages - try again
2 No answer - try again
Failed to receive result of document transmission
1 The receiver might be busy - try again
2 No answer - try again
Reception
Communication error
1 Check your signal strength and try again
2 A non-compatible PC card or PC card s/w. Check our compatibility list
3 A possible network error
Fax negotiation failure
1 A communication error - try again
2 Check your signal strength and try again
3 A non-compatible PC card or PC card s/w. Check our compatibility list
4 A possible network error
Document reception failure
1 Make sure that you got all pages – contact the sender and try again
Failed to send result of document reception
1 A communication error - contact the sender and try again
Page 35

35
General network commands
Transmission and reception of faxes with your PM80 requires a SIM card with fax service
activated. Your Operator will provide you with a separate fax number.
Network fax services
A separate fax number
— your “Personal Number” and your “Personal Fax Number”
In cellular telephone networks calls can be of different types. The most common type is the
ordinary voice call. Another type is the fax call. The cellular telephone operators will typically
provide you with two numbers for your incoming calls: The voice call number which is used
for all ordinary voice calls, sometimes referred to as your “Personal number”, and the cellular
fax number which is used for incoming fax calls. The latter can be referred to as your “Personal fax number”.
Call forwarding services
As a cellular telephone is not always switched on, or within service of the networks, the
network services will store and forward messages.
The telephone can be busy, and you may be unable to answer. Most digital cellular operators
have additional services for storing and forwarding fax messages, integrated with their voice
mail services. The routines for fax services may differ between operators.
Retrieval of stored fax messages
Follow the instructions of your cellular operator, how to access and set your cellular telephone message services and how to operate them.
Page 36

36
Conditional forwarding of fax calls
Incoming calls can be conditionally forwarded to another number. An incoming call can be
forwarded when the called number is “Not answering”, “Not within service (or switched off)”,
or “Number busy”.
In the case an incoming fax call cannot be established, for any of the above reasons, the fax
message can be forwarded to the operator’s fax mail service in the network for intermediate
storage. You can then retrieve the fax message later, just like a voice message.
Check if the call forwarding “Not answering” is activated by dialling the generic command on
your cellular telephone: ] # 61 # followed by the Send-key. The telephone display will show
the current forwarding status for all different call types.
Similarly the commands to check if the call forwarding is activated for “Not within service (or
switched off)” or “Number busy” are: ] # 62 # and ] # 67 # respectively, followed by the Sendkey.
To activate the fax call forwarding
Forwarding of fax calls are activated on your cellular telephone by dialling the generic commands. They are:
yy 61 y fax number y 13 # followed by the Send-key for “Not answering”,
yy 62 y fax number y 13 # followed by the Send-key for “Not within service (or switched off)”,
yy 67 y fax number y 13 # followed by the Send-key for “Number busy”.
Note: “Fax number” means the number on which your fax messages can be stored.
Page 37

37
To deactivate the fax call forwarding
Deactivation of the fax call forwarding is done by the generic commands,
## 61 y 13 # followed by the Send-key for “Not answering”,
## 62 y 13 # followed by the Send-key for “Not within service (or switched off)”, and
## 67 y 13 # followed by the Send-key for “Number busy”.
Note: Some Cellular Network operators unconditionally forward all fax messages, at all times, to their fax mail
services. Within these networks fax call forwarding might function differently.
Page 38

38
SAFETY INSTRUCTIONS
• Observe the relevant restrictions regarding use of electronic equipment when aboard
an aircraft. The use of electronic equipment in an aircraft may be dangerous to the
operation of the aircraft and may be prohibited by law.
• Observe the relevant restrictions regarding use of electronic equipment when at hospitals, refuelling points, fuel depots, chemical plants and where blasting operations are in
progress.
• Operation of your Possio Messenger close to other electronic equipment, such as television sets, radios and personal computers may cause interference.
• Do not point the infra-red beam towards anyone’s eyes and avoid interference with
other equipment using infra-red beams.
• Do not dismantle or attempt to repair your Possio Messenger yourself. All repairs should
be made by qualified personnel.
• Do not expose your Possio Messenger to rain, extreme heat, cold or sunlight, sand, dust
and do not spill liquids on it. Avoid using strong chemicals or detergents when cleaning
your Possio Messenger. Use only a moist cloth.
• Keep your Possio Messenger out of reach of children. Avoid dropping, shaking or banging you Possio Messenger. Rough treatment may damage the shell and/or the electronic
interior.
• Have your Possio Messenger installed in vehicles only by authorized personnel.
• For traffic safety reasons, do not use your Possio Messenger while driving. Do not stop
to use your Possio Messenger in places where stopping is prohibited.
• Use only battery chargers and AC/DC converters approved by System Innovation AB.
Use of any other battery chargers and/or AC/DC converters with the Possio Messenger
may be dangerous.
• Connect only such equipment to your Possio Messenger that is approved by System
Innovation AB. When connecting your Possio Messenger to other electronic equipment
always follow the instructions in the user manuals of such equipment.
Page 39

39
Licence and Warranty
Limited User License
This Limited User Licence is a legal document which constitutes an agreement between you,
as the end user, and System Innovation AB, for the use of the Possio Messenger and the software included therein (hereinafter respectively referred to as the “Product” and the “Software”.
Using the Product indicates your acceptance of the terms of this Limited User Licence and the
Limited Warranty set out below.
System Innovation AB grants you a non-exclusive licence to use the Software on the following
terms.
System Innovation AB retains title of the ownership of the Software and all subsequent copies
hereof, regardless of the form or media in or on which the original and other copies may exist.
The Limited User Licence does not constitute a sale of the original Software nor any copy
thereof. You and your employees and agents are required to protect the copyright of the Software. You may not distribute or otherwise make copies of the Software, except as may be
permitted by law, or make the Software available to any third party, without the prior written
consent of System Innovation AB. You may be held legally responsible for any copyright infringement that is caused by your failure to abide by the terms of the Limited User Licence.
You may not modify or alter the Software. Any portion of the Software that is merged into or
used in conjunction with another software will continue to be the property of System Innovation AB and will be subject to the terms of the Limited User Licence. As owner of the Product
you may transfer, sell or rent the Product to a third party. Any such transferee, purchaser or
lessee shall be bound by the same terms of this Limited User Licence and you are obliged to
inform such person abide by these terms. In case of a transfer or sale, your Limited User
Licence is automatically terminated.
Page 40

40
This Limited User Licence is effective until terminated. The licence will terminate automatically without notice from System Innovation AB if you fail to comply with any provision
hereof. The Software contains confidential material of System Innovation AB and you undertake not to dissect, disassemble, decompile or in any other way endeavour to discover the
workings of the material nor to alter or to deface the material in any way for the purpose of
passing off, except as may be permitted by law.
Limited Warranty
The undamaged Product is warranted to be free from defects in materials, design and workmanship at the time of its original purchase from [an authorized] dealer (the “Dealer”) and
under normal use for the subsequent period of 12 months (the “Warranty Period”).
The Product is produced in accordance with the standards stipulated by ISO 9002, although it
cannot be tested in every possible combination and operating environment. Therefore it is not
warranted that the operations of the Product will be uninterrupted or that the Product will be
error free. You are responsible for the selection of the Product to achieve your intended results
and for the installation, use and results obtained from the use of the Product. It is not warranted that the functions performed by the Product will meet your requirements.
If, during the Warranty Period, the Product proves defective, as assessed by the Dealer or by
System Innovation AB, under normal use, due to defective materials, design or workmanship,
the Dealer will, at his option, either repair or replace the Product, subject to the Warranty
Conditions stated hereafter.
The Dealer and System Innovation AB will use their best endeavours to minimize the handling
time in connection with any warranty claim, although no representation can be made in this
respect. An administrative charge will be made, should the need to replace the Product or any
parts thereof be your fault or should the warranty claim be unfounded or the warranty otherwise void.
Page 41

41
Warranty Conditions
(1) The warranty is not applicable in cases other than defects in material, design and work-
manship. The warranty does not cover the following:
(a) repair and replacement of parts due to normal wear and tear,
(b) upgrading of Software due to amendments or changes in Software parameters,
(c) damage to the product resulting from (i) abuse or misuse, including but not limited
to, the failure to use the Product for its normal purposes or in accordance with System Innovation ABís instructions on use of the Product, and the installation or use of
the Product in a manner inconsistent with the technical or safety standards in force,
(ii) repairs performed by a non-authorized person, opening of the unit by a nonauthorized person or (iii) accidents, acts of God or any cause beyond the control of
dealer or System Innovation AB, including but not limited to lightning, water, fire,
public disturbances and improper ventilation.
(2) This product will never be considered defective in materials, design or workmanship if it
needs to be adapted, changed or adjusted in order to conform to the national or local
technical or safety standards in force in any country other than the one for which the
Product was originally designed and manufactured. This warranty does not reimburse
such adaptions, changes or adjustments, or attempts to do so, whether properly performed or not, nor any damage resulting from them, nor adaption, change or adjustment
to upgrade the Product from its normal purpose as described in this booklet without the
prior written consent of System Innovation AB.
(3) Repair or replacement under the terms of this warranty does not give right to any exten-
sion or a new beginning of the period of warranty. Notwithstanding the foregoing the
warranty period will however be prolonged with the number of days during which the
Product is in possession of the dealer or System Innovation AB due to a valid warranty
claim. Repair or replacement under the terms of this warranty may be fulfilled with
functionally equivalent reconditioned units. Replaced faulty parts or components will
become the property of System Innovation AB.
Page 42

42
(4) For the warranty to be valid, you are required to notify the Dealer of your intentions to
make a claim under the Warranty no later than thirty (30) days from the expiry of the
Warranty Period.
Disclaimer
System Innovation AB grants no further warranties on the Product or the Software. Any liability
of System Innovation AB for the breach of any warranty or condition, express or implied,
whether by statute or otherwise, including any liability for indirect or consequential loss (including but not limited to loss of business profits, business interruption and loss of information) or damage of any kind arising out of the use of or inability to use the Product will not be
valid. System Innovation AB disclaims any warranties or disclaimers made by persons other
than System Innovation AB (including but not limited to distributors and Dealers).
This Limited Warranty does not affect the consumer’s statutory rights under applicable national legislation in force, nor the consumerís rights against the Dealer arising from their purchase contract.
Acknowledgement
You acknowledge that you have read the Limited User Licence and the Limited Warranty and
understood them, and that by using the Product you agree to be bound by their terms and
conditions. You further agree that the Limited Warranty is the complete and exclusive statement of yours and System Innovation AB’s rights and liabilities. This Limited Warranty supersedes all prior oral agreements, proposals or understandings and any other communications
between you and System Innovation AB relating to the subject matter hereof.
Page 43

43
Notices
All warranty enquiries shall be directed to the Dealer. The cost of transportation of the Product
to such place of purchase shall, irrespective of the validity of the warranty claim, be born by
you.
NOTE: The user is cautioned that changes or modifications not expressly approved by the
party responsible for compliance could void the userís authority to operate the equipment.
NOTE: This equipment has been tested and found to comply with the limits for a Class B
digital device, pursuant to Part 15 of the FCC Rules. These limits are designed to provide
reasonable protection against harmful interference in a residential installation. This equipment generates, uses and can radiate radio frequency energy and, if not installed and used in
accordance with the instructions, may cause harmful interference to radio communications.
However, there is no guarantee that interference will not occur in a particular installation. If
this equipment does cause harmful interference to radio or television reception, which can be
determined by turning the equipment off and on, the user is encouraged to try to correct the
interference by one or more of the following measures:
- Reorient or relocate the receiving antenna.
- Increase the separation between the equipment and receiver.
- Connect the equipment into an outlet on a circuit different from that to which the receiver is
connected.
- Connect the equipment into an outlet on a circuit different from that to which the receiver is
connected.
 Loading...