

1
PD302
PD303
PD305
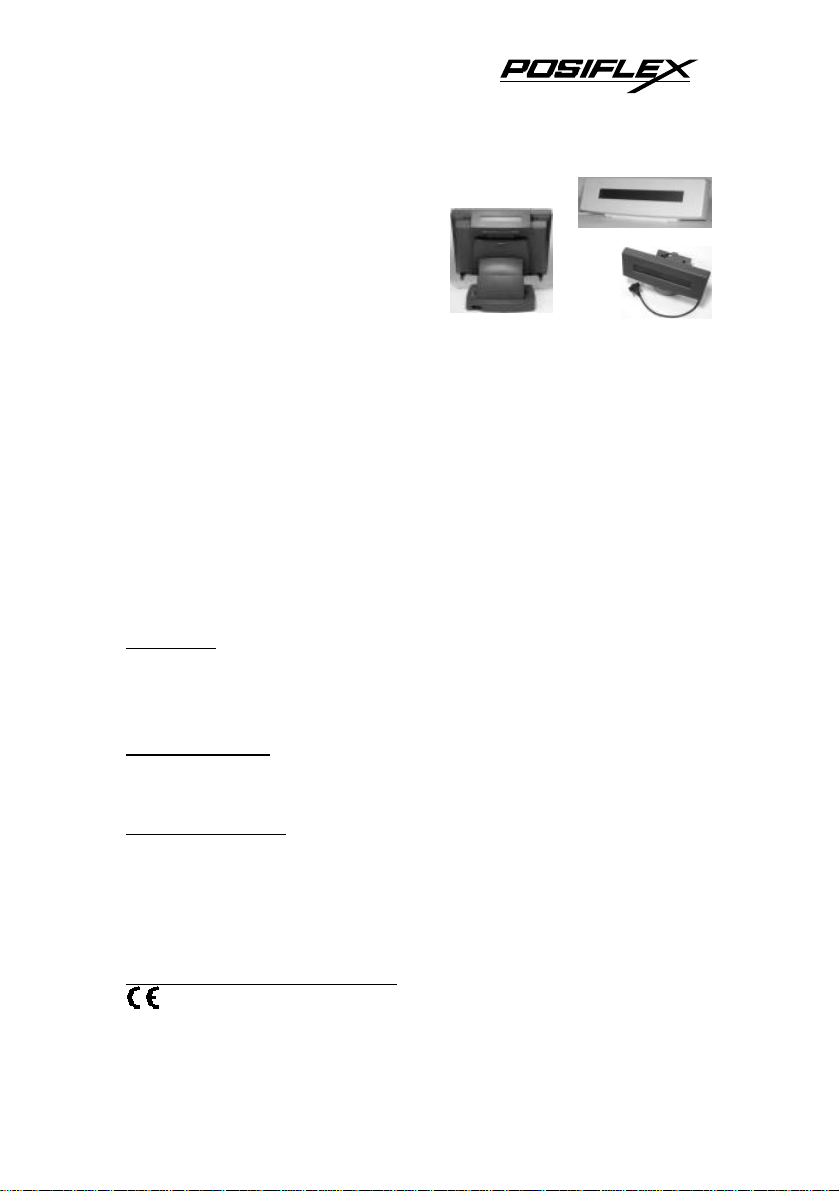
PD300 SERIES
2 X 20 LCD
CUSTOMER DISPLAY
Rev. : A3
I. FEATURES
l Low profile customer display with display area 147 mm by 21 mm
l Two - line LCD display with 20 characters per line.
l Dark blue character with yellow green back-light
l Easy viewing characters (6.0 mm by 9.66 mm)
l Euro dollar sign supported in USA/European font table
l Simple installation using standard serial interface to computers
l Selectable command emulation modes including PST and EPSON
command emulation modes
l Long life, trouble free and user friendly operation
l Tilt angle from 0°C to 90°C for best viewing effect (PD303 & PD305)
l Supports applications for desk top stand-alone (PD303), touch terminal
rear top mount (PD302) and rear mount with swivel (PD305).
FCC NOTICE
This equipment generates, uses, and can radiate radio frequency energy and, if not installed and used in
accordance with the instructions manual, may cause interference to radio communications. It has been tested and found to
comply with limits for a Class A digital device pursuant to subpart J of Part 15 of FCC Rules, which are designed to
provide reasonable protection against interference when operated in a commercial environment. Operation of this
equipment in a residential area is likely to cause interference in which case the user at his own expense will be required to
take whatever measures to correct the interference.
WARRANTY LIMITS
Warranty will terminate automatically when the machine is opened by any person other than the authorized
technicians. The user should consult his/her dealer for the problem happened. Warranty voids if the user does not follow
the instructions in application of this merchandise. The manufacturer is by no means responsible for any damage or
hazard caused by improper application.
ABOUT THIS MANUAL
This manual assists the user to utilize the LCD customer display PD300 series. This series covers several sub
series for various applications. These series of products receive instructions in serial communication protocols and is
capable of entering pass through mode so that all instructions received pass on to next connected serial device if properly
configured.
The manufacturer of the PD300 series heartily apologizes to the user for reserving the right to change or to
modify this manual without notice due to the rapid and constant progress and improvement on science and technology.
The user may always obtain the most up to date information through any of our web sites: http://www.posiflex.com.tw,
http: //www.posiflextw.com, http://www.posiflexusa.com.
TRADE MARKS AND SERVICE MARKS
POSIFLEX is a registered trademark of Mustek Corp..
Other brand and product names are trademarks and registered trademarks and service marks of their respective
owners.
Copyright Mustek Corp. 2002, 2003
P/N: 19430900040
2
II. MODEL NUMBERS
Font Table Used USA/Europe USA/Japan
Rear Top Mount for TP series, Charcoal PD302C PD302CJ
Stand Alone Desk Top model, Ivory PD303 PD303JPN
Rear Mount for TP7000 series, Charcoal PD305C PD305CJ
III. INSTALLATION
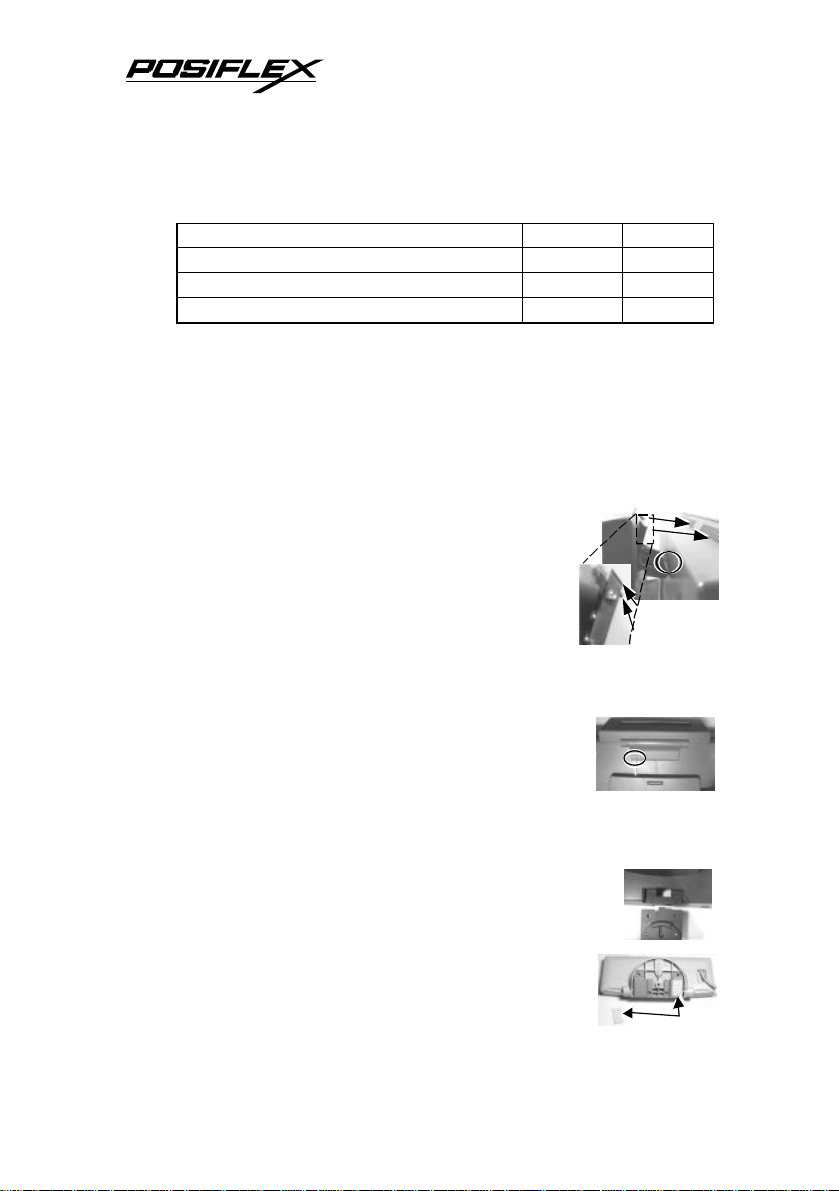
Before Installing PD302 & PD305:
Separate the main unit from its stand assembly. Consult a qualified
electronic engineer to prepare power for the PD302 or PD305 in the service
window on rear side of the main unit and then reassemble the touch terminal.
PD302 Specific:
1. Aim the bottom center cavity of PD302 series toward the
latch stub at rear of touch terminal main unit. Then aim both
metal and plastic hooks at rear of the PD302 series toward
the suitable ventilation openings on top rear of the main
unit. Please use a phillips head driver to fasten the screws
on the metal hook but not to overdo it so that the metal
hooks hold the ribs of the ventilation holes from inside.
2. Plug the DB9 female connector to the COM port with power DC supply
from the TP series. Please remove the COM1 terminator and save it at a safe
place for future use if COM1 is to be used for PD302.
3. Route the cable to go through the notch on back of the stand
assembly of touch terminal as indicated in the picture.
Reassemble the main unit and stand assembly.
(Guidance for future un-installation: Please use screw driver to release the
metal hook before removing PD302 from the ventilation holes.)
PD305 Specific:
Remove rear connect cover of the Posiflex TP7000 terminal per
instruction of the terminal. Fix PD305 to the opening accordingly.
PD303:
1. Adhere the two pieces of EVA tape on the metal plates at
bottom as indicated in picture at right. Peel off the protective
covers of the tape to stick PD303 series on a flat and clean
Metal Hook
Plastic Hook

3
surface. Apply the screw for firm fixation if necessary.
2. Connect the DB9 female connector to the COM port of PC
or POS system. Plug the male/female connector pair in
between PS/2 KB and KB port of PC.
IV. COMMAND EMULATION MODE
EPSON COMMAND MODE (POWER ON DEFAULT):
COMMAND
NAME
BS <08> Move Cursor Left
HT <09> Move Cursor Right
LF <0A> Move Cursor Down
HOM <0B> Move Cursor To Home Position
CLR <0C> Clear Display Screen
CR <0D> Move Cursor To Left Most Position
CAN <18> Clear Cursor Line
ESC = <1B><3D><n>
ESC @ <1B><40> Initialize Display
ESC t <1B><74><n>
US MD1 <1F><01> Specify Overwrite Mode
US MD2 <1F><02> Specify Vertical Scroll Mode
US MD3 <1F><03> Specify Horizontal Scroll Mode
US LF <1F><0A> Move Cursor Up
US CR <1F><0D> Move Cursor To Right Most Position
US $ <1F><24><n><m>
US @ <1F><40> Show Version
US B <1F><42> Move Cursor To Bottom Position
US C <1F><43><n>
US E <1F><45><n>
HEX CODES FUNCTION
Select Peripheral Device / Command Mode
n=1 pass through (should not be used)
n=2, 3 (not required)
n=4 switch to PST command mode
Disable / Enable Euro Dollar Sign
n = 0, 19
Move Cursor To Specified Position
n = 1 ~ 20
m = 1, 2
Cursor On / Off
n = 1, 0
Blink Display Screen
n = 0 ~ 255

4
PST COMMAND MODE:
HEX CODE FUNCTION
<01> Set Pass Through Flag (should not be used)
<06> <N1> <N2> Change Leading Code
<14> <01> Wraparound Mode (Default)
<14> <02> Vertical Scroll Mode
<14> <03> Insert Mode
<14> <04> Overwrite Mode (Default)
<14> <08> Back Space
<14> <09> Move Cursor Right
<14> <0A> Move Cursor Down
<14> <0B> Move Cursor Left
<14> <0C> Delete Character
<14> <0D> Move Cursor To Left Most Position
<14> <0E> Clear Display
<14> <10> Clear Line 1
<14> <11> Clear Line 2
<14> <12> Cursor Block Mode
<14> <13> Cursor Under Line Mode
<14> <15> <02> Clear Pass Through Flag
<14> <16> Switch To Epson Mode
<14> <17> Cursor On
<14> <18> Cursor Off
<14> <19> Reset
<14> <1A> <P> Move Cursor To Position P (P=0~13,14~27h)
<14> <1B> Move Cursor To Rightmost Position Of Line 1
<14> <1C> Move Cursor To Rightmost Position Of Line 2
Though the power on default of the PD300 series itself is the Epson
command mode, the system may have changed the mode to this PST command
mode after the whole power-on-self-test depending on the software system
installed. It would be advisable for the programmer to check ahead.
The Euro Dollar Sign is designated at code <D5>h.
 Loading...