

LM/TM-3215, 3215/KS, 3315
Series
LCD Monitor
FCC NOTICE
This equipment generates, uses, and can radiate radio frequency energy and, if not installed and used in accordance with the
instructions manual, may cause interference to radio communications. It has been tested and found to comply with limits for a Class
A digital device pursuant to subpart J of Part 15 of FCC Ru les, which are designed to provide reasonable protection against
interference when o perated in a commercial environment. Operation of this equipment in a residential area is likely to cause
interference in which case the user at his own expense will be required to take whatever measures to correct the interference.
WARRANTY LIMITS
Warranty will t erminate automatically w hen the machine is opened by any person other than the a uthorized technicians. The user
should consult his/her dealer for the problem happened. Warrant y voids if the user does not follow the instructions in application of
this merchandise. The manufacturer is by no means responsible for any damage or hazard caused by improper application.
ABOUT THIS MANUAL
This manual assists the user to utilize the Monitor LM/Touch Monitor TM series. This product provides capability over a stable and
adjustable LCD monitor with minimal footprint.
The manufacturer o f the LM/TM series. monitor heartily apologizes to the user for reserving the right to change or to modify this
manual without notice due to the rap id and co nstant progress and improvement on science and technology. The user may always
obtain the most up to date information through any of our web sites: http://www.posiflex.com,
http://www.posiflex.com.tw, http://www.posiflexusa.com.
Copyright Posiflex Technology, Inc. 2014
TRADE MARKS AND SERVICE MARKS
POSIFLEX is a registered trademark of Posiflex Technology, Inc.
Other brand and product names are trademarks and registered trademarks and service marks of their respective owners.
P/N: 19600906010
I. PRODUCT MODEL NUMBER
Model Name Screen
Size
LM-3315 15”
TM-3315 15”
LM-3215
15”
LM-3215-B
LM-3215/KS
15”
LM-3215-B/KS
TM-3215
15”
TM-3215B
TM-3215
15”
TM-3215/KS
Touch
Function
N/A
Yes
N/A
N/A
Yes
Yes
Stand
Rear
Alone
Cover
√
√
Mount
√
√
√
√
Max
Resolution
Supported
1024x768
pixels
1024x768
pixels
1024x768
pixels
1024x768
pixels
1024x768
pixels
1024x768
pixels
MEMO
For XT
series
For KS
series
For XT
series
For KS
series
II. FEATURES
• Bezel type monitor.
• High quality TFT LCD panel.
Part 1
• Easy maintenance structure allowing easy cleaning and tilt adjustment.
• VESA mounting supported for all series.
• Support power supply through VGA cable from Posiflex POS Terminal.
Power Setup Notice
√ For rear mount device, it is designed for use with a Posiflex system. In such application, it can
utilize power support from the Posiflex system. Standalone device is equipped with power adaptor.
III. CARTON CONTENTS
1. Monitor/Touch Monitor
2. User’s Manual
3. VGA cable
4. USB signal cable (for TM series only)
5. A Posiflex information CD (for all TM series)
6. Optional +DC 12V power adaptor & power cord
IV. PARTS IDENTIFICATION
* LED INDICATOR STATUS
Color Status
Model
LM/TM-3315/3215 Series Blue Green None
Working Stand-by Off
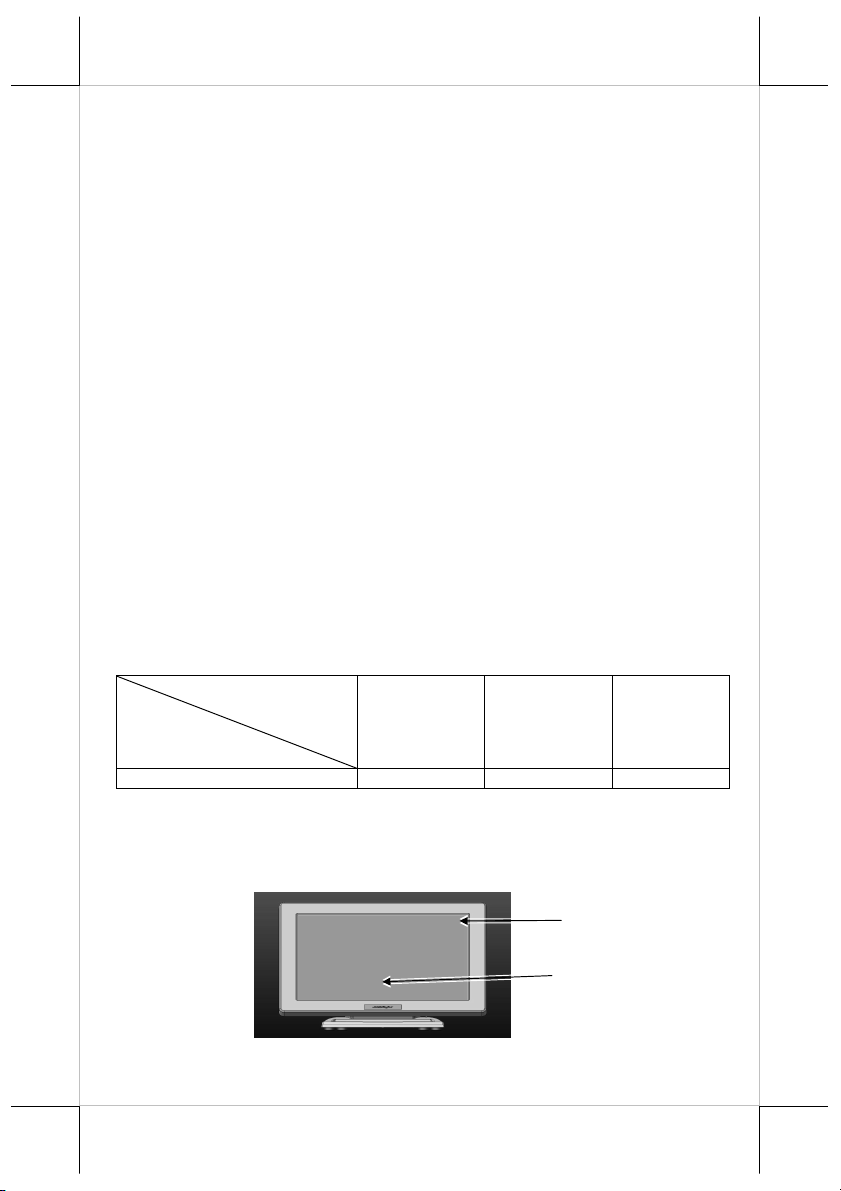
A. FRONT VIEW
LM/TM-3315
Main Unit
Display Screen
Part 2
Hinge
Holes
Button Area
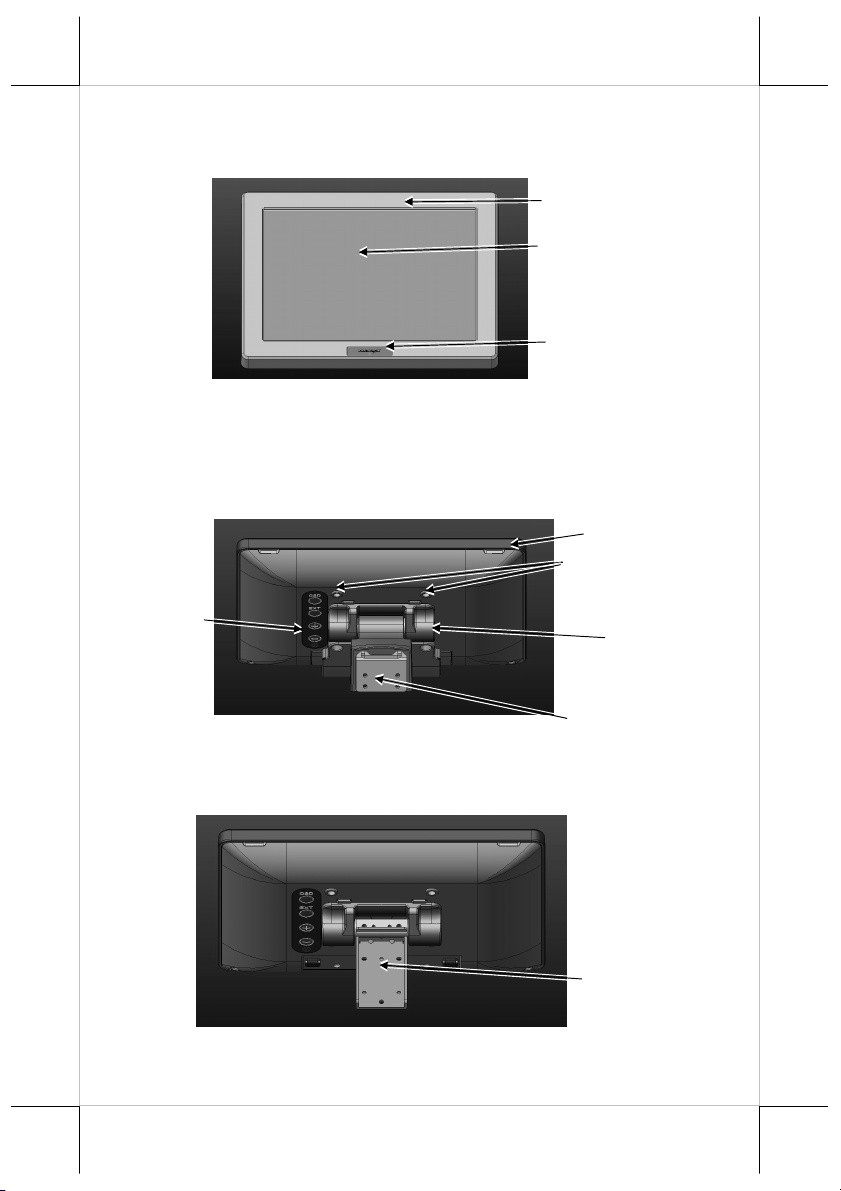
B. REAR VIEW
OSD Control
LM/TM-3215
LM/TM-3215
LM-3215/KS
Main Unit
Display Screen
LED Indicator
Main Unit
VESA Mount
LM/TM-3215
Joint Bracket
for XT series
POS system
LM/TM-3215/KS
Joint Bracket for
KS series
Part 3
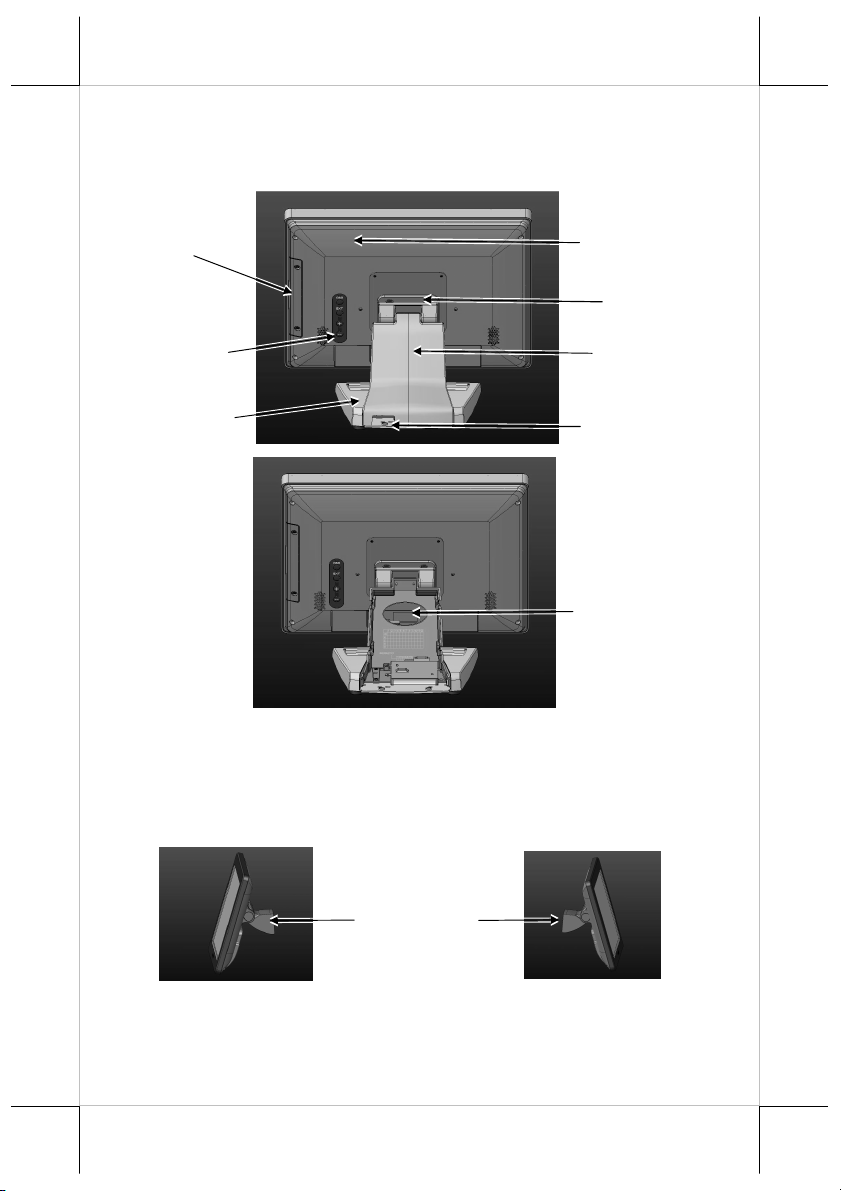
Main Unit
Hinge
Side Mount
Cover
OSD Control
Button Area
Base Stand
C. SIDE VIEW
LM/TM-3315
Plastic Neck
Cover
Cable Exit Hole
Cable Exit Hole
Rear Cover Mount LM/TM-3215
Joint Bracket
For XT
series POS
system
Part 4

(LM-3
215
/3315
Series)
(Option)
Rear Cover Mount LM/TM-3215/KS
Stand alone LM/TM-3315
D. I/O PORT VIEW
Joint Bracket
For KS series
POS system
Plastic
Neck Cover
DB-15 VGA Port
USB-A
Type Port
USB-B
Type Port
Audio
Line In
DC IN
Jack
V. Hardware Installation
LM/TM-3215 Series for XT
LM/TM-3215 series can be attached to POS XT series. For LM/TM-3215 for
Part 5

XT, please refer to the following installation and join the 2nd LCD display to
the system.
Step A): Please locate the 4 holes on the rear side of the host system.
Step B): Please take the 2nd LM LCD display, aim its 4 holes and tighten
the 4 screws to the system.
Step C): Connect the VGA cable that has both 3 x 5 D sub male ends to VGA
port in connector area of the LCD display and the VGA port of the
host system.
Step D): Connect the cable from power adaptor to the DC jack in connector
area of LCD display. Then insert the power adaptor to a clean power
socket and complete installation below.
LM/TM-3215/KS for KS
Part 6

A
Please do the following steps to install LM/TM-3215/KS:
Step A): Hold the LM-3215/KS 2nd LCD
monitor with bracket and aim to join
bracket which is just fixed on the KS
series POS main unit and fasten these
3 pcs short screws which are circled
in the right picture.
Step B): Connect the VGA Cable to the LM VGA port and route the VGA
cable through the cable exit hole of KS base stand to the system
VGA port on the I/O plate.
LM/TM-3315 Series
A. TILTING LCD PANEL
Please do the following steps to tilt LCD panel:
Step A): Hold and push downward the main unit indicated
Step B): Tilt the neck at its right position for most suitable angle for
best view effect and convenience in cable
connection/disconnection.
B
B. CABLE COVER ROUTING
Please do the following steps to remove the cable cover from slim base.
Step A): Release the plastic neck cover.
Step B): Route the cable to the circled holes.
Part 7

A
B
VI. OSD Menu Introduction
Power & OSD buttons
The buttons at the right side of LCD monitor are for the OSD (On Screen
Display) control operations and LCD screen power control as in the below
picture and are explained below.
“OSD” button: To enter OSD menu
“EXT” button: To Exit the option functions
“” “” button: To increase setting; auto tune
feature.
Note: “+” button indicates an Auto Tune feature to automatically optimize
button: To decrease setting; To turn the
monitor power ON/OFF.
image below:
OSD functions
“MAIN MENU”: There are a total of 6 icons in this menu:
Once one icon is selected, it will be displayed in
inverted color to indicate its relationship with the submenu below. On the
physical panel side bar of LCD monitor display,
pressing “EXT” button will shift the selected icon one
by one from left to right and then wrap around to the
leftmost part. Press “OSD” button to enter the selected
sub menu. Items in sub menu are illustrated below.
Press “+”/”-“ to adjust.
Part 8

“BRIGHTNESS / CONTRAST ADJUST SUBMENU”: There are 2
icons in this submenu:
“BRIGHTNESS ADJUST”: When this item is selected, there will
be only the brightness icon with an adjustment indication bar
under it between the main menu area and the video signal mode.
Press “+” button to increase brightness intensity. Press “-“ button
to decrease brightness intensity. Press OSD/EXT to save/exit.
“CONTRAST ADJUST”: When this item is selected, there will be
only the contrast icon with an adjustment indication bar under it
between the main menu area and the video signal mode.
Press “+” button to increase contrast intensity. Press “-“ button
to decrease contrast intensity. Press OSD/EXT to save/exit.
“IMAGE POSITION”: There are 2 icons in this submenu:
“Horizontal Position”: When this item is selected, there will be
only the position icon with an adjustment indication bar for
user to adjust. Press “+” button to move image rightward for
horizontally rightward positioning. Press “-“ button to move
image leftward for horizontally leftward positioning. Press
OSD/EXT to save/exit.
“Vertical Position”: When this item is selected, there will be
only the position icon with an adjustment indication bar for
user to adjust. Press “+” button to move image upward for
vertically upward positioning. Press “-“ button to move
image downward for vertically downward positioning.
Press OSD/EXT to save/exit.
”IMAGE SETUP”: There are 2 icons in this submenu:
“Image Setup”: When this item is selected, there will show an
automatic image setup screen to automatically optimize this
image.
“Manual Image Setting”: When this item is selected, there will
show a manual image settings display for user to manually
configure “Clock” and “Phase”. Phase and clock settings
tweak how the VGA (analog) input of your LCD monitor
Part 9

receives the information coming from your terminal graphics
card and optimize screen resolution.
”IMAGE PROPERTY”: There are 2 icons in this submenu:
“Image RGB intensity”: When this item is selected, there
will show a customized window display for user to adjust
RGB intensity. Press “+” button to increase color intensity.
Press “-“ button to decrease color intensity. Press OSD/EXT
to save/exit.
”OPTIONS”: There are 5 icons in this submenu:
“Information: Show Resolution, Refresh Rate & Product
Details”: When this item is selected, there will show a
compact product detail about resolution and refresh rate
for demonstration.
”Menu Language : Change Language of Menu”: When
this item is selected, there will show a multilingual menu
for user to opt for desired language option.
”Menu Position” (reserved)
Note: This “Menu Position” is reserved.
“Factory Default”: When this item is selected, there will
show a Factory Default menu for user to restore to original
monitor settings below.
Part 10

“Accessibility”: When this item is selected, there will show
an Accessibility menu for user to change menu
time-out setting.
“EXIT”: Exit OSD setup with all adjustment saved.
SUPPORTED DISPLAY MODES
For VGA signals beyond the supported display modes, there will be a message
“Out Of Range” on the middle of screen. Maximum supported color depth for
15” is 24 bits. Supported display modes are illustrated in the table:
Display Resolution Refresh Rate (Hz)
640*400 70 37.9
60 31.5
640*480
72 37.9
75 37.5
720*400 70 37.9
56 35.1
800*600
60 37.9
72 48.1
75 46.9
60 48.4
1024*768
70 56.5
75 60
Horizontal
Frequency (KHz)
SPECIFICATION
Display LM/TM 3215 series
LCD Panel 15.0" TFT LCD
Resolution 1024 (H) x 768 (V)
Active Area (mm) 304.128 (H) x 228.096 (V)
Pixel Pitch (mm) 0.297 (H) x 0.297 (V)
Pixel Arrangement RGB Vertical Stripe
Viewing Angle (Typical) 80/80/80/80 degree (U/D/L/R)
Part 11

Contrast Ratio (Typical) 600 : 1
Response Time (Typical) 3 ms (Raising) / 5 ms (Falling)
Brightness (Typical) 250cd/m2
Touch
Touch Type Bezel resistive (for TM3215)
Interface USB (for TM3215)
General Specification
Display Interface VGA
Power Supply from Posiflex terminal VGA port
Display LM/TM 3315 series
LCD Panel 15" TFT LCD
Resolution 1024 (H) x 768 (V)
Active Area (mm) 304.128 (H) x 228.096 (V)
Pixel Pitch (mm) 0.297 (H) x 0.297 (V)
Pixel Arrangement RGB Vertical Stripe
Viewing Angle (Typical) 80/80/80/80 degree (U/D/L/R)
Contrast Ratio (Typical) 600 : 1
Response Time (Typical) 3 ms (Raising) / 5 ms (Falling)
Brightness (Typical) 250cd/m2
Touch
Touch Type Bezel resistive (for TM3315)
Interface USB (for TM3315)
General Specification
Display Interface VGA
Power Supply from Posiflex terminal VGA port
Part 12

USB Touch Manager
USB Touch Manager for each type of touchscreen is available for user to set
up touchscreen functions. If your system is preloaded with the OS of your
choice, the Manager will be installed on your system. Nevertheless, you can
also download the Manager from our website:
Visit us at http://www.posiflex.com, and click Support on the main menu bar.
Part 13
 Loading...