

Package Contents
Monitor Model
Posiflex POS model
LM-2212X
XP series models
LM-2312X
KS 15”/17” series models
LM-2412X
KS-7212X model
LM-2212X/2312X/2412X
19690909020 Ver. A0
http://www.posiflex.com
LCD Monitor
User Manual
Product Features
12.1” rear-mount monitor
High compatibility with various Posiflex terminals
Support of tilt adjustment: 42.5˚〜77.5 ˚
Color choices: Black/Ivory
12.1” LCD Monitor (x 1)
VGA Cable (x 1)
Mounting Kits (x 1)
User Manual (x 1)
1
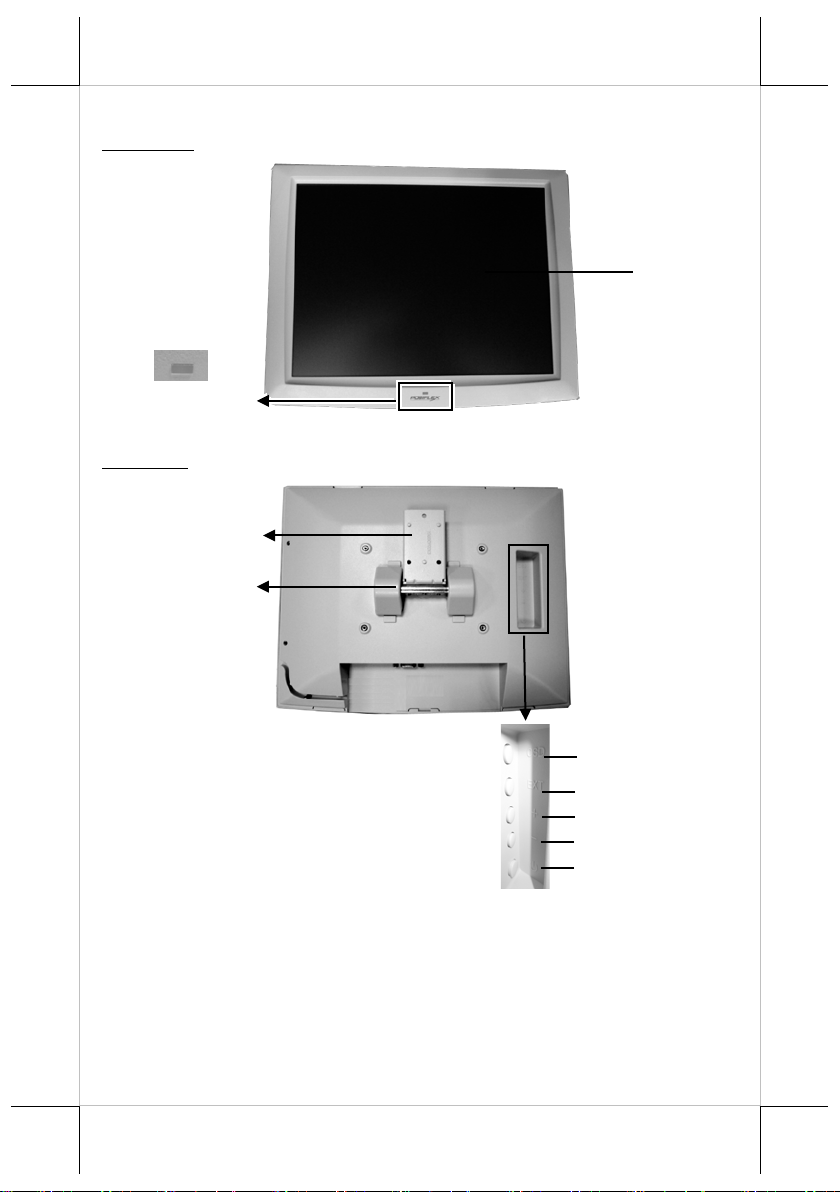
LCD Screen
Power LED Indicator
Monitor Hinge
Monitor Bracket
OSD Button
EXT Button
+ Button
-Button
Power Button
Views of the LM-2212X/2312X/2412X
Front View
Rear View
2
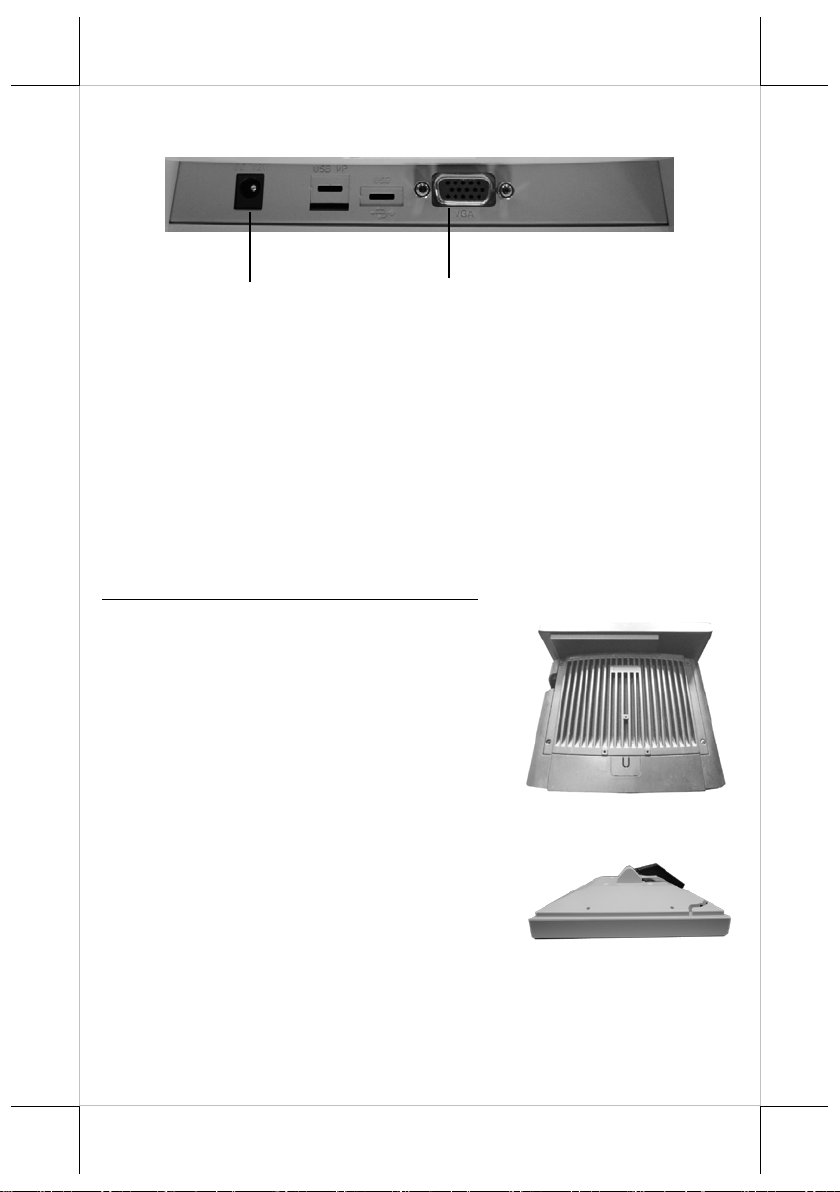
1. Position your terminal wi th its rear
2. Lay t he LM-2212X on a flat surface
DC IN Jack
DB-15 VGA Port
View of I/O Interface of LM-2212X/2312X/2412X
Installing LM-2212X/2312X/2412X LCD Monitor
Follow the below instructions to install LM-2212X/2312X/2412X onto your
Posiflex terminals. During the installation, please ensure the terminal is
properly turned off and disconnected from the power sources to avoid potential
hazards.
The installation instructions for LM-2212X/2312X/2412X are similar, but
slightly different due to the diverse content of mounting kits included in each
model. To have LM-2212X/2312X/2412X properly installed, please be
advised to choose the most appropr ia te installatio n approaches based on the
type of your monitor.
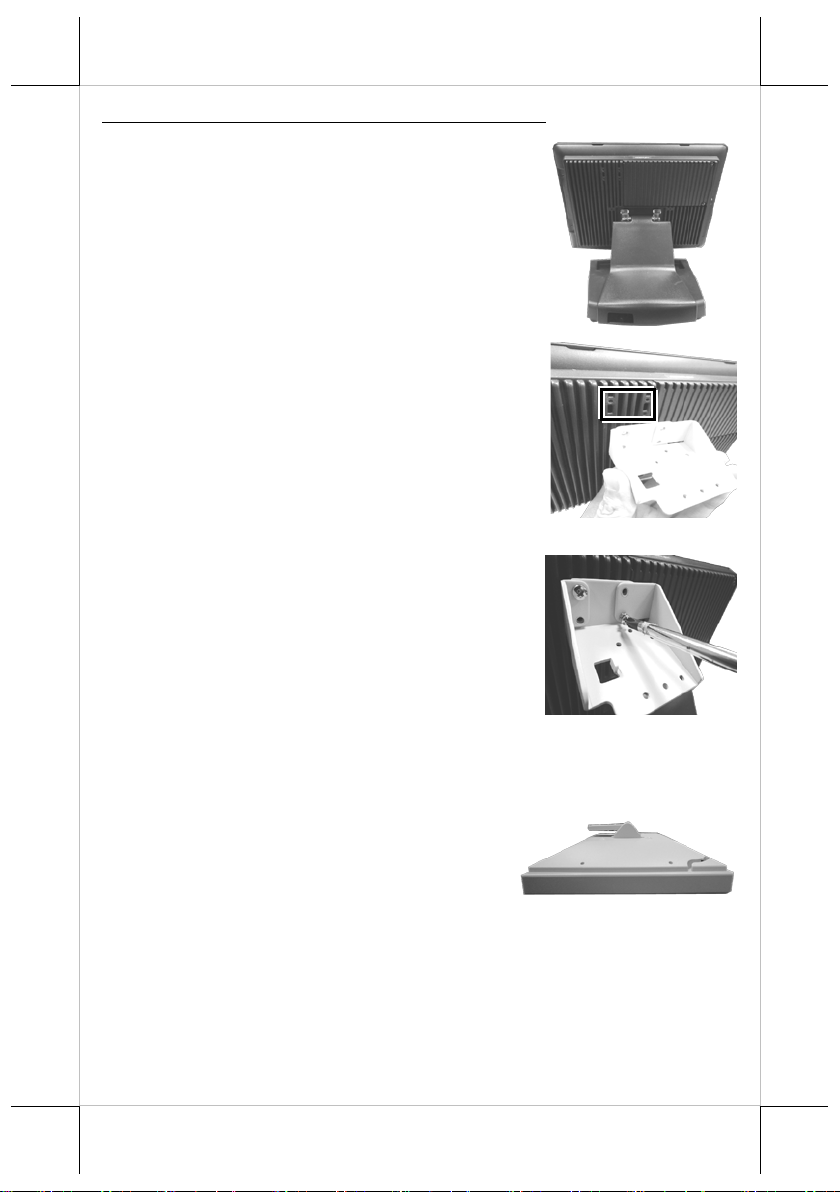
Mounting LM-2212X onto XP series terminals
facing towards you.
with the screen facing downward
and its top side facing toward you.
3
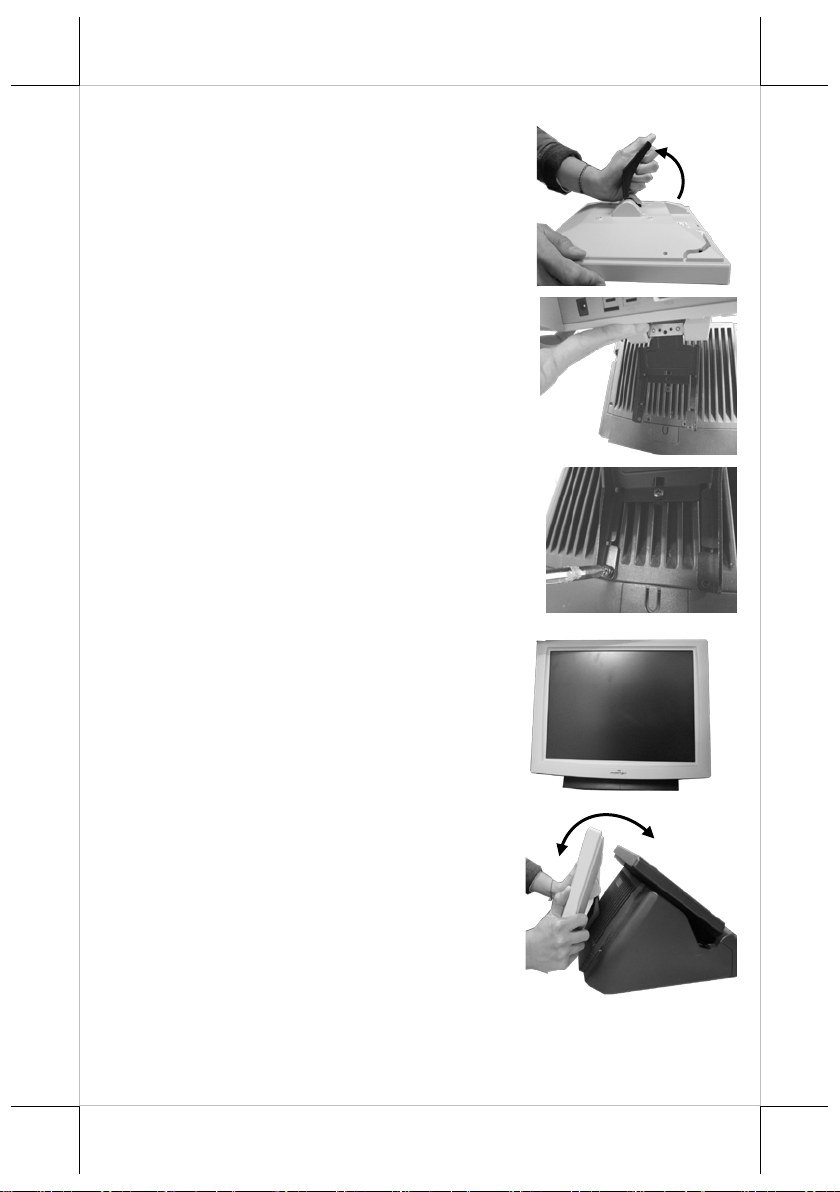
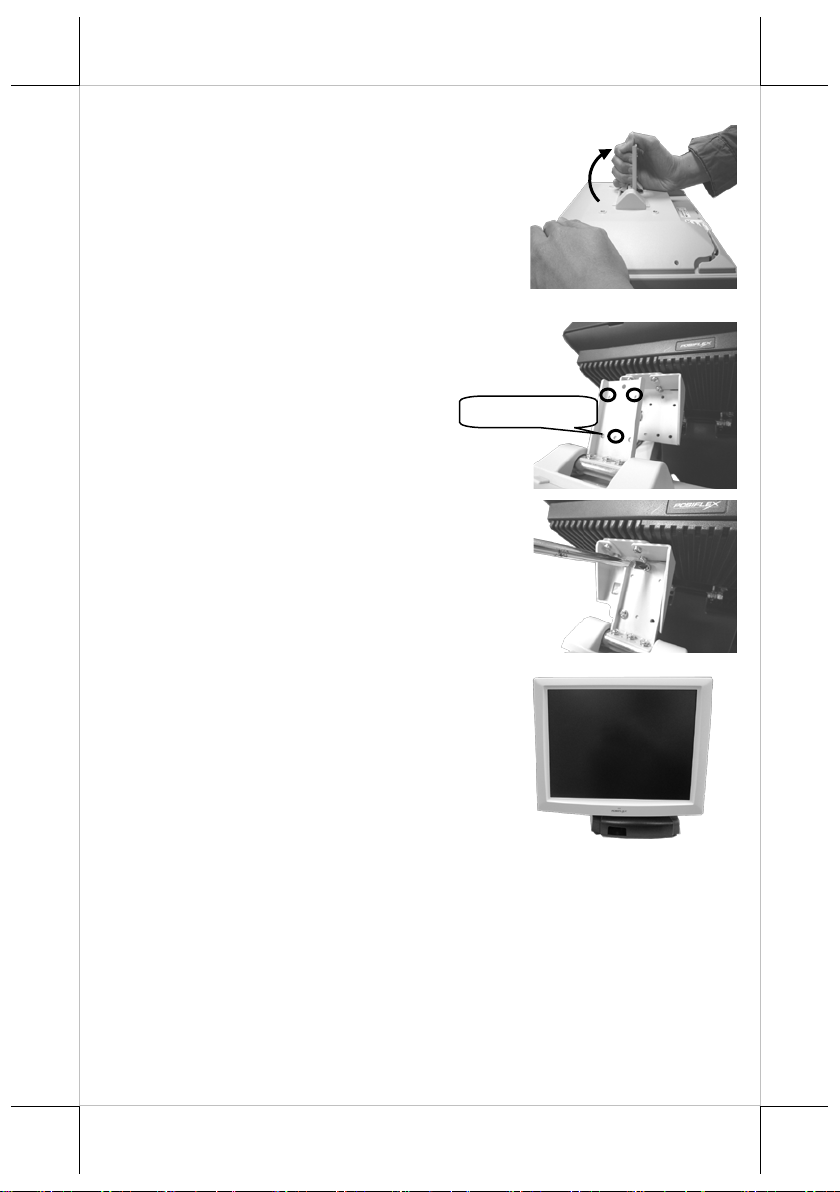
3. Steady the monitor with on hand ,
4. Lift the monitor. Al ign the thre e
5. Well secure the monitor bracket
6. Make sure LM-2212X is well
7. Tilt the monitor in the direc tion
and then pull the monitor bracket
upright as s hown in the fi gure.
screw holes on the monitor bracket
with those o n the rear of t he
terminal.
with the three #6-32-10L fixing
screws.
mounted onto your terminal.
shown by the arrow in the figure.
Please do not press on the LCD
panel while setting up the tilt angle.
4
1. Position your terminal wi th its rear
2. Take L type mounting bracket out of
3. Insert four #6-32-12L fixing screws
4. Lay t he LM-2312X on a flat surface
Mounting LM-2312X onto KS 15”/17” series terminals
facing towards you.
LM-2312X box package. Align the
four screw holes of the mounting
bracket with the hole pattern at the
back of the terminal.
into the screw holes and then tigh ten
the screws to secure the mounting
bracket.
with the screen facing downward
and its I/O ports facing toward you.
5
5. While holding the monitor steady
6. Lift the monitor to align three s crew
7. Properly attach two brackets with
8. Make sure LM-2312X is well
Alignment Dot
with one hand , pull the monitor
bracket upright.
holes on the monitor br acket with
those on the bracket attached to the
terminal using the alignment dots.
three #6-32-6L fixing sc rews.
mounted onto your terminal.
6

9. Tilt the monitor in the direc tion
1. Position your terminal with i ts rear
2. Take L type mounting bracket o ut of
3. Insert four #6-32-12L fixing screws
shown by the arrow in the figure.
Please do not press on the LCD
panel while setting up the tilt angle.
Mounting LM-2412X onto KS-7212X terminal
facing towards you.
LM-2412X box package. Align the
four screw holes of the mounting
bracket with the hole pattern at the
back of the terminal.
into the screw holes and then tighten
the screws to secure the mounting
bracket.
7

4. Lay t he LM-2412X on a flat surface
5. While holding the monitor steady
6. Lift the monitor to align three s crew
7. Well attach two brackets with three
8. Make sure LM-2412X is well
Alignment Dot
with the screen facing downward
and its I/O ports facing toward you.
with one hand , pull the monitor
bracket upright.
holes on the monitor br acket with
those on the bracket attached to the
terminal using the alignment dots.
#6-32-6L fixing screws.
mounted onto your terminal.
8

9. Tilt the monitor in the direc tion
1. After LM-2212X/2312X/2412X is
2. Take the VGA cable out of the
3. Make sure the VGA cable is well
shown by the arrow in the figure.
Please do not press on the LCD
panel while setting up the tilt angle.
Connecting the VGA cable
Follow the below instructions to connect LM-2212X/2312X/2412X to the
terminals with the VGA cable.
well installed to your terminals, tilt
the monitor up
terminal with its screen facing
downwards to find the VG A port of
LM-2212X/2312X/2412X at the
bottom I/O plate.
and then position the
package. Align one end of the VGA
cable with the VGA port at the
bottom I/O plate of your mo ni to r .
secured to the VGA port of the
monitor.
9

4. Sit the terminal and find its own
5. Take t he other end of VGA cable to
6. Make sure the cable is well secured.
VGA port. For example, VGA
connected is located at the bottom
I/O plate of Posiflex KS-7212X
terminal.
insert it into the VGA port of your
terminal.
10

Activating Power Output to LM-2x12X via POS System BIOS
In general, Posiflex terminals will disable the VGA controller in BIOS due to
safety concerns. Therefore, to ensure LM-2212X/2312X/2412X is able to
extract power from the Posiflex XP/KS series terminals, it is necessary to
manually enable the VGA output of the terminals in BIOS settings before the
monitor starts up. However, if the mon itor you are using is not manufactured
by Posiflex, it is strongly suggested to deactivate the VGA port of your
terminal in preventi ng your device from being damaged.
Please go through the below instructions to activate the power output for LM2212X/2312X/2412X. DO NOT plug the VGA cable into VGA connectors
while the terminal is still running.
1. Make sure that LM-2212X/2312X/2412X is well connected to the
Posiflex XP/KS-series terminals using the VGA cable.
2. Press the power button o f the POS to power on the POS. During the boot
process, hit F2 key to access BOIS setting.
3. Use arro w ke ys to check the setting of CRT - 12V output option und er
Intel tab. If it is set to be disa bled, hit Enter key to enable the V GA port.
4. Switch to Exit tab and select Exit Saving Changes option. Choose Yes in
Setup Confirmation message box to save your configurations.
5. After rebooting your P OS, make sure LM-2212X/2312X/2412X is
correctly detected.
11

LED
Status
Description
POWER LED
ON, solid green
System Standby
ON, solid blue
System power ON
OFF
System power OFF
Powering ON/OFF LM-2212X/2312X/2412X
Instead of u s ing an external power supply, LM-2212X/2312X/2412X greatly
depends on Posiflex POS terminals as primary power sources. In such a case,
the LCD monitor will be automatically initiated when the ter minal is powered
up and shut down immediately after you power the POS down.
If LM-2212X/2312X/2412X does not work as expected, please make sure that
you properly change BIOD settings as specified in Activating Power Output
to LM-2x12X via POS System BIOS section.
Power ON the LM-2212X/2312X/2412X
Press the power button of the Posiflex terminal to power on
LM-2212X/2312X/2412X.
Power OFF the LM-2212X/2312X/2412X
To power off LM-2212X/2312X/2412X, press the power button of the POS.
Status LED Indicator
LED status indicators, which are located at the bottom of the screen, are
designed to notify users of the current status of your monitor by emitting
various LED signal s . Please refer to the below chart to accurately interpret the
status indicators to facilitate your troubleshooting.
12

1. Tilt LM-2212X/2312X/2412X
2. Position the terminal with its screen
3. Position the monitor with its screen
Adjusting the Viewing Angle of your LCD Monitor
LM-2212X/2312X/2412X feature the tilt angle adjustment of 42.5˚〜77.5˚ to
help you find your o wn best vi e win g angl e. The following are steps that are
highly recommended to set up the tilting angle for your monitor and terminal.
Please be careful not to press on the LCD panel while you tilt up or down the
device.
upward.
facing towards you. Tilt the POS
forward or backward to your desired
angle.
facing towards you. Tilt
LM-2212X/2312X/2412X up or
down to your desired angle.
13

Display Resolution
Refresh Rate (Hz)
Horizontal Frequency (KHz)
640*400
70
37.9
640*480
60
31.5
72
37.9
75
37.5
720*400
70
37.9
800*600
56
35.1
60
37.9
72
48.1
75
46.9
1024*768
60
48.4
70
56.5
75
60
Setting up the Best Display Resolution for your Monitor
The below chart defines the list of recommended display set tings which you
are able to use for LM-2212X/2312X/2412X. Improper display configuration
will prevent t he mo nit or from displaying the image and lead to a warning
message of “out of range” prompted on the screen.
14

Power & OSD buttons are located o n the rear, right-
they could possibly function in re la tion to OSD menu.
Icon
Description
OSD button
to activate OSD menu
to select the specific menu option
EXT button
to exit from the current configuration
to navigate through OSD menu options
“+” Button
to increase the value of th e specific item
“-”Button
to decrease the value of the specific item
auto-tune feature
Power Button
to turn the monitor ON/OFF
+
Introducing the Posiflex OSD Menu
OSD, as known as O n Screen Display, is employed to assist users in adjusting
a variety of monitor-related settings depending on personal preference.
Through this section, it is expected to familiarize you with the options which
are accessible via OSD menu and to optimize your experiences with
LM-2212X/2312X/2412X.
Power & OSD Buttons
hand side of LM-2212X/2312X/2412X. Each of four
OSD controls works differently in various occasions.
Please refer to the below figure to get an idea of how
Below are guidelines on how to navigate through OSD menu:
1. To get started with OSD, press OSD button to access OSD menu.
2. Scroll through OSD menu options using EXT button.
3. Push OSD button to choose the particular menu option of interest and to
enter its sub-menu.
4. If the se lected menu o ption conta ins sub-menu items, pus h EXT button
to browse available items.
5. Use “
” or “-” buttons to adjust the value of the selected OSD item.
15

OSD Menu Options
Sub-menu items & Descriptions
The option allows you to adjust brightness and
contrast level of your monitor for comfortable viewing
Press - button to decrease contrast.
Select the option to specify the orientation of the
image vertically from top to bottom.
The option is used to determine whether or not to
preferences.
OSD Options
Posiflex OSD menu c ontains a set of six OSD options, and each option could
be comprised of several sub-options to offer more specific configurations.
Brightness/Contrast
experiences. Its submenu is composed of two items as
shown below:
Brightness
Press + button to increase brightness;
Press - button to decrease brightness.
Contrast
Press + button to increase contrast;
Image Position
Image Setup
image. Its submenu provides two orientation options
as follows:
Horizontal Position
Press + button to rotate the image horizontally
from right to left; Press - button to rotate the
image horizontally from left to right.
Vertical Position
Press + button to rotate the image vertically
from bottom to top; Press -
enable the auto-tune function, which will
automatically fine-tune the image quality for
optimizing screen performances.
Automatic
Select to enable the auto-tune feature.
Manual
This item will disable the auto-tune feature and
require you to manually adjust the Clock and
Phase settings for VGA input based on your
button to rotate the
16

OSD Menu Options
Sub-menu items & Descriptions
The option enables you to further adjust RGB color
Resize the screen display.
Options menu option has five sub-menu items as
menu to stay activated on the screen.
Exit
Save your settings and exit OSD menu.
Image Property
Options
intensity.
Color
Press + button to increase color intensity;
Press - button to decrease color intensity.
Image Scaling
follows:
Information
Retrieve monitor-related information, such as
resolution and refresh rate.
Menu Language
Set the language for OSD menu according to
your preference.
Menu Position (Reserved)
Adjust the position of OSD menu.
Factory Default
Restore the current menu back to the default
setting.
Accessibility
Specify the period of time which allows OSD
17

0.24 (H) x 0.24 (V)
Viewing Angle
70/70/70/70 degree (U/D/L/R)
※
Specifications
LM-2212X/2312X/2412X
Display
LCD Panel
Resolution
Active Area(mm)
Pixel Pitch(mm)
Pixel Arrangement RGB W Rectangle
Contrast Ratio 700 : 1
Response Time 25 ms (Raising)/ 10 ms (Falling)
Brightness 500 cd/m2
General Specification
Display Interface VGA
Power Supply 12V from Posiflex terminal VGA port
The product information and specifications are subject to change without
prior notice. To get the detailed information on LM-2212X/2312X/2412X,
please check this model from Posiflex Glob al Website
(http://www.posiflex.com/en-global/Download/download
12.1" TFT LCD
1024 (H) x 768 (V)
245.76 (H) x 184.32 (V)
).
18

<MEMO>
19

<MEMO>
20
 Loading...