

Page 1

DEFAULT
7RQH
7RQH
7RQH
7RQH
TONE SELECTION PATTERN
DEFAULT
7RQH
7RQH
7RQH
7RQH
KRXUV
KRXUV
KRXUV
KRXUV
KRXUV
VARIABLE TONE
CALCULATED BATTERY LIFE
*
®
FALL MANAGEMENT
Posey
Door Guard/Do Not Enter Alarm
The Posey Door Guard Alarm and Do Not Enter
Banner Alarm provide a visual reminder to
residents/patients and deters exit through
doorways. Once activated, the alarm alerts
caregivers of an unassisted exit or movement
beyond a marked area.
Features:
• Attaches to door frame with hook and loop
adhesive patch.
• Removes easily in case of emergency.
• Adjustable to door frame widths up to 53”
(135 cm).
• Pre-connected magnet attaches to faceplate
of alarm.
• Five different alarm tones allow caregivers to
assign a specific tone to each room.
• Alarm unit is easily converted to bed,
wheelchair, or geri-chair application (see
enclosed instructions for Personal Alarm
8202L).
• 95dB Alarm sound at one foot.
• Optional sound dampening plug.
• Low battery light indicator.
• Impact resistant plastic case.
• Compact lightweight alarm:
2” x 4” x 1” (5 cm x 10 cm x 2½ cm),
weighs 4 ounces.
• Posey Limited Lifetime Warranty.
REF
8205 Door Guard Alarm
REF
7999 Do Not Enter Banner Alarm
Inspection
Inspect before each use. Check for
broken stitches, or torn, cut or frayed material.
Banner does not prevent residents from exiting
through door.
Application Instructions
1. Selecting Alarm Tone: The Personal Alarm
may be set to alarm in one of five different
alarm tones.
a. To step through the five tone options,
press the tone selector (6) on the side of
the unit.
b. When the magnet is engaged, pressing
the tone selector will produce a two
second audio demonstration of each
tone.
c. If the two second demonstration is not
enough to determine your tone
preference, remove the magnetic block.
Press the tone selector until the desired
tone is heard, then replace the magnet.
d. The last tone selected will automatically
sound when the alarm is activated.
Posey Company • 5635 Peck Road, Arcadia, CA 91006-0020 USA • www.posey.com
Phone: 1.800.447.6739 or 1.626.443.3143 • Fax: 1.800.767.3933 or 1.626.443.5014
MADE IN U.S.A.
© 2010 Posey Company. All rights reserved.
Note: The tone you select will affect your
alarm’s 9-volt battery life. See chart below.
*Based on Continuous Alarm
2. Attach the alarm unit to the doorknob
side of the door frame, above waist level.
Attach self-adhesive loop (fuzzy) patch by
peeling off backing and pressing into
place. Press the hook (rough) patch on the
back of the alarm firmly to the loop on
the mounting surface.
3. Attach the white plastic hook on the
opposite side of the door frame by
peeling off backing and pressing into
place.
4. Position the Door Guard Banner across
the doorway by attaching the magnet to
the metal plate on one side and the loop
to the plastic hook on the other side. To
reposition the pre-connected magnet,
unthread the key ring and reconnect
through the grommet hole on the
opposite side.
5. The Banner should be taut across the
doorway. Adjust the banner by selecting
the appropriate loop and attaching to the
plastic hook.
8205
7999
Testing Instructions
ALWAYS test after application to door. To
test the Door Guard, place your hand or
arm against the mesh to move the banner
far enough to disengage the magnet from
the faceplate of the Personal Alarm. Alarm
should sound. Note: Your Door Guard
Alarm and Do Not Enter Banner Alarm
come with one additional magnet and pull
cord for use in a bed or chair. Be sure to
store in a safe place.
Optional Sound Dampening Plug:
To decrease the alarm volume, insert the
Sound Dampening Plug into the hole on
the face of the alarm unit. For maximum
alarm volume, DO NOT use plug.
• NEVER use sound dampening plug if
patient can move out of hearing distance
of staff by wheelchair or other means.
• NEVER place alarm unit closer than two
feet from patient’s ear (even if sound
dampening plug is in use).
ALWAYS verify you can hear the alarm
volume at the furthest possible distance
before leaving patient unattended.
NEVER place the alarm unit closer than
two feet from patient’s ear to minimize
patient noise exposure. Refer to
Occupational Safety and Health
Administration Occupational Noise
Exposure Standards 1910.95 for additional
(Continued On Page 2)
M5609 REV B 012110
Page 2
®
ALARM
FRONT
ALARM BACK
TONE
SELECTOR
Posey
Door Guard/Do Not Enter Alarm (Cont.)
7
6
9
1
2
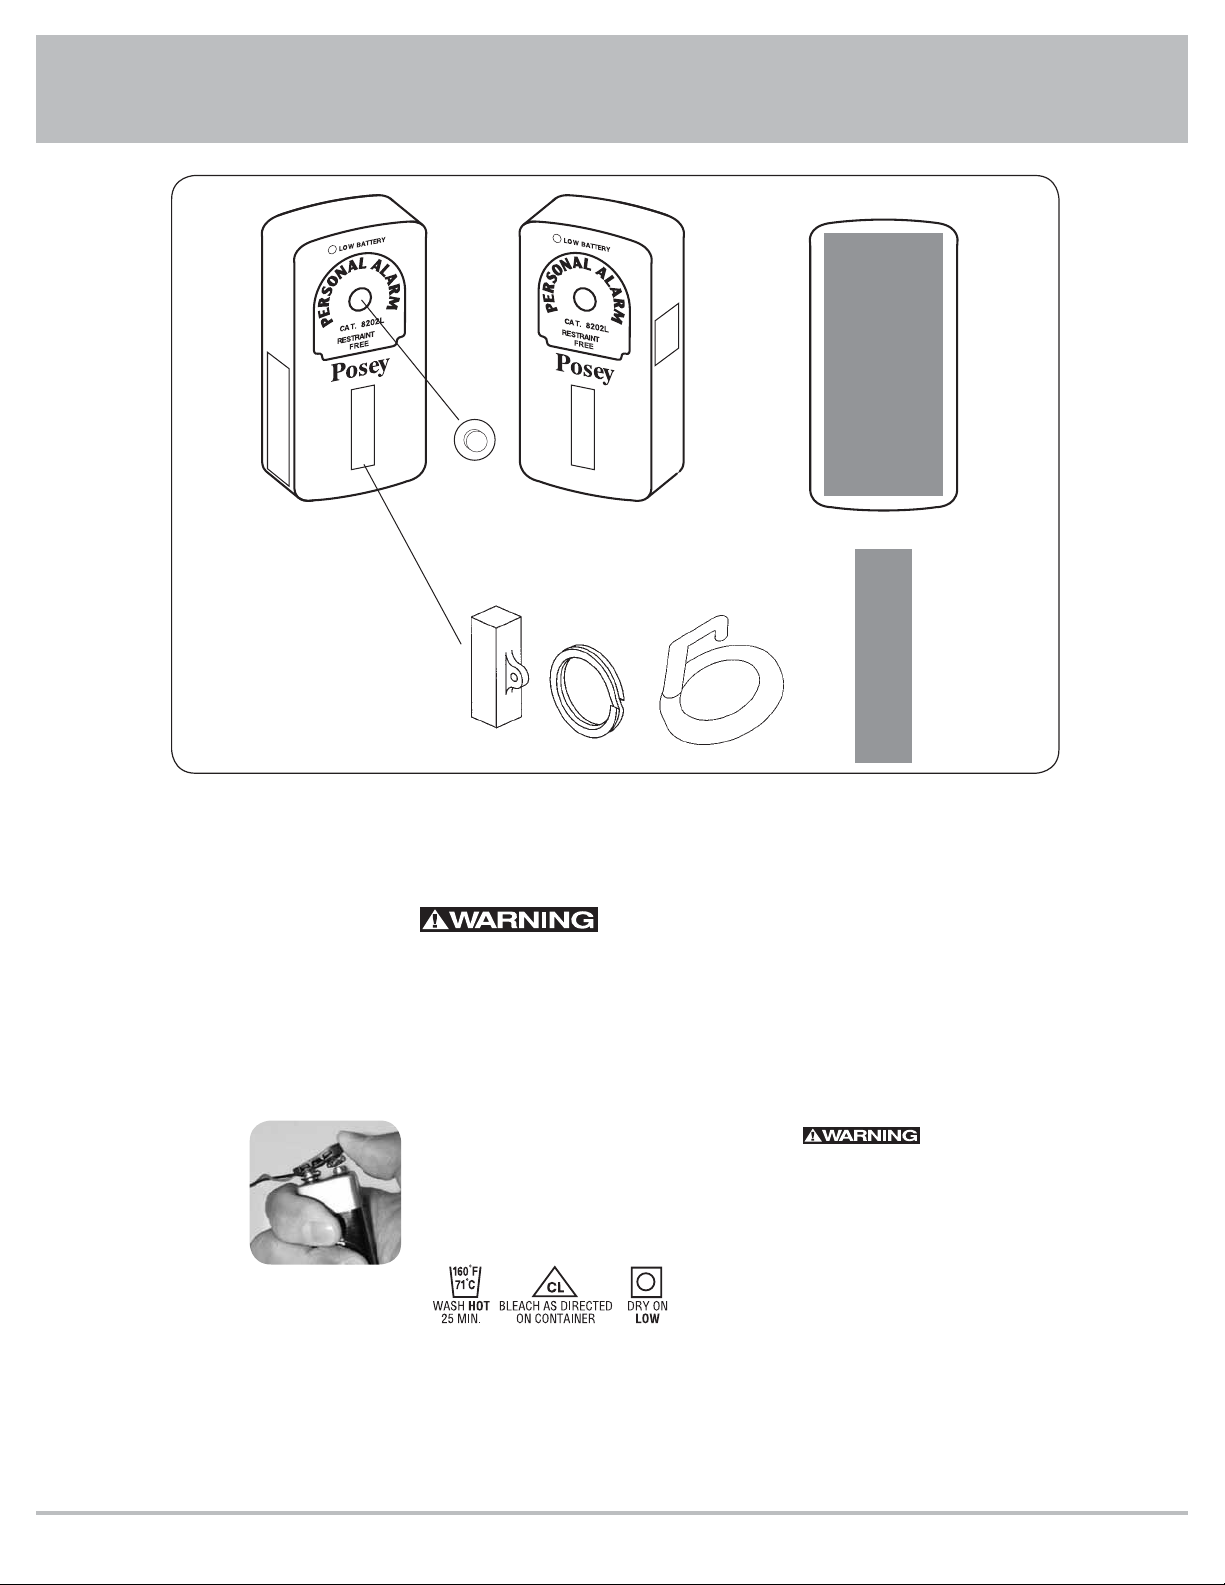
1. Battery Door
2. Metal Plate
3. Magnetic Block
4. Removable Key Ring
5. Plastic Hook
6. Tone Selector
7. Low Battery Light
8. Sound Dampening Plug
9. Hook Patch (on alarm)
10. Loop Patch (adhesive)
Alarm Testing Instructions
NEVER leave a patient unattended without
first testing the alarm to ensure it is
functioning as intended.
To test the Personal Alarm, remove the
magnet from the faceplate. The alarm should
sound.
Battery Replacement
1. Make sure magnet is attached to the
metal plate.
2. Press down on arrow and slide the battery
door open.
3. Remove the battery
from the
compartment and
hold in one hand with
thumb on the terminal
cap. Battery
connection wires
should be away from
the thumb. DO NOT pull the terminal cap
wires.
4. Use thumb to push the terminal cap up,
off the battery (Fig. 1).
5. Connect terminal cap to the new battery.
Make sure the battery is securely
connected to the terminal cap and insert
into alarm unit.
Fig. 1
8
information.
3
4
6. Slide battery door closed.
7. Test system to verify it is working
properly before leaving patient
unattended.
• Battery can explode or leak and cause
damage to alarm or skin if installed
backwards, disassembled, fully discharged
or exposed to water, fire or high
temperatures.
• ALWAYS install a completely new battery
when the low battery light illuminates.
• Installing battery incorrectly can cause
battery to utilize more power than normal
and discharge sooner, causing possible
corrosion. Take care when installing new
battery.
5
Washing Instructions:
Machine wash hot, tumble dry low.
Door Guard and Do Not Enter Banner may
be laundered. The alarm surface may be
wiped clean with a mild disinfectant.
10
Maintaining Hook and Loop:
If hook and loop does not adhere, it is most
likely due to collection of dust and lint. Clean
hook by brushing with a stiff brush.
Storage Instructions
• This device is designed for use in normal
indoor environments.
• This device may be stored in ambient
warehouse temperatures at normal humidity
levels. Avoid excess moisture or high humidity
that may damage product materials.
Disposal
Dispose of per your facility
policy or applicable local code for
BIOHAZARDOUS material.
Limited Lifetime Warranty:
The Posey Company warrants to the original
purchaser, the alarm unit to be free from
defects in materials and workmanship for the
life of the unit. Warranty void if unit is opened,
damaged, or submerged. This warranty gives
you specific legal rights, and you may also have
other rights, which vary from state to state.
Posey Company • 5635 Peck Road, Arcadia, CA 91006-0020 USA Phone: 1.800.447.6739 or 1.626.443.3143 • Fax: 1.800.767.3933 or 1.626.443.5014 • Web: www.posey.com
 Loading...