

Page 1
User Manual EN
Mode d’emploi FR
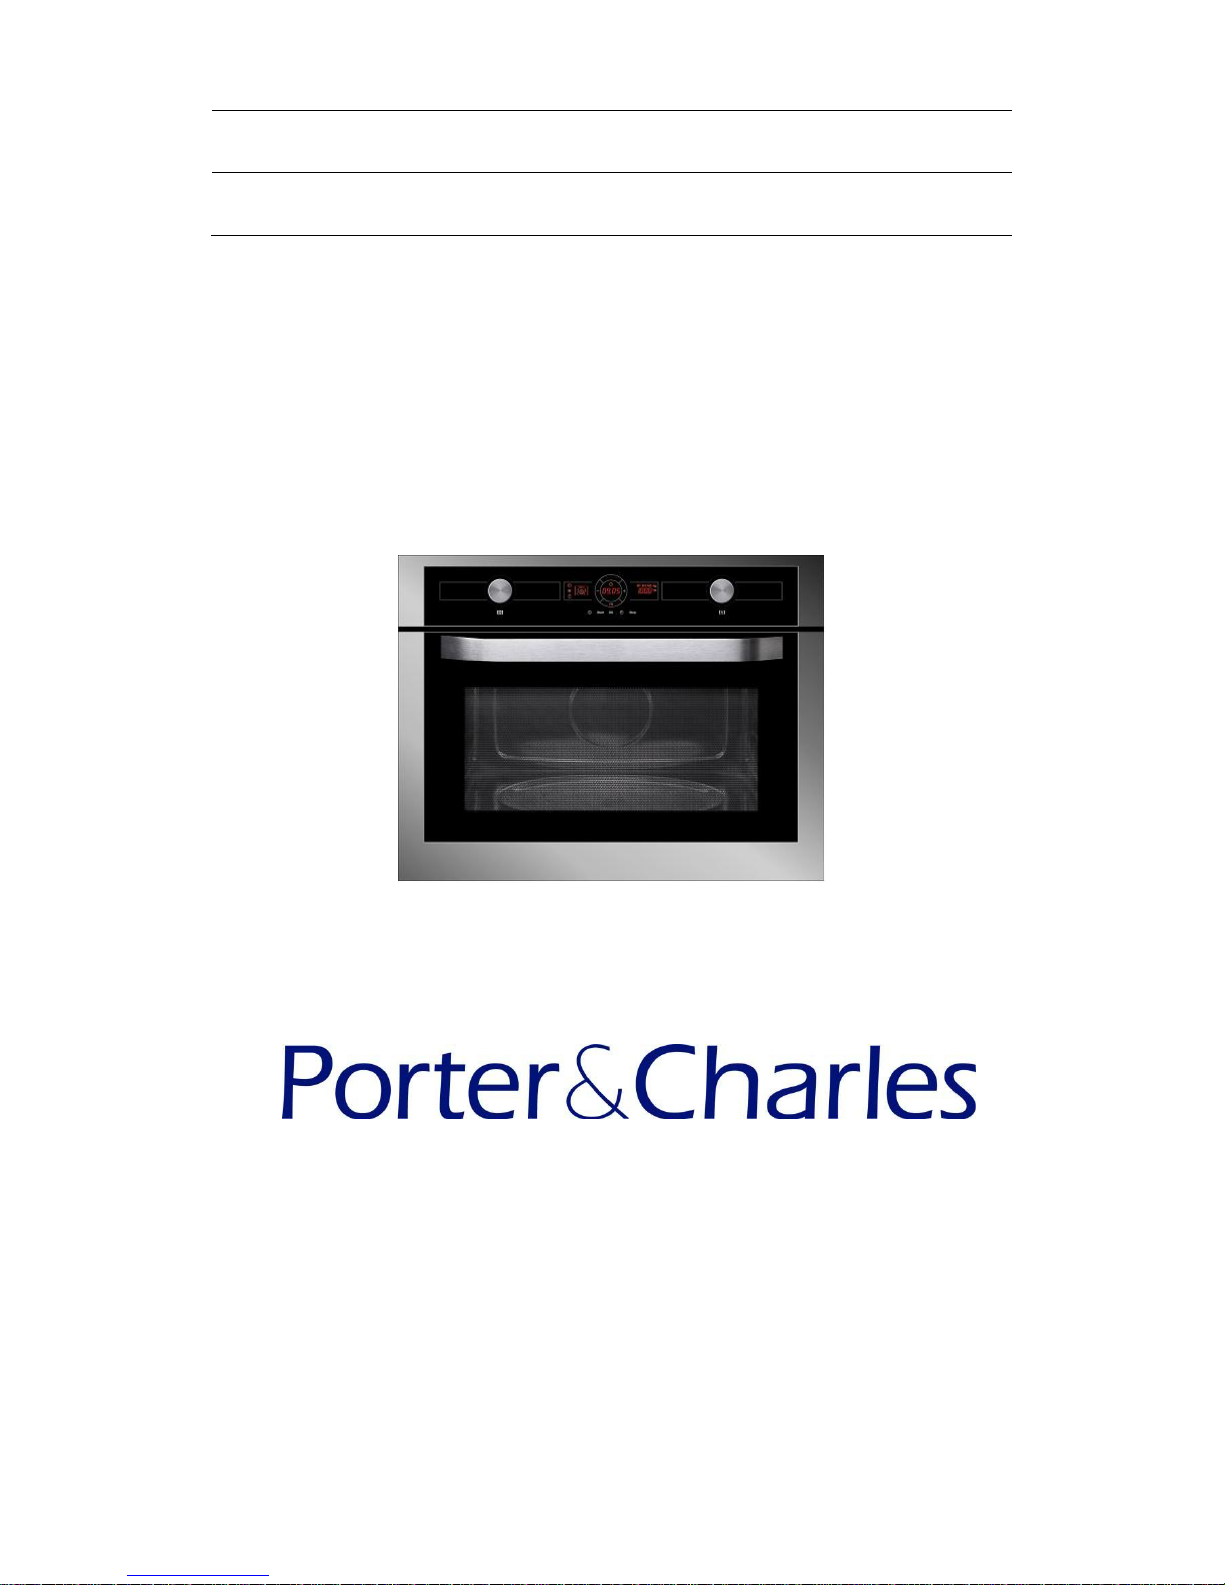
COMBI MICROWAVE
1631001-a
Page 2

1
USA
Dear Customer,
Before going any further, we want to thank you for preferring our Porter & Charles product. We
are sure that this modern, functional and practical microwave oven, manufactured with top
quality materials, will fully meet your expectations.
We ask you to read the instructions in this booklet very carefully as this will allow you to get the
best results from using your microwave oven.
KEEP THE DOCUMENTATION OF THIS PRODUCT FOR FUTURE REFERENCE.
Always keep the instruction manual handy. If you lend the microwave oven to someone
else give them the manual as well!
This Combi Speed Oven complies with Part 18 of the FCC rules.
The user manual is also available for download at www.porterandcharles.ca
Page 3

2
USA
Contents
The advantages of microwaves ....................................................................................................... 10
Description of your oven .................................................................................................................. 11
Function Description ....................................................................................................................... 12
Basic settings ................................................................................................................................... 13
Setting the clock ............................................................................................................................. 13
Hiding/Displaying the Clock ............................................................................................................ 13
Safety blocking ............................................................................................................................... 13
Basic Functions ................................................................................................................................ 14
Microwaves ..................................................................................................................................... 14
Quick Start ................................................................................................................................ ...... 14
Grill ................................................................................................................................................. 14
Microwave + Grill ............................................................................................................................ 15
Microwave + Hot-Air ....................................................................................................................... 16
Grill + Fan ....................................................................................................................................... 16
Defrosting by time (manual) ............................................................................................................ 17
Defrosting by weight (automatic) .................................................................................................... 17
Memory function ................................ ................................ ............................................................. 18
Special functions .............................................................................................................................. 19
Special Function P: Heating food ................................................................................................... 19
Special Function P: Cooking ........................................................................................................... 20
Special Function P: Defrosting & Toasting ..................................................................................... 21
Using the Browning Plate ................................................................................................................ 22
When the oven is working... ............................................................................................................. 23
Interrupting a cooking cycle ............................................................................................................ 23
Altering parameters ........................................................................................................................ 23
End of a cooking cycle .................................................................................................................... 23
Defrosting .......................................................................................................................................... 24
General instructions for defrosting .................................................................................................. 25
Cooking with a microwave oven ..................................................................................................... 26
Cooking with the grill ....................................................................................................................... 28
Roasting ............................................................................................................................................ 31
What kind of ovenware can be used? ............................................................................................. 33
Microwave function ......................................................................................................................... 33
Grill and Hot-Air functions ............................................................................................................... 33
Combined functions ........................................................................................................................ 33
Oven Cleaning and Maintenance ..................................................................................................... 35
Front surface .................................................................................................................................. 35
Oven interior ................................................................................................................................... 35
Oven ceiling ................................ ................................................................ ................................ .... 36
Accessories .................................................................................................................................... 36
What should I do if the oven doesn’t work? ................................................................................... 37
Substitution of light bulb ................................................................................................................. 37
Technical characteristics ................................................................................................................. 38
Specifications ................................................................................................................................. 38
Installation instructions ................................................................................................................... 39
Installation ......................................................................................................................................... 84
Page 4

3
USA
GROUNDING INSTRUCTIONS
This appliance must be grounded. In the event of an electrical short circuit,
grounding reduces the risk of electric shock by providing an escape wire
for the electric current. This appliance is equipped with a cord having a
grounding wire with a grounding plug. The plug must be plugged into an
outlet that is properly installed and grounded.
Warning! IMPROPER USE OF THE GROUNDING CAN RESULT IN A RISK
OF ELECTRICAL SHOCK.
Consult a qualified electrician or serviceman if the grounding instructions
are not completely understood, or if doubt exists as to whether the
appliance is properly grounded, and do not use an extension cord. If the
power supply cord is too short, have a qualified electrician or serviceman
install an outlet near the appliance.
.
When heating food in plastic or paper containers, keep an eye on the appliance
due to the possibility of ignition.
The appliance is intended for heating food and beverages. Drying of food or
clothing and heating of warming pads, slippers, sponges, damp cloth and similar
may lead to risk of injury, ignition or fire.
Page 5

4
USA
IMPORTANT SAFETY INSTRUCTIONS
When using electrical appliances basic
safety precautions should be followed,
including the following:
Warning! To reduce the risk of burns,
electric shock, fire, injury to persons,
or exposure to excessive microwave
energy:
Read all instructions before using
the appliance.
Read and follow the specific
“PRECAUTIONS TO AVOID
POSSIBLE EXPOSURE TO
EXCESSIVE MICROWAVE
ENERGY” found on this manual.
This appliance must be grounded.
Connect only to properly grounded
outlet. See “GROUNDING
INSTRUCTIONS” found on this
manual.
Install or locate this appliance only
in accordance with the provided
installation instructions.
Some products such as whole
eggs and sealed containers – for
example, closed glass jars are able
to explode and should not be
heated in this oven.
Use this appliance only for its
intended use as described in the
manual. Do not use corrosive
chemicals or vapors in this
appliance. This type of oven is
specifically designed to heat, cook,
or dry food. It is not designed for
industrial or laboratory use.
As with any appliance, close
supervision is necessary when
used by children.
Do not operate this appliance if it is
has a damaged cord or plug, if it is
not working properly, or if it has
been damaged or dropped.
This appliance should be serviced
only by qualified service personnel.
Contact nearest authorized service
facility for examination, repair, or
adjustment.
Do not cover or block any openings
on the appliances.
Do not store this appliance
outdoors. Do not use this product
near water – for example, near a
kitchen sink, in a wet basement,
near a swimming pool, or similar
locations.
Do not immerse cord or plug in
water.
Keep cord away from heated
surfaces.
Do not let cord hang over edge of
table or counter.
When cleaning surfaces of door
and oven that comes together on
closing the door, use only mild,
nonabrasive soaps, or detergents
applied with a sponge or soft cloth.
Page 6

5
USA
IMPORTANT SAFETY INSTRUCTIONS
To reduce the risk of fire in the oven cavity:
Do not overcook food. Carefully attend appliance when paper, plastic, or other
combustible materials are placed inside the oven to facilitate cooking.
Remove wire twist-ties from paper or plastic bags before placing bag in oven.
If materials inside the oven ignite, keep oven door closed, turn oven off, and
disconnect the power cord, or shut off power at the fuse or circuit breaker
panel.
Do not use the cavity for storage purposes. Do not leave paper products,
cooking utensils, or food in the cavity when not in use.
Liquids such as water, coffee, or tea are able to be overheated beyond the
boiling point without appearing to be boiling. Visible bubbling or boiling when
the container is removed from the microwave oven is not always present.
THIS COULD RESULT IN VERY HOT LIQUIDS SUDDENLY BOILING OVER
WHEN THE CONTAINER IS DISTURBED OR A UTENSIL INTO THE
LIQUID.
To avoid that type of situation when heating liquids, put a teaspoon or glass
rod inside the container.
Page 7

6
USA
PRECAUTIONS TO AVOID POSSIBLE
EXPOSURE TO EXCESSIVE
MICROWAVE ENERGY
(a) Do not attempt to operate this oven with the door open since open – door
operation can result in harmful exposure to microwave energy. It is important
not to defeat or tamper with the safety interlocks.
(b) Do not place any object between the oven front face and the door or allow
soil or cleaner residue to accumulate on sealing surfaces.
(c) Do not operate the oven if it is damaged. It is particularly important that the
oven door closes properly and that there is no damage to the: (1) door (bent),
(2) hinges and latches (broken or loosened), (3) door seals and sealing
surfaces.
(d) The oven should not be adjusted or repaired by anyone except properly
qualified service personnel.
Pacemakers:
Most pacemakers are shielded from interference from electronic products, including
microwaves. However, patients with pacemakers may wish to consult their
physicians if they have concerns.
Page 8

7
USA
PRECAUTIONS TO BE OBSERVED
BEFORE AND DURING SERVICING TO
AVOID POSSIBLE EXPOSURE TO
EXCESSIVE MICROWAVE ENERGY
(a) Do not operate or allow the oven to be operated with the door open.
(b) Make the following safety checks on all ovens to be serviced before
activating the magnetron or other microwave source, and make repairs as
necessary: interlock operation, proper door closing, seal and sealing
surfaces (arcing, wear, and other damage), damage to or loosening of hinges
and latches, evidence of dropping or abuse).
(c) Before turning on microwave power for any service test or inspection within
the microwave generating compartment, check the magnetron, wave guide
or transmission line, and cavity for proper alignment, integrity and
connection.
(d) Any defective or misadjusted components in the interlock, monitor, door seal,
and microwave generation and transmission systems, shall be repaired,
replaced, or adjusted by procedures described in this manual before the
oven is released to the owner.
(e) A microwave leakage check, to verify compliance with the Federal
Performance Standard, should be performed on each oven prior to release to
the owner.
Page 9

8
USA
Microwave safety
Warning! Never leave the oven unwatched,
especially when using paper, plastic or other
combustible materials. These materials can
char and may fire. FIRE RISK!
Warning! Do not heat pure alcohol or
alcoholic drinks in the microwave. FIRE
RISK!
Warning! Do not heat liquids or other foods
in closed containers since these may
explode readily.
Warning! This appliance is not intended for
use by persons (including children) with
reduced physical, sensory or mental
capabilities, or lack of experience and
knowledge, unless they have been given
supervision or instruction concerning use of
the appliance by a person responsible for
their safety. Children should be supervised
to ensure that they do not play with the
appliance.
Warning! If the oven has a combined
function mode (microwave with other means
of heating), children should not be allowed to
use the oven without adult supervision on
account of the high temperatures generated.
Warning! The oven cannot be used if:
- The door is not closed correctly;
- The door hinges are damaged;
- The surfaces of the contact between the
door and the oven front are damaged;
- The door window glass is damaged;
- There is frequent electrical arcing inside
the oven even though there is no metal
object inside.
The oven can only be used again after it
has been repaired by a Technical
Assistance Service technician.
Beware!
Never heat baby foods or drinks in bottles or
jars with the teats or lids on them. After
heating the food mix or shake well so that
the heat is spread evenly. Check the food
temperature before feeding this to the child.
DANGER OF BURNING!
To avoid food overheating or burning it is
very important not to select long time
periods or power levels that are too high
when heating small quantities of food. For
example, a bread roll can burn after 3
minutes if the power selected is too high.
For toasting, use just the grilling function and
watch the oven all the time. It you use a
combined function to toast bread it will catch
fire in a very short time.
Make sure you never catch the power cables
of other electrical appliances in the hot door
or the oven. The cable insulation may melt.
Danger of short-circuiting!
Page 10

9
USA
Microwave safety
This oven is exclusively for domestic use!
Use the oven only for preparing meals.
Avoid damaging the oven or other
dangerous situations by following these
instructions:
Do not switch on the oven without the
turntable support, the turntable ring and
the respective plate being in place.
Never switch on the microwave when it
is empty. If there is no food inside there
may be an electrical overcharge and the
oven could be damaged. RISK OF
DAMAGE!
For carrying out oven programming
tests put a glass of water inside the oven.
The water will absorb the microwaves and
the oven will not be damaged.
Use only dishes suitable for
microwaves. Before using dishes and
containers in the microwave, check that
these are suitable (see the section on
types of dishes).
Never remove the mica cover on the
ceiling of the oven interior! This cover
stops fat and pieces of food damaging the
microwave generator.
Do not keep any inflammable object
inside the oven as it may burn if the oven
is switched on.
Do not use the oven as a pantry.
Eggs with their shells and whole boiled
eggs must not be heated in microwave
ovens because they may explode.
Do not use the oven for frying as it is
impossible to control the temperature of oil
heated by microwaves.
To avoid being burnt, always use oven
gloves for handling dishes and containers
and touching the oven.
Do not lean or sit on the open oven
door. This may damage the oven,
especially in the hinge zone. The door can
bear a maximum weight of 8 kg.
The turntable and the grills can bear a
maximum load of 8 kg. To avoid damaging
the oven, do not exceed this load.
Cleaning:
Warning! Your microwave oven must be
cleaned regularly. All food remains must
be removed (see section on Oven
Cleaning). If the microwave oven is not
kept clean its surface may deteriorate and
this may shorten the oven’s working life
and could even result in a dangerous
situation.
The door contact surfaces (the front of the
cavity and the inside part of the doors)
must be kept very clean in order to ensure
the oven functions correctly.
Do not use harsh abrasive cleaners or
sharp metal scrapers to clean the oven
door glass since they can scratch the
surface, which may result in shattering
of the glass.
Do not use high pressure or stream jet
cleaning appliances.
Please follow the instructions regarding
cleaning in the section “Oven Cleaning and
Maintenance”.
Repairs:
Warning – Microwaves! The outer
protection of the oven must not be
removed. It is dangerous for anyone not
authorized by the manufacturer to carry
out any kind of repair or maintenance
work.
If the power cable is damaged it should be
substituted by the manufacturer,
authorized agents or technicians qualified
for this task in order to avoid dangerous
situations. Furthermore, special tools are
required for this task.
Repair and maintenance work, especially
of current carrying parts, can only be
carried out by technicians authorized by
the manufacturer.
Page 11

10
USA
The advantages of microwaves
In conventional ovens, heat radiated by electrical
elements or gas burners slowly penetrates the
food from outside to inside. On account of this
there is a major amount of energy is wasted
heating the air, the oven components and the food
containers.
In a microwave oven, heat is generated by the
food itself and the heat travels from inside to
outside. No heat is lost to the air, the walls of the
oven cavity or the dishes and containers (if these
are suitable for use in microwave oven), in other
words, only the food is heated.
Microwave ovens have the following advantages:
1. Shorter cooking times; in general these are up
to 3/4 less than the time required for
conventional cooking.
2. Ultra-fast food defrosting, thus reducing the
danger of bacterial development.
3. Energy savings.
4. Conservation of the nutritional value of foods
due to the shorter cooking times.
5. Easy to clean.
How a microwave oven works
In a microwave oven there is a high tension valve
called a magnetron which converts electrical
energy into microwave energy. These
electromagnetic waves are channelled to the
interior of the oven through a wave guide and
distributed by a metallic spreader or through a
turntable.
Inside the oven the microwaves propagate in all
directions and are reflected by the metal walls,
uniformly penetrating the food.
Why food heats up
Most foods contain water and water molecules
vibrate when subjected to microwaves.
The friction between molecules produces heat
which raises the temperature of the food, defreezing it, cooking it or keeping it hot.
Since the heat arises inside the food:
This can be cooked with little or no liquid or
fats/oils;
De-freezing, heating or cooking in a microwave
oven is quicker than in a conventional oven;
The vitamins, minerals and nutritional
substances in the food are conserved;
The natural colour and aroma of the food are
unchanged.
Microwaves pass through china, glass, cardboard
or plastic but do not go through metal. For this
reason, metal containers or ones with metal parts
must not be used in a microwave oven.
Microwaves are reflected by metal...
... but go through glass and china...
... and are absorbed by foods.
Page 12

11
USA
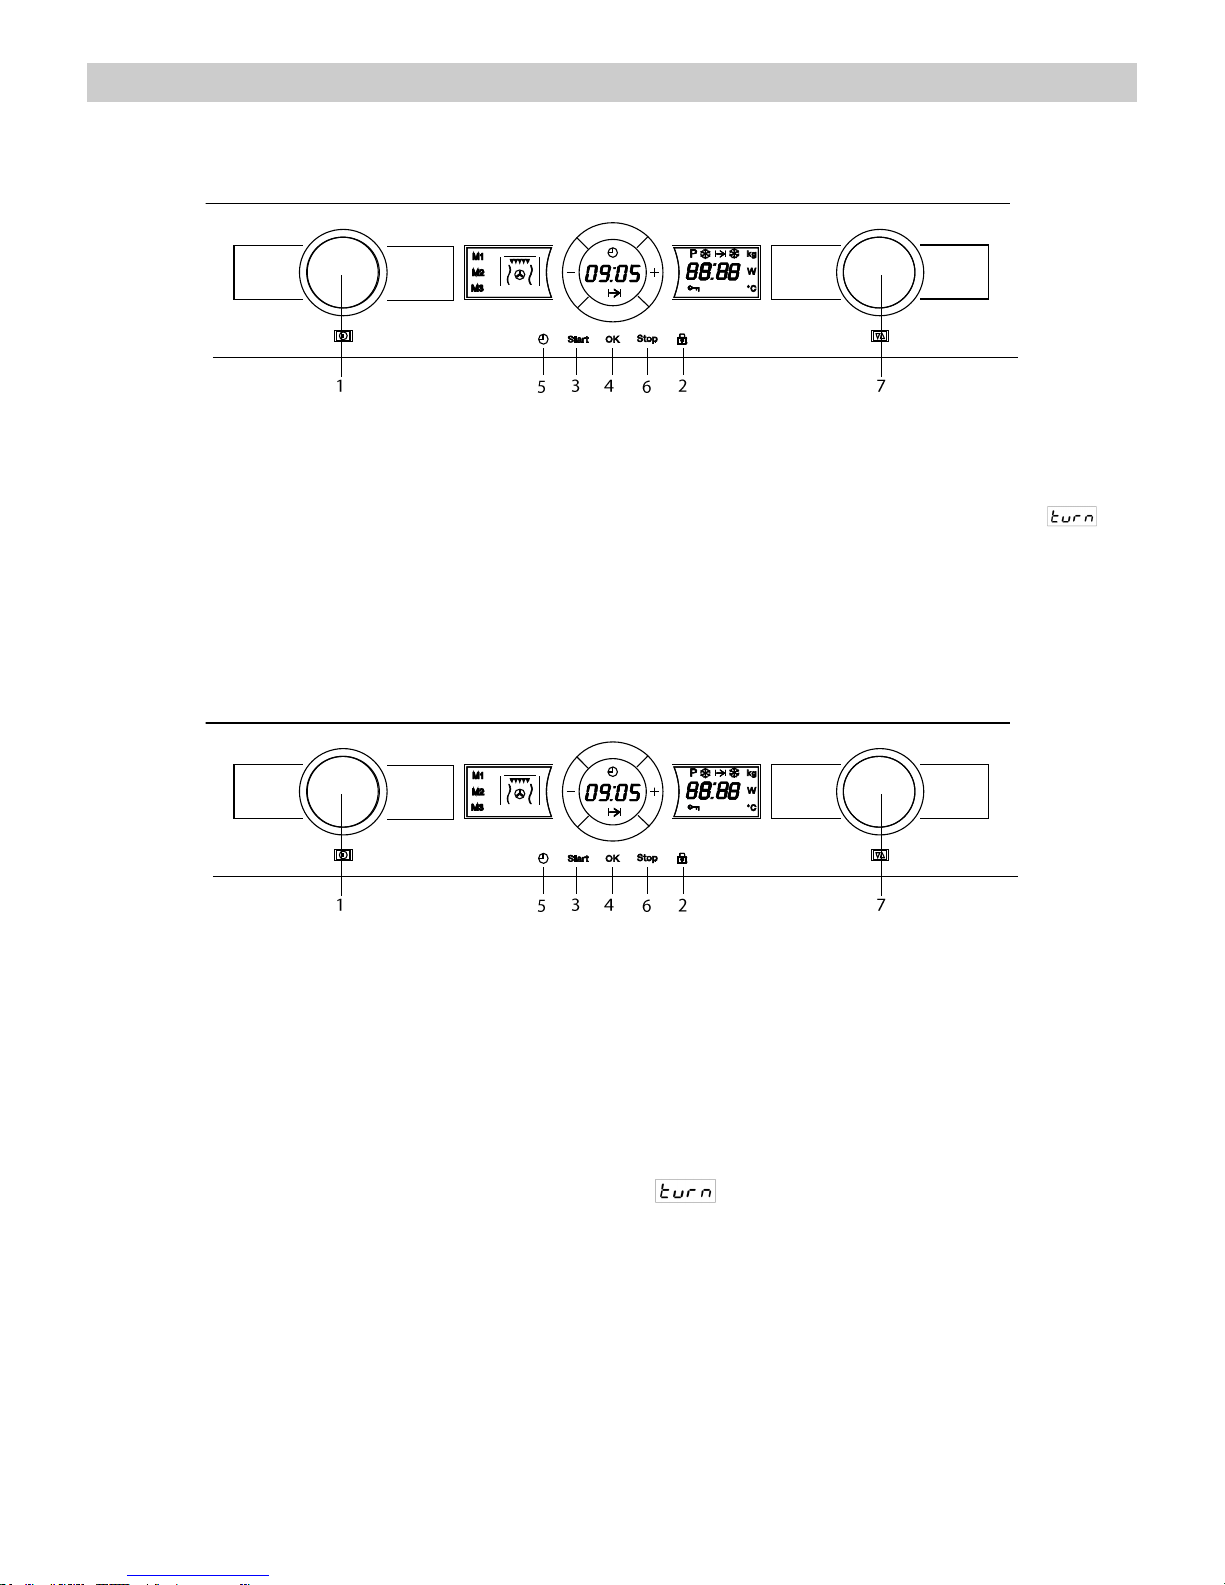
Description of your oven
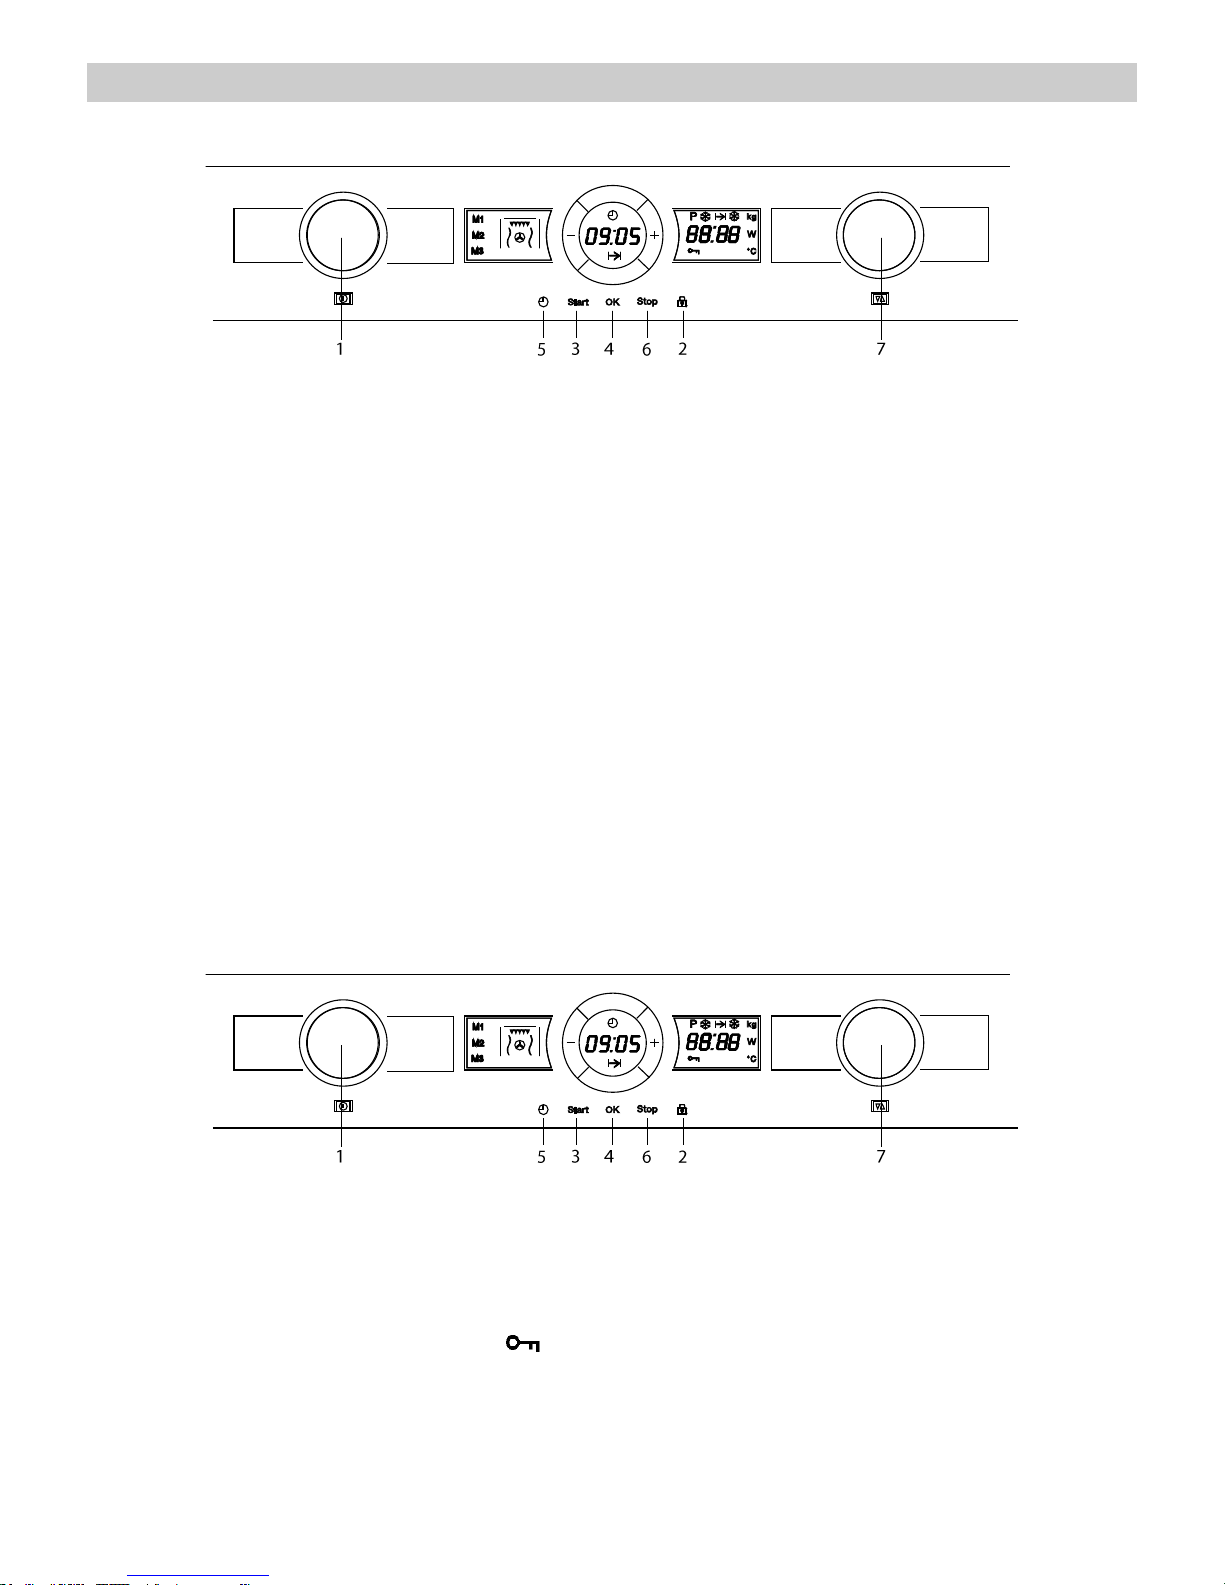
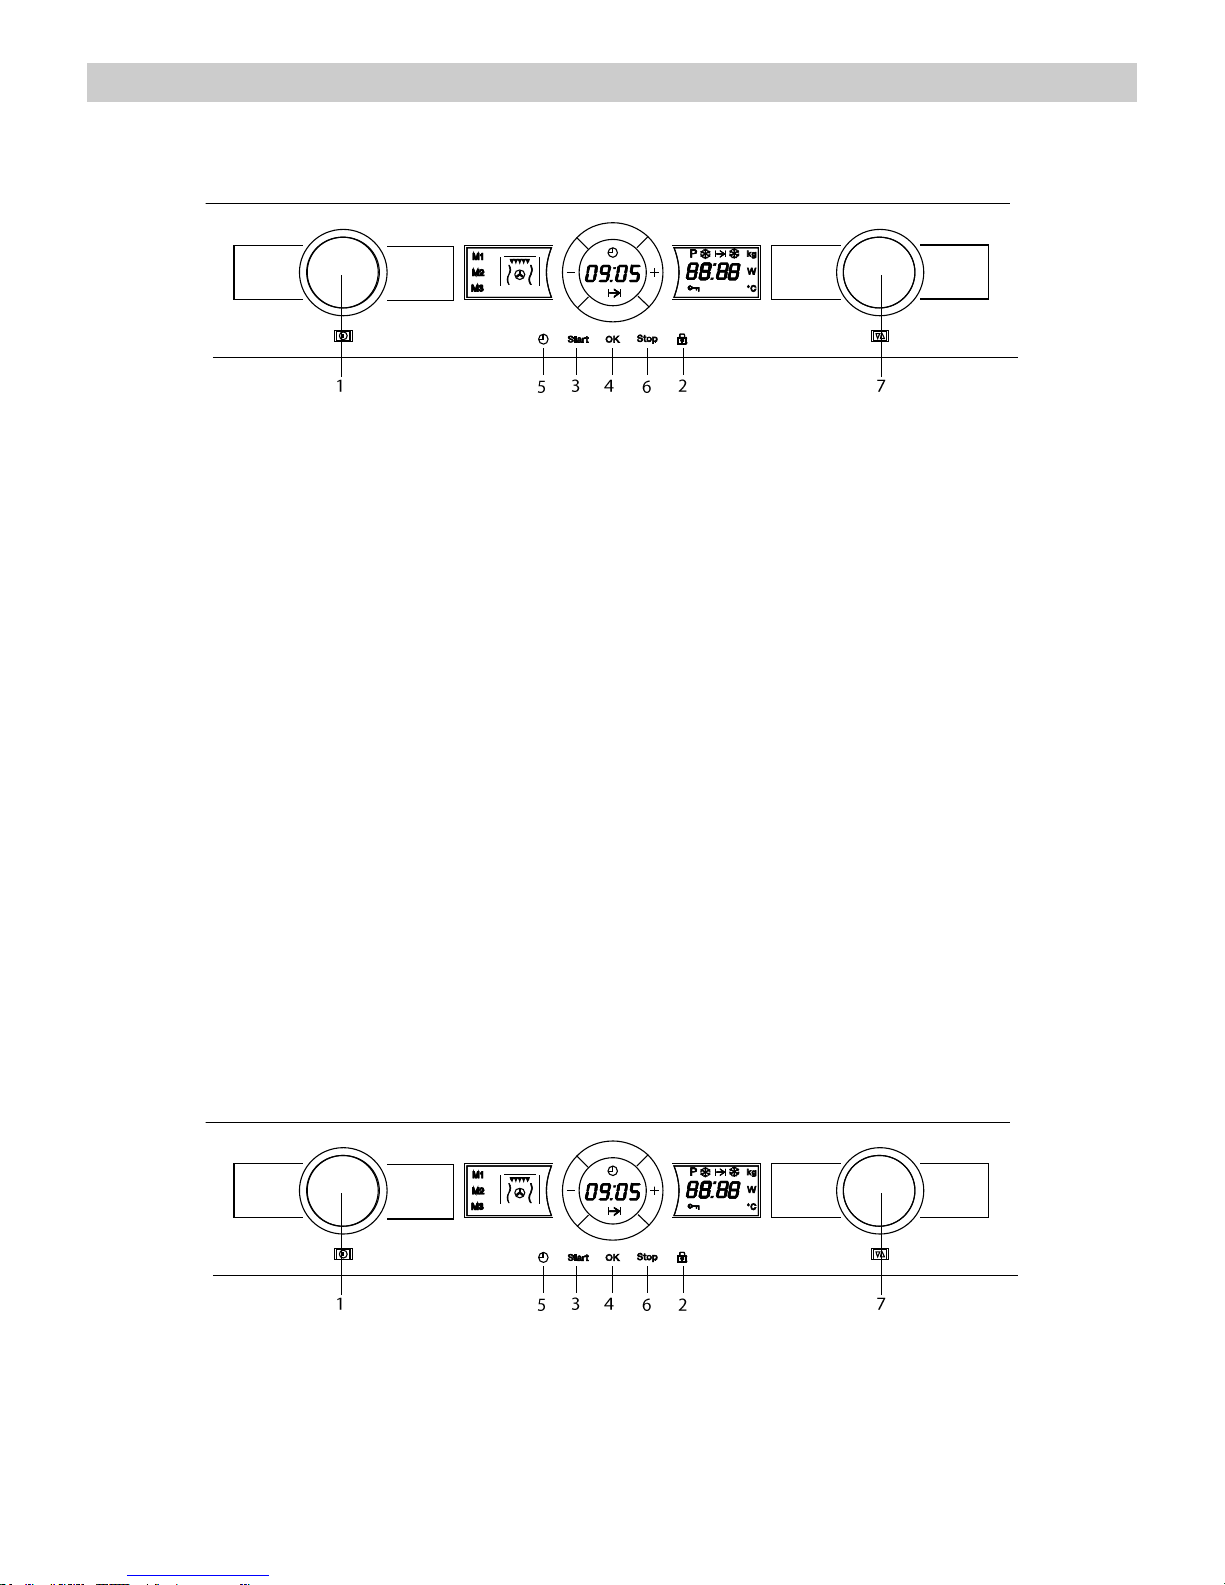
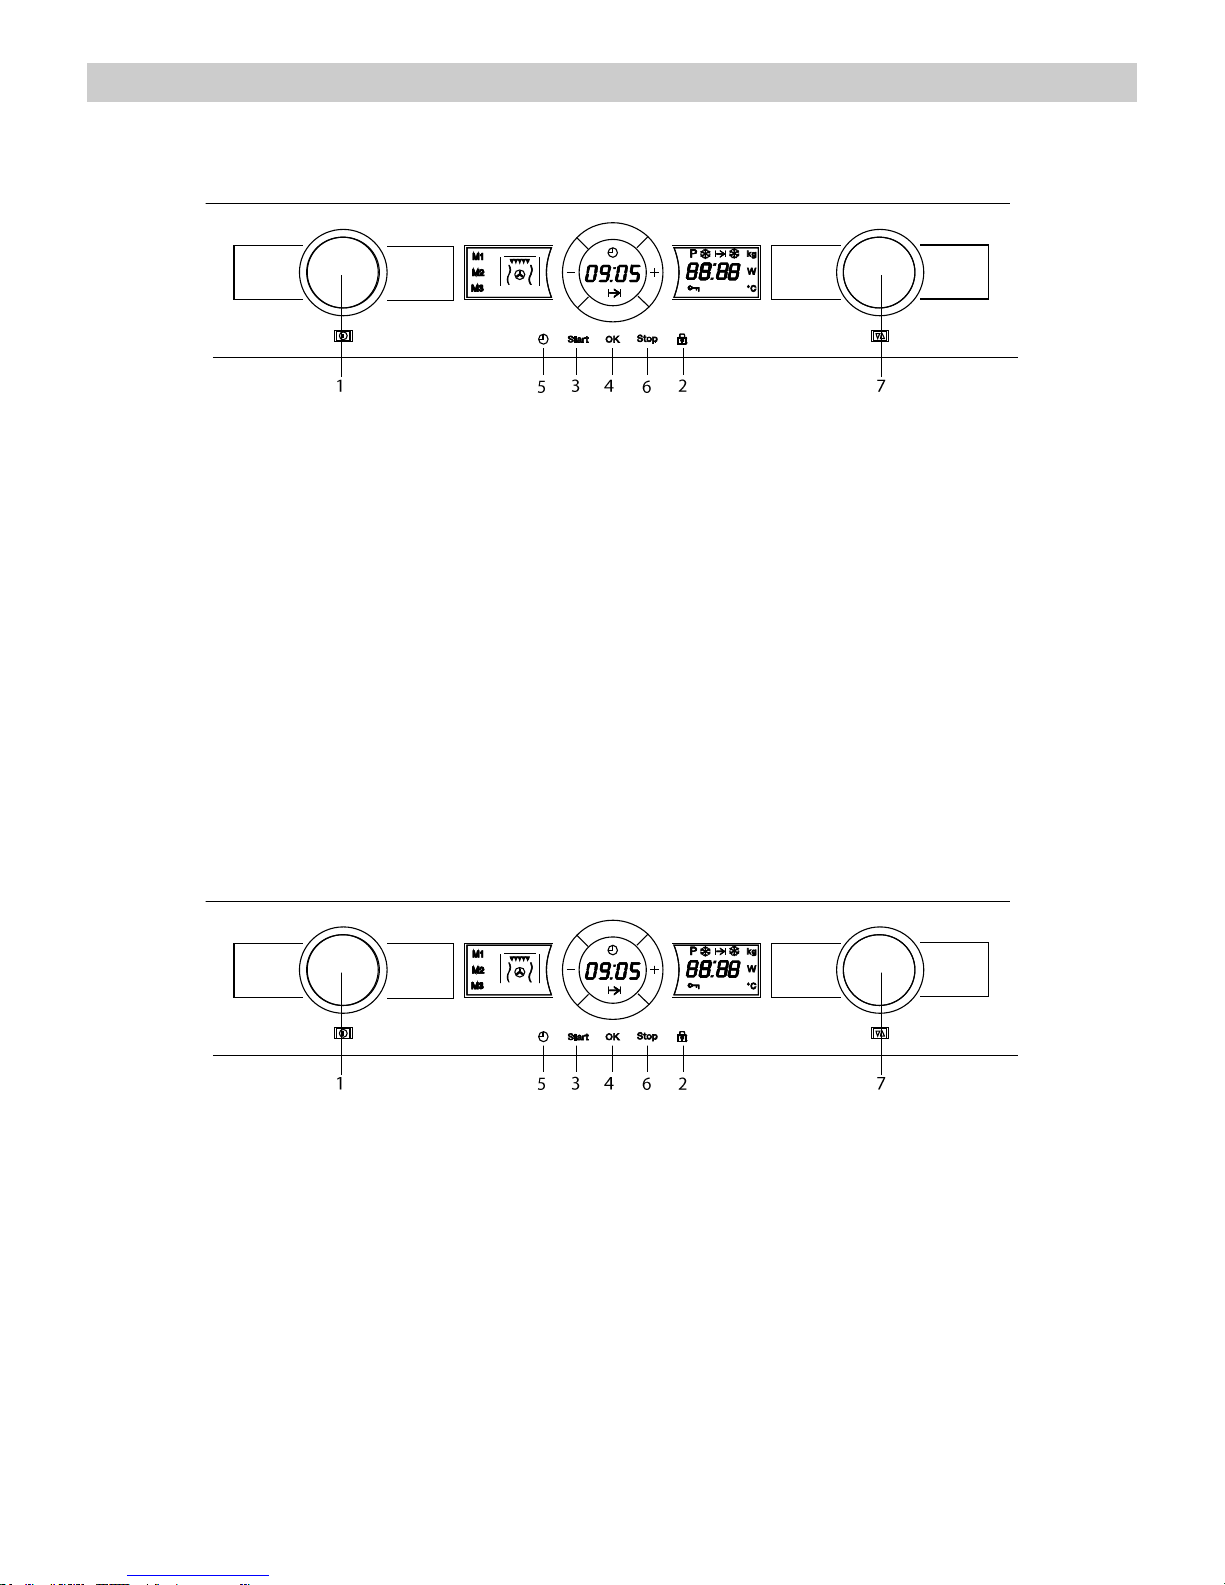
1. – Control Panel
7. – Turntable ring
2. – Door window glass
8. – Turntable plate
3. – Lateral supports
9. – Rectangular Glass Tray
4. – Catches
10. – Rectangular Rack
5. – Hot Air output
11. – Browning Plate
6. – Turntable Support
1. Function selection knob
2. Safety Block key
3. Start key
4. OK key
5. Clock key
6. Stop Key
7. Rotating Knob
A
B
C
D
E
F
G
H
I
J
K
L
M
N
O
A. Clock indicator
I. Defrost by weight indicator
B. Function indicator
J. Weight indicator
C. Cooking Memories indicators
K. Power indicator
D. Minus” key
L. Temperature indicator
E Duration indicator
M. Power/Weight display
F. “Plus” key
N. Safety Block indicator
G. Special Function indicator
O Clock/Duration display
H. “Defrost by time indicator
.
Page 13

12
USA
Description of your oven
Function Description
Symbol
Function
Microwave
Power Output
Foods
Microwave
200 W
Slow defrosting for delicate foods; keeping food hot
400 W
Cooking with little heat; boiling rice
Rapid defrosting
600 W
Melting butter
Heating baby food
800 W
Cooking vegetables and food
Cooking and heating carefully,
Heating and cooking small portions of food
Heating delicate food
1000 W
Cooking and rapidly heating liquids and pre-cooked foods
Microwave
+ Grill
200 W
Toasting food
400 W
Grilling poultry and meat
600 W
Cooking pies and cheese-topped dishes
Grill
Grilling food
Microwaves +
Hot-Air
200
Meat roast and simmer
400
Poultry roast
600
Other fast roasts
Hot-Air
---
Roast and bake
Grill + Fan
---
Food even browning
Page 14
13
USA
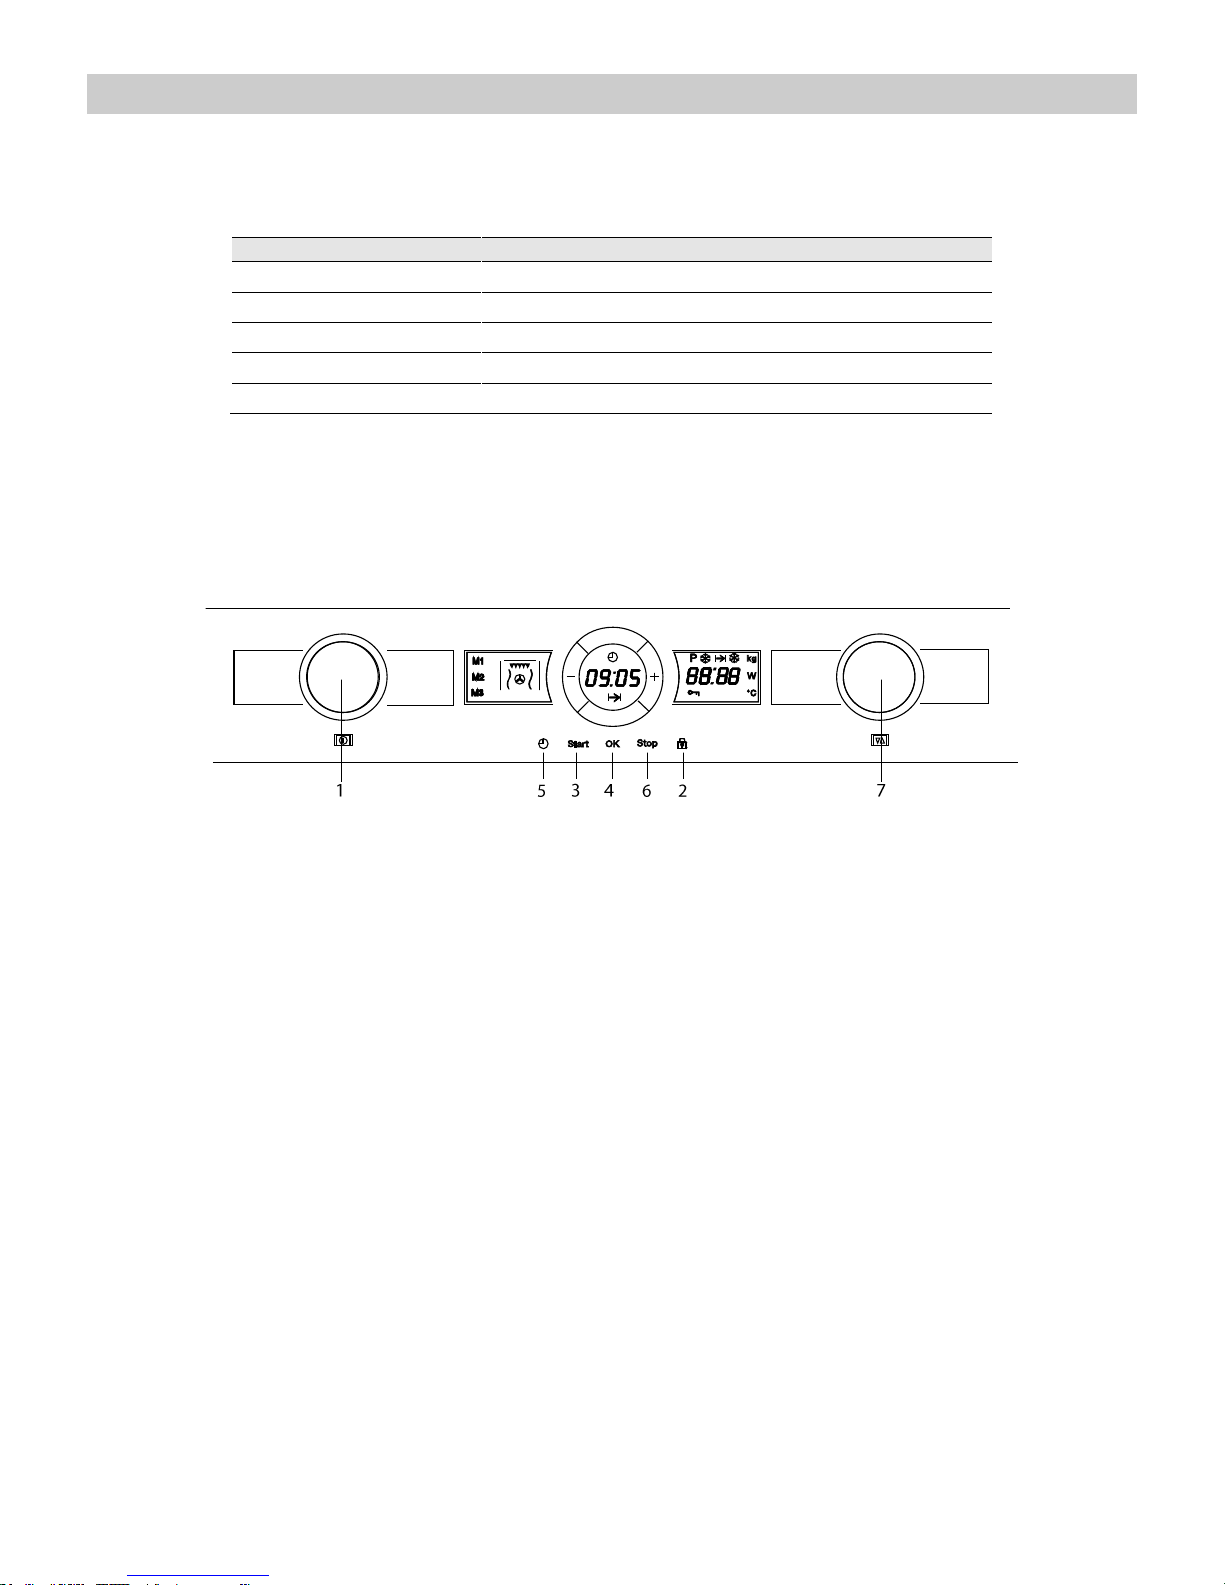
Basic settings
Setting the clock
After your microwave oven is first plugged in or
after a power failure, the clock display will flash to
indicate that the time shown is not correct. To set
the clock, proceed as follows:
1. Press the Clock key (5) when the
Clock/Duration display is showing the clock.
The hour numbers will start to flash.
2. Press the “+” and “-” keys to set the correct
hour value.
3. Press again the Clock key (5) to set the
minutes. The minute numbers will start to
flash.
4. Press the “+” and “-” keys to set the correct
minute value.
5. To finish, press the Clock key (5) again.
Hiding/Displaying the Clock
If the clock display disturbs you, you can hide it by
pressing the Clock key for 3 seconds. The dots
that separate the hours and minutes will flash but
the rest of the clock display will be hidden.
If you want to see the clock display again, press
the Clock key again for 3 seconds.
Safety blocking
The oven operation can be blocked (for example,
to stop it from being used by children).
1. To block the oven, press the Safety Block
key (2) for 3 seconds. You will hear a sound
signal and the message “SAFE” will be
displayed. Safety Block indicator will
illuminate. The oven is blocked in this state
and cannot be used.
2. To unblock the oven, press the Safety Block
key (2) again for 3 seconds. You will hear a
sound signal and the Safety Block indicator will
turn off.
Page 15
14
USA
Basic Functions
Microwaves
Use this function to cook and heat vegetables, potatoes, rice, fish and meat.
1. Turn the Function Selector knob (1) until the
Microwave function indicator flashes. The
Duration display shows 1:00 flashing.
2. Turn the Rotating knob (7) in either direction to
set the duration.
3. Press the OK key (4) to validate. The
microwaves power value flashes on the Power
display. The microwaves power indicator starts
to flash.
4. Turn the Rotating knob (7) in either direction to
set the microwaves power level. If you do not
turn this knob, the oven operates at 800 W
power.
5. Press the OK key (4) to validate.
6. Press the Start key (3). The oven will start to
operate.
NOTE:
The start button may be pressed at anytime
in the above sequence and the oven will
start the cooking process with the displayed
parameters.
Quick Start
1. Press the Start key (3). The oven starts to
function at maximum power for 30 seconds.
2. If you intend to extend the operating time, press
the Start key (3) again. Each time this key is
pressed, the operating time will increase by 30
seconds.
NOTE: If the power of 1000 W is selected, the
operating time is limited to a maximum of 15
minutes.
Grill
Use this function to brown the top of food quickly.
1. Turn the Function Selector knob (1) until the
Grill function indicator flashes. The Duration
display shows 15:00 flashing.
2. Turn the Rotating knob (7) in either direction to
set the duration.
3. Press the OK key (4) to validate.
4. Press the Start key (3). The oven will start to
operate.
Page 16
15
USA
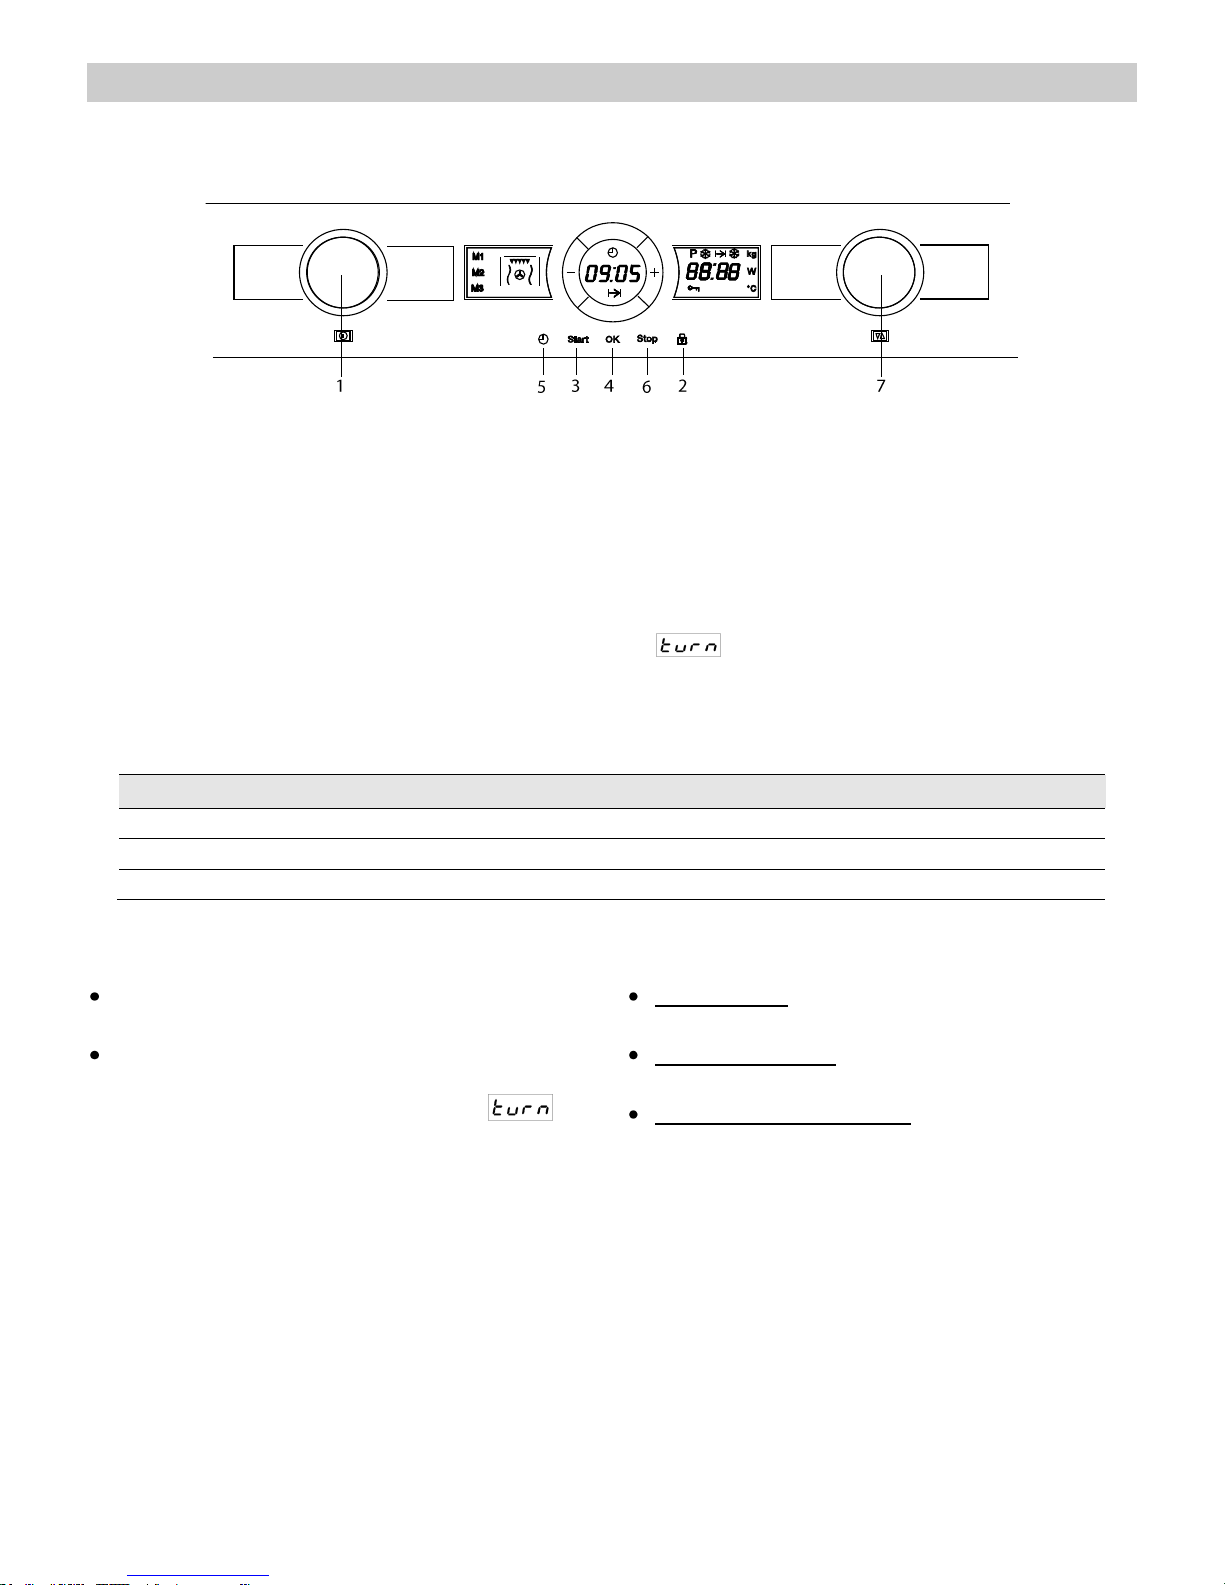
Basic Functions
Microwave + Grill
Use this function to cook lasagne, poultry, roast potatoes and toasted foods.
1. Turn the Function Selector knob (1) until the
Microwave + Grill function indicator flashes.
The Duration display shows 10:00 flashing.
2. Turn the Rotating knob (7) in either direction to
set the duration.
3. Press the OK key (4) to validate. The
microwaves power value flashes on the Power
display. The microwaves power indicator starts
to flash.
4. Turn the Rotating knob (7) in either direction to
set the microwaves power level. If you do not
turn this knob, the oven operates at 600W
power. The maximum power that can be
selected is 600 W.
5. Press the OK key (4) to validate.
6. Press the Start key (3). The oven will start to
operate.
NOTE:
The start button may be pressed at anytime in
the above sequence and the oven will start the
cooking process with the displayed
parameters.
Hot-Air
Use this function to bake food.
1. Turn the Function Selector knob (1) until the
Hot-Air function indicator flashes.
2. Turn the Rotating knob (7) in either direction to
set the duration.
3. Press the OK key (4) to validate. The
temperature value flashes. Turn the Rotating
knob (7) in either direction to set the
temperature.
4. The temperature value flashes. Turn the
Rotating knob (7) in either direction to set the
temperature.
5. Press the OK key (4) to validate.
6. Press the Start key (3). The oven will start to
operate.
.
Page 17

16
USA
Basic Functions
Microwave + Hot-Air
Use this function to rapidly bake the foods.
1. Turn the Function Selector knob (1) until the
Microwave + Grill function indicator flashes.
The Duration display shows 20:00 flashing.
2. Turn the Rotating knob (7) in either direction to
set the duration.
3. Press the OK key (4) to validate. The
microwaves power value flashes on the Power
display. The microwaves power indicator starts
to flash.
4. Turn the Rotating knob (7) in either direction to
set the microwaves power level. If you do not
turn this knob, the oven operates at 400W
power. The maximum power that can be
selected is 600 W.
5. Press the OK key (4) to validate.
6. The temperature value flashes. Turn the
Rotating knob (7) in either direction to set the
desired temperature. If you do not turn this
button, the oven will operate at 160ºC.
7. Press the OK key (4) to validate.
8. Press the Start key (3). The oven will start to
operate.
Grill + Fan
Use this function to bake evenly the food and at the same time brown their surface.
1. Turn the Function Selector knob (1) until the
Grill + Fan function indicator flashes.
2. Turn the Rotating knob (7) in either direction
to set the duration.
3. Press the OK key (4) to validate. The
temperature value flashes. Turn the Rotating
knob (7) in either direction to set the
temperature.
4. The temperature value flashes. Turn the
Rotating knob (7) in either direction to set the
temperature.
5. Press the OK key (4) to validate.
6. Press the Start key (3). The oven will start to
operate.
Page 18
17
USA
Basic Functions
Defrosting by time (manual)
Use this function to defrost any type of food quickly.
1. Turn the Function Selector knob (1) until the
Defrost by Time function indicator flashes. The
Duration display shows 10:00 flashing.
2. Turn the Rotating knob (7) in either direction to
set the duration.
3. Press the OK key (4) to validate.
4. Press the Start key (3). The oven will start to
operate.
5. Turn the food whenever the oven lets out a
beep and the display flashes the word.
Defrosting by weight (automatic)
Use this function to defrost meat, poultry, fish, fruit and bread quickly.
1. Turn the Function Selector knob (1) until the
Defrost by Weight function indicator flashes.
The Duration display shows the food type
“Pr 1” flashing.
2. Turn the Rotating knob (7) in either direction to
set the food type. If you do not turn this knob,
the oven operates with food type “Pr 1”.
3. Press the OK key (4) to validate. The food
weight value flashes on the Weight display. The
weight indicator starts to flash.
4. Turn the Rotating knob (7) in either direction to
set the food weight. If you do not turn this knob,
the oven operates with 200 g.
5. Press the OK key (4) to validate.
6. Press the Start key (3). The oven will start to
operate.
7. Turn the food whenever the oven lets out a
beep and the Weight display flashes the word:
.
Page 19
18
USA
Basic Functions
The following table shows the defrosting by weight function programmes, indicating weight intervals, and
defrosting and standing times (in order to ensure the food is of a uniform temperature).
Programme
Food
Weight (g)
Time (min)
Standing time (min)
Pr 01
Meat
100 – 2000
2 – 43
20 – 30
Pr 02
Poultry
100 – 2500
2 – 58
20 – 30
Pr 03
Fish
100 – 2000
2 – 40
20 – 30
Pr 04
Fruit
100 – 500
2 – 13
10 – 20
Pr 05
Bread
100 – 800
2 – 19
10 – 20
Important Note: see “General instructions for defrosting”.
Memory function
Define and store a memory
1. With the Function Selector (1), select one of
the Basic functions.
2. Set the desired parameters with the Rotating
Knob (7)
3. Press the Clock key (5) for 5 seconds. The
memory symbol “M1” starts blinking.
4. With the Rotating Knob (8) select in which
memory you want to store the defined
parameters (M1, M2 or M3)
5. Press the Ok Key (4) to confirm and store the
memory.
6. Recalling a memorized function
7. Rotate the Function Selector (1) to select the
stored memory.
8. Press the Start Key (3). The oven will start to
operate.
Delete a memory:
1. With the oven in stand-by select the desired
memory by turning the Function Selector
(1).
Press the Clock key (5) for 3 seconds. The
power/weight display shows the message “DEL”
for 3 seconds
Page 20
19
USA
Special functions
Special Function P: Heating food
Use this function to heat various types of food.
1. Turn the Function Selector knob (1) until the
Special Function indicator “P” flashes (the
Duration display shows the food type “A01”
flashing by default).
2. Turn the Rotating knob (7) in either direction to
set the desired special function (A01 – A04:
see table below).
3. Press the OK key (4) to validate. The food
weight value flashes on the Weight display. The
weight indicator starts to flash.
4. Turn the Rotating knob (7) in either direction to
set the food weight.
5. Press the OK key (4) to validate.
6. Press the Start key (3). The oven will start to
operate.
7. Turn the food whenever the oven lets out a
beep and the Weight display flashes the word:
.
The following table shows the Special Function P1 programmes, indicating weight intervals, and
defrosting and standing times (in order to ensure the food is of a uniform temperature).
Programme
Food
Weight (kg)
Time (min)
Note
A 01
Soup
200 – 1500
3 – 15
Turn 1-2 x, keep
covered
A 02
Pre-prepared dishes
dense food
200 – 1500
3 – 20
Turn 1-2 x, keep
covered
A 03
Pre-prepared dishes
e.g. goulash
200 – 1500
3 – 18
Turn 1-2 x, keep
covered
A 04
Vegetables
200 – 1500
2,6 – 14
Turn 1-2 x, keep
covered
Important Notes:
Always use dishes for use in the microwave
oven and a lid or cover to avoid loss of liquids.
Stir or mix the foods several times during
heating, especially when the oven emits a
beep and the display is flashing as
follows: .
The time required to heat the food will depend
on its initial temperature. Food taken straight
from the fridge will take longer to heat up than
food that is at room temperature. If the food
temperature is not what is wanted, select a
greater or lesser weight next time you heat up the
food.
After heating, stir the food and then leave the
food to stand for some time to allow the
temperature to become uniform throughout the
food.
Warning! After heating the container may be very
hot. Although microwaves do not heat up most
containers, these may heat up through heat
transmission from food.
Page 21

20
USA
Special functions
Special Function P: Cooking
Use this function to cook fresh food.
1. Turn the Function Selector knob (1) until the
Special Function indicator “P” flashes (the
Duration display shows the food type “A01”
flashing by default).
2. Turn the Rotating knob (7) in either direction to
set the desired special function (b01 – b04: see
table below).
3. Press the OK key (4) to validate. The food
weight value flashes on the Weight display. The
weight indicator starts to flash.
4. Turn the Rotating knob (7) in either direction to
set the food weight.
5. Press the OK key (4) to validate.
6. Press the Start key (3). The oven will start to
operate.
7. Turn the food whenever the oven lets out a
beep and the Weight display flashes the word:
.
The following table shows the Special Function P2 programmes, indicating weight intervals, and
defrosting and standing times (in order to ensure the food is of a uniform temperature).
Programme
Food
Weight (kg)
Time (min)
Note
b 01
Potatoes
200 – 1000
4 – 17
Turn 1-2 x, keep
covered
b 02
Vegetables
200 – 1000
4 – 15
Turn 1-2 x, keep
covered
b 03
Rice
200 – 500
13 – 20
One part rice, two
parts water
b 04
Fish
200 – 1000
4 – 13
Keep covered
Important Notes:
Always use dishes for use in the microwave
oven and a lid or cover to avoid loss of liquids.
Stir or mix the foods several times during
heating, especially when the oven emits a
beep and the display is flashing as follows
.
Warning! After heating, the container may be
very hot. Although microwaves do not heat up
most containers, these may heat up through
heat transmission from food.
Preparation instructions:
Fish pieces – Add 1 to 3 soup spoons of water or
lemon juice.
Rice – Add water equivalent to twice times the
quantity of rice.
Unpeeled potatoes – Use potatoes of the same
size. Wash them and prick the skin several times.
Add 1 to 3 soup spoons of water.
Peeled potatoes and Fresh vegetables– Cut into
pieces of the same size. Add a soup spoon of
water for every 100 g of vegetables, and salt to
taste.
Page 22
21
USA
Special functions
Special Function P: Defrosting & Toasting
Use this function to defrost and toast various types of food.
1. Turn the Function Selector knob (1) until the
Special Function indicator “P” flashes (the
Duration display shows the food type “A01”
flashing by default).
2. Turn the Rotating knob (7) in either direction to
set the desired special function (C01 – C03:
see table below).
3. Press the OK key (4) to validate. The food
weight value flashes on the Weight display. The
weight indicator starts to flash.
4. Turn the Rotating knob (7) in either direction to
set the food weight.
5. Press the OK key (4) to validate.
6. Press the Start key (3). The oven will start to
operate.
7. Turn the food whenever the oven lets out a
beep and the Weight display flashes the word:
.
The following table shows the Special Function P3 programmes, indicating weight intervals, and
defrosting and standing times (in order to ensure the food is of a uniform temperature).
Programme
Food
Weight (kg)
Time (min)
Note
C 01
Pizza
300 – 500
3 – 9
Preheat the backing pan
C 02
Deep-frozen food
400 – 1000
8 – 14
Turn 2 x, keep covered
C 03
Potato dishes
200 – 450
10 – 12
Turn 1 x
Important Notes:
Always use dishes for use in the microwave
oven and a lid or cover to avoid loss of liquids.
Stir or mix the foods several times during
heating, especially when the oven emits a beep
and the display is flashing as follows .
Warning! After heating, the container may be very
hot. Although microwaves do not heat up most
containers, these may heat up through heat
transmission from food.
Preparation instructions:
Frozen pizza – Use pre-cooked frozen pizzas
and pizzas-rolls.
Deep-frozen food – Use lasagne, cannelloni,
prawn soufflé, all frozen. Keep covered.
Potato dishes, frozen – Chips, potato
croquettes and fried potatoes must be suitable
for preparation in the oven.
Page 23
22
USA
Using the Browning Plate
Normally when cooking food, such as pizzas or
pies, on a grill or in a microwave oven, the dough
or pastry becomes soggy. This can be avoided by
using a browning plate. As a high temperature is
reached quickly on the bottom of the browning
plate, the crust turns crisp and brown.
The browning plate can also be used for bacon,
eggs, sausages, etc.
VERY IMPORTANT NOTES:
Use oven gloves at all times as the browning
plate will become very hot.
Never place the browning plate in the oven
without the glass plate.
Do not place any recipients on the browning
plate that are not heat-resistant (plastic bowls
for example).
How to cook with the browning plate:
1. Preheat the browning plate by selecting
the Microwave and Grill function for 3 to 5
minutes with a 600 W microwaves power
level.
2. Brush the browning plate with oil in order
to brown the food nicely.
3. Place the fresh or frozen food directly on
the browning plate.
4. Place the browning plate on the glass
turntable in the microwave oven.
5. Select the Microwaves and Grill function
and the cooking time as described below.
VERY IMPORTANT NOTES:
As the browning plate has a Teflon layer, if you
use it incorrectly, it can be damaged.
Never cut the food on the plate. Remove the
food from the plate prior to cutting.
Cleaning:
The best way to clean the browning plate is to
wash it with hot water and detergent and rinse off
with clean water. Do not use a scrubbing brush or
a hard sponge otherwise the top layer will be
damaged.
Food
Weight
Cooking
Time
Standing Time
Recommendation
Pizza
200 g
4 - 5 min
---
If the pizza is thin.
If the pizza is high increase the time
by 1 – 2 minutes
300 g
5 - 6 min
---
400 g
7 – 8 min
---
Quiches and
Pies
200 g
3 – 4 min
2 – 3 min
300 g
5 - 6 min
2 – 3 min
Hamburgers
150 - 200
8 - 10 min
5 – 8 min
Turn 2 x
Oven chips
400 g
6 -8 min
---
Turn 1 x
Page 24

23
USA
When the oven is working...
Interrupting a cooking cycle
You can stop the cooking process at any time by
pressing the Stop key once or by opening the
oven door.
In both cases:
Microwave emission is stopped
immediately.
The grill is de-activated but is still very hot.
Danger of burning!
The timer stops and the display shows the
remaining amount of operating time.
If you wish, at this time you can:
1. Turn or stir the food to ensure it will be
evenly cooked.
2. Change the process parameters.
3. Cancel the process by pressing the Stop
key.
To restart the process, close the door and press
the Start key
Altering parameters
The operating parameters (time, weight, power,
etc.) can only be altered when the cooking
process has been interrupted:
1. To alter the time, turn the rotating knob. The
new time defined is immediately valid.
2. To alter the weight/ power, press the
Weight/Power Selection key. The respective
light starts to flash. Alter the parameter by
pressing the “-“and “+”keys and confirm by
pressing the Power Selection key again.
Cancelling a cooking cycle
If you wish to cancel the cooking process, press
the Stop key for 3 seconds.
You will then hear a beep and the time will appear
on the display.
End of a cooking cycle
At the end of the process you will hear three
beeps and the display will show the word “End”.
The beeps are repeated every 30 seconds until
the door is opened or the Stop key is pressed.
Page 25
24
USA
Defrosting
The table below shows different defrosting and
standing times (in order to ensure the food
temperature is evenly distributed) for different
types and weights of food, plus recommendations.
Food
Weight (g)
Defrosting time (min)
Standing time
(min)
Recommendation
Portions of meat,
veal, beef, pork
100
2-3
5-10
Turn once
200
4-5
5-10
Turn once
500
10-12
10-15
Turn twice
1000
21-23
20-30
Turn twice
1500
32-34
20-30
Turn twice
2000
43-45
25-35
Turn three times
Goulash
500
8 -10
10-15
Turn twice
1000
17-19
20-30
Turn three times
Minced meat
100
2-4
10-15
Turn twice
500
10-14
20-30
Turn three times
Sausages
200
4-6
10-15
Turn once
500
9-12
15-20
Turn twice
Poultry (portions)
250
5-6
5-10
Turn once
Chicken
1000
20-24
20-30
Turn twice
Poularde
2500
38-42
25-35
Turn three times
Fish fillet
200
4-5
5-10
Turn once
Trout
250
5-6
5-10
Turn once
Prawns
100
2-3
5-10
Turn once
500
8-11
15-20
Turn twice
Fruit
200
4-5
5-10
Turn once
300
8-9
5-10
Turn once
500
11-14
10-20
Turn twice
Bread
200
4-5
5-10
Turn once
500
10-12
10-15
Turn once
800
15-17
10-20
Turn twice
Butter
250
8-10
10-15
Cream cheese
250
6-8
10-15
Creams
250
7-8
10-15
Page 26

25
USA
Defrosting
General instructions for defrosting
1. When defrosting, use only dishes that are
appropriate for microwaves (china, glass,
suitable plastic).
2. The defrost function by weight and the tables
refer to the defrosting of raw food.
3. The defrosting time depends on the quantity
and thickness of the food. When freezing food
keep the defrosting process in mind. Distribute
the food evenly in the container.
4. Distribute the food as best as possible inside
the oven. The thickest parts of fish or chicken
drumsticks should be turned towards the
outside. You can protect the most delicate parts
of food with pieces of aluminium foil.
Important: The aluminium foil must not come
into contact with the oven cavity interior as this
can cause electrical arcing.
5. Thick portions of food should be turned several
times.
6. Distribute the frozen food as evenly as possible
since narrow and thin portions defrost more
quickly than the thicker and broader parts.
7. Fat-rich foods such as butter, cream cheese
and cream should not be completely defrosted.
If they are kept at room temperature they will
be ready to be served in a few minutes. With
ultra-frozen cream, if you find small pieces of
ice in it, you should mix these in before serving.
8. Place poultry on an upturned plate so that the
meat juices can run off more easily.
9. Bread should be wrapped in a napkin so that it
does not become too dry.
10. Turn the food at regular intervals.
11. Remove frozen food from its wrapping and do
not forget to take off any metal twist-tags. For
containers that are used to keep frozen food in
the freezer and which can also be used for
heating and cooking, all you need to do is take
off the lid. For all other cases you should put
the food into containers that are suitable for
microwave use.
12. The liquid resulting from defrosting, principally
that from poultry, should be discarded. In no
event should such liquids be allowed to come
into contact with other foods.
13. Do not forget that by using the defrosting
function you need to allow for standing time
until the food is completely defrosted.
Page 27

26
USA
Cooking with a microwave oven
Warning! Read the section “Microwave Safety”
before cooking with your microwave.
Follow these recommendations when cooking with
your microwave:
Before heating or cooking foods with peel or
skin (e.g. apples, tomatoes, potatoes,
sausages) prick them so that they do not
burst. Cut the food up before starting to prepare
it.
Before using a container or dish make sure that
it is suitable for microwave use (see the section
on types of ovenware).
When cooking food with very little moisture
(e.g. defrosting bread, making popcorn, etc.)
evaporation is very quick. The oven then works
as if it was empty and the food may burn. The
oven and the container may be damaged in
such a situation. You should therefore set just
the cooking time necessary and you must keep
a close eye on the cooking process.
It is not possible to heat large quantities of oil
(frying) in the microwave.
Remove pre-cooked food from the containers
they come in since these are not always heat
resistant. Follow the food manufacturer’s
instructions.
If you have several containers, such as cups,
for example, set them out uniformly on the
turntable plate.
Do not close plastic bags with metal clips. Use
plastic clips instead. Prick the bags several
times so that the steam can escape easily.
When heating or cooking foods, check that they
reach at least a temperature of 70°C.
During cooking, steam may form on the oven
door window and may start to drip. This
situation is normal and may be more noticeable
if the room temperature is low. The oven’s safe
working is not affected by this. After you have
finished cooking, clean up the water coming
from the condensation
When heating liquids, use containers with a
wide opening, so that the steam can
evaporate easily.
Prepare the foods as per the instructions and
keep in mind the cooking times and power levels
indicated in the tables.
Keep in mind that the figures given are only
indicative and can vary depending on the initial
state, temperature, moisture and type of food. It is
advisable to adjust the times and power levels to
each situation. Depending on the exact
characteristics of the food you may need to
increase or shorten the cooking times or increase
or decrease the power levels.
Cooking with microwaves...
1. The greater the amount of food, the longer the
cooking time. Keep in mind that:
Double the quantity » double the time
Half the quantity » half the time
2. The lower the temperature, the longer the
cooking time.
3. Foods containing a lot of liquid heat up more
quickly.
4. Cooking will be more uniform if the food is
evenly distributed on the turntable. If you put
dense foods on the outside part of the plate and
less dense ones on the centre of the plate, you
can heat up different types of food simultaneously.
5. You can open the oven door at any time. When
you do this the oven switches off automatically.
The microwave will only start working again when
you close the door and press the start key.
6. Foods that are covered require less cooking
time and retain their characteristics better. The
lids used must let microwaves pass through and
have small holes that allow steam to escape.
Page 28

27
USA
Cooking with a microwave oven
Tables and suggestions – Cooking vegetables
Food
Quantity (g)
Addition of
liquids
Power
(Watt)
Time
(min.)
Standing
Time (min.)
Instructions
Cauliflower
Broccoli
Mushrooms
500
300
250
100 ml
50 ml
25 ml
800
800
800
9-11
6-8
6-8
2-3
2-3
2-3
Cut into slices.
Keep covered.
Peas & carrots
Frozen carrots
300
250
100 ml
25 ml
800
800
7-9
8-10
2-3
2-3
Cut into chunks or slices.
Keep covered.
Potatoes
250
25 ml
800
5-7
2-3
Peel and cut into equal
sized pieces. Keep
covered.
Paprika
Leek
250
250
25 ml
50 ml
800
800
5-7
5-7
2-3
2-3
Cut into chunks or slices
Keep covered.
Frozen Brussel
sprouts
300
50 ml
800
6-8
2-3
Keep covered.
Sauerkraut
250
25 ml
800
8-10
2-3
Keep covered.
Tables and suggestions – Cooking fish
Food
Quantity (g)
Power
(Watt)
Time
(min.)
Standing
Time (min.)
Instructions
Fish fillets
500
600
10-12
3
Cook covered over. Turn after half of
cooking time.
Whole fish
800
800
400
2-3
7-9
2-3
Cook covered over. Turn after half of
cooking time. You may wish to cover up the
small edges of the fish.
Page 29

28
USA
Cooking with the grill
For good results with the grill, use the grid iron
supplied with the oven.
Fit the grid iron in such a way that it doesn’t
come into contact with the metal surfaces of
the oven cavity since if it does there is a
danger of electric arcing which may damage
the oven.
IMPORTANT POINTS:
1. When the microwave grill is used for the first
time there will be some smoke and a smell
coming from the oils used during oven
manufacture.
2. The oven door window becomes very hot when
the grill is working. Keep children away.
3. When the grill is operating, the cavity walls and
the grid iron become very hot. You should use
oven gloves.
4. If the grill is used for extended period of time it
is normal to find that the elements will switch
themselves off temporarily due to the safety
thermostat.
5. Important! When food is to be grilled or
cooked in containers you must check that the
container in question is suitable for microwave
use. See the section on types of ovenware!
6. When the grill is used it is possible that some
splashes of fat may go onto the elements and
be burnt. This is a normal situation and does
not mean there is any kind of operating fault.
7. After you have finished cooking, clean the
interior and the accessories so that cooking
remains do not become encrusted.
Page 30
29
USA
Cooking with the Grill
Tables and suggestions – Grill without microwave
Fish
Quantity (g)
Time (min.)
Instructions
Fish
Bass
Sardines/gurnard
800
6-8 fish.
18-24
15-20
Spread lightly with butter. After half of
cooking time turn and spread with
seasoning.
Meat
Sausages
6-8 units
22-26
Prick after half cooking time and turn.
Frozen hamburgers
3 units
18-20
Spare rib (approx. 3 cm thick)
400
25-30
After half of cooking time, baste and turn.
Others
Toast
4 units
1½-3
Watch toasting.
Toasted sandwiches
2 units
5-10
Watch toasting.
Heat up the grill beforehand for 2 minutes. Unless
indicated otherwise, use the grid iron. Place the
grid on a bowl so that the water and the fat can
drop. The times shown are merely indicative and
can vary as a function of the composition and
quantity of the food, as well as the final condition
wished for. Fish and meat taste great if, before
grilling, you brush them with vegetable oil, spices
and herbs and leave to marinate for a few hours.
Only add salt after grilling.
Sausages will not burst if you prick them with a
fork before grilling.
After half the grilling time has passed, check on
how the cooking is going and, if necessary, turn
the food over.
The grill is especially suitable for cooking thin
portions of meat and fish. Thin portions of meat
only need to be turned once, but thicker portions
should be turned several times.
Page 31

30
USA
Cooking with the Grill
Tables and suggestions – Microwave + Grill
The microwave + grill function is ideal for cooking
quickly and, at the same time, browning foods.
Furthermore, you can also grill and cook cheese
covered food.
The microwave and the grill work simultaneously.
The microwave cooks and the grill toasts.
Food
Quantity (g)
Dish
Power
(Watt)
Time (min.)
Standing
time (min.)
Cheese topped pasta
500
Low dish
400
12-17
3-5
Cheese topped potatoes
800
Low dish
600
20-22
3-5
Lasagne
approx. 800
Low dish
600
15-20
3-5
Grilled cream cheese
approx. 500
Low dish
400
18-20
3-5
2 fresh chicken legs
(grilled)
200 each
Low dish
400
10-15
3-5
Chicken
approx. 1000
Low and wide dish
400
35-40
3-5
Cheese topped onion
soup
2 x 200 g cups
Soup bowls
400
2-4
3-5
Before using a dish in the microwave oven make
sure that it is suitable for microwave use. Only use
dishes or containers that are suitable for
microwave use.
The dish to be used in the combined function
must be suitable for microwave and grill use. See
the section on types of ovenware!
Keep in mind that the figures given are merely
indicative and can vary as a function of the initial
state, temperature, moisture and type of food.
If the time is not enough to brown the food well,
put it under the grill for another 5 or 10 minutes.
Please follow the standing times and don’t forget
to turn the meat pieces.
Unless indicated to the contrary, use the turntable
plate for cooking.
The values given in the tables are valid when the
oven cavity is cold (it is not necessary to pre-heat
the oven).
Page 32

31
USA
Tables and suggestions – Roasting
Tables and suggestions – Roasting
Type
Quantity
(g)
Power
(Watt)
Temperature
ºC
Time
(min)
Standing
Time (min)
Comments
Beef stew
1000
200
160/170
80/90
10
Do not put lid on
container
Pork loin
500/600
200
180/190
35/40
10
Do not put lid on
container
Whole
chicken
100/1200
400
200
30/40
10
Put lid on container.
Breast facing
upwards. Do not turn.
Chicken
portions
800
400
200
25/35
10
Do not put lid on
container. Arrange
portions with skin
facing upwards. Do
not turn.
Duck
1500/1700
200
200
70/80
10
Put lid on container.
Do not turn.
Advice for roasting meat
Turn the pieces of meat halfway through the
cooking time. When the roasted meat is ready
you should let it stand for 10 minutes in the oven
with this switched off and closed. This will
ensure the juices in the meat are well
distributed.
Add 2 to 3 soup spoons of gravy or similar liquid
to lean meat and 8 to 10 soup spoons to stews,
depending on the amount of meat in question.
The roasting temperature and time required
depends on the type and amount of meat being
cooked.
If the weight of the meat to be roasted does not
appear on the table choose the settings for the
weight immediately below and extend the cooking
times.
Advice on ovenware
Check that the ovenware fits inside the oven.
Hot glass containers should be put on a dry kitchen
cloth. If such containers are put on a cold or wet
surface the glass may crack and break. Use oven
gloves to take the ovenware out of the oven.
Page 33

32
USA
Tables and suggestions – Baking
Tables and suggestions – Cakes
Type
Container
Level
Temperature
Time (min)
Walnut cake
Spring-form type tin
1
170/180
30/35
Fruit tart
Spring-form type tin
2
150/160
35/45
Fruit cakes
Cake tin with central
hole
1
170/190
30/45
Savoury tarts
Spring-form type tin
2
160/180
50/70
Simple cake (sponge cake)
Spring-form type tin
1
160/170
40/45
Almond cakes
Cake tray
2
110
35/45
Puff pastry
Cake tray
2
170/180
35/45
Advice on cake baking ware
The most commonly used type of baking ware is
black metal tins. If you are also going to use the
microwave, use glass, ceramic or plastic baking
ware. These must be able to withstand
temperatures up to 250ºC. If you use these
types of baking ware the cakes are not browned
as much.
Advice on how to bake cakes
Different amounts and types of pastry require
different temperatures and baking times. Try low
settings first of all and then, if necessary, use
higher temperatures next time. A lower
temperature will result in more uniform baking.
Always put the cake tray in the centre of the
turntable.
Baking suggestions
How to check if the cake is properly cooked
Start sticking a tooth pick in the highest part of
the cake 10 minutes before the end of the
baking time. When no dough sticks to the tooth
pick the cake is ready.
If the cake is very dark on the outside
Next time choose a lower temperature and let
the cake bake for a longer time.
If the cake is very dry
Make small holes in the cake with a tooth pick
after baking has finished. Then sprinkle the cake
with some fruit juice or alcoholic drink. Next time
increase the temperature by about 10º and
reduce the baking time.
If the cake does not come free when turned
Let the cake cool down for 5 to 10 minutes after
baking and it will come out of the tin more easily.
If the cake still does not come free run a knife
carefully around the edges. Next time grease the
cake tin well.
.
Page 34

33
USA
What kind of ovenware can be used?
Microwave function
For the microwave function, keep in mind that
microwaves are reflected by metal surfaces.
Glass, china, clay, plastic, and paper let
microwaves pass.
For this reason, metal pans and dishes or
containers with metal parts or decorations
cannot be used in the microwave. Glass ware
and clay with metallic decoration or content
(e.g. lead crystal) cannot be used in microwave
ovens.
The ideal materials for use in microwave ovens
are glass, refractory china or clay, or heat
resistant plastic. Very thin, fragile glass or china
should only be used for short period of times (e.g.
heating).
Hot food transmits heat to the dishes which can
become very hot. You should, therefore, always
use an oven glove!
How to test ovenware you want to use
Put the item you want to use in the oven for 20
seconds at maximum microwave power. After that
time, if it is cold and just slightly warm, it is
suitable to use. However, if it heats up a lot or
causes electric arcing it is not suitable for
microwave use.
Grill and Hot-Air functions
In the case of the Grill and Hot Air functions, the
ovenware must be resistant to temperature of at
least 300°C. Plastic dishes are not suitable for use
in the grill.
Combined functions
In the microwave + grill function, the ovenware
used must be suitable for use in both the
microwave and the grill.
Aluminium containers and foil
Pre-cooked food in aluminium containers or in
aluminium foil can be put in the microwave if the
following aspects are respected:
Keep in mind the manufacturer’s
recommendations written on the packaging.
The aluminium containers cannot be more than
3 cm high or come in contact with the cavity
walls (minimum distance 3 cm). Any
aluminium lid or top must be removed.
Put the aluminium container directly on top of
the turntable plate. If you use the grid iron, put
the container on a china plate. Never put the
container directly on the grid iron!
The cooking time is longer because the
microwaves only enter the food from the top. If
you have any doubts, it is best to use only
dishes suitable for microwave use.
Aluminium foil can be used to reflect
microwaves during the defrosting process.
Delicate food, such as poultry or minced meat,
can be protected from excessive heat by
covering the respective extremities/edges.
Important: aluminium foil cannot come into
contact with the cavity walls since this may
cause electrical arcing.
Lids
We recommend you use glass or plastic lids or
cling film since:
1. This will stop excessive evaporation (mainly
during very long cooking times);
2. The cooking times are shorter;
3. The food does not become dry;
4. The aroma is preserved.
The lid should have holes or openings so that no
pressure develops. Plastic bags must also be
opened. Baby feeding bottles or jars with baby
food and similar containers can only be heated
without their tops / lids otherwise they can burst.
Page 35

34
USA
What kind of ovenware can be used?
Table of Ovenware
The table below gives you a general idea of what type of ovenware is suitable for each situation.
Operating mode
Type of
ovenware
Microwave
Grill and Hot
Air
Combined
Functions
Defrosting /
heating
Cooking
Glass and china 1)
Home use, not flame resistant, can
be used in dish washer
yes
Yes
no
no
Glazed china
Flame resistant glass and china
yes
Yes
yes
yes
China, stone ware 2)
Unglazed or glazed without metallic
decorations
yes
Yes
no
no
Clay dishes 2)
Glazed
Unglazed
yes
no
yes
no
no
no
no
no
Plastic dishes 2)
Heat resistant to 100°C
Heat resistant to 250°C
yes
yes
no
yes
no
no
no
no
Plastic films 3)
Plastic film for food
Cellophane
no
yes
no
yes
no
no
no
no
Paper, cardboard, parchment 4)
yes
No
no
no
Metal
Aluminium foil
Aluminium wrappings 5)
Accessories
yes
no
yes
no
yes
yes
yes
yes
yes
no
yes
yes
1. Without any gold or silver leaf edging; no lead
crystal.
2. Keep the manufacturer’s instructions in mind!
3. Do not use metal clips for closing bags. Make
holes in the bags. Use the films only to cover
the food.
4. Do not use paper plates.
5. Only shallow aluminium containers without
lids/tops. The aluminium cannot come into
contact with the cavity walls.
Page 36

35
USA
Oven Cleaning and Maintenance
Cleaning is the only maintenance normally
required.
Warning! Your microwave oven should be
cleaned regularly, with all food remains being
removed. If the microwave is not kept clean its
surfaces may deteriorate, reducing the oven’s
working life and possibly resulting in a
dangerous situation.
Warning! Cleaning should be done with the
oven power switched off. Take the plug out of
the socket or switch off the oven’s power
circuit.
Do not use aggressive or abrasive cleaning
products, scourers that scratch surfaces or
sharp objects, since stains may appear.
Do not use high pressure or stream jet
cleaning appliances.
Front surface
Normally you just need to clean the oven with a
damp cloth. If it is very dirty, add a few drops of
dishwashing liquid to the cleaning water.
Afterwards, wipe the oven with a dry cloth.
In an oven with an aluminium front, use a glass
cleaning product and a soft cloth that does not
release any fibres or threads. Wipe from side to
side without exerting any pressure on the surface.
Immediately remove lime, fat, starch or egg white
stains. Corrosion can occur under these stains.
Do not let any water get inside the oven.
Oven interior
After each time the oven is used, clean the inside
walls with a damp cloth since this is the easiest
way to remove splashes or spots of food that may
have stuck to the inside.
To remove dirt that is harder to shift, use a nonaggressive cleaning product. Do not use oven
sprays or other aggressive or abrasive
cleaning products.
Always keep the door and the oven front very
clean to ensure that the door opens and
closes properly.
Make sure water does not enter the microwave
ventilation holes.
Regularly take out the turntable plate and the
respective support and clean the cavity base,
especially after any liquid spillage.
Do not switch on the oven without the
turntable and the respective support being in
place.
If the oven cavity is very dirty, put a glass of water
on the turntable and switch on the microwave
oven for 2 or 3 minutes at maximum power. The
steam released will soften the dirt which can then
be cleaned easily using a soft cloth.
Unpleasant odours (e.g. after cooking fish) can be
eliminated easily. Put a few drops of lemon juice
in a cup with water. Put a spoonful of coffee in the
cup to avoid the water boiling over. Heat the water
for 2 to 3 minutes at maximum microwave power.
Page 37

36
USA
Oven Cleaning and Maintenance
Oven ceiling
To avoid the danger of burning, wait until the
grill is cold before starting to clean.
The mica cover (3) located in the ceiling must
always be kept clean. Any food remains that
collect on the mica cover can cause damage or
provoke sparks.
Do not use abrasive cleaning products or
sharp objects.
To avoid any risk, do not remove the mica
cover.
The glass lamp cover (4) is located on the oven
ceiling and can be removed easily for cleaning.
For this you just need to unscrew it and clean it
with water and dishwashing liquid.
Accessories
Clean the accessories after each use. If they are
very dirty, soak them first of all and then use a
brush and sponge. The accessories can be
washed in a dish washing machine.
Make sure that the turntable plate and the
respective support are always clean. Do not
switch on the oven unless the turntable and the
respective support are in place.
Page 38

37
USA
What should I do if the oven doesn’t work?
WARNING! Any type of repair must only be
done by a specialised technician. Any repair
done by a person not authorised by the
manufacturer is dangerous.
You do not need to contact Technical Assistance
to resolve the following questions:
The display is not showing! Check if:
- The time indication has been switched off
(see section on Basic Settings).
Nothing happens when I press the keys!
Check if:
- The Safety Block is active (see section on
Basic Settings).
The oven does not work! Check if:
- The plug is correctly fitted in the socket.
- The oven’s power is switched on.
- The door is completely closed. The door
should close with an audible click.
- There are any foreign bodies between the
door and the cavity front.
When the oven is operating I can hear some
strange noises! Check if:
- There is any electrical arcing inside the oven
caused by foreign metallic objects (see
section on type of ovenware).
- The ovenware is touching the oven walls.
- There are any loose items of cutlery or
cooking tools inside the oven.
The food doesn’t heat up or heats very
slowly! Check if:
- You have inadvertently used metal
ovenware.
- You have selected the correct operating
times and power level.
- The food you have put inside the oven is a
larger amount or colder than you usually put
in.
The food is too hot, dried out or burnt!
Check if you selected the correct operating
time and power level.
I hear some noises after the cooking
process is finished! This is not a problem.
The cooling fan keeps on working for some
time. When the temperature has dropped
sufficiently, the fan will switch itself off.
The oven switches on but the interior light
does not go on! If all the functions work
properly it is probable that the lamp has blown.
You can keep on using the oven.
Substitution of light bulb
To substitute the light bulb, proceed as follows:
- Disconnect the oven from the power supply.
Take the plug out of the socket or switch off
the oven’s power circuit.
- Unscrew and remove the glass light cover
(1).
- Remove the halogen light bulb (2). Warning!
The bulb may be very hot.
- Fit a new 12V / 10W halogen bulb. Warning!
Do not touch the light bulb surface
directly with your fingers because you
may damage the bulb. Follow the lamp
manufacturer’s instructions.
- Screw the glass light cover into place (1).
- Connect the oven again to the power supply.
Page 39

38
USA
Technical characteristics
Specifications
AC Voltage ......................................................................................................... (see rating plate)
Power required ................................................................................................... 3400 W
Grill power. ......................................................................................................... 1500 W
Hot-Air power. ..................................................................................................... 1600 W
Microwave output power. .................................................................................... 1000 W
Microwave frequency… ...................................................................................... 2450 MHz
Exterior dimensions (W H D). ........................................................................... 595 455 542 mm
Interior dimensions (W H D). ............................................................................ 420 210 390 mm
Oven capacity. .................................................................................................... 38 ltr
Weight ................................................................................................................ 35 kg
Page 40

39
USA
Installation instructions
Before installation
Check that the input voltage indicated on the
rating plate is the same as the voltage of the
power outlet you are going to use. (The rating
plate is located on the front part of the cavity and
it is only visible after opening the door.)
If required by the National Electrical Code (or
Canadian Electrical Code), this appliance must be
installed on a separate branch circuit.
Installer – show the owner the location of the
circuit breaker or fuse. Mark it for easy reference.
Before installing, turn power OFF at the service
panel. Lock service panel to prevent power from
being turned ON accidentally.
Be sure your appliance is properly installed and
grounded by a qualified technician. Installation,
electrical connections and grounding must comply
with all applicable codes.
Open the oven door and take out all the
accessories and remove the packing material.
Do not remove the mica cover on the ceiling of
the interior! This cover stops fat and pieces of
food damaging the microwave generator.
Warning! The front surface of the oven may be
wrapped with a protective film. Before using the
oven for the first time, carefully remove this film,
starting on the inside.
Make sure that the oven is not damaged in any
way. Check that the oven door closes correctly
and that the interior of the door and the front of
the oven opening are not damaged. If you find any
damage contact the Technical Assistance
Service.
DO NOT USE THE OVEN if the metal conduit is
damaged, if the oven does not function correctly
or if it has been damaged or dropped. Contact the
Technical Assistance Service.
Place the oven on a flat and stable surface. The
oven must not be put close to any sources of
heat, radios or televisions.
Electrical supply
Before installing the oven have a qualified
electrician verify that your home is provided with
adequate electrical service and that the addition of
the oven will not overload the branch circuit on
which it is to be installed.
A separate three-wire or four-wire single phase,
240 Volt, 60 Hz,
For hook-up of the oven you will need to have an
approved junction box installed where it will be
easily reached through the front of the cabinet
where the oven will be located. The oven has 3
feet of conduit.
Allow two to three feet of slack in the line so that
the oven can be moved if servicing is ever
necessary.
DO NOT shorten the flexible conduit.
Wiring requirements
When making the wire connections, use the entire
length of the conduit provided (3 feet). The
conduit must not be cut.
Before making connections make sure the power
is off and read and observe the following:
1. A separate three-wire or four-wire, single
phase, 240 Volt, 60 Hz branch circuit is
required for the oven.
2. The oven must be connected with Copper or
Aluminum wire.
3. In the United States:
Wiring must conform to the National
Electrical Code, ANSI/NFPA No. 7 latest
edition. You can obtain a copy of the
National Electrical Code by writing to:
National Fire Protection Association
Batterymarch Park Quincy, MA 02269
Page 41

40
USA
Installation instructions
In Canada:
Wiring must conform to Cana dian Electrical
Code C22.1- latest edition. You can obtain a
copy of the Canadian Electrical Code by
writing to: Canadian Standards Association
178 Rexdale Boulevard Rexdale (Toronto),
Ontario, Canada M9W 1R3
4. Wire size (Copper or Aluminum wire) and
connections must be suitable for the rating of
the appliance as per the National Electrical
Code requirements. The flexible armoured
cable extending from the oven should be
connected directly to the junction box.
5. The junction box should be located so as to
allow as much slack as possible between the
junction box and the oven so it can be
moved if servicing is ever required.
6. A U.L. listed conduit connector must be
provided at each end of the power supply
cable.
Electrical connections
Be sure your appliance is properly installed
and grounded by a qualified technician. Ask
your dealer to recommend a qualified
technician or an authorized repair service.
This appliance is manufactured with a green
GROUND wire connected to the oven chassis.
After making sure that the power has been turned
off, connect the flexible conduit from the oven to
the junction box using a U.L. listed conduit
connector. The figures and the instructions
provided below present the most common way of
connecting the ovens.
Your local codes and ordinances, of course, take
precedence over these instructions.
WARNING” Risk of Electric Shock, frame
grounded to neutral of appliance through a
link.
Grounding through the neutral conductor is
prohibited for new branch-circuit installations
(1996 NEC); mobile homes; and recreational
vehicles, or in an area where local codes prohibit
grounding through the neutral conductor. For
installations where grounding through the neutral
conductor is prohibited:
Disconnect the ground from the neutral at
free end of conduit;
Use grounding terminal or lead to ground
unit; and
Connect neutral terminal or lead to branch
circuit neutral in usual manner.
3-Wire branch circuit (for US only)
Refer to the following Figure, where local codes
allow the connection of GROUND wire from the
oven to the branch circuit NEUTRAL wire (gray or
white colored wire):
If local codes permit, connect the green
GROUND wire from the oven and the white
wire from the oven to the branch circuit
NEUTRAL wire (gray or white colored wire).
Connect the red and black leads from the
oven to the corresponding leads in the
junction box.
Page 42

41
USA
Installation instructions
4-Wire branch circuit (for US and
CANADA)
Refer to the following Figure:
Disconnect ground from neutral at free end
of conduit.
Connect the green GROUND wire from the
oven to the GROUND wire in the junction
box (bare or green colored wire).
Connect the red and black leads from the
oven to the corresponding leads in the
junction box.
After installation
The oven only functions when the door is closed
correctly.
After the first use, clean the inside of the oven and
the accessories, following the cleaning
instructions given in the section “Oven cleaning
and maintenance”.
Fit the Turntable support in the center of the oven
cavity and put the Turntable ring and the
Turntable plate on top, making sure they slot in.
Whenever you use the microwave, the turntable
plate and the respective accessories must be
inside and correctly fitted. The turntable plate can
rotate in both directions.
Page 43

42
FR
Cher client,
Nous vous remercions d'avoir préféré notre produit Porter & Charles. Nous sommes certains que ce
four à micro-ondes moderne, fonctionnel et pratique, fabriqué avec des matériaux de première qualité,
vous donnera toute satisfaction.
Nous vous demandons une lecture attentive des instructions de ce manuel. Elles vous permettront
d'utiliser votre four en obtenant les meilleurs résultats.
CONSERVEZ TOUTE LA DOCUMENTATION DE CE PRODUIT POUR LA CONSULTER
ULTÉRIEUREMENT.
Gardez toujours le manuel d'instructions à portée de main. Si vous cédez l'appareil à un tiers,
remettez-lui également le manuel.
Ce Four Combi Speed respecte la section 18 du règlement FCC.
Vous pouvez aussi télécharger le manuel d’utilisation sur www.porterandcharles.ca
Page 44

43
FR
Sommaire
Instructions pour lier à la terre ................................................................................................ ........ 44
Consignes de sécurité importantes ................................................................................................ 45
Précautions pour éviter une exposition aux micro-ondes ............................................................ 47
Précautions à être observées avant et durant l’entretien pour éviter une possible exposition à un
excès d’énergie du micro-ondes ..................................................................................................... 48
Instructions concernant la sécurité ................................................................................................ 49
Les avantages des micro-ondes ..................................................................................................... 51
Description du four ........................................................................................................................... 52
Description des fonctions ............................................................................................................... 53
Réglages de base ............................................................................................................................. 54
Réglage de l’heure ......................................................................................................................... 54
Fonctions de base ............................................................................................................................ 55
Micro-ondes .................................................................................................................................... 55
Grill ................................................................................................................................................. 56
Air Chaud........................................................................................................................................ 57
Grill ventilée .................................................................................................................................... 58
Décongélation par poids (automatique) .......................................................................................... 59
Fonction Mémoire ........................................................................................................................... 60
Fonctions spéciales ......................................................................................................................... 61
Fonction Spéciale P: Chauffer des aliments ................................................................................... 61
Fonction Spéciale P: Cuisiner ......................................................................................................... 62
Fonction Spéciale P: Décongeler et gratiner .................................................................................. 63
Utilisation du plat grill ...................................................................................................................... 64
Pendant le fonctionnement... ........................................................................................................... 65
Décongélation ................................................................................................................................ ... 66
Indications générales pour la décongélation................................................................................... 67
Cuisiner aux micro-ondes ................................................................................................................ 68
Cuisiner au grill ................................................................................................................................. 70
Tableaux et suggestions .................................................................................................................. 73
Cuire de la viande ........................................................................................................................... 73
Préparer des gâteaux ..................................................................................................................... 74
Quel type de vaisselle utiliser? ....................................................................................................... 75
Fonction Micro-ondes ..................................................................................................................... 75
Fonction Gril et Air Chaud .............................................................................................................. 75
Fonctions Combinées ..................................................................................................................... 75
Couvercles ...................................................................................................................................... 75
Nettoyage et entretien du four ......................................................................................................... 77
Que faire en cas de mauvais fonctionnement ? ............................................................................. 79
Caractéristiques techniques ............................................................................................................ 80
Instructions pour l'installation ......................................................................................................... 81
Dimensions pour l'Installation ......................................................................................................... 84
Page 45

44
FR
INSTRUCTIONS POUR LIER À LA
TERRE
L’appareil doit être lié à la terre. En cas de court-circuit électrique, la liaison à
la terre réduit le risque de choc électrique grâce a la fuite permise par le fil de
terre. L’appareil vient équipé avec un fil de terre ainsi que la prise de terre. La
fiche doit être branchée dans une prise correctement installée et liée à la
terre.
Attention! UNE MAUVAISE LIAISON À LA TERRE PEUT PROVOQUER UN
RISQUE DE CHOC ÉLECTRIQUE.
Consultez un électricien qualifié si les instructions pour lié à la terre ne sont
pas complètement comprises ou en cas de doute quant à savoir si l'appareil
est correctement lié à la terre. Ne pas utiliser de rallonge. Si le cordon
d'alimentation est trop court, demandez à un électricien qualifié d'installer
une prise près de l'appareil.
Page 46

45
FR
CONSIGNES DE SÉCURITÉ
IMPORTANTES
Lors de l'utilisation des appareils électriques les précautions bases de sécurité
doivent être respectées, y compris ce qui suit.
Attention! Pour réduire le risque de brûlures, d’électrocution, d’incendie, de
blessure ou d'exposition à l'énergie micro-ondes excessive :
Lisez toutes les instructions avant d'utiliser l’appareil.
Lisez et suivez les " PRÉCAUTIONS POUR ÉVITER UNE EXPOSITION AUX
MICRO-ONDES " spécifiques indiqués sur ce manuel.
L’appareil doit être lié à la terre. Connectez uniquement à une prise de terre.
Voir "CONSIGNES DE LIAISON À TERRE" présentées dans ce manuel.
Installer ou placer l'appareil en conformité aux instructions d'installation
fournies.
Certains produits comme les œufs entiers et des contenants scellés - par
exemple, des bocaux en verre fermés peuvent exploser et ne doivent pas être
chauffés dans ce four.
Utilisez cet appareil uniquement pour l’usage prévu comme décrit dans le
manuel. Ne pas utiliser de produits chimiques corrosifs dans cet appareil. Ce
type de four a été spécialement conçu pour chauffer, cuire ou sécher des
aliments. Il n'est pas conçu pour utilisation industriel ou de laboratoire.
Comme dans tout appareil, une surveillance étroite est nécessaire quand il est
utilisé par les enfants.
Ne pas utiliser cet appareil s’il a le cordon ou la fiche endommagés, s'il ne
fonctionne pas correctement, s’il a été endommagé ou s’il est tombé.
Cet appareil doit être réparé que par un technicien qualifié. Contactez le centre
de service agréé le plus proche pour une examinassions, réparation ou
réglage.
Ne pas couvrir ou obstruer les ouvertures sur les appareils.
Ne stockez pas cet appareil à l'extérieur. Ne pas utiliser ce produit près de
l'eau - par exemple près d’un évier de cuisine, dans un sous-sol humide, près
d'une piscine, ou des endroits similaires.
Ne pas immerger le cordon ou la fiche dans l’eau.
Garder le cordon loin des surfaces chauffées.
Ne laissez pas le cordon pendre de la table ou du comptoir.
Page 47
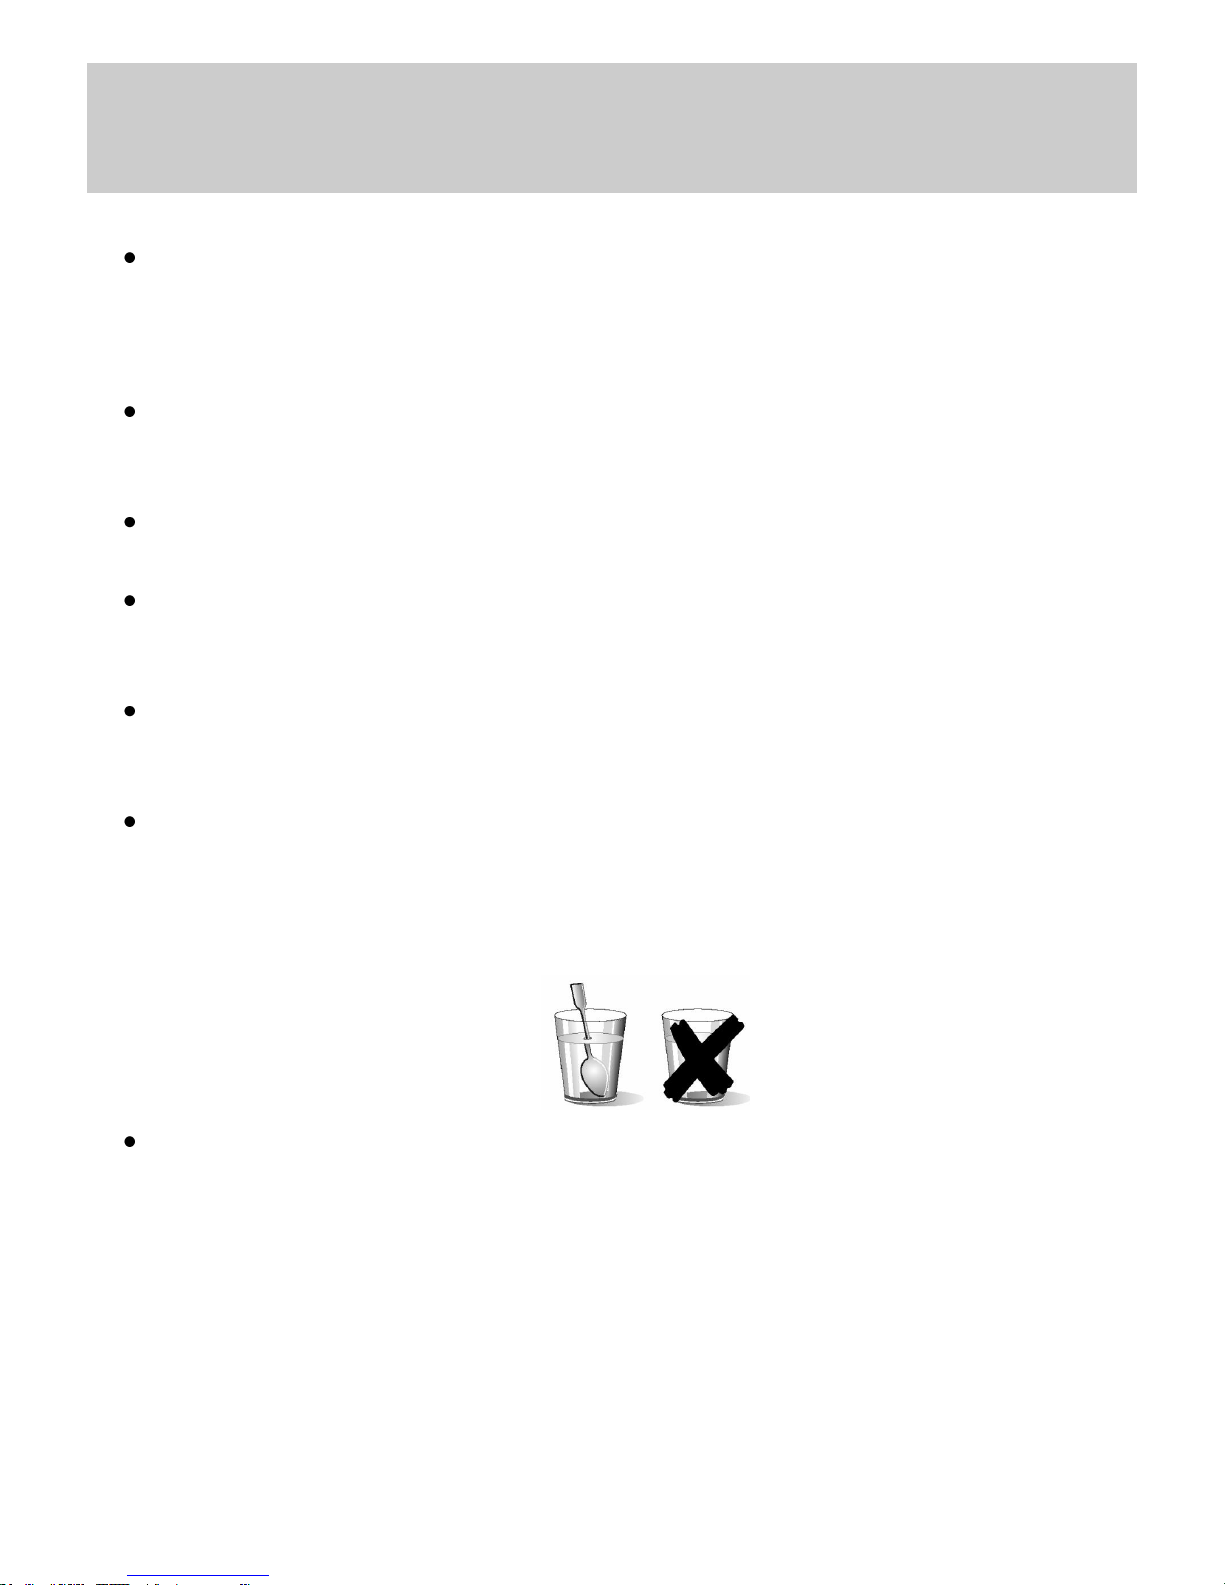
46
FR
CONSIGNES DE SÉCURITÉ
IMPORTANTES
Lors du nettoyage de surfaces de la porte et du four qui se réunit à la
fermeture de la porte, utilisez uniquement du savon léger et non abrasif ou du
détergent et une éponge ou un chiffon doux.
Pour réduire le risque d'incendie dans la cavité du four :
Ne pas trop cuire les aliments. Surveillez attentivement votre four lorsque du
papier , du plastique ou d'autres matériaux combustibles sont placés à
l'intérieur du four pour faciliter la cuisson .
Retirer les attaches de sacs en papier ou en plastique avant de les placer
dans le four.
Si des matériaux à l'intérieur du four prennent feu, gardez la porte du four
fermée, éteignez le four et débranchez le cordon d’alimentation ou coupez le
courant du fusible ou du panneau de disjoncteurs.
Ne pas utiliser la cavité à des fins de stockage . Ne laissez pas de produits en
papier, ustensiles de cuisine, ou de la nourriture dans la cavité lorsqu'il n'est
pas utilisé.
Les liquides tels que l’eau, le café ou le thé peuvent être surchauffés au-delà
du point d'ébullition sans sembler bouillir . Bullage ou ébullition visible lorsque
le récipient est retiré du four à micro-ondes ne sont pas toujours présents.
CELA POURRAIT PROVOQUER QUE DES LIQUIDES TRÈS CHAUDS
DÉBORDENT lorsque le récipient est perturbé ou un ustensile dans le liquide.
Pour éviter ce genre de situation pour le chauffage de liquides, mettez une
cuillère à café ou une tige en verre à l'intérieur du récipient.
Page 48

47
FR
PRÉCAUTIONS POUR ÉVITER UNE
EXPOSITION AUX MICRO-ONDES
(a) Ne pas faire fonctionner ce four avec la porte ouverte, car le fonctionnement
de la porte peut entraîner a une dangereuse exposition d'énergie des microondes. Il est important de ne pas annuler ou de ne pas modifier les
dispositifs de verrouillage de sécurité..
(b) Ne placez aucun objet entre le front de l’appareil et la porte. Ne pas laisser
de souillures ou résidus du produit de nettoyage s'accumuler sur les surfaces
d'étanchéité.
(c) Ne pas faire fonctionner le four s'il est endommagé. Il est particulièrement
important que la porte du four ferme correctement et qu'il n'y ait pas de
dommages : (1) sur la porte (tordue), (2) aux charnières et verrous (brisés ou
desserrés), (3) et aux joints et surfaces d'étanchéité.
(d) Le four doit pas être réglé ou réparé uniquement par un technicien qualifié.
Pacemakers:
La plupart des pacemakers sont protégés des interférences des appareils
électroniques y compris les micro-ondes. Cependant, les patients porteurs de
pacemakers peuvent consulter leur médecin en cas de doute.
Page 49

48
FR
PRÉCAUTIONS À ÊTRE OBSERVÉES
AVANT ET DURANT L'ENTRETIEN
POUR ÉVITER UNE POSSIBLE
EXPOSITION À UN EXCÈS D'ÉNERGIE
DU MICRO ONDES
(a) Ne pas opérer ou permettre que le four soit utilisé avec la porte ouverte.
(b) Faire les vérifications suivantes sur tous les fours à être utilisés avant
d'activer le magnétron ou une autre source de micro ondes, et faire les
réparations nécessaires: opération de verrouillage, fermeture de la porte
correcte, joints et surfaces d’étancheité (l’arc électrique, revêtement, autres
dommages), dommage ou relâchement de charnières et loquets, preuves de
chute ou d'abus.
(c) Avant de brancher le micro ondes pour un service de test où inspection au
compartiment générateur de micro-ondes, vérifier le magnétron, guide
d'ondes ou ligne de transmission et la cavité pour un propre alignement,
intégrité et connexion.
(d) Tout défaut ou dé-réglage de composants du verrouillage, moniteur, joint de
la porte et les systèmes de la génération et de transmission de micro-ondes
doivent être réparés, remplacés ou ajustes par les procédures décrites sur
ce mode d'emploi avant que le four soit livre au propriétaire.
(e) Une vérification des fuites des micro-ondes, pour vérifier la conformité avec
les normes de performance fédérale, doit être effectuée sur chaque four à
être livre au propriétaire.
Page 50

49
FR
Instructions concernant la sécurité
Attention ! Vous devez surveiller votre four si
vous utilisez du papier, du plastique ou autres
matériaux inflammables. Ces matériaux
peuvent être carbonisées et brûler. RISQUE
DE FEU !
Attention ! Si du feu ou des flammes se
dégagent, gardez la porte fermée pour étouffer
les flammes. Éteignez le four et débranchez la
prise de courant ou coupez l'alimentation
électrique.
Attention ! Ne chauffez pas de l’alcool pur ni
des boissons alcooliques. RISQUE DE FEU !
Attention ! N'utilisez pas des récipients
fermés pour chauffer des liquides ou d’autres
aliments, ils pourraient éclater facilement.
Attention ! Cet appareil n’est pas indiqué pour
l’utilisation de la part de personnes (y compris
les enfants) ayant des capacités physiques,
sensorielles ou mentales réduites. Les
utilisateurs n’ayant pas l’expérience, une
connaissance suffisante de l’appareil ou
n’ayant pas reçu les instructions relatives à
l’appareil, devront faire l’objet d’un contrôle de
supervision de la part d’une personne
responsable de leur sécurité. Il est nécessaire
de surveiller les enfants pour empêcher qu’ils
ne jouent avec l’appareil.
Attention ! Si le four possède un mode de
fonctionnement combiné (micro-ondes plus
autres moyens de chauffage), ne laissez pas
les enfants utiliser le four sans la présence
d'un adulte en raison des hautes températures
générées par le four.
Attention! Le four ne peut pas être utilisé si:
- La porte ne ferme pas correctement ;
- Les gonds de la porte sont endommagés ;
- Les surfaces de contact entre la porte et l'avant
de l'appareil sont endommagées ;
- La vitre de la porte est endommagée ;
- Il y a fréquemment un arc électrique à l'intérieur,
malgré l'absence de tout objet métallique.
Le four ne peut être réutilisé qu'après avoir été
réparé par un technicien du Service d'assistasse
technique.
Lors de son utilisation, l’appareil devient
chaud. Faire attention à ne pas toucher les
éléments chauffants situés à l’intérieur du four.
MISE EN GARDE: Les parties accessibles
peuvent devenir chaudes au cours de
l’utilisation. Il est recommandé d’éloigner les
jeunes enfants.
Ne pas utiliser de produits d’entretien abrasifs
ou de grattoirs métalliques durs pour nettoyer
la porte en verre du four, ce qui pourrait érafler
la surface et entraîner l’éclatement du verre.
Attention!
Ne mettez jamais ni bouchon ni couvercle ni
tétine sur les récipients destinés à chauffer les
aliments pour bébés. Après avoir chauffé
l'aliment, remuez ou agitez bien afin de
distribuer uniformément la chaleur. Vous
devez vérifier la température de l'aliment avant
de le donner à l'enfant. DANGER DE
BRÛLURE !
Pour éviter que les aliments ne chauffent trop
ou ne prennent feu, il est très important, quand
vous chauffez de petites quantités
d'aliments, de ne pas sélectionner des
périodes de fonctionnement trop longues, ni
des niveaux de puissance trop élevés. Le
pain, par exemple, peut brûler au bout de 3 m
avec une puissance trop élevée.
Utilisez la fonction grill seulement pour gratiner
et surveillez constamment l’appareil. Si vous
utilisez un mode de fonctionnement combiné
pour le grill, prêtez attention au temps.
N'approchez jamais les câbles d'alimentation
d'autres appareils électriques de la porte
chaude du four. La gaine isolante pourrait
fondre. Danger de court-circuit !!
Page 51

50
FR
Instructions concernant la sécurité
Votre four est exclusivement destiné à un
usage domestique !
Utilisez votre four exclusivement pour la
préparation des repas.
Vous éviterez d'endommager votre four ainsi
que toute autre situation dangereuse si vous
respectez les indications suivantes :
Ne mettez pas le four en fonctionnement
sans le manchon, le support plateau et le
plateau rotatif.
Ne mettez pas votre four en marche à
vide. Sans rien à chauffer, il peut en effet se
trouver en surcharge et être endommagé.
RISQUE DE DÉTÉRIORATION !
Pour effectuer des tests de
programmation du four, placez-y un verre
d'eau. Celle-ci absorbera les micro-ondes et
le four ne sera pas endommagé.
Ne couvrez pas, n'obstruez pas les
ouvertures de ventilation.
N'utilisez que de la vaisselle adéquate pour
micro-ondes. Vérifiez, avant de les utiliser
dans le four, que la vaisselle et les récipients
sont adaptés (voir chapitre sur le type de
vaisselle).
Ne retirez pas le couvercle de mica situé
au plafond de la cavité ! Ce couvercle évite
que les graisses et particules d'aliments
n'endommagent le générateur de microondes.
Ne laissez aucun objet inflammable dans
le four, il peut brûler si vous l'allumez.
N'utilisez pas le four comme rangement.
Vous ne pouvez pas cuire les œufs, avec
ou sans coquille, dans un four micro-ondes
car ils peuvent éclater.
N'utilisez pas le four micro-ondes pour frire
dans l'huile, car il est impossible d'en
contrôler la température sous l'action des
micro-ondes.
Pour éviter les brûlures, utilisez toujours
des gants de cuisine pour manipuler les
récipients et toucher le four.
Ne vous appuyez pas, ne mettez aucun
poids sur la porte ouverte du four. Cela
pourrait endommager la zone des gonds. La
porte peut supporter un poids maximum de
8 kg..
Le plateau rotatif et les grilles supportent
une charge maximum de 8 kg. Ne dépassez
pas cette charge, pour éviter des dégâts.
Nettoyage :
Attention! Le four micro-ondes doit être
nettoyé régulièrement, toutes les particules
d'aliments doivent être retirées (voir chapitre
Nettoyage du four). À défaut d'un entretien
régulier du four micro-ondes, sa surface
peut se détériorer, sa vie utile peut se
réduire et une situation dangereuse peut
éventuellement survenir.
Les surfaces de contact de la porte (l'avant
de la cavité et la partie intérieure de la porte)
doivent être maintenues très propres pour
garantir le bon fonctionnement du four.
S'il vous plaît, soyez attentif aux indications
concernant le nettoyage, figurant au point
« Nettoyage et entretien du four « .
En cas de réparation :
Attention – Micro-ondes ! La protection
extérieure ne doit pas être retirée. Toute
réparation ou maintenance effectuée par
des personnes non autorisées par le
fabricant est dangereuse.
Si le câble d'alimentation est endommagé, il
doit être remplacé par le fabricant, par des
agents certifiés ou des techniciens qualifiés
à cet effet, de façon à éviter des situations
dangereuses et parce que les outils utilisés
sont spécifiques.
Les réparations ou opérations de
maintenance, en particulier des pièces sous
tension, ne peuvent être réalisées que par
des techniciens certifiés par le fabricant..
Page 52

51
FR
Les avantages des micro-ondes
Avec une cuisinière traditionnelle, la chaleur créée
par les brûleurs de gaz ou par les résistances
pénètre lentement de l'extérieur vers l'intérieur de
l'aliment. Il y a, par conséquent, une grande perte
d'énergie pour chauffer l'air, les composants du
four et les récipients.
Dans les micro-ondes, la chaleur est générée par
les aliments eux-mêmes, elle passe de l'intérieur
vers l'extérieur. Il n'y a aucune perte de chaleur
dans l'air, dans les parois de la cavité ni dans les
récipients (s'ils sont bien adaptés aux microondes), c'est-à-dire que seul l'aliment est chauffé.
En résumé, les fours micro-ondes offrent les
avantages suivants :
1. Gain de temps de cuisson : réduction jusqu'à
3/4 du temps par rapport à la cuisson
traditionnelle.
2. Décongélation ultrarapide des aliments, ce qui
réduit le risque de produire des bactéries.
3. Économie d'énergie.
4. Le temps de cuisson étant réduit, les aliments
gardent mieux leur valeur nutritive.
5. Nettoyage facile.
Mode de fonctionnement du four microondes
Le four micro-ondes possède une valve à haute
tension appelée magnétron, qui convertit l'énergie
électrique en énergie micro-ondes. Ces ondes
électromagnétiques sont canalisées vers
l'intérieur du four au moyen d'un conducteur
d'ondes puis distribuées par un diffuseur
métallique ou au moyen d'un plateau rotatif.
À l'intérieur du four, les micro-ondes se propagent
dans tous les sens et sont réfléchies par les
parois métalliques. Elles pénètrent alors
uniformément dans les aliments.
Comment les aliments chauffent-ils?
Tous les aliments contiennent de l'eau dont les
molécules vibrent sous l'action des micro-ondes.
La friction entre les molécules provoque la chaleur
qui élève la température des aliments. Ils peuvent
être décongelés, cuits ou maintenus chauds.
Du fait que les aliments chauffent de l'intérieur :
Ils peuvent être cuisinés sans liquides ni
graisses, ou avec très peu ;
Décongeler, chauffer ou cuisiner est plus
rapide dans un four micro-ondes que dans un
four conventionnel ;
Les vitamines, sels minéraux et substances
nutritives sont conservés ;
Ni la couleur naturelle ni le goût des aliments
ne sont altérés.
Les micro-ondes traversent la porcelaine, le verre,
le carton, le plastique, mais pas le métal. Vous ne
pouvez donc pas utiliser dans le four micro-ondes
de récipients métalliques, ou dont certaines
parties sont en métal.
Les micro-ondes sont réfléchies par le métal...
...traversent le verre et la porcelaine...
... et sont absorbées par les aliments.
Page 53

52
FR
Description du four
1. – Panneau de commandes
7. – Anneau rotatif
2. – Vitre de la porte
8. – Plat Rotatif
3. – Estampillage des plateaux
9. – Plateau cristal
4. – Linguette
10. – Grill rectangulaire
5. – Sortie de l’air chand
11. – Plat a toasté
6. – accouplement du moteur
1. Bouton de sélection des fonctions
5. Touche horloge
2. Touche Blocage de sécurité
6. Touche Stop
3. Touche Start
7. Bouton rotatif
4. Touche OK
A
B
C
D
E
F
G
H
I
J
K
L
M
N
O
A. Indicateur de l’heure
I. Indicateur de décongélation par poids
B. Indicateur de fonction
J. Indicateur de poids
C. Indicateur de fonction mémoire
K. Indicateur de puissance
D. Touche “-“
L. Indicateur du température
E. Indicateur de Durée
M. Affichage temps/durée
F. Touche “+”
N. Indicateur de Blocage de sécurité
G. Indicateur de fonction spéciale
O. Affichage puissance/poids
H. Indicateur de décongélation par temps
Page 54

53
FR
Description du four
Description des fonctions
Symbole
Fonction
Puissance
Micro-ondes
Aliments
Micro-ondes
200 W
Décongélation lente pour aliments délicats ;
Maintenir chaud
400 W
Cuisiner à faible température; cuire du riz
Décongélation rapide
600 W
Fondre du beurre
Chauffer les aliments pour bébé
800 W
Cuisiner légumes et aliments
Cuisiner et chauffer soigneusement
Chauffer et cuisiner de petites quantités
Chauffer des aliments délicats
1000 W
Cuisiner et chauffer rapidement des liquides et des aliments
préconfectionnés,
Micro-ondes
+ Gril
200 W
Gratiner des toasts
400 W
Griller volailles et viande
600 W
Cuisiner tourtes et gratins
Gril
---
Griller des aliments
Micro-ondes +
Air Chaud
200
Rôtir et cuisiner de la viande
400
Rôtir des volailles
600
Autres rôtissages rapides
Air Chaud
---
Rôtir des aliments et préparer des gâteaux
Gril +
Ventilateur
---
Dorer des aliments uniformément
Page 55

54
FR
Réglages de base
Réglage de l’heure
Après le branchement de votre four à micro-ondes
ou après une coupure de courant, l'affichage de
l'horloge clignote pour indiquer qu’elle n’est plus à
l’heure. Pour régler l'horloge, procédez de la
manière suivante :
1. Appuyez sur la touche Heure (5) lorsqu'une
horloge apparaît sur l’affichage central. Les
chiffres des heures clignotent.
2. Appuyez sur les touches « + » et « - » pour
régler l’heure.
3. Appuyez à nouveau sur la touche Heure (5)
pour régler les minutes. Les chiffres des
minutes clignotent.
4. Appuyez sur les touches « + » et « - » pour
régler les minutes.
5. Appuyez à nouveau sur la touche Heure (5).
Masquer/Afficher l’horloge
Si vous ne souhaitez pas afficher l’horloge, vous
pouvez la masquer en appuyant pendant
3 secondes sur la touche Heure. Les points qui
séparent les heures des minutes clignoteront mais
les autres éléments normalement affichés sont
alors masqués.
Si vous souhaitez à nouveau afficher l’heure,
réappuyez sur la touche Horloge pendant
3 secondes.
Blocage de sécurité
Le fonctionnement du four peut être verrouillé
(pour éviter que les enfants ne l'utilise, par
exemple).
1. Pour verrouiller le four, appuyez sur la
touche Blocage de sécurité (2) pendant
3 secondes. Vous entendez un signal sonore
et le symbole « » s’affiche sur l’écran de
droite. Le message « SAFE» s’affiche sur
l’écran central. Le four est alors verrouillé et
ne peut être utilisé.
2. Pour déverrouiller le four, réappuyez sur la
touche Blocage de sécurité (2) pendant
3 secondes. Vous entendez un signal
sonore.
Page 56

55
FR
Fonctions de base
Micro-ondes
Utilisez cette fonction pour cuire et réchauffer légumes verts, pommes de terre, riz, poissons et
viandes.
1. Tournez le bouton de sélection des fonctions
(1) jusqu’à ce que le symbole de micro-
ondes s’allume sur l’écran de gauche. 1:00
s’affiche et clignote sur l’écran central.
2. Tournez le bouton rotatif (7) pour régler la
durée.
3. Appuyez sur la touche OK (4) pour valider.
La puissance de micro-ondes clignote sur
l’écran de droite et le témoin de puissance
s’allume.
4. Tournez le bouton rotatif (7) pour régler la
puissance de micro-ondes. Si vous ne réglez
pas ce paramètre, le four fonctionne par
défaut à 800 W.
5. Appuyez sur la touche OK (4) pour valider.
6. Appuyez sur la touche Start (3). Le four se
met en marche.
REMARQUE: Vous pouvez appuyer à tout
moment de la séquence précédente sur le
bouton Start, le four fonctionne alors selon
les paramètres affichés.
Micro-ondes – Lancement rapide
Utilisez cette fonction pour chauffer rapidement des aliments contenant beaucoup d'eau comme le
café, le thé ou de la soupe assez liquide.
1. Appuyez sur la touche Start. Le four se met
en marche en fonction Micro-ondes, à la
puissance maximum, pendant 30 secondes.
2. Si vous souhaitez prolonger le fonctionnement du four, appuyez de nouveau sur la
touche Start, ce qui a pour effet
d'augmenter le temps de fonctionnement de
30 secondes.
OBSERVATION: quand vous sélectionnez la
puissance maximum de 1000 W, le temps de
fonctionnement est limité à un maximum de
15 minutes.
Page 57

56
FR
Fonctions de base
Grill
Utilisez cette fonction pour gratiner vos plats rapidement.
1. Tournez le bouton de sélection des fonctions
(1) jusqu’à ce que le symbole de grill
s’allume sur l’écran de gauche. 15:00
s’affiche et clignote sur l’écran central.
2. Tournez le bouton rotatif (7) pour régler la
durée.
3. Appuyez sur la touche OK (4) pour valider.
4. Appuyez sur la touche Start (3). Le four se
met en marche.
Micro-ondes + Grill
Utilisez cette fonction pour cuire lasagnes, volailles, pommes de terre rôties ou gratins.
1. Tournez le bouton de sélection des fonctions
(1) jusqu’à ce que le symbole de microondes + grill s’allume sur l’écran de gauche.
10:00 s’affiche et clignote sur l’écran central.
2. Tournez le bouton rotatif (7) pour régler la
durée.
3. Appuyez sur la touche OK (4) pour valider.
La puissance de micro-ondes clignote sur
l’écran de droite et le témoin de puissance
s’allume.
4. Tournez le bouton rotatif (7) pour régler la
puissance de micro-ondes. Si vous ne réglez
pas ce paramètre, le four fonctionne par
défaut à 360 W. Pour cette fonction, la
puissance maximale est de 600 W.
5. Appuyez sur la touche OK (4) pour valider.
6. Appuyez sur la touche Start (3). Le four se
met en marche.
REMARQUE :
Vous pouvez appuyer à tout moment de la
séquence précédente sur le bouton Start, le
four fonctionne alors selon les paramètres
affichés.
Page 58

57
FR
Fonctions de base
Air Chaud
1. tournez le bouton de Sélection de Fonction
(1) jusqu’á ce que le symbole de la fonction
de Air Chaud s’allume sur l’écran gauche.
2. Tournez le bouton rotatif (8) pour régler la
durée.
3. Appuyez sur la touche OK (4) pour valider.
Les valeurs et l’indicateur de température
restent intermittents sur l’écran droit.
4. Tournez le bouton rotatif (8) pour régler la
température prétendue.
5. Appuyez sur la touche OK (4) pour valider.
6. Appuyez sur la touche Start (initier) (3). Le
four commence a fonctionner.
Microondes + Air Chaud
Utiliser cette fonction pour griller rapidement les aliments.
1. Tournez le bouton de Sélection de Fonction
(1) jusqu’á ce que le symbole de la fonction
de Microondes + Grill s’allume sur l’écran
gauche. L’écran principal exhibe 20:00
intermittent.
2. Tournez le bouton rotatif (8) pour régler la
durée.
3. Appuyez sur la touche OK (4) pour valider.
Les valeurs et l’indicateur de température
restent intermittents sur l’écran droit.
4. Tournez le bouton rotatif (8) pour régler le
niveau de puissance des microondes. Si le
bouton n’est pas tourner, le four fonctionne
à 400 W de puissance par default. La
puissance maximum qui peut être
sélectionnée est de 400 W.
5. Appuyez sur la touche OK (4) pour valider.
6. Les valeurs et l’indicateur de température
restent intermittents sur l’écran droit.
Tournez le bouton rotatif (8) pour régler la
température prétendue. Si vous ne tournez
pas ce bouton, le four fonctionne à la
température de 160ºC par default.
7. Appuyez sur la touche OK (4) pour valider.
Appuyez sur la touche Start (Initier) (3). Le four
commence à fonctionner
Page 59

58
FR
Fonctions de base
Grill ventilée
Utiliser cette fonction pour griller uniformément et en même temps dorer les superficies des aliments.
1 Tournez le bouton de Selection de la
Fonction (1) jusqu’á ce que le symbole de la
fonction de Grill ventilé soit visible
2 Tournez le bouton rotatif (8) pour régler la
durée.
3 Appuyez sur la touche OK (4) pour régler.
Les valeurs et l’indicateur de température
restent intermittents sur l’écran droit.
4 Tournez le bouton rotatif (8) pour définir la
température prétendue.
5 Appuyez sur la touche OK (4) pour valider.
6 Appuyez sur la touche Start (Initier) (3). Le
four commence à fonctionner.
Décongélation par temps (manuel)
Utilisez cette fonction pour décongeler rapidement tout type d’aliment.
1. Tournez le bouton de sélection des fonctions
(1) jusqu’à ce que le symbole de
décongélation par temps s’allume sur l’écran
de gauche. 10:00 s’affiche et clignote sur
l’écran central.
2. Tournez le bouton rotatif (7) pour régler la
durée.
3. Appuyez sur la touche OK (4) pour valider.
4. Appuyez sur la touche Start (3). Le four se
met en marche.
5. Retournez l’aliment lorsque le four émet un
signal sonore et affiche le mot :
("tourner").
Page 60
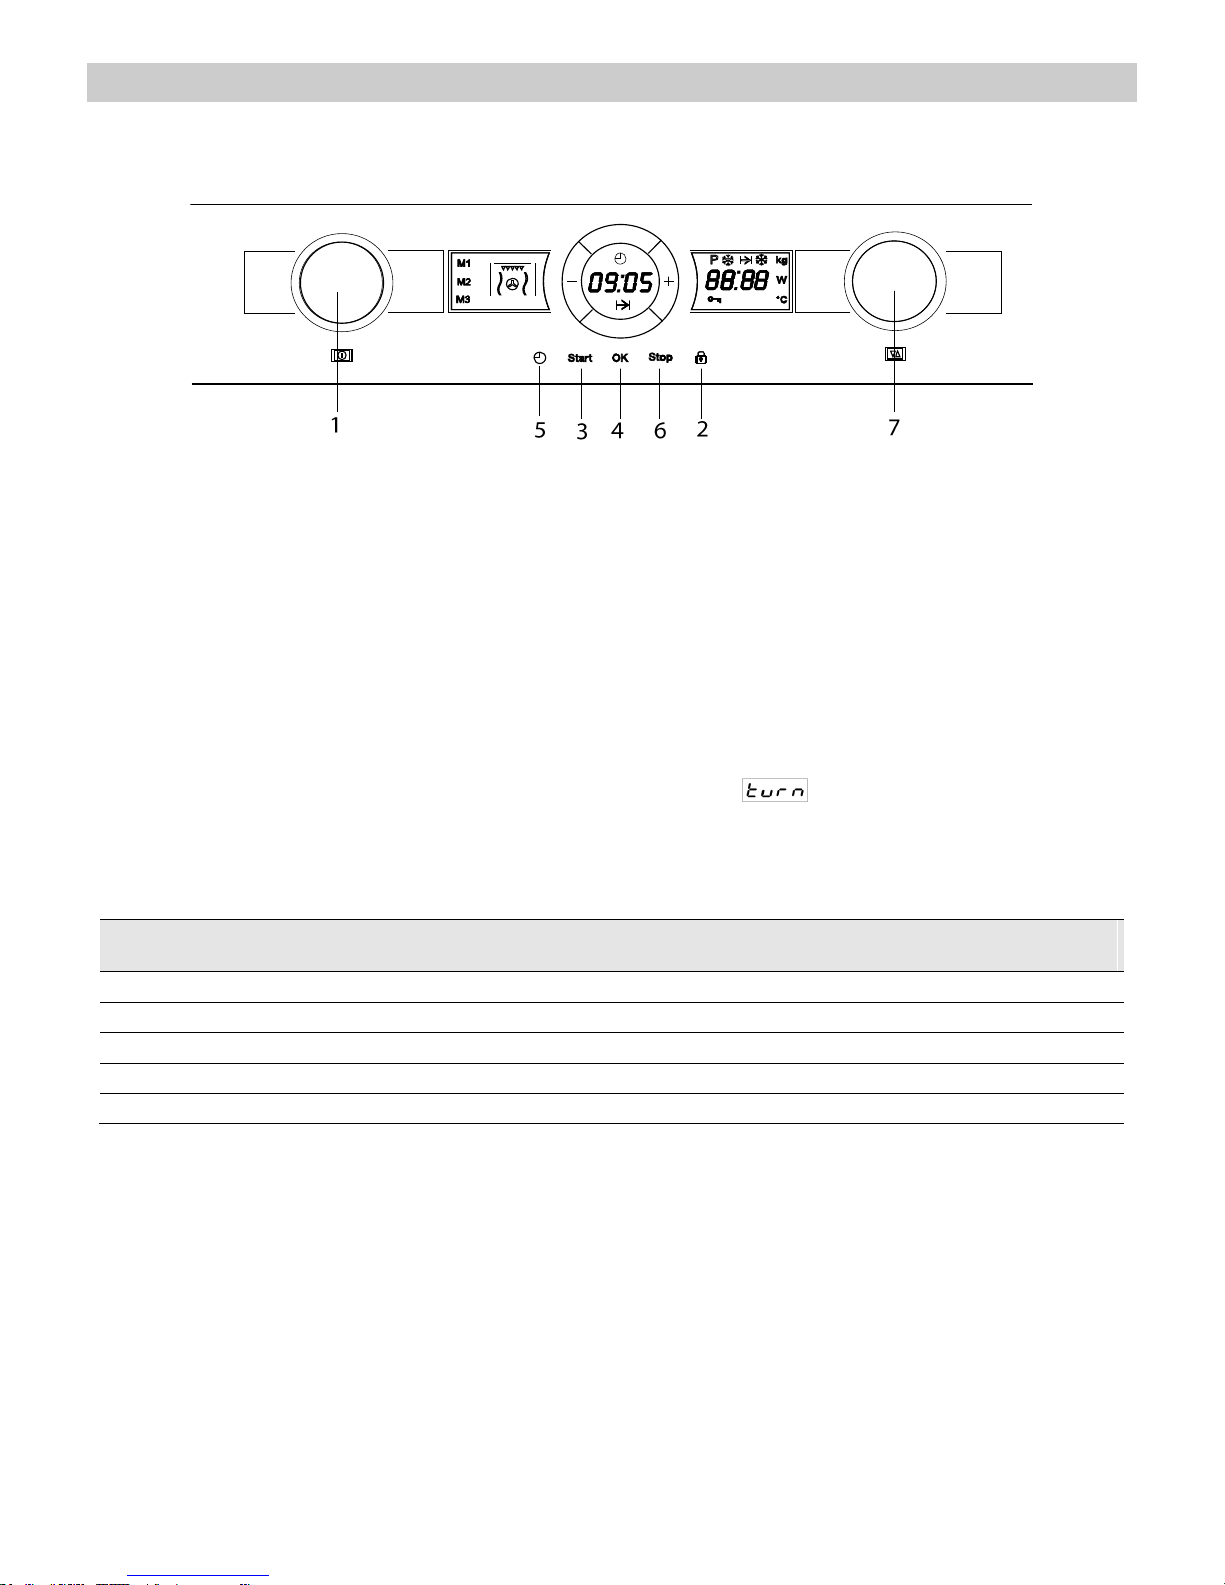
59
FR
Fonctions de base
Décongélation par poids (automatique)
Utilisez cette fonction pour décongeler rapidement viandes, volailles, poisson, fruits et pain.
1. Tournez le bouton de sélection des fonctions
(1) jusqu’à ce que le symbole de
décongélation par poids s’allume sur l’écran
de gauche. « Pr 1 » s’affiche et clignote sur
l’écran central.
2. Tournez le bouton rotatif (8) pour régler le
type d’aliment. Si vous ne réglez pas ce
paramètre, le four fonctionne par défaut
selon le type d’aliment « Pr 1 ».
3. Appuyez sur la touche OK (4) pour valider.
Le poids de l’aliment clignote sur l’écran de
droite et le témoin de poids s’allume.
4. Tournez le bouton rotatif (8) pour régler le
poids de l’aliment. Si vous ne réglez pas ce
paramètre, le four fonctionne par défaut pour
un poids de 200 g d’aliment.
5. Appuyez sur la touche OK (4) pour valider.
6. Appuyez sur la touche Start (3). Le four se
met en marche et affiche le temps restant
sur l’écran central.
7. Retournez l’aliment lorsque le four émet un
signal sonore et l’écran inférieur affiche le
mot : ("tourner").
Le tableau suivant vous présente les programmes de la fonction Décongélation en fonction du poids, en
indiquant les temps de décongélation et de repos (afin que l'aliment soit uniformément chauffé) en
fonction du poids de l'aliment.
Programme
Aliment
Poids (grammes)
Temps (minutes)
Temps de repos
(minutes)
Pr 01
Viande
100 – 2000
2 – 43
20 – 30
Pr 02
Volailles
100 – 2500
2 – 58
20 – 30
Pr 03
Poisson
100 – 2000
2 – 40
20 – 30
Pr 04
Fruit
100 – 500
2 – 13
10 – 20
Pr 05
Pain
100 – 800
2 – 19
10 – 20
Observation importante : voir «Indications générales pour la décongélation».
Page 61

60
FR
Fonctions de base
Fonction Mémoire:
Définir et mémoriser
1 Tournez le bouton de Sélection de la
Fonction (1) pour la fonction désirée.
2 Tournez le bouton rotatif (8) pour régler les
paramètres désirés.
3 Appuyez sur la touche Horloge (5) pendant 5
secondes. O symbole “M1” apparait
intermittent.
4 Tournez le bouton rotatif (8) pour
sélectionner la mémoire a utiliser (M1,M2 ou
M3).
5 Appuyez sur la touche OK (4) pour valider.
Selectionner la mémoire.
1 Tournez le bouton de Sélection de la
Fonction (1) pour sélectionner la mémoire
utilisée.
2 Appuyez sur la touche Start (3). Le four
commence a fonctionner.
Effacer une mémoire
1 Avec le microondes en stand by, tournez le
bouton de Sélection de la Fonction (1) et
sélectionnez la mémoire a effacer.
2 Appuyez sur la touche Horloge (5) pendant 3
secondes. Le display puissance/poids
indique le message “DEL” pendant 3
seconde.
Page 62

61
FR
Fonctions spéciales
Fonction Spéciale P: Chauffer des aliments
Utilisez cette fonction pour chauffer des différents types d'aliments.
1 Tournez le bouton de Seléction de
Fonctions (1) ) jusqu’à ce que l'indicateur de
fonction spéciale "P" clignote. L’ écran de
durée montre le type de nourriture "A01" en
clignotant.
2 Tournez le bouton rotatif (7) dans les deux
sens pour choisir le programme désiré (A-
01-A04 : voir tableau ci-dessous).
3 Appuyez sur la touche OK (4) pour valider.
La valeur du poids de la nourriture clignote
sur l'écran. L'indicateur de poids continue a
clignoter.
4 Tournez le bouton rotatif (7) dans les deux
sens pour définir le poids des aliments
désirés.
5 Appuyez sur la touche OK (4) pour valider.
6 Appuyez sur la touche Start. (3) Le four
s’initie.
7 Retournez les aliments dès que le signal
sonore retentit et que l'écran affiche le mot
" " ("tourner").
Le tableau suivant vous présente les programmes de la Fonction Spéciale "P", en indiquant les temps
de fonctionnement et de repos (de façon à ce que l'aliment soit uniformément réchauffé) par rapport au
poids.
Programme
Aliment
Poids (g)
Temps (m)
Recommandations
A 01
Soupe
200 – 1500
3 – 15
Remuer 1-2 fois, couvrir
A 02
Plats préconfectionnés
Aliments denses
200 – 1500
3 – 20
Remuer 1-2 fois, couvrir
A 03
Plats d'aliments mélangés
Aliments moins denses
200 – 1500
3 – 18
Remuer 1-2 fois, couvrir
A 04
Légumes
200 – 1500
2,6 – 14
Remuer 1-2 fois, couvrir
Observations importantes:
Vous devez toujours utiliser des récipients
adaptés au micro-ondes et un couvercle pour
éviter la perte des liquides.
Remuez ou retournez les aliments plusieurs
fois pendant qu'ils chauffent, en particulier
quand le four émet un signal sonore et que
l'écran affiche l'indication clignotante suivante :
.
Le temps nécessaire pour chauffer les
aliments dépend de leur température initiale.
Les aliments retirés directement du
réfrigérateur mettent plus de temps à chauffer
que ceux à température ambiante. Si la
température de l'aliment ne vous donne pas
satisfaction, sélectionnez un poids moindre ou
plus important la prochaine fois que vous
réchauffez l'aliment. Après avoir réchauffé les
aliments, mélangez-les, puis laissez-les
reposer un peu afin d'uniformiser leur
température.
Attention! Le récipient peut être très chaud à la fin
du fonctionnement. La plupart des récipients ne sont
pas chauffés par les micro-ondes, mais ils peuvent
l'être par transmission de la chaleur des aliments.
Page 63

62
FR
Fonctions spéciales
Fonction Spéciale P: Cuisiner
Utilisez cette fonction pour cuisiner des aliments frais.
1 Tournez le bouton de Seléction de
Fonctions (1) ) jusqu’à ce que l'indicateur de
fonction spéciale "P" clignote. L’ écran de
durée montre le type de nourriture "A01" en
clignotant.
2 Tournez le bouton rotatif (7) dans les deux
sens pour choisir le programme désiré (b-01-
b04 : voir tableau ci-dessous).
3 Appuyez sur la touche OK (4) pour valider.
La valeur du poids de la nourriture clignote
sur l'écran. L'indicateur de poids continue a
clignoter.
4 Tournez le bouton rotatif (7) dans les deux
sens pour définir le poids des aliments
désirés.
5 Appuyez sur la touche OK (4) pour valider.
6 Appuyez sur la touche Start. (3) Le four
s’initie.
7 Retournez les aliments dès que le signal
sonore retentit et que l'écran affiche le mot
" " ("tourner").
Le tableau suivant présente les programmes de la Fonction Spéciale P3, en indiquant les temps de
fonctionnement et de repos (de façon à ce que l'aliment soit uniformément chauffé) en fonction du poids.
Programme
Aliment
Poids (g)
Temps (m)
Recommandations
b 01
Pommes de terre
200 – 1000
4 – 17
Remuer 1–2 fois, couvrir
b 02
Légumes
200 – 500
4 – 15
Remuer 1–2 fois, couvrir
b 03
Riz
200 – 1000
13 – 20
2 volumes d'eau pour 1
volume de riz
b 04
Poisson
200 – 1000
4 – 13
Couvrir
Observations importantes :
Vous devez toujours utiliser des récipients
adaptés au micro-ondes et un couvercle
pour éviter la perte des liquides.
Remuez ou retournez les aliments plusieurs
fois pendant qu'ils chauffent, en particulier
quand le four émet un signal sonore et que
l'écran affiche l'indication clignotante
suivante : .
Attention ! Le récipient peut être très chaud
à la fin du fonctionnement. La plupart des
récipients ne sont pas chauffés par les
micro-ondes, mais ils peuvent l'être par
transmission de la chaleur des aliments.
Instructions de préparation :
Morceaux de poisson – Ajoutez 1 à 3
cuillères à soupe d'eau ou du jus de citron.
Riz – Ajoutez un volume d'eau équivalent au
double de celui du riz.
Pommes de terre non pelées – Choisissez
des pommes de terre de taille égale. Lavezles et percez-en la peau plusieurs fois.
Ajoutez 1 à 3 cuillères à soupe d'eau.
Pommes de terre pelées et légumes frais –
Coupez en morceaux de la même taille.
Ajoutez 1 cuillère à soupe d'eau pour 100 g
de légumes et salez à votre goût
Page 64
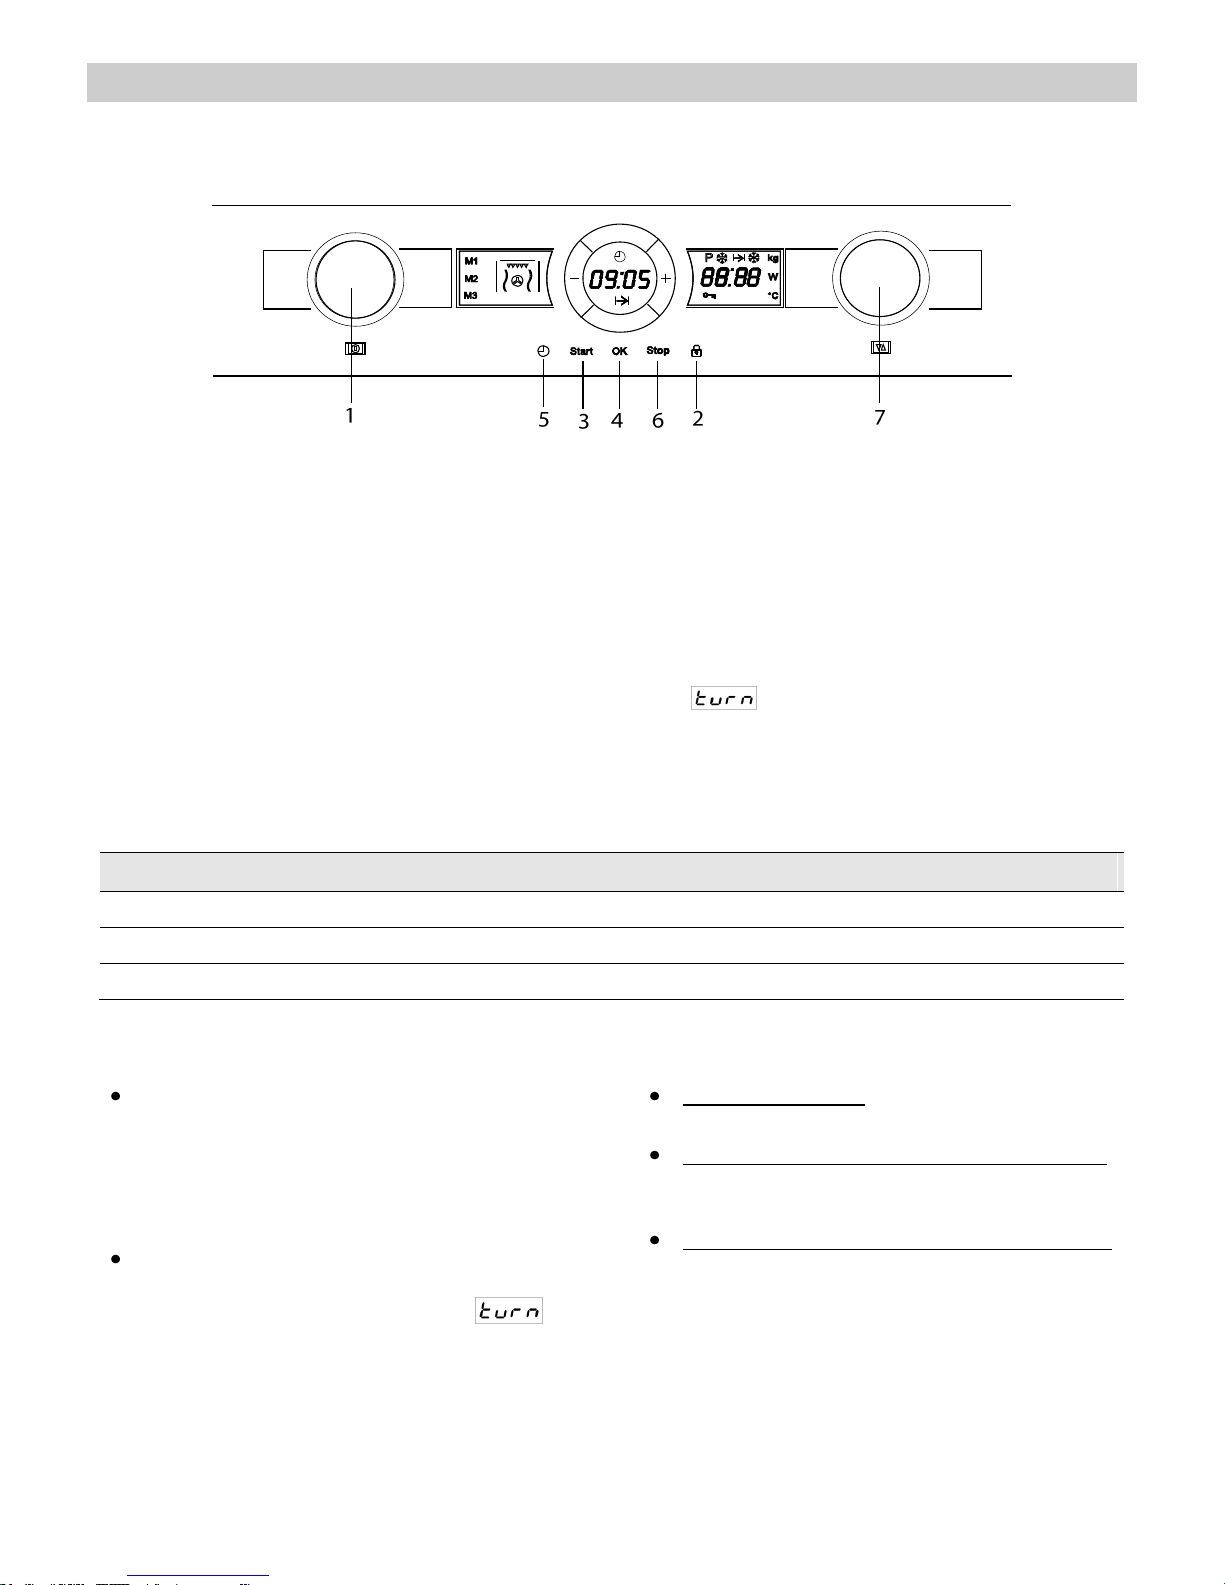
63
FR
Fonctions spéciales
Fonction Spéciale P: Décongeler et gratiner
Utilisez cette fonction pour décongeler et gratiner différents types d'aliments.
1 Tournez le bouton de Seléction de
Fonctions (1) ) jusqu’à ce que l'indicateur de
fonction spéciale "P" clignote. L’ écran de
durée montre le type de nourriture "A01" en
clignotant.
2 Tournez le bouton rotatif (7) dans les deux
sens pour choisir le programme désiré (C01-
C03 : voir tableau ci-dessous).
3 Appuyez sur la touche OK (4) pour valider.
La valeur du poids de la nourriture clignote
sur l'écran. L'indicateur de poids continue a
clignoter.
4 Tournez le bouton rotatif (7) dans les deux
sens pour définir le poids des aliments
désirés.
5 Appuyez sur la touche OK (4) pour valider.
6 Appuyez sur la touche Start. (3) Le four
s’initie.
7 Retournez les aliments dès que le signal
sonore retentit et que l'écran affiche le mot
" " ("tourner").
Le tableau suivant présente les programmes de la Fonction Spéciale P3, en indiquant les temps de
fonctionnement (de façon à ce que l'aliment soit uniformément réchauffé) en fonction du poids.
Programme
Aliment
Poids (g)
Temps (m)
Recommandations
C 01
Pizza
300 – 500
3-9
Grille
C 02
Plats préconfectionnés
400 – 1000
8 – 14
Remuer 1 fois, couvrir
C 03
Dérivés de pomme de terre
200 – 450
10 – 12
Plateau en verre
Observations importantes:
Utiliser uniquement de la vaisselle adaptée
au micro-ondes et résistant à la chaleur (p.
ex. plats à gratins). Le grill produit des
températures très élevées. Toujours couvrir
le plat d’un couvercle pour le programme C
02 afin d’éviter les pertes de liquide.
Remuez les aliments quand le four émet un
signal sonore et que l'écran affiche
l'indication clignotante suivante : .
Attention! Le récipient peut être très chaud à la
fin du fonctionnement. Les fours à micro-ondes ne
chauffent pas la plupart des récipients, mais le
transfert de chaleur de l’élément chauffant du grill
peut néanmoins rendre ces derniers très chauds.
Instructions de préparation :
Pizzas congelées – Choisissez des pizzas
congelées précuites et des pizzas-baguette.
Aliments préconfectionnés ultracongelés –
Choisir lasagnes, cannelloni, soufflé de
crevettes, tous congelés. Toujours couvrir.
Dérivés de la pomme de terre, congelés –
Les frites, les croquettes de pomme de terre
et les sautées doivent être adaptées à la
préparation au four micro-ondes.
Page 65

64
FR
Utilisation du plat grill
Normalement, quand on fait cuire des pizzas ou
des gâteaux au gril ou au micro-ondes, la pâte
reste humide et molle. Vous pouvez éviter cela en
utilisant le plat gril. Comme la partie inférieure du
plat gril atteint des températures élevées, la partie
extérieure de l'aliment est bien grillée et dorée.
Le plat gril peut également être utilisé pour
cuisiner le bacon, les œufs, les saucisses, etc.
OBSERVATIONS TRÈS IMPORTANTES :
Utilisez toujours des gants de cuisine pour le
four car le plat gril atteint des températures très
élevées.
Ne mettez jamais le plat gril dans le micro-
ondes sans le plateau.
Ne mettez, pas dans le plat gril, des récipients
non résistants aux hautes températures (des
récipients en plastique, par exemple).
Comment cuisiner avec le plat gril :
1. Préchauffez le plat gril en sélectionnant la
fonction Micro-ondes + Gril pendant 3 à 5
minutes à la puissance de 600 W.
2. Versez de l'huile dans le plat gril pour que les
aliments soient bien dorés.
3. Placez les aliments directement dans le plat
gril. Vous pouvez mettre des aliments congelés
(pizza congelée, par exemple) sans décongeler
préalablement.
4. Placez le plat gril sur le plateau du four microondes.
5. Sélectionnez la fonction Micro-ondes + Gril et
le temps de cuisson. Nous vous
recommandons les temps de cuisson et de
repos suivants :
Aliment
Poids (g)
Temps de
cuisson (m)
Temps de
repos (m)
Recommandations
Pizza
200
4-5
---
Le temps de cuisson est applicable aux
pizzas dont la pâte est fine.
Pour des pizzas précuisinées, rajouter 1
ou 2 minutes.
300
5-6
---
400
7-8
---
Quiches et
gâteaux
200
3-4
2-3
300
5-6
2-3
Hamburgers
150-200
8-10
5-8
Retourner 2 fois
Frites au four
400
6-8
---
Retourner 1 fois
OBSERVATIONS TRÈS IMPORTANTES :
Le plat gril est recouvert avec du Téflon qui peut
être endommagé à la suite d'une utilisation
incorrecte.
Ne coupez jamais les aliments dans le plat gril.
Retirer les aliments du plat avant de les couper.
Comment nettoyer le plat gril :
La meilleure façon de nettoyer le plat gril est de le
laver avec de l'eau chaude et du produit vaisselle,
puis de le rincer à l'eau claire. N'utilisez pas
d'abrasifs car ils pourraient endommager le
revêtement.
Page 66

65
FR
Pendant le fonctionnement...
Interruption d'une cuisson
Vous pouvez interrompre le fonctionnement du
four à tout instant en appuyant une fois sur le
bouton Stop ou en ouvrant la porte du four.
Dans ces deux cas :
L'émission de micro-ondes cesse
immédiatement.
Le gril est désactivé mais garde une
température très élevée. Danger de brûlure !
Le temporisateur s'arrête et l'écran affiche le
temps de fonctionnement restant.
Vous pouvez alors :
1. Remuer ou retourner les aliments, pour obtenir
une cuisson uniforme ;
2. Modifier les paramètres de la cuisson ;
3. Annuler la cuisson, en appuyant sur le bouton
Stop.
Pour reprendre la cuisson, fermez la porte et
appuyer sur le bouton Start (Démarrer).
Modification des paramètres
Vous pouvez modifier les paramètres de
fonctionnement (temps, poids, puissance, etc.)
seulement quand la cuisson est interrompue :
1. Pour modifier le temps de fonctionnement,
tournez le bouton giratoire dans l'un ou
l'autre sens. Le nouveau temps défini est
immédiatement pris en compte.
2. Pour modifier la puissance /le poids,
appuyez sur le bouton Sélection de
poids/puissance. Le témoin respectif
clignote. Modifiez le paramètre en tournant
le bouton giratoire et validez en appuyant
de nouveau sur Sélection de
poids/puissance.
Annuler une cuisson
Si vous souhaitez annuler le processus de
cuisson, appuyez sur le bouton Stop pendant 3
secondes.
Un signal sonore est alors émis et l'écran affiche
l'heure.
Fin d'une cuisson
À la fin du processus de cuisson, 3 signaux
sonores sont émis et l'écran affiche « End ».
Les signaux sonores sont répétés toutes les 30
secondes jusqu'à ce que la porte soit ouverte ou
que vous appuyez sur le bouton Stop.
Page 67

66
FR
Décongélation
Le tableau ci-dessous présente, d'une manière
générale, les différents temps pour la
décongélation et pour le repos (de façon à ce
que l'aliment soit uniformément chauffé) en fonction
du type et du poids des aliments, et aussi les
respectives recommandations.
Aliment
Poids (g)
Temps de
décongélation (m)
Temps de repos
(m)
Observation
Morceaux de viande,
porc, veau, bœuf
100
2-3
5-10
Retourner 1 fois
200
4-5
5-10
Retourner 1 fois
500
10-12
10-15
Retourner 2 fois
1000
21-23
20-30
Retourner 2 fois
1500
32-34
20-30
Retourner 2 fois
2000
43-45
25-35
Retourner 3 fois
Viande à l'étouffée
500
8-10
10-15
Retourner 2 fois
1000
17-19
20-30
Retourner 3 fois
Viande hachée
100
2-4
10-15
Retourner 1 fois
500
10-14
20-30
Retourner 2 fois
Saucisses
200
4-6
10-15
Retourner 1 fois
500
9-12
15-20
Retourner 2 fois
Volailles (morceaux)
250
5-6
5-10
Retourner 1 fois
Poulet
1000
20-24
20-30
Retourner 2 fois
Poularde
2500
38-42
25-35
Retourner 3 fois
Filets de poisson
200
4-5
5-10
Retourner 1 fois
Truite
250
5-6
5-10
Retourner 1 fois
Crevettes
100
2-3
5-10
Retourner 1 fois
500
8-11
15-20
Retourner 2 fois
Fruit
200
4-5
5-10
Retourner 1 fois
300
8-9
5-10
Retourner 1 fois
500
11-14
10-20
Retourner 2 fois
Pain
200
4-5
5-10
Retourner 1 fois
500
10-12
10-15
Retourner 1 fois
800
15-17
10-20
Retourner 2 fois
Beurre
250
8-10
10-15
Fromage blanc
250
6-8
10-15
Crème fraîche
250
7-8
10-15
Page 68

67
FR
Décongélation
Indications générales pour la décongélation
1. Pour décongeler, utilisez uniquement de la
vaisselle adaptée au micro-ondes
(porcelaine, verre, plastique approprié).
2. La fonction décongélation en fonction du
poids et les tableaux correspondants
concernent les aliments crus.
3. Le temps de décongélation dépend de la
quantité et de la taille de l'aliment. Quand
vous congelez des aliments, pensez déjà à
leur décongélation. Distribuez l'aliment en
morceaux de hauteur égale à celle du
récipient.
4. Distribuez le mieux possible l'aliment à
l'intérieur du four. Les parties les plus
grosses du poisson ou des cuisses de poulet
doivent être tournées vers l'extérieur. Vous
pouvez protéger les parties les plus délicates
avec une feuille d'aluminium. Important : la
feuille d'aluminium ne doit pas entrer en
contact avec les parois de la cavité, car elle
peut provoquer un arc électrique.
5. Les morceaux les plus denses doivent être
retournés plusieurs fois.
6. Distribuez l'aliment congelé de la façon la
plus uniforme possible, les parties les plus
étroites et fines décongèlant plus rapidement
que les parties grosses et hautes.
7. Les aliments riches en graisse comme le
beurre et la crème fraîche ne doivent pas
être complètement décongelés. S'ils sont à
température ambiante, ils seront prêts à être
servis en peu de temps. Pour les crèmes
ultracongelées qui ont gardé de petits bouts
de glace, il est nécessaire de les remuer
avant de les consommer.
8. Mettez les volailles dans un plat creux pour
que le jus de la viande s'écoule plus
facilement.
9. Le pain doit être enveloppé dans une
serviette de table pour ne pas trop sécher.
10. Tournez la nourriture à intervalles réguliers.
11. Retirez l'emballage de l'aliment congelé
sans oublier d'enlever lesliens ou attaches
en métal, le cas échéant. Pour les récipients
destinés à conserver les aliments dans le
congélateur et que vous pouvez également
utiliser dans le four, retirez seulement le
couvercle. Dans les autres cas, mettez les
aliments dans des récipients adaptés au
micro-ondes.
12. Vous devez enlever et jeter le liquide
résultant de la décongélation, principalement
des volailles. Il ne doit, en aucun cas, entrer
en contact avec les autres aliments.
13. Remarquez bien qu'un temps de repos est
nécessaire, dans la fonction décongélation,
jusqu'à ce que l'aliment soit complètement
décongelé.
Page 69

68
FR
Cuisiner aux micro-ondes
Attention ! Lisez attentivement le chapitre
« Consignes de sécurité » avant de cuisiner
avec votre micro-ondes.
Quand vous cuisinez avec le micro-ondes, suivez
les recommandations suivantes :
Avant de chauffer ou de cuisiner des aliments
ayant une peau ou une enveloppe (saucisses,
pommes de terre, tomates, pommes), percez-
les avec une fourchette pour qu'ils n'éclatent
pas à la cuisson. Coupez l'aliment avant de le
préparer.
Vérifiez que votre récipient est adapté aux
micro-ondes avant de l'utiliser (voir chapitre :
« Quel type de vaisselle utiliser ? »).
Certains aliments contiennent peu d'eau et son
évaporation rapide dans le four peut faire que
ce dernier travaille à vide. L'aliment peut alors
carboniser (par exemple en décongelant du
pain ou en faisant des pop-corns). Le four et la
vaisselle peuvent être endommagés. Le mieux
est de surveiller la cuisson et d'éviter tout
dépassement du temps nécessaire.
Il n'est pas possible de chauffer une grande
quantité d'huile (frire) dans le micro-ondes.
Retirez les emballages des plats
préconfectionnés car ils ne sont pas toujours
résistants à la chaleur. Suivez les instructions
données par le fabricant.
Si vous avez plusieurs récipients, par
exemple des tasses, disposez-les
uniformément sur le plateau rotatif.
Ne fermez pas les sacs en plastique avec des
liens ou des attaches en métal. Choisissez-les
en plastique. Percez le sac en plusieurs
endroits pour que la vapeur puisse s'échapper.
Assurez-vous que les aliments que vous
chauffez ou que vous cuisinez atteignent une
température de 70ºC.
Pendant la cuisson, il est possible que de la
vapeur d'eau se condense sur la vitre de la
porte et que des gouttes s'écoulent. C'est une
situation normale, surtout quand la température
ambiante est basse. La sécurité du four n'est
pas en cause. Après l'utilisation, essuyez l'eau
de condensation.
Pour chauffer des liquides, utilisez des
récipients avec une grande ouverture, pour
mieux évacuer la vapeur.
Préparez les aliments en suivant les indications et
restez vigilant aux temps de cuisson et aux
niveaux de puissance qui sont indiqués dans les
tableaux.
Les chiffres sont donnés à titre d'indication. Ils
peuvent changer en fonction de l'état initial, de la
température, de l'humidité et du type d'aliment.
Nous vous conseillons d'ajuster les temps et les
niveaux de puissance à chaque situation. Selon
l'aliment, il faudra allonger ou raccourcir le temps
de cuisson, ou monter ou baisser le niveau de
puissance.
Cuisiner aux micro-ondes...
1. Plus grande est la quantité des aliments, plus
longue est la durée de la cuisson. Remarquez
bien :
Double de la quantité » double du temps
Moitié de la quantité » moitié du temps
2. Plus basse est la température, plus long est le
temps de cuisson.
3. Les aliments liquides se chauffent plus
rapidement.
4. Une bonne distribution des aliments sur le
plateau rotatif facilite une cuisson uniforme. Si
vous chauffez en même temps des aliments
différents, placez ceux qui sont moins denses
au centre du plateau et les plus denses vers
l'extérieur du plateau.
5. La porte du four peut être ouverte à tout
moment. Le four s'éteint alors
automatiquement. Pour le remettre en
fonctionnement, fermez la porte et appuyez sur
la touche start (démarrer).
6. Quand ils sont couverts, les aliments cuisent
plus rapidement et leur qualité est mieux
préservée. Les micro-ondes doivent pouvoir
traverser le couvercle qui doit avoir de petits
orifices pour laisser passer la vapeur d'eau.
Page 70

69
FR
Cuisiner aux micro-ondes
Tableaux et suggestions – Cuisiner les légumes
Aliment
Quantité
(g)
Addition de
liquides
Puissance
(Watt)
Temps
(m)
Temps de
repos (m)
Indications
Choux-fleur
Brocolis
Champignons
500
300
250
100 ml
50 ml
25 ml
800
800
800
9-11
6-8
6-8
2-3
2-3
2-3
Couper en rondelles.
Couvrir
Petits pois et
carottes,
Carottes surgelées
300
250
100 ml
25 ml
800
800
7-9
8-10
2-3
2-3
Couper en morceaux
ou en rondelles.
Couvrir
Pommes de terre
250
25 ml
800
5-7
2-3
Épelucher et couper
en morceau égaux.
Couvrir
Poivron
Poireau
250
250
25 ml
50 ml
800
800
5-7
5-7
2-3
2-3
Couper en morceaux
ou en rondelles.
Couvrir
Choux de Bruxelles
surgelés
300
50 ml
800
6-8
2-3
Couvrir
Choucroute
250
25 ml
800
8-10
2-3
Couvrir
Tableaux et suggestions – Cuisiner le poisson
Aliment
Quantité (g)
Puissance
(Watt)
Temps
(m)
Temps de
repos (m)
Indications
Filets de poisson
500
600
10-12
3
Couvrir. Retourner quand la
moitié du temps est écoulée.
Poisson entier
800
800
400
2-3
7-9
2-3
Couvrir. Retourner quand la
moitié du temps est écoulée.
Éventuellement, couvrir les
extrémités fines du poisson.
Page 71

70
FR
Cuisiner au grill
Pour obtenir de bons résultats avec le gril, utilisez
la grille fournie avec le four.
Positionnez la grille de façon à ce qu'elle
n'entre pas en contact avec les surfaces
métalliques de la cavité, ce qui provoquerait
un arc électrique et pourrait détériorer le four.
INDICATIONS IMPORTANTES :
1. Lors de la première utilisation du gril, un peu de
fumée odorante peut se dégager. Elle résulte
de l'emploi d'huiles pendant le processus de
fabrication.
2. La vitre de la porte atteint des températures
très élevées quand le gril est utilisé. Ne laissez
pas les enfants s'approcher.
3. Nous vous conseillons de porter des gants de
cuisine car la grille et les parois de la cavité
atteignent des températures très élevées.
4. Le thermostat de sécurité fait que les
résistances s'éteignent temporairement lors
d'une utilisation prolongée du gril.
5. Important ! Vous devez vérifier que les
récipients que vous utilisez quand vous
cuisinez ou faites griller des aliments sont bien
adaptés au micro-ondes. Voir le chapitre sur le
type de vaisselle !
6. Quand vous utilisez le gril, des éclaboussures
de graisse peuvent atteindre la résistance et
être brûlées. C'est une situation normale qui ne
représente aucun problème de fonctionnement.
7. Nettoyez l'intérieur et les accessoires après
chaque cuisson, pour que les saletés ne
s'incrustent pas.
Page 72

71
FR
Cuisiner au grill
Tableaux et suggestions – Gril sans micro-ondes
Aliment
Quantité (g)
Temps (m)
Indications
Poisson
Dorades
Sardines/rascasse rouge
800
6-8 unités
18-24
15-20
Beurrer légèrement. Quand la moitié du
temps est écoulée, retourner et ajoutez les
condiments.
Viande
Saucisses
6-8 unités
22-26
Percer et retourner quand la moitié du
temps est écoulée.
Hamburgers congelés
3 unités
18-20
Entrecôte (environ 3 cm
d'épaisseur)
400
25-30
Saucer et retourner quand la moitié du
temps est écoulée.
Autres
Toasts
4 unités
1½-3
Surveiller les toasts.
Gratiner des sandwichs
2 unités
5-10
Surveiller le gratin
Préchauffez le gril pendant 2 minutes. Sauf
indication contraire, utilisez la grille. Placez-la sur
un récipient dans lequel l'eau et la graisse
puissent couler. Les temps sont mentionnés à titre
d'indication car ils peuvent varier en fonction de la
composition des aliments, de leur quantité et de la
cuisson demandée. Le poisson et la viande
gagnent un goût délicieux si, avant de les griller,
vous les badigeonnez d'huile végétale, épices et
herbes aromatiques, et si vous les laisser mariner
quelques heures. Ne salez qu'après la grillade.
Les saucisses n'éclatent pas si vous les percez
préalablement avec une fourchette.
Au milieu du temps de fonctionnement, contrôlez
la cuisson, remuez ou retournez si nécessaire.
Le gril est spécialement adapté pour la cuisson de
la viande en morceaux et du poisson en filets. Les
morceaux fins de viande peuvent être retournés
une seule fois, les plus gros plusieurs fois.
Page 73

72
FR
Cuisiner au gril
Tableaux et suggestions – Micro-ondes + Gril
La fonction Micro-ondes + Gril est idéale pour
cuisiner rapidement et dorer en même temps les
aliments. Vous pouvez également les gratiner.
Les micro-ondes et le gril fonctionnent
simultanément. Les micro-ondes cuisent et le gril
gratine.
Plat
Quantité (g)
Vaisselle
Puissance
(Watt)
Temps (m)
Temps de
repos (m)
Pâtes gratinées
500
Récipient bas
400
12-17
3-5
Pommes de terres
gratinées
800
Récipient bas
600
20-22
3-5
Lasagne
environ 800
Récipient bas
600
15-20
3-5
Tarte au frommage blanc
environ 500
Récipient bas
400
18-20
3-5
2 cuisses de poulet, frais
(sur la grille)
200 chaque
Récipient bas
400
10-15
3-5
Poulet
environ 1000
Récipient bas et
large
400
35-40
3-5
Soupe à l'oignon gratiné
2 tasses de 200
Bol de soupe
400
2-4
3-5
Avant d'utiliser de la vaisselle et des récipients
dans le micro-ondes, vérifiez qu'ils y sont bien
adaptés. Utilisez seulement de la vaisselle
adaptée aux micro-ondes.
La vaisselle utilisée pour la fonction combinée doit
être adaptée aux micro-ondes et au gril. Voir le
chapitre sur le type de vaisselle !
Remarquez que les valeurs sont mentionnées à
titre indicatif et qu'elles peuvent varier en fonction
du temps initial, de la température, de l'humidité et
du type d'aliment.
Si l'aliment n'est pas assez doré, mettez-le 5 ou
10 minutes de plus en fonction gril.
Faites attention aux temps de repos et retournez
les morceaux de volaille.
Sauf indications contraires, utilisez le plateau
rotatif pour cuisiner.
Les valeurs indiquées dans les tableaux sont
valables pour une cavité du four à froid (il n'est
pas nécessaire de préchauffer).
Page 74

73
FR
Tableaux et suggestions
Cuire de la viande
Aliment
Quantité (g)
Puissance
(Watt)
Température
ºC
Temps
(min)
Temps de
repos (min)
Indications
Ragoût de
viande de
bœuf
1000
200
160/170
80/90
10
Récipient sans couvercle.
Côtes de
porc
500/600
200
180/190
35/40
10
Récipient sans couvercle.
Poulet,
entier
100/1200
400
200
35/45
10
Récipient avec couvercle.
Placer la partie du blanc
vers le haut. Ne pas
retourner.
Poulet en
morceaux
800
400
200
30/40
10
Récipient sans couvercle.
Placer les bouts avec la
peau vers le haut. Ne pas
retourner.
Canard
1500/1700
200
200
80/90
10
Récipient avec couvercle.
Ne pas retourner.
Conseils sur comment rôtir
Retournez les morceaux de viande à la moitié du
temps de cuisson. Lorsque le rôti est prêt,
laissez-le reposer pendant 10 minutes après avoir
éteint le four et en laissant la porte fermée. Ainsi,
le jus de la viande se distribuera mieux.
Ajoutez 2 à 3 cuillers à soupe de jus ou de liquide
de type sauce à la viande maigre et 8 à 10
cuillers à soupe aux ragoûts, en fonction de la
quantité de viande cuisinée.
La température et le temps de rôtissage
dépendent du type d’aliment et de sa quantité.
Si le tableau ne spécifie pas le poids du rôti,
suivez les indications pour le poids inférieur le
plus proche et augmentez le temps.
Conseils sur le récipient
Vérifiez que le récipient tient dans le four.
Les récipients en verre doivent être posés sur un
linge de cuisine sec. Si ces récipients sont posés
sur une surface froide ou mouillée, le verre
pourrait se fendre ou s’abîmer. Utilisez des gants
de cuisine pour sortir le récipient du four.
Page 75

74
FR
Braten
Préparer des gâteaux
Aliment
Récipient
Niveau
Température
Temps (min.)
Gâteau aux noix
Moule creux
1
170/180
30/35
Tarte aux fruits
Moule creux
2
150/160
35/45
Gâteaux aux fruits
Moule avec un trou au milieu
1
170/190
30/45
Quiches
Moule creux
2
160/180
50/70
Gâteau simple
Moule creux
1
160/170
40/45
Gâteaux aux amandes
Plateau
2
110
35/45
Feuilleté
Plateau
2
170/180
35/45
Conseils sur les moules à gâteaux
Les moules les plus utilisés sont ceux en métal de
couleur foncée. Si vous souhaitez également
utiliser le micro-ondes, choisissez des moules à
gâteaux en verre, en porcelaine ou en plastique,
résistant à des températures jusqu'à 250º C. Avec
ce type de moule les gâteux brûlent moins.
Conseils pour cuisiner les gâteaux
La température et la cuisson du gâteau
dépendent de la qualité et de la quantité de la
pâte. La première fois, choisissez une
température inférieure et la fois suivante, si
nécessaire, une température plus élevée. Avec
une température inférieure, vous obtenez des
résultats plus uniformes. Placez toujours le moule
au centre du plateau rotatif.
Conseils pour la cuisson
Comment vérifier si un gâteau est cuit
Enfoncez un cure-dent dans la partie la plus
haute du gâteau, 10 minutes avant la fin du temps
de cuisson. Si la pâte ne reste pas collée au curedent, le gâteau est cuit.
Le gâteau a une couleur très foncée
La prochaine fois, sélectionnez une température
plus basse et laissez cuire le gâteau plus
longtemps.
Le gâteau est très sec
Une fois le gâteau cuit, réalisez de petits trous
dans celui-ci à l’aide d’un cure-dent. Ensuite,
mouillez-le avec un peu de jus de fruit ou de
boisson alcoolisée. La prochaine fois, augmentez
la température d’environ 10ºC et réduisez le
temps de cuisson.
Le gâteau ne se décolle pas une fois retourné
Pour que le gâteau se décolle plus facilement du
moule, une fois cuit, laissez-le refroidir pendant 5
à 10 minutes. S’il ne se décolle toujours pas,
introduisez soigneusement un couteau entre le
gâteau et le moule. La prochaine fois, graissez
bien le moule.
.
Page 76

75
FR
Quel type de vaisselle utiliser?
Fonction Micro-ondes
N’oubliez pas que les micro-ondes sont réfléchies
par les surfaces métalliques. Le verre, la porcelaine,
la terre cuite, le plastique et le papier laissent passer
les micro-ondes.
Les récipients ou la vaisselle en métal, ou ayant
des parties ou des décorations métalliques, ne
doivent donc pas être utilisés dans le microondes. Le verre et la terre cuite avec des
décorations ou des parties métalliques (comme
le verre de plomb) ne doivent pas être utilisés.
L'idéal pour cuisiner au four micro-ondes est
d'utiliser le verre, la porcelaine ou la terre cuite
réfractaires, et le plastique résistant à la chaleur. Le
verre et la porcelaine très fins et fragiles doivent être
utilisés, peu de temps, pour décongeler ou chauffer
des aliments déjà confectionnés.
La vaisselle peut être très chaude car les aliments
chauds lui transmettent leur chaleur. Vous devez
donc toujours utiliser un gant de cuisine !
Testez la vaisselle
Placez la vaisselle dans le four. Si au bout de 20
secondes à la puissance maximum elle ressort
froide ou tiède, alors vous pourrez l'utiliser. Elle n'est
pas adaptée si elle a beaucoup chauffé ou provoqué
un arc électrique.
Fonction Gril et Air Chaud
En les fonctions Gril et Air Chaud, la vaisselle doit
résister à des températures de 300ºC.
N'utilisez pas de vaisselle en plastique.
Fonctions Combinées
En les fonctions Combinées, la vaisselle doit être
adaptée autant aux micro-ondes qu'au gril.
Récipients et papier aluminium
Récipients et papier aluminium
Vous pouvez utiliser des récipients en aluminium ou
du papier aluminium dans le four, si vous suivez les
consignes suivantes:
Suivez les recommandations du fabricant figurant
sur l'emballage.
Ces récipients en aluminium ne doivent pas avoir
une hauteur supérieure à 3 cm ni entrer en
contact avec les parois de la cavité (distance
minimum de 3 cm). Le couvercle en aluminium
doit être retiré.
Mettez le récipient en aluminium directement sur
le plateau rotatif. Si vous utilisez la grille, placez
le récipient sur un plateau en porcelaine. Ne
posez jamais le récipient directement sur la
grille !
Le temps de cuisson est plus long car les micro-
ondes entrent dans les aliments seulement par le
dessus. Dans le doute, n'utilisez que de la
vaisselle adaptée aux micro-ondes.
Le papier aluminium peut être utilisé pour
réfléchir les micro-ondes pendant la
décongélation. Les aliments délicats, tels que la
volaille ou la viande hachée, peuvent être
protégés d'un excès de chaleur en recouvrant
leurs extrémités de papier aluminium.
Important : le papier aluminium ne doit pas
entrer en contact avec les parois de la cavité,
cela provoquerait un arc électrique.
Couvercles
Nous vous recommandons d'utiliser des couvercles
en verre, en plastique, ou une pellicule adhérente,
car ainsi :
1. Vous empêchez une évaporation excessive
(principalement pour les cuissons très longues) ;
2. La cuisson est plus rapide ;
3. Les aliments cuits ne sont pas secs ;
4. Le goût est mieux préservé.
Le couvercle doit être percé d'orifices pour éviter
toute formation de pression. Les sacs en plastique
doivent également avoir des ouvertures. Les
biberons, les petits pots pour les bébés et tous les
récipients équivalents doivent être chauffés sans
couvercle, sinon ils pourraient éclater.
Page 77

76
FR
Quel type de vaisselle utiliser?
Tableau – Vaisselle
Le tableau suivant vous indique de manière générale quel type de vaisselle est adapté à chaque
situation
Mode de
fonctionnement
Type vaisselle
Micro-ondes
Gril / Air chaud
Fonctions
Combinées
Décongeler /
réchauffer
Cuisiner
Verre et porcelaine 1)
Vaisselle non résistante au feu, peut
être lavée au lave-vaisselle
oui
oui
non
non
Céramique vitrée
Verre et porcelaine résistant au feu
oui
oui
oui
oui
Céramique, vaisselle en grès 2)
Avec ou sans verre, sans décorations
métalliques
oui
oui
non
non
Vaisselle en terre cuite 2)
Avec du verre
Sans verre
oui
non
oui
non
non
non
non
non
Vaisselle en plastique 2)
Résistant à une chaleur de 100°C
Résistant à une chaleur de 250°C
oui
oui
non
oui
non
non
non
non
Films en plastique 3)
Film plastique pour aliments
Cellophane
non
oui
non
oui
non
non
non
non
Papier, carton, parchemin 4)
oui
non
non
non
Métal
Papier aluminium
Emballages en aluminium 5)
Accessoires
oui
non
oui
non
oui
oui
oui
oui
oui
non
oui
oui
1. Sans rebord doré ou argenté et sans verre
de plomb.
2. Suivez les indications du fabricant !
3. Ne pas utilisez de liens ou attaches en
métal pour fermer les sacs. Perforez les
sacs. Utilisez les films en plastique
uniquement pour recouvrir.
4. N'utilisez pas d’ assiettes en papier ou en
carton.
5. Utilisez uniquement des emballages en
aluminium peu profonds et sans couvercle.
L'aluminium ne doit pas entrer en contact
avec les parois de la cavité.
Page 78

77
FR
Nettoyage et entretien du four
Le nettoyage est l'unique entretien normalement
nécessaire.
Attention ! Le four micro-ondes doit être nettoyé
régulièrement, les éclaboussures et petites
particules doivent être enlevées. Si vous ne le
nettoyez pas régulièrement, la surface du four
peut se détériorer, la vie utile du four sera
réduite et une situation dangereuse peut
éventuellement survenir.
Attention ! Le nettoyage doit être effectué
quand le four est débranché de l'alimentation
électrique. Retirez la prise du mur ou
débranchez le circuit d'alimentation du four.
N'utilisez pas de produits de nettoyage
agressifs ou abrasifs, ni frottoirs ni objets
pointus qui peuvent rayer les parois.
N'utilisez pas d'appareils de nettoyage à haute
pression ou qui projettent de la vapeur.
Surface avant
Un chiffon humide suffit pour nettoyer le four. S'il
est très sale, ajoutez quelques gouttes de produit
vaisselle dans l'eau pour humidifier le chiffon.
Pour finir, essuyez tout le four avec un chiffon
sec.
Pour les fours dont le devant est en
aluminium, utilisez un produit doux pour les vitres
et un chiffon doux ne laissant pas de fibres.
Nettoyez horizontalement sans exercer de
pression sur la surface.
Retirez immédiatement les taches de calcaire,
graisse, amidon et blanc d'œufs. Elles peuvent
provoquer de la corrosion.
Évitez que de l'eau entre dans le four.
Intérieur du four
Après chaque utilisation, nettoyez les parois
intérieures avec un chiffon humide. Il est ainsi
plus facile d'enlever éclaboussures et particules.
Pour les saletés les plus difficiles à enlever,
utilisez un produit de nettoyage non agressif.
N'utilisez pas de sprays pour four ni d'autres
produits de nettoyage agressifs ou abrasifs.
La porte et le devant du four doivent toujours
être bien propres pour assurer un
fonctionnement correct.
Évitez que de l'eau entre dans les orifices de
ventilation du micro-ondes.
Enlevez régulièrement le plateau rotatif et son
support pour nettoyer la base de la cavité, en
particulier quand des liquides ont débordé.
N'allumez pas le four sans le plateau rotatif et
son support.
Si la cavité du four est très sale, placez un verre
d'eau sur le plateau rotatif et faites fonctionner le
four micro-ondes pendant 2 ou 3 minutes à la
puissance maximum. La vapeur ainsi libérée va
ramollir les saletés qui seront plus faciles à
nettoyer avec un chiffon doux.
Les odeurs désagréables (comme après la
cuisson d'un poisson) peuvent être facilement
éliminées. Versez quelques gouttes de citron
dans une tasse d'eau. Mettez une petite cuillère
dans la tasse pour éviter une ébullition après
coup. Chauffez à la puissance maximum pendant
2 à 3 minutes.
Page 79
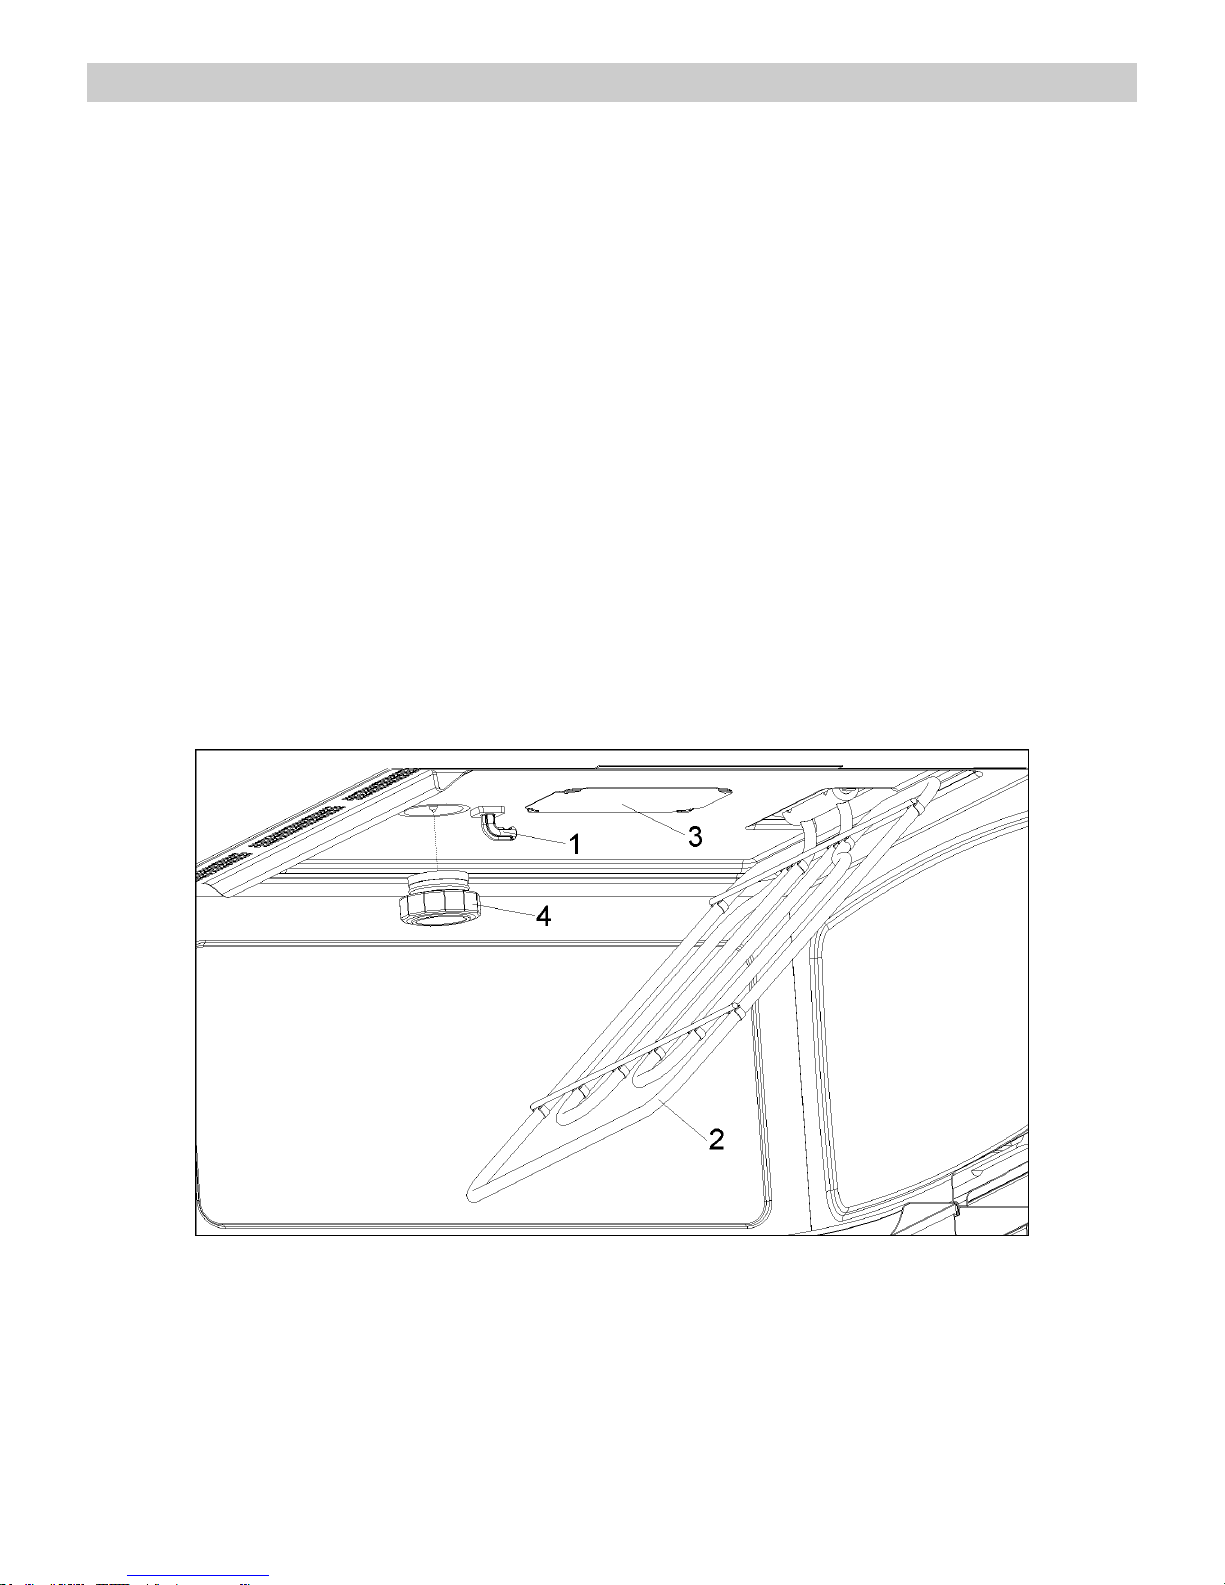
78
FR
Nettoyage et entretien du four
Plafond du four
Quand le plafond du four est sale, le gril peut être
abaissé pour en faciliter le nettoyage.
Attendez que le gril ait refroidi avant de
l'abaisser, pour éviter tout danger de brûlure.
Procédez comme suit :
1. Faites tourner le support du gril de 180º (1).
2. Abaissez doucement le gril (2). Ne forcez pas
excessivement, vous pourriez
l'endommager.
3. Quand le plafond est nettoyé, remettez le gril
(2) à sa place, puis bloquez-le avec son
support en le faisant pivoter de 180º.
Le couvercle en mica (3) situé dans le plafond
doit toujours être propre. Les particules
d'aliments qui s'y accumulent peuvent
endommager le four ou provoquer des étincelles.
N'utilisez pas de produits de nettoyage
abrasifs ni d'objets pointus.
Ne retirez pas le couvercle en mica, pour
éviter tout risque.
Le couvercle en verre de la lampe (4), situé dans
le plafond du four, peut être facilement retiré pour
être nettoyé. Dévissez-le et nettoyez-le avec de
l'eau et un peu de produit vaisselle.
Accessoires
Nettoyez les accessoires après chaque utilisation.
S'ils sont très sales, laissez-les d'abord tremper,
puis lavez-les avec une brosse et une éponge.
Les accessoires peuvent être lavés au lavevaisselle.
Assurez-vous que le plateau rotatif et son support
sont toujours propres. N'allumez pas le four sans
le plateau rotatif et son support.
Page 80

79
FR
Que faire en cas de mauvais fonctionnement ?
ATTENTION ! Toute réparation ne peut être
effectuée que par des techniciens spécialisés.
Toute réparation effectuée par des personnes
non certifiées par le fabricant peut se révéler
dangereuse.
Les problèmes suivants peuvent être corrigés
sans appeler l'assistance technique :
L'écran ne s'allume pas ! Vérifiez si :
- L'affichage de l'heure a été masqué (voir
chapitre Réglages de base).
Rien ne se passe quand on appuie sur les
touches ! Vérifiez si :
- Le blocage de sécurité est actif (voir chapitre
Réglages de base).
Le four ne fonctionne pas ! Vérifiez si :
- La prise est correctement branchée au mur.
- Le circuit d'alimentation du four est branché.
- La porte est complètement fermée. Assurezvous-en au son produit à la fermeture.
- Des corps étrangers se trouvent entre la porte
et le devant de la cavité.
Pendant le fonctionnement du four, des
bruits bizarres se font entendre ! Vérifiez si :
- Des objets métalliques génèrent des arcs
électriques à l'intérieur du four (voir chapitre sur
le type de vaisselle).
- La vaisselle entre en contact avec les parois du
four.
- Il y a des ustensiles de cuisine à l'intérieur du
four.
Les aliments ne chauffent pas ou chauffent
très lentement ! Vérifiez si :
- Vous avez utilisé de la vaisselle en métal.
- Vous avez sélectionné un temps de
fonctionnement et une puissance appropriés.
- Vous avez placé à l'intérieur du four une
quantité d'aliments plus importante ou plus
froide que d'habitude.
L'aliment est excessivement chaud,
desséché ou brûlé ! Vérifiez que vous avez
sélectionné le temps de fonctionnement et le
niveau de puissance appropriés.
Un bruit se fait entendre à la fin d'un
fonctionnement ! Ceci n'est pas un problème.
Le ventilateur de réfrigération continue de
fonctionner un moment. Il se débranche quand
la température est suffisamment basse.
Le four fonctionne mais l'éclairage intérieur
ne s'allume pas ! Si toutes les fonctions
travaillent correctement, vous devez probablement changer la lampe. Vous pouvez continuer
à utiliser l'appareil.
Remplacement de la lampe
Pour remplacer la lampe, procédez de la façon
suivante:
- Débranchez le four de l'alimentation électrique,
en retirant la prise du mur ou en coupant le
circuit d'alimentation du four.
- Dévissez et enlevez le couvercle en verre de la
lampe (1).
- Retirez la lampe halogène (2). Attention ! La
lampe peut être très chaude.
- Installez une nouvelle lampe 12V / 10W.
Attention ! Ne touchez pas la surface de la
lampe directement avec les doigts car cela
l’endommage. Suivez les instructions du
fabricant de la lampe.
- Revissez le couvercle en verre de la lampe (1).
- Rebranchez le four à l'alimentation électrique.
Page 81

80
FR
Caractéristiques techniques
Spécifications
Tension AC ...................................................................................... (voir plaque des caractéristiques)
Puissance requise ........................................................................... 3400 W
Puissance du gril. ............................................................................ 1500 W
Puissance de la Air Chaud .............................................................. 1600 W
Puissance de sortie des micro-ondes. ............................................. 1000 W
Fréquence des micro-ondes… ........................................................ 2450 MHz
Dimensions hors-tout (Longueur Hauteur Profondeur). ................. 595 455 542 mm
Dimensions de la cavité (L H P). ................................................... 420 210 390 mm
Capacité du four. ............................................................................. 38 l
Poids ............................................................................................... 35 kg
Page 82

81
FR
Instructions pour l'installation
Avant l'installation
Vérifiez que la tension de l'alimentation de
l'appareil, indiquée sur la plaque des
caractéristiques correspond à celle de votre
installation. (Le panneaux de caractéristiques est
situé sur la partie avant de la cavité et est visible
seulement après l’ouverture de la porte.)
S'il y a lieu, conformément au Code national de
l'électricité (ou au Code canadien de l'électricité),
cet appareil doit être installé sur un circuit de
dérivation séparé.
Installateur – Indiquer au propriétaire
l’emplacement du disjoncteur ou du fusible.
Identifier sa position pour pouvoir le retrouver
facilement.
Avant l'installation, mettre l'appareil hors service
au panneau de service. Verrouiller le panneau
d'entrée d'électricité pour éviter que le courant ne
soit accidentellement rétabli.
S'assurer que l'appareil est installé et mis à la
terre par un technicien qualifié. L'installation,
les connexions électriques et la mise à la terre
doivent être conformes à tous les codes
applicables.
Ouvrez la porte du four et retirez tous les
accessoires ainsi que l'emballage.
N'enlevez pas le couvercle de mica situé au
plafond de la cavité du four! Ce couvercle évite
que graisses et particules d'aliments
endommagent le générateur de micro-ondes.
Attention! Le devant du four peut être enveloppé
d'une pellicule de protection. Retirez-la
soigneusement, avant la première utilisation, en
commençant par le bas.
Vérifiez que le four n'est pas endommagé.
Assurez-vous que la porte du four ferme correctement et que le côté intérieur de la porte et le
devant de la cavité ne sont pas abîmés. S'ils le
sont, appelez le Service d'assistance technique.
N'UTILISEZ PAS LE FOUR si le conduit flexible
est endommagé, si le four ne fonctionne pas
correctement ou s'il est endommagé ou bien
tombé. Appelez le Service d'assistance technique.
Installez le four sur une surface stable, le plus loin
possible des radios, télévisions et de tout ce qui
produit de la chaleur.
Alimentation Electrique
Avant d’installer le four avec un électricien
qualifié, vérifiez que votre maison est pourvue du
système électrique approprié et qu’en plus le four
ne surchargera pas le circuit de branchement sur
lequel il doit être installé.
Sont nécessaires un triphasé séparé, ou un four à
simple phase à 4 fils, 240 Volt, 60 Hz.
Pour brancher le four, vous aurez besoin d’une
boîte de raccordement approuvée qui est
facilement à portée de main à travers le devant du
meuble où le four sera placé. Le four a 90 cm de
conduit.
Laissez 60 des 90 d’espace entre la ligne
électrique pour que le four puisse être déplacé si
un dépannage était nécessaire.
NE RACCOURCISSEZ PAS le conduit flexible.
Cablage Necessaire
Lorsque vous raccordez les fils, utilisez toute la
longueur de conduit fourni (90 cm). Le conduit ne
doit pas être coupé.
Avant de faire les raccordements, assurez-vous
qu’il n’y a plus d’électricité et lisez et observez ce
qui suit:
1. Sont nécessaires pour le four un circuit de
raccord triphasé ou à quatre fils, simple
phase, 240 Volt, 60 Hz.
2. Le four doit uniquement être raccordé avec
des fils cuivre ou aluminium.
3. Aux Etats-Unis :
Les fils doivent être conformes au code
électrique national, ANSI/NFPA No. 7
dernière édition. Vous pouvez obtenir une
copie du code électrique national en écrivant
à: National Fire Protection Association
Batterymarch Park Quincy, MA 02269
Page 83

82
FR
Instructions pour l'installation
Au Canada:
Les fils doivent être conformes au code
électrique canadien C22.1- dernière édition.
Vous pouvez obtenir une copie du code
électrique canadien en écrivant à: Canadian
Standards Association 178 Rexdale
Boulevard Rexdale (Toronto), Ontario,
Canada M9W 1R3
4. La taille des fils (CUIVRE OU ALUMINIUM)
et des connexions doit être appropriée aux
caractéristiques des appareils
électroménagers par le code électrique
national. Le câble armé flexible s’étendant
du four doit être connecté directement au
boîtier de raccordement.
5. Le boîtier de raccordement doit être situé
pour qu’il y ait un maximum d’espace entre
lui et four pour qu’il puisse être déplacé en
cas de panne.
6. Un connecteur conduit U.L. listé doit être
placé à chaque extrémité du câble de
raccordement d’alimentation.
Connexions Electriques
Assurez-vous que votre installation est
correctement installée et branchée par un
technicien qualifié. Demandez à votre
revendeur un technicien qualifié ou un service
de réparation agréé.
Cet appareil est fabriqué avec un conducteur de
terre vert connecté au châssis du four. Après vous
être assurer qu’il n’y a plus de courant, branchez
le conduit flexible depuis le four jusqu’au boîtier
de raccordement en utilisant un connecteur de
conduit U.L. listé. Les figures suivantes et les
instructions fournies présentant la manière la plus
commune de brancher un four. Vos codes locaux
et règlements sont évidemment prioritaires sur
ces instructions. Effectuez les connexions
électriques conformément aux codes locaux et les
règlements.
“AVERTISSEMENT” Risque d’électrocu-tion,
cadre à la masse à une position neutre d’un
appareil par une liaison.
Mettre à la masse par un conducteur neutre est
interdit pour les nouvelles installations de circuit
électrique (1996 NEC); les mobile homes; et les
véhicules de parc, ou dans les régions où les
codes locaux interdisent de brancher à la masse à
travers un conducteur neutre. Pour les
installations où la mise à terre par un conducteur
neutre est interdit:
Déconnectez la masse du conducteur neutre
aux extrémités libres du conduit ;
Utilisez la borne de terre ou une broche de
raccordement pour mettre à la terre l’unité;
et
Connectez la borne de neutre ou une broche
de raccordement à un circuit de dérivation
neutre de la manière habituelle.
Connexion à 3 Fils (Pour US seulement)
Selon la Figure suivant, où les codes locaux
permettent la connexion du conducteur de terre
du four au fil NEUTRE du circuit de branchement
(fil gris ou coloré blanc):
Si les codes locaux le permettent, connectez
le conducteur de terre vert du four et le fil
blanc du four au fil NEUTRE du circuit de
branchement (fil gris ou coloré blanc).
Connectez les broches de raccordement du
four aux broches de raccordement
correspondantes dans le boîtier de
raccordement.
Page 84

83
FR
Instructions pour l'installation
Connexion à 4 Fils (Pour des US ou
CANADA)
Selon la Figure suivant :
Déconnectez la masse du point neutre aux
extrémités du conduit.
Connectez le conducteur de terre vert du
four au conducteur de terre dans le boîtier
de raccordement (fil nu ou coloré vert).
Connectez les broches de raccordement
rouge et noir du four aux broches de
raccordement correspondantes dans le
boîtier de raccordement.
Après l'installation
Le four ne fonctionne que si la porte est
correctement fermée.
Avant la première utilisation, nettoyez l'intérieur du
four ainsi que les accessoires en suivant les
indications figurant au point «Nettoyage et
entretien de votre four».
Emboîtez le manchon dans le centre de la cavité
du four, placez le support plateau puis le plateau
rotatif qui doit s'emboîter. Chaque fois que le four
est utilisé, il est important que ces accessoires
soient à l'intérieur du four et correctement placés.
Le plateau rotatif peut tourner dans les deux
sens.
Page 85

84
FR
Installation / Dimensions pour l'Installation
EN
Push oven completely into the cabinet
and centre it.
Open microwave door and fasten the
appliance to the cabinet using the four
screws provided. Insert the screws
through the front holes.
FR
Introduisez le four dans le meuble jusqu'à
ce que l'avant de celui-ci butte sur le bois
et alignez-le.
Ouvrez la porte du four et fixez ce dernier
aux parois latérales du meuble au moyen
des 4 vis fournies. Introduisez-les dans
les trous prévus à cet effet.
Page 86

Page 87

Page 88

 Loading...