

Page 1
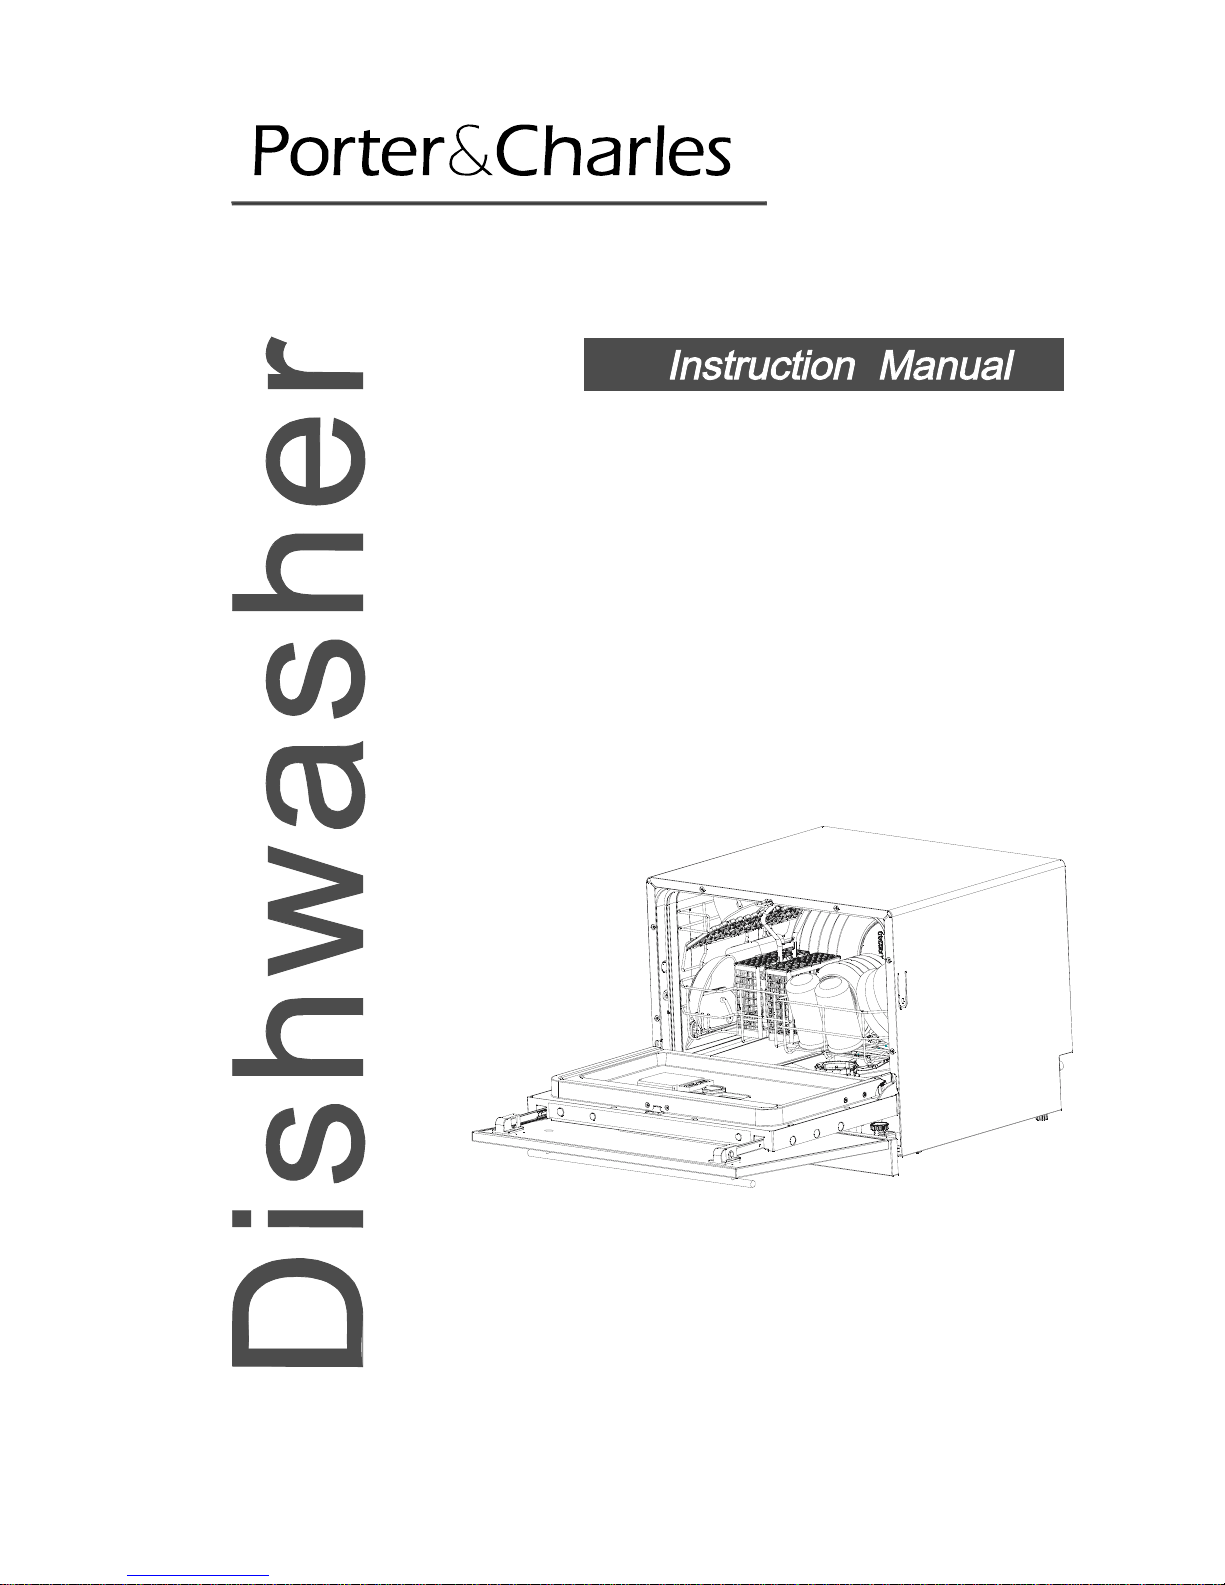
DW4FI
DW4SS
Page 2
Toreview the section onTroubleshootingTips
willhelp youtosolve some common problem s
byyourself .
Dear Custo m er ,
Pleasecarefullyreadingitbef ore usingthedishwasher
will help you to u se and main t ain the d ishw as her prope rly.
Passitontoanysubsequent owner of the appliance.
This manual contai ns sect ion s ofSafe t y Instructions,
OperatingInstructions,InstallationInstructions and
Troubles hooting Tips , etc.
The manufacture r,fol lowing apol icy of c onstant
development a nd updati ng of theproduct, may
make modificatio ns witho ut giving prior notice.
Keep it to refer to at a later date.
Ifyou can not r esolv e the troubles by yourself ,
please ask f or the he lp of professional technicians .
Dishwasher Features........ ............. ............... ...2
Attenti on bef ore o r a fter loading the Dishwasher
Baskets.............................................. ............6
FilteringSystem.............................................11
Caringfor the Dishwasher................ ..... .........12.
A Fill the RinseAid Dispenser................... ......3、
B Functionof Detergent ..............................4,5、
Loadingthe Basket.................. .........................7
CutleryBasket................................................8
WashCycleTable...........................................9
Turning on theAppliance................................9
ChangetheProgramme.............. ................10....
At th e End of the Wa sh Cycle .. ....... ......... .........1 0
Positioning theA ppliance................... ......... .14..
Water Co nne ction.......... . ... .. .... ... .. . ..... ... .......1 5.
AboutPowerConnection........................ .......14.
Connection of Drain Hoses............. ........ .......15.
Startof dishwasher............................. .. ......16.. ..
Beforecallingfor service........................... .....17.
Errorcodes.................................... ..............18.
Contr ol Panel.... ... ... . ... ... . . ... ... . ... ... . ........ .... .. .. ..2
Page 3

1
This appliance must be grounded. In the event ofa
malfunction or breakdown, grounding will reduce
the risk of electric shock by providing a path of
least resistance of electric current. This appliance
is equipped with a cord having an equipmentgrounding conductor and a grounding plug.
The plug must be plugged into an appropriate outlet
that is installed and grounded in accordance with
all local codesand ordinances.
Keep children away from detergent and rinse aid, keep
child away fromthe open doorof the dishwasher,
there could still be some detergent left inside.
ren
Do not abuse, sit on, or stand on the door or dish
rack of the dishwasher.
Do not wash plastic items unless they are marked
dishwasher safe or the equivalent. For plastic items
n
ot so marked, check the manufacturer's
recommendations.
Use only det ergent and rinse additiv es
designed for anaut omatic d ishwasher.
Never use s oap, l aundr y de tergent, orhand
washing deterg ent inyour d ishwasher. Keep
these products out of th e reach ofchild ren.
During installation, thepower supply mustnot
be excessiv ely or dangerouslybentor flattened.
The doorshouldnotbeleftin theopenposition
since thiscouldpresent a tripping hazards.
Do not tamper with controls.
Do not place any heavy objects of stand on the
door when it is open. The appliance could tip
forward.
When lo ad ing items to b e wash ed:
1) L ocate sharpitems so thattheyarenot likely
todamage the doorseal;
2 Warning: Knives andothe r ute nsils with
sh a rp points mus t be loadedin the ba sket
with their pointsd own orp laced in a
horizontalposition.
)
When using you r di shwasher, you should
prevent plastic items from comin g int o contact
with heating element.(This instruction is only
applicable to machines with a visual heating
element.)
If the suppl y cord i s dam aged, it mustbe replaced
by the manu facturer orit s servic e agent ora
similar ly qualified person in or de r to avoid a
hazard.
Please dispos e of pack ing m aterials properly.
Use the dishwasher only for its intended function.
Dishwasher det ergents ares trongly alkaline, they
can be extre mely da ngerous i f swallowed .Avoid
con tactwithskinandeyesandk eepchildren away
from the dishwasher when t he door isop en.
Check that the detergent re ceptible isempty
after compl etion of thewash cycl e.
The appliance is tob e connected tot he water
mains usingnew hose setsandthat old hose- sets
sho uld no t be reuse d.
The maximum sizeof thedishesis260mm.
The maximum permissible inlet water pressureis
1Mp a .
The minimum permissibleinletwaterpressur eis
0.04Mpa.
Children should be supervised to ensure that they do
not play with the appliance.
This appliance is not intended for use by persons
(including children with reduced physical, sensory or
mental capabilities, or lack ofexperience and
knowledge ,unless they have been given supervision
or instruction concerning use of the appliance by a
person responsible for their safety.
)
When using your dishwasher, follow the precautions listed below:
Improper connection of the equipment-grounding
conductor can resultin arisk of electric shock.
Check with a qualified electrician or service
representative if you are in doubt whether the
appliance is properly grounded. Do not modify the
plug provided with the appliance; If it is not fit for
the outlet. Have a proper outlet installed by a
qualified electrician.
Page 4
2
before using itfor thefirsttime.
To g etthe best performance from your dishwasher, r ead all operating instructions
Front v i ew
Back View
Filt er assemblyDetergent Dispenser
Cup S helf
Cutlery Bask et
RinseA idDispenser
Inlet pipeconnector
Drain pipe connector
Spray Arms
Basket
1
5
6
7
8
9
3
2 4
2
1
5
3
6 7
8
4
5
2
4
6
7
Power indicato r: To comeon whenP owe r ON/OFF
buttonis pressedd own.
ON/OFF Button: To turn on/ off the p ower sup ply.
Delayed Start Button: Press this button to se t the
delayed hours f or wash ing. Youcan delay th e start
of wash i ng up to 24 hours. One pres s on t his
button delays thestartof washin gby onehour.
Progr am indica tor : whe n you sele c t w as hing
program,the correspon dlight will display.
RinseAidWarningLight:Tobeonwhenthe
rinse aid disp enser need s to berefilled.
Program button :To select washingprogram
whenpress the button.
3
Delay time display : To displa y b o oki n g t i me .
9
Page 5
3
The rinse aid is rel eas ed d uring the final rinse to prevent water from for ming droplets o n yo ur dis he s. That can leave
spots and strea ks. It al so improve s drying by allowing water to sheet offthe dishes.Your dishwasher isdesigne d to
useliquid rins e aids. The rinsea id dispense r is l ocated inside thed oor next tothe detergent dispenser. To fillthe
dispenser, open thecapandpourthe rinseaidi ntothe dispenseruntilthelevelindicatorturns completelyblack.
Thevolume of therins e aid container is about 110ml.
RinseAid Dispenser
Function of Rinse Aid
Rinse aid is automatically a dded during the last rinse, ensuring thorough rinsing, and spotan d s treak fr ee drying.
Ast he ri nse aid d imin ishes, th e siz e of the blackdo t
on the rinse aidlevel indicator changes,as illustrated below.
Full
3/4full
1/2full
1/ 4 full- Shouldrefill to eliminate spotting
Emp ty
Whento Refill the Rinse Aid Dispenser
Ifthere is nori nse-aid warning light in thec ontrol panel , you can judgethe am ount of rinse-aid by the c olor
of the optical levelindicator locatednextto thecap. When therinse-aid container isfull,the whole
indicator will bedark .As the rinse-aid diminishes, the size o f the dark dot decreases. You should never let
therinseaidgetbelow1/4full.
""
Attention!
Only use branded rinse aid for dishwasher. Never fillthe rinseaiddispenser withanyo ther substances
(e.g. Di shwasher cleaning agent, liquid deterg ent). Th is woulddam age t he app lian ce.
To opent he dispens er,t urn the capt o the " open" (left) arr ow and liftit out.
Pourtherinse aidintothe dispenser,beingcareful not tooverfill.
Replac e the cap by inserting ita lig ned w it h "open" arro w an d tur ning itto th e c losed (right) a rrow.
1
2
3
during thenext wash.
Don't forget to replace the capbefore you closedishwasherdoor.
Clean up an y ri nse aid s plit duringfil ling with anabsorbentcloth to av oid e xcessive foam ing
Page 6
4
Deterg ents
There are 3 sorts of detergen t s
1.With phosphate and withchlorine
2.Withphosph ate and wit hout c hlorine
3.Withoutph osphate andwith out chlo ride
Based on their chemical composition,dishwasher canbesplit in twobasic t ypes:
The use of normal washing p rogrammes i n co njunction w ith co ncentrated d etergen ts
reduces pollution and is good foryour dishes; these wash p rogrammes arespecially mat ched
tothe di rt- diss olvin g properti es o f the e nz yme s of the conc ent rated d e terg ent. For this reason
normal wash programmes in whichconcentrated detergent sareusedcan achieve the same
resultst hat canotherwise only be achieved using heavy program.
“”
“”
“”
Detergent tabletsofdifferent brands dissolve at differentspeeds. For thisreasonsome
detergent tablets ca nnot diss olve and develop their ful l cleaning po wer dur ing short
prog rammes.Therefore please uselong progr ammeswhen using detergent tablets, to
ensure the c omplete remova l of detergent residuals.
Concentr ated Deterge nt
Detergent Tablets
conventional,alkalinedetergentswith caustic components
lo w alk aline concentrated detergents w i t h natural enzymes
Normally new pu lverised detergent is without phos phate. T he water so ftene r functio n of
phospha te is not give n. In this cas e we r ecomme nd to fill sal t in the salt cont a i ner even when
the hardness of water is only6 dH.Ifdetergents without phosphatew ere usedin caseof hardwater
often white spots appear at dishes an d gla sses. In thiscas e please add more detergent toreach
better results. D etergent s with o ut ch lorine do only bleach a lit t le. S t ro ng a nd co lo u red spots will not
rem oved c o m pletely. In this cas e ple ase choo se a pr o gram m e wit h higher Temp erature.
°
Detergent tablets are onlyfor the models with 3 in1 functionor 3 in 1 p rogram.
Detergents with i ts chem ical i ngredients a re necessary tor emove dirt, crushd irt an d transpo rt it outof th e di shwasher.
and dry.
Don't put powder deterge nt intothedispenseruntilyou're readyto wash dishes.
Use only deterge nt speci fically m ade f or use in dishwashers. Keep yourdet erge nt fresh
Proper Use of Deterge nt
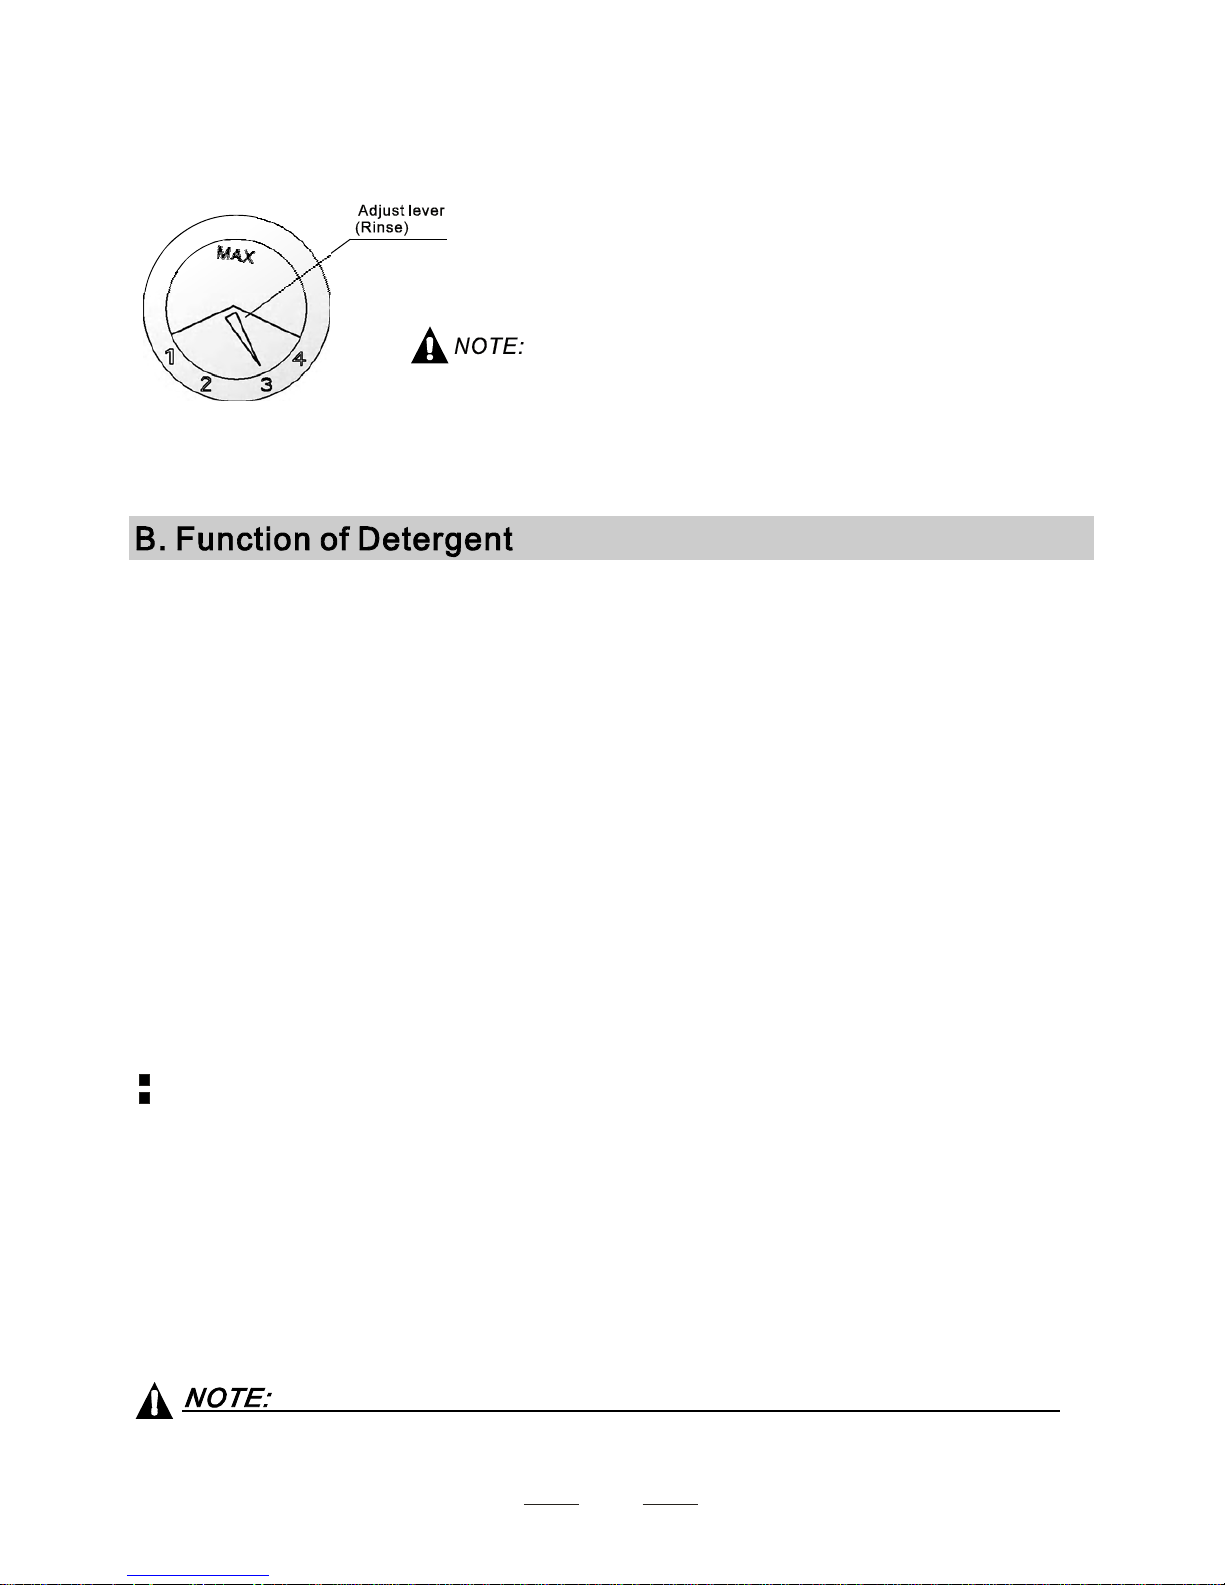
Adjusting Rinse Aid Dispenser
The rinse aiddis penser hasf our set tings.T he recom mended setting is on "3" .
If the d ishes sti ll are not drying prop erly orare spotted, adjust the dial to t he
next high er numb er on "4 ".
Increasethe dose if there are dropsof water or lime spotson thedishes afterwashing.
Reduce i tifthere arestickywhitishstainson your dishes o ra bluish filmon glassware or
knifeblades.
Page 7
AmountofDetergentto Use
The dispenser m ust be re filled bef ore the startof each wash cycle f ollowing the instructions
provided in the Wash CycleTable. Yourdi shwasher usesl ess dete rgent an drinse a id then
conventional dishwasher. Generally, only onetablespoon of detergent is needed for
anormalwashload. Also, moreheavily soileditems needmoredetergent.Always add the
detergen t jus t before star ting the dish was her, othe rwis e it could ge t da mp a nd w ill not
dissolve properl y.
Detergent Dispenser
Always add the detergent just before st arting ea ch wash cycl e.
Only usebranded detergent aidfor dishwasher.
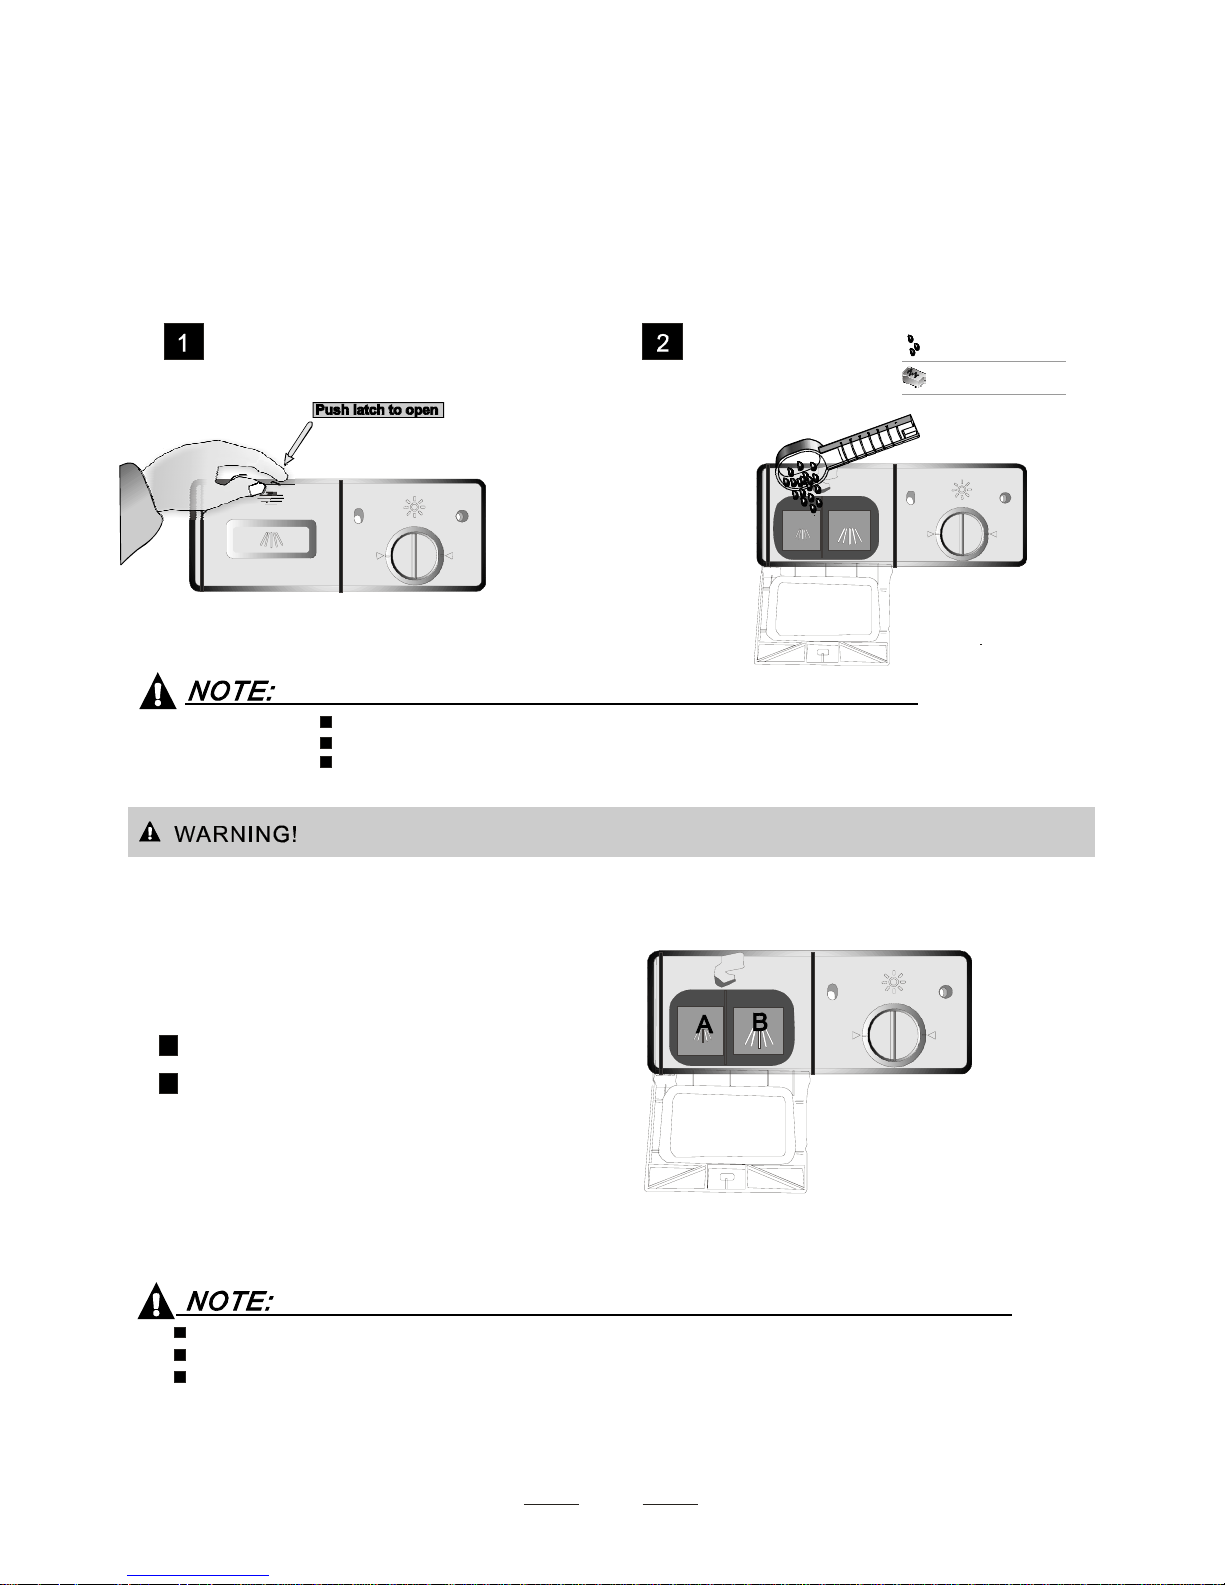
If the lid i s close d: press release button.T he l id springsop en.
5
Detergenttablet
Detergent powder
Fillt he d etergent dispenserw ith d etergent.
The mar king i n d icates the dosing leve l s , as
illustrate donright:
The place c an load15g detergent .
The place can l oad 25g detergent .
Pleaseo bser ve the m anufacturer s dosing and storage
Recommendationsas stated on thedetergent packaging.
Close the lid and press until it l oc ks in place.
If the d ishes are heavily soiled, plac e an addit iona l
detergent dose in the pre-wash det ergent chamber.This detergen t will takeeffect during thepre- wash phas e.
A
B
Fillin detergent
You find information ab out t h e amount of de tergent for thes ingle programme onthe last page.
Pl ease a ware, that according tot h e le vel soiling an d the specific har d n e ss of wa t er di ff e rencesar e pos s ible.
Please observethemanufacturer'srecommendations on thedetergent packaging.
Dishwasher de tergent is corrosive! Take c are to keepi t out ofreach ofc hildren.
Page 8
6
Cutlery w ith w ooden, horn chinaor
mother-of -pearl handl es
Pl as tic items that are not
Ol der cu tlery wit h glu ed pa r ts tha t is not
temperature resistant
Bonded cutle ry ite ms or di shes
Pewter or cooper items
cr ys tal glass
St eel it e ms subjectto r usting
Wooden platte rs
Items ma de from s ynthetic fibres
heat resistant
Some typesofglasses can become
dull after a large number of washes
Silver andaluminium partshavea
tendenc y to d iscolour during washing
Glaz ed patte rn s may fa de if ma ch i ne
washed freq uentl y
Are not suitable
Are of limited suit abilit y
Use a mil d det ergent th at is de scribed a s 'kind ofdishes '. If necessary, seek f urther
in f o r mati o n from det ergent ma nu facturers .
For partic ular items,se lect aprogr amme with a s lo w a te mperature.
To pr even t damag e, d o not tak e gla ss and c utlery o ut of thedish washer immediately
after theprogrammehas ended.
Con sider buying uten sils whic h are identifi edas di shwash er-proof.
Dishes anditems of cutlery mustnot lieinside oneanother, orcovereachoth er.
To avoid damageto glasses,theymust nottouch.
Loadlargeitemswhicharemostdifficulttocleanintothebasket.
Long blad ed kni ves sto red in a n uprigh t posit ion are apot ential haza rd!
Long and/ or s harp items o f cutlerysuch as carv ing kniv es must bep ositione d
horizontally in thebasket.
Please donot overload your di shwasher.
Load hollow ite ms such as cups, glasses, pans etc.W ith the opening downwards so t hat
wat er cannot coll ect in the contain e r or a deepbase .
(For best perfor mance of thedishwasher,follow these l oading gu idelines.
Features and appea ran ce o f baskets and cutlery b ask ets may vary from your m od el.)
Scrape off any largea mounts o f le ftover food. Soften remnants ofburn t food inpan s
It is not necessary to rinse thed ishes u nder ru nning water.
Place objects in the dish was her in followi ng way:
1.Itemssuch as cups, glasses, pots/pans, etc. a re face down.
2.Curvedi tems, or thosewith recesse s, shou ld be loadedat a slant sot hat water canr un off.
3.All utensils arestacked securely and can nottipover.
4.Allutensil s are placed in the way that the spray armscan rotated freely duringw ashing.
Ve ry sm all it ems should n ot be w ashed in the dishwasher as th ey could easilyf all out of the basket.
Page 9
7
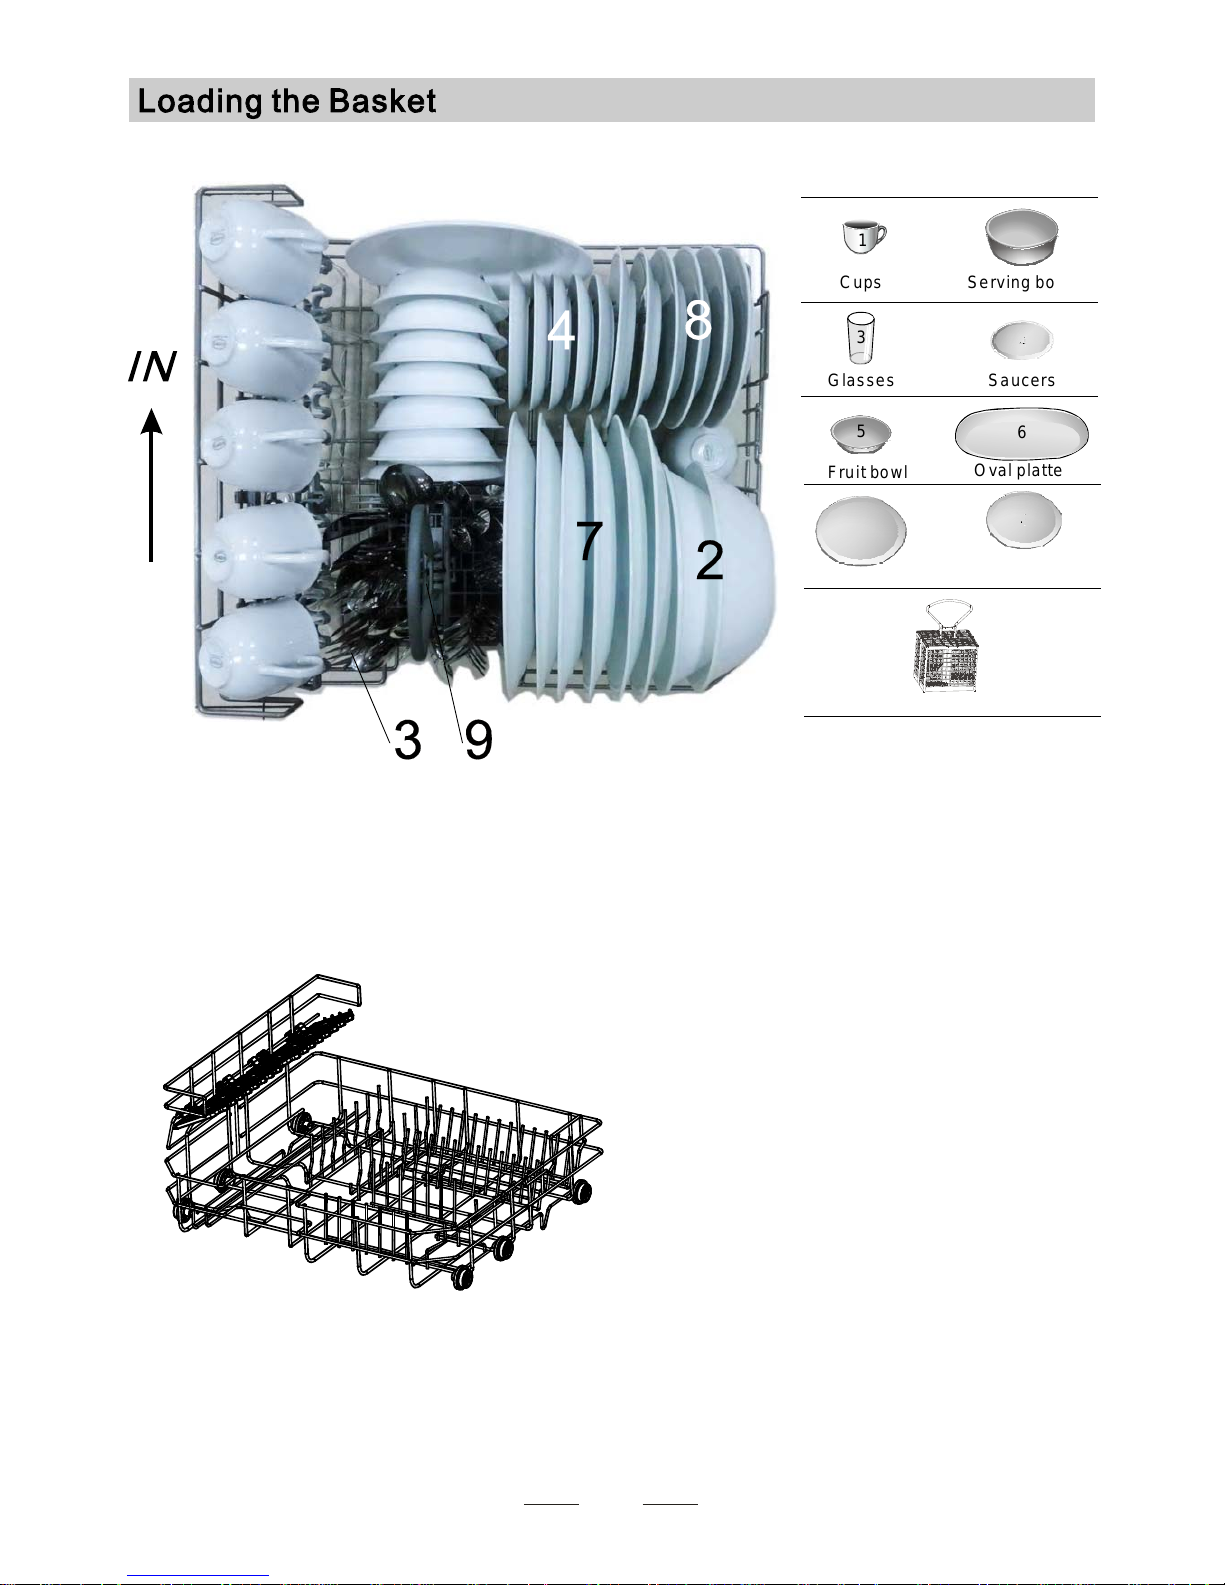
Position the dishes and cookware sot hat they will notgetm oved byth e spray ofwat er.
Plateracks of Basket
The basket is fi tted with p late racks which
can be stow ed horizo ntal if required.
Saucer s
4
Se rving bo w l
3
Glasses
1
Cups
6
Oval platte r
7
Dinner pla tes
Bread and
butter plates
8
Fruit bowl
5
Cutler y basket
9
2
5
6
1
1
Page 10

8
Cutlery should be placed in the cutlery basket with han dles atthe b ottom. If the rack has sidebas kets, the spoon
should be loaded individuallyintothe appropriateslots, especially longutensils should be placed in thehorizontal
position at th e front o f the upperb asket asshow n.
Do not le t any it em ex tend th rough bot tom.
Always load sharpu tensils w ith t he shar p point down!
325
2
6
5
2
3
3
4
4
4
1
1
Teaspoons
3
Dinnerforks
1
Serving f ork s
6
Servingspoons
5
Kni v e s
4
Sal a d f o r k s
2
2
3
1
4
4
1
4
44
44
4
1
1
4
2
3
2
3
Page 11

9
Means: needto fillrinse intothe R inse-Aid Dispenser.
()
*AHAM DW-1-2005 : T his programisthetestcycle, the rinse-aiddispenser
setting is r ecommende d to Pos ition 3.
Starting a washcy cle.. .
1.Drawoutthe basket(seethesection entitled Loadingthe Dishwasher );
2.Pourin thedeterge nt(seethesection entitled Salt, Detergent and Rinse Aid );
3.Insert theplug into the socket. Thepowersupplyis120V/60 Hz;
4.Makesure that the water supply is turned on tofull pressure;
5.P
6.
“”
“”
ressthe buttont
Press the pr ogram button to sel ect wash program you need
7.Close thedoor, thed ishwasherwillstart.
Heavy->Normal->Light->Glass->Speed->Rinse->Soak
on/off oturnon the power supply;
When you press t h e S t ar t/R ese t butt on t o pau se during washi ng,
the display willstop blinkingandthe program willpauseand remain thiscycle
till you Rets ar it a gain.
time
For normally soiled loads,
suchas pots, plates,glasses
and lightly soiledpans.
standarddailycycle.
Forl ightly soiled loads,such
as plates,glasses,bowlsa nd
lightlys oiled pans.
Forthe heaviestsoiled loads,
such as pots,pans,casserole
dishesand dishesthat hav e
been sitting with dried food
onthem for a while.
Ashorter wash for lightly
soiledloads thatdo not
needdrying.
Forl ightly soiled loads,
suchas glasses,crystal and
finechina.
15g
85
75
100
45
70
0.35
0.29
0.40
0.22
0.27
12
12
14.5
12
9.7
Pre- w ash
Pre- w ash
Wash (55 )
Rin se
Rinse(65 )
Dry ing
℃
℃
Wash (50 )
Rinse (6 0 )
Drying
Pre-wash
Pre-wash
(50 )
Rinse
℃
℃
℃
Wash(5 0 )
Rinse
Rinse(60 )
Pre-wash
℃
℃
Drying
/
Pre-wash
Wash (50 )
Rinse
Pre-wash
Pre-wash
(50 )
Rinse(55 )
℃
℃
℃
Heavy
Pre-wash
()
Wash (50 )
Pre-wash 50
Wash (55 )
Rinse
Rinse(65 )
Drying
℃
℃
℃
℃
Glass
Speed
15
g
Light
18g
13+13g
18g
(*AHAM DW-1-2005 )
Normal
/
24
5
0.02
Pre-wash
Forthedishesthat
only need pre-wash.
/
10
2.50.01
Pre-w ash
To rinse dishes tha t you
pla n to w ash later that day.
Soak
Rinse
Page 12

It is dangero u s t o open th e door w hen washi ng , be c a use the hot wate r may sc ald you.
When the wo rking cyc le h as finish ed, the b uzzer of dishwasher will sound8 seconds,then stop. Turn off
the appliance using the ON/O FF butto n, shut o ff the wa ter s upply and open the door ofthe dishwasher.
Wait a few minut es be fore unloadi ng the d ishwasher toavoid handl ing the d ishes an d utensils w hile t hey
are still hotand m ore susceptible to break age. The y will als o dry be tter.
SwitchOff theDishwasher
In the digi tal disp lay app ears 0 ( remainin g program me time), only in this case the programme hasende d.
1.Switchoff the dishwa sher by p ressin g the O N/OFF button.
2.Turn off thewater tap!
Openthe doorcarefully.
Hot dishes ar e sensit ive to kn ocks. The di shes shou ld theref ore be a llowed t o cool d own arou nd 15 minutes
before removingfrom theappliance.
Open the dish washer's door,leave itaj ar and w ait a fewm inutes beforer emoving the dishes. In thisway they
will be cool er and t he drying willbe improved.
Unloadingthe dishwasher
Itis normal thatt he dishw asher is wetinside.
will keep on working after 10 seconds.
If you open thedoo r wh ile washing , the mach ine w ill pause. Then you close the door , the ma chine
10
Premise: You can modify t hewashing program, When the dishwasher just
runs for ash ort ti me. Other wise, th e deterg ent may havealr eady been
released, and the appliance may h ave alrea dy d rained the wash water.I f t his
isthecase, thedetergent dispenser mustbe refilled (see the section entitled
" Loading the Detergent " ) .
Open the doo r t o pause during washing,press Program Button m ore than
three sec onds the m achine willbe in stand bys tate , then yo u can change
the pro gram tothe desired cycle set ting
(see the s ect i on entitl ed " Starting a wash cycle.. ." ).
NOTE: If youopent he doo r duri ng washing, the machine will pause. When you
close the door, themachinewill keeponworking after 10seconds.
The programligh ts show the state of t he di shwasher:
a) Allprogram lights off---------------stand by
b)One ofthe program lights on----------pause
c) One of t he program lights blinkin g----- run
Aforgotten dish can be added anytime before the detergent cup opens.
Add forgotten dishes.
Close the door
After the spray arms stop working,youcan open the door
completely.
2
3
Open the door alittleto s top the washing.
1
4
Page 13

The filter prevent larger re mnants offood o r ot her o bjects f rom gett ing insid e the pump.
The filter system con sists of acoarse filter,a flat (Mainf ilter)
and a micro filte r ( fi n e filter) .
Foodandsoil particles trappedby this filter ar epulverized bya
special jet on the spray arm a n d washed down t o dra i n.
Main filter
1
Larger items, suchaspiecesof boneorglass, thatcould block
the drain are trapped in the c oarse filt er.Tore move th e items
caughtby the filter,gently squeezethe tap on the top of this
filterand lift out.
Coarsefilter
3
This filter ho lds s oil and f ood residue inthe sump a rea and
prevents it frombei ng redepo sit on t he dishes during wash cycle.
Fine filter
2
2
3
1
Filterassembly
Thefilterefficiently
Fo r best per form a n c e and results , the filt er assembly m ust be regularly. this reason, it i s a g ood i dea to
remove the la rger food particlestr apping i n the filteraf ter each was h cycle b y rinsing the filterand cup un der
running w ater.Toremove thefilter assembly, pull on th e cup ha ndle in t he upwa rd direct ion.
removes food particles from the wa sh wate r,all owing it tobe re-cyclated duringthe cycle.
For
Nev er run the dishwa sher w i t hout the filters i n place.
The dis h wash er mus t never beused without the filters.
Improper r eplacemen t of thefilter mayreduce the performance level o f the appliance
anddamage dishesandutensils.
the filter system will be installed.
If do it from step1 to step 3, the filter system w ill be removed;while if do it from S tep 3 t o Step 1,
11
Step contrarotate the Fine ,
Step2: lift it up;
1: filter
Step3 lift the Main filterup:
2
1
3
Page 14

12
The cont rol pane l can bec leaned by u sing a l ightly dampenedc loth and dry thoroughl y.
The exterior u se a goo d applia nce polish w ax.
Never usesharpobjects,scouring padsor harsh cleaners onany partof thedishwasher.
Protec tAgainst Freez ing
1.Cutoff electricalpowertothe dishwasher.
2.Turn offthe water supply and disconnect the waterinletpipefrom the water valve.
3.Drainwaterfrom the inlet pipeand watervalve. (Usea pant ocatchthewater)
4.Reconnect thewater inlet pipe tothe water valve.
5.Removethe f ilter a t th e bot tom of t he tub a nd use a sponge to use up waterin sump.
please takefrostprotectionm easures on dishwasherinwinter. E fter washingcycles,
please operate as follows
ach time a
:
- Inspect t he filters fo r blo cking e very time the dishwasher has bee n used.
- By unscrew ing the c oarse fi lter.you can rem ove the f ilter sys tem.Remove any food remnants and
clean thefilters under running water.
Remarks:
Cleani ngT he Filter
Clea ningThe Do or
To cle an the co arse fi lter and thefin e filter, use a c leaning b rush. Reasse mble the f ilter p arts as shown in the figures
in the last pagea nd reinse rt the en tire assem bly in t he dishw asher,positioning in itsseat and pressi ng downwa rd.
Theentire filter assemblyshouldbe cleanedonce a week.
Whenc leaningthe filters,don't knock on them. Otherwise,the filters could be
contortedand the performanceofdishwashercouldbe debased.
To cleanthe edge aroundt he door ,glide and decora tive pan els,
you should us e on ly a sof t warm, damp cloth.
To avoidpene trati on of wa ter in to t he door l ock and
electrical components,do not use a spray cleaner o f any kin d.
Neveruse a sprayc leaner t o clean t he door panelas it may d amage thedoor lock
and electricalcomponents.
Abrasive agent ors ome pape r towel should not be used because of the r isk of
scratching or leavingspotson the stainless steel surface.
If your dis hwasher cannot work because of theice, please cont act profe ssio nal service person s.
Ifyou want to clean the inner surface of decorativepanels,
1)removethe slide8screwsbetween the seat and decorative panels;
2)theny ouc an cleanthe surface, please use a damp and softcloth;
3)then,open thedoors and sidingto thegraph state ,
pullout theslide,alignscrewh olesinto the eight screws removed,
pleasenote thatefforts to tight en the screws c annot be toolarge,
so as not to bore fa i lure.
Page 15
It isrecommend that youruna wash cycle with the
dishwasher empt y and the n remove th e plu g from the
socket, turn o ff the wa ter supp ly and l eave the door of
the appl iance sli ghtly open. Th i s wil l hel p the door
seals to astlonger andprevent odoursfrom forming
withinthe appliance.
If the app liance m ust be mo ved, tr y to keepit inthe
vertical position. If absolutely necessary, it canbe
positioned on itsback .
Oneofthe factors thatcauseodors to forminthe
dishwasher is foo d th at remains tr apped in the seals.
Periodic clea ning witha d amp spongewill preve nt this
fro m occ urring.
After ever y wash, turn offt he w ater supp ly to the
appliance and leavethe doo r slightl y open sotha t
moisture an d odor s are nottrapped inside.
Before cleaning orp erformi ng mainten ance, always
remove the plug f rom the socket.
To clean theexterior and rubber parts of the dishwasher,
donot usesolvents or abrasive cleani ngproducts.
Only use a c lo th with w arm soapy water.
Torem ove sp ots or stains from the surface oft h e
interi or, use a cloth da mpe ned withw at er w ith alittl e
vinegar,o r a c leaning pro duct mad e sp ecifically fo r
dishw ashers.
AfterEvery Wash
Removethe Plug
No SolventsorAbrasive Cleaning
Moving the Applia nce
Seals
When itis notin needfor along time
13
Theinstallationof thepipes
and electrical equipments
shouldbe doneby profession als.
Electrical ShockHazard
Disconnect electrical powerbefore
installingdishwasher.
Failure to doso canresult indeath
or electri cal sh ock.
Theinstallationpositionof dishwashershould benear theexisting inletand drain
hosesand powercord.
Oneside of thecabinet sinkshould be chosento facilitatethe co nnectionof drain
hosesof thedishwasher.
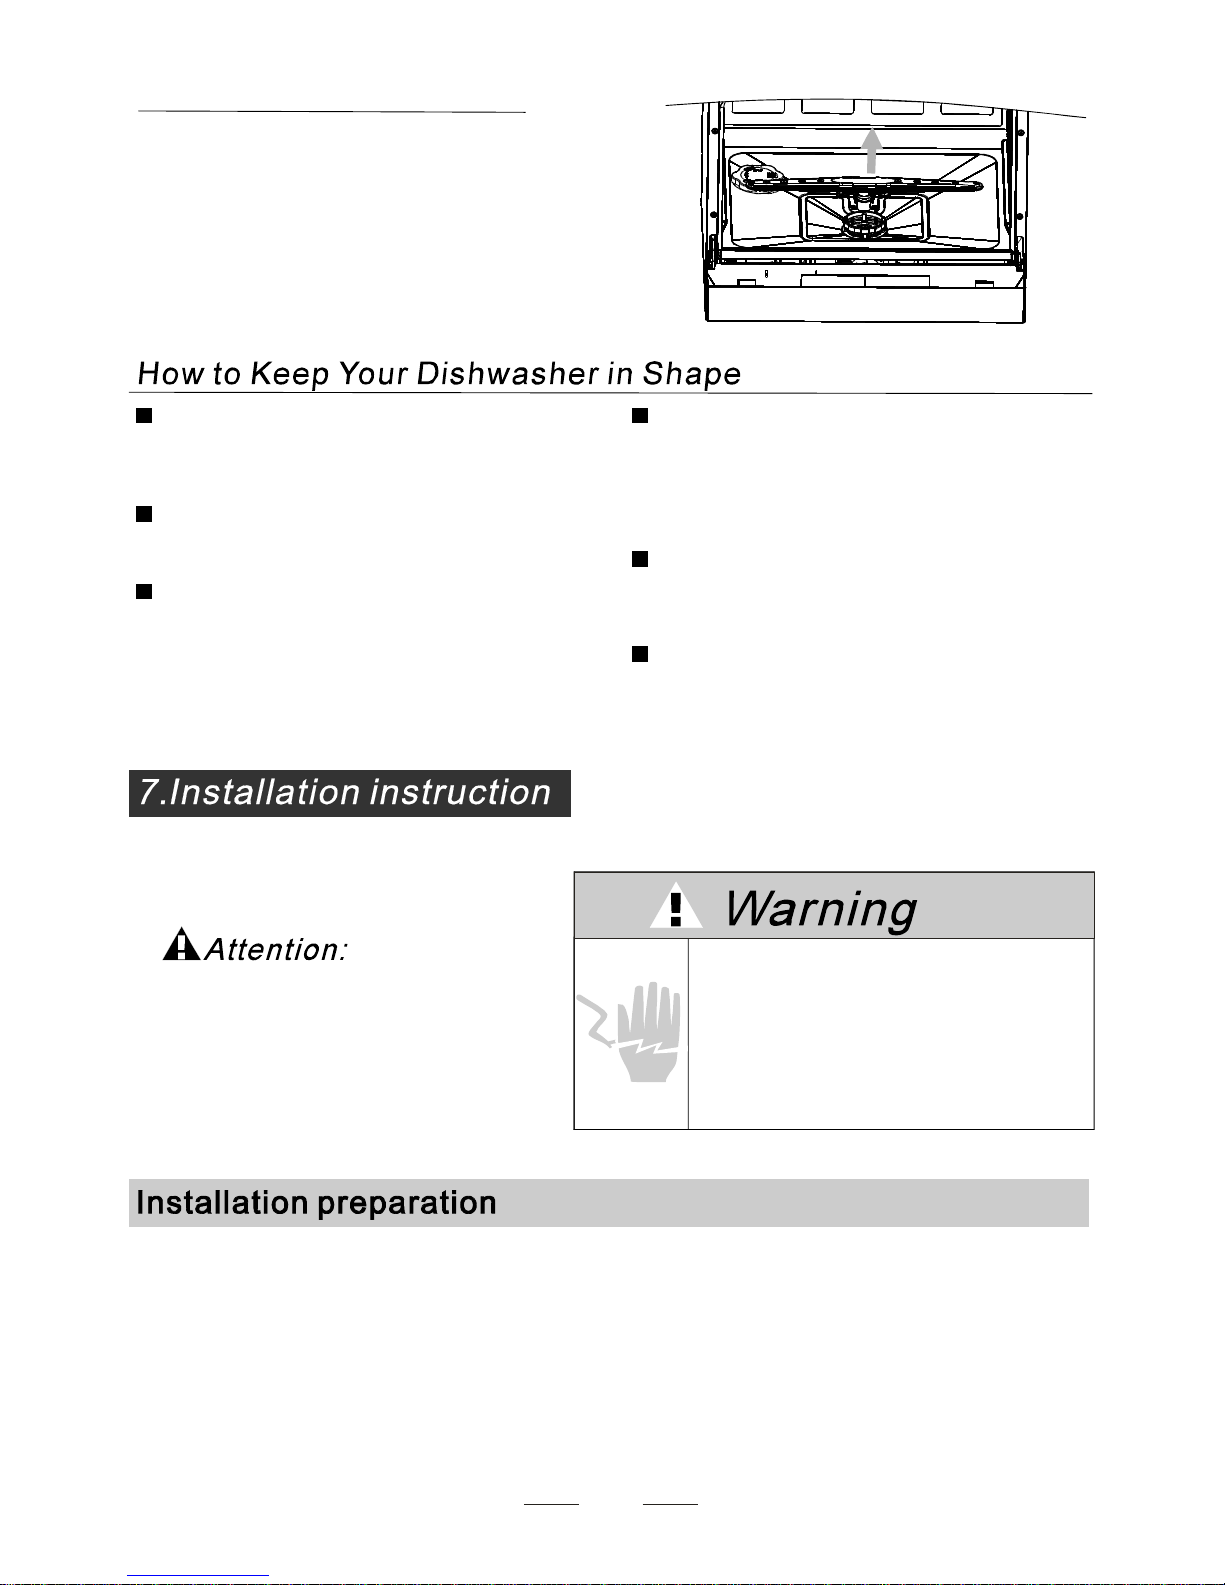
Cleani ng the SprayArms
The s pray armscan be easily removed f or periodic cleaning
of the noz zles, to p reve nt possible c logging. Washthem
under running waterand ca refully replace them in their s eats,
checking that their rotary movement is in no wayimpeded.
Grasp the middle of the spr ay ar m, pull itup wards to remove
it. Washthe armsunder a jet ofrunning water andreturnthem
car e fully to t heir seat . Af t er re assem b l y, check th at the spra y
arms turn freely. Otherwise, check thatthey have been
in stall ed cor r ectly.
Page 16

Ensure the v oltage a nd frequenc y of thepowe r being correspondsto
those on therating plate. Only in sert the p lug into an electrical socket whichis ea rthed
properly.I f the el ectrical sockett o which thea ppliance m ust be c onnected is not
appropriate f or the plug , replace the socket, rather thanusinga adaptors orthelikeas
theycould causeoverheatingandburns.
Please look at the rat ing label to know the ratingvoltage a nd conn ect the d ishwasher tothe appropriate powersuppl y.
Use the r equired fuse1 0 amp , time d elay f use or c ircui t breake r recommended and provide sepa rate circ uit servi ng
only this appliance.
This appliance must be earthed. In the event of a malfunction or breakdown, earthing will reduce the risk of
electric shock by providing a path of least resistance for the electric current. This applianceis equipped with
a cordhaving an equipment-earthing conductor and an earthing plug. The plug must be plugged into an
appropriate outlet that isinstalled and earthed in accordance with all local standards and requirements.
For personal safety:
DO NOT USE AN EXTENSION CORD OR AN ADAPTER PLUG WITH THIS APPLIANCE.
DONOT, UNDER ANY CIRCUMSTANCES, CUT OR REMOVETHE EARTHING
CONNECTION FROM THE POWER CORD.
14
for personal safety:
DO NOT USE AN EXTENSION CORD OR AN ADAPTER PLUG WITH THIS APPLIANCE.
DO NOT, UNDER ANY CIRCUMSTANCES, CUT OR REMOVE THE
FROM THE POWER CORD.
EARTHING
CONNECTION
Improper connection of the equipment earthing conductor can result in the risk of an
electric shock.
Check with a qualified electrician or service representative if you are in doubt whether the
appliance is properly earthed.
Do not modify the plug provided with the appliance. If the plug does not fit properly to the
outlet, please have a qualified electrician to install a proper outlet.
and the s ides, alo ng t he adjacent cabinets or wall. T he dish washer is equippedw ith waters upply
Position theappli ance in thed esired l ocatio n. The backshould rest against the w all behindit ,
and drain hoses thatcanb epositioned tothe right ortheleft tofacilitate proper installation.
Page 17

Insertthe drainhose intoa drain pipewith a minimumdiameterof 4cm,o rlet it
runintothesink,makingsuretoavoidbendingorcrimpingit.Usethespe ial
plasticsupportthatcomes withthe appliance. Thefree endof thehosemust be
ata heightlower than75cm andmustnot be immersed in water toavoid theback
flowof it.
c
15
Thespecial plastic hose support must besolidlyfastened tothe wallto
preventthedrain hosefrom m ovingand allowing waterto spilloutside
thedrain.
Page 18

16
If the si nk is 100 0 higher fromthe floor, the exces s wa ter in ho ses cann ot be dr ained di rectly
intothe sink. It will be necessaryto d rainexcesswaterfromhoses into a bowl or suitable
container that ishe ld outsi de and lowerthan the sink.
Connectthewater drainhose. Thed rain hose mustb ecorrectly fittedtoavoid water leaks.
Ensure that thewat er drain hose is not kinke d or squashed.
If you n e e d a drain hose extension, observe t o use a si mi lar drain hose.
It m ust be nolongerthan4 metres; otherwise the cleaning effect ofthe dishwasher could be reduced.
Wa ter Outl et
Exte nsi on Ho se
How to Drain Exces s Water From Hoses
Thefollowingthings shouldbe checked beforestarting thedishwasher.
1
Thedishwasheris leveland fixedproperly
2
The inle t val ve is ope n
3
Thereis aleakage atthe connections ofthe conducts
4
The wiresare tightlyconnected
5
The poweris switched on
6
The inle t and drain ho ses are kno tte d
7
Allpacking materialsand printings shouldbe takenout fromthe dishwasher
The conten t of this m anual is very he lpful to the u sers.
After installation, please make sure to keep thismanual.
Page 19

Fuse blown, or the
circuit breaker tripped.
Replace fuse or reset circuit breaker. Remove any other
appliances sharing the same circuit with the dishwasher
Spilled rinse-aid
Always wipe up rinse-aid spills immediately.
Hard water minerals
The affected item s are
notcorrosion resistant.
The lid of softer
is loose.
Thesp ay arm is
knocking against
an itemin a basket.
r
Itemof crockery
are insecure
in the wash cabinet.
This may be caused
by on-site installation
or the cross-section of
the piping.
A programme was not
run after dishwasher
salt wasadded.
Traces of salt have
gotintothe wash cy le.c
T o clean the interior, use a damp sponge with
dishwasher detergentand wearrubber gloves.
Never use any other cleaner than dishwasher
detergent for the risk of foaming or suds.
Always run the Quick wash programme .
without any crockery in the dishwasher and
without selecting the Turbo function (if present),
after adding dishwasher salt.
Check the lip .Ensure thef ix is fine.
Interrupt the programme, and rearrange the items
whichare obstructing the sp ay arm.r
Interrupt the programme,
and rearrange the items of crockery.
This has no influence on dishwasher function.
if in doubt, contact a suitably qualified plumber.
Detergent with
colourant was used.
Make sure that the detergentis the one without
colour ant.
Improper detergent
Make sure the dishwasher is turned on and the door is
closed securely.
Closeddishwasher making sure that door latches.
Make sure the power cordis properly plugged into the
wall socket.
Power supplyis not
turned on.
Door ofdishwasher
not properly closed.
Kink in drain hose
Filter clogged.
Kitchen sinkclogged.
Check drain hose.
Check coarse thefilter.
(see section titled )"CleaningTheFilter"
Check kitchen sink to make sure it is draining well.
If problem is kitchen sink not draining ,you may need
a plumberrather than a serviceman for dishwasher.
Use only the special dishwasher detergent to avoid
suds. If this occurs, open the dishwasher and let suds
evaporate.Add 1 gallon of cold water to the tub. Close
and latch the dishwasher, then Start the "soak" wash
cycle to drain out the water . Repeat if necessary.
17
Technical
problems
General
problems
Noise
Page 20

The dis hes were not
loaded correctly.
See notes in " Loading the Dishwasher Baskets ".
Select a more intensive programme.
See" Wash Cycle Table ."
Use more detergent,or change your detergent.
Rearrange the items so that the sp ay can rotate freel y.r
Clean and/or fit the filter combinationcorrectly.
Clean the sp ay arm jets. See "Cleaning the Spray
Arms".
r
Use less detergent if you have soft water and select
a shortestcycle to wash the glassware and to get
them clean.
Use a mild abrasive cleaner to eliminate those marks.
Re-loading the dishes properly.
Load the dishwasheras suggested in the directions.
Increase the amount of rinse-aid/Refill the rinse-aid
dispenser.
Do not empty your dishwasherimmediately after
washing. Open the door slightly so that the steam can
escape. Begin unloading the dishwasher only once t
he dishes are barely warm to the touch. Empty the low
basket first. This prevents water form dropping off
dishes in the upper basket.
In short programmes the wash ing temperature is lower.
This also lowerscleani ngperformance. Choose a
programmewitha long washing time.
Water drainage is more difficult with these items.
Cutlery or dishes of this type are not suitable for
washing in the dishwasher.
Theprogramme was
notpowerful enough.
Not enough detergent
wasdispensed.
Item are blocking
the path of sp ay arms.r
The filter combination
inthebaseofwash
cabinet is not clean or
is not correctly fitted.
This may cause
the sp ay arm jets
to get blocked.
r
Combination of soft
water andtoomuch
detergent.
Aluminum utensils
have rubbed against
dishes.
Dishes block
detergent cups.
Improper loading
Too little rinse-aid
Dishes are removed
too soon.
Wrong programme
selection
Using cutlery with
a low-quality coating
If overflow occurs, turn off the main water supply before calling a service.
If there is water in the base pan because of an overfill or small leak,
the water should be removed before restarting the dishwasher.
18
Unsat i s
-factory
washin g
result
Unsat i s
-factory
dryin g
result
When some malfunctions come on, the appliance will display error codes to warn you:
Longer inlet time.
Faucets is not opened, or water intake is restricted,
or wat erpressure is too low.
Some element of dishwasher leaks .
Overflow .
Page 21

19
Capacity:
Power s upply:
Hotwater connection
W pressure:ater
0.04- 1. 0M P a
Max 60℃
Seeratinglabel
6pla ce settings
Thed imensionswith * va riable
accordingto actualsituation
“”
Page 22

Step 1a:
Ifo nly thebod y intocabinets, pleasemake this mapth e sizeo fth ec abinet hole.
Space of cabinet
Electrical, drain
and water supply
line entrances,
both sides
20
Page 23

Step1b
Ifth e entir e decorativepanel into the cabinetalso,
thesizeofashouldbeequaltoD+3.5+E+6;sizebshouldbeequaltoC+6;
Meanwhile , thecabinet around the inward booster:
the bottomoft he entireplane for theE-49 +3;
bothsidesoft he( C-55 5)/ 2 +3;
C,D, E and F asthe secondstep withinthe relevant size d ecorative pa nels;
:
Space of cabinet
Electrical, drain
and water supply
line entrances,
both sides.
21
Page 24

Ste p 2
Weightof thedecorativepanel(up) should be
min 3Kg-max 4Kg .
Dim.Aand B could beal terable by handle,
Dim.C,D,E and Fcould bealterableby fact,
Ifyo uw antto makethe decorativepanels size same as
the machine,pleaseuse theminimum sizei nbrackets;
Dim.Fshould beinrange 16~22mm,
besidesthe applianceassembling decorative panels.
:
If the m
:
front of the
Note
′
achine with adecorativeplate,no thisstep.
decorative panel
(up)
decorative panel
(down)
22
Page 25

Step 3:
Assemblethe decorativepanels.
Ifthe m
achine w ith a decor ati ve plate , no this ste p.
23
Step4:
Assemble thedecorativedooronthedishwasher,
asf igure.First installsidepiecescrew between
baseboard anddecorativepanel( down),in all4;
thenpull glidefrom out doorgroove ,case8-screw
betweendecorativepanels and glide.
Ift he machinewith a decorativeplate ,no thisstep
Note:
.
Screw ,inall4
Screw, in all8
Page 26

24
Step
aperture
5:
Installthe dishwasher in aperture,
but not full,as figure,adjust screw,
let its bo tt om al i gn s base,
thenpush dishwasherfull.
’
Step :6
Take out c ap, a hole , using
screwdriverinstall screw, bothsides.
Thenrecoverthe capin hole.
revealing
Page 27

Warranty
Porter&Charles products are designed and built to the highest standards.
We expect your appliances to provide many years of trouble free enjoyment.
In the event of an appliance requiring attention, each appliance is covered by a 2
year warranty from the date of purchase.
Refer to warranty policy for complete terms and conditions.
Coverage is for costs of parts and labour for appliances in capital cities &
metropolitan areas. We reserve the right to charge directly for handling
expenses outside the metropolitan region.
Porter&Charles products are supported by a national service support system.
Call our customer service department for attention.
Please retain your invoice to quote should you require service assistance.
This will identify your product for our priority service back-up. Please
attach your invoice to this manual for easy future reference. To register
your purchase, you can either complete the section below to mail or fax, or
register online at www.porterandcharles.ca/warranty-information.
Porter&Charles
871 Cranberry Court
Oakville, ON L6L 6J7
Canada
Toll: 1-866-699-4973
Tel: 905-829-8389
Fax: 905-829-8409
Email: marketing@euro-line-appliances.com
For Service & Parts:
EURO-PARTS
1-800-678-8352
Important: Please record details of your purchase below and mail or fax to
-----------------------------------------------------------------------------------------cut along line ------------------------------------------------------------------------------------
Porter&Charles
Name: ________________________________ Tel No _________________________________
Address: ______________________________________________________________________
City : _________________________ Prov/State:___________ Postal Code/ZIP: ____________
Where purchased: ____________________________Purchase date: _____________________
Items purchased:________________________________________________________________
Serial No’s: :___________________________________________________________________
 Loading...