

Porter-Cable PCC583B Instruction Manual
18V Cordless / 12VDC Inflator
Instruction manual
Manuel d'instructions
Manual de'instrucciones
www.portercable.com
INSTRUCTIVO DE OPERACI N,
CENTROS DE SERVICIO Y P LIZA DE
GARANT A.
ADVERTENCIA: LÉASE ESTE
INSTRUCTIVO ANTES DE USAR EL
PRODUCTO.
Dispositif de gonflage de 12 V c.c./sans
fil, de 18 V
Inflador inalámbrico de 18 V / 12 VCC
Battery and charger sold separately
CATALOG NUMBER
PCC583B
90577349 PCC583B Inflator.qxd:??????-00 BDL500 laser 7/22/11 3:06 PM Page 1

2
SAFETY GUIDELINES - DEFINITIONS
It is important for you to read and understand this manual. The information it contains
relates to protecting YOUR SAFETY and PREVENTING PROBLEMS. The symbols
below are used to help you recognize this information.
DANGER: Indicates an imminently hazardous situation which, if not avoided, will
result in death or serious injury.
WARNING: Indicates a potentially hazardous situation which, if not avoided, could
result in death or serious injury.
CAUTION: Indicates a potentially haz ard ous situation which, if not avoided, may
result in minor or mod er ate injury.
NOTICE: Used without the safety alert symbol indicates a potentially hazardous
situation which, if not avoided, may result in property damage.
WARNING! Read all instructions before operating product. Failure to follow all
instructions listed below may result in electric shock, fire and/or serious injury.
SAVE THESE INSTRUCTIONS
WARNINGS:
1.) Read these instructions.
2.) Keep these instructions.
3.) Heed all warnings.
4.) Follow all instructions.
5.) Do not use this apparatus near water. Keep the case dry at all times.
6.) Clean only with dry cloth.
7.) Do not block any ventilation openings. Install in accordance with the manufacturers
instructions.
8.) Do not place near any heat sources such as radiators, heat registers, stoves or other
apparatus (including amplifiers) that produce heat.
9.) Do not defeat the safety purpose of the polarized or grounding-type plug. A polarized
plug has two blades with one wider than the other. A grounding type plug has two blades
and a third grounding prong. The wide blade or the third prong are provided for your
safety. If the provided plug does not fit into your outlet, consult an electrician for
replacement of the obsolete outlet.
10.) Protect the cord from being walked on or pinched particularly at plugs, convenience
receptacles, and the point where they exit from the apparatus.
11.) Only use attachments / accessories specified by the manufacturer.
12.) Unplug unit when lightning is in the area or when unit is not in use.
13.) Refer all servicing to qualified service personnel. Servicing is required when the
apparatus has been damaged in any way, such as power-supply cord or plug is
damaged, liquid has been spilled or objects have fallen into the apparatus, the apparatus
has been exposed to rain or moisture, does not operate normally, or has been dropped.
14.) Do not expose to dripping or splashing. WARNING: To reduce the risk of fire or
electric shock, do not expose this apparatus to rain or moisture.
15.) Do not operate near flammable materials, fumes or gases.
16.) Do not disassemble product. Incorrect reassembly may result in a risk of electric
shock or fire.
17.) Provide adequate ventilation and refrain from placing items on or around the product
during operation.
18.) Do not incinerate the battery even if it is severely damaged or is completely worn
out. The battery can explode in a fire. Check with local codes for possible special
disposal instructions.
19.) If any leakage of liquid from the battery cells occurs, discontinue use immediately
and return the battery to your local PORTER-CABLE Service Center or authorized
service facility.
20.) Never attempt to open the battery for any reason. If the plastic housing of the
battery breaks or cracks, immediately discontinue use and do not recharge
.
21.) Keep this product out of the reach of children.
90577349 PCC583B Inflator.qxd:??????-00 BDL500 laser 7/22/11 3:06 PM Page 2

22.) Since the vibration produced by the inflator may cause it to “walk”, do not operate on
a high shelf or other surface. Operate at ground or bench level only.
GENERAL SAFETY RULES
• KEEP WORK AREA CLEAN. Cluttered areas and benches invite injuries.
• CONSIDER WORK AREA ENVIRONMENT. Donʼt expose power tools to rain. Donʼt use
power tools in damp or wet locations. Keep work area well lit. Do not use tool in presence
of flammable liquids or gases.
• GUARD AGAINST ELECTRIC SHOCK. Prevent body contact with grounded surfaces.
For example; pipes, radiators, ranges, and refrigerator enclosures.
• KEEP CHILDREN AWAY. Do not let visitors contact tool or extension cord. All visitors
should be kept away from work area.
• STORE IDLE TOOLS. When not in use, tools should be stored in dry, and high or locked-
up place — out of reach of children.
• DONʼT FORCE TOOL. It will do the job better and safer at the rate for which it was intended.
• USE RIGHT TOOL. Donʼt force small tool or attachment to do the job of a heavy-duty
tool. Donʼt use tool for purpose not intended.
• DRESS PROPERLY. Do not wear loose clothing or jewelry. They can be caught in
moving parts. Rubber gloves and non-skid footwear are recommended when working
outdoors. Wear protective hair covering to contain long hair.
• USE SAFETY GLASSES. Also use face or dust mask if operation is dusty.
• DONʼT ABUSE CORD. Never carry tool by cord or yank it to disconnect from receptacle.
Keep cord from heat, oil, and sharp edges.
• SECURE WORK. Use clamps or a vise to hold work. Itʼs safer than using your hand and it
frees both hands to operate tool.
• DONʼT OVERREACH. Keep proper footing and balance at all times.
• MAINTAIN TOOLS WITH CARE. Keep tools sharp and clean for better and safer
performance. Follow instructions for lubricating and changing accessories. Inspect tool
cords periodically and if damaged, have repaired by authorized service facility. Inspect
extension cords periodically and replace if damaged. Keep handles dry, clean, and free
from oil and grease.
• DISCONNECT OR LOCK OFF TOOLS when not in use, before servicing, and when
changing accessories, such as blades, bits, cutters.
• REMOVE ADJUSTING KEYS AND WRENCHES. Form habit of checking to see that
keys and adjusting wrenches are removed from tool before turning it on.
• AVOID UNINTENTIONAL STARTING. Donʼt carry tool with finger on switch. Be sure
switch is off when plugging in.
• When using an extension cord, be sure to use one heavy enough to carry the current
your product will draw. An undersized cord will cause a drop in line voltage resulting in
loss of power and overheating. The following table shows the correct size to use
depending on cord length and nameplate ampere rating. If in doubt, use the next
heavier gauge. The smaller the gauge number, the heavier the cord.
Recommended Minimum Wire Size for Extension Cords
Total Length of Cord
25 ft. 50 ft. 75 ft. 100 ft. 125 ft. 150 ft. 175 ft.
7.6 m 15.2 m 22.9 m 30.5 m 38.1 m 45.7 m 53.3 m
Wire Size AWG
18 18 16 16 14 14 12
• OUTDOOR USE EXTENSION CORDS. When tools are used outdoors, use only
extension cords intended for use outdoors and so marked.
• STAY ALERT. Watch what you are doing. Use common sense. Do not operate tool when
you are tired.
• CHECK DAMAGED PARTS. Before further use of the tool, a guard or other part that is
damaged should be carefully checked to determine that it will operate properly and
perform its intended function. Check for alignment of moving parts, binding of moving
parts, breakage of parts, mounting, and any other conditions that may affect its operation.
A guard or other part that is damaged should be properly repaired or replaced by an
authorized service center unless otherwise indicated elsewhere in this instruction manual.
3
90577349 PCC583B Inflator.qxd:??????-00 BDL500 laser 7/22/11 3:06 PM Page 3

4
Have defective switches replaced by authorized service center. Do not use tool if switch
does not turn it on and off.
• DO NOT OPERATE portable electric tools near flammable liquids or in gaseous or
explosive atmospheres. Motors in these tools normally spark, and the sparks might ignite
fumes.
ADDITIONAL SAFETY WARNINGS FOR YOUR INFLATOR
WARNING! FOR HOME AND CAR USE ONLY:
• Inflate car and bike tires, balls, rafts, swimming pool floats, air mattresses, and more
in and around the home.
WARNING! RISK TO BREATHING:
• The compressed air from your inflator is not safe for breathing. Never inhale air
from your inflator or from a breathing device connected to the inflator.
WARNING! RISK OF BURSTING:
• Inflate items only to their manufacturerʼs recommendations. Exceeding the pressure
rating could cause them to explode resulting in personal injury.
• Do not leave unit running unattended. Overinflation of tires and other items could result
in serious injury and property damage.
WARNING! RISK OF ELECTRICAL SHOCK:
• Turn off and remove battery from inflator when not in use, when cleaning, or when
changing nozzles.
• Do not expose inflator to rain or wet conditions. Water entering the inflator will
increase the risk of electric shock.
WARNING! RISK OF FALLING:
• Since the vibration produced by the inflator may cause it to “walk”, do not operate
on a high shelf or other surface. Operate at ground or bench level.
WARNING! RISK OF UNSAFE OPERATION:
• Do not modify or attempt to repair. Never drill into, weld, or make any modifications to
the inflator or its attachments.
• Do not operate inflator when car engine is running.
• Operate only with the accessories included or those rated for 160 p.s.i. or higher.
The use of any accessory not recommended for use with this tool could be hazardous.
• Never “horseplay”. High pressure air is dangerous. Donʼt direct air-flow at yourself or others.
WARNING! RISK OF FIRE:
• Inflator can become hot during use. Allow inflator to cool 30 minutes before storing away.
• Never carry the inflator by the hose.
90577349 PCC583B Inflator.qxd:??????-00 BDL500 laser 7/22/11 3:06 PM Page 4
IMPORTANT SAFETY INSTRUCTIONS FOR BATTERY CHARGERS
SAVE THESE INSTRUCTIONS: This manual contains important safety instructions for
battery chargers.
• Before using charger, read all instructions and cautionary markings on charger, battery
pack, and product using battery pack.
WARNING: Shock hazard. Do not allow any liquid to get inside charger.
CAUTION: Burn hazard. To reduce the risk of injury, charge only designated
PORTER-CABLE batteries. Other types of batteries may burst causing personal injury and
damage.
CAUTION: Under certain conditions, with the charger plugged in to the power
supply, the charger can be shorted by foreign material. Foreign materials of a conductive
nature such as, but not limited to, steel wool, aluminum foil, or any buildup of metallic
particles should be kept away from charger cavities. Always unplug the charger from the
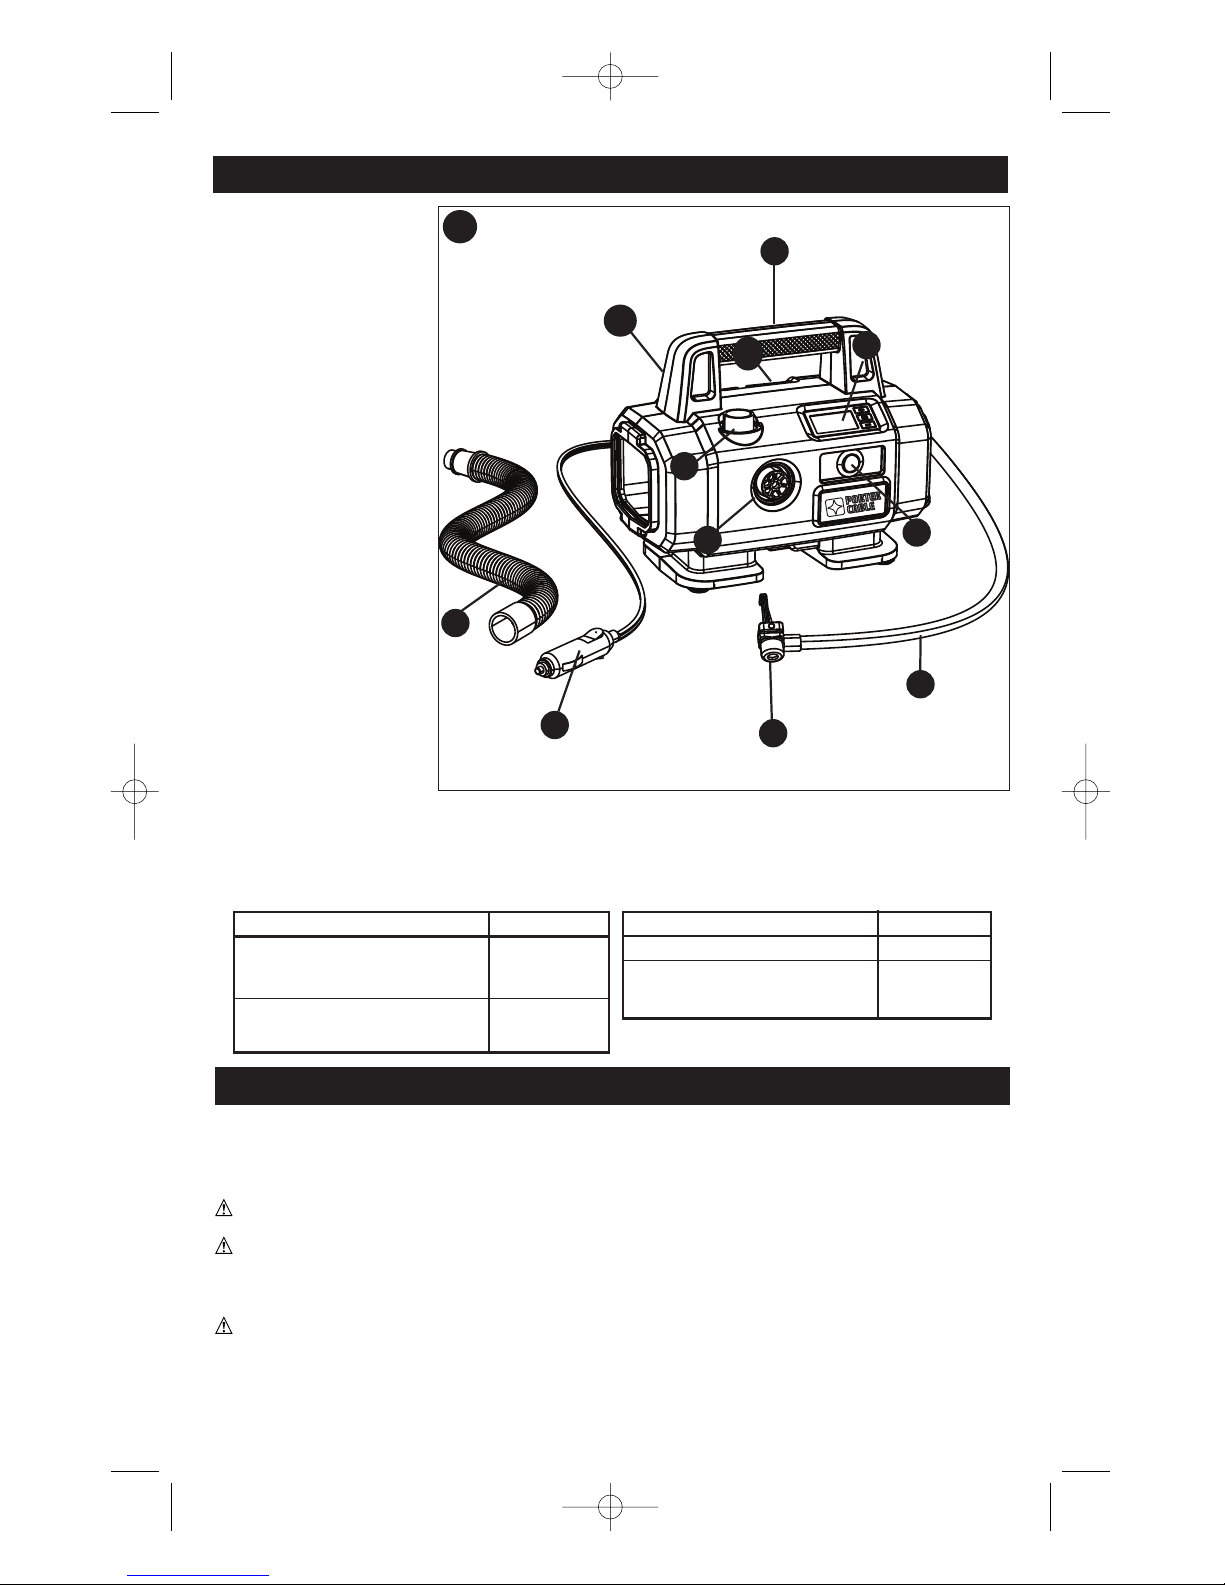
1. Power switch
2. LCD (liquid crystal
display)
3. Handle
4. High-volume pump
deflate connection
5. High-volume pump
inflate connection
6. Air hose with
universal valve adaptor
7. Universal valve
adaptor
8. 12 Vdc vehicle
connector adaptor
9. High-volume hose
(unregulated air
pressure hose, no auto
shut-off)
10. Battery compartment
(back of unit)
11. Accessory storage
(back of handle)
FUNCTIONAL DESCRIPTION
Li-Ion Battery Packs and Chargers
Battery: Li-Ion 18V
Charger: Li-Ion
PC18BL
PC18BLX
PC18BLEX
PCLMVC
PCXMVC
Description Cat. #
NI-CD Battery Packs and Chargers
This product can accept any of the batteries and chargers listed in the chart below.
Battery: NI-CD 18V
Charger: NI-CD
PC18B
PCMVC
PCXMVC
Description Cat. #
1
2
3
7
5
4
6
11
8
10
9
A
5
90577349 PCC583B Inflator.qxd:??????-00 BDL500 laser 7/22/11 3:06 PM Page 5

power supply when there is no battery pack in the cavity. Unplug charger before
attempting to clean.
WARNING:
• DO NOT attempt to charge the battery pack with any chargers other than the ones in
this manual. The charger and battery pack are specifically designed to work together.
• These chargers are not intended for any uses other than charging designated
PORTER-CABLE rechargeable batteries. Any other uses may result in risk of fire,
electric shock or electrocution.
• Do not expose charger to rain or snow.
• Pull by plug rather than cord when disconnecting charger. This will reduce risk of
damage to electric plug and cord.
• Make sure that cord is located so that it will not be stepped on, tripped over, or
otherwise subjected to damage or stress.
• Do not use an extension cord unless it is absolutely necessary. Use of improper
extension cord could result in risk of fire, electric shock, or electrocution.
• An extension cord must have adequate wire size (AWG or American Wire Gauge)
for safety. The smaller the gauge number of the wire, the greater the capacity of the
cable, that is 16 gauge has more capacity than 18 gauge. When using more than one
extension to make up the total length, be sure each individual extension contains at least
the minimum wire size.
• Do not place any object on top of charger or place the charger on a soft surface
that might block the ventilation slots and result in excessive internal heat. Place
the charger in a position away from any heat source. The charger is ventilated
through slots in the top and the bottom of the housing.
• Do not mount charger on wall or permanently affix charger to any surface. The
charger is intended to use on a flat, stable surface (i.e., table top, bench top).
• Do not operate charger with damaged cord or plug — have them replaced immediately.
• Do not operate charger if it has received a sharp blow, been dropped, or otherwise
damaged in any way. Take it to an authorized service center.
• Do not disassemble charger; take it to an authorized service center when service or
repair is required. Incorrect reassembly may result in a risk of electric shock,
electrocution or fire.
• Disconnect the charger from the outlet before attempting any cleaning. This will
reduce the risk of electric shock. Removing the battery pack will not reduce this risk.
• NEVER attempt to connect 2 chargers together.
• The charger is designed to operate on standard household electrical power (120
Volts). Do not attempt to use it on any other voltage.
SAVE THESE INSTRUCTIONS
Important Safety Instruction for Battery Packs
WARNING: For safe operation, read this manual and manuals originally supplied
with tool before using the charger.
The battery pack is not fully charged out of the carton. Before using the battery pack and
charger, read the safety instructions below. Then follow charging procedures outlined.
READ ALL INSTRUCTIONS
• Do not incinerate the battery pack even if it is severely damaged or is completely
worn out. The battery pack can explode in a fire. Toxic fumes and materials are created
when Li-Ion battery packs are burned.
• Do not charge or use battery in explosive atmospheres, such as in the presence of
flammable liquids, gases or dust. Inserting or removing the battery from the charger may
ignite the dust or fumes.
• If battery contents come into contact with the skin, immediately wash area with mild
soap and water. If battery liquid gets into the eye, rinse water over the open eye for 15
minutes or until irritation ceases. If medical attention is needed, the battery electrolyte for
Li-Ion batteries is composed of a mixture of liquid organic carbonates and lithium salts. For
NI-CD batteries it is a 25-35% solution of potassium hydroxide.
• Contents of opened battery cells may cause respiratory irritation.Provide fresh air. If
symptoms persist, seek medical attention.
WARNING: Burn hazard. Battery liquid may be flammable if exposed to spark or flame.
6
90577349 PCC583B Inflator.qxd:??????-00 BDL500 laser 7/22/11 3:06 PM Page 6
• Charge the battery packs only in PORTER-CABLE chargers.
• DO NOT splash or immerse in water or other liquids. This may cause premature cell failure.
• Do not store or use the tool and battery pack in locations where the temperature
may reach or exceed 105°F (40˚C) (such as outside sheds or metal buildings in
summer).
WARNING: Never attempt to open the battery pack for any reason. If battery pack
case is cracked or damaged, do not insert into charger. Do not crush, drop or damage
battery pack. Do not use a battery pack or charger that has received a sharp blow, been
dropped, run over or damaged in any way (i.e., pierced with a nail, hit with a hammer,
stepped on). Damaged battery packs should be returned to service center for recycling.
Battery Cap Information
Battery storage and carrying caps are provided for use whenever the
battery is out of the tool or charger. Remove cap before placing battery in
charger or tool.
WARNING: Fire hazard. Do not store or carry battery so that metal objects can
contact exposed battery terminals. For example, do not place battery in aprons,
pockets, tool boxes, product kit boxes, drawers, etc., with loose nails, screws, keys, etc.
Transporting batteries can possibly cause fires if the battery terminals inadvertently
come in contact with conductive materials such as keys, coins, hand tools and the
like. The US Department of Transportation Hazardous Material Regulations (HMR)
actually prohibit transporting batteries in commerce or on airplanes (i.e., packed in
suitcases and carry-on luggage) UNLESS they are properly protected from short circuits.
So when transporting individual batteries, make sure that the battery terminals are
protected and well insulated from materials that could contact them and cause a short
circuit. NOTE: Batteries should not be put in checked baggage.
Storage Recommendations
1. The best storage place is one that is cool and dry away from direct sunlight and
excess heat or cold.
2. Long storage will not harm the battery pack or charger.
Charging Procedure
PORTER-CABLE chargers are designed to charge PORTER-CABLE battery packs in
30-60 minutes depending on the pack being charged.
1. Plug the charger into an appropriate outlet before inserting the battery pack.
2. Insert the battery pack into the charger. (Fig. B)
3. The LED will flash indicating that the battery
is being charged.
4. The completion of charge is indicated by the
LED remaining on continuously. The pack is
fully charged and may be used at this time or
left on the charger.
Charger Diagnostics
The charger is designed to detect certain problems that can arise with the battery packs
or the power source. Problems are indicated by one LED flashing in different patterns.
Bad Battery
The charger can detect a weak or damaged battery. The LED flashes in the pattern
indicated on the label. If you see this bad battery blink pattern, do not continue to
charge the battery. Return it to a service center or a collection site for recycling.
Battery Cap
B
7
90577349 PCC583B Inflator.qxd:??????-00 BDL500 laser 7/22/11 3:06 PM Page 7

Hot/Cold Pack Delay
When the charger detects a battery that is excessively hot or excessively cold, it
automatically starts a Hot/Cold Pack Delay, suspending charging until the battery
has normalized. After this happens, the charger automatically switches to the Pack
Charging mode. This feature ensures maximum battery life. The light flashes in the
pattern indicated on the label.
Problem Power Line
When the charger is used with some portable power sources such as generators
or sources that convert DC to AC, the charger may temporarily suspend operation.
The LED flashes in the pattern indicated on the label. This indicates that the power
source is out of limits.
Leaving the Battery In the Charger
The charger and battery pack can be left connected with the LED glowing indefinitely.
The charger will keep the battery pack fresh and fully charged. This charger features an
automatic tune-up mode which equals or balances the individual cells in the battery pack
to allow it to function at peak capacity. Battery packs should be tuned up weekly or
whenever the battery no longer delivers the same amount of work. To use the automatic
tune-up mode, place the battery pack in the charger and leave it for at least 8 hours.
Important Charging Notes
1. Longest life and best performance can be obtained if the battery pack is charged when
the air temperature is between 65°F and 75°F (18°- 24°C). DO NOT charge the battery
pack in an air temperature below +40°F (+4.5°C), or above +105°F (+40.5°C). This is
important and will prevent serious damage to the battery pack.
2. The charger and battery pack may become warm to touch while charging. This is a
normal condition, and does not indicate a problem. To facilitate the cooling of the battery
pack after use, avoid placing the charger or battery pack in a warm environment such as
in a metal shed, or an uninsulated trailer.
3. If the battery pack does not charge properly:
a. Check current at receptacle by plugging in a lamp or other appliance
b. Check to see if receptacle is connected to a light switch which turns power off
when you turn out the lights.
c. Move charger and battery pack to a location where the surrounding air
temperature is approximately 65°F - 75°F (18°- 24°C).
d. If charging problems persist, take the tool, battery pack and charger to your
local service center.
4. The battery pack should be recharged when it fails to produce sufficient power on jobs
which were easily done previously. DO NOT CONTINUE to use under these conditions.
Follow the charging procedure. You may also charge a partially used pack whenever you
desire with no adverse affect on the battery pack.
5. Foreign materials of a conductive nature such as, but not limited to, steel wool,
aluminum foil, or any buildup of metallic particles should be kept away from charger
cavities. Always unplug the charger from the power supply when there is no battery pack
in the cavity. Unplug charger before attempting to clean.
6. Do not freeze or immerse charger in water or any other liquid.
WARNING: Shock hazard. Do not allow any liquid to get inside charger. Never attempt
to open the battery pack for any reason. If the plastic housing of the battery pack breaks or
cracks, return to a service center for recycling.
LIQUID CRYSTAL DISPLAY FLUID (FIRST AID MEASURES)
If liquid crystal comes in contact with your skin:
Wash area off completely with plenty of water. Remove contaminated clothing.
If liquid crystal gets into your eye:
Flush the affected eye with clean water and then seek medical attention.
If liquid crystal is swallowed:
Flush your mouth thoroughly with water. Drink large quantities of water and induce
vomiting. Then seek medical attention.
8
90577349 PCC583B Inflator.qxd:??????-00 BDL500 laser 7/22/11 3:06 PM Page 8
The label on your tool may include the following symbols.
V ..........................volts A..........................amperes
Hz ........................hertz W ........................watts
min........................minutes ......................alternating
current
......................direct current
n
o ........................no load speed
..........................
Class II Construction
........................earthing terminal
........................safety alert symbol
INTRODUCTION
INTENDED USE
Your PORTER-CABLE inflater is designed to be used cordless or in most vehicles from
the standard 12 Volt socket to inflate car and bike tires, balls, rafts, air mattresses,
swimming pool floats, etc. This product is intended for household use only.
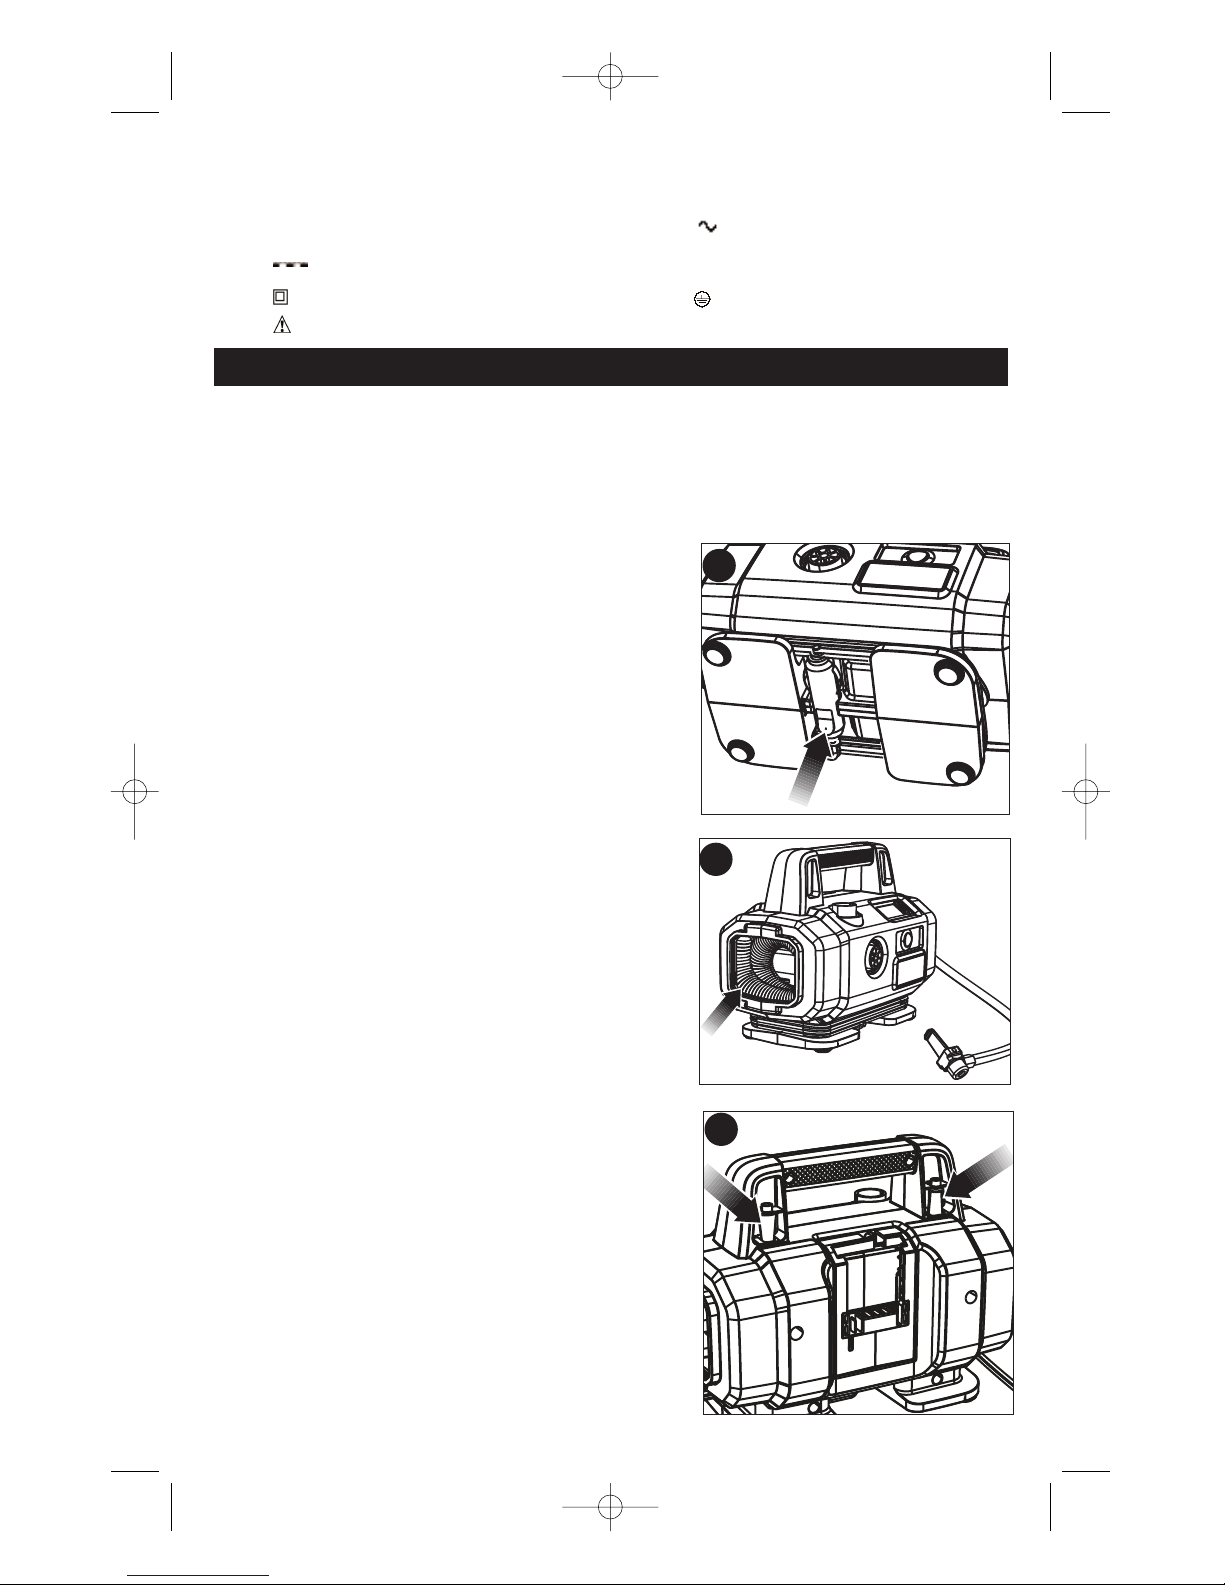
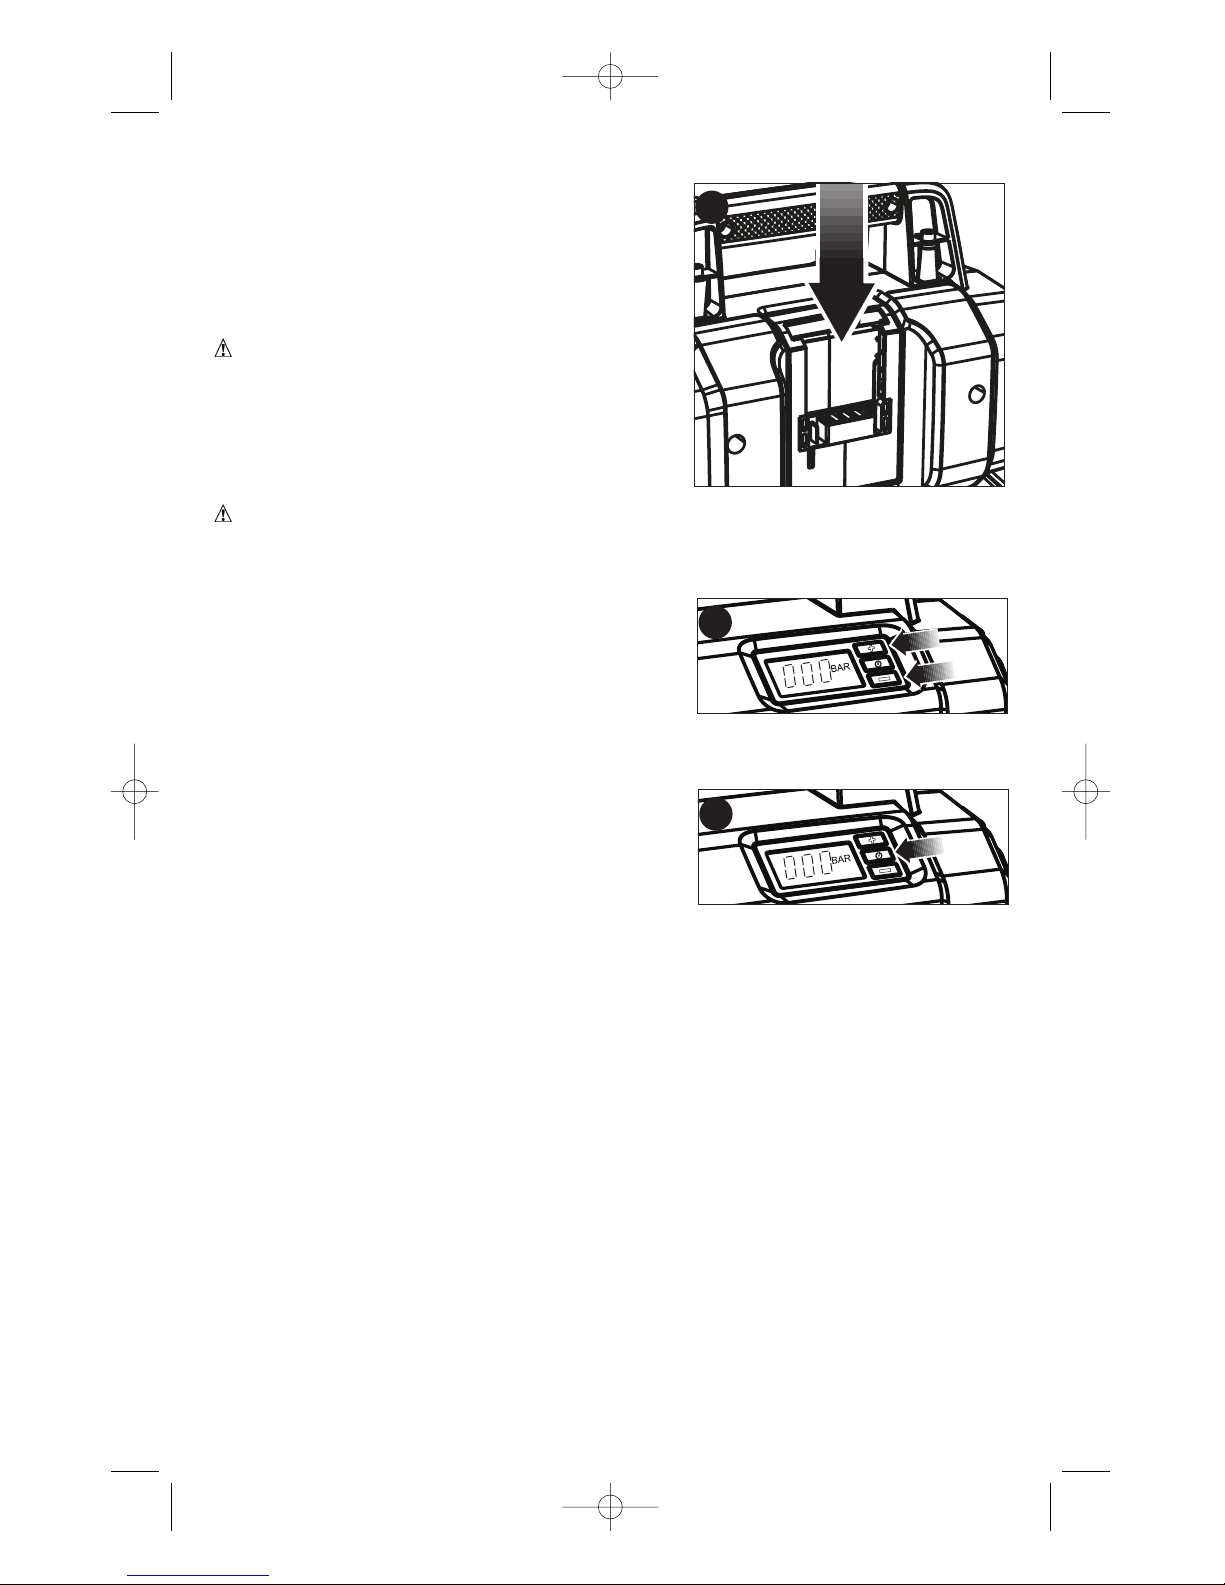
HOSE CORD AND ACCESSORY STORAGE - FIGURES B,C & D
• Wrap the 12 Vdc cord around the base of the unit and snap the 12 Vdc adapter into its
storage location on the base of the unit (figure B).
• The high volume air hose is located in a storage
compartment on the left side of the unit (figure C).
• The air hose with universal valve adaptor is located
in a storage compartment on the right side of the
unit, store the hose with the lever in the up position.
• The accessories are located in a storage
compartment on the back of the handle (figure D).
C
D
B
9
90577349 PCC583B Inflator.qxd:??????-00 BDL500 laser 7/22/11 3:06 PM Page 9
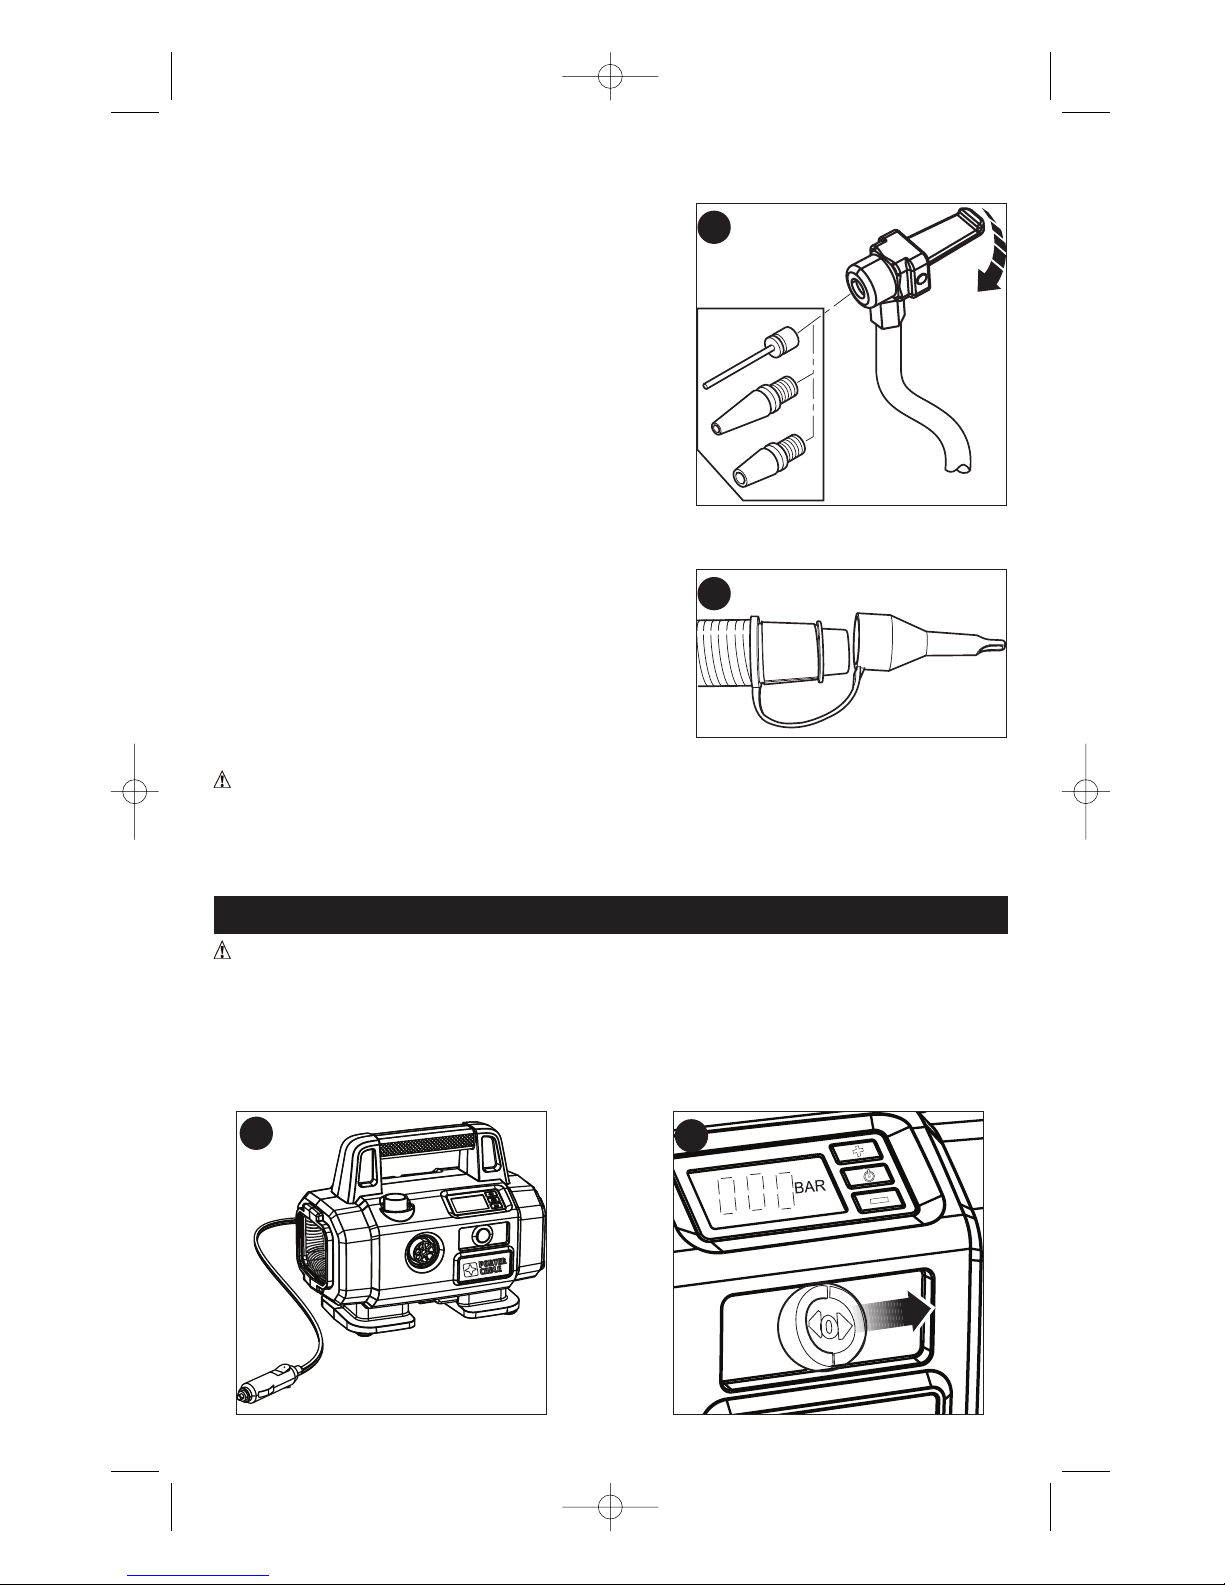
FITTING THE ACCESSORIES - FIGURE E
Your inflator is supplied with the standard tapered nozzles and the needle inflator
nozzle (stored in the back of the handle).
• To use the universal valve adaptor, make sure that
the lever is in the up position.
• Place the valve adapter over the stem of the
inflation needle or tapered nozzle (figure E).
• Press the lever on the valve adapter down to lock it
in place.
• Place the inflation needle or tapered nozzle into the
item to be inflated.
Note: Always make sure that the lever is in the up
position when not in use. Operate your inflator only
with the universal valve adaptor or with the included
nozzles.
Note: Make sure that the universal valve adapter is
firmly locked in place before turning the inflator on.
High Volume Hose - Figure F
• To use the high volume hose, remove it from the
side storage location.
• Use the hose with the tapered nozzle for small
openings or without the nozzle for large openings.
Many inflatables have an internal flap that prevents
air loss during inflation, especially air mattresses.
Unless this flap is displaced by the nozzle the
inflatable will not inflate. Push the nozzle firmly into
the valve to make sure that you push this flap out of
the way.
WARNING: Risk of Bursting. Excessive air pressure may cause a hazardous risk of
bursting or personal injury. Check the manufacturer's maximum pressure rating for items
being inflated.
Note: If the pressure rating for the item being inflated is above 100 psi, note that the
maximum run time is 10 minutes, leave to rest for 20 minutes before re-use.
OPERATING THE INFLATOR
WARNING: Do not operate the inflator when the vehicleʼs engine is running.
Note: Make sure that your 12 Volt accessory socket is live. On some vehicles the
accessory socket may only become live when the ignition key is in the accessory position.
To power the display from the 12Vdc adapter:
• Always fully extend the 12 Vdc cord before each use (figure G).
• Insert the 12 Vdc adapter into your vehicles 12 V accessory socket.
• Push the main power switch to the right (inflate position) to power up the LCD (figure H).
E
F
G
H
10
90577349 PCC583B Inflator.qxd:??????-00 BDL500 laser 7/22/11 3:06 PM Page 10
To power the LCD from the external battery (cordless operation):
• Insert battery pack into inflator until an audible
click is heard (figure I). Make sure battery pack is
fully seated and fully latched into position.
Note: To remove battery, depress the battery
release button in the back of the battery pack and
pull battery pack out.
• Push the main power switch to the right (inflate
position) to power up the LCD (figure H).
WARNING: Risk of Bursting. Do not leave unit
running unattended. Overinflation of tires and other
items could result in serious injury and property
damage.
QUICK START
WARNING: Never leave inflator running unattended in this mode. In can burst car
tires and other items.
To use your inflator immediately you can do so without setting the automatic shut-off
feature.
• Push the main power switch to the right (inflate
position, figure H).
• To switch between the different units (PSI, BAR or
KPA) press - & + buttons together repeatedly until
the required units are displayed (figure J).
• Connect the universal valve adaptor and an
accessory, if required, to the item to be inflated,
making sure that the lever of the valve adaptor is in
the down position to lock it in place.
Note: Make sure that the universal valve adaptor is
correctly fitted to the item to be inflated.
• To start the inflator, press the power button on the
LCD (figure K).
• When the item is inflated as required or to stop the
inflator at any time press the power button on the
LCD.
Note: When the inflator is shut off, the pressure reading displayed will drop slightly from
the reading displayed while the inflator is running. This pressure reading with the inflator
off is correct.
• Remove the hose from the item and store it on the side of the unit.
• Turn the main power switch to the off (middle) position.
SETTING THE AUTOMATIC SHUT-OFF PRESSURE
Note: The LCD will only show inflation pressures when the inflator is being used.
• To switch between the different units (PSI, BAR or KPA) press - & + buttons together
repeatedly until the required units are displayed (figure J).
• To set shut off pressure, press and hold either + or – button until the display starts to
flash, then release.
• Press + or – button until the desired pressure is displayed.
• The display will flash 3 times and return to a reading of “0.0”. This is normal.
• Connect the universal valve adaptor and accessories, if required, to the item to be
inflated, making sure that the lever of the valve adaptor is in the down position to lock
it in place.
• To start the inflator, press the power button on the LCD (figure K).
• When the item to be inflated has reached the preset value, the unit will automatically turn off.
Note: You may notice the actual pressure reading may drop after a couple of seconds,
this is normal.
• To stop the inflator at any time press the power button on the LCD (figure K).
• Remove the valve adaptor or accessory from the inflated item and the 12 Volt adapter
I
J
K
11
90577349 PCC583B Inflator.qxd:??????-00 BDL500 laser 7/22/11 3:06 PM Page 11
from your vehicle's 12 Volt accessory socket (if used).
• Turn the main power switch to the off (middle) position.
Note: If the main power switch is turned off, all settings will be lost and will need to be re-
entered following the instructions under the heading 'Setting the automatic shut-off
pressure'. This is a safety feature to prevent the risk of items OVER INFLATING.
USING THE INFLATOR AS A PRESSURE GAUGE
• Push the main power switch to the right (inflate position) to power up the LCD (figure H).
• Connect the universal valve adaptor to the item to be checked.
• The LCD will display the itemʼs pressure.
• After checking, turn the main power switch off (middle position) and return the air hose to
the storage location.
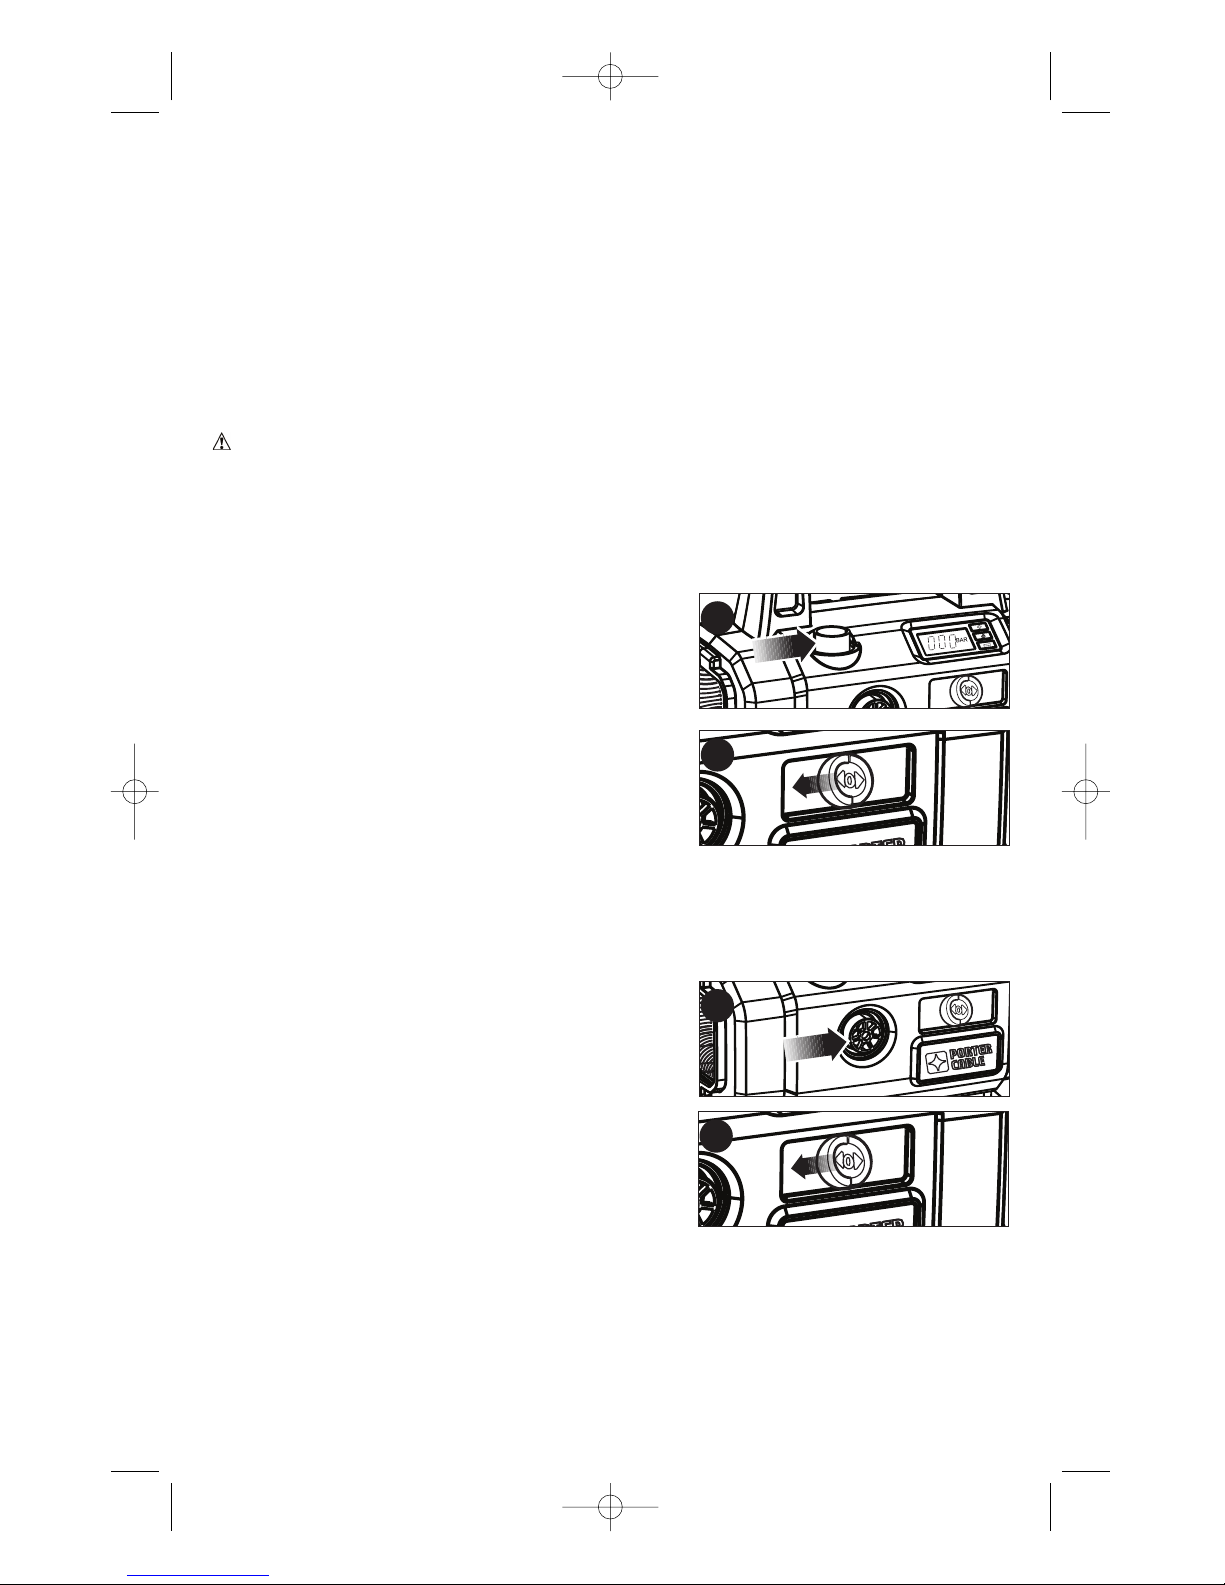
OPERATING THE HIGH-VOLUME PUMP
WARNING: Do not operate the pump when the vehicleʼs engine is running.
Note: Make sure that your 12 Vdc accessory socket is live. On some vehicles the
accessory socket may only become live when the ignition key is in the accessory position.
To inflate using the high-volume pump (i.e air mattresses, rafts, swimming pool
floats):
Note: The pump mode DOES NOT have an auto shut-off feature.
• Remove the high-volume hose from the storage
compartment on the side of the unit and connect it to
the high-volume pump inflate connection (figure L).
• Insert the hose (with accessories if required) into
the item to be inflated.
• To start the pump, push the main power switch to
the left (pump position) (figure M). The pump will
start immediately and the LCD screeen will not be
illuminated.
• When the item is inflated as required or to stop the
pump at any time return the main power switch to the
off position.
• Remove the hose from the item and store it on the unit.
To deflate using the high-volume pump (i.e air mattresses, rafts, swimming pool
floats):
Note: The pump mode DOES NOT have an auto shut-off feature.
• Remove the high-volume hose from the storage
compartment on the side of the unit and connect it to
the high-volume pump deflate connection (figure N).
• Insert the hose (with accessories if required) into
the item to be deflated.
• To start the pump, push the main power switch to
the left (pump position) (figure O). The pump will
start immediately and the LCD screeen will not be
illuminated.
• When the item is deflated or to stop the pump at
any time return the main power switch to the off
position.
• Remove the hose from the item and store it on the unit.
REPLACING THE FUSE IN THE VEHICLE DC ACCESSORY PLUG
• Remove the cap by turning it counterclockwise.
• Remove the center pin.
• Remove the fuse.
• Insert a new fuse of the same type and size (8A/250V).
• Replace the cap and center pin.
• Tighten the cap by turning clockwise onto the plug.
M
L
O
N
12
90577349 PCC583B Inflator.qxd:??????-00 BDL500 laser 7/22/11 3:07 PM Page 12

MAINTENANCE
Clean only with a dry cloth. Never let any liquid get inside the tool; never immerse any
part of the tool into a liquid.
IMPORTANT: To assure product SAFETY and RELIABILITY, repairs, maintenance and
adjustment (other than those listed in this manual) should be performed by authorized
service centers or other qualified service personnel, always using identical replacement parts.
TROUBLESHOOTING
Problem Possible Cause Possible Solution
• Unit will not start. 12 Volt adapter Connect the 12 Volt
not connected. adapter.
Accessory socket Turn key to accessory
not live. position.
Main ON/OFF switch not in Turn main switch to
correct position. required position.
The fuse in the 12 Volt adapter Replace the fuse with
is blown. one of the same size
and type (8A/250V).
Cord or switch is damaged. Have cord or switch
replaced at a Porter-Cable
Service Center or
Authorized Servicer.
• Will not inflate. Incorrect mode selected. Select correct mode.
Battery depleted. Recharge battery and
retry.
For assistance with your product, visit our website at www.portercable.com for a list of service
centers, or call the Porter-Cable Customer Care Center at (888) 848-5175.
REPLACEMENT PARTS
Use only identical replacement parts. For a parts list or to order parts, visit our service website at
www.portercable.com. You can also order parts from your nearest PORTER-CABLE Factory Service
Center or PORTER-CABLE Authorized Warranty Service Center. Or, you can call our Customer
Care Center at (888) 848-5175.
SERVICE AND REPAIRS
All quality tools will eventually require servicing and/or replacement of parts. For information about
PORTER-CABLE, its factory service centers or authorized warranty service centers, visit our website
at www.portercable.com or call our Customer Care Center at (888) 848-5175. All repairs made by our
service centers are fully guaranteed against defective material and workmanship. We cannot
guarantee repairs made or attempted by others.
You can also write to us for information at PORTER-CABLE, 4825 Highway 45 North, Jackson,
Tennessee 38305, (888) 848-5175 - Attention: Product Service. Be sure to include all of the
information shown on the nameplate of your tool (model number, type, serial number, etc.).
ACCESSORIES
WARNING: Since accessories, other than those offered by PORTER-CABLE,
have not been tested with this product, use of such accessories with this tool could be
hazardous. To reduce the risk of injury, only PORTER-CABLE recommended accessories
should be used with this product.
A complete line of accessories is available from your PORTER-CABLE Factory Service
Center or a PORTER-CABLE Authorized Warranty Service Center. Please visit our Web
Site www.portercable.com for a catalog or for the name of your nearest supplier.
THREE YEAR LIMITED WARRANTY
PORTER-CABLE will repair or replace, without charge, any defects due to faulty
materials or workmanship for three years from the date of purchase for tools (two years
for batteries). This warranty does not cover part failure due to normal wear or tool
abuse. For further detail of warranty coverage and warranty repair information, visit
www.portercable.com or call (888) 848-5175. This warranty does not apply to
accessories or damage caused where repairs have been made or attempted by others.
13
90577349 PCC583B Inflator.qxd:??????-00 BDL500 laser 7/22/11 3:07 PM Page 13

14
This warranty gives you specific legal rights and you may have other rights which vary
in certain states or provinces.
In addition to the warranty, PORTER-CABLE tools are covered by our:
1 YEAR FREE SERVICE: PORTER-CABLE will maintain the tool and replace worn parts
caused by normal use, for free, any time during the first year after purchase.
90 DAY MONEY BACK GUARANTEE: If you are not completely satisfied with the
performance of your PORTER-CABLE Power Tool for any reason, you can return it within
90 days from the date of purchase with a receipt for a full refund – no questions asked.
LATIN AMERICA: This warranty does not apply to products sold in Latin America. For
products sold in Latin America, see country specific
warranty information contained in the packaging, call the local company or see website
for warranty information.
To register your tool for warranty service visit our website at www.portercable.com
.
WARNING LABEL REPLACEMENT
If your warning labels become illegible or are missing, call (888) 848-5175 for a free
replacement.
The following are PORTER-CABLE trademarks for one or more power tools and accessories: a gray
and black color scheme; a “four point star” design; and three contrasting/outlined longitudinal stripes.
The following are also trademarks for one or more PORTER-CABLE and Delta products: Les
éléments ci-dessous sont des marques de commerce des outils et des accessoires de PORTERCABLE : un agencement de couleurs grise et noire; un motif d « étoile à quatre pointes » et trois
bandes longitudinales contrastantes/à contours. Les marques suivantes sont également des
marques de commerce se rapportant à un ou plusieurs produits PORTER-CABLE ou Delta : Las
siguientes son marcas comerciales PORTER-CABLE que distinguen a una o m s herramientas y
accesorios: un gr fico de color gris y negro; un dise o de “estrella de cuatro puntas” y tres franjas
longitudinales contrastantes/delineadas. Las siguientes también son marcas comerciales para uno o
m s productos de PORTER-CABLE y Delta: 2 BY 4®, 890™, Air America®, AIRBOSS™, AutoSet®, B.O.S.S.®, Bammer®, Biesemeyer®, Builders Saw®, Charge Air®, Charge Air Pro®,
CONTRACTOR SUPERDUTY®, Contractor's Saw®, Delta®, DELTA®, Delta Industrial®, DELTA
MACHINERY & DESIGN™, Delta Shopmaster and Design®, Delta X5®, Deltacraft®,
DELTAGRAM®, Do It. Feel It.®, DUAL LASERLOC AND DESIGN®, EASY AIR®, EASY AIR TO
GO™, ENDURADIAMOND®, Ex-Cell®, Front Bevel Lock®, Get Yours While the Sun Shines®, Grip
to Fit®, GRIPVAC™, GTF®, HICKORY WOODWORKING®, Homecraft®, HP FRAMER HIGH
PRESSURE®, IMPACT SERIES™, Innovation That Works®, Jet-Lock®, Job Boss®, Kickstand®,
LASERLOC®, LONG-LASTING WORK LIFE®, MAX FORCE™, MAX LIFE®, Micro-Set®, MidiLathe®, Monsoon®, MONSTER-CARBIDE™, Network®, OLDHAM®, Omnijig®, PC EDGE®,
Performance Crew™, Performance Gear®, Pocket Cutter®, Porta-Band®, Porta-Plane®, PORTERCABLE®, PORTER-CABLE Professional Power Tools®, Powerback®, POZI-STOP™, Pressure
Wave®, PRO 4000®, Proair®, Quicksand and Design®, Quickset II®, QUIET DRIVE
TECHNOLOGY™, QUIET DRIVE TECHNOLOGY AND DESIGN™, Quik-Change®, QUIK-TILT®,
RAPID-RELEASE™, RAZOR®, Redefining Performance®, Riptide®, Safe Guard II®, Sand Trap
and Design®, Sanding Center®, Saw Boss®, Shop Boss®, Sidekick®, Site Boss®, Speed-Bloc®,
Speedmatic®, Stair Ease®, Steel Driver Series®, SUPERDUTY®, T4 & DESIGN®, THE
AMERICAN WOODSHOP®, THE PROFESSIONAL EDGE®, Thin-Line®, Tiger Saw®,
TIGERCLAW®, TIGERCLAW AND DESIGN®, Torq-Buster®, TRU-MATCH®, T-Square®,
Twinlaser®, Unifence®, Uniguard®, UNIRIP®, UNISAW®, UNITED STATES SAW®, Veri-Set®,
Versa-Feeder®, VIPER®, VT™, VT RAZOR™, Water Driver®, WATER VROOM®, Waveform®,
Whisper Series®, X5®, YOUR ACHIEVEMENT. OUR TOOLS.®
Trademarks noted with ® are registered in the United States Patent and Trademark Office and may
also be registered in other countries. Other trademarks may apply. Les marques de commerce
suivies du symbole ® sont enregistrées auprès du United States Patent and Trademark Office et
peuvent être enregistrées dans d autres pays. D autres marques de commerce peuvent également
être applicables. Las marcas comerciales con el s mbolo ® est n registradas en la Oficina de
patentes y marcas comerciales de Estados Unidos (United States Patent and Trademark Office), y
también pueden estar registradas en otros pa ses. Posiblemente se apliquen otras marcas
comerciales registradas.
4825 Highway 45
North Jackson, TN 38305
(888) 848-5175 www.portercable.com
90577349 PCC583B Inflator.qxd:??????-00 BDL500 laser 7/22/11 3:07 PM Page 14
 Loading...