

Porter-Cable Laser Square LS3100 Instruction Manual

Instruction
manual
The Model and Serial No. plate is located on the main
housing of the tool. Record these numbers in the
spaces below and retain for future reference.
Model No. ______________________________________
Type ___________________________________________
Serial No. _______________________________________
IMPORTANT
Please make certain that the person who is
to use this equipment carefully reads and
understands these instructions before
starting operations.
Part No. 905068 - 03-26-02
ESPAÑOL: PÁGINA 17
FRANÇAISE : PAGE 33
To learn more about Porter-Cable
visit our website at:
http://www.porter-cable.com
Copyright © 2002 Porter-Cable Corporation
Patents Pending. Engineered in USA.
Manufactured in PRC.
MODEL LS3100
LASER SQUARE
Self-Leveling, 3-Beam Level,
Square & Plumb Laser
905068 - 03-26-02.qxd 9/23/02 10:34 AM Page 1

2
GENERAL SAFETY RULES
ELECTRICAL SAFETY
1. Use battery operated laser square with alkaline batteries only. Use of
any other batteries may permanently damage the laser square.
PERSONAL SAFETY
1. Stay alert, watch what you are doing, and use common sense when
operating a laser. Do not use laser square while tired or under the
influence of drugs, alcohol, or medication. A moment of inattention while
operating a laser may result in personal injury.
2. Use safety equipment. Eye protection, dust mask, non-skid safety
shoes, hard hat, or hearing protection must be used for appropriate
conditions.
3. Prolonged eye contact with laser beams can cause eye irritation and
injury to the eye. Never stare direcly into beam or view with optical
instruments. Avoid prolonged eye contact with laser beams. Laser beam
contact with the eyes can also cause temporary flash blindness, which can
cause the user to be distracted, which can lead to accidents.
4. Do not aim the laser beams at others.
TOOL USE AND CARE
1. Do not use laser square if switch does not turn it on or off. A laser that
cannot be controlled with the switch is dangerous and must be repaired.
2. Store idle laser square out of reach of children and other untrained
persons. Laser square should only be used by trained users.
3. Use only accessories that are recommended by the manufacturer for
your model. Accessories that may be suitable for one laser square may
create a risk of injury when used on another laser square.
SERVICE
1. Laser square service must be performed only by qualified repair
personnel. Service or maintenance performed by unqualified personnel may
result in a risk of injury.
2. When servicing a laser square, use only identical replacement parts.
Follow instructions in the Maintenance Section of this manual. Use of
unauthorized parts or failure to follow Maintenance Instructions may create a
risk of shock or injury.
SPECIFIC SAFETY RULES
1. Be aware that the laser square is always in an operating condition,
because it does not have to be plugged into an electrical outlet. Always set
the switch to the “OFF” position when installing or removing the batteries.
2. IMPORTANT: These labels are attached to every laser square. They
are not to be removed or defaced.
3.
CAUTION: Use of controls, adjustments or procedures other than those
specified herein may result in laser radiation exposure.
4. AVOID EXPOSURE: Laser radiation is emitted from this aperture.
5. WARNING: There are certain applications for which this laser
square was designed. Porter-Cable strongly recommends that this laser
square NOT be modified and/or used for any application other than for
which it was designed. If you have any questions relative to its application
DO NOT use the laser square until you have written Porter-Cable and we
have advised you. Technical Service Manager
Porter-Cable Corporation
4825 Highway 45 North
Jackson, TN 38305
905068 - 03-26-02.qxd 9/23/02 10:34 AM Page 2

3
FUNCTIONAL DESCRIPTION
FOREWORD
Porter-Cable Model LS3100 Laser Square is a
time-saving 3 beam precision
laser square of superior quality and is easy to use.
Place it on any surface and
the perfectly balanced, self-leveling pendulum inside the device takes care of the
rest.
ASSEMBLY
IMPORTANT: These labels are attached to every laser square. They are
not to be removed or defaced.
CAUTION: Use of controls, adjustments or procedures other than those
specified herein may result in laser radiation exposure. Never stare directly into
beam or view directly with optical instruments.
Do not disassemble or attempt to perform any internal servicing. Repairs or
service to this device are to be performed by authorized service centers only. Do
not aim the laser beams in laser square at others.
laser square contains a semiconductor laser diode with a wavelength of 635
nanometers. The continuous output of any single beam never exceeds 1.0
milliwatts. laser square complies with US FDA performance standards, 21 CFR,
Subchapter J.
AVOID EXPOSURE: Laser radiation is emitted from this aperture.
1. User safety
This symbol is attached to the laser square at every aperture.
905068 - 03-26-02.qxd 9/23/02 10:34 AM Page 3
4
OPERATION
3. Mounting accessory features
Introduction
Congratulations! You’ve just purchased a time-saving, precision laser tool of
superior quality. Laser Square is not only precise, but it’s also easy to use.
Simply turn laser square on, place it on any surface and the perfectly balanced,
self-leveling pendulum inside the device takes care of the rest. If placed on a
surface which positions the pendulum beyond its operating range indicated in
the specifications laser square’s 3 beams will blink quickly, indicating the need
for the device to be re-positioned on a more level surface. It’s that simple. So get
to work and enjoy the time-savings which laser square provides.
4. How to use Laser Square
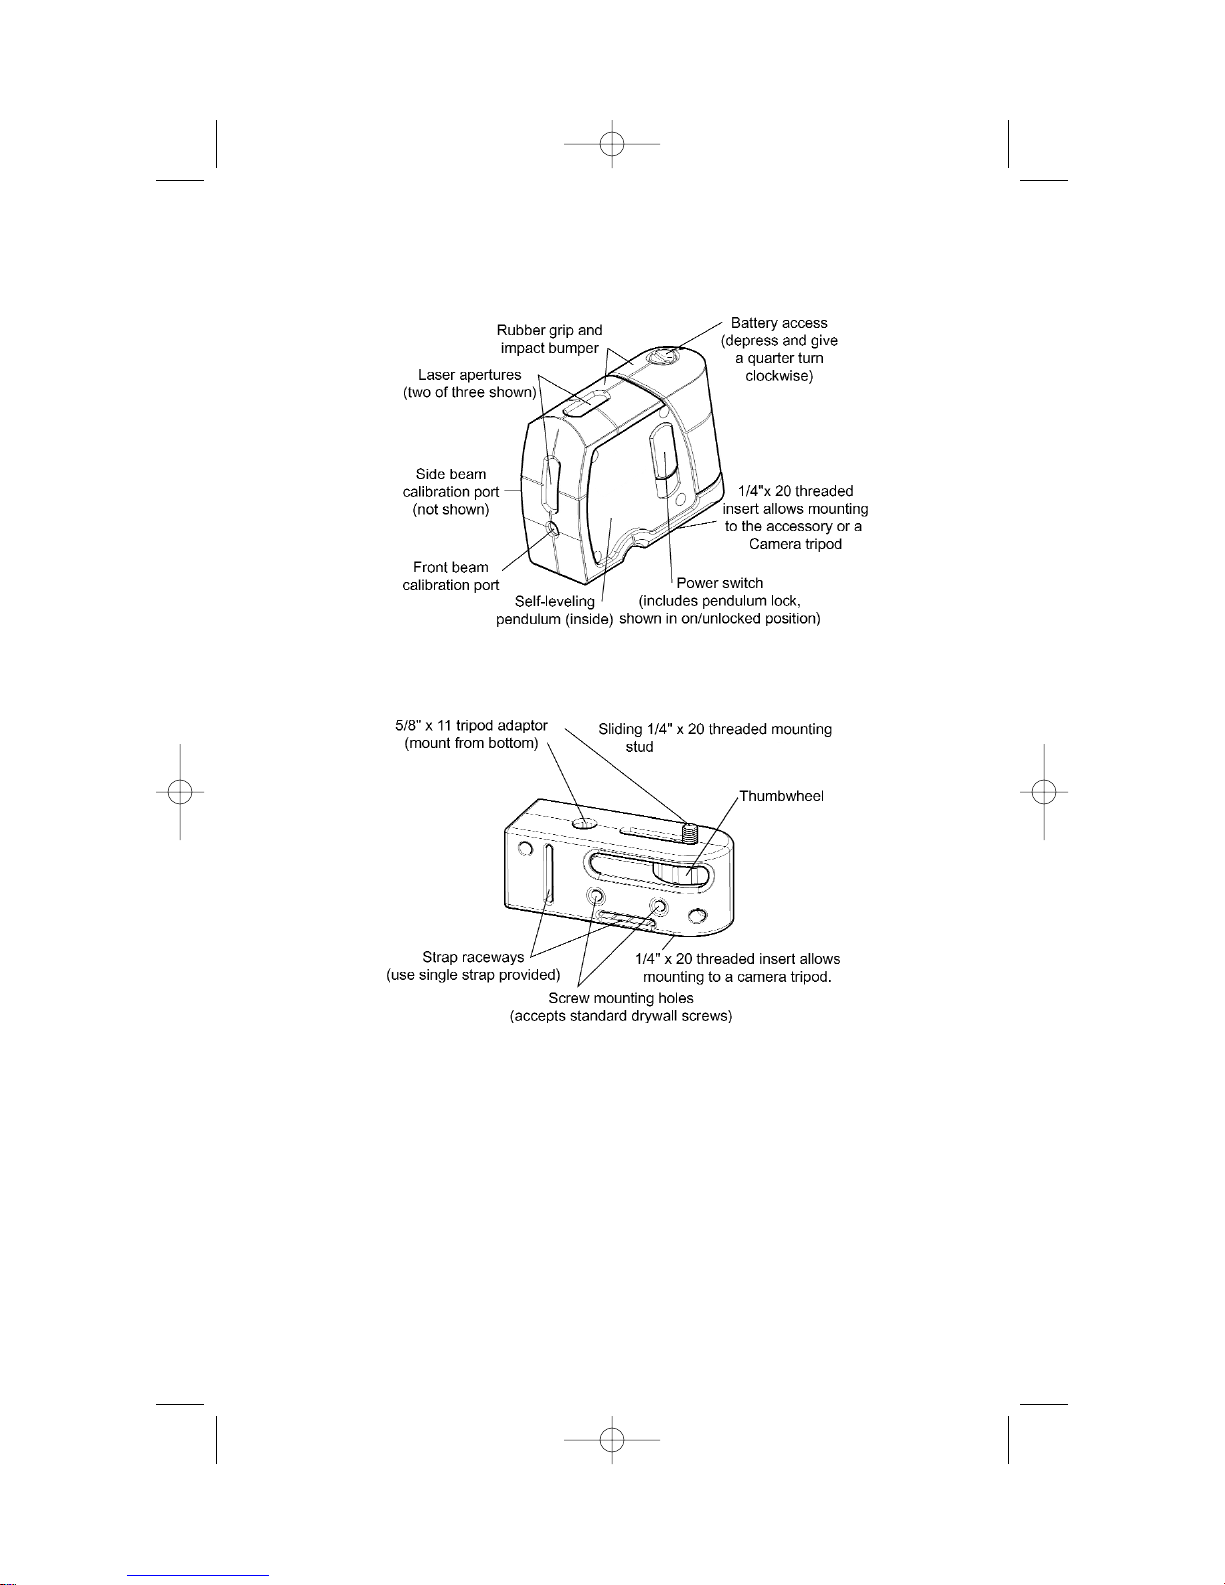
2. Laser Square features
905068 - 03-26-02.qxd 9/23/02 10:34 AM Page 4

5
Turning the laser square on and off
• To turn laser square on, slide the power switch to the up position.
Note: This not only turns the laser on, but also releases the protective
pendulum lock.
• To turn laser square off, slide the power switch to the down position.
Auto-off feature
• A battery saving Auto-off feature has been incorporated into laser square
which will shut the device off automatically in 20 minutes unless overridden.
To override the Auto-off feature simply turn the device on, off, and on again
within 4 seconds. Once the Auto-off feature has been overridden, all three
lasers will blink quickly for two seconds and the device will remain on for
eight hours before turning off automatically.
Out-of-level indicator
• Laser Square is a self-leveling device which is effective only within the
specified range. If the device is not within this range all three laser beams
will blink quickly, indicating the need for laser square to be positioned on a
more level surface.
Low battery indicator
• When the battery power becomes low, all three laser beams will blink
slowly, indicating the need for all three of the batteries to be replaced.
Note: Space has been provided in the storage box for spare batteries.
Note: laser square can be used for up to 10 hours during low battery
indication before it will turn off completely.
Using the reflective targets
• The red plastic film used in the targets enhances the laser making the laser
dot much more visible. Tabs on the target allow it to be attached to a
standard tape measure which can then be used as a Storey pole.
Using the laser enhancement glasses
• The red plastic used in the glasses enhances the laser, making the laser dot
more visible. These glasses are particularly useful when using laser square
outdoors or in brightly lit environments.
Battery replacement
• Turn the slotted screw located at the back of laser square in the clockwise
direction. This will release the battery cover and provide access to the
batteries. Replace all three batteries, and then return the battery cover to its
original position following the steps illustrated on the next page. When the
battery cover is in place, give the slotted screw a quarter turn in the counterclockwise direction to lock the cover in place.
Note: Alkaline batteries offer the longest battery life when used in this
device.
905068 - 03-26-02.qxd 9/23/02 10:34 AM Page 5

6
Sliding mounting stud
• Mount laser square to the accessory using the sliding mounting stud.
• Use the sliding/rotating action of the sliding mounting stud to:
1. Cantilever laser square over the accessory.
2. Rotate laser square around the mounting stud to change the location
of the horizontal leveling beam without changing the elevation of the
beam.
1/4"-20 Tripod mount
• Use this threaded hole, located on the bottom of the accessory, to mount the
accessory and the attached laser square to a camera tripod.
5/8"-11 Tripod mount
• Use this threaded hole, which continues through the accessory, to mount the
accessory and the attached laser square to a surveyor’s tripod.
Screw mounting holes
• Use the screw mounting holes to fasten the accessory and the attached
laser square to walls with drywall screws (at least 2" long).
Strap raceways
• Use the strap raceways to fasten the accessory and the attached laser
square to objects such as pipes and wooden studs with a diameter of
approximately 6" or less.
Magnets
• Use the magnets to fasten the accessory and the attached laser square to
steel objects such as steel studs.
5. How to use the mounting accessory
905068 - 03-26-02.qxd 9/23/02 10:34 AM Page 6
 Loading...