

Page 1

1
Tile SawInstruction
manual
The Model and Serial No. plate is located on the main
housing of the tool. Record these numbers in the
spaces below and retain for future reference.
Model No. ______________________________________
Type ___________________________________________
Serial No. _______________________________________
IMPORTANT
Please make certain that the person who is
to use this equipment carefully reads and
understands these instructions before
starting operations.
Part No. 895736-008
MODEL 1500
ESPAÑOL: PÁGINA 15
FRANÇAISE : PAGE 29
To learn more about Porter-Cable
visit our website at:
http://www.porter-cable.com
Copyright © 2000 Porter-Cable
Corporation
895736 - 08-31-00.qxd 2/14/02 3:54 PM Page 1
Page 2

2
IMPORTANT SAFETY INSTRUCTIONS
WARNING: When using electric tools, basic safety precautions should always
be followed to reduce the risk of fire, electric shock and personal injury,
including the following:
READ AND FOLLOW ALL INSTRUCTIONS.
There are certain applications for which this tool was designed. Porter-Cable
strongly recommends that this tool NOT be modified and/or used for any
application other than for which it was designed. If you have any questions
relative to its application DO NOT use the tool until you have written PorterCable and we have advised you.
Technical Service Manager
Porter-Cable Corporation
4825 Highway 45 North
Jackson, TN 38305
WARNING: FAILURE TO FOLLOW THESE RULES
MAY RESULT IN SERIOUS PERSONAL INJURY
1. FOR YOUR OWN SAFETY, READ INSTRUCTION MANUAL BEFORE
OPERATING THE TOOL. Learn the tool’s application and limitations as well as
the specific hazards peculiar to it.
2. KEEP GUARDS IN PLACE and in working order.
3. GROUND ALL TOOLS. If tool is equipped with three-prong plug, it should
be plugged into a three-hole electrical receptacle. If an adapter is used to
accommodate a two-prong receptacle, the adapter lug must be attached to a
known ground. Never remove the third prong.
4. REMOVE ADJUSTING KEYS AND WRENCHES. Form habit of checking
to see that keys and adjusting wrenches are removed from the tool before
turning it on.
5. KEEP WORK AREA CLEAN. Cluttered areas and benches invite
accidents.
6. DON’T USE IN DANGEROUS ENVIRONMENT. Don’t use power tools in
damp or wet locations, or expose them to rain. Keep work area well-lighted.
7. KEEP CHILDREN AND VISITORS AWAY. All children and visitors should
be kept a safe distance from work area.
8. MAKE WORKSHOP CHILDPROOF – with padlocks, master switches, or
by removing starter keys.
9. DON’T FORCE TOOL. It will do the job better and be safer at the rate for
which it was designed.
10. USE RIGHT TOOL. Don’t force tool or attachment to do a job for which it
was not designed.
11. WEAR PROPER APPAREL. No loose clothing, gloves, neckties, rings,
bracelets, or other jewelry to get caught in moving parts. Nonslip footwear is
recommended. Wear protective hair covering to contain long hair.
12. ALWAYS USE SAFETY GLASSES. Wear safety glasses (must comply with
ANSI Z87.1). Everyday eyeglasses only have impact resistant lenses; they are
not safety glasses. Also use face or dust mask if cutting operation is dusty.
13. SECURE WORK. Use clamps or a vise to hold work when practical.
14. DON’T OVERREACH. Keep proper footing and balance at all times.
15. MAINTAIN TOOLS IN TOP CONDITION. Keep tools sharp and clean for
best and safest performance. Follow instructions for lubricating and changing
accessories.
2
895736 - 08-31-00.qxd 2/14/02 3:54 PM Page 2
Page 3

33
16. DISCONNECT TOOLS before servicing and when changing accessories
such as blades, bits, cutters, etc.
17. USE RECOMMENDED ACCESSORIES. The use of improper accessories
may cause hazards or risk of injury to persons.
18. REDUCE THE RISK OF UNINTENTIONAL STARTING. Make sure switch
is in “OFF” position before plugging in power cord.
19. NEVER STAND ON TOOL. Serious injury could occur if the tool is tipped
or if the cutting tool is accidentally contacted.
20. CHECK DAMAGED PARTS. Before further use of the tool, a guard or other
part that is damaged should be carefully checked to determine that it will
operate properly and perform its intended function. Check for alignment of
moving parts, binding of moving parts, breakage of parts, mounting, and any
other conditions that may affect its operation. A guard or other part that is
damaged should be properly repaired or replaced by an authorized service
center unless otherwise indicated elsewhere in this instruction manual. Have
defective switches replaced by authorized service center. Do not use tool if
switch does not turn it on and off.
21. DIRECTION OF FEED. Feed work into a blade or cutter against the
direction of rotation of the blade or cutter only.
22. NEVER LEAVE TOOL RUNNING UNATTENDED. TURN POWER OFF.
Don’t leave tool until it comes to a complete stop.
23. DRUGS, ALCOHOL, MEDICATION. Do not operate tool while under the
influence of drugs, alcohol or any medication.
24. MAKE SURE TOOL IS DISCONNECTED FROM POWER SUPPLY while
motor is being mounted, connected or reconnected.
25. WARNING: SOME DUST CREATED BY POWER SANDING, SAWING,
GRINDING, DRILLING, AND OTHER CONSTRUCTION ACTIVITIES contains
chemicals known to cause cancer, birth defects or other reproductive harm.
Some examples of these chemicals are:
• lead from lead-based paints,
• crystalline silica from bricks and cement and other masonry products, and
• arsenic and chromium from chemically-treated lumber.
Your risk from these exposures varies, depending on how often you do this
type of work. To reduce your exposure to these chemicals: work in a well
ventilated area, and work with approved safety equipment, such as those dust
masks that are specially designed to filter out microscopic particles.
26. SAVE THESE INSTRUCTIONS. Refer to them often and use them to
instruct others.
ADDITIONAL SAFETY RULES FOR TILE SAWS
1. DISCONNECT SAW BEFORE SERVICING, WHEN CHANGING CUTTING
WHEELS, AND CLEANING.
2. USE SPLASH HOOD FOR EVERY OPERATION FOR WHICH IT CAN BE
USED.
3. TO AVOID THE POSSIBILITY OF THE APPLIANCE PLUG OR RECEPTACLE
GETTING WET, POSITION TILE SAW TO ONE SIDE OF A WALL MOUNTED
RECEPTACLE TO PREVENT WATER FROM DRIPPING ONTO THE
RECEPTACLE OR PLUG. The user should arrange a “drip loop” in the cord
connecting the saw to a receptacle. The “drip loop” is that part of the cord below
the level of the receptacle, or the connector if an extension cord is used, to
prevent water traveling along the cord and coming in contact with the receptacle.
895736 - 08-31-00.qxd 2/14/02 3:54 PM Page 3
Page 4
44
4. IF THE PLUG OR RECEPTACLE DOES GET WET, DON’T UNPLUG THE
CORD. Disconnect the fuse or circuit breaker that supplies power to the tool.
Then unplug and examine for presence of water in the receptacle.
5. WHEN THE TOOL IS NOT IN USE, THE SWITCH SHOULD BE LOCKED
IN THE OFF POSITION TO PREVENT UNAUTHORIZED USE OF THE TOOL.
6. MAKE SURE YOUR FINGERS AND HANDS ARE NOT IN THE CUTTING
LINE OF THE BLADE.
7. USE ONLY CONTINUOUS WET CUT DIAMOND BLADES RATED AT 6000
RPMS OR GREATER. Use tool only with smooth edge cutting wheels free of
openings and grooves.
8. CHECK WATER LEVEL AND OPERATION OF PUMP BEFORE EACH
USE.
9. REPLACE DAMAGED CUTTING WHEEL BEFORE OPERATING TILE
SAW.
10. DO NOT FILL WATER BATH ABOVE WATER FILL LINE.
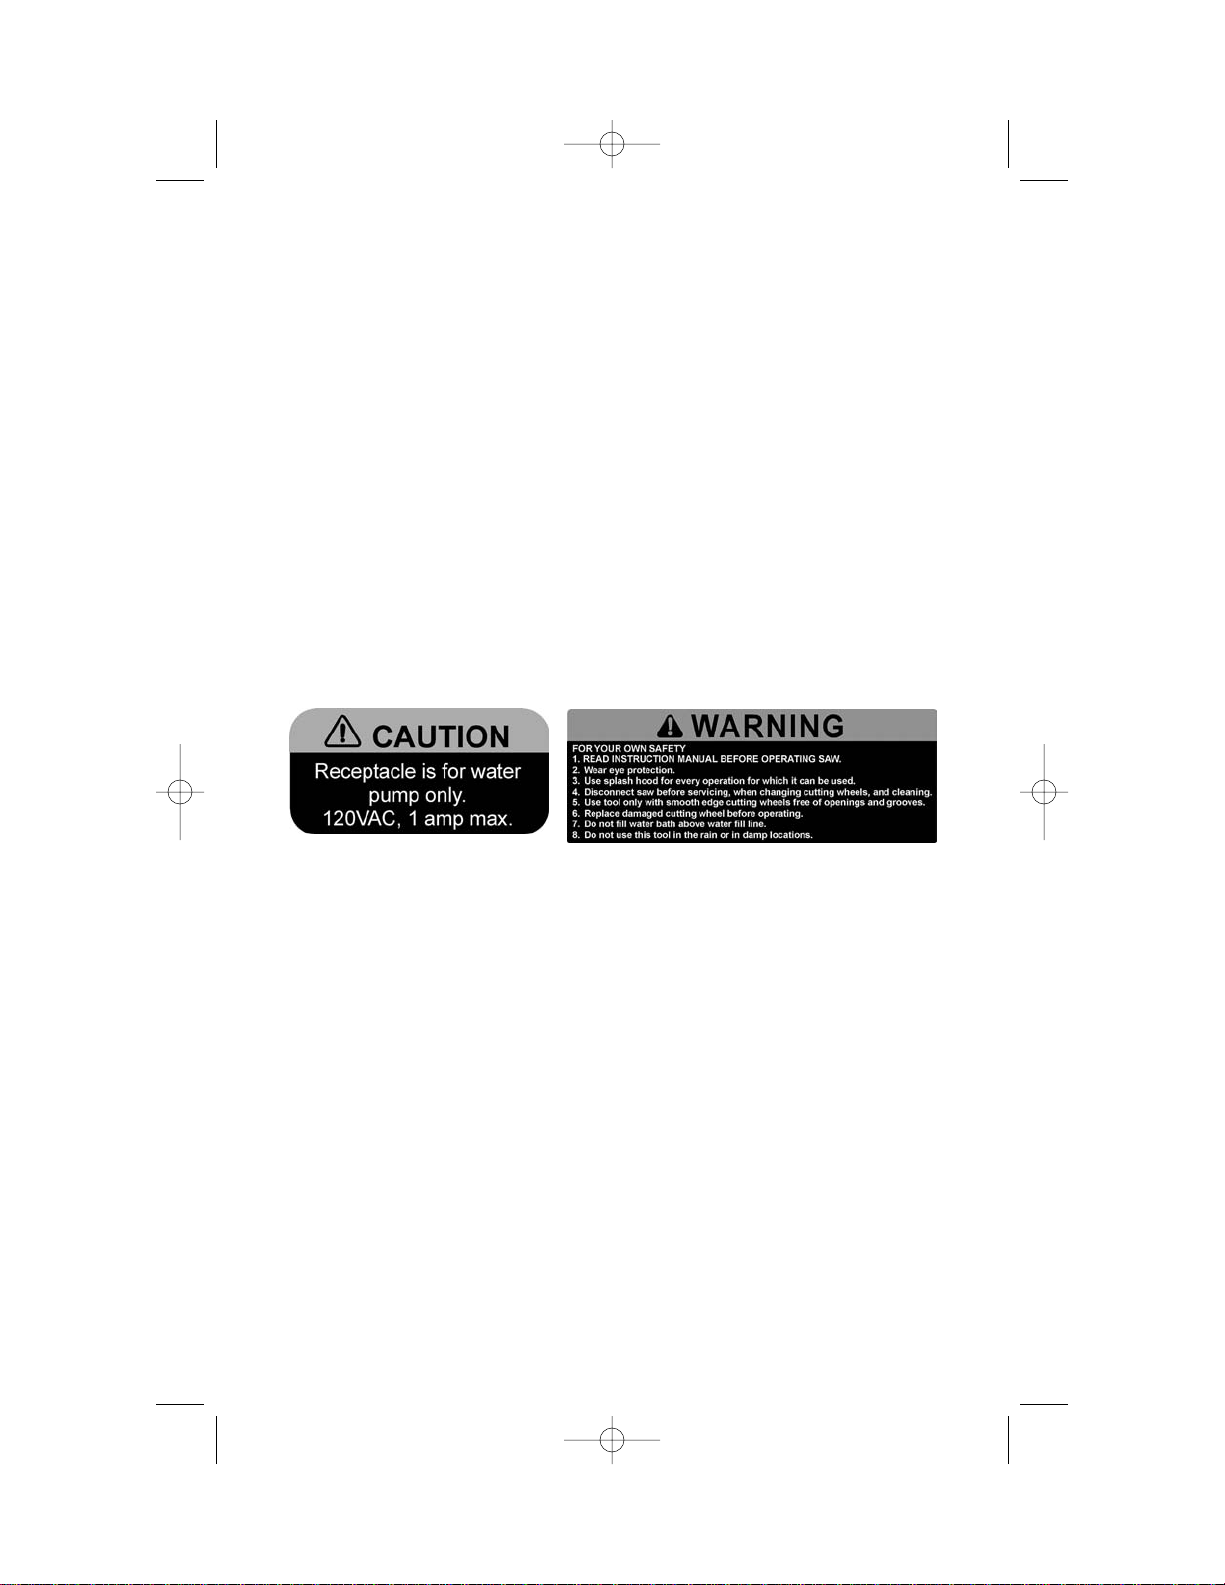
11. ONLY PLUG WATER PUMP CORD INTO MOTOR RECEPTACLE.
12. GROUND FAULT CIRCUIT INTERRUPTER (GFCI) PROTECTION
SHOULD BE PROVIDED ON THE CIRCUIT(S) OR OUTLET(S) TO BE USED
FOR THE TILE SAW.
REPLACEMENT PARTS
When servicing use only identical replacement parts.
MOTORS
Many Porter-Cable tools will operate on either D.C., or single-phase 25 to 60
cycle A.C. current and voltage within plus or minus 5 percent of that shown
on the specification plate of the tool. Several models, however, are designed
for A.C. current only. Refer to the specification plate on your tool for proper
voltage and current rating.
CAUTION: Do not operate your tool on a current on which the
voltage is not within correct limits. Do not operate tools rated A.C.
only on D.C. current. To do may seriously damage the tool.
EXTENSION CORD SELECTION
If an extension cord is used, make sure the conductor size is large enough to
prevent excessive voltage drop, which will cause loss of power and possible
motor damage. A table of recommended extension cord sixes will be found in
this section. This table is based on limiting line voltage drop to 5 volts (10 volts
for 230 volts) at 150% of rated amperes.
If an extension cord is to be used outdoors it must be marked with the suffix
W-A following the cord type designation. For example – SJTW-A to indicate it
is acceptable for outdoor use.
895736 - 08-31-00.qxd 2/14/02 3:54 PM Page 4
Page 5

55
To avoid the possibility of the appliance plug or receptacle getting wet, position
tile saw to one side of a wall mounted receptacle to prevent water from dripping
onto the receptacle or plug. The user should arrange a “drip loop” in the cord
connecting the saw to a receptacle. The “drip loop” is that part of the cord
below the level of the receptacle, or the connector if an extension cord is used,
to prevent water traveling along the cord and coming in contact with the
receptacle.
If the plug or receptacle does get wet, DON’T unplug the cord. Disconnect the
fuse or circuit breaker that supplies power to the tool. Then unplug and
examine for presence of water in the receptacle.
Use only extension cords that are intended for outdoor use. These extension
cords are identified by a marking “Acceptable for use with outdoor
appliances; store indoors while not in use.” Use only extension cords having
an electrical rating not less than the rating of the product. Do not use
damaged extension cords. Examine extension cord before using and replace
if damaged. Do not abuse extension cords and do not yank on any cord to
disconnect. Keep cord away from heat and sharp edges. Always disconnect
the extension cord from the receptacle before disconnecting the product from
the extension cord.
CAUTION: Keep the extension cord away from the cutting area and
position the cord so that it will not be a tripping hazard or contact
material being placed into or removed from the machine.
WARNING: To reduce the risk of electrocution, keep all connections
dry and off the ground. Do not touch plug with wet hands.
Ground Fault Circuit Interrupter (GFCI) protection should be provided
on the circuit(s) or outlet(s) to be used for the tile saw. Receptacles
are available having built-in GFCI protection and may be used for this
measure of safety.
RECOMMENDED EXTENSION CORD SIZES FOR USE WITH PORTABLE ELECTRIC TOOLS
GROUNDING INSTRUCTIONS
WARNING: THIS TOOL MUST BE GROUNDED WHILE IN USE TO
PROTECT THE OPERATOR FROM ELECTRIC SHOCK.
In the event of a malfunction or breakdown, grounding provides a path of least
resistance for electric current to reduce the risk of electric shock. This tool is
equipped with an electric cord having an equipment-grounding conductor
and a grounding plug. The plug must be plugged into a matching outlet that
is properly installed and grounded in accordance with all local codes and
895736 - 08-31-00.qxd 2/14/02 3:54 PM Page 5
Page 6

6
ordinances. Do not modify the plug provided – if it will not fit the outlet, have
the proper outlet installed by a qualified electrician. Improper connection of
the equipment-grounding conductor can result in risk of electric shock.
The conductor with insulation having an outer surface that is green with or
without yellow stripes is the equipment-grounding conductor. If repair or
replacement of the electric cord or plug is necessary, do not connect the
equipment-grounding conductor to a live terminal.
Check with a qualified electrician or service personnel if the grounding
instructions are not completely understood, or if in doubt as to whether the
tool is properly grounded.
Use only 3-wire extension cords that have 3-prong grounding type plugs and
3-pole receptacles that accept the tool’s plug. Repair or replace damaged or
worn cord immediately.
Grounded, cord-connected tools
intended for use on a supply circuit
having a nominal rating less than 150
volts: This tool is intended for use on a
circuit that has an outlet that looks like
the one illustrated in Fig. 1A. The tool
has a grounding plug that looks like the
plug illustrated in Fig. 1A. A temporary
adapter, which looks like the adapter
illustrated in Fig. 1B, may be used to
connect this plug to a 2-pole receptacle
as shown in Fig. 1B if a properly
grounded outlet is not available. The
temporary adapter should be used only
until a properly grounded outlet can be
installed by a qualified electrician. The
green-colored rigid ear, lug, and the
like, extending from the adapter must
be connected to a permanent ground
such as a properly grounded outlet box
cover. NOTE: In Canada, the use of a
temporary adapter is not permitted by
the Canadian Electric Code.
OPERATING INSTRUCTIONS
FOREWORD
Porter-Cable Model 1500 Tile Saw is designed to cut ceramic tile. The Model
1500 is powered by
1
¼2 horsepower motor. The tile saw has the capacity to
cut 14" in length, 10" diagonal cut, and 2" depth cut.
UNPACKING
1. Carefully remove the machine from the carton. We recommend you retain
all packing materials until after you have inspected and satisfactorily operated
the machine.
WARNING: Do not connect the machine to the power source until
you have read and understood this entire instruction manual.
6
Fig. 1B
GROUNDED OUTLET BOX
GROUNDING MEANS
ADAPTER
GROUNDED OUTLET BOX
Fig. 1A
CURRENT
CARRYING
PRONGS
GROUNDING PRONG
IS LONGEST OF THE 3 PRONGS
895736 - 08-31-00.qxd 2/14/02 3:54 PM Page 6
Page 7

7
Fig. 1
A
B
C
D
E
F
P
N
M
K
J
I
G
O
Q
R
7
2. Place the machine on a firm, level surface where there is plenty of room
for handling and properly supporting the workpiece.
3. Familiarize yourself with all features and controls as explained in this
manual.
4. Unassembled items are shown in Fig. 1, for identification and use in
assembling the saw.
ASSEMBLY
1. Locate and identify all parts.
2. Insert the plug (F) Fig. 1, into the
water tray (A) Fig. 1. The plug should
be inserted into the top of the water
tray as shown in Fig. 2.
ATTACHING THE MOTOR
TO THE SAW ARM
1. Place the motor on a flat surface.
2. Line up the 3 holes (A) Fig. 3, in
the motor, with the 3 holes (A) Fig. 4 in
the saw arm.
Fig. 2
Fig. 3
A
A Water tray (1)
B Cutting tray (1)
C Saw arm (1)
D Motor (1)
E Water pump (1)
F Water plug (1)
G
1
¼4-20 x 1¼2" Flathead screws
(5)
I Blade flange (2)
J Blade (1)
K Allen wrench (1)
M Flange wrench (1)
N Arbor wrench (1)
O Arbor nut (1)
P Rip guide (1)
Q Cable tie (3)
R Hose adapter (1)
B
Fig. 4
A
895736 - 08-31-00.qxd 2/14/02 3:54 PM Page 7
Page 8

88
3. Thread each screw (G) Fig. 1, through the holes in the saw arm to the
holes in the motor. WARNING: MAKE SURE THAT THE MOTOR
GROUNDING TAB (B) FIG. 3, STAYS IN PLACE WHEN ATTACHING THE
MOTOR TO THE SAW ARM, FOR THIS PROVIDES A MEANS OF
GROUNDING THE MOTOR.
4. Once the screws are threaded into the saw arm and motor, Fig. 5, tighten
securely.
ATTACHING SAW ARM TO THE CUTTING TRAY
1. Insert the water pump hose into the largest hole in the side of the cutting
tray (from the outside) Fig. 6, pull the hose through the hole.
2. Position the saw arm (C) Fig. 1, onto the cutting tray as shown in Fig. 7.
3. Insert the 2 screws (G) Fig. 1, through the 2 holes on the inside of the
cutting tray Fig. 8, and tighten securely.
4. Place the water pump (E) Fig. 1, into the bottom of the water tray Fig. 9.
5. Attach the water pump hose, from the saw, to the water pump with the
hose adapter (R) Fig. 1, as shown in Fig. 9.
Fig. 9
Fig. 8
Fig. 5
Fig. 6 Fig. 7
895736 - 08-31-00.qxd 2/14/02 3:54 PM Page 8
Page 9

99
6. Plug the water pump cord into the
motor plug receptacle see Fig. 10.
NOTE: Place cord through the cord
slot Fig. 11A, in the water tray.
WARNING: ONLY PLUG WATER
PUMP CORD INTO MOTOR
RECEPTACLE.
7. Loosen the water hose clamp (A)
Fig. 11B, and insert cable tie (Q) Fig.
1, through the water hose clamp.
Secure water pump cord and motor
cord to saw arm with cable tie as
shown in Fig. 11C. Tighten the water hose clamp (A) Fig. 11B.
8. Secure water pump hose and cord to the cutting tray frame with cable tie
(Q) Fig. 1, as shown in Fig. 11D.
ATTACHING THE SAW BLADE
NOTE: Use only continuous wet
cut diamond blades rated at 6000
RPMs or greater.
1. Loosen knob (A) Fig. 12, and open
the blade cover.
Fig. 12
A
Fig. 11B
Fig. 11D
Fig. 10
Fig. 11A
Fig. 11C
A
895736 - 08-31-00.qxd 2/14/02 3:55 PM Page 9
Page 10

1010
2. Place the inner flange (I) Fig. 1, onto
the motor arbor as shown in Fig. 13.
3. Place the blade (J) Fig. 1, onto the
motor arbor. NOTE: Make sure the
blade is placed on the arbor with the
arrow on the blade facing counterclockwise, as shown in Fig. 14.
4. Place the outer flange (I) Fig. 1,
onto the motor as shown in Fig. 15.
5. Tighten the arbor nut (O) Fig. 1,
onto the arbor Fig. 16 using the 2
wrenches provided (M,N) Fig. 1. NOTE: Wrench (M) Fig. 1, is used to hold the
arbor in place while wrench (N) Fig. 1, is used to tighten the arbor nut onto the
arbor.
6. Close blade cover and tighten blade cover knob (A) Fig. 12.
7. Attach the rip guide (P) Fig. 1 to the cutting tray by loosening the locking
knob and placing the rip guide onto the front of the cutting tray and tighten
the locking knob Fig 17.
STARTING AND STOPPING MACHINE
CAUTION: Make sure switch is OFF and power circuit voltage is the
same as that shown on the specification plate.
Connect machine to power circuit. NOTE: To avoid the possibility of the
appliance plug or receptacle getting wet, position tile saw to one side of a wall
mounted receptacle to prevent water from dripping onto the receptacle or
plug. The user should arrange a “drip loop” Fig. 18, in the cord connecting the
saw to a receptacle. The “drip loop” is that part of the cord below the level of
Fig. 15
Fig. 16
Fig. 13
Fig. 14
Fig. 17
895736 - 08-31-00.qxd 2/14/02 3:55 PM Page 10
Page 11

1111
the receptacle, or the connector if an
extension cord is used, to prevent
water traveling along the cord and
coming in contact with the receptacle.
1. To start the machine, slide the
switch button (A) Fig. 19, down until
the switch locks into the ON position.
2. To stop the machine, press on the
upper end of the switch button (A) Fig.
20.
LOCKING SWITCH IN THE
“OFF” POSITION
IMPORTANT: When the tool is
not in use, the switch should be
locked in the OFF position using a
padlock (A) Fig. 21, to prevent
unauthorized use of the tool.
OPERATING TILE SAW
Before operating the tool, make sure
the tile saw is assembled properly.
Fill water tray to fill line and be sure
pump is totally submerged. Check
water level and operation of pump
before each use.
To cut tile, place the tile on the cutting
tray and turn the machine on. Hold the
tile firmly against the cutting tray with
both hands. WARNING: Make sure
your fingers and hands are not in the
cutting line of the blade (A) Fig. 22A.
Push the cutting tray forward towards the blade, feed the tile slowly and evenly
into the cutting blade until the tile has been cut through completely. Pull the tray
backwards until the cutting tray is in the rear most position and remove the cut
tile.
Fig. 22A
A
Fig. 21
A
Fig. 19
Fig. 20
A
A
Fig. 18
895736 - 08-31-00.qxd 2/14/02 3:55 PM Page 11
Page 12

12
12
WATER PUMP
The flow rate dial (A) Fig. 22B, should be set on the maximum setting.
RIP GUIDE
The rip guide is used to make precision cuts. Position the rip guide on the
cutting tray scale, to the amount of tile to be cut off. Hold the tile against the
rip guide and the cutting tray and proceed to cut the tile as discussed in the
section “OPERATING TILE SAW.”
MAINTENANCE
KEEP TOOL CLEAN
Periodically blow out all air passages with dry compressed air. All plastic parts
should be cleaned with a soft damp cloth. NEVER use solvents to clean plastic
parts. They could possibly dissolve or otherwise damage the material.
The cutting tray can be detached by pulling the locking pin (A) Fig. 23 out, so
that the tray can slide off the rail, for cleaning purposes. Change water in
water tray daily. Do not leave water in water tray overnight.
WARNING: DO NOT CUT TILE WITHOUT USING THE TILE
CUTTING TRAY.
CAUTION: Wear safety glasses while using compressed air.
Fig. 23
A
Fig. 22B
A
895736 - 08-31-00.qxd 2/14/02 3:55 PM Page 12
Page 13

13Ê13ÊÊ
FAILURE TO START
Should your tool fail to start, check to make sure the prongs on the cord plug
are making good contact in the outlet. Also, check for blown fuses or open
circuit breakers in the line.
LUBRICATION
This tool has been lubricated with a sufficient amount of high-grade lubricant
for the life of the unit under normal operating conditions. No further lubrication
is necessary.
BRUSH INSPECTION AND LUBRICATION
For your continued safety and electrical protection, brush inspection and
replacement on this tool should ONLY be performed by an AUTHORIZED
PORTER-CABLE SERVICE STATION or a PORTER-CABLE SERVICE
CENTER.
At approximately 100 hours of use, take or send your tool to your nearest
Authorized Porter-Cable Service Station to be thoroughly cleaned and
inspected; worn parts replaced, when necessary, relubricated with fresh
lubricant, if required; reassembled with new brushes; and performance tested.
Any loss of power before the above maintenance check may indicate the need
for immediate servicing of your tool. DO NOT CONTINUE TO OPERATE TOOL
UNDER THIS CONDITION. If proper operating voltage is present, return your
tool to the service station for immediate service.
SERVICE AND REPAIRS
All quality tools will eventually require servicing or replacement of parts due to
wear from normal use. These operations, including brush inspection and
replacement, should ONLY be performed by either an AUTHORIZED
PORTER-CABLE SERVICE STATION or a PORTER-CABLE SERVICE
CENTER. All repairs made by these agencies are fully guaranteed against
defective material and workmanship. We cannot guarantee repairs made or
attempted by anyone other than these agencies.
Should you have any questions about your tool, feel free to write us at any
time. In any communications, please give all information shown on the
nameplate of your tool (model number, type, serial number, etc.).
ACCESSORIES
The testing of this tool has been accomplished with the following accessories.
For safest operation, it is recommended that only these accessories be used
with this product.
WARNING: Since accessories other than those listed have not been
tested with this product, use of such accessories could be
hazardous.
87027 7" Wet Cutting Diamond Blade
895736 - 08-31-00.qxd 2/14/02 3:55 PM Page 13
Page 14

P
P
14Ê
14ÊÊ
PORTER-CABLE LIMITED ONE YEAR WARRANTY
Porter-Cable warrants its Professional Power Tools for a period of one year from the date of original
purchase. We will repair or replace, at our option, any part or parts of the product and accessories
covered under this warranty which, after examination, proves to be defective in workmanship or
material during the warranty period. For repair or replacement, return the complete tool or accessory,
transportation prepaid, to your nearest Porter-Cable Service Center or Authorized Service Station.
Proof of purchase may be required. This warranty does not apply to repair or replacement required
due to misuse, abuse, normal wear and tear or repairs attempted or made by other than our Service
Centers or Authorized Service Stations.
ANY IMPLIED WARRANTY, INCLUDING THE IMPLIED WARRANTIES OF MERCHANTABILITY AND
FITNESS FOR A PARTICULAR PURPOSE, WILL LAST ONLY FOR ONE (1) YEAR FROM THE DATE
OF PURCHASE.
To obtain information on warranty performance please write to: PORTER-CABLE CORPORATION,
4825 Highway 45 North, P.O. Box 2468, Jackson, Tennessee 38302-2468; Attention: Product Service.
THE FOREGOING OBLIGATION IS PORTER-CABLE’S SOLE LIABILITY UNDER THIS OR ANY
IMPLIED WARRANTY AND UNDER NO CIRCUMSTANCES SHALL PORTER-CABLE BE LIABLE FOR
ANY INCIDENTAL OR CONSEQUENTIAL DAMAGES. Some states do not allow limitations on how
long an implied warranty lasts or the exclusion or limitation of incidental or consequential damages,
so the above limitation or exclusion may not apply to you.
This warranty gives you specific legal rights and you may also have other legal rights which vary from
state to state.
895736 - 08-31-00.qxd 2/14/02 3:55 PM Page 14
 Loading...