

Portek ScatterBird MK4 Operator's Handbook Manual

GAS POWERED BIRD SCARER
MARK 4
ALWAYS WEAR SAFETY PROTECTION
TO HSE/EN SPECIFICATIONS
Operator’s
Handbook
portek.co.uk

2
Contents
Important Safety Information Page 3
Setting Up & Assembly Page 4
Barrel Assembly Page 5
12v Power Source (External) Page 5
12v Power Source (Internal) Page 6
Gas Connection Page 8
Leg Assembly Page 9
App Installation & Set-Up - iOS/iPhone Page 10
Checking the Scatterbird App Will Work Page 10
Checking that Bluetooth is Active Page 11
Downloading the Scatterbird App Page 12
Things to Check Before Running the App Page 13
App Installation & Set-Up - Android Page 14
Checking the Scatterbird App Will Work Page 14
Downloading the Scatterbird App Page 16
Checking that Bluetooth is Active Page 17
Things to Check Before Running the App Page 18
Using the Scatterbird App Page 19
App Overview Page 19
Weekly Program Page 21
Daily Program Page 25
Connecting to Scatterbird Page 27
Multiple Scatterbirds Page 31
Additional App Features Page 33
Changing the Pin Code Page 33
Multiple Phones Page 34
Troubleshooting Page 36
Scatterbird MK4 Wiring Diagram Page 41
Scatterbird MK4 Parts List & Diagram Page 42
EC Certificate of Conformity Page 44
Scatterbird MK4 Specifications Page 44
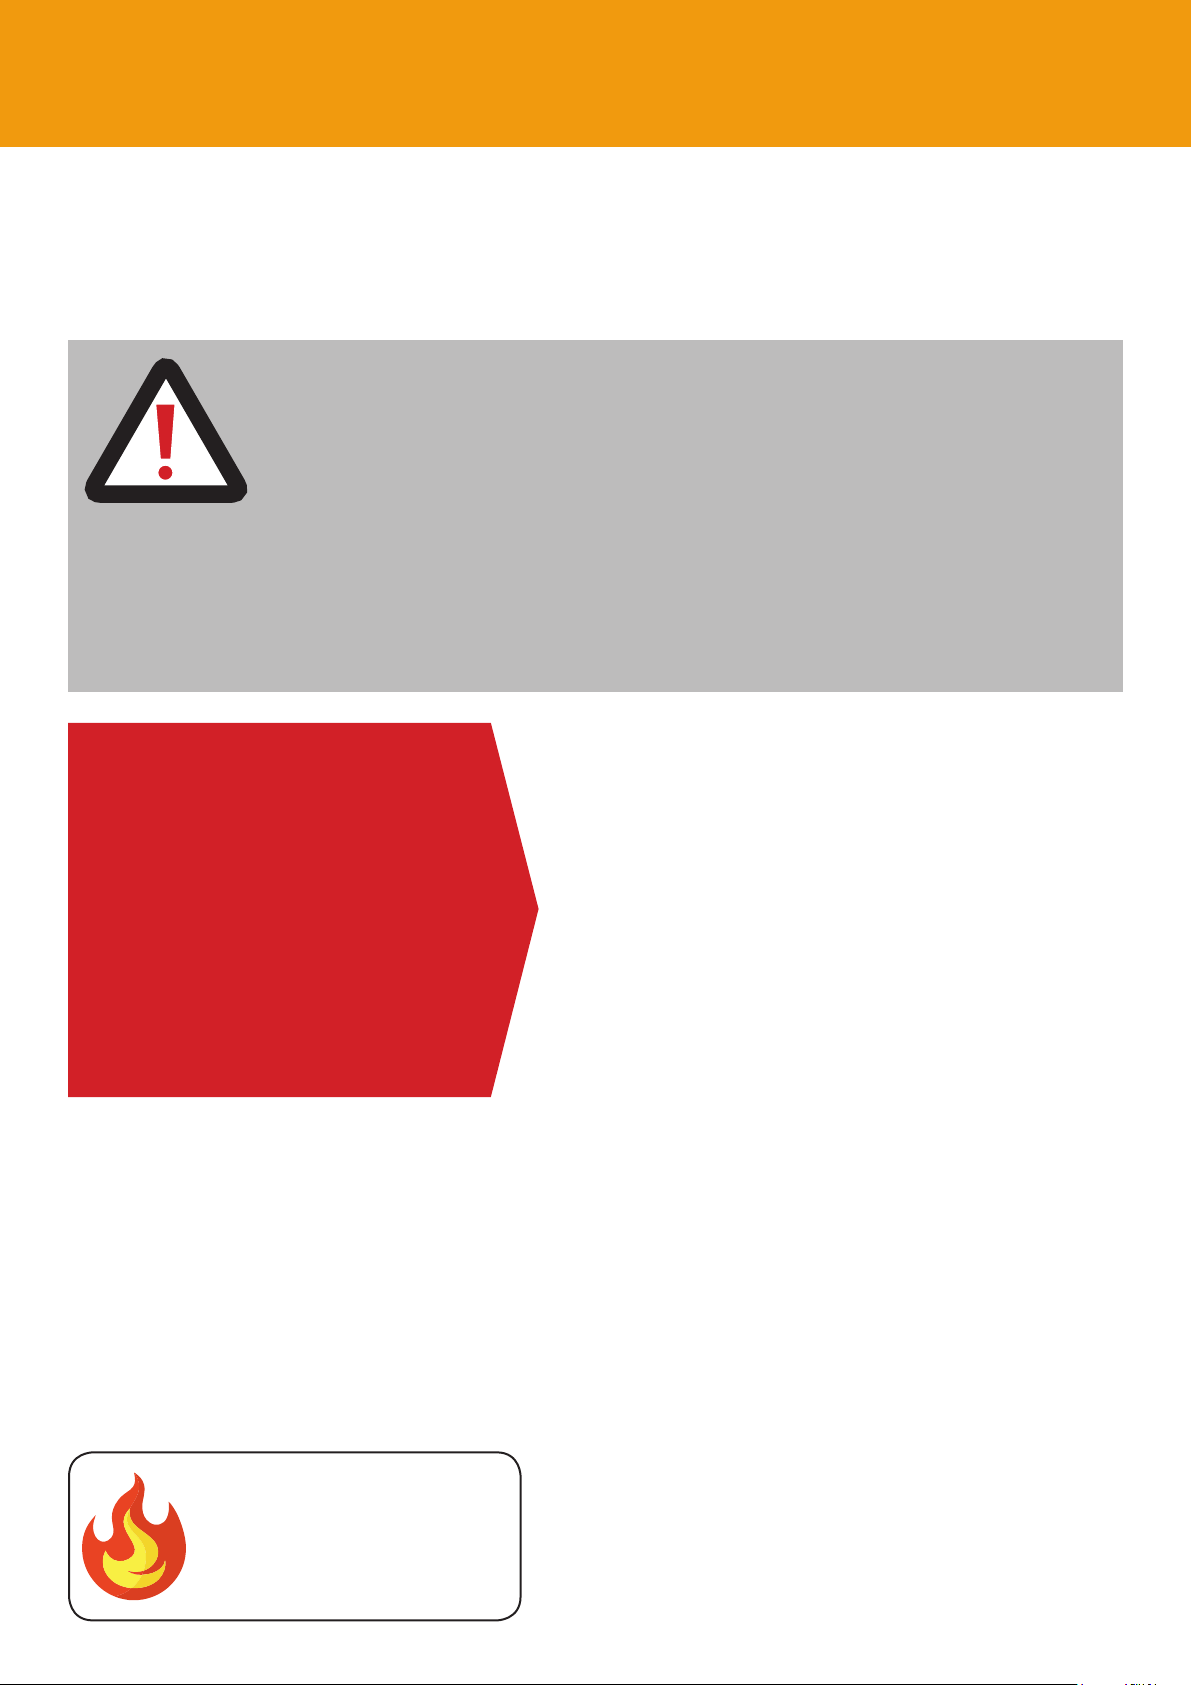
Important safety information
SAVE THESE INSTRUCTIONS FOR FUTURE REFERENCE
Please refer to the safety instructions, assembly instructions and parts list before setting-up, operating,
maintaining and cleaning your Scatterbird MK4. Keep this Instruction Manual safe so you may refer to it
at any time.
Safety Rules
WARNING
Read and understand all the instructions before use.
Failure to follow the instructions in this manual may cause
fire, hearing loss or other injury.
3
This machine is strictly to be operated by one person.
Never place any object in front of or inside the barrel.
The Scatterbird MK4 is designed to make
WARNING:
When using this machine,
basic safety precautions should
be followed to reduce risk of
personal injury and machine
damage. Read all instructions
thoroughly before attempting
to operate the machine.
1. Keep the work space free from obstacles which could cause an accident. Ensure a clear working area of at
least 2m is maintained to eliminate risk of fire.
2. Keep children away from the machine. Children should never be allowed near to the machine or to operate
the machine.
3. Safety equipment must be used. When operating the Scatterbird MK4 earmuffs should be worn, see above.
4. Only genuine Scatterbird MK4 accessories and parts can be used as replacements.
5. MAINTENANCE: For your own safety, the care and maintenance of the Scatterbird MK4 should be on a regular basis.
6. This machine can only be used to scare birds. Using the Scatterbird MK4 in other ways may cause injuries or
damage to property and invalidate any guarantee.
7. ATTENTION: the warnings, alerts and instructions in this manual cannot cover all situations. The operator must use
basic common sense and caution at all times.
loud bangs for scaring birds. The use
of ear defenders to protect hearing is
recommended for anyone operating or
likely to be near a unit which is operating.
We recommend hearing muffs to:
BS EN 352-1:2002 with a noise reduction
rating of 30 or above.
WARNING FIRE RISK
ALWAYS KEEP A 2 METRE
CLEAR AREA AROUND
THE SCATTERBIRD MK4
Portek cannot be held liable for any injuries or damages that may occur, if the
Scatterbird MK4 is used in any inappropriate way, and/or if the device has
been modified in any way.
© Copyright 2018
Nothing within this edition may be copied, reproduced or stored onto a
retrieval system without the written approval of Portek. Specifications,
descriptions and illustrative material in this manual are as accurate as known
at the time of publication, but are subject to change without notice.
4
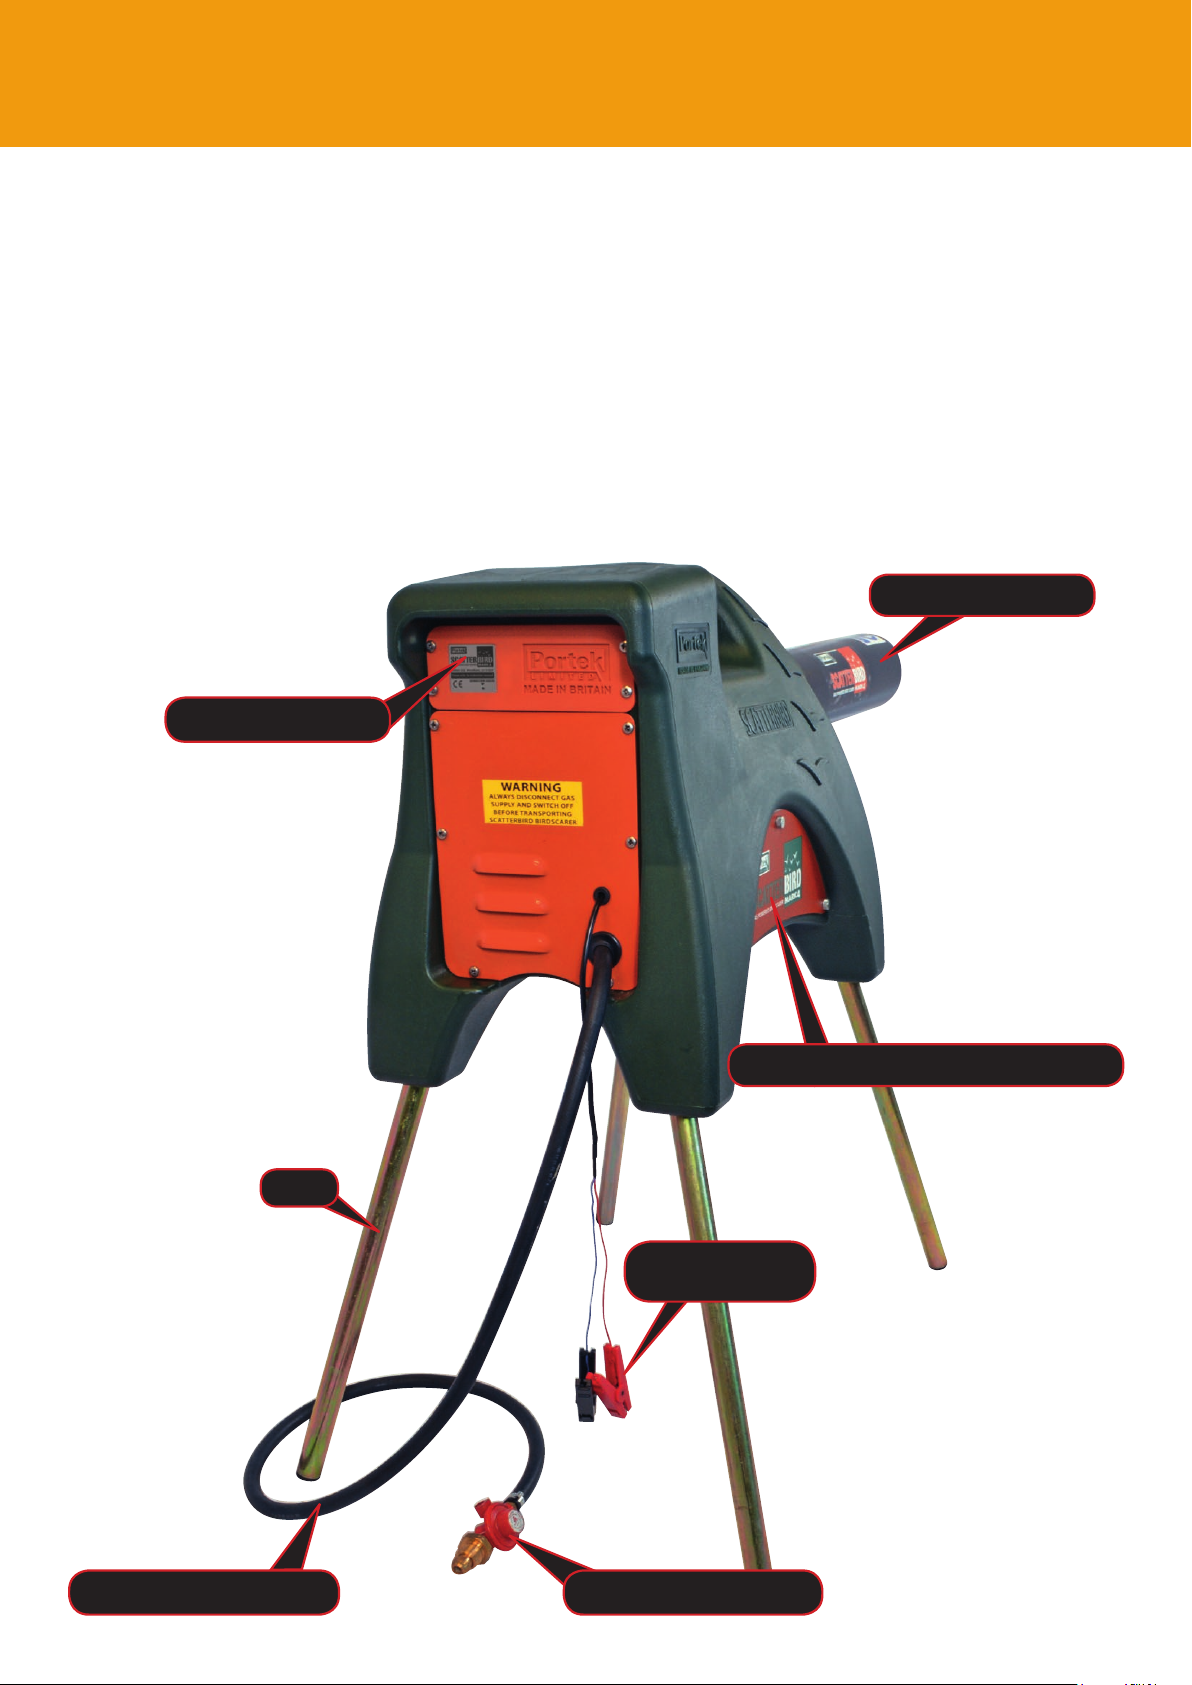
Setting up and assembly
The Scatterbird MK4 comes almost fully assembled.
The Scatterbird MK4 follows in the Portek line of propane operated guns, which have set the industry
standard for Birdscaring for decades. The Scatterbird MK4 is the new generation model. It has a robust
polyethylene moulding with a stainless steel barrel and fittings. This is complemented with state of the
art electronics to enable a wide range of easily programmed features.
Though the Scatterbird MK4 is an easy to operate machine we recommend reading this instruction book
fully before operating. It covers safe use, setup, programming and a troubleshooting guide. Please keep
this instruction book safe for future use should it be needed.
“Sounding” Barrel
Bluetooth Receiver
Legs
Internal 12v Battery Compartment
12v Power Lead
(with Crocodile Clips)
Propane Gas Feed Pipe
“POL” Type Regulator

Setting up and assembly
Barrel Assembly
Assembly of the barrel to the main unit is done by
using the pre-drilled holes and the two 8mm self
tapping screws provided. Remove the screws from
the inner barrel (where they have been placed for
transportation).
1 2
5
Slide the plastic “sounding” barrel over the
stainless steel inner barrel, carefully lining up the
holes, before screwing the screws back through
the holes to secure the plastic part of the barrel.
12V Power Source Assembly
The Scatterbird MK4 requires a 12V power supply
to drive the electronics. There are two options
available:
1. Using the Supplied 12V Lead
Complete with crocodile clips, these leads
are already attached to the electronics of the
Scatterbird unit. You simply need to connect the
red to the positive terminal and the black to the
negative terminal of your own 12V battery.
Please make sure that the battery is in good
condition. If it is old then it may not hold charge
and the voltage will drop quickly. If this happens
then the electronics will not operate.
For safety the electronics will not operate the gas
gun when the voltage drops below 10V.
6
Setting up and assembly
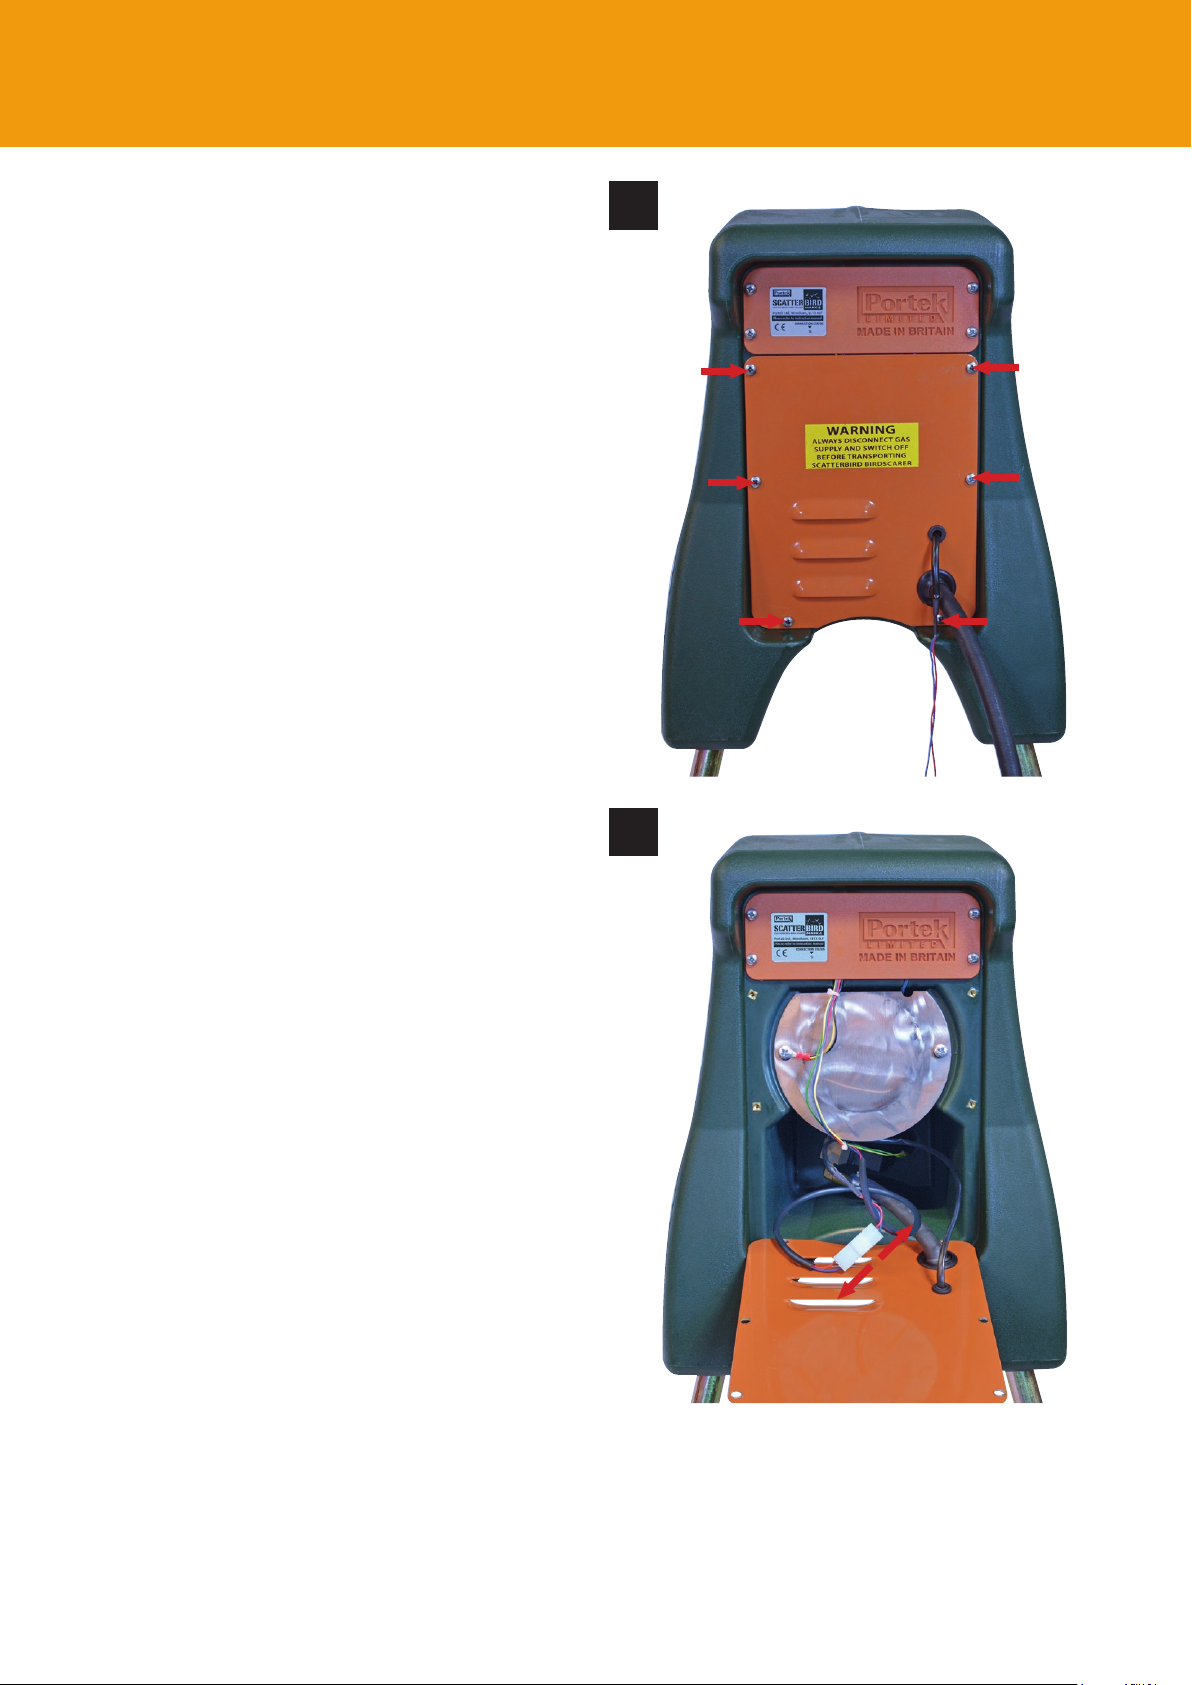
2. Using the Rechargeable Battery
The advantage of this is that the unit is much
more transportable. The battery will have
sufficient capacity to last a number of weeks, even
when the unit is set to fire frequently. The battery,
charger and short battery lead needed are all
available as accessories from Portek Ltd.
To use the rechargeable battery firstly remove the
bottom back panel by undoing the 6 screws. Pull
apart the white connector block that holds the
main wiring harness to the crocodile battery lead.
DO NOT pull apart by holding the wires, hold the
connector block.
Note: The now unused crocodile lead can be tidied
with a cable tie for future use, or, if wanted, can
be removed completely from the unit. To do this
remove the spade terminals from the crocodile
clips, then feed the wires through the backplate.
This needs to all be done before the backplate
is re-attached to the unit. The wires can then be
stored for use later if required.
1
2
Setting up and assembly
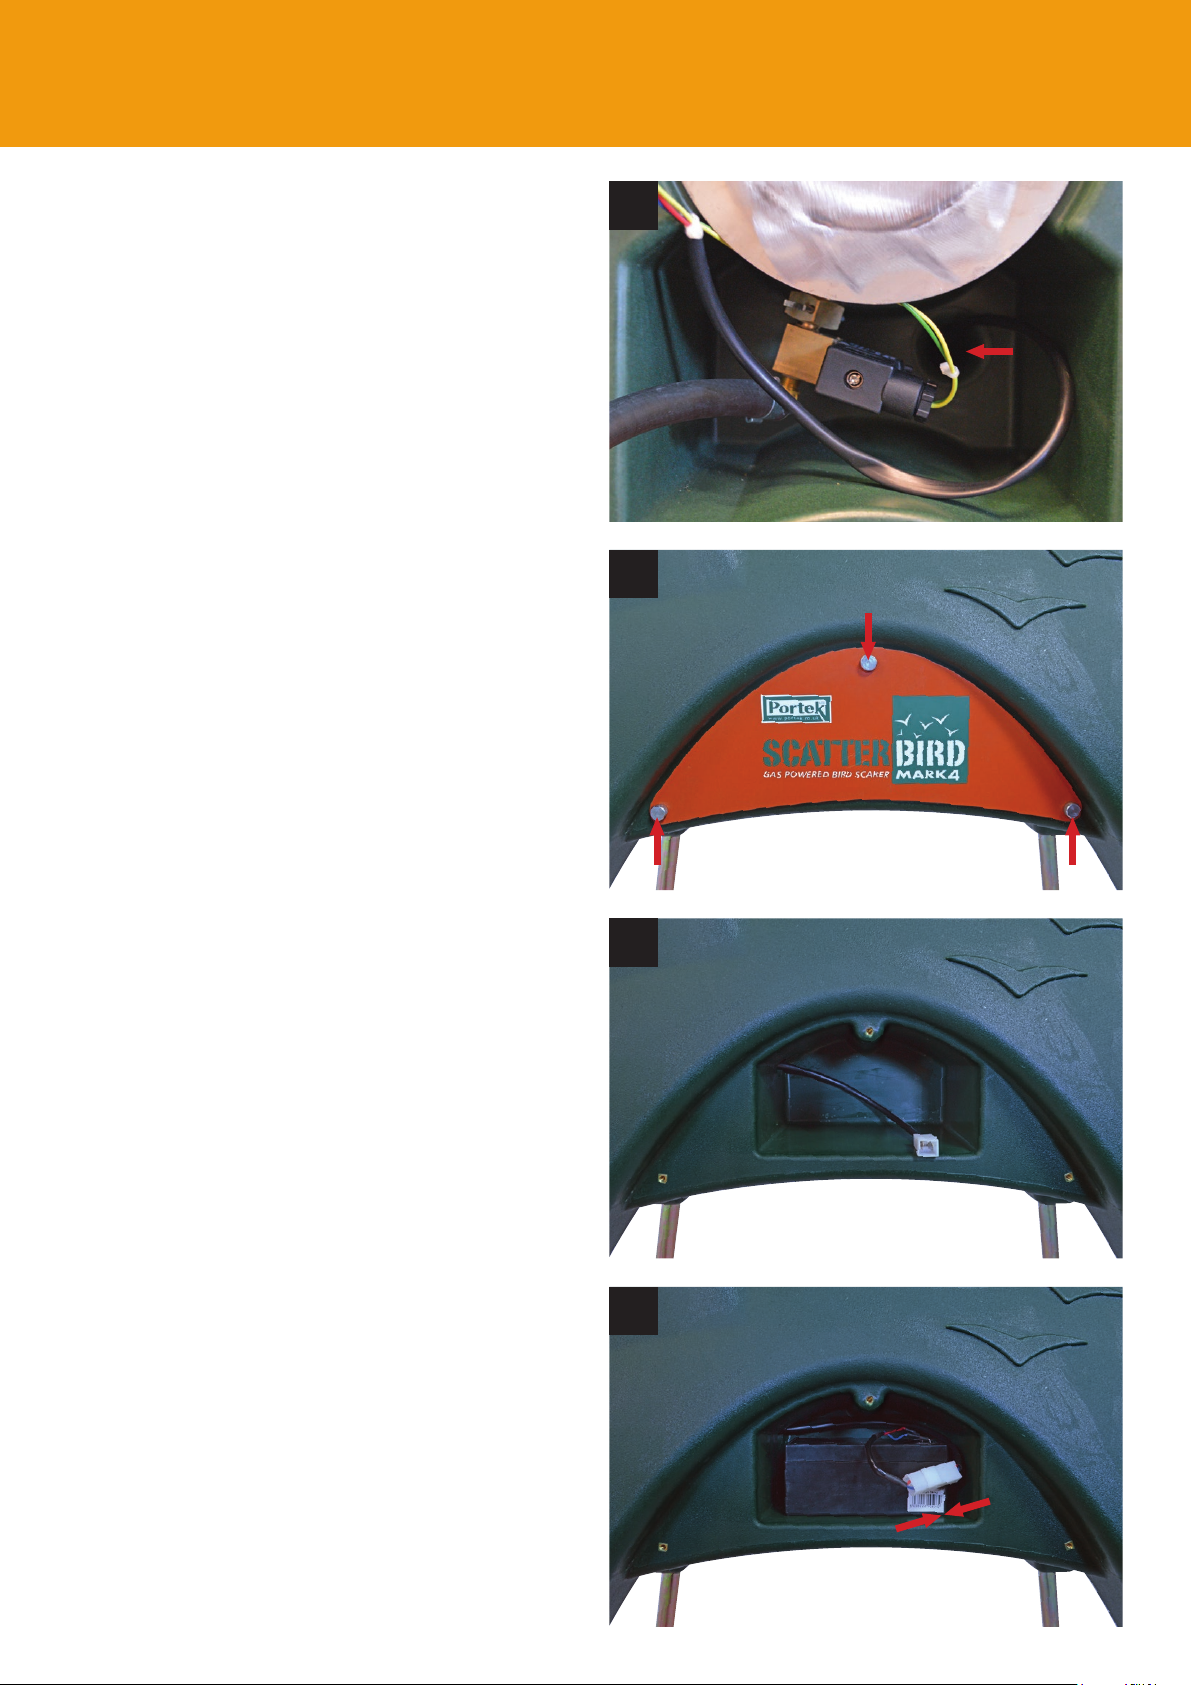
7
Feed the connector block on the wiring harness
through the moulded in hole at the back right of
the moulding (Photo 3).
Undo the side panel of the machine. This can be
done by undoing the 3 screws on the side of the
Scatterbird MK4 unit (Photo 4).
3
4
Attach the short battery lead connector block to
the wiring harness connector block, which you
have fed through into this side cavity (Photo 5).
Make sure that you have the pip on the connector
blocks matched together. These ensure that the
polarity of the wires is correct when they are
connected to the battery (Photo 6). The spade
connectors on this short lead can now be attached
to the rechargeable battery. Make sure that the
red wire is connected to the red, positive terminal
and the blue wire is attached to the black,
negative terminal. The battery can then be placed
in the housing and the side panel replaced.
5
6
8
Setting up and assembly
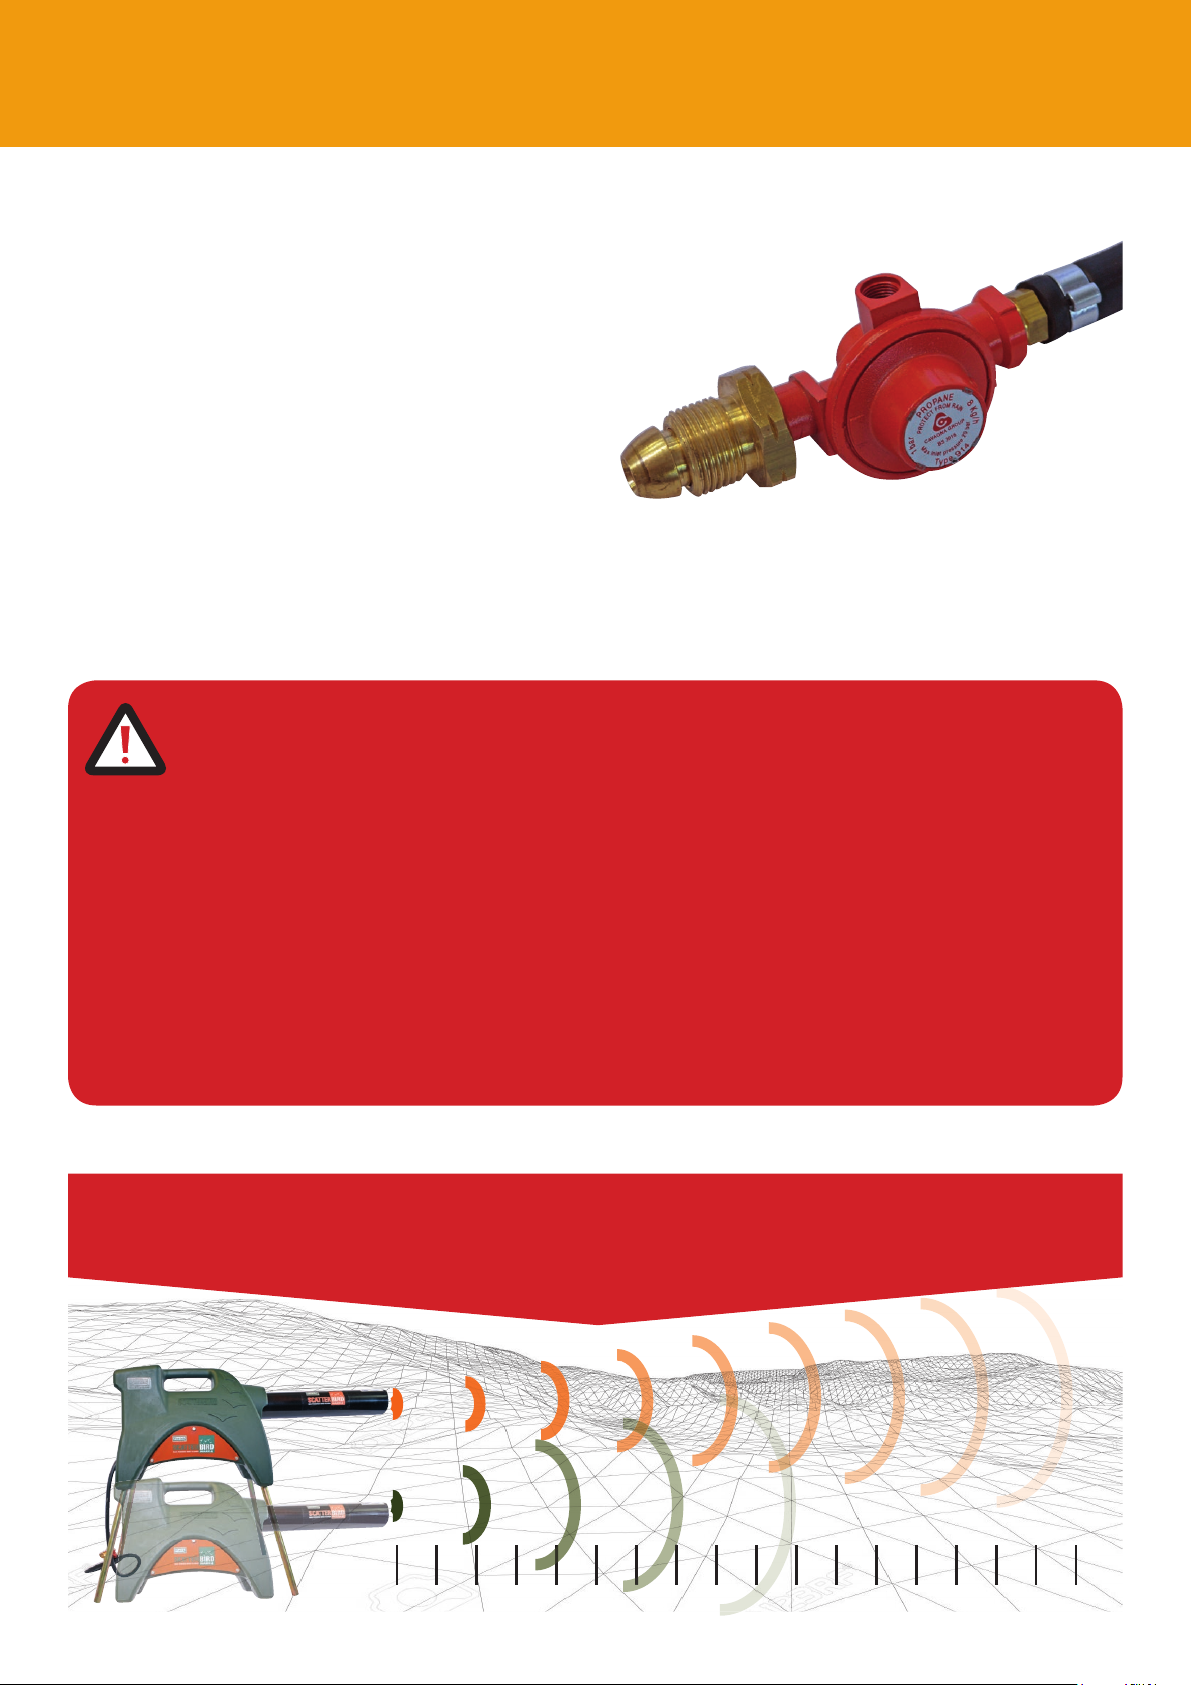
Gas Connection
The unit comes with a standard “POL” type
regulator, which is fi xed at 1 bar of pressure.
DO NOT use any other type of regulator. The gas
regulator can be attached to any size of propane
gas bottle that has a POL connection (this is the
standard type used in UK).
When the regulator is connected make sure that
the fi tting is tight and that there is no gas leakage.
You can do this by using a leak detecting fl uid
to make sure no bubbles are visible at the joint
(alternatively some washing up liquid with a small
amount of water is also very effective).
WARNINGS:
1. When the regulator is not connected to a gas bottle protect it from ingress of dust or dirt
by placing it in a plastic bag, if possible, tying off the open end with a piece of string,
elastic band or similar. Though the regulator and the solenoid valve have fi lters in them
to stop dirt blocking the solenoid or jet it is always better to avoid getting debris into the
gas line in the fi rst place. If it’s not there it cannot block anything! Failure to keep the gas
line clean could lead to the solenoid being held open when it should be closed, potentially
causing a fi re.
2. When the unit is being transported always ensure that the gas is turned off at the gas
bottle.
The Scatterbird MK4’s legs raise the unit off the ground and allow
the full force of the “BANG” to be heard with maximum effect.

Setting up and assembly
9
Leg Assembly
The four legs supplied can be used at the
discretion of the user. The advantage of using
them is twofold. Firstly they will extend the
area that the Scatterbird MK4 will be effective.
Secondly they will lift the main unit off the
ground, avoiding ground water. Attaching the legs
is quite simple.
Firstly align a leg with the moulded-in insert that
it will slide into. These all have an angle to them
as can be seen from the picture of the complete
unit.
1
2
Press the sprung loaded pips into the leg so you
can start to ease the leg into the main unit
(Photo 2 & 3). It can be easier to do this one pip
at a time, twisting the leg slightly to get the pip to
go in.
When the pips are in, the leg can be pushed as
far as it will go (Photo 4). You may well be able
to feel when the pips locate in a groove in the
inside of the moulded-in metal inserts. Repeat this
process for all four legs.
Leg Removal
3
4
If you want to remove the legs then they will pull
straight out, the sprung loaded pips releasing the
legs from the main unit.

10
App installation and set up - iOS
Checking the Scatterbird App
will run on your iPhone
The Scatterbird MK4 can only
be used with phones that have
the capabilities necessary. It
can be used with iPhones that
have software version ‘iOS 9’
or higher. If you need to check
to see what version your smart
phone is then the below details
will help you do this:
1. From the home page of your
iPhone click on the “Settings”
icon (Fig 1). Depending on
how you have your iPhone
set up, this may appear in
a different location and you
may need to slide the screen
to left or right to see the icon.
Fig 1 Fig 2
Fig 3 Fig 4
2. Next click on the “General”
icon to see the general phone
settings information screen
(Fig 2). You may need to
scroll up or down to fi nd it.
3. Select the “About” option
(Fig 3). Click on this to get to
the next screen. Once again
you may need to scroll up or
down to fi nd it.
4. Locate the iOS software
version information by
scrolling up or down. On this
example the iOS software
version is shown as 11.4.1
(Fig 4). The fi rst part of the
version, 11 in this case,
means that the App will run
on the phone because it is
higher than 9.
Remember: You may be able to view the complete screen, but
you may need to scroll up/down to see all the different items.
App installation and set up - iOS
11
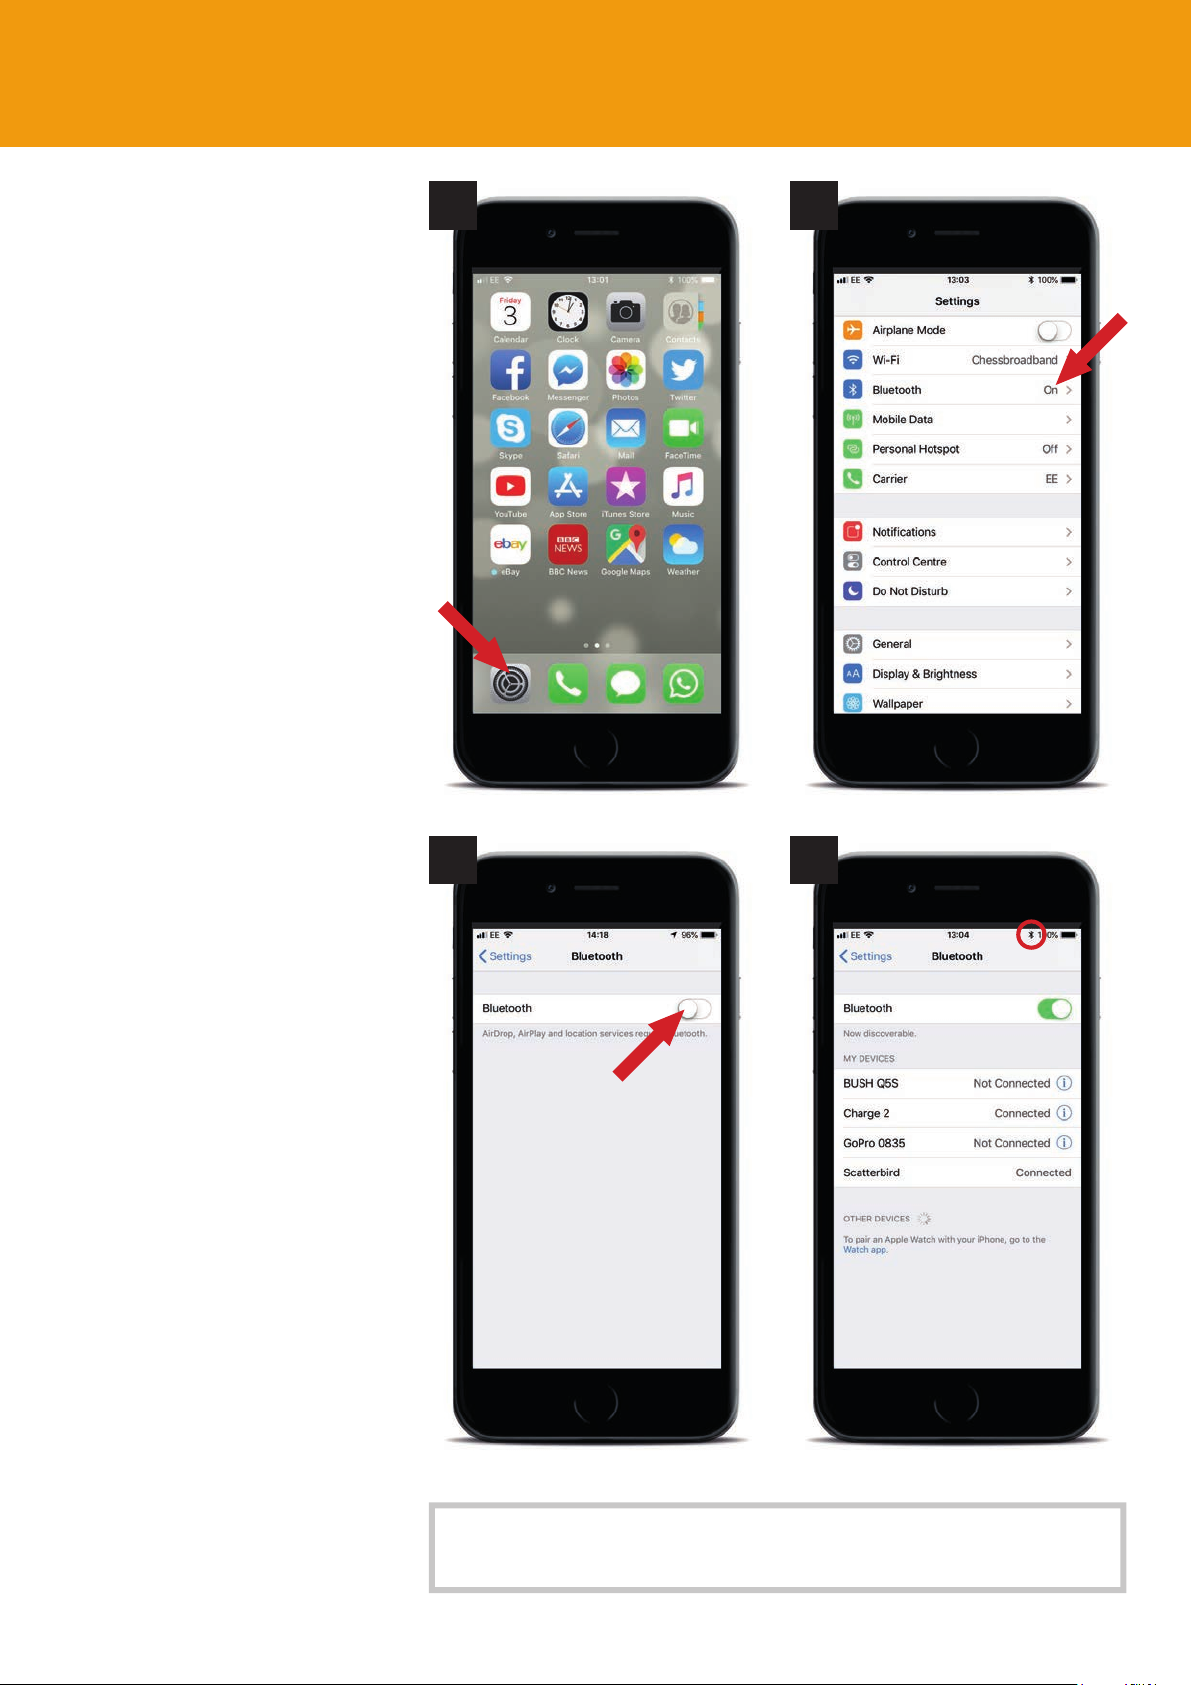
Checking that Bluetooth is
active on your iPhone
Your iPhone talks to the
Scatterbird MK4 using Bluetooth.
Make sure that Bluetooth is
switched on.
1. From the home page of your
iPhone click on the “Settings”
icon (Fig 1). Depending on
how you have your iPhone
set up, this may appear in
a different location and you
may need to slide the screen
to left or right to see the icon.
2. Find the “Bluetooth” icon.
You may need to scroll up or
down to fi nd it. Check to the
Bluetooth is switched on, if
it is active you should see
“On” to the right hand of the
Bluetooth icon (Fig 2).
Fig 1 Fig 2
Fig 3 Fig 4
3. If Bluetooth is switched off,
click the icon, then the on/
off switch, your Bluetooth
should now become active
and a list of Bluetooth devices
will appear below the on/
off switch. The Bluetooth
icon will also appear in the
top right hand of the phone
screen (Circled, Fig 4).
Your phone should now be ready
for starting the Scatterbird App!
Remember: You may be able to view the complete screen, but
you may need to scroll up/down to see all the different items.
12
App installation and set up - iOS
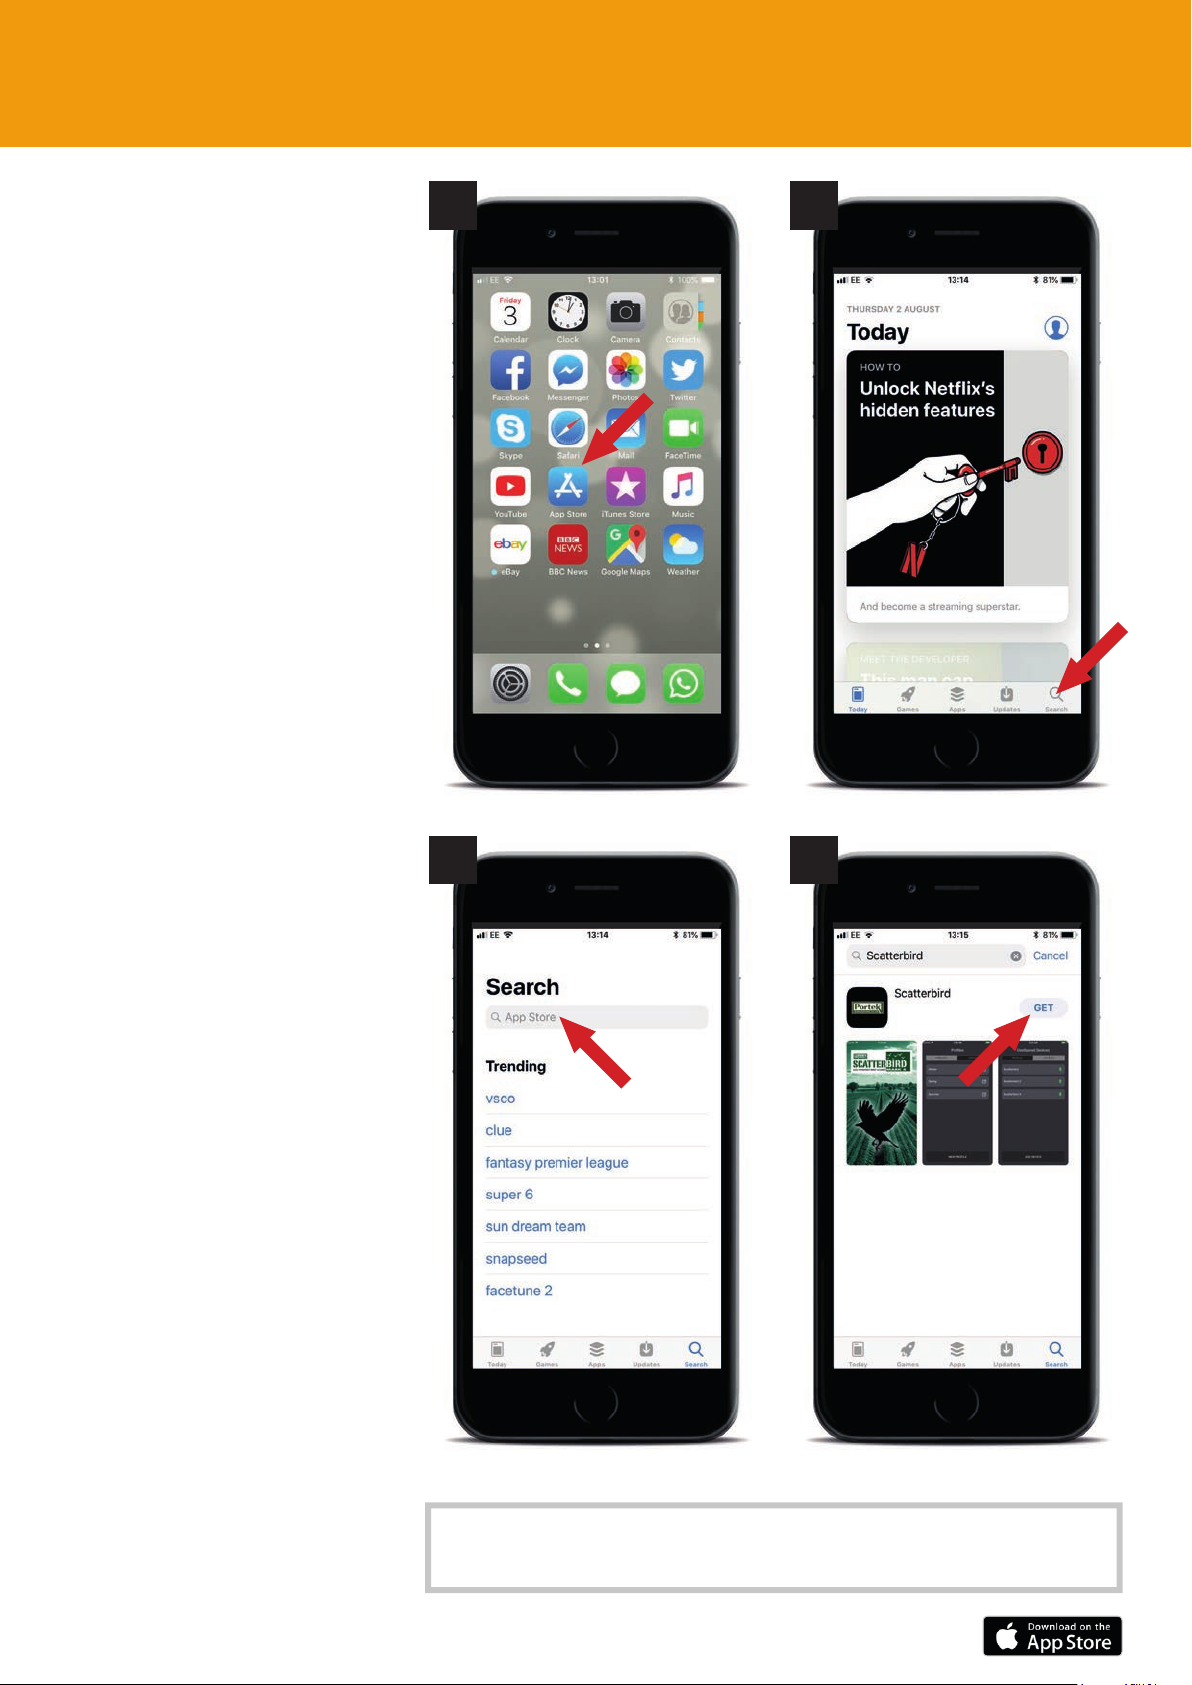
Downloading the Scatterbird
App to your iPhone
1. To download the Scatterbird
App click on the “App Store”
icon on the home page
of your iPhone (Fig 1).
Depending on how you have
your iPhone set up, this may
appear in a different location
and you may need to slide
the screen to left or right to
see the icon.
2. On entering the App Store,
click on the “Search” icon,
then type “Scatterbird” into
the search bar (Fig 2 & 3).
Fig 1 Fig 2
3. The App will come up in
the search, you can either
click the “GET” button (Fig
4) to download it instantly
or click the icon to fi nd out
more about the application,
including it’s features, ratings
and update history.
Fig 3 Fig 4
Remember: You may be able to view the complete screen, but
you may need to scroll up/down to see all the different items.

App installation and set up - iOS
13
4. While in the main information
pages you can also download
the App by clicking on “GET”
(Fig 5).
5. Once the App has download,
it can be found on the home
page of your iPhone. Simply
click the “Scatterbird” App
icon to launch the programme
(Fig 6).
Fig 5 Fig 6
Remember: You may be able to view the complete screen, but
you may need to scroll up/down to see all the different items.
Things to check before running the Scatterbird App on your iPhone
For the dawn and dusk feature to work, your
phone needs to be connected to either your phone
network or the internet when you program the
profi les.
From the comfort of your home, you can easily set
up the profi les, and then later send them to your
Scatterbird when in the fi eld. Your Scatterbird MK4
will function 100% without this feature if you are
not connected to the internet when programming.

14
App installation and set up - Android
Checking the Scatterbird App
will run on your Android
Phone
The Scatterbird MK4 can only
be used with phones that have
the capabilities necessary. It can
be used with many phones that
are not “Windows”. These are
all called Android because this
is the software they all use. So,
if it’s made by Samsung, HTC,
Nokia, Sony, etc. if they are not
a “Windows” phone, then they
will be an “Android” phone.
Android phones must have
software version ‘4.4’ or higher
and have ‘Bluetooth Low Energy’
(Bluetooth 4.0 or higher). If
you need to check to see what
version your smart phone is then
the below details will help you
do this:
Fig 1 Fig 2
Fig 3 Fig 4
1. Press the icon on the main
screen. This will bring up the
main menu of items on your
phone. Scroll around until you
find the “Settings” icon and
click to get to the next screen
(Fig 1).
2. Scroll to find the “About
Phone” listing and click it
(Fig 2).
4. Find “Software Information”
and click it (Fig 3).
5. Locate the Android software
version information. This
needs to be 4.4 or higher.
On this example the software
version is shown as 8.0.0
(Fig 4).
Remember: You may be able to view the complete screen, but
you may need to scroll up/down to see all the different items.
 Loading...