

Page 1

PORTATREE PROFESSIONAL MANUAL
The Portatree Professional Drag Racing Timing System can be used “Stand Alone”
(without the use of a Personal Computer) or with an IBM Compatible Personal Computer
connected through Com Port 1 or 2 to the Portatree Professional. We recommend using a
Personal Computer if you intend to have over 100 entries. See the Specifications that we
recommend for your computer before your buy one and make sure that you run the viewing
screen in 800 x 600 resolution.
SETTING UP THE PERSONAL COMPUTER SOFTWARE:
The software for the Portatree Professional is available in 3 different combinations; 1.)
Database only, 2.) Database and Scoreboard Drivers 3.) Database, Scoreboard Drivers, and
Qualifying / Ladders. Another option that can be purchased separately is Auto Start, which is
available in options 2 & 3. The software is sent in CD Rom only and the disk containing the
Registration Key (Ptspro.ini File) which must be loaded manually into the C:\Windows
directory. This file is necessary to create the link between the Personal Computer and the
Portatree Professional Drag Race Computer.
You should first load the CD Rom that comprise Paradox Runtime. This contains the
Post Process Program and the Drag Race Program (“Ptree.exe”). See the Post Process
Program Installation Instructions on Page 8 of this manual. The Post Process Program is run in
conjunction with Paradox Runtime while the Drag Race Program runs without the need to start
Paradox Runtime.
You can Drag and Drop Shortcut Icons onto your main screen in Windows ’95 or ’98 by
opening up the Windows Explorer. Find the ptree.exe file (should be in C:\portatree\) and the
Pdxrwn32.exe file (should be in C:\Program Files\Borland\Paradox9 Runtime). Left Click (Hold
Left Mouse Button Down) and drag the file name onto the Main Screen. You can rename the
Icon Drag Race Program (ptree.exe) and Post Process Program (Pdxrwn32.exe).
CONNECTING THE PORTATREE PROFESSIONAL COMPUTER TO THE P.C.
After all disks are loaded into your Personal Computer, you should concentrate on
getting the Drag Race Program operational first. Power up your Track Interface Box with 12
volts D.C.and make sure the Toggle Switch is “ON” to power up your Portatree Professional
Computer. You will see Competition, Diagnostics, and System Setup on the Portatree
Professional Display. Now you must double click on the Drag Race Program Icon on your
Personal Computer, you will see the Main Portatree Professional Drag Race System screen
open up. If you are connected to the Portatree Professional Computer, you will see under the
“Portatree Pro Status” the Serial, Version, Config, and Mfg Date appear. If you see “labs” ,
“labv”, “labc” , “labm” -- you are NOT connected. This means that either your serial port on
the P.C. is BAD, you are not using the special Null Modem Cable provided with your software,
or you are on a different com port and must go into the C:\ Windows\ptspro.ini file and edit the
[communications] section where it says port=1 ( this means com 1 or set it to a 2 for com 2 ).
You must be linked to the Personal Computer before you can go to the next step.
SETTING UP THE PRO BOX
Click on “Setup” and then “ProBox” and you will see the screen on the next page (this is
the Switch Setting Screen) with 4 tabs labeled Switches, Race, Lights, and Test Lights. The
Switch settings shown are for a _ mile Asphalt track. Note that all down track locations (60 Ft
330 ft, 594 ft, 660 ft, 990 ft, 1254 ft, 1320 ft ) the polarity is set to HIGH. This is true on an
asphalt track only using Banner SBL1 (Yellow) Infrared Sensors. If you are running a Sand,
Page 2
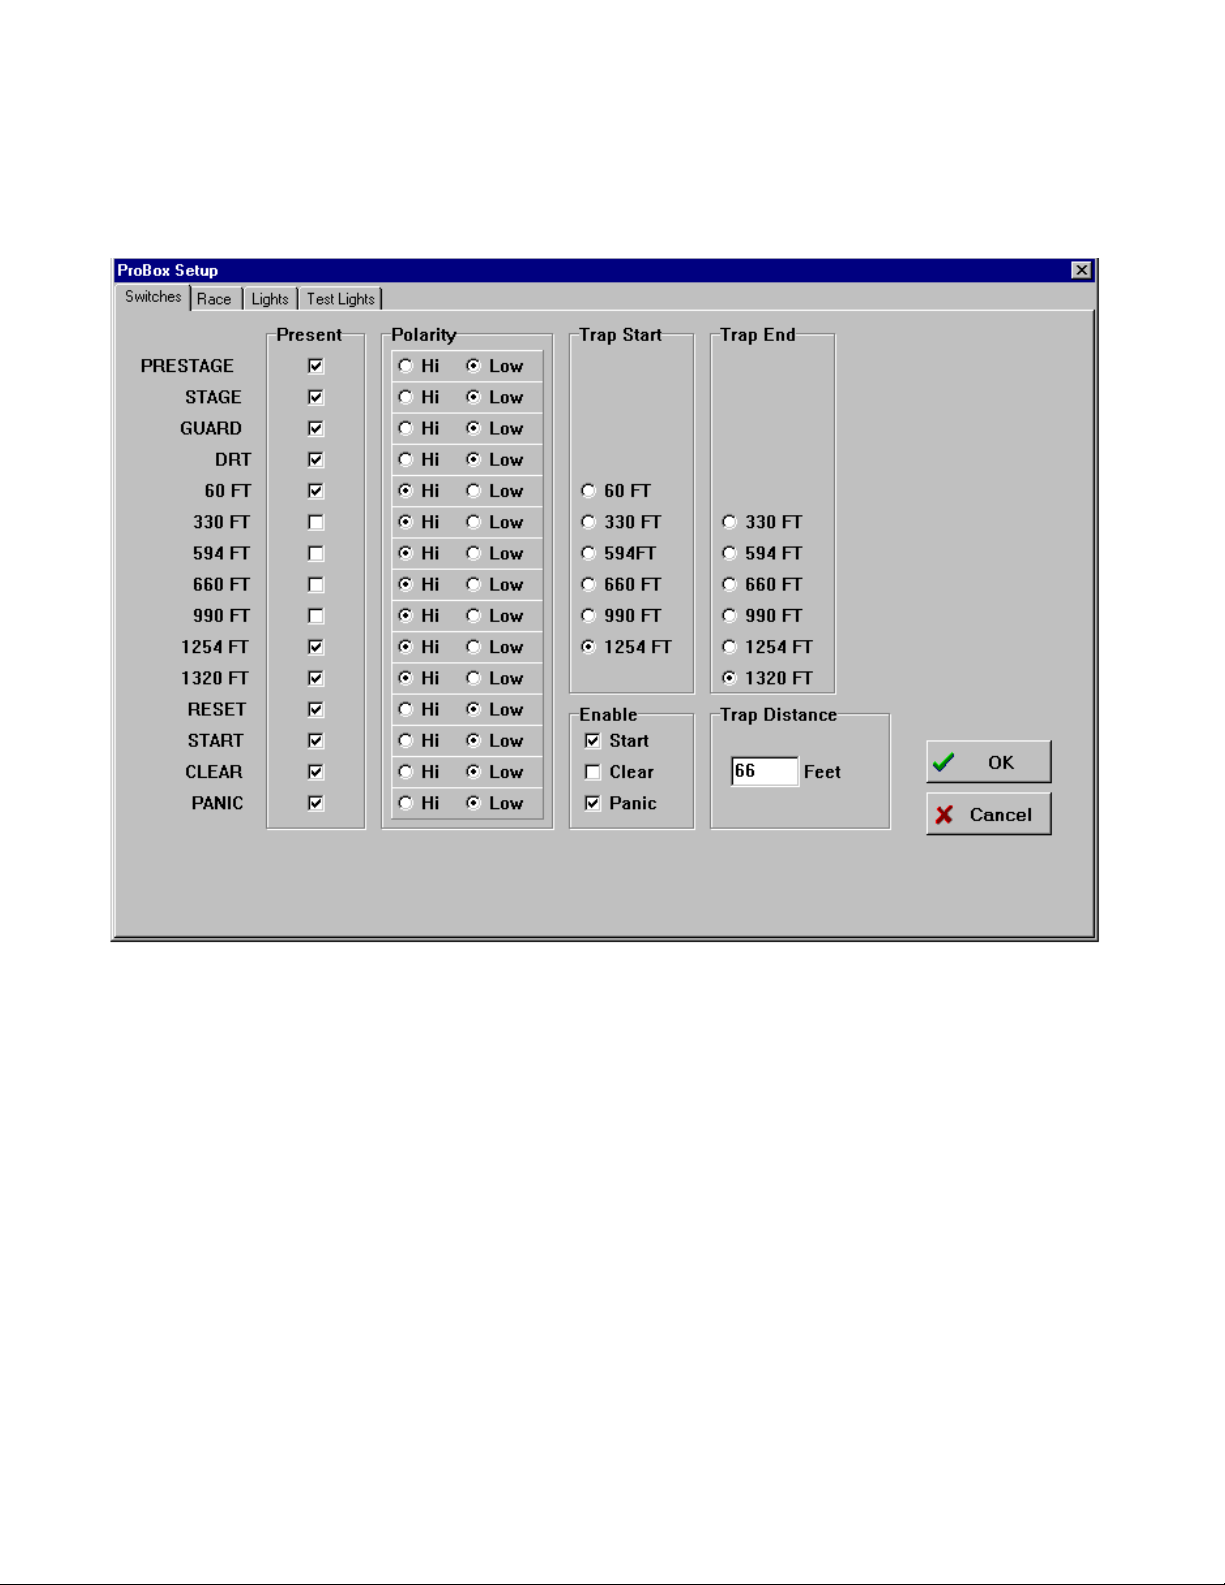
Dirt, or Mud Track you would set the polarity to LOW because you are using the Silver Light
Source Photo Cells. On the side marked “Present” you should have check marks next to the
sensor locations are at your track. NOTE: The 1320 is always the FINISH LINE even if your
track is only 60 feet long !! the 1254 is the MPH trap for the 1320 and the 594 is the MPH trap
for the 660 foot. If you were running an 1/8 mile track the finish would be the “1320” sensor
and the MPH trap would be the “1254”. A 330 foot on an 1/8 mile trap would be the “660”. On
a 300 foot Dirt Track the “1320” would be the FINISH and the “1254” would be the MPH trap
even if the trap was only 10 feet long !! These numbers are only labels as to which sensor that
we are referring. The Trap Distance can be changed to the distance used on your track from
10 to 132 feet. If you are using Kilometers, it can go from 3 to 40 meters (Kilometers Per Hour
can be selected set on the “Race” Tab). The other 3 pages are self explanatory.
SETTING UP THE PRINT STRINGS
This section is used only if you are using the level shifter and printing time slips directly
out of the Portatree Professional Computer. If you are using an RS-485 Network Card and
Smart Switch, you will not need this section.
The Level Shifter (RS-485 to RS-232 converter) is off white in color and has a power
light and 3 switches on the face of it. The switches should be set to DTE, SIMU, RS=on /
TS=on. You must have the converter powered with the adapter provided. This unit is driven
directly from the Pro Box and is a great backup system if your RS-485 Network should fail.
Click on “Setup” and then click on “Print Strings”. The next page shows the Results
Printout – String Setup Screen which will appear. This is where you would setup printer lines
for your Time Slips. You can type in up to 13 different lines and they must be only 40
characters long and you must center them manually. When you have the lines completed,
you can type in a print sequence exactly as you would on the “STAND ALONE” Portatree
Page 3
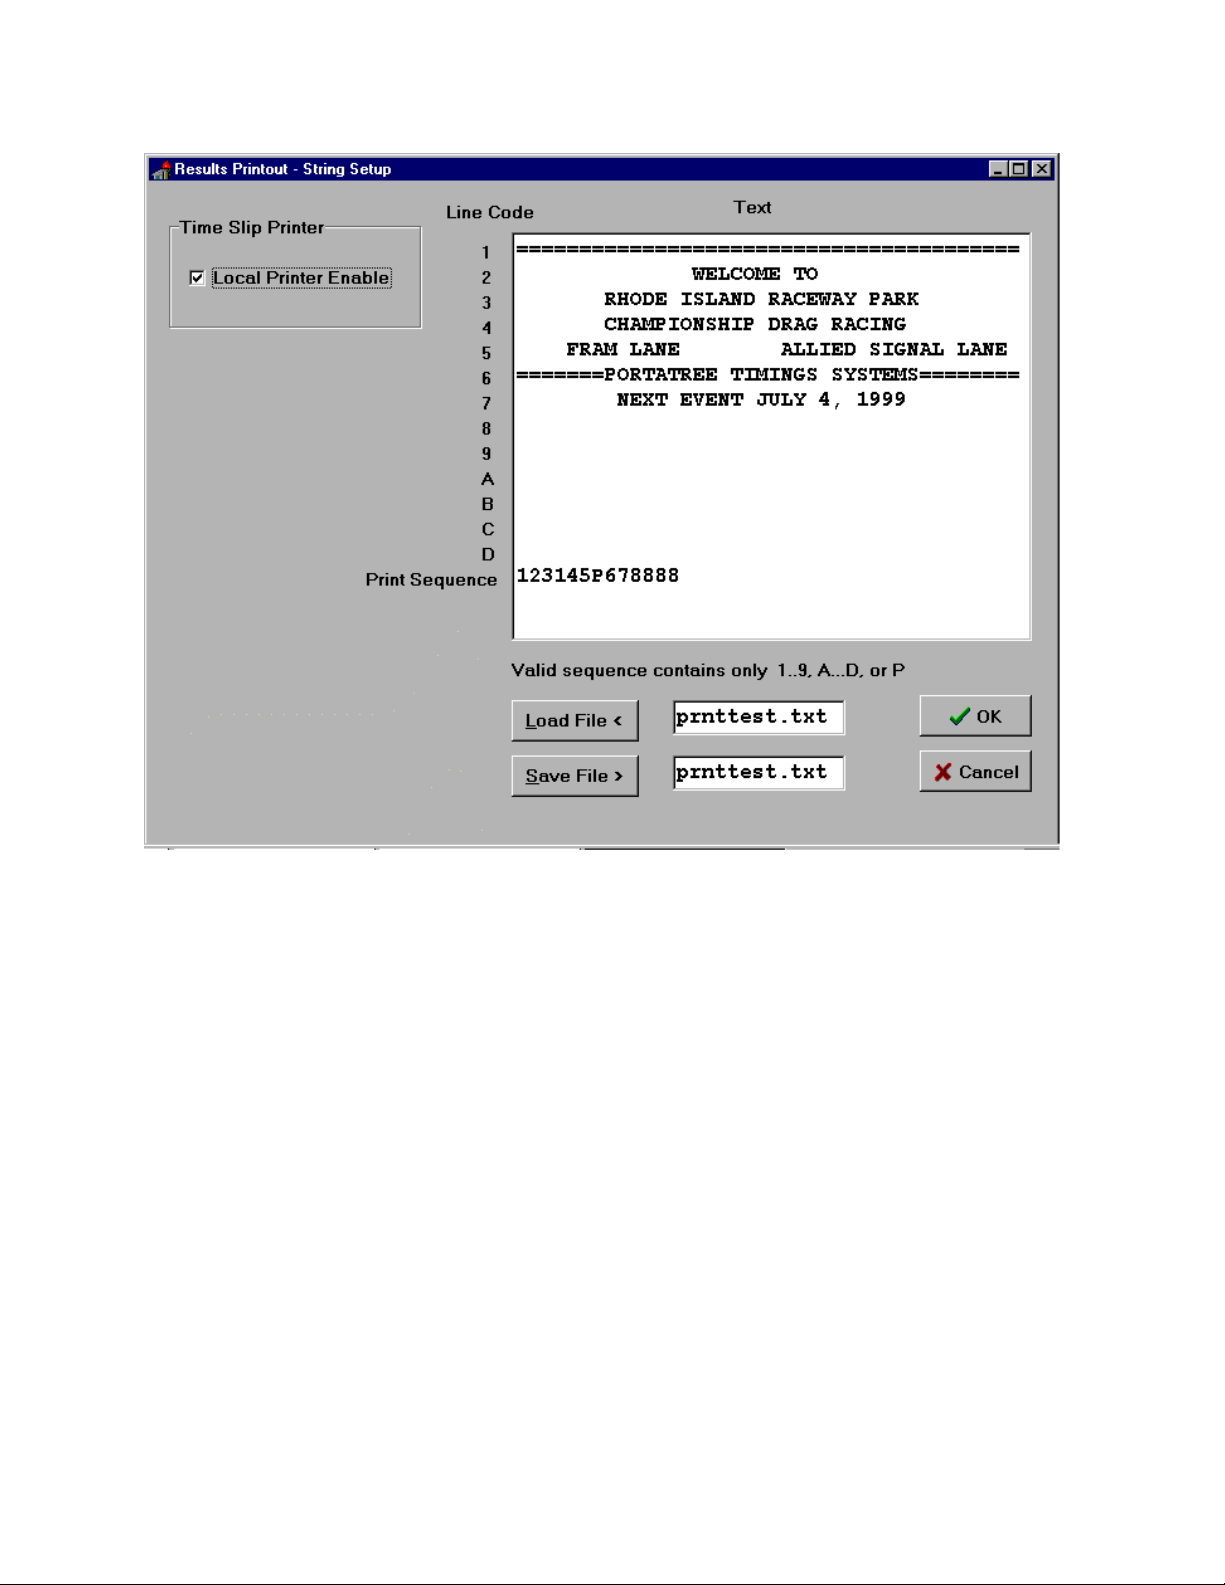
Professional Computer. The print sequence must use a Capital “P” in the sequence to print
the race information. You should also leave an empty line and put 4 of them at the end to
push the time slip out of the printer. See the Portatree Pro Box Video on how to setup your
print strings.
The Local Printer Enable box must be checked when using a level shifter. You can also
save files and load files in the bottom of this screen. Just type in a new file name with a *.txt
extension and it will save file or load file with the time slip you created.
RACE SETUP SCREEN
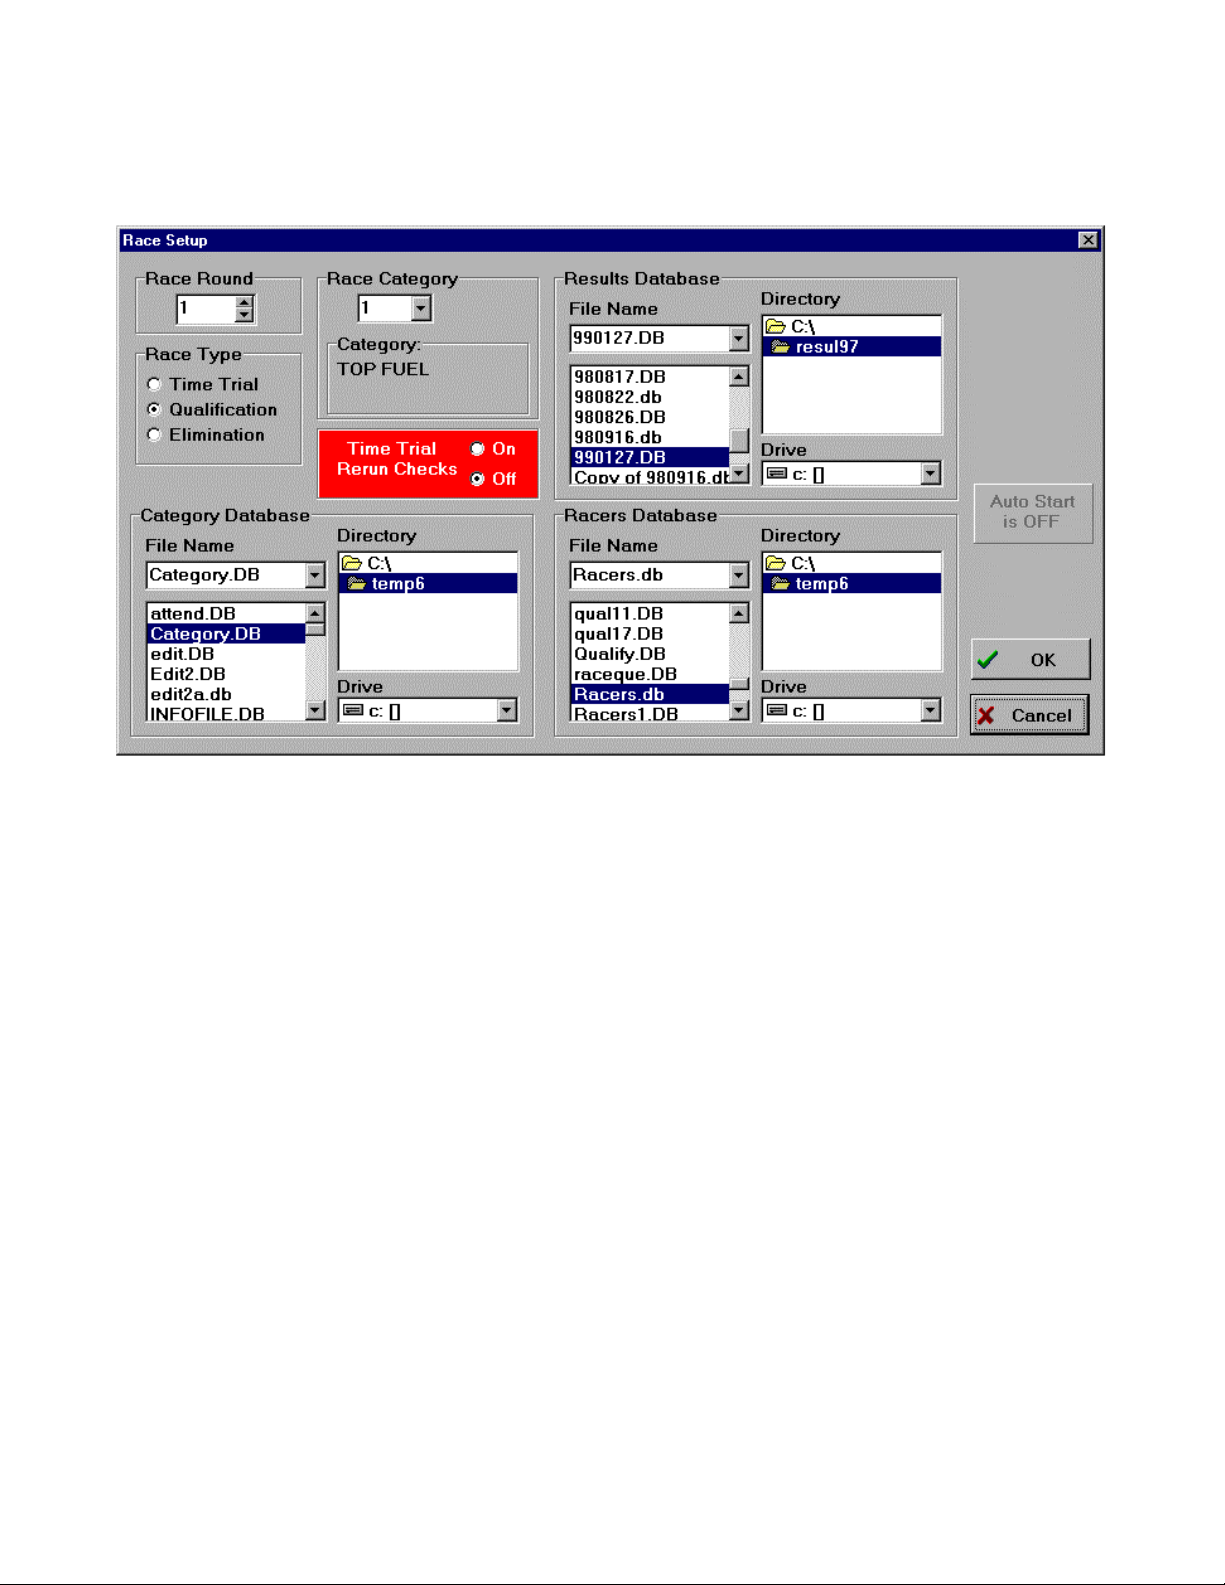
Click on “Race” and then click on “Race Screen” to start into the Race Program. You
will see the “Race Setup” Screen appear (See Below). The Race Setup Screen is where you
will make changes to the RACE ROUND, RACE CATEGORY, and RACE TYPE. It is also
where you will setup the Results Database (Race Day File) and select the Racers.db and the
category.db files. There is also a check box where you can turn “on” or “off” rerun checks
during time trials. This is a useful feature if you want to make sure each vehicle is only getting
one time trial per round.
The Results Database must be created every Race Day. It is your record of runs made
down your race track. The results file must take the format Year, Month, & Day. An example
would be a race on May 29, 1999. The file should be typed in as 990529.db. If you get
partially rained out and want to finish racing on another day, you can always reopen this file
and add more results to it. It just makes sense to label your results this way so that if you want
to retrieve data at a later date about a specific race, you can easily find the data.
You must also make sure that you put this file into a separate directory. This is
important because you will be making a tremendous amount of result files and they would be
best kept in separate directories and a new one setup each year. The format that we use is to
Page 4
create a new directory called C:\RESUL99 (open the Windows Explorer and create a new
folder). A C:\RESUL96, C:\RESUL97, and a C:\RESUL98 have been created for each race
year. Next year we will create a C:\RES2000 directory. On the Right Side of the Race Setup
Screen, click on the C:\ under the Directory heading next to File Name under Results
Database and then click on the new directory, C:\RESUL99, that you have just created. Then
enter the Race Day File for the new Race Day.
Under Racers Database and Category Database, you must click on the C:\ under
Directory and then click on Portatre and Portatre again ( C:\portatree\portatree directory –
some windows ’98 computers only show C:\portatre ) and then select the Racers.db and the
category.db files (racers1.db is the second racer database and racers2.db is the third).
Setup the Round, Race Type, and Race Category that you would like to run. We have
made several sample categories for you, but in order to change these categories, you will have
to go into the Post Process Program. When all of your data is entered, Click on “OK” and the
Main Race Screen will appear.
MAIN RACE SCREEN
The main screen is a typical Windows ’95 and ’98 Program which uses all of the
standard “HOT” keys. The screen is very user friendly and very easy to use. Racers and
entered on the Right Side of the screen by positioning the cursor with your Mouse or by
Keystroke. The F5, F6, F7, and F8 keys position the cursor into the four data entry slots on
the right of the screen. Que 1 Left is where you usually begin (depress F5) and the entry
number would be typed into the edit box. Single runs are entered into the Que 1 Left or Right
and the empty lane should be typed in as “BYE”. The computer recognizes “BYE” as an empty
lane and automatically disqualifies the run. If you have already set up the category, then the
Dial-In, Tree Speed, and Tree Type would be entered automatically. The category editor in the
Post Process Program handles this feature. After you have entered Que 1 Left and Que 1
Right you would Click on the “BUMP QUE” button or depress “F12” to advance them onto the
main screen. At this point you can edit the Dial-In, Tree Type, and Tree Speed only. You can
not change the Entry Number on the main race screen. When you are confident that the
information on the main screen is correct, then you can click on “Tower Ready” or depress “F9”
Page 5
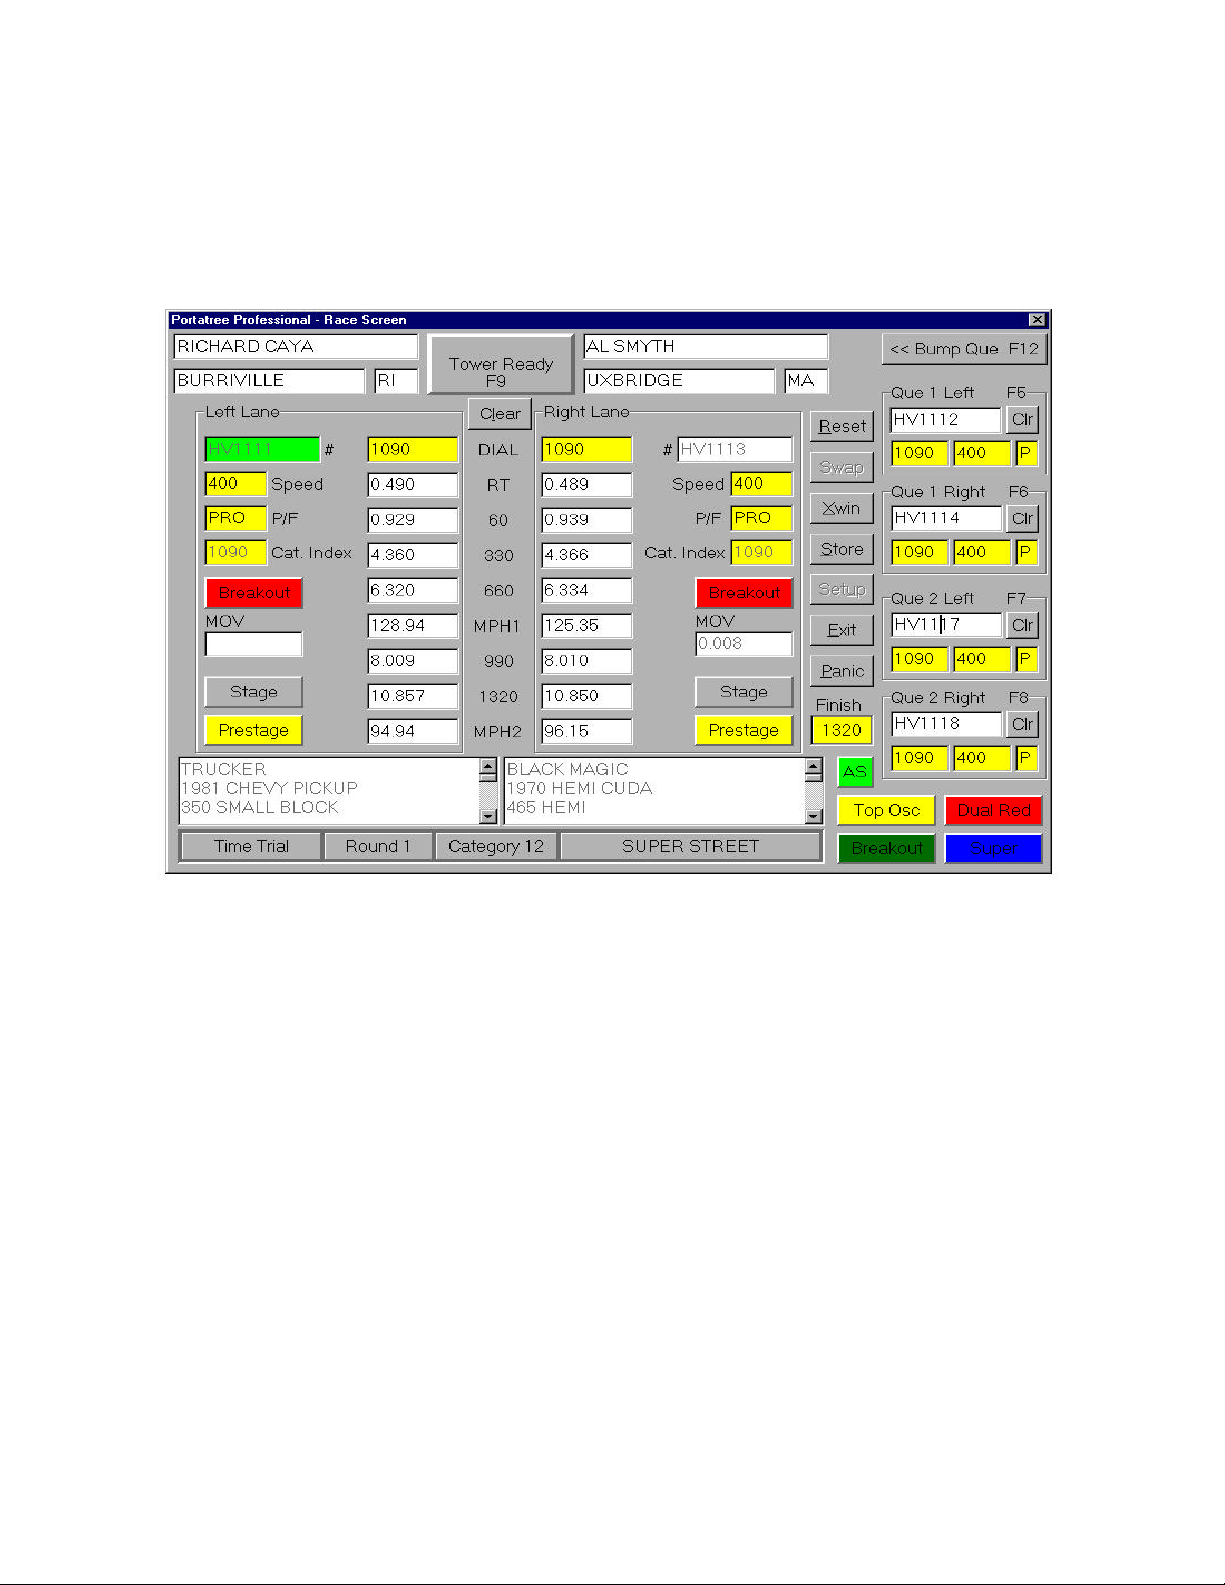
to send the information to the Pro Box. The tower ready light on the track will illuminate and
the starter can start the race.
The lower right corner of the race screen has 4 panels which activate (lighted) and
deactivate when left Mouse Clicked. They also activate from data entry provided in the
category editor in the Post Process Program. They can be deactivated or activated at any time
when in the Race Screen. These 4 panels are for Top Bulb Oscillate (Renders Delay Boxes
Useless), Breakout (Bracket Racing), Dual Red Lights (Usually Used during Time Trials), and
Super Start (Blue Light on Christmas Tree – Deep Staging Not Allowed).
VERSION 100 RACE SCREEN
There is a small panel labeled “AS” above the 4 panels above which is for “Automatic
Storing” of results. Sometimes during a track testing session, it is best to turn this box off so
that tests are not stored. This panel can be activated and deactivated by a Left Button Mouse
Click. The Box above “AS” is labeled “Finish” and this represents the location of the Finish
Line. This can be changed automatically by going to the Category editor and entering a –1, 0,
or 1 in the Finish Line location field. A 0 means that the finish is at the 1320 foot location and a
1 means that the finish is at the 660 foot location (Mid Track), and a -1 means that the finish
location has been selected in the Pro Box Setup Screen (Look above under Pro Box Setup)
under the switches page and “Trap End”.
The rest of the Race Screen has various buttons to Reset the Race in case one vehicle
does not finish or Reset the Tower Ready if the race has not started yet (This would allow you
to change incorrect data and send a Tower Ready again). The Breakout Boxes illuminate if a
vehicle goes below their Dial-In) and the Prestage and Stage Panels illuminate when the
vehicles break the starting line beams. The Clear Buttons clear information off of the race
screen or out the of the que. The “Xwin” button exhanges the winner if the Centerline is
crossed or another Disqualification has occurred. The 200 and 300 versions have
“Disqualification” Buttons at the top of the screen which turn red when depressed and
automatically disqualify an entry and change the winner of the race if necessary. These
versions also have a MOV box for seconds as well as feet (or Meters if running Kilometers per
Hour). The Panic Button turns the Panic Lights “ON” and “OFF” and the Setup Button brings
Page 6

you back to the setup screen to change category, round, and type. The “Swap” button allows
you to switch the entries from lane to lane. Once you have sent a Tower Ready, some
buttons are grayed out and not allowed to be used !!
As the race progresses, the information appears on the screen as it is reported from
the Pro Box. In version 200 and 300 the MPH (KPH) is calculated by the P.C. and appears
instantly where on version 100 the information is sent after the race is over. If a driver “Red
Lights” the background on that lane will changed to Red.
VERSION 200 & 300 RACE SCREEN
VERSION 200 and 300
These two versions have provision for scoreboard drivers and utilize an RS-485 Circuit
Board which send the data over a network. The network is addressable and canbe used to
drive two timeslip printers, Dial-In displays, and 1 or 2 scoreboards per lane. The program can
be used to drive AMT L.E.D. scoreboards directly or Chrondek/Daktronics scoreboards
through an Addressable RS-485 to RS-232 Smart Switch. Smart Switches are used to drive
Timeslip Printers as well.
RS-485 NETWORK
When you first start up the Drag Race Program, you would “Click On” Setup and then
“RS-485 Network” to set the addresses and activate the devices that you will be using at your
track. If you are not using scoreboards, then it does not matter whether AMT or the Daktronic
Scoreboards are selected. You should only activate the RS-485 Network Smart Switches that
are being used as we poll the smart switches and if you select one that is not working or that
you do not have connected, then the system may “HANG” for short periods of time. The smart
Page 7

switches have 8 dip switches on the face which are binary. To select address 1 turn dip switch
1 “ON” and all others OFF and to select address 2 turn dip switch 2 “ON” all others OFF. To
select address 3 both dip switches 1 and 2 would be “ON” and all others OFF.
The settings for the AMT scoreboards can utilize address 1 and 2 even if you are using
Address 1 and 2 on the Smart Switches. The program uses a different format for the
addresses on the Smart Switches and the Scoreboards. The addresses that you set in the
RS-485 Network Screen must match the addresses that you set on the devices. The AMT
Scoreboards have 8 dip Switches inside the back cover of the display. The first 3 dip switches
are preset at the factory for the type of display and the 5 dip switches that are left are for
addresses 0 to 31. The address selection starts at dip switch 8 and goes down to dip switch
4. When dip switch 8 is ON and 7,6,5,4 are OFF the display is set for address 1. You can
check this out be depowering the display and restarting it. On Power Up, the scoreboard will
show you the current address setting. Address 2 is set by turning dip switch 7 ON and turning
8,6,5,4 OFF. Address 3 is set by turning dip switch 8 & 7 ON and turning 6,5,4 OFF. Address
4 is set by turning dip switch 6 ON and turning 8,7,5,4 OFF. This is a binary format.
RS-485 PRINTERS – TIME SLIP PRINTER SETUP SCREEN
Click On Setup and then RS-485 Printers at the main screen in the drag race program.
The Printer setup screen allows you to customize your time slip message for your racetrack
and select which lines you want to print. The Test Printer button allows you to look at a
sample time slip to make sure that the information is correctly entered. You must center each
line of information and we usually use dashes “----“ before and after the information Text lines
so that they make the information easier to read for the racer. See the time slip setup screen
on the previous page. You can select 1 copy (if you have duplicate time slip paper) or 2 copies
(if you have single sheet paper or 2 printers).
Page 8

RS-485 SCOREBOARDS
The scoreboards can be set to only display the information that you select. The
Reaction time (RT), Dial-In, MPH, and Elapsed Time (ET) can be displayed. On single line
displays, the ET is displayed first and then the MPH and ET are oscillated from one to the
other. You can change the time between the changes in the C:\Windows\ptspro.ini file. Look
for [Scoreboards] and the OscillationMilliSec=2000. The 2000 stands for 2000 milliseconds or
2 seconds. If you want to change the time to 1 _ seconds, then you should change the 2000 to
1500. If you have 2 displays (AMT displays only) on each side of the finish line, then you
would use 4 addresses when communicating with them. You can select which display gets
which information in the setup screen. The Daktronic displays are controlled by a single smart
switch and the Portatree Professional software sends the correct protocol to the scoreboard
driver so that the correct information is displayed by selecting 1 0r 2 line displays.
Page 9

POST PROCESS PROGRAM
The post process program is written utilizing the Borland Paradox Runtime Software.
This software utilizes the Borland Database Engine (BDE) and automatically handles use of
the database by the Drag Race Program and Post Process Program if calls to the databaseare
made simultaneously. This program allows you to print various reports and view screens
while fully utilizing Windows ’95 and ’98 capabilities. You can open several files in the Post
Process Program at the same time and jump from each of these programs to the Drag Race
Program while races are in process. It is a very robust program of which no reports of system
hanging or malfunction have been reported to Portatree. The system supports Windows
Networking and handles network traffic very efficiently.
LOADING THE 5 SOFTWARE DISKS
You have been sent 5 Post Process Program disks which must be loaded into you
Personal Computer in order to operate the system. The best way to load this program is
Double Click on My Computer and then Control Panel and you will see Add/Remove
Programs. Click on “Install” and start loading the 5 disks following the instructions from the
Windows Operating System. You can also remove the program in the same procedure by
clicking on remove.
After you have successfully installed the program, you should create a desktop ICON by
going to the Windows Explorer and finding the Post Process Program (Pdxrwn32.exe) which is
located in the C:\Program Files\Borland\Paradox Runtime directory. Drag and Drop this file on
to the main Windows ’95 / ’98 screen and rename the ICON “Post Process PROGRAM”.
Double Click on the Post Process ICON that you have just created. This will open up
the Paradox Runtime file and you will be at the main screen. You should see a Blank Screen.
Click on “File” the Click on “Working Directory” and “Browse” until you locate the C:\portatre
directory ( some Windows ’95 / ’98 versions put the files into the C:\portatre\portatre directory ).
Click on O-Kay to change directories and then click on File then Open then Script and select
“Startup.sdl”. This will open the Main Screen of the Portatree Post Process Program. When
you close down the Post Process Program from the Main Screen of the Post Process
Program, the next time that you open the Program you will automatically come to the Post
Process Main Screen.
SETTING UP THE “RESULTS” ALIAS
Page 10

We use a Paradox Runtime pointer to locate the Result files that you will be creating
and it is called an “ALIAS” which we call “RESULTS”. In order to create the ALIAS you must
go to the Post Process Main Screen and Click on FILE, then ALIAS and select NEW. The
cursor will go to an empty edit box and you must type in the word RESULTS. You must then
go to PATH and type in the path as to where your results will be located. We like to keep
results files from each year in separate directories. Go to the Windows Explorer and Click on
the “C:\” (Root Directory) then click on the Right side of the screen and Right Click and select
NEW and FOLDER and type in a name for your new results directory. The format that we use
is C:\RESUL99 for results for the ’99 season. We used C:\RESUL98 for the ’98 season. Now
you must type in the path in the ALIAS Manager (C:\RESUL99) and then Click on O-Kay. The
computer will ask you if you would like to Save to Public Alias and you again must click on OKay and you will end up back at the main Post Process Program Main Screen.
RACER’S ENTRY SCREEN
Click on Racer Entry and you can select from the Main Racer’s Database, Second
Racer’s Database, and a Third Racer’s Database. You should keep your regular racers in the
main racer database. The second and third racers database are for special events where
racers come in from different areas and probably will not race regularly at your track. The
DRAG RACE Program can only open one racer database at a time, so it is important that you
select the racers database that you will be using for the specific race day. Most tracks will only
use the Main Racer’s Database.
There are 39 different fields in the racers database in software version 100 and 40 fields
in version 200 and 300 ( the 40th field is the Class Index field ). You can enter all or some of
Page 11
the fields in this database. If you are going to use the points program, it is important that you
enter a “Y” in the Registered Field so that the Points Program recognizes that the specific
racer is registered and points should be administered.
The CarNumber is the most important field. The program will always capitalize the
letters used in the CarNumber field and will only allow you to use a unique number for each
participant. You can not duplicate numbers. If you enter a number that has already been
used, the program will look up the entry and show the information about the entry on the
screen. You should try to use a format at your track that will identify the racers. Some tracks
use 2 letters and 4 numbers, 1 letter and 4 numbers, or just 4 numbers. It depends how big
your track is and how you intend to run your races. It is very important that you consider your
Car Number system at your track before you proceed to enter racer information.
The Drag Race Program will find the unique CarNumber regardless of category. Even if
you have a CarNumber racing in 2 different categories, the Drag Race Program will not stop
the entry. It is very important that you keep track of the entrants in each class.
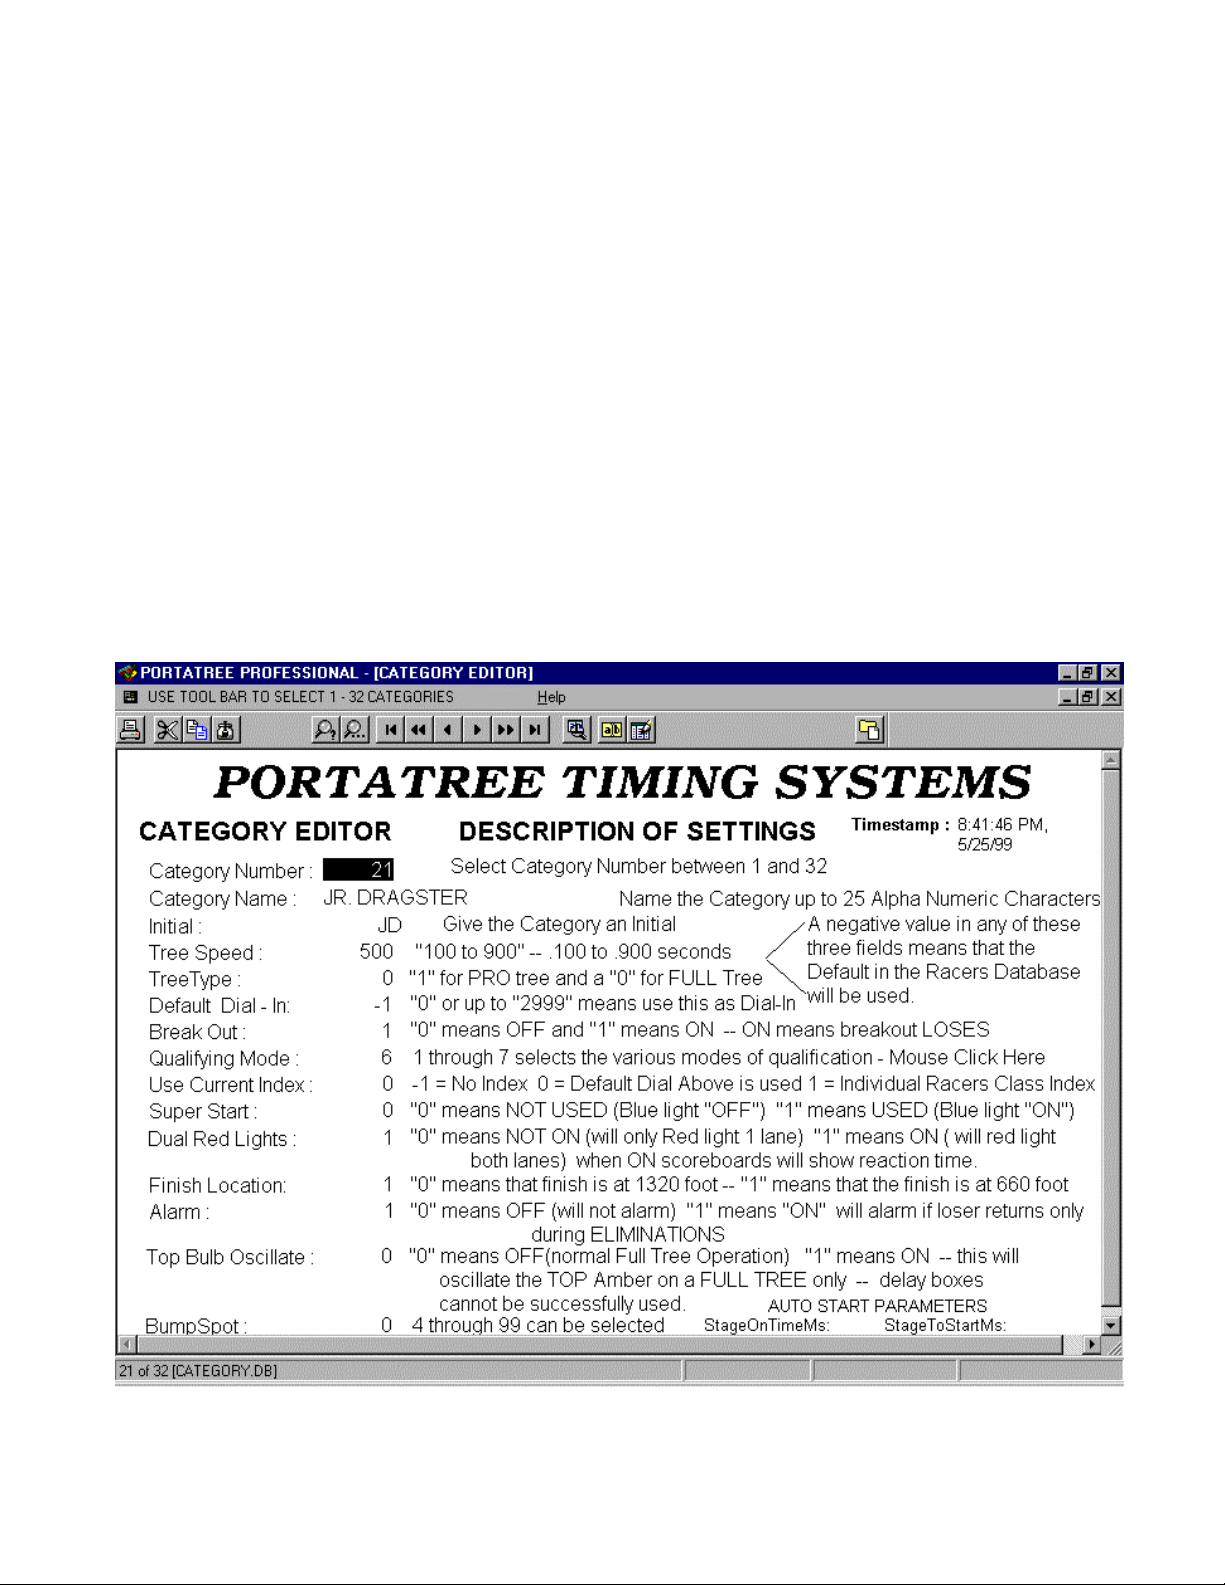
CATEGORY EDITOR
The category editor is used to set up the different race categories that you have at your
race track. There is a Help Button above the Navigator Bar which explains each of the 15
fields. The Navigator bar can be used to scroll through the 32 categories 1 by 1, 10 by 10 or
first to last. You must put the editor in “EDIT” mode by depress F9 or by clicking on the Edit
button on the tool bar.
DATA LOG EDITOR AND VIEWER
The data log editor and viewer is the where you can easily print out results and find
information on the individual races. Click On the Race Day File and a PopUp Menu appears
Page 12

on the screen with each of the race day files that you have in your Results directory
(RESULTS – Alias). By Clicking On the file for the race day that you want to view, a
temporary file is created with all of the results for that file. The Update DataLog Button below
the name of the Race Day File can be used when you return to this screen and only want to
add the information that is new. This feature saves a lot of time in loading the data because
the system only has to add the records since the last time that you undated the Data Log. It is
required that you keep the Data Log program open when using the Update DataLog Button.
The Print Buttons are self explanatory. The 3 buttons on the Right side of the screen
are for selecting information by Time Trial, Qualification, or Elimination in the Category and / or
Round that you select. The 3 on the Left side of the screen are for printing the entire results or
for an individual entry number.
The navigator bar at the top of the screen is for moving through records. There are
search buttons so that you can search for certain Car Numbers, Categories, etc. The File
folder on the Right of the Tool Bar is the Project Viewer and you can open different forms at
the same time.
QUALIFYING
At the Main Portatree Menu, Click on Qualifying and then qualify to enter the qualifying
program. There are 7 ways to qualify in the Category Editor and when you select a Category
Name, the program looks up the Qual Mode field in the Category Editor and proceeds to
qualify the vehicles this order.
You must select a Race Day File first and then the racer’s database that you intend to
qualify. Then you must “CLICK ON” the Category Name and a list of all 32 categories
Page 13

appears. Select the Category that you wish to Qualify and a qualifying list will appear in the
order that the Category editor had recorded. In this case selection number 2 – Qualification
Run Best Round by RT (Reaction Time) was selected and the list started with the best reaction
time to the worst. The Note that when several ties happened, the person that did the reaction
time first got the higher position ( see R # -- Race Number -- the lower race number means
they raced before a higher race number ) .
When the qualifying list is correctly established, then you must save the qualifying list is
you intend to ladder then participants. You can print a copy of this report from this form..
LADDERS
The ladder program works in conjunction with the qualifying program. You MUST
qualify and save the qualifying list first before you ladder or the ladder program will not work. A
WARNING message will appear before you ladder if your qualification list that you are about to
ladder was not qualified the same day. This is the only warning that you will get regarding the
qualifying list integrity. The ladder program is designed for 64 vehicles maximum and does a
sportsman ladder. A Pro Ladder is optional on 4, 8, 16, and 32 entries.
1. Open the Ladder Program by Clicking on Ladders and then ladders again. This will
open up the main screen of the ladders program. Click on “Select Category” ( or
Category Name) and the Qualifying list that you just created will appear for that
category. This is a good place to check to make sure that you qualifying list that you
printed is the same as the list in your ladders program. The bump spot from your
category editor appears in an edit box and allows you to change the bump spot or let all
entrants run.
Page 14

2. Click on the “First Round Pairing” button to pair up the vehicles in the order for your
ladder. The Program will prompt you for a Pro Ladder if 4,8,16, or 32 vehicles are in the
ladder. The vehicles will be paired in their appropriate order for Eliminations at this
point.
3. Click on “Pairing List “ so that the first round of pairing will be available to print for your
staging crew. The pairing list is used to pair up the vehicles in the staging lanes prior to
the race. The “LANE” indicates the Entry that has lane choice. You can print a Pairing
list up every round and the “LANE” will change based on the driver and vehicle’s
performance in the previous round. If then qualified by ET the racer with the quicker
E.T. in the previous round will get Lane Choice. If they qualified by RT then the racer
with the better RT gets lane choice. If they qualified by Closest to Dial, then the racer
closest to dial in the previous round gets lane choice.
PAIRING LIST -- NOTE: This is only a partial list as shown on the P.C. Screen
4. You can print a first round ladder sheet or a completed last round ladder sheet, but we
do not allow partial ladders to be printed. A first round ladder is shown on the next
page. Ladders position entries in an exact position from the first round and the ladder is
never altered after this point.
5. The completed ladder will only by able to be printed with results after all rounds are
complete. The report will be printed with all round results and will indicate the top
Eliminator of the category.
6. If you should need to edit your ladder, you will have to go to the qualifying and ladder
editor in the DataLog section of the Post Process Program.
Page 15

7. There are specific printouts for 4, 8, 16, 32, and 64 ladders. The 64 vehicle ladder does
not appear in the same layout as the 32 and smaller ladders. The ladders are designed
to fit on 1 page so that the report is neat and efficient.
8. If you require a custom ladder, you can consult Portatree Timing Systems, Inc. and you
will be instructed on how to create your own special ladder format. This can be done
via E-Mail, Fax, or Telephone.
FIRST ROUND LADDER -- This is only a partial ladder as shown on the P.C. Screen
POINTS PROGRAM
The points program is designed to give points only on those racers registered in the
Main Racer’s Database. Each racer who will receive points must have a “Y” in the Registered
field of the Main Racer’s Database. There is a HELP button on the tool bar at the top of the
screen that explains how to run your Points Program and the function of each button on the
screen.
The Race Day file will match the selection that you made in the DataLog Viewer, but if
you want to change the file, Click on the File Name and a PopUp menu of each file will appear.
Select the file that you wish to collect data and assign Points. Make sure that each Category
has the correct Points assigned to each of the Attendance, Qualifying, and Elimination run.
This can be done by Clicking on the category number field or any field of information and using
the Navigator Bar at the top of the screen to go to the different Categories and use the Arrow
Keys to navigate to the different valued fields that you wish to assign.
Click on the Assign Points button to run the program and the information about the
Race Day File will appear with the assigned points in the screen below. If you want to change
Page 16

points manually, you must Click your mouse in the field EE9 and assign the points. After you
have manually entered the changes, Click on the Manual Edit button and the points will be
totaled again.
When you are satisfied that the points have been assigned correctly, you can save them
by Clicking On Store Points for Race Day and an edit box will appear asking you to enter the
points day that you wish to store these points under. You should predetermine which days
correspond to Points Days and select a number from 1 – 20 to store your results.
Click on Total Points View Report to make sure the points have been stored correctly.
Click on Empty Total Points only at the end of the year. You should always save a copy of the
yearpts.db from your Windows Explorer into another directory. The Eliminations Panel will
speed up your points processing when illuminated if you are not assigning any points for
qualification runs or if you are not qualifying. Click on the Panel to illuminate it.
If you have specific questions about the program, you should carefully write them down
in very specific detail so that we may give you a precise answer. We are best served by EMail as it is quick and efficient and cost effective. This Manual Can be E-Mailed in a Zip File
as a Microsoft Word Document. You must be able to open a *.doc file in order to have this EMailed.
Extra copies of videos, instructions, manuals, or program disks will be available, but will
cost additional monies for preparation, shipping, and handling. Requests for this information
will be treated as an Order and will be shipped by Credit Card or C.O.D.
Version 029579
 Loading...