

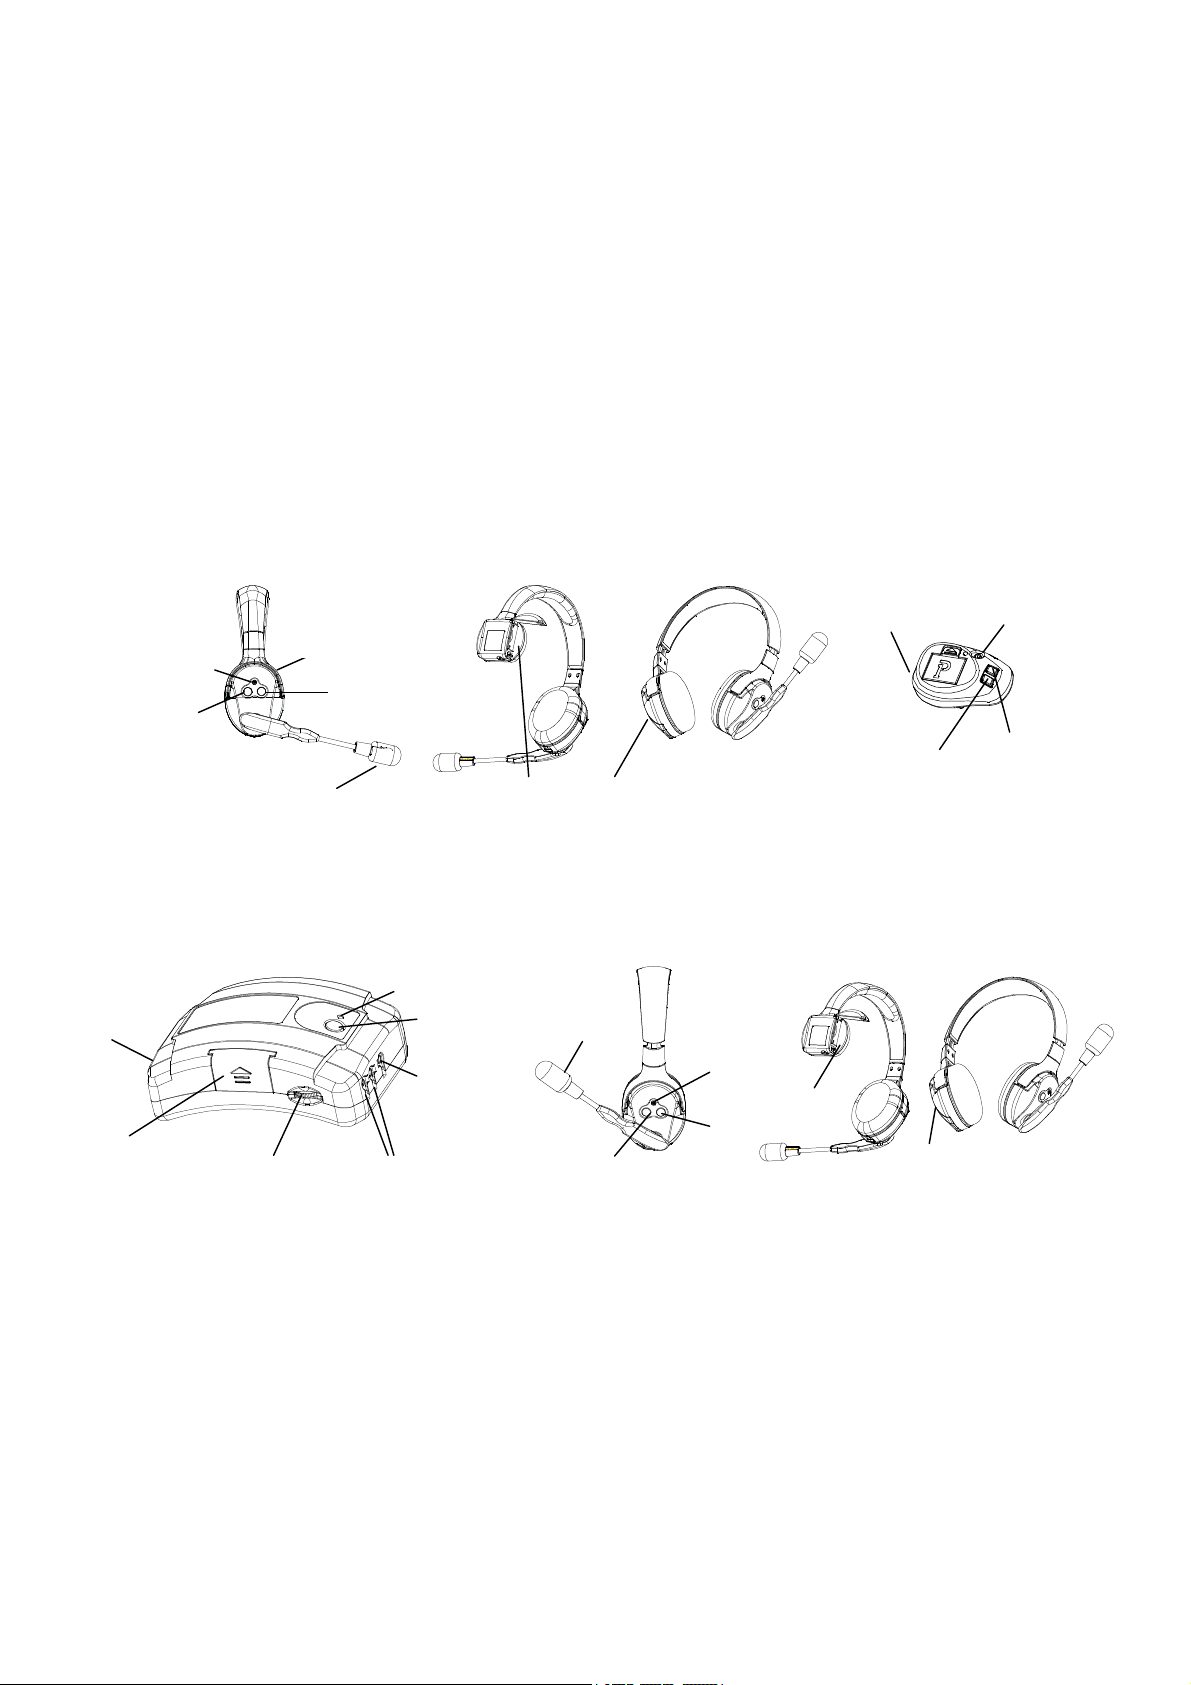
M
ic
P
ower on/off
Vol up R
eceiver
Vol down
EarJack
M
ic
SUB key
Vol down
FULL DUPLEX DECT SYSTEMS
user manual
Introduction
Thank you for your choice of Full Duplex DECT Systems.
This is a DECT (Digital Enhanced Cordless Telecommunications) duplex wireless system. To the quality of
audio and to the safety offered from the digital technology, The offers manifold and useful features including
Full duplex system, LED In use illumination, multi-headset capabilities and multi-volume select. Please read this
instruction carefully before using your new system for the first time.
A glance guide for the headset
Vol down
A glance guide for the base unit
UltraLite HD-R
Battery pack
UltraLite HD-RD
UltraPAK
Power on/off
Vol up
UltraLite HD-M
Battery pack
Vol up
DC Jack 5V
Battery
THE HUB HD
Power switch/VOL
Conference indicator
All Conference
Connector for
Connector for wire Headset 1
Installation
Please check your package the following items(options):
-Base Unit (THE HUB HD/ UltraLite HD-M/ UltraLite HD-MD)
-Wireless Headset (UltraLite HD-R/ UltraLite HD-RD/ UltraPAK)
-Wire Headset (Max4GS/ Max4GD)
-AC/DC adaptor for Base Unit(5V/1A)
- Packing batterie(800mAH/3.7V)
Choose a suitable site for the base unit, make sure it is not near to other electrical equipments.
Connect the AC adaptor socket to the Base Unit and the power socket. Turn on the power of base.
UltraLite HD-MD
Battery pack
Page 1

Wire Headset
UltraPAK
Max4G
D
Max4GS
SUB key
2
UltraPAK
Ultralite
HD-RD
Ultralite
HD-M /
SUB key1
UltraliteHD-R
UltraliteHD-R
UltraliteHD-MD
THE HUB HD
UltraliteHD-RD
The pack rechargeable batteries come with your
charger.
-Insert the rechargeable battery into the headset as the above figure indicated, matching correct polarity.
-Fit the battery compartment cover by sliding it down so that it clicks firmly into place.
NOTE: Reversing the orientation may damage the headset. Please use the battery type supplied or recommended equivalents. A
different battery could cause an explosion or damage of your headset.
Low battery indicator
Whenever you see the low battery indicator LED flash on the headset, or you have heard the low battery warning
tone during a call conversation, please:
-End the call as soon as possible.
-Change the headset battery.
To charge the battery, put the battery into the charger cradle. The charging LED on charger unit will come on to
indicated that the battery is in charging.
Basic Functions
Make a talk
-Power up the headset to search registered of base, the “In use” LED is ON.
During a talk conversation, you can adjust the talk volume (1 ~ 5 levels) by simply pressing • or ‚ key.
Mute
-During a call conversation, you can mute your voice by rise up microphone arm.
-Deactivate the mute function, go down the microphone arm again.
Headset Power On / Off
To power Off the headset
- Press and hold “power on/off” key about 3 seconds, the headset will switch off which can prolong the use
time of headset.
To power On the headset
-Press “power on/off” key
The headset will power on with the “In use” LED light, the headset to search registered of base.
Page 2

specific settings may void the warranty.
Out of range indication
If your headset has registered and is in located range, the “In use” LED will blanking steadily, when your
headset goes out of range, the communication link will be lose temporarily, the “In use” LED will blink.
If you go back to the located range again, the communication link will restore, also the “In use” LED will
blanking steadily.
Note: your talk will be cut without any audible warning tone if you are in a talk and out of the located range.
Registration
The headset and base shall be factory pre-registered with the identification digital security codes, which are
stored into the non-volatile memory, so that your headset shall be ready for working after out-of-box. However,
your headset shall also has a procedure to allow you to re-do the registration operation in case of the link is lost
accidentally.
-press ‚ key 3 times, Press and hold • key for 3 seconds on the headset “In use” LED is ON, your headset
entered the registration mode
-Press and hold SUB key for 3 seconds on the base until “SUB” LED is flashlight, the base also entered the
registration mode.
Note: SUB key A1is for channel A station, B1 is for channel B station.
-About 5-10 seconds the headset “In use” LED is OFF and following to ON, that means the headset has located
the base, and the base until “SUB” LED is OFF and following to ON.
-If the headset does not locate the base, the headset “In use” LED will be blink after 15 seconds and it will
return to the non-located mode. Try again and check that you are not in the interference environment
Note: your base can register up to
four headsets. Two headset register on the every subscribe key.
Unsubscribe headset registered
-At standby mode
-Press and hold SUB key enter the base’s registration mode with the “SUB” LED is flashlight
-Press SUB key 7 times again the “SUB” LED is quick flash
-All headsets registered to this part are cleared
Note: (1)SUB key A1 to unsubscribe both A1 and A2 headset.
(2)SUB key B1 to unsubscribe both B1 and B2 headset.
Conference talk
When you are in a talk on the base, you can invite another channel headset to join your conversation.
-Press the “All Conference” key on the base that you want to talk.
-At the all conference mode, 4 wireless headset and 2 cord headset can conference.
-Press the “All Conference” key on the base once again, turn off the all conference mode.
LIMITED WARRANTY
This limited warranty only applies to the use of this device with a communications service for which it is designed. This
device alone does not provide the customer with any communications service and requires a separate subscription to a
communications service from a service provider. Altering service provider-
This limited warranty does not warrant that the device will be free of any limitations of voice quality or service caused by
(1) the services provided by the customer’s underlying communications service provider; or (2) interference from other
radio frequencies or transmissions, static electricity, and other electronic devices.
Page 3

Exposure to Radio Frequency (RF) Signals
This device is a radio transmitter and receiver. It is designed and manufactured not to exceed the emission limits
for exposure to radio frequency (RF) energy set by the Federal Communications Commission (FCC) of the U.S.
Government. These limits are part of comprehensive guidelines and establish permitted levels of RF energy for the
general population. The guidelines are based on the safety standards previously set by both U.S. and international
standards bodies. These standards include a substantial safety margin designed to assure the safety of all persons,
regardless of age and health. This device and its antenna must not be co-located or operating in conjunction with any
other antenna or transmitter. This product has been shown to be capable of compliance for localized specific absorption
rate (SAR) for uncontrolled environment/general population exposure limits specified in ANSI/IEEE Std. C95.1-
had been tested in accordance with the measurement procedures specified i
n IEEE 1528.
2005 and
FCC information
Any Changes or modifications not expressly approved by the party responsible for compliance could void the user's
authority to operate the equipment. This device complies with Part 15 of the FCC Rules. Operation is subject to the
following two conditions: (1) this device may not cause harmful interference, and (2) this device must accept any
interference received, including interference that may cause undesired operation. This equipment has been tested and
found to comply with the limits for a Class B digital device, pursuant to Part 15 of the FCC Rules. These limits are
designed to provide reasonable protection against harmful interference in a residential installation. This equipment
generates, uses and can radiate radio frequency energy and, if not installed and used in accordance with the instructions,
may cause harmful interference to radio communications. However, there is no guarantee that interference will not occur
in a particular installation. If this equipment does cause harmful interference to radio or television reception, which can be
determined by turning the equipment off and on, the user is encouraged to try to correct the interference by one or more of
the following measures:
l Reorient or relocate the receiving antenna.
l Increase the separation between the equipment and receiver.
l Connect the equipment into an outlet on a circuit different from that to which the receiver is connected.
l Consult the dealer or an experienced radio/TV technician for help.
Modifications not expressly approved by PortaPhone could void the user's authority to operate the equipment. Privacy of
communications may not be ensured when using this equipment. Privacy of communications may not be ensured when
using this phone.
ISEDC Information
This device complies with ISEDC licence-exempt RSS standard(s). Operation is subject to the following two
conditions:
(1) this device may not cause interference, and
(2) this device must accept any interference, including interference that may cause undesired operation of the device.
Le présent appareil est conforme aux CNR d'Industrie Canada applicables aux appareils radio exempts de licence.
L'exploitation est autorisée aux deux conditions suivantes :
(1) l'appareil nedoit pas produire de brouillage, et
(2) l'utilisateur de l'appareil doit accepter tout brouillage radioélectrique subi, même si le brouillage est
susceptible d'en compromettre le fonctionnement.
The device been tested is compliance with RF field strength limits, users can obtain Canadian information on RF
exposure and compliance. Le présent appareil est conforme .Après examen de ce matériel aux conformité ou aux limites
d’intensité de champ RF,les utilisateurs peuvent sur l’exposition aux radiofréquences et la conformité and compliance
d’acquérir.les informations correspondantes.
Page 4
 Loading...