

PortaOne PortaSwitch Handbook

Porta Switch
PORTA
ONE
®
Handbook:
Broadband Internet, Wifi and IPTV Services
Maintenance Release 23
www.portaone.com

Porta Switch
Copyright Notice & Disclaimers
Copyright © 2000-2011 PortaOne, Inc. All rights reserved
PortaSwitch® Handbook:
Broadband Internet, WiFi and IPTV Services, May 2011
Maintenance Release 23
V1.23.4
Please address your comments and suggestions to: Sales Department,
PortaOne, Inc. Suite #408, 2963 Glen Drive, Coquitlam, BC, V3B 2P7
Canada.
Changes may be made periodically to the information in this publication.
The changes will be incorporated in new editions of the guide. The
software described in this document is furnished under a license
agreement, and may be used or copied only in accordance with the terms
thereof. It is against the law to copy the software on any other medium,
except as specifically provided in the license agreement. The licensee may
make one copy of the software for backup purposes. No part of this
publication may be reproduced, stored in a retrieval system, or transmitted
in any form or by any means, electronic, mechanical, photocopied,
recorded or otherwise, without the prior written permission of PortaOne
Inc.
The software license and limited warranty for the accompanying products
are set forth in the information packet supplied with the product, and are
incorporated herein by this reference. If you cannot locate the software
license, contact your PortaOne representative for a copy.
All product names mentioned in this manual are for identification
purposes only, and are either trademarks or registered trademarks of their
respective owners.
PortaSwitch® Handbook: Converged Services
© 2000-2011 PortaOne, Inc. All rights Reserved. www.portaone.com
2

Porta Switch
Table of Contents
Preface............................................................................................................................ 5
1. Prepaid WiFi Services ................................................................. 6
Typical Prepaid WiFi Service Scenario................................................................. 7
Setting Up Your Network Components................................................................ 8
Checklist........................................................................................................................ 14
Initial Configuration of PortaSwitch.................................................................... 15
Create Destination.................................................................................................... 15
Create Nodes.............................................................................................................. 16
Create a Vendor Tariff............................................................................................. 17
Enter Rates.................................................................................................................. 18
Create Vendors........................................................................................................... 20
Define Connections................................................................................................... 22
Create a Customer Tariff........................................................................................ 22
Enter Rates.................................................................................................................. 24
Create a Product........................................................................................................ 24
Create a Customer.................................................................................................... 27
Generate Accounts.................................................................................................... 28
Verify Wireless Internet Event History for Account...................................... 32
PortaSwitch® Handbook: Converged Services
2. IPTV Services .............................................................................. 34
IPTV Service Scenario.............................................................................................. 35
Checklist........................................................................................................................ 38
Set up the Kasenna LivingRoom™ Server........................................................ 38
Configure PortaBilling.............................................................................................. 38
Create Subscriptions................................................................................................ 39
Create Products.......................................................................................................... 40
Create Customer and Account.............................................................................. 42
Check Results on LivingRoom Server................................................................. 44
3. Broadband Internet Access Services.................................... 45
Examples of Broadband Packages...................................................................... 46
Checklist........................................................................................................................ 47
Initial Configuration of PortaSwitch.................................................................... 48
Create Destination.................................................................................................... 48
Create Services.......................................................................................................... 49
Create Nodes.............................................................................................................. 50
Create a Vendor Tariff............................................................................................. 51
Enter Rates.................................................................................................................. 53
Create a Vendor.........................................................................................................54
Define a Connection.................................................................................................55
Create a Customer Tariff........................................................................................ 56
Enter Rates.................................................................................................................. 57
Create Subscriptions................................................................................................ 58
Create a Destination Group Set........................................................................... 60
Define a Destination Group................................................................................... 60
Assign Prefix to Destination Group..................................................................... 61
Create a Volume Discount Plan............................................................................ 62
© 2000-2011 PortaOne, Inc. All rights Reserved. www.portaone.com
3

Porta Switch
Define Discounts within Volume Discount Plan.............................................. 63
Create a Product........................................................................................................ 66
Create a Customer.................................................................................................... 71
Create Accounts.........................................................................................................72
Check Current Volume Discount Statistics for Account............................... 75
Verify Broadband Event History for Account................................................... 76
PortaSwitch® Handbook: Converged Services
© 2000-2011 PortaOne, Inc. All rights Reserved. www.portaone.com
4
Porta Switch
Preface
This document provides PortaBilling® users with step-by-step
instructions and examples for setting up various prepaid and postpaid
services on a VoIP network.
Where to get the latest version of this guide
The hard copy of this guide is updated at major releases only, and does
not always contain the latest material on enhancements occurring between
minor releases. The online copy of this guide is always up to date, and
integrates the latest changes to the product. You can access the latest copy
of this guide at: www.portaone.com/support/documentation/
Conventions
This publication uses the following conventions:
Commands and keywords are given in boldface
Terminal sessions, console screens, or system file names are displayed
in fixed width font
The exclamation mark draws your attention to important information or
actions.
PortaSwitch® Handbook: Converged Services
NOTE: Notes contain helpful suggestions about or references to materials not
contained in this manual.
Timesaver means that you can save time by taking the action described
in the paragraph.
Tips provide information that might help you solve a problem.
Trademarks and Copyrights
PortaBilling®, PortaSIP®, PortaUM® and PortaSwitch® are registered
trademarks of PortaOne, Inc.
© 2000-2011 PortaOne, Inc. All rights Reserved. www.portaone.com
5

Porta Switch
Prepaid WiFi Services
1. Prepaid WiFi
Services
Prepaid WiFi services enable Internet telephony service providers
(ITSP) to offer wireless access services that customers can pay for in
advance.
The market for prepaid services includes tourists, immigrant
communities, mobile populations such as military personnel, and
people with limited credit histories. These users can all gain immediate
access to WiFi services at key locations such as hotels, cafes by using
prepaid WiFi cards (“access codes”) purchased at supermarkets and
other types of retail outlets. Prepaid WiFi access is a single “purchase”
transaction – so at the moment of the authorization all available funds
are withdrawn from the account and converted into the WiFi access
time.
© 2000-2011 PortaOne, Inc. All rights Reserved. www.portaone.com
6

Porta Switch
Prepaid WiFi Services
Typical Prepaid WiFi Service Scenario
In an ITSP internal network infrastructure, prepaid services are
implemented through a debit card application and work in conjunction
with the following:
Mikrotik RouterBoard 532 with RouterOS 2.9 installed
PortaBilling®
This combination of services enables a carrier to authorize prepaid WiFi
access and debit individual user accounts in real time.
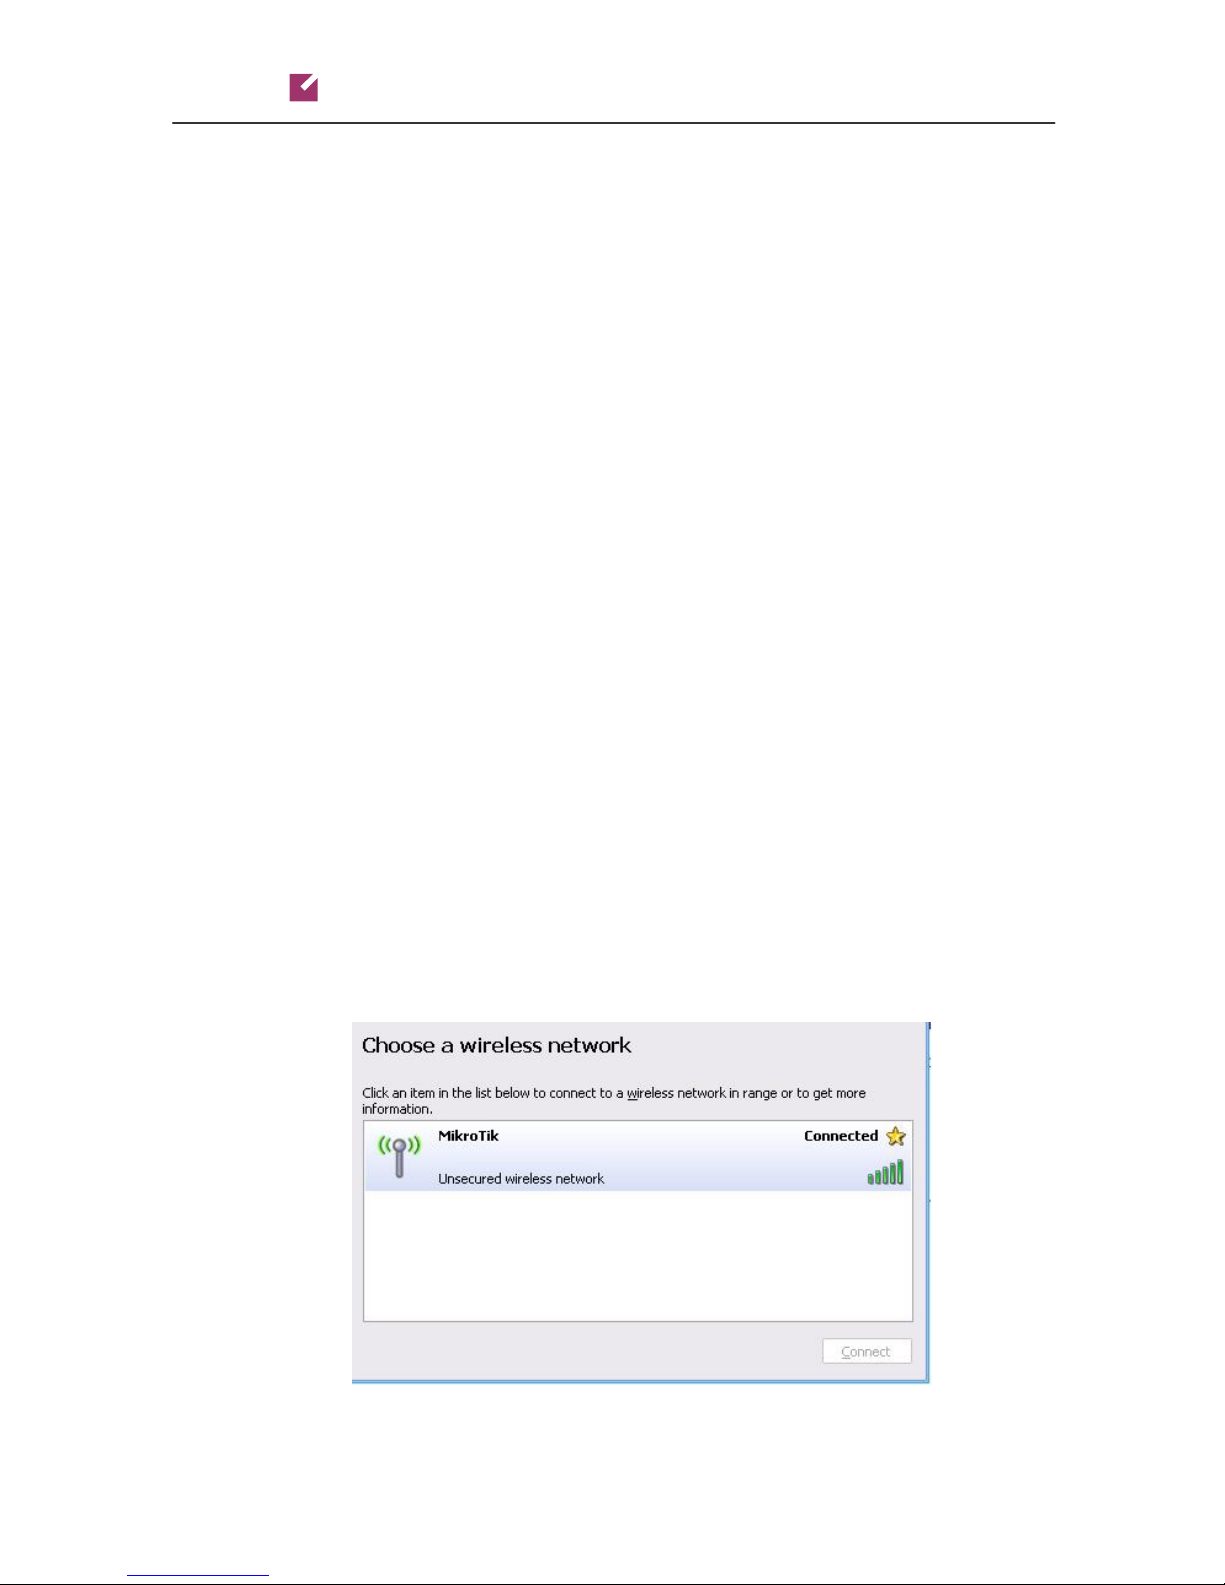
Customer interaction:
Customer selects the WiFi network
Customer clicks “Connect”
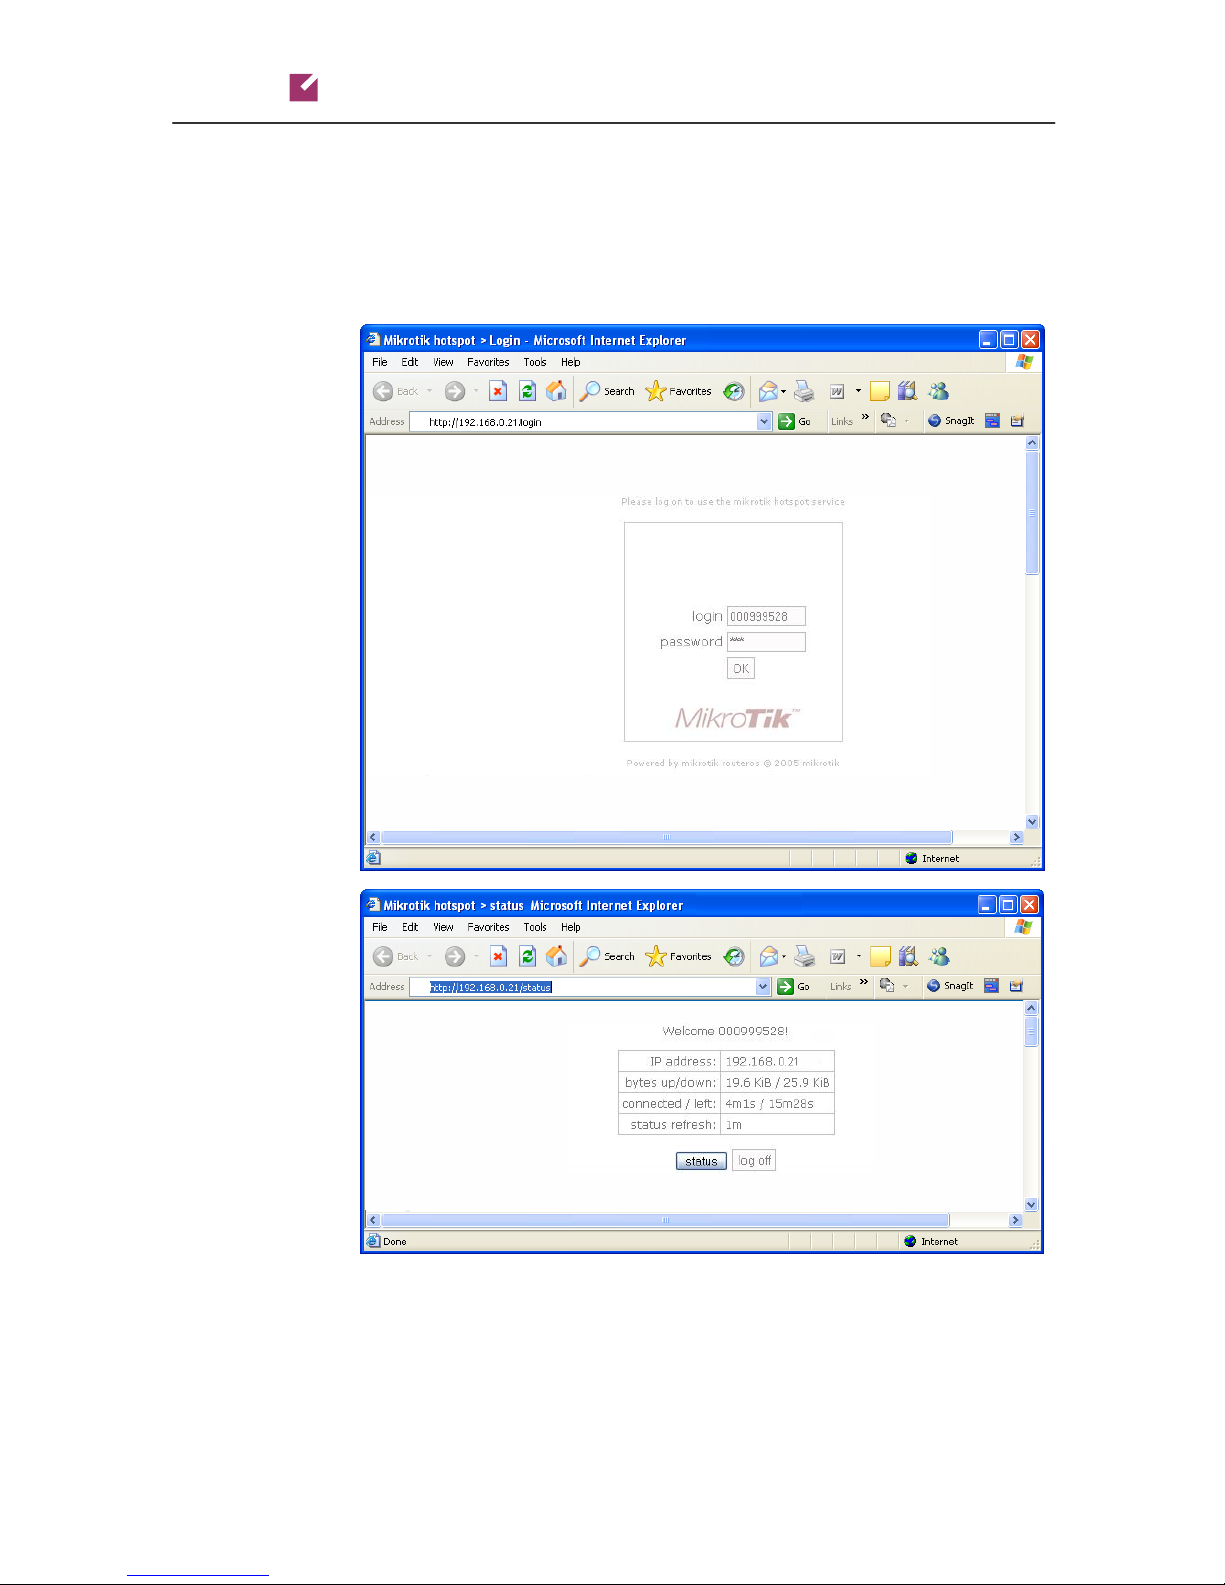
Customer opens web browser
Customer opens WiFi gateway authorization page
Customer enters the login and password
Customer starts working
© 2000-2011 PortaOne, Inc. All rights Reserved. www.portaone.com
7
Porta Switch
Prepaid WiFi Services
Setting Up Your Network Components
Mikrotik Configuration Guidelines
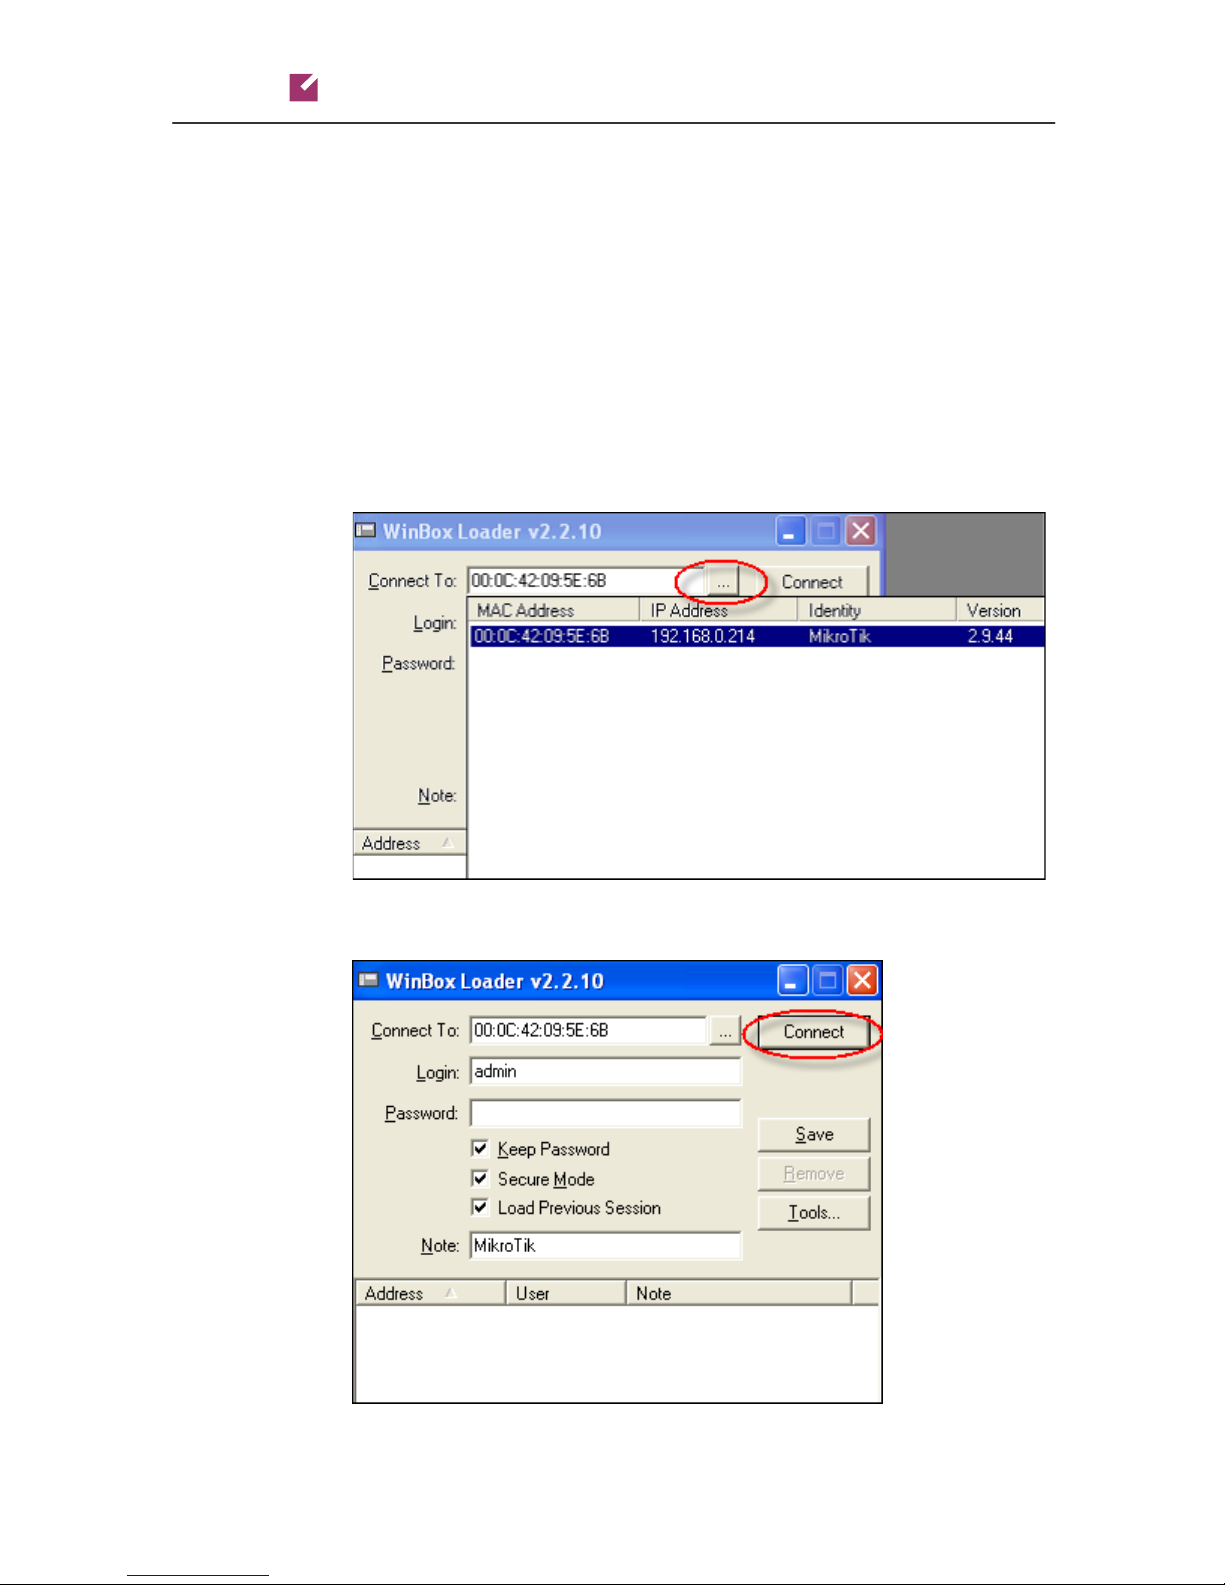
1. Assign a proper IP address to Mikrotik.
If it is already assigned go to step 2. If not, set IP address manually or
enable DHCP client and assign it to Ethernet interface with the help of
winbox.exe utility.
Click the “…” button, and select your router; only one should appear.
Make sure the login is admin and there is no password. Click Connect.
© 2000-2011 PortaOne, Inc. All rights Reserved. www.portaone.com
8
Porta Switch
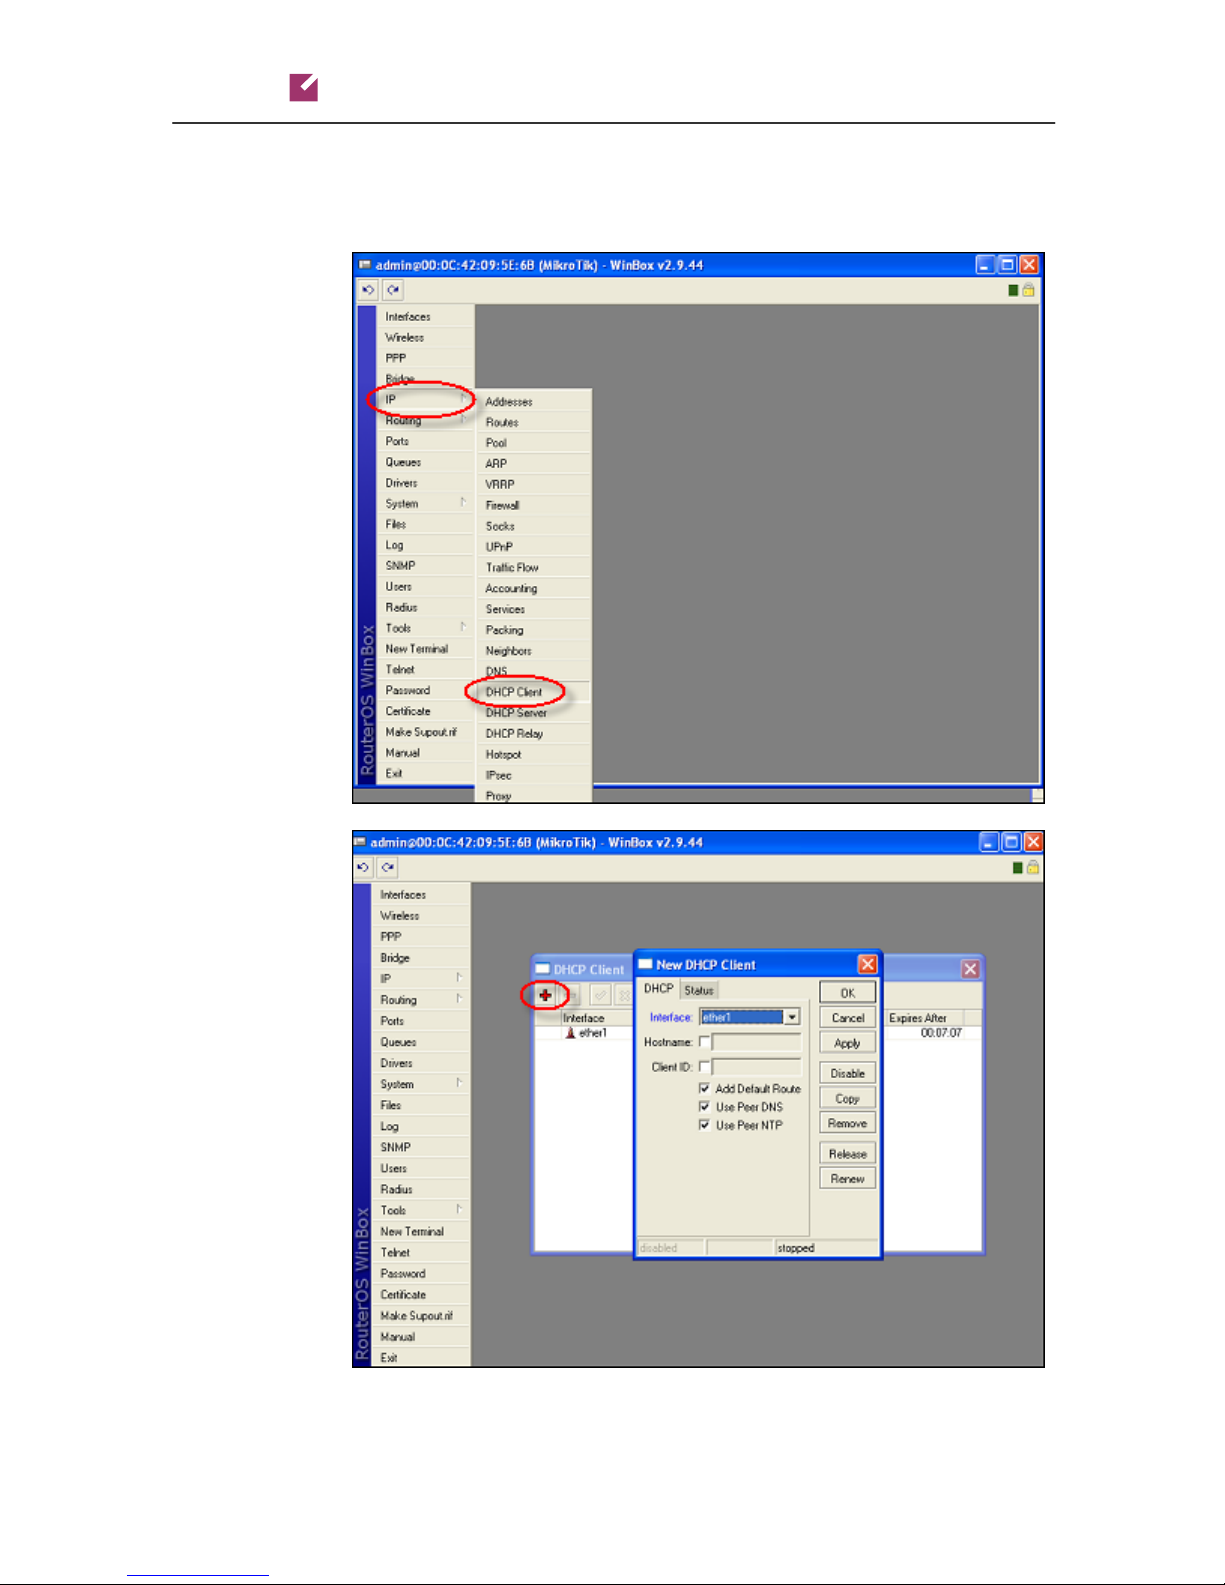
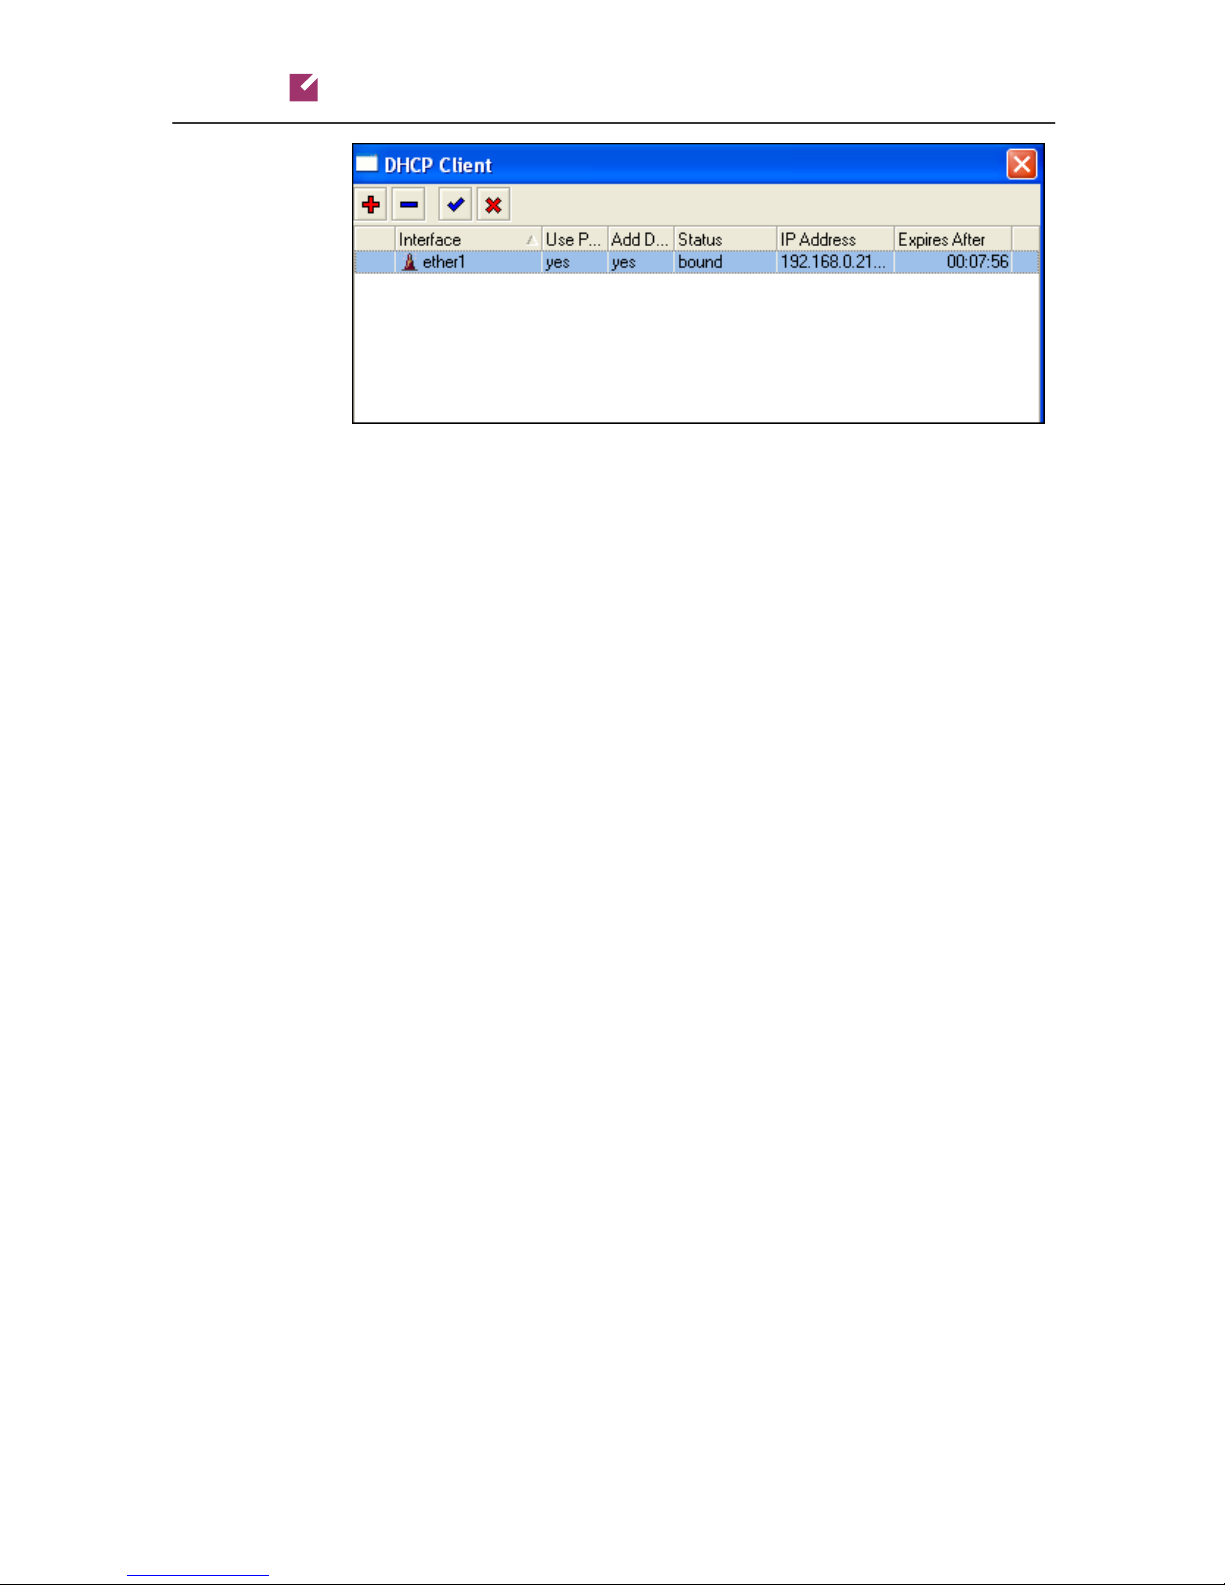
Open the IP tab, choose DHCP Client and then at the window click the
“+” button. Assign a new DHCP Client port using the Interface
dropdown box and click OK.
Prepaid WiFi Services
© 2000-2011 PortaOne, Inc. All rights Reserved. www.portaone.com
9
Porta Switch
2. Connect to Mikrotik.
ssh admin@192.186.0.21
NOTE: Replace 192.168.0.21 with Mikrotik IP address:
3. Assign IP address to wlan1 interface.
[admin@Mikrotik] > /ip address add interface=wlan1 address=192.168.12.1
netmask=255.255.255.0 disabled=no
[adimn@Mikrotik] > / address print
Flags: X – disabled, I – invalid, D – dynamic
# ADDRESS NETWORK BROADCAST INTERFACE
0 D 192.168.0.214/24 192.168.0.0 192.168.0.255 ether1
1 192.168.12.1/24 192.168.12.0 192.168.12.255 wlan1
[admin@MikroTik] >
Prepaid WiFi Services
NOTE: Network “192.168.12.0/24” is used as a sample.
4. Enable wlan1 interface and set wireless to “access
point-bridge” mode.
[admin@Mikrotik] > /interface enable wlan1
[admin@Mikrotik] > /interface print
Flags: X – disabled, D – dynamic, R - running
# NAME TYPE RX-RATE TX_RATE MTU
0 R ether1 ether 0 0 1500
1 R ether2 ether 0 0 1500
2 R ether3 ether 0 0 1500
3 R wlan1 wlan 0 0 1500
[admin@Mikrotik] >
[admin@Mikrotik] > /interface wireless print
Flags: X – disabled, R – running
0 name="wlan1" mtu=1500 mac-address=00:0C:42:05:7A:B6 arp=enabled
disable-running-check=no interface-type=Atheros AR5413
radio-name="000C42057AB6" mode=station ssid="MikroTik" area=""
frequency-mode=manual-txpower country=no_country_set antenna-gain=0
frequency=5180 band=5ghz scan-list=default rate-set=default
supported-rates-b=1Mbps,2Mbps,5.5Mbps,11Mbps supported-rates-
a/g=6Mbps,9Mbps,12Mbps,18Mbps,24Mbps,36Mbps,48Mbps,54Mbps
rates--b=1Mbps basic-rates-a/g=6Mbps max-station-count=2007 acktimeout=dynamic tx-power-mode=default noise-floor-threshold=default
periodic-calibration=default periodic-calibration-interval=60 bursttime=disabled dfs-mode=none antenna-mode=ant-a wds-mode=disabled
wds-default-bridge=none wds-default-cost=100 wds-cost-range=50-150
wds-ignore-ssid=no update-stats-interval=disabled defaultauthentication=ye
default-forwarding=yes default-ap-tx-limit=0
basic-
© 2000-2011 PortaOne, Inc. All rights Reserved. www.portaone.com
10

Porta Switch
default-client-tx-limit=0 proprietary-extensions=post-2.9.25 hidessid=no security-profile=default disconnect-timeout=3s on-failretry-time=100ms preamble-mode=both compression=no allow-
sharedkey=no
[admin@Mikrotik] > /interface wireless set 0 mode=”ap-bridge”
[admin@Mikrotik] > /interface wireless print
Flags: X – disabled, R – running
0 name=”wlan1”...
mode=ap-bridge …
…
[admin@Mikrotik] >
5. Configure DHCP-SERVER for WiFi.
5.1. Add IP pool which will be used for WiFi;
[admin@Mikrotik] >/ip pool add name=wifi-pool ranges=192.168.12.2-
192.168.12.255
[admin@Mikrotik] >/ip pool print
# NAME RANGE
0 wifi-pool 192.168.12.2-192.168.12.255
[admin@Mikrotik] >
5.2. Add dhcp network;
[admin@Mikrotik] > /ip dhcp-server network add address=192.168.12.0/24
dns-server=192.168.0.1,213.186.192.2 gateway=192.168.12.1 comment="wifi
network"
[admin@Mikrotik] > /ip dhcp-server network print
# ADDRESS GATEWAY DNS-SERVER WINS-SERVER DOMAIN
0 ;;; wifi network
192.168.12.0/24 192.168.12.1 192.168.0.1
213.186.192.2
[admin@Mikrotik] >
NOTE: Network «192.168.12.0/24» used for sample, replace it with real
network address and set correct dns-server address(es).
5.3. Add dhcp server;
[admin@Mikrotik] > /ip dhcp-server add interface=wlan1 addresspool=wifi-pool lease-time=3d00:00:00 disabled=no
[admin@Mikrotik] >/ip dhcp-server print
Flags: X – disabled, I – invalid
# NAME INTERFACE RELAY ADDRESS-POOL LEASE-TIM ADD-ARP
0 dhcp1 wlan1 wifi-pool 3d
[admin@Mikrotik] >
Prepaid WiFi Services
6. Configure RADIUS client.
[admin@Mikrotik] > /radius add address=111.11.11.11 secret="mikrotik"
service="hotspot"
[admin@Mikrotik] > /radius print
Flags: X – disabled
# SERVICE CALLED-ID DOMAIN ADDRESS SECRET
0 hotspot 111.11.11.11 mikrotik
[admin@Mikrotik]
NOTE: 111.11.11.11 – IP of Master (Radius) Server, secret
– RADIUS Key
© 2000-2011 PortaOne, Inc. All rights Reserved. www.portaone.com
>
11
Porta Switch
7. Configure HOTSPOT server.
7.1. Add profile for RADIUS AAA;
[admin@Mikrotik] > /ip hotspot profile add name="wi-fi AAA" useradius=yes
[admin@Mikrotik] > /ip hotspot profile print
Flags: * - default
0 * name="default" hotspot-address=0.0.0.0 dns-name="" htmldirectory=hotspot rate-limit="" http-proxy=0.0.0.0:0 smtpserver=0.0.0.0
login-by=cookie,http-chap http-cookie-lifetime=3d split-user-
-domain=no use-radius=no
1 * name="wi-fi AAA" hotspot-address=0.0.0.0 dns-name="" html-
directory=hotspot rate-limit="" http-proxy=0.0.0.0:0 smtp-
server=0.0.0.0
login-by=cookie,http-chap http-cookie-lifetime=3d split-user-domain=no
use-radius=yes radius-accounting=yes radius-interim-update=received
nas-port-type=wireless-802.11 radius-default-domain="" radius-locationid="" radius-location-name=""
[admin@Mikrotik] >
7.2. Add HOTSPOT server;
[admin@Mikrotik] > /ip hotspot add name="WiFi" interface=wlan1 addresspool="wifi-pool" profile="wi-fi AAA"
[admin@Mikrotik] > /ip hotspot print
Flags: X – disabled, I – invalid, S – HTTPS
# NAME INTERFACE ADDRESS-POOL PROFILE IDLE-TIMEOUT
0 X WiFi wlan1 wifi-pool wi-fi AAA 5m
[admin@Mikrotik] > /ip
[admin@Mikrotik] > /ip hotspot print
Flags: X – disabled, I – invalid, S – HTTPS
# NAME INTERFACE ADDRESS-POOL PROFILE IDLE-TIMEOUT
0 WiFi wlan1 wifi-pool wi-fi AAA 5m
[admin@Mikrotik] >
NOTE: The name of the HOTSPOT server should be WiFi (the same as the special
destination for WiFi service in PortaBilling®).
Prepaid WiFi Services
hotspot enable 0
8. Connect to WiFi router.
Select the WiFi network and click Connect.
© 2000-2011 PortaOne, Inc. All rights Reserved. www.portaone.com
12
Porta Switch
9. Get online.
Launch your web browser;
Enter your MikroTik’s IP address (configured on the step 1) in
Enter your Account Id and Service password.
the browser’s Address field;
Prepaid WiFi Services
© 2000-2011 PortaOne, Inc. All rights Reserved. www.portaone.com
13

Porta Switch
Checklist
Print the following page and use it to check off the operations you have
completed while performing system setup according to the instructions in
this chapter. Please be sure to perform all of the operations (all of the
boxes must be checked), otherwise the service will not work.
Operation
General configuration
Enter company data under My Company. [ ]
Specify a base currency. [ ]
For any other currency you plan to use, specify the exchange rate
source and define exchange rates.
Create a symbolic destination WiFi. [ ]
Network configuration
Add node on the web.
Configure your gateway. [ ]
Rating configuration (Vendor)
Create a tariff A, which describes your termination costs. [ ]
Insert rates in tariff A for a symbolic WiFi destination. [ ]
Create a vendor. [ ]
Create a connection for this vendor with the Wi-Fi service type,
using tariff A.
Rating configuration (Customer)
Create a tariff B, which will be applied to prepaid WiFi users. [ ]
Insert rates in tariff B for a symbolic WiFi destination. [ ]
Create your WiFi product. [ ]
Create one rating entry in account’s product, using the node you
created and tariff B.
Account provisioning
Create a retail customer who owns the WiFi cards. [ ]
Generate a batch of accounts for this customer. [ ]
Testing
Mikrotik Configuration. [ ]
Prepaid WiFi Services
Done
[ ]
[ ]
[ ]
© 2000-2011 PortaOne, Inc. All rights Reserved. www.portaone.com
14
Porta Switch
Prepaid WiFi Services
Initial Configuration of PortaSwitch
TIP: When the system has just been installed, use username pb-root and
password pb-root to login.
The following steps are normally performed only once, after the system is
installed:
Visit My Company on the main menu. Enter information about your
company and set up a base currency. Naturally, this does not limit your
operations to this currency only. However, on cost / revenue reports and
the like different currencies will be converted to the one you specify here.
NOTE: Once you set up a base currency it cannot be changed. If you make a mistake,
you will have to start with a new PortaBilling® environment.
From the main menu, choose Users and create login entries for users
who will be working with the system. It is not recommended that the
default PortaBilling® root user (pb-root) be used for any operations
other than initial set-up. Make sure you are able to login as the newlycreated user and change the password for the pb-root user.
If you plan to do billing in multiple currencies, define them and specify
exchange rates in Currencies section.
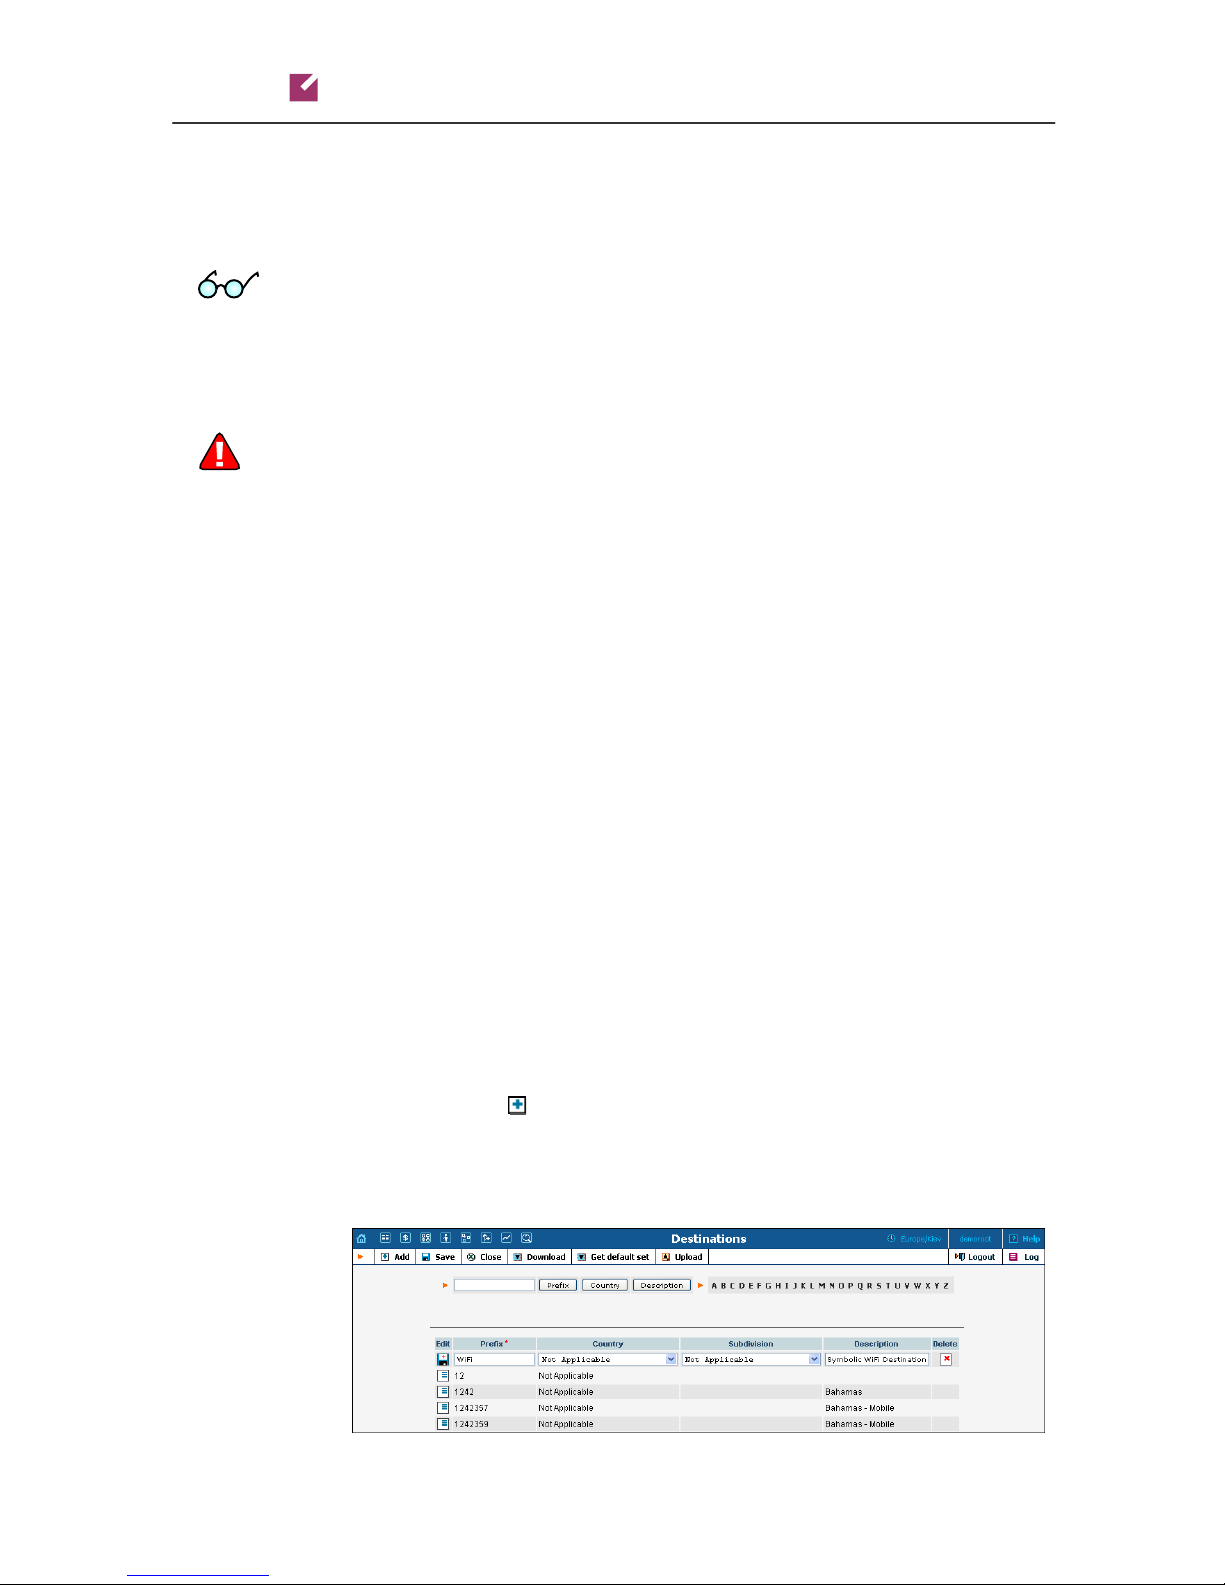
Create Destination
You need to create the same destination as the name of HOTSPOT
server you specified in step 7 above (Configure HOTSPOT server.) when
you set up your network components;
1. In the Rating section of Admin-Index, choose Destination.
2. Click on the
3. Fill in the required information. The country subdivision is optional.
You can use the Description column to store some extra information
about the destination.
© 2000-2011 PortaOne, Inc. All rights Reserved. www.portaone.com
Add button.
in this case it will be WiFi.
15

Porta Switch
4. Click Save.
Create Nodes
This step is only required if you have not entered your gateways into the
system before. In this case, you must enter your gateways as nodes.
PortaBilling® requires some key information about your network
equipment such as IP address, Node ID, Radius shared secret, etc.
Prepaid WiFi Services
1. In the Networking section of the Admin-Index page, choose Nodes.
2. In the Node management window, click the
Add icon.
3. Fill in the New Node form:
o Node Name – A short descriptive name for this node (will be
used in the select menus).
o Manufacturer - Select Mikrotik.
o Type – VoIP node type; select ROUTER.
o Node ID – Mikrotik server host name (recommended
hostname.domainname).
o NAS-IP-Address – IP address of the gateway.
© 2000-2011 PortaOne, Inc. All rights Reserved. www.portaone.com
16
Porta Switch
o Auth. Translation rule – Leave this empty for now; see the
o RTP Proxying – Leave the default selection (Optimal); this
o Radius Client – Make sure this check-box is enabled, since the
o Radius Key – Enter the RADIUS secret key you have specified
o Radius Source IP – See the Node ID, NAS IP address, and Radius
o POD Server – This checkbox relates to ISP billing. Leave it
4. Click
5. Repeat steps 2-4 until all of your nodes have been entered.
Prepaid WiFi Services
Translation Rules section of the PortaBilling Administrator
Guide.
parameter is not used for the WiFi Internet access service.
gateway (node) must be able to communicate with PortaBilling
via RADIUS.
in the configuration of the gateway.
source IP section of the PortaBilling Administrator Guide.
Unless your gateway has multiple network interfaces, the value
here should be the same as the NAS-IP-Address.
unchecked for now.
Save&Close.
Create a Vendor Tariff
The tariff is a single price list for the use of WiFi services. To provide
WiFi services successfully, the following tariff should be created:
o A tariff with the termination costs for each termination partner
you have; these tariffs are created as “Applied to: Vendor”.
To create the required tariff, follow the next steps:
© 2000-2011 PortaOne, Inc. All rights Reserved. www.portaone.com
17

Porta Switch
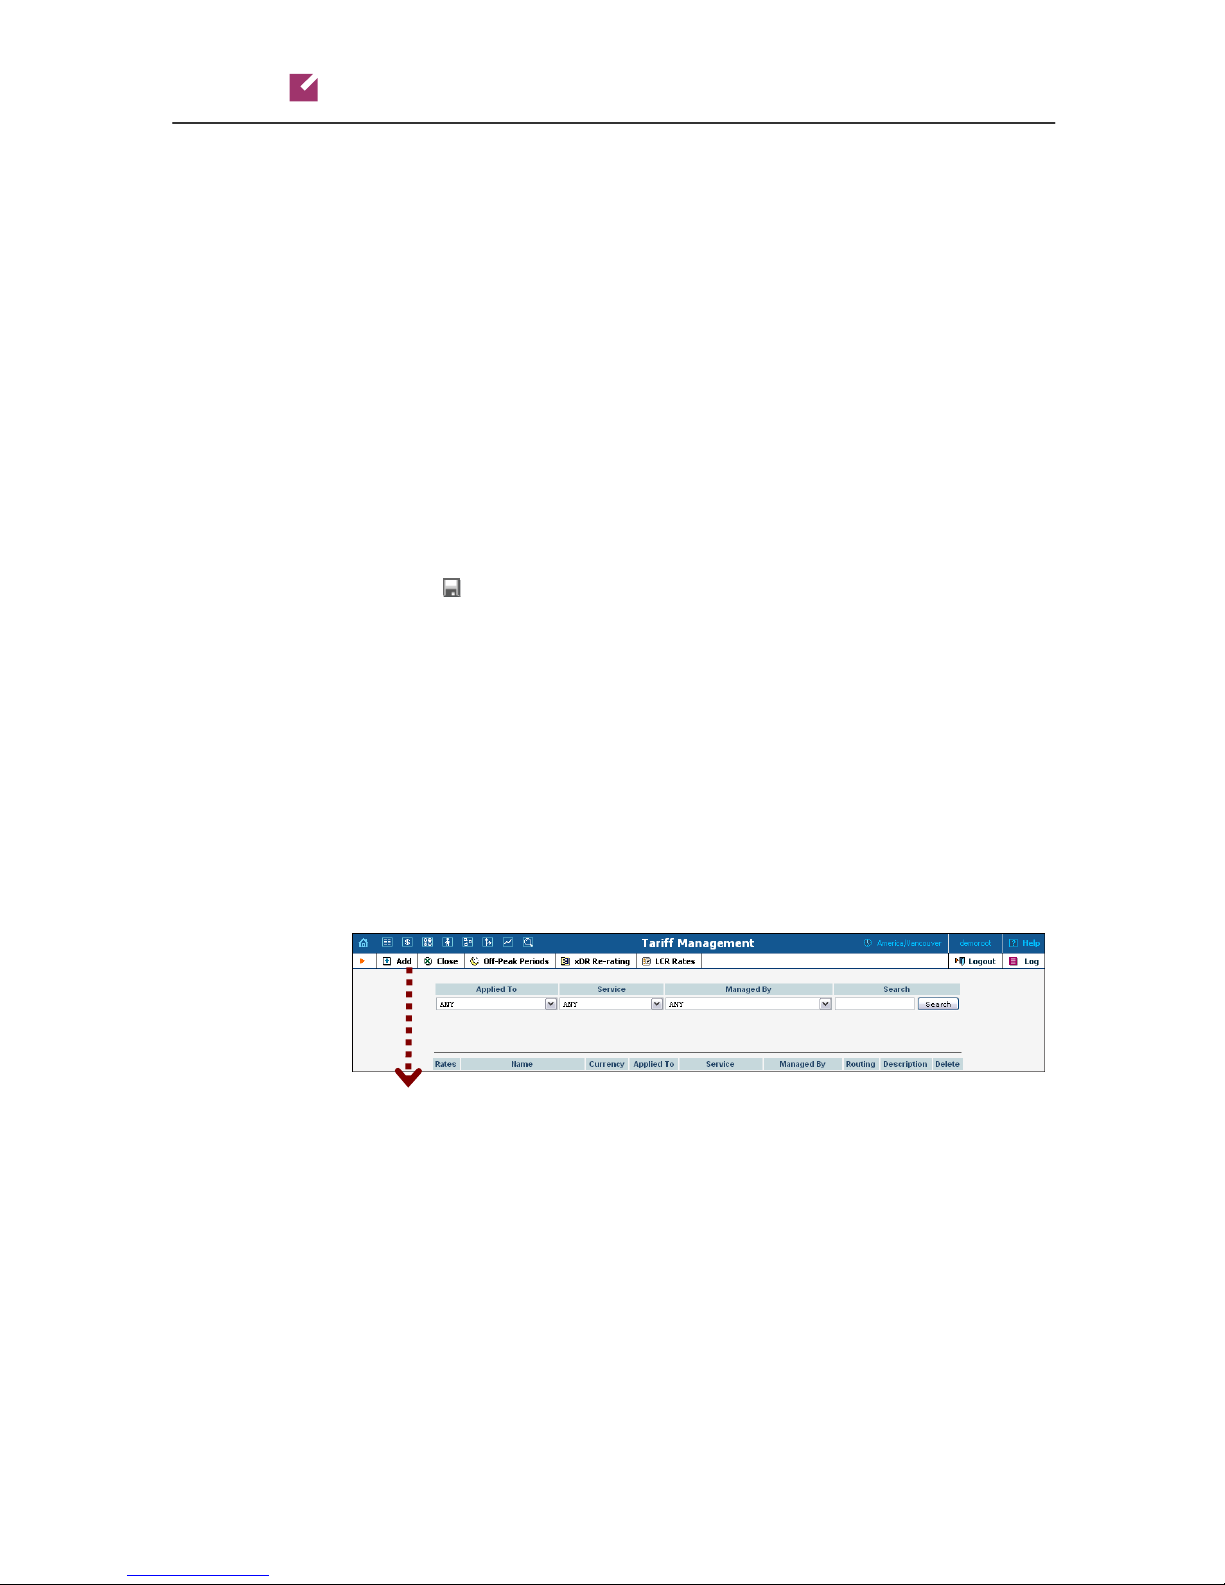
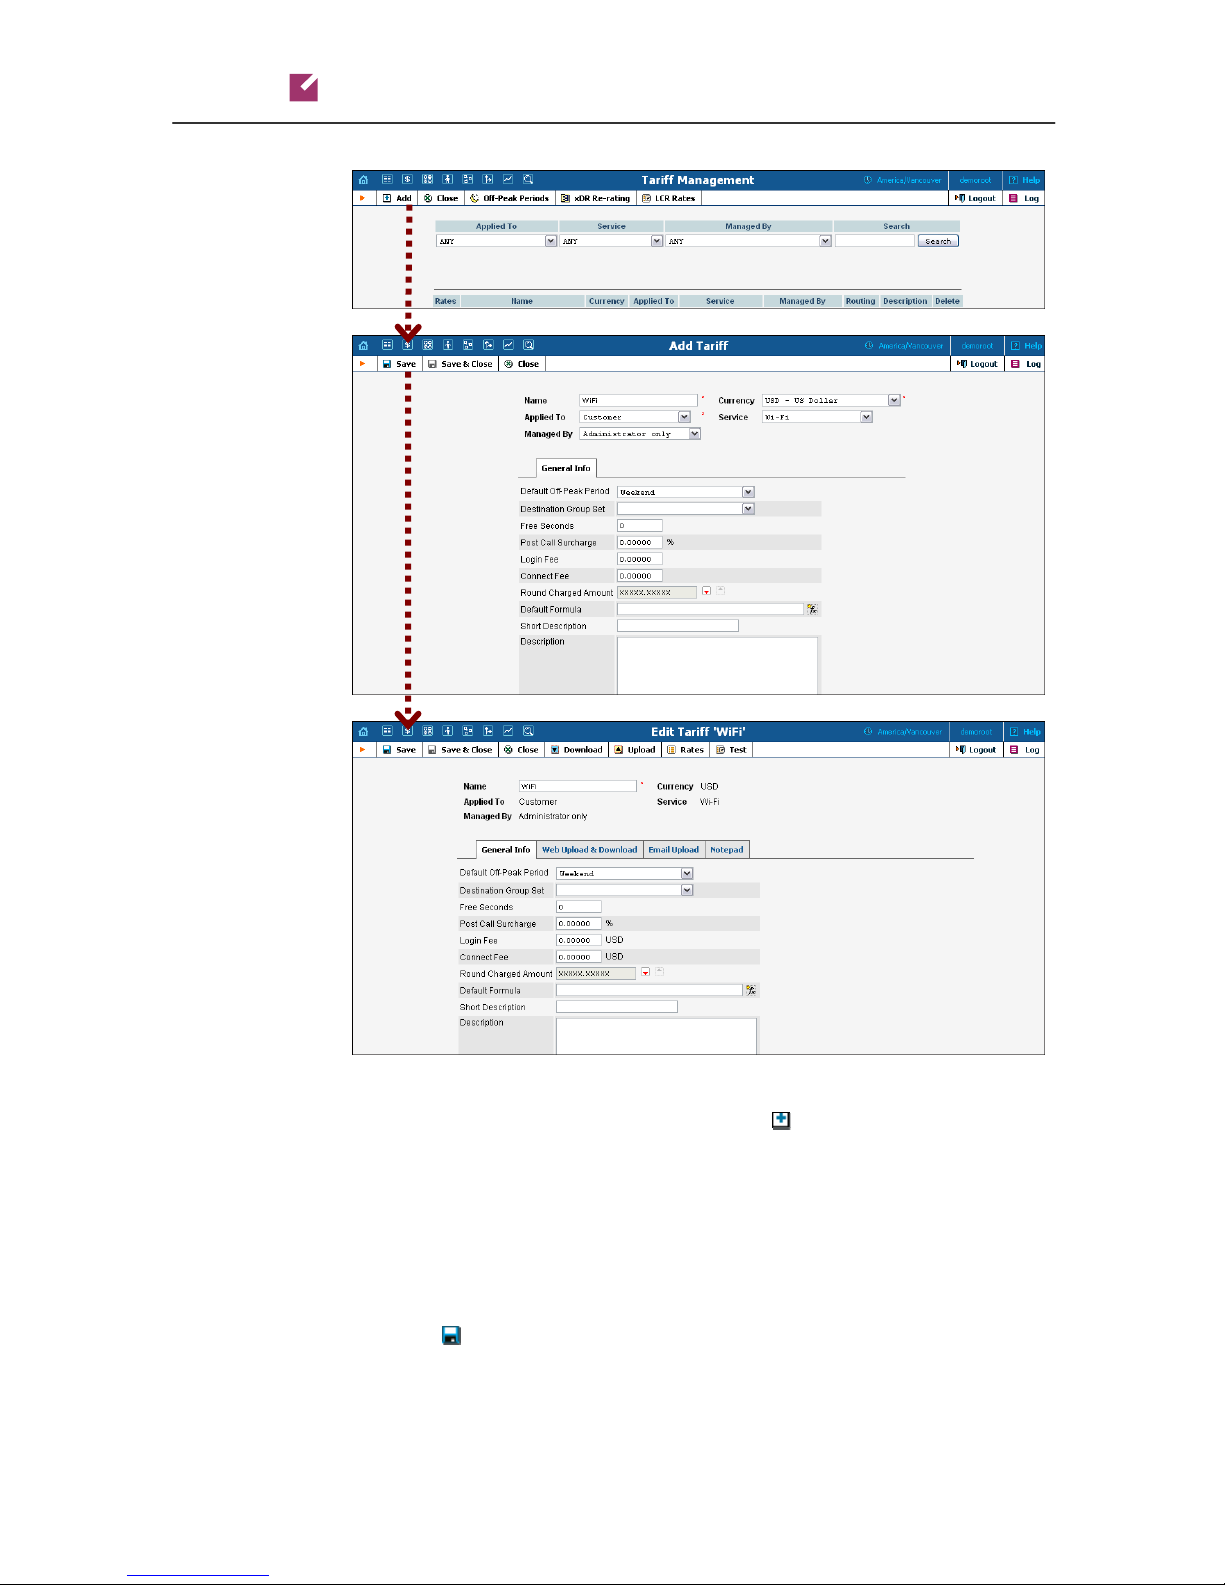
1. In the Rating section of Admin-Index, choose Tariffs.
2. On the Tariff Management page, choose Add.
3. Fill in the Add Tariff form:
o Name - A short name for the tariff object; this is the name you
o Currency – Indicates the currency, in which the vendor charges
will then see in the select menus.
you.
Prepaid WiFi Services
NOTE: The currency for the tariff may be chosen only once, and cannot be changed
later.
o Applied To – Choose Vendor in the Applied To select menu.
o Routing – Clear the check-box Routing.
o Service – Choose Wi-Fi here.
o Default Off-peak Period – If you do not differentiate between
o Short Description – A short tariff description.
o Description – An extended tariff description.
4. Click
Enter Rates
Rates are per-destination prices. Please refer to the Call Billing Parameters
section in the PortaBilling Administrator Guide for more information
on billing parameters.
Managing Rates Online
peak and off-peak rates, just choose Not defined; otherwise,
select one of the previously defined off-peak periods.
Save.
Managing rates online is very convenient for maintaining existing rate
tables, as well as for reference purposes. For new price lists or major
updates, an offline method is better.
© 2000-2011 PortaOne, Inc. All rights Reserved. www.portaone.com
18
Porta Switch
Prepaid WiFi Services
1. On the Tariff Management page you will see a list of available tariffs.
Click the Rates icon before the name of the tariff. When you are in
Tariff Management for a particular tariff, click on Rates in the
toolbar.
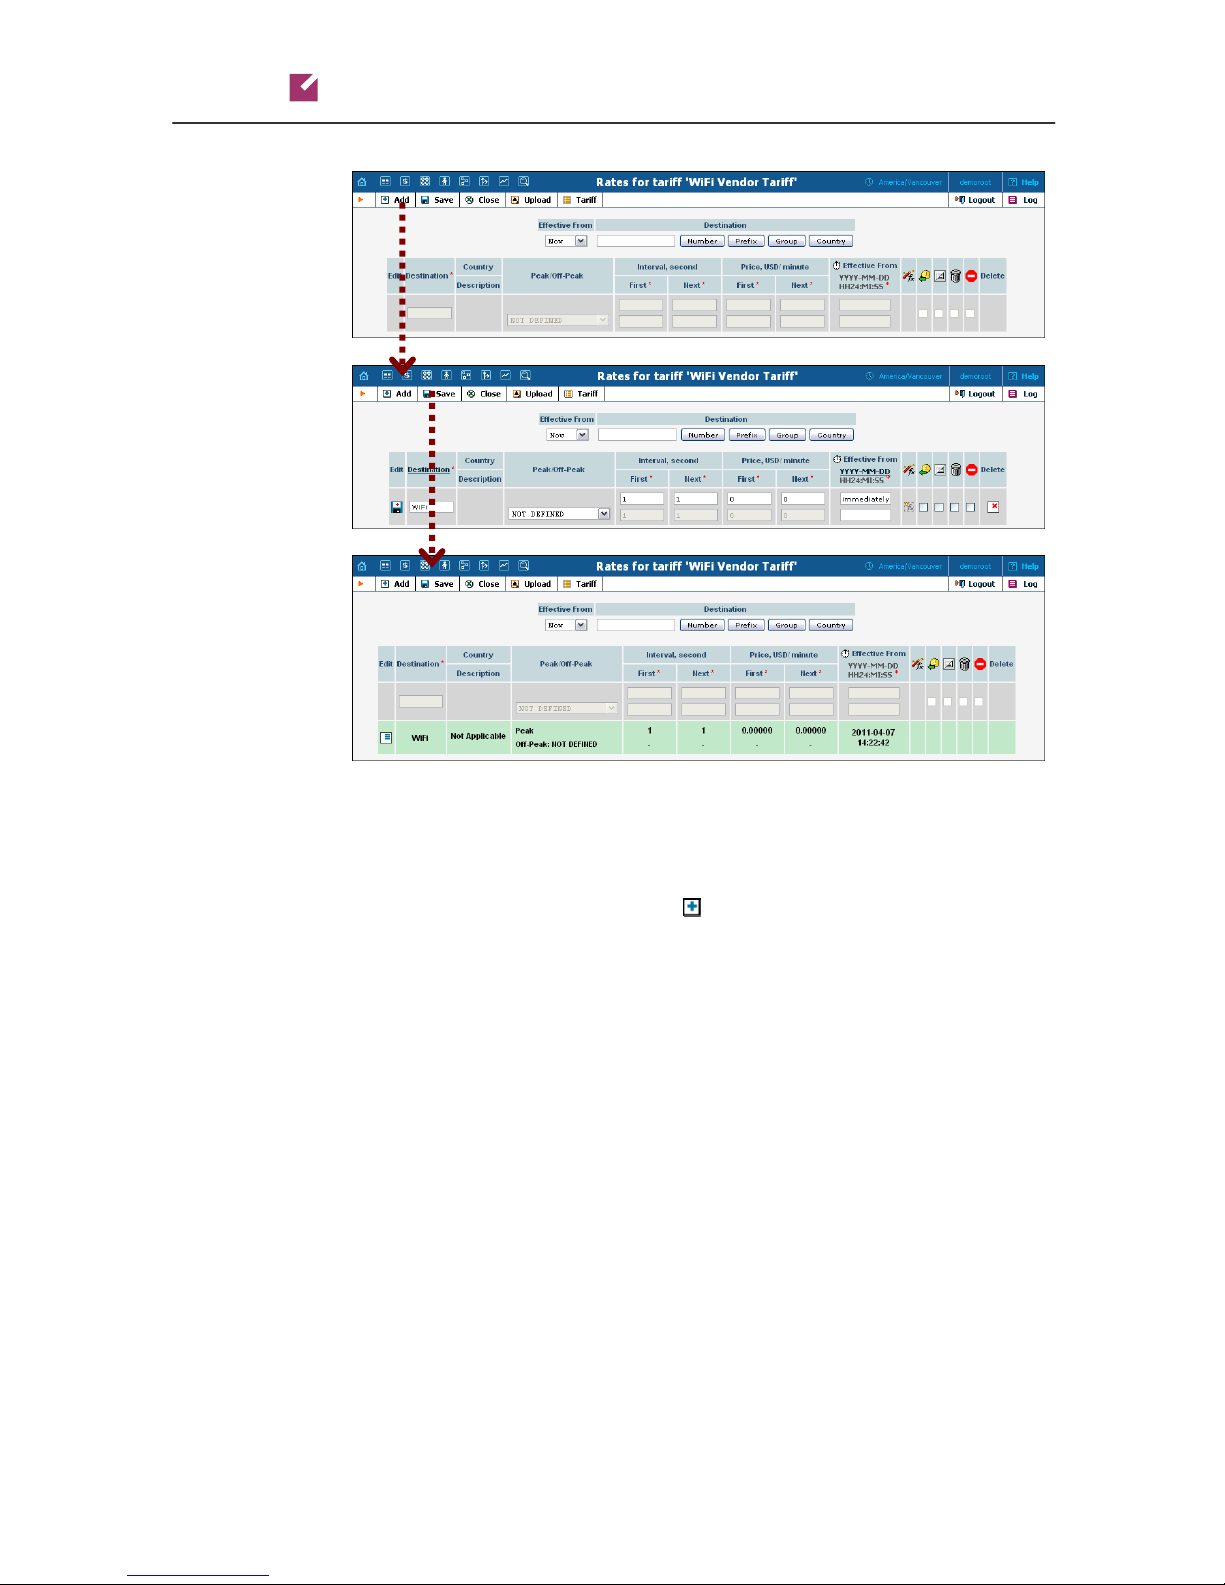
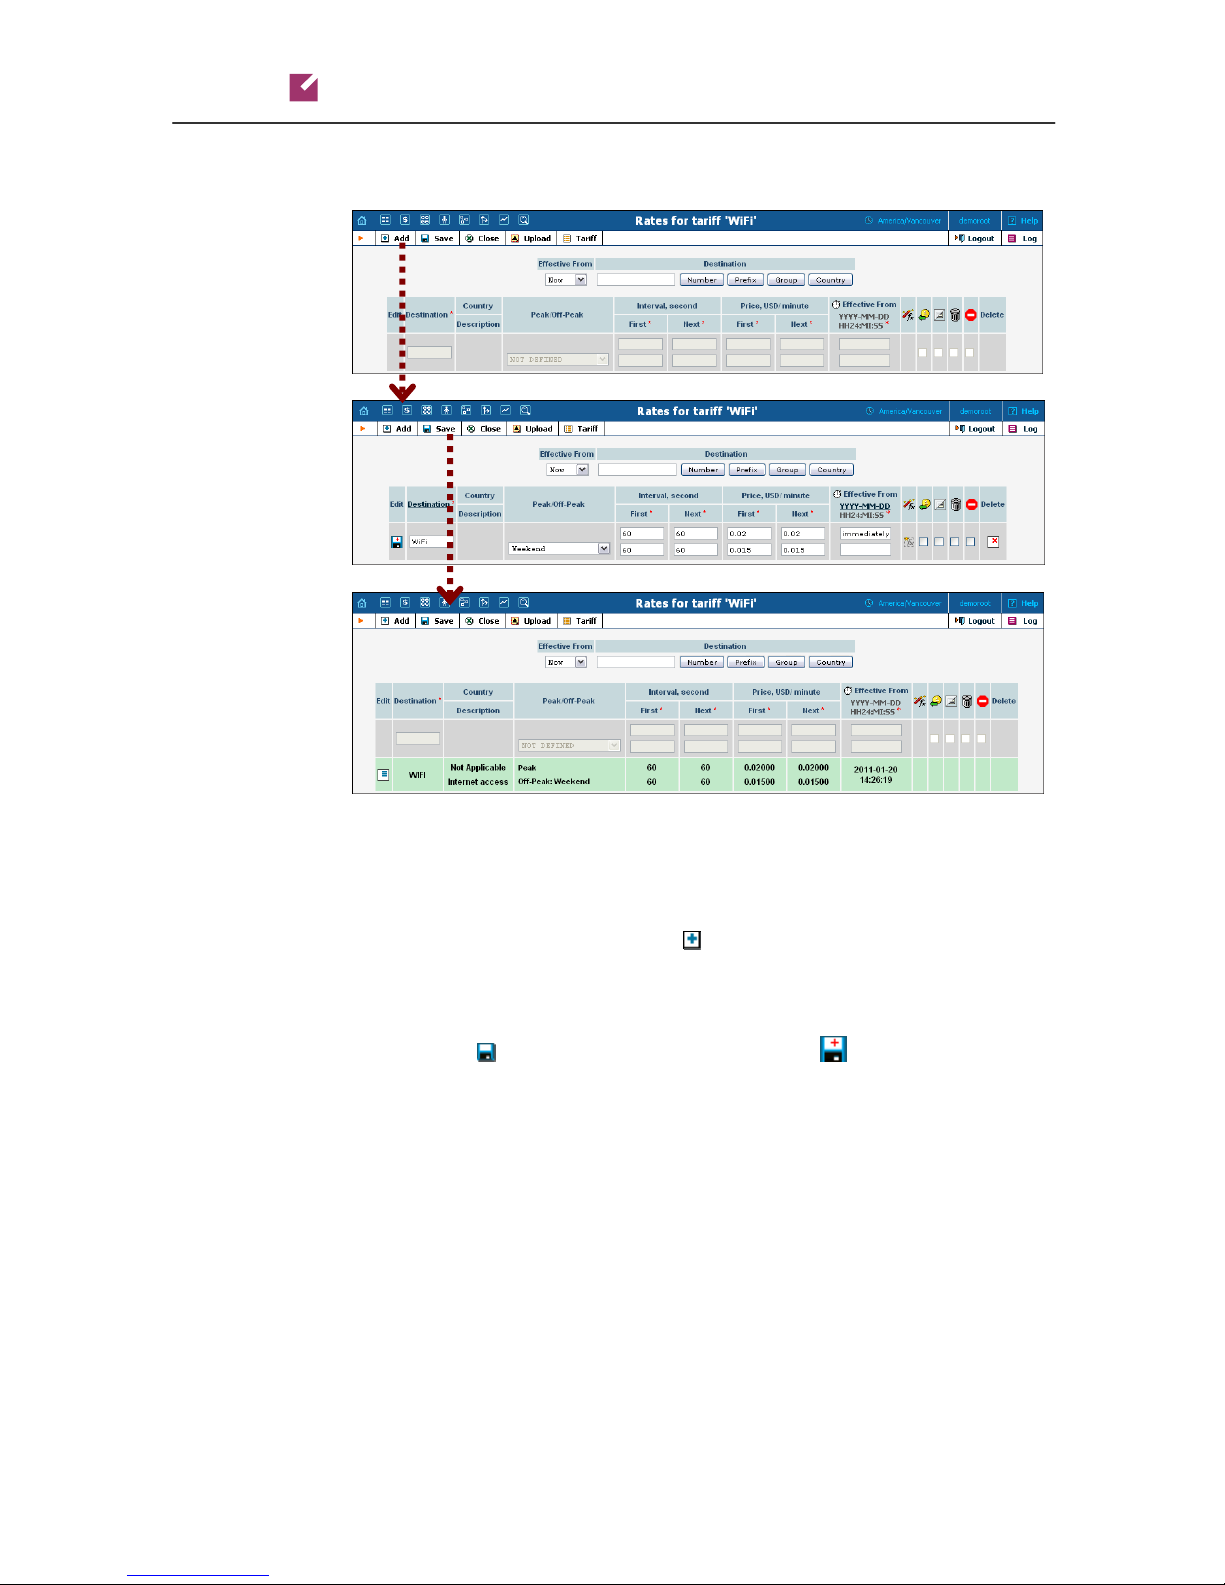
2. In the Edit Rates screen, click Add.
3. Fill in the required information:
o Destination – A symbolic destination prefix may be entered
directly, or you can access the destinations directory by clicking
the Destination link (in the column header).
NOTE: The phone prefix you are trying to create a rate for must already exist in
Destinations.
o Interval First – first billing unit in seconds.
o Interval Next – next billing unit in seconds.
o Price First – per-minute price for first interval.
o Price Next – per-minute price for next interval.
o Off-peak Interval First– first billing unit in seconds for off-peak
time.
o Off-peak Interval Next – next billing unit in seconds for off-
peak time.
o Off-peak Price First – per-minute price for first interval for off-
peak time.
© 2000-2011 PortaOne, Inc. All rights Reserved. www.portaone.com
19
Porta Switch
o Off-peak Price Next – per-minute price for next interval for
NOTE: Off-peak fields appear only if an off-peak period has been defined for the
tariff.
o Effective From – If you want this rate to take effect sometime in
NOTE: When using the calendar, you can specify that the date you are entering is in a
different time zone than your present one. PortaBilling® will then automatically adjust
the time.
o Rate Formula Wizard – launches the wizard for creating a
o Payback Rate, Hidden, Forbidden or Discontinued flags are
4. Click the
of the row.
Prepaid WiFi Services
off-peak time.
the future, you can either type in a date manually, or use the
calendar (click the DD-MM-YYYY link).
custom rating formula
optional.
Save button in the toolbar, or the icon on the left side
Create Vendors
This step is only required if you have not entered information about your
vendors into the system before. Vendors are your termination partners
who will charge you for providing WiFi services.
1. In the Participants section of the Admin interface, choose Vendors.
2. On the Vendor Management page, click Add.
© 2000-2011 PortaOne, Inc. All rights Reserved. www.portaone.com
20
Porta Switch
Prepaid WiFi Services
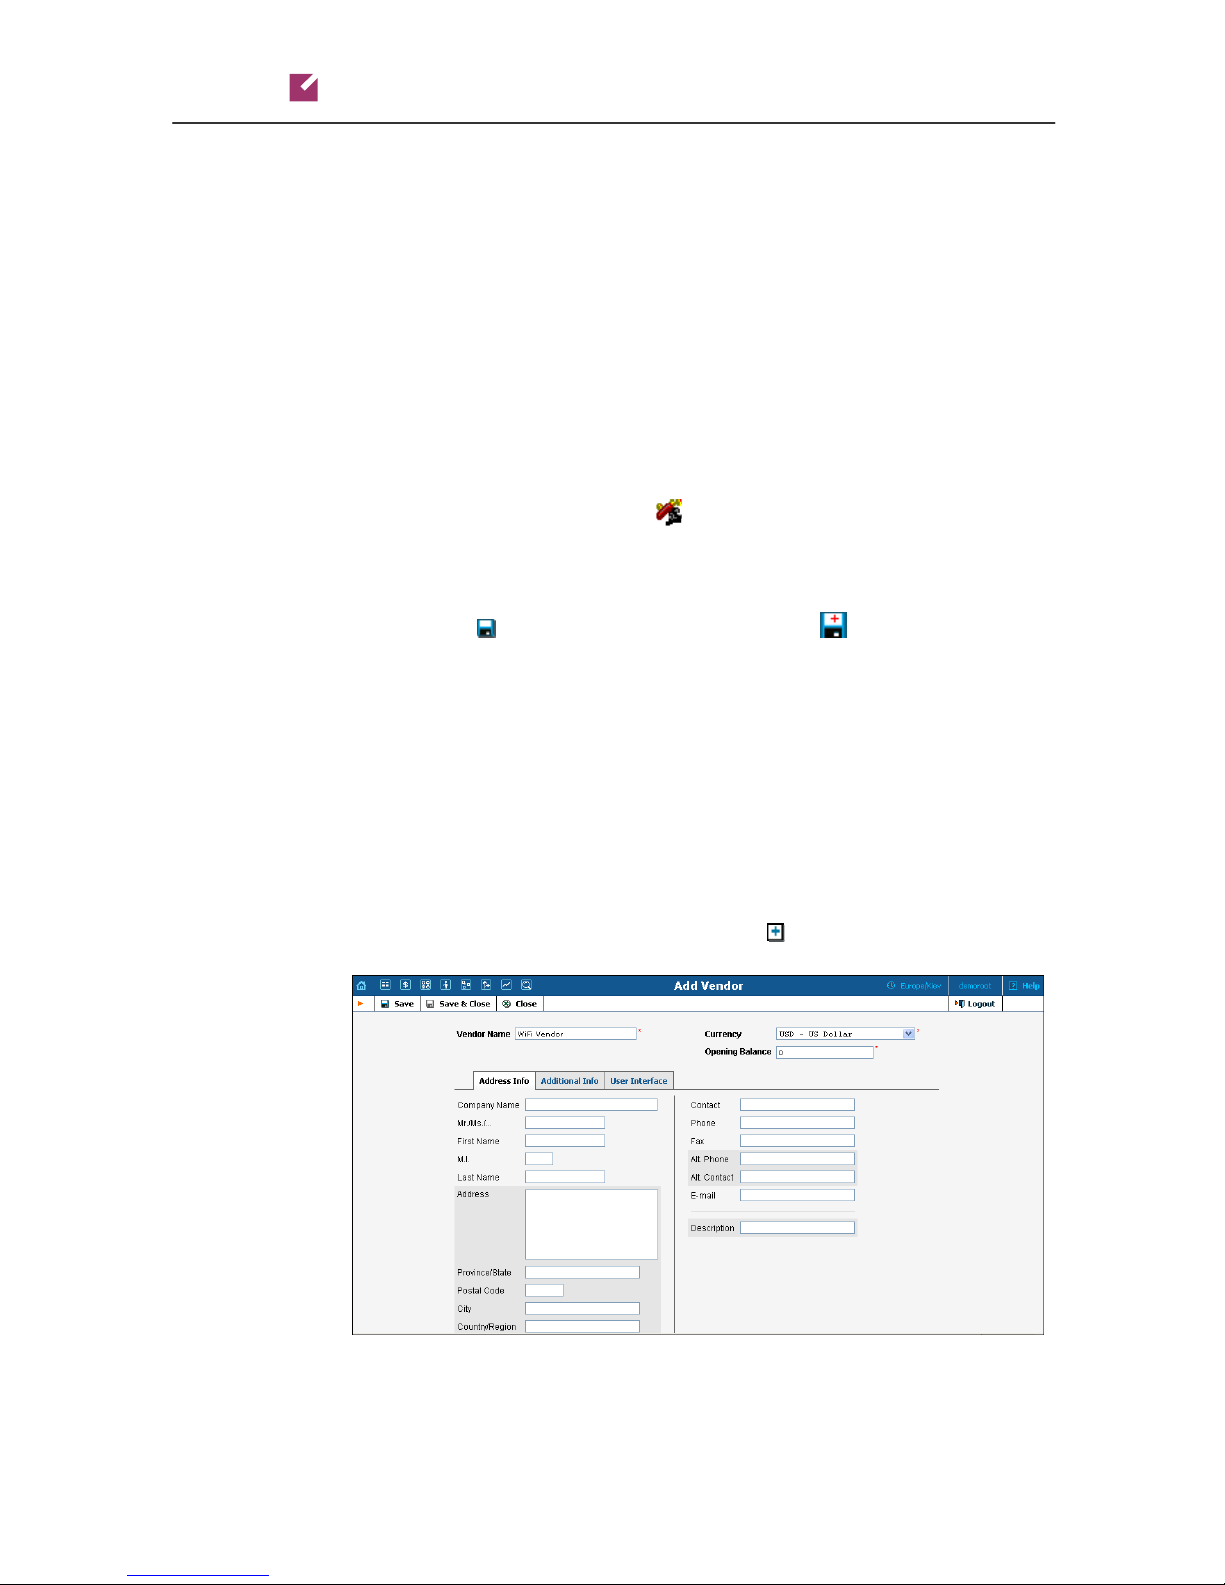
3. Fill in the Add Vendor form. Please note that there are three tabs
available on the screen. The most important fields are:
Main form (top)
o Vendor Name – a short name for the Vendor object; this will be
used on the web interface.
o Currency – the currency in which this vendor charges you.
o Opening balance – starting balance for the vendor; the default
is zero.
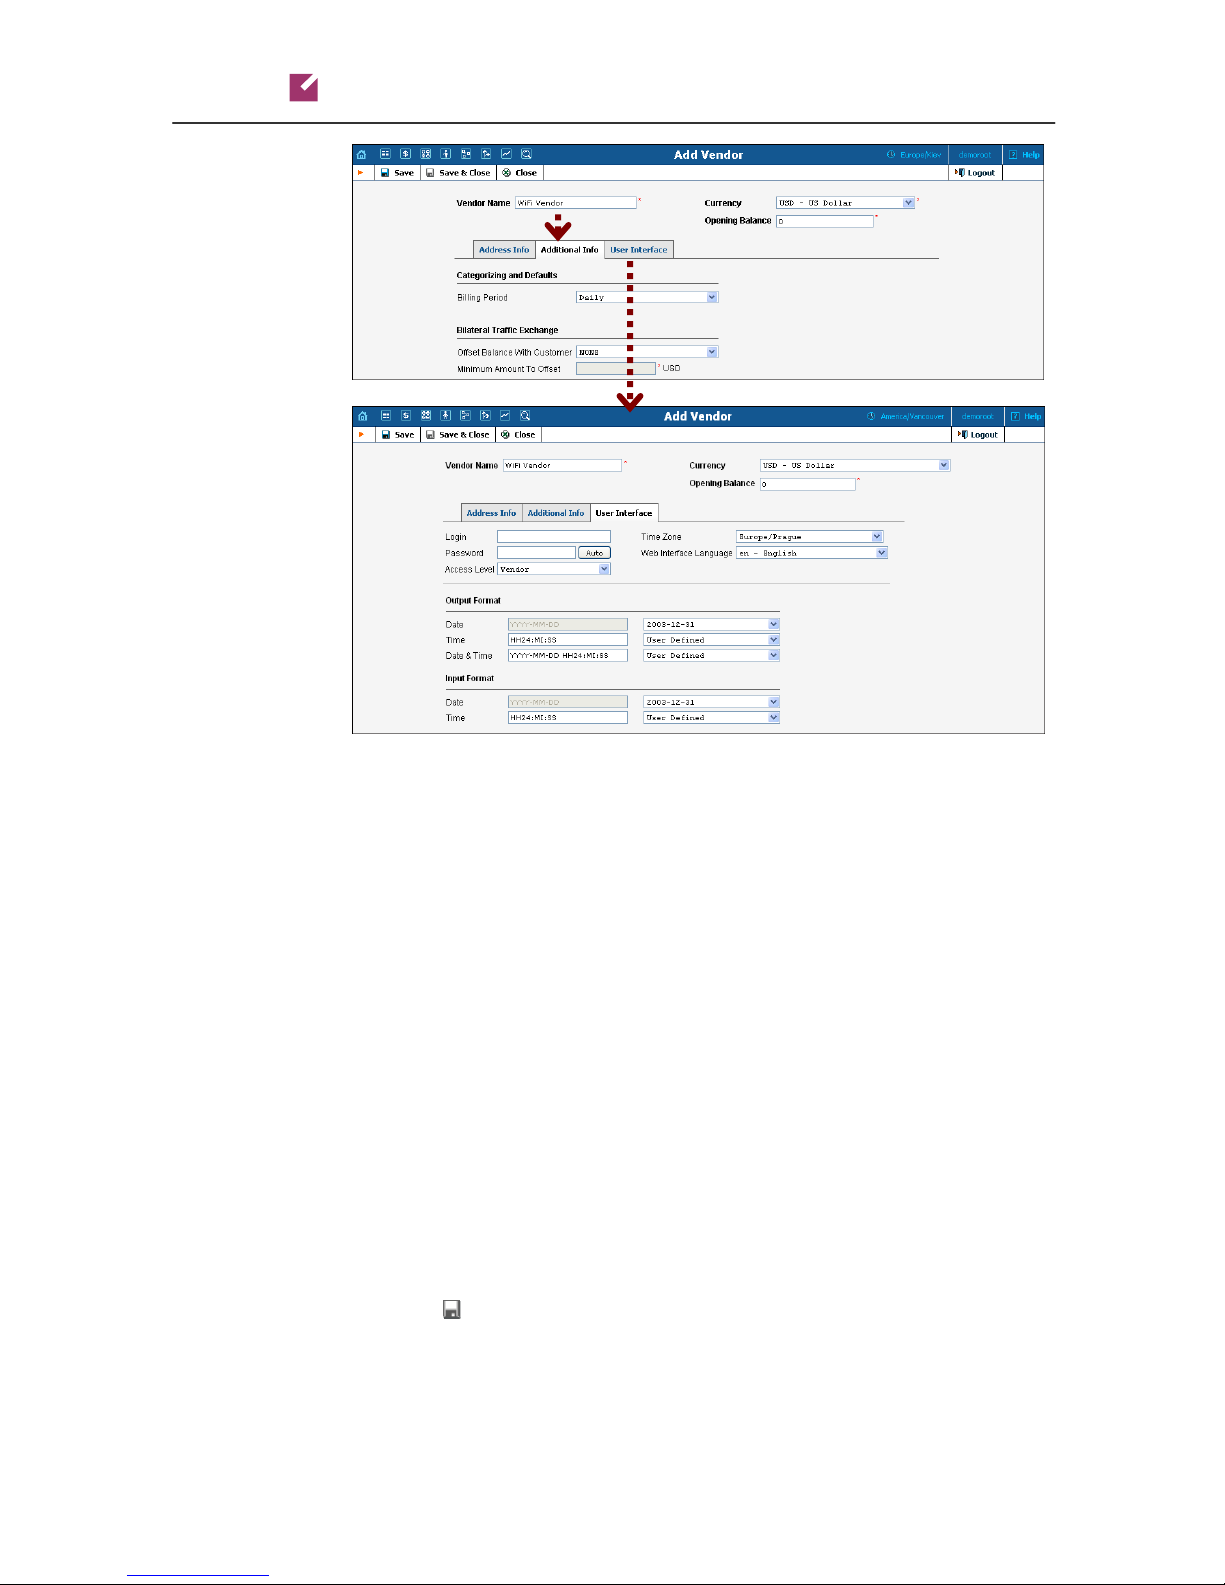
Additional Info
o Billing period – split period for vendor statistics.
User Interface
o Time zone – the time zone that the vendor uses for his billing
period. Statistics will be split into periods in this time zone, so
your statistics will match the vendor’s.
4. Click Save&Close.
5. Repeat steps 2-4 to add all of your vendors.
© 2000-2011 PortaOne, Inc. All rights Reserved. www.portaone.com
21
Porta Switch
Define Connections
Connections are points at which data leave or enter a network and are
directed to or from vendors, whereby costing occurs.
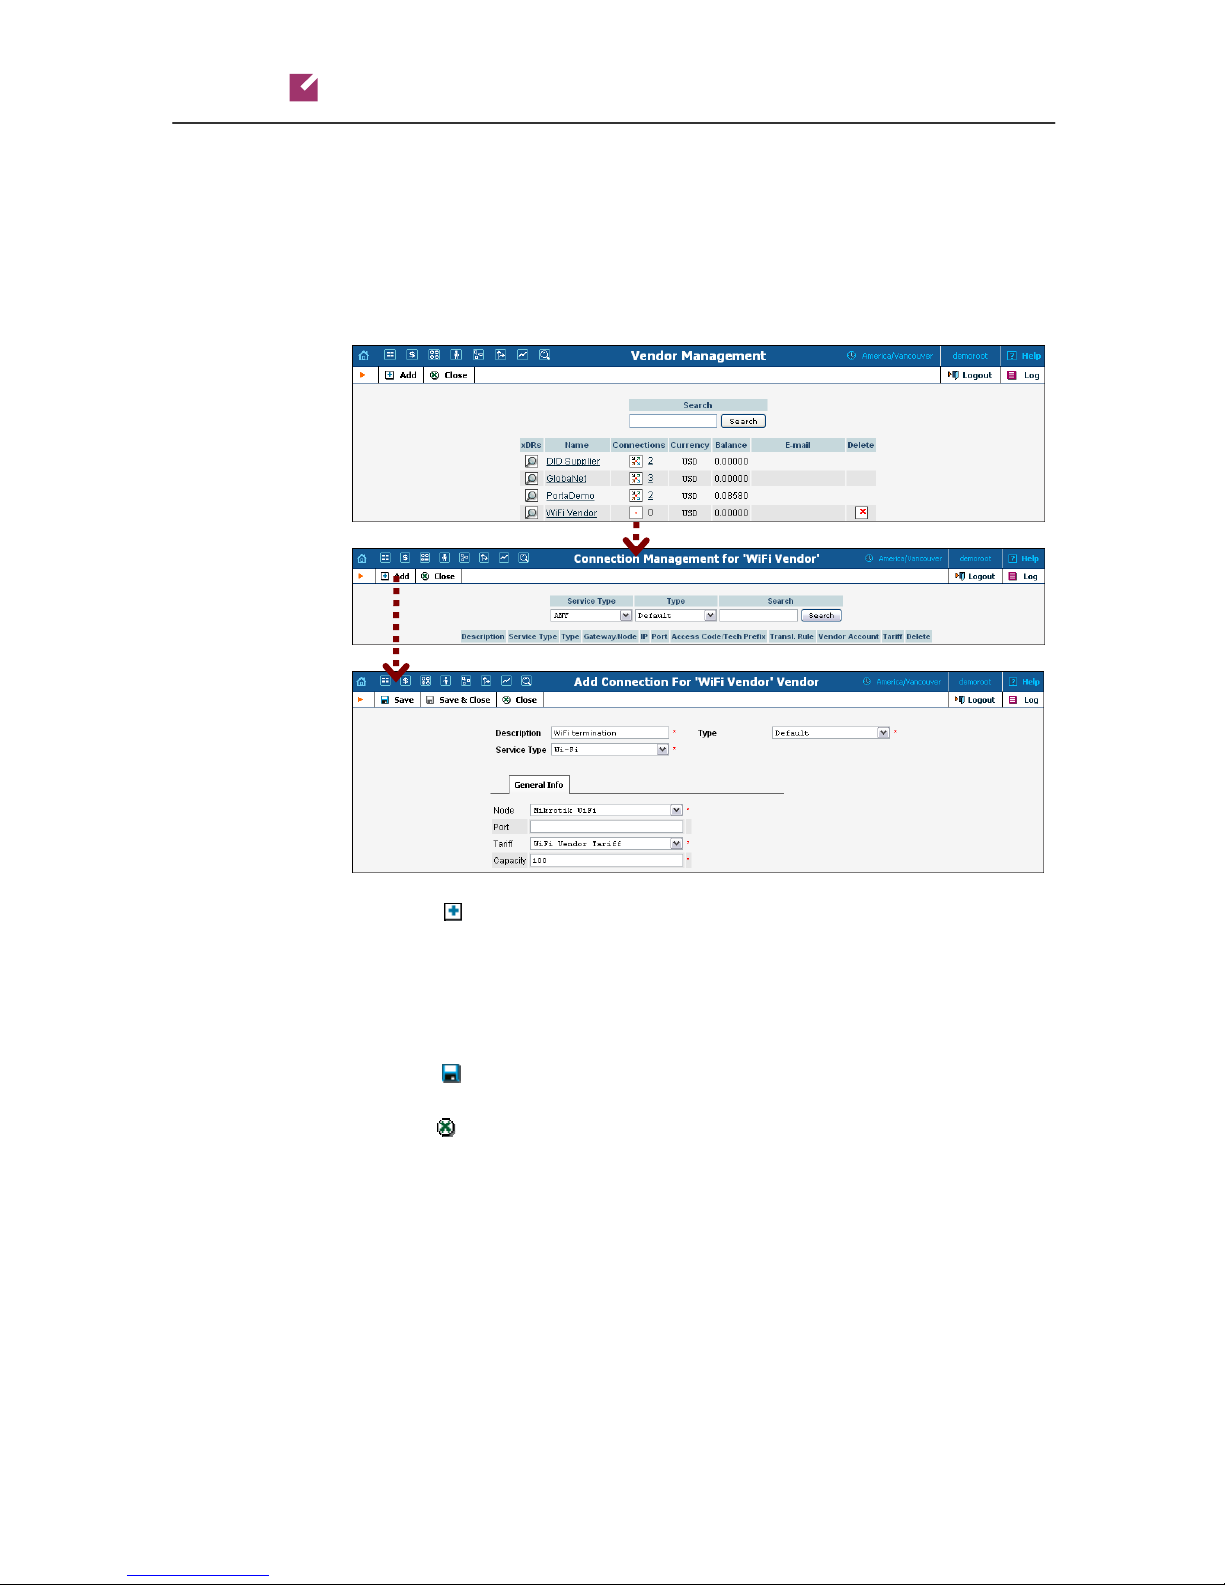
1. In the Participants section of the admin interface, choose Vendors.
2. Click on the Connections icon next to the vendor name.
Prepaid WiFi Services
3. Press Add to add a new connection.
4. Fill in the connection information. In the Service Type drop-down
box, select Wi-Fi. In the Node drop-down box, choose the Mikrotik
WiFi router which you previously added as a node. Choose the tariff
which defines your termination costs for this connection / vendor.
Description and Capacity are mandatory for all connection types.
5. Click
6. Repeat steps 3-6 to add more connections to the same vendor, then
click Close in order to exit to the Vendor Management screen.
7. Repeat steps 2-7 to add connections for other vendors.
Save.
Create a Customer Tariff
To provide WiFi services successfully, one more tariff should be created:
o A tariff for each account’s billing scheme, these tariffs are created
as “Applied to: Customer”.
To create the required tariff, follow the next steps:
© 2000-2011 PortaOne, Inc. All rights Reserved. www.portaone.com
22
Porta Switch
Prepaid WiFi Services
1. In the Rating section of Admin-Index, choose Tariffs.
2. On the Tariff Management page, choose Add.
3. Fill in the New Tariff form (please refer to the Create a Vendor Tariff
section above for a detailed description of the available tariff
attributes). In the Applied To select menu, choose “Customer”, as
this tariff will be used to charge your WiFi customers. Then choose
“Administrator Only” in the Managed By select menu (this option
is only visible after you select Applied To: Customer above). In the
Service select menu, choose Wi-Fi.
4. Click Save.
© 2000-2011 PortaOne, Inc. All rights Reserved. www.portaone.com
23
Porta Switch
Enter Rates
Prepaid WiFi Services
1. On the Tariff Management page you will see a list of available tariffs.
Click the Rates icon before the name of the tariff. When you are in
Tariff Management for a particular tariff, click on Rates in the
toolbar.
2. In the Edit Rates screen, click Add.
3. Fill in the required information (please refer to the Enter Rates for
Vendor Tariff section above for a detailed description of the available
rate attributes).
4. Click the
of the row.
Save button in the toolbar, or the icon on the left side
Create a Product
Account for accessing your prepaid WiFi services will be issued for a
specific product. Products are a powerful feature that defines different
ways to bill an account. Product definition is always done in two steps:
product definition and creation of rating list.
© 2000-2011 PortaOne, Inc. All rights Reserved. www.portaone.com
24
 Loading...