


EtherCAN / EtherCANopen Gateway
Art_No. : 0540/30 (EtherCAN)
Art_No.: 0540/31 (EtherCANopen)
(english version)
port GmbH
Regensburger Str. 7
D-06132 Halle/Saale
Source: https://portgmbh-my.sharepoint.com/personal/mt_port_de/Documents/manuals/ecan9_manual.docx
Version: 1.0 Confidential 2/13
History
Version
Created
Validated
Released
Date
Name
Date
Name
Date
Name
1.0
2015-08-03
Marcus
Tangermann
2015-08-04
Sten
Mückenheim
2015-08-04
Marcus
Tangermann
Initial version

Source: https://portgmbh-my.sharepoint.com/personal/mt_port_de/Documents/manuals/ecan9_manual.docx
Version: 1.0 Confidential 3/13
Table of contents
1 Introduction ............................................................................................................................. 4
2 Device Scheme ........................................................................................................................ 4
3 Initial Setup ............................................................................................................................. 5
4 Configuration via Webinterface ............................................................................................... 5
4.1 Basic Settings ................................................................................................................... 5
4.1.1 General concepts ........................................................................................................ 5
4.1.2 Login to the web interface .......................................................................................... 6
4.1.3 Basic configuration .................................................................................................... 7
4.1.4 Date/Time .................................................................................................................. 8
4.1.5 SD Card ..................................................................................................................... 8
4.1.6 Configuration Management ........................................................................................ 9
4.2 CANopen Server ............................................................................................................. 10
4.2.1 Introduction ............................................................................................................. 10
4.2.2 Configuration ........................................................................................................... 10
4.3 CAN Server .................................................................................................................... 11
4.3.1 Introduction ............................................................................................................. 11
4.3.2 Configuration ........................................................................................................... 11
4.4 CAN logging .................................................................................................................. 12
5 Firmware update.................................................................................................................... 13
6 Service and Support .............................................................................................................. 13
Source: https://portgmbh-my.sharepoint.com/personal/mt_port_de/Documents/manuals/ecan9_manual.docx
Version: 1.0 Confidential 4/13
1 Introduction
The EtherCAN ARM9 Gateway provides two CAN interfaces and connects decentralized CAN or
CANopen networks with the classic Ethernet network. The TCP / IP protocol is used for Ethernet
communications, while the CAN bus supports both, the "traditional" CAN (CAN Layer 2) or
CANopen.
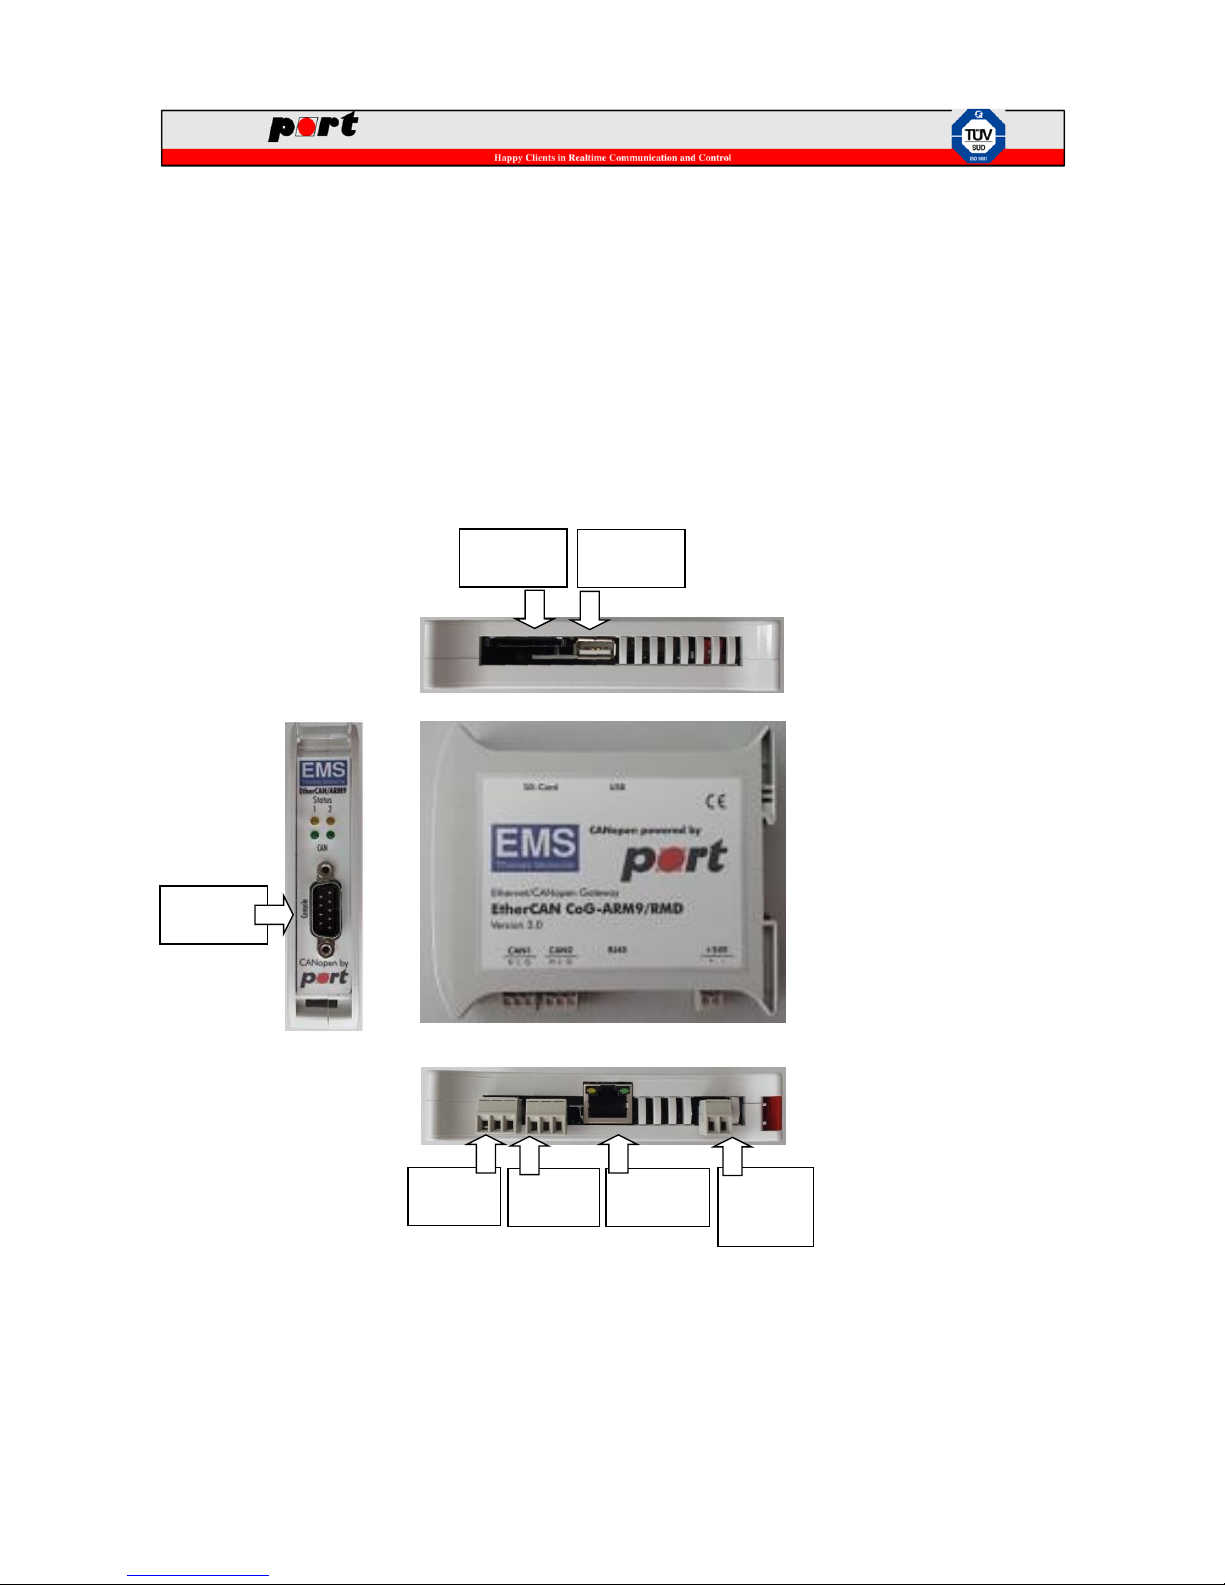
2 Device Scheme
USB-Host
connector
SD Card
slot
power
supply
connect
CAN1
connect
CAN2
connect
Ethernet
connector
RS232
connector
Source: https://portgmbh-my.sharepoint.com/personal/mt_port_de/Documents/manuals/ecan9_manual.docx
Version: 1.0 Confidential 5/13
3 Initial Setup
For the setup of the gateway, the following requirements must be fulfilled:
PC with a recent web browser (tested with Firefox and Chrome)
connection to an Ethernet network
Power supply 24V
For initial commissioning of EtherCAN ARM9 gateways, connect the device to an Ethernet
network and provide power to the device.
4 Configuration via Webinterface
The EtherCAN ARM9 device can be configured via a recent web browser. When using factory
defaults, the device has the IP address 192.168.199.22.
The following section provides an overview of the configuration of the EtherCAN ARM9 device
via a web browser.
4.1 Basic Settings
4.1.1 General concepts
When making changes to the settings via the web interface, most of the changes will be active
immediately. Nevertheless, the changes are not saved to persistent memory unless explicitly
requested via “Config. Management” menu entry. This twostep process allows testing of new
settings without touching a well-known configuration until all required settings are tested.
The user will get a hint that additional saving is required in every configuration menu where this
general concept applies:

Source: https://portgmbh-my.sharepoint.com/personal/mt_port_de/Documents/manuals/ecan9_manual.docx
Version: 1.0 Confidential 6/13
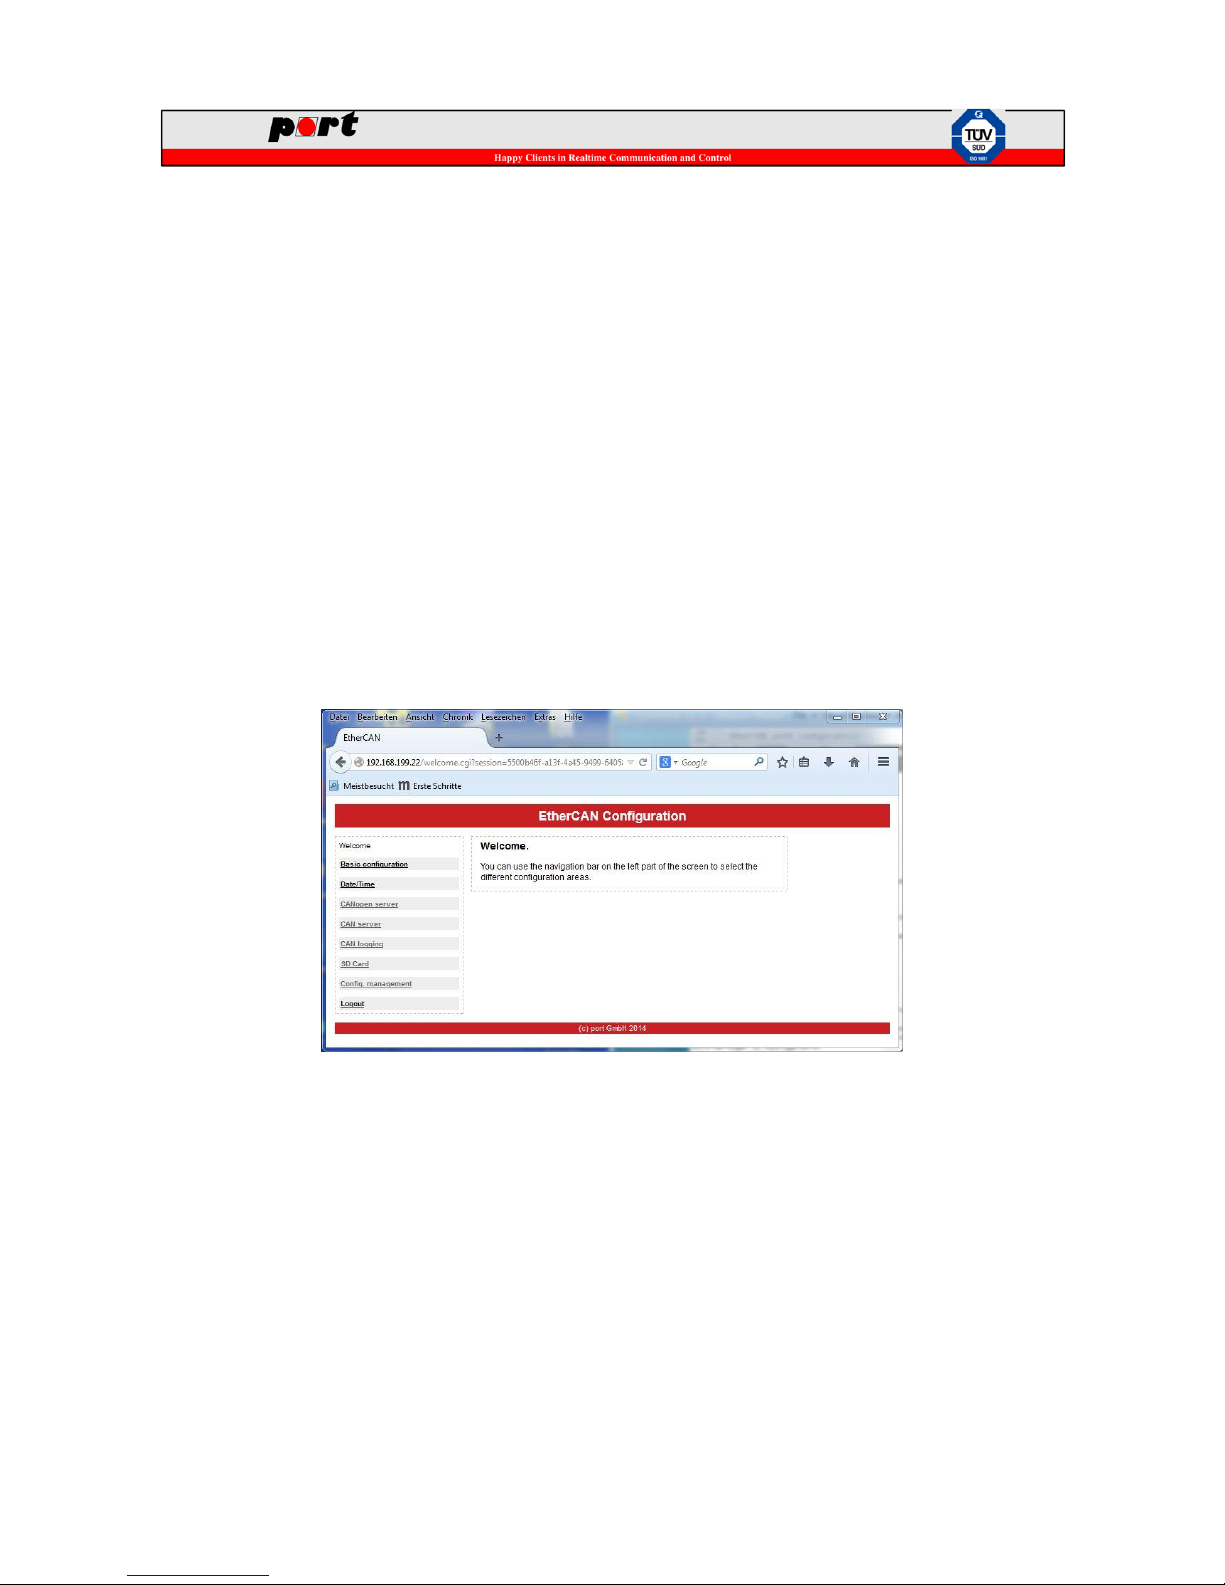
4.1.2 Login to the web interface
To access the web interface of the device, enter http://192.168.199.22 into a browser and the
following login page will be shown:
By entering the login information for "User" and "Password", the user has the possibility to
configure the gateway in accordance with its requirements. When using factory defaults, the
following settings apply:
User: admin
Password: admin
The password can be changed using the “Basic configuration” page.
Please ensure, that the setup of the PC allows the connection to 192.168.199.0
network via setting the correct IP address/subnet of you PC Ethernet interface.
Source: https://portgmbh-my.sharepoint.com/personal/mt_port_de/Documents/manuals/ecan9_manual.docx
Version: 1.0 Confidential 7/13
After login, the following browser interface is shown to the user:
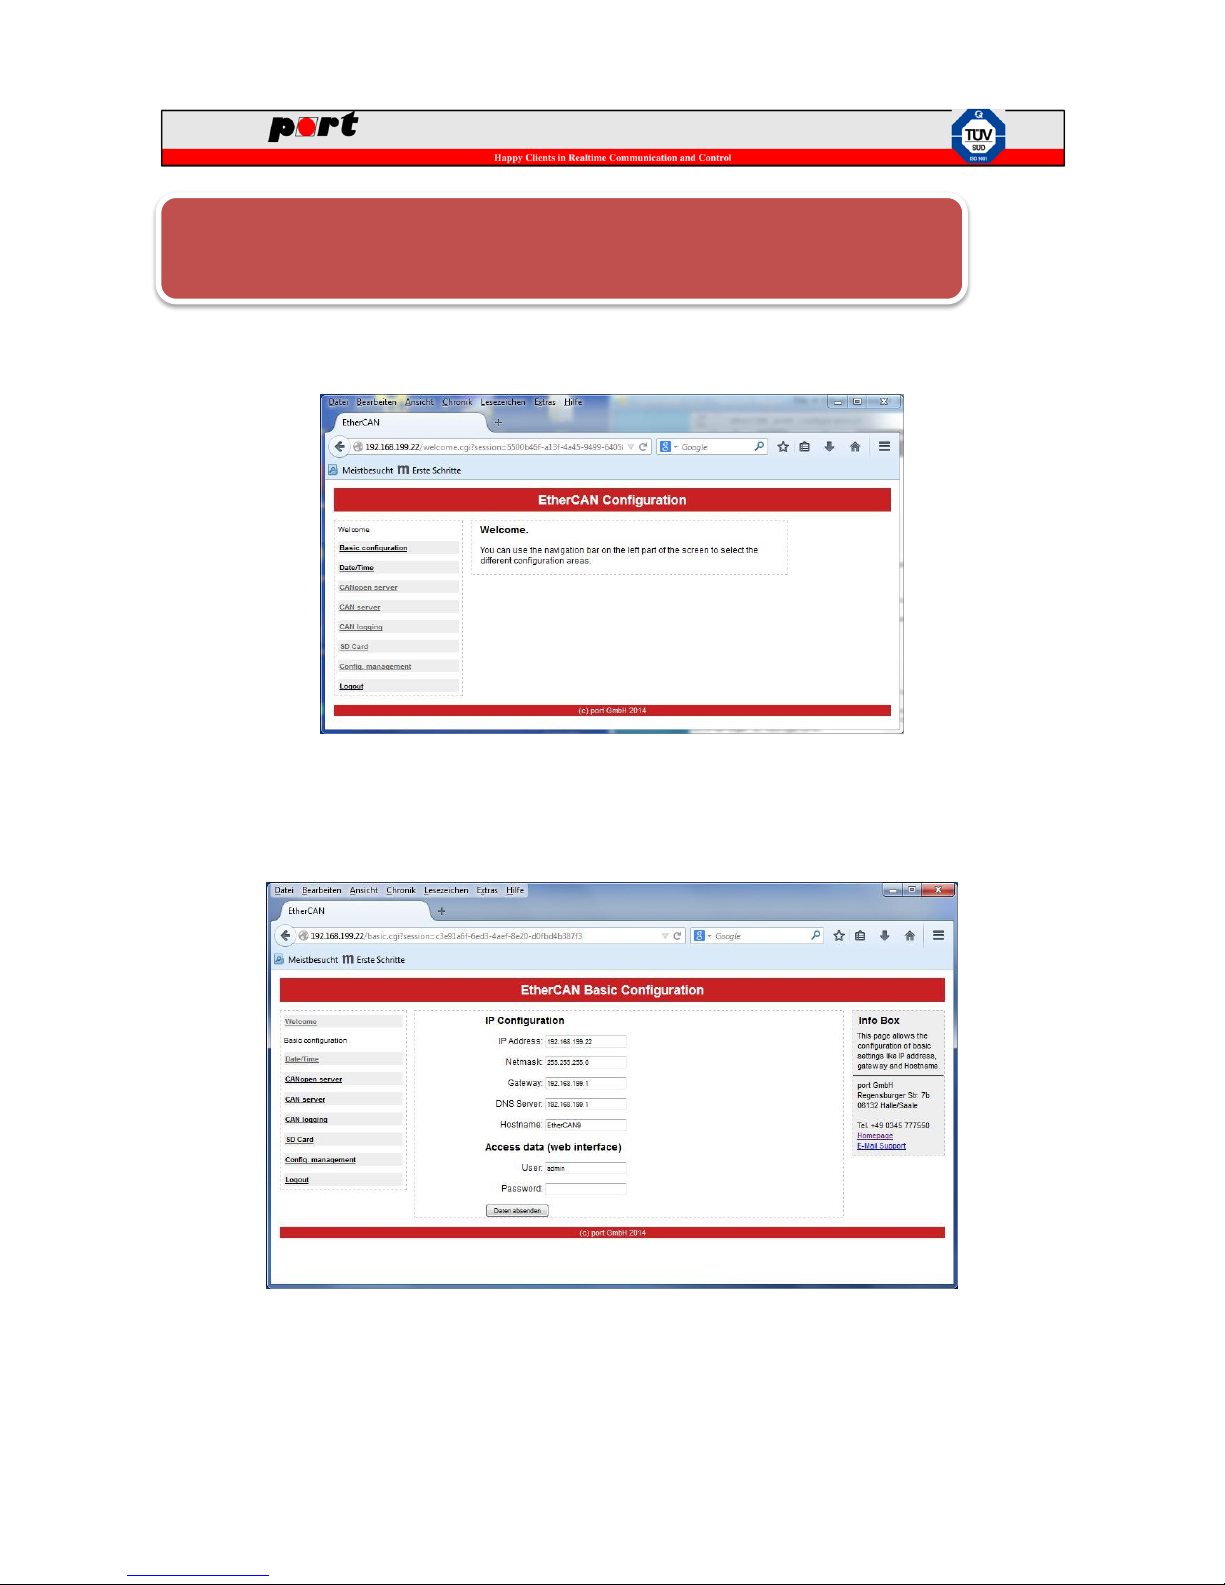
4.1.3 Basic configuration
The basic configuration allows to enter basic settings of the device:
The basic configuration page allows the setting of
IP address: The IP address where the device is reachable. This address applies to the web
interface and to CAN(open) server as well
Only one concurrent web session can be active at any time. When a user logs in into
a device where a session is already active, the first session will be deleted. A
warning is shown on the credentials page when there is already an active session.

Source: https://portgmbh-my.sharepoint.com/personal/mt_port_de/Documents/manuals/ecan9_manual.docx
Version: 1.0 Confidential 8/13
Netmask: The netmask for the IP settings. Based on the netmask the device can decide
where an IP address is located outside of its own local subnet.
Gateway: IP address of the gateway to be used for contacting IP addresses outside of its
own subnet
DNS server: The IP address of the DNS server which can resolve logical addresses.
Hostname: The hostname of the device.
User/Password: Username and password of the web interface.
4.1.4 Date/Time
The internal clock of the device can be set either manually or via central time servers using the NTP
protocol. Two public NTP servers are setup by default but not activated.
4.1.5 SD Card
The SD Card menu shows the current state of the SD Card that can be used for logging CAN data.
It also allows the release of the SD Card from the system.
When NTP servers are used, please ensure to set a proper DNS server and default
gateway in the “Basic configuration” menu for internet access, otherwise public
servers are not reachable. Also ensure that a possible firewall allows access to
UDP port 123.

Source: https://portgmbh-my.sharepoint.com/personal/mt_port_de/Documents/manuals/ecan9_manual.docx
Version: 1.0 Confidential 9/13
4.1.6 Configuration Management
The “Configuration Management” menu allows the loading and saving of configurations to/from
the flash memory. It also allows the installation of the license data for the CANopen Server if not
already delivered via the factory defaults.
A configuration can be stored or loaded via the “Configuration Actions” section. There is also the
possibility to load the factory defaults. The “Configuration State” entry shows whether the current
configuration was already saved to the persistent storage.
Before removing an SD Card from a running device, always release the card first via
the “SD Card” menu. Otherwise the file system of the card may be damaged.

Source: https://portgmbh-my.sharepoint.com/personal/mt_port_de/Documents/manuals/ecan9_manual.docx
Version: 1.0 Confidential 10/13
In the “Licence Manager” section, the current installed licence information is shown if a licence is
already installed.
When uploading a new licence please ensure that the licence file name is set as provided. Some
browser add additional information to a file for example if downloaded twice
(licence_0644_V53.dat becomes licence_0644_V53 (1).data when downloading a second time)
which leads to an invalid license file.
4.2 CANopen Server
4.2.1 Introduction
The CANopen Server implements the protocol CiA 309-3 that allows the access of CANopen
networks via TCP.
In addition to the CANopen server contained in this device, port provides a graphical user interface
(CANopen Device Monitor) to communicate with CANopen devices using the CANopen server.
Please see CANopen Device Monitor for further details.
The following section only describes the setup of the CANopen Server via the web interface. For a
detailed description of functionality and the communication protocol, please consult the document
“CANopen Gateway Server DS309-3 User Manual”.
4.2.2 Configuration
The CANopen server can be simply configured via a web interface.
Depending on the type of ordered device, there may be no license installed on the
device. In that case the CANopen server runs in demo mode with limited bitrate
and restricted node id. To check whether a license is installed, please consult the
“Config. Management” menu or the “CANopen server” page. A license can be
purchased via service@port.de

Source: https://portgmbh-my.sharepoint.com/personal/mt_port_de/Documents/manuals/ecan9_manual.docx
Version: 1.0 Confidential 11/13
Node ID, bitrate and TCP Server port can be set individually for each CAN interface. Bitrate
settings for all services running on the same CAN interface must be equal. So the settings for
CANopen Server, CAN Server and CAN logging must be the same on a CAN interface.
4.3 CAN Server
4.3.1 Introduction
The CAN Server implements a CAN-to-TCP gateway which allows monitoring of CAN-based
communication via TCP connection.
In addition to the CAN Server contained in this device, port provides a graphical user interface
(CANReport) to communicate with CAN devices using the CAN server.
Please see CAN-report for further details.
The following section only describes the setup of the CAN Server via the web interface. For a
detailed description of functionality and the communication protocol, please consult the document
“CANserver Horch Reference Manual”.
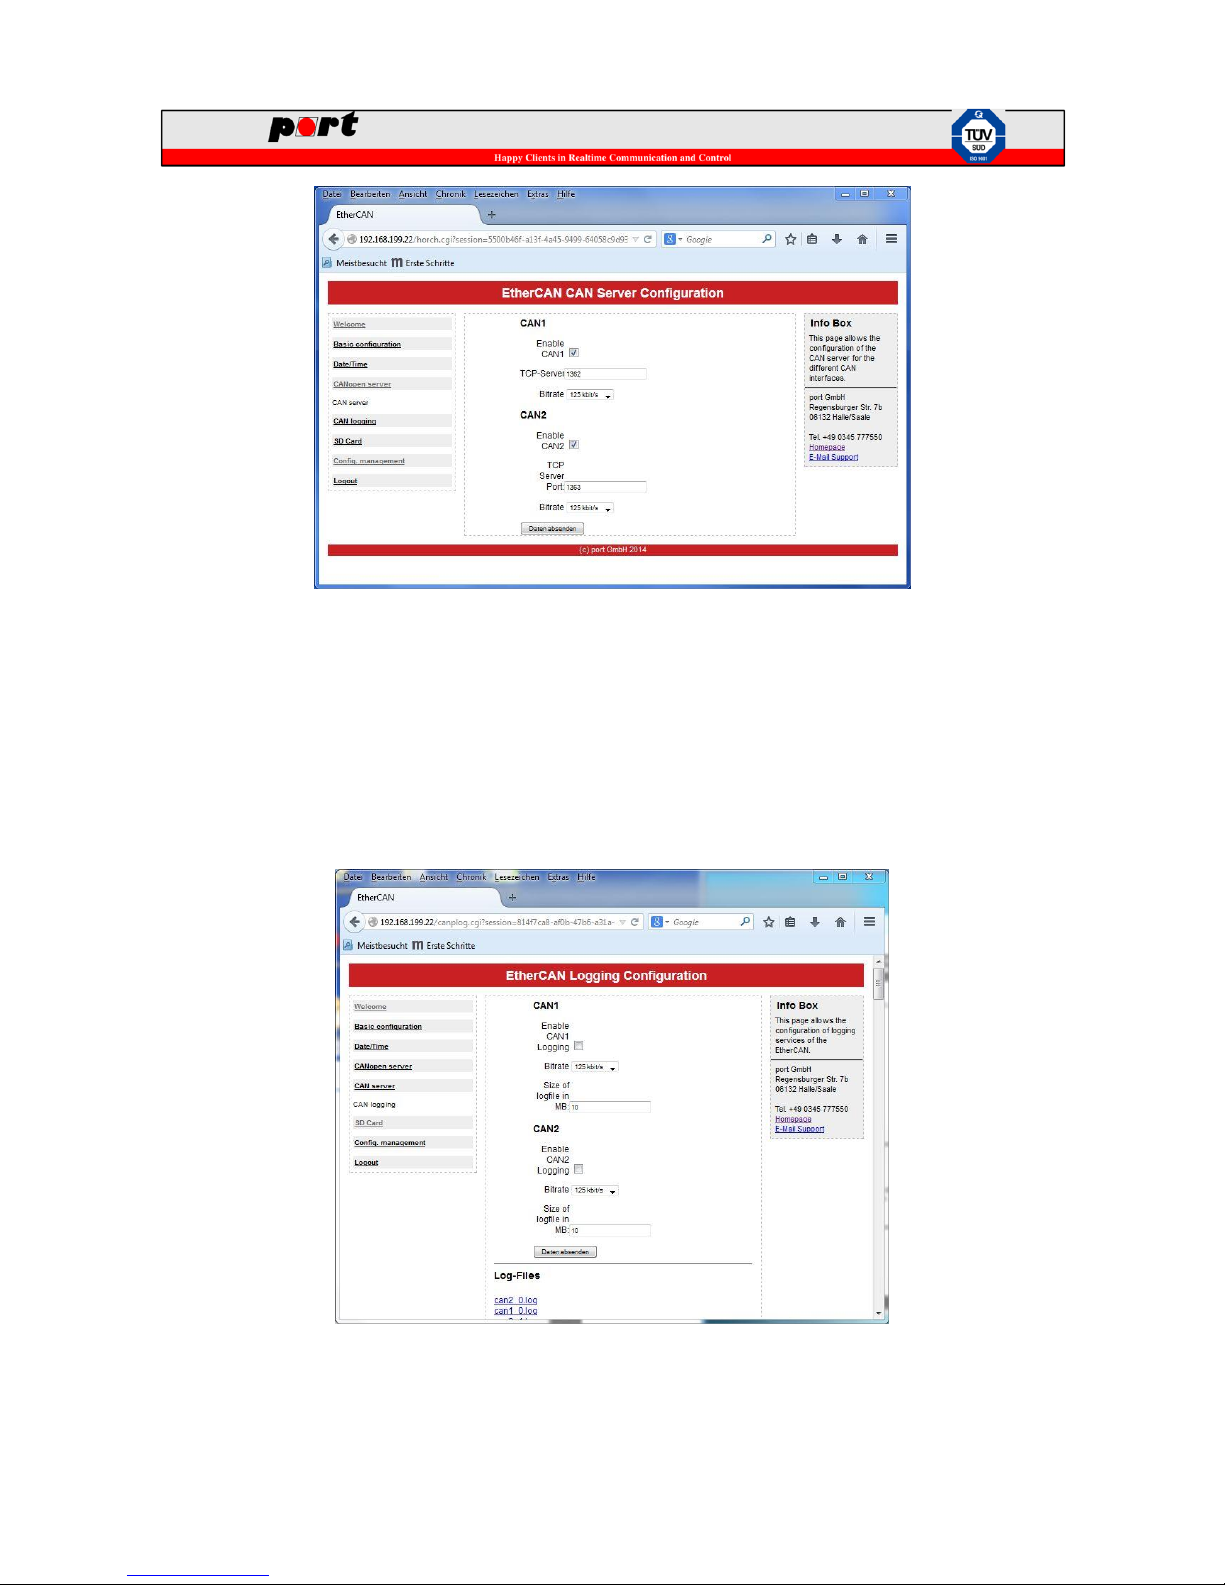
4.3.2 Configuration
The CAN Server can be simply configured via the “CAN server” menu.
Source: https://portgmbh-my.sharepoint.com/personal/mt_port_de/Documents/manuals/ecan9_manual.docx
Version: 1.0 Confidential 12/13
For each CAN interface the TCP server port and the bitrate can be set individually. Bitrate settings
for all services running on the same CAN interface must be equal. So the settings for CANopen
Server, CAN Server and CAN logging must be the same on a CAN interface.
4.4 CAN logging
The device offers the logging of CAN message to a SD Card. The configuration of the logging can
be set up via the “CAN logging” page.
For each CAN interface, bitrate and logfile size can set individually. Bitrate settings for all services
running on the same CAN interface must be equal. So the settings for CANopen Server, CAN

Source: https://portgmbh-my.sharepoint.com/personal/mt_port_de/Documents/manuals/ecan9_manual.docx
Version: 1.0 Confidential 13/13
Server and CAN logging must be the same on a CAN interface.
The logfile size determines the size of each individual log file. After reaching this size threshold, a
new logfile is created on the SD Card. When there is no more space available on the SD Card. The
oldest logfile is deleted and replace by a new file.
The filenames use the following pattern:
can<1|2>_<NUM>.log
So logfiles for CAN1 interface start with can1 followed by the number of log file e.g. can1_0.log
for the first logfile aso.
Logfiles can be downloaded individually or as a zip archive containing all logfiles via the web
interface. The data is stored on the SD Card as text files in the root directory and thus can be read
by other devices such as a PC. Before removing a SD Card form a running system, please release
the card via the SD Card menu otherwise the file system may be damaged.
5 Firmware update
The firmware of the device can be update via a SD Card. For a detailed description of a firmware
update, please consult the document “EtherCAN ARM9 Firmware Upgrade”.
6 Service and Support
In case of technical question please contact our support via support@port.de .
 Loading...