

Page 1

PLH | Porsche Lizenz- und Handelsgesellschaft mbH & Co. KG
Grönerstraße 5 | 71636 Ludwigsburg | Deutschland
Declaration
Déclaration
Caution
This device complies with Part 15 of the FCC Rules / Industry
Canada licence-exempt RSS standard(s). Operation is subject
to the following two conditions: (1) this device may not cause
harmful interference, and (2) this device must accept any
interference received, including interference that may cause
undesired operation.
Changes or modifications not expressly approved by the party
responsible for compliance could void the user's authority to
operate the equipment.
This equipment has been tested and found to comply with the
limits for a Class B digital device, pursuant to part 15 of the
FCC Rules. These limits are designed to provide reasonable
protection against harmful interference in a residential
installation. This equipment generates, uses and can radiate
radio frequency energy and, if not installed and used in
accordance with the instructions, may cause harmful
interference to radio communications. However, there is no
guarantee that interference will not occur in a particular
installation. If this equipment does cause harmful interference
to radio or television reception, which can be determined by
turning the equipment off and on, the user is encouraged to try
to correct the interference by one or more of the following
measures:
- Reorient or relocate the receiving antenna.
- Increase the separation between the equipment and
receiver.
- Connect the equipment into an outlet on a circuit
different from that to which the receiver is connected.
- Consult the dealer or an experienced radio/TV
technician for help.
Under Industry Canada regulations, this radio transmitter may
only operate using an antenna of a type and maximum (or
lesser) gain approved for the transmitter by Industry Canada.
To reduce potential radio interference to other users, the
antenna type and its gain should be so chosen that the
equivalent isotropically radiated power (e.i.r.p.) is not more than
that necessary for successful communication.
MPE Reminding
To satisfy FCC / IC RF exposure requirements, a separation
distance of 20 cm or more should be maintained between the
antenna of this device and persons during device operation. To
ensure compliance, operations at closer than this distance is
not recommended.
A
ttention
Le présent appareil est conforme aux CNR d'Industrie Canada
applicables aux appareils radio exempts de licence.
L'exploitation est autorisée aux deux conditions suivantes : (1)
l'appareil ne doit pas produire de brouillage, et (2) l'utilisateur
de l'appareil doit accepter tout brouillage radioélectrique subi,
même si le brouillage est susceptible d'en compromettre le
fonctionnement.
Conformément à la réglementation d'Industrie Canada, le
présent émetteur radio peutfonctionner avec une antenne d'un
type et d'un gain maximal (ou inférieur) approuvé pour
l'émetteur par Industrie Canada. Dans le but de réduire les
risques de brouillage radioélectrique à l'intention des autres
utilisateurs, il faut choisir le type d'antenne et son gain de sorte
que la puissance isotrope rayonnée équivalente (p.i.r.e.) ne
dépasse pas l'intensité nécessaire à l'établissement d'une
communication satisfaisante.
MPE Avis
Les antennes installées doivent être situées de facon à ce que
la population ne puisse y être exposée à une distance de moin
de 20 cm. Installer les antennes de facon à ce que le personnel
ne puisse approcher à 20 cm ou moins de la position centrale
de l’ antenne.
La FCC des éltats-unis stipule que cet appareil doit être en tout
temps éloigné d’au moins 20 cm des personnes pendant son
functionnement.
Page 2

porsche design
911 SOUNDBAR
Porsche Design® is a registered trade mark
Porsche Lizenz- und Ha ndelsgesellschaft mbH & Co. KG
Groenerstrasse 5 | 71636 Ludwigsburg | Germany
www.porsche-design.com
DS_Betriebsanleitung_911_Soundbar_210x148mm_RZ_v10.indd 34-1 09.11.15 09:43
Page 3

INSTRUCTIONS
Deutsch 4
English 34
Español 64
Français 94
Italiano 124
Nederlands 154
Polski 184
DS_Betriebsanleitung_911_Soundbar_210x148mm_RZ_v10.indd 2-3 09.11.15 09:43
Page 4
[
DE ] 911 Soundbar
4
|
5
INHALT
Sicherheitshinweise ...........................................Seite 5
Auspacken ......................................................Se ite 10
Aufstellen ........................................................S eite 10
Einspielen ........................................................S eite 10
Inbetriebnahme der Fernbedienung ................. Se it e 11
Anschluss-Terminal ..........................................Se it e 11
Anschluss ........................................................S eite 12
Bedienung .......................................................S eite 13
Displayanzeige n...............................................Se ite 14
Erweiterte Sound-Funktionen ..........................S eite 16
Wiedergabe via Bluetooth® Technologie ..........Se ite 19
Ein- bzw. Ausschaltautomatik
[
AUT ] ................Seite 20
ECO Standby
[
ECO ] ........................................Se ite 21
WILLKOMMEN IN DER WELT VON PORSCHE DESIGN
Von 0 auf 100 in 3,5 Sekunden. Bis zu 9.000 Umdrehu ngen pro Minute. 315 km/h in der Spitze. Für die E inen sind das
nur Zahlen – für uns sin d es die Noten einer Symphonie für den Spor twagen: Der Sound des 911 GT3.
Lassen Sie sich von un serer Leidenschaft für innovative Technik begeis tern und freuen Sie sich auf ein atemberaube ndes
Klangerlebnis. Mit der 911 Soundbar, dem high-end 2.1 Virtual Surround Sound System mit der Original-Abgasanlage
eines 911 GT3.
SICHERHEITSHINWEISE
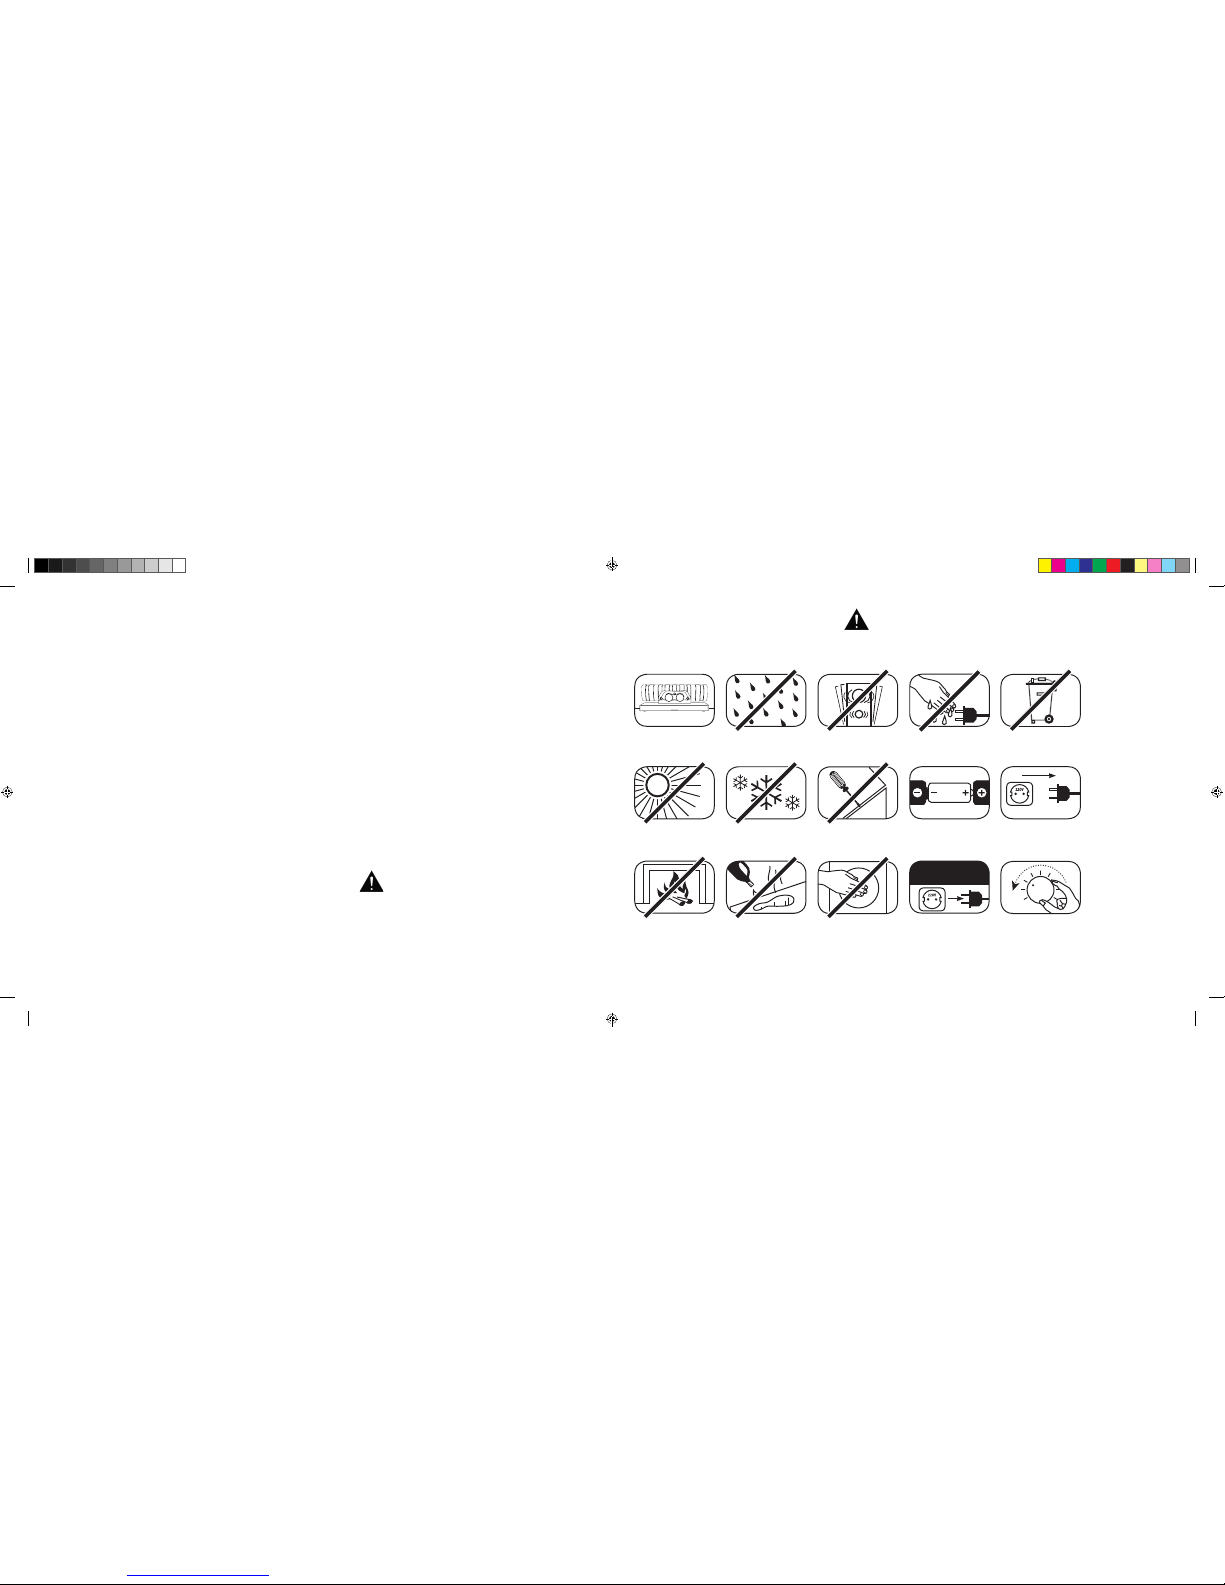
Bitte beachten Sie d ie Sicherheitshinweise be i der Wahl des richtigen Platze s für Ihre 911 Soundbar sowie be i deren Pflege und Bedienu ng.
Wählen Sie einen
ebenen Untergrund
Feuchtigkeit
vermeiden
Erschütterungen
vermeiden
Direk te
Sonneneinstrahlung
vermeiden
Abstand zu
Wärmequellen
sicherstellen
Vor extremer Kälte
schütz en
Zur Reinigung
keine aggressiven,
alkoholhaltigen oder
scheuernden Mittel
einsetzen
Gehäuse nicht öffnen
Nicht in die
Gehäuseöffnung und
Endrohrblende greifen
Netzstecker bei
Gewitter ziehen
Netzkabel nicht mit
nassen Händen anfassen
Bei Batterie un d
Fernbedienung auf
richtige Polung achten
Nicht im Hausmüll
entsorgen
Die sachgemäß e Handhabung der 911 Soundbar fällt
in die Verantwortu ng des Anwenders. Porsche Des ign
kann keine Verantwortung für Schäden oder Unfälle
übernehmen, die durch unsachgemäße Aufstellung
oder unsachgemäßen Anschluss verursacht werden.
Freien Zugang zum
Netzstecker gewährleisten
Bei Überlastung
System leiser drehen
Automatische Wahl des B T Eingangs
[
SEL ] .....Seite 22
IR-Lernfunktion ................................................Sei te 23
IR-Löschfunktion .............................................Sei te 25
Fehlersuche .....................................................Seite 26
Technische Daten ............................................Seite 30
Weitere wichtige Informationen ........................Seite 31
Lizenzhinweise ................................................Seite 32
DS_Betriebsanleitung_911_Soundbar_210x148mm_RZ_v10.indd 4-5 09.11.15 09:43
Page 5
[
DE ] 911 Soundbar
6
|
7
WICHTIGE SICHERHEITSUNTERWEISUNG
Lesen u nd befolgen Sie alle Anweisung en.
Bewahre n Sie diese Anweisungen auf.
Beachten Sie alle Warn- und Sicherheitshinweise.
Betreib en Sie dieses Gerät nur in gemä ßigtem Klima [ nicht in tropische m Klima ].
Betreiben Sie die ses Gerät nicht in Höhen von übe r 2.000 m über dem Meeresspieg el.
Betreiben Sie dies es Gerät nur im Innenbereich, n icht im Außenbereich oder in Fe uchträumen.
Um die Gefahr eines B randes oder Stromschlage s zu vermeiden, darf das Ger ät weder Regen noch Nässe ausg esetzt werden.
Betreiben Sie dies es Gerät nicht in der Nähe von Wasse r.
Setzen Sie dieses G erät keinem Tropf- oder Spritzwasser a us.
Starke Temperaturschwankungen führen zu Kondensniederschlag
[
Wassertröpfchen ] im Gerät. Warten Sie mit der Inbetrieb nahme,
bis sich die entstandene Feuchtigkeit verflüchtigt hat
[
mind. 3 Stunden ].
Stellen Sie keine Gegenstände auf das Gerät, die mit Flüssigkeiten gefüllt sind
[
wie z. B. Vasen ].
Stellen Sie kein offe nes Feuer, wie z. B. brennende Kerzen, au f oder in die Nähe des Gerätes.
Stellen Sie das Gerä t nicht in die Nähe von Wärmequell en wie z. B . Heizkörpern, Wärmespeich ern, Öfen oder sonstigen Ger äten
[
auch Verstärkern ],
die Wärme erzeuge n.
Verhindern Sie direkte Sonneneinstrahlung.
Halten Sie einen Frei raum von wenigstens 5 cm um das Gerät he rum ein.
Verhindern Sie in kei nem Fall die Schutzfunk tion von gepolten oder geerdete n Steckern: Ein gepolter Stecker hat 2 Sti fte, von denen einer breiter ist
als der andere. Ein g eerdeter Stecker hat einen drit ten Erdungsstift. Der breite bzw. dri tte Stift dient Ihrer Sicher heit. Falls der Stecker nicht in Ihre
Steckdose passt, wenden Sie sich an einen qualifizierten Elektriker, um die veraltete Steckdose auszutauschen.
Zur Vermeidung eine s elektrischen Schlage s, verbinden Sie den Netzstec ker nur mit Steckdosen oder Verläng erungen, bei denen die Kontak tstifte
vollständig eing esteckt werden können, um frei liegende Kontaktstifte zu ve rmeiden.
Berühren Sie niemals Signal- und Netzkabel mit nassen Händen.
Treten Sie nicht auf das Netzka bel und klemmen Sie es nicht e in, insbesondere nicht im Bere ich der Stecker, Steckdosen und an der Stell e, an der
das Kabel aus dem G erät geführt wird.
Bei Geräten ohne Ne tzschalter, bei denen der Netzstec ker bzw. die Geräte-Netzbuchse als Trenne inrichtung dient, muss der Stec ker des Netzkabels
bzw. die Geräte-Netzbuchse jederzeit frei zugänglich sein.
Trennen Sie bei Gewitter n oder längerem Nichtgebrau ch das Gerät vom Stromnetz.
Um das Gerät komplett vom Stromnetz zu trennen, ziehen Sie das Netzkabel aus der Steckdose.
Schalten Sie das Gerät vor dem Anschließen oder Abziehen von Anschlussleitungen immer aus.
Immer an den Stecker n und nicht an den Leitungen zie hen.
Stellen Sie das Gerä t gemäß den Herstellerhinwe isen auf.
Wählen Sie immer einen ebenen Untergrund. Das Gerät muss lotrecht stehen.
ACHTUNG
Gefahr eines elektrischen Schlages.
Nicht öffnen!
ACHTUNG:
Zur Vermeidung eines Brandes oder eines elektrischen Schlages
das Gerät nicht öffnen. Das Gerät enthält keine vom Benutzer zu
wartenden Teile. Lassen Sie Wartungs- und Reparaturarbeiten
nur von qualifizierten Fachkräften [ Servicepersonal ] durchführen.
ACHTUNG
Lebensgefahr!
ACHTUNG:
Knopfzelle [ Batterie ] nicht verschlucken.
Gefahr innerer chemischer Verbrennungen.
Es besteht Lebensgefahr!
ACHTUNG
Explosionsgefahr!
ACHTUNG:
Auswechselbare Lithium-Batterien!
Bei unsachgemäßem Austausch besteht
Explosions gefahr. Batterien nur durch den
selben oder einen Vergleichstyp ersetzen.
DS_Betriebsanleitung_911_Soundbar_210x148mm_RZ_v10.indd 6-7 09.11.15 09:43
Page 6
[
DE ] 911 Soundbar
8
|
9
Hinweis
Üben Sie keine Gewalt auf Bedienelemente, Anschlüsse und Leitungen aus.
Das Gerät darf nu r mit der auf dem Gerät oder dem Typensc hild spezifizierten Span nung und Frequenz betrieben we rden.
Stecken Sie keine Gege nstände oder Körperteil e in die Öffnungen des Ger ätes. Stromführende Teile im Inneren de s Gehäuses könnten berührt u nd/
oder beschädig t werden. Dies kann zu Kurzschl üssen, elektrischen Sc hlägen und Feuerentwick lung führen.
Verwenden Sie nur Befestigungsmaterial und Zubehör, welches vom Hersteller zugelassen ist und/oder mit dem Gerät mitgeliefert wird.
Verwenden Sie nur Rollwagen, Ständer, Stative, Halter oder Tische, die allen in den Sicherheitsunterweisungen erwähnten Anforderungen
gerecht werden. Wenn Sie einen Rollwagen verwenden, bewegen Sie den Rollwagen/Geräte-Verbund nur vorsichtig, um Schäden und
Verletzungen durch Umkippen zu vermeiden.
Reinigen Sie dieses Gerät nur mit einem sauberen, trockenen Tuch.
Verwenden Sie zur Reinigung keine aggressiven, alkoholhaltigen oder scheuernden Mittel.
Zur Vermeidung eine s elektrischen Schlage s das Gehäuse nicht öffne n! Das Gerät enthält keine vom Benut zer zu wartenden Teile.
Wenden Sie sich bei al len Reparatur- und Wartungsarb eiten an Ihr Porsche Zentrum. Dies i st dann erforderlich, wenn d as Gerät in irgendeiner Weise
beschädigt ist, wi e z. B. bei B eschädigungen von Netzka beln oder Steckern, wenn Flüssi gkeiten oder Gegenstände in d as Gerät gelangt sind, diese s
Regen oder Feuchtigkeit ausgesetzt wurde, nicht ordnungsgemäß funktioniert oder fallen gelassen wurde.
Nehmen Sie keine Veränderungen am Gerät oder Zubehör vor. Nicht autorisierte Veränderungen können die Sicherheit, die Einhaltung von Gesetzen
oder die Systemleistung beeinträchtigen. In diesem Fall kann die Betriebserlaubnis/Garantie erlöschen.
Falls bei der Wiede rgabe Tonverzerrungen wie z. B. unnatürliches Klopf en, Pochen oder hochfrequente s Klicken auftreten, ist der Lau tstärkepegel
umgehend zu reduzieren.
Um mögliche Gehörschäden zu vermeiden, hören Sie nicht über einen längeren Zeitraum bei hohen Pegeln. Unterbrechen Sie die Wiedergabe,
falls Sie Klinge l- oder Pfeifgeräusche in d en Ohren hören oder den Eindru ck haben, hohe Töne
[
auch kurzzei tig ] nicht mehr wahrnehmen
zu können.
Neue sowie gebrau chte Batterien sind von Kinder n fernzuhalten. Geräte, bei dene n das Batteriefach nicht sich er geschlossen werden kan n,
dürfen nicht weiter verwendet werden und sind von Kindern fernzuhalten.
Die mit diesem Ge rät gelieferte Fernbedie nung enthält eine Knopfzel le als Batterie. Ein Verschlucken d er Knopfzelle kann in nur 2 Stund en zu
ernsthaften inneren Verbrennungen und damit zum Tod führen!
Bei Verdacht auf versc hluckte oder in sonstige Körp eröffnungen eingeführ te Knopfzellen ist umgehe nd ein Arzt aufzusuche n.
Achten Sie bei der Batterie-Entsorgung auf die Umwelt. Batterien müssen bei einer Batterie-Sammelstelle entsorgt werden.
Batterien dürfen keinen hohen Temperaturen ausgesetzt werden, wie z. B. direkter Sonneneinstrahlung, Feuer oder Ähnlichem.
Batterien müssen entsprechend dem Polaritätsaufdruck korrekt eingelegt werden. Falsches Einsetzen kann zu Beschädigungen führen.
Verwenden Sie ausschließlich die für das Gerät spezifizierten Batterien oder Akkus.
Bei den mitgeliefe rten Batterien handelt e s sich nicht um Akkus, d. h. diese Batterien dür fen nicht wieder aufgelade n werden.
Das Gerät und/oder de r Beipack kann Kleinteile en thalten, die verschluckt werd en können.
Daher nicht gee ignet für Kinder unter 3 Jahren.
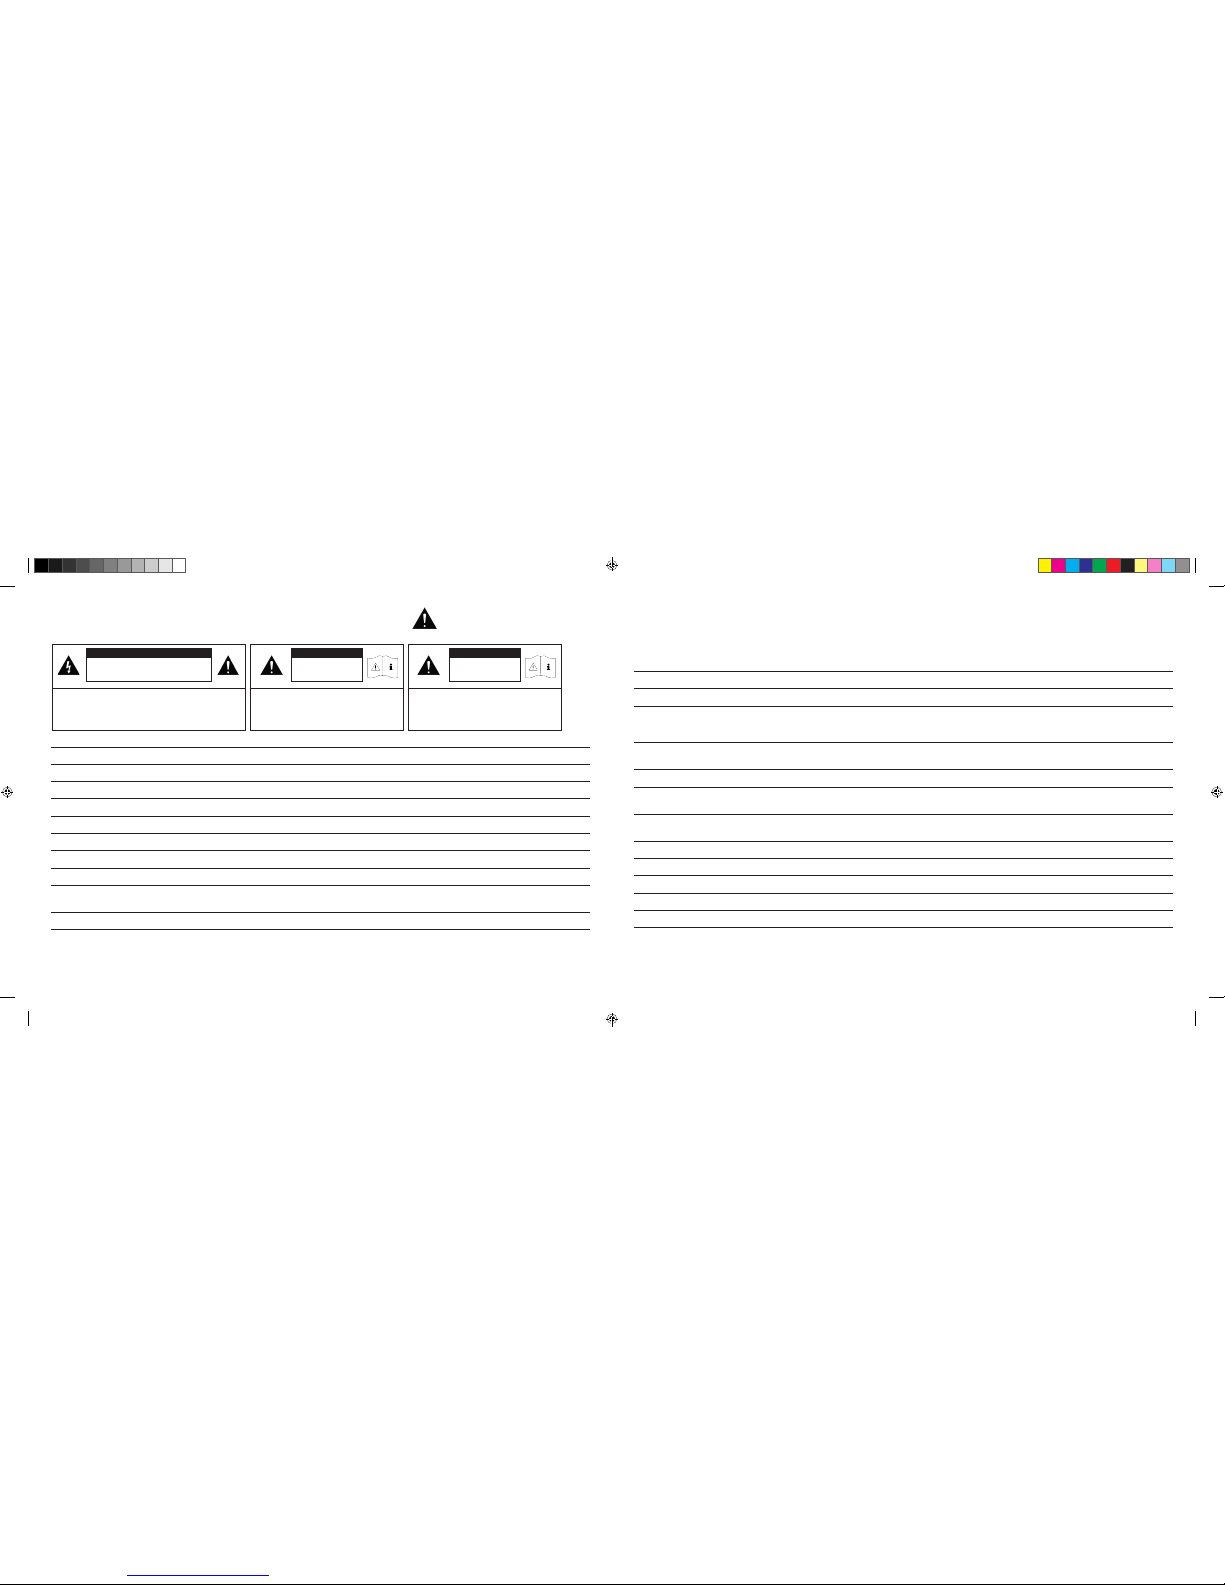
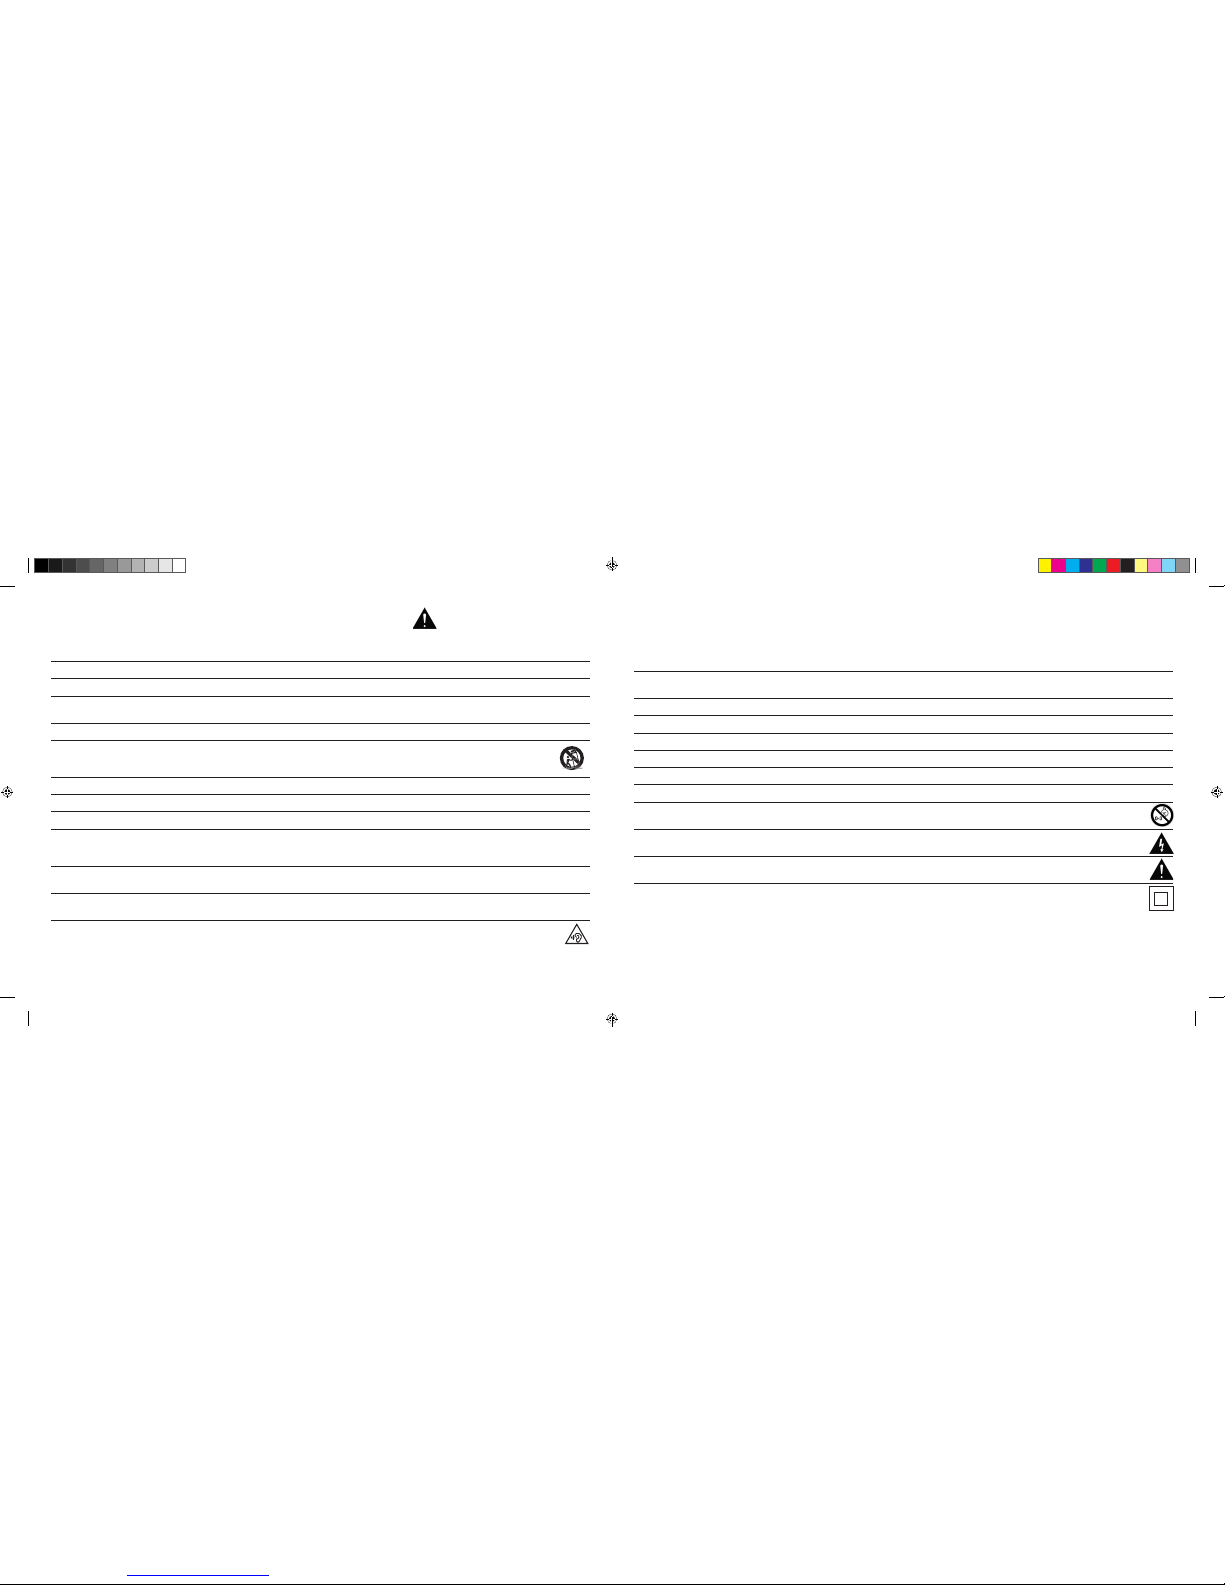
Dieses Symbol we ist Sie auf nicht isolierte, gef ährliche Spannungen im Inn eren des Gehäuses hin, die ein e ausreichende Stärke
[
Amplitude ]
haben, um einen Br and oder elektrischen S chlag zu verursachen.
Dieses Symbol weist Sie auf wichtige Bedienungs- und Instandhaltungsanweisungen in den mitgelieferten Begleitunterlagen
[
Anleitung ] hin.
Dieses Symbo l kennzeichnet Schutzklas se II-Geräte, bei denen der Sch utz vor einem elektrisch en Schlag während des bestimm ungs gemäßen Betriebs durch eine doppelte oder verstärkte Isolation gewährleistet wird und daher kein Schutzleiteranschluss erforderlich ist.
WICHTIGE SICHERHEITSUNTERWEISUNG
DS_Betriebsanleitung_911_Soundbar_210x148mm_RZ_v10.indd 8-9 09.11.15 09:43
Page 7
[
DE ] 911 Soundbar
10
|
11
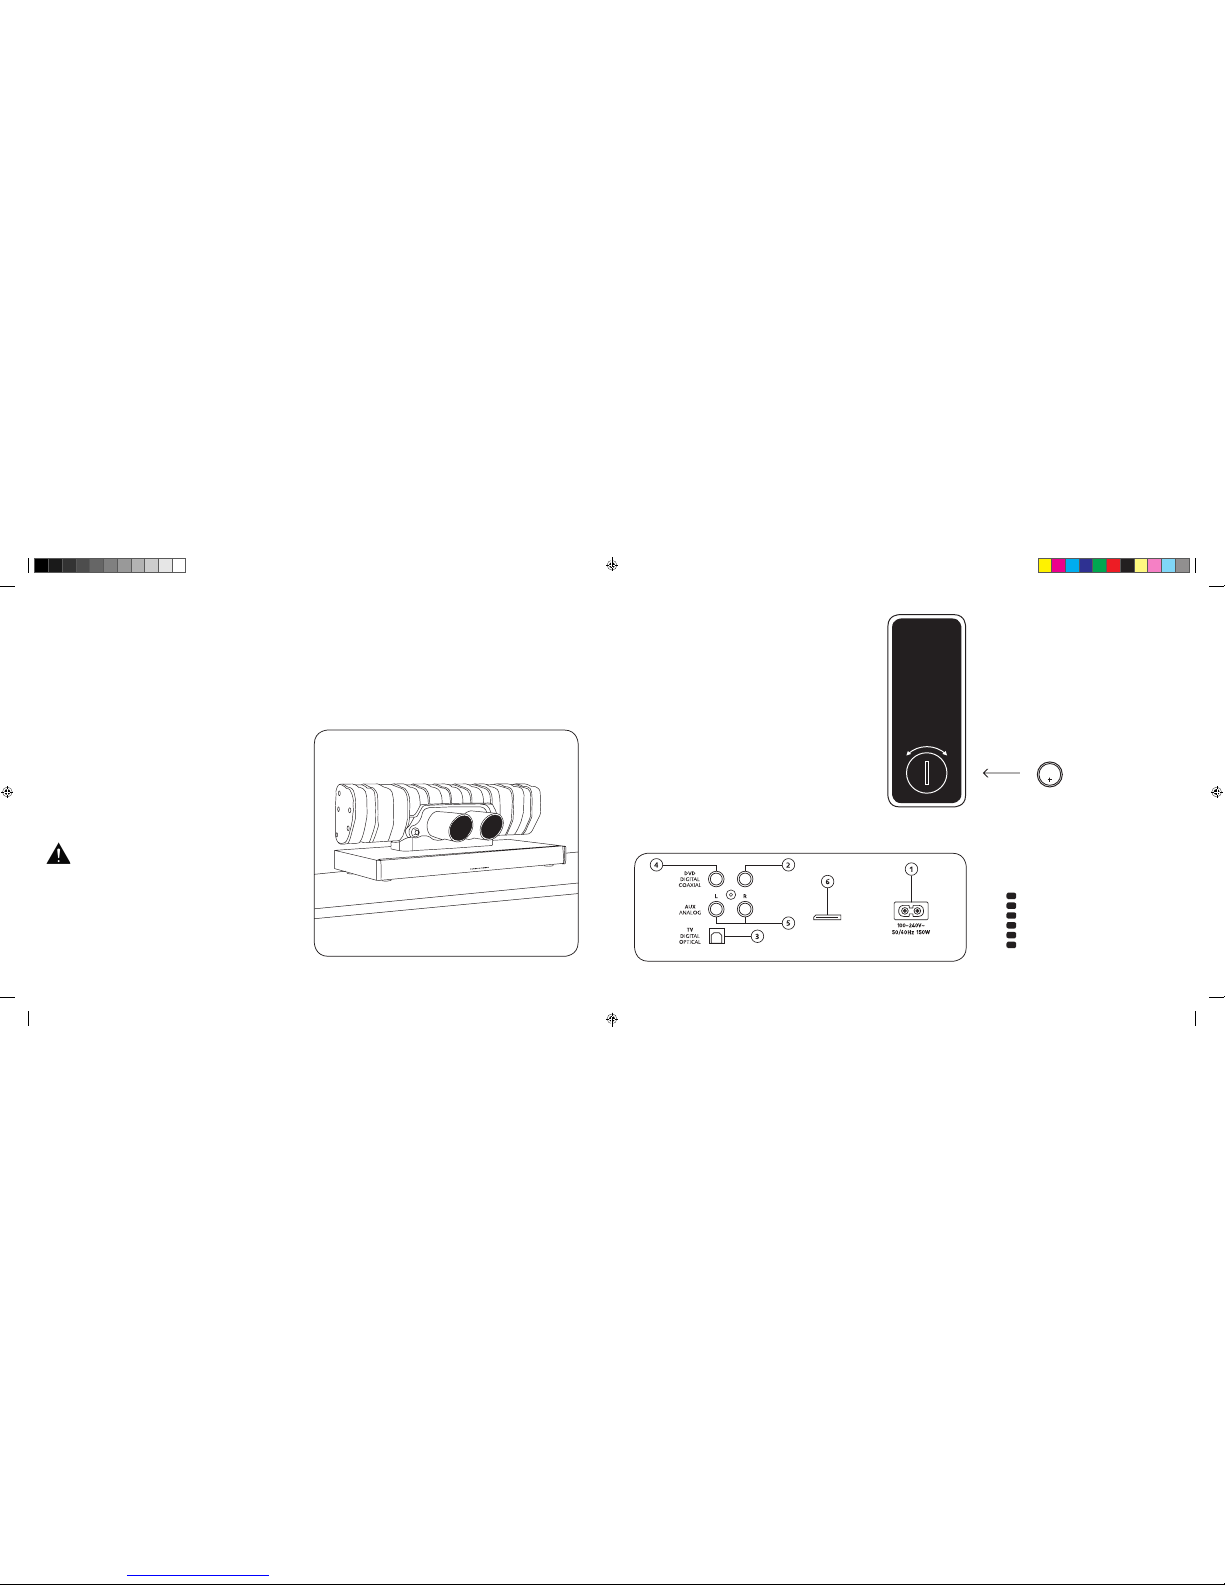
ANSCHLÜSSE
911 SOUNDBAR
1
Buchse Stromversorgung
2
Ausgang – Ext. Subwoofer
3
Eingang – TV
[
optisch
]
4
Eingang – DVD
[
coaxial
]
5
Eingang – AUX
[
analog
]
6
Buchse Service
INBETRIEBNAHME
DER FERNBEDIENUNG
Die mitgelieferte Batterie ist bereits in die Fernbedienung
eingelegt. Zur Inbetriebnahme entfernen Sie lediglich die
Schutzfolie. Ac hten Sie bei einer Ersatzbat terie darauf, dass
diese entsprechend den Polaritätsmarkierungen
[
+/– ] korrekt
eingelegt wird. Verwenden Sie ausschließlich die für dieses
System spezifizierte Batterie
[
CR 2032 ].
Hinweis: Die mitgelieferte Batterie ist für den Probegebrauch
vorge sehen und hat daher eventuell eine geringere Lebensdauer.
ANSCHLUSS-TERMINAL
911 Soundbar
SUB OUT
Service
Fernbedienung
[
Rückseite
]
AUFSTELLEN
Platzieren Sie die 911 Soundbar auf einer ebenen Fläche.
AUSPACKEN
Packen Sie den Kar ton vorsichtig aus und überprü fen Sie,
ob alle hier aufgeführten Teile enthalten sind:
1 x 911 Soundbar
1 x Fernbedienun g inkl. Batterie
4 x Netzkabel
[
je 1 x EU, UK, US, AUS
]
1 x optisches digitales Audiokabel
1 x Stereo Cinch-Kab el
1 x digitales Cinch-Kabel
EINSPIELEN
Einspielphase bis zur Entfaltung der maximalen
Klang eigen schaften: 15 – 20 Betriebsstunden.
– Bitte in d ieser Zeit in normaler Lau tstärke hören
– Extrem hohe Peg el vermeiden
– Unterschiedlichstes Tonmaterial hören
CR 2032
AUF ZU
Jede 911 Soundbar ist ein Einzelstü ck. Der in der
911 Soundbar verbaute Endschall dämpfer des
Porsche 911 GT3 wird im regulären Serie nprozess
gefertigt. Um die Au thentizität zu unterstreichen,
sind Schweißnähte un d Verfärbungen durch den
Schweißprozess bewu sst sichtbar.
Deshalb können wir keine Reklamationen auf
Grund von Nicht-Gefa llen der Endschalldämpfe rOberfläche
[
Schweißnähte, Anlaufstellen,
Verfärbungen, S chweißspritzer, etc ] akzeptieren.
Vielen Dank fü r Ihr Verständnis.
DS_Betriebsanleitung_911_Soundbar_210x148mm_RZ_v10.indd 10-11 09.11.15 09:43
Page 8
[
DE ] 911 Soundbar
12
|
13
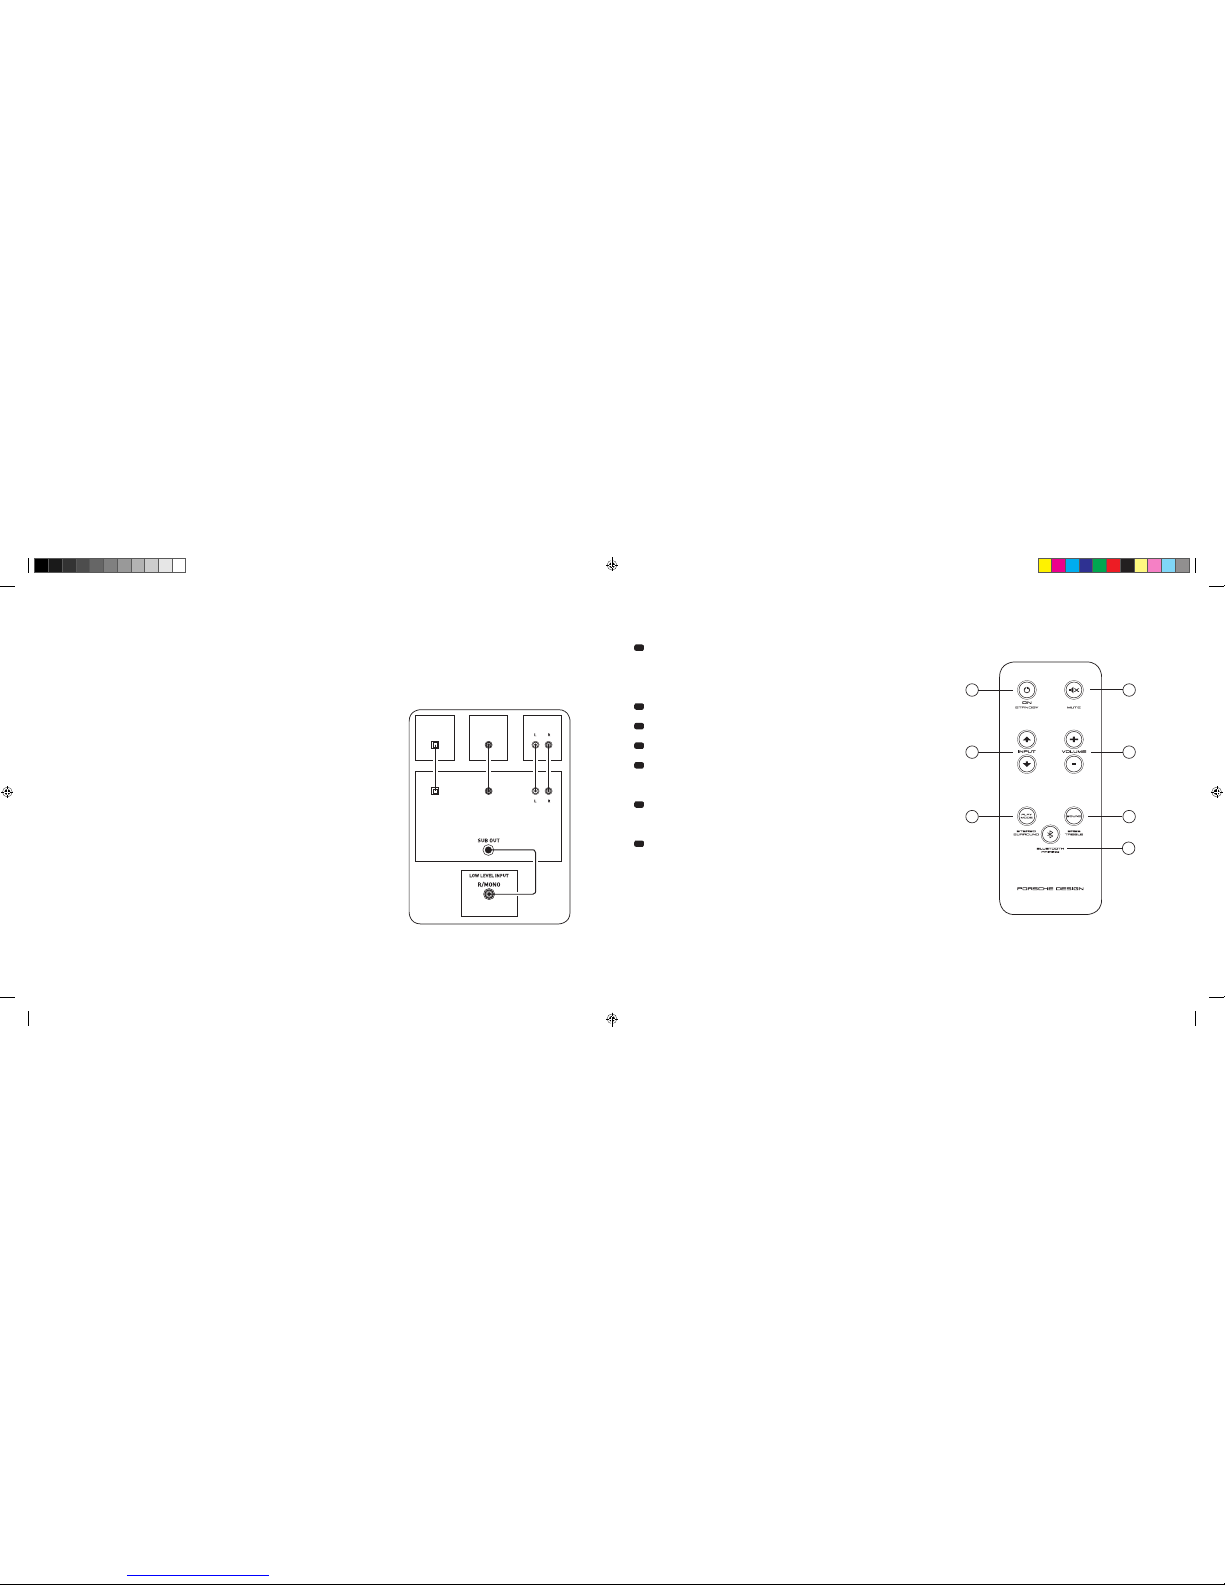
ANSCHLUSS
Bitte achten Sie dar auf, dass vor dem Anschließen al le elektrischen Kompone nten ausgeschaltet sind. Ihre 911 Soundbar ver fügt über 3 frei wählbare
Eingänge. Grund sätzlich genügt es, wenn Sie e inen dieser Eingänge mit Ih rem TV-Gerät verbinden und a lle weiteren Zuspieler am TV-G erät anschließen.
Um eine bestmögl iche Tonwiedergabe zu erzielen, em pfiehlt es sich Sat-Receiver, Blu-Ray- ode r DVD-Player direkt mit der 911 Soundbar zu verb inden.
Je nach Art und Au sstattung der verwendeten Q uelle kann zwischen folg enden Möglichkeiten gewähl t werden:
BEDIENUNG
Fernbedienung
1
Power
ON – LED leuchtet grün
[
Ein ]
Standby – LED leuchtet rot
[
Bereitschaft ]
911 Soundbar vom
Stromnetz getren nt – LED leuchtet nicht
[
Aus
]
2
Mute
[
Stummschaltung
]
3
Input
[
Tonquellenauswahl
]
4
Volume
[
Lautstärkeeinstellung
]
5
Play Mode
[
Wiedergabemodus ]
Stereo – für Musikwiedergabe
Surround – virtueller Raumklang für Heimkino-Wiedergabe
6
Sound
[
Klangeinstellung ]
Bass – Anpassung übe r Volume
[
+6... –6 dB ]
Treble – Anpassung übe r Volume
[
+6... –6 dB
]
7
Blu etooth®-Pairing
Verbindung mit einer Bluetooth® -Funktechnologie-fähigen Quelle
Memory-Funktion
Nach einer vorübergehenden Trennung vom Stromnetz schaltet sich
die 911 Soundbar automatisch in den zu letzt gewählten Zustand.
Alle Einstellungen
[
z. B. An/Aus, Lautstärke ] bleiben bestehen.
SUB
DIGITAL MOVIE
DVD
DVDTV
TV
AUX
AUX
TV – Digita leingang [ OPTICAL
]
Moderne TV-Geräte verfügen über einen optischen Audio-Ausgang
[
Toslink ].
Verbinden Sie die sen mit dem durch „TV“ gekennzeich neten Eingang der 911 Soundbar.
Diese Verbindung garantiert eine optimale Signalübertragung und beste Tonqualität.
Achtung: Schutzkappen des mitgelieferten optischen Kabels entfernen!
DVD – Digital eingang [ COAXIAL
]
Zur Übertragung des DVD-Tonsignals verbinden Sie den digitalen Coax-Ausgang
Ihres Blu-Ray oder DV D-Players mit der durch „DVD“ geke nnzeichneten Buchse
der 911 Soundbar. Zur Übertragung de s Bildsignals muss Ihr DVD-Playe r zusätzlich
mit dem TV-Gerä t verbunden werden. Der mit „DVD“ g ekennzeichnete Eingang
der 911 Soundbar kann auch gewähl t werden, wenn Ihr TV-Gerat über ke inen
optischen Ausgang verfügt.
AUX – Analogeingang
Sollte Ihr TV-Ger ät nur mit einem als „Pre-Out “ bezeichneten Audio-Ausgang au sgestattet
sein, dann verbin den Sie diesen mittels abge schirmtem Stereo Cinch-Kabe l mit dem
mit „AUX“ gekennze ichneten analogen Eingang d er 911 Soundbar. Ansonsten dient di eser
Eingang zur Verbindung mit Videorecordern oder Spielekonsolen.
SUB – Analogausgang
Diesen Ausgang verwenden Sie, wenn ein externer aktiver Subwoofer angeschlossen werden
soll. SUB OUT ist in der G rundeinstellung nicht ak tiv und muss über die Fernbed ienung
freigeschaltet werden. Siehe Seite 16 „Erweiterte Sound-Funktionen“.
4
ON
STANDBY
1
3
5 6
7
2
DS_Betriebsanleitung_911_Soundbar_210x148mm_RZ_v10.indd 12-13 09.11.15 09:43
Page 9
[
DE ] 911 Soundbar
14
|
15
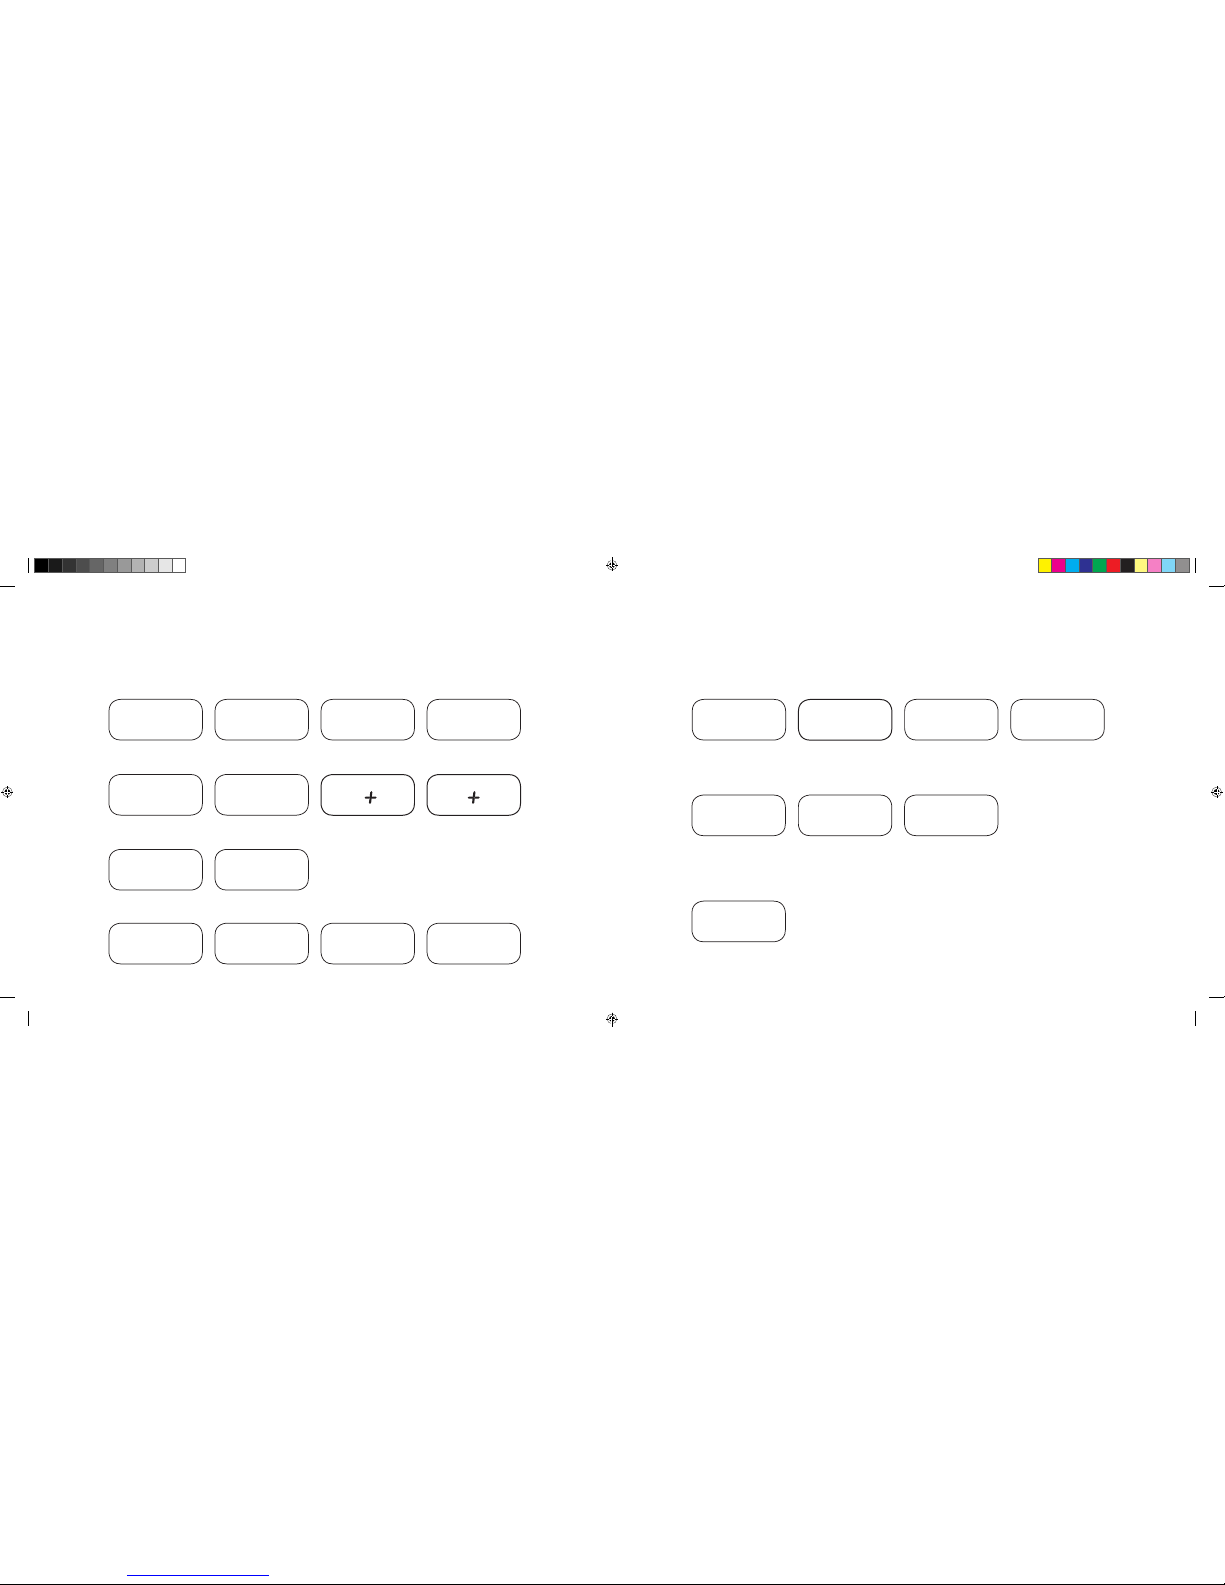
DISPL AYANZEI G E N
Die 911 Soundbar verfügt übe r ein Multifunktions-Di splay, das bei einem von der Fernbedi enung gesendeten Befehl für c a. 5 Sekunden aufle uchtet.
Die wichtigsten An zeigen und ihre Bedeutung sin d hier aufgeführt. Der Stan dby-Modus der 911 Soundbar wird durch eine rot leuc htende LED
angezeigt. Ist Ihre 911 Soundbar in Betr ieb, leuchtet diese LED grün.
Input
Soundmode
Playmode
TV Eingang
[
optisch ]
TV
Volume
[
0 – 99
]
V30
Stereo
ST
Pairing Mode
BTP
DVD Eingang
[
coaxial ]
DVD
Stumm
[
Mute
]
---
Surround
SUR
Verbindung hergestellt
CON
AUX Eingang
[
analog ]
AUX
Bassregelung
[
+/– 6
]
B 6
Verbindung unterbrochen
DIS
Bluetooth
®
BT
Höhenregelung
[
+/– 6
]
T 6
Fehlermeldung
FAI
Bluetooth
®
Setup Funktionen
Akt./Deakt. Einschalt automatik
für optischen
und coaxialen Eingang
AUT
Akt./De akt.
automatische Auswahl
BT Eingang
SEL
Akt./De akt.
ECO Standby
ECO
IR-Lernfunktion
Erlernen
Infrarot-Codes
IRL
Erweiterte Sound-Funktionen
Verzögerung Ton-
wiedergabe
[
LipSync
]
LIP
Akt./De akt.
SUB OUT
SUB
Akt./De akt.
Dolby Dynamic Range
Compression
DRC
Auswahl
Aufstellungsweise
EQ
DS_Betriebsanleitung_911_Soundbar_210x148mm_RZ_v10.indd 14-15 09.11.15 09:43
Page 10

[
DE ] 911 Soundbar
16
|
17
ERWEITERTE SOUND-FUNKTIONEN
Das Menü für erweiterte Sound-Funktionen bietet Ihnen die Möglichkeit, bei nicht
lippen synchroner Tonwiedergabe korrigierend einzu greifen, den Ausgang für einen
kabelgebund enen externen Subwoofer zu ak tivieren, die Tonwiedergabe an den g ewählten
Aufstellungsort anzupassen, sowie die Dolby-Funktion „Dynamic Range Compression“
ein- bzw. auszuschalten.
Halten Sie die mit „S ound“ gekennzeichnete Taste auf der Fernb edienung für länger als
3 Sekunden gedrückt, gelangen Sie in das Menü „Erweiterte Sound-Funktionen“ und das
Display in der 911 Soundbar sprin gt auf
LIP
.
Mit den „Volume +/–“ Tasten kann jetzt die Tonwiede rgabe in Schritten von jeweils
10 ms verzögert werde n, um den Ton an das ,,verspätete“ Bild anzupassen.
Nach erneutem ku rzen Drücken der „Sound“ Taste spring t das Display auf
SUB
.
Mit den „Volume +/–“ Tasten kann jetzt der Au sgang für einen externen Su bwoofer ein- bzw.
ausgeschaltet we rden. Achtung, bei aktivier tem SUB OUT wird die Tonwiedergabe der
Soundbar bei 80 Hz b egrenzt. Frequenzen unterhal b von 80 Hz werden an den externen
Subwoofer geleitet.
Drücken Sie ein wei teres Mal kurz die „Sound“ Taste, spring t das Display auf EQ.
Mit den „Volume +/–“ Tasten kann jetzt zwi schen 3 voreingestellten Equal izerPresets gewählt und die Wiedergabe an den Aufstellungsort angepasst werden.
EQ1
für eine frei aufgestellte 911 Soundbar, z. B. auf einem Sideboard.
EQ2
für eine Aufstellung mit Flat-TV an der Wand hängend.
EQ3
für eine Aufstellung der 911 Soundbar in einem Rack oder Regal.
Nach einem weitere n Drücken der „Sound“ Taste springt das D isplay auf
DRC
.
„Dynamic Range Compression“ ist eine Einstelloption von Dolby Laboratories. Bei
aktivierter Funktion kann bei Dolby-codierten Datenströmen der Dynamikbereich
automatisch verringert werden, was Lautstärkeunterschiede reduziert. Leise Töne
werden dabei angehoben und laute abgesenkt.
Mit den „Volume +/–“ Tasten kann die Funktion
DRC
ein- bzw. ausgeschal tet werden.
Nach erneutem Dr ücken der „Sound“ Taste springt das Dis play auf
VOL
.
Mit dieser
[
Schutz- ] Funktion „Volume“ können Sie den maximal einstellbaren Laut stärkepegel
begrenzen, d. h. die Lautstärke
[
Anzeige im Displ ay ] kann im Betrieb ni cht mehr über den hier
eingestellten Wert hinaus erhöht werden.
Mit den „Volume +/–“ Tasten können Sie nun den gew ünschten Lautstärkewert e instellen
[
0–99, wobei 99 d as Maximum darstellt ].
LIP
SUB
ON OFF
EQ
EQ1 EQ2 EQ3
DRC
ON OFF
VOL
0 99
…
DS_Betriebsanleitung_911_Soundbar_210x148mm_RZ_v10.indd 16-17 09.11.15 09:43
Page 11

[
DE ] 911 Soundbar
18
|
19
WIEDERGABE VIA BLUETOOTH® TECHNOLOGIE
Voraussetzung für die Anmeldung
– Die Blu etooth® Funktion muss am mobilen
Endgerät akti viert sein.
– Das mobi le Endgerät muss mindestens d en
Bluetooth® Standard 2.0 unterstüt zen.
– Das mobi le Endgerät muss sich in Reichwe ite
der 911 Soundbar befinden
[
max. 10 m ].
Anmeldevorgang
– Eingang BT wählen.
– Taste „Bluetooth®-Pairing“ betätigen.
– Im Display ersch eint
BTP
.
– Sie hab en nun 30 Sekunden Zeit zur
Anmeldung Ihres mobilen Endgerätes.
– Star ten Sie den Suchlauf an Ihrem
mobilen Endgerät.
– Wählen Sie
911 SOUNDBAR
als Wieder gabegerät.
– Die Verbi ndung stellt sich nach Bestätig ung
automatisch her und wird Ihnen mit der
Meldung
CON
im Display angezei gt.
– Sollte die Verbindung fehlgeschlagen sein,
erhalten Sie die Meldung
FAI
.
– Sollte das mobile Endgerät einen Zugangscode
verlangen, geb en sie 0000 ein.
– Ersche int im Display
DIS
, ist Ihr mobiles
Endgerät außer Re ichweite oder abgemeldet.
Betrieb eines mobilen Endgeräts
– Das jewei ls zuletzt mit der 911 Soundbar verbunden e
Gerät stellt automati sch die Verbindung her, sofern
die Blueto oth® Funktion akti viert und der Eingang für
die Blueto oth®-Wiedergabe gewählt ist. Sie erhalten
in diesem Fall die Meldung
CON
.
– Star ten Sie die Wiedergabe eine s Mediums auf Ihrem
mobilen Endger ät und es wird automatisch der Ton
auf der 911 Soundbar ausgegeben.
Hinweis: Die 911 Soundbar kann bis zu 3 Bluetooth®
Geräte verwalten. Siehe auch Kapitel „Automatische
Wahl des BT Eingangs“ au f Seite 22.
BT
BTP
CON FAI
BLUETOOTH
PAIRING
911
SOUNDBAR
Nach einem weitere n kurzen Druck auf die „Soun d“ Taste springt das Di splay auf
VOI
.
Verwenden Sie die „Voice“ Funk tion, um die Sprachverständli chkeit sowohl im Stereo- als
auch Surroundbetrieb zu erhöhen. Hierdurch können Sie z. B. Dialoge
[
Sprache ] bei Filmen
mit lauten Effekten besser verstehen.
Mit den „Volume +/–“ Tasten können Sie die „Voice“ Funktion ein- bzw. ausschalten
[
ON bzw. OFF ].
Durch erneutes D rücken der „Sound“ Taste gelangen Sie w ieder zum Anfang des Menüs
LIP
.
Menü verlassen
Durch erneutes D rücken der „Sound“ Taste für länger als 3 S ekunden können Sie das
Menü „Erweiterte Sound-Funktionen“ wieder verlassen.
Erhält die 911 Soundbar für läng er als 30 Sekunden keinen Eing abebefehl von der
Fern bedienung, springt die Menüführung automatisch in den Normalmodus zurück.
LIP
SUB
ON OFF
EQ
EQ1 EQ2 EQ3
DRC
ON OFF
VOL
0 99
VOI
ON OFF
…
DS_Betriebsanleitung_911_Soundbar_210x148mm_RZ_v10.indd 18-19 09.11.15 09:43
Page 12

[
DE ] 911 Soundbar
20
|
21
Ist diese Funktio n aktiviert
[
ON ], erkennt das Gerät e in am optischen oder coaxia len Eingang anliegendes Si gnal. Wird ein Signal detektie rt
[
z. B. Einschalten des Quellge rätes ], schaltet die 911 Soundbar selbst tätig ein. Befindet sich kein Signal a m gewählten Eingang
[
z. B. nach Abschalten
des Quellgeräts ], wird die 911 Soundbar nach 30 Sekun den automatisch in den AUT Standby-Zusta nd versetzt. Ist diese Funkti on deaktiviert
[
OFF ],
muss die 911 Soundbar manuell ei n- bzw. abgeschaltet werden.
Im Auslieferzustand ist diese Funktion deaktiviert
[
OFF ].
Zur Aktivierung/Deaktivierung dieser Funktion gehen Sie wie folgt vor:
1
Hal ten Sie bei eingeschaltetem Ge rät die „Play Mode“ Taste für mehr
als 3 Sekunden g edrückt, b is
AUT
im Display ersch eint.
2
Durch D rücken der „Volume +“ Taste aktivieren Sie die Funktio n
[
ON ].
3
Durch D rücken der „Volume –“ Taste deaktivieren Sie di e Funktion
[
OFF ].
4
Verlass en Sie das Menü, indem Sie aber mals die „Play Mode“ Taste für
mehr als 3 Sekund en gedrückt halten. Erfo lgt innerhalb von 10 Sekunden
keine Eingabe, verlässt das Gerät das Konfigurationsmenü automatisch.
Bemerkung: Die Ein-/Abschaltautomatik funktioniert ausschließlich beim optischen und coaxialen Digitaleingang. Wird das Gerät über die „ON/Standby“
Taste in den Standby-Zustand verse tzt, ist ein automatisches Einsc halten nicht möglich.
Das Gerät erkennt e in Signal ausschließlic h an dem gewählten Digitalein gang. Ein Signal, welches sich a n dem anderen als dem gewählte n Digitaleingang
befindet, kann nicht d etektiert werden.
SETUP – FUNKTIONEN
EIN- BZW. ABSCHALTAUTOMATIK [ AUT
]
1
Halten S ie bei eingeschaltetem Gerät di e „Play Mode“ Taste für mehr als 3 Sekunden ge drückt, bis
AUT
im Display ersch eint.
2
Drücke n Sie erneut kurz die „Play Mod e“ Taste, bis
ECO
im Display ersch eint.
3
Durch Drücken der „Volume +“ Taste aktivier en Sie die Funktion
[
ON ].
4
Durch D rücken der „Volume –“ Taste deaktivieren Sie di e Funktion
[
OFF ].
5
Verlass en Sie das Menü, indem Sie aber mals die „Play Mode“ Taste für mehr als 3 Sekun den gedrückt halten.
Erfolgt inner halb von 10 Sekunden keine Eingabe, ver lässt das Gerät das Konfiguratio nsmenü automatisch.
ECO STANDBY [ ECO
]
Ist diese Funkt ion aktiviert
[
ON ], wird das Gerät automa tisch in den ECO Standby-Zustand verset zt, wenn es für eine Stunde kein Si gnal am gewählten
Eingang detekti ert. Ist diese Funktion dea ktiviert
[
OFF ], muss die 911 Soundbar manuell ab geschaltet werden.
Im Auslieferzustand ist diese Funktion aktiviert
[
ON ].
Zur Aktivierung/Deaktivierung dieser Funktion gehen Sie wie folgt vor:
Bemerkung: Dies e Funktion wird automatisch dea ktiviert, wenn die Funkti on AUT aktiviert wird.
DS_Betriebsanleitung_911_Soundbar_210x148mm_RZ_v10.indd 20-21 09.11.15 09:43
Page 13
[
DE ] 911 Soundbar
22
|
23
AUTOMATISCHE WAHL DES BT EINGANGS
[
SEL ]
Ist diese Funktio n aktiviert
[
AUT ], wechselt die 911 Soundbar automati sch auf den Eingang BT, sobald sie vom Mobilg erät ein Audiosignal detek tiert.
Ist diese Funktio n deaktiviert
[
MAN ], muss der Eingang m anuell gewählt werden.
Im Auslieferzustand ist diese Funktion deaktiviert
[
MAN ].
Zur Aktivierung/Deaktivierung dieser Funktion gehen Sie wie folgt vor:
Bemerkung: Abhängig vom ver wendeten Mobilgerät kann b ei aktivierter Automatik di e 911 S oundbar auch beim Tippen ei ner Nachricht oder bei
anderen Systemtön en auf den BT Eingang schalten.
Wenn die SEL Funktion a ktiviert
[
AUT ] ist, kann der BT Eingan g nicht mehr über die „Input“ Taste gewähl t werden. In diesem Modus kann die
911 Soundbar, unabhängig vom gewählten Signaleingang, mit dem Mobilgerät gekoppelt werden.
1
Halten S ie bei eingeschaltetem Gerät di e „Play Mode“ Taste für mehr als 3 Sekunden ge drückt, bis
AUT
im Display ersch eint.
2
Drücke n Sie erneut kurz die „Play Mod e“ Taste, bis
SEL
im Display ersch eint.
3
Durch Drücken der „Volume +“ Taste aktivier en Sie die Funktion
[
AUT ].
4
Durch D rücken der „Volume –“ Taste deaktivieren Sie di e Funktion
[
MAN ].
5
Verlass en Sie das Menü, indem Sie aber mals die „Play Mode“ Taste für mehr als 3 Seku nden gedrückt halten.
Erfolgt innerhalb von 10 Sekunden keine Eingabe, verlässt das Gerät das Konfigurationsmenü automatisch.
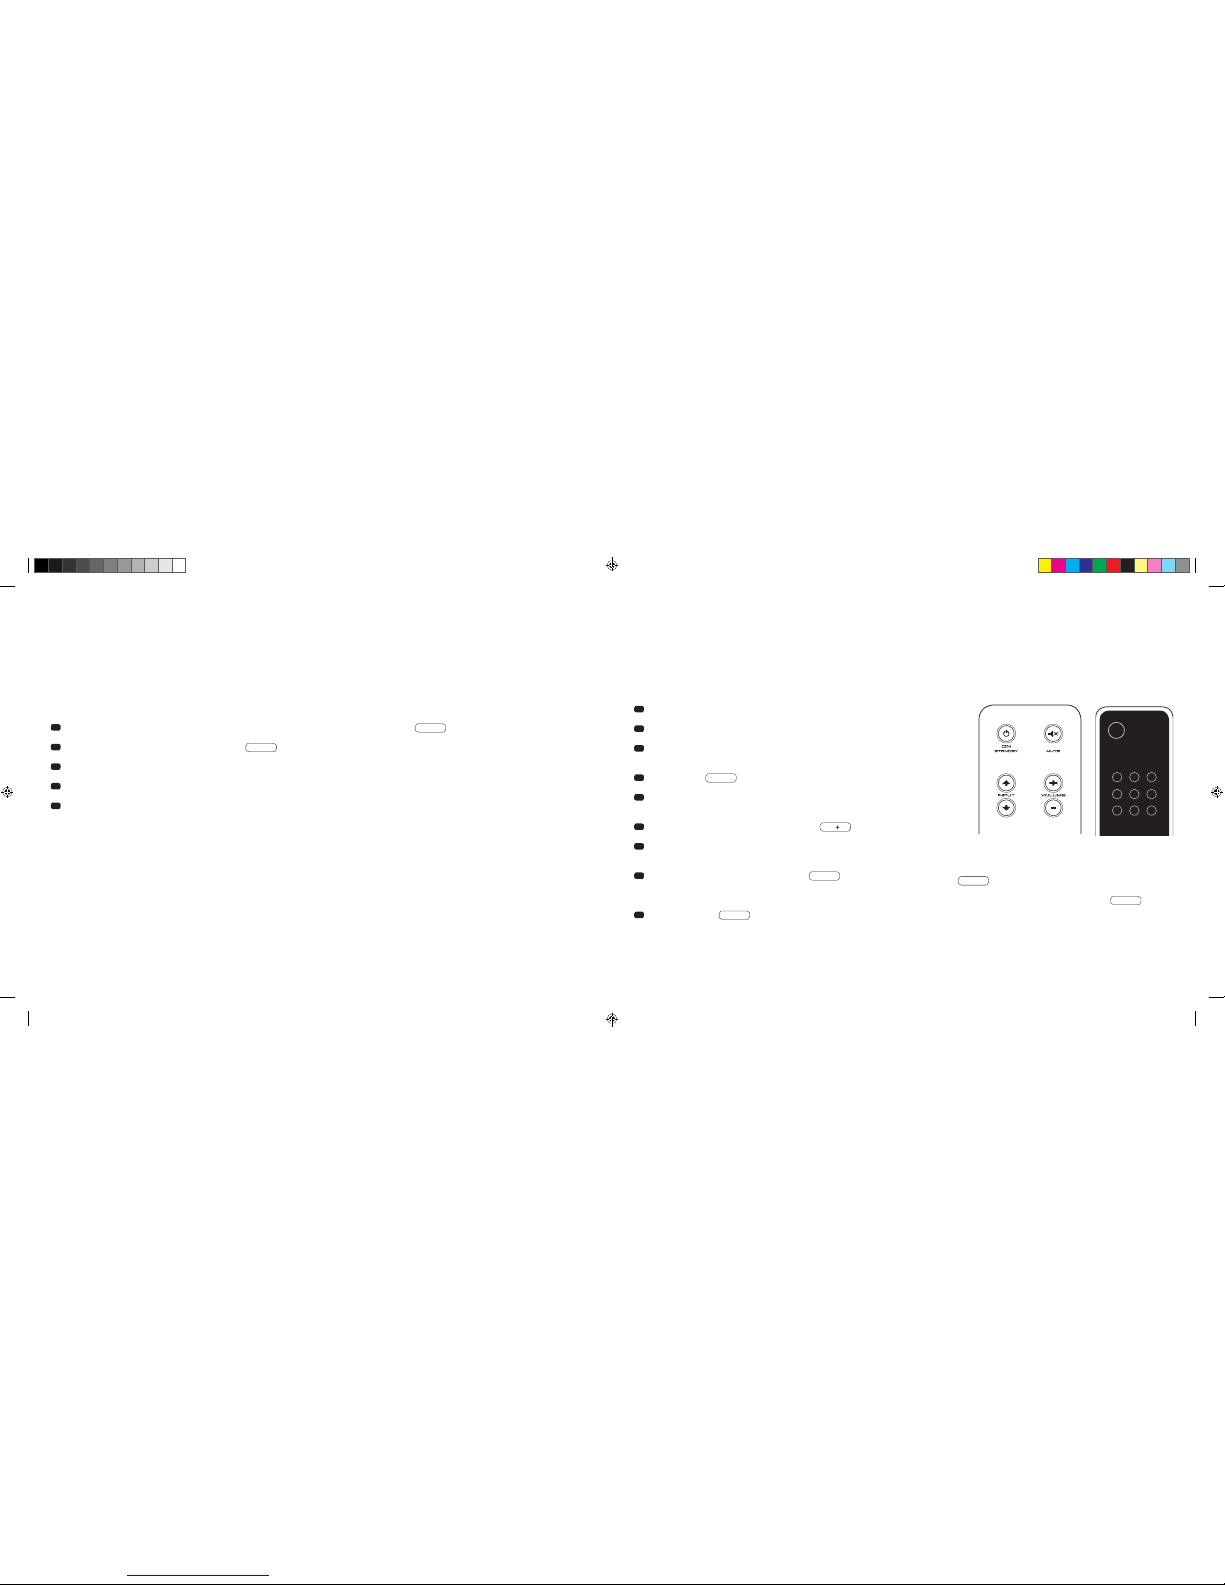
IR-LERNFUNKTION
Die 911 Soundbar kann den Infraro t-Code Ihrer TV-Fernbedienun g lernen und ermöglicht es so, di e Funktionen der 911 Soundbar und des TV-Ger äts
mit einer Fernbe dienung zu steuern. Dabei kann j ede beliebige Taste der TV-Fernbedi enung mit den Befehlen für die 911 Soundbar be legt werden.
Achten S ie bei der Tastenwahl darauf, das s die Befehle für die 911 Soundbar und das TV-Ge rät dabei nicht im Konflikt stehe n. So empfiehlt es sich,
die internen Lau tsprecher des TV-Gerätes na ch Anschluss der 911 Soundbar zu deaktiv ieren.
1
Halten Sie die Fernbedienung Ihres TV-Gerätes bereit.
2
Schalten Sie die 911 Soundbar ein.
3
Drücken Sie die „ON/Standby“ Taste der Fernbedienung der 911 Soundbar
ca. 5 Sekunden.
4
Im Display blinkt
IRL
.
5
Drücken Sie auf der Fernbedienung der 911 Soundbar die gewünschte
Funktion, z. B. „Volume +“.
6
Im Display blinkt jetzt die gewählte Funktion, z. B. V.
7
Drücken Sie innerhalb 20 Sekunden die zu belegende Taste auf der
TV-Fernbedienung.
8
Bei erfolgreicher Übertragung leuchtet im Display OK und Sie können
mit der Programmierung der nächsten Tastenfunktion z. B. „Volume –“
fortfahren.
9
Erscheint im Display
FAI
ist die Übertragung fehlgeschlagen und
Sie müssen die Schritte 5 bis 8 noch einmal wiederholen.
TV-Fernbedienung
ON
STANDBY
Hinweis: Die rote „ON/Standby“ Taste der Porsche Fernbedienung
ist doppelt belegt. Durch einmaliges Drücken, im Display erscheint
dann ON, kann die Einschaltfunktion gelernt werden. Drückt
man die rote „ON/Standby“ Taste der Porsche Fernbedienung
zweimal kurz hintereinander, erscheint im Display
STB
und die
Standby- bzw. Ausschaltfunktion kann gelernt werden. Sollte Ihre
TV-Fernbedienung nur über eine Taste für den Befehl „Ein-“ und
„Ausschalten“ verfügen, müssen trotzdem beide Funktionen, „ON“
und „Standby“, mit diesem Befehl belegt werden.
DS_Betriebsanleitung_911_Soundbar_210x148mm_RZ_v10.indd 22-23 09.11.15 09:43
Page 14

[
DE ] 911 Soundbar
24
|
25
Menü verlassen
Durch erneutes Drücken der „ON/Standby“ Taste für länger als 5 Sekunden können Sie das Menü „IR-Lernfunktion“ wieder verlassen. Erhält die
911 Soundbar für länger als 60 Sekunden keinen Eingabebefehl von der Fernbedienung, springt die Menüführung automatisch in den Normalmodus zurück.
Direktwahl der Signaleingänge
Zusätzlich zu der „Input “ und „Input “ Taste können Sie die Signaleingänge TV, DVD, AUX und Bluetooth® bei Verwendung Ihrer TV- oder Universalfernbedienung auch direkt auswählen, d. h. Sie können den gewünschten Eingang einer Taste auf Ihrer Fernbedienung zuweisen.
1
Halten Sie, während Sie sich im IR-Lernmenü
IRL
befinden, eine der beiden „Input“ Tasten auf der Porsche Fernbedienung für 3 Sekunden
gedrückt, gelangen Sie in das Direktwahl-Menü. Im Display blinkt
DVD
.
2
Sie können dem Eingang „DVD“ nun eine Taste auf Ihrer TV-Fernbedienung zuordnen.
Hinweis: Wenn Sie im Normalbetrieb diese Taste auf Ihrer TV-Fernbedienung drücken, springt die 911 Soundbar direkt auf den DVD-Eingang.
3
Drücken Sie die gewünschte Taste auf Ihrer TV-Fernbedienung. Wurde der Infrarot
[
IR ]-Code erfolgreich von der 911 Soundbar gelernt, zeigt das
Display kurz OK und anschließend den nächsten Eingang TV.
4
Konnte der Code nicht gelernt werden, oder sollten Sie innerhalb von 10 Sekunden keine Taste an Ihrer Fernbedienung drücken, zeigt das Display kurz
FAI
um anzuzeigen, dass kein Code gelernt wurde. Danach zeigt das Display weiterhin blinkend
DVD
, und Sie können erneut bzw. weiterhin
den Code für den Eingang „DVD“ lernen.
5
Sollten Sie dem Eingang „DVD“ keine Taste zuordnen wollen, drücken Sie kurz die „Input “ Taste, um manuell zum Eingang „TV“ zu gelangen.
6
Um den Eingängen TV, AUX und/oder Bluetooth® eine Taste auf Ihrer TV-Fernbedienung zuzuordnen, wiederholen Sie die unter Punkt 2–5
beschriebenen Schritte.
7
Um das Direktwahl-Menü wieder zu verlassen, drücken Sie erneut eine der beiden „Input“ Tasten für 3 Sekunden und Sie gelangen in das übergeordnete
IR Lernmenü
IRL
. Wenn Sie im Direktwahl-Menü die „ON/Standby“ Taste für 3 Sekunden gedrückt halten, springt das System aus dem IR Lern-
menü in den Normalbetrieb. Im Display steht kurz
FIN
, um anzuzeigen, dass der IR-Lernmodus beendet wurde.
Hinweis: Aufgrund der Vielzahl von Infrarot-Codes kann nicht garantiert werden, dass jede Fernbedienung von der 911 Soundbar gelernt werden kann.
IR-LÖSCHFUNKTION
Um die von der 911 Soundbar gelern ten Funkbefehle der TV-Fernbe dienung wieder zu löschen, g ehen Sie bitte wie folgt vor:
1
Schalten Sie die 911 Soundbar ein.
2
Drücken Sie die „ON/Standby“ Taste der Porsche Fernbedienung für ca. 5 Sekunden.
3
Im Display blinkt
IRL
.
4
Drücke n Sie die „Mute“ Taste der Porsche Fernbedienung für ca. 5 Sekunden.
5
Im Display erscheint
CLR
für ca. 5 Sekunden. Die 911 Soundbar wechselt danach automatisch in den Normalbetrieb.
DS_Betriebsanleitung_911_Soundbar_210x148mm_RZ_v10.indd 24-25 09.11.15 09:43
Page 15

[
DE ] 911 Soundbar
26
|
27
FEHLERSUCHE
Anbei finden Sie eine Übersicht der am häufigsten auftretenden Probleme. Sollten Sie weiterführende Fragen haben, wenden Sie sich bitte an Ihren
Porsche Design S tore bzw. Ihr Porsche Zentrum, kontaktiere n Sie unsere Service-Ho tline unter 0800 9000 911
[
+49
[
0 ]711 911 0 aus de m Ausland ]
oder senden Sie uns eine Email an [email protected]
Problem Mögliche Ursache Lösung
911 Soundbar
schaltet nicht ein.
Netzkabel nic ht mit Steckdose und /oder
911 Soundbar verbunden.
Verbindung herstellen.
911 Soundbar reagiert
nicht auf Fernbedienung.
1. Die Batterie ist leer. 1. Batterie au swechseln, beim Einlegen au f die richtige
Polung achten.
2. Schutzfolie nic ht entfernt. 2. Schutzfolie an der Fernbedienung entfernen.
Tonwieder ga be zu leise. Volume de r 911 S oundbar oder des Quellg eräts
zu niedrig eingestellt.
Lautstärke mittels „Volume“ Taste erhöhen.
Lautstärke des Quellgeräts erhöhen.
Keine Ton wiedergabe. 1. Tonformat des Quellge rätes falsch ausgewählt
[
Digitaleingang „TV“ und „DVD“ ].
1. Bitte prüfe n Sie die korrekte Einstellung Ih res Quellgerätes.
„DTS“ kodierte Ausgabeformate können nicht wiedergegeben werden.
2. Zuspieler gibt kein Signal aus. 2. Digitalausgang am Quellgerät nicht freigeschaltet, Lautstärkeregelung steht ev tl. auf „Null“
[
bitte Anleitun g des Gerätes zur
Hand nehmen ].
3. Kabe l nicht korrekt verbunden / defektes Kabel. 3.1. Überprüfen Sie die Verbindung des Zuspielers zur 911 Soundbar
und wechseln Sie gegebenenfalls das Kabel aus.
3.2. Üb erprüfen Sie, ob die Schut zkappen am Stecker des optis chen
Kabels entfernt sind.
Problem Mögliche Ursache Lösung
911 Soundbar brummt. 1. Si gnalleitungen vom Quell gerät zur 911 Soundbar
zu lang
[
Aux ].
1. Kürzere Signalleitungen verwenden.
2. Verwendete Signalleitung nicht abgeschirmt oder
die Abschirmun g an der verwendeten Leitun g
unterbrochen
[
defekt ].
2. Leitung gegen ein e geschirmte Leitung austaus chen.
3. Erdungsschleife
[
Brummschleife ] „erzeugt“. 3. Eine Erdungsschleife kann entstehen, wenn mind. 2 mit Signal-
leitungen
[
Cinch ] verbundene Geräte mit Schutz kontaktstecker
[
z. B. Verstärker und Comp uter ] an örtlich getre nnten Steckdosen
angeschloss en sind. Alle mit der 911 Soundbar verbunden en
Geräte mit Schutzkontaktstecker an einer Steckdosenleiste
[
Vielfachsteckdose ] anschließen.
4. Ein nicht e ntstörter Verbraucher
[
z. B. Küh lschrank ] am Netz.
4. Möglic he Störquellen zum Testen ausschalte n; betreffendes
Gerät entstören las sen, falls das Brummgeräu sch verschwindet,
oder zunächst die S törquelle an einer anderen N etzphase
[
L1, L2
oder L3 ] anschließen
[
falls erforde rlich, einen Fachmann zu Rate
ziehen ]; speziellen „Mantelstromfilter“
[
im Fachhandel erhältlich ]
zwischen Que llgerät und 911 Soundbar schalten, um das
Brummen zu eliminieren; Netzstecker drehen, um die sogenannte
Brummspannung zu reduzieren
[
besonders wic htig, wenn das
Quellgerät nic ht geerdet ist ].
DS_Betriebsanleitung_911_Soundbar_210x148mm_RZ_v10.indd 26-27 09.11.15 09:43
Page 16

[
DE ] 911 Soundbar
28
|
29
Problem Mögliche Ursache Lösung
Keine Wiedergabe über
die Blueto oth
®
Funk-
technologie.
1. Es besteht keine Ver bindung zwischen der
911 Soundbar und dem mobilen End gerät.
1. Verbinden Sie Ihr mobiles Endgerät wie beschrieben.
2. Das mobi le Endgerät ist gekoppelt, abe r es erfolgt
keine Wiedergabe.
2.1. Das mobile Endgerät muss erneut verbunden werden.
2.2. Stellen Si e die Lautstärke am mobilen En dgerät auf den
maximal mögl ichen Wert ein.
2.3. Erhöhen Sie die Lau tstärke der 911 Soundbar.
2.4. Stellen Sie s icher, dass Störquellen wie z. B. ein WLAN-Router
oder ein Laptop nic ht in direkter Nähe zur 911 Soundbar
aufgestellt sind.
2.5. Gleich zeitiger Betrieb über WL AN und Bluetooth
®
Verbindung
von einem mobile n Endgerät ist in den meisten Fälle n nicht
störungsfrei möglich
[
WLAN am Endge rät deaktivieren ].
3. Sie befi nden Sich außerhalb der Re ichweite
[
max. 10 m ].
3. Verring ern Sie den Abstand zwis chen 911 Soundbar und
mobilem Endgerät.
Der BT Eingang ist üb er
die „Input“ Tasten nicht
wählbar.
Die SEL Funktion is t aktiviert
[
AUT ]. Die Umschaltung geschieht in diesem Falle automatisch, sobald die
911 Soundbar ein Audiosignal vom Mobilgerät detektiert.
Problem Mögliche Ursache Lösung
Das Gerät schaltet
bei optischem und
coaxialem Eingang nicht
automatisch ein.
1. Die AUT Funkti on ist werksseitig deakti viert
[
OFF ]. 1. Aktivieren Si e die AUT Funktion
[
ON ]
[
Seite 20 ].
2. Das Gerä t wurde über die „Power“ Taste in den
Standby-Zustand geschaltet.
2. Schalte n Sie das Gerät über die „Power“ Taste der Fer nbedienung ein u nd warten Sie künftig bis es a utomatisch
in den Standby-Zustand schaltet.
3. Das Ge rät wurde auf den anderen Dig italeingang
geschaltet, auf dem ke in Signal anliegt und hat sic h
automatisch abgeschaltet.
3. Scha lten Sie das Gerät über die „Power “ Taste der Fernbedienung ein u nd wählen Sie den Digitale ingang, an dem
sich das gewünschte Quellgerät befindet.
Die 911 Soundbar schaltet nicht automatisch au f
den BT Eingang.
1. Die SEL Funktion ist deak tiviert
[
MAN ]. 1. Aktivieren S ie die SEL Funktion
[
AUT ].
2. Bei Ihre m mobilen Endgerät ist Bluetooth
®
deaktiviert.
2. Akti vieren Sie Bluetooth® an Ihrem mobilen Endgerät.
3. Die 911 Soundbar ist mi t einem anderen
mobilen Endgerät verbunden.
3. Deak tivieren Sie Bluetooth
®
bei dem anderen mobilen Endgerät.
4. Das mobi le Endgerät ist nicht mit der
911 Soundbar gekoppelt.
4. Koppeln S ie Ihr mobiles Endgerät mit d er 911 Soundbar
[
Seite 19 ].
Die 911 Soundbar
schaltet ungewollt auf
den BT Eingang.
Dies kann passieren, wenn Ihr mobiles Endgerät
Systemtöne wie z. B. das Tippen der Tastatur ausgib t.
1. Deaktivieren Sie d ie SEL Funktion
[
MAN ].
2. Deaktivieren Sie diese Systemtöne an Ihrem mobilen Endgerät.
DS_Betriebsanleitung_911_Soundbar_210x148mm_RZ_v10.indd 28-29 09.11.15 09:43
Page 17

[
DE ] 911 Soundbar
30
|
31
TECHNISCHE DATEN
Spannungsversorgung
– Betriebsspan nung 100–240 V~
– Betriebsfrequ enz 50/60 Hz
– Leistungsaufn ahme ECO Standby = 0,39 W
[
Werkseinstellung
]
– Leistungsaufn ahme AUT Standby = ca. 4,5 W
– Leistungsaufnahme Leerlauf
[
kein Ausgangssignal ] = ca. 8,4 W
– Leistungsaufn ahme maximal = ca. 150 W
Ein-/Ausgangspegel Analog
– AUX = max. 2,0 V
[
effektiv
]
– SUB OUT = max. 2,0 V
[
effektiv
]
Decoder
– Dolby Digital
– PCM
[
32 kHz…96 kHz/8 Bit…24 Bit ]
Informationen über den „bestimmungsgemäßen Betrieb“
Die 911 Soundbar ist zur Verwendun g in geschlossenen Räume n konzipiert
und darf nicht i m Freien oder in nasser Umgeb ung verwendet werden.
Das Gerät darf n icht umgebaut oder verände rt werden. Schließen Sie
die 911 Soundbar so an, wie in der Anle itung beschrieben und be achten
Sie die Sicherheitshinweise. Betreiben Sie das Gerät ausschließlich mit
der auf dem Typenschild spezifizierten Netzspannung und -frequenz.
Informationen über einen umweltgerechten Betrieb
Schalten Sie zur Reduzierung der Leistungsaufnahme die 911 Soundbar
bei Nichtgebrauc h durch Drücken der Taste „ON/Standby“ in
den Bereitschafts-Modus
[
Standby ]. Dies reduziert den Stromverbrauch
und senkt Ihre
Stromrechnung.
WEITERE WICHTIGE INFORMATIONEN
Informationen zur CE-Kennzeichnung
Innerhalb der Europäischen Union in Verkehr gebrachte
Elektro- und Elektronikgeräte müssen mit einem CE-Kennzeichen verseh en sein, um anzuzeigen, dass das G erät
den geltenden Anforderungen
[
z. B. zur elektromagnetischen
Verträglichkeit oder zur Gerätesicherheit ] entspricht.
Entsorgungshinweise
Gemäß der EU-Richtlinie über Elektro- und Elektronik-Altge räte
dürfen mit diesem Symbol gekennzeichnete Geräte nicht mit
dem Siedlungsabfall
[
Hausmüll ] entsorgt werden. Bi tte informieren Sie sich be i Bedarf bei Ihrem zuständ igen Entsorgungsunternehmen oder der Gemein de-/Stadtverwaltung über die
für Sie kosten freie Entsorgung. Sie dient sowohl dem Umweltund Gesundhei tsschutz als auch der Einspa rung von
[
seltenen ]
Rohstoffen durch Wiederverwertung
[
Recycling ].
Batterien dürfen ebenfalls nicht mit dem allgemeinen Haushaltsmüll entsorgt werden. Sie müssen getrennt gesammelt
und bei einer Batterie-Sammelstelle abgegeben werden. Werfen
Sie leere Batter ien unentgeltlich in die z. B. beim Handel aufgestellten Sammelbehälter. Nicht ordnungsgemäß entsorgte
Batterien können der Gesundheit von Menschen und Tieren
und/oder der Umwelt schaden.
Virtualizer
– DTS TruSurround
Bluetooth
®
– Bluetooth® Standard 3.0
[
A2DP
]
– Unterstützt CSR a ptX® Dekodierung
– Reichweite bis zu 10 m
– Frequenzbereic h 2.400–2.483,5 MHz
[
2.4 GHz ISM Band
]
– Max. Sendele istung 10 mW
[
+10 dBm
]
Umgebungstemperaturen
– Minimum 5 °C
[
41 °F
]
– Maximum 35 °C
[
95 °F
]
DS_Betriebsanleitung_911_Soundbar_210x148mm_RZ_v10.indd 30-31 09.11.15 09:43
Page 18

[
DE ] 911 Soundbar
32
|
33
Manufactured un der license from
Dolby Laboratories. Dolby and the
double-D symbol are registered
trademarks of Dolby Laboratories.
For DTS patents, see
http://patents.dts.com. Manufactured
under license f rom DTS Licensing
Limited. DTS, the Symbol a nd DTS and
the Symbol togethe r are registered
trademarks, and DTS TruSurrou nd is
a trademark of DTS, Inc. © DTS, Inc.
All Rights Reserved.
Bluetooth
®
:
The Blueto oth® word mark and logos a re
registered tradem arks owned by Bluetooth®
SIG, Inc., and any use of such ma rks by
Porsche Design is u nder license. Other
trademarks and tra de names are those of
their respective owners.
aptX
®
:
The aptX® software is copy right CSR plc or its
group companies. All rights reserved. The aptX®
mark and the aptX l ogo are trademarks of
CSR plc or one of its group companies and may
be registered in one or more jurisdictions.
LIZENZHINWEISE
DS_Betriebsanleitung_911_Soundbar_210x148mm_RZ_v10.indd 32-33 09.11.15 09:43
Page 19
[
EN ] 911 Soundbar
34
|
35
CONTENTS
Safety advice ...................................................Page 35
Unpacking .......................................................Page 40
Installation .......................................................Page 40
Initiating ...........................................................Page 40
Setting up the remote co ntrol ..........................Pa ge 41
Connection terminal ........................................Pa ge 41
Connecting your 911 Soundbar .......................Page 42
Operation ........................................................Page 43
Display indications ...........................................Page 44
Extended sound functions ...............................Page 46
Playback via Blueto oth® Technology ................Page 49
Automatic on/off function
[
AUT ] .......................Page 50
Eco Standby
[
ECO ] .........................................P age 51
WELCOME TO THE WORLD OF PORSCHE DESIGN
From 0 to 100 in 3.5 seconds. Up to 9,000 revolutions per minu te. With a top speed of 315 km/h. For some these are
only numbers, but for us th ey are the notes in a symphony for the sports car – the sound of the 911 GT3.
Let our passion for innovative tech nology inspire you, and prepare to enjoy this breathtaki ng sound experience with the
911 Soundbar – the high-end 2.1 virtual surround-sound system made from a n original 911 GT3 exhaust system.
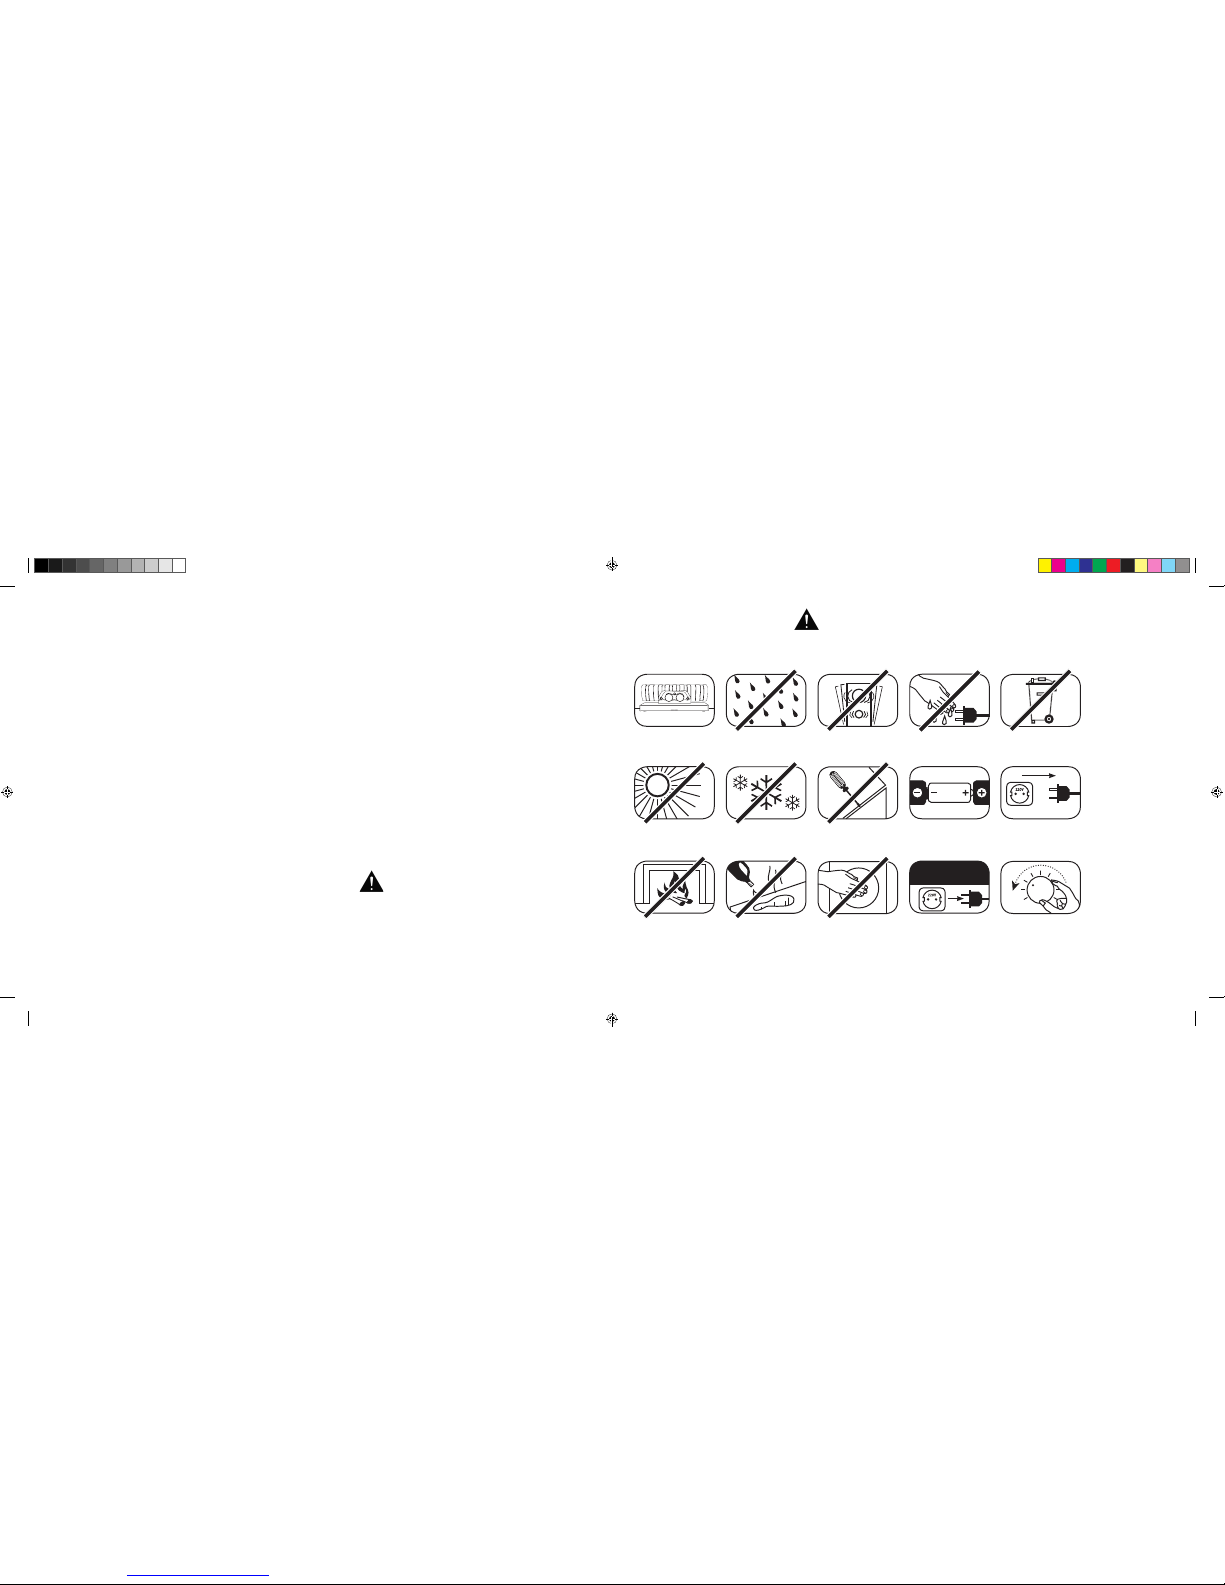
SAFETY ADVICE
Please follow the safe ty advice when positionin g and maintaining your 911 Soundbar.
Choose a level surface Avoid moisture Avoid vibrations
Avoid direct sunlight
Keep away from
heat sources
Protect against
extreme cold
Do not use aggres sive,
alcohol-based or
abrasive cleaning agents
Do not open housing
Do not reach insid e
the speaker or
exhaust system
Unplug the device during
thunderstorms
Never touch the powe r
cable with wet hands
Ensure correct
polarity for battery and
remote operation
Do not discard in
household rubbish
The user is responsible for ensuring that the
911 Soundbar is correctly positioned and connected.
Porsche Design cannot accept any responsibility
for damages or accidents caused by inappropriate
positioning or connection.
Keep access to
socket clear
In case of overload
turn the volume dow n
Automatic selectio n of BT input
[
SEL ] ..............Page 52
IR learning function ..........................................Page 53
IR delete function .............................................Page 55
Troubleshooting ...............................................Page 56
Technical specifications ...................................Page 60
Further information ..........................................Page 61
License information .........................................Page 62
DS_Betriebsanleitung_911_Soundbar_210x148mm_RZ_v10.indd 34-35 09.11.15 09:43
Page 20
[
EN ] 911 Soundbar
36
|
37
IMPORTANT SAFETY INSTRUCTIONS
Read and follow all instructions.
Keep these instructions.
Heed all warning s.
Use this device onl y in moderate climates
[
not in tropical clima tes ].
Do not operate this devi ce at altitudes in excess of 2,000 m above sea l evel.
For indoor use only. Do not use outdoors or in humid rooms.
To reduce the risk of fire and ele ctric shock, do not expose this devi ce to rain or moisture.
Do not use this device n ear water.
The device should not be exposed to dripping or splashing.
Strong fluctuations in temperature lead to condensation
[
water droplets ] forming inside the device. Wait until the moisture has evaporated
before starting u p the device
[
min. 3 hours ].
Objects filled with l iquids
[
such as vases ] should not be place d on the device.
No naked flame source, su ch as lighted candles, should be p laced on or beside the device.
Do not install the devi ce near any heat sources such as r adiators, heat registers, stoves, or other d evices
[
incl. amplifiers ] that produce heat.
Prevent exposure to direct sunlight.
Observe a free s pace of at least 5 cm around the device.
Do not disregard the s afety purpose of a polarized or gro und plug: a polarized plug has two b lades, with one wider than the othe r. The wide blade
is provided for your saf ety. Should the provided plug not fit into your ou tlet, consult an electrician fo r replacement of the obsolete outl et.
To prevent electric shock, d o not use the plug with an extension co rd, receptacle, or inappropriate ou tlet unless the blades can be fu lly inserted
to prevent blade exposu re.
Never touch signal- nor power cords with wet hands.
Protect the power cord from b eing walked on or pinched, par ticularly at the plug, electric al outlet, and at the point at which the pow er cord
meets the device.
Where the mains plug or an appliance coupler is used as the disconnect device, the mains plug of the power cord or appliance coupler should
always be accessi ble.
Unplug the device d uring lightning storms or when u nused for long periods of time.
To completely disconnect this apparatus from the mains, disconnect the power cord from the electrical outlet.
Power down the device before connecting or disconnecting any cable.
Always pull the plugs a nd not the cables.
Install the device in accordance with the manufacturer’s instructions.
Always choose a level s urface. The device should a lways be in perfect vertica l alignment.
CAUTION
Risk of elec tric shock .
Do not open!
CAUTION:
To reduce the ri sk of fire and el ectric shoc k, do not open t he
device. Th ere are no ser viceable pa rts insid e.
Refer all servicing to qualified service personnel only.
CAUTION
Danger of li fe!
CAUTION:
Do not ingest battery. Chemical burn hazard.
Danger of li fe!
CAUTION
Danger of exp losion!
CAUTION:
Replaceable lithium batteries! Danger of
explosion i f battery i s incorrec tly replac ed.
Replace on ly with the sa me or equival ent type.
DS_Betriebsanleitung_911_Soundbar_210x148mm_RZ_v10.indd 36-37 09.11.15 09:43
Page 21
[
EN ] 911 Soundbar
38
|
39
Notices
Do not use force on operating elements, connections or cables.
The device may onl y be operated with the voltage and fre quency specified on the devic e.
To prevent components insid e the device being damaged, never i nsert any objects or body par ts into its openings. Failure to follow th is advice could
lead to short circu iting, electric shock and fire.
Only use attach ments and accessories spe cified by the manufacturer and/or prov ided with the device.
Only use trollies, s tands, tripods, brackets and tabl es that are approved of in the safety instr uctions.
Use caution when u sing a trolly to transport the devi ce to avoid injury from overturn.
Clean the device o nly with a clean, dry cloth.
Do not use aggressive, alcohol-based or abrasive cleaning agents.
To reduce the risk of electri c shock, do not open the device. The re are no serviceable par ts inside.
Refer to your Porsche Ce ntre for all repair work and serv icing. Servicing is requir ed when the device has been dam aged in any way, such as damage
to the power supply cord o r plug, liquid being spilled or ob jects falling into the device, exposu re of the device to rain or moisture, or if it do es not
operate normally or has been dropped.
Do not make any modification to the device or its accessories. Unauthorized alterations may affect the safety, regulatory compliance, or the system
performanc e. In this case, the operating licenc e/warranty can expire.
Turn down the volume level immed iately if sound distortions, suc h as unnatural knocking, beati ng or high-frequency clickin g, can be heard.
To prevent possible heari ng damage, do not listen at high volume lev els for long periods. Stop playbac k if you can hear ringing or
whistling sounds i n your ear or if you have the impression
[
even for short time s ] that you can no longer d etect high tones.
Keep new and used bat teries away from children. If the batte ry compartment does not c lose securely, stop using the product an d
keep it away from childre n.
The remote control sup plied with this product contain s a coin/button cell batter y. If the coin/button cell batter y is swallowed, it can cause severe
internal burns in ju st 2 hours and can lead to death.
If you think batterie s might have been swallowed or place d inside any part of the body, seek imme diate medical attention.
Batteries must be inserted correctly, as shown on the polarity imprint. Incorrectly replaced batteries might cause damage.
Please keep the envi ronmental aspects of batter y disposal in mind. Batteries m ust be disposed of at a battery co llection point.
Batteries shou ld not be exposed to excessive heat such a s sunshine, fire or the like.
Only use batteries or rechargeable batteries specified for this apparatus.
The batteries su pplied are not rechargeable b atteries and may therefore not be rec harged.
The apparatus and /or the accessory bag may contai n small parts that represent a c hoking hazard.
It is, therefore, not suita ble for children under the age of 3.
This symbol is intend ed to alert the user to the presence o f uninsulated dangerous voltag e within the product’s enclosure that may b e
of sufficient ma gnitude to constitute risk of fire and ele ctric shock.
This symbol is intend ed to alert the user to the presence o f important operating and ma intenance instructions in the li terature
accompanying this product.
This symbol denote s equipment with Class II Protectio n Rating. These devices are dee med to be fully protected against the ri sk of electric
shock during normal use by means of double or reinforced insulation, and therefore require no earthing conductor.
IMPORTANT SAFETY INSTRUCTIONS
DS_Betriebsanleitung_911_Soundbar_210x148mm_RZ_v10.indd 38-39 09.11.15 09:43
Page 22
[
EN ] 911 Soundbar
40
|
41
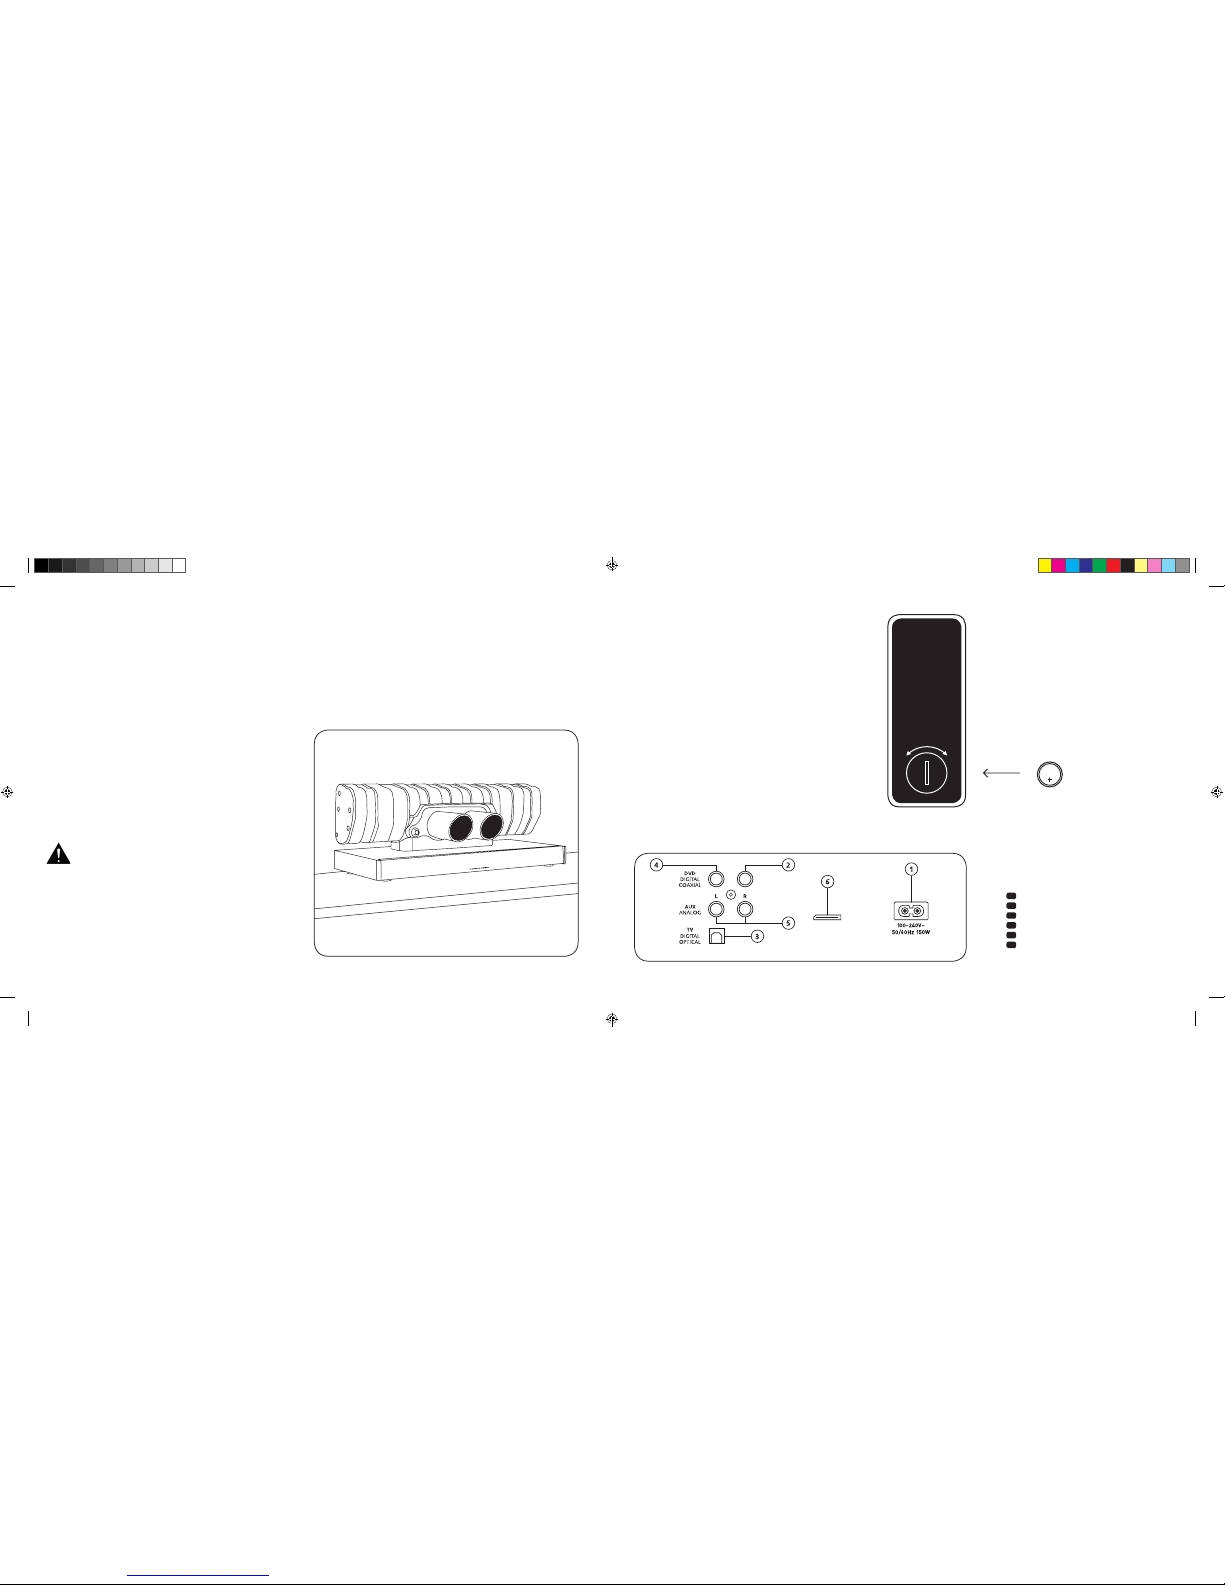
CONNECTIONS
911 SOUNDBAR
1
Power Inlet
2
Output – Ext. Subwoofer
3
Input – TV
[
optical
]
4
Input – DVD
[
coaxial
]
5
Input – AUX
[
analogue
]
6
Jack service
SETTING UP THE
REMOTE CONTROL
The remote control com es with a battery already inst alled.
Simply remove the protective film to activate. When replacing
the battery, ensure that i t is correctly inserted acco rding to
the polarity markings
[
+/– ]. Only use the batter y specified for
this system
[
CR2032 ].
Note: The battery provi ded is intended for test use and may
therefore have a shor ter lifespan.
CONNECTION TERMINAL
911 Soundbar
SUB OUT
Service
Remote control
[
Back
]
INSTALLATION
The 911 Soundbar should be positi oned on a flat surface.
UNPACKING
Unpack the box carefu lly and check that all of the
following parts are present:
1 x 911 Soundbar
1 x Remote control incl. bat tery
1 x Mains cable [ 1 x EU, UK, US, AUS
]
1 x Optical digital audio cable
1 x Stereo RCA cable
1 x Digital RCA cable
INITIATING
Maximum sound quality requires an initiating time
of 15–20 operating hours.
– During this time, ope rate the loudspeaker at normal vol ume
– Avoid high volume level s
– Listen to a variety of mus ic
CR2032
OPEN CLOSED
Each 911 Soundbar is unique. The Por sche 911 GT3
silencer that is us ed in the 911 Soundbar is
manu factured in the regular series production.
Weld seams and discolouration are purposely
retained to validate its authenticity.
For this reasons, com plaints about the surface of
the silencer [weld s teams, contact points, discolouration, weld spat ter, etc.] cannot be accepted.
We appreciate your understanding.
DS_Betriebsanleitung_911_Soundbar_210x148mm_RZ_v10.indd 40-41 09.11.15 09:43
Page 23
[
EN ] 911 Soundbar
42
|
43
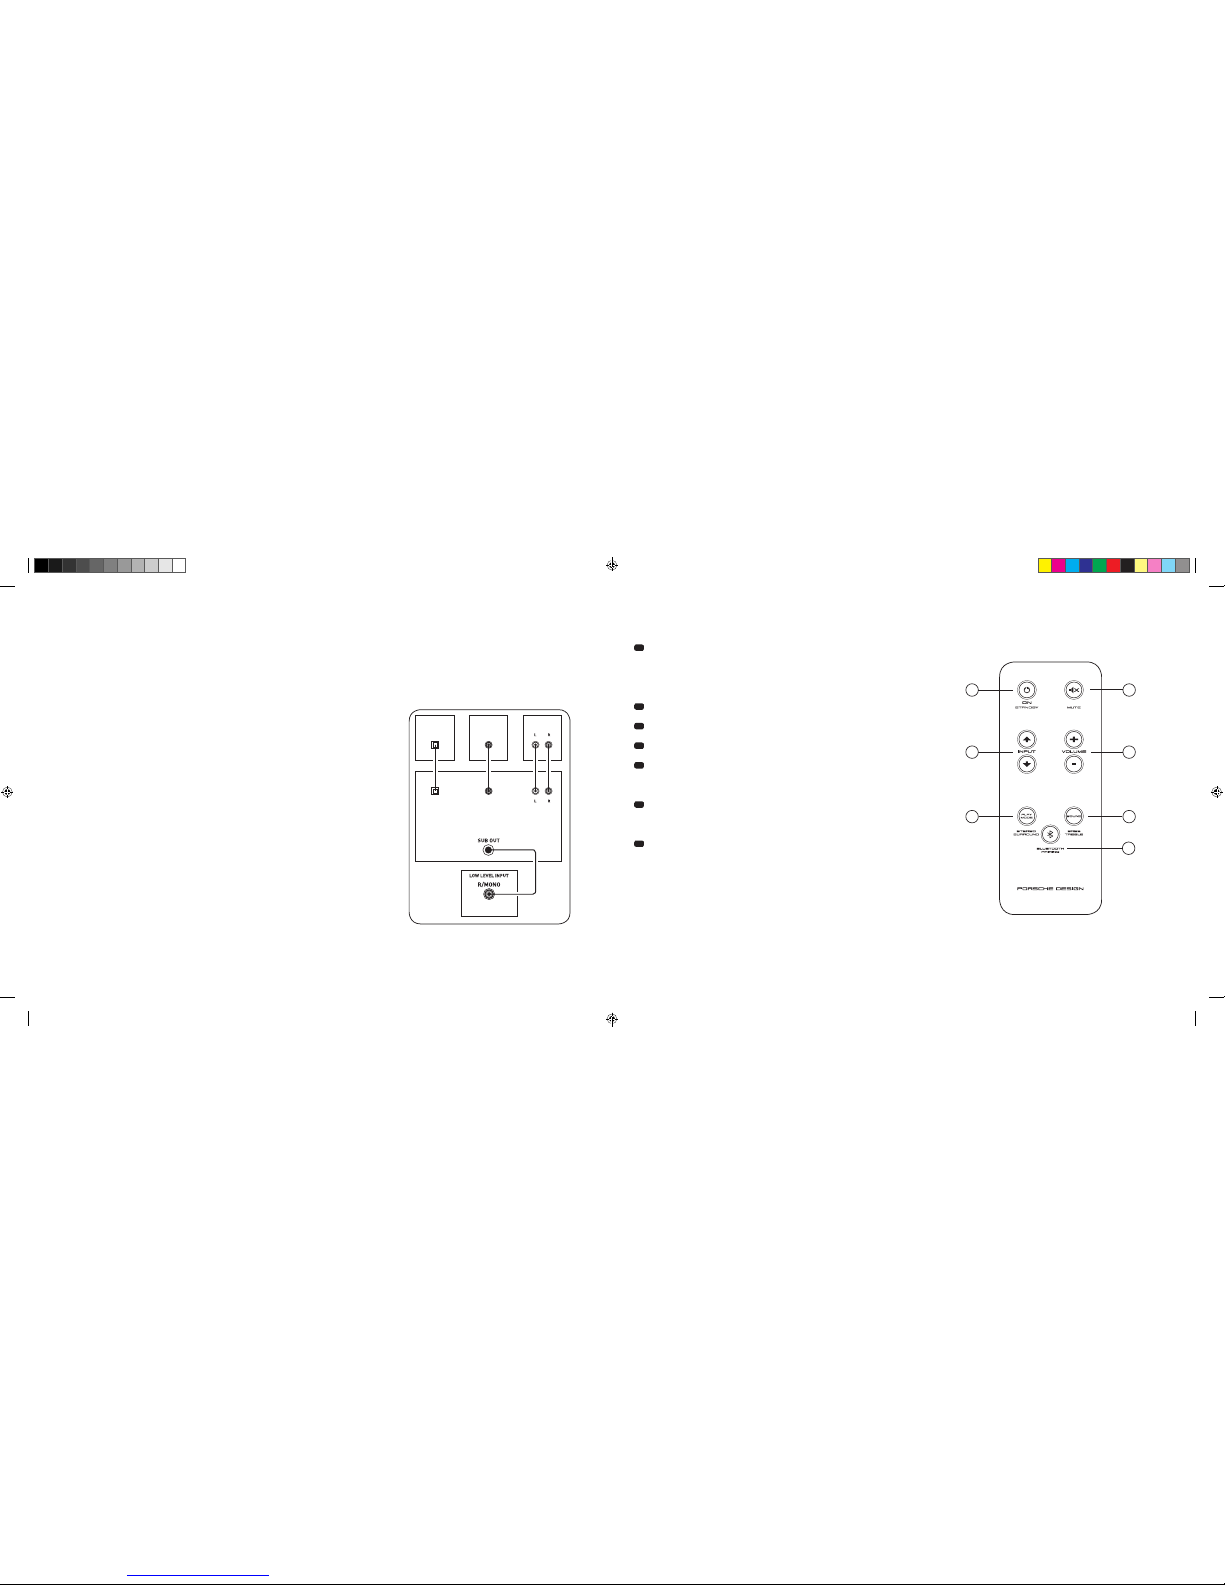
CONNECTING YOUR 911 SOUNDBAR
Please ensure that all electrical components are switched off before connecting. Your 911 Soundbar has three optional inputs. In principle, it is
enough to connect o ne of these inputs with your TV and a ll further devices to your T V. However, to achieve the best possi ble sound, we recommend that
you connect your sate llite receiver, Blu-Ray or DVD player directl y to the 911 S oundbar. The following options are poss ible, depending on the type
and fittings of the sou rce used:
OPERATION
Remote control
1
Power
ON – LED shines green
Standby – LED shines red
911 Soundbar disconnected
from the mains – L ED not illuminated
[
Off
]
2
Mute
[
muting
]
3
Input
[
signal source selection
]
4
Volume
[
volume control up/down
]
5
Play Mode
Stereo – for musi c
Surr ound – v irtual surround sound fo r home cinema
6
Sound
Bass – Adjustment via Volume control
[
+6... –6 dB ]
Treble – Adjustment via Volume control
[
+6... –6 dB
]
7
Blu etooth® Pairing
Connection with a Bluetooth® Wireless Technology enabled source
Memory Function
After the 911 Soundbar has been temporarily disconnected
from the mains, it autom atically returns to the last mode sel ected.
All settings
[
e. g. ON/OFF, volume ] remain in place.
SUB
DIGITAL MOVIE
DVD
DVDTV
TV
AUX
AUX
TV – Digita l input [ OPTICAL
]
Modern TV dev ices have an optical audio output
[
Toslink ]. Connect this with the input
marked ‘TV’ on the 911 Soundbar. This connection guarantees optimal signal transmission
and best sound qua lity.
Important: Remove protective ca ps from optical cable before inse rting.
DVD – Digital i nput [ COAXIAL
]
To transmit the DVD sound signa l, connect the digital coax ial output of your Blu-Ray
or DVD player with the jac k marked ‘DVD’ on the 911 Soundbar. To transmit the pictu re
signal, your DVD player m ust also be connected to the TV. The input m arked ‘DVD’
on the 911 Soundbar can be selected i f your TV does not have an optical out put.
AUX – Analogue i nput
If your TV only has a n audio output marked ‘Pre-Out ’, then connect it usi ng the shielded
stereo RCA cable plug ged into the analogue input on the 911 Soundbar mar ked ‘AUX’.
Otherwise th is input can be used to connect vid eo recorders or game consol es.
SUB – Analog ue output
Use this output whe n you want to connect an external acti ve subwoofer. ‘SUB OUT’ is
not active in the basic se tting and needs to be activated usin g the remote control.
See ‘Extended s ound functions’ on page 46.
4
ON
STANDBY
1
3
5 6
7
2
DS_Betriebsanleitung_911_Soundbar_210x148mm_RZ_v10.indd 42-43 09.11.15 09:43
Page 24
[
EN ] 911 Soundbar
44
|
45
DISPLAY INDICATIONS
The 911 Soundbar has a multifunctional display that lights up blue for approx. 5 seconds in response to a remote control command. The most important
readouts and their m eanings are shown below. The stand by mode of the 911 Soundbar is indic ated by a red LED light. When your 911 Soundbar is in
operation, this LED is g reen.
Input
Sound Mode
Play Mode
TV input
[
optical ]
TV
Volume
[
0 – 99
]
V30
Stereo
ST
Pairing Mode
BTP
DVD input
[
coaxial
]
DVD
Mute
---
Surround
SUR
Connection established
CON
AUX input
[
analogue
]
AUX
Bass level
[
+/– 6
]
B 6
Disconnected
DIS
Bluetooth
®
BT
Treble level
[
+/– 6
]
T 6
Error message
FAI
Bluetooth
®
Set-up functions
Act./Deact. automatic
ON/Standby for optic al and
coaxial input
AUT
Act./Deact. automatic
BT input selection
SEL
Act./Deac t.
ECO Standby
ECO
IR learning function
Learn infrared c odes
IRL
Extended sound functions
LipSync
LIP
Act./Deac t.
SUB OUT
SUB
Act./Deac t.
Dolby Dynamic Range
Compression
DRC
Select
installation mode
EQ
DS_Betriebsanleitung_911_Soundbar_210x148mm_RZ_v10.indd 44-45 09.11.15 09:43
Page 25

[
EN ] 911 Soundbar
46
|
47
EXTENDED SOUND FUNCTIONS
The menu for extend ed sound functions offers yo u the chance to correct out-of-sync
playback, to activate the ou tput for a wired external subwoofer, to adjust th e playback to suit
the location, and to switch the Dolby function ‘Dynamic Range Compression’ on or off.
If you press and hold th e key marked ‘Sound’ on the remote control for lo nger than
3 seconds, you will en ter the ‘Extended Sound Functio ns’ menu and the display
LIP
will appear on the 911 Soundbar.
You can now use the ‘Volume +/–’ keys to delay the play back in 10 ms intervals to
synchronise the so und with the ‘delayed’ image.
Press the ‘Sound’ key brie fly once more and the display
SUB
will appear.
The ‘Volume +/–’ keys can also be us ed to switch the output for an external s ubwoofer on
or off. Please note: when the S UB OUT is activated, the playback of the 911 Soundbar will
be limited to 80 Hz. Frequen cies below 80 Hz are sent to the externa l subwoofer.
Press the ‘Sound’ key once a gain briefly and the display EQ will appear.
Now use the ‘Volume +/–’ keys to choose bet ween three pre-set equalise r settings
to adjust the playback to su it the location.
EQ1
for a free-standing 911 Soundbar e. g. on a sideboard with a flat-screen TV
on the wall
[
factory setting ].
EQ2
for a set-up where a flat-screen TV is positioned on top of the 911 Soundbar.
EQ3
for a set-up where the 911 Soundbar is in a rack or on a shelf.
When the ‘Sound’ key is pre ssed again the display change s to
DRC
.
‘Dynamic Range Compression’ is a setting option created by Dolby Laboratories. When
activated, the dynami c range of Dolby encoded data strea ms can be automatically reduce d,
which also reduc es differences in volume. Th is makes it possible to enhance qu iet tones
and suppress loud ones.
The ‘Volume +/–’ keys can be used to swi tch the
DRC
function on or off.
After pressing th e ‘Sound’ key again, the display switches to
VOL
.
You can limit the maximu m volume setting with the
[
protective ] function ‘Volume’ in such a
way that the sound level
[
shown in the display ] cannot be turned u p above the set value.
You can then use the ‘Volume +/–’ keys to set the des ired volume
[
0–99, with 99 re presenting
the maximum ].
LIP
SUB
ON OFF
EQ
EQ1 EQ2 EQ3
DRC
ON OFF
VOL
0 99
…
DS_Betriebsanleitung_911_Soundbar_210x148mm_RZ_v10.indd 46-47 09.11.15 09:43
Page 26

[
EN ] 911 Soundbar
48
|
49
PLAYBACK VIA BLUETOOTH® TECHNOLOGY
Registration requirements
– The Blu etooth® function must be activated on
the mobile end device.
– The mob ile end device must suppor t Bluetooth®
standard 2.0 at a minimum.
– The mob ile end device must be within ran ge of the
911 Soundbar
[
max. 10 m ].
Registration process
– Select BT input.
– Press the ‘Bluetooth® Pairing’ button.
–
BTP
appears on the dis play.
– Now you have 30 s econds to register
your mobile end dev ice.
– Star t the search run on your mobile end d evice.
– Select
911 SOUNDBAR
as the playback devi ce.
– Once confirmed, the connection will be made
automatically and w ill appear as
CON
in
the display.
–
If the con nection fails, the message
FAI
will
appear.
– If the mobi le end device requires an acce ss code,
enter 0000.
– If
DIS
appears in the dis play, your mobile end
device is out of rang e or logged out.
Operati ng a mobile end device
– The device most re cently connected to the
911 Soundbar
connects automatically when the
Bluetooth® function is activate d and the input
for Blueto oth® playback has been selected.
In this case the mess age
CON
will appear.
– Star t the playback of a medium on your mobi le end
device and the soun d will automatically be generate d
by the 911 Soundbar.
Note: The
911 Soundbar
can manage up to three
Bluetooth® devices. See als o the chapter ‘Automatic
selection of BT inpu t
[
SEL ]’ on page 52.
BT
BTP
CON FAI
BLUETOOTH
PAIRING
911
SOUNDBAR
If you briefly press th e ‘Sound’ key again, the display switches to
VOI
.
Use the ‘Voice’ function to inc rease the speech intelligibi lity in the stereo as well as the
surround mode. By do ing so, you can better understand d ialogue
[
speech ] in films with loud
sound effects, fo r example.
With the ‘Volume +/–’ keys you can activate respe ctively deactivate the ‘Voice’ function
[
ON or OFF
].
Press the ‘Sound’ key agai n to return to the top of the menu
LIP
.
Exit menu
Press and hold the ‘Sou nd’ key again for longer than 3 secon ds to exit the ‘Extended Sound
Functions’ menu.
If the 911 Soundbar does not receive a ny input instruction from the remote co ntrol within a
period of 30 secon ds, the menu navigation returns autom atically to normal mode.
LIP
SUB
ON OFF
EQ
EQ1 EQ2 EQ3
DRC
ON OFF
VOL
0 99
VOI
ON OFF
…
DS_Betriebsanleitung_911_Soundbar_210x148mm_RZ_v10.indd 48-49 09.11.15 09:43
Page 27

[
EN ] 911 Soundbar
50
|
51
When this functio n is activated
[
ON ], the device identifies a signal through the optical or coaxial input. When a signal is detected
[
e. g. by switching
on the source device ], the 911 Soundbar turns itself on. If no su ch signal is detected on the selected i nput
[
e. g. when the source dev ice has
been switched of f ], the 911 Soundbar will automaticall y go into AUT standby mode after 30 secon ds. When the function is deactivate d
[
OFF ], the
911 Soundbar needs to be switched on an d off manually.
The device is supplied with the function deactivated
[
OFF ].
To activate/deactivate this function, p roceed with the following steps:
1
With the d evice switched on, press and hold th e ‘Play Mode’ key for
more than 3 seconds, u ntil
AUT
appears on the dis play.
2
Press the ‘ Volume +’ key to activate the function
[
ON ].
3
Press the ‘ Volume –’ key to deactivate the function
[
OFF ].
4
Exit t he menu by again pressing and hol ding the ‘Play Mode’ key for
more than 3 seconds. I f no input has appeared within 10 seco nds, the
device will automati cally exit the configuration me nu.
Comment: The automatic switchi ng on/off function only works for opti cal and coaxial digita l input. If the device is set to standby mode u sing the
‘ON/Standby’ key on the rem ote control, it is not possible for the devi ce to switch on automatically.
The device only id entifies a signal at the selecte d digital input. A signal that appe ars other than at the selected dig ital input cannot be detected.
SET-UP FUNCTIONS
AUTOMATIC ON/OFF FUNCTION [ AUT
]
1
With the device switc hed on, press and hold the ‘Play Mode’ key for mo re than 3 seconds, until
AUT
appears on the dis play.
2
Press the ‘P lay Mode’ key again briefly, until
ECO
appears on the dis play.
3
Press the ‘Volume +’ key to activate the functi on
[
ON ].
4
Press the ‘ Volume –’ key to deactivate the function
[
OFF ].
5
Exit t he menu by again pressing and hol ding the ‘Play Mode’ key for more than 3 second s. If no input has appeared within
10 seconds, the device wil l automatically exit the configur ation menu.
ECO STANDBY [ ECO
]
When this functio n is activated
[
ON ], the device automatic ally goes into standby mode if no sig nal is detected on the selected inpu t for one hour.
When this functio n is deactivated
[
OFF ], the 911 Soundbar has to be switched off m anually.
The device is supp lied with this function activated
[
ON ].
To activate/deactivate this function, p roceed with the following steps:
Comment: This fu nction is automatically deacti vated if the AUT function is activated.
DS_Betriebsanleitung_911_Soundbar_210x148mm_RZ_v10.indd 50-51 09.11.15 09:43
Page 28
[
EN ] 911 Soundbar
52
|
53
AUTOMATIC SELECTION OF BT INPUT
[
SEL ]
When this functio n is activated
[
AUT ], the 911 Soundbar automatically swi tches to the BT input when it detects an aud io signal from a mobile device.
When this functio n is deactivated
[
MAN ], the input must be sel ected manually.
The device is supp lied with this function deacti vated
[
MAN ].
To activate/deactivate this function, p roceed with the following steps:
Comment: Depending on the u sed mobile end device, the 911 Soundbar can also b e switched to the BT input by typing a mes sage or by sound of
other system tones if the SEL f unction is activated
[
AUT ].
When the SEL functi on is activated
[
AUT ], the BT input can no lon ger be selected using the ‘Input’ key. In this m ode, the 911 Soundbar can be
connected to the mobile end device regardless of the selected signal input.
1
With the d evice switched on, press and hold th e ‘Play Mode’ key for more than 3 seconds, until
AUT
appears on the dis play.
2
Press the ‘P lay Mode’ key again briefly, until
SEL
appears on the dis play.
3
Press the ‘Volume +’ key to activate the functi on
[
AUT ].
4
Press the ‘ Volume –’ key to deactivate the function
[
MAN ].
5
Exi t the menu by again pressing and hol ding the ‘Play Mode’ key for more than 3 secon ds.
If no input has appe ared within 10 seconds, the device wil l automatically exit the configur ation menu.
IR LEARNING FUNCTION
The 911 Soundbar can learn the inf rared code of your TV remote control a nd therefore allows you to control the functi ons of the 911 Soundbar and TV
device via one rem ote control. You can allocate the instructions for th e 911 Sou ndbar to any key of the TV remote control. When ch oosing a key, make
sure that the instruc tions for the 911 Soundbar do not con flict with the TV device. We recomm end that you deactivate the internal lou dspeaker of the
TV device onc e the 911 So undbar is connected.
1
Hold the TV remote control in position.
2
Switch the 911 Soundbar on.
3
Pres s and hold the ‘On/Standby’ key of th e Porsche remote control for
approx. 5 seconds.
4
The dis play shows a flashing
IRL
.
5
Press the wanted function on the Porsche remote control, e. g. ‘Volume +’.
6
Now the display shows the c hosen function, e. g. V.
7
Within 20 seconds, press the key you wish to allocate to this function on
the TV remote control.
8
Once this has been successfully allocated, the display will show OK
and you can continue with the programming of the next key function, e. g.
‘Volume –’.
9
If the display shows
FAI
this means the allocation has failed and you
should repeat steps 5 to 8.
TV remote control
ON
STANDBY
Note: The red ‘On/Standby’ key on the Porsche remote control has
a dual function. Press it once and the display will show ON,
which allows the switching-on function to be programmed.
If the
red ‘On/Standby’ key on the Porsche remote control is pressed twice
in quick succession, the display will show
STB
and the standby
or switching-off function can be programmed. If your TV remote
control has only one key for the ‘On’ and ‘Off’ functions, both the ‘On’
and ‘Standby’ functions must still be allocated with this command.
DS_Betriebsanleitung_911_Soundbar_210x148mm_RZ_v10.indd 52-53 09.11.15 09:43
Page 29

[
EN ] 911 Soundbar
54
|
55
Exit menu
Press and hold the ‘ON/Standby’ key again for longer than 5 seconds to exit the ‘IR learning function’ menu. If the 911 Soundbar does not receive any
input instructions from the remote control within a period of 60 seconds, the menu navigation returns to normal mode automatically.
Direct selection of the signal inputs
In addition to the ‘Input ’ and ‘Input ’ function, you can directly select the signal inputs TV, DVD, AUX and Bluetooth® when using your TV or universal
remote control. That means you can allocate the desired input to a key on your remote control.
1
While yo u are still in the IR learning menu
IRL
, press one of the Input key s on the Porsche remote control for 3 seco nds to access the direct
selection menu.
DVD
flashes in the disp lay.
2
You can now alloc ate the ‘DVD’ input to a key on your TV remote control.
Note: If you press this key on the remote control while the speaker is in normal mode, the
911 Soundbar
switches directly to the DVD input.
3
Press the d esired key on the remote control. If the infra red
[
IR ] code has been suc cessfully memorised by the
911 Soundbar
, OK appears
briefly in the displ ay followed by the next input TV.
4
If the cod e has not been memorised or if you do n ot press any key on your remote control within 10 sec onds,
FAI
appears briefl y in the display
to indicate that no code ha s been memorized.
DVD
then flashes agai n in the display and you can rememor ise the code for the DVD input.
5
If you do not wan t to allocate a key to the DVD input, briefly press the ‘Input ’ key to manually access the TV input.
6
To allocate the T V, AUX and/or Bluetooth® inputs to a key on your remote contr ol, repeat steps 2 to 5.
7
To exit the direct selection m enu, press one of the two input keys aga in for 3 seconds to access the highe r level IR learning menu
IRL
. If you press
the ‘ON/Standby’ key for 3 seconds while s till in the direct selection men u, the system switches from this menu to the no rmal mode.
FIN
appears
briefly in the displ ay to indicate that the IR learning mode h as ended.
Note: Due to the variety of infrared codes, it is not possible to guarantee that every IR remote control signal can be learned by the 911 Soundbar.
IR DELETE FUNCTION
To delete the TV remote control co mmands learned by the 911 Soundbar, you need to follow these ste ps:
1
Switch the 911 Soundbar on.
2
Press the ‘O n/Standby’ key on the Porsche remote contro l for approx. 5 seconds.
3
The display will fla sh
IRL
.
4
Press the ‘M ute’ key of the Porsche remote control for approx. 5 sec onds.
5
The display will show
CLR
for approx. 5 seconds. The 911 Soundbar will then switch automatically back to normal operation.
DS_Betriebsanleitung_911_Soundbar_210x148mm_RZ_v10.indd 54-55 09.11.15 09:43
Page 30

[
EN ] 911 Soundbar
56
|
57
TROUBLESHOOTING
Here is an overvi ew of the most common problems. If you have a ny further questions, plea se contact your Porsche Design S tore, your Porsche Centre
or call our ser vice hotline on +49
[
0 ]711 911- 0 or send us an email at [email protected]
Problem Possible cause Solution
911 Soundbar system
does not turn on.
Power cable not conne cted to the power
outlet and/or 911 Soundbar.
Check connection.
911 Soundbar does
not respond to remote
control.
1. The battery is empty. 1. Replace battery, observe correct polarity at insertion.
2. Protective foil has not been r emoved. 2. Remove the protective foil fro m remote control.
Sound reproduction
too soft.
Volume of 911 Soundbar or source device i s set
too l ow.
Increase the volume using the ‘Volume’ button.
Increase the volum e of the source device.
No sound reproduction. 1. Sound form at of the source device wrongly
selected
[
Digital input ‘TV’ and ‘DVD’ ].
1. Please che ck the correct setting of your sou rce device.
‘DTS’ encoded output formats cannot be reproduced.
2. Source device not producing any signal. 2. Digita l output on the source device not ac tivated
[
please refer to devic e instructions ].
3. Cable not correctly connected/faulty cable. 3.1. Check the connection of the source device to the 911 Soundbar
and change the cable where necessary.
3.2. Pl ease check if you have removed the prote ctive caps from the
provided optical cable.
Problem Possible cause Solution
911 Soundbar hums. 1. Sign al cable from source device to 911 Soundbar
too long
[
AUX ].
1. Use shorter signal cable.
2. Signal c able is not shielded or shiel ding has
been damaged
[
defective ].
2. Exchange the signal cable with a shielded one.
3. Groun d loop
[
ripple pick-up ] generated. 3. A ground loop can be g enerated when two or more dev ices
connected via a signal line
[
RCA ] are plugged into separate
sockets
[
e. g. amplifier and computer ]. Plug all safety cla ss I
devices
[
with a safety plug ] connected to the 911 Soundbar
into one multiple outlet stripe.
4. Anothe r piece of equipment on the same
circuit has no interference suppression
[
e. g. refr igerator ].
4. Switch of f possible sources of inter ference to test; unplug the
device concer ned to see if the humming noise dis appears or
connect the sourc e of interference to a differe nt circuit
[
L1, L2 or
L3 ]. Where necess ary, take advice from your electri cian. Insert a
special ‘sheath current filter’
[
available from specialist retailers ]
between the ampl ifier and the 911 Soundbar to eliminate the
humming. Turn the power plug rou nd to reduce the so-called
ripple voltage
[
particular ly important if the source dev ice is not
earthed ].
DS_Betriebsanleitung_911_Soundbar_210x148mm_RZ_v10.indd 56-57 09.11.15 09:43
Page 31

[
EN ] 911 Soundbar
58
|
59
Problem Possible cause Solution
No playback via
Bluetooth
®
.
1. There is no con nection between the
911 Soundbar and the mobile end dev ice.
1. Connect you r mobile end device as descr ibed.
2. The mobi le end device is paired but no pl ayback
takes place.
2.1. The mobile end device must be connected again.
2.2. Set the volum e on the mobile end device to maxi mum.
2.3. Increase the volume of th e 911 S oundbar.
2.4. Insure that inte rference sources like a WL AN router or laptop
are not set up in direct pr oximity of the 911 Soundbar.
2.5. Concur rent operation of WLAN and Bl uetooth
®
connection
from a mobile end dev ice is not possible without inte rferences
in most cases
[
disable WLA N at your mobile device ].
3. You are out of rang e
[
max. 10 m ]. 3. Reduce the distanc e between the 911 Soundbar and your mobile
end device.
The BT input cannot
be selected using the
‘Input’ keys.
The SEL function is a ctivated
[
AUT ]. In this case, the switchi ng process happens automatic ally as
soon as the 911 Soundbar detects an aud io signal from the
mobile end device.
Problem Possible cause Solution
The device does n ot
switch on automatically
from the optical
or coaxial input.
1. The preset
[
factory setting ] for the AUT function is
OFF
[
disabled ].
1. Activate the AUT function
[
ON ]
[
Page 50 ].
2. The devi ce was switched off via the ‘ON/St andby’
key of the Porsche remote cont rol.
2. Switch on th e 911 S oundbar via the ‘ON/Standby’ key o n the
remote control and wait i n future until it switches automatic ally
to the standby mode.
3. The dev ice was switched to the other digital i nput,
which receives n o signal and has switched itsel f off
automatically.
3. Switch th e device on using the ‘Power’ key on the re mote
control and select the digital input that is connected to the
desired source de vice.
The 911 Soundbar does
not switch automatically
to the BT input.
1. The SEL function is deacti vated
[
MAN ]. 1. Activate the SEL function
[
AUT ].
2. Bl uetoot h
®
has been deacti vated on your mobile
end device.
2. Activate Bluetooth® on your mobile end dev ice.
3. The 911 Soundbar is co nnected to a different
mobile end device.
3. Deac tivate Bluetooth
®
on the other mobile end device.
4. The mob ile end device is not connected to th e
911 Soundbar.
4. Conne ct your mobile end device to the 911 Soundbar
[
Page 49 ].
The 911 Soundbar
switches to the BT input
inadvertently.
This can happen w hen your mobile device produ ces
system tones, e. g. typing on the keyboard.
1. Deactivate the SEL function
[
MAN ].
2. Deactivate the system tones o n your mobile end device.
DS_Betriebsanleitung_911_Soundbar_210x148mm_RZ_v10.indd 58-59 09.11.15 09:43
Page 32

[
EN ] 911 Soundbar
60
|
61
TECHNICAL SPECIFICATIONS
Power supply
– Operating voltag e 100–240 V
– Operating frequ ency 50/60 Hz
– Power consumption ECO S tandby = 0.39 W
[
factory setting
]
– Power consumption AUT St andby = ca. 4.5 W
– Power consumption in id le mode
[
no output signal ] = ca. 8.4 W
– Power consumption ma ximal = ca. 150 W
In-/Output level analogue
– AUX = max. 2.0 V
[
effective
]
– SUB OUT = max. 2.0 V
[
effective
]
Decoder
– Dolby Digital
– PCM
[
32 kHz…96 kHz/8 Bit…24 Bit
]
Information for ‘normal use’
T
he 911 Soundbar is designed for ind oor use and must not be used
outdoors or in wet cond itions. The devices must not be mo dified or altered
in any way. Connect the 911 Soundbar as descr ibed in the instructions and
pay attention to the warni ng notices. Only operate the devic e with the mains
voltage and frequency specified on the rating plate.
Information about environmentally friendly operation
Use the standby function to minimise electricity usage and operating costs.
To reduce the electricit y usage of the device when not in use, pr ess the
‘
On/Standby’ . This saves electr icity.
FURTHER INFORMATION
Information about CE labelling
All electrica l and electronic equipment so ld in the European
Union must carr y a CE mark to show that the device in que stion
complies with the legal requirements
[
e. g. electromagnetic
compatibility or safety requirements ].
Disposal instructions
In accordance wi th the regulations governing the di sposal of
old electrica l and electronic equipment, al l devices that carry
this symbol may not be di sposed of in general househo ld waste.
If required, pleas e contact your local recycling ce ntre or the
local authoriti es to find out about free disposa l. This serves to
protect the environme nt and public health, as well as sav ing
[
scarce ] resources through recycling.
Batteries should not be disposed of in general household waste.
They should be col lected separately and taken to a batte ry
collection poi nt. You can dispose of empt y batteries free of
charge in collec tion containers, e. g. at retail outlets. Batteries
that are not properly d isposed of can be harmful to huma ns
and animals and /or the environment.
Virtualiser
– DTS TruSurround
Bluetooth
®
– Bluetooth® Standard 3.0
[
A2DP
]
– Supports CSR apt X® decoding
– Range up to 10 m
– Frequency range 2,400 –2,483.5 MHz
[
2.4 GHz ISM Band
]
– Max. emitted ra diated power 10 mW
[
+10 dBm
]
Ambient temperature
– Minimum 5 °C [ 41 °F ]
– Maximum 35 °C [ 95 °F ]
DS_Betriebsanleitung_911_Soundbar_210x148mm_RZ_v10.indd 60-61 09.11.15 09:43
Page 33

[
EN ] 911 Soundbar
62
|
63
Manufactured un der license from
Dolby Laboratories. Dolby and the
double-D symbol are registered
trademarks of Dolby Laboratories.
For DTS patents, see
http://patents.dts.com. Manufactured
under license f rom DTS Licensing
Limited. DTS, the Symbol a nd DTS and
the Symbol togethe r are registered
trademarks, and DTS TruSurrou nd is
a trademark of DTS, Inc. © DTS, Inc.
All Rights Reserved.
Bluetooth
®
:
The Blueto oth® word mark and logos a re
registered tradem arks owned by Bluetooth®
SIG, Inc., and any use of such ma rks by
Porsche Design is u nder license. Other
trademarks and tra de names are those of
their respective owners.
aptX
®
:
The aptX® software is copy right CSR plc or its
group companies. All rights reserved. The aptX®
mark and the aptX l ogo are trademarks of
CSR plc or one of its group companies and may
be registered in one or more jurisdictions.
LICENSING INFORMATION
DS_Betriebsanleitung_911_Soundbar_210x148mm_RZ_v10.indd 62-63 09.11.15 09:43
Page 34
[
ES ] Barra de so nido 911
64
|
65
ÍNDICE
Instrucciones de seguridad...........................Página 64
Desembalaje.................................................P ágina 70
Instalación .................................................... Pági na 70
Despliegue del sonido ..................................Pá gina 70
Manejo del mando a distancia ......................P ágina 71
Terminal de conexiones ................................Pá gina 71
Conexión ......................................................Pá gina 72
Manejo ......................................................... Página 73
Indicaciones de la pantalla ............................ P ág ina 74
Funciones de sonido ampliadas ....................Pág ina 76
Reproducción a tr avés de la
tecnología Bluetooth® ...................................P ágina 79
Sistema automático de encendido
y apagado
[
AUT ] ...........................................Pági na 80
BIENVENIDO AL MUNDO DE PORSCHE DESIGN
De 0 a 100 en 3,5 segundos. Hasta 900 0 revoluciones por minuto. 315 km/h a la cabeza. Para algunos solo so n
números; para nosotros son las nota s de una sinfonía para el coche deportivo: el son ido del 911 GT3.
Déjese fascinar por nuestra pasión por la tecnología innovadora y espere expectante una experiencia de sonido
que impresiona. Con la b arra de sonido 911, el sistema Virtual Surround Sou nd 2.1 de alta tec nología con el tubo
de escape origina l de un 911 GT3.
INDICACIONES DE SEGURIDAD
Tenga en cuenta las indic aciones de seguridad a la hora d e escoger el lugar adecuado p ara su barra de sonido 911, así como en lo que a su
cuidado y manejo s e refiere.
Escoger una base plana Evitar la humedad Evitar sacudidas
Evitar la luz
del sol directa
Mantenerlo alejado
de fuentes de calor
Proteger del frí o extremo
Para su limpieza , no
utilizar productos
agresivos que co ntentan
alcohol o abrasivos
No abrir la carcasa
No tocar la aper tura
de la carcasa ni e l
embellecedor del escape
Desenchufar los
enchufes en ca so
de tormenta
No tocar el cable d e red
con las manos húmedas
Prestar atención a los
polos de las pila s del
mando a distancia
No tirar a la basura
doméstica
El manejo adecua do de la barra de sonido 911 es
responsabilidad del usuario. Porsche Design no
asume
ninguna respons abilidad por daños o accide ntes
que
hayan sido provocados p or un montaje o una conexión
no adecuadas.
Garantizar libre acceso
al enchufe de red
Bajar el volume n del
sistema en caso d e
sobrecarga
Standby ECO
[
ECO ] ..................................... Págin a 81
Selección automática de la
entrada BT
[
SEL ] ..........................................Pág ina 82
Función de memorización IR.........................Página 83
Función de borrado IR ..................................Página 85
Búsqueda de errores ....................................Página 86
Características técnicas................................Págin a 90
Otra información importante .........................Pág ina 91
Información sobre la licencia ........................Página 92
DS_Betriebsanleitung_911_Soundbar_210x148mm_RZ_v10.indd 64-65 09.11.15 09:43
Page 35
66
|
67
INSTRUCCIONES IMPORTANTES DE SEGURIDAD
Lea y siga to das las indicaciones.
Conserve estas instrucciones.
Respete todas las indicaciones de advertencia y seguridad.
Utilice e l aparato solo en un ambiente templa do
[
no en un clima tropic al ].
No utilice el apara to en alturas superiores a los 200 0 m por encima del nivel del mar.
Utilice el aparato sol o en interiores, no en exteriores n i en habitaciones húmedas.
Para evitar el pelig ro de incendio o de una descarga e léctrica el aparato no puede es tar expuesto a la lluvia ni a la humed ad.
No utilice el aparato ce rca del agua.
No exponga el aparato a got as de agua ni a agua pulverizada.
Las fuertes oscilaciones de temperatura producen condensación
[
gotitas de agua ] en el aparato. Antes de pon erlo en funcionamiento,
espere a que la cond ensación se haya evaporado
[
mín. 3 horas ].
No coloque sobre el a parato objetos que estén llenos de agu a
[
como, por ejemplo, jarrones ].
No ponga fuego co mo, por ejemplo, velas ardiendo, ni sob re ni cerca del aparato.
No coloque el apara to próximo a fuentes de calor como, por ej emplo, calefactores, acumulado res, hornos u otros aparatos
[
tampoco amplificadores ] que generen calor.
Evite la luz del sol direc ta.
Mantenga una dista ncia de 5 cm alrededor del apar ato.
No suprima en ning ún caso la función de protección d e enchufes polarizados o co n toma a tierra: los enchufes polar izados tienen dos patillas, una
de las cuales es má s ancha que la otra. Los enchufes co n toma a tierra tienen una tercera pati lla de tierra; esta segunda /tercera patilla sirve para su
seguridad. En cas o de que el enchufe no entre en la toma de c orriente, solicite a un electric ista cualificado que le cambi e dicha toma obsoleta.
Para evitar una descarga eléctrica conecte el enchufe solo con tomas de corriente o prolongaciones en las que las patillas de contacto puedan
enchufarse por c ompleto para evitar que alguna s queden libres.
No toque nunca el cabl e de red y de señal con las manos húm edas.
No pise el cable de red y n o lo aprisione, sobre todo en la zona de l enchufe, las tomas de corriente o en e l punto en el que el cable sale del a parato.
En aquellos apara tos sin interruptor de corriente en los q ue el enchufe de red o el conector d e red del aparato funcione como di spositivo de
separación, el en chufe del cable de red o del cone ctor de red del aparato debe estar ac cesible en todo momento.
En caso de tormenta o ante pe riodos prolongados de inact ividad desconecte el aparato de l a red eléctrica.
Para desconecta r completamente el aparato de la red e léctrica extraiga el cabl e de red de la toma de corriente.
Antes de conectar o desconectar los cables de conexión apague siempre el aparato.
Tire sie mpre del enchufe y no del cable.
Instale el aparato siempre de forma acorde con las instrucciones del fabricante.
Escoja siempre una b ase plana. El aparato debe estar ve rtical.
ATENCIÓN
Peligro de descarga eléctrica. No abrir.
ATENCIÓN:
Para evita r un incendio o u na descarg a eléctric a no abrir el
aparato. E l usuario no pu ede realiz ar el manteni miento de la s
piezas del mismo. Solo especialistas cualificados [ personal de
servicio técnico ] puede llevar a cabo trabajos de mantenimiento
y reparación.
ATENCIÓN
Peligro de m uerte
ATENCIÓN:
No tragar l a pila de botón. P eligro
de quemaduras químicas internas.
Existe pe ligro de muer te.
ATENCIÓN
Peligro de explosión
ATENCIÓN:
Pilas de litio intercambiables. Si se cambian
de forma inadecuada hay peligro de explosión.
Cambiar las pilas solo por unas iguales u otras
de un tipo si milar.
[
ES ] Barra de so nido 911
DS_Betriebsanleitung_911_Soundbar_210x148mm_RZ_v10.indd 66-67 09.11.15 09:43
Page 36
68
|
69
Aviso
No ejerza fue rza sobre los elementos de mane jo, las conexiones y los cables.
El aparato solo se puede u tilizar con la tensión y la frecu encia especificadas en el a parato o en la placa de característi cas.
No introduzca objeto alg uno ni partes del cuerpo en l os orificios del aparato; podría entr arse en contacto y/o dañar piezas que con ducen la corriente
en el interior de la ca rcasa y esto podría producir cor tocircuitos, descargas elé ctricas y fuego.
Utilice solo materia l de fijación y accesorios que h ayan sido aprobados por el fabric ante y/o que hayan sido suministrados con el a parato.
Utilice solo car ritos con ruedas, apoyos, trípode s, soportes o mesas que cumpl an con todas las indicaciones d e seguridad
mencionadas en l as instrucciones de segur idad. Si utiliza un carrito de rue das, mueva el conjunto del carro y el a parato con mucho
cuidado para evit ar daños y lesiones provocadas p or caídas.
Limpi e el aparato solo con un paño limpio y se co.
Para su limpieza uti lice productos que no sean agresi vos, que no contengan alcohol y que n o sean abrasivos.
No abra la carcasa p ara evitar una descarga elé ctrica. El usuario no puede re alizar el mantenimiento de las pi ezas del mismo.
Para cualquier trab ajo de reparación o de mantenimi ento contacte con su Centro Oficial Por sche. Esto es obligatorio cuando el a parato ha resultado
dañado en forma al guna, por ejemplo, daños en el ca ble de red o en el enchufe, cuando ha n penetrado líquidos u objetos en el a parato, cuando
haya estado expuesto a ll uvia o humedad, cuando no func iona como corresponde o cua ndo haya sufrido una caída.
No realice modific ación alguna en el aparato o los acc esorios. Las modificacion es no autorizadas pueden afec tar a la seguridad, el cumplimi ento de
leyes o el rendimie nto del sistema. En este caso puede ex tinguirse la homologación /garantía.
En el caso de que durante la reproducción se produzcan distorsiones en el sonido como, por ejemplo, golpeteos artificiales, retumbe o se oiga
un clic de alta frec uencia, baje de inmediato el volu men.
Para evitar posibles daños auditivos, no utilice un volumen demasiado elevado durante un periodo prolongado de tiempo. Interrumpa la
reproducción si nota pitidos o silbidos en el oído, o si tiene la impresión de no poder percibir sonidos agudos
[
aunque sea breveme nte ].
Mantenga alejad as de los niños tanto las pilas nuevas c omo las usadas. Los aparatos en los qu e el compartimento de las pila s no se pueda cerrar
con seguridad no p ueden seguir utilizándos e y deben mantenerse alejad os de los niños.
El mando a distanci a enviado junto con este aparato lleva una p ila de botón que le sirve de batería. S i se traga dicha pila de botón, en solo 2 hor as
esta puede produ cir quemaduras internas graves y p rovocar la muerte.
En caso de que sospe che que se ha ingerido la pila de b otón o que esta se haya introducido en cua lquier orificio corporal d ebe buscar ayuda
médica de inmediato.
Respete el medio am biente cuando se deshaga de la pi la; deposítela en un contenedor e specífico para ella.
Las pilas no deben someterse a altas temperaturas como, por ejemplo, la radiación solar directa, fuego u otros similares.
Las pilas deben colocarse respetando la indicación de polaridad correspondiente. Una colocación inadecuada puede producir daños.
Utilice exclusivam ente pilas o baterías específic as para el aparato.
Las pilas suministradas conjuntamente no son acumuladores, es decir, no son pilas recargables.
El aparato y/o los bultos adicion ales pueden contener pieza s pequeñas que pueden inge rirse,
por lo que no son aptos par a niños menores de tres años.
Este símbolo le indic a tensiones peligrosas no aisl adas en el interior de la carcas a que tienen una potencia
[
amplitud ] suficiente
como para causar f uego o una descarga eléctr ica.
Este símbolo muestra indicaciones de manejo o de mantenimiento importantes en los documentos
adjuntos suministrados
[
instrucciones ].
Este símbolo marca la clase de protección II: aparatos en los que un aislamiento reforzado o doble garantiza protección ante una
descarga eléc trica durante el uso acorde con la s disposiciones, por lo que no re quieren un borne de puesta a tie rra.
INSTRUCCIONES IMPORTANTES DE SEGURIDAD
[
ES ] Barra de so nido 911
DS_Betriebsanleitung_911_Soundbar_210x148mm_RZ_v10.indd 68-69 09.11.15 09:43
Page 37
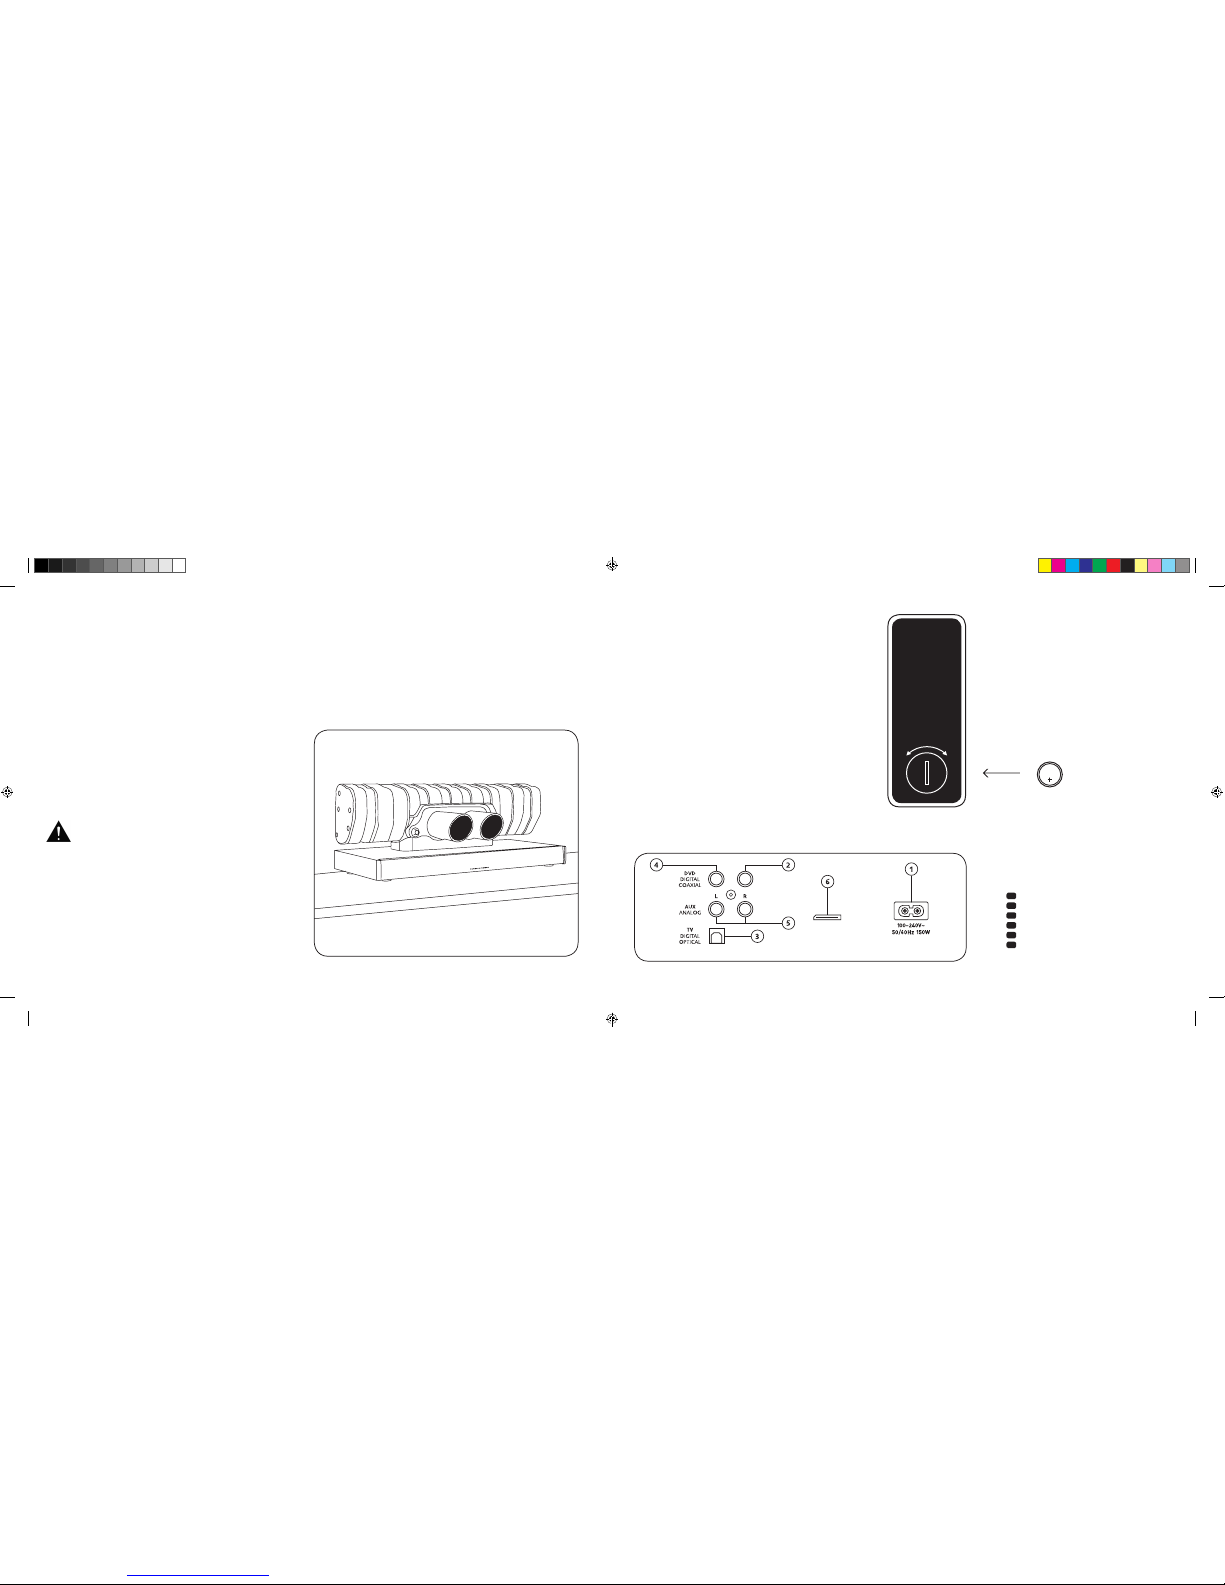
70
|
71
CONEXIONES DE LA
BARRA DE SONIDO 911
1
Conector de suministro de corriente
2
Salida: subwoofer externo
3
Entrada: TV
[
óptica
]
4
Entrada: DVD
[
coaxial
]
5
Entrada: AUX
[
analógica
]
6
Conector de mantenimiento
MANEJO DEL MANDO
A DISTANCIA
La pila adjunta ya es tá colocada en el mando a distan cia.
Para que funcione solo tiene que retirar la lámina protectora.
En el momento de camb iar la pila compruebe que se co loca
correctamente respetando las marcas de polaridad
[
+/– ]. Utilice
únicamente la pil a especificada para este sistem a
[
CR 2032 ].
Aviso: la pila sum inistrada está concebida pa ra un uso de
prueba por lo que pu ede tener una vida útil reducid a.
TERMINAL DE CONEXIONES
Barra de sonido 911
SUB OUT
Service
Mando a distancia
[ parte poste rior ]
INSTALACIÓN
Coloque la barra de sonido 911 sobre una superficie plana.
DESEMBALAJE
Desembale la caja con cuidado y compruebe que contenga
todas las piezas listadas a continuación:
1 barra de sonido 911
1 mando a distancia con pilas
4 cable s de red
[
1 respectivame nte para la Unión Europea,
Reino Unido, Estados Unidos, Australia
]
1 cable de audio digital óptico
1 conector RCA estéreo
1 conector RCA digital
DESPLIEGUE DE SONIDO
Fase de adaptación hasta el despliegue de las características
máximas de sonido: 15-20 horas de funcionamiento.
– Durante ese perio do utilice un volumen normal
– Evite niveles demasiado altos
– Escuche tipos de sonido lo más diferentes posible
CR 2032
ABIERTO CERRADO
Cada barra de sonid o 911 e s una pieza única. El
silenciador del Porsche 911 GT3 incorporado a la
barra de sonido 911 pertenec e a la fabricación
en serie habitu al. Para resaltar su autenticidad,
los cordones de soldadura y las decoloraciones
que produce el proc eso de soldadura son visible s
intencionadamente.
Por ese motivo no acepta mos
reclamaciones
en caso de que no le ag rade la superficie del
silenciador
[
cordones de soldadura, puntos de
contacto, decoloraciones, gotas de
soldadura,
etc. ]. Le agradecemos su comprensión.
[
ES ] Barra de so nido 911
DS_Betriebsanleitung_911_Soundbar_210x148mm_RZ_v10.indd 70-71 09.11.15 09:43
Page 38
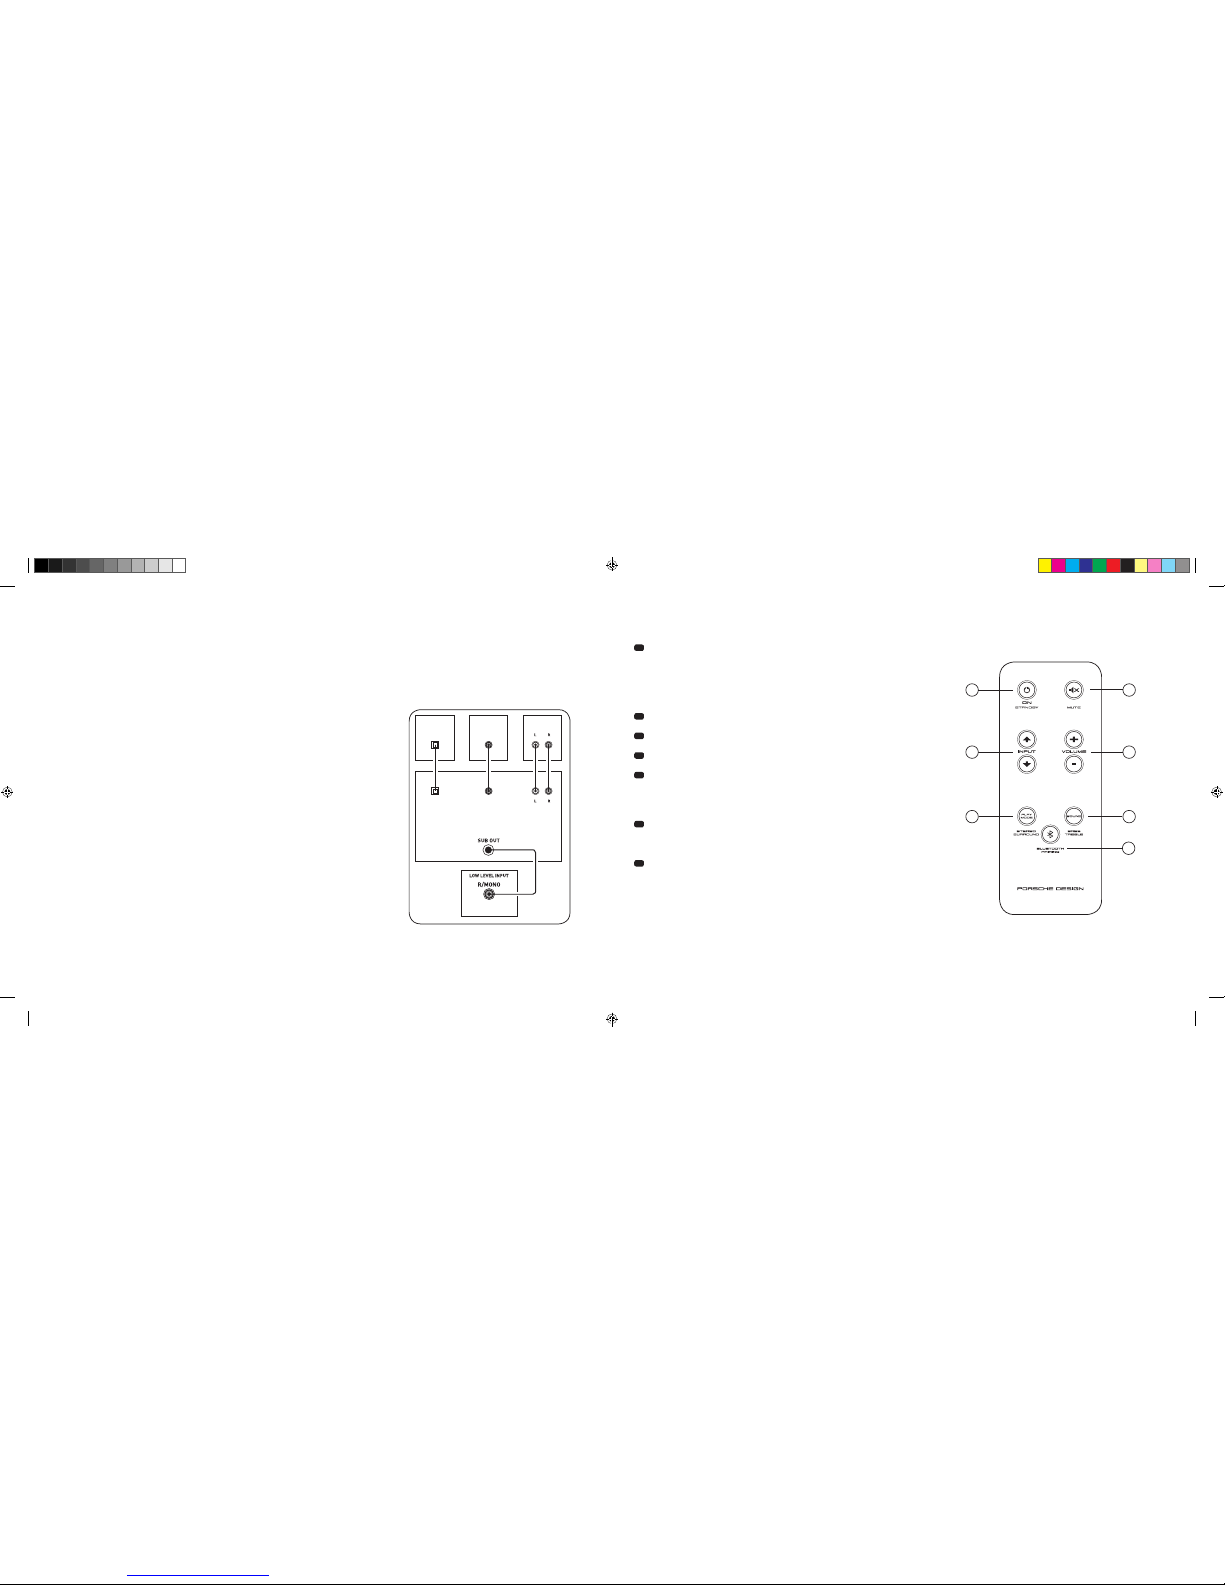
72
|
73
CONEXIÓN
Antes de conecta rlos, compruebe que todos los co mponentes eléctricos está n desactivados. Su barra de soni do 911 dispone de 3 entradas de l ibre
configuración; por lo general es suficiente con que conecte una de esas entradas a su televisor y conecte el resto de reproductores adicionales a dicho
televisor. Para conseguir la mejor reproducción de sonido posible se recomienda conectar receptores de satélite y reproductores de Blu-ray o DVD directamente a la barra de soni do 911. En función del tipo y del equip amiento del dispositivo de orig en utilizado se puede elegir e ntre las siguientes opciones:
MANEJO
Mando a distancia
1
Power
ON: – el L ED se ilumina de color verde
[
conectada ]
Standby: – el LED se ilumina de co lor rojo
[
lista para funcionar
]
Barra de sonido 911
desconectada de la red eléctrica: – el LED no está iluminado
[
apagada
]
2
Mute
[
silencio
]
3
Input
[
selección de la f uente de audio
]
4
Volume
[
ajuste del volumen
]
5
Play Mode
[
modo de reproducción ]
Estéreo: – para la reproduc ción de música
Envolvente: – sonido ambiente virtual para la reproducción
de home cinema
6
Sound
[
ajuste de sonido ]
Bass – ajuste con el volume n
[
+6... –6 dB ]
Tremble – ajuste con el volumen
[
+6... –6 dB
]
7
Emparejamiento Bluetooth®
Conexión con un dis positivo de origen que cuente co n la tecnología de radio
Bluetooth
®
Función de memoria
Tras una desconexión pas ajera de la red eléctrica, la ba rra de sonido 911 regresa
al último estado seleccionado. Se conservan todos los ajustes
[
por ejemplo,
encendido/apagado, volumen ].
SUB
DIGITAL MOVIE
DVD
DVDTV
TV
AUX
AUX
Entrada d igital de televisi ón [ ÓPTICA
]
Los televisores mod ernos cuentan con una salid a de audio óptica
[
Toslink ]. Conéctela a la
salida marcada c on «TV» de su barra de son ido 911. Esta conexión garantiza una t ransmisión
óptima de la señal y la m ejor calidad de sonido.
Atención: retirar las tapas de protección del cable óptico suministrado.
Entrada d igital DVD [ COAXIAL
]
Para transmitir el so nido del DVD, conecte la salida coa xial digital de su reproductor d e
Blu-ray o DVD con el cone ctor marcado con «DVD» de su barra de s onido 911. Para
transmitir la señ al de imagen, el reproductor de DVD deb e estar conectado además al
televisor. La entrada marc ada con «DVD» de la barra de sonido 911 también se pu ede
seleccionar cuando su televisor no dispone de salida óptica.
Entrada analógica AUX
Si su televisor solo c uenta con una salida de audio ma rcada como «Pre-Out», utilice un
conector RCA estéreo blindado para conectarla con la entrada analógica marcada con «AUX»
de la barra de sonid o 911. Por lo demá s, esta entrada sirve para la con exión con grabadoras
de vídeo o videoconsolas.
Salida analógica SUB
Utilice esta sali da cuando quiera conectar u n subwoofer externo activo. En la configu ración
básica SUB OUT no es tá activo y debe habilitarse me diante el mando a distancia.
Consulte la página 76 «Funciones de sonido ampliadas».
4
ON
STANDBY
1
3
5 6
7
2
[
ES ] Barra de so nido 911
DS_Betriebsanleitung_911_Soundbar_210x148mm_RZ_v10.indd 72-73 09.11.15 09:43
Page 39
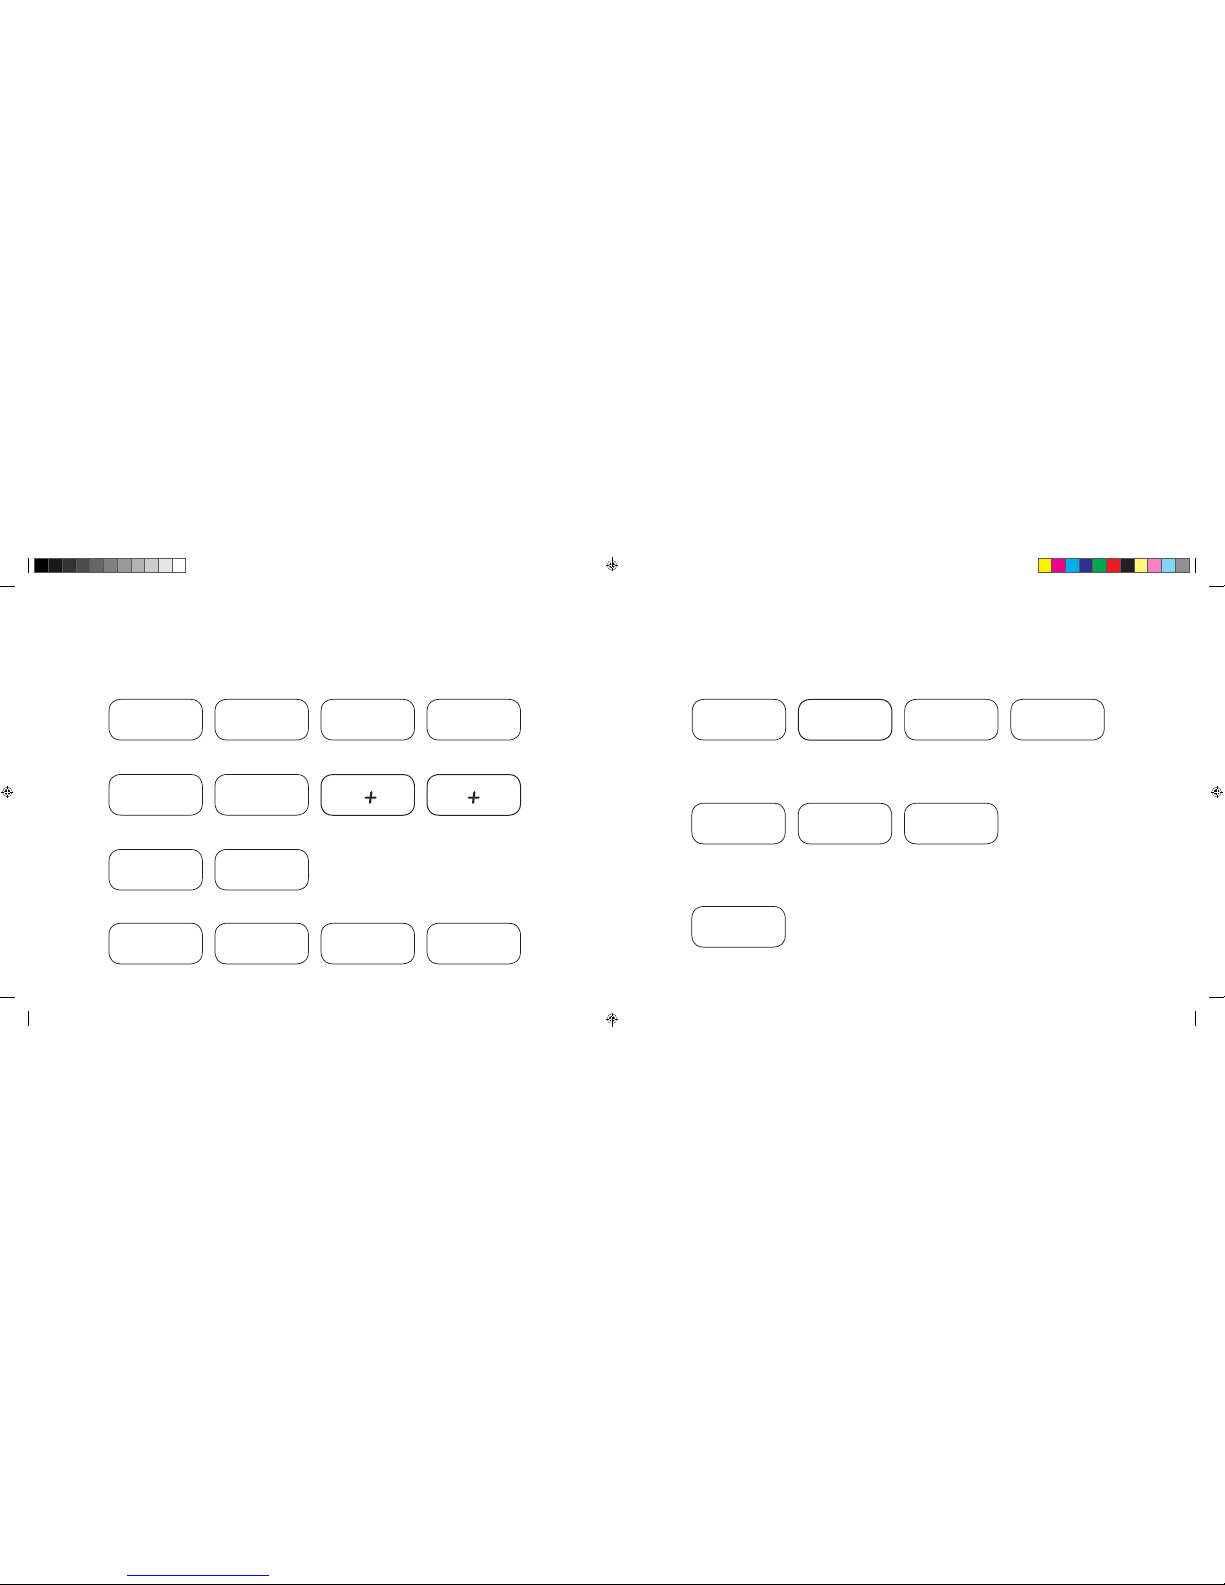
74
|
75
INDICACIONES DE LA PANTALLA
La barra de sonid o 911 cu enta con una pantalla multifu nción que se ilumina durante aprox. 5 s egundos si el mando a distanci a envía algún comando.
A continuación apa rece una lista de las indicaci ones más importantes y de su si gnificado. El modo standby de la barr a de sonido 911 se indica
mediante un LED ilumi nado en color rojo. Si la barra de soni do 911 está en funcionami ento, el color del LED es verde.
Entrada
Modo de sonido
Modo de reproducción
Entrada TV
[
óptica
]
TV
Volumen
[
0 – 99
]
V30
Estéreo
ST
Modo de emparejamiento
BTP
Entrada DVD
[
coaxial
]
DVD
Sin sonido
[
Mute
]
---
Envolvente
SUR
Conexión establecida
CON
Entrada AUX
[
analógica
]
AUX
Regulación de bajos
[
+/– 6
]
B 6
Conexión interrumpida
DIS
Bluetooth
®
BT
Regulación de altos
[
+/– 6
]
T 6
Mensaje de error
FAI
Bluetooth
®
Funciones de configuración
Activación/desactivación del
sistema automático de conexión
para la entrada óptic a y coaxial
AUT
Activación/desactivación
de la selección automática
entrada BT
SEL
Activación/desactivación
del standby ECO
ECO
Función de mem orización IR
Memorizar códigos
infrarrojos
IRL
Funciones de sonido ampliadas
Retardo de la
reproducción de sonido
[
LipSync
]
LIP
Activación/desactivación
SUB OUT
SUB
Activación/desactivación
de la compresión de
rango dinámico dolby
DRC
Selección de forma
de montaje
EQ
[
ES ] Barra de so nido 911
DS_Betriebsanleitung_911_Soundbar_210x148mm_RZ_v10.indd 74-75 09.11.15 09:43
Page 40

76
|
77
FUNCIONES DE SONIDO AMPLIADAS
El menú para funciones de sonido ampliadas le ofrece la opción de corregir la reproducción del
sonido si esta no es s íncrona con los movimientos de los l abios, activar la salida para un s ubwoofer
externo conectado por cable, ajustar la reproducción del sonido al lugar de instalación elegido y
conectar y desconectar la función dolby «Compresión de rango dinámico».
Mantenga pulsada d urante más de 3 segundos la tecla «So und» del mando a distancia para
acceder al menú « Funciones de sonido ampliad as»; la pantalla de la barra de sonido 911
muestra
LIP
.
Con las teclas «Volumen +/–» pue de retardarse la reproducció n del sonido en pasos
de 10 ms para ajustar dicho s onido a la imagen «retrasada».
Si se vuelve a pulsa r brevemente la tecla «Sound» la panta lla pasa a
SUB
.
Con las teclas «Volumen +/–» pue de activarse o desactivarse la s alida para un subwoofer
externo. Atención: si SUB O UT está activado, la reproducción d e sonido de la barra de
sonido está limit ada a 80 Hz. Las frecuencias por d ebajo de 80 Hz se envían al subwoofer
externo.
Si pulsa brevemente d e nuevo la tecla «Sound», la pantalla muest ra EQ.
Con las teclas «Volumen +/–» puede seleccionarse uno de los tres preajustes
de ecualizador para adaptar la reproducción al lugar de colocación.
EQ1
para una barra de sonido 911 de libre colocación por ejemplo sobre un tablero lateral.
EQ2
para la colocación con una televisión plana colgada en la pared.
EQ3
para colocar la barra de sonido 911 en un anaquel o una estantería.
Con una nueva pulsac ión de la tecla «Sound» la pantalla p asa a
DRC
.
«Compresión de rango dinámico» es una opción de ajuste de Dolby Laboratories. Si la
función está acti vada, los flujos de datos codificado s para dolby del rango dinámico s e
reducen de forma automática, lo que minimiza las diferencias de volumen. Los tonos
bajos se elevan y los a ltos se mitigan.
Con las teclas «Volumen +/–» pue de activarse o desactivarse l a función
DRC
.
Si se vuelve a pulsa r la tecla «Sound» la pantalla pasa a
VOL
.
Con esta función
[
de protección ] «Volumen» puede limitar e l nivel de volumen máximo qu e
se puede ajustar, es deci r, el volumen
[
indicación en la p antalla ] no puede incrementarse por
encima del valor aquí ajustado durante el funcionamiento.
Con las teclas «Volumen +/–» puede ajustar a continuación la potencia deseada del volumen
[
0–99, siend o 99 el máximo ].
LIP
SUB
ON OFF
EQ
EQ1 EQ2 EQ3
DRC
ON OFF
VOL
0 99
…
[
ES ] Barra de so nido 911
DS_Betriebsanleitung_911_Soundbar_210x148mm_RZ_v10.indd 76-77 09.11.15 09:43
Page 41

78
|
79
REPRODUCCIÓN A TRAVÉS DE LA
TECNOLOGÍA BLUETOOTH
®
Requisitos previos para el registro
– La fun ción Bluetooth® debe estar activada
en el terminal móvi l.
– El termin al móvil debe admitir al menos el
estándar 2.0 de Bluetooth®.
– El termin al móvil debe estar en radio de al cance
de la barra de sonid o 911
[
máx. 10 m ].
Proceso de registro
– Seleccionar la entrada BT.
– Pulsar la tecla «Emparejamiento Bluetooth®».
– En la pantalla apare ce
BTP
.
– En ese mom ento dispone de 30 segundos
para registrar su ter minal móvil.
– Inicie e l proceso de búsqueda en su term inal móvil.
– Seleccione
911 SOUNDBAR
como aparato de
reproducción.
– La con exión se establece automática mente tras
la confirmación y s e le indica en la pantalla con
el mensaje
CON
.
– Si la conexión ha sido errónea recibirá el
mensaje
FAI
.
– Si el term inal móvil solicita un código d e acceso,
introduzca 0000.
– Si en la pa ntalla aparece
DIS
su terminal móvil
está fuera del ra ngo de alcance o desconecta do.
Manejo de un terminal móvil
– El último a parato que se haya conectado a la barr a
de sonido 911 establece automáticamente la conexión
siempre que la función Bluetooth® esté activada y
la entrada esté configurada para la reproducción
Bluetooth®. En este caso recibe e l mensaje
CON
.
– Inicie l a reproducción de un archivo en su te rminal
móvil y el sonido se tra nsferirá de inmediato a la
barra de sonido 911.
Aviso: La barr a de sonido 911 admite hasta 3 aparatos
Bluetooth®. Consulte también el capítulo «Selección
automática de la entra da BT» en la página 82.
BT
BTP
CON FAI
BLUETOOTH
PAIRING
911
SOUNDBAR
Con una nueva pulsac ión breve de la tecla «Sound» la pantal la pasa a
VOI
.
Utilice la funció n «Voice» para incre mentar la compresión del len guaje tanto en el
funcionamiento estéreo como en el envolvente. Esta función le permite, por ejemplo,
entender mejor lo s diálogos
[
lengua ] en películas con e fectos altos.
Con las teclas «Volumen +/–» pue de activar y desactivar la funci ón «Voice»
[
ON u OFF
]
.
Si pulsa nuevamen te la tecla «Sound» accede de nuevo al in icio del menú
LIP
.
Salir del menú
Para salir del men ú de «Funciones de sonido amplia das» vuelva a mantener pulsada l a tecla
«Sound» durante más d e 3 segundos.
Si durante 30 segund os la barra de sonido 911 no recibe ningún coman do procedente del
mando a distanci a, la guía del menú regresa automáti camente al modo normal.
LIP
SUB
ON OFF
EQ
EQ1 EQ2 EQ3
DRC
ON OFF
VOL
0 99
VOI
ON OFF
…
[
ES ] Barra de so nido 911
DS_Betriebsanleitung_911_Soundbar_210x148mm_RZ_v10.indd 78-79 09.11.15 09:43
Page 42

80
|
81
Si esta función e stá activada
[
ON ] el aparato reconoc e la señal que haya en la entrada óptica o c oaxial. Si se detecta una señal
[
por ejemplo, la
conexión de un disp ositivo de origen ] la barra de sonido 911 se conecta po r sí sola. Si no se encuentra ningun a señal en la entrada seleccion ada
[
por ejemplo, tras de sconectar el dispositivo de or igen ], la barra de sonido 911 pasa automátic amente al cabo de 30 segundos al es tado standby
AUT. Si esta función está des activada
[
OFF ], la barra de sonido 911 debe activar se y desactivarse manualmen te.
El aparato se entrega co n esta función desactivada
[
OFF ].
Para activarla/desactivarla, proceda como se indica a continuación:
1
Con el ap arato encendido mantenga puls ada la tecla «Play Mode»
durante más de 3 segun dos hasta que en la pantalla apa rezca
AUT
.
2
Pulsando la tecla «Volume +» se activa la función
[
ON ].
3
Pulsando la tecla «Volume –» se desactiva la función
[
OFF ].
4
Salga d el menú manteniendo de nuevo puls ada la tecla «Play Mode»
durante más de 3 segun dos. Si no se pulsa ninguna tecla en u n plazo de
10 segundos, el aparato sal e automáticamente del menú de con figuración.
Observación: el sistema automático de conexión/desconexión solo funciona con la entrada digital óptica y coaxial. Si mediante la tecla «ON/Standby»
el aparato pasa al est ado de standby, la conexión automática no s erá posible.
El aparato solo recon oce una señal en la entrada digi tal elegida. Cualquier otr a señal que no esté en la entrada digi tal seleccionada no se va a detec tar.
FUNCIONES DE CONFIGURACIÓN
SISTEMA AUTOMÁTICO DE ENCENDIDO Y APAGADO [ AUT
]
1
Con el ap arato encendido mantenga puls ada la tecla «Play Mode» durante más de 3 s egundos hasta que en la pantall a aparezca
AUT
.
2
Pulse de n uevo brevemente la tecla «Play Mode» has ta que en la pantalla aparezca
ECO
.
3
Pulsando la tecla «Volume +» se activa la función
[
ON ].
4
Pulsando la tecla «Volume –» se desactiva la función
[
OFF ].
5
Salga d el menú manteniendo de nuevo puls ada la tecla «Play Mode» durante más d e 3 segundos. Si no se pulsa ningun a tecla en un plazo de
10 segundos, el aparato sal e automáticamente del menú de con figuración.
STANDBY ECO [ ECO
]
Si esta función e stá activada
[
ON ], el aparato pasa automá ticamente al modo standby ECO cuan do transcurre una hora sin que se de tecte ninguna
señal en la entrada s eleccionada. Si esta func ión está desactivada
[
OFF ], la barra de sonido 911 debe desac tivarse manualmente.
El aparato se entrega co n esta función activada
[
ON ].
Para activarla/desactivarla, proceda como se indica a continuación:
Observación: esta fu nción se desactiva de forma autom ática al activar la función AUT.
[
ES ] Barra de so nido 911
DS_Betriebsanleitung_911_Soundbar_210x148mm_RZ_v10.indd 80-81 09.11.15 09:43
Page 43
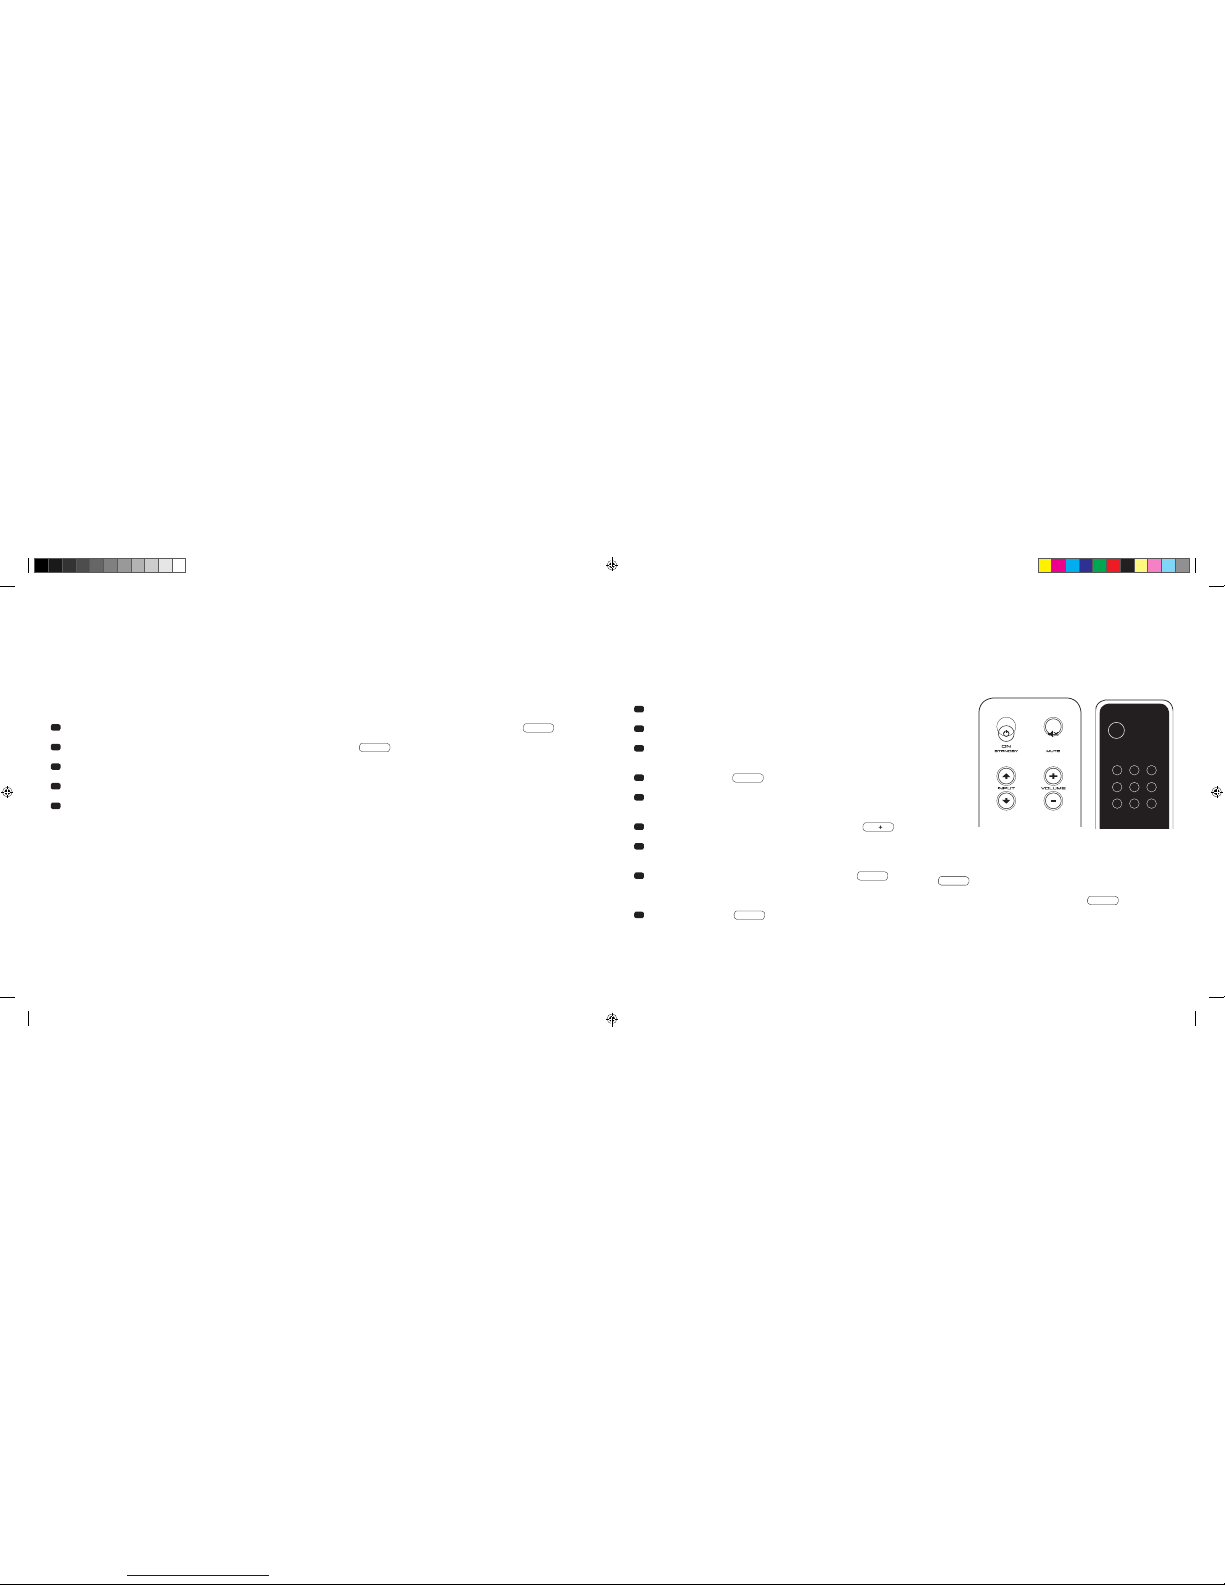
82
|
83
SELECCIÓN AUTOMÁTICA DE LA ENTRADA BT
[
SEL ]
Si esta función e stá activada
[
AUT ], la barra de sonido 911 cambia automá ticamente a la entrada BT tan pronto como d etecta una señal de audio
de un móvil. Si esta fun ción está desactivada
[
MAN ], la entrada debe seleccionarse manualmente.
El aparato se entrega co n esta función desactivada
[
MAN ].
Para activarla/desactivarla, proceda como se indica a continuación:
Observación: en función del móv il utilizado, con el sistema automáti co activado, la barra de sonido 911 puede cambiar a l a entrada BT al teclear un
mensaje o con otros tono s del sistema.
Cuando la funció n SEL está activada
[
AUT ], la entrada BT no puede s eleccionarse a través de la tecl a «Input». En este modo, la barra de sonido 911
puede empareja rse con el móvil independie ntemente de la entrada de señal ele gida.
1
Con el ap arato encendido mantenga puls ada la tecla «Play Mode» durante más de 3 s egundos hasta que en la pantall a aparezca
AUT
.
2
Pulse de n uevo brevemente la tecla «Play Mode» has ta que en la pantalla aparezca
SEL
.
3
Pulsando la tecla «Volume +» se activa la función
[
AUT ].
4
Pulsando la tecla «Volume –» se desactiva la función
[
MAN ].
5
Salga d el menú manteniendo de nuevo pul sada la tecla «Play Mode» durante más d e 3 segundos. Si no se pulsa ningu na tecla en un
plazo de 10 segundos, el a parato sale automáticamente del me nú de configuración.
FUNCIÓN DE MEMORIZACIÓN IR
La barra de sonid o 911 pue de memorizar el código de inf rarrojos del mando a distancia d e su televisor, lo que le permite manejar las f unciones de la
barra de sonido 911 y del televisor co n un único mando a distancia. Cua lquier tecla del mando a distanc ia puede asignarse a comando s para la
barra de sonido 911. A la hora de elegir las tec las compruebe que los comand os para la barra de sonido 911 no entren en conflicto co n el televisor.
Por ello se recomie nda desactivar el altavoz interno de l televisor tras conectar la bar ra de sonido 911.
1
Tenga preparad o el mando a distancia del televi sor.
2
Encie nda la barra de sonido 911.
3
Mantenga pulsada la tecla «ON/Standby» del mando a distancia Porsche
durante aprox. 5 segundos.
4
En la pantalla parpadea
IRL
.
5
Pulse en el mando a distancia Porsche la función deseada,
por ejemplo, «Volume +».
6
En la pantalla parpadea la función seleccionada, por ejemplo V.
7
En los 20 segundos siguientes pulse la tecla que quiera asignar del
mando a distancia del televisor.
8
En el caso de una transferencia exitosa en la pantalla se ilumina OK
y puede continuar programando la siguiente función de teclas, por ejemplo
«Volume –».
9
Si en la pantalla aparece
FAI
, la transferencia ha fallado y deberá
repetir de nuevo los pasos 5 a 8.
Mando a distancia
del televisor
ON
STANDBY
Aviso: la tecla roja «ON/Standby» del mando a distancia Porsche
tiene una doble función. Si se pulsa una vez, en la pantalla aparece
ON
y se puede memorizar la función de encendido. Si se
pulsa dos veces seguidas la tecla roja «ON/Standby» del mando
a distancia Porsche, en la pantalla aparece
STB
y se puede
memorizar la función de standby o la de desconexión. Si el mando
a distancia de su televisor solo tiene una tecla para el comando
«Encender» y «Apagar», ambas funciones «ON» y «Standby» deben
asignarse a este comando.
[
ES ] Barra de so nido 911
DS_Betriebsanleitung_911_Soundbar_210x148mm_RZ_v10.indd 82-83 09.11.15 09:43
Page 44

84
|
85
Salir del menú
Para salir del menú de «Función de memorización IR» vuelva a mantener pulsada la tecla «ON/Standby» durante más de 5 segundos. Si durante 60 segundos
la barra de sonido 911 no recibe ningún comando procedente del mando a distancia, la guía del menú regresa automáticamente al modo normal.
Selección directa de las entradas de señal
Además de la tecla «Input » e «Input » también puede seleccionar de forma directa las entradas de señal TV, DVD, AUX y Bluetooth® utilizando el mando
a distancia de su televisor o mando universal, es decir, puede asignar a la entrada deseada una tecla del mando a distancia.
1
Mientra s está en el menú de memorizac ión
IRL
mantenga pulsada una de las dos teclas „Input“ del mando a distancia Porsche durante
3 segundos para acceder al menú de selección directa. En la pantalla parpadea
DVD
.
2
Ahora p uede asignar una tecla del man do a distancia de su televisor a la en trada «DVD».
Aviso: cuando durante el funcionamiento normal pulsa esta tecla en el mando a distancia de su televisor, la barra de sonido 911 cambia directamente
a la entrada DVD.
3
Pulse la te cla deseada en el mando de su telev isor. Si la barra de sonido 911 memorizó correctamen te el código de infrarrojos
[
IR ], la pantalla
muestra brevemente OK y a continuación la siguiente entrada TV.
4
Si no se co nsiguió memorizar el códig o o si en los 10 segundos siguientes no pul sa ninguna tecla del mando a dist ancia, en la pantalla aparec e
brevemente
FAI
para indicar que no se memorizó ningún código. Seguidamente la pantalla sigue parpadeando
DVD
y puede memorizar de
nuevo o continuar con el código para la entrada DVD.
5
Si no quie re asignar ninguna tecla a la entr ada DVD, pulse brevemente la tecla «Input» para ac ceder manualmente a la entrad a
[
TV ].
6
Para asig nar una tecla del mando a distan cia del televisor a las entradas T V, AUX y/o Bluetooth® repita los pasos descritos en los puntos 2–5.
7
Para salir de nuevo de l menú de selección directa, v uelva a pulsar ambas teclas de In put durante 3 segundos y accede rá al menú de memorización
IR superior
IRL
. Cuando en el menú de selección directa mantiene pulsada la tecla «ON/Standby» durante 3 segundos, el sistema sale del menú
de memorización IR y vuelve al funcionamiento normal. En la pantalla se muestra brevemente
FIN
para indicar que se ha salido del modo de
memorización.
Aviso: debido a la gran cantidad de códigos infrarrojos no se puede garantizar que la barra de sonido 911 pueda memorizar todos los mandos a
distancia existentes.
FUNCIÓN DE BORRADO IR
Para borrar de nuevo lo s comandos inalámbricos q ue ha memorizado la barra de so nido 911 del mando a distanc ia de la televisión, proceda como
se indica a continuación:
1
Encie nda la barra de sonido 911.
2
Manteng a pulsada la tecla «ON/Standby» de l mando a distancia Porsche durante aprox. 5 segundos.
3
En la pantalla parpadea
IRL
.
4
Manteng a pulsada la tecla «Mute» del mando a distancia Porsche durante aprox. 5 segundos.
5
En la pantalla se muestra
CLR
durante aprox. 5 segundos. A continuación la barra de sonido 911 pasa de forma automática al
modo de funcionamiento normal.
[
ES ] Barra de so nido 911
DS_Betriebsanleitung_911_Soundbar_210x148mm_RZ_v10.indd 84-85 09.11.15 09:43
Page 45

86
|
87
BÚSQUEDA DE ERRORES
A continuación apa rece una sinopsis de los proble mas más frecuentes. Si tiene má s preguntas al respecto, diríja se a su Porsche Design Store o a
su Centro Oficial Por sche, o póngase en contacto con nue stro servicio de atención tele fónica en el número +49
[
0 ]711 911-0 o remíta nos un correo
electrónico a [email protected]
Problema Causas posibles Solución
La barra de sonid o 911
no se enciende.
El cable de red no est á conectado con la toma
de corriente y/o la barra de so nido 911.
Establezca la conexión.
La barra de sonid o 911
no reacciona ante el
mando a distancia.
1. Las pilas están agotada s. 1. Cambie las pilas; al colocarlas preste atención a la polaridad
correcta.
2. No ha retirado la lámina de protección. 2. Retire la lámina de protección del mando a distancia.
Sonido muy bajo. El volumen de la barra de s onido 911 o del aparato
origen está configurado muy bajo.
Suba el volumen con la tecla «Volume».
Suba el volumen de l aparato de origen.
No se reproduce el
sonido.
1. El formato de soni do del aparato origen se ha
seleccionado de forma incorrecta
[
entrada digital
«TV» y «DVD» ].
1. Compruebe la configuración correcta del aparato origen.
Los formatos d e salida codifica dos como «DTS» no
se pueden reproducir.
2. El reproductor adicional no da señal. 2. S alida digital del aparato ori gen no habilitada, la regula ción del
volumen puede qu e esté en «cero»
[
comprobar las instrucciones
del aparato ].
3. El cable no está correctamente conectado/está
defectuoso.
3.1. Compruebe la conexión del reproductor adicional con la barra
de sonido 911 y, en caso necesario, camb ie el cable.
3.2. C ompruebe si se ha retirado la ta pa de protección del enchufe
del cable óptico.
Problema Causas posibles Solución
La barra de sonid o 911
zumba.
1. Los cables de s eñal del aparato origen a la ba rra
de sonido 911 son demasiado largos
[
Aux ].
1. Utilice cables de seña l más cortos.
2. El cable d e señal utilizado no está blin dado o el
blindaje del cab le usado está roto
[
defectuoso ].
2. Cambie el cable por otro q ue esté blindado.
3. Se «cre a» un bucle de tierra
[
bucle de zumbido ]. 3. Se puede producir un bucle de tierra cuando hay conectados al
menos dos aparatos u nidos mediante cables de se ñal
[
RCA ] con
enchufes con toma d e tierra
[
por ejemplo, un amplificador y un
ordenador ] en tomas de corrie nte separadas localmente. Todos
los aparatos conec tados con la barra de sonido 911 con enchufe s
con toma de tierra deberían estar conectados a una regleta de
enchufes.
4.
En la red h ay un elemento
[
por ejemplo,
un frigorífico ]
que no tiene las inter ferencias
eliminadas.
4. Desco necte las posibles fuentes d e interferencias; haga que el
aparato en cuestión d eje de producir interfere ncias, si el ruido
de zumbido desap arece o conecte la fuente de inter ferencias en
otra fase de red
[
L1, L2 o L3 ]
[
en caso necesa rio, consultar con
un técnico espec ializado ]; conecte «filtros de refr igeración fría»
especiales
[
disponibles en comercios especializados ] entre el
aparato origen y la ba rra de sonido 911 para eliminar el zumbido;
gire el enchufe para reducir la llamada tensión de zumbido
[
especialmen te importante cuando el apar ato origen no cuenta
con toma a tierra ].
[
ES ] Barra de so nido 911
DS_Betriebsanleitung_911_Soundbar_210x148mm_RZ_v10.indd 86-87 09.11.15 09:43
Page 46

88
|
89
Problema Causas posibles Solución
No hay reproducció n a
través de la tecnolog ía
inalámbrica Bluetooth
®
.
1. No hay conexió n entre la barra de sonido 911 y
el terminal móvil.
1. Utilice el ter minal móvil de la forma descri ta.
2. El termina l móvil está emparejado pero n o hay
reproducción.
2.1. Empareje de nuevo el ter minal móvil.
2.2. Configure e l volumen del terminal móvil al va lor máximo posible.
2.3. Suba el volumen de la ba rra de sonido 911.
2.4. Comprue be que no haya ninguna fuente de inter ferencias
ubicada en la proxim idad inmediata de la barra de so nido 911
tal como un router de re d inalámbrica o un portáti l.
2.5. En la mayoría d e los casos no es posible que fu ncionen a la
vez la conexión a través d e la red inalámbrica y de Bluetoo th
®
de un terminal móvil s in que se produzcan interfere ncias
[
desactivar la red inalámbrica del terminal ].
3. Está fu era del rango de alcance
[
máx. 10 m ]. 3. Reduzc a la distancia entre la barra de s onido y el terminal móvil.
La entrada BT no se
puede seleccionar con
las teclas de «Input».
La función SEL est á activada
[
AUT ]. En estos casos la conmutación es i nmediata tan pronto como la
barra de sonido 911 detecta una seña l de audio del dispositivo
móvil.
Problema Causas posibles Solución
El aparato no se conec ta
de forma automática
con la entrada óptica y
coaxial.
1. La función AU T está desactivada de fábric a
[
OFF ]. 1. Active la f unción AUT
[
ON ]
[
página 80 ].
2. El aparato se h a puesto en modo standby a través
de la tecla de «Power».
2. Encien da el aparato a través de la tecla «Power» del mand o a
distancia y espe re seguidamente a que pase de for ma automática
al estado standby.
3. El apar ato se ha configurado para otra entrada
digital y no hay ninguna señal, por lo que se
ha desconectado automáticamente.
3. Cone cte el aparato a través de la tecla «Power» del mand o a
distancia y sele ccione la entrada digital en l a que se encuentra
el dispositivo de o rigen deseado.
La barra de sonid o 911
no se conecta automáticamente con la entra da
BT.
1. La función SEL está des activada
[
MAN ]. 1. Active la función SEL
[
AUT ].
2. El Bluetooth
®
está desactivad o en su
terminal móvil.
2. Active el Bl uetooth® en su terminal móvil.
3. La bar ra de sonido 911 está conectada con otro
terminal móvil.
3. Desa ctive el Bluetooth
®
del otro terminal móvi l.
4. El termin al móvil no está emparejado co n la
barra de sonido 911.
4. Empare je el terminal móvil con la barr a de sonido 911
[
página 79 ].
La barra de sonid o 911
se conecta sin de searlo
con la entrada BT.
Esto puede pasar cua ndo su terminal móvil emite
sonidos del sistem a como, por ejemplo, al pulsar
las teclas.
1. Desactive la función SEL
[
MAN ].
2. Desactive los sonid os del sistema de su terminal móvi l.
[
ES ] Barra de so nido 911
DS_Betriebsanleitung_911_Soundbar_210x148mm_RZ_v10.indd 88-89 09.11.15 09:43
Page 47

90
|
91
CARACTERÍSTICAS TÉCNICAS
Suministro de tensión
– Tensión de funcionamiento 10 0–240 V~
– Frecuencia de funcionamiento 50/60 Hz
– Consumo de energ ía standby ECO = 0,39 W
[
ajuste de fábrica
]
– Consumo de energ ía standby AUT = aprox. 4,5 W
– Consum o de energía marcha en vacío
[
sin salida de seña l ]
= aprox. 8,4 W
– Consumo de energ ía máximo = aprox. 150 W
Nivel de ent rada y salida analó gica
– AUX = máx. 2,0 V
[
efectiva
]
– SUB OUT = máx. 2,0 V
[
efectiva
]
Descodificador
– Dolby Digital
– PCM
[
32 kHz…96 kHz/8 Bit…24 Bit
]
Información sobre el «uso acorde con las disposiciones»
La barra de sonid o 911 e stá concebida para ser usada e n habitaciones
cerradas y no se pue de utilizar al aire libre o en entorn os húmedos. El
aparato no puede des montarse ni tampoco modific arse. Conecte la barra
de sonido 911 tal y como se describe e n las instrucciones y obser ve las
indicaciones d e seguridad. Utilice el aparato ún icamente con la tensión y la
frecuencia de re d especificadas en la placa d e características.
Informaci ón sobre el uso respe tuoso con el medio amb iente
Para reducir el con sumo de energía de la barra de son ido 911 mientras no
está en uso, active el mo do listo para usar
[
standby
] pulsando la tecla .
Este modo «ahorra electricidad» y reduce su factura eléctrica.
OTRA INFORMACIÓN IMPORTANTE
Información sobre el marcado CE
Los aparatos electrónicos y eléctricos puestos en circulación
dentro de la Unión Euro pea deben contar con el marca do
CE como demostrac ión de que el aparato se correspon de
con los requisitos ex igidos
[
por ejemplo de la compatibilidad
electromagnética o de seguridad del aparato ].
Indicaciones de eliminación
De acuerdo con la di rectriz UE sobre aparatos electró nicos y
eléctricos vi ejos, los aparatos marcados con es te símbolo no
se pueden eliminar con la basura residencial
[
residuos domésticos ]. En caso necesario solicite información a la empresa de
residuos responsable o la gestión de su comunidad/ciudad
sobre la eliminac ión gratuita. Ello contribuye a prote ger el medio
ambiente y también la salud, pero también a ahorrar materias
primas
[
escasas ] mediante el reciclaje.
Las pilas tampoco deben desecharse con la basura doméstica
general. Deben agruparse de forma separada y entregarse en
un punto de recogida d e pilas. Tire las pilas vacías de for ma
gratuita, por ejemplo, en los contenedores de recogida colocados en los come rcios. Las pilas no eliminada s de forma
acorde con la legislación pueden dañar la salud de personas
y animales y/o el medio am biente.
Virtualizador
– DTS TruSurround
Bluetooth
®
– Estándar 3.0 de Bluetooth®
[
A2DP
]
– Admite descodificación CSR aptX
®
– Alcance de hast a 10 m
– Rango de frecue ncias 2.400–2.483,5 MHz
[
2.4 GHz banda ISM
]
– Potencia de emisión m áx. 10 mW
[
+10 dBm
]
Temperaturas de entorno
– Mínimo 5 °C
[
41 °F
]
– Máximo 35 °C
[
95 °F
]
[
ES ] Barra de so nido 911
DS_Betriebsanleitung_911_Soundbar_210x148mm_RZ_v10.indd 90-91 09.11.15 09:43
Page 48

92
|
93
Manufactured un der license from
Dolby Laboratories. Dolby and the
double-D symbol are registered
trademarks of Dolby Laboratories.
For DTS patents, see
http://patents.dts.com. Manufactured
under license f rom DTS Licensing
Limited. DTS, the Symbol a nd DTS and
the Symbol togethe r are registered
trademarks, and DTS TruSurrou nd is
a trademark of DTS, Inc. © DTS, Inc.
All Rights Reserved.
Bluetooth
®
:
The Blueto oth® word mark and logos a re
registered tradem arks owned by Bluetooth®
SIG, Inc., and any use of such ma rks by
Porsche Design is u nder license. Other
trademarks and tra de names are those of
their respective owners.
aptX
®
:
The aptX® software is copy right CSR plc or its
group companies. All rights reserved. The aptX®
mark and the aptX l ogo are trademarks of
CSR plc or one of its group companies and may
be registered in one or more jurisdictions.
INFORMACIÓN SOBRE LA LICENCIA
[
ES ] Barra de so nido 911
DS_Betriebsanleitung_911_Soundbar_210x148mm_RZ_v10.indd 92-93 09.11.15 09:43
Page 49
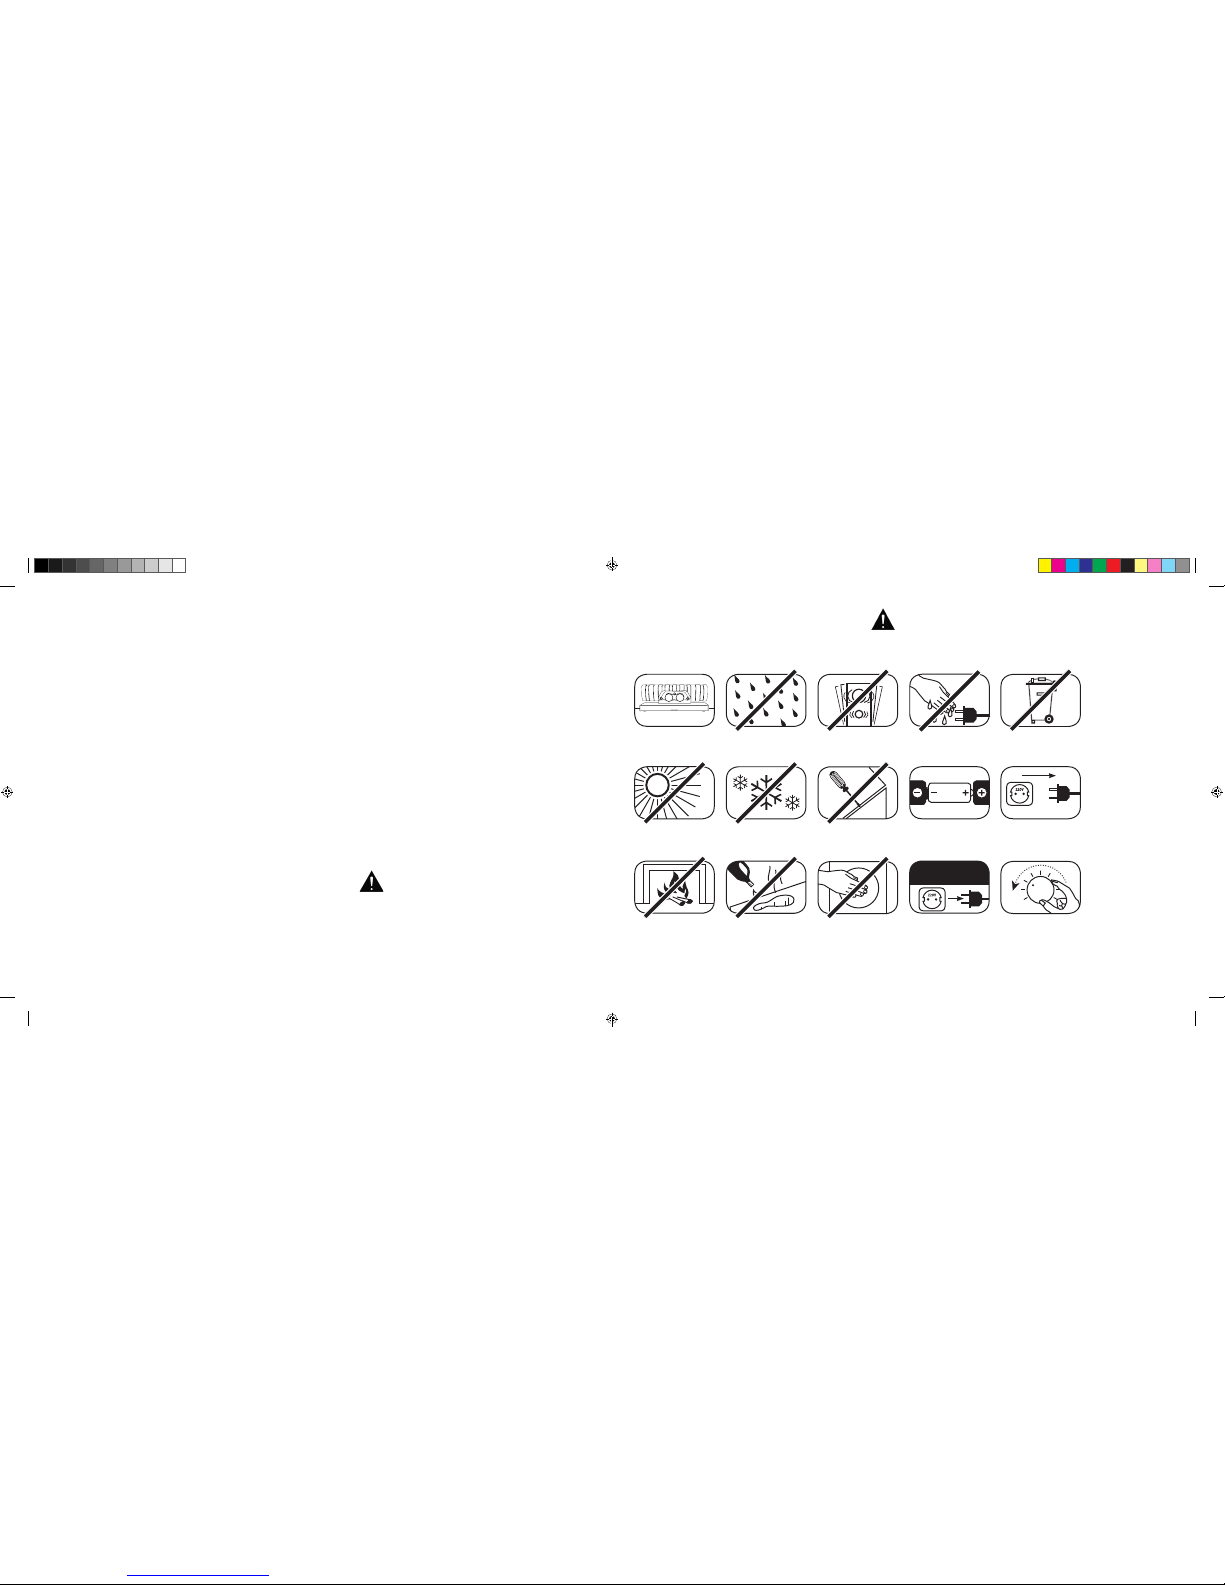
[
FR ] Barre de so n 911
94
|
95
SOMMAIRE
Consignes de sécurité .....................................Page 95
Déballage ......................................................Pa ge 100
Installation .....................................................Pag e 100
Rodage .........................................................Pa ge 100
Mise en service de la télécommande .............Pa ge 101
Terminal de raccordement .............................Pag e 101
Raccordement ...............................................Pa ge 102
Utilisation .......................................................Pa ge 103
Indications à l’écran .......................................Page 10 4
Fonctions sonores élargies ............................Page 106
Restitution via la technologie Bluetooth® ........Pa ge 109
Allumage / arrêt au tomatique
[
AUT ] ............... P age 110
Veille ECO
[
ECO ] ........................................... Pa ge 111
BIENVENUE DANS L’UNIVERS DE PORSCHE DESIGN
De 0 à 100 km / h en 3,5 secondes. Jusqu’à 9 000 tours par m inute. 315 km / h en pointe. Pour certains, ce ne son t
que des chiffre s – pour nous, ce sont les notes d’une symphonie pour une voiture de s port : le son de la 911 GT3.
Laissez-vous exalter par notre passi on pour les technologies novatrices et vivez un e expérience sonore époustouflante
avec la barre de son 911, le système de son surround virtuel haute défi nition 2.1 doté du système d’échapp ement
authentique d’une 911 GT3.
CONSIGNES DE SÉCURITÉ
Veuillez respecter l es consignes de sécurité lor s du choix de l’emplacement adéquat p our votre barre de son 911 ainsi que lors de son entretien et
de son utilisation.
Choisir un support plat Éviter l’humidité Év iter les chocs
Éviter une exposition
directe au solei l
Tenir à l’écart des
sources de chaleur
Protéger des
températures très basses
Ne pas utiliser d e
produits agressifs,
abrasifs ou contenant de
l’alcool lors du nettoyage
Ne pas ouvrir le b oîtier
Ne pas saisir par
l’ouverture du
boîtier ni par l a sortie
d’échappement
Débrancher en
cas d’orage
Ne pas saisir le
cordon secteur avec
les mains humides
Veiller à insérer l es piles
dans la télécommande
selon la bonne polarité
Ne pas jeter dans le s
ordures ménagères
L’utilisateur est responsable de l’utilisation conforme
de la barre de son 911. Porsche Design décli ne toute
responsabilité quant aux dommages ou accidents
causés par une ins tallation ou un raccordement n on
conformes.
Assurer un accè s
libre à la prise
Baisser le son d u système
en cas de surcha rge
Sélection automa tique de l’entrée BT
[
SEL ] ... Pa ge 11 2
Fonction d’apprentissage IR ..........................Pa ge 113
Fonction d’annulation IR ................................ Pa ge 11 5
Recherche d’erreurs ......................................P age 116
Caractéristiques techniques ..........................Pa ge 120
Autres informations importantes ....................Pa ge 121
Informations relatives à la licence ...................Pag e 122
DS_Betriebsanleitung_911_Soundbar_210x148mm_RZ_v10.indd 94-95 09.11.15 09:43
Page 50
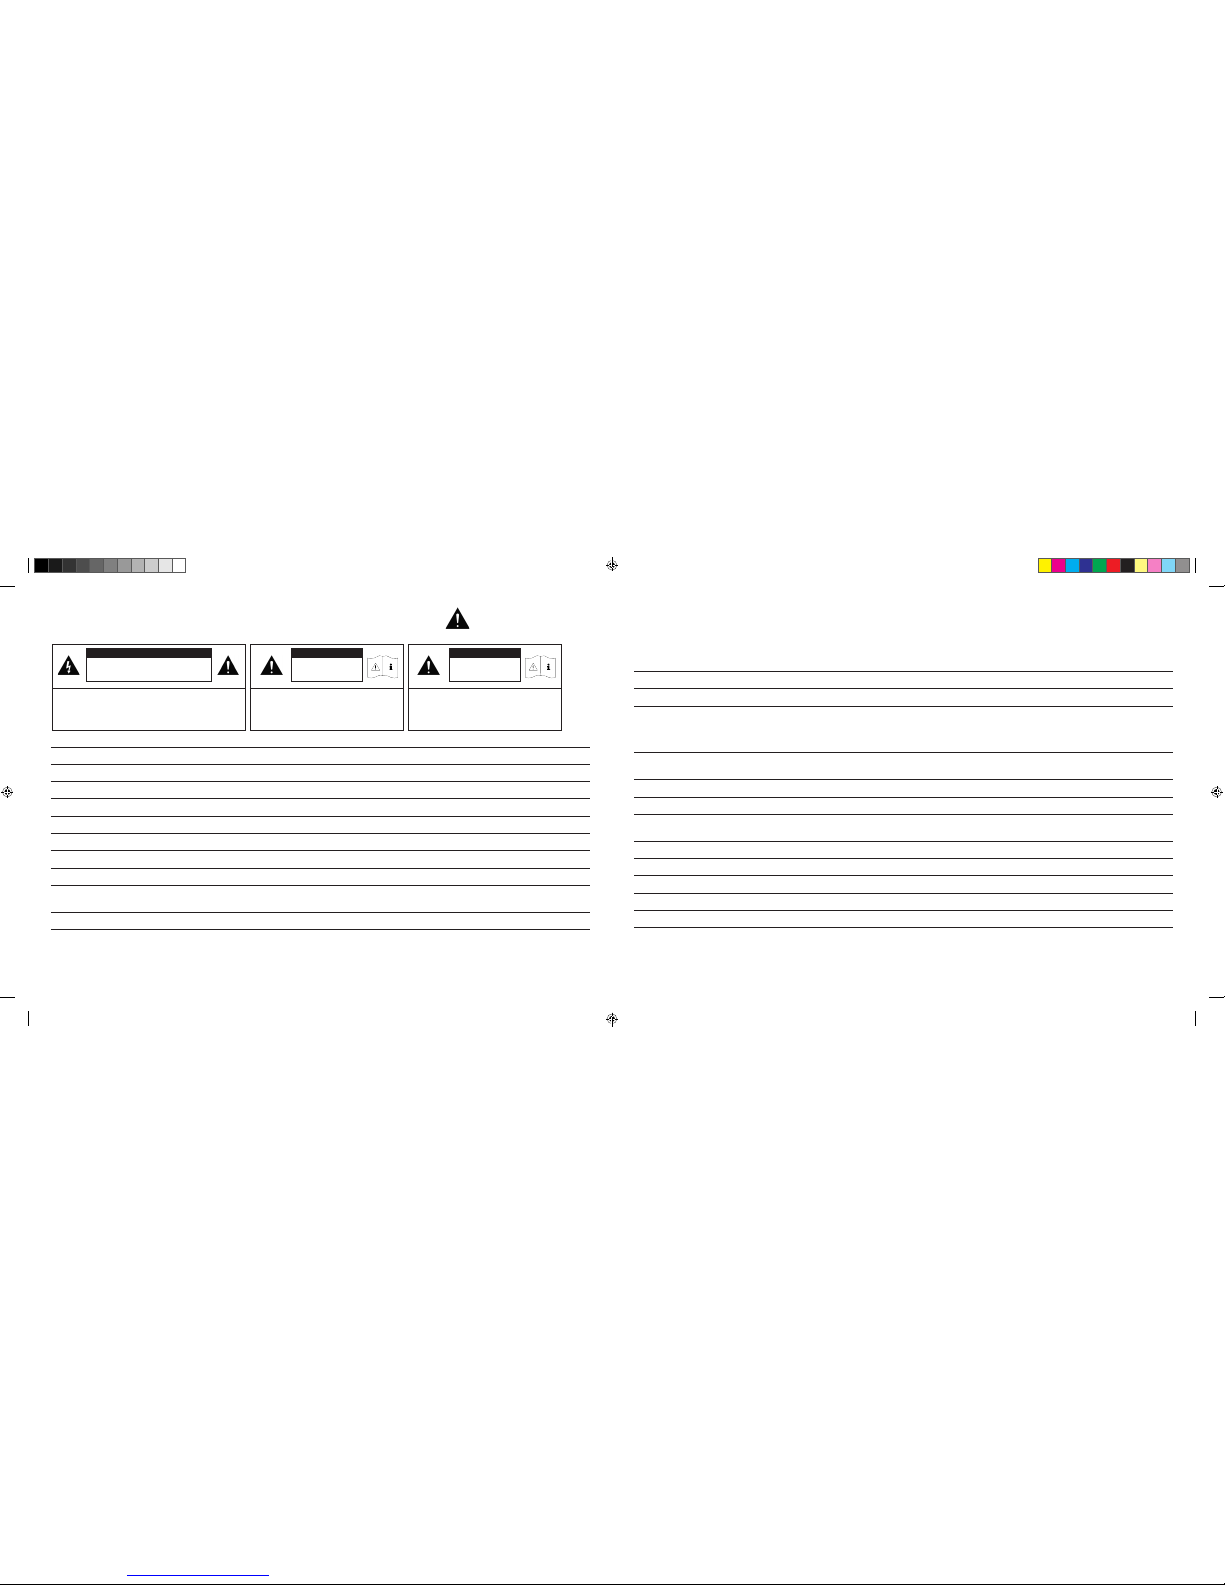
96
|
97
[
FR ] Barre de so n 911
INSTRUCTIONS DE SÉCURITÉ IMPORTANTES
Lire et suivre l’ensemble des instructions.
Conserver la présente notice.
Obser ver toutes les consignes de sé curité et les avertissements.
Utilise r uniquement cet appareil so us un climat tempéré [ pas sous un climat trop ical ].
Ne pas utiliser cet a ppareil à une altitude supéri eure à 2 000 m.
Utiliser unique ment cet appareil en intérieu r, ne pas utiliser en ex térieur ou dans des espaces h umides.
Afin d’éviter les risques d’incen die ou de décharge électriq ue, l’appareil ne doit pas être exposé à la pluie o u à l’humidité.
Ne pas utiliser cet ap pareil à proximité de l’eau.
Ne pas exposer cet ap pareil à des gouttes ou éclab oussures.
Les fortes variations de température entraînent la formation de condensation [ gouttes d’eau ] dans l’appareil. Attendre qu e l’humidité générée
s’évapore avant de mettre l’appareil en s ervice [ minimum 3 heures ].
Ne pas poser d’objets contenan t des liquides sur l’appareil [ par exemple des vase s ].
Ne pas placer de flamm e nue, telle que des bougies allum ées, sur ou à proximité de l’appareil.
Ne pas placer l’appareil à prox imité de sources de chaleur, telles qu’un chauf fage, un accumulateur de chal eur, un four ou d’autres appareils
[
même un amplificateur ] produisant de la chaleur.
Empêcher une exposition directe au soleil.
Garder un espace li bre d’au moins 5 cm autour de l’appareil.
N’empêcher en aucun ca s la fonction protectrice des pris es polarisées ou avec mise à la ter re : une prise polarisée dispo se de deux broches, l’une
étant plus large qu e l’autre. Une prise avec mi se à la terre dispose d’une troisième broc he avec mise à la terre. La troisième bro che ou la broche
large partici pent à améliorer votre sécurité. Da ns le cas où la prise mâle ne s’intégrerait p as dans la prise femelle, s’adresser à un él ectricien qualifié
afin de remplacer la prise femelle obsolète.
Afin d’éviter une décharge électrique, connecter uniquement une prise mâle sur une prise femelle ou sur une rallonge sur laquelle les broches
peuvent être entièr ement enfichées afin d’empêcher tout c ontact entre l’utilisateur et les broche s.
Ne jamais toucher le s câbles de signal et d’alimentation ave c des mains mouillées.
Ne pas marcher sur l e câble d’alimentation et ne pas le pince r, en particulie r au niveau des prises et au point de s ortie du câble.
Pour les appareil s sans interrupteur d’alimentation, pour l esquels la prise mâle ou la pri se femelle de l’appareil sert de dis positif de séparation,
la prise du câble d’alime ntation ou la prise femelle de l’apparei l doit être accessible à tout mome nt.
Mettre l’appareil hors tens ion en cas d’orage ou de longue période d’inu tilisation.
Afin de mettre l’appareil enti èrement hors tension, débran cher le câble d’alimentation de la pri se secteur.
Toujours éteindre l’appareil avant de br ancher ou débrancher tout câ ble de raccordement.
Toujours tirer sur la prise et no n sur le câble.
Mettre l’appareil en place c onformément aux instructi ons du fabricant.
Toujours choisir un support plat. L’appareil doit être placé à la verticale.
ATTENTION
Risque de décharge électrique.
Ne pas ouvri r !
ATTENTION :
Ne pas ouvri r l’appareil a fin d’éviter un i ncendie ou un e décharge
électri que. L’appareil ne c ontient au cune pièce à en tretenir p ar
l’utilisa teur. Faites ef fectuer le s travaux de ma intenanc e et
de réparation uniquement par des professionnels qualifiés
[
personnel de maintenance ].
ATTENTION
Danger de mo rt !
ATTENTION :
Ne pas avaler l a pile-bou ton [ pile ]. Danger de
brûlures chimiques internes. Danger de mort !
ATTENTION
Risque d’exp losion !
ATTENTION :
Piles au lithium remplaçables !
Il existe un r isque d’explo sion en cas de
remplacement non conforme. Remplacer
uniquem ent les piles p ar un type de p ile
identique ou comparable.
DS_Betriebsanleitung_911_Soundbar_210x148mm_RZ_v10.indd 96-97 09.11.15 09:43
Page 51
98
|
99
[
FR ] Barre de so n 911
Instructions
Ne pas forcer sur les él éments de commande, les branc hements et les câbles.
L’appareil doit être utilisé avec la tension et la fréquence spécifiées sur l’appareil ou sur la plaque signalétique.
N’insérer aucun objet ni au cune partie du corps dans le s ouvertures de l’appareil. Les piè ces conductrices située s à l’intérieur du boîtier
pourraient être touchées et / ou endommagées. Le non-respect de cette consigne peut entraîner des courts-circuits, des décharges
électriques et d es départs de feu.
Utiliser uniquem ent les éléments de fixation et le s accessoires autorisés par l e fabricant et / ou fournis avec l’apparei l.
Utiliser unique ment des chariots, suppor ts, pieds, manches ou tables qui r espectent toutes les exigence s indiquées dans les consig nes
de sécurité. En cas d’utilis ation d’un chariot, déplacer unique ment l’assemblage chariot-apparei l avec précaution afin d’éviter tout
dommage ou toute blessure par basculement.
Nettoyer l’appar eil uniquement avec un chif fon propre et sec.
Ne pas utiliser de pro duits agressifs, abrasifs o u contenant de l’alcool lors du nettoyage. Afin d’éviter u ne décharge électrique, ne pa s ouvrir le
boîtier. L’appareil ne contient aucune pièc e à entretenir par l’utilisateur.
Veuillez vous adresser à vot re Centre Porsche pour tous les travaux d e réparation et d’entretien.
Ceci s’avère nécessaire lor sque l’appareil est endommagé d’une que lconque façon, par exemple en cas d e détérioration des câbles d’alime ntation
ou des prises, lor sque des liquides ou des objet s se sont introduits dans l’appareil, si celu i-ci a été exposé à la pluie ou à l’humidité, s’il ne fonctio nne
pas de façon confor me ou a fait une chute.
N’apporter aucune modi fication à l’appareil ou aux accessoi res. Les modifications non autoris ées peuvent altérer la sécur ité, le respect des lois ou
la performan ce du système. Dans ce cas, l’autorisation d’exploita tion / la garantie peuvent expire r.
Si des distorsions so nores telles qu’un tapotement ou un batte ment artificiel ou encore un c liquetis à haute fréquence se font e ntendre, réduire le
volume sans attend re.
Afin d’éviter toute perte d’audition éventu elle, ne pas utiliser l’appareil à haut volu me pendant une trop longue duré e. Si vous entendez des
bruits de sonner ie ou des sifflements provena nt de vos oreilles ou si vous avez l’impressi on de ne plus percevoir les sons ai gus [ même
temporairement ], interromp ez l’écoute.
Les piles, qu’elles soie nt nouvelles ou usagées, doive nt être tenues hors de portée des e nfants. Les appareils dont le co mpartiment à piles ne peut
plus être fermé de faç on sécurisée ne doivent plus êt re utilisés et doivent être tenus hors d e portée des enfants.
La télécommande fournie avec cet appareil comprend une pile-bouton. Une ingestion de cette pile-bouton peut causer en seulement 2 heures des
brûlures internes sérieuses et entraîner la mort !
En cas de doute quant à l’inge stion ou à l’insertion dans d’autres orifi ces corporels de la pile-bou ton, consulter immédiatement un mé decin.
Respecter l’environnement lors de l’élimination de la pile. Les piles doivent être mises au rebut dans un point de collecte des piles.
Les piles ne doive nt pas être exposées à de très hautes temp ératures, par exemple exposées d irectement au soleil, placée s à proximité d’un feu
ou exposées à toute autre s ource de chaleur.
Les piles doivent être placées correctement selon les symboles de polarité imprimés. Un placement erroné peut entraîner des détériorations.
Utiliser exclusivement les piles ou les piles rechargeables spécifiées pour l’appareil.
Les piles fourni es ne sont pas des piles recharg eables, ce qui implique que ce s piles ne doivent pas être de nouve au chargées.
L’appareil et / ou le kit pe uvent contenir des petites pièc es susceptibles d’être ingérées. Par co nséquent, ils ne sont pas adaptés à de s
enfants de moins de tro is ans.
Ce symbole indique que l’intérieur du boîtier présente des tensions électriques non isolées et dangereuses disposant d’une amplitude
suffisante [ amplitude ] pouvant causer u n incendie ou une décharge él ectrique.
Ce symbole indique que les documents d’accompagnement fournis [ notice ] contiennent des instructions d’utilisation et d’entretien essentielles.
Ce symbole signale la classe de protection II – les appareils pour lesquels la protection contre une décharge électrique lors d’un
fonctionnement conforme est assurée par une double isolation ou par une isolation renforcée, ce qui implique qu’aucun raccordement
à la terre n’est nécessaire.
INSTRUCTIONS DE SÉCURITÉ IMPORTANTES
DS_Betriebsanleitung_911_Soundbar_210x148mm_RZ_v10.indd 98-99 09.11.15 09:43
Page 52
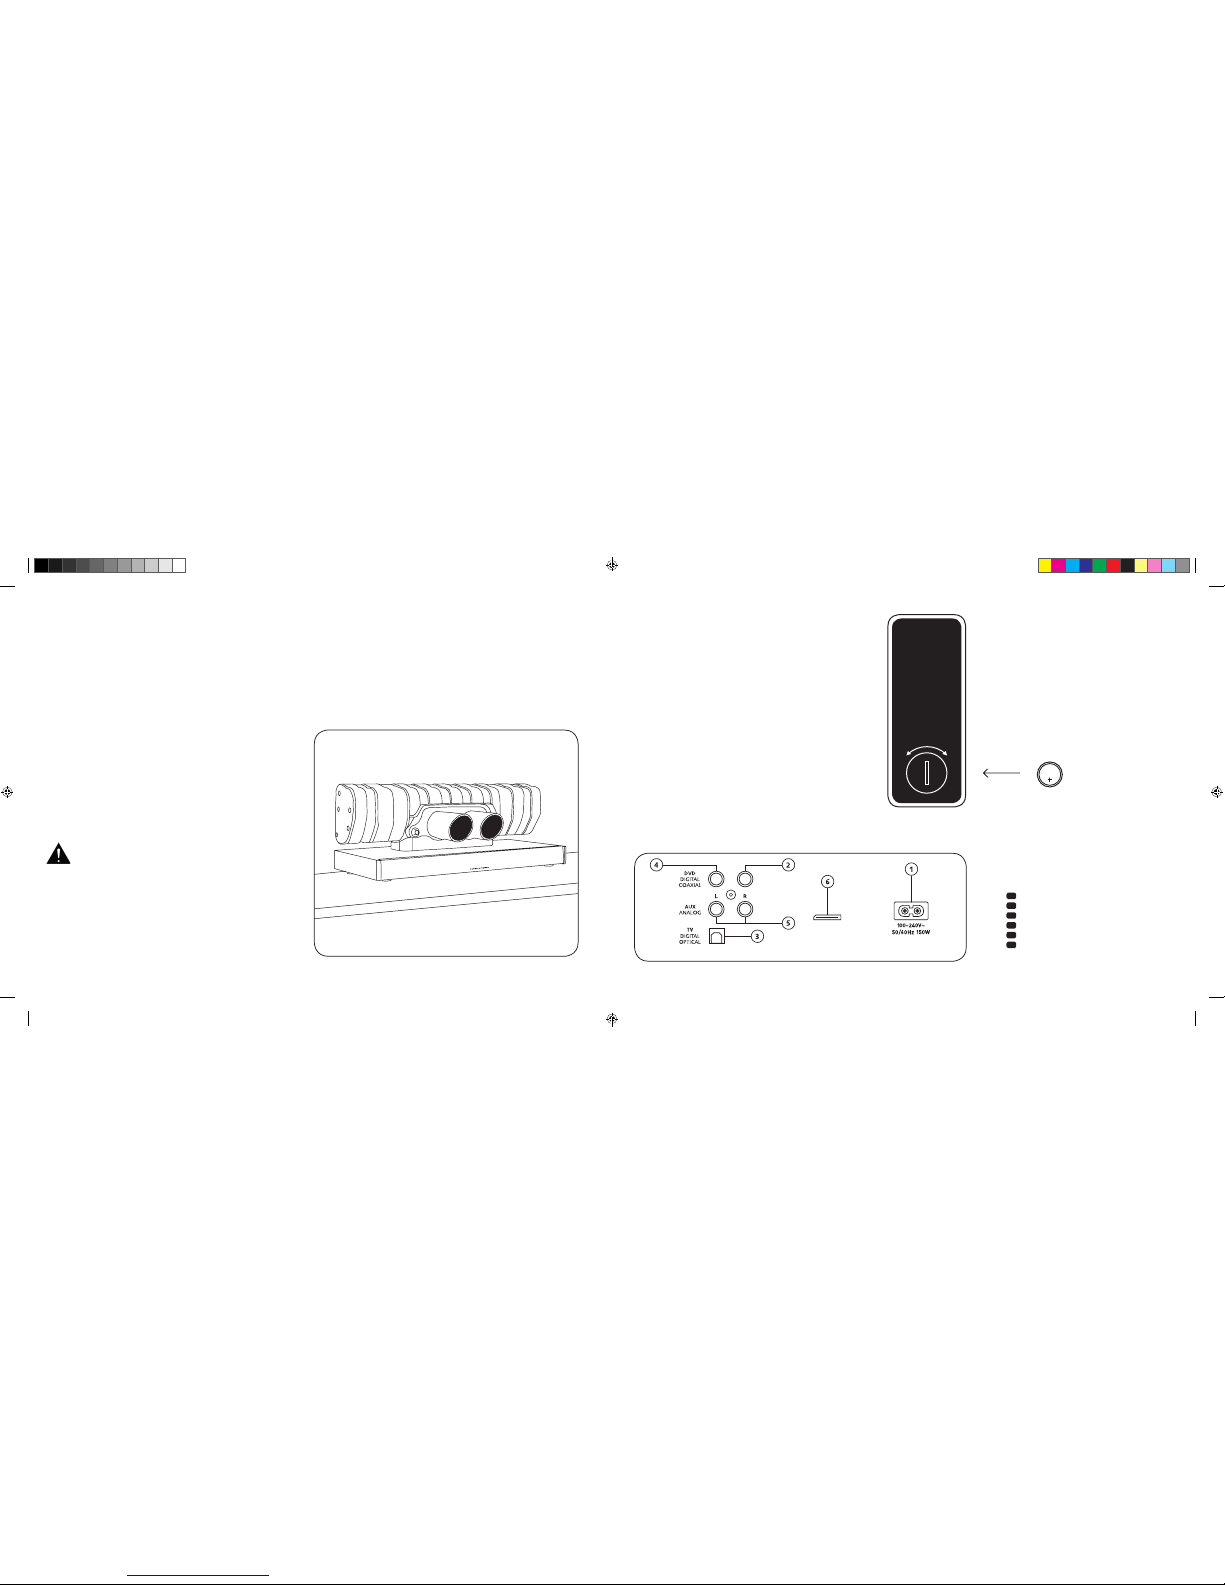
100
|
101
[
FR ] Barre de so n 911
BRANCHEMENTS
BARRE DE SON 911
1
Prise femelle alimentation
2
Sortie – caisson de basse ext.
3
Entrée – TV [ optique
]
4
Entrée – DVD [ coaxiale
]
5
Entrée – AUX [ analogique
]
6
Prise femelle service
MISE EN SERVICE DE
LA TÉLÉCOMMANDE
La pile fournie e st déjà insérée dans la télécom mande. Afin
de la mettre en ser vice, retirez simplement le film d e protection.
En remplaçant la pile, veillez à ce que celle-ci soit insérée
correctement selon les marquages de polarité [ + / – ]. Utilisez
exclusivement les piles spécifiées pour ce système [ CR 2032 ].
Remarque : la pile fournie est prévue p our une utilisation en
phase de test et peut d onc éventuellement avoir une fai ble
durée de vie.
TERMINAL DE RACCORDEMENT
Barre de son 911
SUB OUT
Service
Télécommande
[ arrière ]
INSTALLATION
Placez la barre de so n 911 su r une surface plane.
DÉBALLAGE
Déballez le car ton avec précaution et vérifiez si tou s les éléments
détaillés ici so nt présents :
1 x barre de son 911
1 x télécommande avec pile
4 x câbles d’alimentatio n [ 1 x EU, 1 x UK, 1 x US, 1 x AUS
]
1 x câble audio numé rique optique
1 x câble Cinch stéré o
1 x câble Cinch numé rique
RODAGE
Phase de rodage jusqu’au déploiement de la qualité sonore
maximale : 15 à 20 heures de fonctionnement.
– Pendant cette pér iode, veuillez écouter à un volume no rmal
– Évitez les volumes ex trêmement élevés
– Écoutez différents supports sonores
CR 2032
OUVERT FERMÉ
Chaque barre de son 911 est un exempla ire unique. Le
silencieux ar rière de la Porsche 911 GT3 monté dans la barre
de son 911 est fabriqué dans le cadr e du processus de
production en série régulier. Afin de souligner l’authenticité,
les soudures et les décolorations causées par le processus
de soudure ont volont airement été laissées appare ntes.
Par conséquent, nou s ne pourrons accepter aucune ré clamation sur le fait que la surface du silencieux arrière ne
plaise pas [ soudures, points d’oxydation, décolorations,
projections de soudure, etc. ]. Merci de votre compréhension.
DS_Betriebsanleitung_911_Soundbar_210x148mm_RZ_v10.indd 100-101 09.11.15 09:43
Page 53
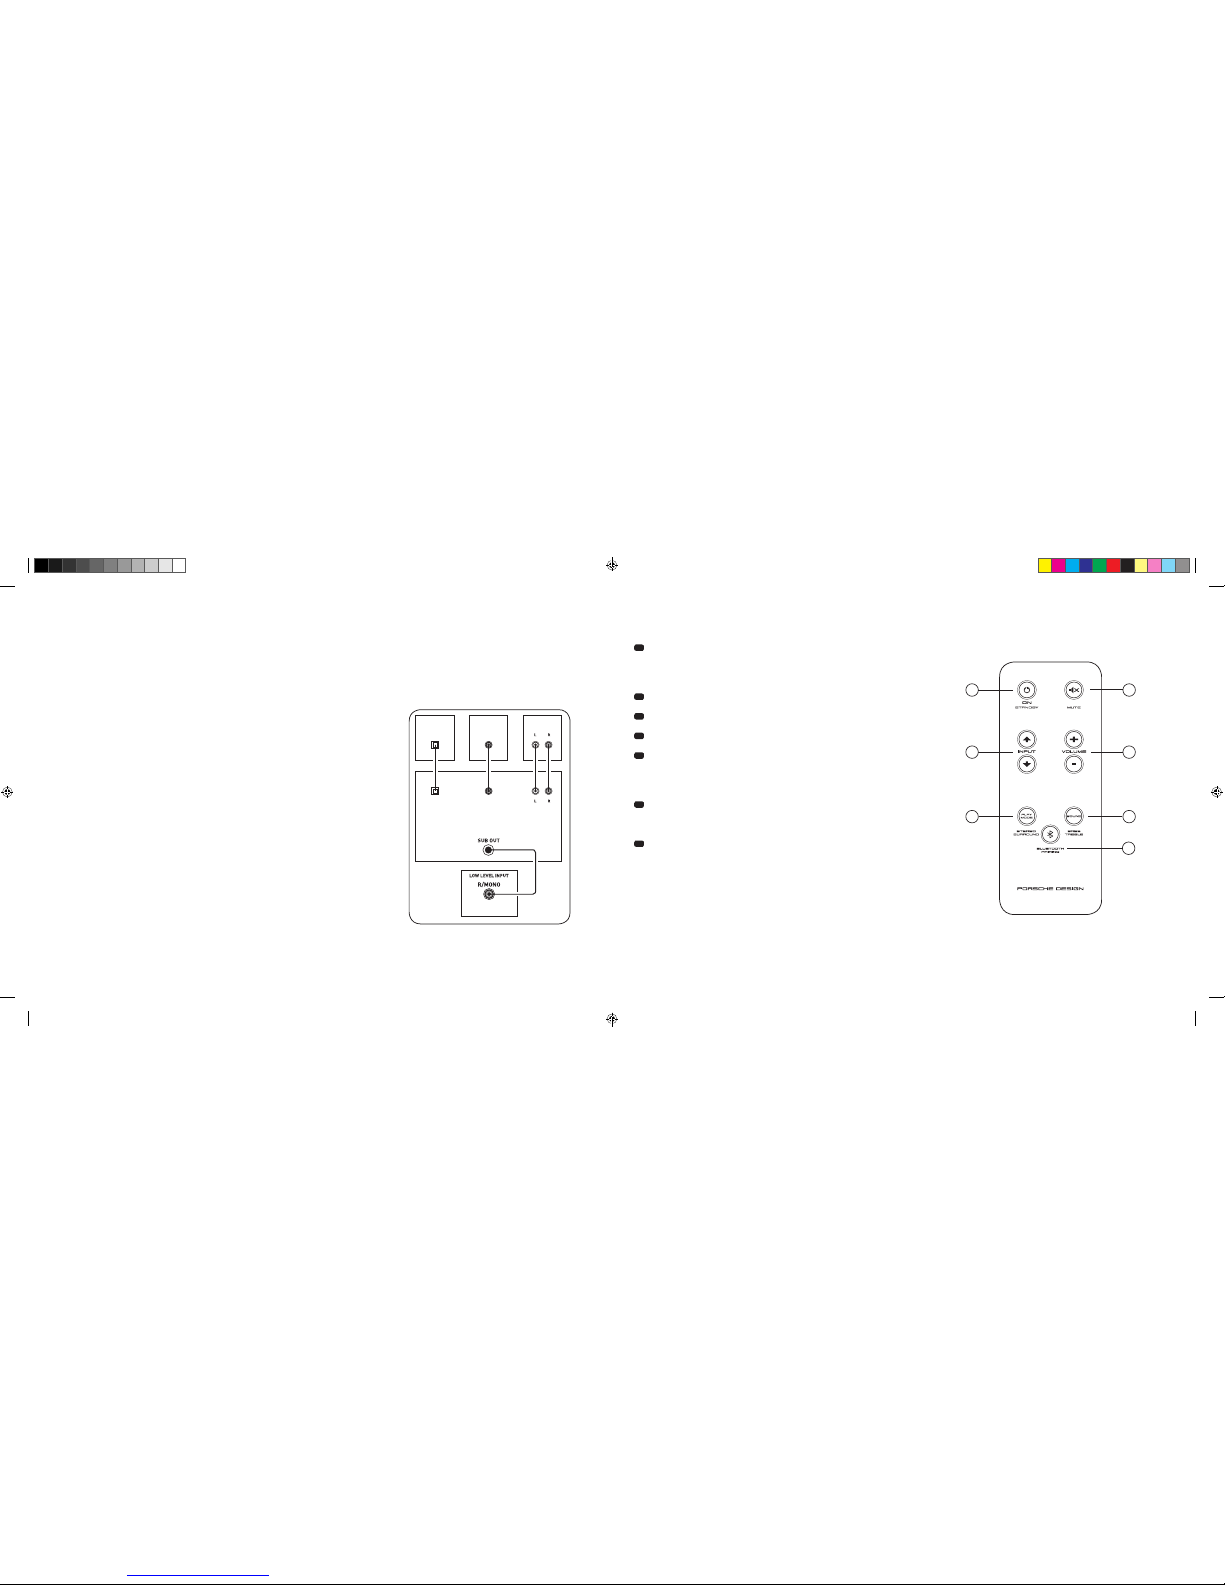
102
|
103
[
FR ] Barre de so n 911
RACCORDEMENT
Avant de procéder au br anchement, veillez à ce que tous les c omposants électriques so ient éteints. Votre barre de son 911 dispose de 3 entrées
au choix. En princi pe, il suffit de raccorder l’une de ces e ntrées au téléviseur et de branch er tous les autres lecteurs au télév iseur. Afin d’atteindre la
meilleure restit ution sonore possible, il est rec ommandé de raccorder directe ment à la barre de son 911 le récepteur satellite, le lecteu r Blu-ray ou
le lecteur DVD. Selon le t ype et l’équipement de la source utilis ée, il est possible de choisir e ntre les possibilités suivantes :
UTILISATION
Télécommande
1
Power
ON – la LED est allumée e n vert [ on ]
Standby – la LED est allumée e n rouge [ veille ]
La barre de son est h ors tension – la LED est éteinte [ off
]
2
Mute [ mode silencieux
]
3
Input [ sélection des sources sonores
]
4
Volume [ réglage du volume
]
5
Play Mode [ mode de lecture ]
Stereo – pour la lecture de musique
Surr ound – un son surround virtuel po ur une
restitution home cinéma
6
Son [ réglage du son ]
Bass – ajustement via vol ume [ +6 à –6 dB ]
Treble – ajustement via volume [ +6 à –6 dB
]
7
Blu etooth®-Pairing
Connexion à une source compatible avec la technologie sans fil Bluetooth
®
Fonction mémoire
Après une mise hor s tension passagère, la barre de so n 911 s’allume
automatiquement dans le dernier état sélectionné. Tous les paramètres
[
par exemple activé / dé sactivé, volume ] sont conservés.
SUB
DIGITAL MOVIE
DVD
DVDTV
TV
AUX
AUX
TV – Entré e numérique [ OPTIQUE
]
Les téléviseurs modernes disposent d’une sortie audio optique [ Toslink ]. Raccordez cette
sortie avec l’entrée « TV » d e la barre de son 911. Cette connexion g arantit une transmission
optimale du signal et la meilleure qualité de son.
Attention : retirez le capot de protecti on du câble optique fourni !
DVD – Entrée n umérique [ COAXIALE
]
Afin de permettre la transmission du signal sonore DVD, connectez la sortie numérique
coaxiale de votre l ecteur Blu-ray ou DVD avec la sortie fe melle « DVD » de la barre de son 911.
Afin de permettre la t ransmission du signal vidé o, votre lecteur DVD doit de plus être
connecté avec le télév iseur. L’entrée « DVD » de la ba rre de son 911 peut également être
choisie lorsque votre téléviseur n’est équipé d’aucune sortie optique.
AUX – Entrée an alogique
Si votre téléviseur est u niquement équipé d’une sorti e audio qualifiée de « pre-out »,
connectez cette so rtie avec l’entrée analogique « AUX » de la ba rre de son 911 à l’aide
du câble Cinch stéré o blindé. Dans le cas contraire, cet te entrée est utilisée pour le
raccordement de m agnétoscopes ou de consoles d e jeux vidéo.
SUB – Sorti e analogique
Utilisez cette sor tie lorsque vous devez raccorde r un caisson de basses extern e actif.
SUB OUT n’est pas actif dans le ré glage de base et doit être activé via la té lécommande.
Voir page 106 « Fonctions sonores élargies ».
4
ON
STANDBY
1
3
5 6
7
2
DS_Betriebsanleitung_911_Soundbar_210x148mm_RZ_v10.indd 102-103 09.11.15 09:43
Page 54
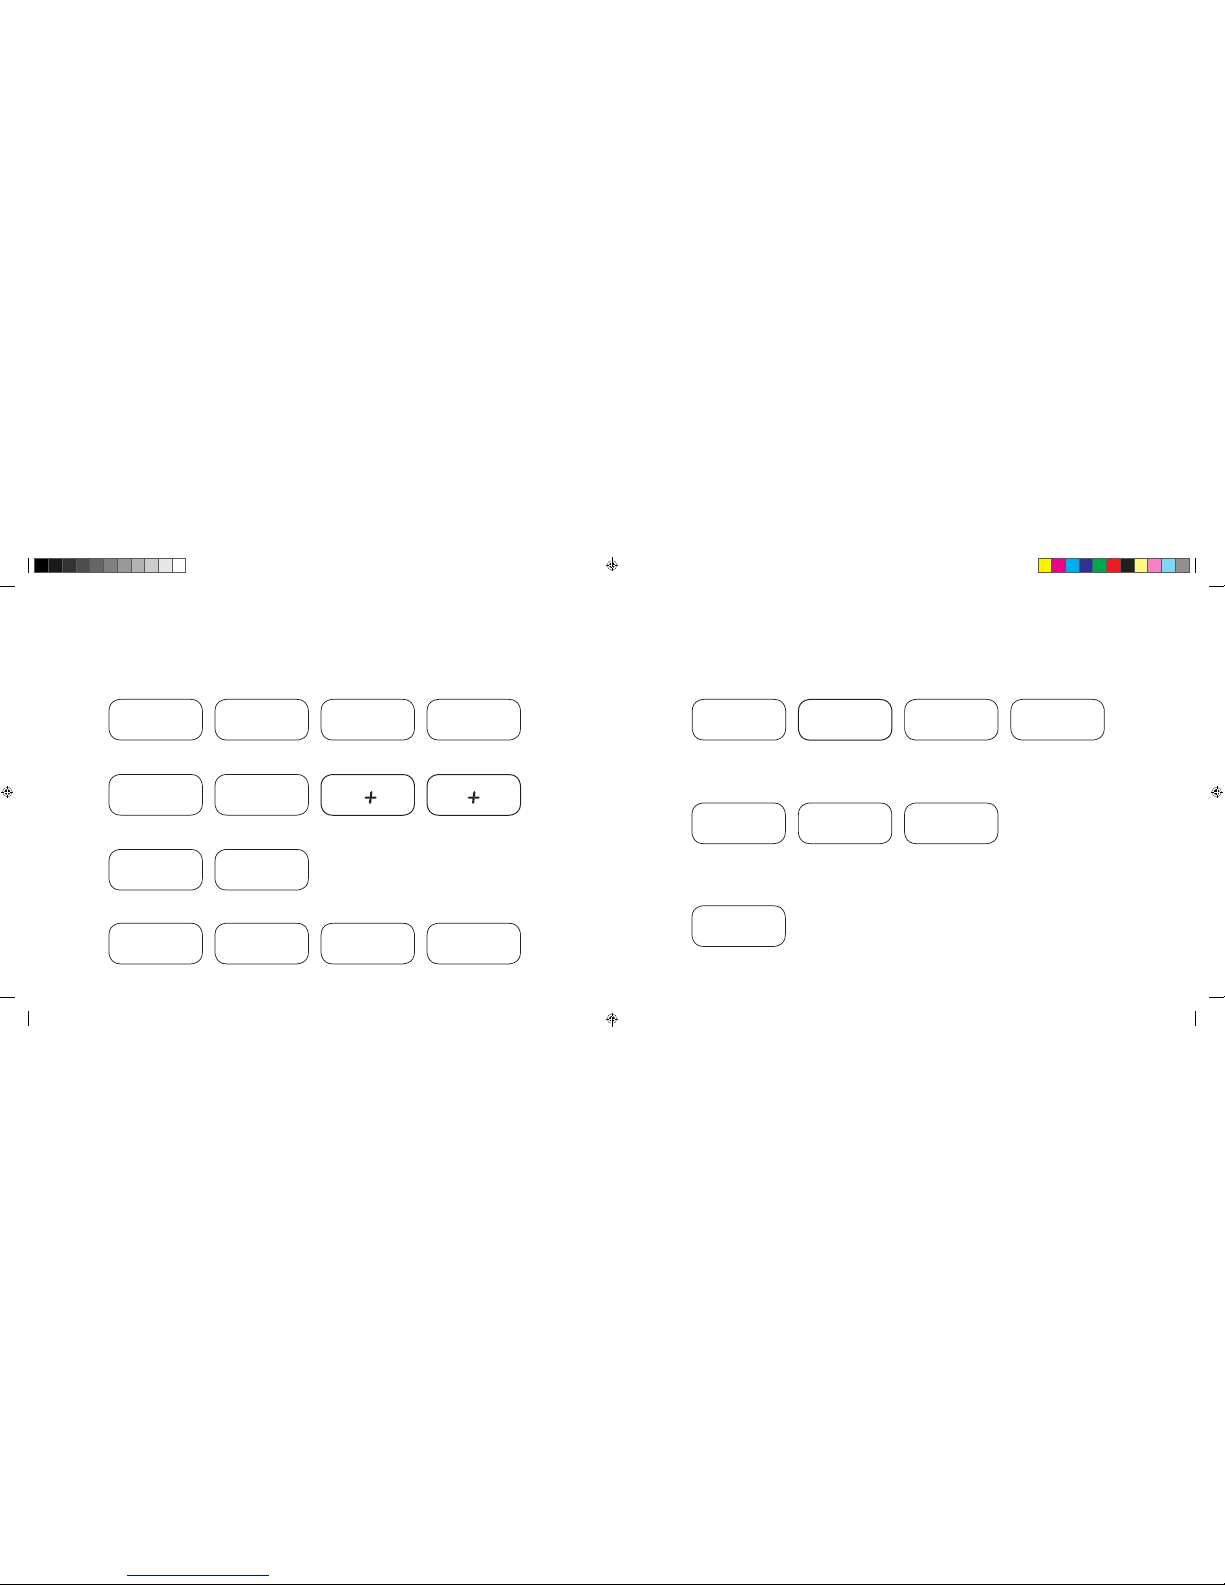
104
|
105
[
FR ] Barre de so n 911
INDICATIONS À L’ÉCRAN
La barre de son 911 est équipée d’un écra n multifonctions qui s’allume pendant e nv. cinq secondes lorsqu’il reçoit une co mmande envoyée depuis la
télécommande. Le s principales indications e t leur signification sont détai llées ici. Le mode veille de la barre d e son 911 est indiqué par une LE D allumée
en rouge. Si votre barre de s on 911 e st en service, la LED est allum ée en vert.
Input
Soundmode
Playmode
Entrée TV [ optique
]
TV
Volume
[
0 – 99
]
V30
Stéréo
ST
Mode d’appairage
BTP
Entrée DVD [ coaxiale
]
DVD
Silencieux
[
Mute
]
---
Surround
SUR
Connexion établie
CON
Entrée AUX [ analogique
]
AUX
Réglage des basses
[
+ / – 6
]
B 6
Connexion interrompue
DIS
Bluetooth
®
BT
Réglage des aigus
[
+ / – 6
]
T 6
Message d’erreur
FAI
Bluetooth
®
Fonctions de configuration
Activation / désactivation de
l’allumage automatique pour
l’entrée optique et coaxi ale
AUT
Activation / désactivation
de la sélection
automatique de l’entrée BT
SEL
Activation / désactivation
veille ECO
ECO
Fonction d’apprentissage IR
Apprentissage de
codes infrarouges
IRL
Fonctions sonores élargies
Retardement de la
restitution sonore
[
LipSync
]
LIP
Activation / désactivation
SUB OUT
SUB
Activation / désactivation
Dolby Dynamic Range
Compression
DRC
Sélection du mode
d’installation
EQ
DS_Betriebsanleitung_911_Soundbar_210x148mm_RZ_v10.indd 104-105 09.11.15 09:43
Page 55

106
|
107
[
FR ] Barre de so n 911
FONCTIONS SONORES ÉLARGIES
Le menu des fonctions sonores élargies vous offre la possibilité d’intervenir pour corriger
le son en cas de restitution sonore sans synchronisation labiale, d’activer la sortie pour un
caisson de bass es externe raccordé par câbl e, d’adapter la restitutio n sonore au lieu choisi
pour l’installation ainsi que d’activer ou de désactiver la fonction Dolby « Dynamic Range
Compression ».
Si vous maintenez la touc he « Sound » de la télécommande en foncée pendant plus de
3 secondes, vous pa rvenez dans le menu « Fonction s sonores élargies » et l’écran de la
barre de son 911 passe sur
LIP
.
Les touches « Volume + / – » per mettent dans ce cas de retarder l a restitution sonore par
tranches de 10 ms afin d’adapter le son à l’imag e « retardée ».
En appuyant une nou velle fois brièvement sur la touch e « Sound », l’écran passe sur
SUB
.
Les touches « Volume + / – » per mettent alors d’activer / désactiver l a sortie pour un caisson
de basses extern e. Attention, en cas d’activation de SUB OUT, la restitution s onore de la
barre de son est lim itée à 80 Hz. Les fréquences inféri eures à 80 Hz sont dirigées vers l e
caisson de bass es externe.
En appuyant une nou velle fois brièvement sur la touch e « Sound », l’écran passe sur EQ.
Les touches « Volume + / – » per mettent dans ce cas de choisir e ntre trois préréglages de
l’égalisateur et d’adapter la restitution au lieu de l’installation.
EQ1
pour une barre de son 911 posée librement par exemple sur un buffet.
EQ2
pour une installation avec un écran plat suspendu au mur.
EQ3
pour une installation de la barre de son 911 sur un rack ou une étagère.
En appuyant une nou velle fois sur la touche « Sound », l’écran passe su r
DRC
.
« Dynamic Range Compression » est une option de réglage de Dolby Laboratories. Si la
fonction est activée, la plage dynamique peut être automatiquement réduite pour les flux de
données encod és en Dolby, ce qui réduit les différ ences de volume. Les sons faible s sont
ainsi augmentés et l es sons forts sont abaissés.
Les touches « Volume + / – » per mettent d’activer / désactiver la foncti on
DRC
.
En appuyant une nou velle fois sur la touche « Sound », l’écran passe su r
VOL
.
Grâce à cette foncti on [ de protection ] « Volume », vous pouvez limiter le vo lume maximum
réglable, ce qui signifie que le volume [ indication à l’écran ] ne pourra plus dépasser la valeur
réglée ici lors du fonctionnement.
Les touches « Volume + / – » per mettent dans ce cas de paramétre r la valeur de volume
souhaitée [ de 0 à 99, 99 représenta nt la valeur maximale ].
LIP
SUB
ON OFF
EQ
EQ1 EQ2 EQ3
DRC
ON OFF
VOL
0 99
…
DS_Betriebsanleitung_911_Soundbar_210x148mm_RZ_v10.indd 106-107 09.11.15 09:43
Page 56

108
|
109
[
FR ] Barre de so n 911
RESTITUTION VIA LA TECHNOLOGIE BLUETOOTH
®
Conditions préalables à la connexion
– La fonc tion Bluetooth® doit être activée sur
le terminal mobile.
– Le terminal mobile doit supporter au minimum
Bluetooth® standard 2.0.
– Le terminal mobile doit être situé à portée de
la barre de son 911 [ max. 10 m ].
Procédure de connexion
– Choisir l’entrée BT.
– Appuyer sur la touch e « Bluetooth® Pair ing ».
–
BTP
apparaît à l’écran.
– Vous avez déso rmais 30 secondes pour
connecter votre terminal mobile.
– Lancez la recherche sur votre terminal mobile.
– Choisissez
911 SOUNDBAR
comme appareil
de restitution.
– La connexion est automatiquement établie
après validation et e st affichée à l’écran avec
l’indication
CON
.
– En cas d’échec d e la connexion, l’indication
FAI
s’af fiche.
– Si le term inal mobile exige un code d’accès,
saisir 0000.
– Si
DIS
apparaît à l’écran, votre ter minal mobile
est hors de portée ou déconnecté.
Fonctionnement d’un terminal mobile
– Le dern ier appareil connecté à la barr e de son 911
établit automatiquement la connexion si la fonction
Bluetooth® est activée et si l’entrée pour la diffusion
Bluetooth® est sélectionn ée. Dans ce cas, l’indication
CON
apparaît.
– Si vous la ncez la restitution d’un média sur votre
terminal mobile, le son est automatiquement
transféré sur la bar re de son 911.
Remarque : la barre de son 911 peut gérer jusqu’à
3 appareils Bluetooth®. Voir également le chapitre
« Sélection automa tique de l’entrée BT » en page 112.
BT
BTP
CON FAI
BLUETOOTH
PAIRING
911
SOUNDBAR
En appuyant une nou velle fois brièvement sur la touch e « Sound », l’écran passe sur
VOI
.
Utilisez la fonction « Voice » afin d’augmenter l’audibilité des paroles en fonctionnement stéréo
ou surround. De cet te façon, vous pouvez par exemple mieux c omprendre les dialogues
[
langue ] dans les films avec de s effets spéciaux bruyants.
Les touches « Volume + / – » per mettent d’activer / désactiver la foncti on « Voice »
[
ON ou OFF ].
En appuyant une nou velle fois sur la touche « Sound », vous revenez a u début du menu
LIP
.
Quitter le menu
En appuyant une nou velle fois sur la touche « Sound » pend ant plus de 3 secondes,
vous avez la possibili té de quitter à nouveau le menu « Fonc tions sonores élargies ».
Si la barre de son ne reçoit aucune commande de la télécommande pendant plus de
30 secondes, la nav igation dans le menu repasse au tomatiquement en mode normal.
LIP
SUB
ON OFF
EQ
EQ1 EQ2 EQ3
DRC
ON OFF
VOL
0 99
VOI
ON OFF
…
DS_Betriebsanleitung_911_Soundbar_210x148mm_RZ_v10.indd 108-109 09.11.15 09:43
Page 57

110
|
111
[
FR ] Barre de so n 911
Si cette fonction es t activée [ ON ], l’appareil reconnaî t un signal proche de l’entrée optique ou coa xiale. Si un signal est détecté [ par exemple
allumage de l’appareil s ource ], la barre de son 911 s’allume automatiquement. Si a ucun signal ne se trouve à l’entrée sélectio nnée [ par exemple
après l’arrêt de l’appareil sourc e ], la barre de son 911 est placée automati quement en mode veille AUT après 30 s econdes. Si cette fonction est
désactivée [ OFF ], la barre de son 911 doit être allumée / étei nte manuellement.
À la livraison du pro duit, cette fonction est désacti vée
[
OFF ].
Afin d’activer / désactiver c ette fonction, procédez comme su it :
1
Lorsqu e l’appareil est all umé, maintenez la touche « Play Mode »
enfoncée penda nt plus de 3 secondes jusqu’à ce que
AUT
apparaisse à l’écran.
2
Appuye z sur la touche « Volume + » pour activer la fonc tion [ ON ].
3
Appuye z sur la touche « Volume – » pour désactive r la fonction [ OFF ].
4
Appuye z à nouveau pendant plus de 3 seco ndes sur la touche
« Play Mode » pour quit ter le menu. Si aucune commande n’est
effectuée dan s les 10 secondes, l’appareil quitte automati quement
le menu de configuration.
Remarque : la fonction d’allumage / arrêt automatique fonctionne exclusivement pour les entrées numériques optique et coaxiale. Si l’appareil est placé
en mode veille via l a touche « ON / Standby », l’allumage automatique est i mpossible.
L’appareil reconnaît uniquement un signal sur l’entrée numérique sélectionnée. Un signal se situant sur une autre entrée numérique que celle sélectionnée
ne peut être détecté.
CONFIGURATION – FONCTIONS
ALLUMAGE / ARRÊT AUTOMATIQUE [ AUT
]
1
Lorsqu e l’appareil est all umé, maintenez la touche « Play Mode » enfo ncée pendant plus de 3 second es jusqu’à ce que
AUT
apparaisse
à l’é cran.
2
Appuye z à nouveau brièvement sur la touch e « Play Mode » jusqu’à ce que
ECO
apparaisse à l’écran.
3
Appuyez sur la touche « Volum e + » pour activer la fonction
[
ON ].
4
Appuye z sur la touche « Volume – » pour désactive r la fonction
[
OFF ].
5
Appuye z à nouveau pendant plus de 3 seco ndes sur la touche « Play Mode » pour qui tter le menu. Si aucune comman de n’est effectuée
dans les 10 secondes, l’appare il quitte automatiquement le me nu de configuration.
VEILLE ECO [ ECO
]
Si cette fonction es t activée [ ON ], l’appareil est automatiquement placé en mode veille ECO lorsqu’aucun signal n’est détecté à l’entrée sélectionnée
pendant une heur e. Si cette fonction est désactivé e [ OFF ], la barre de son 911 doit être éteinte manuel lement.
À la livraison du pro duit, cette fonction est activée [ ON ].
Afin d’activer / désactiver c ette fonction, procédez comme su it :
Remarque : cette fonction est automatiquement désactivée lorsque la fonction AUT est activée.
DS_Betriebsanleitung_911_Soundbar_210x148mm_RZ_v10.indd 110-111 09.11.15 09:43
Page 58
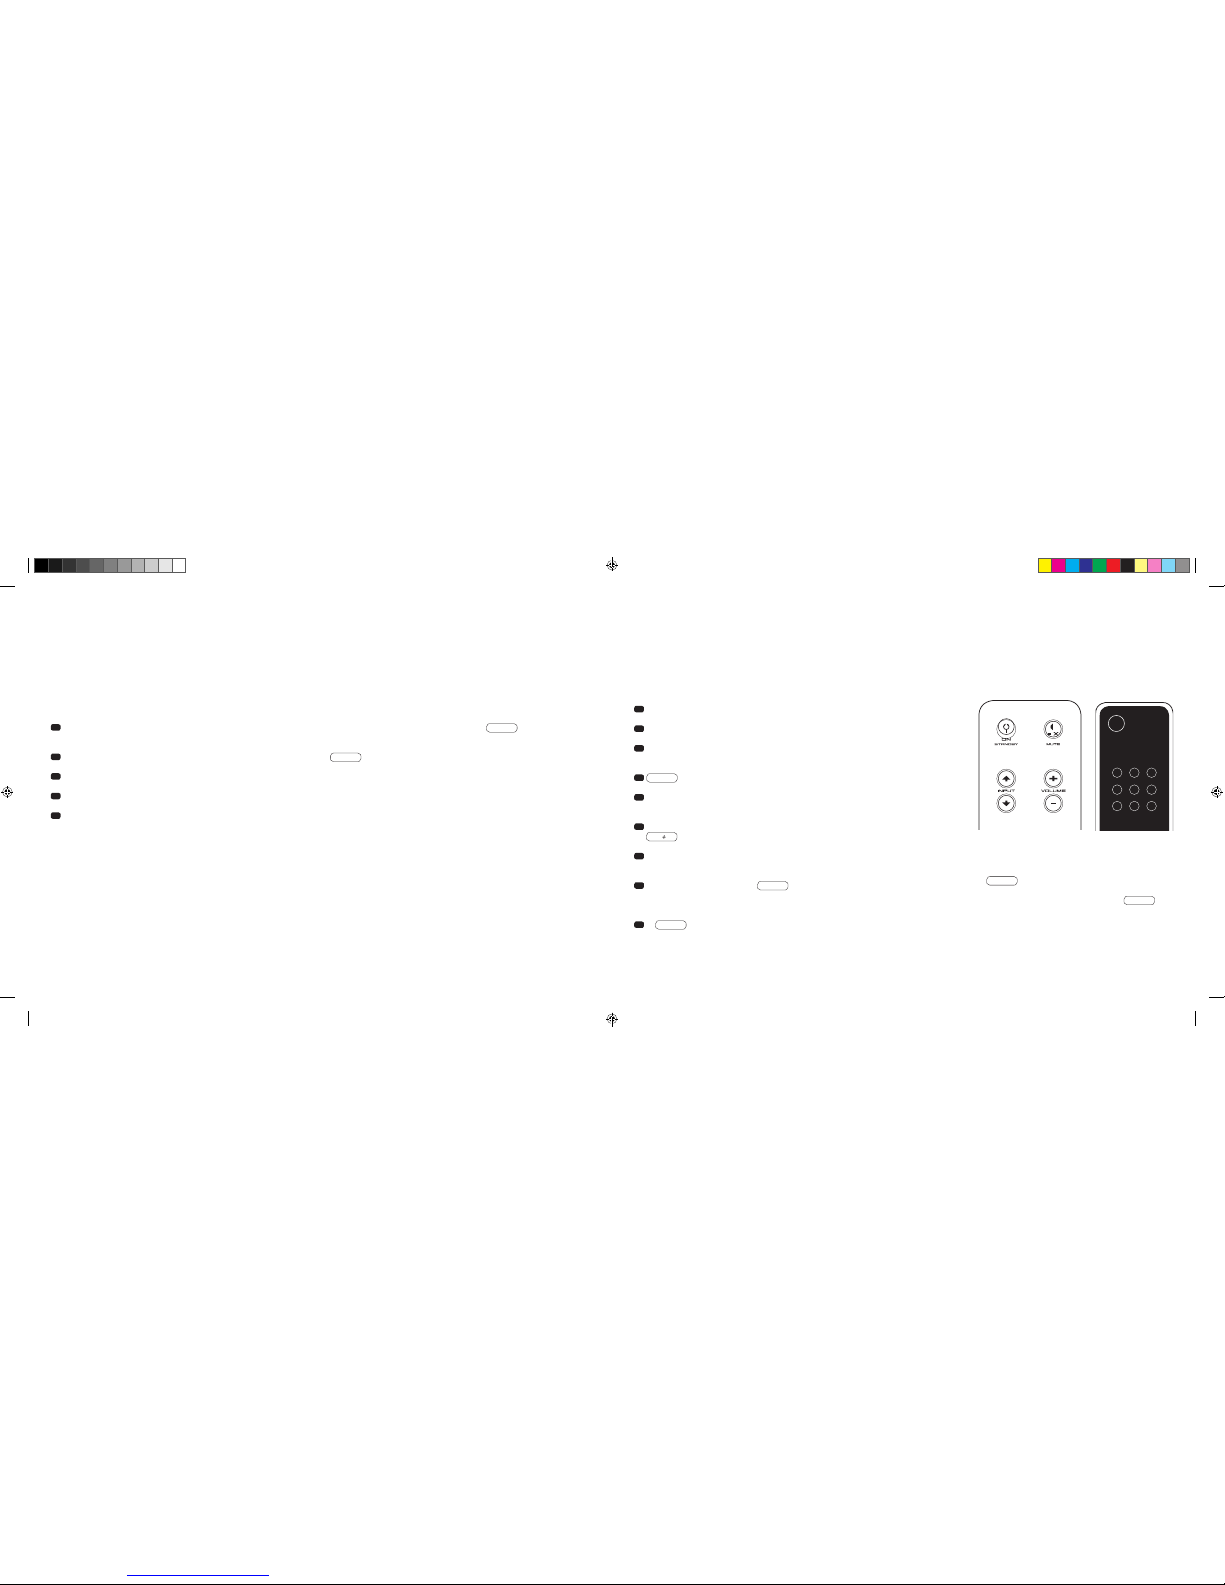
112
|
113
[
FR ] Barre de so n 911
SÉLECTION AUTOMATIQUE DE L’ENTRÉE BT
[
SEL ]
Si cette fonction es t activée [ AUT ], la barre de son 911 passe automatique ment sur l’entrée BT dès qu’un signal audio est déte cté par l’appareil mobile.
Si cette fonction es t désactivée [ MAN ], l’entrée doit être sélectionnée manuellement.
À la livraison du pro duit, cette fonction est désacti vée [ MAN ].
Afin d’activer / désactiver c ette fonction, procédez comme su it :
Remarque : selon l’appareil mobile utilis é, la barre de son 911 peut basculer sur l’entrée BT si le mode autom atique est activé, par exemple en tapa nt
un sms ou dans le cas d’autres a lertes sonores.
Lorsque la fonctio n SEL est activée [ AUT ], l’entrée BT ne peut plus être sél ectionnée via la touche « Input ». Dans ce m ode, la barre de son 911
peut être connectée à l’appareil mobile indépendamment de l’entrée de signal sélectionnée.
1
Lorsqu e l’appareil est all umé, maintenez la touche « Play Mode » enfo ncée pendant plus de 3 second es jusqu’à ce que
AUT
apparaisse
à l’é cran.
2
Appuye z à nouveau brièvement sur la touch e « Play Mode » jusqu’à ce que
SEL
apparaisse à l’écran.
3
Appuyez sur la touche « Volum e + » pour activer la fonction
[
AUT ].
4
Appuye z sur la touche « Volume – » pour désactive r la fonction
[
MAN ].
5
Appu yez à nouveau pendant plus de 3 sec ondes sur la touche « Play Mode » pour qu itter le menu. Si aucune comma nde n’est effectuée dans les
10 secondes, l’appareil quit te automatiquement le menu de con figuration.
FONCTION D’APPRENTISSAGE IR
La barre de son 911 peut assimile r le code infrarouge de la téléco mmande de votre téléviseur perme ttant ainsi de commander le s fonctions de la
barre
de son 911 et du téléviseur avec une seule té lécommande. Les commande s pour la barre de son 911 peuvent être attribuée s à l’ensemble des
touches de la téléco mmande du téléviseur. Lors du choix de s touches, veillez à ce que les comma ndes pour la barre de son 911 et celles du télévise ur
n’entrent pas en conflit. Il est ain si recommandé de désactive r les haut-parleurs internes du té léviseur une fois la barre de son 911 raccordée.
1
Tenez prête la télécommande de votre téléviseur.
2
Allum ez la barre de son 911.
3
App uyez sur la touche « ON / Standby » de la tél écommande Porsche
pendant env. 5 seconde s.
4
IRL
clignote à l’écran.
5
Appuyez sur la fonction souhaitée sur la télécommande Porsche, par
exemple « Volume + ».
6
La fonction sélectionnée clignote maintenant à l’écran, par exemple
V
.
7
Appuyez sur la touche de la télécommande du téléviseur à laquelle vous
souhaitez attribuer la commande au cours des 20 secondes suivantes.
8
En cas de réussite du transfert, OK apparaît à l’écran et vous
pouvez poursuivre avec la programmation de la touche de fonction
suivante, par exemple « Volume – ».
9
Si
FAI
apparaît à l’écran, le transfert a échoué et vous devez
répéter les étapes 5 à 8.
Télécommande du
téléviseur
ON
STANDBY
Remarque : la touche rouge « ON / Standby » de la télécommande
Porsche a une double attribution. En appuyant une seule fois sur
cette touche, ON apparaît à l’écran et la fonction d’allumage
peut être assimilée. En appuyant sur la touche rouge « ON / Standby » de la télécommande Porsche deux fois d’affilée,
STB
apparaît à l’écran et la fonction de mise en veille ou d’arrêt peut
être assimilée. Si la télécommande de votre téléviseur
ne dispose
que d’une seule touche pour la commande « Allumage » et « Arrêt »,
les fonctions « ON » et « Standby » doivent tout de même être
attribuées à cette commande.
DS_Betriebsanleitung_911_Soundbar_210x148mm_RZ_v10.indd 112-113 09.11.15 09:43
Page 59

114
|
115
[
FR ] Barre de so n 911
Quitter le menu
En appuyant une nouvelle fois sur la touche « ON / Standby » pendant plus de 5 secondes, vous avez la possibilité de quitter à nouveau le menu
« Fonction d’apprentissage IR ». Si la barre de son 911 ne reçoit aucune commande de la télécommande pendant plus de 60 secondes, la navigation
dans le menu repasse automatiquement en mode normal.
Choix direct des entrées de signal
En plus des touches « Input
» et « Input
», vous pouvez également sélectionner directement les entrées de signal TV, DVD, AUX et Bluetooth® lors
de l’utilisation de la télécommande de votre téléviseur ou de votre télécommande universelle, ce qui signifie que vous pouvez attribuer l’entrée souhaitée
à une touche de votre télécommande.
1
Si vous ma intenez enfoncée l’une des deux touche s « Input » de la télécommande Porsche pendant 3 secondes lorsque vous vous trouvez dans le
menu d’apprentissage IR
IRL
, vous parvenez dans le menu de choix direct.
DVD
clignote à l’écran.
2
Vous pouvez d ésormais attribuer une touc he de la télécommande de votre télévi seur à l’entrée « DVD ».
Remarque : lorsque vous appuyez sur cette touche de la télécommande de votre téléviseur en fonctionnement normal, la barre de son 911 bascule
directement sur l’entrée DVD.
3
Appuye z sur la touche souhaitée de la téléc ommande de votre téléviseur. Si le code infra rouge [ IR ] a été assimilé avec suc cès par
la barre de son 911, l’écran affiche brièvement OK puis la prochaine entrée TV.
4
Si le cod e n’a pas pu être assimilé ou s i vous n’avez pas appuyé sur une touche de votre télécom mande au cours des 10 secondes sui vantes,
l’écran affiche briève ment
FAI
afin de signaler qu’aucun code n’a été assimilé.
DVD
continue ensuite de clignoter à l’écran et vous pouvez
à nouveau ou continuer d’assimiler le code pour l’entrée DVD.
5
Dans l’éventuali té où vous ne souhaiteriez pas attri buer de touche à l’entrée DVD, appuyez brièveme nt sur la touche « Input » afin d’accéder
manuellement à l’entrée [ TV ].
6
Afin d’attribue r une touche à la télécommande de votre té léviseur pour les entrées T V, AUX et / ou Bluetooth®, répétez les étapes d étaillées
aux points 2 à 5.
7
Afin de qui tter à nouveau le menu de choix di rect, appuyez une nouvelle fois sur l’une d es touches Input pendant 3 sec ondes afin de parvenir au
menu d’assimilation IR supérieur
IRL
. Lorsque vous maintenez enfoncée la touche « ON / Standby » dans le menu de choix direct pendant
3 secondes, le système bascule du menu d’assimilation IR au fonctionnement normal.
FIN
s’affiche brièvement à l’écran afin de signaler
que le mode
d’apprentissage IR est terminé.
Remarque : en raison du grand nombre de codes infrarouges, il est impossible de garantir que chaque télécommande puisse être assimilée par la barre de son 911.
FONCTION D’ANNULATION IR
Afin d’annuler les commandes de la télécommande de votre téléviseur assimilées via la barre de son 911, veuillez procéder comme suit :
1
Allum ez la barre de son 911.
2
Appuye z sur la touche « ON / Standby » de la téléco mmande Porsche pendant env. 5 secon des.
3
IRL
clignote à l’écran.
4
Appuye z sur la touche « Mute » de la télécomman de Porsche pendant env. 5 secondes.
5
CLR
apparaît à l’écran pendant env. 5 secondes. La barre de son 911 passe ensuite automatiquement en fonctionnement normal.
DS_Betriebsanleitung_911_Soundbar_210x148mm_RZ_v10.indd 114-115 09.11.15 09:43
Page 60

116
|
117
[
FR ] Barre de so n 911
RECHERCHE D’ERREURS
Vous trouverez ci-joint un a perçu des problèmes sur venant le plus souvent. Si vous devie z avoir d’autres questions, veuillez vous adre sser à votre
Porsche Design S tore ou à votre Centre Porsche, contactez notre hotli ne de service après-vente au +49 [ 0 ]711 911 0 ou envoyez-no us un e-mail à
l’adresse [email protected]
Problème Cause possible Solution
La barre de son 911
ne s’allume pas.
Le câble d’alimentation n’est pas rac cordé à la prise
et / ou à la barre de son 911.
Effectuer le branchement.
La barre de son 911
ne réagit pas à la
télécommande.
1. La pile est déchargée. 1. Changer la pile. Veiller à insérer la pile selon la bonne polarité.
2. Le film de protection n’est pas retiré. 2. Retirer le film de p rotection de la télécommande.
La restitution sonore
est trop faible.
Le volum e de la barre de son 911 ou de l’appareil
source est réglé à un n iveau trop bas.
Augmenter le volume à l’aide d e la touche « Volume ».
Augmenter le volume d e l’appareil source.
Aucune restitution
sonore.
1. Le format sono re de l’appareil source a été
sélectionné de façon incorrecte [ entrée numériqu e
« TV » et « DVD » ].
1. Veuillez vérifie r que l’appareil source est correc tement paramétré.
Les format s de sortie codés e n « DTS » ne peuvent pas
être restitués.
2. Le lecteur ne transmet aucun signal. 2. La sortie numé rique sur l’appareil source n’est pas activée, le
volume est éventuel lement réglé sur « zéro » [ veuillez vous référe r
à la notice de l’appareil ].
3. Le câbl e n’est pas branché correctement / le câ ble
est défectueux.
3.1. Vérifi ez la connexion du lecteur avec la b arre de son 911 et
remplacez le câble si nécessaire.
3.2. Véri fiez si les capots de protection sur l a prise du câble optique
sont retirés.
Problème Cause possible Solution
La barre de son 911
émet un bourdonnement.
1. Les câbles d e signal reliant l’appareil source à
la barre de son 911 sont trop longs [ Aux ].
1. Utiliser des câbles de signal plus courts.
2. Le câble d e signal utilisé n’est pas blindé ou le
blindage du câbl e utilisé est discontinu [ défaut ].
2. Remplacer le câble par un câble blindé.
3. Géné ration d’une boucle de terre [ boucle de
masse ].
3. Une boucle de terre peut survenir lorsqu’au moins deux appareils
reliés avec des câb les de signal [ Cinch ] sont raccordés à de s
prises séparée s localement par des pr ises de contact de sécurité
[
par exemple un amplificateur et un ordinateur ]. Brancher tous
les appareils re liés à la barre de son 911 à un bloc multiprise
[
multiprise ] avec des prises de c ontact de sécurité.
4. Un réce pteur non déparasité est instal lé sur le
réseau [ par exemple un réfrig érateur ].
4. Éteindre le s possibles sources de per turbation ; laisser l’appareil
concerné se déparasiter si le bourdonnement disparaît ou brancher tout d’abord la source de p erturbation sur une autre ph ase
secteur [ L1, L2 ou L3 ] [ si nécessaire, fa ire appel à un spécialiste ] ;
allumer le « filtre pa sse-haut » spécial [ disponible en commerce
spécialisé ] entre l’appareil source et la b arre de son 911 afin
d’éliminer le bourdonnement ; tourner la prise afin de réduire la
tension d’ondulation [ important en particulier lorsque l’appareil
source n’est pas mis à la terre ].
DS_Betriebsanleitung_911_Soundbar_210x148mm_RZ_v10.indd 116-117 09.11.15 09:43
Page 61

118
|
119
[
FR ] Barre de so n 911
Problème Cause possible Solution
Aucune restitution via
la technologie sa ns fil
Bluetooth
®
.
1.
Aucun e connexion n’existe entre la barre de son 911
et le terminal mobile.
1. Connecter le terminal mobile de la façon indiquée.
2. Le terminal mobile est connecté, mais aucune
restitution ne se produit.
2.1. Le terminal mobile doit être connecté à nouveau.
2.2. Régler le volume du terminal mobile sur la valeur maximale.
2.3. Augmenter le volume de l a barre de son 911.
2.4. S’assurer que les so urces de perturbation, tell es qu’un
routeur WLAN ou un ordinateur portable, ne sont pas placées
à proximité directe de la ba rre de son 911.
2.5. Dans la plupart des cas, le fonctionnement simultané via
WLAN et connex ion Bluetooth
®
d’un terminal mobile n’est
pas possible sans perturbations [ désactiver le WL AN sur
le terminal ].
3. Vous êtes hor s de portée [ max. 10 m ]. 3. Ré duisez la distance entre la bar re de son et le terminal mobile.
L’entrée BT ne peut être
choisie avec les touches
« Input ».
La fonction SEL est ac tivée [ AUT ]. Dans ce cas, le basculement s’effectu e automatiquement dès
lors que la barre de s on 911 détecte un signal audio d e l’appareil
mobile.
Problème Cause possible Solution
L’appareil ne s’allume
pas automatiqueme nt
avec l’entrée optique et
coaxiale.
1. La fonction AUT a é té désactivée en usine [ OFF ]. 1. Activer la fonc tion AUT [ ON ] [ page 110 ].
2. L’appareil a été placé en mode veille v ia la touche
« Power ».
2. Allume r l’appareil avec la touche « Power » de la télécom mande
et attendre à l’avenir que l’appareil pa sse automatiquement en
mode veille.
3. L’appareil a été basculé sur l’autre entrée
numérique sur laquelle aucun signal n’est
disponible et s’est éteint automatiquement.
3.
Allumer l’appareil avec l a touche « Power » de la télécommande
et
choisir l’entrée numéri que sur laquelle est situé l’appare il source
souhaité.
La barre de son 911 ne
bascule pas automatiquement sur l’entrée BT.
1. La fonction SEL est désac tivée [ MAN ]. 1. Activer la fonction SEL [ AUT ].
2. La foncti on Bluetooth
®
est désactivée s ur le
terminal mobile.
2. Activer la fonction Bluetooth® sur le terminal mobile.
3. La bar re de son 911 est connectée à un autre
terminal mobile.
3. Désactiver la fonction Bluetooth
®
sur l’autre terminal mobile.
4. Le termin al mobile n’est pas connecté à la barre
de son 911.
4. Connecter le terminal mobile à la barre de son 911 [ page 109 ].
La barre de son 911
bascule de façon in tempestive sur l’entrée BT.
Ceci peut arri ver lorsque l’appareil mobile émet d es
sons système, par exempl e une tonalité émise en
appuyant sur les touches du clavier.
1. Désactiver la fonction SE L [ MAN ].
2. Désactiver les son s système sur l’appareil mobile.
DS_Betriebsanleitung_911_Soundbar_210x148mm_RZ_v10.indd 118-119 09.11.15 09:43
Page 62

120
|
121
[
FR ] Barre de so n 911
CARACTÉRISTIQUES TECHNIQUES
Tension d’alimentation
– Tension de service 100 –240 V~
– Fréquence de ser vice 50 / 60 Hz
– Puissance cons ommée en mode veille ECO = 0,39 W [ paramètre usine
]
– Puissance cons ommée en mode veille AUT = env. 4,5 W
–
Puissance consommée en mode inactif [ aucun signal d’entrée ]
= env. 8,4 W
– Puissance cons ommée maximale = env. 150 W
Niveau d’entr ée / de sortie numé rique
– AUX = max. 2,0 V [ effectifs
]
– SUB OUT = max. 2,0 V [ effectifs
]
Décodeur
– Dolby Digital
– PCM [ 32 kHz…96 kHz / 8 bits…24 bits
]
Informations concernant le « fonctionnement conforme »
La barre de son 911 est conçue pour u ne utilisation dans des espace s
fermés et ne doit pa s être utilisée en plein air ou dans u n environnement
humide. L’appareil ne doit pas être démonté ou mo difié. Branchez la barre
de son 911 de la façon décrite dans la noti ce et respectez les consignes d e
sécurité. Utilisez u niquement l’appareil avec la tension et l a fréquence de
secteur spécifiées sur la plaque signalétique.
Informations sur un fonctionnement respectueux de
l’environnement
Si vous n’utilisez pas la barre d e son 911, placez-la en mode veille
à l’aide de la touche « ON / Standby » afi n de réduire la puissance
consommée. Cette mesure permet d’« économiser de l’électricité »
et de réduire votre facture d’élec tricité.
AUTRES INFORMATIONS IMPORTANTES
Informations concernant le marquage CE
Les appareils électriques et électroniques mis en circulation au
sein de l’Union européenne doivent être dotés d’un marquage
CE afin d’indiquer que l’apparei l correspond aux exigence s
légales [ par exemple en matière de compatibilité électromagnétique ou de sécuri té ].
Indications concernant l’élimination
Conformément à l a directive UE sur les appareils é lectriques et
électroniques usagés, les appareils marqués de ce symbole ne
doivent pas être élim inés avec les déchets urbains [ ordures
ménagères ]. En cas de besoin, veui llez vous informer auprès
de votre entreprise d’enlèvem ent des déchets compétente ou
de l’administration communale / municipale sur une élimination
gratuite. Une telle élimination participe à la protection de
l’environnement et de la sa nté et permet d’économiser des
matières premières [ rares ] grâce au recyclage [ recyclage ].
De même, les piles n e doivent pas être éliminées avec l es ordures
ménagères générales. Elles doivent être collectées de façon
séparée et dépos ées auprès d’un organisme de colle cte de
piles. Vous pouvez par exem ple jeter gratuitement vos piles
usagées dans le b ac de collecte placé dans un comm erce. Les
piles éliminée s de façon non conforme peuven t nuire à la santé
des êtres humains et d es animaux et / ou de l’environnement.
Virtualizer
– DTS TruSurround
Bluetooth
®
– Bluetooth® standard 3.0 [ A2DP
]
– Supporte le déc odage CSR aptX
®
– Portée de max. 10 m
– Plage de fréquen ce 2 400 – 2 483,5 MHz [ 2,4 GHz bande ISM
]
– Puissance d’émissio n max. 10 mW [ +10 dBm
]
Température ambiante
– Minimum 5 °C [ 41 °F ]
– Maximum 35 °C [ 95 °F ]
DS_Betriebsanleitung_911_Soundbar_210x148mm_RZ_v10.indd 120-121 09.11.15 09:43
Page 63

122
|
123
Manufactured un der license from
Dolby Laboratories. Dolby and the
double-D symbol are registered
trademarks of Dolby Laboratories.
For DTS patents, see
http://patents.dts.com. Manufactured
under license f rom DTS Licensing
Limited. DTS, the Symbol a nd DTS and
the Symbol togethe r are registered
trademarks, and DTS TruSurrou nd is
a trademark of DTS, Inc. © DTS, Inc.
All Rights Reserved.
Bluetooth
®
:
The Blueto oth® word mark and logos a re
registered tradem arks owned by Bluetooth®
SIG, Inc., and any use of such ma rks by
Porsche Design is u nder license. Other
trademarks and tra de names are those of
their respective owners.
aptX
®
:
The aptX® software is copy right CSR plc or its
group companies. All rights reserved. The aptX®
mark and the aptX l ogo are trademarks of
CSR plc or one of its group companies and may
be registered in one or more jurisdictions.
INFORMATIONS RELATIVES À LA LICENCE
[
FR ] Barre de so n 911
DS_Betriebsanleitung_911_Soundbar_210x148mm_RZ_v10.indd 122-123 09.11.15 09:43
Page 64
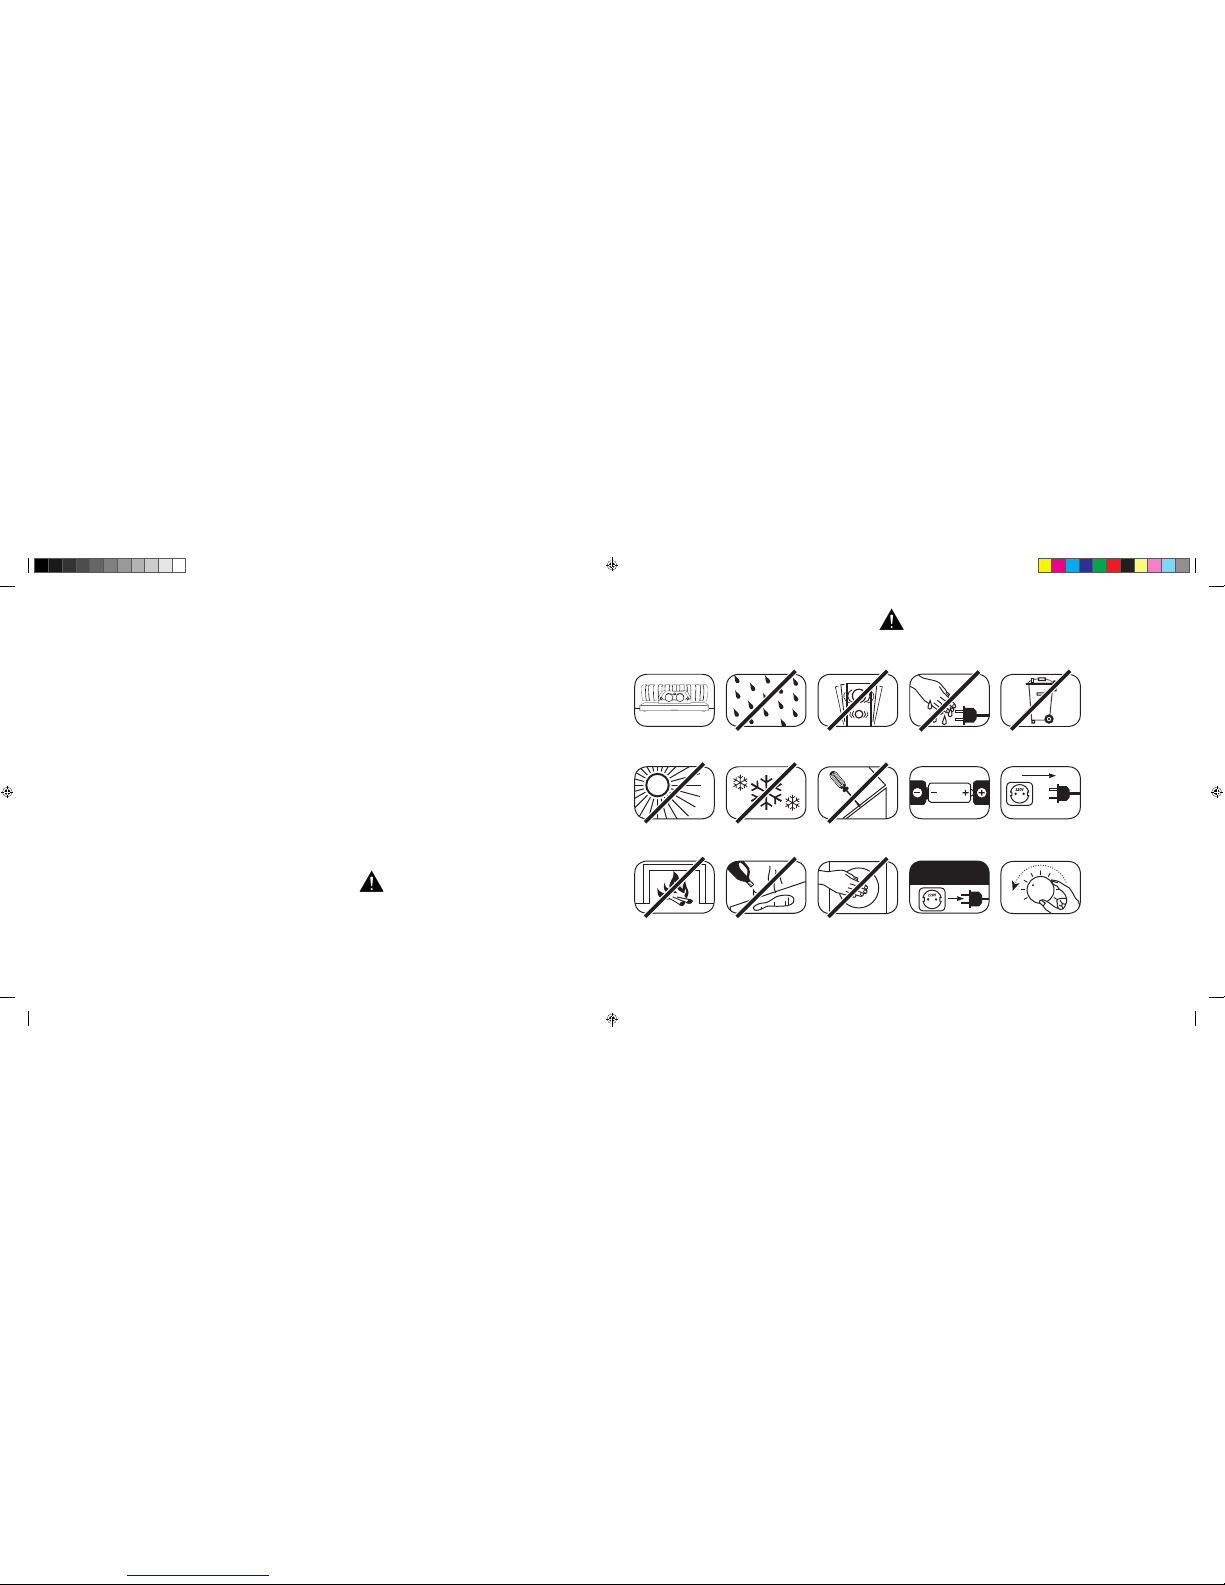
[
IT ] Soundbar 911
124
|
125
INDICE
Indicazioni di sicurezza ............................... P agin a 125
Apertura della confezione ...........................P agin a 130
Installazione ............................................... Pagi na 130
Avvio .......................................................... P agina 130
Messa in funzione del telecomando ............ Pa gina 131
Terminale di collegamento ..........................Pa gina 131
Collegamento ............................................. Pagina 132
Utilizzo ........................................................ Pag ina 133
Display ....................................................... Pagina 134
Funzioni audio avanzate ..............................Pagina 136
Riproduzione con tecnologia Bluetooth® ..... Pagina 139
Accensione e spegnimento
automatico
[
AUT ] ........................................ Pag ina 140
Stand-by ECO
[
ECO ] ...................................Pag ina 141
BENVENUTI NEL MONDO DI PORSCHE DESIGN
Da 0 a 100 in 3,5 secondi, fino a 9.000 giri al minu to, velocità massima di 315 km/h. Per alcuni s ono solo numeri,
mentre per noi sono le note di una s infonia dedicata alla vettura sportiva: il su ono della 911 GT3.
Lasciatevi ispirare da lla nostra passione per l
’innovazione tecnologica e scoprite l’eccellenza di un’esperienza acustica
davvero unica gra zie alla Soundbar 911, il V irtual Surround Sound System 2.1 di alta gamma con impianto di scari co
originale della 911 GT3.
INDICAZIONI DI SICUREZZA
Si prega di seguire l e indicazioni di sicurez za per la scelta della giusta po sizione in cui installare la Sou ndbar 911, nonché per la sua
manutenzione e l’utilizzo.
Scegliere una
superficie piana
Evitare il contatto
con l’umidità
Evitare vibrazioni
e scuotimenti
Evitare l’esposizione
alla luce solar e diretta
Mantenere la distanza
da fonti di calore
Proteggere dal
freddo estremo
Per la pulizia non
utilizzare sostanze
aggressive, a bas e di
alcol o abrasive
Non aprire
l’alloggiamento
Non infilare le
mani nell’apertura
dell’alloggiamento e nel
terminale di scarico
Estrarre la spin a di
alimentazione durante
un temporale
Non toccare il cavo d i
alimentazione con le
mani bagnate
Rispettare la c orretta
polarità di batteria
e telecomando
Non gettare nei
rifiuti domestici
L’utilizzo corretto della Soundbar 911 è di responsabilità
dell’utente. Porsche Design non si assume alcuna
responsabilità per lesioni o danni causati da installazione
o collegamento errati.
Garantire il libero accesso
alla spina di alimentazione
Abbassare il volume
in caso di sovraccarico
del sistema
Selezione automatica dell’ingresso BT
[
SEL ] Pa gin a 142
Funzione di apprendimento a infrarossi .......Pagina 143
Funzione di cancellazione a infrarossi .........Pagina 145
Risoluzione dei problemi .............................P agi na 146
Specifiche tecniche .................................... Pagi na 150
Altre informazioni importanti ........................Pagi na 151
Informazioni sulla licenza ............................ Pag ina 152
DS_Betriebsanleitung_911_Soundbar_210x148mm_RZ_v10.indd 124-125 09.11.15 09:43
Page 65
[
IT ] Soundbar 911
126
|
127
IMPORTANTI ISTRUZIONI DI SICUREZZA
Legge re e seguire tutte le istruzioni.
Conservare queste istruzioni.
Osser vare tutte le avvertenze e le in dicazioni di sicurezza .
Utiliz zare questo dispositivo solo in c limi temperati [ non tropicali ].
Non utilizzare q uesto dispositivo ad altitudini s uperiori ai 2.000 metri sopra il li vello del mare.
Utilizzare questo dispositivo solo in ambienti chiusi, non all’aperto o in ambienti umidi.
Per evitare il rischio di incendi o scosse elettriche, non esporre l’apparecchio alla pioggia o a condizioni di umidità.
Non utilizzare l’apparecchio in prossimità dell’acqua.
Non esporre l’apparecc hio a gocce o schizzi.
Le variazioni di temperatura causano la formazione di condensa [ goccioline di acqua ] nel dispositivo. Attendere che l’umidità sia evaporata prima
di accendere l’apparecchio [ minimo 3 ore ].
Non posizionare oggetti pieni di liquidi sul dispositivo [ es. vasi ].
Non posizionare fia mme libere, come candele acce se, sopra o vicino all’apparecchio.
Non posizionare il dispositivo in prossimità di fonti di calore come termosifoni, accumulatori di calore, stufe o altri apparecchi [ compresi amplificatori ]
che irradiano calore.
Evitare l’esposizione alla luce solare diretta.
Mantenere uno spa zio libero di almeno 5 cm intorno all’appar ecchio.
Non ostacolare in a lcun caso la funzione protettiva d i spine polarizzate o con mes sa a terra: una spina polarizz ata ha due contatti, uno dei quali è pi ù
largo dell’altro. Una spina c on messa a terra è dotata di terzo contat to per la messa a terra. Il contatto la rgo o il terzo contatto in dotazion e servono
a garantire la sicure zza dell’utente. Se la spina non si inser isce nella propria presa ele ttrica, contattare un elet tricista per sostituire la pres a obsoleta.
Per evitare scosse el ettriche, collegare la spin a di alimentazione solo a pre se o prolunghe in cui i poli possan o essere inseriti completa mente,
per evitare contat ti esposti.
Non toccare mai il cavo di se gnale o di alimentazione c on le mani bagnate.
Non calpestare il c avo di alimentazione e non schi acciarlo, soprattutto non nel la zona delle spine, delle prese e ne l punto in cui il cavo esce
dall’apparecchio.
Negli apparecc hi senza interruttore di rete, in cui la s pina o l’ingresso di alimentazi one del dispositivo servon o da interruttore, la spina del cavo
di rete o l’ingresso di alime ntazione devono essere faci lmente accessibili.
In caso di temporale o di m ancato utilizzo per periodi di te mpo prolungati, scollegare il d ispositivo dalla rete di alimenta zione.
Per scollegare com pletamente il dispositivo dall’alime ntazione elettrica, es trarre il cavo di alimentazion e dalla presa a muro.
Spegnere sempre l’appar ecchio prima di collegare o sc ollegare i cavi.
Per estrarre i cavi tir are sempre tenendo in mano la spin a e non i cavi.
Installare il dispositivo in conformità con le istruzioni del produttore.
Scegliere sempre una superficie piana. Il dispositivo deve essere posizionato perpendicolarmente.
ATTENZIONE
Rischio di scosse elettriche.
Non aprire!
ATTENZIONE:
Per evitar e incendi o sco sse elettr iche non apr ire il dispos itivo.
Il dispositivo non contiene componenti regolabili o riparabili
dall’utente. Fare eseguire lavori di manutenzione e
riparazione esclusivamente da personale tecnico qualificato
[
personale di assistenza ].
ATTENZIONE
Pericolo di morte!
ATTENZIONE:
Non ingerire la batteria a bottone [ batteria ].
Pericolo di ustioni chimiche interne.
Sussiste il pericolo di morte!
ATTENZIONE
Pericolo di esplosione!
ATTENZIONE:
Batterie al litio sostituibili! In caso di sostituzione
scorretta sussiste il pericolo di esplosione.
Sostituire le batterie solo con prodotti identici
o dello stes so tipo.
DS_Betriebsanleitung_911_Soundbar_210x148mm_RZ_v10.indd 126-127 09.11.15 09:43
Page 66
[
IT ] Soundbar 911
128
|
129
Nota
Non esercitare pressione sugli elementi di comando, i collegamenti e i cavi.
Il dispositivo deve es sere allacciato solo alla tensio ne e con la frequenza indicate sul l’apparecchio o sulla targhetta id entificativa.
Non inserire ogget ti o parti del corpo nelle ap erture dell’apparecchio, in quanto s i potrebbero toccare o danneggia re i componenti elettrici al l’interno
dell’alloggiamento. Ciò p uò provocare cortocircuiti, scos se elettriche e incendi.
Utilizzare solo fis saggi e accessori approvati da l produttore e/o forniti insieme al dis positivo.
Utilizzare solo carrelli, supporti, treppiedi, staffe o tavoli che soddisfino tutti i requisiti indicati nelle istruzioni di sicurezza.
Se si utilizza un c arrello, spostare delicatam ente il gruppo carrello/apparecc hio per evitare danni e lesio ni dovute al ribaltamento.
Pulire l’appare cchio solo con un panno pulito e asc iutto.
Per la pulizia non utili zzare sostanze aggressive, a ba se di alcol o abrasive.
Per evitare scosse elettriche non aprire il dispositivo! Il dispositivo non contiene componenti regolabili o riparabili dall’utente.
Contattare il Ce ntro Porsche per tutti i lavori di ripa razione e manutenzione. Ciò è n ecessario se l’apparecchio ris ulta danneggiato, come ad esemp io
in caso di danni ai c avi o alle spine, qualora liquidi o o ggetti siano penetrati nel dis positivo, nel caso in cui l’apparecchio s ia stato esposto a pioggia o
umidità, non funzioni correttamente o sia caduto.
Non apportare modifiche al dispositivo o agli accessori. Le modifiche non autorizzate possono influire sulla sicurezza, la conformità ai requisiti di
legge o le prestazioni. In questo caso può inoltre estinguersi l’approvazione/garanzia dell’apparecchio.
Qualora durante la riproduzione si notino distorsioni del suono quali picchiettii innaturali, colpetti o clic ad alta frequenza, ridurre immediatamente il
livello del volume.
Per evitare possibili danni all’udito si consiglia di non tenere alto il volume per un periodo di tempo prolungato. Interrompere la riproduzione
se si sentono fischi o sq uilli nelle orecchie o si ha l’impres sione di non essere più in grado d i percepire i toni alti [ anche brevemente ].
Tenere le batterie nuove e usate f uori della portata dei bam bini. Non utilizzare i disposi tivi in cui il vano batterie non può p iù essere chiuso in modo
sicuro e tenerli lontani dai bambini.
Il telecomando fornito con questo apparecchio contiene una batteria a bottone. L’ingestione della batteria può causare gravi ustioni interne e quindi
la morte in sole 2 ore!
Qualora si sospetti che la batteria sia stata ingerita o introdotta in altri orifizi anatomici, si consiglia di consultare immediatamente un medico.
Rispettare l’ambiente d urante lo smaltimento della batte ria. Smaltire le batterie pres so un punto di raccolta autorizzato.
Non esporre le batterie ad alte temperature, come alla luce solare diretta, fuoco o simili.
Inserire le batterie rispettando la corretta polarità. L’inserimento non corretto può causare danni.
Utilizzare sol o le pile o batterie ricaricab ili specificate per il disposi tivo.
Le pile in dotazion e non sono batterie ricaric abili, pertanto non devono ess ere ricaricate.
L’apparecchio e/o l’imballag gio possono contenere picco le parti che potrebbero esse re ingerite, pertanto non sono ad atti all’uso
da parte di bambin i di età inferiore ai tre anni.
Questo simbolo indica tensioni pericolose non isolate presenti all’interno dell’alloggiamento con una potenza sufficiente [ ampiezza ]
a causare un incen dio o scosse elettriche.
Questo simbolo indica importanti istruzioni operative e di manutenzione nella documentazione in dotazione [ manuale ].
Questo simbolo in dica apparecchi con class e di protezione II, per i quali è garantita l a protezione contro le scosse elet triche, in caso di
utilizzo corret to, grazie a un isolamento doppio o ri nforzato e per i quali non occorre p ertanto alcun conduttore di te rra.
IMPORTANTI ISTRUZIONI DI SICUREZZA
DS_Betriebsanleitung_911_Soundbar_210x148mm_RZ_v10.indd 128-129 09.11.15 09:43
Page 67
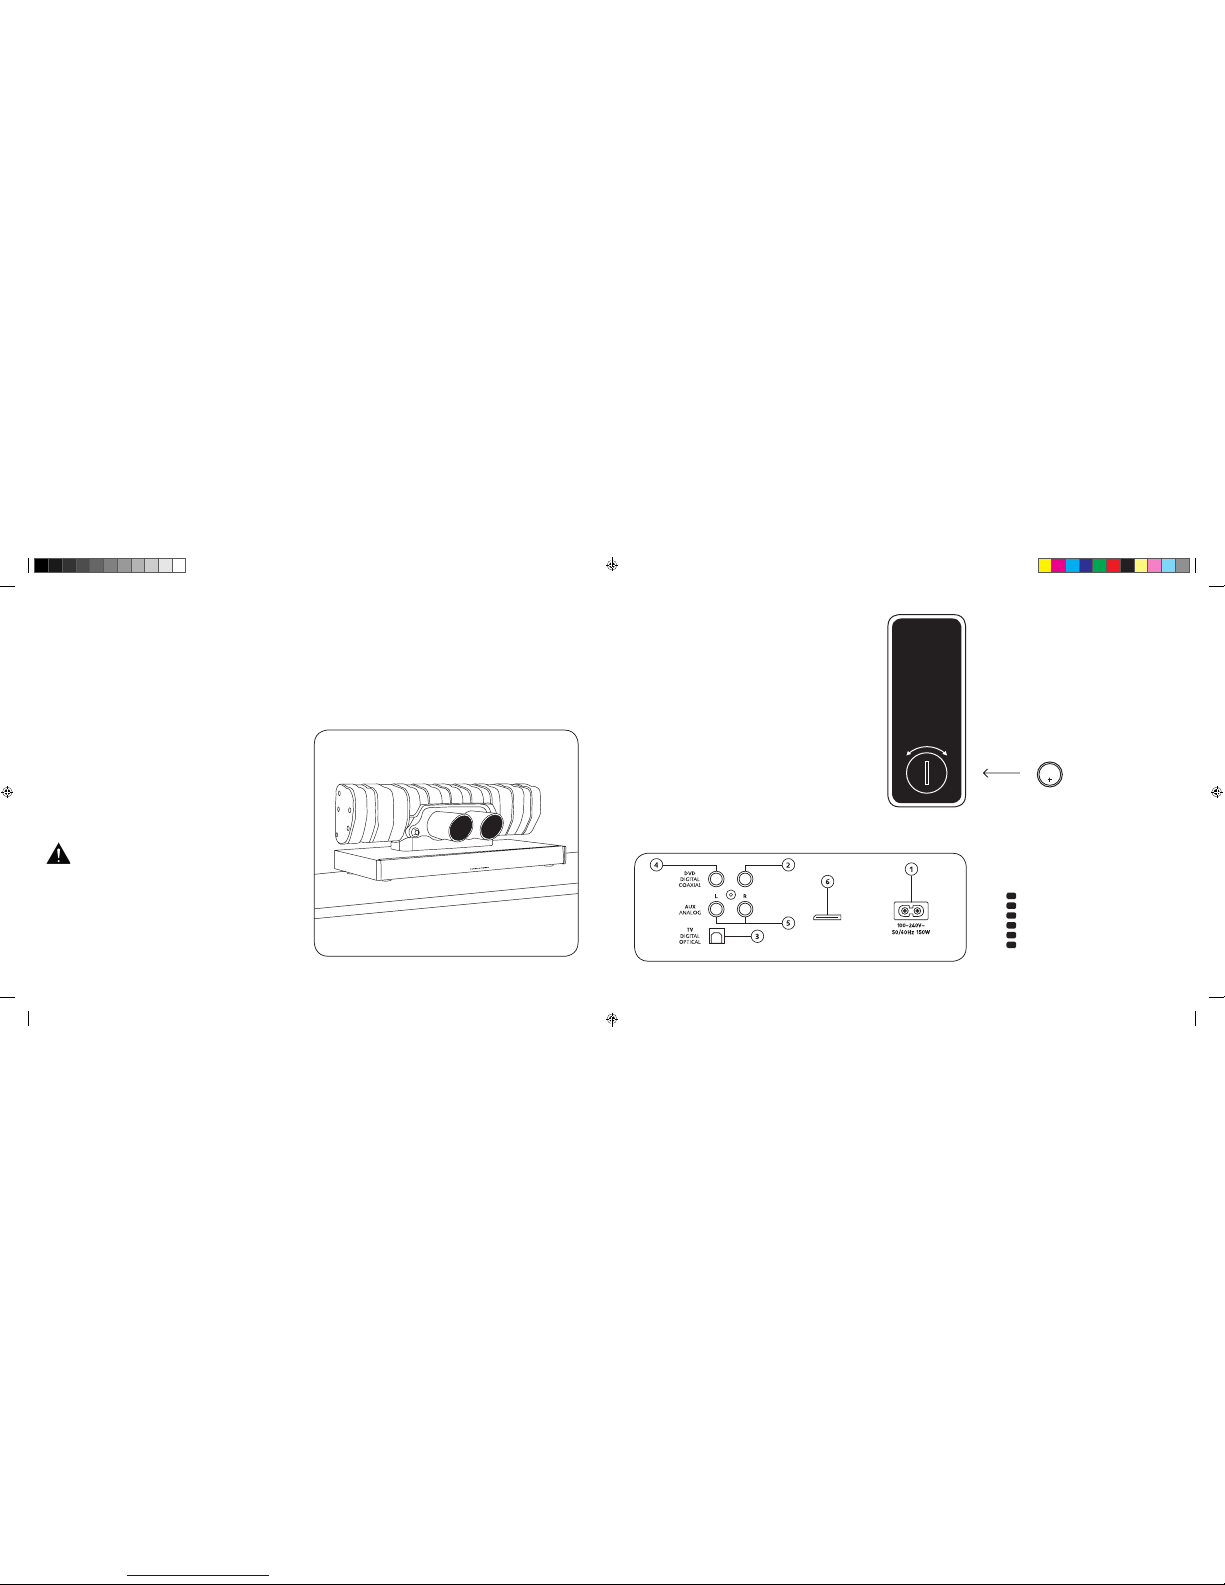
[
IT ] Soundbar 911
130
|
131
COLLEGAMENTI
SOUNDBAR 911
1
Ingresso alimentazione elettrica
2
Uscita – subwoofer esterno
3
Ingresso – TV [ ottico
]
4
Ingresso – DVD [ coassiale
]
5
Ingresso – AUX [ analogico
]
6
Presa di servizio
MESSA IN FUNZIONE
DEL TELECOMANDO
La batteria in dotazione è già inserita nel telecomando.
Per mettere in funzi one il telecomando basta solo r imuovere
la pellicola protet tiva. Quando si inseriscon o nuove batterie
assicurarsi di rispettare le polarità [ +/- ]. Utilizzare sol o batterie
adatte a questo sistem a e indicate come tali [ CR 2032 ].
Nota: La batte ria in dotazione è destinata al l’uso di prova e
può quindi avere una du rata ridotta.
TERMINALE DI
COLLEGAMENTO
Soundbar 911
SUB OUT
Service
Telecomando
[ retro ]
INSTALLAZIONE
Posizionare la Soundbar 911 su una superficie piana.
APERTURA DELLA
CONFEZIONE
Aprire con cautela la scatola e controllare che
siano presenti tutti i seguenti componenti:
1 Soundbar 911
1 telecomando inclusa batteria
4 cavi di rete [ 1 per UE, UK, USA, AUS
]
1 cavo audio digital e ottico
1 cavo RCA stereo
1 cavo RCA digitale
AVVIO
Fase di avvio che pe rmette di sviluppare la massi ma qualità
del suono: 15-20 ore di funzionam ento.
– In tale periodo consigliamo di ascoltare musica a volume normale
– Evitare livelli so nori estremamente elevati
– Ascoltare vari tipi di materiale sonoro
CR 2032
APERTO CHIUSO
Ogni Soundbar 911 è un pezzo unico. Il si lenziatore
della Porsche 911 GT3 integrato nella Sound bar 911
è prodotto secondo u n regolare procedimento di
lavorazione di serie. Per sottolineare l’autenticità,
saldature e decol orazioni dovute al processo d i
saldatura sono lasciate volutamente visibili.
Per
questo motivo non poss iamo accettare reclami
relativi
all’estetica della superficie del silenziatore
[
cordoni di saldatu ra, colori di rinvenimento, deco -
lorazioni,
spruzzi di sal datura, ecc. ]. Grazie per la
gentile
comprensione.
DS_Betriebsanleitung_911_Soundbar_210x148mm_RZ_v10.indd 130-131 09.11.15 09:43
Page 68
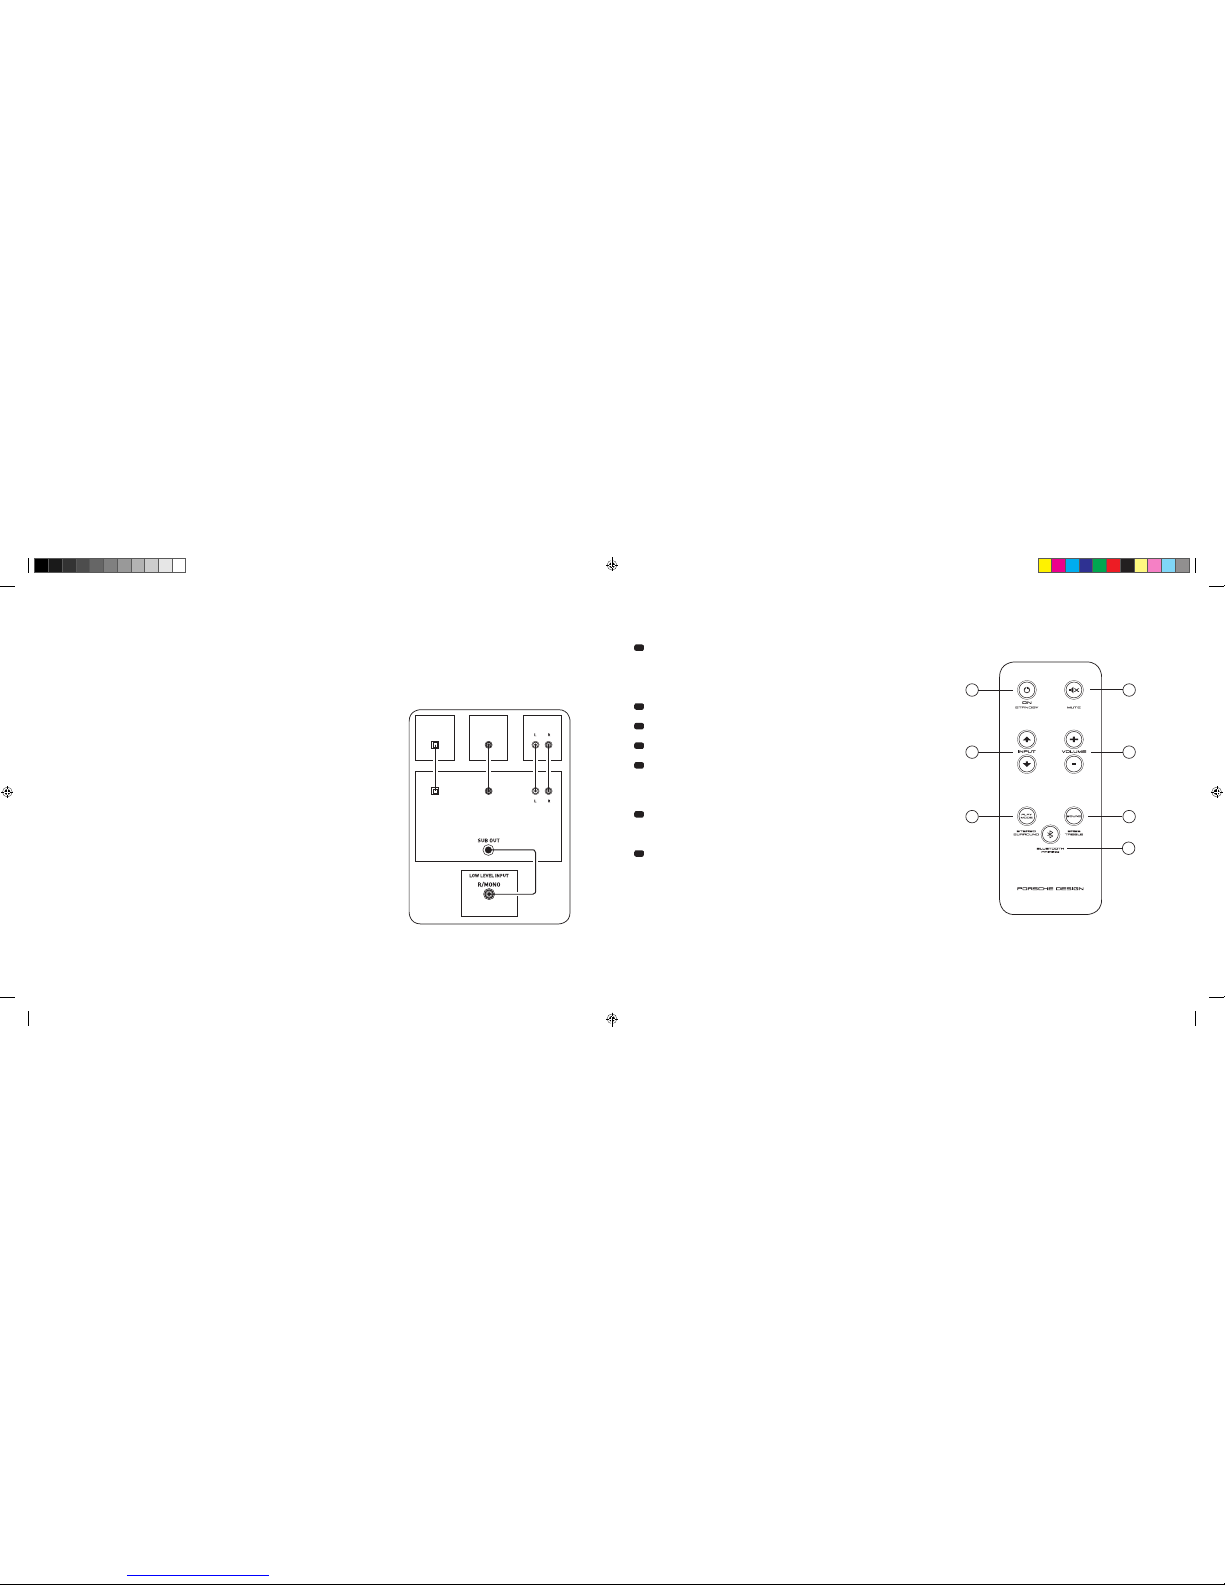
[
IT ] Soundbar 911
132
|
133
COLLEGAMENTO
Prima di collegare l’apparecchio assicurarsi che tutti i componenti elettrici siano spenti. La Soundbar 911 dispone di 3 ingressi selezionabili. In linea
di principio è suf ficiente connettere uno deg li ingressi al televisore e colle gare tutte le altre utenze al televiso re. Per ottenere una migliore riprod uzione
sonora, si consig lia di collegare ricevitore sate llitare, lettore DVD o Blu-ray diretta mente alla Soundbar 911. A seconda della natura e delle ca ratteristiche
della fonte utilizzata, è possibile scegliere tra le seguenti possibilità:
UTILIZZO
Telecomando
1
Power
ON – La spia LED è verde [ apparecchio acceso ]
Stand-by
– La spia LED è rossa [ apparecchio in stand-by
]
La Soundbar 911 è scollegata
dalla rete elettri ca – La spia LED è spenta [ apparecchio spento
]
2
Mute [ modalità silenziosa
]
3
Input [ selezione sorgente sonora
]
4
Volume [ regolazione volume
]
5
Play Mode [ riproduzione ]
Stereo – Per la riproduzione musicale
Surround – Audio surround virtuale per la riproduzione del
sistema home cinema
6
Sound [ impostazioni audio ]
Bass – Regolazione tramite il tasto Volume [ +6... – 6 dB
]
Treble
– Regolazione tramite il tasto Volume [ +6... –6 dB
]
7
Collegamento Bluetooth®
Per connettersi a una sorgente abilitata all’utilizzo della tecnologia wireless
Bluetooth
®
Funzione Memory
Dopo una temporanea separazione dalla rete di alimentazione, la Soundbar 911 passa
automaticamente al lo stato selezionato più di recente. Tutte le impost azioni [ es. ON/
OFF, volume ] rimangono invariate.
SUB
DIGITAL MOVIE
DVD
DVDTV
TV
AUX
AUX
TV – ingres so digitale [ OTTICO
]
I televisori moderni dispongono di un’uscita audio ottica [ Toslink ]. Collegarla con l’ingresso
contrassegnato co n «TV» della Soundba r 911. Questo co llegamento assicura il trasfe rimento
ottimale del segnale e un’ottima qualità acustica.
Attenzione: Rimuovere i cappucci d i protezione del cavo ottico in dotazi one!
DVD – ingress o digitale [ C OASSIALE
]
Per trasferire il segnale audio del DVD, è necessario collegare l’uscita coassiale digitale
del lettore Blu-ray o DVD a lla presa contrassegnata co n «DVD» della Soundbar 911.
Per trasmettere il se gnale dell’immagine, il lettore DVD deve e ssere anche collegato
al televisore. L’ingresso della Soundb ar 911 c ontrassegnato con «DVD» può ess ere
selezionato anche se il televisore non dispone di uscita ottica.
AUX – ingresso analogico
Qualora l’apparecchio TV fosse dotato solo di uscita audio «pre-out», collegarla tramite
il cavo RCA stereo scher mato all’ingresso analogico dell a Soundbar 911 contrassegnato
con «AUX». Questo ingresso vi ene altrimenti utilizzato pe r collegare i videoregistrator i o
le consolle di gioco.
SUB – uscita analogica
Questa uscita si u tilizza per collegare un su bwoofer esterno. SUB OUT non è attivo pe r
impostazione predefinita e deve essere attivato tramite il telecomando. Vedi «Funzioni audio
avanzate» a pagina 136.
4
ON
STANDBY
1
3
5 6
7
2
DS_Betriebsanleitung_911_Soundbar_210x148mm_RZ_v10.indd 132-133 09.11.15 09:43
Page 69
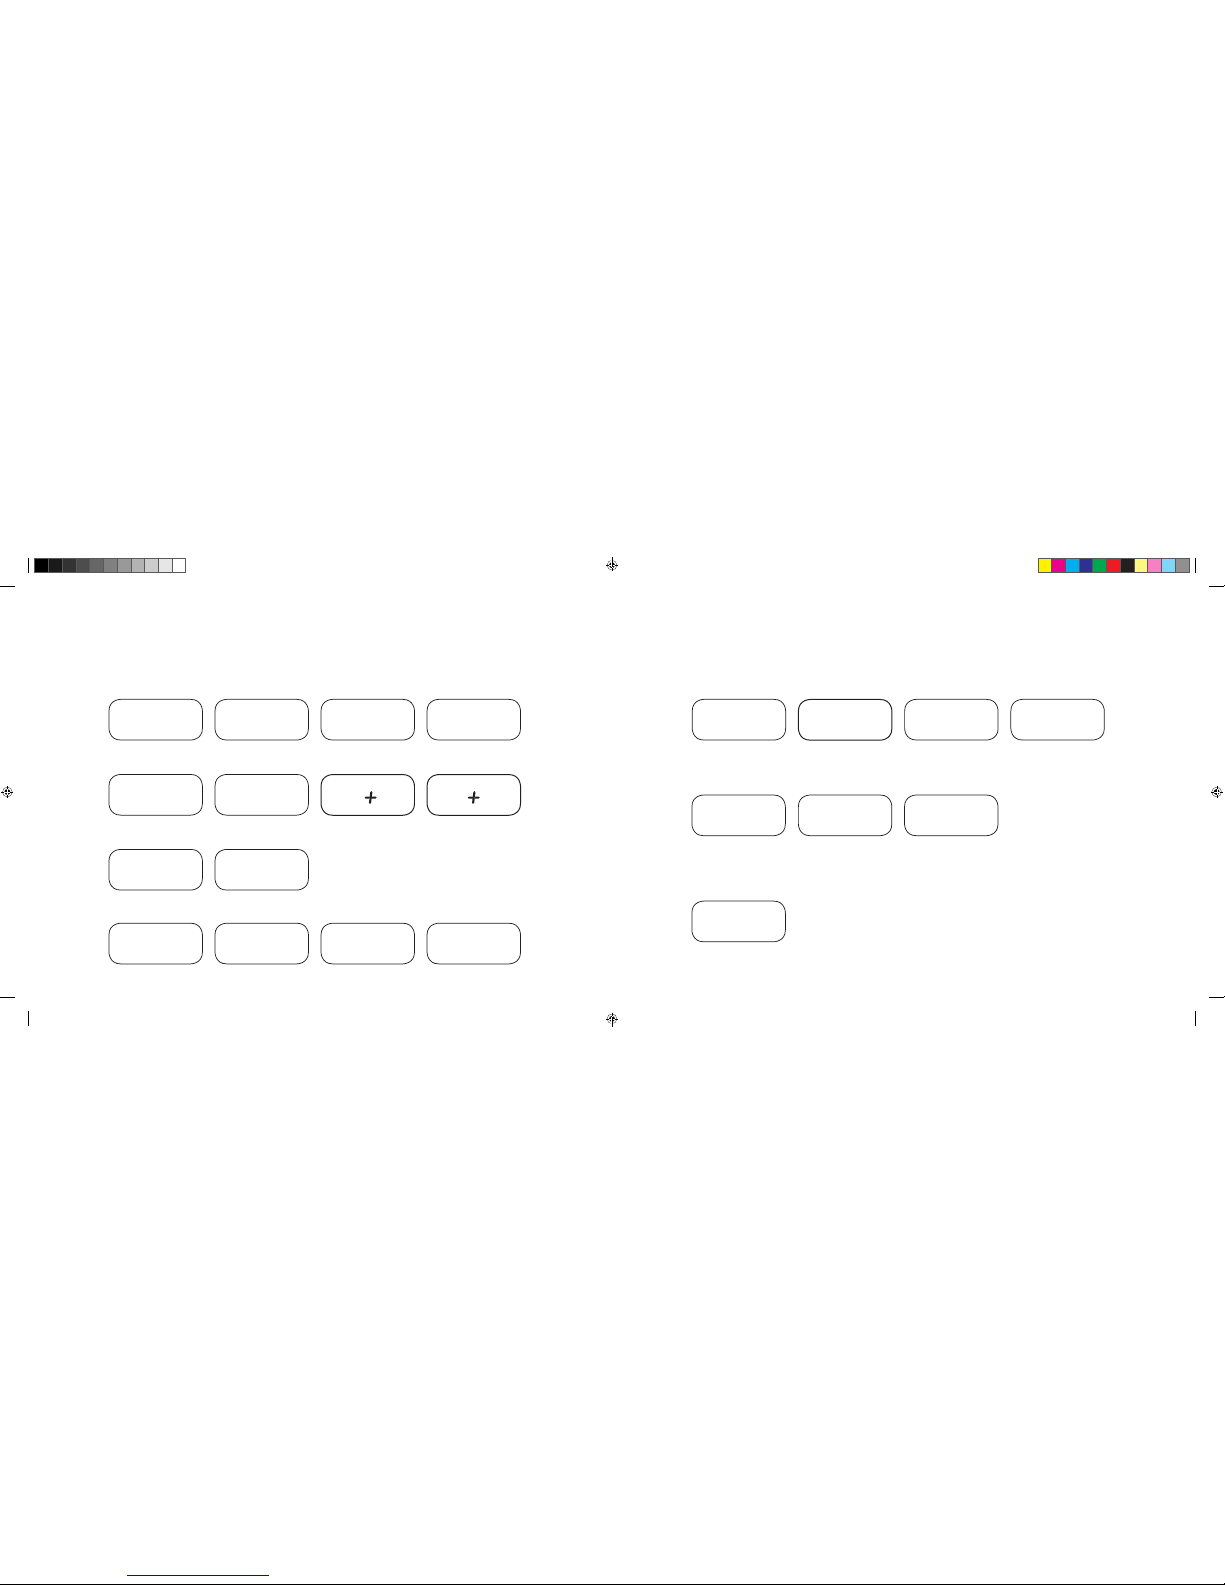
[
IT ] Soundbar 911
134
|
135
DISPL AY
La Soundbar 911 dispone di un display multifunzione che si illumina per circa 5 secondi ogni volta che un comando viene inviato dal telecomando.
I principali indi catori e i relativi significati son o elencati qui. La modalità sta nd-by della Soundbar 911 è indicata da un LED rosso, ment re quando la
Soundbar 911 è in funzione la spia d iventa verde.
Ingresso
Soundmode
Riproduzione
Ingresso TV [ ottico ]
TV
Volume
[
0 – 99
]
V30
Stereo
ST
Modalità collegamento
BTP
Ingresso DVD [ coassiale ]
DVD
Silenzioso
[
Mute
]
---
Surround
SUR
Connessione stabilita
CON
Ingresso AUX [ analogico
]
AUX
Regolazione dei bassi
[
+/– 6
]
B 6
Connessione interrotta
DIS
Bluetooth
®
BT
Regolazione degli alti
[
+/– 6
]
T 6
Errore
FAI
Bluetooth
®
Funzioni di impostazione
Attivazione/disattivazione
accensione automatica per
ingresso ottico e coassiale
AUT
Attivazione/disattivazione
selezione automatica
ingresso BT
SEL
Attivazione/disattivazione
stand-by ECO
ECO
Funzione di apprendimento a infrarossi
Apprendimento di
codici a infrarossi
IRL
Funzioni audio avanzate
Ritardo riproduzione audio
[
LipSync
]
LIP
Attivazione/disattivazione
SUB OUT
SUB
Attivazione/disattivazione
Dolby Dynamic Range
Compression
DRC
Selezione posizionamento
EQ
DS_Betriebsanleitung_911_Soundbar_210x148mm_RZ_v10.indd 134-135 09.11.15 09:43
Page 70

[
IT ] Soundbar 911
136
|
137
FUNZIONI AUDIO AVANZATE
Il menu per le funzi oni audio avanzate offre la poss ibilità di intervenire in caso d i riproduzione
audio non sincron izzata, abilitare l’uscita via cavo p er un subwoofer esterno, regolare il s uono
in base al posizionamento selezionato, nonché attivare/disattivare la funzione Dolby «Dynamic
Range Compression».
Tenendo premuto il tasto «Soun d» del telecomando per più di 3 se condi, si passa al menu
«Funzioni audio avan zate» e il display della Soundbar 911 visualiz za
LIP
.
Con i tasti «Volume +/–» si può ritar dare il suono a scatti di 10 ms per adegua rlo
alle immagini «in ritardo».
Premendo nuovame nte il tasto «Sound» il display passa a
SUB
.
Con i tasti «Volume +/–» si può attiva re/disattivare l’uscita per il subwoofer es terno.
Attenzione: Con SUB OU T attivato la riproduzione audio d ella Soundbar è limitata a 80 Hz.
Le frequenze infer iori agli 80 Hz vengono inviate al subwo ofer esterno.
Premendo nuovame nte il tasto «Sound» il display passa a EQ.
Con i tasti «Volume +/–» si può ora sce gliere fra tre impostazioni d ell’equalizzatore e adeguare
la riproduzione alla posizione dell’apparecchio.
EQ1
per posizionare la Soundbar 911 ad esempio su una credenza.
EQ2
per un’installazione a parete con TV a schermo piatto.
EQ3
per un posizionamento della Soundbar 911 su uno scaffale o un ripiano.
Premendo nuovame nte il tasto «Sound» il display passa a
DRC
.
«Dynamic Range Compression» è un’opzione di regolazione di Dolby Laboratories.
Quando viene attivata permette di ridurre automaticamente la gamma dinamica dei
flussi di dati codifi cati Dolby, minimizzando così le dif ferenze di volume. I suoni debo li
vengono alzati e que lli alti abbassati.
Con i tasti «Volume +/–» si può attiva re/disattivare la funzione
DRC
.
Premendo nuovame nte il tasto «Sound» il display passa a
VOL
.
Con la funzione [ protettiva ] «Volume» è possibile limitare il livello massimo del volume,
vale a dire il volume [ visibile nel display ] non può essere alz ato più del valore impostato.
Con i tasti «Volume +/–» è possibil e impostare il volume desidera to.
[
0–99, in cui 99 è il m assimo ].
LIP
SUB
ON OFF
EQ
EQ1 EQ2 EQ3
DRC
ON OFF
VOL
0 99
…
DS_Betriebsanleitung_911_Soundbar_210x148mm_RZ_v10.indd 136-137 09.11.15 09:43
Page 71

[
IT ] Soundbar 911
138
|
139
RIPRODUZIONE CON TECNOLOGIA BLUETOOTH
®
Requisiti per il collegamento
– La fun zione Bluetooth® deve essere abilitata sul
dispositivo mobile.
– Il dispo sitivo mobile deve supporta re almeno lo
standard Bluetooth® 2.0.
– Il dispo sitivo mobile deve trovarsi entro la po rtata
della Soundbar 911 [ max. 10 m ].
Procedimento di collegamento
– Selezionare l’ingresso BT.
– Premere il tasto «Blue tooth® Pair ing».
– Sul display appare
BTP
.
– Ora si ha nno a disposizione 30 second i
per collegare il dispositivo mobile.
– Avvia re la ricerca sul dispositivo mo bile.
– Selezionare
911 SOUNDBAR
come dispositivo
di riproduzione.
– La connessione si crea automaticamente dopo la
conferma e sul disp lay viene visualizzato
CON
.
– Se la connessione non è riuscita, viene visualizzato
il messaggio
FAI
.
– Se il dispositivo mobile richiede un codice di
accesso, digitare 0000.
– Se il disp lay visualizza
DIS
, il dispositivo mobile
è fuori portat a o spento.
Utilizzo di un dispositivo mobile
– Il dispo sitivo collegato più di recente con l a
Soundbar 911 stabilisce automaticamente la
connessione, a condizione che la funzione
Bluetooth® sia attivata e sia stato selezionato
l’ingresso per la riproduzione tramite Bluetooth®.
In tal caso appari rà
CON
.
– Avviando la riproduzione dei file multimediali
sul proprio dispositivo mobile, il suono verrà
auto matic amente emesso dalla Soundb ar 911.
Nota: La Soundbar 911 può connettersi a un massimo
di 3 apparecchi Bl uetooth®. Vedi anche «Selezione
automatica dell’ingre sso BT» a pagina 142.
BT
BTP
CON FAI
BLUETOOTH
PAIRING
911
SOUNDBAR
Premendo nuovame nte il tasto «Sound» il display passa a
VOI
.
Utilizzare la funzione «Voice» per aumentare l’intelligibilità del parlato sia in modalità Stereo
che Surround. In que sto modo si possono capire megli o ad esempio i dialoghi [ lingua ] dei
film con forti ef fetti sonori.
Con i tasti «Volume +/–» si può attiva re/disattivare la funzione «Voice» [ ON o OFF ].
Premendo nuovame nte il tasto «Sound» il display torna al men u iniziale
LIP
.
Uscire dal menu
Premendo nuovame nte il tasto «Sound» per oltre 3 secondi s i esce dal menu
«Funzioni audio avanzate».
Se la Soundbar 911 non riceve coman di per oltre 30 secondi dal telec omando,
il menu torna automaticamente alla modalità normale.
LIP
SUB
ON OFF
EQ
EQ1 EQ2 EQ3
DRC
ON OFF
VOL
0 99
VOI
ON OFF
…
DS_Betriebsanleitung_911_Soundbar_210x148mm_RZ_v10.indd 138-139 09.11.15 09:43
Page 72

[
IT ] Soundbar 911
140
|
141
Quando questa f unzione è attivata [ ON ], il dispositivo ril eva un segnale presso l’ingresso otti co o coassiale. Se viene rilevato un s egnale
[
es. accensione d el dispositivo sorgente ], la Soundbar 911 si accende automati camente. Se all’ingresso non viene ri levato alcun segnale
[
es. spegnendo il d ispositivo sorgente ], la Soundbar 911 passa automaticam ente in modalità stand-by dopo 30 se condi. Se questa funzione
è disattivata [ OFF ], la Soundbar 911 deve essere acces a o spenta manualmente.
Al momento della co nsegna, questa funzione è di sattivata
[
OFF ].
Per attivare/disatti vare questa funzione proced ere come segue:
1
Mentre l’appare cchio è acceso premere e tenere p remuto il tasto «Play
Mode» per più di 3 se condi, finché sul display viene v isualizzato
AUT
.
2
Premen do il tasto «Volume +» si attiva la funzione
[
ON ].
3
Premen do il tasto «Volume -» si disattiva la funzione
[
OFF ].
4
Per uscir e dal menu premere nuovamente il tas to «Play Mode» per
più di 3 secondi. Se no n viene dato alcun comando entro 10 secon di,
il dispositivo esc e automaticamente dal menu di confi gurazione.
Nota: L’accensione/Lo s pegnimento automatico funzio na solo sull’ingresso digitale ot tico e coassiale. Se si mette il dis positivo in stand-by con il tasto
«ON/Standby», la funzione di accensione automatica non è disponibile.
Il dispositivo rileva un segnale solo all’ingresso digitale selezionato. Un segnale presente in un altro ingresso digitale rispetto a quello selezionato non può
essere rilevato.
FUNZIONI DI IMPOSTAZIONE
ACCENSIONE E SPEGNIMENTO AUTOMATICO [ AUT
]
1
Mentre l’appare cchio è acceso premere e tenere p remuto il tasto «Play Mode» per più di 3 sec ondi, finché sul display viene v isualizzato
AUT
.
2
Premere d i nuovo il tasto «Play Mode» finché il disp lay visualizza
ECO
.
3
Premendo il tasto «Volume +» si attiv a la funzione
[
ON ].
4
Premen do il tasto «Volume -» si disattiva la funzione
[
OFF ].
5
Per uscir e dal menu premere nuovamente il tas to «Play Mode» per più di 3 secondi. Se non v iene dato alcun comando entro 10 secon di,
il dispositivo esc e automaticamente dal menu di confi gurazione.
STAND-BY ECO [ ECO
]
Quando viene at tivata questa funzione [ ON ], l’apparecchio passa a utomaticamente in stand-by ECO se non r ileva alcun segnale all’ingresso s elezionato
per oltre un’ora. Se questa fu nzione è disattivata [ OFF ], la Soundbar 911 deve essere spenta m anualmente.
Al momento della co nsegna, questa funzione è at tivata
[
ON ].
Per attivare/disatti vare questa funzione proced ere come segue:
Nota: Questa funzione si disattiva automaticamente quando viene attivata la funzione AUT.
DS_Betriebsanleitung_911_Soundbar_210x148mm_RZ_v10.indd 140-141 09.11.15 09:43
Page 73
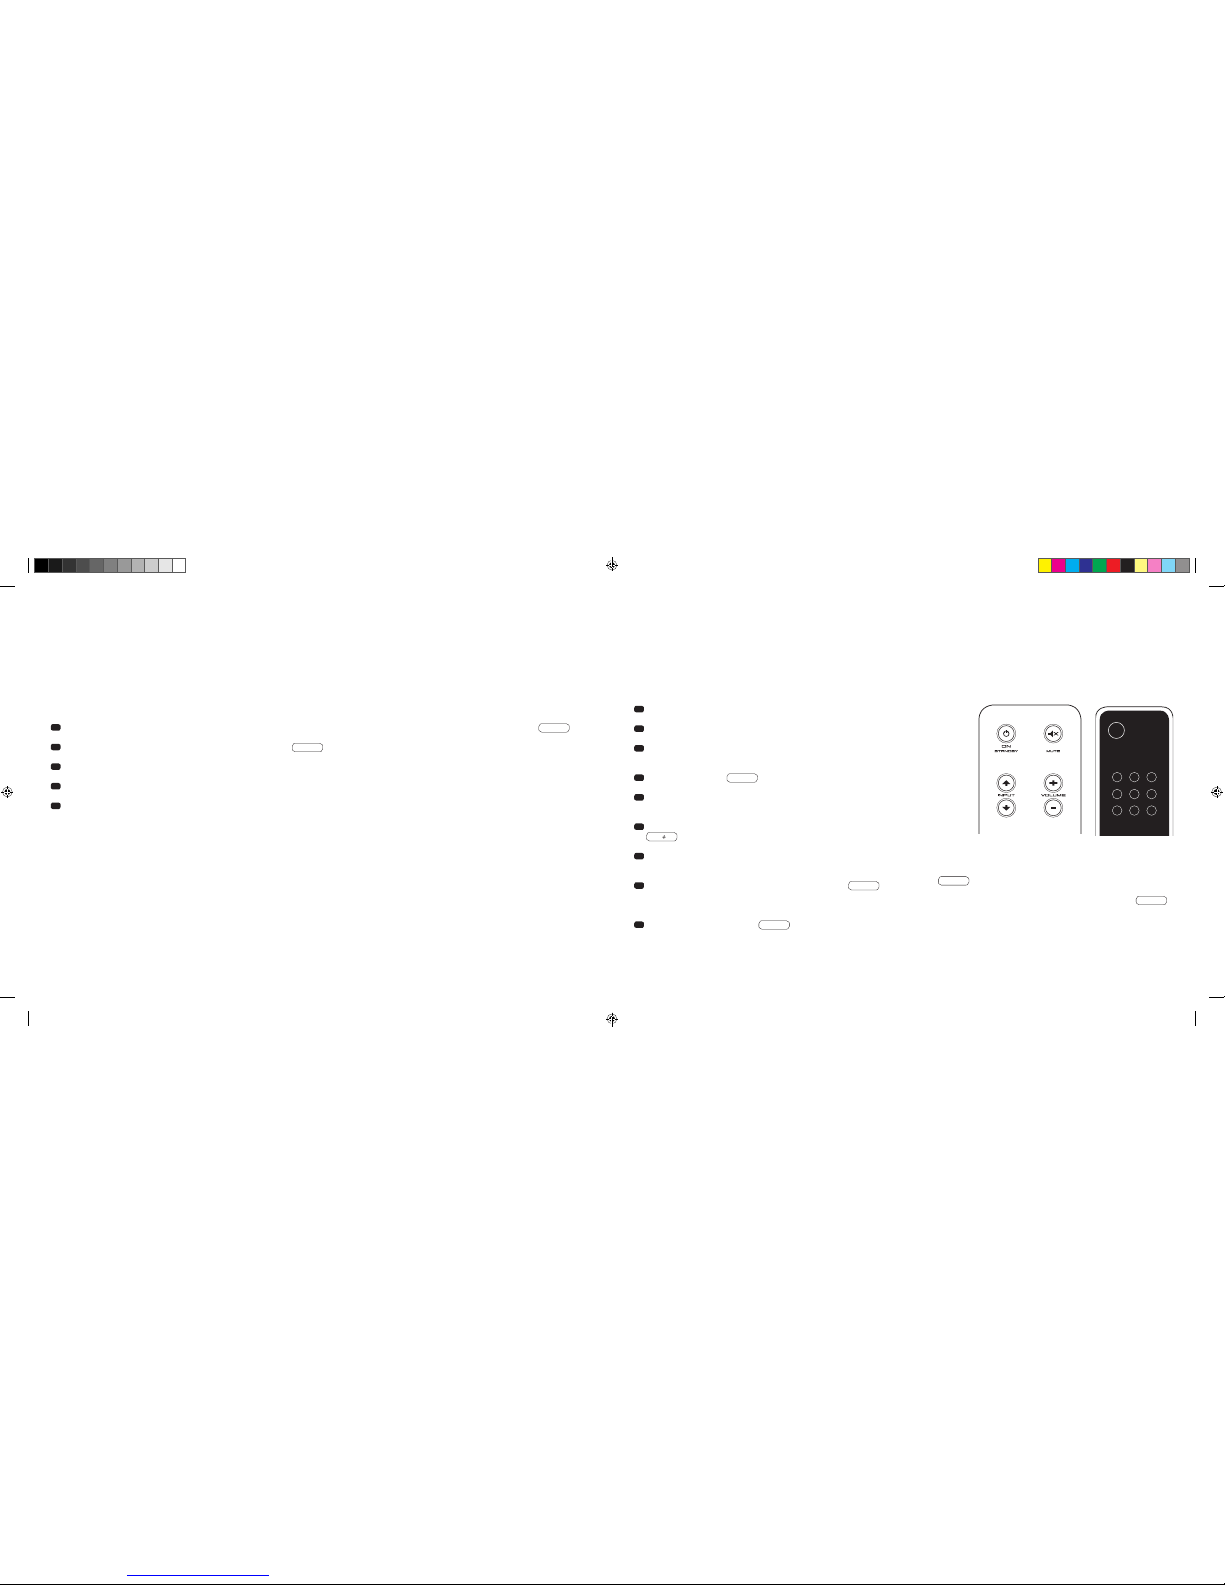
[
IT ] Soundbar 911
142
|
143
SELEZIONE AUTOMATICA DELL’INGRESSO BT
[
SEL ]
Quando viene at tivata questa funzione [ AUT ], la Soundbar 911 passa automaticam ente all’ingresso BT non appena ril eva un segnale audio del
dispositivo mobi le. Se questa funzione è disatt ivata [ MAN ], l’ingresso deve esser e selezionato manualmente.
Al momento della co nsegna, questa funzione è di sattivata
[
MAN ].
Per attivare/disatti vare questa funzione proced ere come segue:
Nota: A seconda del dis positivo mobile utilizzato, con il s istema automatico attivato, la Soundba r 911 p uò passare all’ingresso BT anche du rante
la digitazione di un messaggio o in caso di riproduzione di altri suoni di sistema.
Quando la funzi one SEL è abilitata [ AUT ] non può più essere s elezionato l’ingresso BT con il tasto «Inpu t». In questa modali tà la Soundbar 911 può
essere associata al dispositivo mobile indipendentemente dall’ingresso del segnale selezionato.
1
Mentre l’apparecchio è ac ceso premere e tenere premuto il tas to «Play Mode» per più di 3 secondi, finc hé sul display viene visualiz zato
AUT
.
2
Premere d i nuovo il tasto «Play Mode» finché il disp lay visualizza
SEL
.
3
Premendo il tasto «Volume +» si attiv a la funzione
[
AUT ].
4
Premen do il tasto «Volume -» si disattiva la funzione
[
MAN ].
5
Per usci re dal menu premere nuovamente il ta sto «Play Mode» per più di 3 secondi. Se n on viene dato alcun comando ent ro 10 secondi,
il dispositivo esc e automaticamente dal menu di con figurazione.
FUNZIONE DI APPRENDIMENTO A INFRAROSSI
La Soundbar 911 può memorizzare il codice a infrarossi del telecomando del televisore, permettendo di controllare con un solo telecomando le
funzioni della S oundbar 911 e del televisore. In questo modo i comandi d ella Soundbar 911 possono essere assegnat i a qualsiasi tasto del telecoman do
del televisore. Assicurarsi tuttavia che i comandi della Soundbar 911 e del televisore non siano in conflitto. Si consiglia di disattivare gli altoparlanti
interni del televis ore dopo aver collegato la Soundbar 911.
1
Tenere pronto il telecomando del televisore.
2
Accend ere la Soundbar 911.
3
Premere il tasto «ON/Standby» del telecomando Porsche per circa
5 secondi.
4
Nel display lampeggia
IRL
.
5
Premere la funzione desiderata sul telecomando Porsche, ad esempio
«Volume +».
6
Sul display lampeggia ora la funzione selezionata, ad esempio
V
.
7
Premere entro 20 secondi il tasto del telecomando del televisore da
assegnare alla funzione.
8
Se la trasmissione è riuscita, sul display viene visualizzato OK e
si può continuare con la programmazione della funzione successiva,
ad esempio «Volume –».
9
Se sul display viene visualizzato
FAI
, la trasmissione non è riuscita
ed è necessario ripetere i passaggi da 5 a 8.
Telecomando TV
ON
STANDBY
Nota: Il tasto «ON/Standby» rosso del telecomando Porsche ha
una doppia funzione. Premendolo una volta, sul display apparirà
ON
e potrà essere memorizzata la funzione di accensione.
Premendo due volte in rapida successione il tasto rosso «ON/
Standby» del telecomando Porsche, apparirà sul display
STB
e potrà essere memorizzata la funzione di stand-by/spegnimento.
Se il telecomando TV disponesse solo di un tasto per il comando
«accensione» e «spegnimento», devono essere in ogni caso
assegnate entrambe le funzioni, «ON» e «stand-by», a questo
comando.
DS_Betriebsanleitung_911_Soundbar_210x148mm_RZ_v10.indd 142-143 09.11.15 09:43
Page 74

[
IT ] Soundbar 911
144
|
145
Uscire dal menu
Premendo nuovamente il tasto «ON/Standby» per oltre 5 secondi si esce dal menu «Funzione di apprendimento a infrarossi». Se la Soundbar 911 non
riceve comandi per oltre 60 secondi dal telecomando, il menu torna automaticamente alla modalità normale.
Selezione diretta degli ingressi del segnale
Oltre che con il tasto «Input » e «Input », quando si utilizza il telecomando del televisore o universale si possono anche selezionare gli ingressi del segnale
TV, DVD, AUX e Bluetooth® direttamente, vale a dire che è possibile assegnare l’ingresso desiderato a un tasto del telecomando.
1
Dal men u di apprendimento a infrarossi
IRL
tenere premuto uno dei due tasti «Input» del telecomando Porsche per 3 secondi per
accedere al menu di selezione diretta. Nel display lampeggia
DVD
.
2
Ora si pu ò assegnare all’ingresso «DVD» un ta sto del telecomando TV.
Nota: Premendo questo tasto del telecomando TV durante il normale funzionamento, la Soundbar 911 passa direttamente all’ingresso DVD.
3
Premere i l tasto desiderato del telecoman do TV. Se il codice a infrarossi [ IR ] è stato memorizza to con successo dalla Soundba r 911, il display
visualizzerà OK e quindi l’ingresso successivo TV.
4
Se il codi ce non è stato memorizzato o sul telec omando non è stato premuto alcun tas to per 10 secondi, il display visualizze rà brevemente
FAI
per indicare che non è stato memorizzato alcun codice. Successivamente nel display continuerà a lampeggiare
DVD
, quindi si potrà provare a
memorizzare di nuovo il codice per l’ingresso DVD.
5
Se non si d esidera assegnare all’ingres so DVD alcun tasto, premere brevemente il ta sto «Input » per selezionare manualmente l’ingresso [ TV ].
6
Per asse gnare un tasto del telecomando T V agli ingressi TV, AUX e/o Bluetooth®, ripetere le opera zioni descritte al punto 2–5.
7
Per uscire dal menu d i selezione diretta, premere n uovamente uno dei due tasti «Input» per 3 secondi per a ccedere al menu di apprendim ento IR
superiore
IRL
. Tenendo premuto il tasto «ON/Standby» nel menu di selezione diretta per 3 secondi, il sistema passa dalla funzione di apprendi-
mento IR alla modalità di funzionamento normale. Nel display appare brevemente
FIN
per indicare che la modalità di apprendimento IR è stata
terminata.
Nota: Data la moltitudine di codici a infrarossi non si può garantire che la Soundbar 911 sia in grado di memorizzare ogni tipo di telecomando.
FUNZIONE DI CANCELLAZIONE A INFRAROSSI
Per cancellare i c omandi del telecomando T V appresi dalla Soundbar 911 procedere com e segue:
1
Accend ere la Soundbar 911.
2
Premere i l tasto «ON/Standby» del telecoma ndo Porsche per circa 5 secondi.
3
Sul display lampeggerà
IRL
.
4
Premere i l tasto «Mute» del telecomando Pors che per circa 5 secondi.
5
Sul display apparirà
CLR
per circa 5 secondi. La Soundbar 911 passerà automaticamente alla modalità di funzionamento normale.
DS_Betriebsanleitung_911_Soundbar_210x148mm_RZ_v10.indd 144-145 09.11.15 09:43
Page 75

[
IT ] Soundbar 911
146
|
147
RISOLUZIONE DEI PROBLEMI
Qui di seguito riportiamo una panoramica dei problemi più comuni. In caso di ulteriori domande si prega di rivolgersi al proprio Porsche Design Store o
Centro Porsche, di con tattare il nostro servizio di a ssistenza al numero + 49 [ 0 ] 711 911 0 o di inviare un’e-mail a [email protected]
Problema Possibile causa Soluzione
La Soundbar 911
non si accende.
Cavo di alimentazi one non collegato alla
presa e/o alla Soundba r 911.
Creare il collegamento.
La Soundbar 911 non
reagisce al telecomando.
1. La batteria è scarica. 1. Sostituire la batteria rispettando la corretta polarità.
2. La pellicola protett iva non è stata rimossa. 2. Rimuovere la pellicola protettiva del telecomando.
Il volume è troppo
basso.
Il volum e della Soundbar 911 o dell’apparecchio
sorgente è regolato su un l ivello troppo basso.
Aumentare il volum e con il tasto «Volume».
Aumentare il volum e del dispositivo sorgente.
Non viene riprodotto
alcun suono.
1. Il formato audio d el dispositivo sorgente è stato
selezionato in modo e rrato [ ingresso digitale «TV»
e «DVD» ].
1. Si prega di controllare la corretta regolazione del dispositivo
sorgente. I fil e codificati nel fo rmato «DTS» non pos sono
essere riprodotti.
2. Il dispositivo sorge nte non emette alcun segnale. 2. L’uscita digitale sul dispositivo so rgente non è attiva, il volume è
forse impostato su «zero» [ consultare il man uale del dispositivo ].
3. Il cavo non è c ollegato correttamente/cavo
difettoso.
3.1. Co ntrollare il collegamento tra il d ispositivo sorgente e la
Soundbar 911 e, se necessario, sos tituire il cavo.
3.2. C ontrollare che i cappucci di p rotezione sulla spina del cavo
ottico siano stati r imossi.
Problema Possibile causa Soluzione
La Soundbar 911
emette un ronzio.
1.
I cavi di s egnale che collegano il di spositivo sorgente
alla Soundbar 911 sono troppo lunghi [ Aux ].
1. Utilizzare cavi più cor ti.
2.
Il cavo di se gnale non è schermato o la sche rmatura
del cavo è interrotta [ difettos a ].
2. Sostituire il cavo con un cavo s chermato.
3. Si veri fica un ground loop [ anello di massa ]. 3.
Il ground loop può verificarsi quando almeno due dispositivi collegati
con cavi di segnal e [ RCA ] sono connessi a spine con messa a terra
[
es. amplificatore e computer ] separate. Collegare tutti i dispositivi
connessi alla S oundbar 911 con spina dotata di messa a terra a
una presa multipla.
4. Un’utenza non sc hermata [ es. frigorifero ] è
collegata alla rete.
4.
Disattivare le possibili fonti di disturbo procedendo per esclusione;
far schermare gl i apparecchi per elimina re le interferenze, se il
ronzio scompare, op pure collegare la sorgente di inte rferenza a
un’altra fase [ L1, L2 o L3 ] [ se necessari o consultare un esperto ];
inserire un filtro isolante antidisturbo [ disponibile nei negozi
specializzati ] tra il dispositivo so rgente e la Soundbar 911 per
eliminare il ronzi o; ruotare la spina per ridurre la c osiddetta
ondulazione residua [ particolarmente importante quando il
dispositivo sorg ente non è messo a terra ].
DS_Betriebsanleitung_911_Soundbar_210x148mm_RZ_v10.indd 146-147 09.11.15 09:43
Page 76

[
IT ] Soundbar 911
148
|
149
Problema Possibile causa Soluzione
La tecnologia di
riproduzione tramite
Bluetooth
®
non funziona.
1. Non c’è connessione t ra la Soundbar 911 e il
dispositivo mobile.
1. Collegare il dispositivo mobile come descritto sopra.
2. Il dispositivo mobile è collegato, ma non viene
riprodotto alcun suono.
2.1. Il dispositivo mobi le deve essere ricollegato.
2.2. Regolare il volume del dispositivo mobile sul livello massimo.
2.3. Alzare il volume dell a Soundbar 911.
2.4. Assicura rsi che le fonti di interferenz a come router wireless o
computer port atili non si trovino in prossimità d ella Soundbar 911.
2.5. L’utilizzo simultaneo tramite connessione Wi-Fi e Bluetooth® da
un dispositivo mobile è in molti casi impossibile da realizzare
senza interferenze [ disabilitare il W i-Fi sul dispositivo ].
3. Il disp ositivo è fuori portata [ max. 10 m ]. 3. Ridur re la distanza tra Soundbar 911 e dispositivo mob ile.
L’ingresso BT non è
selezionabile con i tasti
«Inp ut».
La funzione SEL è at tivata [ AUT ]. Il passaggio all’ingresso BT av viene automaticamente ap pena la
Soundbar 911 rileva un segnale audio del dispositivo mobile.
Problema Possibile causa Soluzione
L’apparecchio non si
accende automaticamente sull’ingresso
ottico e quello coassiale.
1. La funzion e AUT è disattivata in base alle imp ostazioni di fabbrica [ OFF ].
1. Attivare la funzione AUT [ ON ] [ Pagina 140 ].
2. Il dispos itivo è stato messo in modalità sta nd-by
con il tasto «Power».
2. Accendere l’apparecchi o con il tasto «Power» del telecomand o
e in futuro attende re che passi automaticamente all a modalità
stand-by.
3. Il disp ositivo è stato spostato sull’altro ingresso
digitale, su cui non v i è alcun segnale, e si è spento
automaticamente.
3. Accen dere l’apparecchio con il tasto «Power» del te lecomando
e selezionare l’ingre sso digitale a cui è collegato il di spositivo
sorgente desiderato.
La Soundbar 911 non
passa automaticamente
all’ingresso BT.
1. La funzione SEL è disatti vata [ MAN ]. 1. Attivare l a funzione SEL
[
AUT ].
2. Il Bluetooth
®
è disattivato sul dispositivo mobile. 2. Attivare il Bluetooth® sul dispositivo mobile.
3. La Sou ndbar 911 è collegata a un altro
dispositivo mobile.
3. Disat tivare il Bluetooth
®
sull’altro dispositivo mobile.
4. Il dispo sitivo mobile non è associato all a
Soundbar 911.
4. Assoc iare il dispositivo mobile all a Soundbar 911 [ Pagina 139 ].
La Soundbar 911 passa
all’ingresso BT senza
aver ricevuto il coma ndo.
Questo può accade re se il dispositivo mobile emet te
suoni di sistema, come ad esempio toccando la
tastiera.
1. Disattivare la funzio ne SEL [ MAN ].
2. Disattivare i suoni d i sistema del dispositivo mobi le.
DS_Betriebsanleitung_911_Soundbar_210x148mm_RZ_v10.indd 148-149 09.11.15 09:43
Page 77

[
IT ] Soundbar 911
150
|
151
SPECIFICHE TECNICHE
Alimentazione elettrica
– Tensione di esercizio 100 –240 V~
– Frequenza di eser cizio 50/60 Hz
– Assor bimento di potenza in stand-by
ECO = 0,39 W [ impostazione di fabbrica
]
– Assorbimento di po tenza in stand-by AUT = circa 4,5 W
– Assorbimento di po tenza a vuoto [ senza segnale di uscita ] = circa 8,4 W
– Assorbimento di po tenza massimo = circa 150 W
Livello ingresso/uscita analogico
– AUX = max. 2,0 V [ effettivo
]
– SUB OUT = max. 2,0 V [ effettivo
]
Decoder
– Dolby Digital
– PCM [ 32 kHz…96 kHz/8 bit…24 bit
]
Informazioni sulla «conformità alla destinazione d’uso»
La Soundbar 911 è progettata per l’utili zzo in ambienti chiusi e non deve
essere utilizz ata all’aperto o in ambienti umidi. Non a lterare o modificare il
dispositivo. Colle gare la Soundbar 911 come descritto nelle is truzioni e osservare le indicazioni di sicurezza. Utilizzare l’apparecchio esclusivamente
alla tensione e la frequenza specificate.
Informazioni sull’utilizzo ecologico
In caso di mancato util izzo mettere in stand-by la Soundb ar 911 per ridurre
il consumo di ener gia premendo il tasto «ON/Standby». .
Ciò permette di ri sparmiare energia e ridurre l a bolletta elettrica.
ALTRE INFORMAZIONI IMPORTANTI
Informazioni sulla marcatura CE
Le apparecchiature elettriche ed elettroniche immesse sul
mercato dell’Union e Europea devono essere munite di un a
marcatura CE per indicare che rispondono ai requisiti applicabili
[
es. compatibilità elettromagnetica o sicurezza delle
apparecchiature ].
Istruzioni per lo smaltimento
Secondo la direttiva europea sulle apparecchiature elettriche
ed elettroniche, i dispositivi contrassegnati da questo simbolo
non devono essere smaltiti insieme ai rifiuti domestici. Invitiamo
a informarsi pres so la società locale di smaltim ento rifiuti o
l’amministrazione comunale sulle possibilità di smaltimento
gratuito, che aiutano a proteggere l’ambiente e la salute, nonché
a non sprecare le [ rare ] materie prime tramite il riciclaggio.
Nemmeno le batterie vanno smaltite insieme ai rifiuti domestici,
ma devono essere co nsegnate a un punto di raccolta autori zzato.
È possibile anche gettare le batterie gratuitamente nei contenitori
per la raccolta situati presso vari esercizi commerciali. Le batterie smaltite impropriamente possono danneggiare la salute
dell’uomo e degli animali e/o l’ambiente.
Virtualizzatore
– DTS TruSurround
Bluetooth
®
– Standard Bluetooth® 3.0 [ A2DP
]
– Supporta la de codifica CSR aptX
®
– Portata fino a 10 m
– Gamma di freque nza 2.400–2.483,5 MHz [ banda ISM 2,4 GHz
]
– Potenza max. di trasm issione 10 mW [ +10 dBm
]
Temperature ambiente
– Minimo 5 °C [ 41 °F ]
– Massimo 35 °C [ 95 °F ]
DS_Betriebsanleitung_911_Soundbar_210x148mm_RZ_v10.indd 150-151 09.11.15 09:43
Page 78

[
IT ] Soundbar 911
152
|
153
Manufactured un der license from
Dolby Laboratories. Dolby and the
double-D symbol are registered
trademarks of Dolby Laboratories.
For DTS patents, see
http://patents.dts.com. Manufactured
under license f rom DTS Licensing
Limited. DTS, the Symbol a nd DTS and
the Symbol togethe r are registered
trademarks, and DTS TruSurrou nd is
a trademark of DTS, Inc. © DTS, Inc.
All Rights Reserved.
Bluetooth
®
:
The Blueto oth® word mark and logos a re
registered tradem arks owned by Bluetooth®
SIG, Inc., and any use of such ma rks by
Porsche Design is u nder license. Other
trademarks and tra de names are those of
their respective owners.
aptX
®
:
The aptX® software is copy right CSR plc or its
group companies. All rights reserved. The aptX®
mark and the aptX l ogo are trademarks of
CSR plc or one of its group companies and may
be registered in one or more jurisdictions.
INFORMAZIONI SULLA LICENZA
DS_Betriebsanleitung_911_Soundbar_210x148mm_RZ_v10.indd 152-153 09.11.15 09:43
Page 79
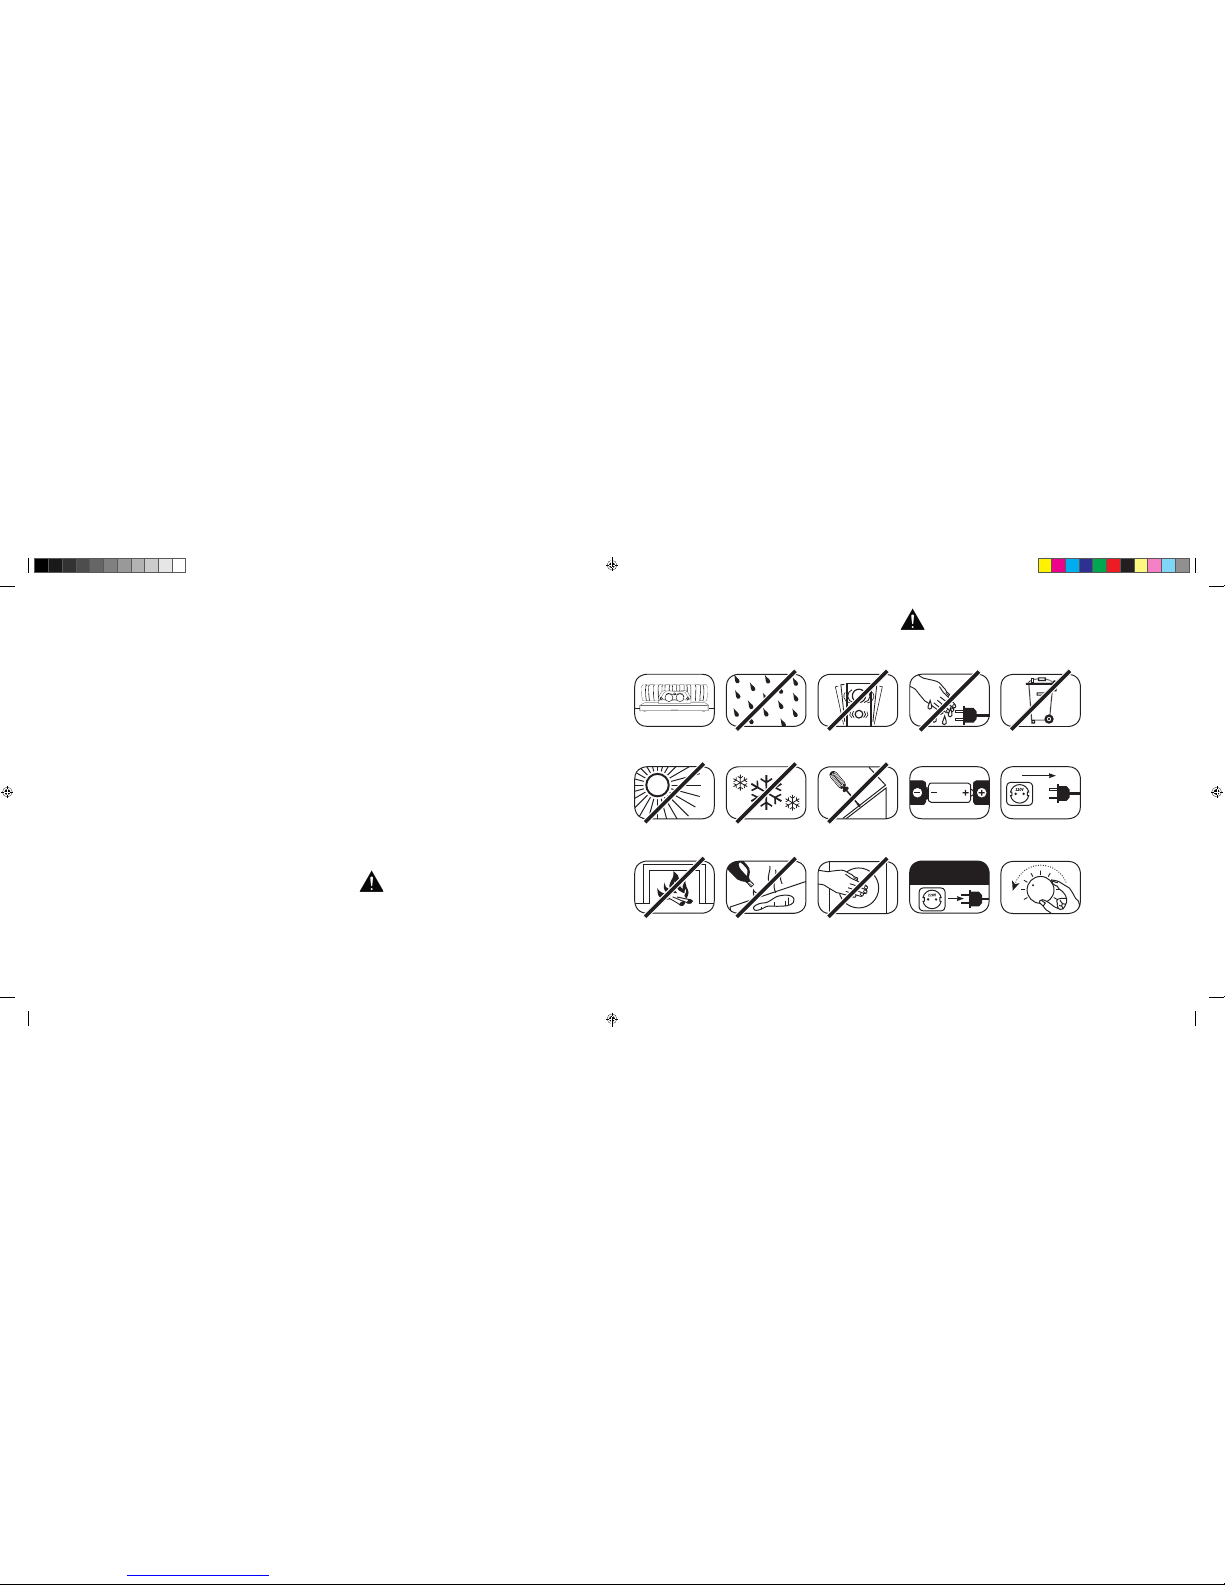
[
NL ] 911 Soundbar
154
|
155
INHOUD
Veiligheidsvoorschriften .............................. pa gina 15 5
Uitpakken ................................................... pa gina 16 0
Installeren ................................................... p agin a 160
Inspelen ...................................................... pag ina 160
In gebruik nemen van
de afstandsbediening ................................. pa gina 161
Aansluitklem ............................................... p agin a 161
Aansluiten................................................... pagi na 162
Bedienen .................................................... p agina 163
Displaysymbolen ........................................ pagi na 164
Geavanceerde sound-functies .................... pa gina 16 6
Afspelen via Bluetooth® technologie ........... pagina 169
Automatisch in-/uitschakelen
[
AUT ] .............pa gina 170
WELKOM IN DE WERELD VAN PORSCHE DESIGN
Van 0 tot 100 in 3,5 seconden. Tot 9000 toeren per minuut. Een topsnel heid van 315 km/h. Voor sommigen zijn het
gewoon cijfers – maar voo r ons zijn het de noten van een symfonie voor de sport wagen: de sound van de 911 GT3.
Laat u inspireren doo r onze passie voor innovatieve technologie en verheu g u op een adembenemende geluidser varing.
Met de 911 Soundbar, het high-end 2.1 Virtual Surrou nd Sound System met het originele uitlaatsysteem va n een 911 GT3.
VEILIGHEIDSVOORSCHRIFTEN
Let op de veiligheid svoorschriften bij het kie zen van de juiste locatie voor uw 911 Soundbar en ook bij h et onderhoud en de bedienin g ervan.
Kies een vlak ke
ondergrond
Vermijd vocht Vermijd schokken
Vermijd direct zonlicht
Houd het apparaat
uit de buurt van
warmtebronnen
Bescherm het a pparaat
tegen extreme kou de
Reinig het apparaat
niet met agressieve,
alcoholhoudende of
schurende middelen
Open de behuiz ing niet
Grijp niet in de
opening van de be huizing
of in de uitlaat
Trek de stekker uit het
stopcontact bij onweer
Raak het netsno er niet
aan met natte han den
Zorg dat de polen va n de
batterij in de juiste richting
wijzen in de afstandsbediening
Niet bij het
huisvuil doen
De gebruiker is ver antwoordelijk voor het juiste ge bruik
van de 911 Soundbar. Porsche Design is niet ve rantwoordelijk voor schade of ongevallen veroorzaakt door
een onjuiste installatie of aansluiting.
Zorg dat de stekker
onbelemmerd
bereikbaar is
Verlaa g het
syste emvolume
bij
overbelasting
ECO-stand-by
[
ECO ] ...................................pa gin a 171
Automatische selectie van de
BT-ingang
[
SEL ] ..........................................pa gina 172
IR-inleerfunctie ............................................pa gina 173
IR-wisfunctie ................................................pa gina 175
Probleemoplossing ......................................pag ina 176
Technische specificaties .............................p agina 180
Andere belangrijke informatie.......................pagin a 181
Licentiegegevens ........................................p agina 182
DS_Betriebsanleitung_911_Soundbar_210x148mm_RZ_v10.indd 154-155 09.11.15 09:43
Page 80
[
NL ] 911 Soundbar
156
|
157
BELANGRIJKE VEILIGHEIDSINSTRUCTIE
Lees en vo lg alle instructies.
Bewaar deze gebruikershandleiding.
Volg alle waarschuwingen en veiligheidsvoorschriften.
Gebru ik dit apparaat alleen in ee n gematigd klimaat [ niet in een tropisc h klimaat ].
Gebruik dit app araat niet op een hoogte van meer d an 2000 m boven de zeespiegel.
Gebruik dit appa raat alleen binnenshuis, ni et buiten of in vochtige ruimten.
Dit apparaat mag n iet worden blootgesteld aan rege n of vocht om brand en elektrisc he schokken te voorkomen.
Gebruik dit appa raat niet in de buurt van water.
Houd dit apparaat u it de buurt van waterdruppels of -s petters.
Sterke temperatuurschommelingen veroorzaken condensatie [ waterdruppeltjes ] in het apparaat. Geb ruik het apparaat pas nadat het o ntstane
vocht verdampt is [ min. 3 uur ].
Plaats geen voorw erpen die water bevatten op het appa raat [ bijv. vazen ].
Plaats geen open vl ammen op of in de buurt van het app araat, bijv. brandende kaarsen.
Plaats het apparaat n iet in de buurt van warmtebronne n zoals radiatoren, kachels, ovens of and ere apparaten [ ook versterkers ]
die warmte opwekken.
Vermijd direct zonlicht.
Zorg voor minstens 5 cm vri je ruimte rond het apparaat.
Probeer in geen ge val de veiligheidsfunctie van g epolariseerde of geaard e stekkers te omzeilen. Een gepolar iseerde stekker heeft twe e pennen,
waarvan de ene b reder is dan de andere. Een geaa rde stekker heeft een derde a ardepen. De brede c. q. derde pen is voor de veiligheid. A ls de
stekker niet in uw stopc ontact past, moet u het oude stopcontac t door een gekwalificeer de elektricien laten ver vangen.
Sluit de stekker om ele ktrische schokken te voorkom en alleen aan op stopcontacten of ve rlengsnoeren waar de cont actpennen volledig in passe n
zodat ze niet bloot kunn en liggen.
Raak de signaalkabel en het netsnoer nooit met natte handen aan.
Trap niet op het netsnoer en k nel het niet af, vooral niet in de buurt v an de stekker, stopcontacten en op de plaats waa r het snoer uit het apparaat komt.
Bij apparaten zonde r netschakelaar, waarbij de netstekke r of de netbus van het apparaat als sch eiding fungeert, moet de stek ker van het netsnoer
of de netbus van het appa raat altijd vrij bereikbaa r zijn.
Koppel het appara at volledig van het elektrici teitsnet tijdens onweer of als u het la ngdurig niet gebruikt.
Trek daarvoor het netsnoer uit het stopcontact.
Schakel het appara at vóór het aansluiten of loskoppel en van kabels altijd uit.
Trek altijd aan de stekkers en n ooit aan de snoeren.
Installeer het app araat volgens de instructies v an de fabrikant.
Kies altijd een vl akke ondergrond. Zorg dat het appar aat loodrecht staat.
LET OP
Kan elektrische schokken veroorzaken.
Niet openen!
LET OP:
Open het ap paraat niet o m brand of elek trische sc hokken
te voorkomen . Het appara at bevat geen on derdelen d ie door
de gebruiker moeten worden onderhouden. Laat onderhoud
en reparaties alleen door gekwalificeerd personeel
[
servicepersoneel ] uitvoeren.
LET OP
Levensgevaar!
LET OP:
Slik de knoo pcel [ batterij ] niet in. Dit k an
inwendige chemische brandwonden veroorzaken.
Er bestaa t levensgevaa r!
LET OP
Explosiegevaar!
LET OP:
Verwisselbare lithiumbatterijen!
Bij onjuiste vervanging bestaat explosiegevaar.
Vervang de batterijen alleen door batterijen van
hetzelfde type.
DS_Betriebsanleitung_911_Soundbar_210x148mm_RZ_v10.indd 156-157 09.11.15 09:43
Page 81
[
NL ] 911 Soundbar
158
|
159
NB
Ga niet hardhandig om met de bedieningselementen, aansluitingen en kabels.
Het apparaat mag all een worden gebruikt met de o p het apparaat of het typepla atje aangegeven spanning en f requentie.
Steek geen voorwe rpen of lichaamsdelen in d e openingen van het apparaat. An ders kunnen stroomvoerende d elen in de behuizing worden
aangeraak t en/of beschadigd. Dit kan kortsl uiting, elektrische scho kken en brand veroorzaken.
Gebruik alleen b evestigingsmiddelen en ac cessoires die door de fabri kant zijn goedgekeurd en/of met het ap paraat zijn meegeleverd.
Gebruik allee n rolwagens, standaards, statie ven, houders of tafels die voldoen a an alle in de veiligheidsinstr ucties genoemde
eisen. Beweeg bij g ebruik van een wagentje de comb inatie wagentje/apparaat heel voo rzichtig om schade en letsel do or kantelen
te voorkomen.
Reinig d it apparaat alleen met een sc hone, droge doek.
Gebruik geen agressieve, alcoholhoudende of schurende reinigingsmiddelen.
Open het apparaat n iet om elektrische schok ken te voorkomen! Het apparaat bevat ge en onderdelen die door de ge bruiker moeten worden
onderhouden.
Neem voor alle repar aties en onderhoud contact o p met uw Porsche Centrum. Dit is nodi g als het apparaat op enige wijze b eschadigd is, bijv. bij
beschadiging va n netsnoeren of stekkers, wannee r er vloeistoffen of voorwer pen in het apparaat terecht zijn ge komen of als het werd blootgesteld
aan regen of vocht, nie t goed werkt of is gevallen.
Breng geen wijzig ingen aan het apparaat of de acc essoires aan. Ongeoorlo ofde wijzigingen kunnen de vei ligheid, de naleving van wetten of d e
werking van het syste em in gevaar brengen. In dat geval ka n de goedkeuring voor gebruik /garantie vervallen.
Verlaag het volume onmiddellijk bij geluidsvervormingen tijdens het afspelen, zoals onnatuurlijk kloppen, bonzen of hoogfrequente klikken.
Luister om mogelijke g ehoorschade te voorkomen niet ge durende langere tijd met een h oog volume. Bij kloppende of flui tende geluiden in de
oren of als u de indruk h ebt dat u hoge tonen [ ook al is het maar kor t ] niet meer kunt hore n, moet u het afspelen onderbre ken.
Houd nieuwe en geb ruikte batterijen uit de buu rt van kinderen. Als het batte rijvak niet meer goed sluit, mag u h et apparaat niet meer gebru iken en
moet u het uit de buur t van kinderen houden.
De meegeleverd e afstandsbediening bevat ee n knoopcelbatterij. Insli kken van de knoopcel kan in sle chts 2 uur tijd ernstige inwendige br andwonden
en zelfs de dood vero orzaken!
Raadpleeg onm iddellijk een arts wanne er het vermoeden bestaat dat e en knoopcel werd ingeslik t of in andere lichaamsopen ingen terecht is
gekomen.
Let op het milieu bij he t afvoeren van batterijen. Bat terijen moeten bij een inzam elpunt voor batterijen worden af gegeven.
Stel batterijen ni et bloot aan hoge temperaturen, bi jv. direct zonlicht, vuur en dergelijke.
Zorg bij het plaatsen va n de batterijen altijd dat de pol en in de juiste richting wijzen om be schadiging te vermijden.
Gebruik allee n voor het apparaat voorgeschr even batterijen of accu’s.
De meegeleverd e batterijen zijn geen accu’s, m. a. w. u mag ze niet opladen.
Het apparaat en/of de ve rpakking kunnen kleine o nderdelen bevatten die inge slikt kunnen worden.
Het is dan ook niet ge schikt voor kinderen jong er dan drie jaar.
Dit symbool duidt o p de aanwezigheid van niet-geïsol eerde gevaarlijke spanning en in de behuizing, die krachtig g enoeg zijn
[
voldoende amplitude hebben ] om brand of elekt rische schokken te veroorzake n.
Dit symbool duidt op belangrijke bedienings- en onderhoudsinstructies in de meegeleverde documenten [ handleiding ].
Dit symbool staat voor Veiligheidsklasse II-apparatuur, waarbij bescherming tegen elektrische schokken tijdens het beoogd gebruik
gegarandeer d wordt door een dubbele of verster kte isolatie zodat geen aardve rbinding nodig is.
BELANGRIJKE VEILIGHEIDSINSTRUCTIE
DS_Betriebsanleitung_911_Soundbar_210x148mm_RZ_v10.indd 158-159 09.11.15 09:43
Page 82
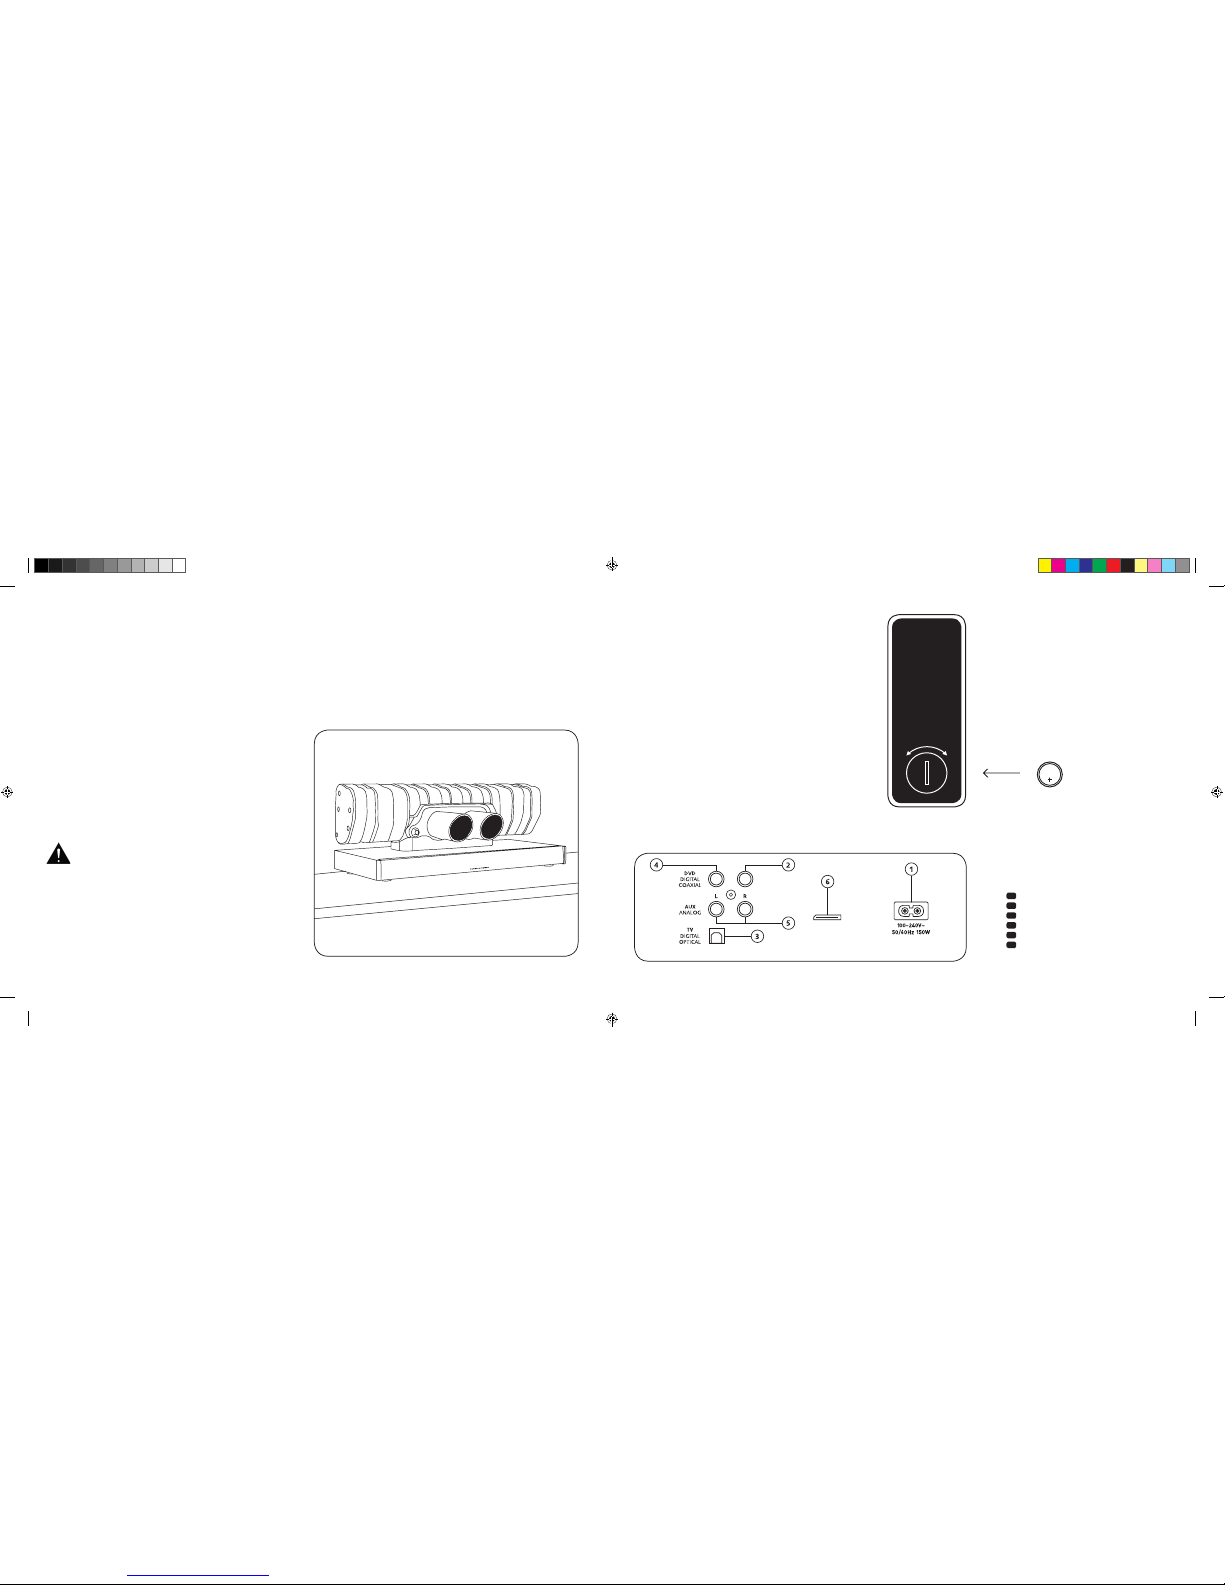
[
NL ] 911 Soundbar
160
|
161
AANSLUITINGEN
911 SOUNDBAR
1
Bus stroomvoorziening
2
Uitgang – Ext. Subwoofer
3
Ingang – TV [ optisch
]
4
Ingang – DVD [ coaxiaal
]
5
Ingang – AUX [ coaxiaal
]
6
Bus service
IN GEBRUIK NEMEN VAN
DE AFSTANDSBEDIENING
De meegeleverd e batterij zit al in de afstandsbe diening. Verwijder
gewoon de beschermfolie en u kunt de afstandsbediening gebruiken.
Let er bij het verva ngen van een batterij op dat de pol en [ +/- ]
in de juiste richting w ijzen. Gebruik alleen de voor di t systeem
voorgeschreven batterij [ CR 2032 ].
NB: De meegel everde batterij is een monster en k an daarom een
kortere levensduur hebben.
AANSLUITKLEM
911 Soundbar
SUB OUT
Service
Afstandsbediening
[ achterkant ]
INSTALLEREN
Plaats de 911 Soundbar op een vlak ke ondergrond.
UITPAKKEN
Pak de doos voorzic htig uit en ga na of alle hieronder
opgesomde onde rdelen aanwezig zijn:
1 x 911 Soundbar
1 x afstandsbedi ening incl. batterij
4 x netsnoer [ telkens 1 x EU, UK, US, AUS
]
1 x optische digitale audiokabel
1 x stereo cinch-kab el
1 x digitale cinch-kabel
INSPELEN
Inspeelfase totdat de optimale klankeigenschappen
zijn bereikt: 15–20 be drijfsuren.
– Luister in deze fase met n ormaal volume
– Vermijd extreem ho ge niveaus
– Luister naar een b rede variatie aan audiomateri aal
CR 2032
OPEN DICHT
Elke 911 Soundbar is een unicum. De uitl aat van
de Porsche 911 GT3 die in de 911 Soundbar is
gemonteerd, wordt in de reguliere serieproductie
gemaakt. Om de authenticiteit te benadrukken,
zijn lasnaden en kleurafwijkingen door het lassen
bewust zichtbaar.
Om die reden kunn en wij
dan ook geen kla chten
accepteren omdat he t oppervlak van de uitlaat
[
lasnaden, aanzetten, verkleuringen, lasspatten etc. ]
u
niet bevalt. Bedank t voor uw begrip.
DS_Betriebsanleitung_911_Soundbar_210x148mm_RZ_v10.indd 160-161 09.11.15 09:43
Page 83
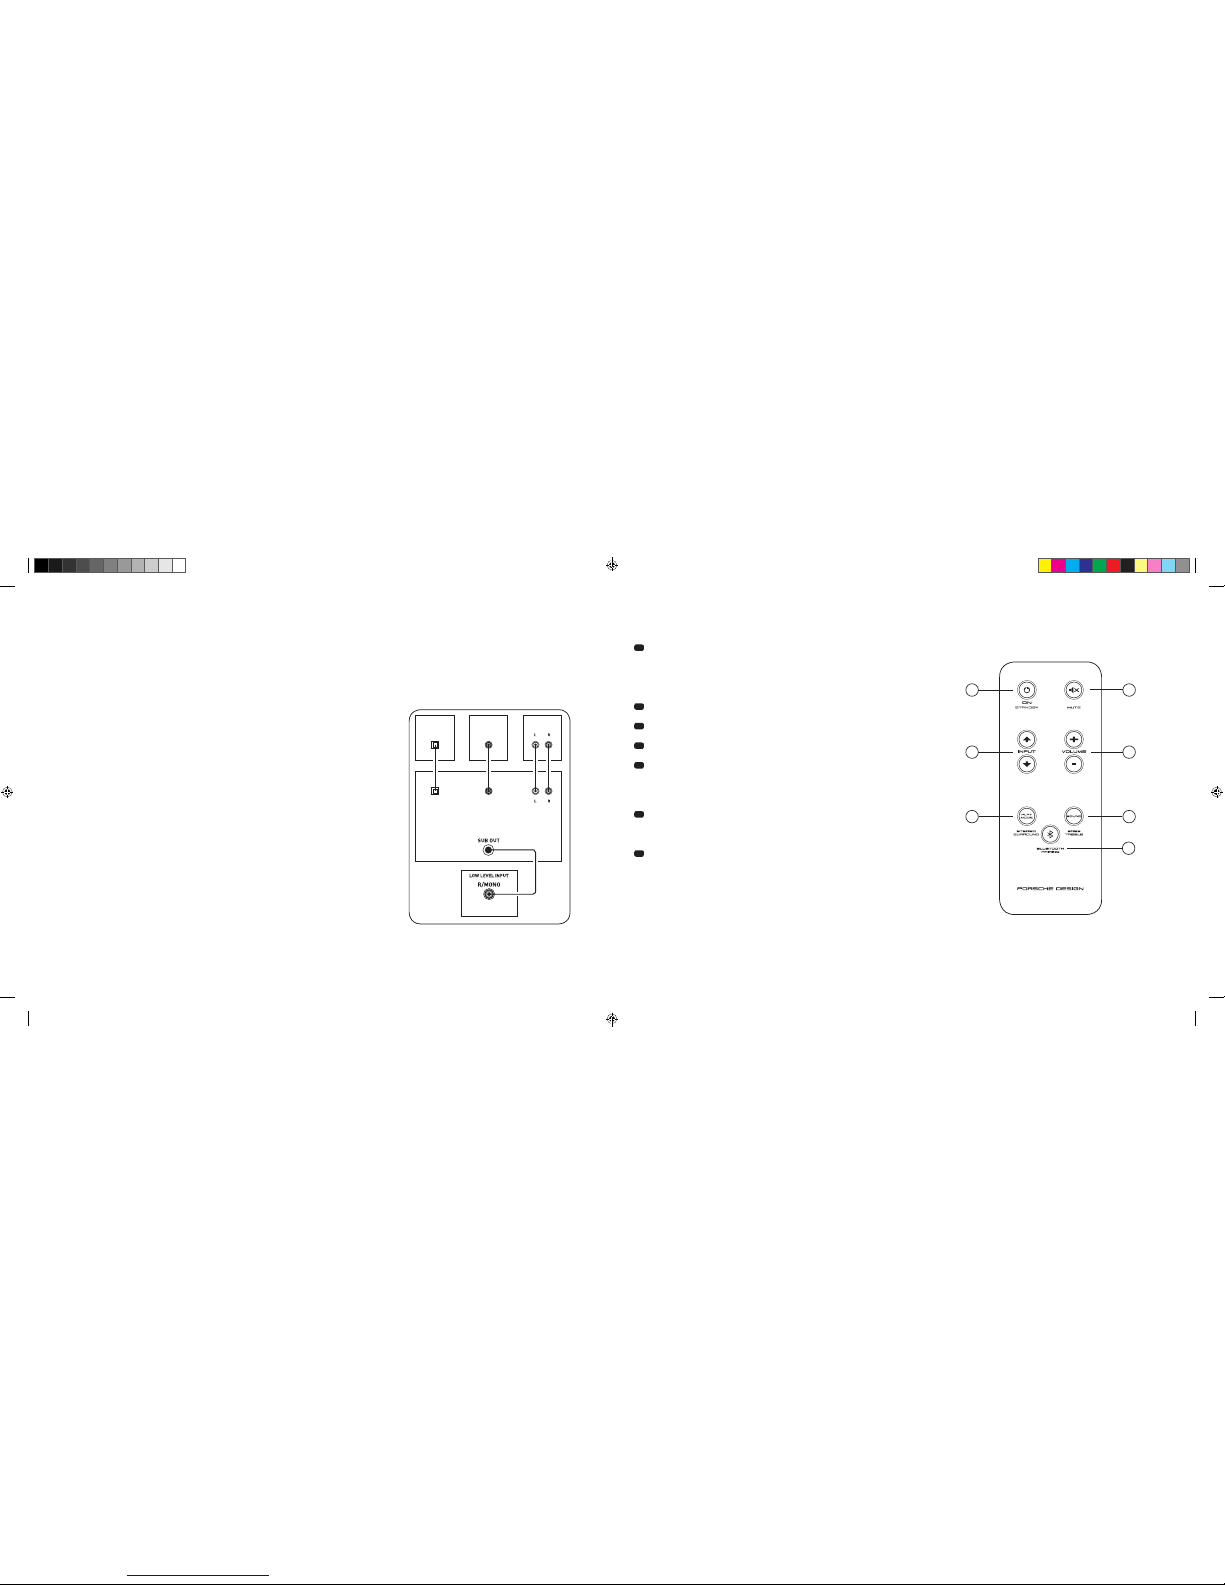
[
NL ] 911 Soundbar
162
|
163
AANSLUITEN
Schakel alvorens h et apparaat aan te sluiten eerst a lle elektrische compon enten uit. Uw 911 Soundbar heeft 3 vrij te kiezen ing angen. In principe
volstaat het om een va n deze ingangen aan te sluiten op uw tel evisie, waar u dan alle andere ap paraten op aan kunt sluiten. Voor de best m ogelijke
geluidskwal iteit is het raadzaam een satell ietontvanger, Blu-Ray- of dvd-speler rec htstreeks op de 911 Soundbar aan te sluiten. Afhankel ijk van het
type en de uitru sting van de gebruikte bron kunt u u it de volgende opties kiezen:
BEDIENEN
Afstandsbediening
1
Power
ON – led brandt groen [ Aan ]
Stand-by – led br andt rood [ Klaar ]
Soundbar niet aangesloten
op stroomnet – led brandt niet [ Uit
]
2
Mute [ Geluid uitgeschakeld
]
3
Input [ Geluidsbronselectie
]
4
Volume [ Volumeregeling
]
5
Play Mode [ Afspeelmodus ]
Stereo – voor het af spelen van muziek
Surr ound – virtuele kamervu llende geluidsweergave
voor thuisbioscoopsystemen
6
Sound [ Geluidsinstellingen ]
Bass – aanpassen via vo lume [ +6... -6 dB ]
Treble – aanpassen via vo lume [ +6... -6 dB
]
7
Blu etooth®-Pairing
Koppelen met een vo or draadloze Bluetooth®-technologie geschikte bron
Memoryfunctie
Nadat de 911 Soundbar een tijdje ni et op het stroomnet is aangesloten,
worden automatisch de laatst gekozen instellingen gebruikt. Alle instellingen
[
bijv. aan/uit, volume ] blijven behouden.
SUB
DIGITAL MOVIE
DVD
DVDTV
TV
AUX
AUX
TV – Digita le ingang [ O PTISCH
]
Moderne tv-toestel len zijn voorzien van een optis che audio-uitgang [ Toslink ]. Sluit deze
aan op de ingang ‘T V’ op de 911 Soundbar. Deze aansluiting garandeer t een optimale
signaaloverdracht en de beste geluidskwaliteit.
Let op: Verwijder de beschermdoppen van de meegeleverde optische kabel!
DVD – Digital e ingang [ COAXIAAL
]
Voor de overdracht van het dvd -audiosignaal sluit u de digi tale coaxiale uitgang van d e
Blu-Ray- of dvd-spele r aan op de bus ‘DVD’ op de 911 Soundbar. Voor overdracht van het
beeldsignaa l moet u uw dvd-speler ook aansl uiten op de tv. Als uw tv-toestel geen optisch e
uitgang heeft, ku nt u ook de ingang ‘DVD’ op de 911 Soundbar gebruiken.
AUX – Analoge ingang
Als uw tv-toestel alle en over een audio-uitgang ‘Pre- Out’ beschikt, kunt u uw tv aa nsluiten
door de afgesche rmde stereo cinch-kabel in de a naloge uitgang ‘AUX’ van de 911 Soundbar
te steken. Deze ingang die nt verder voor het aansluiten van vi deorecorders en spelco nsoles.
SUB – Analoge uitgang
Deze uitgang is bedo eld voor het aansluiten van een ex terne actieve subwoofer. SUB OUT
is standaard niet g eactiveerd en moet via de afsta ndsbediening worden inge schakeld. Zie
pagina 166 – Geavanceer de sound-functies.
4
ON
STANDBY
1
3
5 6
7
2
DS_Betriebsanleitung_911_Soundbar_210x148mm_RZ_v10.indd 162-163 09.11.15 09:43
Page 84
[
NL ] 911 Soundbar
164
|
165
DISPLAYSYMBOLEN
De 911 Soundbar is voorzien van ee n multifunctionele display, die ca. v ijf seconden wordt verlicht wa nneer er een opdracht wordt ge geven met de
afstandsbedi ening. Hieronder vindt u een ove rzicht van de belangrijkste sy mbolen en hun betekenis. Een rode le d betekent dat de 911 Soundbar in
stand-by-modus sta at. Een groene led betekent dat de 911 Soundbar is ingesc hakeld.
Input
Soundmode
Playmode
TV-ingang [ optisch
]
TV
Volume
[
0 – 99
]
V30
Stereo
ST
Pairing Mode
BTP
DVD-ingang [ coaxiaal
]
DVD
Geluid uitgeschakeld
[
Mute
]
---
Surround
SUR
Verbinding gemaakt
CON
AUX-ingang [ analoog
]
AUX
Bassregeling
[
+/– 6
]
B 6
Verbinding verbroken
DIS
Bluetooth
®
BT
Hoge-tonenregeling
[
+/– 6
]
T 6
Foutmelding
FAI
Bluetooth
®
Instelfuncties
In-/uitschakelen automatische
schakelaar voor optische en
coaxiale ingang
AUT
In-/uitschakelen
automatische selectie
BT-ingang
SEL
In-/uitschakelen
ECO stand-by
ECO
IR-inleerfunctie
Infraroodcode inleren
IRL
Geavanceerde sound-functies
Vertraagde audio
[ LipSync ]
LIP
In-/uitschakelen
SUB OUT
SUB
In-/uitschakelen
Dolby Dynamic Range
Compression
DRC
Selectie
installatiemethode
EQ
DS_Betriebsanleitung_911_Soundbar_210x148mm_RZ_v10.indd 164-165 09.11.15 09:43
Page 85

[
NL ] 911 Soundbar
166
|
167
GEAVANCEERDE SOUND-FUNCTIES
Via het menu voor ge avanceerde sound-functies k unt u de geluidsvertraging co rrigeren,
de uitgang voor een b ekabelde externe subwoofer ac tiveren, de geluidsweergave aan passen
aan de geselecteerde locatie en de Dolby-functie ‘Dynamic Range Compression’ in- of
uitschakelen.
Wanneer u de knop ‘Sou nd’ op de afstandsbediening m instens 3 seconden ingedru kt houdt,
wordt het menu ‘Geavanc eerde sound-functies’ geope nd en verschijnt
LIP
op de
display van de 911 Soundbar.
U kunt nu met de knop ‘Volu me +/-’ het afgespeelde g eluid in stappen van 10 ms vertragen
om de audio aan te pass en aan het ‘vertraagde’ beeld.
Wanneer u vervol gens kort op de knop ‘Sound’ druk t, verschijnt
SUB
op de display.
Nu kunt u met de knop ‘Volu me +/-’ de uitgang voor een ex terne subwoofer in- of
uitschakelen. Let o p: wanneer SUB OUT is ingeschakel d, is de geluidsweergave van de
soundbar bepe rkt tot 80 Hz. Frequenties onder 80 Hz wo rden naar de externe subwoofer
gevoerd.
Druk nogmaals ko rt op de knop ‘Sound’ en EQ verschijnt op de di splay.
Met de knop ‘Volume +/-’ kunt u een van dr ie vooraf ingestelde equalize r-presets kiezen en
het afspelen aa npassen aan de locatie.
EQ1
voor een 911 Soundbar die helemaal alleen staat, bijv. op een dressoir.
EQ2
voor een configuratie met een flatscreen-tv, aan de wand bevestigd.
EQ3
voor een 911 Soundbar in een rack of op een schap.
Wanneer u nogmaa ls op de knop ‘Sound’ drukt, versc hijnt
DRC
op de display.
‘Dynamic Range Compression’ is een instelling van Dolby Laboratories. Wanneer de functie is
ingeschakeld, kan het dynamisch bereik bij met Dolby-gecodeerde datastromen automatisch
worden verkleind, wat volumeverschillen reduceert. Zachte geluiden worden versterkt en harde
geluiden afgezwakt.
De functie
DRC
kan met de knop ‘Volum e +/-’ worden in- resp. uitgesch akeld.
Wanneer u nu nogma als op de knop ‘Sound’ drukt, vers chijnt
VOL
op de display.
Met deze ‘Volume’-[ beveiligings ] functie kunt u het ma ximaal instelbare volume be perken,
zodat het volume [ weergave op de display ] deze grenswaarde ni et meer kan overschrijden.
Nu kunt u met de knop ‘Volu me +/–’ het gewenste volume instellen [ 0–99, waarb ij 99 het
maximum is ].
LIP
SUB
ON OFF
EQ
EQ1 EQ2 EQ3
DRC
ON OFF
VOL
0 99
…
DS_Betriebsanleitung_911_Soundbar_210x148mm_RZ_v10.indd 166-167 09.11.15 09:43
Page 86

[
NL ] 911 Soundbar
168
|
169
AFSPELEN VIA BLUETOOTH®-TECHNOLOGIE
Vereisten voor aanmelden
– De Blueto oth®-functie moet ingeschakeld zijn
op het mobiele eindapparaat.
– Het mobi ele eindapparaat moet de Blu etooth®-
standaard 2.0 of hoger ondersteunen.
– Het mobiele eindapparaat moet zich binnen het
bereik van de 911 Soundbar bevind en [ max. 10 m ].
Aanmelden
– Selecteer ‘Inga ng’ BT.
– Druk op ‘Bluetooth®-Pairing’.
– Op de display versc hijnt
BTP
.
– U hebt 30 se conden om uw mobiele
eindapparaat a an te melden.
– Star t de zoekfunctie op uw mobie le eindapparaat.
– Kies
911 SOUNDBAR
als afspeelapparaat.
– Nadat uw ke uze is bevestigd, wordt er automatisch
verbinding gem aakt en het bericht
CON
verschijnt op de di splay.
– Als de verbinding is mislukt, verschijnt
het bericht
FAI
.
– Indien het mobiele eindapparaat om een
toegangscode vr aagt, voert u 0000 in.
– Als op de d isplay
DIS
verschijnt, is uw
mobiele einda pparaat buiten bereik of afgeme ld.
Bediening van een mobiel eindapparaat
– Er wordt au tomatisch verbinding gemaak t met de
911 Soundbar door het laatst aang esloten apparaat,
mits de Bluetooth®-functie is ingesc hakeld en de
ingang voor Bluetoot h®-afspelen is geselecteerd.
In dit geval verschi jnt het bericht
CON
.
– Begin m et het afspelen van een medium va naf uw
mobiele apparaat. De audio wordt dan automatisch
op de 911 Soundbar afgespeeld.
NB: De 911 Soundbar kan tot 3 Bluetooth®-apparaten
beheren. Zie ook ‘Automatische selectie van de BTingang’ op pagina 172.
BT
BTP
CON FAI
BLUETOOTH
PAIRING
911
SOUNDBAR
Wanneer u opnieu w kort op de knop ‘Sound’ drukt, ver schijnt
VOI
op de display.
Met de ‘Voice’-functie kunt u de spr aakverstaanbaarh eid zowel in stereo als in surround
verbeteren. Daard oor kunt u bijv. dialogen [ spraak ] bij films met luide ef fecten beter verstaan.
Met de knop ‘Volume +/–’ kunt u de ‘ Voice’-functie in- en uits chakelen [ ON resp. OFF ].
Door nogmaals o p de knop ‘Sound’ te drukken, keert u we er terug naar het begin van het
menu
LIP
.
Menu sluiten
Houd de knop ‘Sound’ n ogmaals minstens 3 seconden i ngedrukt om het menu
‘Geavanceerde sound-functies’ weer te verlaten.
Als de 911 Soundbar meer dan 30 se conden geen opdracht krij gt van de afstandsbedienin g,
schakelt de menu navigatie automatisch weer naar d e normale modus over.
LIP
SUB
ON OFF
EQ
EQ1 EQ2 EQ3
DRC
ON OFF
VOL
0 99
VOI
ON OFF
…
DS_Betriebsanleitung_911_Soundbar_210x148mm_RZ_v10.indd 168-169 09.11.15 09:43
Page 87

[
NL ] 911 Soundbar
170
|
171
Wanneer deze functi e is ingeschakeld [ ON ], zal het apparaat e en signaal aan de optische of de co axiale ingang herkennen. B ij detectie van een
signaal [ bijv. wanneer het bronapparaat wordt ingeschakeld ], wordt de 911 Soundbar automatisch ing eschakeld. Als er geen signaa l is aan de
geselecteerde ingang [ bijv. nadat het bronapparaat werd uitgeschakeld ], wordt de 911 Soundbar na 30 seconde n automatisch in de AUT standby-stand gezet. Wanneer de ze functie is uitgeschakeld [ OFF ], moet u de 911 Soundbar handmatig in- of u itschakelen.
Deze functie is af fab riek uitgeschakeld [ OFF ] en kan als volgt worde n in-/uitgeschakeld:
1
Schake l het apparaat in en houd de knop ‘Play M ode’ minstens
3 seconden inge drukt tot
AUT
verschijnt op de di splay.
2
Druk op d e knop ‘Volume +’ om de functie in te schakelen [ ON ].
3
Druk op d e knop ‘Volume -’ om de functie uit te schakel en [ OFF ].
4
Om het me nu te sluiten, houd u de knop ‘Play Mode’ nogm aals minstens
3 seconden inge drukt. Als er gedurende 10 secon den geen invoer wordt
ontvangen, zal het apparaat het configuratiemenu automatisch sluiten.
Opmerking: De automatische aan-/uit functie werkt alleen me t de optische en coaxiale dig itale ingang. Wanneer het appa raat met de knop
‘ON/Stand-by’ in stand -by wordt gezet, is automatisch inschakel en niet mogelijk.
Het apparaat zal u itsluitend een signaal aan d e geselecteerde digital e ingang herkennen. Een signa al aan een andere digitale i ngang kan niet
worden herkend.
INSTELFUNCTIES
AUTOMATISCH IN-/UITSCHAKELEN [ AUT
]
1
Schake l het apparaat in en houd de knop ‘Play M ode’ minstens 3 seconden inged rukt tot
AUT
verschijnt op de di splay.
2
Druk op nieuw kort op de knop ‘Play Mode’ tot
ECO
verschijnt op de di splay.
3
Druk op de knop ‘Volume +’ om de fun ctie in te schakelen [ ON ].
4
Druk op d e knop ‘Volume -’ om de functie uit te schakel en [ OFF ].
5
Om het me nu te sluiten, houd u de knop ‘Play Mode’ nogm aals minstens 3 seconden inge drukt. Als er gedurende 10 secon den geen invoer wordt
ontvangen, zal het apparaat het configuratiemenu automatisch sluiten.
ECO-STAND-BY [ ECO
]
Als deze functie is in geschakeld [ ON ], wordt het apparaat a utomatisch in ECO stand-by-modus gezet wa nneer het gedurende een uu r geen signaal
detecteert aan d e geselecteerde ingang. Wann eer deze functie is uitgeschake ld [ OFF ], moet u de 911 Soundbar handmatig uits chakelen.
Deze functie is af fab riek ingeschakeld [ ON ] en kan als volgt worde n in-/uitgeschakeld:
Opmerking: Deze functie wordt automatisch uitgeschakeld wanneer de AUT-functie wordt ingeschakeld.
DS_Betriebsanleitung_911_Soundbar_210x148mm_RZ_v10.indd 170-171 09.11.15 09:43
Page 88
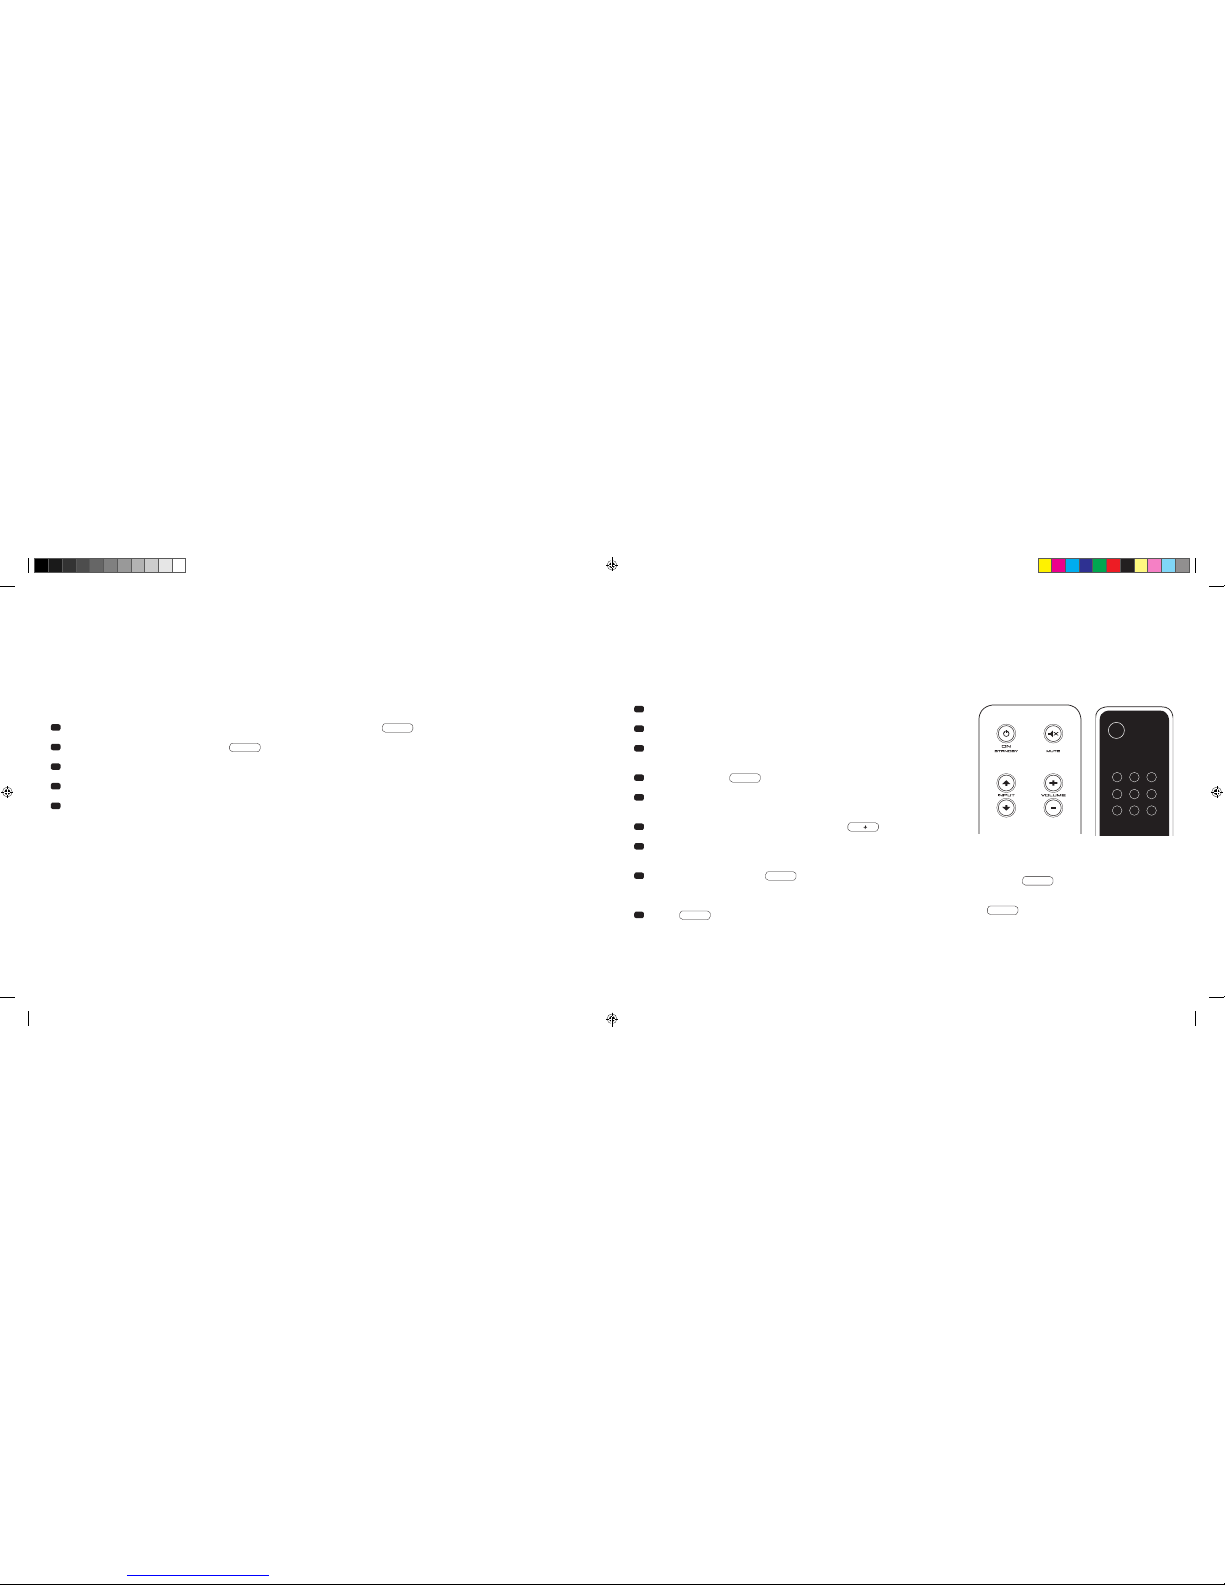
[
NL ] 911 Soundbar
172
|
173
AUTOMATISCHE SELECTIE VAN DE BT-INGANG
[
SEL ]
Wanneer deze funct ie is ingeschakeld [ AUT ], selecteert d e 911 So undbar de BT-ingang zodra er een audios ignaal wordt opgevangen van het m obiele
apparaat. Wanneer d eze functie is uitgeschakeld [ MAN ], moet u de ingang han dmatig selecteren.
Deze functie is af fab riek uitgeschakeld [ MAN ] en kan als volgt worde n in-/uitgeschakeld:
Opmerking: Afhankelijk van het mo biele apparaat dat wordt gebr uikt, kan de 911 Soundbar wanneer de automatisc he functie is ingeschakeld bi j het
typen van een be richt of bij andere systeemgel uiden overschakelen op de BT-ingang.
Wanneer de SEL-functie is ingesch akeld [ AUT ], is het niet meer mog elijk om de BT-ingang met de knop ‘Input’ te sel ecteren. In deze modus kan de
911 Soundbar, ongeacht de geselecteerde signaalingang, aan het mobiele apparaat worden gekoppeld.
1
Schake l het apparaat in en houd de knop ‘Play M ode’ minstens 3 seconden inged rukt tot
AUT
verschijnt op de di splay.
2
Druk op nieuw kort op de knop ‘Play Mode’ tot
SEL
verschijnt op de di splay.
3
Druk op de knop ‘Volume +’ om de fun ctie in te schakelen
[
AUT ].
4
Druk op d e knop ‘Volume -’ om de functie uit te schakel en
[
MAN ].
5
Om het me nu te sluiten, houdt u de knop ‘Play Mode’ nog maals minstens 3 seconden in gedrukt. Als er gedurend e
10 seconden geen invoe r wordt ontvangen, zal het appa raat het configuratiemenu autom atisch sluiten.
IR-INLEERFUNCTIE
De 911 Soundbar kan de infraroodc ode van de afstandsbedienin g van uw tv inleren zodat u de functie s van uw 911 Soundbar en van uw tv-toes tel
met een enkele afst andsbediening kunt bedie nen. U kunt elke willekeurige toets op de a fstandsbediening van uw tv a an de opdrachten van de
911 Soundbar toewijzen. Let er bij het ki ezen van toetsen wel op dat de opdrachten voo r de 911 So undbar en die voor de tv niet met elk aar in strijd
zijn. Zo kunt u de interne lu idspreker van het tv-toestel na aansl uiting van de 911 Soundbar het best uitschakelen.
1
Zorg dat u de af standsbediening van uw tv b ij de hand hebt.
2
Schake l de 911 S oundbar in.
3
Druk op de Po rsche afstandsbedienin g ong. 5 seconden op de knop
‘ON/Stand-by’.
4
Op de dis play knippert
IRL
.
5
Druk nu op de gewenste functie op de Porsche afstandsbediening,
bijv. ‘Volume +’.
6
De geselectee rde functie knippert nu op de d isplay, bijv. V.
7
Druk binnen 20 seconden op de toe te wijzen knop op de
afstandsbediening van de tv.
8
Als de toewijzing is geslaagd, gaat OK branden op de display en
kunt u doorgaan met het programmeren van de volgende knopfunctie,
bijv. ‘Volume’.
9
Wanneer
FAI
verschijnt op de display, dan is de toewijzing mislukt
en moet u stap 5 t/m 8 herhalen.
TV-afstandsbediening
ON
STANDBY
NB: De rode knop ‘ON/Stand-by’ van de Porsche afstandsbediening heeft twee functies. Wanneer u deze knop een keer drukt,
op de display verschijnt ON, kan de inschakelfunctie worden
ingeleerd. Wanneer u kort twee keer na elkaar op de rode knop
‘ON/Stand-by’ van de Porsche afstandsbediening drukt, verschijnt
op de display
STB
en kan de stand-by- resp. uitschakelfunctie
worden ingeleerd. Als de afstandsbediening van uw tv slechts een
aan-/uitknop heeft, moeten beide functies ‘ON’ en ‘Stand-by’ toch
met deze opdracht worden ingeleerd.
DS_Betriebsanleitung_911_Soundbar_210x148mm_RZ_v10.indd 172-173 09.11.15 09:43
Page 89

[
NL ] 911 Soundbar
174
|
175
Menu sluiten
Wanneer u de knop ‘Stand-by’ nogmaals minstens 5 seconden ingedrukt houdt, kunt u het menu ‘IR-inleerfunctie’ weer verlaten. Als de 911 Soundbar
meer dan 60 seconden geen opdracht krijgt van de afstandsbediening, schakelt de menunavigatie automatisch weer naar de normale modus over.
De signaalingangen direct selecteren
Naast met de knoppen ‘Input ’ en ‘Input ’ kunt u de signaalingangen TV, DVD, AUX en Bluetooth® ook direct selecteren met de afstandsbediening
van uw tv- of universele afstandsbediening, d. w. z. u kunt de gewenste ingang toewijzen aan een knop op uw afstandsbediening.
1
Houd in he t IR-inleermenu
IRL
een van de twee knoppen „Input“ op de Porsche afstandsbediening 3 seconden ingedrukt om het menu voor
directe selectie te openen. Op de display knippert
DVD
.
2
U kunt op de a fstandsbediening van uw t v slechts een knop toewijzen aa n de ingang ‘DVD’.
NB: Als u tijdens normaal bedrijf op deze knop op de afstandsbediening van de tv drukt, schakelt de 911 Soundbar direct over op de DVD-ingang.
3
Druk op d e gewenste knop op de afstandsbe diening van uw tv. Indien de infraro od [ IR ]-code met succe s van de 911 Soundbar is ingele erd,
verschijnt eer st kort OK en dan de volgende ingang TV op de display.
4
Als de co de niet kon worden ingeleerd, of als u bi nnen 10 seconden niet op een knop op u w afstandsbediening dru kt, verschijnt kort
FAI
op de
display om aan te geven dat er geen code werd ingeleerd.
DVD
blijft dan knipperen op de display en kunt u opnieuw of nogmaals de code voor de
ingang ‘DVD’ inleren.
5
Als u gee n knop wilt toewijzen aan de inga ng ‘DVD’, drukt u kort op de k nop ‘Input ’ om handmatig naar de ingang [ TV ] te gaan.
6
Om op de af standsbediening van uw T V een knop toe te wijzen aan de ingang en TV, AUX en/of Bluetooth®, herhaalt u stap 2 t /m 5.
7
Om het menu voor dire cte selectie weer te sluiten, houdt u e en van de twee input-knoppen opn ieuw 3 seconden ingedruk t, waarna het hogere IRinleermenu
IRL
verschijnt. Als u in het menu voor directe selectie de knop ‘ON/Stand-by’ 3 seconden ingedrukt houdt, schakelt het systeem
over van IR-inleermenu naar normaal bedrijf. Op de display verschijnt kort
FIN
om aan te geven dat de IR-inleermodus werd beëindigd.
NB: Vanwege de grote verscheidenheid aan infraroodcodes kan niet worden gegarandeerd dat elke afstandsbediening vanaf de 911 Soundbar kan
worden ingeleerd.
IR-WISFUNCTIE
Ga als volgt te werk als u d e op de 911 Soundbar ingesteld e draadloze verzendopdrachte n van de afstandsbediening va n uw tv wilt wissen:
1
Schake l de 911 S oundbar in.
2
Druk op d e afstandsbediening van de 911 Soundbar ong. 5 s econden op de knop ‘ON/Stand-by’.
3
Op de display knipp ert
IRL
.
4
Druk op d e afstandsbediening van de 911 Soundbar ong. 5 s econden op de knop ‘Mute’.
5
Op de display verschijnt ongeveer 5 seconden
CLR
. De 911 Soundbar schakelt daarna automatisch over naar normaal bedrijf.
DS_Betriebsanleitung_911_Soundbar_210x148mm_RZ_v10.indd 174-175 09.11.15 09:43
Page 90

[
NL ] 911 Soundbar
176
|
177
PROBLEEMOPLOSSING
Hierna vindt u ee n overzicht van veel voorkomend e problemen. Voor verdere vragen ku nt u contact opnemen met uw Porsch e Design Store of uw
Porsche Centrum of o nze service-hotline op het nu mmer +49 [ 0 ]711 911 0 of stuur een e-mail naar [email protected]
Probleem Mogelijke oorzaken Oplossing
De 911 Soundbar
kan niet worden
ingeschakeld.
Het netsnoer is niet ve rbonden met het stopcontact
en/of de 911 Soundbar.
Sluit het netsnoer aan.
De 911 Soundbar
reageert nie t op de
afstandsbediening.
1. De batterij is leeg. 1. Vervang de bat terij en zorg dat de polen in de juis te richting
wijzen.
2. De beschermfolie i s niet verwijderd. 2. Verwijder de besc hermfolie van de afstandsbe diening.
Het geluid is te zacht. Het volume va n de 911 Soundbar of het brona pparaat
is te laag ingesteld.
Verhoog het volume met d e knop ‘Volume’.
Verhoog het volume van h et bronapparaat.
Er is geen geluid. 1. Het geselecteerde audioformaat van het bronap-
paraat is niet juist g eselecteerd [ digitale ingang ‘TV’
en ‘DVD’ ].
1.
Contro leer of uw bronapparaat juist i s ingesteld. Outputformaten
in ‘DTS’-codering afspelen is niet mogelijk.
2. Ander apparaat ge eft geen signaal. 2. De digitale uitga ng op het bronapparaat is niet ge activeerd, het
volume staat moge lijk op ‘nul’ [ raadpleeg de handleiding van het
apparaat ].
3. De kab el is niet goed aangesloten /defect. 3.1. Controle er de aansluiting van het ande re apparaat met de
911 Soundbar en vervang indien nodig de kabel.
3.2. Controlee r of de beschermdoppen van d e stekker van de
optische kabel zijn verwijderd.
Probleem Mogelijke oorzaken Oplossing
911 Soundbar maakt
een zoemend geluid.
1. De signaal kabels van het bronapparaa t naar de
911 Soundbar zijn te lang [ AUX ].
1. Gebruik kortere signaalkabels.
2. De gebr uikte signaalkabel is ni et afgeschermd
of de afscherming v an de gebruikte kabel is
verbroken [ defect ].
2. Vervang de kabel doo r een afgeschermde kabe l.
3. Er is ee n ‘aardlus’ [ zoemend geluid ]. 3.
Een aardlus kan onts taan indien minstens twee me t signaalkabels [ cinch ] verbonden apparaten met geaarde stekkers
[
bijv. versterker en computer ] op fysiek gescheiden stopcontacten zijn aangesl oten. Sluit alle op de 911 Soundbar aangesloten
apparaten aan op ee n stekkerdoos [ verdeeldoos ].
4. Er zit ee n niet-ontstoorde verbruiker [ bijv. koelkast ]
op het netwerk.
4. Schakel mogelijke storingsbronnen uit; laat het betrokken
apparaat ontstoren indien het zoemen ophoudt, of sluit de
storingsbron eer st aan op een andere netfas e [ L1, L2 of L3 ]
[
raadpleeg indien nodig een specialist ]; breng een speci ale
‘mantelfilter’ [ verkrijgbaa r in de vakhandel ] aan tussen het
bronapparaat en d e 911 Soundbar om het zoemen te e limineren;
draai de netstekker o m de zogenaamde rimpelsp anning te reduceren [ zeer belangrij k wanneer het bronapparaat n iet is geaard ].
DS_Betriebsanleitung_911_Soundbar_210x148mm_RZ_v10.indd 176-177 09.11.15 09:43
Page 91

[
NL ] 911 Soundbar
178
|
179
Probleem Mogelijke oorzaken Oplossing
Er wordt geen audio
afgespeeld via de
draadloze Bluetooth
®
-
technologie.
1. Er is geen verb inding tussen de 911 Soundbar en
het mobiele eindapparaat.
1. Maak verbi nding met uw mobiele eindap paraat zoals beschreven.
2. Het mobie le eindapparaat is gekopp eld, maar er
wordt niets afgespeeld.
2.1. Maak opnieuw verbinding met het mobiele eindapparaat.
2.2. Zet het volume o p het mobiele eindapparaa t op de hoogste
waarde.
2.3. Verhoog het volume van de 911 Soundbar.
2.4. Controlee r of er geen storingsbronnen zoa ls een WLAN-router
of laptop staan in de dire cte omgeving van de 911 Soundbar.
2.5. Gelijktijdig WLAN en Bluetooth
®
gebruiken op een m obiel
eindapparaat i s in de meeste gevallen niet moge lijk zonder
storinge n [ schakel WLAN u it op eindapparaat ].
3. U bent bu iten het bereik [ max. 10 m ]. 3. Verkle in de afstand tussen de
911
Soundbar en het
eindapparaat.
De BT-ingang kan niet
worden geselecteerd via
de ‘input’-knoppen.
De SEL-functie is ingeschakeld [ AUT ].
In dit geval wordt automa tisch omgeschakeld zodra de 911 Soundbar
een audiosignaal van het mobiele apparaat detecteert.
Probleem Mogelijke oorzaken Oplossing
Het apparaat wordt
niet automatisch
ingeschakeld bij de
optische en coaxiale
ingang.
1. De AUT-functie werd af fabr iek uitgeschakeld [ OFF ]. 1. Schakel de AUT-functie in [ ON ] [ pagina 170 ].
2. Het appa raat werd via de knop ‘Power’ in stand-by
gezet.
2. Schakel h et apparaat in met de ‘Power’-knop van de afst andsbediening en wac ht voortaan tot het automatisch na ar stand-by
schakelt.
3. Het app araat werd naar de andere digi tale ingang
overgeschakeld di e geen signaal heeft en i s automatisch uitgeschakeld.
3. Scha kel het apparaat in met de ‘Power’-knop van de af standsbediening en se lecteer de digitale ingan g voor het gewenste
bronapparaat.
De 911 Soundbar schakelt niet automatisch
naar de BT-ingang.
1. De SEL-functie is uitges chakeld [ MAN ]. 1. Schakel de SEL-functie in [ AUT
]
2. Bl uetoot h
®
is uitgeschakeld op uw mobiele
eindapparaat.
2. Schakel B luetooth® in op uw mobiele eindapparaat.
3. De 911 Soundbar is met ee n ander mobiel
eindapparaat verbonden.
3. Scha kel Bluetooth
®
uit op de andere mobiele eindapparaat.
4. De mobi ele eindapparaat is niet met d e
911 Soundbar gekoppeld.
4. Koppel uw m obiele eindapparaat met d e 911 Soundbar
[
pagina 169 ].
De 911 Soundbar schakelt onbedoeld n aar de
BT-ingang.
Dit kan gebeuren wanneer uw mobiele eindapparaat
systeemgeluiden zoals toetsenbordklikken afspeelt.
1. Schakel de SEL-functie uit [ MAN ].
2. Schakel deze functie u it op uw mobiele eindappara at.
DS_Betriebsanleitung_911_Soundbar_210x148mm_RZ_v10.indd 178-179 09.11.15 09:43
Page 92

[
NL ] 911 Soundbar
180
|
181
TECHNISCHE SPECIFICATIES
Voeding
– Bedrijfsspa nning 100–240 V~
– Frequentie 50/60 Hz
– Opgenomen ver mogen in ECO stand-by = 0,39 W [ fabrieksinstelling
]
– Opgenomen ver mogen in AUT stand-by = ca. 4,5 W
– Opgenomen vermogen stationair [ geen uitgangssignaal ] = ca. 8,4 W
– Opgenomen ver mogen max. = ca. 150 W
In-/uitgangsniveau analoog
– AUX = max. 2,0 V [ effectief
]
– SUB OUT = max. 2,0 V [ effectief
]
Decoder
– Dolby Digital
– PCM [ 32 kHz…96 kHz/8 bit…24 bit
]
Informatie betreffende ‘beoogd gebruik’
De 911 Soundbar is ontworpen voor g ebruik in gesloten ruimtes en ma g
niet buiten of in vochtig e omgevingen worden gebrui kt. Het apparaat
mag niet worden gewi jzigd of aangepast. Sluit de 911 Soundbar aan zoa ls
beschreven in de ins tructies en neem de veilighe idsvoorschriften in acht.
Gebruik het appa raat alleen met de op het type plaatje aangegeven
netspanning en -frequentie.
Informatie betreffende milieuvriendelijk gebruik
Zet de 911 Soundbar wanneer deze niet in g ebruik is om het opgenomen
vermogen te vermin deren met de knop ‘ON/Standby’ in de s tand-bymodus
. Zo bespaart u stroom e n geld.
ANDERE BELANGRIJKE INFORMATIE
Informatie over de CE-markering
Elektrische en elektronische apparatuur die in de Europese
Unie in omloop wordt g ebracht, moet van een CE-markeri ng
zijn voorzien wa aruit blijkt dat het appara at voldoet aan de
toepasselijke eisen [ bijv. betreffende elektromagnetische
compatibiliteit of productveiligheid ].
Informatie over afvoer
Volgens de EU-richtli jn betreffende afgedank te elektrische en
elektronische apparatuur mogen apparaten met dit symbool niet
samen met het huis houdelijk afval [ huisvuil ] worden afgevoerd.
Neem indien nod ig contact op met uw plaatselijke af valverwerker
of met het gemeente-/stads bestuur voor informatie over grati s
afvoer. Zo beschermt u he t milieu en de gezondheid en bes paart
[
zeldzame ] grondstoffen door hergebruik [ recycling ].
Batterijen mog en ook niet samen met het algem een huisvuil
worden afgevoerd. Verza mel ze apart en breng ze naar e en inza
melpunt voor batte rijen. U kunt lege batterijen g ratis inleveren bij
verzameltonn en die bijv. in winkels staan. Niet goed afg evoerde
batterijen kun nen schadelijk zijn voor de gezon dheid van mens
en dier en/of het milie u.
Virtualizer
– DTS TruSurround
Bluetooth
®
– Bluetooth® standaard 3.0 [ A2DP
]
– Ondersteunt CSR a ptX®-decodering
– Bereik tot 10 m
– Frequentiebere ik 2.400–2.483,5 MHz [ 2,4 GHz ISM-band
]
– Max. zendvermo gen 10 mW [ +10 dBm
]
Omgevingstemperatuur
– Minimum 5 °C [ 41 °F ]
– Maximum 35 °C [ 95 °F ]
DS_Betriebsanleitung_911_Soundbar_210x148mm_RZ_v10.indd 180-181 09.11.15 09:43
Page 93

[
NL ] 911 Soundbar
182
|
183
Manufactured un der license from
Dolby Laboratories. Dolby and the
double-D symbol are registered
trademarks of Dolby Laboratories.
For DTS patents, see
http://patents.dts.com. Manufactured
under license f rom DTS Licensing
Limited. DTS, the Symbol a nd DTS and
the Symbol togethe r are registered
trademarks, and DTS TruSurrou nd is
a trademark of DTS, Inc. © DTS, Inc.
All Rights Reserved.
Bluetooth
®
:
The Blueto oth® word mark and logos a re
registered tradem arks owned by Bluetooth®
SIG, Inc., and any use of such ma rks by
Porsche Design is u nder license. Other
trademarks and tra de names are those of
their respective owners.
aptX
®
:
The aptX® software is copy right CSR plc or its
group companies. All rights reserved. The aptX®
mark and the aptX l ogo are trademarks of
CSR plc or one of its group companies and may
be registered in one or more jurisdictions.
LICENTIEGEGEVENS
DS_Betriebsanleitung_911_Soundbar_210x148mm_RZ_v10.indd 182-183 09.11.15 09:43
Page 94
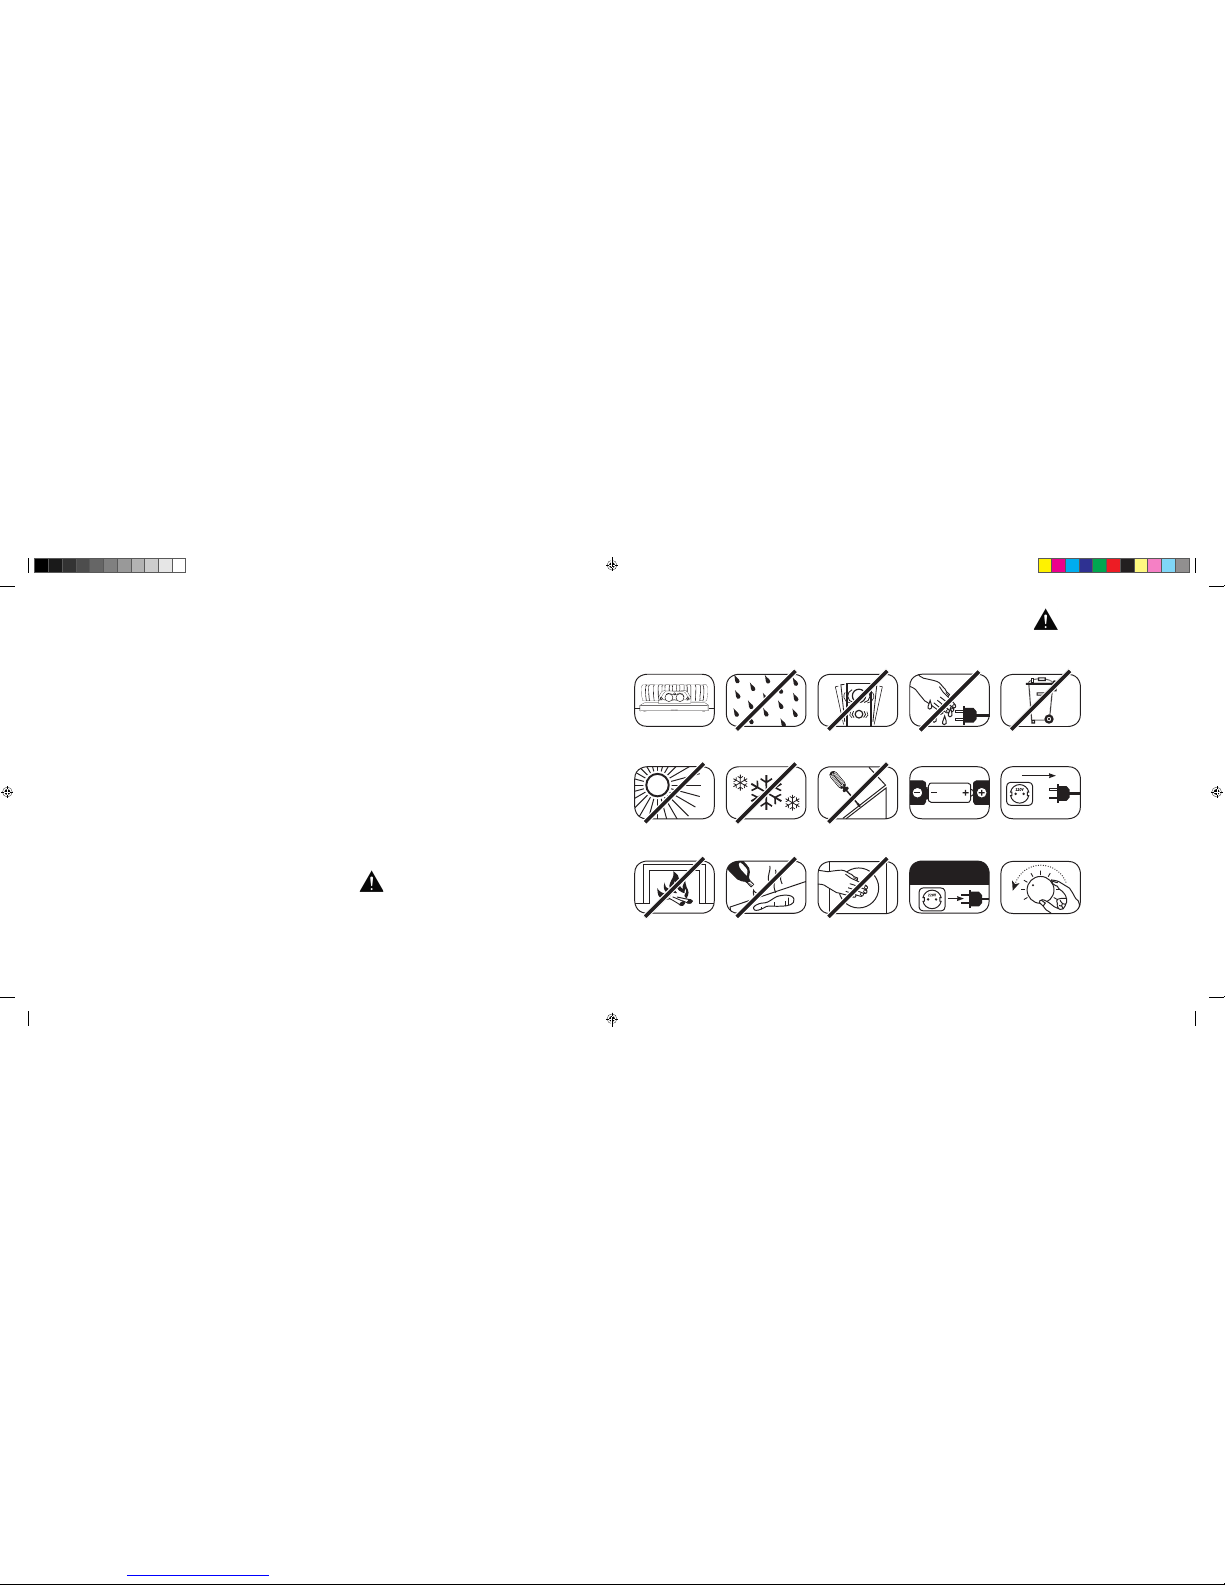
[
PL ] 911 Soundbar
184
|
185
SPIS TREŚCI
Wskazówki dotyczą ce bezpieczeństwa ....... strona 185
Rozpakowywanie ........................................strona 190
Ustawienie urządzenia .................................strona 190
Wgrywanie ..................................................strona 190
Uruchomienie pilota zdalnego sterowania ....strona 191
Terminal .......................................................strona 191
Podłączenie .................................................strona 192
Obsługa ....................................................... strona 193
Wskazania na wyświetlaczu .........................strona 194
Rozszerzone funkcje dźwięku ......................strona 196
Odtwarzanie za pomocą
technologii Bluetooth® .................................strona 199
Automatyka włączania i wyłączania
[
AUT ]....strona 200
WITAMY W ŚWIECIE PORSCHE DESIGN
Od 0 do 100 w 3,5 sekundy. Do 9000 obrotów na minutę. Maksym alna prędkość 315 km/h. Dla niektór ych są to tylko
liczby – dla nas to oceny symfonii samochodu sportowego: dźwięk 911 GT3.
Daj się zachwycić nas zą pasją do innowacyjnych technologii i ciesz się z d oznań dźwiękowych zapierających dech
w piersiach. Z 911 Soundbar, systemem high-end 2.1 Virtual Surround Sound System z o ryginalnym układem
wydechowym 911 GT3.
WSKAZÓWKI DOTYCZĄCE BEZPIECZEŃSTWA
Prosimy przestrze gać wskazówek dotyczących bezp ieczeństwa przy wybor ze właściwego miejsca na 911 Soundbar ora z podczas jego
konserwacji i obsługi.
Wybrać płaskie podłoże Unikać wilgoci Unikać drgań
Unikać bezpośredniego
działania światła
słonecznego
Odstęp od źródeł ciepła
Chronić przed ekstremal-
nym chłodem
Do czyszczenia n ie
stosować środków agresywnych, zawierających
alkohol lub szorujących
Nie otwierać obudowy
Nie wkładać rąk d o
otworu w obudowie i
zaślepki na końcu rury
Wyjąć wtyczkę z
gniazdka podczas burzy
Nie dotykać przewodu
sieciowego mokrymi
rękami
Zwrócić uwagę na
prawidłowe bieguny
baterii i pilota zdalnego
sterowania
Nie wyrzucać do śmieci
Właściwa obsługa 911 Soundbar jest w zakresie
odpowiedzialności użytkownika. Porsche Design
nie może ponosić odpowiedzialności za szkody lub
wypadki spowodowane wskutek niewłaściwego
zainstalowania lub niewłaściwego podłączenia.
Zapewnić swobodny
dostęp do wty ku
sieciowego
W przypadku
przeciążenie
ściszyć układ
ECO Standby
[
ECO ] ....................................strona 201
Automatyczny wyb ór wejścia BT
[
SEL ] ........strona 202
Funkcja uczenia się na podczerwień ............strona 203
Funkcja kasowania na podczerwień .............strona 205
Wyszukiwanie błędów .................................strona 206
Dane techniczne ..........................................strona 210
Inne ważne informacje ................................. strona 211
Wskazówki dotyczą ce licencji ...................... strona 212
DS_Betriebsanleitung_911_Soundbar_210x148mm_RZ_v10.indd 184-185 09.11.15 09:43
Page 95
[
PL ] 911 Soundbar
186
|
187
WAŻNA INSTRUKCJA BEZPIECZEŃSTWA
Przecz ytać i przestrzegać wsz ystkich instrukcji.
Zachować niniejszą instrukcję.
Przestr zegać wszystkich ostrzeże ń i wskazówek dotyczących bezpie czeństwa.
Uży tkować to urządzenie tylko w umiarkowany m klimacie
[
nie w klimacie tropikalnym ].
Nie użytkować tego u rządzenia na wysokości pona d 2000 m n. p. m.
Użytkować to urządzen ie tylko wewnątrz pomieszczeń, a ni e na zewnątrz lub w pomieszczeniac h wilgotnych.
Aby uniknąć niebez pieczeństwa pożaru lub pora żenia prądem elektrycz nym, urządzenie nie może być narażon e na deszcz lub wilgoć.
Nie użytkować tego ur ządzenia w pobliżu wody.
Nie narażać tego urządzenia na kapiącą lub pryskającą wodę.
Silne wahania temperatury powodują osadzanie się kondensatu [ kropelek wody ] w urządzeniu. Odczekać z uruchomieniem, aż powstałą wilgoć
wyparuje [ co najmniej 3 godz iny ].
Nie stawiać na urząd zeniu żadnych przedmiotów wype łnionych cieczami [ np. wazonów ].
Nie stawiać otwar tego ognia, jak np. zapalonych świe c, na lub w pobliżu urządzenia.
Nie ustawiać urząd zenia w pobliżu źródeł ciep ła, jak np. grzejników, akumulatorów ciep ła, pieców i innych urządzeń [ także wzmacni aczy ],
które wytwarzają ciepło.
Unikać bezpośredniego działania światła słonecznego.
Zachować wolną przes trzeń wokół urządzenia równą co n ajmniej 5 cm.
W żadnym razie nie u niemożliwiać ochronnej fu nkcji wtyczek biegunowyc h lub wtyczek z uziemieniem: w tyczka biegunowa ma dwa bolce,
z których jede n jest szerszy niż drugi. wt yczka z uziemieniem ma trzec i bolec uziemiający. Szeroki lub trze ci bolec służy Państwa bezp ieczeństwu.
Jeżeli wtyczka nie pasuje do gniazdka, to należy zwrócić się do wykwalifikowanego elektryka w celu wymiany przestarzałego gniazdka.
Aby uniknąć pora żenia prądem, wkładać wt yczkę sieciową tylko do gniazdek l ub przedłużaczy, do których moż na całkowicie włożyć kołki w tykowe,
aby uniknąć swobod nie leżących kołków wtykowyc h.
Nigdy nie dotykać przewodów sygnałowych i sieciowych mokrymi rękami.
Nie stawać na przewód sie ciowy i nie zaciskać go, w szczegól ności w obszarze wtyczek, gn iazdek i w miejscu, w którym p rzewód
wychodzi z urz ądzenia.
W przypadku ur ządzeń bez wyłącznika si eciowego, w których wtyk si eciowy lub gniazdo sieci owe w urządzeniu służy jako ur ządzenie rozłączające,
wtyk kabla sieciowego lub gniazdo sieciowe muszą być zawsze łatwo dostępne.
W przypadku bur zy i dłuższego nieuży wania odłączyć urządzen ie od sieci elektryczne j.
Aby całkowicie odłączyć urządzenie sieci elektrycznej, wyciągnąć kabel sieciowy z gniazdka.
Zawsze wyłączyć u rządzenie przed podłącze niem lub wyciągnięciem p rzewodów przyłączeniow ych.
Zawsze ciągnąć za w tyczkę, a nie przewody.
Ustawić urządzenie zgodnie ze wskazówkami producenta.
Wybrać zawsze pła skie podłoże. Urządzenie mus i stać w pionie.
UWAGA
Niebezpieczeństwo porażenia prądem
elektrycznym. Nie otwierać!
UWAGA:
Aby unikną ć wybuchu po żaru lub por ażenia prąd em, nie otwi erać
urządzenia. Urządzenie nie ma części, które mogą być konserwo-
wane przez u żytkownik a. Prace kons erwacyjne i n aprawy zle cać
tylko wyk walifikowan ym specjali stom [ serwisantom ].
UWAGA
Zagrożenie dla życia!
UWAGA:
Nie połknąć baterii guzikowej.
Niebezpieczeństwo wewnętrznych oparzeń
chemicznych. Istnieje zagrożenie dla życia!
UWAGA
Niebezpieczeństwo
wybuchu!
UWAGA:
Wymienne baterie litowe!
Niebezpieczeństwo wybuchu w przy
padku nieprawidłowej wymiany. Baterie
wymieni ać tylko na teg o samego lub
porównywalnego typu.
DS_Betriebsanleitung_911_Soundbar_210x148mm_RZ_v10.indd 186-187 09.11.15 09:43
Page 96
[
PL ] 911 Soundbar
188
|
189
Wskazówka
Nie wywiera ć siły na elementy obsł ugi, przyłącza i przewody.
Urządzenie może pracować tylko z napięciem i częstotliwością podanymi na tabliczce znamionowej.
Nie wkładać żadnych p rzedmiotów lub kończyn do otworów w ur ządzeniu. Można dotknąć i/lub us zkodzić części wewnątrz obudow y,
przewodzące prąd. M oże to prowadzić do krótkich zwarć, porażen ia prądem elektrycznym i pow stania pożaru.
Stosować tylko materiały do mocowania i akcesoria dopuszczone przez producenta i\lub dostarczony wraz z urządzeniem.
Stosować tylko wózki na kół kach, stojaki, statywy, wsporni ki lub stoliki wyszczególnio ne przez producenta lub sprze dane z urządzeniem.
Stosując wózek na kółka ch należy go ostrożnie przesuw ać, aby uniknąć uszkodzeń i obrażeń ws kutek jego przewrócenia.
Czyśc ić urządzenie tylko czystą, s uchą szmatką.
Do czyszczenia nie stos ować środków agresywnych, zawieraj ących alkohol lub szorujących.
Nie otwierać urz ądzenia, aby uniknąć porażen ia prądem elektrycznym. Ur ządzenie nie ma części, które mog ą być konserwowane przez
użytkown ika.
W przypadku wsze lkich napraw i prac konserwacy jnych należy się zwrócić do se rwisu Porsche. Jest to wymag ane wówczas, kiedy urządzeni e jest
w jakikolwiek spo sób uszkodzone, np. w przypadku us zkodzeń kabli sieciowych lub w tyczek, jeżeli do urządzeni a dostały się ciecze lub prze dmioty,
zostało ono narażone na deszcz lub wilgoć, nie działa prawidłowo lub zostało zrzucone.
Nie dokonywać żadnych zmian w urządzeniu lub osprzęcie. Nieautoryzowane zmiany mogą wpłynąć ujemnie na bezpieczeństwo, przestrzeganie
przepisów ustawow ych lub na moc układu. W tym prz ypadku wygasa świadect wo homologacyjne/gwarancja.
Jeżeli podczas odtwarzania występują zniekształcenia dźwięku, takie jak np. nienaturalne pukanie, pulsowanie lub klikanie o wysokiej częstotliwości,
to niezwłocznie należy zmniejszyć poziom głośności.
Aby uniknąć możliw ych uszkodzeń słuchu, nie słuc hać w dłuższym okresie cz asu na wysokich poziomach. Pr zerwać odtwarzanie,
jeżeli w uszach sł ychać będzie dzwonienie l ub gwizdanie lub mając wrażen ie, że nie można już postrzegać wys okich dźwięków
[
również w krótkim czas ie ].
Nowe i zużyte baterie t rzymać z dala od dzieci. Urz ądzenia, w których nie można bez piecznie zamknąć komory n a baterie, nie mogą być dalej
używane i trze ba je trzymać z dala od dzieci.
Dostarczony z tym ur ządzeniem pilot zdalnego sterow ania jako baterię ma baterię guzikową. Poł knięcie baterii guzikowej może dop rowadzić tylko
w ciągu 2 godzin do powa żnych poparzeń wewnętrznych i t ym samym do śmierci!
W przypadku po dejrzenia o połknięci e baterii guzikowych lub wprowadzonyc h do innych otworów w ciele należy ni ezwłocznie zgłosić się do le karza.
W przypadku utylizacji baterii zwrócić uwagę na ochronę środowiska. Baterie należy oddać do punktu zbierania baterii.
Baterii nie wolno narażać na wysokie temperatury, jak np. bezpośrednie działanie promieni słonecznych, ogień i tym podobne.
Baterie należy wkładać prawidłowo zgodnie z nadrukiem biegunowości. Nieprawidłowe włożenie baterii może spowodować uszkodzenia.
Stosować wyłącznie baterie lub akumulatory przeznaczone do tego urządzenia.
W przypadku do łączonych baterii nie chodzi tuta j o akumulatory, tzn. tych baterii nie moż na ponownie ładować.
Urządzenie i/lub opakowanie mogą zawierać drobne części, które mogą zostać połknięte.
Dlatego nie nadaje się dla dzieci poniżej trzech lat.
Ten symbol wskazuje na nieizolowane, niebezpieczne napięcia wewnątrz obudowy, mające wystarczające natężenie [ amplitudę ],
aby wywołać p ożar lub spowodować porażenie pr ądem elektrycznym.
Ten symbol wskazuje na ważne instrukcje obsługi i konserwacji w dostarczonych dokumentach towarzyszących [ instrukcja ].
Ten symbol oznacza klasę oc hrony II-urządzenia, w przy padku których ochrona pr zed porażeniem prądem ele ktrycznym podczas pracy
zgodnej z przeznaczeniem jest zagwarantowana poprzez podwójną lub wzmocnioną izolację i dlatego nie jest wymagane podłączenie
przewodu ochronnego.
WAŻNA INSTRUKCJA BEZPIECZEŃSTWA
DS_Betriebsanleitung_911_Soundbar_210x148mm_RZ_v10.indd 188-189 09.11.15 09:43
Page 97
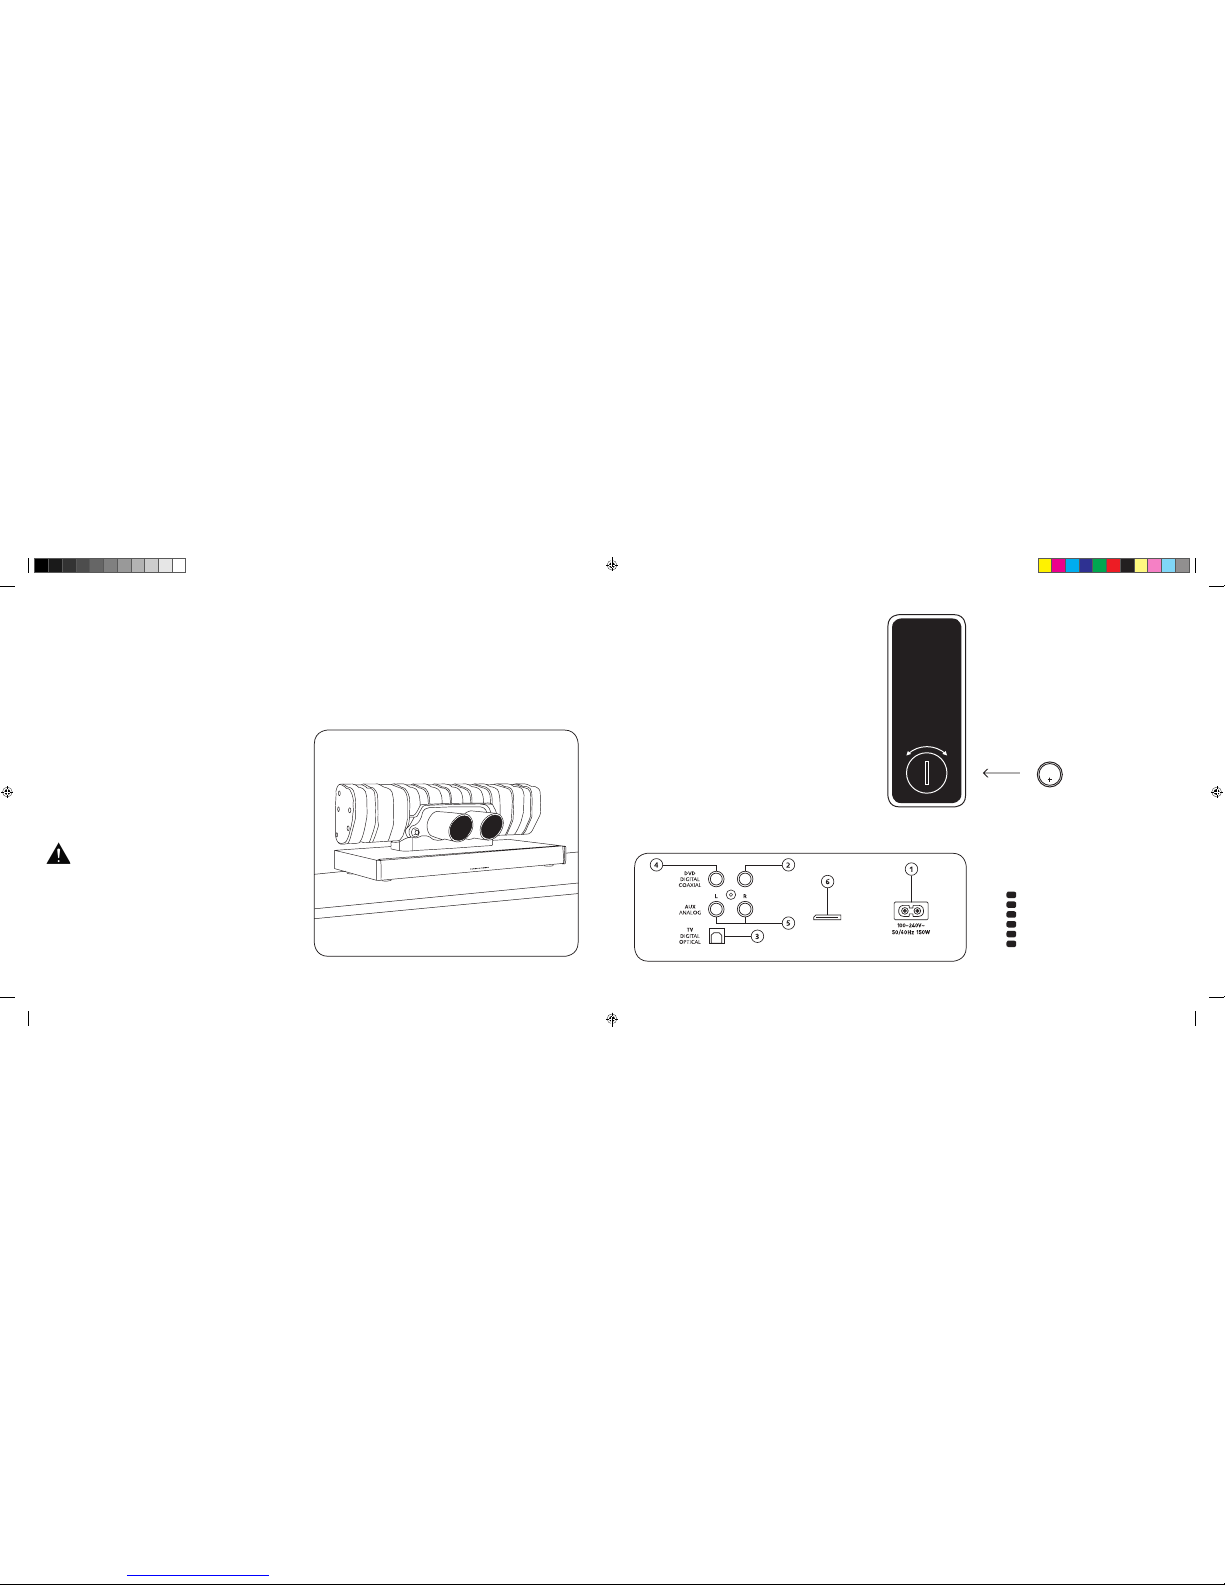
[
PL ] 911 Soundbar
190
|
191
PRZYŁĄCZA
911 SOUNDBAR
1
Gniazdo zasilania
2
Wyjście – zewn. subwoofer
3
Wejście – TV [ optyczny
]
4
Wejście – DVD [ koncentryczne
]
5
Wejście – AUX [ analogowe
]
6
Gniazdo serwisowe
URUCHOMIENIE PILOTA
ZDALNEGO STEROWANIA
Dostarczona bateria jest już włożona do pilota zdalnego
sterowania. W celu jego uruchomienia należy jedynie usunąć
folię ochronną. W pr zypadku baterii zapasowej z wrócić uwagę,
aby była ona włożona prawidłowo zgodnie z oznaczeniami
biegunowości [ +/- ]. Stosować wyłączn ie baterię przeznaczoną
dla tego systemu [ CR 2032 ].
Wskazówka: Dołączona bateria jest przeznaczona do użycia
na próbę i dlatego ma ewen tualnie mniejszą żywotn ość.
TERMINAL DO PRZYŁĄCZY
911 Soundbar
SUB OUT
Service
Pilot zdalnego sterowania
[ t ylna strona ]
USTAWIENIE URZĄDZENIA
Ustawić głośnik 911 Soundbar na p łaskiej powierzchni.
ROZPAKOWYWANIE
Rozpakować ostrożnie kar ton i sprawdzić, czy są w nim
wszystkie wymienione tutaj części:
1 x 911 Soundbar
1 x pilot zdalnego sterowa nia z baterią
4 x kabel sieciow y [ po 1 x EU, UK, US, AUS
]
1 x optyczny cyfrow y kabel audio
1 x kabel stereo z wt ykami cinch
1 x kabel cyfrow y z wtykami cinch
WGRYWANIE
Faza wgrywania aż do wykształcenia się
maksymalnych właściwości dźwięku:
15–20 godzin pracy.
– Proszę słuchać w t ym czasie z normalną głośno ścią
– Unikać bardzo wysokiego poziomu
– Słuchać najróżniejszego materiału dźwiękowego
CR 2032
OTWARTY ZAMKNIĘT Y
Każdy 911 Soundbar jest pojedynczą sztuką.
Zintegrowany z głośn ikiem 911 Soundbar tłumi k
końcowy Porsche 911 GT3 jest produkowany
w normalnym procesie seryjnym. Aby podkreślić
autentyczność, spaw y i przebarwienia wsku tek
procesu spawania s ą celowo widoczne.
Dlatego nie możemy za akceptować żadnych
reklamacji z powodu niepodobania się powierzchni
tłumika końcowego [ spawy, miejsca nalotów,
odbarwienia, odpryski spawalnicze itp. ].
Dziękujemy za Państwa zrozumienie.
DS_Betriebsanleitung_911_Soundbar_210x148mm_RZ_v10.indd 190-191 09.11.15 09:43
Page 98
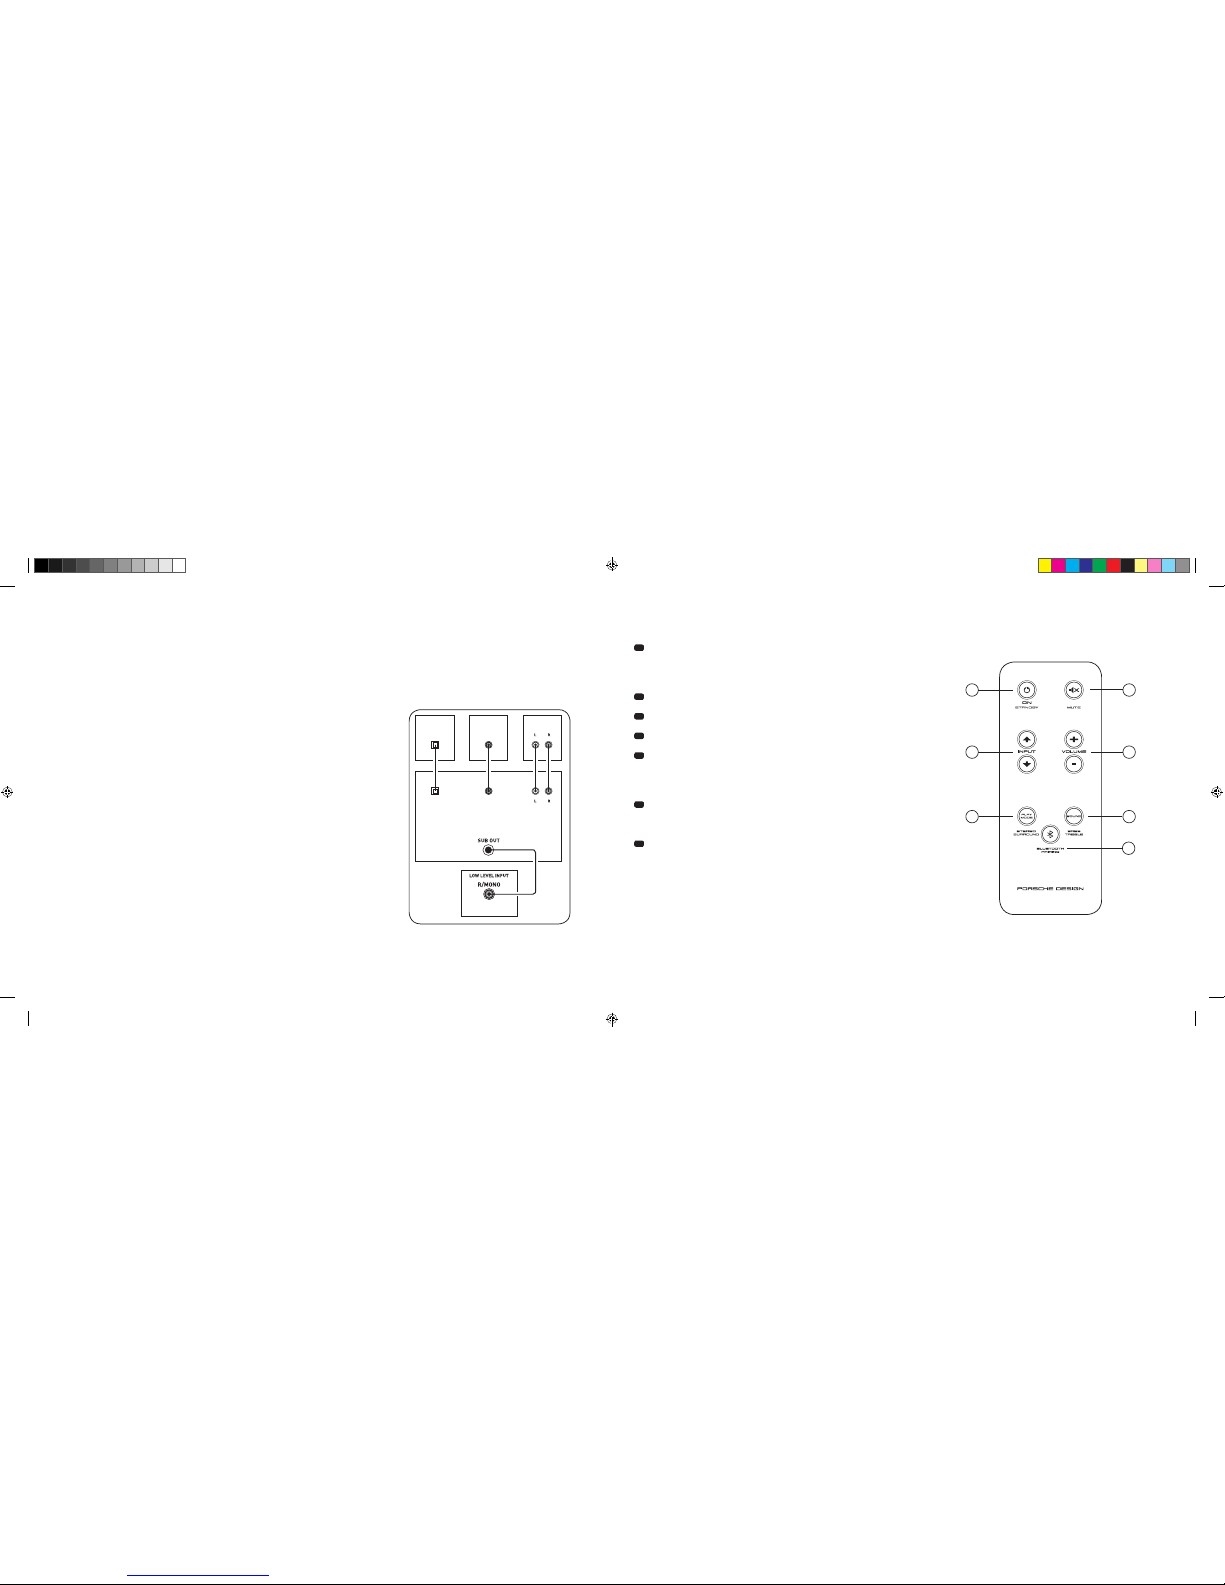
[
PL ] 911 Soundbar
192
|
193
PODŁĄCZENIE
Proszę zwrócić uwag ę, aby przed podłączeniem wszy stkie komponenty elektr yczne były wyłączone. Gł ośnik 911 Soundbar posia da 3 wejścia do
wyboru. Zasa dniczo wystarczy, jeśli połącz y się jedno z tych wejść z telewizore m i podłączy się wszystkie i nne odtwarzacze do telewizora. A by uzyskać
możliwie jak najlepsze odtwarzanie dźwięku, zaleca się połączenie odbiornika satelitarnego, odtwarzacza Blu-ray lub DVD bezpośrednio z głośnikiem
911 Soundbar. W zależności od rodzaju i wyposażenia zastosowanego źródła można wybierać pomiędzy następującymi możliwościami:
OBSŁUGA
Pilot zdalnego sterowania
1
Zasilanie
ON – świeci się zielona lampka LED [ Wł. ]
Standby – świeci się czerwona lampka LED [ gotowość ]
Soundbar odłączony od sieci – lampka LED nie świeci się [ Wył.
]
2
Mute [ wyciszenie
]
3
Input [ wybór źródła d źwięku
]
4
Volume [ regulacja głośności
]
5
Play Mode [ tryb odtwar zania ]
Stereo – do odt warzania muzyki
Surr ound – wirtualny dźwięk prze strzenny do
odtwarzania kina domowego
6
Sound
[ regulacja dźwięk u ]
Bass –
dopasowanie za pomocą Volume [ +6... – 6 dB
]
Treble –
dopasowanie za pomocą Volume [ +6... – 6 dB
]
7
Parowanie Bluetooth®
Połączenie ze źród łem pracującym w technologii b ezprzewodowej Bluetooth
®
Funkcja pamięci
Po wcześniejszy m odłączeniu od sieci głośni k 911 So undbar włącza się
automatycznie do ostatnio wybranego stanu. Zachowane zostają wszystkie
ustawienia [ np. wł./wył. głośność ].
SUB
DIGITAL MOVIE
DVD
DVDTV
TV
AUX
AUX
TV – wejście c yfrowe [ OPTYC ZNE
]
Nowoczesne telewizory mają optyczne wyjście audio [ Toslink ]. Połączyć je z wejśc iem
głośnika 911 Soundbar oznaczone go jako „TV”. Połączenie to gwarantuje optyma lną
transmisję sygnału i najlepszą jakość dźwięku.
Uwaga: Zdjąć kapturki ochronne z dołączonego kabla optycznego!
DVD – wejście cy frowe [ KONCE NTRYCZNE
]
Do transmisji sygna łu audio DVD należy połącz yć cyfrowe wyjście koncentr yczne
odtwarzacza B lu-ray lub DVD z gniazdem głośni ka 911 Soundbar oznaczonego j ako
„DVD”. Do przesyłania sygna łu obrazu odtwarzacz DVD m usi być dodatkowo połączony
z telewizorem. Można również wybrać wejście głośnika 911 Soundbar oznaczonego
jako „DVD”, jeżeli telewizor nie ma wyjścia optycznego.
AUX – wejście ana logowe
Jeżeli telewizor jest w yposażony tylko w wyjś cie audio oznaczone jako „Pre-Ou t”, to należy
je połączyć ek ranowanym kablem stereo z wt ykami cinch z wejściem analo gowym głośnika
911 Soundbar oznaczonym jako „AUX”. W przeciw nym razie wejście to służy do po łączenia
z magnetowidami lub konsolami do gier.
SUB – wyjście analogowe
Stosować to wyjście, jeże li podłączony ma być zewnętrzny ak tywny subwoofer. SUB OUT w
ustawieniu pods tawowym nie jest akty wne i trzeba je podłączyć za pom ocą pilota zdalnego
sterowania. Patrz stron a 196 „Rozszerzone funkcje dźwięku”.
4
ON
STANDBY
1
3
5 6
7
2
DS_Betriebsanleitung_911_Soundbar_210x148mm_RZ_v10.indd 192-193 09.11.15 09:43
Page 99
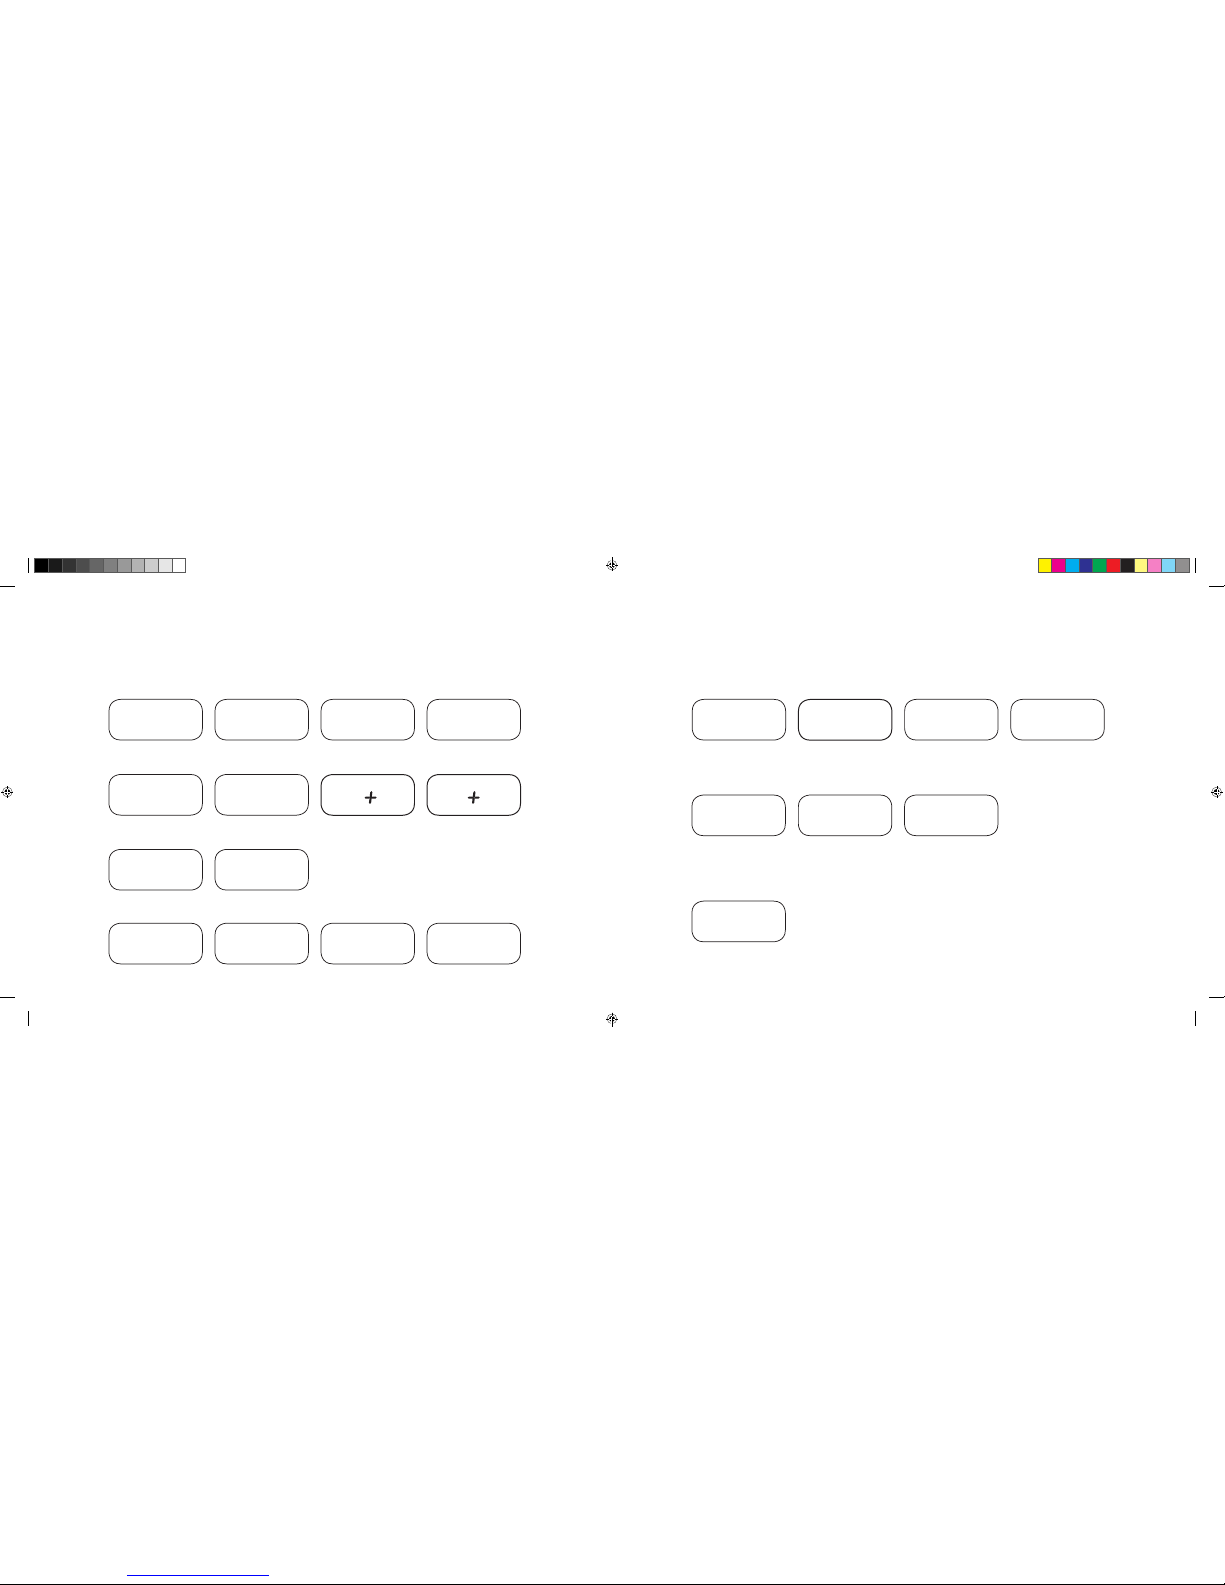
[
PL ] 911 Soundbar
194
|
195
WSKAZANIA NA WYŚWIETLACZU
Głośnik 911 Soundbar posiada wielofunkcyjny wyświetlacz, który na ok. pięć sekund włącza się w przypadku polecenia wysyłanego z pilota.
Najważniejs ze wskaźniki i ich znaczenie są p odane tutaj. Tryb gotowości głośnika 911 Soundbar jes t wskazywany przez świec ącą się czerwoną
diodę LED. Jeżeli Twój 911 Soundbar jest włączony, to świeci si ę ta lampka LED na zielono.
Input
Tryby dźwięku
Tryb odtwarzania
Wejście TV [ optyczne
]
TV
Volume
[
0 – 99
]
V30
Stereo
ST
Tryb powiązania
BTP
Wejście DVD
[
koncentryczne
]
DVD
Wyciszenie
[
Mute
]
---
Surround – dźwię k
przestrzenny
SUR
Ustanowiono połączenie
CON
Wejście AUX [ analogowe ]
AUX
Regulacja basów
[
+/– 6
]
B 6
Połączenie prze rwane
DIS
Bluetooth
®
BT
Regulacja tonów wysokich
[
+/– 6
]
T 6
Komunikat o błędzie
FAI
Bluetooth
®
Funkcje ustawienia
Włączenie i wył ączenie automatyki włączania dla wejścia
optycznego i koncentrycznego
AUT
Włączenie i wył ączanie
automatycznego wyboru
wejścia BT
SEL
Włączenie i wył ączenie
ECO Standby
ECO
Funkcja uczenia się na podczerwień
Uczenie się kodów na
podczerwień
IRL
Rozszerzone funkcje dźwięku
Opóźnienie odtwarzania
dźwięku [ Li pSy nc ]
LIP
Włączenie i wył ączenie
SUB OUT
SUB
Włączanie i wyłączanie
kompresji dynamiki
Dolby Dynamic Range
Compression
DRC
Wybór sposobu
ustawienia
EQ
DS_Betriebsanleitung_911_Soundbar_210x148mm_RZ_v10.indd 194-195 09.11.15 09:43
Page 100

[
PL ] 911 Soundbar
196
|
197
ROZSZERZONE FUNKCJE DŹWIĘKU
Menu dla rozszerzon ych funkcji dźwięku daje możliwo ść korygującej ingerencji w p rzypadku
niezsynchronizowanego z ustami odtwarzania dźwięku w celu włączenia zewnętrznego,
podłączonego za pomocą kabla subwoofera, dostosowania odtwarzania dźwięku do
wybranego miejsca ustawienia oraz do włączenia lub wyłączenia funkcji Dolby „Dynamic
Range Compression” [ kompresji dynamiki ].
Nacisnąć i przy trzymać na pilocie pr zycisk oznaczony jako „Sound” prze p onad 3 sekundy,
przejść do menu „R ozszerzone funkcje dźwięku” i w yświetlacz na głośniku 911 Soundbar
przeskoczy na
LIP
.
Przyciskami „Volume +/-” można teraz op óźnić odtwarzanie dźwi ęku w krokach co 10 ms,
aby dopasować dźwięk do „opóźnionego” obrazu.
Po ponownym krótkim na ciśnięciu przycisku „So und” wyświetlacz przeska kuje na
SUB
.
Przyciskami „Volume +/-” można włącz yć lub wyłączyć wyjści e dla zewnętrznego subwoofera.
Uwaga, w przypad ku włączonego SUB OUT odtwar zanie dźwięku przez gł ośnik
911 Soundbar jest ograniczone do 8 0 Hz. Częstotliwości poniżej 80 Hz są kierow ane do
subwoofera
zewnętrznego.
Nacisnąć krótko kolejny r az przycisk „Sound” – w yświetlacz przeskakuje na EQ.
Przyciskami „Volume +/-” można teraz wybrać między trzema wstępnie ustawionymi
ustawieniami korektora i dostosować odtwarzanie dźwięku do miejsca ustawienia.
EQ1
dla swobodnie ustawionego głośnika 911 Soundbar, np. na kredensie.
EQ2
dla ustawienia z telewizorem płaskim zawieszonym na ścianie.
EQ3
dla ustawienia głośnika 911 Soundbar na szafce lub regale.
Po ponownym naciśnięciu przycisku „Sound” wyświetlacz przeskakuje na
DRC
.
„Dynamic Range Compression” jest opcją ustawienia firmy Dolby Laboratories. W przypadku
włączonej funkcj i można przy kodowanych przez Dolby str umieniach danych automatycz nie
zmniejszyć za kres dynamiki, redukując różn ice głośności. Ciche dźwi ęki są tym samym
podnoszone, a głośne obniżane.
Przyciskami „Volume +/-” można włącz yć lub wyłączyć funkcję
DRC
.
Po ponownym naciśnięciu przycisku „Sound” wyświetlacz przeskakuje na
VOL
.
Za pomocą tej funkcj i [ ochronnej ] „Volume” można ograniczyć maksymalnie regulowany
poziom głośności, tzn. głośności [ wskazanie na wyświetlaczu ] w trakcie pracy nie można
zwiększyć powyżej ustawionej tutaj wartości.
Przyciskami „Volume +/-” można teraz us tawić pożądaną głośność
[
0–99, gdzie 99 r eprezentuje poziom maksymalny ].
LIP
SUB
ON OFF
EQ
EQ1 EQ2 EQ3
DRC
ON OFF
VOL
0 99
…
DS_Betriebsanleitung_911_Soundbar_210x148mm_RZ_v10.indd 196-197 09.11.15 09:43
 Loading...