

Page 1

Dear Owner,
We would like to thank you for your purchase of a
Porsche Cayenne. Judging by the car you have
chosen, you are a motorist of a special breed, and
you are probably no novice when it comes to
automobiles.
Remember however, as with any vehicle, you
should take time to familiarize yourself with your
Porsche and its performance characteristics.
Always drive within your own unique capabilities as
a driver and your level of experience with your
Porsche. Ensure that anyone else driving your
Porsche does the same. To prevent or minimize
injury, always use your safety belts. Never
consume alcohol or drugs before or during the
operation of your vehicle.
This Owner's Manual contains a host of useful
information. Please take the time to read this
manual before you drive your new Porsche.
Become familiar with the operation of your
Porsche car for maximum safety and operating
pleasure. The better you know your Porsche, the
more pleasure you will experience driving your
new car.
Always keep your Owner's Manual in the car, and
give it to the new owner if you ever sell your
Porsche.
A separate Maintenance Booklet explains how
you can keep your Porsche in top driving condition
by having it serviced regularly.
A separate Warranty and Customer Information Booklet contains detailed information about
the warranties covering your Porsche.
For U.S. only:
If you believe that your vehicle has a fault which
could cause a crash, injury or death, you should
immediately inform the National Highway Traffic
Safety Administration (NHTSA) in addition to
notifying Porsche Cars North America, Inc.
(Porsche Cars N.A.).
If NHTSA receives similar complaints, it may open
an investigation, and if it finds that a safety
problem exists in a group of vehicles, it may order
a recall and remedy campaign. However, NHTSA
cannot become involved in individual problems
between you and your dealer, or Porsche Cars
N.A.
To contact NHTSA, you may call the Vehicle Safety
Hotline toll-free at 1–888–327–4236 (TTY:
1–800–424–9153); go to
http://www.safercar.gov; or write to: Administrator, NHTSA, 400 Seventh Street, SW.,
Washington, DC 20590.
You can also obtain other information about motor
vehicle safety from http://www.safercar.gov.
Your car has thousands of parts and components
which have been designed and manufactured in
accordance with Porsche's high standards of
engineering quality and safety.
Warning!
Any alteration or misuse of the vehicle can
lead to accidents and serious or fatal
personal injuries.
Any alteration of the vehicle may negate or
interfere with those safety features built into
the vehicle. Modifications may be carried out
on your vehicle only if approved by Porsche.
Your Porsche is intended to be used in a safe
manner obeying the local laws and in the
light of driving conditions faced by you, and
in accordance with the instructions provided
in this Owner's Manual.
f Do not misuse your Porsche by ignoring those
laws and driving conditions, or by ignoring the
instructions in this manual.
Regularly check your vehicle for signs of
damage.
Damaged or missing aerodynamic components such as spoilers or underside panels
affect the driving behavior and therefore
must be replaced immediately.
Your car may have all or some of the components
described in this manual.
Should you have difficulty understanding any of
the explanations of features or equipment installed
in your vehicle, contact your authorized Porsche
dealer. He/She will be glad to assist you. Also
check with your dealer on other available options
or equipment.
1
Page 2

Throughout this booklet, left is designated as the
driver's side of the vehicle, and right as the
passenger's side of the vehicle.
Text, illustrations and specifications in this manual
are based on the information available at the time
of printing.
It has always been Porsche's policy to continuously improve its products. Porsche, therefore,
reserves the right to make changes in design and
specification, and to make additions or improvements in its product without incurring any obligation to install them on products previously manufactured.
We wish you many miles of safe and pleasurable
driving in your Porsche.
f Do not alter your Porsche. Any alteration could
create dangerous conditions or defeat safety
engineering features built into your car.
f Do not misuse your Porsche. Use it safely, and
consistently with the law, according to the
driving conditions, and the instructions in this
manual.
Alteration or misuse of your Porsche could
cause accidents and serious personal injury
or death.
Note to owners
In Canada, this manual is also available in French.
To obtain a copy contact your dealer or write to:
Setting and operating vehicle components when driving
Warning!
There is a danger of accident if you set or
operate the on-board computer, radio,
navigation system, telephone or other equipment when driving.
This could distract you from the traffic and
cause you to lose control of the vehicle resulting in serious personal injury or death.
f Operate the components while driving only if
the traffic situation allows you to do so safely.
f Carry out any complicated operating or setting
procedures only with the vehicle stationary.
Important!
For your own protection and longer service life of
your car, please heed all operating instructions
and special warnings. These special warnings use
the safety alert symbol, followed by the words
Danger, Warning and Caution. These special
warnings contain important messages regarding
your safety and/or the potential for damage to
your Porsche. Ignoring them could result in
serious mechanical failure, serious personal injury
or death.
2
Note aux proprietaires
Au Canada on peut se procurer un exemplaire de
ce Manuel en français auprès du concessionaire
ou du:
Porsche Cars Canada, Ltd.
Automobiles Porsche Canada, LTEE
5045 Orbitor Drive
Building #8, Suite 200
Mississauga, Ontario
Canada L4W 4Y4
Telephone number for customer assistance:
1-800-PORSCHE / Option 3
Engine Exhaust
Danger!
Engine exhaust is dangerous if inhaled.
Engine exhaust fumes have many components which you can smell. They also contain
carbon monoxide (CO), which is a colorless
and odorless gas.
Carbon monoxide can cause unconsciousness and even death if inhaled.
f Never start or let the engine run in an en-
closed, unventilated area.
It is not recommended to sit in your car for
prolonged periods with the engine on and the
car not moving.
Page 3

California Proposition 65 Warning
Warning!
Engine exhaust, some of its constituents, and
certain vehicle components contain or emit chemicals known to the State of California to cause
cancer and birth defects or other reproductive
harm.
In addition, certain fluids contained in vehicles and
certain products of component wear contain or
emit chemicals known to the State of California to
cause cancer and birth defects or other reproductive harm.
Hot Exhaust Pipes
Warning!
Risk of burn injury when standing near or
coming into contact with the exhaust pipe.
The exhaust pipe is hot when the vehicle is running
and remains hot for some time after the vehicle is
turned off.
f To prevent injury, make a point of noting where
your vehicle’s exhaust pipe is, avoid placing
your legs near the exhaust pipe when loading
and unloading cargo in the rear, and closely
supervise children around the vehicle during
time when the exhaust pipe could be hot.
A hot exhaust pipe can cause serious burns.
Portable Fuel Containers
Danger!
Portable fuel containers may leak, whether
they are full or partially empty. Fuel leaking
from a portable container carried in your
vehicle could, in case of an accident, cause
a fire or explosion, resulting in serious
personal injury or death.
f Never carry additional fuel in portable contai-
ners in your vehicle.
Vehicles with SportDesign package
Caution!
Risk of damage. On vehicles with SportDesign package, front, rear, and side
member trim are painted and located lower
on the vehicle. Off-road driving can seriously
damage these trim parts.
f When driving off-road, make sure these parts
are not damaged.
f Make sure there is sufficient clearance
between obstacles and the underside of the
vehicle.
f Avoid driving through water.
f Do not use side member trim as a running
board.
Porsche Ceramic Composite Brake
(PCCB)
f Please see the chapter “BRAKES” on
Page 163.
The high-performance brake system is designed
for optimal braking effect at all speeds and temperatures.
Certain speeds, braking forces and ambient conditions (such as temperature and humidity) therefore
might cause brake noises.
Wear on the different components and braking
system, such as brake pads and brake discs,
depends to a great extent on the individual driving
style and the conditions of use and therefore
cannot be expressed in actual miles on the road.
The values communicated by Porsche are based
on normal operation adapted to traffic. Wear increases considerably when the vehicle is driven on
race tracks or through an aggressive driving style.
f Please consult an authorized Porsche dealer
about the current guidelines in effect before
such use of your vehicle.
3
Page 4

Dear Porsche Owner
A lot has gone into the manufacture of your
Porsche, including advanced engineering, rigid
quality control and demanding inspections. These
engineering and safety features will be enhanced
by you...
the safe driver...
– who knows her/his car and all controls,
– who maintains the vehicle properly,
– who uses driving skills wisely and always
drives within her/his own capabilities and the
level of familiarity with the vehicle.
You will find helpful hints in this manual on how to
perform most of the checks listed on the following
pages. If in doubt, have these checks performed
by your authorized Porsche dealer.
Before driving off...
Check the following items first
f Turn the engine off before you attempt any
checks or repairs on the vehicle.
f Be sure the tires are inflated correctly.
Check tires for damage and tire wear.
f See that wheel bolts are properly tightened
and not loose or missing.
f Check engine oil level, add if necessary. Make
it a habit to have engine oil checked with every
refueling.
f Check all fluid levels such as windshield
washer and brake fluid levels.
f Be sure the vehicle battery is well charged and
cranks the engine properly.
f Check all doors and lids for proper operation
and latch them properly.
f Check and if necessary replace worn or
cracked wiper blades.
f See that all windows are clear and unobst-
ructed.
f Check air intake slots and area between en-
gine compartment lid and windshield. Ensure
that these areas are free of snow and ice, so
the heater and the windshield wipers work
properly.
f If a child will be riding in the vehicle, check
child seat/child seat restraint system to ensure
that restraints are properly adjusted.
f Check all exterior and interior lights for opera-
tion and that the lenses are clean.
f Check the headlights for proper aim, and if
necessary, have them adjusted.
f Check under the vehicle for leaks.
f Be sure all luggage is stowed securely.
Emergency equipment
It is good practice to carry emergency equipment
in your vehicle.
Some of the items you should have are: window
scraper, snow brush, container or bag of sand or
salt, emergency light, small shovel, first-aid kit,
etc.
4
Page 5

In the driver's seat...
f Check operation of the horn.
f Position seat for easy reach of foot pedals and
controls.To reduce the possibility of injury from
the airbag deployment, you should always sit
back as far from the steering wheel as is
practical, while still maintaining full vehicle
control.
f Adjust the headrest so that the upper edge of
the headrest is brought to eye level or higher.
f Adjust the inside and outside rear view mirrors.
f Buckle your safety belts.
f Check operation of the foot and parking brake.
f Check all warning and indicator lights with
ignition on and engine not running.
f Start engine and check all warning displays for
warning symbols.
f Never leave an idling car unattended.
f Lock doors from inside, especially with
children in the car to prevent inadvertent
opening of doors from inside or outside. Drive
with doors locked.
On the road...
f Never drive after you have consumed alcohol
or drugs.
f Always have your safety belt fastened.
f Always drive defensively.
Expect the unexpected.
f Use signals to indicate turns and lane changes.
f Turn on headlights at dusk or when the driving
conditions warrant it.
f Always keep a safe distance from the vehicle in
front of you, depending on traffic, road and
weather conditions.
f Reduce speed at night and during inclement
weather.
Driving in wet weather requires caution and
reduced speeds, particularly on roads with
standing water, as the handling characteristics
of the vehicle may be impaired due to hydroplaning of the tires.
f Always observe speed limits and obey road
signs and traffic laws.
f When tired, get well off the road, stop and take
a rest. Turn the engine off. Do not sit in the
vehicle with engine idling.
Please see the chapter “ENGINE EXHAUST” on
Page 2.
f When parked, always put the parking brake on
and put the gearshift lever in neutral or the
Tiptronic selector lever in position P.
On hills also turn the front wheels toward the
curb.
f When emergency repairs become necessary,
move the vehicle well off the road. Turn on the
emergency flasher and use other warning
devices to alert other motorists. Do not park
or operate the vehicle in areas where the hot
exhaust system may come in contact with dry
grass, brush, spilled fuel or other flammable
material.
f Make it a habit to have the engine oil checked
with every refueling.
5
Page 6

Break in hints for the first
2,000 miles (3,000 kilometers)
The following tips will be helpful in obtaining
optimum performance from your new Porsche.
Despite the most modern, high-precision manufacturing methods, the moving parts must still wear
in with each other. This wearing-in occurs mainly in
the first 2,000 miles (3,000 km).
Therefore:
f Preferably take longer trips.
f Avoid frequent cold starts with short-distance
driving whenever possible.
f Avoid full throttle starts and abrupt stops.
f Do not exceed maximum engine speed of
4,200 rpm (revolutions per minute).
f Do not run a cold engine at high rpm either in
Neutral or in gear.
f Do not let the engine labor, especially when
driving uphill. Shift to the next lower gear in
time (use the most favorable rpm range).
f Never lug the engine in high gear at low
speeds. This rule applies at all times, not just
during the break-in period.
f Do not participate in motor racing events,
sports driving schools, etc. during the first
2,000 miles (3,000 kilometers).
There may be a slight stiffness in the steering,
gear-shifting or other controls during the break-in
period which will gradually disappear.
Break in brake pads and brake discs
New brake pads and discs have to be “broken in”,
and therefore only attain optimal friction when the
car has covered several hundred miles or km.
The slightly reduced braking ability must be
compensated for by pressing the brake pedal
harder. This also applies whenever the brake pads
and brake discs are replaced.
New tires
New tires do not have maximum traction. They
tend to be slippery.
f Break in new tires by driving at moderate
speeds during the first 60 to 120 miles (100
to 200 km). Longer braking distances must be
anticipated.
Engine oil and fuel consumption
During the break-in period oil and fuel consumption may be higher than normal.
f Please see the chapter “ENGINE DATA” on
Page 349.
As always, the rate of oil consumption depends on
the quality and viscosity of oil, the speed at which
the engine is operated, the climate and road
conditions, as well as the amount of dilution and
oxidation of the lubricant.
f Make a habit of checking engine oil with every
refueling, add if necessary.
6
Page 7

Table of Contents
Overview Illustrations......................... 10
Driver’s cockpit ............................................11
Steering wheel and instrument cluster ............ 12
Center console, front .................................... 13
Opening and Locking ......................... 14
Never invite car theft! .................................... 15
Keys ............................................................ 16
Central Locking System ................................17
Brief overview – Opening and locking from
outside ........................................................18
Unlocking and locking from outside ................ 19
Opening and locking from inside ....................28
Opening and closing the engine
compartment lid ...........................................29
Malfunctions when opening and closing ..........31
Seats, Mirrors and Steering Wheel ..... 33
Seat and Headrest........................................34
Front seat with memory.................................37
Easy Entry Function .....................................39
Fire Extinguisher ........................................... 40
Heated Seats – Front and Rear ......................40
Safety Belts..................................................42
Airbag Systems ............................................ 45
Child Restraint Systems ................................49
LATCH Child Seat System..............................53
Child Restraint Anchorages............................ 54
Door Mirrors.................................................55
Interior Mirror ............................................... 57
Automatic Anti-Dazzle Mirror .......................... 57
Steering Wheel .............................................58
Multi-Functional Steering Wheel ......................60
Sun Visors.................................................... 62
Make-up mirror .............................................62
Sun Blinds, Rear Side Windows ......................62
Air Conditioning, Parking Heater and
Heated Rear Window ......................... 63
Opening the Cover Flap of the
Air-Conditioning Control Panel .......................64
Overview of Air-Conditioning Systems ............. 64
Valid for Every Air-Conditioning System...........65
Brief Overview – Manual Air-Conditioning ......66
Manual Air-Conditioning..................................67
Brief Overview – Automatically Controlled
2-Zone Air-Conditioning System......................69
Automatically Controlled
2-Zone Air-Conditioning.................................. 70
Brief Overview – Automatically Controlled
4-Zone Air-Conditioning System,
Front Control Panel .......................................73
Brief Overview – Automatically Controlled
4-Zone Air-Conditioning System,
Rear Control Panel ........................................74
Automatically Controlled
4-Zone Air-Conditioning.................................. 75
Vents ........................................................... 79
Heated Rear Window .....................................80
Parking Heater..............................................81
Windows and Sliding Roofs ................ 86
Power windows.............................................87
Brief overview - sliding/lifting roof ................ 91
Sliding/Lifting Roof........................................92
Brief overview – Panorama roof system .......96
Panorama roof system ..................................97
Lights, Turn Signals and Windshield
Wipers ............................................ 103
Light Switch ...............................................104
Instrument Illumination.................................105
Automatic Headlight Beam Adjustment..........106
Turn signal/High Beam/
Headlight Flasher Stalk ................................106
Emergency flasher ......................................107
Interior Lighting...........................................107
Comfort Lighting.........................................109
Coming Home Function
(Auto Shut Off Delay) ...................................109
Door-Surrounding Lighting ...........................109
Brief overview – Windshield wipers.............110
Windshield Wiper/Washer Stalk ....................111
Table of Contents 7
Page 8

Multi-Purpose Display
and Instruments .............................. 115
Instrument Panel USA Models ......................117
Instrument Panel Canada Models..................119
Oil Temperature Gage ................................. 120
Tachometer................................................120
Clock.........................................................120
Fuel Gage...................................................120
Speedometer .............................................120
Odometer ..................................................121
Voltmeter ................................................... 121
Cooling System ..........................................122
Emission Control.........................................123
Operating the multi-purpose display on the
instrument panel .........................................124
Opening the main menu............................... 125
Operating example: Displaying average
consumption ..............................................125
Displaying/resetting average speed .............127
Displaying range on remaining fuel ............... 127
Displaying tire pressure............................... 127
Displaying compass .................................... 127
Displaying navigation information .................127
Operating the telephone via the
multi-purpose display ..................................128
Setting speed limit on the multi-purpose
display ....................................................... 129
Displaying warning messages ...................... 130
Displaying status of level control.................. 131
Displaying status of locks/reduction.............131
Displaying average consumption .................. 132
Setting Tire Pressure Monitoring .................. 132
Switching off passenger compartment
monitoring on the multi-purpose display ........142
Synchronous adjustment of door mirrors ......143
Changing settings for opening and locking
the vehicle..................................................143
Switching daytime driving lights on/off..........145
Setting lighting off delay ..............................146
Setting the clock.........................................146
Setting compass.........................................147
Changing language for displays....................148
Changing units for displays ..........................148
Resetting display to factory settings.............148
Overview of warning messages ...............149
Driving and Driving Safety ................ 157
Ignition Lock/Steering Lock .........................158
Starting and Stopping the Engine .................160
Parking Brake.............................................162
Brakes .......................................................163
Cruise Control ............................................167
Manual transmission, clutch .........................169
Tiptronic S..................................................170
Selector Lever Positions..............................171
Driving Programs for On-Road and
Off-Road Driving..........................................177
Power-Transmission and
Running-Gear Control Systems .....................181
Air Suspension with Level Control and
Height Adjustment.......................................190
Porsche Active Suspension Management
(PASM).......................................................193
Porsche Dynamic Chassis Control (PDCC)..... 194
Off-Road Driving..........................................195
Luggage Compartment,
Loadspace and Storage.................... 203
Folding rear seats forward and returning
to upright position ...................................... 204
Loadspace ................................................ 207
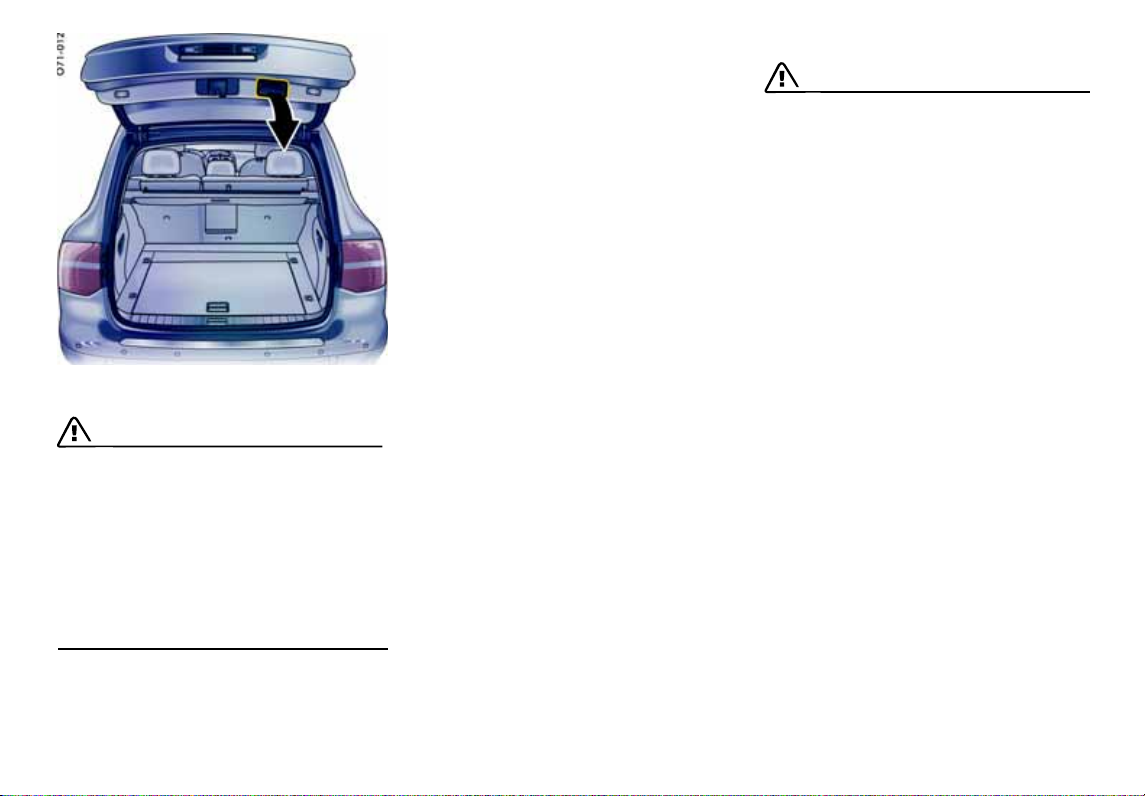
Cargo management system ........................ 208
Luggage Compartment Cover ..................... 211
Luggage safety net .................................... 212
Ski Bag ..................................................... 214
Roof Transport System............................... 216
Off-road roof-mounted Headlights
Cayenne S Transsyberia ............................. 217
Car Audio Operation/Tips............................ 218
Porsche Communication Management
(PCM)........................................................ 220
iPod, USB and AUX..................................... 221
Storage..................................................... 222
Cupholder.................................................. 226
Ashtray...................................................... 227
Cigarette Lighter........................................ 228
Trailer Hitch .................................... 229
Trailer Coupling.......................................... 230
Loading Information.................................... 231
Parking ........................................... 236
Parking Aids .............................................. 237
Swivelling down mirror glass as parking aid.. 241
Garage door opener................................... 241
8 Table of Contents
Page 9

Alarm System and Theft Protection .. 244
Alarm System and
Passenger Compartment Monitoring ............245
Maintenance and Car Care............... 249
Exercise Extreme Caution when Working
on your Vehicle...........................................250
Engine Oil................................................... 251
Checking Engine Oil Level............................ 252
Topping up Engine Oil .................................253
Coolant Level .............................................255
Brake-Fluid Level......................................... 257
Washer Fluid............................................... 258
Power Steering........................................... 259
Changing Air Cleaner...................................260
Changing Particle Filter ...............................260
Automatic Transmission Fluid....................... 260
Manual Transmission Oil .............................. 260
Wiper Blades .............................................. 261
Emission Control System............................. 263
How Emission Control Works .......................264
Fuel Economy............................................. 265
Operating Your Porsche in other Countries ...266
Fuel ...........................................................266
Portable Fuel Containers .............................268
Fuel Recommendations ...............................269
Fuel Evaporation Control .............................270
Car Care Instructions ..................................270
Minor Repairs.................................. 279
Exercise Extreme Caution
when Working on your Vehicle......................280
Tires/Wheels ..............................................281
Jack...........................................................291
Tool Kit ......................................................292
Compressor ...............................................292
Spacers .....................................................293
Wheel Bolts ................................................293
Changing Wheels ........................................294
Flat Tire......................................................295
Lifting the Vehicle
with a Lifting Platform or Garage lift..............298
Electrical System ........................................312
Battery.......................................................320
Replacing the remote control battery............322
Emergency Starting with Jumper Cables .......323
Replacing Bulbs ..........................................326
Headlights ..................................................327
Tail light .....................................................336
License Plate Lights ....................................338
Headlight Adjustment ..................................339
Changing headlights
from left to right-hand traffic ........................340
Bulb Chart ..................................................342
Towing.......................................................342
Tire Pressure and Technical Data..... 346
Vehicle Identification................................... 347
Engine Data ............................................... 349
Tires, Rims, Tracks .................................... 350
Tire Pressures, Cold (68 °F/20 °C).............. 354
Weights..................................................... 356
Ground Clearance ...................................... 357
Capacities ................................................. 359
Dimensions................................................ 360
Driving Performance................................... 361
Index .............................................. 362
Table of Contents 9
Page 10

Overview Illustrations
Driver’s cockpit ............................................11
Steering wheel and instrument cluster ............ 12
Center console, front .................................... 13
10 Overview Illustrations
Page 11

Driver’s cockpit
1.Power Lift Gate
See Page 23.
2.Power Windows
See Page 87.
3.Inner door Handle
See Page 28.
4.Door mirror adjustment
See Page 55.
5.Engine compartment lid release
See Page 29.
6.Parking brake
See Page 162.
7.Diagnostic socket
8.Parking brake release
See Page 162.
9.Ignition lock/steering lock
See Page 158.
10.Seat adjustment
See Page 34.
11.Instrument lighting knob
See Page 105.
12.Light switch
See Page 104.
Overview Illustrations 11
Page 12
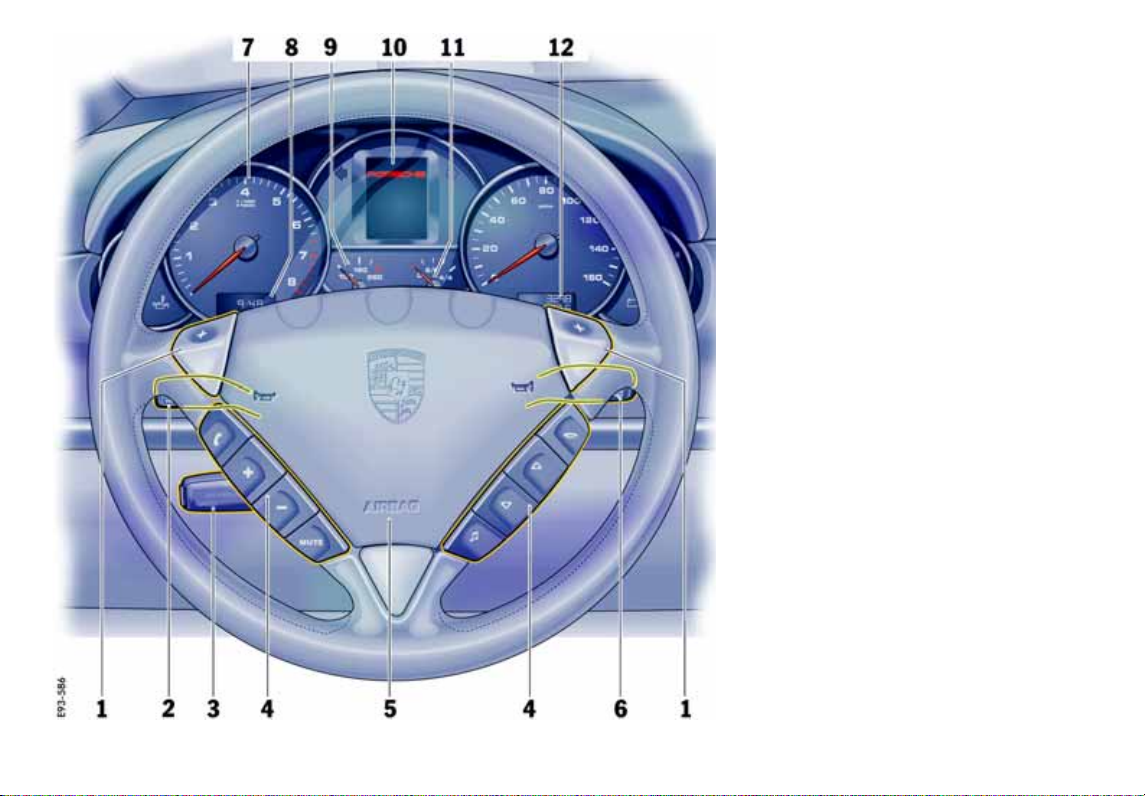
Steering wheel and instrument
cluster
1.Tiptronic rocker switches
See Page 58.
2.Turn signals
See Page 106.
3.Cruise control
See Page 167.
4.Function keys
See Page 60.
5.Horn
See Page 58.
6.Windshield wipers
See Page 111.
7.Tachometer
See Page 120.
8.Clock
See Page 123.
9.Cooling system temperature gage
See Page 122.
10.Multi-purpose display
See Page 124.
11.Fuel gage
See Page 120.
12.Odometer
See Page 121.
12 Overview Illustrations
Page 13

Center console, front
1.Porsche Communication Management (PCM)
See separate operating instructions.
2.Air conditioner
See Page 64.
3.Ashtray/cigarette lighter
See Page 226.
4.Cupholder
See Page 226.
5.Reduction (Low Range), differential locks
See Page 177.
6.Sport mode
See Page 179.
7.Porsche Active Suspension Management
(PASM) running-gear setup
See Page 193.
8.Height adjustment, air suspension
See Page 190.
9.Armrest, storage trays
See Page 224.
10.ParkAssistent warning indicator
See Page 239.
11.Vents
See Page 79.
12.Glove compartment
See Page 223.
Overview Illustrations 13
Page 14

Opening and Locking
Never invite car theft! .................................... 15
Keys ............................................................ 16
Central Locking System ................................17
Brief overview – Opening and locking from
outside ........................................................18
Unlocking and locking from outside ................ 19
Opening and locking from inside ....................28
Opening and closing the engine
compartment lid ...........................................29
Malfunctions when opening and closing ..........31
14 Opening and Locking
Page 15
Never invite car theft!
An unlocked car with the key in the ignition lock
invites car theft.
A steering wheel lock and a gong alarm are
standard equipment in your Porsche. The gong
alarm will sound if you open the driver's door while
the key is still in the ignition lock. It is your reminder to pull the key out of the ignition lock and to
lock the doors.
Warning!
Any uncontrolled movement of the vehicle
may result in property damage, serious
personal injury or death.
Never leave your vehicle unattended with the
key in the ignition lock, especially if children
and/or pets are left unattended in the
vehicle. They can operate power windows
and other controls. If the engine is left
running, they may accidentally engage the
shift lever. Serious personal injury or death
could result from loss of control of the
vehicle.
f Always remove the ignition key.
f Always set the parking brake.
f Lock the doors with the key or with the remote
control.
Warning!
Risk of a serious accident.
The steering column will lock when you remove the key while you are driving or as the
car is rolling to a stop. You will not be able to
steer the car.
Serious personal injury or death could result
from loss of control of the vehicle.
f Never remove the key from the steering lock
while you are driving.
To protect your vehicle and your possessions
from theft, you should always proceed as
follows when leaving your vehicle:
f Close windows.
f Close sliding/lifting roof or Panorama Roof
System.
f Remove ignition key (switch ignition off in
vehicles that have Porsche Entry & Drive).
f Engage steering lock.
f Lock storage tray between the front seats and
glove compartment.
f Remove valuables (e.g. car documents, radio
control module, cell phones, house keys) from
the car.
f Lock doors.
f Lock the glove compartment.
f Close oddment trays.
f Cover luggage compartment with the luggage
compartment cover.
f Close rear lid and rear window.
Opening and Locking 15
Page 16
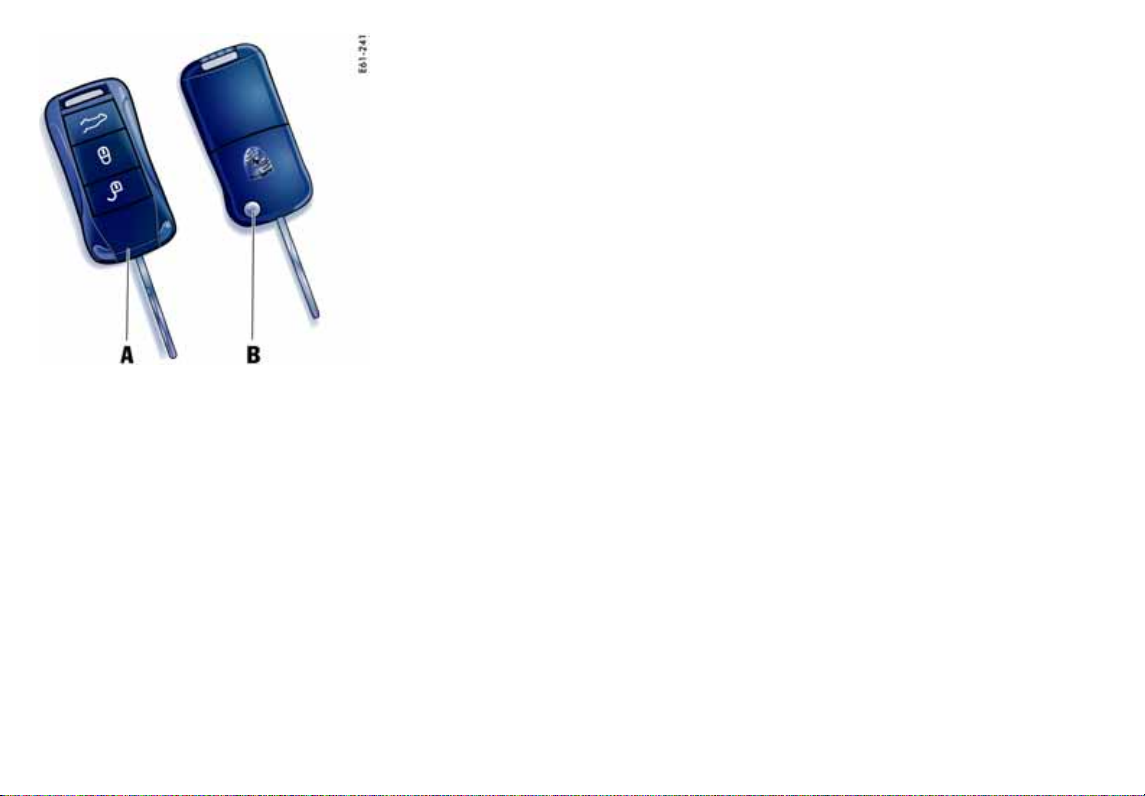
A -Car key
B - Release button for key bit
f Inform your insurance company of any loss or
theft of car keys or if extra or replacement
keys have been made.
f Remove the ignition key, even if leaving the
vehicle only briefly.
Folding out the key bit
f Press release button B.
The key bit folds out.
Folding in the key bit
f Press release button B and fold in the key bit.
Note on operation
The air conditioner settings are stored on the
respective key when switching off the ignition and
locking the vehicle.
Replacement keys
Car keys can only be ordered through an
authorized Porsche dealer. Sometimes, this may
take a long time.
You should therefore always keep a spare key on
your person. Keep it in a safe place, but under no
circumstances in or on the vehicle.
The key codes of new keys have to be “reported”
to the vehicle control module by your authorized
Porsche dealer. All keys belonging to the vehicle
must also be reported again.
Note
Third parties can continue to operate the mechanical locks using the lost key.
Keys
Two car keys with integrated remote control are
supplied with your Porsche. The car keys are
designed as folding keys.
These keys operate all the locks on your vehicle.
f Be careful with your car keys: do not part with
them except under exceptional circumstances.
16 Opening and Locking
Emergency operation
f Please see the chapter “EMERGENCY OPERA-
TION - UNLOCKING THE IGNITION KEY” on
Page 159.
Page 17
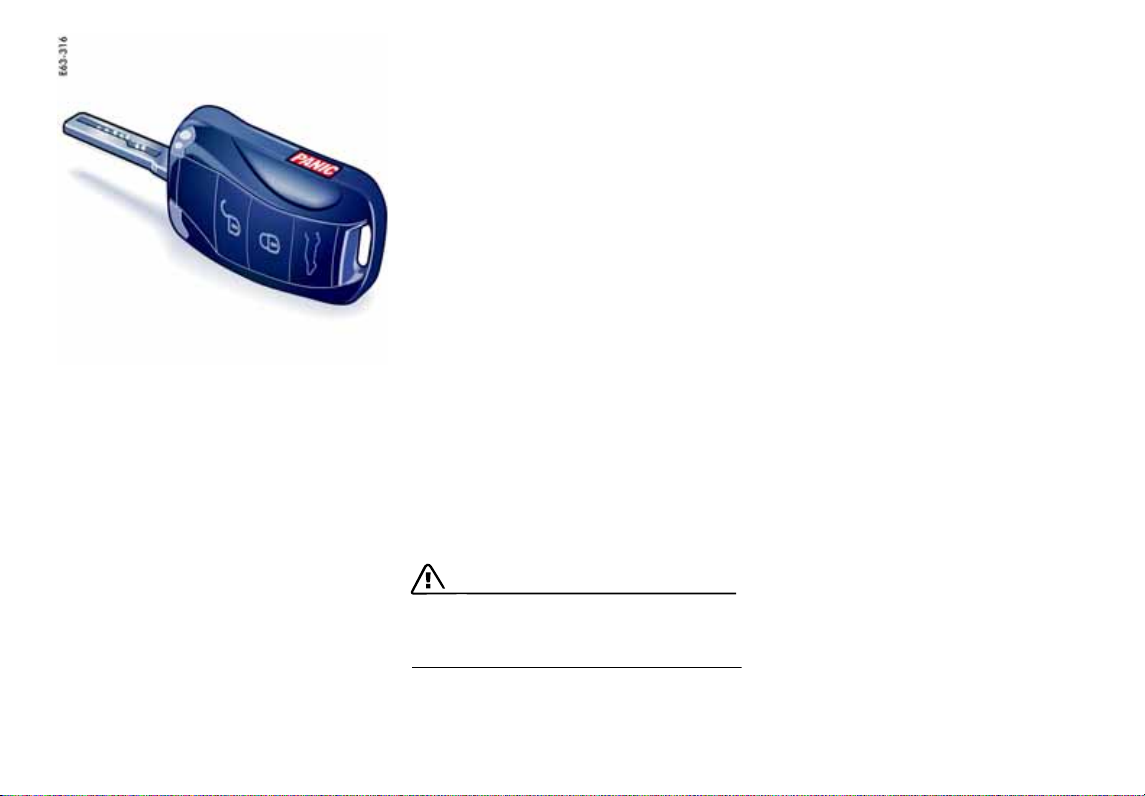
Panic button
In dangerous situations or when one's own safety
is threatened, it is possible to draw attention to
the situation by triggering an alarm.
To trigger an alarm
f Press button.
The horn sounds and the emergency flashers
flash.
To stop the alarm
f Press button again.
The horn becomes silent and the emergency
flashers go out.
Central Locking System
USA: KR55WK45032
Canada: CAN 267 104 187
This device complies with:
Part 15 of the FCC Rules
RSS-210 of Industry Canada.
Operation of this device is subject to the following
two conditions:
– It may not cause harmful interference, and
– it must accept any interference received
including interference that may cause
undesired operation.
Note
The manufacturer is not responsible for any radio
or TV interference caused by unauthorized modifications to this equipment.
Such modification could void the user's authority
to operate the equipment.
Warning!
Any changes or modifications not expressly
approved by Porsche could void the user’s
authority to operate this equipment.
Your vehicle is equipped with a central locking
system. The following are unlocked or locked
together:
– Doors
– Rear lid/rear window
– Filler flap
The central locking system is always activated
when the vehicle is unlocked and locked.
On the multi-purpose display of the instrument
panel, you can set different variants for locking
and unlocking the doors and rear lid. You can open
all doors irrespective of the setting made.
The vehicle cannot be locked if the driver’s door is
not completely closed.
If one of the following components is not completely closed when you try to lock the vehicle the
door/lid is not locked:
– vehicle doors
– rear lid
–rear window
– engine compartment lid
The indication by the emergency flasher and by
the acoustic signal will be provided after all doors
and lids are closed.
Opening and Locking 17
Page 18
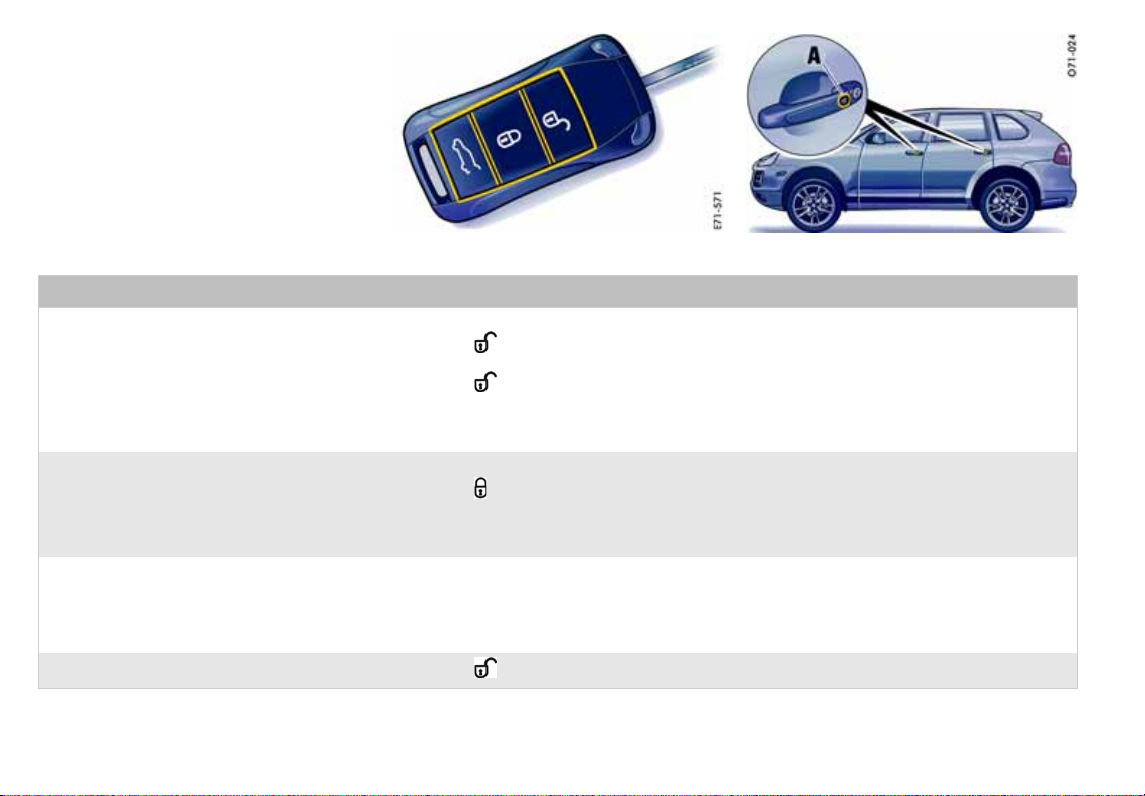
Brief overview – Opening and
locking from outside
The Porsche Entry & Drive option can be recognized by the buttons A in the door handles.
This brief overview does not replace the information provided in the chapter “Opening and locking
from outside”. In particular, warnings are not replaced by this brief overview.
Key Porsche Entry & Drive
What do I want to do? What do I have to do? What happens?
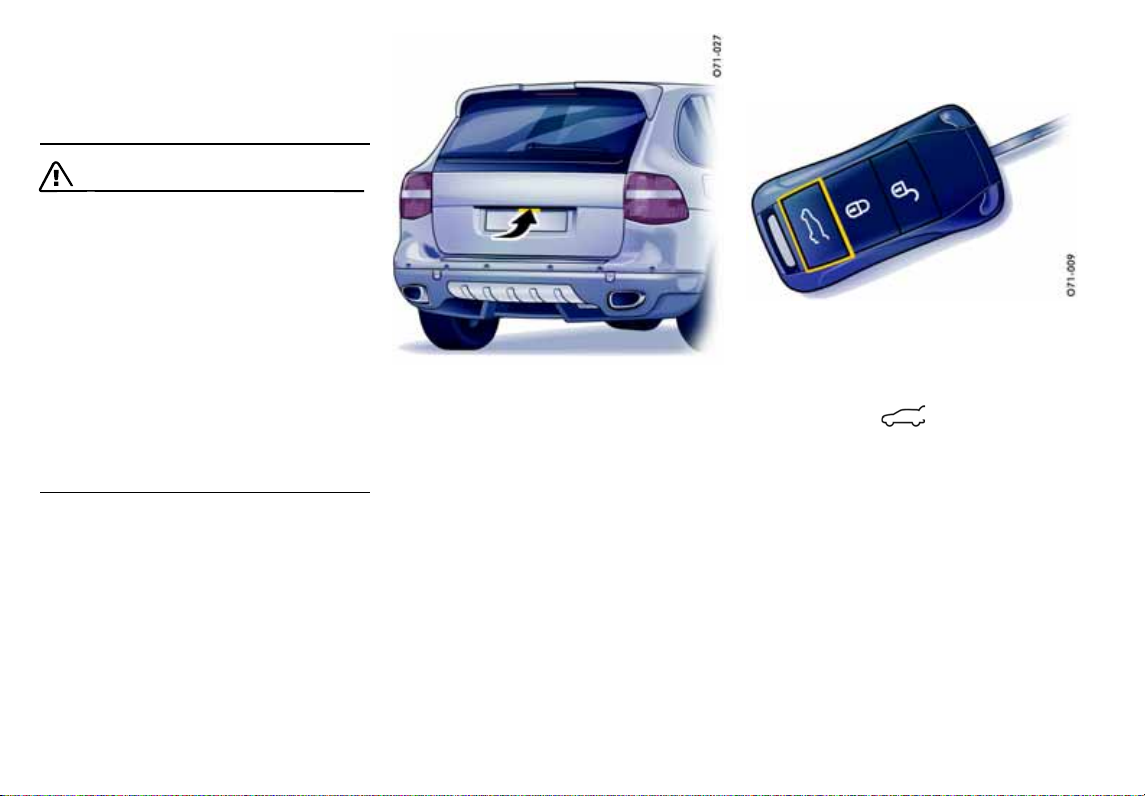
Unlocking
Using the key:
Press button on the key once.
The emergency flasher flashes once.
The driver’s door can be opened.
Locking
Locking if persons/animals
are remaining in vehicle
(switching off passenger compartment
monitoring of the alarm system)
Switching off alarm
18 Opening and Locking
Press button on the key twice.
With Porsche Entry & Drive:
Grip door handle fully.
Using the key:
Press button on the key.
With Porsche Entry & Drive:
Press the button A in the handle.
f Please see the chapter “TEMPORARILY
DEACTIVATING PASSENGER COMPARTMENT
MONITORING SYSTEM” on Page 246.
Press button on the key.
All vehicle doors and the rear lid can be opened.
The doors and the rear lid
can be opened.
The emergency flasher flashes twice and an
acoustic signal will sound twice.
The doors are locked.
Page 19
Unlocking and locking from
outside
Depending on your vehicle equipment, you can
either unlock and lock it with the car key or without
a key by means of Porsche Entry & Drive.
With the key
Use the buttons on the key to unlock and lock the
vehicle.
With Porsche Entry & Drive
On vehicles with Porsche Entry & Drive, you can
unlock, lock and start the vehicle without using the
key.
You simply have carry the key with you, e.g. in
your trouser pocket.
Do not expose the car key to a high level of
electromagnetic radiation. This could adversely
affect Porsche Entry & Drive.
Readiness for operation
The Porsche Entry & Drive readiness for operation
is switched off for the passenger doors after approximately 30 hours and for the driver’s door after approximately 90 hours if the vehicle is not unlocked during this period. In this case:
f Pull door handle once, to reactivate the sys-
tem.
f Pull door handle again, to open the door.
or
f Press button on the key to reactivate the
system.
Note on operation
The factory settings of the vehicle are described
in this chapter.
You can change the settings and store them on
the respective key on the multi-purpose display of
the instrument panel.
For further information on the possible settings on
the multi-purpose display:
f Please see the chapter “CHANGING SETTINGS
FOR OPENING AND LOCKING THE VEHICLE”
on Page 143.
Opening and Locking 19
Page 20
Note on operation
The vehicle doors are locked automatically after
30 seconds if they are not opened.
If the passenger compartment monitoring system
has been switched off (restricted theft protection),
this also remains the case after automatic
relocking.
The doors can be opened from inside by pulling
the inner door handle twice.
Unlocking and opening doors
Unlocking driver’s door with the key
1. Briefly press button on the key once.
The emergency flasher flashes once.
The driver’s door is now unlocked.
2. Pull the door handle.
Unlocking all vehicle doors with the key
1. Briefly press button on the key twice.
The emergency flasher flashes once.
The doors are now unlocked.
2. Pull the door handle.
20 Opening and Locking
Unlocking with Porsche Entry & Drive
(keyless)
The vehicle can be unlocked if you are in the area
of the driver's door with the key.
f Grip door handle fully. The doors are now
unlocked.
f Pull the door handle.
Page 21
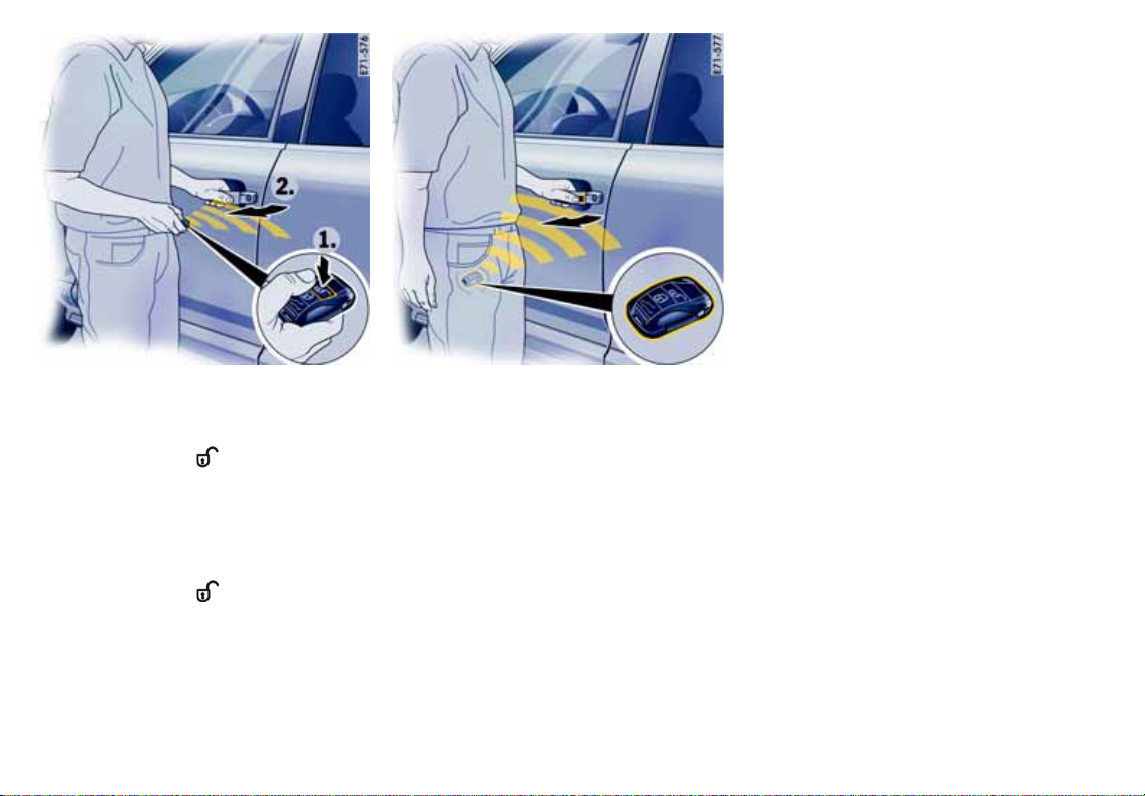
Locking doors
Locking with the key
f Close the door.
f Briefly press button on the key once.
The emergency flasher flashes twice and an
acoustic signal will sound twice.
f If persons or animals remaining in the car:
Please see the chapter “TEMPORARILY
DEACTIVATING PASSENGER COMPARTMENT
MONITORING SYSTEM” on Page 246.
Locking with Porsche Entry & Drive (keyless)
You must carry the key with you.
f Close the door.
f Briefly press the Porsche Entry & Drive locking
button A in the door handle.
The emergency flasher flashes twice and an
acoustic signal will sound twice.
f If persons or animals remaining in the car:
Please see the chapter “TEMPORARILY
DEACTIVATING PASSENGER COMPARTMENT
MONITORING SYSTEM” on Page 246.
Note on operation for locking the doors
The vehicle cannot be locked if the driver’s door is
open.
Automatic door locking and automatic
door unlocking
Warning!
In an emergency situation where you need to
exit the car through an automatically locked
door, remember the following procedure to
open the door.
f Unlock the doors by pressing the central
locking button or
f pull the inside door handle twice to open the
door.
In the multi-purpose display of the instrument
panel, you have the option of selecting diverse
variants of automatic door locking (AUTO LOCK)
and automatic door unlocking (AUTO UNLOCK).
f For further information:
Please see the chapter “SETTING AUTO LOCK
(AUTOMATIC DOOR LOCKING) AND AUTO
UNLOCK (AUTOMATIC DOOR UNLOCKING)” on
Page 144.
Opening and Locking 21
Page 22
Unlocking and opening rear lid
(vehicles with spare wheel bracket)
On vehicles with spare wheel bracket, this must be
swung to the side before opening the rear lid.
f For further information on opening the spare
wheel bracket:
Please see the chapter “OPENING SPARE
WHEEL BRACKET” on Page 310.
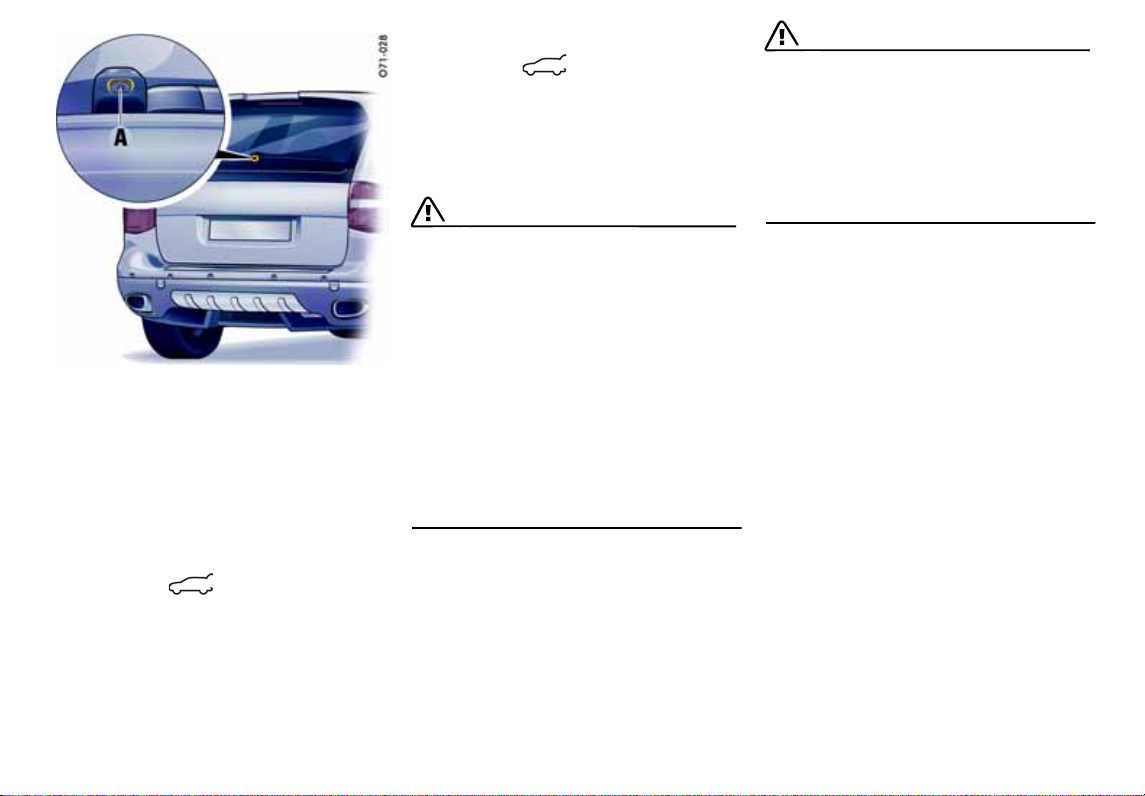
Danger!
Risk of poisoning. Exhaust gases can enter
the passenger compartment when the rear
lid is open.
f Always keep the rear lid closed when the
engine is running.
f Always keep the rear lid closed while driving.
The vehicle doors remain locked after unlocking
the rear lid.
The rear lid is locked automatically after
30 seconds if it is not opened.
Unlocking with the key
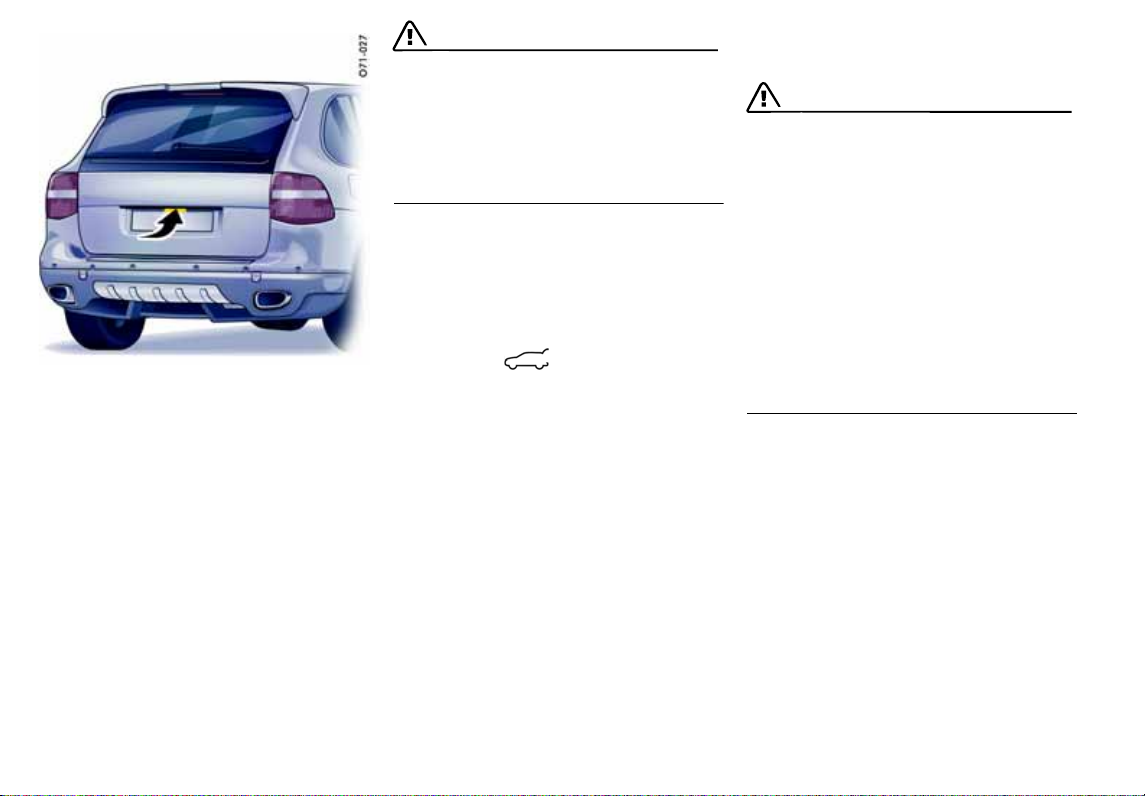
f Press button on the key.
f Press the release handle (arrow) on the rear lid
and open the rear lid.
Unlocking with Porsche Entry & Drive
(keyless)
Warning!
Risk of being locked out of vehicles with
Porsche Entry & Drive.
f Do not leave the key in the vehicle if the vehicle
is locked and access is gained through the
rear lid. The vehicle is automatically locked
when the rear lid is closed.
If the key has been left in the vehicle, the emergency flasher flashes twice and a warning signal sounds. The rear lid can be opened again
within approx. 30 seconds.
After 30 seconds have elapsed, the vehicle
can be unlocked again only with the second
key.
The rear lid is unlocked if you are in the rear area
of the vehicle with the key.
f Press the release handle (arrow) on the rear lid
and open the rear lid.
22 Opening and Locking
Page 23
Locking the rear lid
Warning!
Danger of crushing. The rear lid is automatically pulled into the lock and locked.
f Make sure that your fingers are not under the
rear lid.
f Keep foreign objects or limbs away from
moving parts (latch striker) of the power
closing mechanism.
f Do not leave children in the car unattended.
The rear lid has a power closing mechanism.
1. Pull down the rear lid by means of the closing
handle (arrow), and press it gently into the
lock.
The rear lid is automatically pulled closed and
locked. (only if rear lid is unlocked)
2. Lock the vehicle.
Powerliftgate (Rear Lid)
Danger!
Risk of poisoning. Exhaust gases can enter
the passenger compartment when the rear
lid is open.
f Always keep the rear lid closed when the
engine is running.
f Always keep the rear lid closed while driving.
Danger of injury and damage if the rear lid is
automatically opened or closed in an uncontrolled way!
f Do not leave children in the car unattended.
f Open or close the rear lid only when the vehicle
is stationary.
f Never drive with the rear window or rear lid
open.
Exhaust gases can enter the passenger
compartment.
f Open or close the rear lid only when there are
no persons, animals or objects within its
movement range.
f Always observe the opening and closing opera-
tion so that movement can be stopped at any
time in the event of danger.
Opening and Locking 23
Page 24
f Make sure that there is sufficient clearance be-
hind or above the vehicle (e.g. roof transport
systems, garage ceiling).
f Remove rear rack systems before opening the
rear lid automatically.
Warning!
Risk of being locked out of vehicles with
Porsche Entry & Drive.
f Do not leave the key in the vehicle if the vehicle
is locked and access is gained through the
rear window. The vehicle is automatically
locked when the rear lid is closed.
If the key has been left in the vehicle, the emergency flasher flashes twice and a warning
signal sounds. The rear lid can be opened
again within approx. 30 seconds.
After 30 seconds have elapsed, the vehicle
can be unlocked again only with the second
key.
Acoustic indication during opening/closing
of the rear lid
Opening and closing of the rear lid are indicated
by three warning tones.
You can have the warning tones activated/deactivated at your authorized Porsche dealer.
Opening the rear lid automatically
When the vehicle is operated with a trailer, the rear
lid can only be opened with the release button on
the rear lid.
There are three ways of opening the rear lid:
Option 1
f Make sure the vehicle is unlocked if your
vehicle is not equipped with Porsche Entry &
Drive. Then briefly press the release handle on
the rear lid.
The vehicle need not be unlocked on vehicles
with Porsche Entry & Drive. You simply have
carry the car key with you, e.g. in your trouser
pocket.
Option 2
f Press the button on the key for approx.
1 second.
If the vehicle is locked, the vehicle doors remain locked when the rear lid is opened.
24 Opening and Locking
Page 25
Option 3
f Pull and hold the button in the driver’s door with
the ignition switched on until the rear lid has
opened fully.
Opening is interrupted if the button is released
prematurely.
Automatically closing the rear lid
Make sure that the load is not in the area of the
rear lid when the lid is closed, otherwise the closing operation will be interrupted after contact
with the load, and the rear lid will open again by a
few inches.
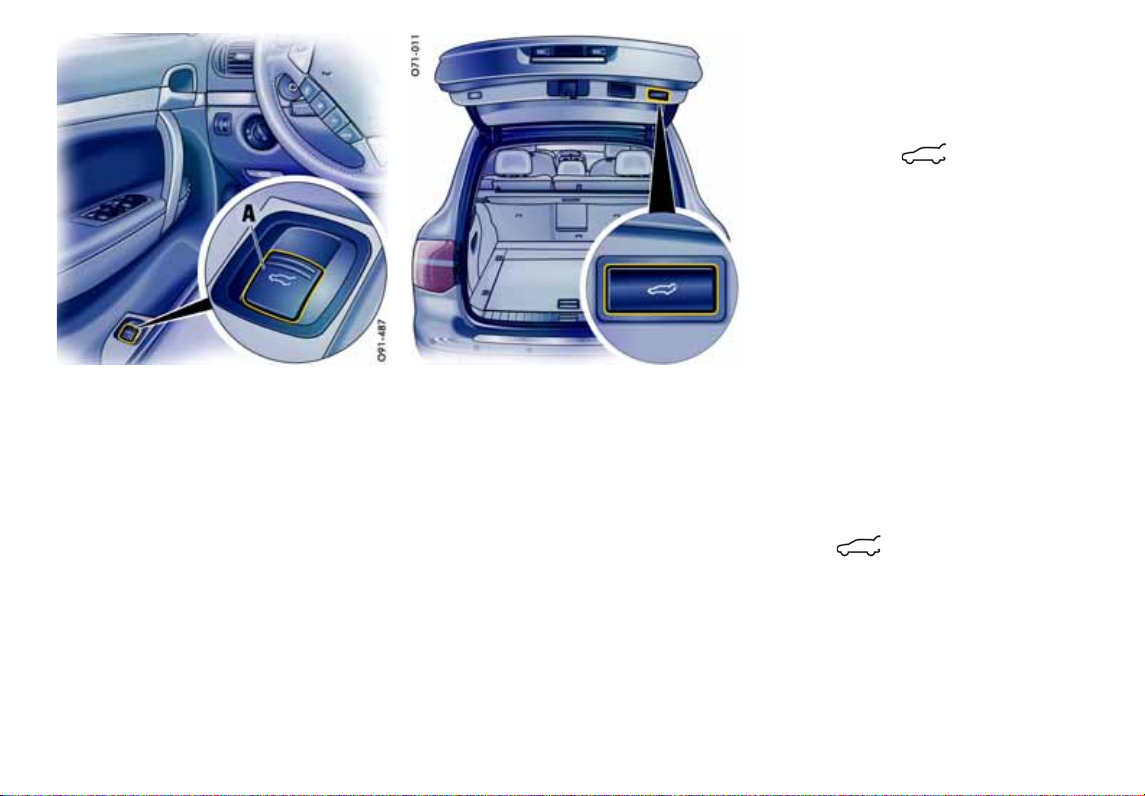
f Briefly press the button in the rear lid trim pa-
nel.
Interrupting the opening or closing operation
in the event of danger
The opening or closing operation is interrupted immediately if one of the following buttons is
pressed:
f Press the button on the key
or
Release the button in the driver’s door
or
Briefly press the button in the rear lid trim panel
or
Briefly press the release button on the rear lid.
Automatic operation can be continued again at
any time. To do this, press the corresponding button.
Detection of obstacles during opening
The rear lid will stop moving if the system detects
that the opening is blocked by an obstacle. A warning signal then sounds.
When the obstacle has been removed, the rear lid
can be opened by pressing
the button on the key
or
the button in the driver’s door
or
the release button on the rear lid.
Opening and Locking 25
Page 26

Detection of obstacles during closing
Warning!
Danger of crushing.
f Despite the presence of this detection system,
you are still responsible for keeping yourself
and others entirely out of the way of the door
as it is closing.
The closing operation is interrupted if closing of
the rear lid is blocked by an obstacle.
A warning signal sounds and the rear lid opens
again by a few inches.
When the obstacle has been removed, the rear lid
can be closed by pressing one of the corresponding buttons.
Adjusting the opening height of the rear lid
The opening height of the rear lid can be individually adjusted so that the rear lid does not collide
with the garage ceiling, for example.
On vehicles with level control, the vehicle height
changes depending on the setting of the level control system. For this reason, always adjust the opening height with the vehicle at the highest level setting so that the rear lid cannot accidentally collide
with the garage ceiling, for example.
1. Stand behind the vehicle and open the rear lid.
2. Press the button on the key to stop the
automatic opening operation at around 2/3 of
the opening height.
3. Now move the rear lid up by hand until the desired opening height is reached. Make sure that
there is a sufficient minimum clearance from
any obstacle.
4. Press and hold the button in the rear lid trim panel for approx. 3 seconds.
An acknowledgement signal sounds, and the
emergency flasher lights up once.
The opening height of the rear lid has now
been programmed.
The rear lid can now be closed by briefly pressing the button.
This setting cannot be deleted. If a different setting is required, repeat steps 1 to 4.
Malfunctions of the rear lid drive
The automatic function is not active if the battery
voltage is too low.
If a button is pressed, the rear lid lock is unlocked
and a warning signal sounds for 3 seconds. The
rear lid can now be opened by hand.
f Charge the vehicle battery.
Emergency operation of the rear lid
A warning signal sounds for approx. 3 seconds if
the automatic opening or closing operation is interrupted by a fault.
f Open or close the rear lid by hand.
26 Opening and Locking
Page 27
Unlocking and opening rear window
The vehicle doors remain locked after unlocking
the rear lid.
The rear window is locked automatically after
30 seconds if it is not opened.
Unlocking with the key
(only on vehicles without Powerliftgate)
f Press button on the key for approx.
2seconds.
The rear window pops open.
Unlocking with the key
1. Press button on the key.
2. Press the release button A and open the
window.
Unlocking with Porsche Entry & Drive
(keyless)
Warning!
Risk of being locked out of vehicles with
Porsche Entry & Drive.
f Do not leave the key in the vehicle if the vehicle
is locked and access is gained through the
rear window. The vehicle is automatically
locked when the rear window is closed.
If the key has been left in the vehicle, the emergency flasher flashes twice and a warning
signal sounds. The rear window can be opened
again within approx. 30 seconds.
After 30 seconds have elapsed, the vehicle
can be unlocked again only with the second
key.
Danger!
Risk of poisoning. Exhaust gases can enter
the passenger compartment when the rear
window is open.
f Always keep the rear lid and rear window
closed when the engine is running.
f Always keep the rear lid and rear window
closed while driving.
The rear window is unlocked if you are in the rear
area of the vehicle with the key.
f Press the release button A and open the
window.
Closing the rear window
Close the rear window and press it into the lock
until it can be felt to engage.
Note on operation
On vehicles with Porsche Entry & Drive, the rear
lid, rear window and spare wheel bracket can no
longer be opened when the car key with remote
control is out of range.
Opening and Locking 27
Page 28
Locking doors
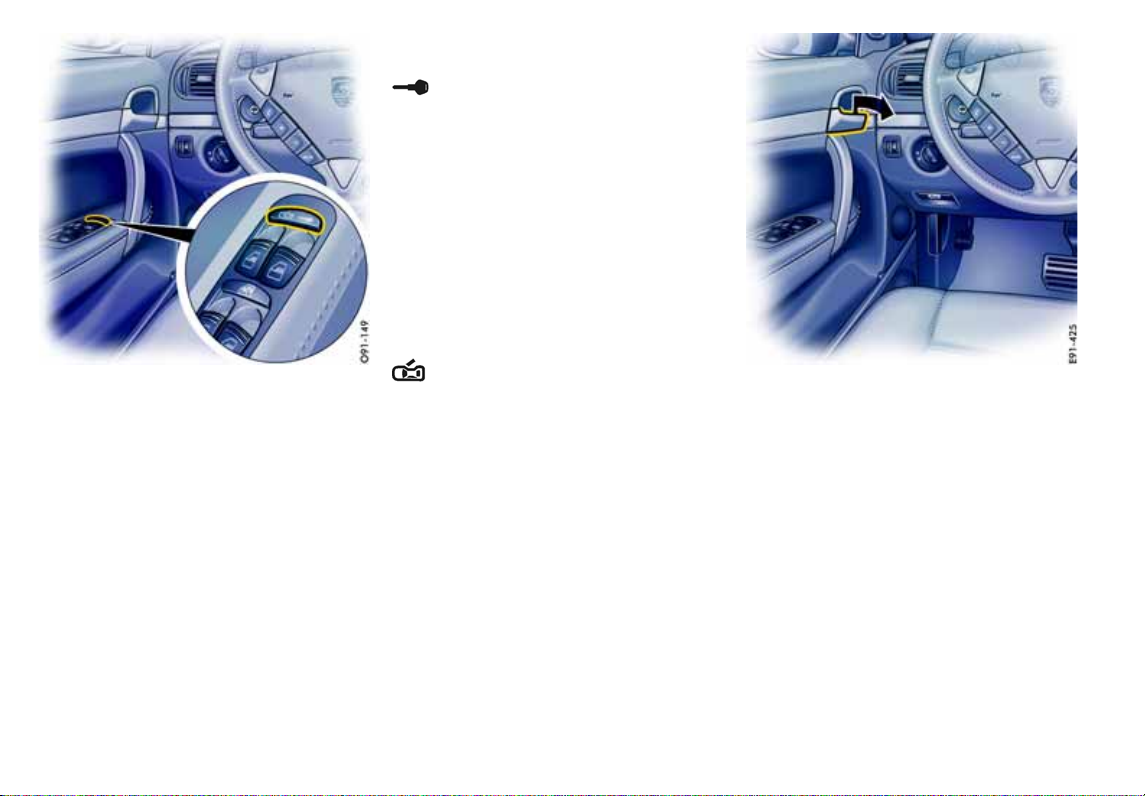
Button in the armrest
f Press the right half of the button in the door
panel.
All vehicle doors will be locked.
The doors can be opened by pulling the inner
door handle twice.
Automatic with Auto Lock
The vehicle is locked automatically when a speed
of 6 km/h (4 mph) is exceeded.
Unlocking doors
Opening and locking from inside
The factory settings of the vehicle are described
in this chapter.
You can change the settings and store them on
the respective key on the multi-purpose display of
the instrument panel.
f For further information on the possible settings
(e.g. Auto Lock and Auto Unlock) on the multipurpose display:
Please see the chapter “CHANGING SETTINGS
FOR OPENING AND LOCKING THE VEHICLE”
on Page 143.
28 Opening and Locking
Button in the armrest
f Press the left half of the button in the door
panel.
If pressed on the front doors, all doors will be
unlocked.
If pressed on the rear doors, only the relevant
door will be unlocked.
Automatic with Auto Unlock
The vehicle is automatically unlocked when the
ignition key is withdrawn or the ignition is switched
off.
Note on operation
If the vehicle was locked by remote control or with
the key, it cannot be unlocked with the central
locking button.
Opening doors
Opening unlocked doors
f Pull inner door handle once.
Opening locked doors
f Pull inner door handle twice.
Page 29
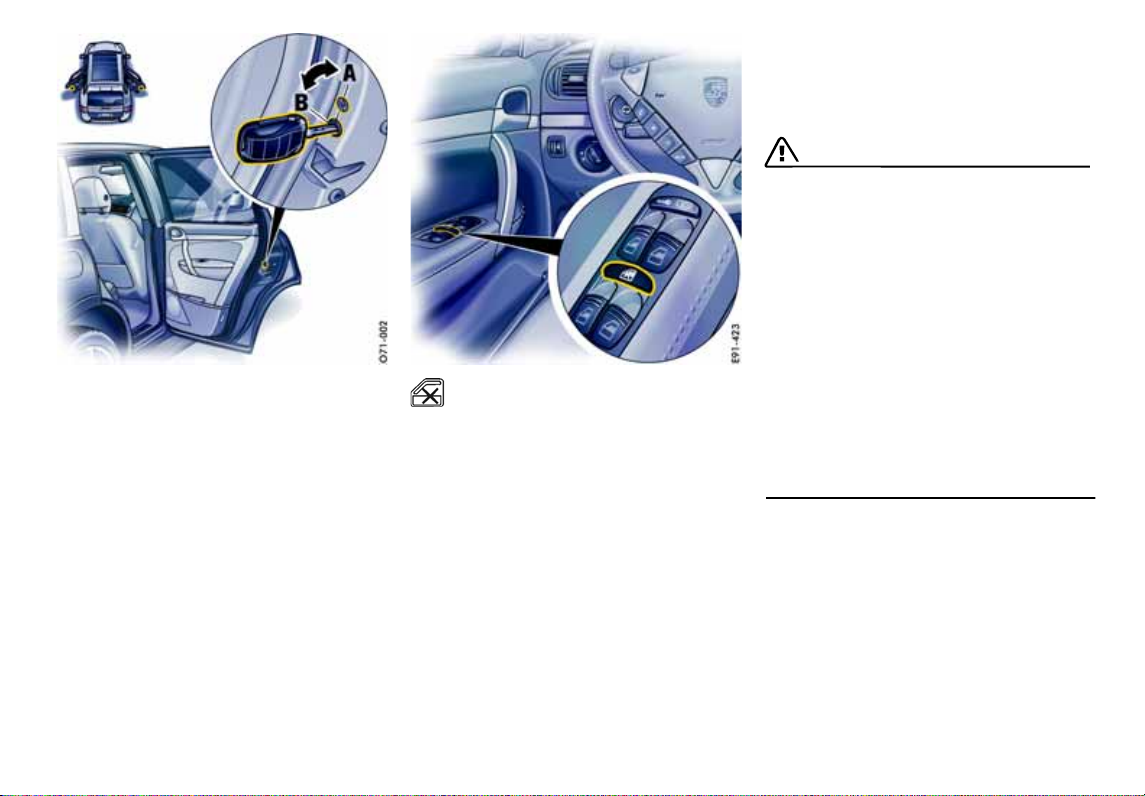
Securing rear doors
You can secure the rear doors to prevent unintentional opening when driving.
Switching child lock on and off
The child locks are fitted in the lock area of the
rear doors.
The doors cannot be opened from inside when the
child locks are engaged.
f To engage: Turn child lock to position A.
f To disengage: Turn child lock to position B.
Switching child protection on/off
The power windows, central locking buttons on
the rear doors and the rear control panel for the
air conditioning can be disabled by means of the
safety button in the armrest of the driver’s door.
f Press the safety button to switch child protec-
tion on and off.
The symbol in the safety button lights up if
child protection is active.
Opening and closing the engine
compartment lid
Opening
Caution!
Risk of damage to engine compartment lid or
windshield wipers.
f Make sure that the windshield wipers are not
pulled out forwards when opening the engine
compartment lid.
f Always switch the windshield wipers off (wiper
stalk in position 0) before opening the engine
compartment lid.
If the wiper arms are not in their final position,
they will automatically move to this position
when the engine compartment lid is opened.
This will happen even if the ignition is off.
The wiper arms remain in this position until the
lid is closed and the wiper system is switched
off and then on again.
Opening and Locking 29
Page 30
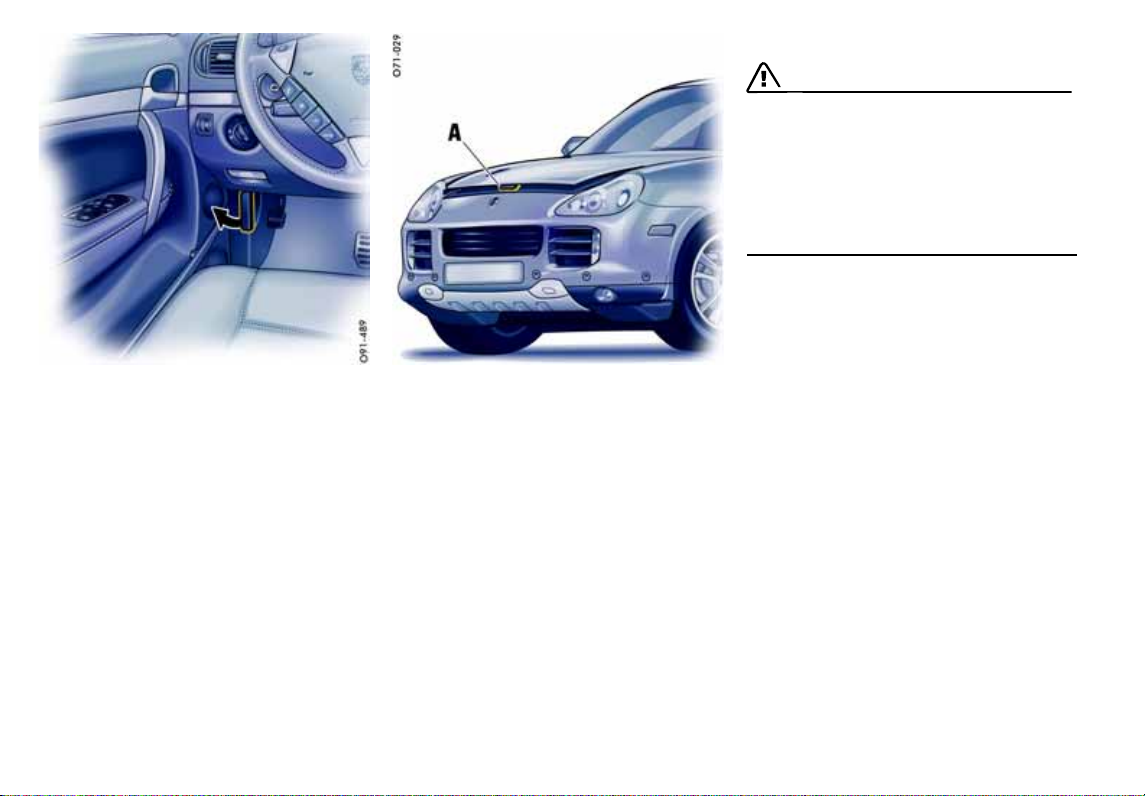
1. Pull the release lever (arrow).
The engine compartment lid is now unlocked.
2. Unlatch safety catch A .
3. Open the lid completely.
Closing
Danger!
Risk of loss of control or an accident, resulting in serious personal injury or death.
f Should you notice at any time while driving that
one of the lids is not secured properly, please
stop immediately in a suitable place and close
it.
The front lid may fly up impairing vision.
1. Lower lid and let it fall into the lock. If necessary, push the lid closed with the palm of your
hand in the area of the lock.
2. Check that the lid has correctly engaged in the
lock.
When the vehicle is in motion, a message will be
displayed on the multi-purpose display of the
instrument panel if the lid is not closed properly.
30 Opening and Locking
Page 31

Malfunctions when opening and
closing
Emergency operation of rear lid
If the rear lid cannot be opened with the radio remote control (e.g., if the battery of the remote
control is dead), the emergency operation must
be performed:
1. Unlock and open the driver’s door with the car
key.
2. Switch on the ignition so that the alarm system
will not be triggered.
3. Check if the TAILGATE function is activated in
the multi-purpose display of the instrument
panel.
Please see the chapter “SETTING REAR LID
LOCKING” on Page 144.
4. Press the central locking button in the armrest.
The rear lid is now unlocked and can be opened
with the unlocking handle.
Only one door is unlocked
The setting for locking and unlocking the doors
and rear lid has been changed on the multipurpose display of the instrument panel. You can
open all doors irrespective of the setting made.
f Press button on the key twice within
2seconds.
The vehicle cannot be unlocked
The remote control of the key may
– not function correctly due to radio waves (also
radio contact between remote control and
vehicle in the case of Porsche Entry & Drive),
– fail due to a fault,
– fail due to an exhausted battery.
f Unlock the vehicle with the unfolded key in the
key lock.
f If you unlock the vehicle with the key at the
door lock, only the driver’s door can be
opened.
In order to prevent the alarm system from
being triggered, you must switch the ignition
on within 15 seconds of opening the door.
The vehicle cannot be locked
This is recognizable by the fact that the
emergency flasher does not flash and there is no
locking noise.
The remote control of the key may
– not function correctly due to radio waves (also
radio contact between remote control and
vehicle in the case of Porsche Entry & Drive),
– fail due to a fault,
– fail due to an exhausted battery.
f Lock the vehicle with the unfolded key at the
door lock.
If there is a defect in the central locking system,
operating the lock barrel in the driver’s door will
lock all functioning locking elements of the central
locking system.
f For information on locking the doors by means
of the emergency operation:
Please see the chapter “NOT ALL VEHICLE
DOORS ARE LOCKED” on Page 32.
f Have faults in the central locking system reme-
died at an authorized Porsche dealer.
Opening and Locking 31
Page 32

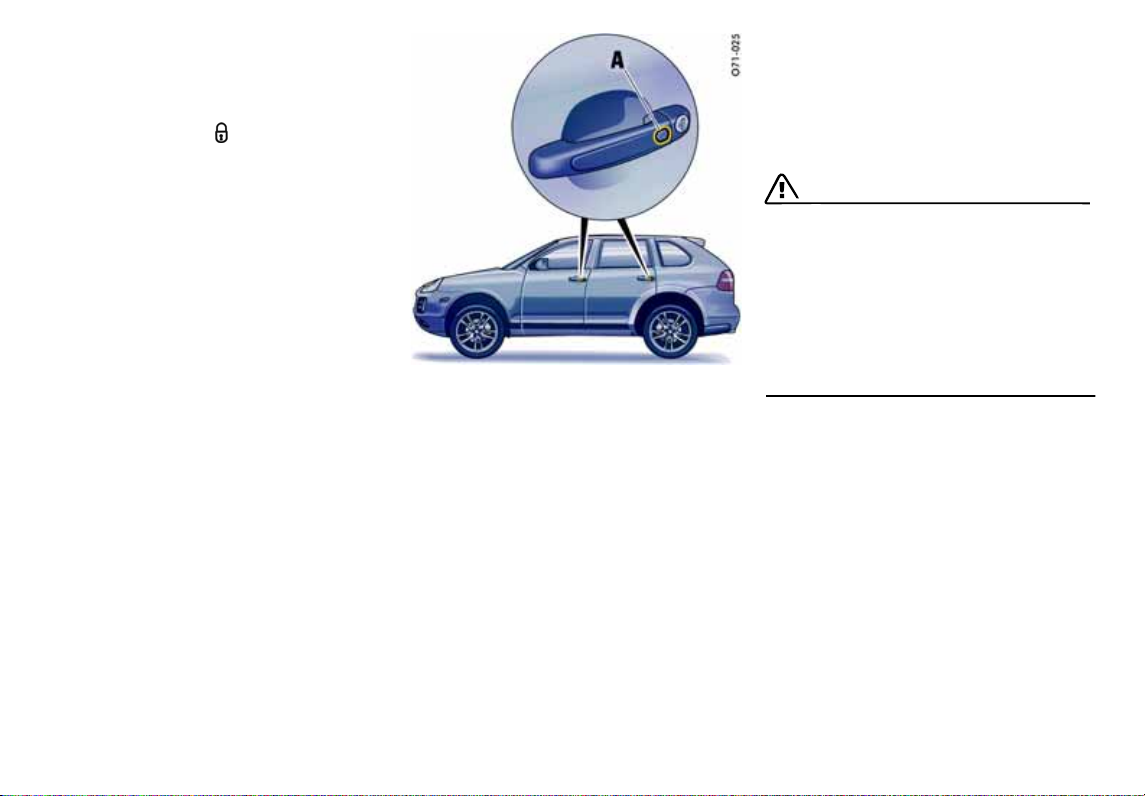
Not all vehicle doors are locked
The central locking system has failed. The doors
must be locked with the emergency locking
device.
1. Open the passenger’s door.
2. Remove cover A.
32 Opening and Locking
3. Press red slide B with the key bit in the
direction of the arrow.
For information on folding out the key bit:
Please see the chapter “FOLDING OUT THE
KEY BIT” on Page 16.
4. Fit cover A again.
5. Repeat procedure at the rear doors.
6. Close all doors.
7. Lock the driver’s door with the key in the door
lock.
Page 33

Seats, Mirrors and Steering Wheel
Seat and Headrest ....................................... 34
Front seat with memory ................................ 37
Easy Entry Function ..................................... 39
Fire Extinguisher .......................................... 40
Heated Seats – Front and Rear...................... 40
Safety Belts ................................................. 42
Airbag Systems............................................ 45
Child Restraint Systems................................ 49
LATCH Child Seat System ............................. 53
Child Restraint Anchorages ........................... 54
Door Mirrors................................................ 55
Interior Mirror .............................................. 57
Automatic Anti-Dazzle Mirror ......................... 57
Steering Wheel............................................. 58
Multi-Functional Steering Wheel...................... 60
Sun Visors ................................................... 62
Make-up mirror ............................................ 62
Sun Blinds, Rear Side Windows ..................... 62
Seats, Mirrors and Steering Wheel 33
Page 34

Seat and Headrest
Danger!
The seat may move unexpectedly if you
attempt to adjust while driving. This could
cause sudden loss of control, resulting in
serious personal injury or death.
f Do not adjust seats while the vehicle is in mo-
tion.The backrest locks must be engaged at all
times while the vehicle is in motion.
Safety belts only offer protection when the
backrest is upright and the belts are properly
positioned on the body.
Improperly positioned safety belts or safety
belts worn by passengers in an excessively
reclined position can cause serious personal
injury or death in an accident.
f Do not operate the car with the driver or pas-
senger backrests excessively reclined.
Please see the chapter “SEAT POSITION” on
Page 36.
f Porsche recommends the use of L.A.T.C.H.
(Lower Anchorage and Tether for Children)
equipped Porsche child seats.
Risk of injury if persons or animals are in the
movement range of the seat during seat adjustment.
f Adjust the seat so that no-one is put a risk.
Your vehicle is equipped with a total of five headrests in the backrests of the front and rear seats.
The height of the headrests in the front and back
seats is adjustable. All headrests are removable.
All occupants, including the driver, should not
operate a vehicle or sit in a vehicle’s seat until the
headrests and backrests are placed in their proper positions so that the risk of neck injuries is
minimized in the event of a crash.
For proper positioning and operation of the headrest, the backrest’s inclination should be adjusted
such that the headrest is in an upright position.
Driver and passengers should be seated upright
and in the center of their seats.
Adjusting headrests
Danger!
Improperly positioned headrests can cause
serious personal injury or death in an accident.
f Adjust the headrest so that the upper edge of
the headrest is brought to eye level or higher.
f Do not drive the vehicle without the headrest in
place and properly adjusted.
Example: driver’s seat
Raising
f Push headrest upwards until the desired
position is reached.
Additionally press button B on the outer rear
seat headrests.
Push the middle rear headrest upwards into its
locked position.
Lowering
f Press button B and, at the same time, push the
headrest downwards until the desired position
is reached.
For lowering the middle rear headrest below its
locked position press button A and, at the
same time, push it down fully.
34 Seats, Mirrors and Steering Wheel
Page 35

Example: driver’s seat
Removing headrests
Front seats
f Press button A and, at the same time,
completely remove headrest.
Rear seats - outer headrests
1. Press button B and push the headrest all the
way down.
2. Press button A and, at the same time, pull the
headrest completely out.
Example: middle rear headrest for sport seats
Rear seat - middle headrest
f Press button A and, at the same time, pull the
headrest completely out.
Danger!
Driving with removed headrests, improperly
positioned headrests or improperly installed
headrests can cause serious personal injury
or death in an accident.
f Adjust the headrests so that the upper edge of
the headrest is brought to eye level or higher.
f Do not drive the vehicle without the headrest in
place and properly adjusted.
Installing headrests
Front and outer rear headrests
Note
The middle headrest of the rear seat bench must
only be fitted to the middle seat of the rear seat
backrest.
1. Insert the headrests into the guides.
2. Press button B and, at the same time, push the
headrest downwards until the desired position
is reached.
Rear seat - middle headrest
Danger!
Driving with an improperly installed headrest
can cause serious personal injury or death in
the event of an accident.
f Do not attempt to insert the rear middle seat
headrest into either of the rear side seats. The
rear middle headrest is designed specifically
for the rear middle seat and its safety parameters only.
f Vehicles with comfort seats:
Insert the headrest into the guides and push it
down fully until it is engaged.
f Vehicles with sport seats:
Insert the headrest into the guides, push it
down fully and afterwards push it upwards until
it is engaged.
Seats, Mirrors and Steering Wheel 35
Page 36
Seat position
A correct sitting position is important for safe and
fatigue-free driving. We recommend the following
procedure for adjusting the driver’s seat to suit
individual requirements:
1. Adjust the seat height to give yourself enough
headroom and an unobstructed view outside
the vehicle.
2. Adjust the seat until, with the accelerator pedal
fully depressed, your leg is straight but your
entire foot still rests on the accelerator pedal.
3. Grip the top half of the steering wheel. Set the
backrest angle and steering wheel position so
that your arms are almost outstretched.
However, your shoulders must still rest on the
backrest.
4. If necessary, correct the seat fore-and-aft
adjustment.
5. Adjust the height of the headrest so that the
upper edge is at eye level or higher.
Adjusting the seat
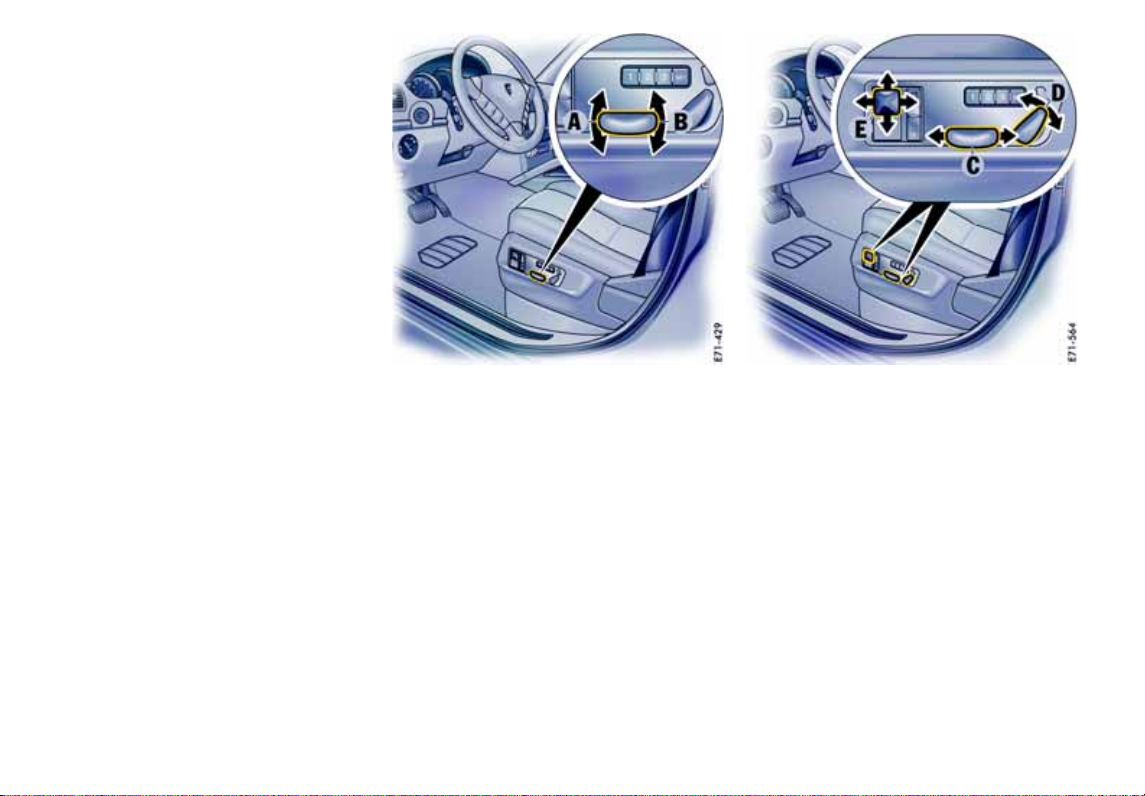
A Front seat height adjustment.
B Rear seat height adjustment.
C Fore and aft adjustment.
D Backrest angle adjustment.
E Lumbar support adjustment.
To permit a relaxed sitting posture, the backrest curvature is infinitely adjustable in vertical
and horizontal directions for individual pelvis
and spinal column support.
f Press the switch in the direction indicated by
the arrows until the desired setting is reached.
36 Seats, Mirrors and Steering Wheel
Page 37
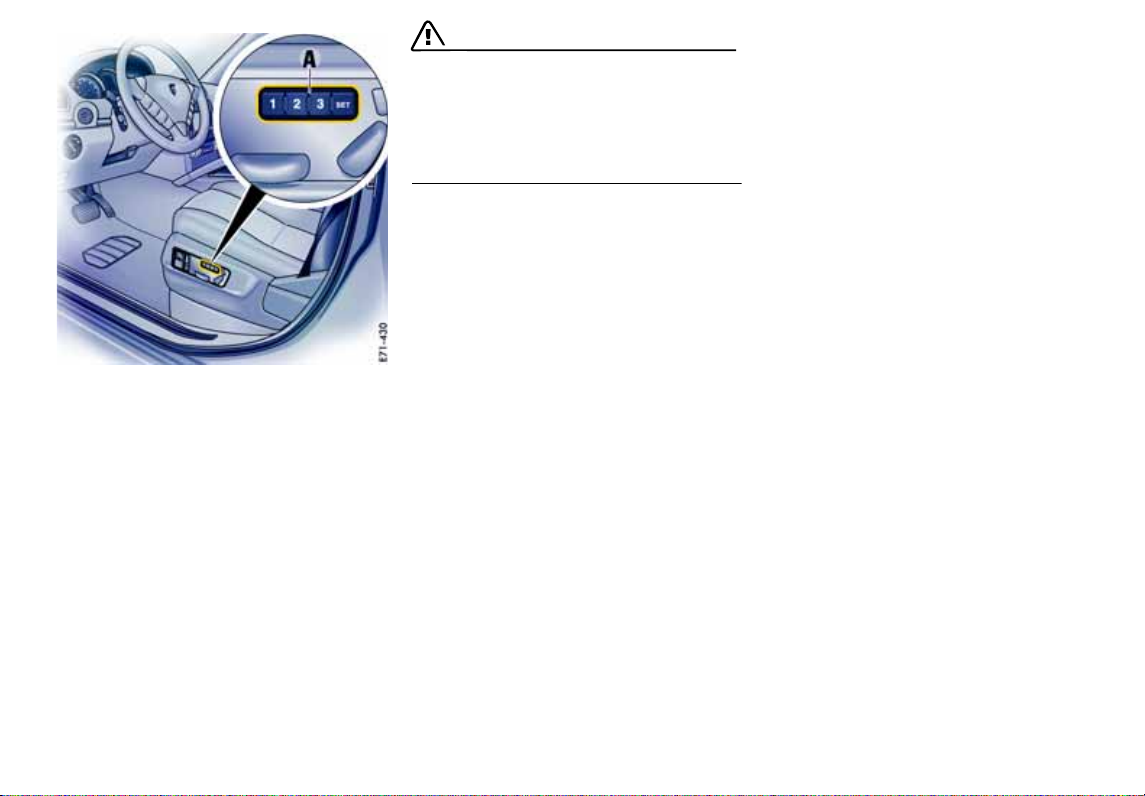
Front seat with memory
Personal seat, door mirror, steering wheel and
safety belt height adjustments can be stored and
recalled on the person buttons A and car keys.
Warning!
Risk of crushing due to uncontrolled recall of
settings.
f Cancel automatic adjustment by pressing any
of the seat adjustment buttons.
f Do not leave children in the car unattended.
Memory options
–Seat adjustment
– Door mirror adjustment
Comfort memory options
–Seat adjustment
– Door mirror adjustment
– Steering wheel and safety belt height adjust-
ment
Recalling the settings using the car key or
in vehicles that have Porsche Entry &
Drive
f Open the driver’s door.
The stored settings of the driver's seat are
recalled automatically.
Cancelling setting
Automatic settings can be cancelled immediately
by pressing any driver’s seat setting button.
Recalling the settings with person buttons
1 - 3 (driver’s and passenger’s seat)
1. Unlock vehicle and open the driver’s door.
2. Press the relevant person button until the
stored positions have been reached
or
Briefly touch the person button if the ignition
key is inserted or if the ignition is switched on
(in vehicles that have Porsche Entry & Drive).
The stored positions for each seat are recalled
automatically.
Cancelling setting
Automatic settings can be cancelled immediately
by pressing any seat adjustment button.
Seats, Mirrors and Steering Wheel 37
Page 38
Storing driver’s seat settings
Storing settings on a person button and a car
key
1. Apply the parking brake.
2. Switch ignition on.
3. Make the required adjustments to the seat,
mirror, steering wheel and safety belt.
4. Briefly press the SET memory button and,
within 10 seconds, hold down one of the person buttons (1, 2 or 3) until an acknowledge
tone is obtained.
The settings are now stored on the desired
person button.
5. Withdraw car key or switch ignition off in
vehicles that have Porsche Entry & Drive.
6. Press the SET memory button within
10 seconds and keep the button depressed
until an acknowledge tone is obtained.
The settings are now assigned to the car key.
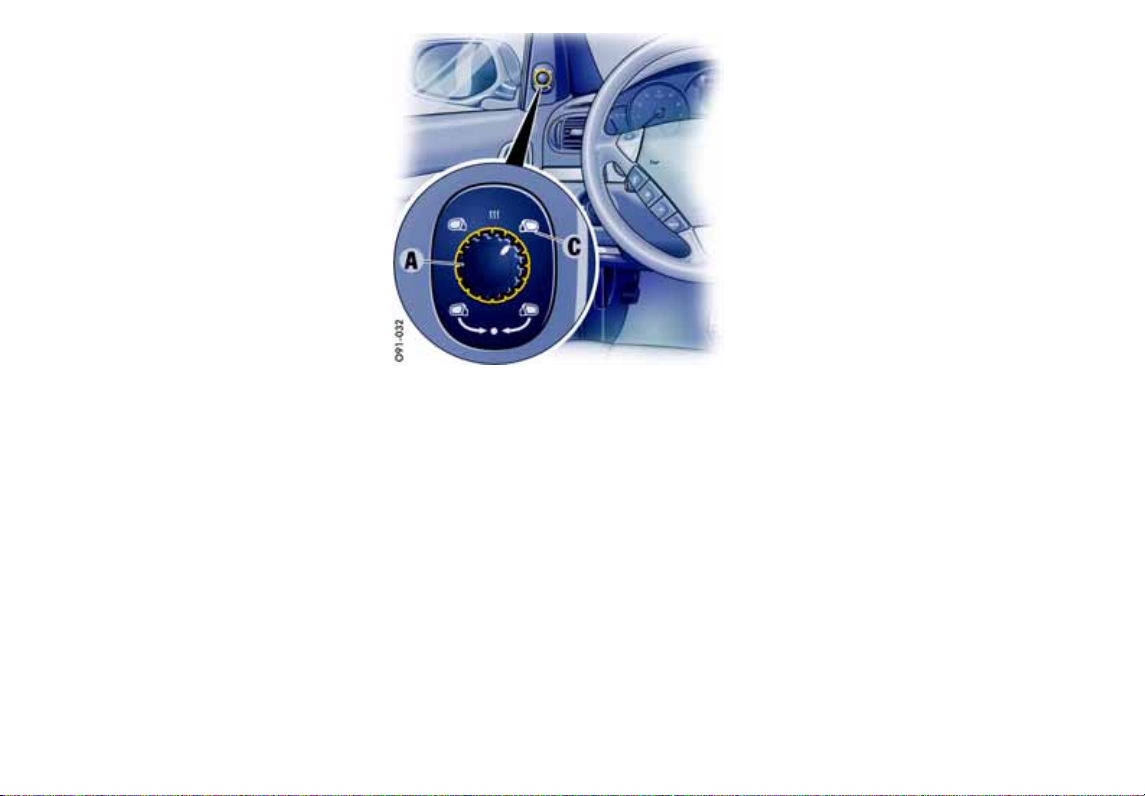
A - Control switch for door mirror adjustment
C - Passenger mirror setting
Storing passenger mirror setting as a
parking aid
If the passenger’s mirror is supposed to swivel
downwards when reversing, this can also be
stored in the driver’s seat setting.
1. Apply the parking brake.
2. Switch ignition on.
3. Press the relevant person button.
4. Engage reverse gear.
5. Set the control switch A for the mirror setting
to the passenger’s side C.
The passenger’s mirror swivels downwards.
6. Adjust the passenger’s mirror to the required
setting.
7. Briefly press the SET memory button and,
within 10 seconds, hold down the person
button on which the setting is to be stored until
an acknowledge tone is obtained.
Storing passenger seat settings
1. Apply the parking brake.
2. Switch ignition on.
3. Adjust seat position and belt height.
4. Briefly press the SET memory button and,
within 10 seconds, hold down one of the person buttons (1, 2 or 3) until an acknowledge
tone is obtained.
Automatic storage – driver’s seat
If settings were changed after the driver’s door
was opened, these new settings are temporarily
stored when the vehicle is locked.
This storage is deleted if the vehicle is unlocked
with a programed key and the driver’s door is
opened. Then the settings of the key used is
recalled.
38 Seats, Mirrors and Steering Wheel
Page 39

Easy Entry Function
The Easy Entry function makes it easier for you to
get in and out of the car.
Warning!
Risk of crushing if persons are behind the
driver's seat when settings are recalled.
Risk of damage if the rear seat bench is folded forward when settings are recalled.
f Switch off the Easy Entry function if there are
persons behind the driver's seat or if the rear
seat bench is folded forward.
Switching Easy Entry function on and off
f Press switch A.
Entering the vehicle
When the driver’s door is opened, the driver’s seat
moves to the rear.
Once the driver’s door is closed and the ignition
key is inserted or, in the case of vehicles that have
Porsche Entry & Drive, the ignition is switched on,
the seat and steering wheel move into the stored
position.
Exiting the vehicle
The steering wheel moves into the frontmost, top
position.
– After the ignition key is removed or
– After the ignition is switched off and the
driver's door is opened on vehicles equipped
with Porsche Entry & Drive or
– When the steering column is locked.
When the driver’s door is opened, the driver’s seat
moves to the rear.
Seats, Mirrors and Steering Wheel 39
Page 40
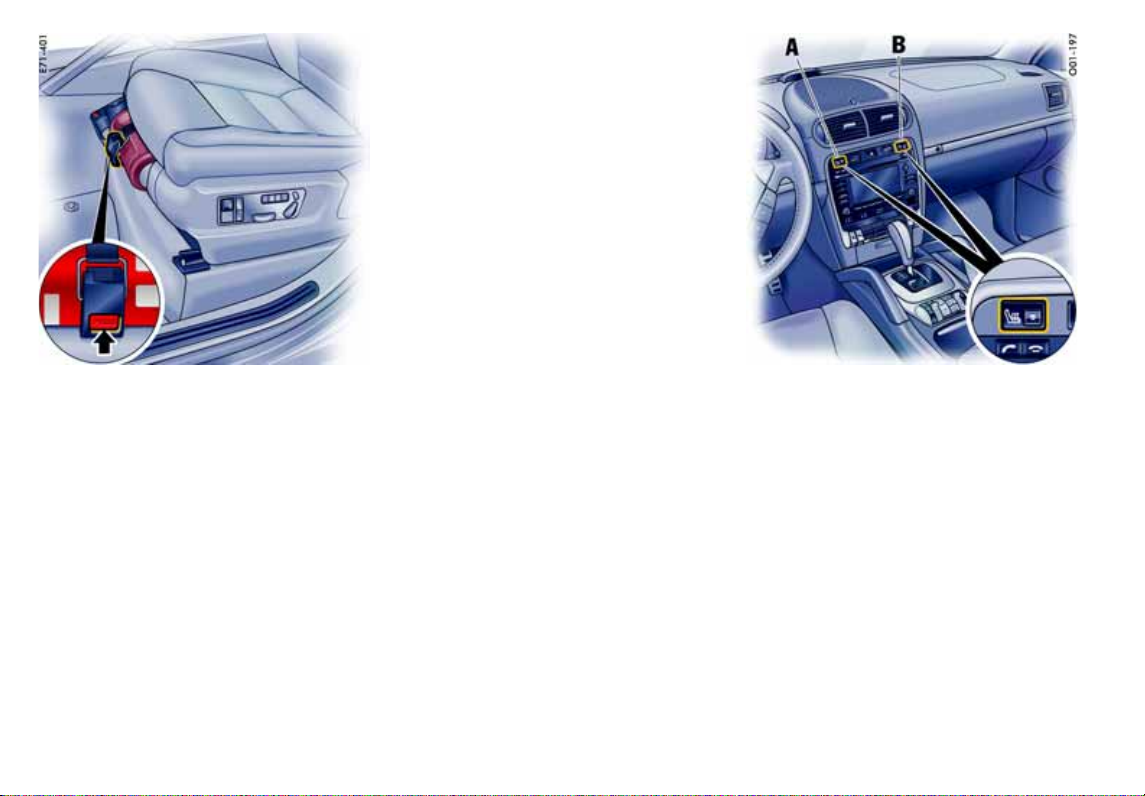
Fire Extinguisher
If the vehicle is equipped with a fire extinguisher, it
is mounted underneath the left or right front seat,
depending on equipment level.
Fire extinguisher under the left front seat
f To remove the fire extinguisher in case of an
emergency, hold the fire extinguisher with one
hand, and press the PRESS button on the fire
extinguisher holder with the other hand
(arrow).
Fire extinguisher under the right front
seat
f Take the fire extinguisher out of the drawer
under the seat.
Note
f Pay attention to the final control date on the
fire extinguisher. If the fire extinguisher is used
after its testing interval has elapsed, it may not
function properly.
f Follow the operating instructions on the fire
extinguisher.
f The functional ability of the fire extinguisher
should be checked by a specialist workshop
every 1 to 2 years.
f After use, have the fire extinguisher refilled.
A -Front seat, left
B -Front seat, right
Heated Seats – Front and Rear
The seat heating is ready for operation when the
engine is running. The heating power can be infinitely adjusted with the thumb wheel.
40 Seats, Mirrors and Steering Wheel
Page 41

C -Rear seat, left
D -Rear seat, right
Switching on
f Turn thumb wheel until the desired position is
reached.
Switching off
f Turn thumb wheel to 0.
A - Switches seat heating on
B - Switches seat heating off
C - Temperature control for left seat
D - Temperature control for right seat
Rear seat heating in vehicles with an
four-zone air conditioning system
Switching on
f Press button A.
After the seat heating is switched on, the air
conditioning display switches to seat heating
mode for approx. 10 seconds.
Controlling the temperature
f Move button C or button D upwards or down-
wards until the desired position is reached.
Switching off
f Press button B.
Seats, Mirrors and Steering Wheel 41
Page 42

Safety Belts
Danger!
Always make sure your and your passengers'
safety belts are properly fastened while the
vehicle is in motion.
Failure to follow safety belt warnings may result in serious personal injury or death.
f For your and your passengers' protection, use
safety belts at all times while the vehicle is in
motion.
f Use appropriate child restraint systems for all
small children.
Proper wearing of safety belts
f Saf et y belt s m ust b e p ositi on ed on t he body as
to restrain the upper body and lap from sliding
forward. Improperly positioned safety belts
can cause serious personal injury in case of an
accident.
f The shoulder belt should always rest on your
upper body. The shoulder belt should never be
worn behind your back or under your arm.
f For maximum effectiveness, the lap belt
should be worn low across the hips.
f Pregnant women should position the belt as
low as possible across the pelvis. Make sure it
is not pressing against the abdomen.
f Belts should not be worn twisted.
f Do not wear belts over rigid or breakable
objects in or on your clothing, such as eye
glasses, pens, keys, etc. as these may cause
injury.
f Several layers of heavy clothing may interfere
with proper positioning of belts.
f Belts must not rub against sharp objects or
damage may occur to the belt.
f Two occupants should never share the same
belt at the same time.
Care and maintenance
f Keep belt buckles free of any obstruction that
may prevent a secure locking.
f Belts that have been subjected to excessive
stretch forces in an accident must be inspected or replaced to ensure their continued effectiveness in restraining you.
The same applies to belt tensioner systems
which have been triggered. In addition, the
anchor points of the belts should be checked.
f If safety belts do not work properly, see your
authorized Porsche dealer immediately.
f If the belts sh ow dam age to webbi ng, b ind ing s,
buckles or retractors, they should be replaced
to ensure safe operation.
f Do not modify or disassemble the safety belts
in your vehicle.
f The belts must be kept clean or the retractors
may not work properly.
Please see the chapter “CAR CARE
INSTRUCTIONS” on Page 270.
f Never bleach or dye safety belts.
f Do not allow safety belts to retract until they
are completely dry after cleaning or this may
cause damage to the belt.
Belt tensioner
Depending on the force of a collision, fastened
seat belts are automatically tightened in an
accident.
The belt tensioners are triggered in:
– Front and rear impacts of sufficient severity
– Side impacts (only belt tensioners of the front
seats are triggered)
– In cases of vehicle rollover
42 Seats, Mirrors and Steering Wheel
Page 43

Maintenance Notes
The belt tensioner system can be triggered only
once; the system must be replaced afterwards.
If there is a fault in the belt tensioner system, the
airbag warning light lights up.
Work may be performed on the belt tensioner
system only by an authorized Porsche dealer.
Smoke is released when the belt tensioners are
triggered.
This does not indicate a fire in the vehicle.
Safety Belt Warning System
An audio-visual warning system is interconnected with the driver’s safety belt.
Every time the ignition is turned on, the gong will
sound for about 6 seconds to remind driver and
passenger to buckle up.
In addition, the gong will sound for approx.
90 seconds if vehicle speed exceeds 15 mph/
24 km/h.
The safety belt warning lights in the instrument panel and multi-purpose display will go off as soon as
the driver has buckled up.
Fastening the safety belt
f Assume a comfortable sitting position.
Adjust the backrest of the front seat so that the
belt always rests on your upper body and runs
across the middle of your shoulder.
f Grasp the belt tongue and pull the belt in a
slow, continuous motion across your chest and
lap.
Note on operation
The belt can be blocked if the vehicle is standing
at an angle or if the belt is pulled out using a
jerking movement.
f The belt cannot be pulled out while accelera-
ting and slowing down, when cornering and
when driving uphill.
f Insert the belt tongue into the appropriate
buckle on the inboard side of the seat, until it
locks securely with an audible click.
f Make sure that belts are not trapped or twis-
ted, and that they are not rubbing on sharp
edges.
f The horizontal section of the belt should al-
ways fit snugly across the pelvis. Therefore, after fastening the belt, always pull the diagonal
part of the belt upwards.
Pregnant women should position the belt as
low as possible across the pelvis, and ensure
that it is not pressing against the abdomen.
f Pull on the diagonal section of the belt now and
again during the journey to ensure that the
horizontal section remains tight.
Seats, Mirrors and Steering Wheel 43
Page 44

f Make sure that the belts and buckles fit
correctly on the rear seat bench.
Releasing the safety belt
f Hold the belt tongue.
f Press the red button (arrow).
f Guide belt tongue to the reel.
44 Seats, Mirrors and Steering Wheel
Safety belt height adjustment
The heights of the belt deflectors for the driver’s
seat, passenger’s seat and the outer rear seats
can be adjusted.
Adjust the height of the safety belt so that it runs
across the middle of the shoulder, not against the
neck.
Adjusting belt height manually
f Upward – push belt deflector up.
f Downward – press button A and move belt
deflector.
Adjusting belt height electrically
f Operate rocker switch B in the desired
direction until the optimal belt adjustment is
reached.
On vehicles with comfort memory, seat belt height
adjustment can be stored on the person buttons
and vehicle keys and recalled with these.
f Please see the chapter “FRONT SEAT WITH
MEMORY” on Page 37.
Page 45

Airbag Systems
The airbags in combination with the safety belts
make up a safety system which offers the driver
and the passenger the greatest known protection
from injuries in case of accident.
Your vehicle is equipped with weight sensing for
the passenger's seat in accordance with
U.S. Federal/Canadian Motor Vehicle Safety
Standard 208.
Even if your vehicle is equipped with airbags, the
safety belts must be worn at all times,
because the front airbag system is only actuated
by frontal collisions with an impact of sufficient severity.
Below the deployment threshold of the airbag
system, and during types of collisions which do
not cause the actuation of the system, the safety
belts provide the primary protection to the
occupants when correctly worn. Therefore, all
persons within the vehicle must wear safety
belts at all times (in many states, state law
requires the use of safety belts).
f Please see the chapter “SAFETY BELTS” on
Page 42.
The front airbags are located under the padded
steering wheel panel on the driver’s side and, on
the passenger's side, in the dashboard.
The side airbags for the front seats are installed
on the side in the seat backrests.
The head airbags are installed above the doors
in the roof area.
Danger!
To provide optimal occupant protection, airbags must inflate at very high speed. If you
are not wearing your safety belt or are too
close to the airbag when it is deployed, inflating airbags can result in serious personal injury or death.
Improper handling of weight sensing can
unintentionally impair switching the
passenger's airbag off and on.
f Make sure there are no people, animals or ob-
jects between the driver or passenger and the
area into which the airbag inflates.
f Sit back as far from the dashboard or steering
wheel as is practical, while still maintaining full
vehicle control.
f Always hold the steering wheel by the outer
rim. Never rest your hands on the airbag panel.
f Always fasten seat belts because triggering
of the airbag system depends on the force and
angle of impact.
f Do not transport heavy objects on or in front of
the passenger seat. These could impair the
function of the airbag, the seat belts, and
weight sensing.
f Do not hang objects (e.g., jackets, coats, coat
hangers) over the backrest.
f Always keep the lid of the door storage com-
partment closed. Objects must not protrude
out of the door storage compartment.
The storage compartment must be closed
while driving.
f No changes must be made to the wiring or
components of the airbag system.
f Do not add any additional coverings or stickers
to the steering wheel or in the area of the
passenger airbag, side airbags and head
airbags. Doing so may adversely affect the
functioning of the airbag system or cause
harm to the occupants if the airbag system
should deploy.
Do not use protective seat covers.
f Do not modify the seat coverings. Do not
attach additional cushions, protective
coverings, or pillows to the passenger's seat.
Do not affix things to the passenger's seat or
cover it with other materials. Do not cover the
back of the backrest. Do not make changes to
the passenger's seat and to the seat base
frame.
f Do not undertake any wiring for electrical ac-
cessory equipment in the vicinity of the airbag
wiring harnesses. Doing so may disable the
airbag system or cause inadvertent inflation.
f If the warning light comes on, the airbag
system should be repaired immediately by
your authorized Porsche dealer.
Seats, Mirrors and Steering Wheel 45
Page 46

f Always keep feet in the footwell while driving.
Do not put feet on the dashboard or the seat
area. Do not lean against the inside of the door
or outside the window while the vehicle is
moving.
f Using accessories not approved by Porsche
can cause the weight sensing to be impaired.
f Do not squeeze objects, such as the fire
extinguisher, or first aid kit under the seat.
f Only have seats removed and installed by an
authorized Porsche dealer so that weight
sensing components will not be damaged.
f Give your passenger all of the information in
this chapter.
Note
Airbag components (e.g. steering wheel, seats)
may be disassembled only by an authorized
Porsche dealer.
f When disposing of a used airbag unit, our
safety instructions must be followed. These
instructions can be obtained at any authorized
Porsche dealer.
Function of the airbag system
Airbags are a supplemental safety system. Your
primary protection comes from your safety belts.
The front airbags are triggered during a frontal
collision of sufficient force and direction.
In the event of a side impact of corresponding
force, the side airbag on the impact side is
triggered.
The inflation process generates the amount of gas
required to fill the airbags at the necessary
pressure in fractions of a second.
Airbags help to protect the head and upper body,
while simultaneously damping the motion of the
driver and passenger in the impact direction in the
event of a frontal impact or side impact.
In order to help provide protection in severe collisions which can cause death and serious injury,
airbags must inflate extremely rapidly. Such high
speed inflation has a negative but unavoidable
side effect, which is that it can and does cause injuries, including facial and arm abrasions, bruising
and broken bones. You can help minimize such injuries by always wearing your safety belts.
There are many types of accidents in which
airbags are not expected to deploy. These include
accidents where the airbags would provide no benefit, such as a rear impact against your vehicle.
Other accidents where the airbags are designed
not to deploy are those where the risk of injury
from the airbag deployment could exceed any protective benefits, such as in low speed accidents or
higher speed accidents where the vehicle decelerates over a longer time. Since airbag deployment
does not occur in all accidents, this further emphasizes the need for you and your passengers to
always wear safety belts.
Your vehicle is equipped with a crash sensing and
diagnostic module. This module will record the
use of the seat belt restraint system by the driver
and front passenger when the airbags and/or belt
tentioner are triggered.
Precondition for activating the restraint systems:
f Ignition is switched on.
Advanced Airbag
Your vehicle is equipped with weight sensing for
the passenger's seat in accordance with
U.S. Federal/Canadian Motor Vehicle Safety
Standard 208.
Depending on the weight acting on the
passenger's seat, the passenger's airbag will
automatically be switched on and off.
Depending on the angle and force of impact, the
passenger's airbag which is switched-on will be
triggered during a collision.
Precondition for switching the passenger's airbag
on and off, depending on weight:
f Ignition is switched on.
46 Seats, Mirrors and Steering Wheel
Page 47

Seat adjustment for the passenger's seat
Danger!
Safety belts only offer protection when the
backrest is upright and the belts are properly
positioned on the body. Improperly positioned safety belts can cause serious personal
injury or death in an accident.
f Do not operate the car with the driver or pas-
senger backrests excessively reclined.
If the seat is in an extreme position (e.g., the backrest is in contact with the rear seat bench), the
backrest can warp. Warping of the backrest can
lead to malfunctions.
f Correct the seat adjustment.
The seat is not jammed and is self-supporting.
The backrest is in the upright position.
f Do not transport a load and objects in the rear
footwell or under the passenger's seat.
If the load or objects are under the seat, they
can cause malfunctions.
If the weight on the passenger's seat is reduced
significantly, e.g., by supporting weight on the
armrest, the passenger's airbag can be switched
off.
f Select an upright seat position, and do not
support weight on the armrests or lean out of
the window.
Always keep feet in the footwell while driving.
Do not put feet on the dashboard or the seat
area. Do not lean against the inside of the door
or outside the window while the vehicle is
moving.
If the passenger's seat is warped significantly, a
message is displayed in the multi-purpose display
in the instrument panel:
f Correct the seat adjustment.
f Please see the chapter “OVERVIEW OF
WARNING MESSAGES” on Page 149.
Vehicle modifications to accommodate
persons with disabilities
Because modifications to your vehicle could
compromise your advanced airbag system,
please call 1-800-PORSCHE prior to having your
vehicle modified.
Automatic deactivation of the passenger
airbags
Danger!
The use of a child restraint system in the
front passenger seat can result in serious
personal injury or death to the child from an
airbag deployment.
To reduce risk of injury from an inflating
airbag in an accident, Porsche strongly
recommends:
f Under all normal circumstances, the child seat
must be placed in the rear.
Do not use a child restraint system in the front
passenger seat.
Before transporting a child on the passenger seat:
f Please see the chapter “CHILD RESTRAINT
SYSTEMS” on Page 49.
– When a child weighing up to 29 lbs (13 kg)
is seated in the child restraint system, the front
airbag is automatically deactivated on the passenger side.
– When an adult is seated in the front seat the
front airbag remains active on the passenger‘s
side.
Seats, Mirrors and Steering Wheel 47
Page 48

A - PASSENGER AIRBAG OFF indicator lamp
Note on operation
Although not desired, it can occur in the case of
heavier children that the passenger airbags
remain active or, in the case of very light adults or
young persons, that the passenger airbag is
deactivated.
The condition of the passenger airbag system is
shown by the indicator lamp A in the central
console.
f If in doubt, fasten the child restraint system on
the rear bench or transport the passenger on
the rear bench.
Note
f After switching on the ignition, the PASSEN-
GER AIRBAG OFF warning light lights up for a
few seconds as a check.
PASSENGER AIRBAG OFF indicator lamp
lights up
The passenger's airbag is switched off.
PASSENGER AIRBAG OFF indicator lamp
does not light up
– The passenger's airbag is active and ready for
operation.
– If the passenger's seat is not occupied, the
PASSENGER AIRBAG OFF indicator lamp will
also not light up, even though the passenger's
airbag is switched off.
Danger!
Risk of serious personal injury or death due
to the passenger airbag triggering
unintentionally.
When the ignition is on and a child weighing
up to 29 lbs (13 kg) is seated in the child restraint system on the passenger seat the indicator lamp „PASSENGER AIRBAG OFF“
must be on.
If the “PASSENGER AIRBAG OFF” indicator
lamp does not light up, it could indicate a
fault in the system.
In this case:
f Fasten the child restraint system on the rear
bench immediately. Do not install any child restraint system on the passenger’s seat.
f Have the fault remedied at your nearest
authorized Porsche dealer.
48 Seats, Mirrors and Steering Wheel
Page 49

Warning light
Faults are indicated by a warning light on the
tachometer.
f In the following cases you should immedi-
ately consult an authorized Porsche
dealer in order to assure the airbag
system is functioning properly:
– If the warning light does not light up when the
ignition is switched on or
– If the warning light does not go out once the
engine is running or
– If the warning light appears while driving.
Airbag maintenance
In order to ensure long-term functioning, the airbag system must be inspected by an authorized
Porsche dealer at the intervals recommended in
your Maintenance Booklet.
Important information
If you sell your Porsche, notify the purchaser that
the vehicle is equipped with airbags, and refer
them to the chapter, “Airbag Systems”, in the
owner's manual (safety and disposal rules).
Further information on the airbag system can be
found on stickers attached to the sun visors, as
well as on all airbag components.
For special recommendations on the use of child
restraints:
f Please see the chapter “CHILD RESTRAINT
SYSTEMS” on Page 49.
Child Restraint Systems
Porsche recommends that all infants and children
be restrained in child restraint systems at all times
while the vehicle is in motion in accordance with
applicable laws.
f Porsche recommends the use of L.A.T.C.H.
(Lower Anchorage and Tether for Children)
equipped Porsche child seat.
Use only child restraint systems with the LATCHsystem recommended by Porsche. These systems have been tested and adjusted to the interior
of your Porsche and the appropriate child weight
groups. Other systems have not been tested and
could entail an increased risk of injury.
You can obtain child seats that are LATCH
compatible at your authorized Porsche dealer.
f Always observe the separate installation
instructions for your child seat.
The use of infant or child restraints is required by
law in all 50 US states and the Canadian provinces. The child restraint system should be one that
complies with U.S. Federal/Canadian Motor Vehicle Safety Standards and should be secured by a
lap belt or lap belt portion of a lap-shoulder belt or
for child seats equipped with the LATCH sytem
(Lower Anchorage and Tether for Children, also
known as ISOFIX) to the LATCH anchorages.
A statement by the seat manufacturer of
compliance with this standard can be found on the
instruction label on the restraint and in the
instruction manual provided with the restraint.
Seats, Mirrors and Steering Wheel 49
Page 50

Danger!
Risk of serious personal injury or death to the
child.
f Follow all child restraint instructions and
warnings in this manual.
– When using an infant or child restraint system,
be sure to follow all manufacturer's instructions on installation and use.
– Infants and small children should neither be
held on the lap, nor should they share a safety
belt with another occupant while the vehicle is
in motion.
– Children too big for child restraint systems
should use regular safety belts. A shoulder belt
can be used providing it does not cross the
face or the neck of the child.
– Choose a child restraint system according to
the weight of the child.
– Child restraint systems that are damaged or
have been heavily stressed in an accident must
be replaced immediately.
– Children could be endangered in a crash if their
child restraints are not properly secured in the
vehicle.
– Do not affix objects to child restraint systems
or cover them with other materials.
f For maximum safety and protection, do not
use a child restraint system in the front
passenger seat.
Direction of installation for child restraint
systems
According to accident statistics, children are safer
when properly restrained in the rear seating positions than in the front seating positions.
Under all normal circumstances, the child seat
must be placed in the rear.
f Do not use a child restraint system in the front
passenger seat.
Children up to 29 lbs (13 kg)
Children of this weight must be transported in a restraint system which is fitted facing backwards.
Children between 20 and 40 lbs (9 and
18 kg)
Children of this weight are transported in child
restraint systems facing forward.
Children between 33 and 55 lbs (15 and
25 kg)
Children of this weight are transported in child
restraint systems facing forward.
Children between 49 and 79 lbs (22 and
36 kg)
Children of this weight are transported in child
restraint systems facing forward.
Using child restraint systems in the front
passenger seat
Danger!
The use of a child restraint system in the
front passenger seat can result in serious
personal injury or death to the child from an
airbag deployment.
To reduce risk of injury from an inflating
airbag in an accident, Porsche strongly
recommends:
f Under all normal circumstances, the child seat
must be placed in the rear.
Do not use a child restraint system in the front
passenger seat.
However, there may be serious situations where it
might be necessary to place a child in the front
seat so that he/she can be kept under direct
observation to prevent an immediate risk to the
child (for example, while driving to the doctor or
hospital). The following instructions are provided
to you solely for that purpose.
f Seek appropriate advice from your authorized
Porsche dealer about the possible installation
of a Porsche child restraint system.
f If a child restraint system must be fastened to
the passenger's seat, adjust the passenger's
seat as far away from the airbag as possible.
50 Seats, Mirrors and Steering Wheel
Page 51
f If emergency or other serious conditions
require a child to be placed in the front seat,
exercise extreme caution and defensive
driving of your vehicle. You must recognize
that any substantial frontal impact could result
in the deployment of the passenger airbag,
which could lead to serious injury or death of
the child.
Child restraint system for children weighing
up to 29 lbs (13 kg)
If the child restraint system must be fastened to
the passenger's seat in exceptional cases:
– make sure that the PASSENGER AIRBAG OFF
indicator lamp lights up.
– adjust the passenger's seat as far away from
the airbag as possible
Danger!
Risk of serious personal injury or death due
to the passenger airbag triggering unintentionally.
When the ignition is on and child weighing up
to 29 lbs (13 kg) is seated in the child restraint system on the passenger seat the indicator lamp “PASSENGER AIRBAG OFF” must
be on.
If the “PASSENGER AIRBAG OFF” indicator
lamp does not light up, it could indicate a
fault in the system.
In this case:
f Fasten the child restraint system on the rear
bench immediately.
f Have the fault remedied at your nearest
authorized Porsche dealer.
Child restraint system for children weighing
more than 29 lbs (13 kg)
Your vehicle is equipped with weight sensing for
the passenger's seat in accordance with
U.S. Federal Motor Vehicle Safety Standard 208.
Depending on the weight acting on the
passenger's seat, the passenger's airbag will
automatically be switched on or off.
f In case of doubt, fasten the child restraint
system on the rear bench.
Small adult passengers
f Make sure that the PASSENGER AIRBAG OFF
indicator lamp does not light up.
Danger!
Risk of serious or mortal injury due to the
passenger airbag not triggering.
When the ignition is on and the small adult
passenger is seated on the passenger seat,
the indicator lamp “PASSENGER AIRBAG
OFF” must be off.
If the “PASSENGER AIRBAG OFF” indicator
lamp lights up, it could indicate a fault in the
system.
In this case:
f Carry the passenger on the rear bench until the
fault is repaired.
f Have the fault remedied at your nearest
authorized Porsche dealer.
Seats, Mirrors and Steering Wheel 51
Page 52
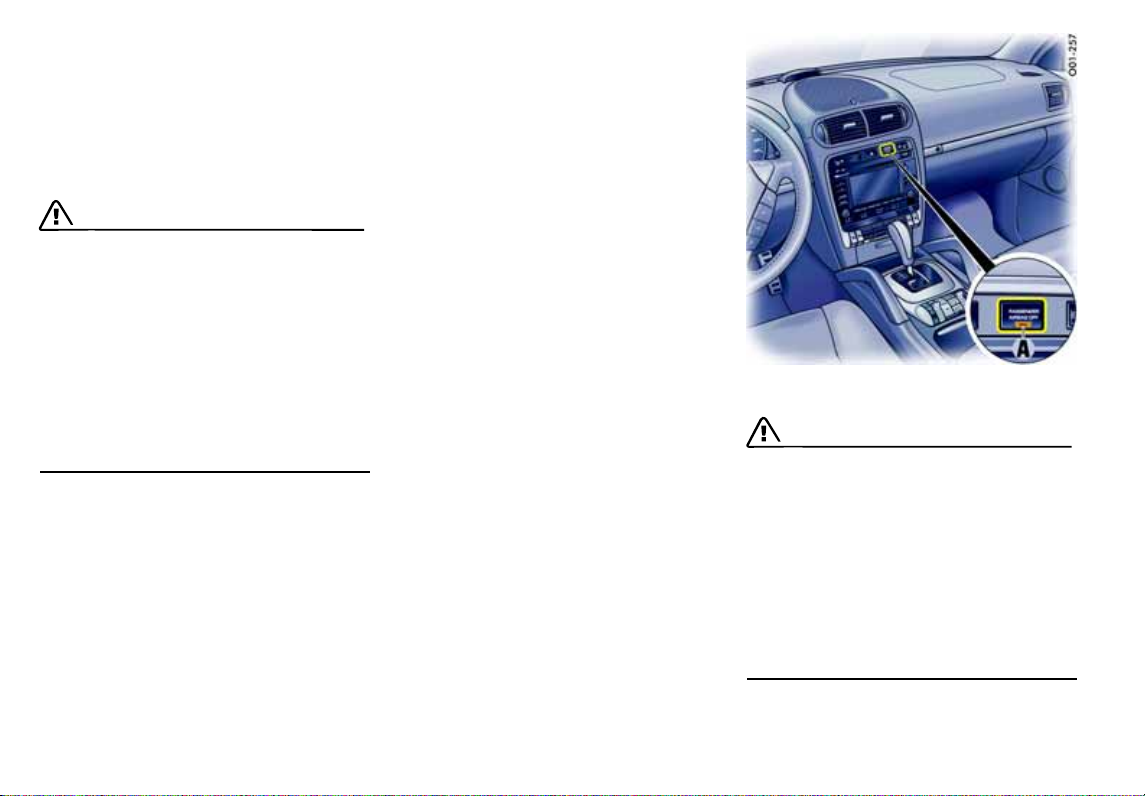
Automatic locking retractor
The safety belts for the front passenger and the
rear bench are equipped with an automatic locking
retractor for securing the child restraint system.
When activated, this retractor allows you to
securely fasten the child restraint system in place
so that inadvertent movements will not occur.
Danger!
The use of a child restraint system on the
front passenger seat can result in serious
personal injury or death to the child from an
airbag deployment.
To reduce risk of injury from an inflating
airbag in an accident, Porsche strongly
recommends:
f Under all normal circumstances, the child seat
must be placed in the rear.
Do not use a child restraint system on the front
passenger seat.
However, there may be serious situations where it
might be necassary to place a child in the front
seat so that he/she can be kept under direct observation to prevent an immediate risk to the child
(for example, while driving to the doctor or hospital). The following instructions are provided to you
solely for that purpose.
f Seek appropriate advice from your authorized
Porsche dealer about the possible installation
of a Porsche child restraint system.
f If a child restraint system must be fastened to
the passenger's seat, adjust the passenger's
seat as far away from the airbag as possible.
Before transporting a child on the passenger seat:
f Please see the chapter “CHILD RESTRAINT
SYSTEMS” on Page 49.
f If emergency or other serious conditions
require a child to be placed in the front seat,
exercise extreme caution and defensive driving of your vehicle. You must recognize that
any substantial frontal impact could result in
the deployment of the passenger airbag, which
coluld lead to serious injury or death of the
child.
A - PASSENGER AIRBAG OFF indicator lamp
Danger!
Risk of serious personal injury or death to the
child, when excessive force is acting on the
passenger's seat due to the seat belt and the
passenger's airbag is switched on unintentionally.
f After fastening the child restraint system, do
not adjust the seat.
f Check the condition of the passenger airbag
system shown by the indicator lamp A in the
central console.
52 Seats, Mirrors and Steering Wheel
Page 53
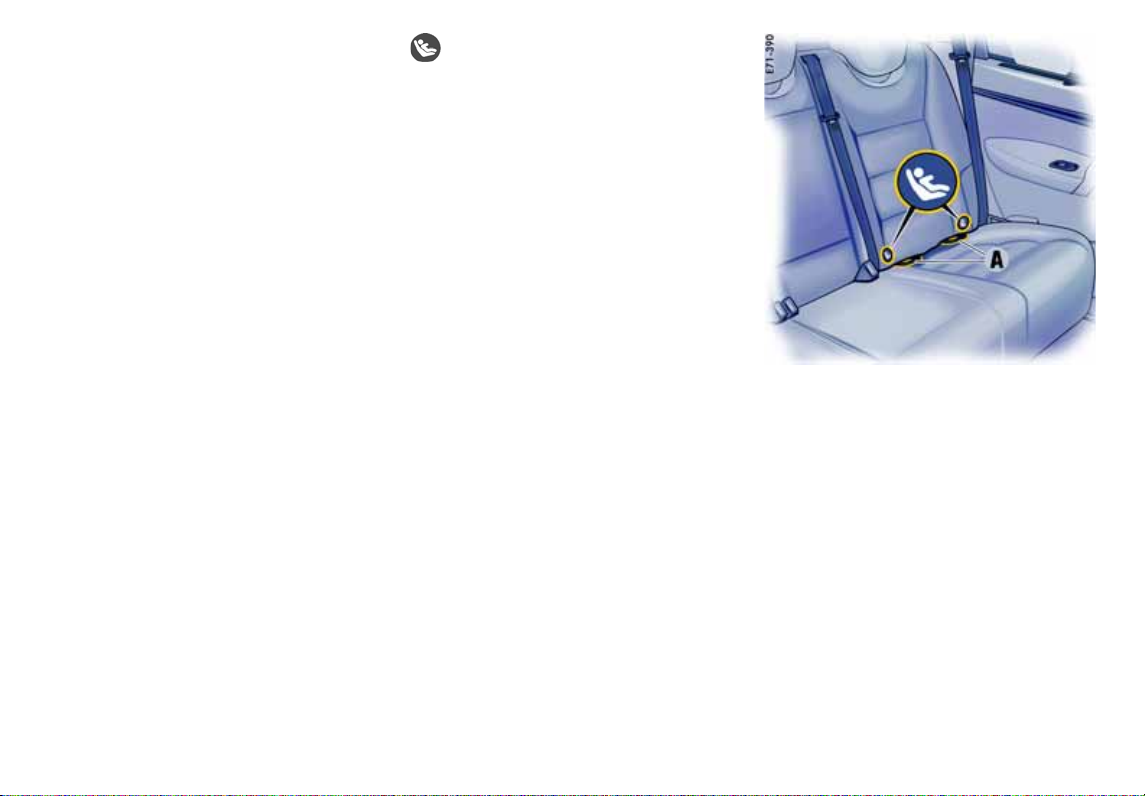
Activating the automatic locking retractor
1. If a child restraint system must be fastened to
the passenger's seat, adjust the passenger's
seat as far away from the airbag as possible.
2. Fasten child seat.
3. Pull the safety belt retractor completely out. At
this point the locking mechanism is activated.
4. Insert the safety belt tongue into the buckle
and make certain that it is properly latched.
Make no more adjustments to the seat.
5. Allow the safety belt to retract until it is tight on
the child restraint system. You may further
tighten the belt by pulling on it to allow more of
it to retract.
Make sure that excessive seat belt forces do
not occur by moving the seat with the child
seat installed.
Releasing the safety belt
f Unbuckle the safety belt latch.
Then make certain that the belt has fully retracted.
At this point the automatic locking feature will be
disengaged.
Seek appropriate advice from your authorized
Porsche dealer about the possible installation of a
Porsche child restraint system.
LATCH Child Seat System
Use only child restraint systems with the LATCH
system recommended by Porsche.
These systems have been tested and adjusted to
the interior of your Porsche and the appropriate
child weight groups. Other systems have not been
tested and could entail an increased risk of injury.
You can obtain child seats that are
LATCH-compatible at your authorized Porsche
dealer.
Always observe the separate installation instructions for your child seat.
Installing a LATCH child seat system
Markings on the right and left for the LATCH child
seat anchorage can be found on the backrests of
the outer rear seats.
The anchor bars A for the LATCH child seat
anchorage can be found directly under the
markings between backrest and seat cushion.
Seats, Mirrors and Steering Wheel 53
Page 54
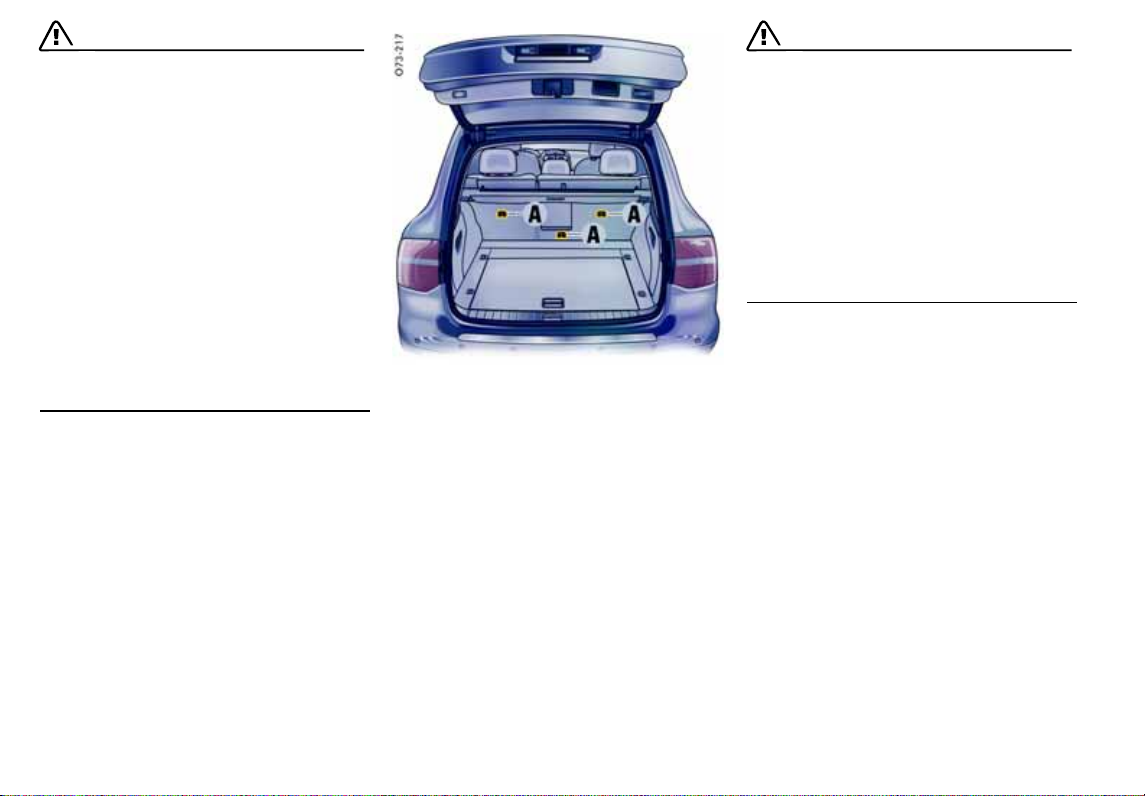
Danger!
The use of a child restraint system on the
front passenger seat can result in serious
personal injury or death to the child from an
airbag deployment.
To reduce risk of injury from an inflating
airbag in an accident, Porsche strongly
recommends:
f Under all normal circumstances, the child seat
must be placed in the rear.
Do not use a child restraint system on the front
passenger seat.
f Please see your authorized Porsche dealer for
correct Porsche Child Seat availability.
f Porsche recommends the use of a Porsche
Child Seat with Lower Anchorage and Tether
for Children system (LATCH) on the rear seats.
1. Secure the child seat to retaining lugs A as
outlined in the operating manual for the child
seat.
2. Pull the child seat to check that both fastening
points are engaged correctly.
Warning!
Child restraint anchorages are designed to
withstand only those loads imposed by
correctly fitted child restraints. Under no
circumstances are they to be used for adults
safety belts or harnesses. Such use could
result in serious personal injury or death.
f Do not misuse the child restraint anchorages.
Only attach one child seat tether per anchorage.
f They are not designed to withstand loads
imposed by adults.
Child Restraint Anchorages
f Please see the chapter “AUTOMATIC LOCKING
RETRACTOR” on Page 52.
If your child restraint seat or seats require the use
of a tether strap, you will want to use the anchor
points A provided behind the rear bench backrests.
To ensure proper installation, see your authorized
Porsche dealer.
54 Seats, Mirrors and Steering Wheel
Page 55

Warning!
Risk of accident. Vehicles or objects appear
smaller in convex mirrors and further away
than they are in reality.
f Bear this distortion in mind when estimating
the distance of vehicles behind you and when
reversing into a parking space.
f Also make use of the interior mirror for judging
the distance.
Risk of damage to the door mirrors when
washing the vehicle in a car wash.
f Fold in door mirrors before using the car wash.
Adjusting the door mirrors synchronously
In the multi-purpose display of the instrument
panel, you have the option of adjusting the door
mirrors synchronously.
f Please see the chapter “SYNCHRONOUS
ADJUSTMENT OF DOOR MIRRORS” on
Page 143.
Folding in door mirror
f Switch ignition on.
f Turn control switch to D.
Both door mirrors fold in automatically.
A - Door mirror setting – driver’s side
B - Heat door mirror
C - Door mirror setting – passenger’s side
D - Fold in door mirrors
Door Mirrors
The convex mirror glass on the passenger's side
provides a larger field of view.
Adjusting mirrors
1. Switch ignition on.
2. Select A for the driver’s side or C for the
passenger’s side by turning the control switch.
3. Move the door mirrors in the appropriate
direction by tilting the control switch.
If the electrical adjustment facility fails
f Adjust the mirror by pressing on the mirror
face.
If the electrical adjustment facility fails
f Fold in mirror manually.
Unfolding door mirrors
f Switch ignition on.
f Turn control switch to A or C.
Both door mirrors unfold automatically.
If the electrical adjustment facility fails
f Unfold mirrors manually.
Seats, Mirrors and Steering Wheel 55
Page 56
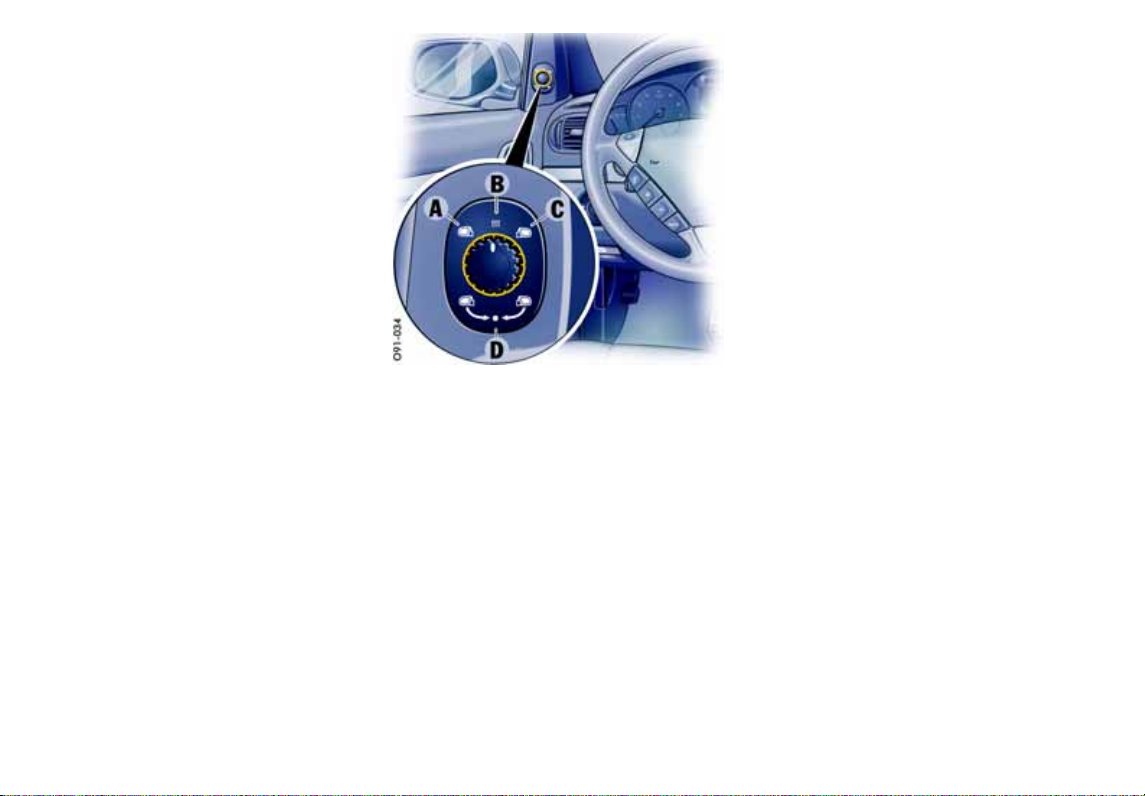
Door mirror heating
The door mirror heater is ready for operation
when the ignition is switched on.
Switching on
f Turn control switch to B.
Both door mirrors are heated.
Switching off
f Change the position of the control switch.
Storing door mirror settings
On vehicles with seat memory, individual door mirror settings can be stored on the person buttons
of the seat memory and vehicle keys and recalled
with these.
f Please see the chapter “FRONT SEAT WITH
MEMORY” on Page 37.
f Please see the chapter “STORING PASSEN-
GER MIRROR SETTING AS A PARKING AID” on
Page 38.
Preconditions
– Vehicle must be equipped with seat memory.
– Control switch must be turned to position C
(passenger mirror’s setting).
– Reverse gear must be engaged.
Moving mirror glass to its initial position with
reverse gear engaged
The mirror glass swivels to its initial position when:
– The car is shifted out of reverse gear or
– The position of the control switch for the door
mirror setting is changed.
A - Door mirror setting – driver’s side
B - Heat door mirror
C - Door mirror setting – passenger’s side
D - Fold in door mirrors
Swivelling down mirror glass as parking
aid
When reverse gear is engaged, the mirror glass
on the passenger's side swivels down slightly to
show the curb area.
56 Seats, Mirrors and Steering Wheel
Page 57
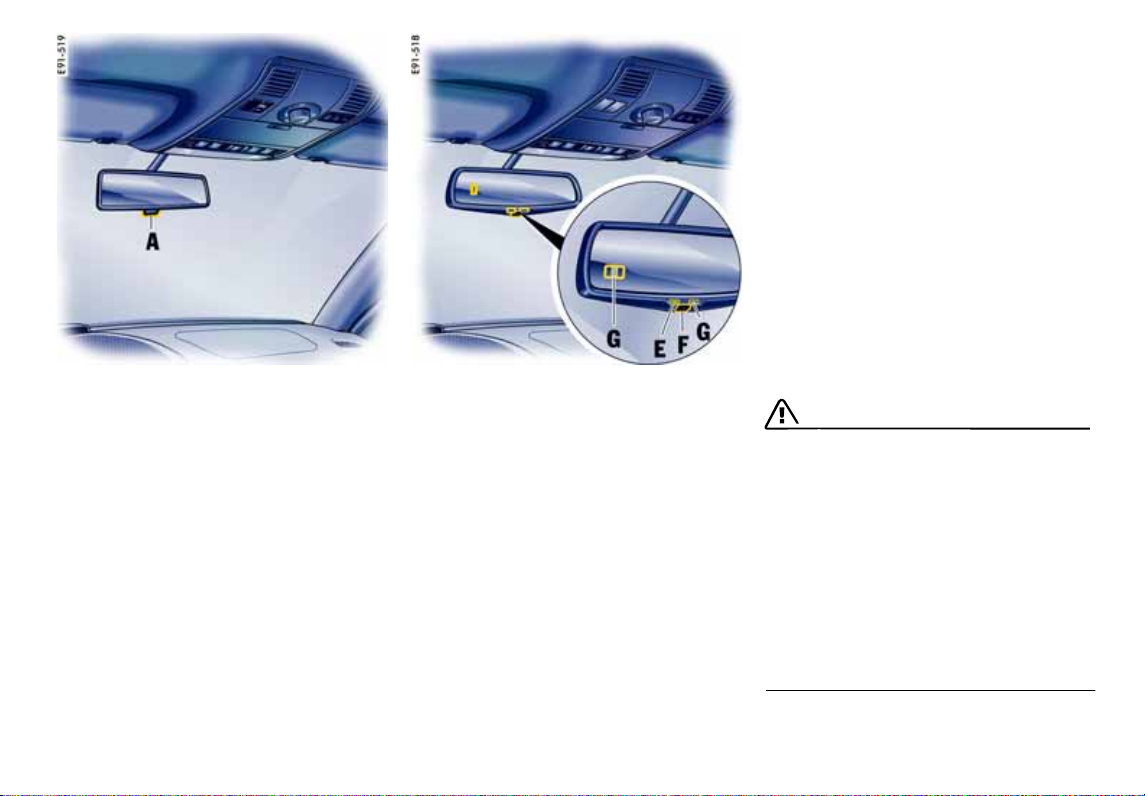
Interior Mirror
Initial position – lever forward
Anti-dazzle setting – lever back
Note on operation
f When the interior mirror is being adjusted, anti-
dazzle lever A must point forward.
E - Light-emitting diodes (LED)
F - Button for automatic anti-dazzle operation
G - Light sensors
Automatic Anti-Dazzle Mirror
Sensors on the front and rear sides of the interior
mirror measure the incident light. The mirrors
automatically change to anti-dazzle position or
revert to their normal state, depending on the light
intensity.
Note on operation
The incident light in the area of light sensors G
must not be restricted (e.g. by stickers on the
windshield).
Switching off automatic anti-dazzle
operation
f Press button F.
Light-emitting diode E goes out.
Note on operation
Anti-dazzle operation switches off automatically,
if:
– Reverse gear is engaged or
– Interior lighting and/or
reading lights in the front are switched on.
Switching on automatic anti-dazzle
operation
f Press button F.
Light-emitting diode E lights up.
Warning!
Danger of injury. Electrolyte fluid can
emerge from broken mirror glass. This fluid
irritates the skin and eyes.
f If the electrolyte fluid should come into contact
with the skin or eyes, immediately rinse it off
with clean water.
See a doctor if necessary.
Risk of damage to paintwork and leather and
plastic parts, and clothing. Electrolyte fluid
can be removed only while it is still wet.
f Clean the affected parts with water.
Seats, Mirrors and Steering Wheel 57
Page 58

Horn
Steering Wheel Heating
Steering Wheel
Tiptronic rocker switches
The Porsche Tiptronic is a six-speed transmission
and features an “automatic” and a “manual” gearshift mode.
You can change temporarily to manual mode using
rocker switches A on the steering wheel.
f For further information on gearshifting with
Tiptronic S:
Please see the chapter “TIPTRONIC S” on
Page 170.
f Press button B to operate the horn.
Airbag unit
Airbag unit C is located behind the padded
steering wheel boss.
In conjunction with the safety belts, the “airbag” is
a safety system designed to provide the driver and
passengers with maximum protection from injury
in an accident.
f For further information on the airbag system:
Please see the chapter “AIRBAG SYSTEMS” on
Page 45.
The steering wheel heating is switched on and off
automatically when the ignition is switched on
depending on the interior temperature.
On vehicles with manual air conditioning
The steering wheel heating switches itself on
when the following criteria are fulfilled at the same
time:
1. Low outside temperature.
2. Low engine temperature.
3. The interior temperature setting in the display
of the air conditioning is 10 and more bars.
or at the highest level (all bars) of the interior
temperature setting on the display of the air
conditioning.
The steering wheel heating switches itself off
again after a warming-up phase, or is switched off
if one of the criteria is no longer met.
f For more information about setting the interior
temperature on vehicles with manual air conditioning:
Please see the chapter “SETTING
TEMPERATURE” on Page 68.
58 Seats, Mirrors and Steering Wheel
Page 59

Steering Wheel Adjustment
Warning!
Risk of accident. The steering wheel may
move further than desired if you attempt to
adjust it when driving.
You can lose control of the vehicle, causing
serious personal injury or death.
f Do not adjust the steering wheel when driving.
Risk of crushing due to uncontrolled recall of
seat memory settings.
f Do not leave children in the car unattended.
Manual adjustment
1. Swivel locking lever A downwards.
2. Adapt the steering wheel setting to the backrest angle and your seat position. Move the
steering wheel in the desired direction.
3. Swivel locking lever A back until you feel it
engage.
Electrical adjustment
f Press control switch B in the relevant direction
until the desired setting is reached.
The steering wheel setting can be stored in the
seat memory.
f For further information on storing and calling
up the steering wheel setting on vehicles with
comfort memory:
Please see the chapter “FRONT SEAT WITH
MEMORY” on Page 37.
Seats, Mirrors and Steering Wheel 59
Page 60

Multi-Functional Steering Wheel
Warning!
There is a danger of accident if you set or
operate the on-board computer, radio, navigation system, telephone or other equipment
when driving.
This could distract you from the traffic and
cause you to lose control of the vehicle resulting in serious personal injury or death.
f Operate the components while driving only if
the traffic situation allows you to do so safely.
f Carry out any complicated operating or setting
procedures only with the vehicle stationary.
Depending on the equipment in your vehicle, you
can use these function keys to operate the
following Porsche communication systems:
–PCM
–Radio
– Telephone,
– TV tuner,
– CD audio, DVD audio, DVD video,
or an iPod or USB storage device connected via
the universal audio interface.
Readiness for operation of multifunctional steering wheel
– With ignition switched on and
– With Porsche communication systems
switched on.
f Please read and understand the operating in-
structions supplied for the Porsche communication systems before operating the function
keys.
Note on operation
The Porsche communication systems cannot be
switched on and off using the multi-functional
steering wheel.
Operating the function keys
The function keys on the steering wheel (arrows)
can be operated by pressing and by pulling.
Various functions may require you to press or pull
the buttons several times in order to achieve the
desired setting.
60 Seats, Mirrors and Steering Wheel
Page 61

Steering wheel buttons – lighting
When the light switch is operated, the light
switches on automatically.
Using the buttons on the back of the steering
wheel (arrow), the lighting for the function keys
and the rocker switches can be switched on and
off.
Switching lighting off
f Press button.
Function keys on multi-functional
steering wheel
f Please read and understand the operating in-
structions supplied for the Porsche communication systems before operating the function
keys.
Answer the telephone
–Take calls.
Hang up the telephone
– End or reject the call.
Increase the volume of the relevant
communication system
Decrease the volume of the relevant
communication system
Switch off the sound
Next radio station/title
– Select the next radio station or title.
Last radio station/title
– Select the previous radio station or
title.
Source selection
– Select available audio source.
Switching lighting on
f Press button again.
Seats, Mirrors and Steering Wheel 61
Page 62

Sun Visors
f Swing sun visor A down to prevent dazzle from
the front.
f If you are dazzled from the side, unclip sun
visor A from the inner bracket and swivel it
round so that it is in front of the door window.
You can also swivel sun visor B downwards.
Note on operation
f Please note that sun visor B must be swivelled
upwards before swivelling back sun visor A.
Otherwise, sun visor B can no longer be
swivelled upwards.
62 Seats, Mirrors and Steering Wheel
Make-up mirror
The make-up mirror on the rear of the sun visor is
closed with a sliding cover.
Warning!
Risk of injury in an accident.
f Keep the sliding cover closed while driving.
f The make-up mirror illumination is switched on
automatically when the sliding cover is opened
(arrow).
Sun Blinds, Rear Side Windows
The sun blinds in the rear door trim panels can be
pulled out and secured in the holders A.
Caution!
Risk of damage.
f Pull out sun blinds during the journey only when
door windows are closed.
Retracting sun blinds
f Disengage the sun blind from holders A and
carefully guide it back into the retractor roller.
Page 63

Air Conditioning, Parking Heater and Heated Rear Window
Opening the Cover Flap of the
Air-Conditioning Control Panel ....................... 64
Overview of Air-Conditioning Systems ............ 64
Valid for Every Air-Conditioning System .......... 65
Brief Overview – Manual Air-Conditioning...... 66
Manual Air-Conditioning................................. 67
Brief Overview – Automatically Controlled
2-Zone Air-Conditioning System ..................... 69
Automatically Controlled
2-Zone Air-Conditioning ................................. 70
Brief Overview – Automatically Controlled
4-Zone Air-Conditioning System,
Front Control Panel ...................................... 73
Brief Overview – Automatically Controlled
4-Zone Air-Conditioning System,
Rear Control Panel ....................................... 74
Automatically Controlled
4-Zone Air-Conditioning ................................. 75
Vents .......................................................... 79
Heated Rear Window .................................... 80
Parking Heater............................................. 81
Air Conditioning, Parking Heater and Heated Rear Window 63
Page 64

Opening the Cover Flap of the
Air-Conditioning Control Panel
f Swivel cover flap on the handle downwards
(arrow).
Overview of Air-Conditioning
Systems
The following air-conditioning system types may
be installed, depending on your vehicle equipment:
A - Manual air-conditioning system
Air quantity, air distribution and temperature can
be set on the control panel of the manual air-conditioning system.
B - Automatically controlled 2-zone airconditioning system
The air-conditioning system controls the preselected interior temperature completely automatically.
Temperature can be set individually for the left and
right air-conditioned areas.
C - Automatically controlled 4-zone airconditioning system
The air-conditioning system controls the set
interior temperature completely automatically.
Temperature, air quantity and air distribution can
be set individually for the front left, front right, rear
left and rear right air-conditioned areas.
How do I recognize which is “my” airconditioning system?
A - Wide rocker switch and no AUTO button
B - AUTO button and REST button present
C - Button for rear control panel is present
64 Air Conditioning, Parking Heater and Heated Rear Window
Page 65
Valid for Every Air-Conditioning
System
Note on operation
The air conditioner settings are stored on the
respective remote control when switching off the
ignition and locking the vehicle. The “Air flow O FF ”
setting is stored for approx. 60 minutes and the
“Recirculated air” setting is stored for approx.
20 minutes.
REST mode
Using engine residual heat
The residual heat of the engine can be used to
heat the interior up to 20 minutes after the ignition
has been switched off.
f Press button (manual and 2-zone air-
conditioning) or (4-zone air-conditioning) on the front control panel.
The air-conditioning settings cannot be changed in REST mode.
Ending the function
f Press button (manual and 2-zone air-
conditioning) or (4-zone air-conditioning) on the front control panel.
Note on operation
If the battery voltage is too low, REST mode is
automatically ended.
ECON mode
Warning!
Risk of accident due to impaired vision,
resulting in serious personal injury or death.
The outside air that is flowing in is not dried
in ECON mode. The windows may mist up.
f Do not switch on ECON mode in damp
weather.
In ECON mode, the air-conditioning compressor is
switched off and this deactivates the cooling
function (e.g. to save fuel).
The air-conditioning compressor is always swit-
ched off at temperatures below 37.4 °F (3 °C).
Switching on ECON mode
f Press button .
The ECON logo appears on the air-conditioning
display panel.
The air-conditioning compressor is switched
off.
Switching off ECON mode
f If the interior temperature is too high,
press button or
press button (2-zone air-conditioning)
or button (4-zone air-conditioning).
The ECON logo disappears from the air-conditioning display panel.
The air-conditioning compressor is switched
on.
Information on air-conditioning
compressor
The air-conditioning compressor:
– May switch off briefly to ensure sufficient
engine cooling if the engine is operating under
extreme load.
– Switches off automatically at temperatures
below approx. 37.4 °F (3 °C) and cannot be
switched on, even manually.
– Operates most effectively with windows
closed.
If the car has been in the sun for a long time,
however, it is a good idea to ventilate the
interior briefly with the windows open.
– Depending on the outside temperature and
humidity, condensation can drip from the evaporator and form a pool under the car.
This is normal and not a sign of leakage.
f If uncooled air flows out when the lowest
temperature has been set (“LO”), switch off the
air-conditioning compressor and have the fault
remedied at an authorized Porsche dealer.
Air Conditioning, Parking Heater and Heated Rear Window 65
Page 66

Brief Overview –
Manual Air-Conditioning
This brief overview does not replace the information provided in the chapter “Manual Air-Conditioning”. In particular, warnings are not replaced
by this brief overview.
What do I want to do? What do I have to do?
Setting temperature
Push button K up (warmer) or down (colder).
Setting air quantity
Setting air distribution
Defrosting windshield
Push button E up (more) or down (less).
Air to windshield: Press button F.
Air to central and side vents: Press button H.
Air to footwell: Press button G.
Press button A.
66 Air Conditioning, Parking Heater and Heated Rear Window
Page 67

Control panel
A - Windshield defroster
B -Heated rear window
C - Recirculated air
D - Air-conditioning display
E - Air-quantity button
F - Air to windshield
G - Air to footwell
H - Air to central and side vents
I - ECON button (air-conditioning compressor off/on)
J - REST button (engine residual heat)
K -Temperature button
Manual Air-Conditioning
Air quantity, air distribution, and temperature
can be set on the control panel of the manual air
conditioning.
This individual adjustment is shown on the air-conditioning display panel.
Please read the information on:
–REST mode,
–ECON mode and
– Air-conditioning compressor
on page 65.
Defrost windshield
f Press button .
Indicator light in button lights up.
The air flows to the windshield and the front
side windows.
The windshield is demisted or defrosted as
quickly as possible.
Ending the function
f Press button again.
Air Conditioning, Parking Heater and Heated Rear Window 67
Page 68
Setting temperature
f The selected temperature is shown in a bar dis-
play on the display above the button.
The more bars that are displayed, the higher
the temperature of the air flowing into the
interior.
Increase temperature
f Push temperature button K up.
Decrease temperature
f Push temperature button K down.
Note
f For maximum cooling, activate recirculated air
button .
Setting air quantity
f The selected air quantity is shown in a bar dis-
play on the display above the button.
The more bars that are displayed, the more air
flows into the interior.
If the air quantity was reduced so much that “OFF”
appears on the display, the outside-air supply is interrupted.
Increase air quantity
f Push air quantity button E up.
Decrease air quantity
f Push air quantity button E down.
Warning!
Risk of accident due to impaired vision,
resulting in serious personal injury or death.
If the air quantity is “OFF”, the windows may
mist up.
f Only select air quantity setting “OFF” for short
periods.
f If windows mist up, push air quantity button E
up to increase air quantity and select the function “Defrost windshield”.
Setting air distribution
Air to windshield
f Press button .
The air flows to the windshield.
Air to central and side vents
f Press button .
The air flows from the central and side vents.
Vents must be open.
Air to footwell
f Press button .
The air flows to the footwell.
Switching recirculating-air mode
on
Warning!
Risk of accident due to impaired vision,
resulting in serious personal injury or death.
In recirculating-air mode, the windows may
mist up.
f Only select recirculating-air mode for short
periods.
f If windows mist up, switch recirculating-air
mode off immediately by pressing the
recirculating-air button again and select the
function “Defrost windshield”.
f Press button .
Indicator light in button lights up.
The outside-air supply is interrupted and only
the inside air is circulated.
68 Air Conditioning, Parking Heater and Heated Rear Window
Page 69

Brief Overview – Automatically
Controlled 2-Zone Air-Conditioning
System
This brief overview does not replace the information provided in the chapter “Automatically
Controlled 2-Zone Air-Conditioning”. In particular,
warnings are not replaced by this brief overview.
What do I want to do? What do I have to do?
Switching on automatic air-conditioning
system
Press button C.
Setting temperature
Setting air quantity
Setting air distribution
Defrosting windshield
Left vehicle side: Push button H up (warmer) or down (colder).
Right vehicle side: Push button N up (warmer) or down (colder).
Push button G up (more) or down (less).
Air to windshield: Press button I.
Air to central and side vents: Press button K.
Air to footwell: Press button J.
Press button A.
Air Conditioning, Parking Heater and Heated Rear Window 69
Page 70

Control panel
A - Windshield defroster
B -Heated rear window
C - AUTO button (automatic mode)
D - Recirculated air, automatic recirculated air
E - Air-conditioning display
F -Temperature sensor
G - Air-quantity button
H - Temperature button for left side
I - Air to windshield
J - Air to footwell
K - Air to central and side vents
L - ECON button (air-conditioning compressor off/on)
M- REST button (engine residual heat)
N - Temperature button, right side
Automatically Controlled 2-Zone
Air-Conditioning
Depending on various factors (e.g. sunlight, air
quality), the air-conditioning system controls the
preset interior temperature fully automatically.
Temperature can be set individually/separately for
the two left and right air-conditioned areas.
You can manually influence the automatic system.
This individual adjustment is shown on the
air-conditioning display panel.
Please read the information on:
–REST mode,
–ECON mode and
– Air-conditioning compressor
on page 65.
70 Air Conditioning, Parking Heater and Heated Rear Window
Defrosting the windshield
f Press button .
Indicator light in button lights up.
The air flows to the windshield and the front
side windows.
The windshield is demisted or defrosted as
quickly as possible.
Ending the function
f Press button again or
f Press button .
Page 71

Automatic mode
f Press button .
Indicator light in button lights up.
Air quantity and air distribution are automatically controlled and variations are compensated.
Note on operation
If necessary, the automatic system can be manually influenced.
This manual setting is retained until the appropriate function button is pressed again or the button
is pressed.
Sensors
To avoid affecting the performance of the air-conditioning system:
f Do not cover the sun sensor on the dashboard
and the temperature sensor F in the front control panel of the air-conditioning system.
Setting temperature
To suit personal comfort, the interior temperature
can be adjusted between 61 °F and 85 °F (16 °C
and 29.5 °C).
Recommendation: 72 °F (22 °C)
The selected temperature is shown on the display
above the button.
Increase temperature
f Push temperature button up.
Left side of vehicle: button H
Right side of vehicle: button N
Decrease temperature
f Push temperature button down.
Left side of vehicle: button H
Right side of vehicle: button N
If “LO” or “HI” appears on the display, the system
is operating at maximum cooling or heating
power. Automatic mode is switched off.
If the preselected temperature is changed, the air
quantity blowing out can adjust automatically in
automatic mode.
The desired temperature is reached more quickly
this way.
Setting air quantity
The selected air quantity is shown in a bar display
on the display above the button.
The more bars that are displayed, the more air
flows into the interior.
Increase air quantity
f Push air quantity button G up.
Decrease air quantity
f Push air quantity button G down.
Press button to return to automatic mode.
If the air quantity was reduced so much that “OFF”
appears on the display, the outside-air supply is
interrupted.
Warning!
Risk of accident due to impaired vision,
resulting in serious personal injury or death.
If the air quantity is “OFF”, the windows may
mist up.
f Only select air quantity setting “OFF” for short
periods.
f If windows mist up, push air quantity button G
up to increase air quantity and select the function “Defrost windshield”.
Air Conditioning, Parking Heater and Heated Rear Window 71
Page 72
Setting air distribution
Air to windshield
f Press button .
The air flows to the windshield.
Air to central and side vents
f Press button .
The air flows from the central and side vents.
Vents must be open.
Air to footwell
f Press button .
The air flows to the footwell.
Ending air distribution functions
f Press the relevant button again or
f Press button .
Accepting settings for driver’s side for the
entire vehicle
The MONO function allows temperature settings
for the driver’s side to be accepted for the entire
vehicle.
Switching MONO function on
The temperature settings for the driver’s side can
be accepted for the entire vehicle.
f Press button for 2 seconds.
The MONO logo appears on the air-conditioning display panel.
Ending MONO function
f Press button for 2 seconds or
f Change the settings in the air-conditioned
areas.
Switching automatic
recirculating-air mode on
f Press button once.
Indicator light in button lights up.
Control of the outside-air supply depends on
the air quality.
Note
The recommended operating mode is automatic
recirculating-air mode.
Switching recirculating-air mode
on
Warning!
Risk of accident due to impaired vision,
resulting in serious personal injury or death.
In recirculating-air mode, the windows may
mist up.
f Only select recirculating-air mode for short
periods.
f If windows mist up, end recirculating-air mode
by pressing the recirculating-air button again
and selecting the function “Defrost windshield”.
f Press button twice.
Indicator light in button lights up.
The outside-air supply is interrupted and only
the inside air is circulated.
Note on operation
When the air-conditioning compressor is switched
off manually or automatically, recirculating-air
mode ends after approx. 3 minutes.
72 Air Conditioning, Parking Heater and Heated Rear Window
Page 73
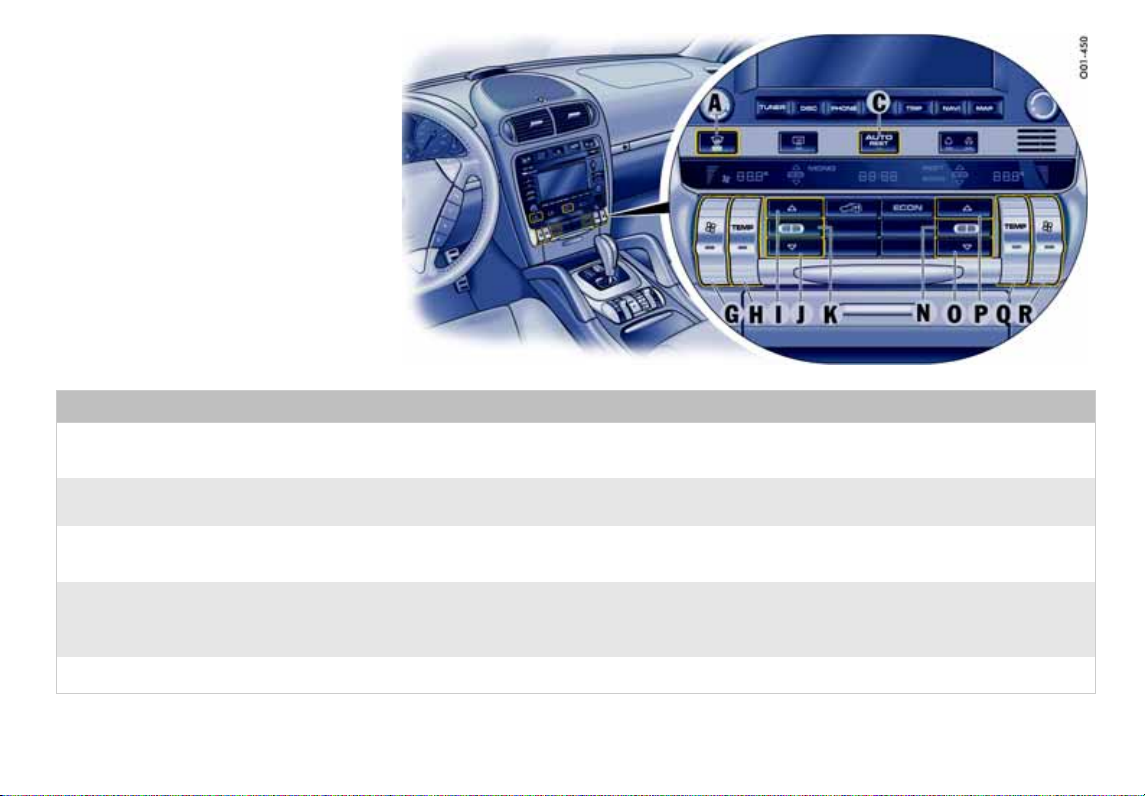
Brief Overview – Automatically
Controlled 4-Zone Air-Conditioning
System, Front Control Panel
This brief overview does not replace the information provided in the chapter “Automatically
Controlled 4-Zone Air-Conditioning”. In particular,
warnings are not replaced by this brief overview.
What do I want to do? What do I have to do?
Switching on automatic air-conditioning
system at front
Press button C.
Setting temperature at front
Setting air quantity at front
Setting air distribution at front
Defrosting windshield
Left side: Push button H up (warmer) or down (colder).
Right side: Push button Q up (warmer) or down (colder).
Left side: Push button G up (more) or down (less).
Right side: Push button R up (more) or down (less).
Air to windshield, left or right side: Press button I or P.
Air to central and side vents, left or right side: Press button K or N.
Air to footwell, left or right side: Press button J or O.
Press button A.
Air Conditioning, Parking Heater and Heated Rear Window 73
Page 74

Brief Overview – Automatically
Controlled 4-Zone Air-Conditioning
System, Rear Control Panel
This brief overview does not replace the information provided in the chapter “Automatically
Controlled 4-Zone Air-Conditioning”. In particular,
warnings are not replaced by this brief overview.
What do I want to do? What do I have to do?
Switching on automatic air-conditioning
system at rear
Press button C.
Setting temperature at rear
Setting air quantity at rear
Setting air distribution at rear
Left side: Push button H up (warmer) or down (colder).
Right side: Push button S up (warmer) or down (colder).
Left side: Push button G up (more) or down (less).
Right side: Push button T up (more) or down (less).
Air to side window, left or right side: Press button I or P.
Air to central vent, left or right side: Press button K or R.
Air to footwell, left or right side: Press button J or Q.
74 Air Conditioning, Parking Heater and Heated Rear Window
Page 75

Control panel, front
A - Windshield defroster
B -Heated rear window
C - AUTO button (automatic mode)
REST button (engine residual heat)
D - Recirculated air, automatic recirculated air
E - Air-conditioning display
F -Temperature sensor
G - Air-quantity button, left
H -Temperature button, left
I - Air to windshield, left
J - Air to footwell, left
K - Air to left central and side vents
L - Setting for rear air-conditioned areas
M- ECON button (air-conditioning compressor off/on)
N - Air to right central and side vents
O - Air to footwell, right
P - Air to windshield, right
Q - Temperature button, right
R - Air-quantity button, right
Automatically Controlled 4-Zone
Air-Conditioning
Depending on various factors (e.g. ambient temperature, sunlight, air quality), the air-conditioning
system controls the preset interior temperature
fully automatically.
Temperature, air quantity and air distribution can
be set individually/separately for the four air-conditioned areas front left, front right, rear left and
rear right.
You can manually influence the automatic system.
This individual adjustment is shown on the
air-conditioning display panel.
Please read the information on:
–REST mode,
–ECON mode and
– air-conditioning compressor
on page 65.
Defrosting the windshield
f Press button on the front control panel.
Indicator light lights up.
The air flows to the windshield and the front
side windows.
The windshield is demisted or defrosted as
quickly as possible.
Ending the function
f Press button again or
f Press the button .
Air Conditioning, Parking Heater and Heated Rear Window 75
Page 76

Control panel, rear
C - AUTO button (automatic mode)
F - Air-conditioning/seat heating display
G - Air-quantity button, left
H - Temperature button, left; seat heating, left
I - Air to vent, left door post
J - Air to footwell, left
K - Air to left central vent (center console)
O -Seat heating off/on
P - Air to vent, right door post
Q - Air to footwell, right
R - Air to right central vent (center console)
S - Temperature button, right; seat heating, right
T - Air-quantity button, right
Automatic mode
You can switch to automatic mode for the front
and rear air-conditioned areas, independently of
one another.
f Press AUTO button C on the front or rear
Note on operation
If necessary, the automatic system can be
manually influenced.
This manual setting is retained until the appropriate function button is pressed again or the AUTO
button C is pressed.
control panel.
The indicator light in button C of the front control panel and the AUTO indication in the rear
display panel are lit.
Air quantity and distribution are automatically
controlled and variations are compensated.
76 Air Conditioning, Parking Heater and Heated Rear Window
Sensors
To avoid affecting the performance of the air-conditioning system:
f Do not cover the sun sensor on the dashboard
and the temperature sensor F in the front control panel of the air-conditioning system.
Page 77

Setting temperature
To suit personal comfort, the interior temperature
for each of the four air-conditioned areas can be
adjusted between 61 °F and 85 °F (16 °C and
29.5 °C).
Recommendation: 72 °F (22 °C)
The selected temperature is shown on the display
above the button.
Increase temperature
f Push temperature button up.
Left air-conditioned area, front: Button H
Right air-conditioned area, front: Button Q
Left air-conditioned area, rear: Button H
Right air-conditioned area, rear: Button S
Decrease temperature
f Push temperature button down.
Left air-conditioned area, front: Button H
Right air-conditioned area, front: Button Q
Left air-conditioned area, rear: Button H
Right air-conditioned area, rear: Button S
If “LO” or “HI” appears on the display, the system
is operating at maximum cooling or heating
power.
If the preselected temperature is changed, the air
quantity blowing out can adjust automatically in
automatic mode.
The desired temperature is reached more quickly
this way.
Setting air quantity
The air quantity can be selected individually for
each of the four air-conditioned areas.
The selected air quantity is shown in a bar display
on the display above the button. The more bars
that are displayed, the more air flows into the interior.
Increase air quantity
f Push air quantity button up.
Left air-conditioned area, front: Button G
Right air-conditioned area, front: Button R
Left air-conditioned area, rear: Button G
Right air-conditioned area, rear: Button T
Decrease air quantity
f Push air quantity button down.
Left air-conditioned area, front: Button G
Right air-conditioned area, front: Button R
Left air-conditioned area, rear: Button G
Right air-conditioned area, rear: Button T
f Press AUTO button C to return to automatic
mode.
If the air quantity on the front control panel was reduced so much that “OFF” appears on the display,
the outside-air supply is interrupted.
Warning!
Risk of accident due to impaired vision,
resulting in serious personal injury or death.
If the air quantity is “OFF”, the windows may
mist up.
f Only select air quantity setting “OFF” for short
periods.
f If windows mist up, push air quantity buttons
G and O up to increase air quantity and select
the function “Defrost windshield”.
Setting air distribution
Air to windshield and side windows
The air quantity can be selected individually for
each of the four air-conditioned areas.
– Front control panel:
The air flows to the windshield.
– Rear control panel:
The air flows to the respective side window.
f Press button .
Air Conditioning, Parking Heater and Heated Rear Window 77
Page 78

Air to central and side vents
f Press button .
– Front control panel:
The air flows from the front central and side
vents.
– Rear control panel:
The air flows to the center vents.
f Vents must be open.
Air to footwell
f Press button .
The air flows to the footwell.
Ending air distribution functions
f Press the relevant button again or
f Press the AUTO button C.
Accepting settings for driver’s side for the
entire vehicle
The MONO function allows the temperature and air
quantity settings for the driver’s side to be
accepted for the entire vehicle.
Switching on MONO function
f Press button in the front control panel
for 2 seconds.
The MONO logo appears on the air-conditioning display panel.
Ending MONO function
f Press button in the front control panel
for 2 seconds or
f Change the settings in the air-conditioned
areas.
Switching automatic recirculatingair mode on
f Press button on the front control panel
once.
Indicator light in button lights up.
Control of the outside-air supply depends on
the air quality.
Note
The recommended operating mode is automatic
recirculating-air mode.
Switching recirculating-air mode
on
Warning!
Risk of accident due to impaired vision,
resulting in serious personal injury or death.
In recirculating-air mode, the windows may
mist up.
f Only select recirculating-air mode for short
periods.
f If windows mist up, end recirculating-air mode
by pressing the recirculating-air button again
and selecting the function “Defrost windshield”.
f Press button on the front control panel
twice.
Indicator light in button lights up.
The outside-air supply is interrupted and only
the inside air is circulated.
Note on operation
When the air-conditioning compressor is switched
off manually or automatically, recirculating-air
mode ends after approx. 3 minutes.
78 Air Conditioning, Parking Heater and Heated Rear Window
Page 79

Controlling rear air-conditioned
areas with the front control panel
f Press button .
The Symbol appears on the display.
The rear air-conditioned areas can be
controlled from the front control panel.
Ending the function
f Press button again.
Note on operation
The function is ended automatically 10 seconds
after the last settings are made.
Rear seat heating
Disabling control panel for
air-conditioned areas at the rear
Power windows, central locking buttons on the
rear doors and rear control panel for the air conditioning can be disabled using the safety button in
the armrest of the driver’s door.
Switching child protection on/off
f Press the safety button to switch child
protection on and off.
The symbol in the safety button lights up if
child protection is active.
The rear seats can also be heated in vehicles with
four-zone air conditioning.
f For further information on the rear seat
heating:
Please see the chapter “REAR SEAT HEATING
IN VEHICLES WITH AN FOUR-ZONE AIR CONDITIONING SYSTEM” on Page 41.
Air Conditioning, Parking Heater and Heated Rear Window 79
A - Continuous opening and closing
B - Setting vent direction
Vents
Opening vents
f Rotate thumb wheel A upward.
Closing vents
f Rotate thumb wheel A downward.
Page 80
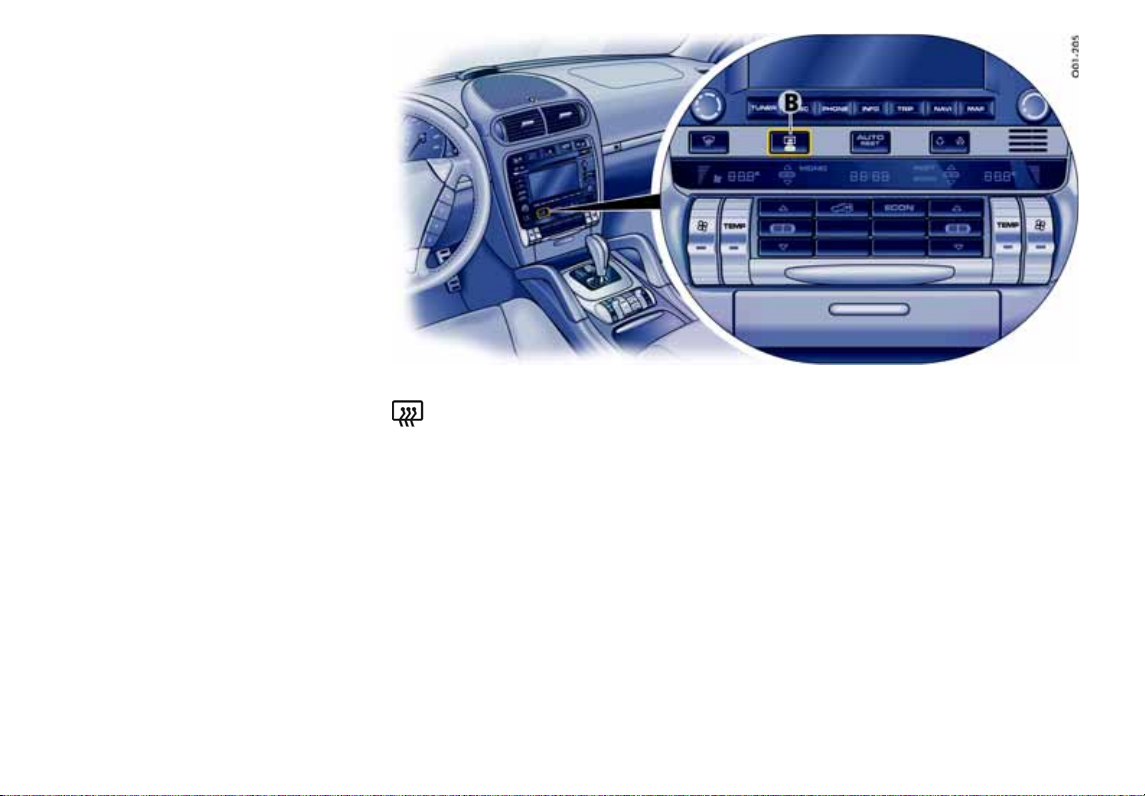
Changing air flow direction
f Swivel vent fins B in the desired direction.
Note on operation
Fresh air or conditioned fresh air can be delivered
from all vents depending on the air distribution
setting.
Fresh-air intake
In order to ensure unhindered air intake:
f Keep the fresh-air intake between the wind-
shield and the engine compartment lid free
from snow, ice and leaves.
Heated Rear Window
The heated rear window is ready for operation
when the ignition is on.
80 Air Conditioning, Parking Heater and Heated Rear Window
Switching on
f Press button B.
Indicator light in button lights up.
Depending on the outside temperature, the
heating switches off automatically after approx.
5 to 20 minutes.
The heating can be switched back on again by
pressing the switch again.
Switching off
Press button B.
Indicator light in button goes out.
Page 81

A -“–” button
B -TIMER button
C - ON/OFF button
D -“+” button
Parking Heater
The parking heater features two functions: parking
heating and parking ventilation.
The parking heater is ready for use regardless of
the ignition key position.
The parking heater is also used as an auxiliary
heater. Operation of the parking heater is therefore clearly audible when outside temperatures
are low, even if the parking heater has been
manually switched off.
The parking heater is operated using the following
buttons on the front air-conditioning control panel:
Switch parking heater on and off
Activate program
Start programming
Call memories
Set ON times
Activate heating function
Set ON times
Activate ventilating function
Danger!
Risk of poisoning due to carbon monoxide
(CO). The parking heater consumes fuel and
emits exhaust fumes. Exposure to such
fumes can cause unconsciousness, serious
personal injury or death.
f Switch off the parking heater before refueling.
f Do not operate the parking heater in enclosed
spaces (e.g. a garage).
Air Conditioning, Parking Heater and Heated Rear Window 81
Page 82

Notes on operation
The parking heater runs on fuel, and it therefore
cannot be switched on after the reserve warning
lights up.
f For further information on the fuel reserve
warning:
Please see the chapter “FUEL RESERVE WARNING” on Page 120.
The parking heater must be operated at least
once per month with the engine cold.
Ignition off: When the parking heater is running,
the remaining running time is shown on the display
panel.
Operation of the parking heater is clearly audible
when outside temperatures are low and the engine
is cold.
In certain circumstances, exhaust gases may be
visible under the vehicle.
Switching parking heater on and
off
Switching on
f Press ON/OFF button .
The most recently activated parking heating or
parking ventilation function is switched on.
Switching off
f Press ON/OFF button again.
Note on operation
f After switching off the parking heater using
ON/OFF button , wait for at least
2 minutes before you press the button again.
The combustion chamber is cleaned.
82 Air Conditioning, Parking Heater and Heated Rear Window
Page 83
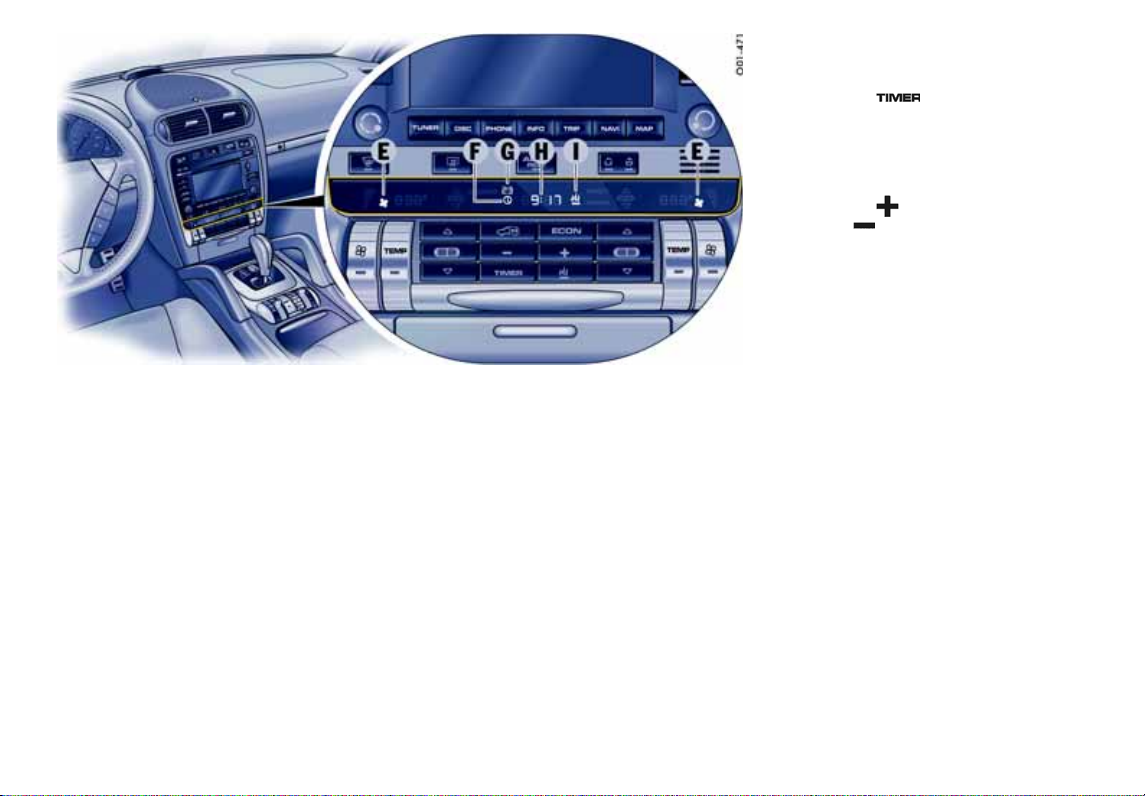
E - Parking ventilation symbol
F - ON time symbol
G -Memory symbol
H -ON time
I -Parking heating symbol
Programming the parking heater
The parking heater has three independent
memories for programming the ON times. The
ON time, together with the associated parking
heating or parking ventilation function, can be
programed in each memory.
Complete programming of the parking heater
requires definition of the
– Function and
–ON time.
Programming function
1. Switch ignition off.
2. Press button on the front
air-conditioning control panel.
The symbols for the parking heating I or parking ventilation E function flash on the display.
3. Select function.
Press button for parking heating
or button for parking ventilation.
If no other entry is made within 10 seconds, the
display returns to its initial status.
However, the selected function is retained and is
activated when the parking heater is next turned
on.
f For further information on switching parking
heater on and off:
Please see the chapter “SWITCHING PARKING
HEATER ON AND OFF” on Page 82.
Air Conditioning, Parking Heater and Heated Rear Window 83
Page 84

Programming ON times
1. Switch ignition off.
2. Press button .
3. Select function (parking heating or parking
ventilation).
4. Select the memory using button .
The desired memory can be selected by pressing button several times.
5. Set ON time using the and buttons.
Pressing the buttons adjusts the time on a
minute-by-minute basis. If the button is kept
depressed, the time is adjusted faster.
ON times are only valid for 24 hours.
6. Press ON/OFF button .
Displays F and G flash for approx. 10 seconds.
Flashing of the displays can be ended before
this time has elapsed by pressing the ON/OFF
button again.
After ON/OFF button has been pressed ON
time H, clock symbol F and memory G are
displayed for 2 minutes.
The display then goes out.
The parking heater has now been programed
and the selected memory is active (symbol G
is lit).
Note on operation
Only one memory can be active at any one time.
Activating the memory
The parking heater runs for 30 minutes. It then
switches itself off automatically.
The program must be reactivated for every subsequent run.
To do this:
1. Switch ignition off.
2. Press button .
3. Select function (parking heating or parking ventilation).
4. Select the memory using button . The
ON time that was last saved is displayed.
5. Press ON/OFF button .
The program is reactivated.
Displays F and G flash for approx. 10 seconds.
The ON/OFF button can be pressed again
to switch off the displays before this time has
elapsed.
After the ON/OFF button has been
pressed, the ON time H, clock symbol F and
memory G are displayed for 2 minutes.
The display then goes out.
The parking heater has now been programed
and the selected memory is active (symbol G
is lit).
Note on operation
Only one memory can be active at any one time.
Example:
The parking heater is to activate the parking
heating function at 9:48 a.m.
To do this:
1. Switch ignition off.
2. Press button on the front air-conditioning control panel.
The symbols for the parking heating or parking
ventilation function flash on the display.
3. Press button .
This selects the parking heating function.
4. Select the memory using button .
5. Set ON time to 9:48 a.m. using the and
buttons.
6. Press ON/OFF button .
The parking heater has now been programed
and the selected memory is active.
Note on operation
If the parking heater is switched on manually prior
to program start of an active memory, this will
delete the programming.
The memory must be reactivated if it is needed.
If the memory is not reactivated, the parking
heater will not switch on.
84 Air Conditioning, Parking Heater and Heated Rear Window
Page 85

Parking heater faults
Initial start-up following period of nonutilization
If you have not used the parking heater for several
weeks, the system may require the parking heater
to be switched on several times before it actually
“starts up”.
f Please take a break of approximately
5 minutes between each individual switch-on
attempt.
Requirement for initial start-up of the
parking heater:
–Cold engine.
Have the parking heater checked by an authorized
Porsche dealer in the following cases:
– If the parking heater fails to “start-up” after the
3rd switch-on attempt.
– In the event of faults in the parking heater, no
function symbol appears on the display – only
the remaining running time is shown.
The display flashes on briefly and then goes
completely dark.
– In the event of a serious accident, the parking
heater switches off automatically for safety
reasons.
The parking heater is not ready for operation.
– If the temperature rises, the overheating
protection switches the parking heater off
automatically. The parking heater is not ready
for operation.
– The parking heater is switched off automati-
cally if the voltage is too low. The parking
heater is temporarily unavailable.
Air Conditioning, Parking Heater and Heated Rear Window 85
Page 86

Windows and Sliding Roofs
Power windows.............................................87
Brief overview - sliding/lifting roof................ 91
Sliding/Lifting Roof .......................................92
Brief overview – Panorama roof system .......96
Panorama roof system..................................97
86 Windows and Sliding Roofs
Page 87
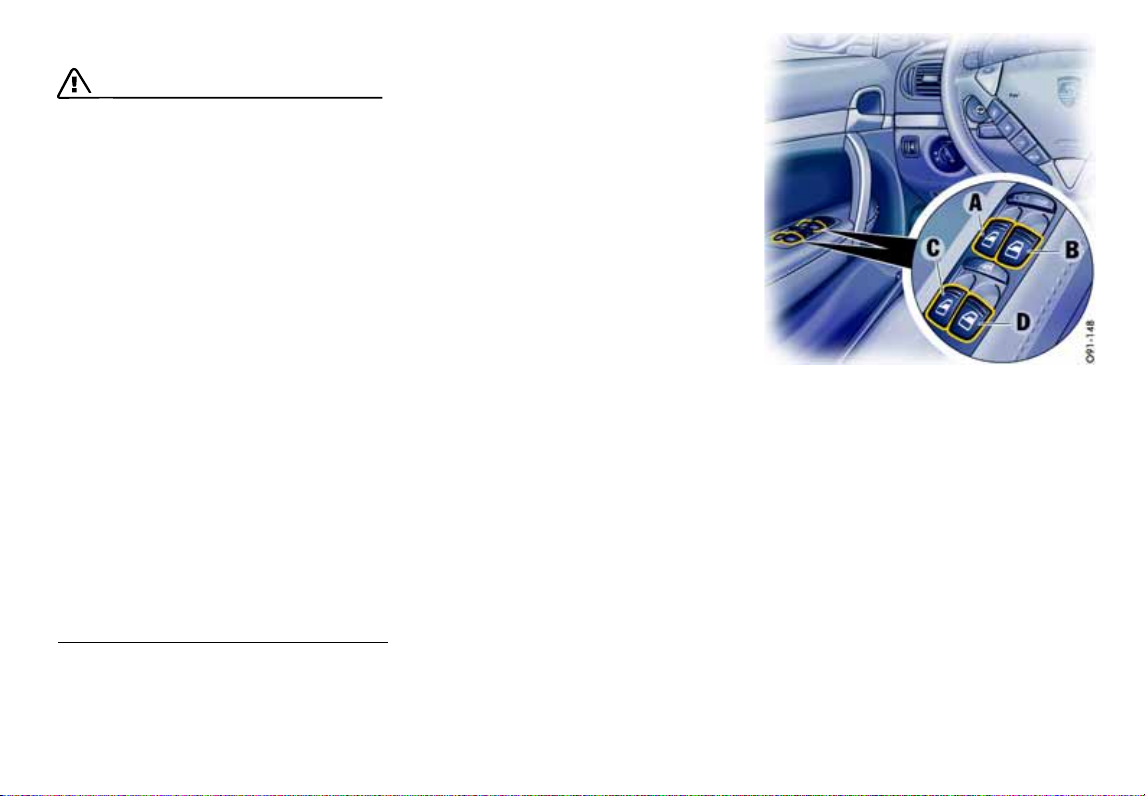
Power windows
Warning!
Risk of injury when the door windows close.
This applies especially if the windows are
closed with the comfort function.
When this function is in operation the window
goes up automatically.
f Make sure that fingers, hands, arms or other
body parts are not in the way when the
windows close.
f Remove the ignition key or switch ignition off in
vehicles that have Porsche Entry & Drive to
shut off power to the window switches when
the vehicle is not attended by a responsible
person. Always take the ignition key with you
when leaving the vehicle. Uninformed persons
could injure themselves by operating the
power windows.
f In case of danger, immediately release the but-
ton on the car key or the button in the door
handle in vehicles that have Porsche Entry &
Drive.
f Do not leave children in the car unattended.
Risk of an accident.
f Do not put anything on or near the windows
that may interfere with the driver's vision.
Note on operation
f Always keep the side windows closed while
driving off-road.
Readiness for operation of power windows
– With ignition switched on or
– A maximum of 10 minutes with door closed
and ignition key withdrawn, but only until
driver’s or passenger door is first opened.
The one-touch operation for closing the door
windows is available only when the ignition is
switched on.
Opening/closing windows
Opening window with the rocker switch
f Press rocker switch until the window has
reached the desired position.
A - Power window in driver’s door
B - Power window in passenger’s door
C - Left rear power window
D - Right rear power window
Note on operation
Rocker switches A and B in the driver’s door have
a two-stage function:
– If the switch in question is pressed or pulled to
the first level, the front window is opened or
closed manually.
– If the switch is completely pressed or pulled to
the second level, the front window is opened or
closed automatically (one-touch operation).
Press or pull again to stop the window in the
desired position.
Windows and Sliding Roofs 87
Page 88
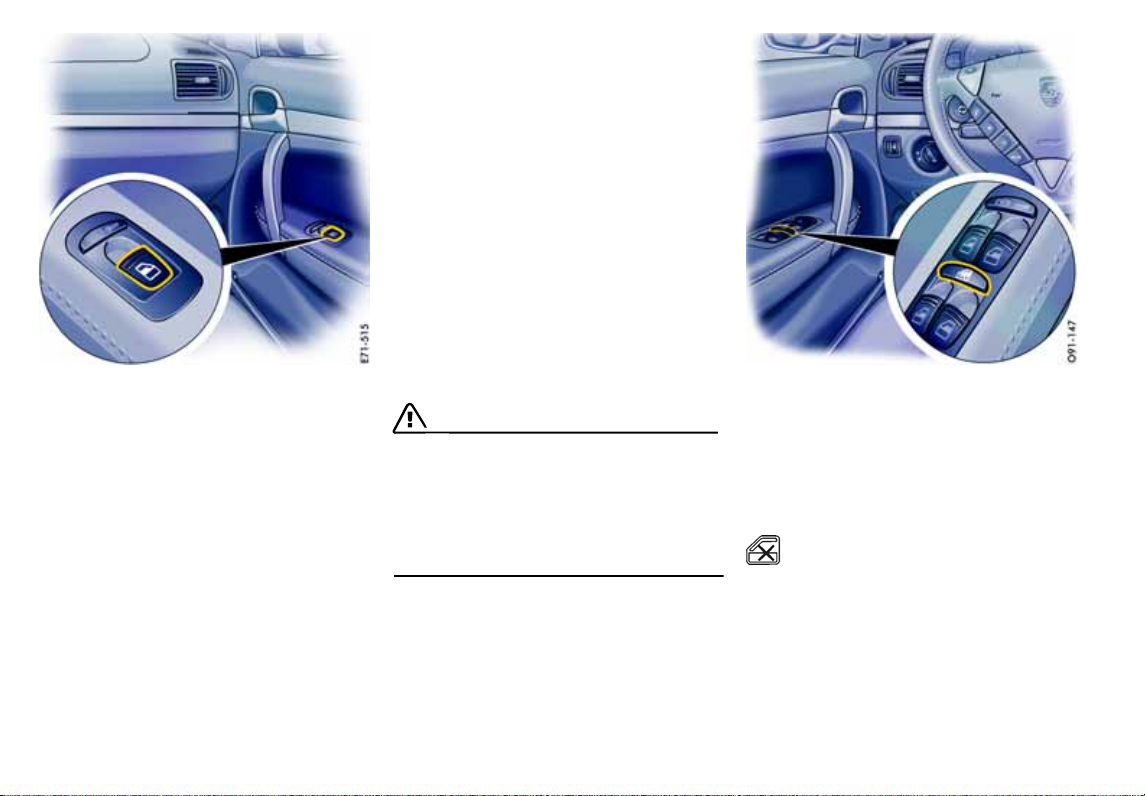
Power windows in passenger’s door and rear doors
Closing window with the rocker switch
– Pull rocker switch until the window has reached
the desired position.
One-touch operation for front windows
f Pull or press rocker switch to its final position
in the driver’s door.
Window moves to its final position.
Press or pull again to stop the window in the
desired position.
Note on operation
If a door window is blocked during closing, it will
stop and open again by several centimetres.
However, this is not the case:
– If the rocker switch is pressed again within
10 seconds of the window being blocked and
– The windows are closed using the car key in
the door lock (comfort function).
The windows close with their full closing force.
Warning!
Risk of serious personal injury. If the rocker
switch is pulled again within 10 seconds of
the window being blocked, the window will
close with its full closing force.
f Ensure that no one can be injured when the
windows close.
One-touch operation is disabled for 10 seconds
after the door window is obstructed.
Disabling power windows in the rear
doors
The power windows, central locking buttons on
the rear doors and the rear control panel for the
air conditioning can be disabled by means of the
safety button in the armrest of the driver’s door.
Switching child protection on/off
f Press the safety button to switch child protec-
tion on and off.
The symbol in the safety button lights up if
child protection is active.
88 Windows and Sliding Roofs
Page 89

On vehicles with and without Porsche Entry & Drive
Opening/closing windows with car key
Warning!
Danger of injury. The window will close with
its full closing force.
f Ensure that no one can be injured when the
windows close.
f Hold the car key in the door lock in the unlo-
cking or locking position until the windows
have reached the desired position.
If you unlock the vehicle with the key at the door
lock, only the driver’s door is unlocked. In order to
prevent the alarm system from being triggered,
you must switch the ignition on within 15 seconds
of opening the door.
Windows and Sliding Roofs 89
Page 90

On vehicles with Porsche Entry & Drive
Closing windows with button in door
handle
Warning!
Danger of injury. The window will close with
its full closing force.
f Ensure that no one can be injured when the win-
dows close.
Note on operation
The comfort function remains available for approx.
30 seconds after the vehicle has been locked.
Storing final position of the door windows
The end positions of the door windows are lost
when the battery is disconnected and reconnected. The one-touch operation of the windows is
disabled.
Perform these procedures for all windows:
1. Close window completely once by pulling
rocker switch.
2. Open window completely again by pressing
rocker switch.
f Hold the button in the door handle when
locking the vehicle until the windows and the
Panorama roof system have reached the
desired position.
90 Windows and Sliding Roofs
Page 91

Brief overview - sliding/lifting roof
This brief overview does not replace the information provided in the chapter “Sliding/lifting roof”.
In particular, warnings are not replaced by this
brief overview.
Switch in the roof console
What do I want to do? What do I have to do? What do I see?
Opening roof
Turn switch to position C.
Or:
Turn switch to position B.
(noise-optimized position)
Roof opens.
Lifting roof
Close roof
Turn switch to position D. Roof is lifted.
Turn switch to position A. Roof closes.
Windows and Sliding Roofs 91
Page 92

Sliding/Lifting Roof
The electric sliding/lifting roof is made of singlesheet safety glass. It is equipped with a slidingroof cover that can be infinitely adjusted manually
to protect against the sun.
The sliding/lifting roof is operated using a knob in
the roof console.
Warning!
Risk of injury when operating or automatically closing the sliding/lifting roof.
f Ensure that no one can be injured when
the sliding/lifting roof is operated.
f Always withdraw ignition key when leaving the
vehicle or switch ignition off in vehicles that
have Porsche Entry & Drive. Always take the
ignition key with you when leaving the vehicle.
Uninformed persons (e.g. children) could injure
themselves by operating the sliding/lifting
roof.
f In case of danger, release the knob or car key
immediately and operate the sliding/lifting roof
in the opposite direction.
f Always keep the sliding/lifting roof and the side
windows closed while driving off-road.
Readiness for operation of the sliding/
lifting roof
– With ignition switched on.
– With ignition key withdrawn until door is
first opened, but only for a maximum of
10 minutes.
Readiness function of the sliding/lifting
roof switches off after 10 minutes
If the vehicle is unlocked, the sliding/lifting roof
can no longer be operated after 10 minutes
(to save the vehicle battery). The power supply is
switched back on when the ignition is switched on
or the engine started.
A - Closes sliding/lifting roof completely
B - Opens sliding/lifting roof to comfort setting
C - Opens sliding/lifting roof completely
D - Opens sliding/lifting roof in lift position
Note on operation
Using the automated presetting system, every
usable sliding/lifting roof position can be
controlled directly with the knob.
92 Windows and Sliding Roofs
Page 93

A - Closing sliding/lifting roof completely
f Turn knob to switch position A.
Note on operation
The sliding/lifting roof is equipped with a force
limiter. If the sliding/lifting roof is obstructed
during the closing process, the sliding/lifting roof
opens again immediately.
Closing the sliding/lifting roof after
operation of the force limiter
f Remove the obstruction.
f Turn knob to position A again.
B - Opening sliding/lifting roof to comfort
setting
f Turn knob to switch position B.
The sliding/lifting roof opens in switch position B
until it reaches the best position relative to noise.
It can be opened fully, however, if you continue to
turn the switch beyond the limit to position C.
C - Opening sliding/lifting roof completely
f Turn knob beyond stop position B to switch
position C.
Effort is required to turn the knob.
Once released, the knob rebounds to position
B.
D - Lifting sliding/lifting roof
f Turn knob between switch positions A and D
until it reaches the required position. The roof
is lifted completely in switch position D.
Comfort function on vehicles without
Porsche Entry & Drive
Closing the sliding/lifting roof
f Hold the car key in the door lock in the locking
position until the windows and the sliding/
lifting roof have reached the desired position.
Comfort function on vehicles with
Porsche Entry & Drive
Closing the sliding/lifting roof
f Hold the car key in the door lock in the locking
position until the windows and the sliding/
lifting roof have reached the desired position
or
f Hold the button in the door handle when
locking the vehicle until the windows and the
sliding/lifting roof have reached the desired
position.
Windows and Sliding Roofs 93
Page 94

Emergency operation of sliding/lifting
roof
If the sliding/lifting roof is defective, this can be
closed or opened manually.
Warning!
Risk of serious personal injury and damage
to the sliding/lifting roof during emergency
operation.
f Ensure that no one can be injured when the
sliding/lifting roof is operated.
f During and after emergency operation, the
sliding/lifting roof may no longer be operated
with the rocker switch.
94 Windows and Sliding Roofs
1. Open the glasses case in the roof console
(arrow).
2. Unclip cover A.
3. Fold up armrest.
4. Remove key B from the lower storage tray
(underneath the rubber mat) in the center
console.
Page 95

5. Insert the key in opening C. This requires a somewhat greater effort.
6. Close sliding/lifting roof
To close the roof – turn to the right.
To open the roof – turn to the left.
7. Remove the key and return it to the storage
tray.
8. Clip in cover.
f Have the fault remedied at an authorized
Porsche dealer.
Windows and Sliding Roofs 95
Page 96
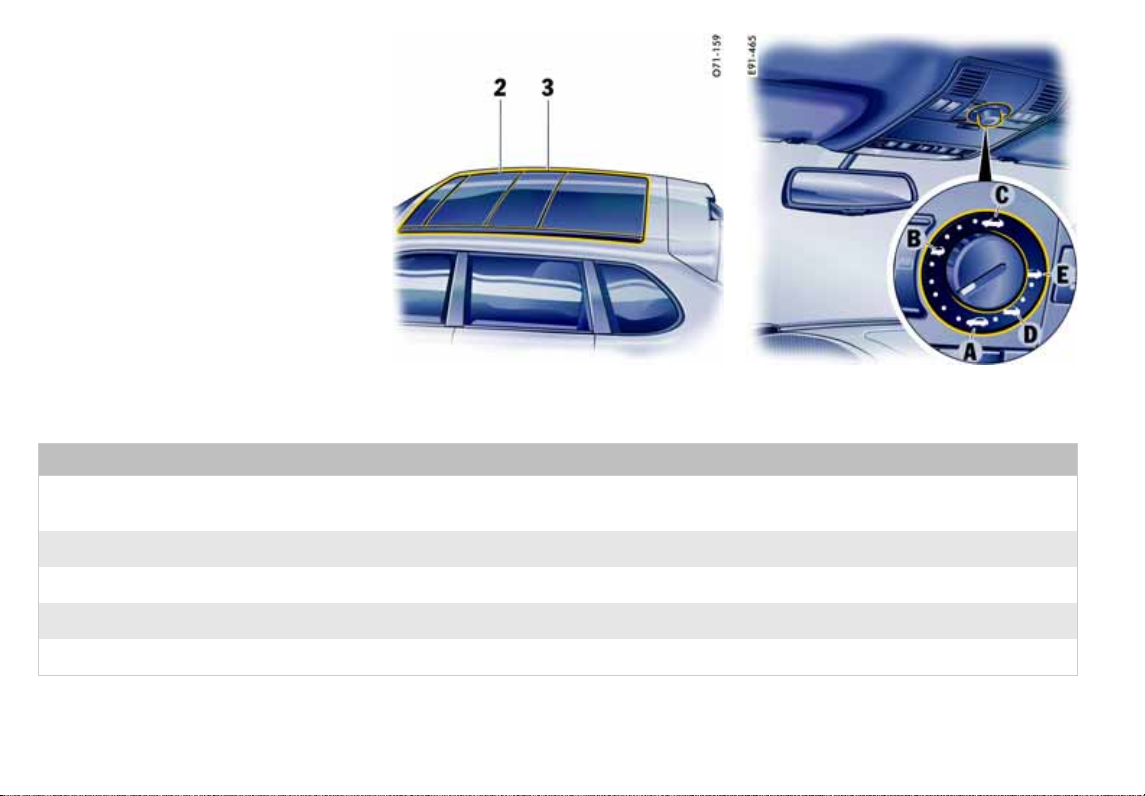
Brief overview –
Panorama roof system
This brief overview does not replace the information provided in the chapter “Panorama roof
system”.
In particular, warnings are not replaced by this
brief overview.
Elements of the Panorama roof system Switch in the roof console
What do I want to do? What do I have to do? What do I see?
Open roof completely
(roof elements 2 and 3)
Turn switch to position C. Roof elements 2 and 3 open.
Open roof element 2
Open roof element 3
Lift roof element 3
Close roof
96 Windows and Sliding Roofs
Turn switch to position B. Only roof element 2 opens.
Turn switch to position E. Only roof element 3 opens.
Turn switch to position D. Only roof element 3 is lifted.
Turn switch to position A. All opened roof elements are closed.
Page 97

Panorama roof system
The Panorama roof system of your Porsche
consists of a total of four roof elements.
Roof element 1 is the draft deflector. This
adjusts itself according to the speed, and helps
protect from the disturbing effects of the wind
when the Panorama roof system is open,
especially at high speeds or from turbulent air
flow.
Both roof elements 2 and 3 can be moved by
activating the knob in the vehicle's longitudinal
direction. Roof element 3 can also be raised.
This allows the interior to be better ventilated.
Roof element 4 is a fixed glass element and
completes the Panorama roof system.
1 -Draft deflector
2 - Sliding roof element
3 - Sliding/lifting roof element
4 - Fixed glass element
Caution!
Risk of damage when activating the
Panorama roof system due to improperly
atteched roof elements.
f Check that the roof elements are securely
attached before starting to drive.
f Make sure there is sufficient clearance
between the Panorama roof system and the
attached roof elements.
Readiness for operation of the
Panorama roof system
– With ignition switched on.
– With ignition key withdrawn until door is
first opened, but only for a maximum of
10 minutes.
Readiness function of the Panorama roof
system switches off after 10 minutes
If the vehicle is unlocked, the Panorama roof system can no longer be operated after 10 minutes
(to save the vehicle battery). The power supply is
switched back on when the ignition is switched on
or the engine started.
Windows and Sliding Roofs 97
Page 98
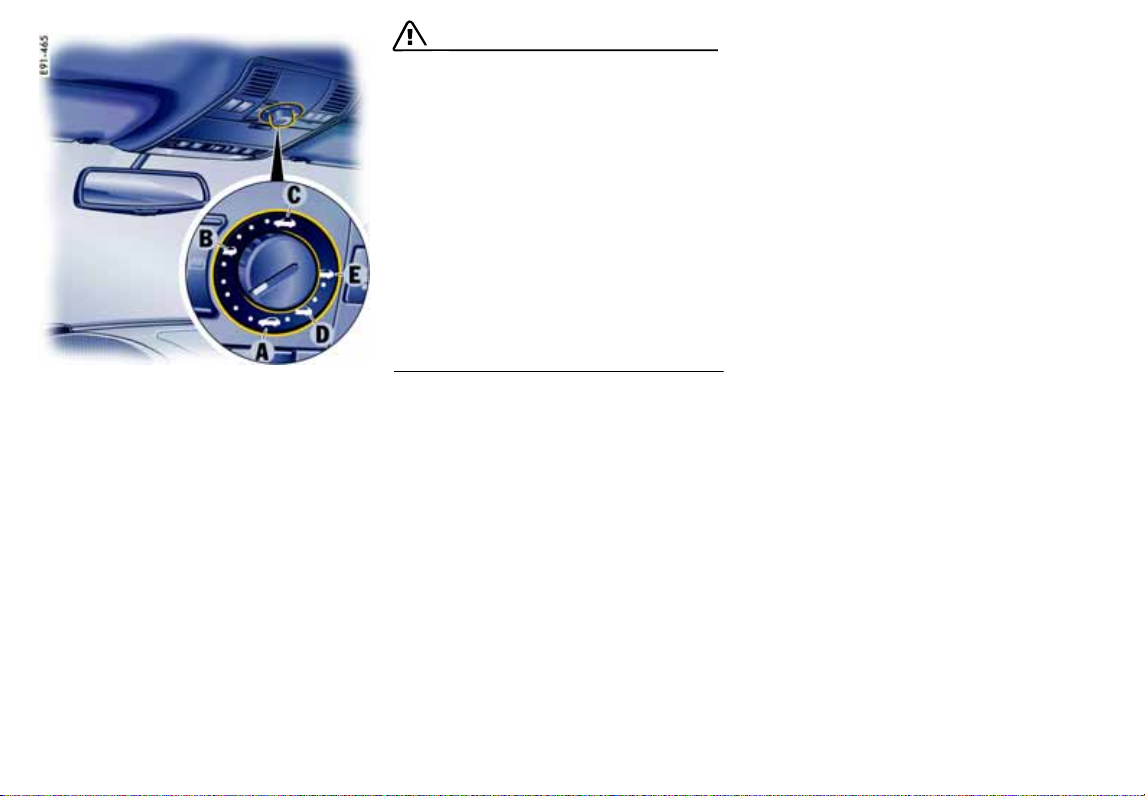
A - Close Panorama roof system completely
B - Open sliding roof element completely
C - Open Panorama roof system completely
D - Sliding/lifting roof element in lift position
E - Open sliding/lifting roof element completely
Note on operation
Using the automated presetting system, every
usable roof position can be controlled directly with
the knob.
f Always keep the Panorama roof system and
the side windows closed while driving off-road.
Warning!
Risk of injury when operating or automatically closing the Panorama roof system.
f Ensure that no one can be injured when the
Panorama roof system is operated.
f Always withdraw ignition key when leaving the
vehicle or switch ignition off in vehicles that
have Porsche Entry & Drive. Always take the
ignition key with you when leaving the vehicle.
Uninformed persons (e.g. children) could injure
themselves by operating the Panorama roof
system.
f In case of danger, operate the knob in the
opposite direction or release the car key
immediately.
A - Closes Panorama roof system
completely
f Turn knob to switch position A.
B - Opens sliding roof element completely
f Turn knob to switch position B.
Roof element 2 will be opened completely.
The roller blind will open automatically to the
selected opening width.
C - Opens Panorama roof system
completely
f Turn knob beyond the stop position B to switch
position C.
Roof elements 2 and 3 will be opened
completely.
The roller blind will open automatically to the
selected opening width.
D - Raises sliding/lifting roof element
Turn knob to switch position D.
Roof element 3 will be raised completely. The
roller blind does not change position here.
E - Opens sliding/lifting roof element
completely
f Turn knob to switch position E.
f Roof element 3 will be opened completely.
The roller blind will open automatically to the
selected opening width.
98 Windows and Sliding Roofs
Page 99
Comfort function on vehicles without
Porsche Entry & Drive
Force limiter for the Panorama roof
system
Save final position of the Panorama roof
system
Opening and closing the Panorama roof
system
f Hold the car key in the door lock in the
unlocking or locking position until the windows
and the Panorama roof system have reached
the desired position.
Comfort function on vehicles with
Porsche Entry & Drive
Opening and closing the Panorama roof
system
f Hold the car key in the door lock in the
unlocking or locking position until the windows
and the Panorama roof system have reached
the desired position.
Closing the Panorama roof system
f Hold the button in the door handle when
locking the vehicle until the windows and the
Panorama roof system have reached the
desired position.
All roof elements are equipped with a force limiter.
If the sliding roof or the sliding/lifting roof element
is obstructed during the closing or opening
process, the respective roof element opens or
closes again immediately.
Closing a roof element after triggering the
force limiter
1. Remove the obstruction.
2. Turn knob to position A again.
Electric emergency closing function
Warning!
Risk of injury from the emergency closing
function for the Panorama roof system. The
force limiter is not available and the roof
elements will close with full force.
f Ensure that no one can be injured when the
Panorama roof system is closing.
If the roof cannot be closed due to dirt, ice, or
similar substances:
1. Turn knob to position A.
2. Hold the knob in position A until all roof
elements are completely closed.
After disconnecting/reconnecting the vehicle
battery or if the vehicle battery is discharged, or
after emergency starting with jumper cables, the
final positions of the Panorama roof system are
lost.
Warning!
Risk of injury when closing the Panorama
roof system. The force limiter is not available
and the roof elements will close with full
force.
f Ensure that no one can be injured when the
Panorama roof system is closing.
1. Switch ignition off.
2. Turn knob to position A.
3. Switch ignition on.
4. Press knob up at its front edge in position A
and keep pressed.
The teaching process begins after around
5 seconds. Hold the knob pressed in position
until the roller blind and all roof elements have
completely stopped moving. The procedure
lasts a maximum of 20 seconds.
5. Release the knob.
The raised sliding/lifting roof element 3 closes automatically. The teaching process is
then completed.
Windows and Sliding Roofs 99
Page 100

Note on operation
If the procedure is interrupted, saving the final
positions must be started from the beginning.
Opening/closing the roller blind
The rocker switch has a two-stage function:
– If the rocker switch is pressed to the first
stage, the roller blind opens or closes as long
as the rocker switch is being pressed.
– If the rocker switch is pressed completely, the
roller blind opens or closes to the final
position.
Opening the roller blind
f Press rocker switch to the rear F.
Closing the roller blind
f Press rocker switch to the front G.
100 Windows and Sliding Roofs
Roller blind
A roller blind is integrated into the Panorama roof
system and can be adjusted by activating the
rocker switch in the roof console.
Note
If the rocker switch is pressed completely while
the roof elements are moving, the roller blind
opens or closes to the final position after the roof
elements have reached the selected position.
 Loading...