

Page 1
POPP HUB
Manual
011801
Info
This device is a control center (gateway) for Z-Wave home automation networks. It is used to control different single
devices as well as complete defined scenes and actions combining device functions within the network. It needs only a
few steps to get your Popp HUB up and running.
1
Page 2
Product Description
This device is a certified Z-Wave Plus smart home controller which can be used to connect and control different Z-Wave
devices within one network and additionally provides high-level Home Automation functionality (scripting etc.).
The Popp HUB functionality can be accessed via the Web UI, which can be opened in a browser on a PC, and also via
iOS and Android applications. For custom integrations, HTTP / JavaScript API is available. The Popp HUB is based on
Z-Way software stack from Z-Wave.Me. For more information about Z-Way software stack and its features, please see
Z-Wave.Me forum at https://forum.z-wave.me
As a certified Z-Wave Plus device the HUB can communicate with all other Z-Wave certified devices regardless of vendor
or year of origin and it implements the enhanced functions of Z-Wave Plus. The HUB can communicate in a secure
environment if the other device supports the secure environment too. If not the controller will fall back to the normal
communication mode automaticall y. During inclusion the use of secure environment can be suppressed for performance
reason if desired.
In Z-Wave all non-battery powered device will act as routers for other devices to form a so-called meshed network.
Installation Guideline
1. Connect the HUB to your local network using Ethernet cable.
2. Power up the controller. After up to 2 minutes the HUB is ready to use and the white LED will breathe
normal. Now you can connect your computer or mobile device to the new WIFI Popp-xxxx (xxxx=last 4
digits of MAC address displayed on device label, WIFI-password on label too). Attention: For securit y
reasons the initial configuration is available via W IFI only. Later on you have more options.
3. Point your browser to http://192.168.1.1. If you use a mobile device install and start the Popp HUB app
(Use the QR code on page 13).
4. The welcome screen displays your unique device ID. Remember it! Define your access password for the
default login name ‘admin’ and your email for password recovery.
5. In case there is a firmware update you will see a message screen. Please confirm and update the firmware.
Make sure not to un-power the device during the firm ware update.
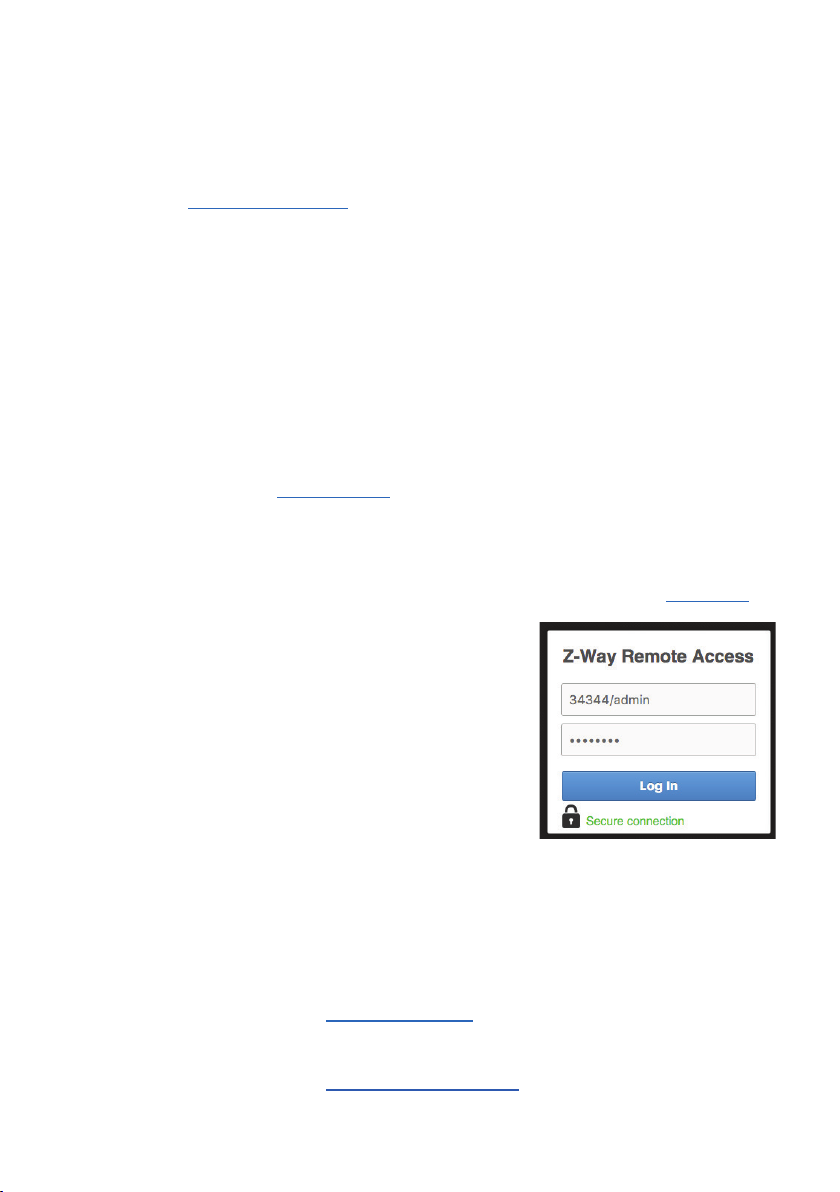
6. Now you can access your controller from outside your home too using the service find.popp.e
DEVICE_ID/LOGIN (e.g. 12345/admin) and your password.
7. Start adding Z-W ave devices and apps and have fun. To add
your first Z-Wave device, go to Setup Devices Z-Wave
Add New and follow the instructions.
The Popp HUB can be placed on the table or mounted on the wall using the
mounting plate attached to the enclosure. It runs stand-alone (no connection
to the outer world or to any other network) and connected to the Internet. In
this case the device acts as WIFI router too.
u. Use
The User Interface
The Web UI of the Popp HUB has two parts:
• Smart Home UI
• Expert UI
When you log in into the Web UI, you get into the Smart Home UI.
The Smart Home UI:
• Provides a subset of Z-Wave related functionality (most typically used functions).
• Provides high-level home automation functionality (applications, rooms, scripting etc.).
• Is available via the following URL: http://IP-address:8083
The Expert UI:
• Provides full access to low-level Z-Wave related functionality.
• Is available via the following URL: http://IP-address:8083/expert
2
Page 3
When you log in into the W eb UI (using the URL http://IP-address:8083
Home UI is intended for typical everyday home automation tasks, for high-level Smart Home configuration, and provides
only basic operations for Z-Wave network configuration and administration. For advanced Z-Wave configuration, please
use the Expert UI.
), you get into the Smart Home UI. The Smart
ill. 1: SmartHome UI
The user interface looks similar on different devices such as desktop pc, smartphone or tablet pc (both native app and
browser) but it will adapt to the screen sizes. It allows controlling devices and read sensor status. Every function of any
device is shown as one single Element (In case a physical device has multiple functions – like switching and
metering – it will generate multiple elements). All elements are listed in the Element View and can be filtered by
function type (switch, dimmer, sensor) or other filtering criteria.
Every element offers a configuration interface for changing names, remove it from the screens etc. Important elements
can be placed in the Dashboard. Additionally, the elements can be accessed using room assignments. The Rooms
overview displays all existing rooms. In this area you can add new rooms and open existing rooms directly. Every change
of a sensor value or a switching status is called an Event and is shown in the Timeline. Filtering allows monitoring
the changes of one single function or device.
All other functions such as time triggered actions, the use of information from the Internet, scenes plugin of other
technologies and service are realized in Apps. These apps are ready-to-use scripts/templates that can add extra logic
and functionality such as logic rules like “IFTHEN”, scene definitions, timers, interactions with external (non Z-Wave)
devices connected via USB dongle or via internet etc. Some apps are built-in into the system. More can be downloaded
from an app store. To use an app, you create an instance of this app and configure its properties. If useful you can create
more than one instances of one single app. The apps can create none, one or multiple new elements and events. You
can install new apps and manage existing apps using the Configuration Menu Apps.
Furthermore, it’s possible to change every single element’s Configuration directly.
Another thing you can find on the user interface is the System Time.
3
Page 4
Menu and Dashboard
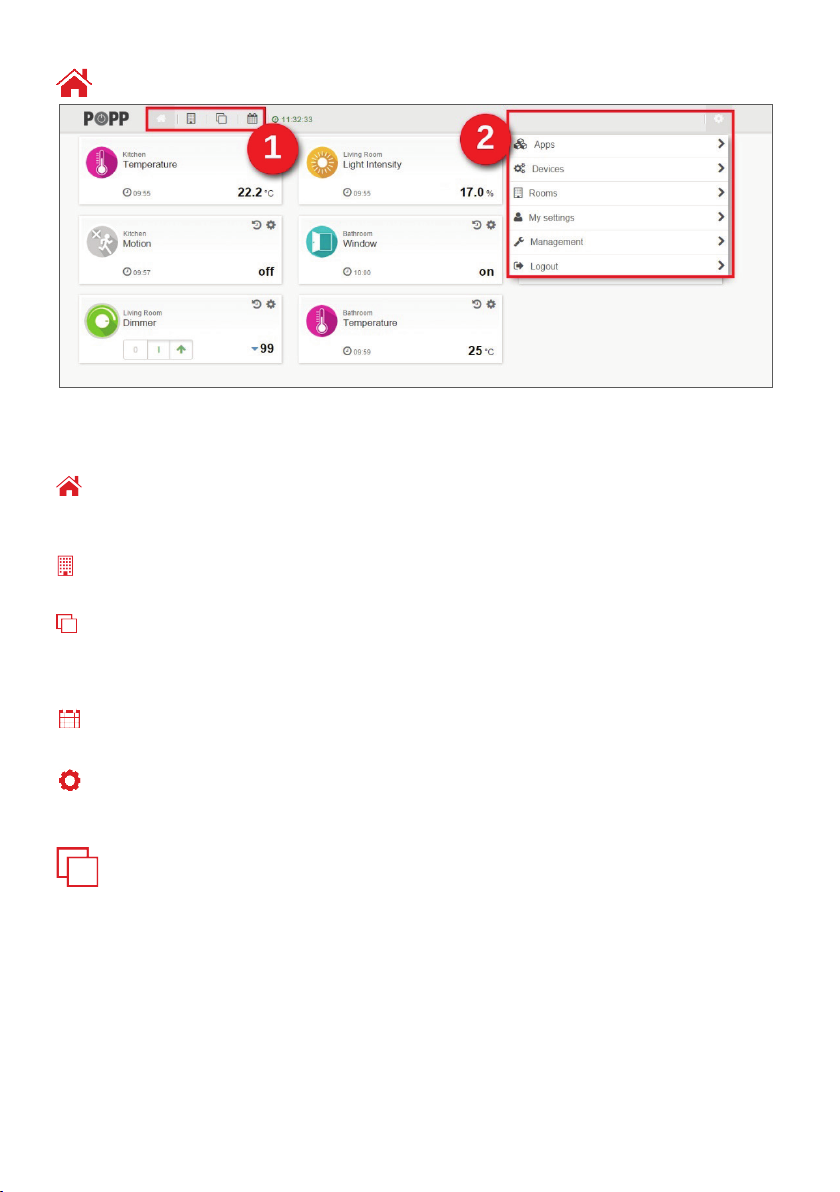
ill. 2: SmartHome UI – Dashboard
In the Smart Home UI’s header 4 icons can be found [ill.2 (1)]. You can use these icons for navigation through the
Smart Home UI (left to right: Dashboard; Rooms; Element View; Events/Timeline).
Dashboard:
Here you can find a selection of devices defined b y yourself. You can control these devices and receive various
information by different sensors (e.g. temperature, brightness, window open/closed).
Rooms:
Here you can find a list of all created rooms (see also chapter Configuration Menu / Rooms) with assigned elements.
Elements:
Here you can find all devices connected to the Popp HUB (see also chapter Configuration Menu / Devices).
Analogous to the Dashboard the Devices menu provides various device information and you can control the devices
from here.
Events (Timeline):
Here you can find a chronological list with all events so far (see also chapter E vent List).
Configuration Menu:
At the header’s far right you will find the button (gear wheel) for the Configuration Menu or Setup [ill.2 (2)].
Elements:
Here you can find all devices connected to the Popp HUB (see also chapter Configuration Menu / Devices).
Analogous to the Dashboard the Devices menu provides various device information and you can control the devices
from here.
4
Page 5

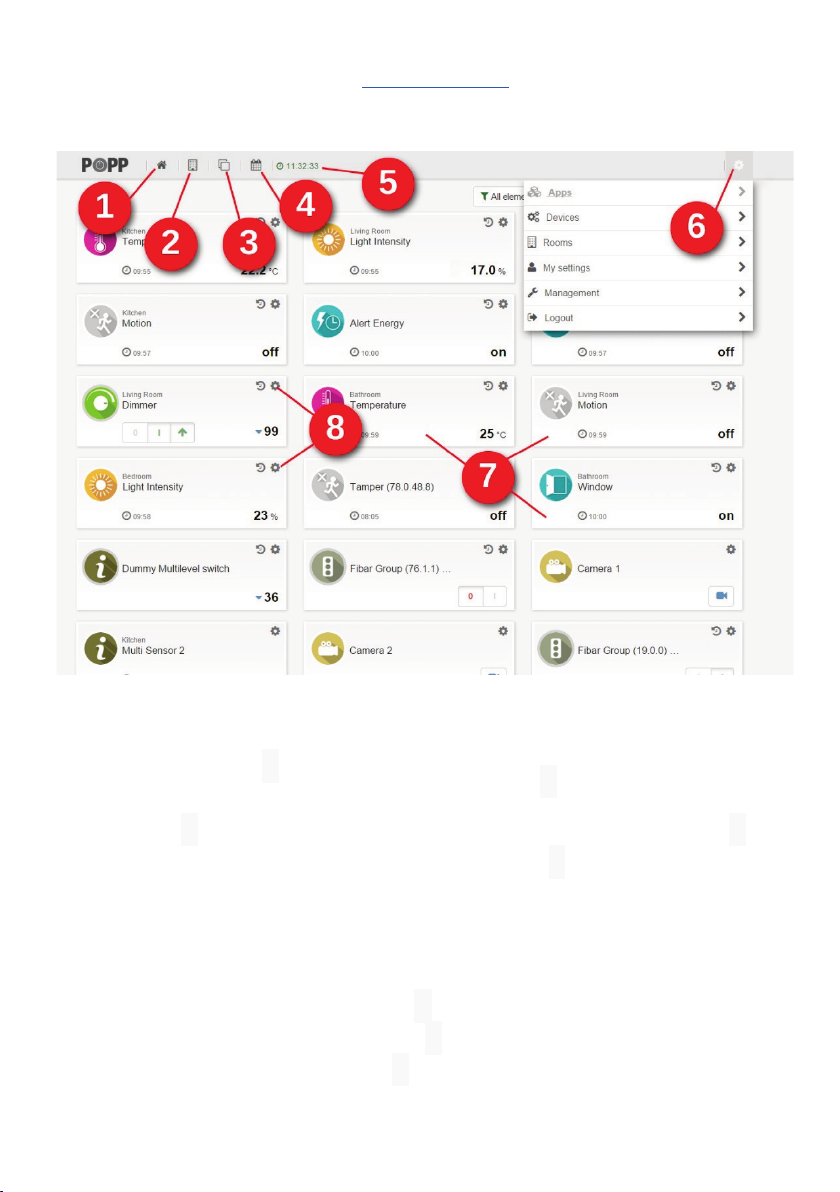
ill. 3: Basis elements (), Device configuration (), Device actions (), Polling time (), Filter and search ()
Once one device is connected to the control center (see also chapter Configuration Menu / Devices) its function will
be displayed as a separate element in the Element View [ill.3]. If the device owns multiple functions (e.g. flood sensor:
flood alarm and temperature) every function will be displayed as a separate element [ill.3 (1)]. If the device is battery
powered, you will see the polling time (displays last communication between device and control center) bottom left [ill.3
(4)].
The so-called Wake Up (data exchange between one si ngle device and the Popp HUB) takes place automatically from
time to time. While sensors report and display measuring values, actuator perform some actions. These actions can be
controlled directly [ill.3 (3)], e.g. with ON/OFF switches or arrows.
Through the gear wheel icon top right in the element’s frame [Abb.3 (2)] you will reach the device’s configuration menu
where you can do different things:
• Change the automatic generated element name.
• Assign the element to one room (see also chapter Configuration Menu / Rooms)
• Add and remove element to/from the Dashboard
• Hide element (Element will be hidden in any view, but can be displayed again by using “Show hidden” button in
“All elements” filter.)
• Deactivate elements (Element cannot be used for any scene, app, module and is fully deactivated.)
• Assign free definable tags to any element
Not only devices will be displayed as elements. Plugins (apps) will be displayed as icons, too (see also chapter
Applications). Thus the number of elements can grow very fast. But you can reduce the number of displayed
elements by using the filter function [Abb.3 (5)].
The filter uses the following:
• (Device) Category
• Tag
• Free text search
The filter function is not available on the Dashboard.
5
Page 6

Event List
ill. 4: Event List (), Filter (), Event Filter ()
Configuration Menu (Setup)
ill. 6: Configuration Menu
6
Page 7

The gear wheel symbol top right [ill.6] opens the configuration menu (setup). Here you can manage all of your smart
home system’s settings.
Applications
Opens the app store (Online Apps) as well as already downloaded (Local Apps) and currently activated (Active)
modules.
Devices
Through this menu item you can connect and manage physical devices to your smart home center. Currently it’s
possible to integrate Z-Wave devices as well as IP-cameras and EnOcean devices (appropriate wireless stick needed).
Under menu item Devices you will find two buttons referred to any device type:
• „Add new“
• „Manage“
Add new devices
Z-Wave devices: Press the logo of the new device’s manufacturer (ill.8 (2)]. Thereafter you will see a list where you
can choose the device you want to connect to the smart home control center.
You will receive a step-by-step instruction for preparation and inclusion of your new device. If the device is not listed
yet, please press „Add Z-Wave Device and identify it automatically” or [ill.8 (1)]. Perhaps you will need the device’s
manual to start the inclusion process. Both ways lead to full range of functions, because Z-Wave identifies all the
device’s functions during the inclusion process.
Cameras: If your camera type is listed, please select and add necessary settings such as access data and ip-address.
If your camera is not listed, please select the general “Web Camera” i con. Thereafter you will need the camera’s
manual to find out the camera’s URL for device control and access to the image. Possibly our user forum and user
support will help.
EnOcean devices: In case of a connected EnOcean stick you will see “EnOcean” as additional selectable device type.
Please select your new EnOcean device from the manufacturer and product list. Thereafter this device will be ready-touse immediately.
ill. 7: Add and manage devices
ill. 8: Add Z-Wave devices automatically () or select a manufacturer (),
7
Page 8

Manage devices
Pressing the „Manage“ button [ill.7] opens device management screen. Here you can see the connected devices‘
status. Furthermore, you can open every device’s own configuration menu.
ill. 9: Open Z-Wave device list (), check battery status (), check network status ()
Battery status: The tab Battery status [ill.9 (2)] gives you an overview about every battery powered device’s battery
status within your Z-Wave network. Normally Z-Wave device’s battery have a life of 2 to 5 years. In addition to this
overview list you will receive a warning message in the event list (see also chapter Event List).
Configuration: In the „Z-Wave devices“ tab [ill.9 (1)] you can click every listed device to open its appropriate
configuration view. Here you can – for example – rename, hide and unhide the device and assign to rooms. After
including a new device, the settings will be opened automatically (see also chapter Configuration Menu / Add new
devices).
Some Z-Wave devices have special configuration parameters which help to adjust the device to the user’s needs. Use
the button “Hardware configuration” in the configuration view. These parameters refer to the physical device only.
Network status: If there occur a problem wit h one device (defect, low battery, missing device, communication
errors…), it will be displayed here. Use the appropriate link to get further information about the problem and possibly
opportunities to solve the problem.
Rooms
At first you can create new rooms in this area. Additionally, it’s possible to assign an individual picture to every room as
well as all devices installed in the appropriate room. All assignments can be changed anytime.
ill. 10: Room overview
8
Page 9

Management [ill. 11]
Here you can find important system settings such as user management, remote access management, backup creation,
system restore, firmware update, problem reporting and the opportunity to enter a token for app store access as well.
User management: If there are several persons having access to one smart home they will prioritize different
information. Accordingly, it’s possible to hide and unhide elements and information on the user interface. That will be
realized by using user profiles. Every profile has its own settings, dashboard and event filter preferences.
In delivery state there is only the profile “Admin” existing and all events will be listed here. For login please use the user
name admin with password admin as well. For security reasons don’t forget to change the password individual.
If you create a new profile you have to assign a role to this profile. This role defines the appropriate user’s access
rights within the smart home system:
• Admin: unlimited rights
• User: Can control devices remotely and receives the devices’ information. It’s not possible to connect
new devices or install apps to the smart home system.
• Local user: Identical rights as „user“, but with limitation to the access which is only possible within
the local network. There is no remote access available.
• Anonymous user: No rights
Additionally, you can assign rooms to every user where he will have access then.
Remote access: This menu item contains the ID for your remote access which can be used from outside via mobile
app controlling devices and receiving information. The ID is unique and generated randomly. Please create an
individual password for remote access in the appropriate field.
You can disable the remote access function by deactivating the “Enable Remote Access “checkbox. Sometimes it’s
needed for our support team to help. In this case it’s necessary to activate the “Enable Remote Support Access”
checkbox temporarily.
Backup: A backup file can be created that includes all custom configurations, downloaded apps and Z-W ave controller
data. You should store this backup file on your computer. A completely reset controller couldn't be restored with this
backup. If needed, please use the backup/restore functionality from the Expert UI (see also chapter User Interface)
Restore: Use this to overwrite current configuration. As described on Backup a completely reset controller couldn't be
restored with this backup. It is recommended to use the backup/restore functionality from the ExpertUI.
Factory default: This will remove all already installed or updated apps, devices, settings etc.
Firmware update: If there is a newer Smart Home UI (Z-Way) version available you can start the update here.
ill. 11: Smar t Home management with various settings
9
Page 10

App Store Access: By default, you have access to all online available applications verified by the Z-Way developers.
Furthermore, app developers can give access to their own apps to limited user group. For this it needs a so called
“token” provided by the app developer. If you have received such a token, please enter into the appropriate field under
“App Store Access”. After this the app will be displayed at Configuration Menu Apps
You can enter any number of tokens.
Report problem: If you identify a problem on Z-Way interface we would be pleased about your feedback. That gives
us the opportunity to solve the problem in a timel y manner.
Please note: This is no support form! It is dedicated to report bugs in the UI only. If you need support, please consult
the support forums or see chapter Support
Info: Here you will find the firmware’s and user interface’s current version number.
My settings
Use this menu item to do some settings for your user interface:
• Profile name
• User e-mail
• Default language
• UI update rate (How often the screen will be refreshed.)
• Hide and unhide all device events
• Hide and unhide all system events
• Change password („My User Account“)
• Expert view (Hide and unhide system apps.)
ill. 12: Profile management with various settings
10
Page 11

Applications (Apps) – APPgrade your Home
Automations are a smart home’s core. The Smart Home UI owns ready-to-use applications – so called Apps – which
make the user’s life easier. As known from smartphones ready-to-use apps for various applications are available. The
user gets a ready program where he has to select some parameters only – for example devices included to the
automation scene.
ill. 5: App Store can be chosen by “Apps” (), Tabs (), Add an application ()
Applications can be found under C onfiguration Menu / Apps [Abb.5 (1)]. Below this menu item [Abb.5 (2)] you can
find the tabs „Local Apps“, „Online Apps“ and „Active“. Online Apps contains an app store with downloadable apps
and modules submitted from community members and verified by Z-W ay developers. Additionally, it’s also possible to
display apps which aren’t released from Z-Way developers. In this case you need a so called “Token” provided by the
app’s developer. Please enter this „Token” in the field „App Store Access” at Configuration Menu / Management
The Local tab displays all apps already downloaded. That can be for example:
Scenes
Common switch of various elements
Associations
Automatic switch of some elements by another element
Automations
Easy automatic control such as switching off the light after a defined time.
Complicated solutions such as a central heating control or an alarm system based on installed elements.
Plugins
Pre-configured modules for integration of ip-based devices or services (e.g. ip-camera, online weather,…)
Some applications (Apps) can be used in multiple instances. If you want to use various ip-cameras from one
manufacturer for example, please download the appropriate ip-camera modules from the app store and go to Local
tab. With the “+Add App” [ill.5 (3)] button you can add any number of the module to active elements list integrating
several cameras.
In tab Active all current activated modules are listed. Please consider that only local installed apps can be
activated. Activated apps/modules create new elements. These elements can – similar to all other basic elements –
be renamed, assigned to rooms or assigned with attri butes (see also chapter Elements).
11
Page 12

LEDs and Buttons
The HUB provides multiple LEDs:
• 3 green Status LEDs on the left hand side:
o CPU running, Ethernet working, W IFI operations
• White LED on Bottom:
o Flashing: Inclusion State
o Fast Flashing: Exclusion state
o Breathing: Z-Wave Network Management Active
• White LED frame around the Box (Power and tamper state):
o Off: No power or battery operated
o Breathing: Normal state (After an update process it could take up to two minutes until the LED will
begin to breath. That indicates completed update.)
o Fast blinking: Tampered
The HUB provides 4 buttons on the backside of the enclosure:
• Tamper: Automatically activated when the HUB is removed from the mounting base
• Z-Wave:
• Reset: Hold down the reset button when powering up the HUB. This turns the device back into factory
• WPS: WPS function of WIFI
o Single click turns the HUB into Z-Wave Inclusion Mode (white LED blink)
o Long press starts Z-Wave Exclusion Mode (white LED blinks fast).
Repeating the action stops the modes.
defaults and resets all passwords and settings.
Support for EnOcean Devices
In order to use EnOcean devices please plugin the Popp EnOcean Stick (POPE12204) into the USB Port. Start the user
interface, open
by using
before pairing. Identifying the wrong device will result in malfunction. Not all EnOcean devices are supported at the
moment. Please find a list of supported devices on www.popp.eu/enocean
Configuration Apps and activate the EnOcean App. Now you can add and use EnOcean devices
Configuration Devices. Please note that EnOcean devices are not self-describing but need to be identified
.
Mobile Access
For controlling your smart home via mobile device you can download the Popp HUB App:
Z-Way
The Popp HUB is powered by Z-W ay, the famous Z-Wave control software of
Z-Wave.Me that is also powering famous projects such as Razberry
(razberry.zwave.me
HowTos provided and describes for the Razberry project – e.g. on http://forum.z-wave.me – can be used and applied
for the Popp HUB too.
). This means that all apps, workarounds, tricks and
12
Page 13

MCU
MT7620, OS
OS
MT OpenWRT
Z-Wave Chip
Sigma Designs SD3503
Frequency
865…869 MHz, configurable according to country spec.
Flash
16 MB onboard plus 4 GB SD Card already included
External Power Supply
5V, 1A
Connectivity
10/100MB Ethernet plus WIFI b/g/n
Technical Data
Support
Should you encounter any problem, please give us an opportunity to address it before returning this product. Mos t
questions regarding Z-Wave wireless communication standard can be answered through the international community
at www.z-wave.info
If your question can’t be answered there, please use www.popp.eu/support or contact us by email: info@popp.eu
The complete CE declaration can be found on: www.popp.eu/ce
All questions regarding this declaration of conformity can be directed to the following address:
Popp & Co., 27 Old Gloucester Street, London, WC1N 3AX, UK
.
© 2016 POPP & Co.
While t he information in this manual has been compiled with great care, it may not be deemed an assurance of product characteristics.
Popp & Co. shall be liable only to the degree specified in the terms of sale and delivery.
The reproduction and distribution of the documentation and software supplied with this product and the use of its contents is subject to
written authorization from Popp & Co. We reserve the right to make any alterations that arise as the result of technical development.
Phone: +44 (0) 20 7419 5726
eMail: info@popp.eu
Web: www.popp.eu
13
 Loading...