

Page 1
Installation Instructions
Tailgate Lock
PL8660 series
Honda Ridgeline
2005 and Up
With or Without
Backup Camera
Package Contents: Lock Bezel, 2 keys, Mounting Bracket,
Locking Bolt Linkage, Crank Linkage,
2 Screws #8-32 x 1 1/2", 1 Bolt 1/4" x 2”
Locking Bolt Linkage and Slide Bolt
Long and Short Wire Harness, Zip Ties
Tools Required: 10 MM Socket, T40 Torx Bit, Phillip Head
5/32” Allen Wrench
Rubber Mallet
Power Drill
3/16” (or 5MM), 1/2" (or 12MM) Drill Bits
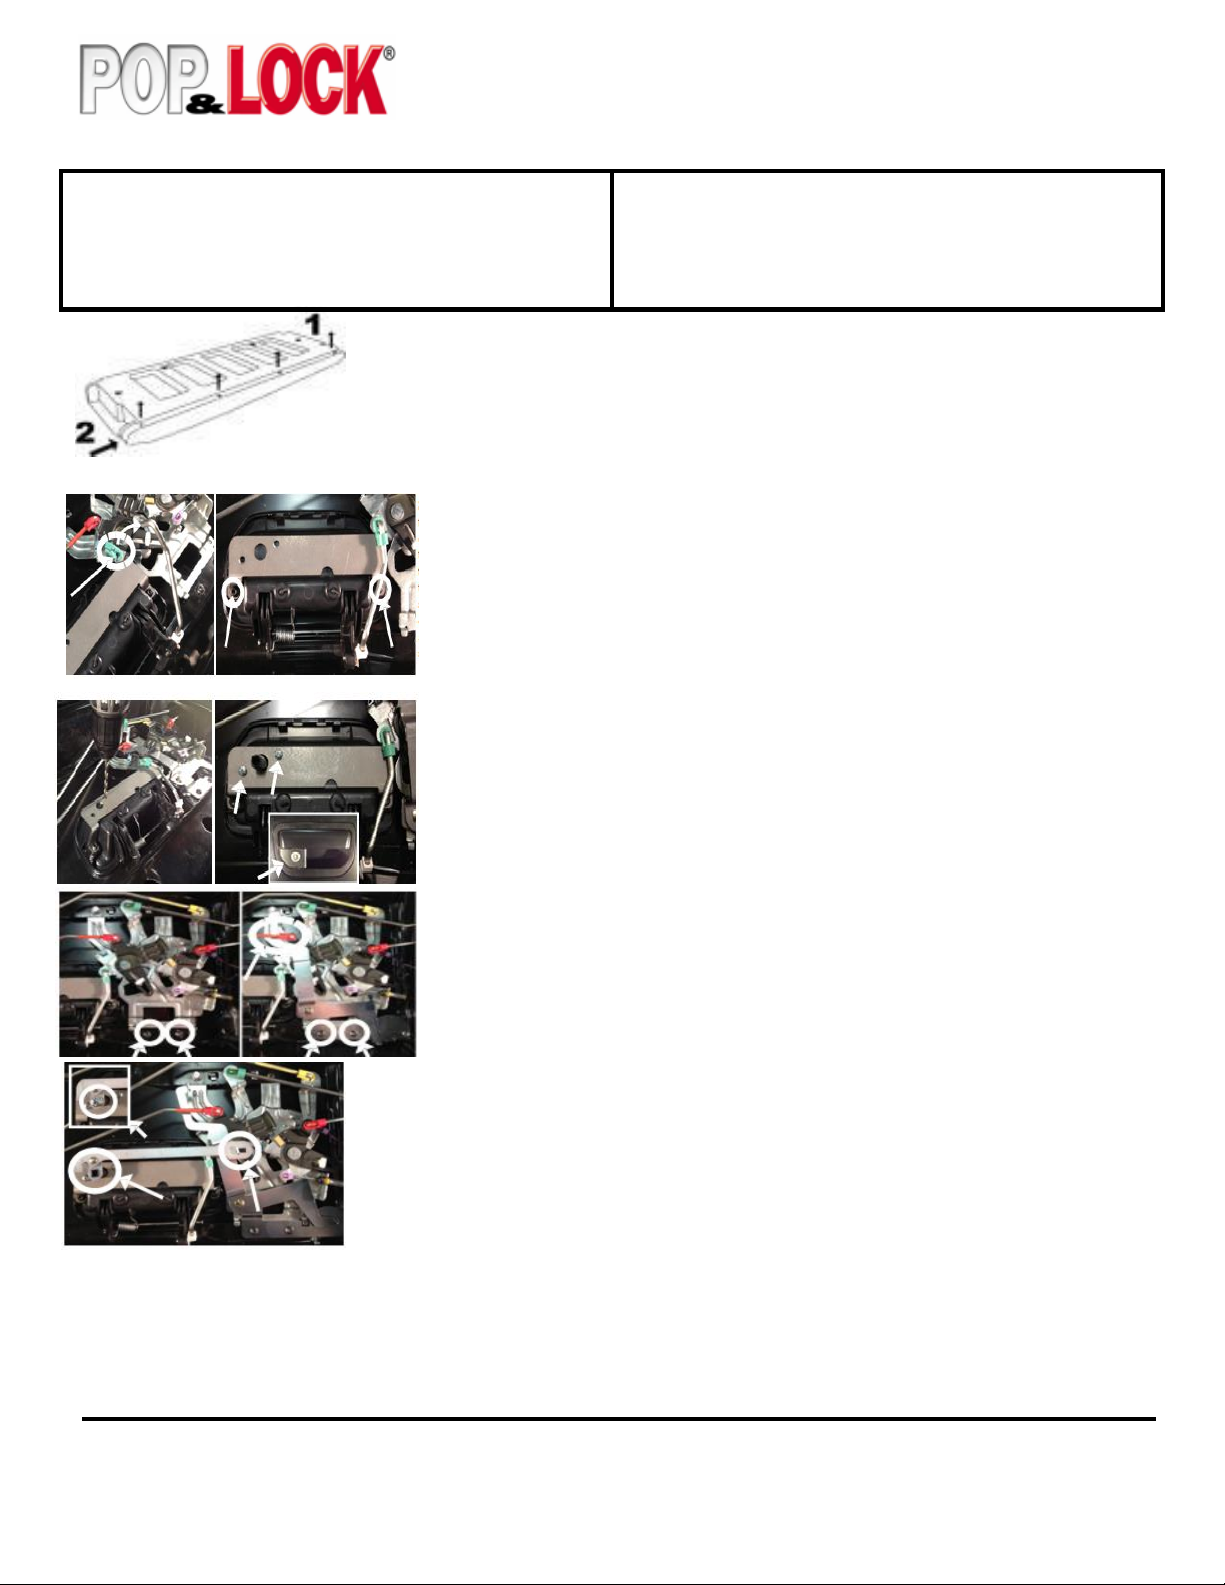
STEP 1 - Lower the tailgate. Remove the four Phillips head screws from the top trim, slide the
trim to the right (passenger) side using a rubber mallet and lift to remove it. Apply downward
pressure on the top trim if it bows up. Remove the white clips that remain on the tailgate by
turning them 45 degrees to pull out. NOTE THE ORIENTATION BEFORE REMOVEL.
Remove the T40 torx screws holding the interior trim panel and lift it off.
STEP 2 - Remove the handle rod from mechanicals by turning the green rod clip and
pulling the rod out of the clip. Swing the rod up and out of the way. Remove the two
screws holding the factory handle in place; there are tabs that will hold the handle
from falling out of the tailgate, but for extra assurance hold the handle in place so not
let the handle to fall. Install the mounting bracket over the back side of the handle and
reinstall the two screws and tighten. You may need to file the washer down go get the
bolt to fit. Reinstall the handle rod. The handle should now look like picture.
STEP 3 – Using the bracket holes as a template drill the two 3/16” (or 5MM) holes
and one 1/2" (or 12MM) hole. Insert the lock assembly from the front of the bezel
inserting the shaft through the 1/2" hole and aligning the two mounting holes on the
bezel with the mounting bracket. Insert the 2 supplied 8-32 x 1 1/2" screws
through the mounting bracket in the bezel. Tighten the screws. DO NOT OVER
TIGHTEN. IF LOCK ASSEMBLY BINDS LOOSEN SCREWS UNTIL THE
KEY MOVES FREELY!
STEP 4 – Remove the two mechanical assemble screws. Mount the POP N LOCK
bolt linkage under the upper latch rod as shown using the existing two mechanical
assemble screws. The lock assembly should look like picture.
STEP 6 – Check the functioning of the lock.
STEP 5 – Install the crank rod assembly by holing the slotted end onto the bolt linkage and the
square hole to the end of the lock assembly shaft. Insert the 1/4" x 20 x 2” screw into the shaft and
tighten.
Lock – Turn the key to the right (passenger side) to the
two o’clock position and then back to 12 o’clock to lock.
Unlock – Turning the key to the left (driver side) to the
ten o’clock position and then back to 12 o’clock to
unlock.
For instructions in color please visit
our website at popandlock.net
Page 2
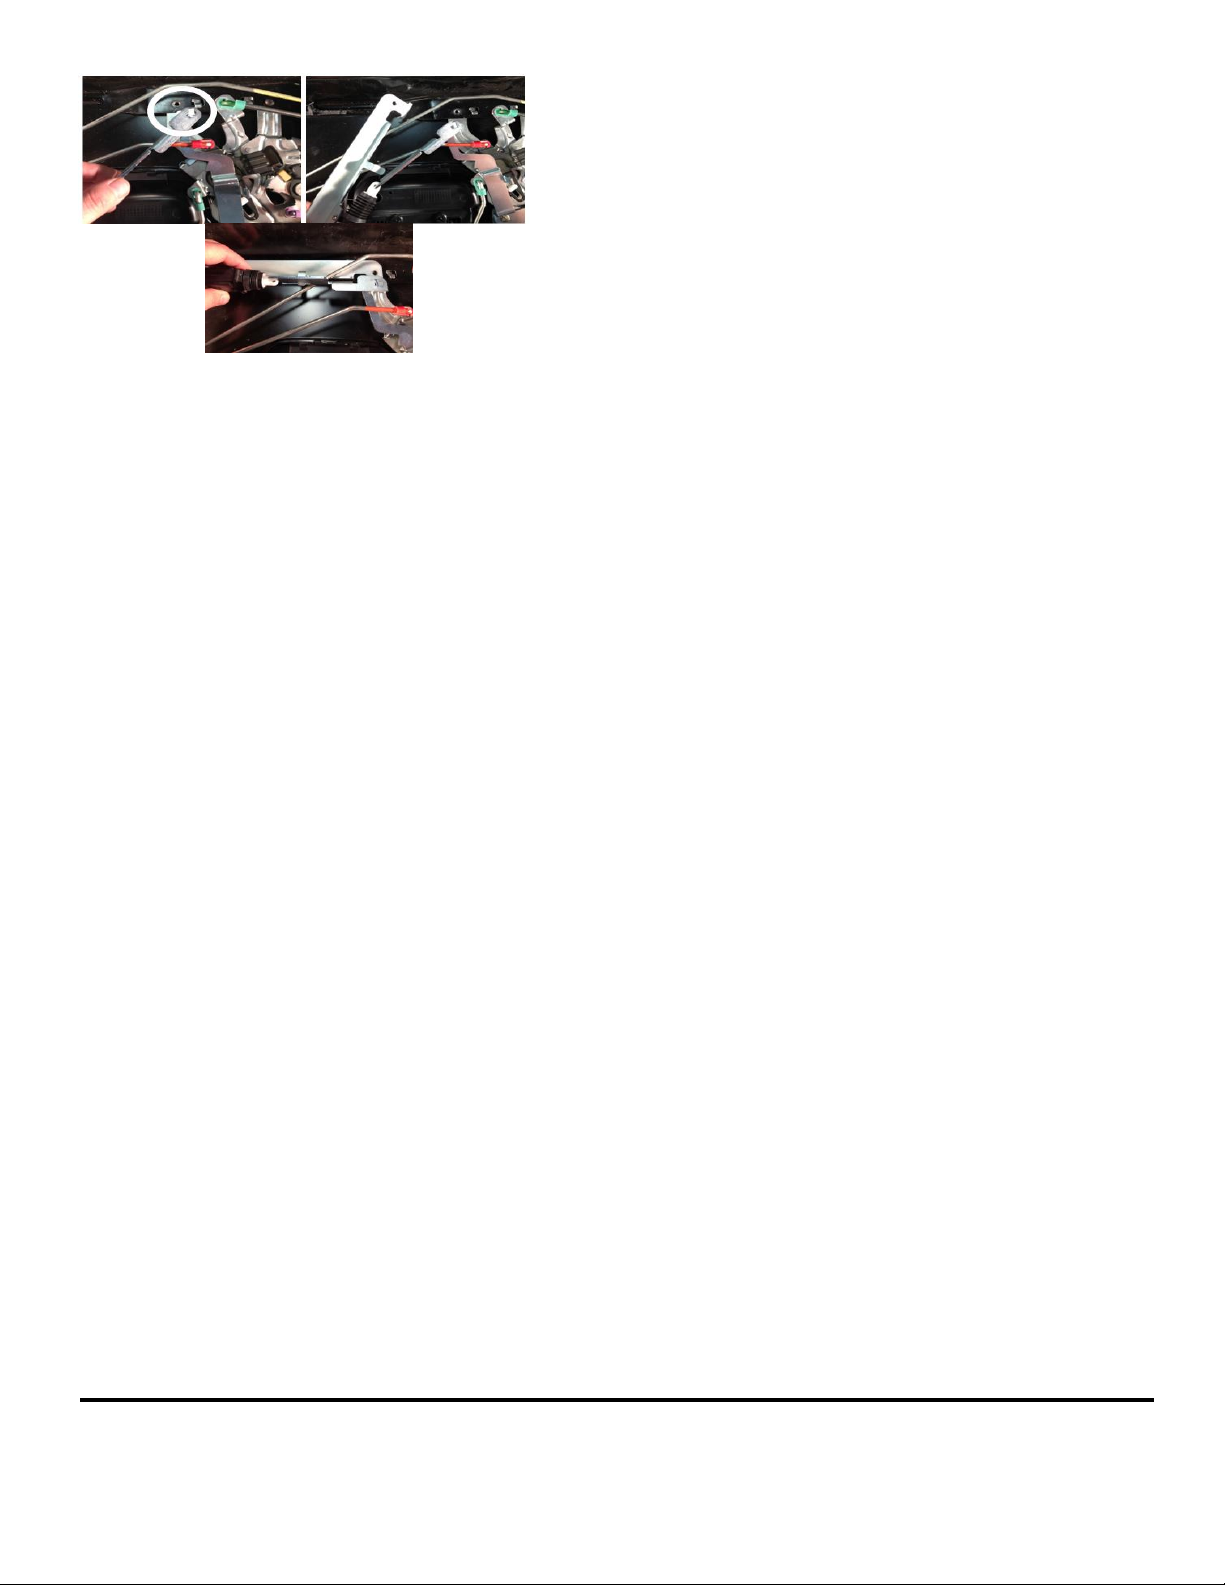
STEP 7 – Remove the driver side lower mechanical assembly screw.
Hook the end of the slide bolt onto the t-post of the lock bolt linkage
and turn to position shown in the picture to the upper left. Hook the
white plastic hook of the actuator onto the slide bolt and rock the
actuator into place making sure the bolt end goes under and the slide
bolt goes above the latch rod as shown in the picture to the upper right
and lower center. Reinstall the driver side lower mechanical assembly
screw and tighten. Gently slide the slide bolt to the lock and unlock
position to verify function of lock.
STEP 8 – Wiring (there are other ways to run the wiring this is one way) – Snake the short wiring cable up the tailgate through the
driver side drain hole and connect it to the bullet connectors of the power unit. Secure with cable ties to prevent the wire from
getting pinched or in the way of the latch rods. Connect the other end to the long wiring cable. Locate this connector under the
truck so that it is accessible for tailgate removal. Run the long wiring cable along the factory wire harness to the engine
compartment securing it with cable ties. Snake it into the driver’s compartment using the rubber grommet in the firewall that the
factory wire harness run through from the fuse box. Remove the driver side kick panel and run the wire down into the driver side
kick panel. The lock and unlock wires are located in the fuse box area under the kick panel. The wire colors are yellow with a black
stripe (lock) and the yellow with a green stripe (unlock) wires. Use the two wire taps to connect to these two wires. Test the
operation of the lock (if the tailgate lock works in the opposite direction as the door locks, disconnect the bullet connectors off the
actuator and switch the wires that they were plugged into and plug back together). Secure all the wiring and replace the kick panel.
STEP 9 – Replace the interior trim panel of the tailgate using the torx screws removed in Step 1. Replace the white top trim clips
onto the trim cap, making sure they are oriented as noted in Step 1. Carefully locate the top trim over the holes in the tailgate and
press it firmly until they snap into place. Reinstall the four Phillips Head screws.
For instructions in color please visit
our website at popandlock.net
Page 3

POP & LOCKTM LIMITED WARRANTY FORM
LIMITED WARRANTY TERMS AND CONDITIONS
(1) Installation. Pop & Lock™, LLC (and Pop & Lock™ Corporation) is not responsible for installing the Pop &
Lock™ or for the harm suffered by any person as a result installing it.
(2) Warranties.
a. Customer acknowledges that it is unreasonable to believe that any device whatever will prevent a theft in the
case of every attempt and that the most that can be expected from a so-called anti-theft or security device is
that it will deter many thieves.
b. POP & LOCK™ LLC. (and Pop & Lock™ Corporation) MAKES, AND CUSTOMER RECEIVES, NO
WARRANTY, EXPRESSED OR IMPLIED, EXCEPT THE WARRANTIES OF TITLE TO THE POP &
LOCK™ AND THEIR MERCHANTABILITY, PARTICULARILY NO WARRANTY OF FITNESS FOR
A PARTICULAR USE OR PURPOSE OR AGAINST INFRINGEMENT.
c. As Customer’s only remedy, Pop & Lock™, LLC (and Pop & Lock™ Corporation) will repair or replace, at its
option and without charge, any lock that is defective in material or workmanship when received by
Customer and is returned to Pop & Lock™ LLC (and Pop & Lock™ Corporation), FOB Pop & Lock™
Corporation’s offices, within one (1) year after it’s receipt by the Customer. Pop & Lock LLC will ship all
replacement, or repaired, Locks to Customer, FOB Pop & LockTM’s shipping point.
d. Factory support is only available for Pop & Lock™ products purchased as new through an Authorized Pop &
Lock™
dealer.
Please Note: Pop & Lock™ Products purchased on auction sites such as Ebay, Amazon and
Craigslist, to name a few, will not be covered under factory warranty under any circumstance. Pop &
Lock™, LLC (and Pop & Lock™ Corporation) is unable to verify whether products sold through
Auction Sites are new, used, or refurbished, and as such, Pop & Lock, LLC (and Pop & Lock™
Corporation) is unable to warranty such purchases. Pop & Lock, LLC advises using extreme caution
when buying through auction sites as you'll be doing so at your own risk.
(3) No Liability. Pop & Lock™ Corporation is not liable for any loss or damage claimed by Customer or any third person
to have been suffered or incurred as a result or, or related to, the Locks purchased under this Agreement, regardless
of the circumstances or form of action, except any bodily injury or death for which Pop & Lock™ is liable under
products-liability law. Without limiting the generality of the foregoing, in no event will Pop & Lock™ LLC be liable to
Customer for any indirect, special, or consequential damages, regardless of the circumstances or the cause of
action, particularly not for the value of a vehicle, or any other money damages in the event that a tailgate is stolen
either notwithstanding the use of a Pop
& Lock™ or when it has been returned for repair or replacement.
END OF TERMS AND CONDITIONS
POP & LOCK LLC 1271 CONTRACT DRIVE GREEN BAY, WI USA 54304
Additional Install Instructions and answers to technical questions can be found on our website at www.popandlock.net or by calling
Technical Support 1-800-342-5911 option 1
Monday – Friday 8:30am to 4:30pm CST
Pop and Lock’s limited warranty expires one (1) year after date of purchase.
Proof of purchase is required for warranty claims. Please submit a scanned copy or electronic image/photo of
your receipt through any of the following methods:
E-mail: [email protected]
Fax: 855-491-5911
Mail: 1271 Contract Ave, Green Bay, Wisconsin (USA) 54304
Please be sure to include:
Name, address and phone number
Model and year of truck
Model/Part number of the lock
Brief description of the problem
 Loading...