

Page 1

TROUBLE SHOOTING GUIDE
If the Pump and Motor runs but there is little or no water ow, the following conditions
may apply:-
1. Check to see if the Filter needs cleaning or is blocked - refer to Filter Instruction
Manual.
2. Pump is not primed - re-prime as per instructions in “Starting Pump”.
3. Air leaks in suction lines - Check for air bubbles under Clear Lid and tighten.
Check all pipes and connections and repair if necessary.
4. Water on ground under the Pump and Motor usually indicates a damaged Pump
Shaft Seal - this should be repaired immediately or further damage may occur.
5. Pump unable to draw water from the pool - check that Valves to the Pump are
fully open and that the water level is correct in the pool.
6. Blockages - Check Strainer Basket and Pool Skimmer Basket are free of
obstruction. If a blockage is suspected inside the Pump or in the Pipework the
advice of your pool service technician should be sought.
If the motor does not run, the problem could be that:-
1. Power not connected - Check power point by plugging in a portable appliance to
ensure power is available. Also check Fuses and Main Power Supply Switch.
2. Overload tripped - Poolrite Motors incorporate an Internal Switch that will reset
automatically after the Motor has cooled.
3. Blockage preventing Pump from rotating.
4. Motor fused or “burnt out” - “burning” smell evident - replacement may be
required.
Warning
The Pump Motor is an electrical device and as such should not be disassembled or
serviced by anyone other than an authorised Poolrite Service Technician or qualied
Electricial Service Company.
The appliance is not intended for use by young children or inrm persons unless they
have been adequately supervised by a responsible person to ensure that they can use
the appliance safely.
Young children should be supervised to ensure that they do not play with the
appliance.
Also, any other problems that cannot be corrected by routine maintenance should be
attended to by an experienced Pool Service Technician.
OPERATING INSTRUCTIONS
STARTING PUMP
Before switching the pump ON check that all Pipework is properly sealed and that the
pool water is at the recommended level (check with your Pool Builder).
1a. Self Priming Pump with Strainer Pot
First prime the Pump by removing the Clear Lid by unscrewing in an anticlockwise direction.
Fill the Strainer Pot with water to the Suction Port. Replace the Lid ensuring that it
is sealed on the Gasket properly and tighten in a clockwise direction.
1b. Non Self Priming Pump without Hair and Lint Pot
The Non Self Priming Pump should always be installed below the pool water level,
therefore ensure the suction pipe and pump body are lled with water.
2. Connect to power supply and switch ON.
3. Allow Pump to run discharging the water back to the pool.
4. If ow is not established within approximately 1 minute, switch off the Pump
and repeat procedure. Continued failure to prime may indicate an air leak in the
suction line which should be rectied.
ROUTINE MAINTENANCE
The Strainer Basket should be inspected frequently through the Clear Lid and emptied
as follows when a build-up of rubbish is evident.
1. Switch off Pump.
2. Remove Clear Lid.
3. Remove Strainer Basket.
4. Empty accumulated rubbish and hose Strainer Basket clean.
5. Replace Strainer Basket.
6. If Strainer Pot has emptied of water, repeat steps in “Starting the Pump”.
WATER LEAKS
7. Water leaking from under the Pump and Motor should be attended to immediately
as this would indicate a failure of the Pump Shaft Seal. If this seal is not
immediately replaced damage may occur.
8. Pool water leaking onto the pump motor from associated plumbing should be
attended to immediately before damage occurs.
MOTOR NOISE
9. If the Pump Motor starts to get “noisy” the Motor should be checked by a Pool
Technician to ascertain whether the Motor Bearings need replacement. This
should be attended to immediately as Bearing failure may cause Motor burn out.
LARGE AIR BUBBLES UNDER THE STRAINER POT LID
10. Check the Gasket under the Clear Lid and check the pipe connection to the
Suction Port at the front of the Pump to make sure it is tight - do not overtighten.
CHEMICAL BALANCE GUIDE
11. The unit is designed to be used for Spa or Swimming Pool water, balanced in
accordance with Langlier Saturation Index, with a pH level of 7.0 to 8.0 and is
regularly treated with a chlorine Sanitising agent, the level not exceeding 3000 PPM.
INSTALLATION INSTRUCTIONS
The “Enduro” Pump has been designed to work with a variety of lter types including
Sand, Cartridge and Diatomaceous Earth. The installation of the Enduro Pump should
be carried out by an experienced Pool Plumbing, Pump and Filter Installer.
LOCATION
1. Install at a distance no more than 12 metres from the Pool or Spa and no more
than 1 metre above water level or 1 metre below water level in the case of the
Self-Priming Pump with Strainer Pot. If the pool is to be installed outside these
parameters, seek the advice of your local Poolrite Distributor.
2. The Pump should be placed on a secure and level concrete block or similar base
600 x 300mm in size (Pump only) and should be placed in a location that cannot be
ooded by storm water or by accidental immersion.
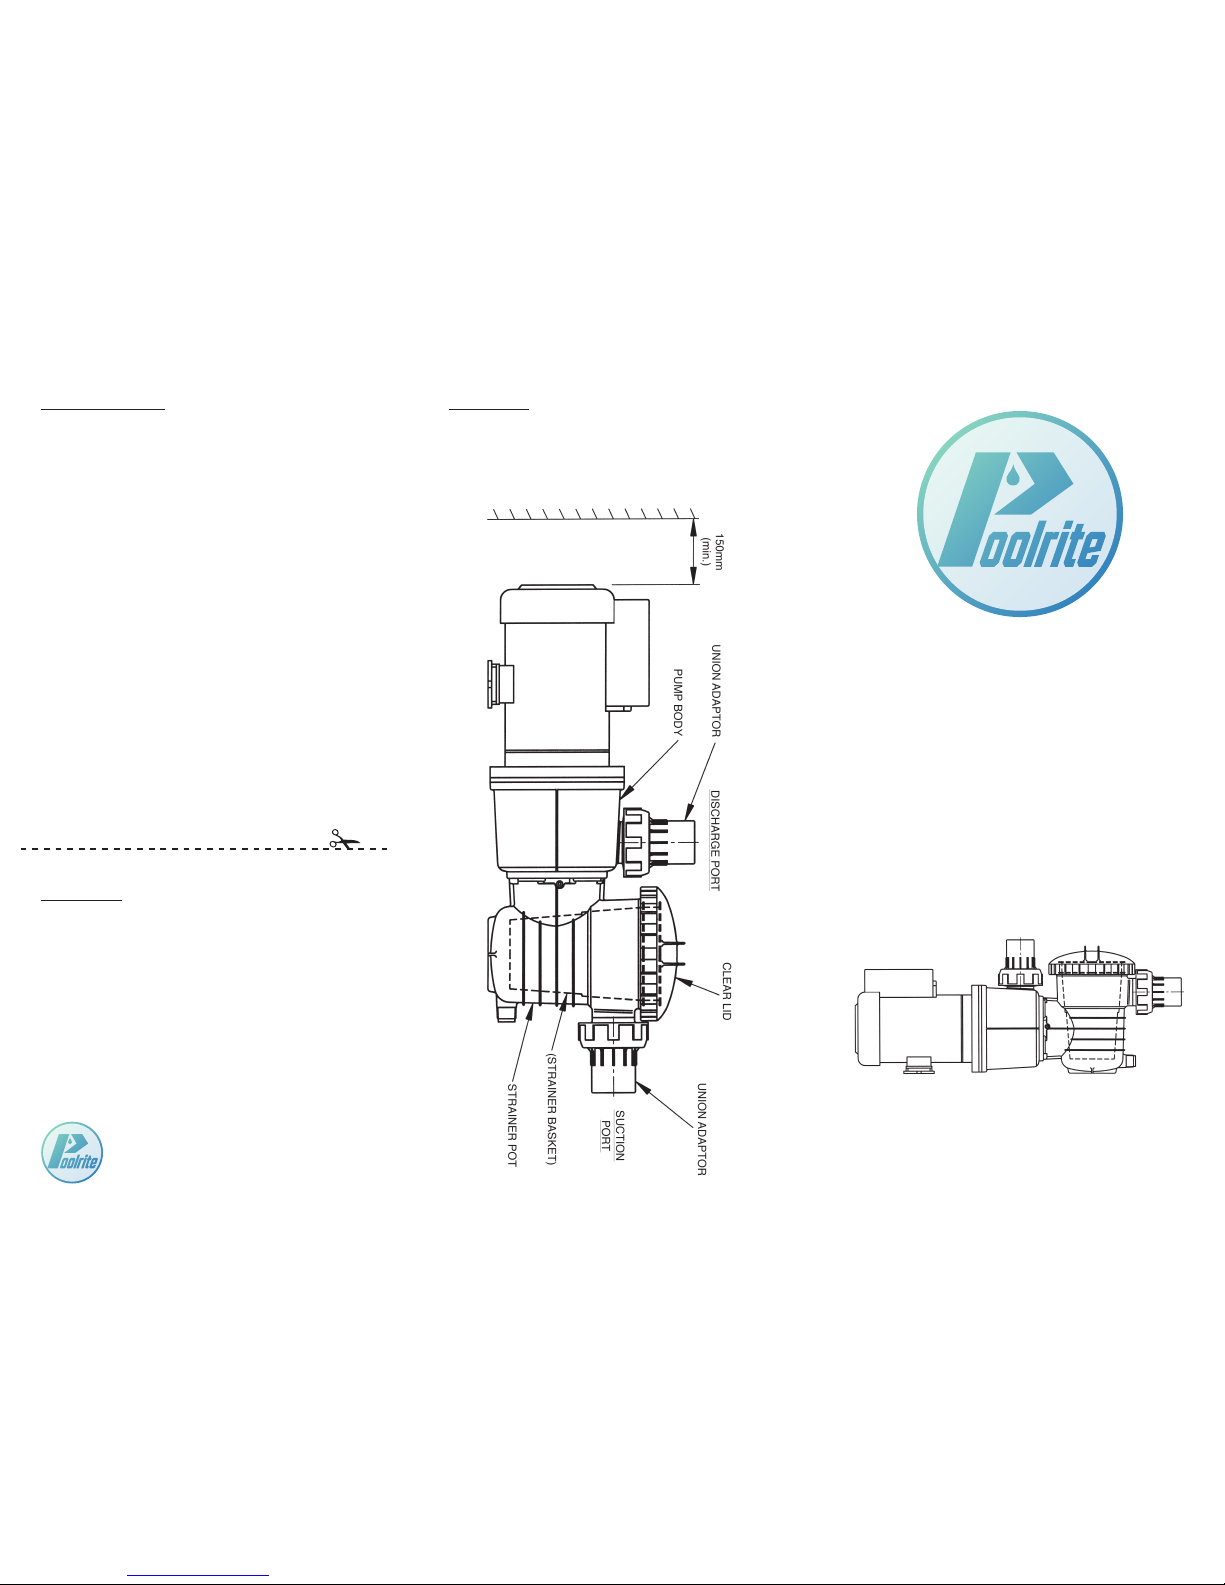
3. The rear of the Motor should be no closer than 150mm from a wall, fence or any
other barrier to allow for adequate airow to cool the Motor.
PIPE CONNECTION
4. The Suction and Discharge Ports are provided with Union Adaptors for quick
disconnection. These connectors will accept either 40mm or 50mm PVC pipe and
should be joined to the pipe with PVC Solvent Cement. Suction lines should be no
smaller than as follows:-
Pump Model Max Suction Line Length Min. PVC pipe size
EP 750 12m 50mm
EP 900 12m 50mm
EP 1100 12m 50mm
Discharge pipe should be no smaller than 40mm.
When installed below water level, Shut-off Valves should be tted to the Suction and
Discharge Lines which should be free from air leaks. The discharge from the Pump
Outlet should be connected to the Inlet of the Filter and the Suction Port connected to
the Skimmer Box or Suction Outlet from the Pool or Spa.
WEATHER PROTECTION
5. The Enduro Pump is completely Weatherproof and therefore no enclosure is
necessary. However should it be desirable to install the Pump in an enclosure, the
enclosure must have both a ventilation inlet and outlet opening to allow cooling
airow around the Pump Motor. Each opening should be at least 200 sq cm in area
as close as practicable to the Pump.
POWER CONNECTION
6. The Enduro Pump is designed to be connected to a nominal 240 volt 50Hz power
supply and is supplied with a 1.8 metre lead and 3 Pin Plug. A Weatherproof 3 Pin
Power Point should be tted by an electrician in a dry place, shielded from pool water
splash over.
EXTENSION LEADS ARE NOT RECOMMENDED FOR USE WITH THIS EQUIPMENT
BECAUSE THEY ARE UNSAFE IN AND AROUND THE POOL ZONE.
Page 2
ENDURO PUMP WARRANTY
In addition to the conditions of sale and warranties implied at law and which
may not be excluded, Marco Engineering warrants the Enduro Pump to be free
from defect for a period of up to two (2) years from the date of purchase by the
Owner from Marco Engineering or an authorised supplier of the Enduro Pump.*
Marco Engineering will authorise a qualied technician to repair the Enduro
Pump provided that:
• Marco Engineering is notied within seven (7) days of the defect being
detected;
• the Enduro Pump has not undergone any unauthorised modication or been
tted with other than genuine Poolrite approved parts; and
• the Enduro Pump has been installed and operated in accordance with the
Installation Instructions and Operating Instructions, respectively.
Marco Engineering will not be liable to repair the Enduro Pump if the repair is
necessary because of misuse, accidental damage, entry of foreign objects or
materials into the equipment, improper or inadequate maintenance or repair or
incorrect operation of the Enduro Pump.
This warranty does not extend to reasonable wear and tear of the Enduro Pump.
All repairs must be undertaken by a technician authorised by Marco Engineering.
The Owner will be responsible for all freight and/or travelling charges. Marco
Engineering accepts no responsibility for goods while in transit.
Marco Engineering accepts no responsibility for representations other than
expressly contained in literature published by Marco Engineering. In particular
Marco Engineering has made no representation as to the tness of the Enduro
Pump for any particular purpose except as contained in such literature.
Complete, detach and return to Marco Engineering
WARRANTY CARD
Name of Purchaser: ____________________________________________
Address: _____________________________________________________
_____________________________________________________________
_____________________________________________________________
Purchased From: ______________________________________________
Date: ________________________________________________________
Equipment and Model: _________________________________________
Customer Record
Purchased From: ______________________________________________
_______________________________________________________
Purchase Date: ________________________________________________
Stella Print
Item No. 22534
(6/05)
ENDURO
Swimming Pool &
Spa Pool Pump
Installation
Instructions
ENDURO
SWIMMING POOL PUMP
QUICK START GUIDE
* Terms and conditions apply, please visit www.poolrite.com/pages/warranty for more information.
Marco Engineering
PO Box 1491, Browns Plains QLD 4118
Phone: +61 7 3803 6222 | Fax: +61 7 3803 6353
Email: [email protected] | www.poolrite.com
 Loading...