

Page 1
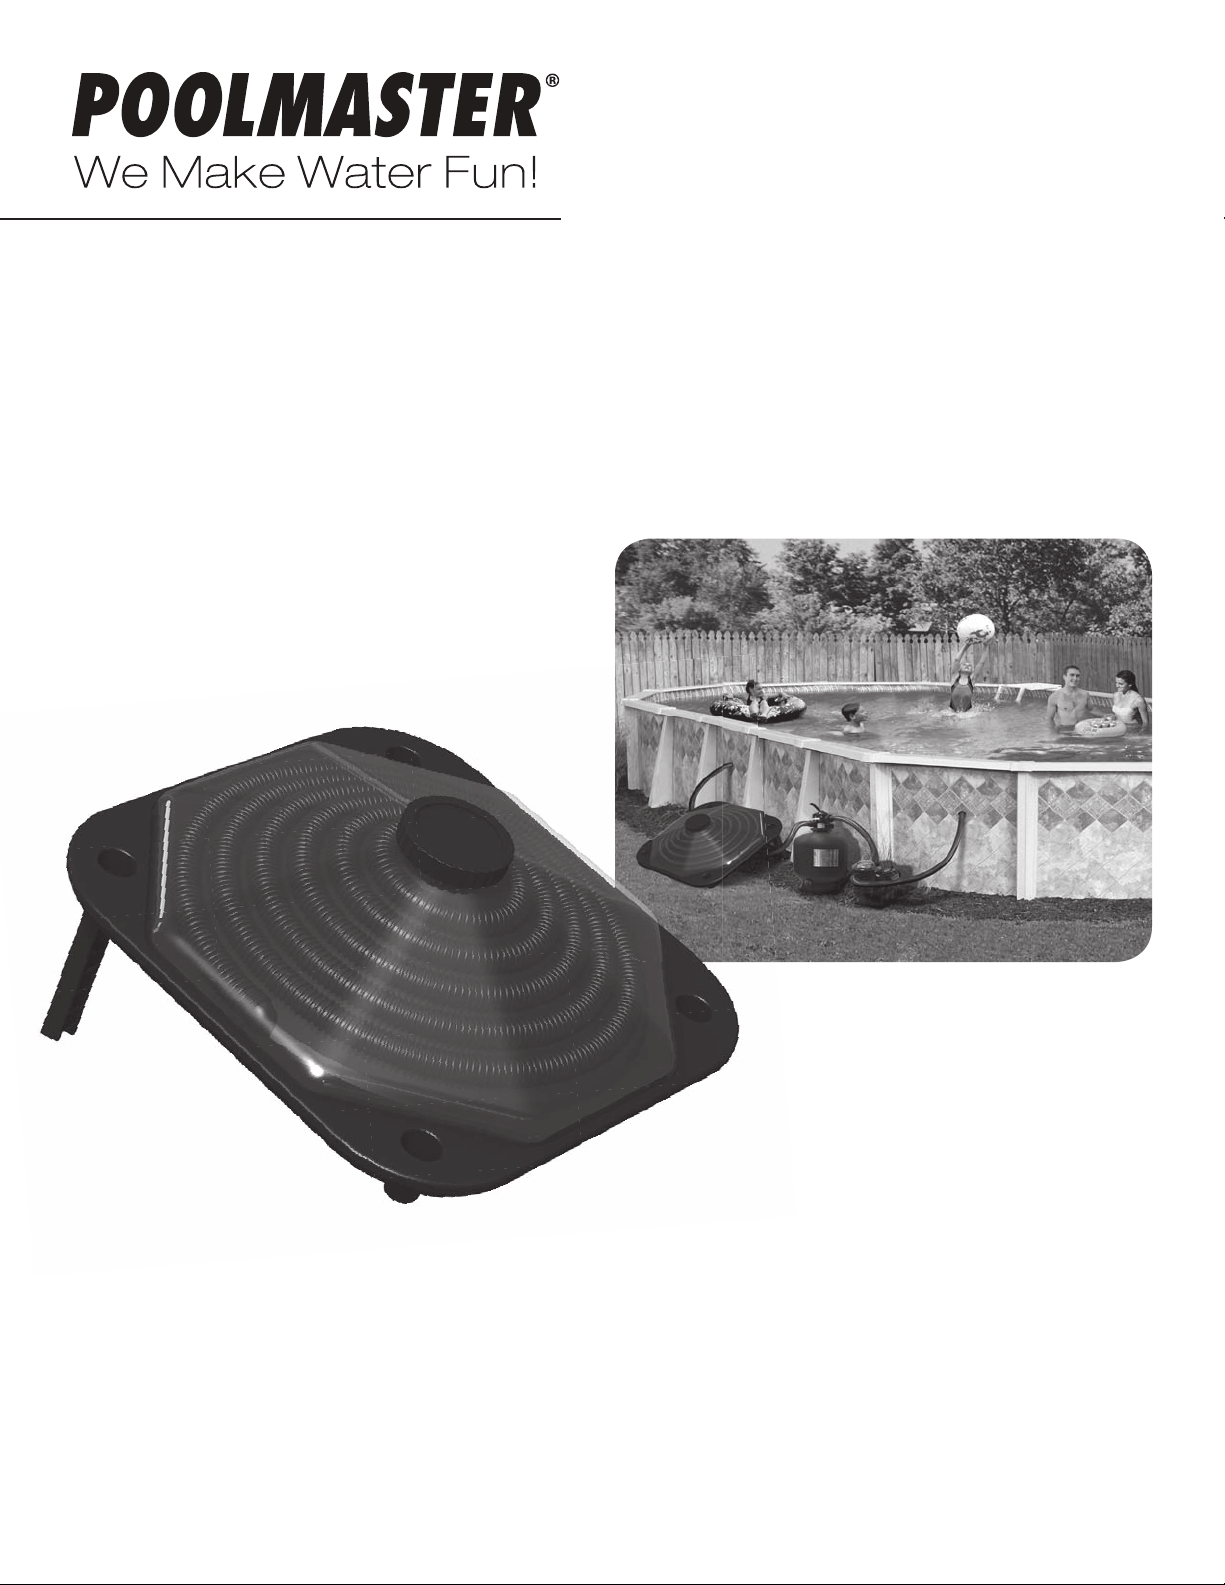
Above-Ground Pool
Solar
Calentón Solar Para Alberca Sobre Tierra
Heater
59025
INSTRUCTIONS
Read instructions BEFORE assembling!
KEEP THESE INSTRUCTIONS for future reference.
Page 2
THANK YOU FOR YOUR PURCHASE!
We know that you and your family will enjoy the warming water that the Poolmaster
for Above-Ground Pools will provide. We encourage you to read through all of the instructions before
assembling your Solar Heater to maximize its performance, extending your swimming season.
If you have any questions, please do not hesitate to contact us at 1-800-854-1492.
®
Solar Heater
WARNING:
• Carefully read and adhere to all notations and safety warnings
mentioned within these instructions. Failure to follow these
instructions as outlined can cause damage to the Solar Heater
itself, injury, or death.
• Please do NOT allow children to operate the Solar Heater.
• Make sure that the INTAKE VALVE is closed off when installing
or working on your Solar Heater to avoid water flow from the
pool return.
• Install your Solar Heater away from the pool to prevent children
from using the heater as a stepping stool into the pool -
DO NOT STEP ON HEATER.
• DO NOT service your Solar Heater while the pool pump is running.
• NEVER use any petroleum based lubricants on your Solar Heater,
as this will destroy the parts.
• Your Solar Heater is to be installed between the filter and pool
water return inlet, AFTER the water is filtered. The heater must
come AFTER the filter to prevent buildup in the hoses.
• Before loosening any threaded connections on your filter pump
or pool, be sure that the suction and pressure hoses on the filter
are closed or blocked to prevent water flow.
• Do not remove Solar Heater cover unless for maintenance
purposes only.
NOTE: Please review and understand the water flow options and position settings for the 3-Way Bypass Valve . Refer to page 10 & 11 for
details.
1
Page 3
EVERYTHING YOU NEED TO KNOW
FOR OPTIMAL PERFORMANCE:
• Place your Solar Heater on a solid surface.
• Make sure that the Solar Heater is lower than your pool’s water level.
• Make sure your Solar Heater is in a location that has the most SUN EXPOSURE for
optimal heating effectiveness.
• Make sure your Solar Heater is a safe distance away from your pool and not in the path
of traffic or outdoor activities.
GENERAL ASSUMPTIONS:
• Your Solar Heater is for above-ground pool use only
• Your pool must be set up and filled with water
• Your above-ground pool has a pump-operated water filtering system already set up with the necessary
hoses needed to feed water in and out of your pool and filter system
HOW DOES THE SOLAR HEATER WORK?
Solar heating is a cost-effective, eco-friendly way to heat your pool. Here’s how it works!
• Your solar heater connects between your filter pump and pool return inlet through two hose connections:
• An INCOMING hose will feed your pool’s cold, filtered water out of your filter and through one port on the Solar Heater.
• An OUTGOING hose will feed the sun-warmed water back out to your pool from the other port on the Solar Heater.
• Between the INCOMING hose and the OUTGOING hose, the water travels through the solar coils where
it is heated, warming the temperature of your pool water up to 10° warmer under optimal conditions.
• You have flexibility in how you regulate your pool’s temperature, depending upon how you set up your
Solar Heater.
WHAT SIZE IS YOUR POOL?
• The size of your pool will affect how many Solar Heaters you will need to achieve the optimal water temperature.
• One unit will effectively heat a pool size of 15 – 18 feet with a standard depth of 3 feet.
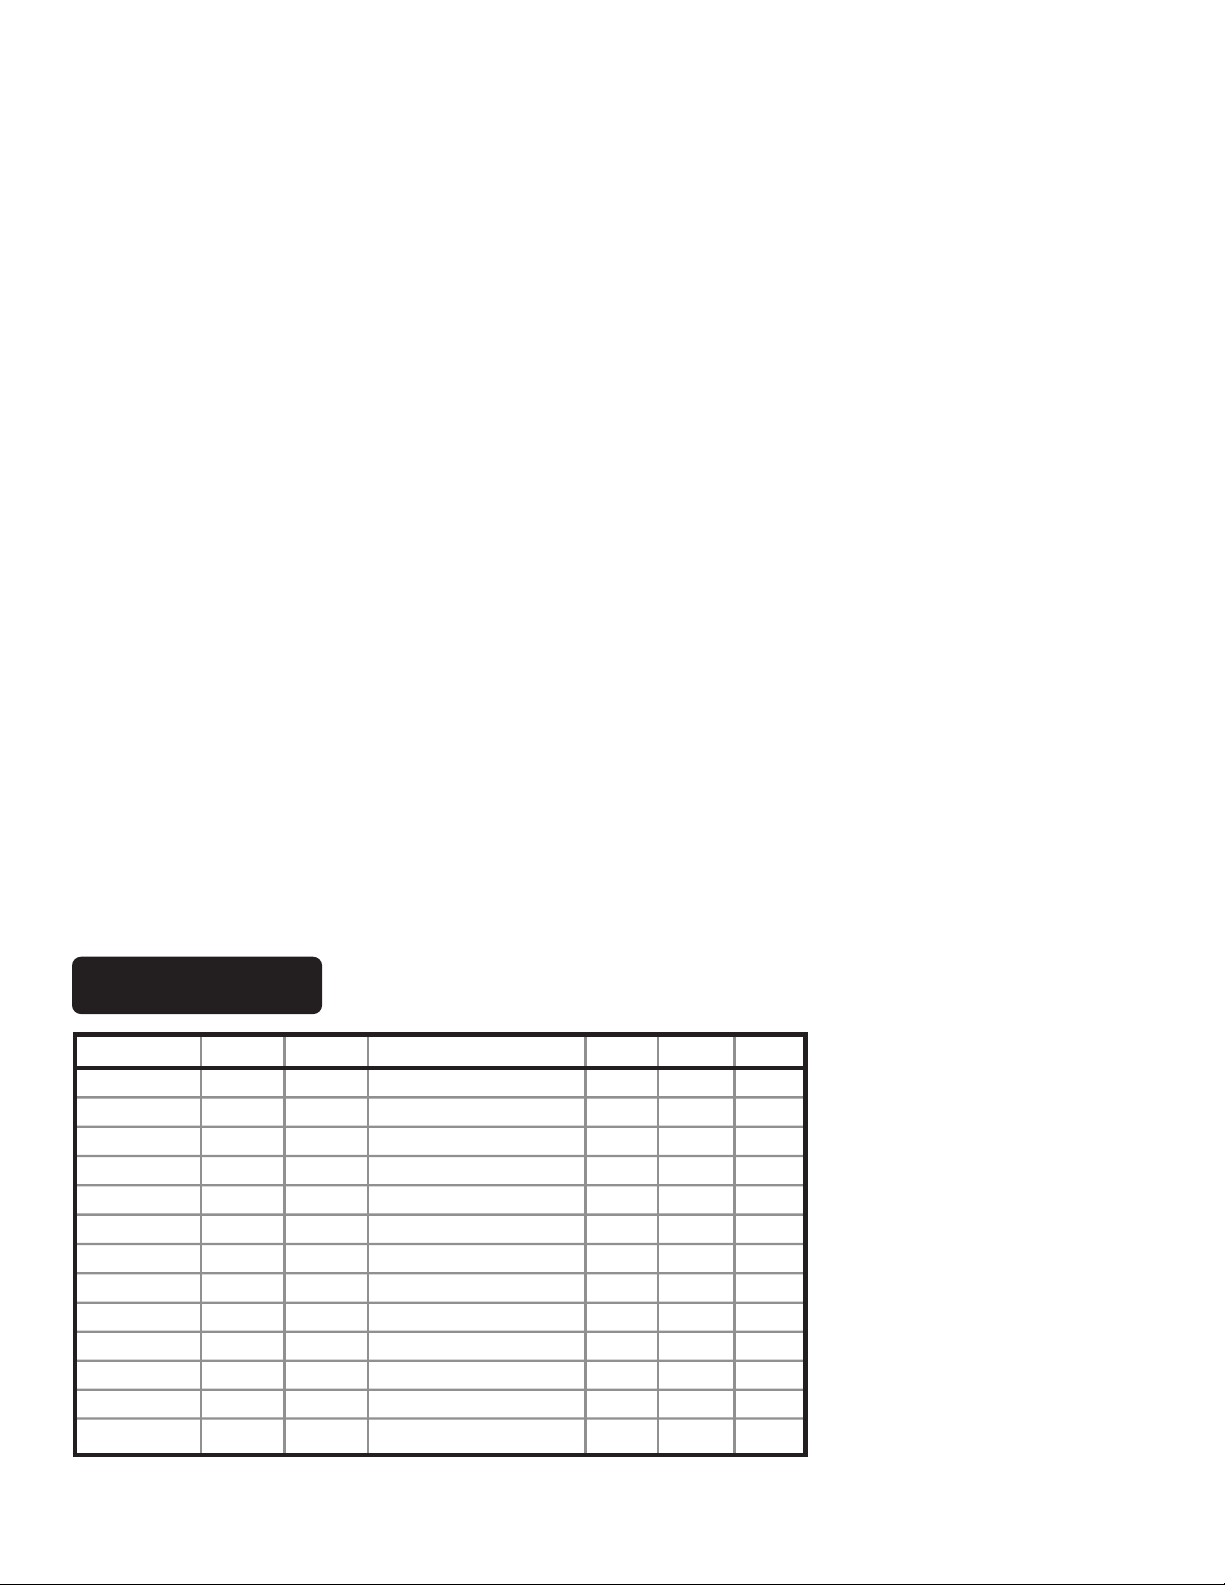
USAGE CHART
Recommended Heaters*
Pool Size
10 ft Round
12 ft Round
15 ft Round
18 ft Round
21 ft Round
24 ft Round
27 ft Round
12 x 24 ft Oval
14 x 28 ft Oval
15 x 30 ft Oval
16 x 32 ft Oval
18 x 33 ft Oval
Sq. Ft.
79
113
177
254
346
452
572
226
308
353
402
466
Depth
30”
36”
48”
48”
52”
52”
52”
48”
48”
48”
52”
52”
Approximate Gallons
1,200
2,100
4,200
6,100
8,900
11,600
14,700
5,400
7,300
8,400
10,300
12,000
1
1.26
2.21
4.42
6.42
9.37
12.21
15.47
5.68
7.68
8.84
10.84
12.63
2
0.63
1.11
2.21
3.21
4.68
6.11
7.74
2.84
3.84
4.42
5.42
6.32
3
0.40
0.70
1.40
2.03
2.97
3.87
4.90
1.80
2.43
2.80
3.43
4.00
DAYS TO HEAT
Heating time and number of units is approximate and is based on optimal sun conditions
*
Heating temperature is based on 5˚ F
2
Page 4
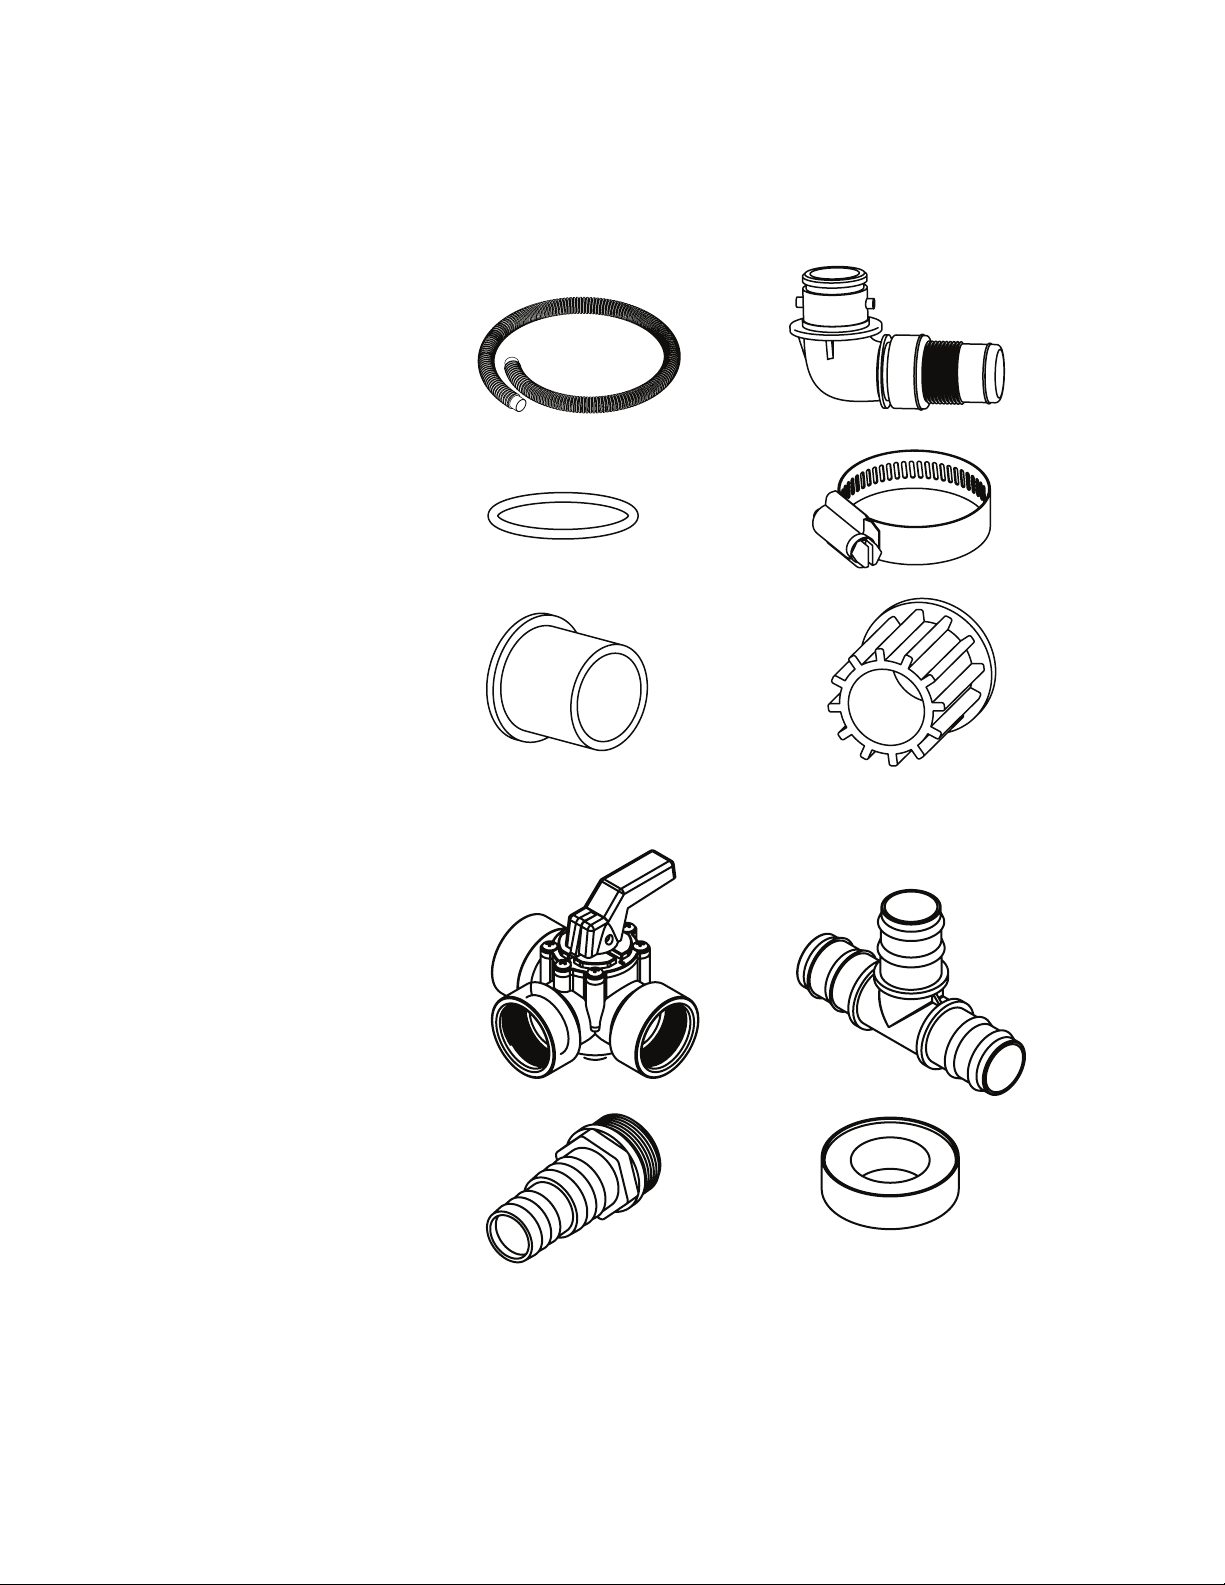
PARTS LIST - Please check to make sure you have all these parts BEFORE you begin
Your Solar Heater comes with everything you need to assemble ONE Solar Heater unit PLUS an
additional Bypass Kit of parts that allows you to regulate your water temperature based on your pump’s
horsepower. The Bypass Kit also allows the ability to backwash your filter and vacuum your pool by
simply switching valve positions.
1 Solar Heater
A: 2 Hoses (1 1/2” x 6’5” )
B: 2 Side Hose Connectors
C: 2 O-Rings
D: 8 Hose Clamps
E: 2 1 1/4” – 1 1/2” Hose Reducers
F: 1 Water Controller
A
C
E
B
D
F
1 BONUS Bypass Kit
(for use in regulating water
temperature / direction)
G: 1 3-Way Bypass Valve
H: 1 T-Shape Hose Connector
J: 3 Adaptors
K: Roll of Teflon Tape
G
J
H
K
3
Page 5
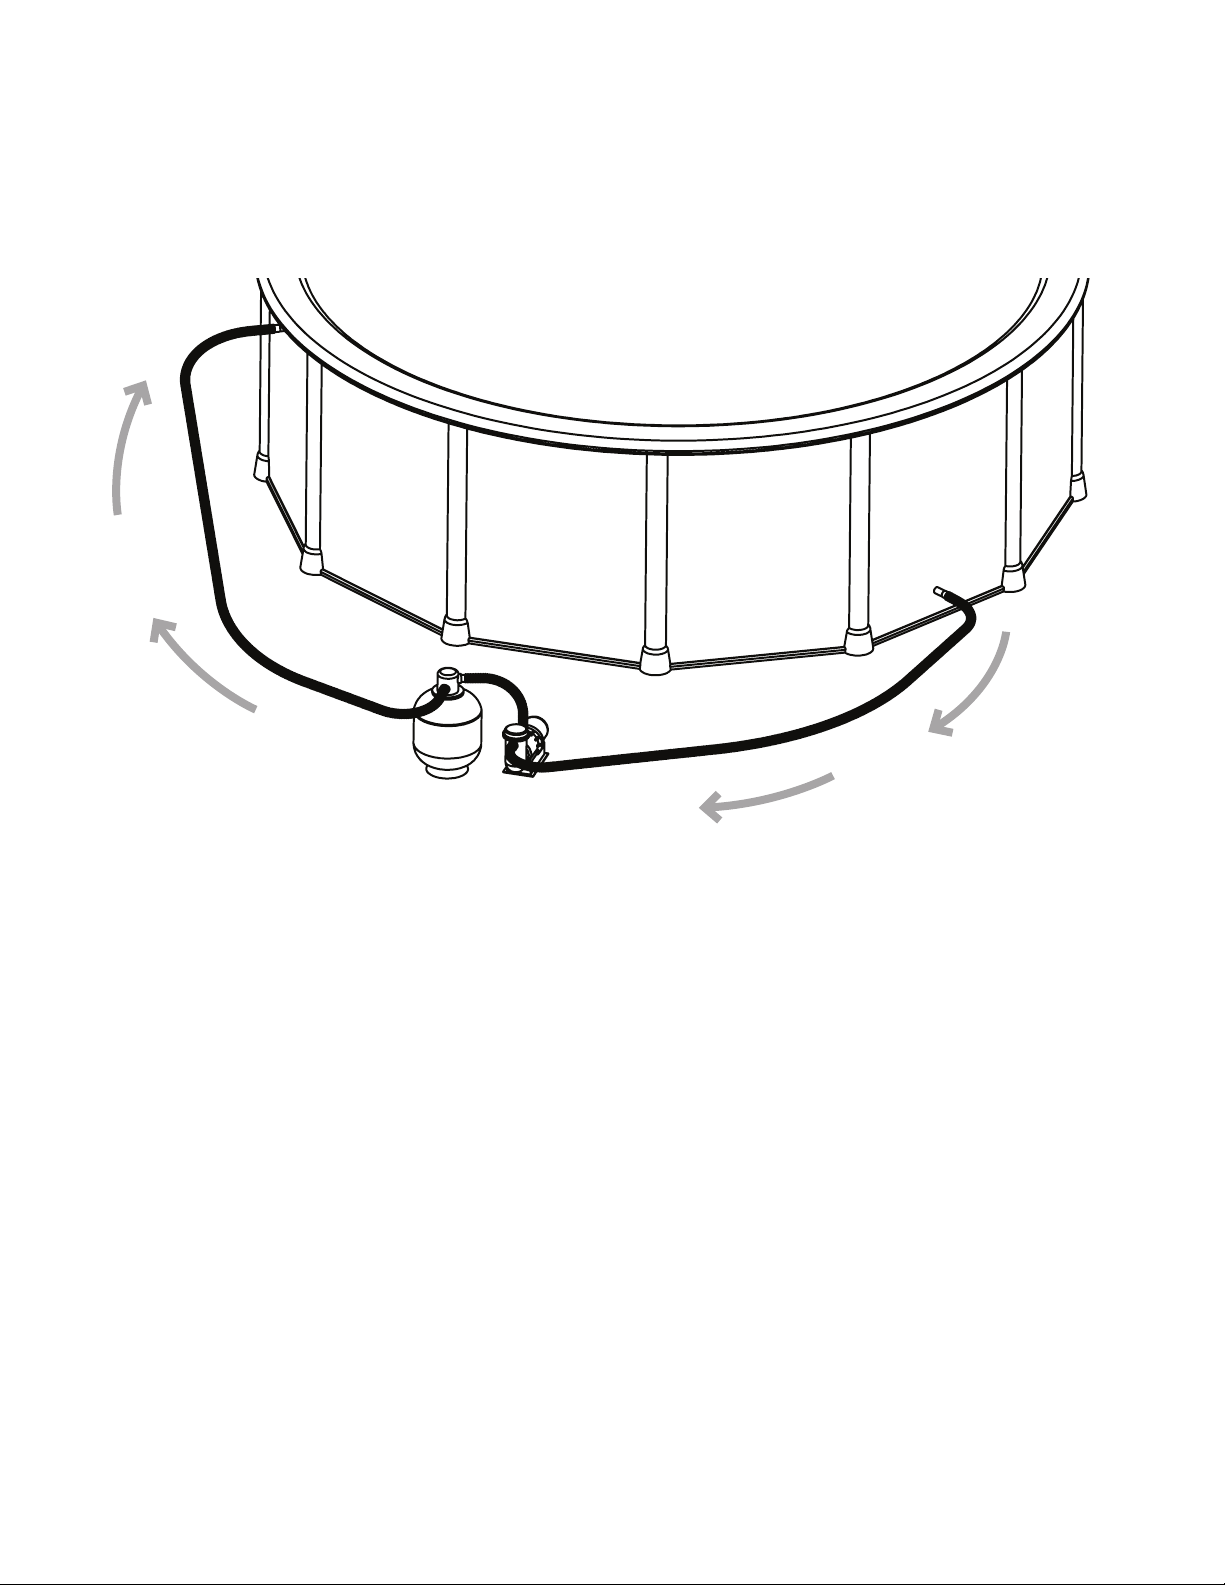
SET-UP OPTIONS
DIAGRAM 1 - Pool & Basic Filter System
Your pool should have this basic setup:
FILTERED
WATER
IN
POOL
WATER
OUT
FILTER PUMP SYSTEM
BEFORE YOU BEGIN
• Turn off your filter pump before you begin your installation process.
• Be prepared to block the water from coming out of your pool and filter when you disconnect
the filter pump hose in the next step.
4
Page 6
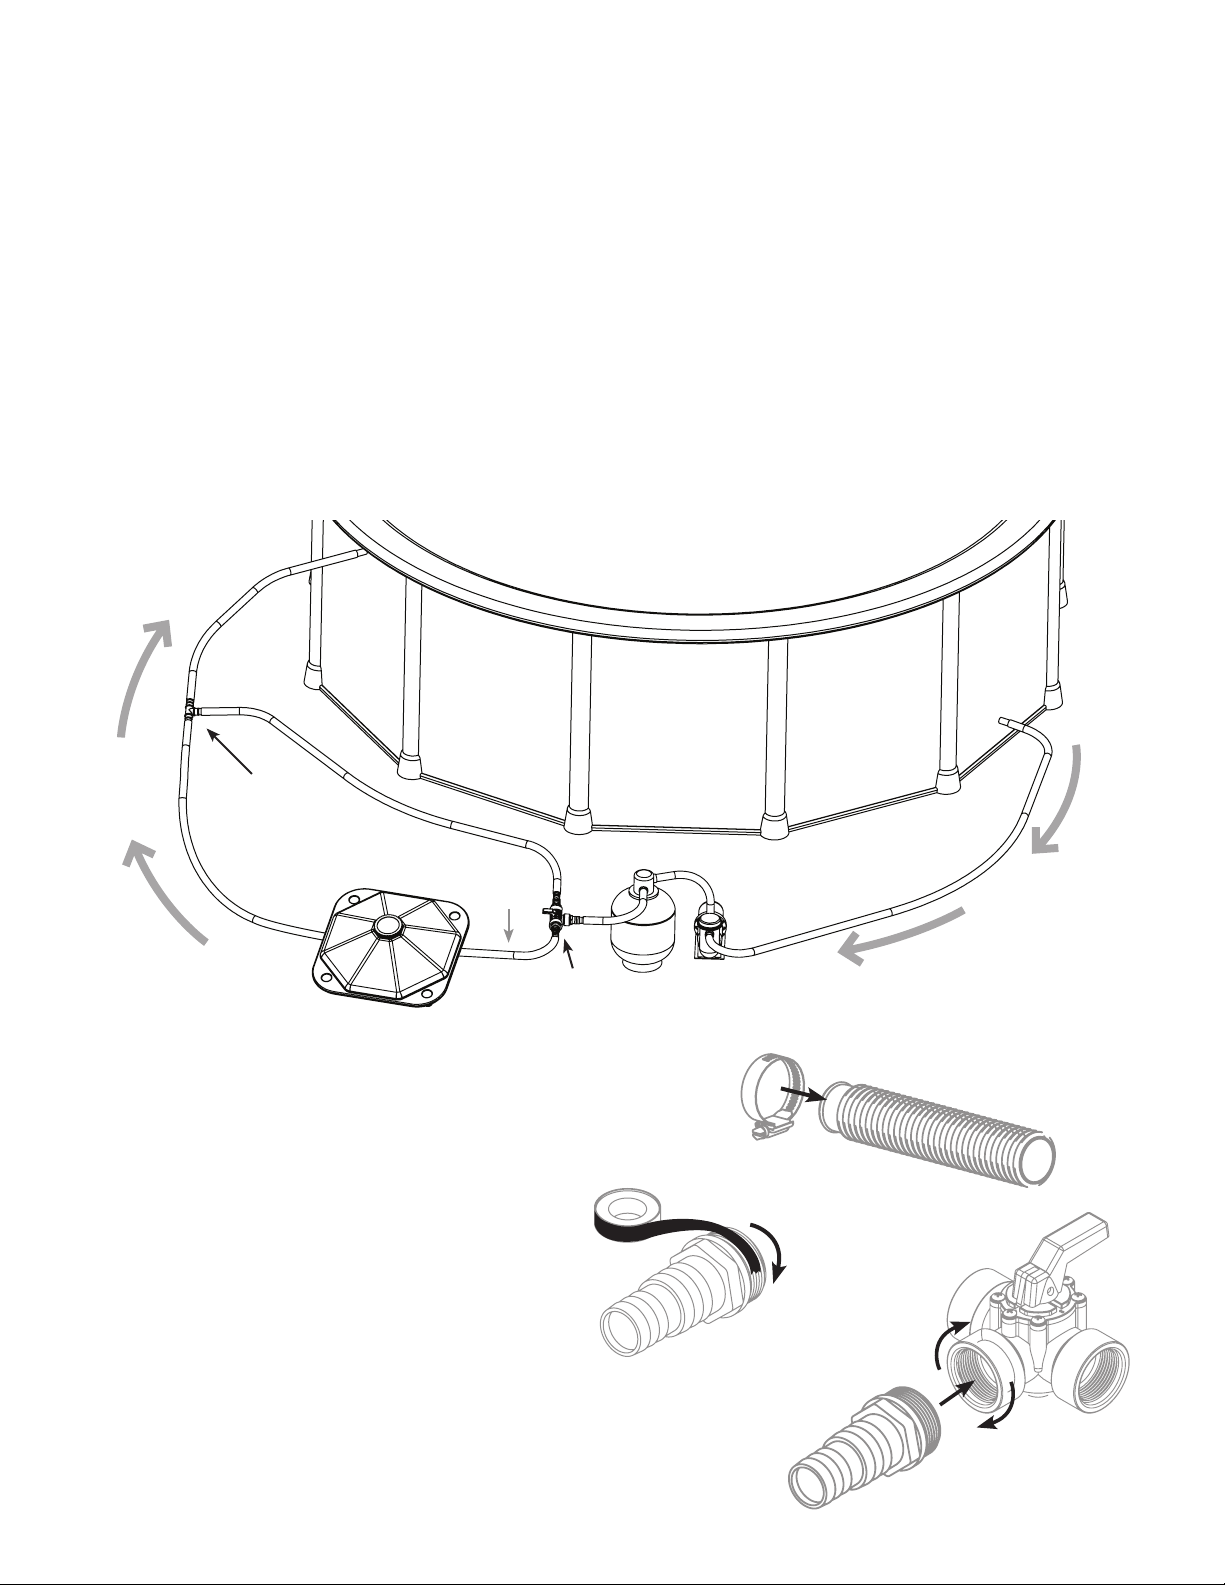
DIAGRAM 2 - Using One Solar Heater WITH 3-Way Bypass Kit
To best regulate your water temperature, we recommend the following set-up.
• This set up allows you to regulate the temperature using a 3-Way Bypass Valve which controls the
amount of warmed water that flows back into the pool.
• The 3-Way Bypass Valve allows the water to do the following:
1. Stop the flow of water through the solar heater to allow you to backwash your filter or vacuum your
pool.
2. Maintain the water flow at all times through the solar heater.
3. Maintain a flow rate of 50% through the solar heater which best maintains the desired temperature
(by regulating a slower water flow through the heater, the water will have more time to warm in the
unit before flowing back into the pool).
NOTE: Your pump’s horsepower will be a factor in determining the proper setting of the 3-Way
Bypass Valve.
WARMED
WATER
T-CONNECTOR
IN
OUTGOING
HOSE
SOLAR HEATER
• Place hose clamps over all hose ends.
• Prepare all three adaptors (J) by wrapping
the threaded ends with teflon tape (L).
INCOMING
HOSE
FILTER PUMP SYSTEM
POOL
WATER
OUT
3-WAY
BYPASS
VALVE
X3
X3
• Screw the prepared ends of the adaptors
into the three openings of the 3-Way Bypass Valve.
5
Page 7
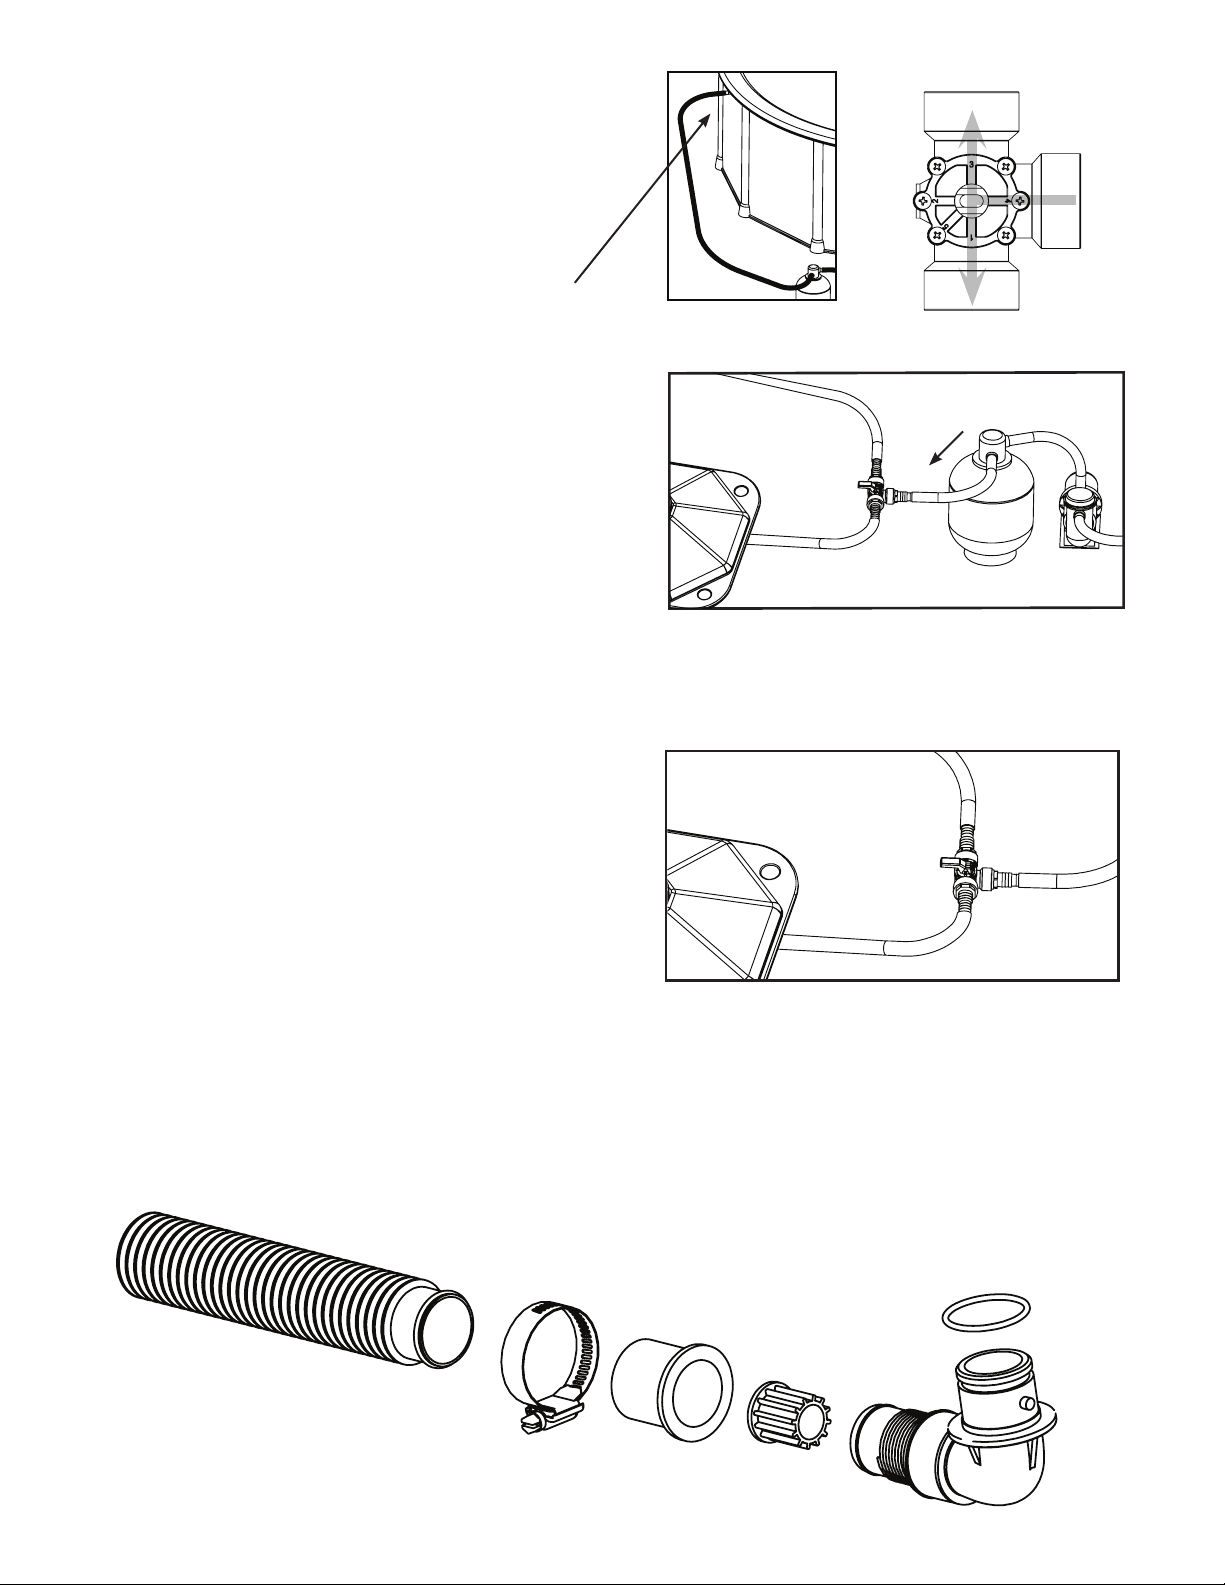
WARNING NOTE: Before attaching the 3-Way
Bypass Valve, make sure you note the RIGHT
FROM FILTER marking on the valve. (See photo
on far right.) FAILURE TO CONNECT THE 3-WAY
BYPASS VALVE IN THE RIGHT WAY WILL RESULT
IN IMPROPER WATER FLOW AND POTENTIAL
DAMAGE TO YOUR ENTIRE SYSTEM.
• Detach the end of the hose that connects to
your pool where the water is returned.
• With this unattached end, loosen and place a
hose clamp over the end of the hose & insert
over the adapter on the noted RIGHT FROM
FILTER side of the 3-Way Bypass Valve (1).
Make sure the hose is pushed all the way to the
end of the adaptor. Tighten the hose clamp.
WARNING NOTE: The 3-Way Bypass Valve must
be installed between the pump/filter and solar
heater otherwise DAMAGE TO THE SOLAR HEATER
WILL OCCUR.
Bypass to Pool
From
Filter
RIGHT
To Solar Heater
(1)
• With a new hose, place a hose clamp over the end
of hose and insert over the adapter on the noted
“TO SOLAR HEATER” side (bottom opening) of the
3-Way Bypass Valve (2).
Make sure the hose is pushed all the way to the
end of the adaptor. Tighten the hose clamp.
• Prepare the unattached hose end coming from
the noted bottom opening TO SOLAR HEATER
side of the 3-Way Bypass Valve & follow Diagram 3
for order of parts and connection to each other.
DIAGRAM 3
INCOMING HOSE CONNECTION COMPONENTS
Hose end (A) + clamp (D) + hose reducer (E) + water controller (F) + side hose connector (B) + O-ring (C)
(2)
(1)
A
D
E
C
(Use your flat head screwdriver to loosen and tighten the hose clamps)
6
F
B
Page 8
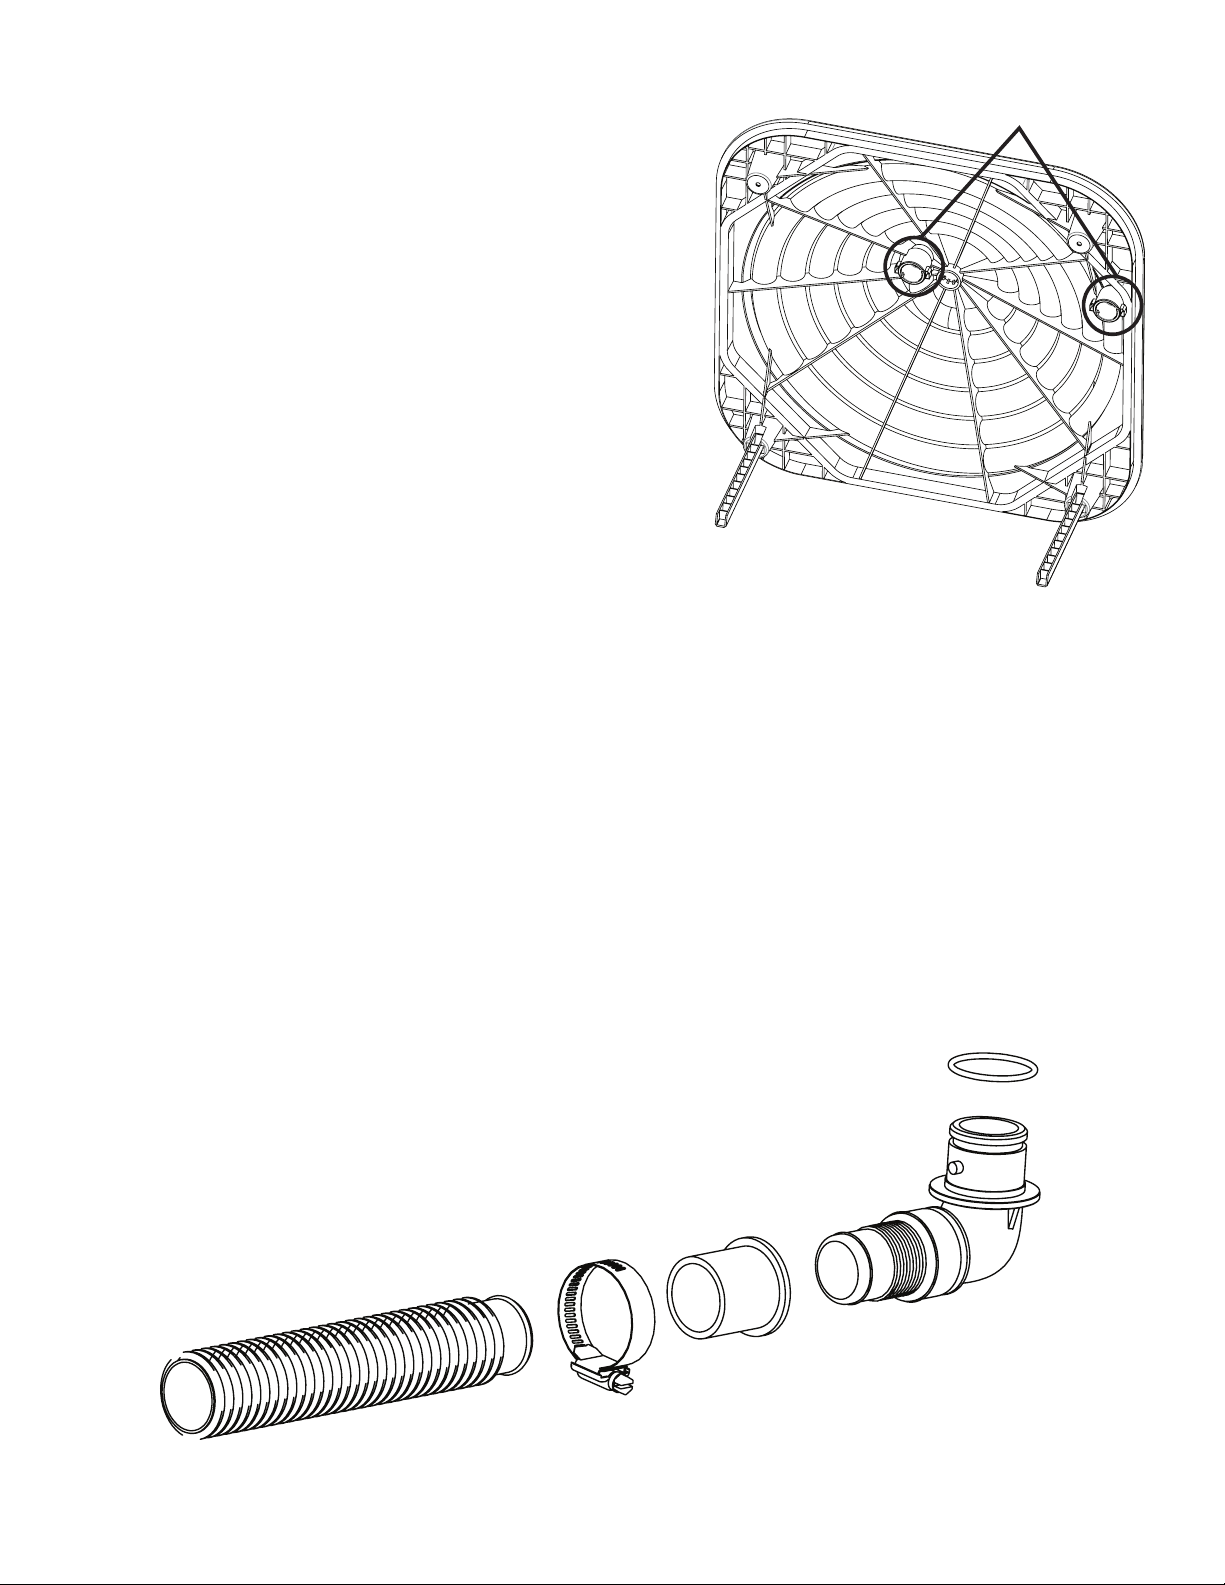
• Turn the Solar Heater unit over and locate the
two openings – one will be used for an INCOMING
hose from the filter and the other for an OUTGOING
hose back into the pool. It does not matter which
opening you use for which purpose, but note that
whichever opening you use for the hose coming
INTO the Solar Heater, you MUST USE THE
WATER CONTROLLER COMPONENT (F)
noted in Diagram 3.
Make sure you know which opening is INCOMING
and which is OUTGOING.
• Once you’ve assembled the Diagram 3 components onto the end of the hose, insert the
prepared end into the opening on the underside of the Solar Heater that you designated as the
INCOMING opening.
Incoming & Outgoing
Openings
NOTE: There are notches on the side hose connectors that need to match to the notch holes on the
Solar Heater openings. Once they are matched up, MAKE SURE YOU TURN TO LOCK IN PLACE.
• With a new hose, prepare one end as your OUTGOING hose connection by following Diagram 4
for order of parts and connection to each other. This connection will direct the warmed water out
of your Solar Heater and into your pool.
DIAGRAM 4
OUTGOING HOSE CONNECTION COMPONENTS
Hose end (A) + clamp (D) + hose reducer (E) + side hose connector (B) + O-ring (C)
C
B
E
D
A
(Use your flat head screwdriver to loosen and tighten the hose clamps)
7
Page 9
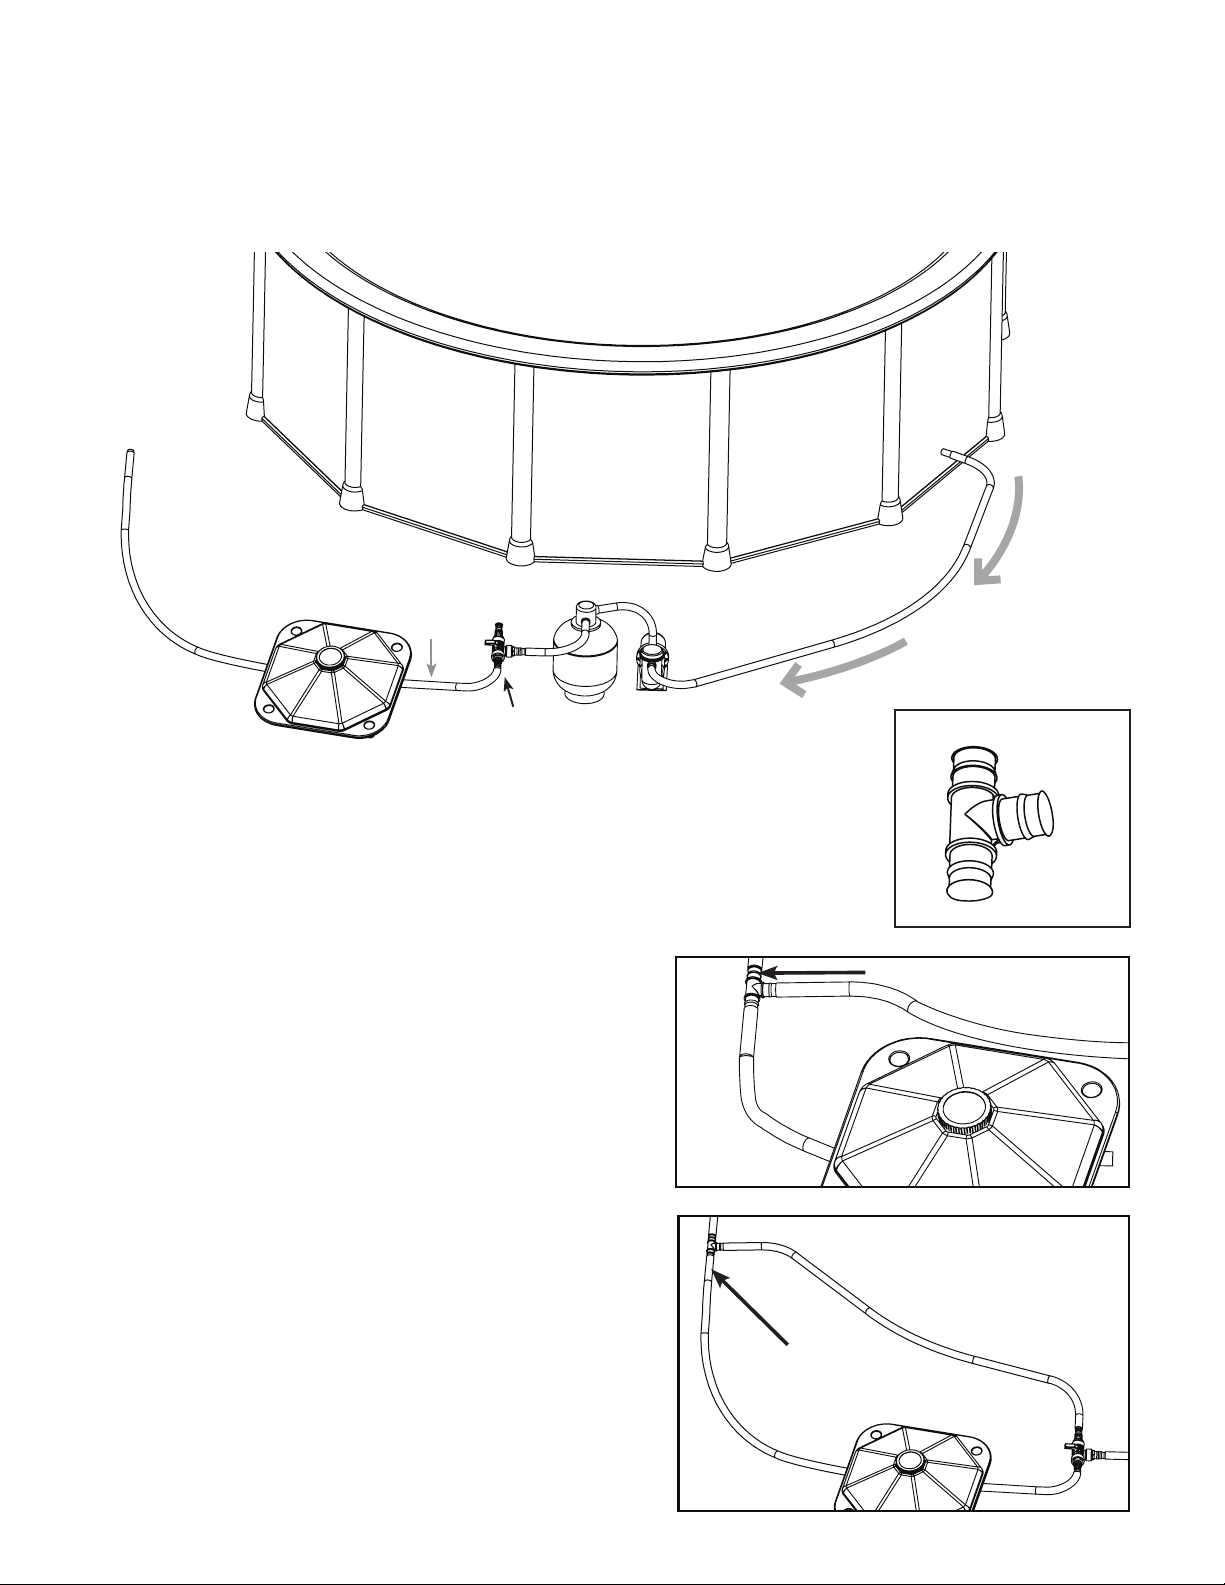
• Once you’ve assembled the Diagram 4 components, insert the prepared end with side hose connector
into the other opening on the underside of the Solar Heater that you designated as the OUTGOING
opening. NOTE: ONCE YOUR SIDE HOSE CONNECTOR IS IN PLACE, MAKE SURE YOU TURN TO LOCK.
• Turn your Solar Heater over. You should now have your Solar Heater connected to an INCOMING hose
and OUTGOING hose.
INCOMING
HOSE
SOLAR HEATER
FILTER PUMP SYSTEM
3-WAY
BYPASS
VALVE
• Connect the loose end of the Solar Heater’s
OUTGOING hose (1) to the left end of the last
component, (H) the T-connector.
Make sure the hose is pushed all the way to the
end of the adaptor. Tighten the hose clamp.
(1)
POOL WATER
OUT
T-CONNECTOR
R
L
T-CONNECTOR
(H)
• With a new hose, attach one end to the adapter
on the top opening noted BYPASS TO POOL of
the 3-Way Bypass Valve (1) and the other end into
the center of the T-connector.
Make sure the hose is pushed all the way to the
end of the adaptor. Tighten the hose clamp.
8
T-CONNECTOR
(1)
Page 10
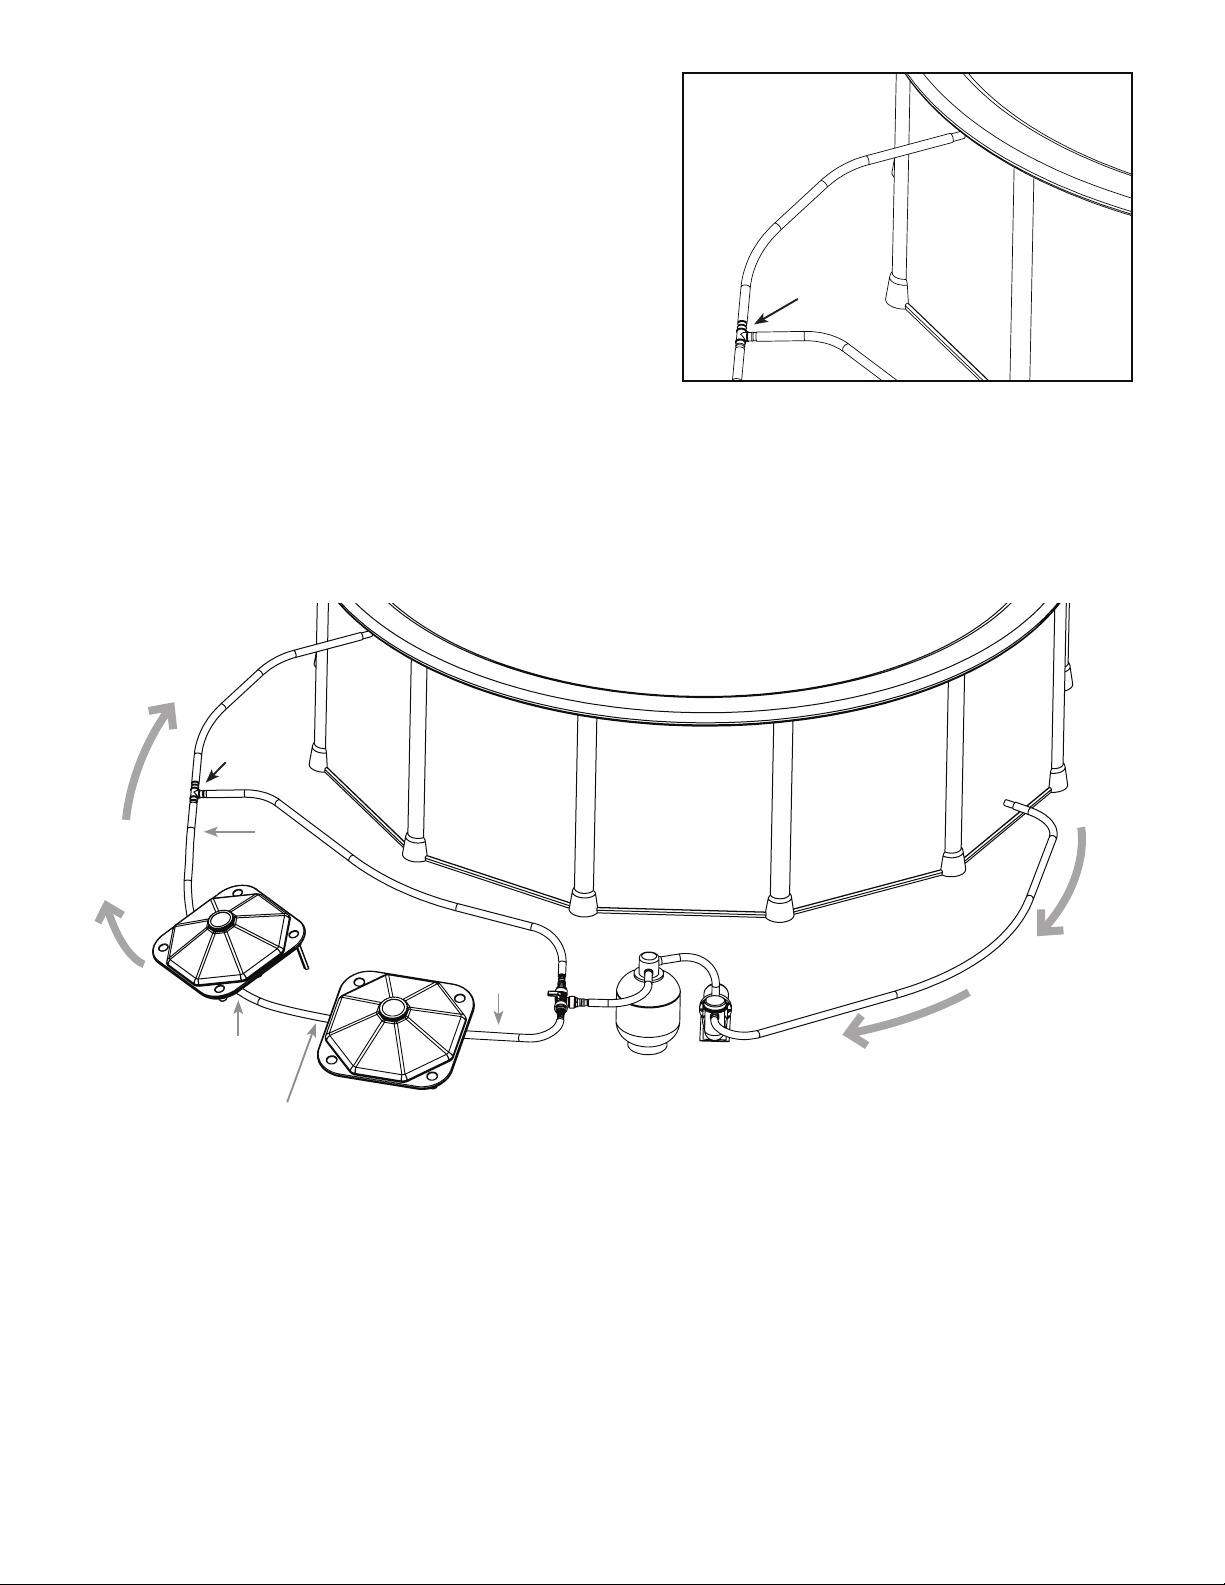
• With the last hose, connect one end to the last
T-connector opening (1) and the
(2)
other end into your pool (2).
Make sure the hose is pushed all the way to the
end of the adaptor. Tighten the hose clamp.
T-CONNECTOR
(1)
• Congratulations! You’re finished with your assembly.
Now, let’s learn how to use your 3-Way Bypass Valve.
DIAGRAM 5 - Using Multiple Solar Heater WITH 3-Way Bypass Kit
To best regulate your water temperature for a larger pool size, we recommend this setup.
T-CONNECTOR
WARMED
WATER
IN
OUTGOING
HOSE
SOLAR
HEATER
INCOMING
HOSE END
OUTGOING HOSE END
SOLAR
HEATER
INCOMING
HOSE
FILTER PUMP SYSTEM
POOL
WATER
OUT
3-WAY
BYPASS
VALVE
1. Purchase an additional Poolmaster Solar Heater
2. Follow the set-up instructions in Diagram 2 - Using One Solar Heater WITH 3-Way Bypass Kit
bridging the two units together using the incoming and outgoing hose connection method
shown in diagrams 3 & 4.
9
Page 11
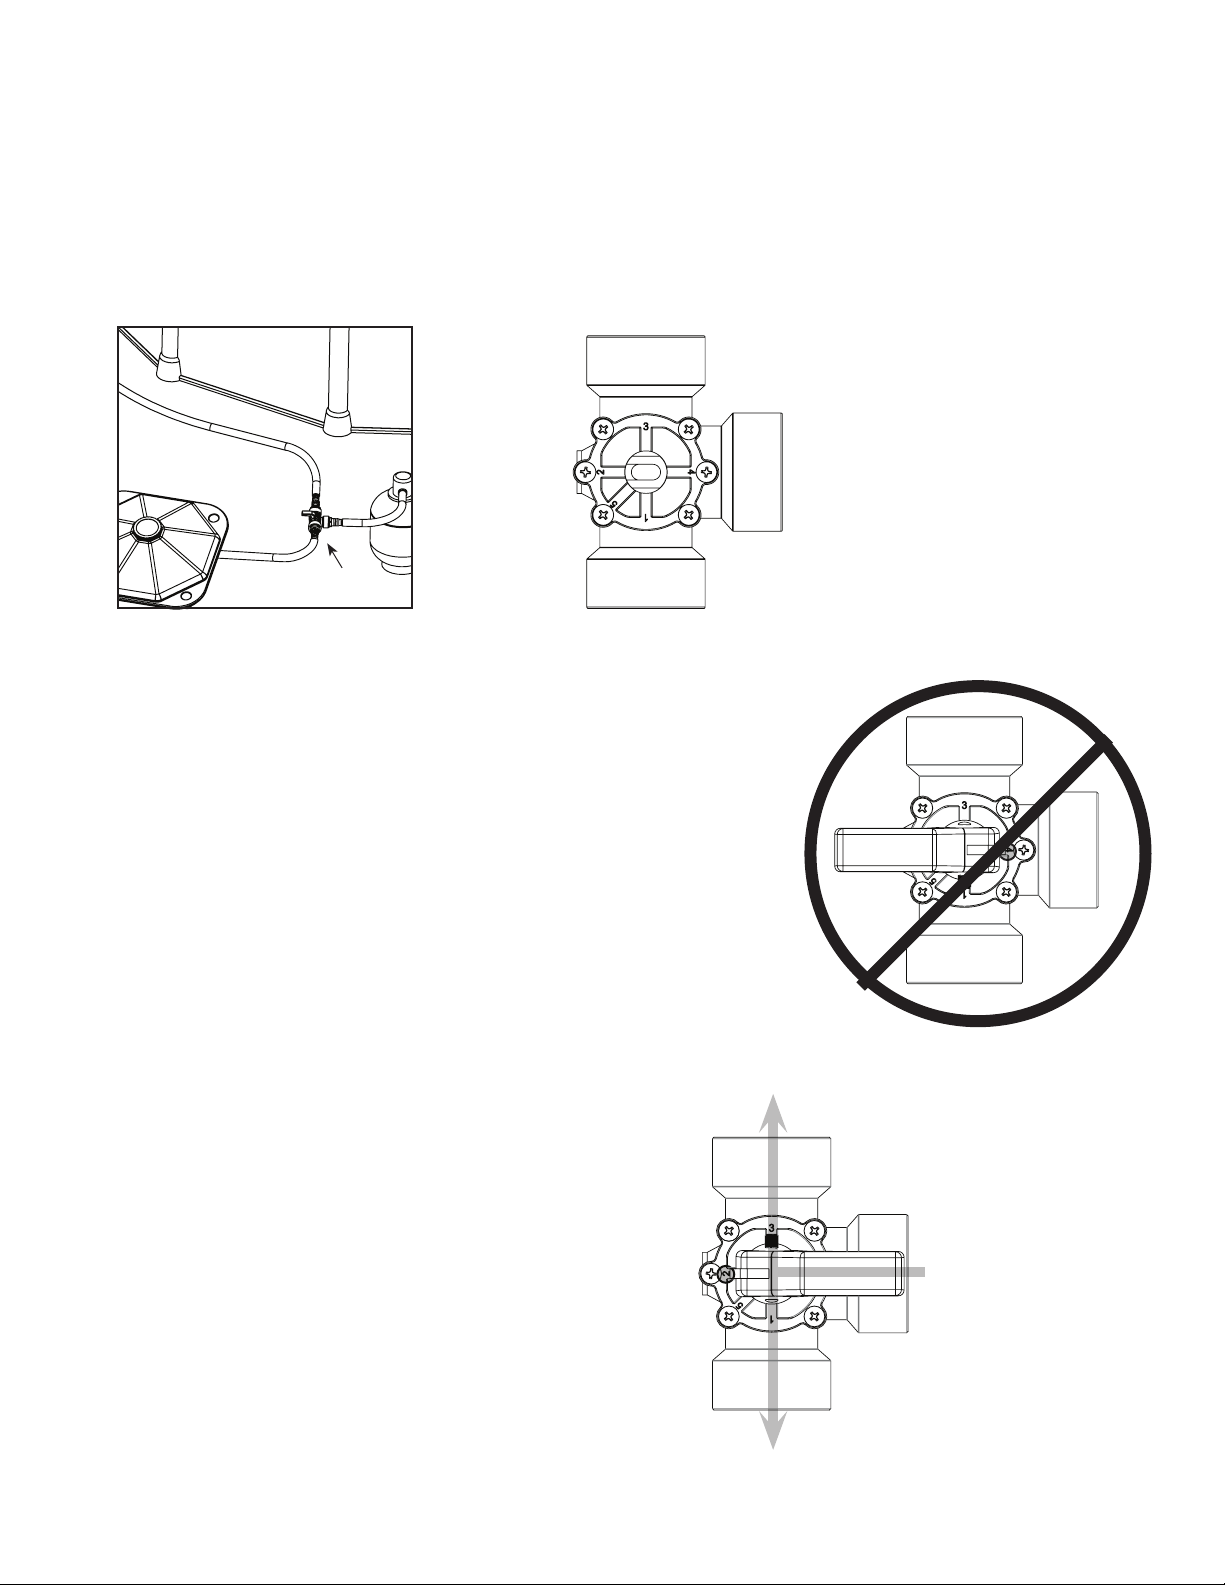
OPERATING YOUR 3-WAY BYPASS VALVE
WARNING NOTE: If you run your pump at night, turn your 3-Way Bypass Valve to position 1.
• Your 3-Way Bypass Valve is to help you regulate your warm water flow and takes into account the horse
power of your filter pump. The top of the 3-Way Bypass Valve has numbers to denote positions (1, 2, 3,
4, 5) to turn the valve. To turn your 3-Way Bypass Valve, you must PRESS DOWN TO TURN, as noted on
the handle itself.
• The orientation of your 3-Way Bypass Valve is very important. Please make sure that you have
assembled the 3-Way Bypass Valve in the position / direction shown.
Bypass to Pool
From
Filter
RIGHT
RIGHT
To Solar
Heater
• Make sure that your filter pump system is turned off BEFORE
you adjust any setting on your 3-Way Bypass Valve.
ADJUST THE VALVE POSITION TO YOUR DESIRED SETTING
• Position 4 =
WARNING: Maintenance mode only.
Never use this position unless your pump is off.
This position blocks ALL water flow from your
filter pump into your pool.
Position 4: Blocks water
from heater & pool
Bypass to
Pool
Bypass to
Pool
From
Filter
RIGHT
To Solar
Heater
• Position 2 = Allows full flow rate of water through the
heater and through the 3-Way Bypass Valve into the
pool. This setting will not give you optimal heated
water temperature.
10
From
Filter
RIGHT
To Solar
Heater
Position 2: 100% flow through
solar heater & to pool
Page 12
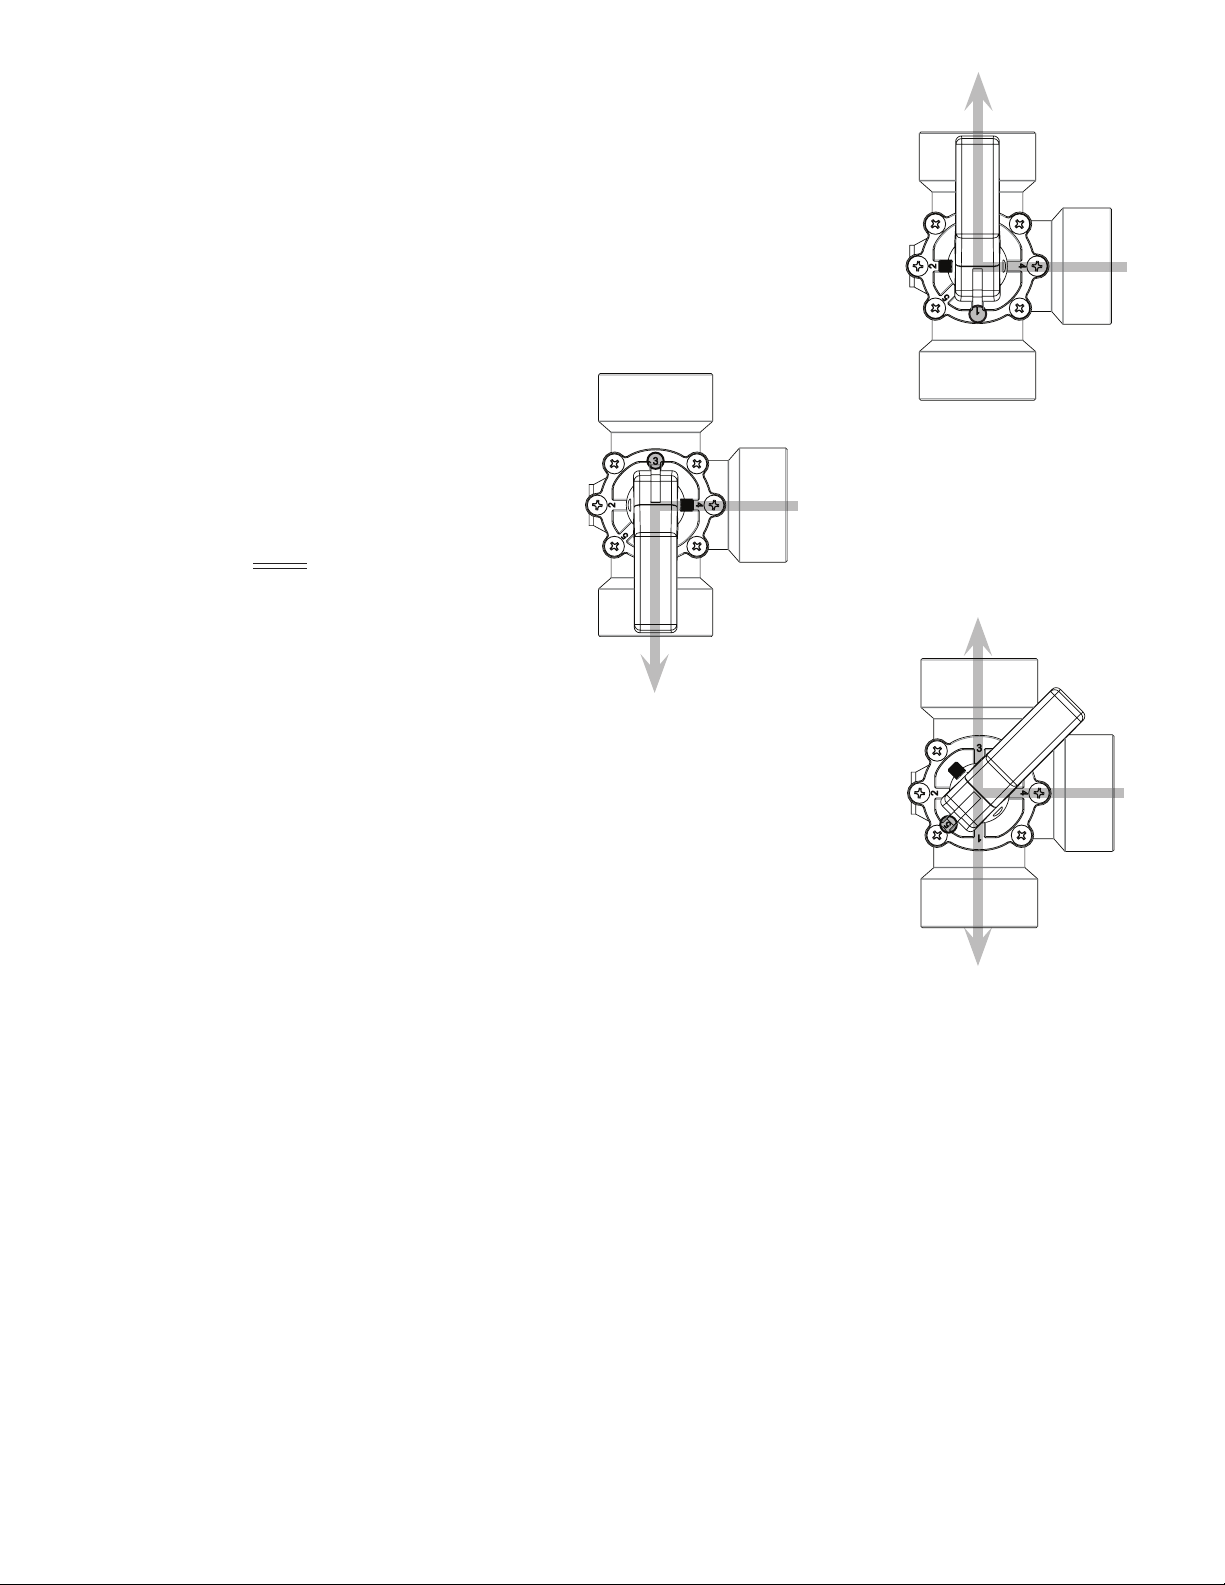
• Position 1 = Directs 100% of the water flow through the 3-Way Bypass Valve
and directly to your pool. The water from your filter pump will NOT go
through the solar heater.
THIS POSITION IS RECOMMENDED AT NIGHT TO BEST MAINTAIN
THE WARMED WATER TEMPERATURE IN YOUR POOL.
Bypass to
Pool
• Position 3 = Directs 100% of the water
flow through your solar heater and is
From
Filter
to be used with low horsepower filter
pumps
water flow directly to the solar heater
1
⁄3 HP or lower. Too much
RIGHT
will damage it.
To Solar Heater
Position 3: 100% water
through solar heater
Bypass to Pool
From
Filter
RIGHT
To Solar
Heater
Position 1: 100% water
to pool only
Bypass to
Pool
From
Filter
1
• Position 5 = Allows a (
the bypass into the pool. This position is to be used with a pump greater than
1
⁄2 hp if solar heater is on the same level as pump.
⁄2) flow of water through the heater and 100% through
RIGHT
To Solar
Heater
Position 5: ½ flow solar
heater and 100% to pool
FAQ’s (Frequently Asked Questions)
Q. My pool water doesn’t seem to be getting any warmer. What should I do?
A. First check to make sure that water is flowing through the tubes. You can simply lift these up and feel the water
within them. Next, check the flow strength at the Pool’s return inlet. Can you feel water flowing into the pool?
Has your Solar Heater been exposed to the sun light for long periods of time? Remember, one Solar Heater
for a 15 – 18 ft pool is recommended. Is your pool larger than this? If you’ve checked all this, you may have
a clog in your tubing. Try to isolate which tube and purge out the clog.
Q. There is a leak at the connection site. What should I do?
A. Hose clamps have been provided to use for all connection sites. Make sure these are on properly and tightened.
Q. What position should the 3-Way Bypass Valve be in when I need to backwash my filter or vacuum my pool?
A. Turn your 3-Way Bypass Valve to position 1.
NOTE: It is recommended to use a pool cover when pool is not in use to aid in maintaining your warmed water.
11
Page 13

770 Del Paso Road I Sacramento, CA 95834-117
Tel: (916) 567-9800 I Toll: (
Email: [email protected] I Website: www.poolmaster.com
800) 854-1492 I Fax: (916) 567-9880
Poolmaster Warranty 2013
Poolmaster products have a one year warranty against manufacturer’s defects.
Poolmaster may repair or replace the defective item or send replacement parts to resolve the problem.
Poolmaster reserves the right to request the return of faulty goods for our inspection.
 Loading...