

Page 1
MODEL GAPT
GATE ALARM
Installation Instructions
IMPORTANT
READ THOROUGHLY BEFORE USING ALARM
This product has been designed to aid in the detection of unwanted intrusions into unsupervised areas. POOLGUARD GAPT IS A SAFETY ALARM
SYSTEM AND NOT A LIFESAVING DEVICE. It should be used in conjunction with the safety equipment currently in use and should not affect existing
safety procedures.
Gate Alarm GOOD ART 6/19/03 11:45 AM Page 1
Page 2
1. INSTALLING GATE SENSOR
(Figure 1)
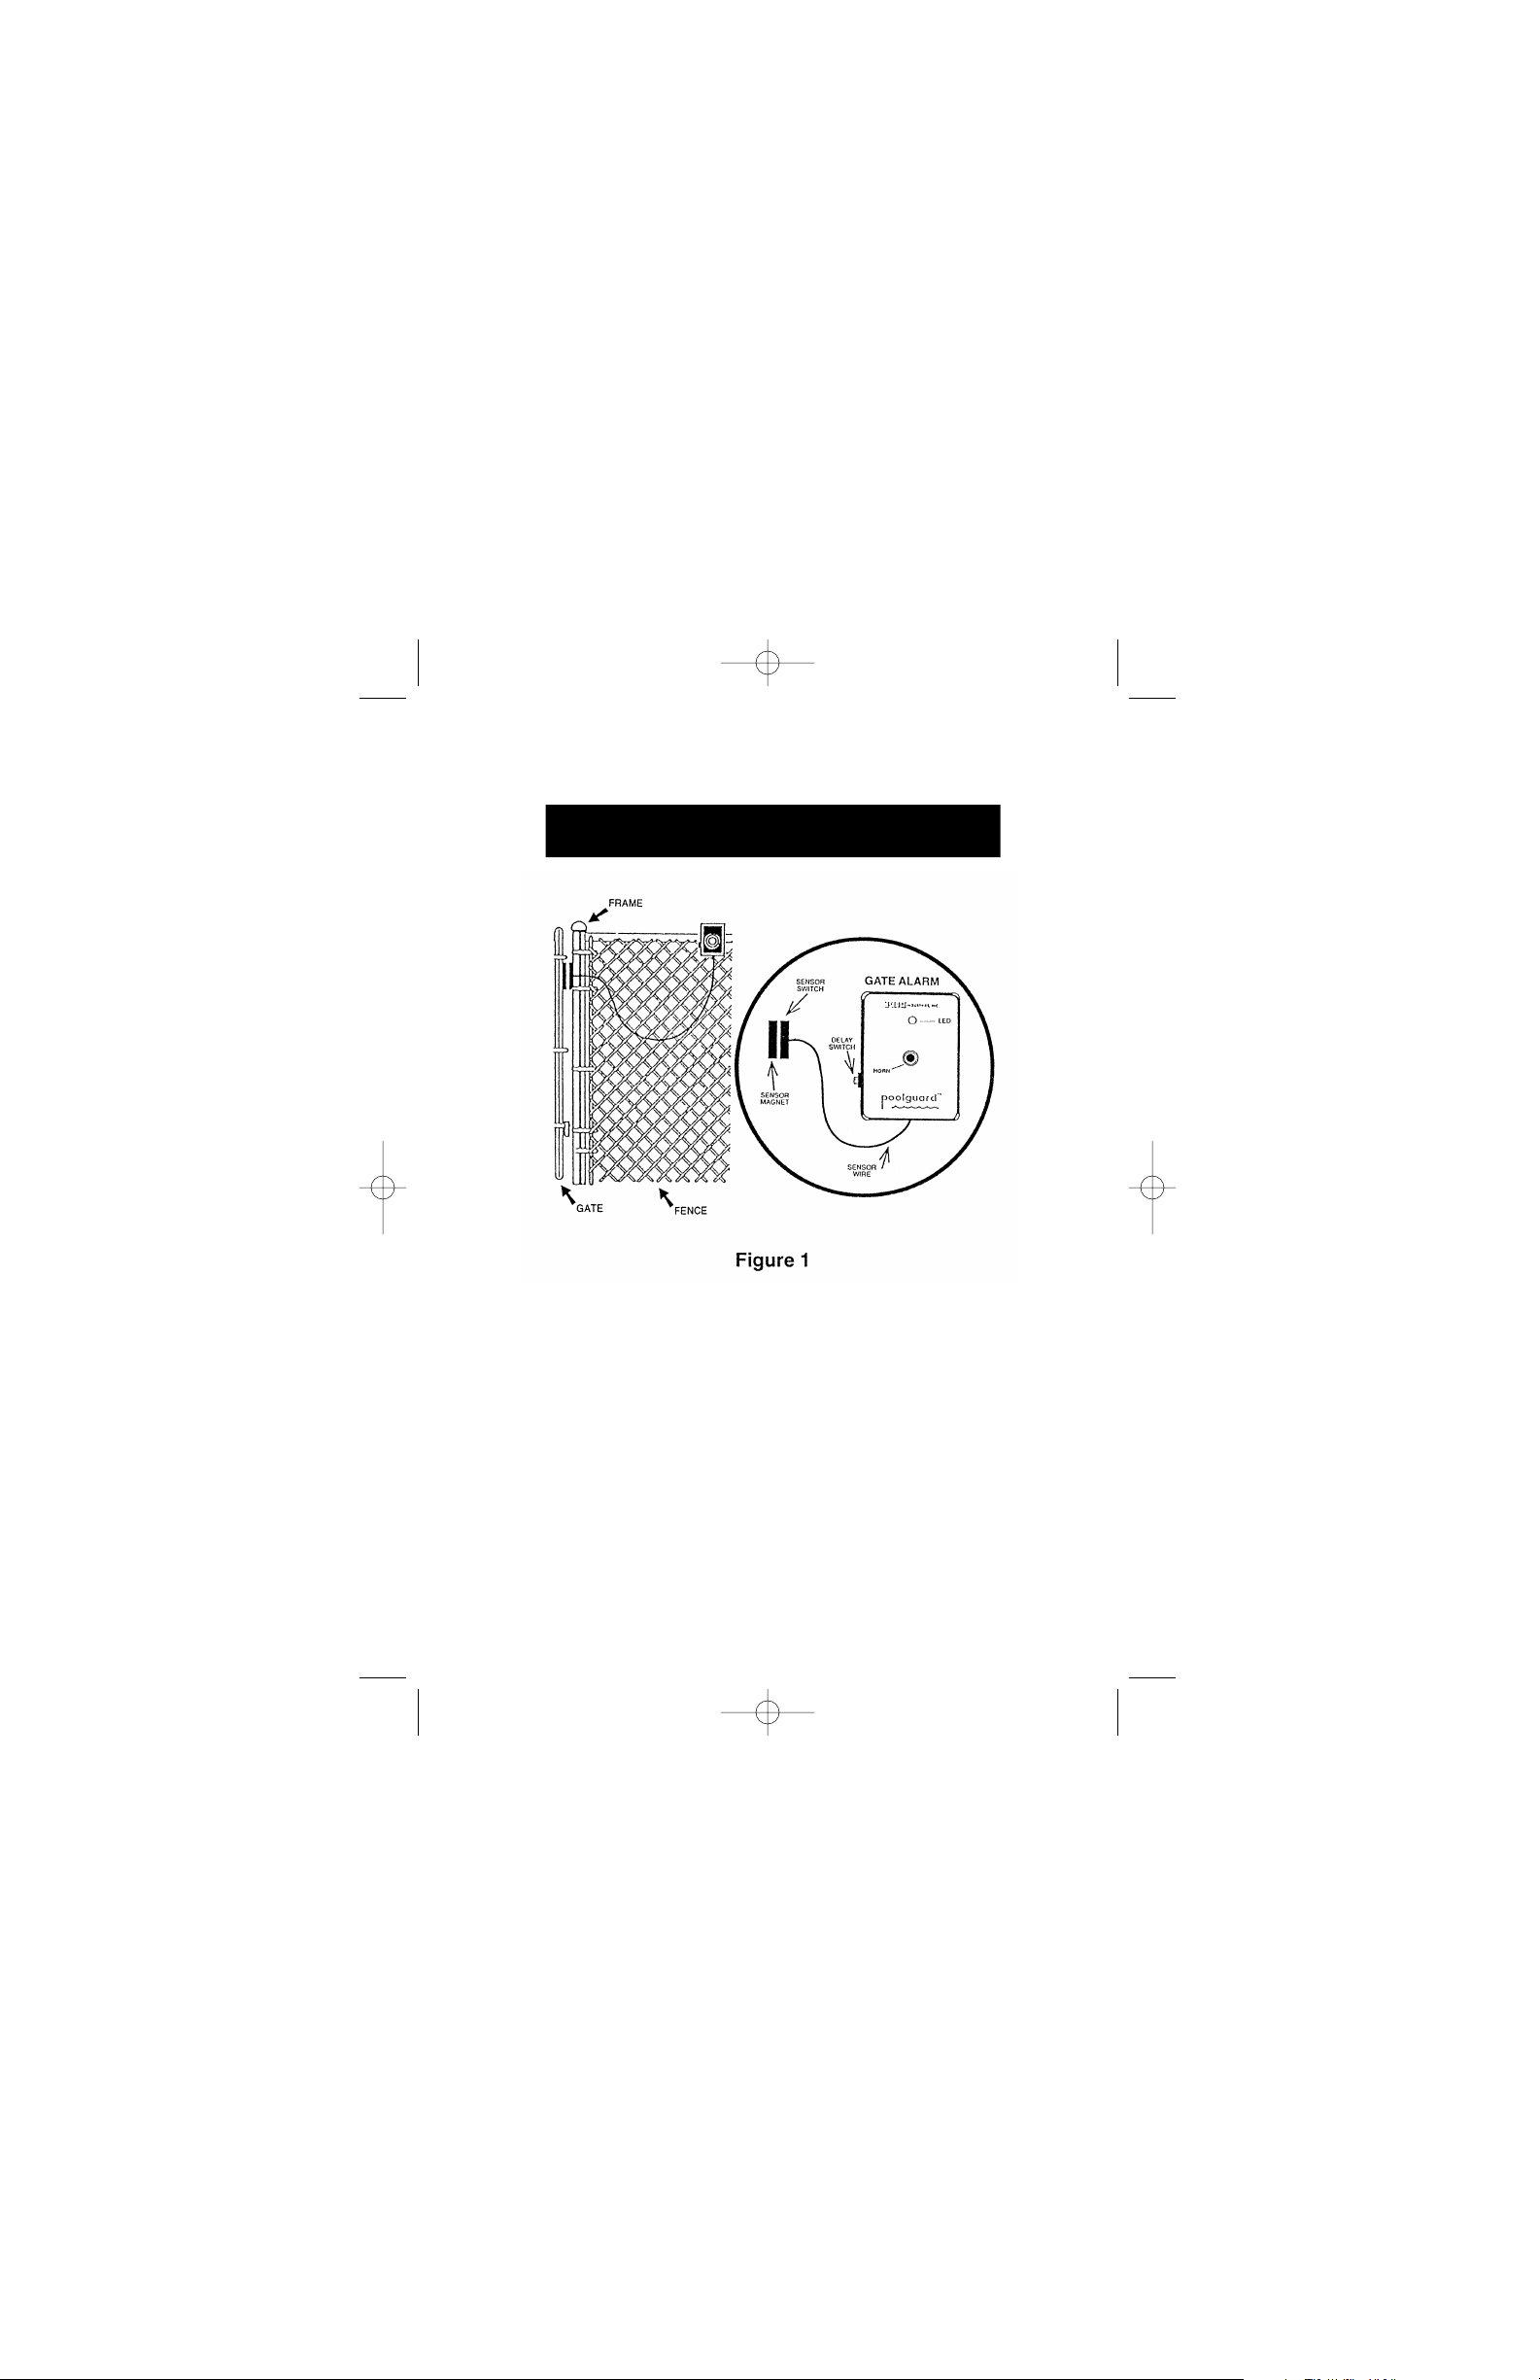
The Poolguard Gate Alarm is activated by a sensor which consists of two parts. One
part contains the sensor switch and the other contains the sensor magnet. The sensor
switch is permanently connected to the sensing wire that comes from the Poolguard
Gate Alarm. Using the screws supplied, the sensor switch is installed on the stationary
part (usually the frame) of the fence, and the sensor magnet on the gate itself.The sensor switch should be mounted on the side near the top of the fence post (Figure 1), but
not on the side which is hinged. To function properly the sensor switch and sensor mag-
net should line up with each other, and a spacing of 2 1/2” between the sensor switch
and the sensor magnet is acceptable. If either the gate or the fence post is made of
steel this may limit the spacing between the sensor switch and sensor magnet to 1 1/4”,
test your alarm. If a spacing of 2 1/2” is needed, use 1/4” thick wood or plastic shims
under the sensor switch and sensor magnet.
Gate Alarm GOOD ART 6/19/03 11:46 AM Page 2
Page 3
A.
B.
C.
D.
E.
F.
G.
Determine the best location, the gate alarm should be mounted at least 54”
high or out of easy reach of a child.
There are many ways of mounting your gate alarm, one of the simplest is
explained below.This way will work best for most fences. If you have a chain
link fence mounting to a post or piece of wood added to the fence works well.
Remove mounting plate from gate alarm by removing the four small screws.
Place mounting plate at the location which you have chosen to locate the
alarm. With a pencil mark the two spots where the large end of the keyholes
will be located when you hang the gate alarm. These two marks are where 2
of 6 supplied screws will be inserted to hang your alarm.
Insert the supplied screws, and leave about 3/16” (not including the head of
the screw) of the screws.
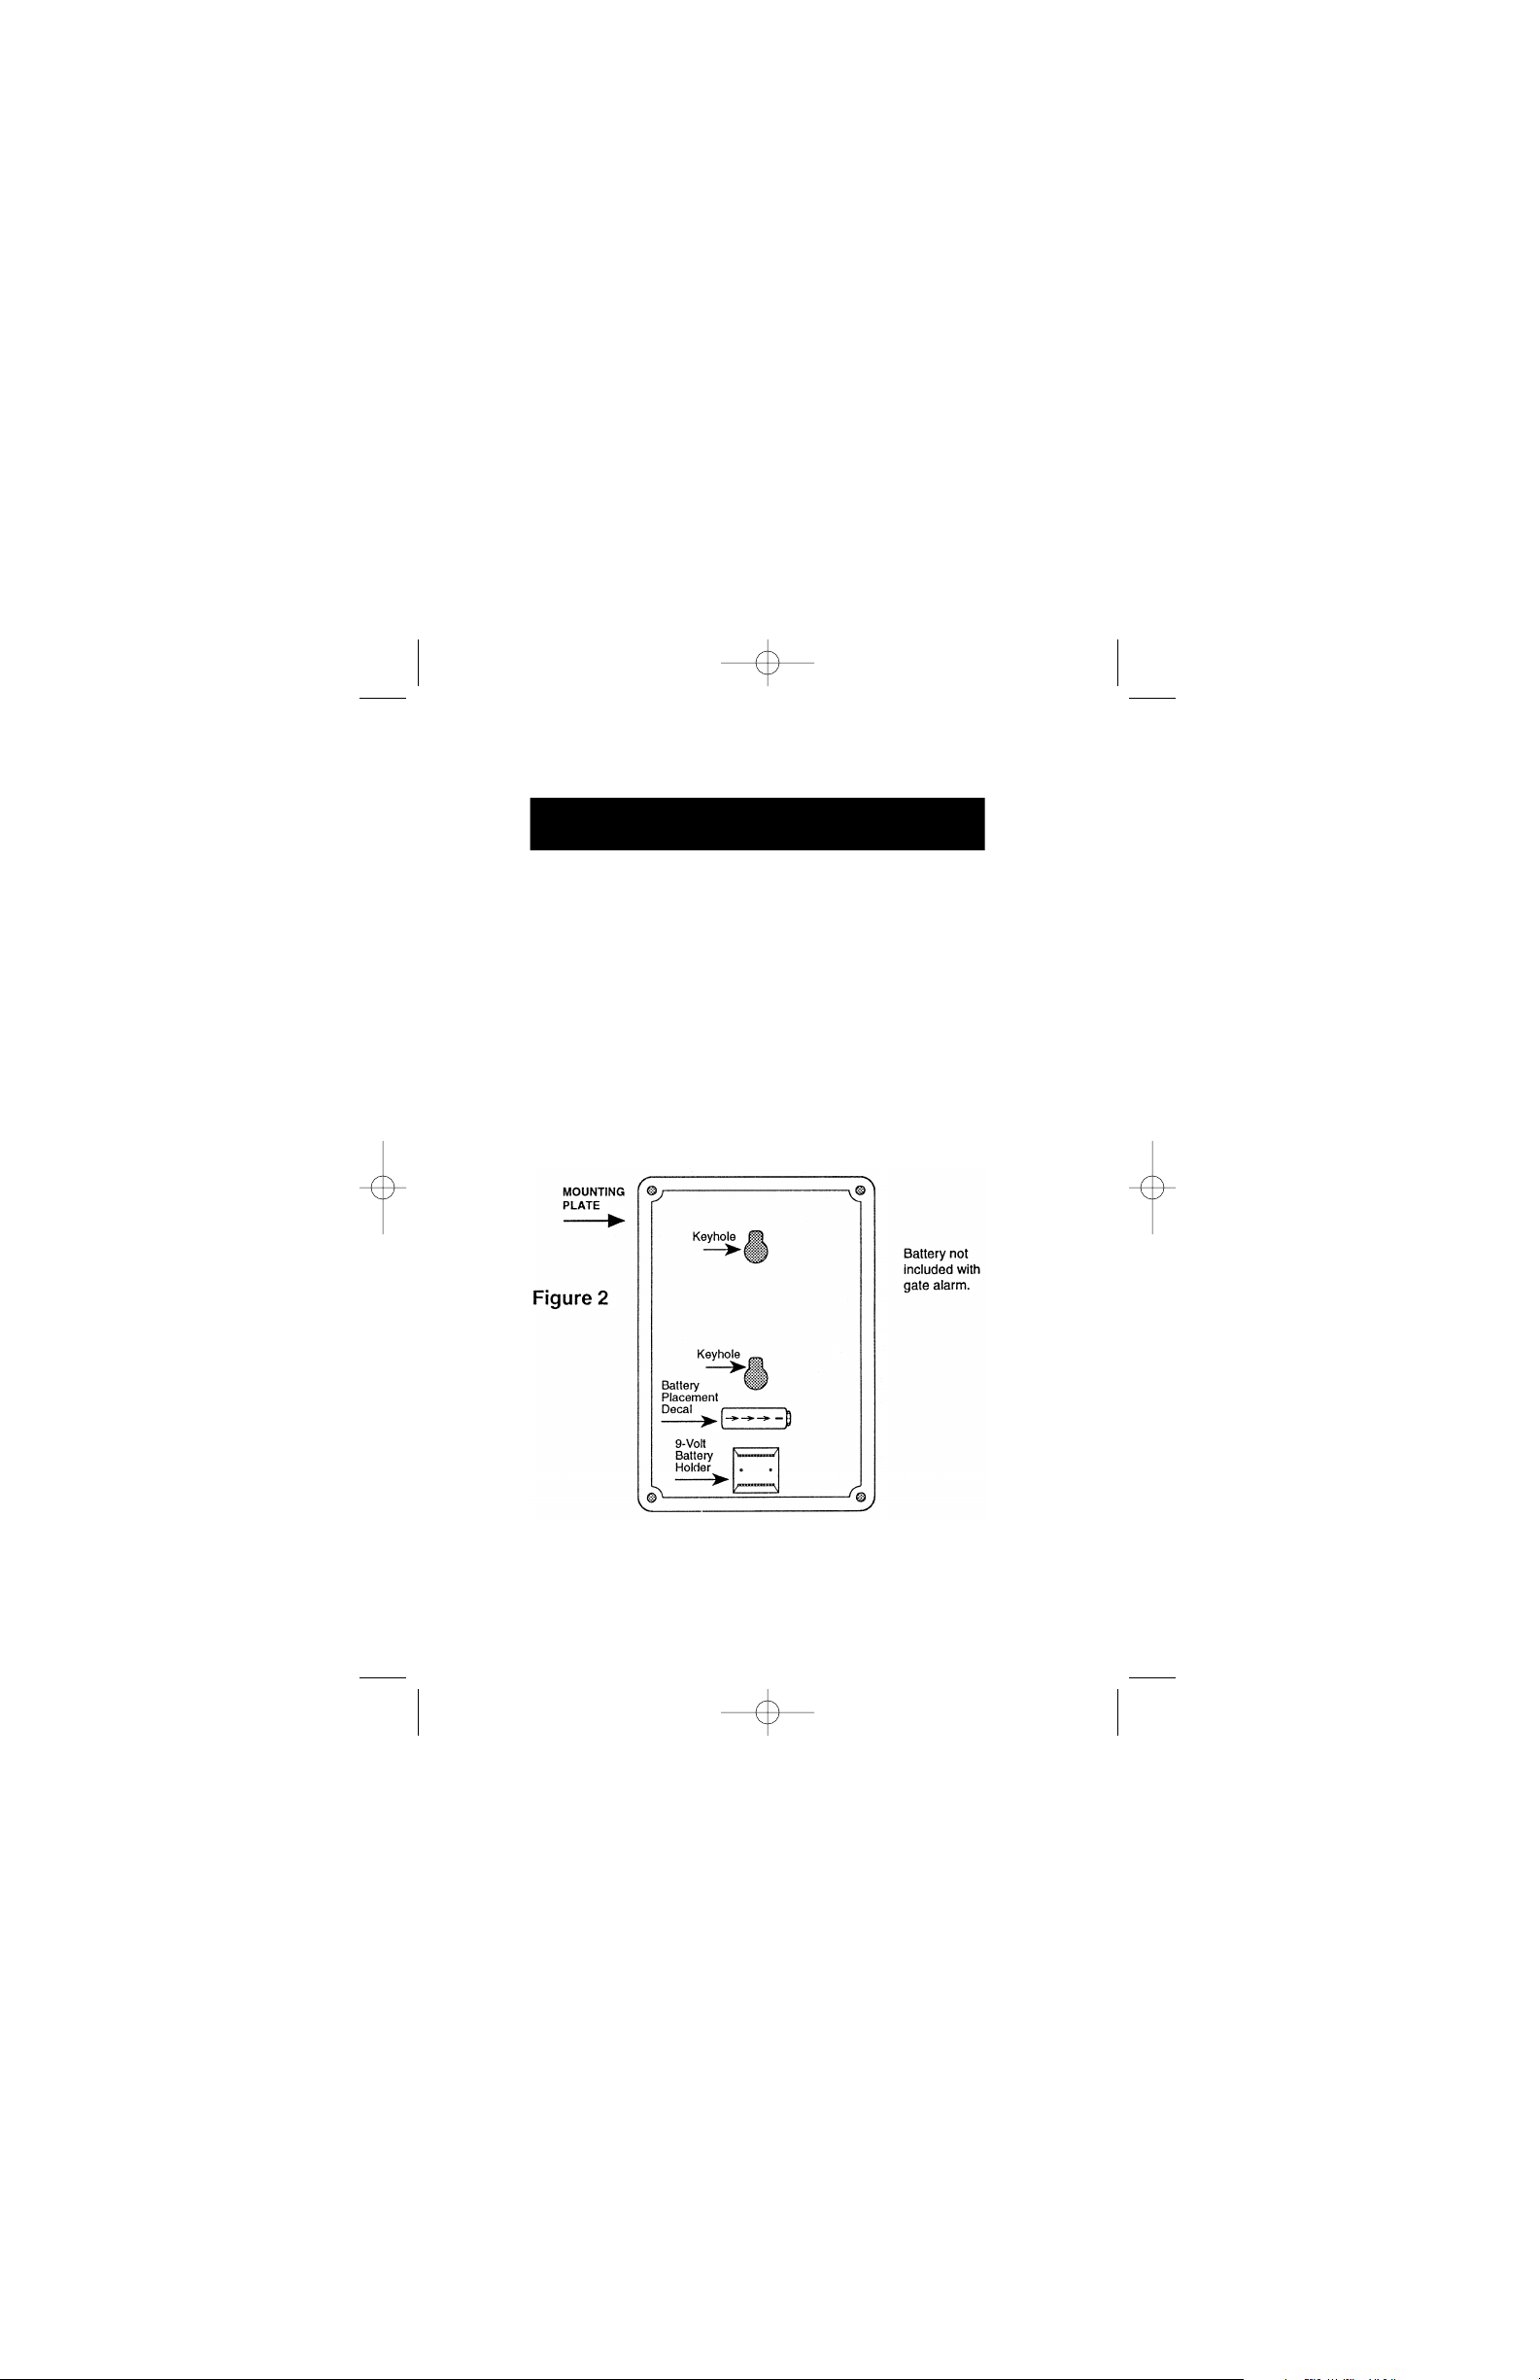
Connect a 9-volt battery to the battery snap and install the battery into the
gate alarm battery holder. See Figure 2 for proper battery placement.Replace
the mounting plate and the four screws to hold it in place.
When the 9-volt battery is installed to the gate alarm, the LED will flash once
every 10 seconds. When the alarm sounds, the LED will flash once every
second.
Hang gate alarm on the mounted screws and pull downward until the screws
are positioned in the small end of the keyholes in the back of the unit.
2. INSTALLING POOLGUARD GATE ALARM
AND BATTERY (Figure 2)
Gate Alarm GOOD ART 6/19/03 11:46 AM Page 3
Page 4

3. OPERATING YOUR GATE ALARM
(Figure 1)
The POOLGUARD GATE ALARM uses two delay modes which allows the
user to exit and enter the gate without the alarm sounding. These two modes
are explained below:
A.
B.
4. LOW BATTERY FUNCTION
When the 9-volt battery is low, the gate alarm horn will chirp once every 10
seconds–this means it is time to install a new battery. Test your gate alarm
weekly by opening the gate and allowing the alarm to sound.
WARRANTY AND REPAIRS
POOLGUARD is sold with a limited warranty to cover defects in parts and
workmanship for one year from date of purchase. (Retain proof of purchase).d If Poolguard exhibits a defect, please call our Customer
Service department at 1-800-242-7163. Unauthorized returns will not be
accepted. Proper repair is only ensured when the unit is returned to the
manufacturer.
FIRST DELAY MODE: When the gate is opened the alarm automatically goes into the first delay mode which gives you 7 seconds
after the gate is opened to push the delay switch. If the delay
switch is not pushed within 7 seconds the alarm will sound with the
gate open or closed. To silence the alarm close the gate then push
the delay switch.
SECOND DELAY MODE: When the gate is opened and the delay
switch is pushed within 7 seconds this puts the gate alarm in the
second delay mode which allows you another 7 seconds to go
through the gate and close it. When the gate is closed within 7
seconds the alarm will automatically reset. If the gate is not closed
within 7 seconds the alarm will automatically go to the first delay
mode, then the alarm will sound when the gate is opened or closed.
P.O. Box 658
NORTH VERNON, IN 47265
812-346-2648
MADE IN THE USA
Gate Alarm GOOD ART 6/19/03 11:46 AM Page 4
 Loading...