

Page 1

Congratulations on your purchase of a Pontiac Solstice. Please read this information and your Owner Manual
to ensure an outstanding ownership experience. Note that your vehicle may not include all the features
described in this booklet. Keep this booklet with your Owner Manual for easy reference.
DRIVER INFORMATION
Instrument Panel . . . . . . . . . . . . .2
Instrument Panel Cluster . . . . . . .3
Driver Information Center . . . . . . .4
SAFETY & SECURITY
Remote Keyless Entry . . . . . . . . .6
Door Lock/Unlock without RKE . .6
Automatic Door Locks . . . . . . . . .7
Passenger Airbag Status
Indicator . . . . . . . . . . . . . . . . . . . . .7
OnStar
®
. . . . . . . . . . . . . . . . . . . . . .7
Emergency Trunk Release . . . . . .7
COMFORT
Seat Adjustments . . . . . . . . . . . . .8
Tilt Steering Wheel . . . . . . . . . . . .8
Climate Controls . . . . . . . . . . . . . .8
ENTERTAINMENT
Radio and CD Operation . . . . . . .9
XM
®
Radio . . . . . . . . . . . . . . . . . .12
Multiple-Disc CD Player . . . . . . .12
Audio Steering Wheel Controls .12
Bluetooth
®
System . . . . . . . . . . .13
CONVENIENCE
Speed-Sensitive Wipers . . . . . . .13
Exterior Lamps . . . . . . . . . . . . . .14
Cruise Control . . . . . . . . . . . . . . .14
Map Pockets . . . . . . . . . . . . . . . .15
PERFORMANCE & MAINTENANCE
StabiliTrak®– Stability Control
System . . . . . . . . . . . . . . . . . . . . .15
Manual Transmission
Operating Tips . . . . . . . . . . . . . . .16
Automatic Transmission
Operating Tips . . . . . . . . . . . . . . .16
Operating the Convertible Top . .16
Car Washing . . . . . . . . . . . . . . . .18
Tire Pressure Monitor . . . . . . . . .18
Tire Inflator Kit . . . . . . . . . . . . . . .19
Towing and Dinghy Towing . . . .19
Premium Unleaded Gasoline . . .19
Resetting the Oil Life System . .19
OWNER INFORMATION
Roadside Assistance . . . . . . . . .20
My GMLink . . . . . . . . . . . . . . . . . .20
Page 2
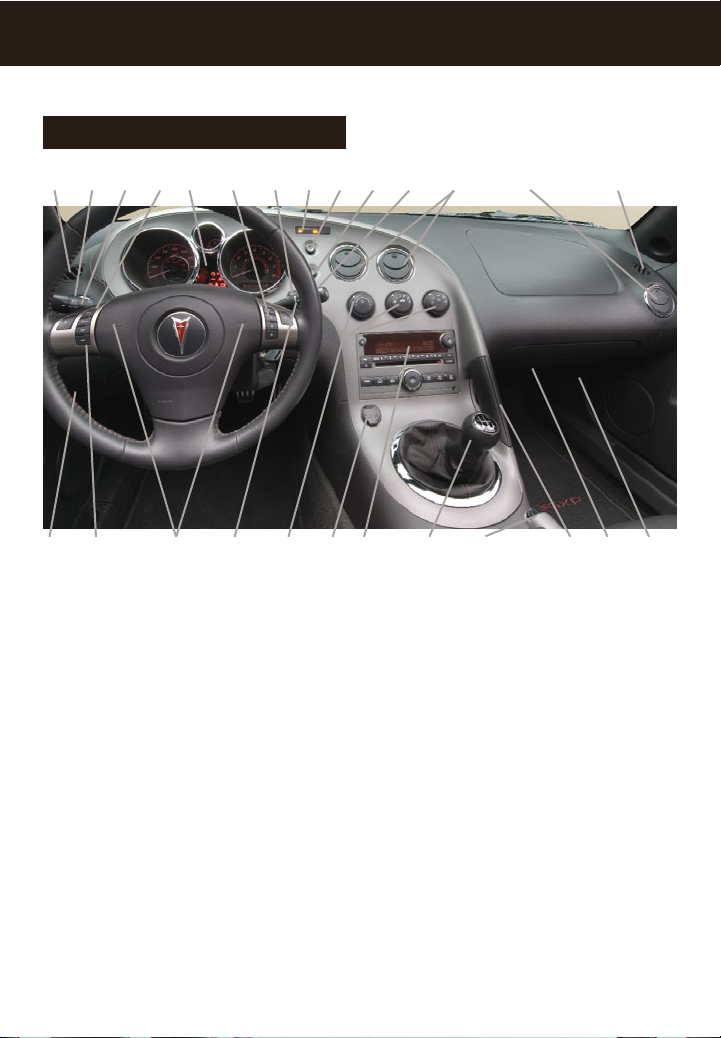
Getting to Know Your Solstice
2
The main features of the instrument
panel include:
A. Side Window Air Outlets
B. Air Outlets
C. Turn Signal/Multifunction Lever
D. Cruise Control Buttons (if equipped)
E. Instrument Cluster
F. Audio Steering Wheel Controls
(if equipped)
G. Instrument Panel Brightness Control
H. Passenger Airbag Status Indicator
I. Hazard Warning Flashers Button
J. Fog Lamp Button (if equipped)
K. StabiliTrak Button
L. Hood Release Lever
M. Driver Information Center Controls
(if equipped)
N. Horn
O. Windshield Wiper/Washer Controls
P. Climate Controls
Q. Accessory Power Outlet
R. Audio System
S. Gearshift Lever
T. Parking Brake Lever
U. Cupholder
V. Trunk Release Button (in Glove Box)
W. Glove Box
Instrument Panel
DRIVER INFORMATION
A F HG I J
M N SO P Q R T
K B
L U V W
See Section 3 of your Owner Manual.
CB D E B A
Page 3
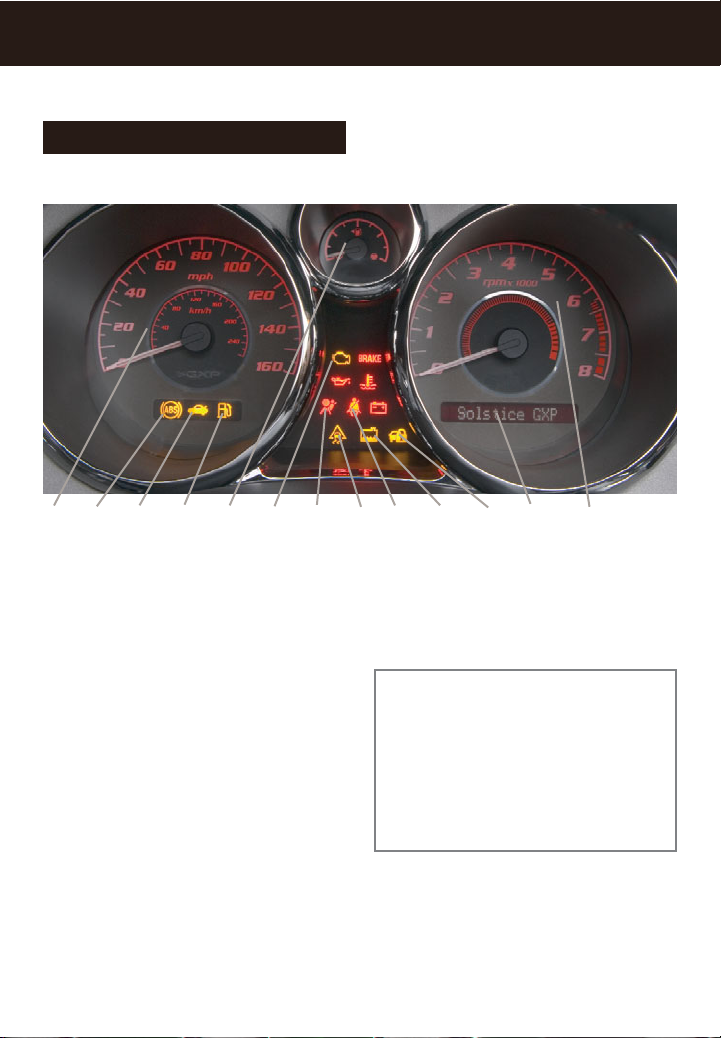
3
Your vehicle’s instrument panel is
equipped with this cluster or one very
similar to it. The instrument panel cluster
includes these key features:
A. Speedometer
B. Antilock Brake System Warning Light
C. Trunk Ajar Light
D. Low Fuel Warning Light
E. Fuel Gauge
F. Malfunction Indicator Lamp
(Check Engine Light)
G. Airbag Readiness Light
H. StabiliTrak Warning Light
I. Safety Belt Reminder Light
J. Low Coolant Warning Light
K. Security Light
L. Odometer/Driver Information Center
M. Tachometer
See Section 3 of your Owner Manual.
Note: The instrument panel cluster is
designed to let you know about many
important aspects of your vehicle’s
operation. It is important to read your
Owner Manual and become familiar with
the information being relayed to you
by the lights, gauges and indicators,
as well as what action can be taken to
ensure safety and to prevent damage.
Instrument Panel Cluster
B GECAILKJHMDF
Page 4
Getting to Know Your Solstice
4
Driver Information Center
(if equipped)
Your vehicle’s Driver Information Center
(DIC) provides vehicle information,
vehicle warning messages and vehicle
feature personalization. The DIC messages will be shown on your instrument
panel cluster display.
To operate the DIC, the ignition switch
must be on. The DIC is controlled
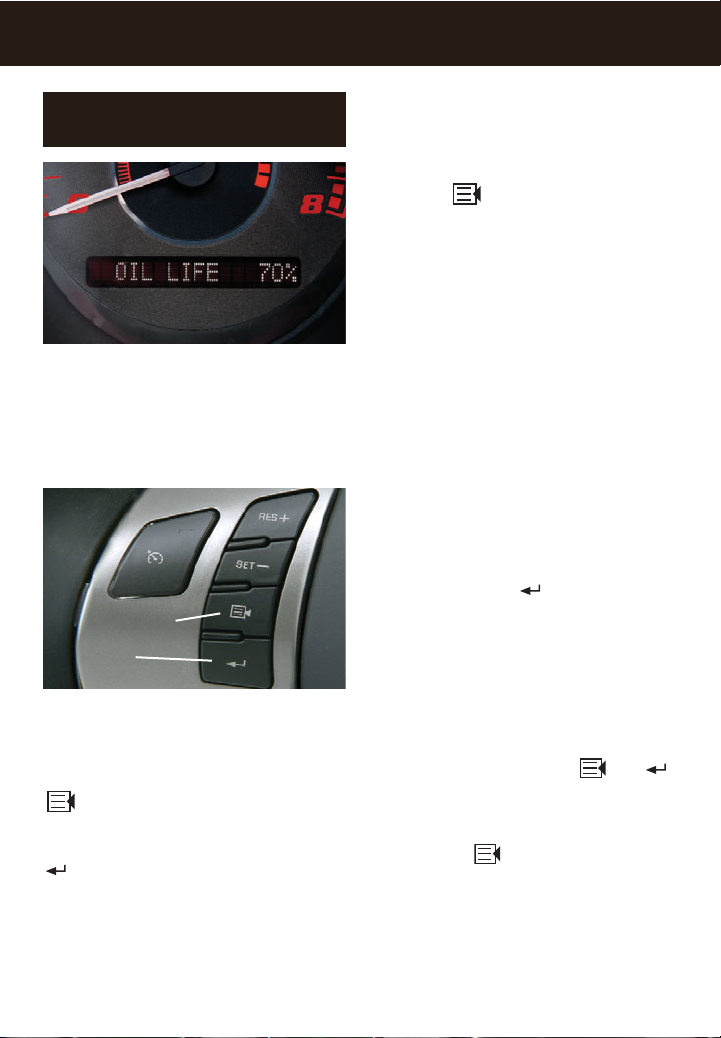
through the following two buttons located on the left side of the steering wheel:
(Information): Press this button (A)
to scroll through the vehicle information
mode displays.
(Reset): Press this button (B) to
reset some information mode options,
select a personalization setting or
acknowledge a warning message.
Press both buttons for several seconds
and release to enter the personalization
menu.
Vehicle Information
Press the button to scroll through
the following vehicle information:
• Odometer
• Trip A or Trip B
• Fuel Range (until empty)
• MPG AVG (average fuel economy)
• MPG INST (instantaneous fuel
economy)
• AV Speed (average vehicle speed)
• Oil Life (remaining useful oil life)
• Coolant (engine coolant temperature)
• Tire Pressure (front and rear tire
pressures)
• Boost (if equipped) (indicates the
amount of boost the turbocharged
engine is receiving)
Press and hold the button to reset
the information while it is displayed.
Vehicle Feature Personalization
A variety of your vehicle’s features can
be personalized to your preference. To
personalize features:
1. The vehicle must be stopped to
access the personalization menu.
Press and hold both the and
buttons for several seconds and
release to enter the personalization
menu.
2. Press the button to scroll
through the available personalization
features.
A
B
Page 5

5
3. Press the button to toggle
between the available settings for
each feature.
4. Press the button to record your
selection and move to the next feature.
Personalization features include:
• OIL LIFE RESET
• UNITS
• LOCK HORN (Horn chirp during
Remote Keyless Entry locking)
• UNLOCK HORN (Horn chirp during
Remote Keyless Entry unlocking)
• LIGHT FLASH (Exterior light flash
during Remote Keyless Entry locking
or unlocking)
• DELAY LOCK (Delays locking the
vehicle for five seconds after the last
door is closed)
• AUTO UNLK (Automatically unlocks
the vehicle doors)
• UNLK (Determines when Auto
Unlock will occur; automatic transmission only)
• EXT LIGHTS (Exterior perimeter
lighting during Remote Keyless Entry
unlock)
• LANGUAGE
Warnings and Messages
If a problem is sensed in one of your
vehicle’s systems, a warning or message will appear in the DIC display (see
your Owner Manual for a complete list of
possible warnings and messages).
After a warning or message appears,
press either the or button to
clear the display screen for further use.
Acknowledging the message only clears
the display; it does not resolve the
problem.
If your vehicle is equipped with OnStar
and your Check Engine light or any
other warning message appears, you
can press the OnStar button and speak
to an OnStar Advisor. In many vehicles,
OnStar Advisors can access certain
diagnostic information and can tell you
how serious the problem is and what
you should do about it.
See Section 3 of your Owner Manual.
Note: Your vehicle’s warnings and
messages provide critical information
that can prevent damage to your vehicle. Review your Owner Manual to
become familiar with the information
displayed and the action required.
Page 6
Getting to Know Your Solstice
6
SAFETY & SECURITY
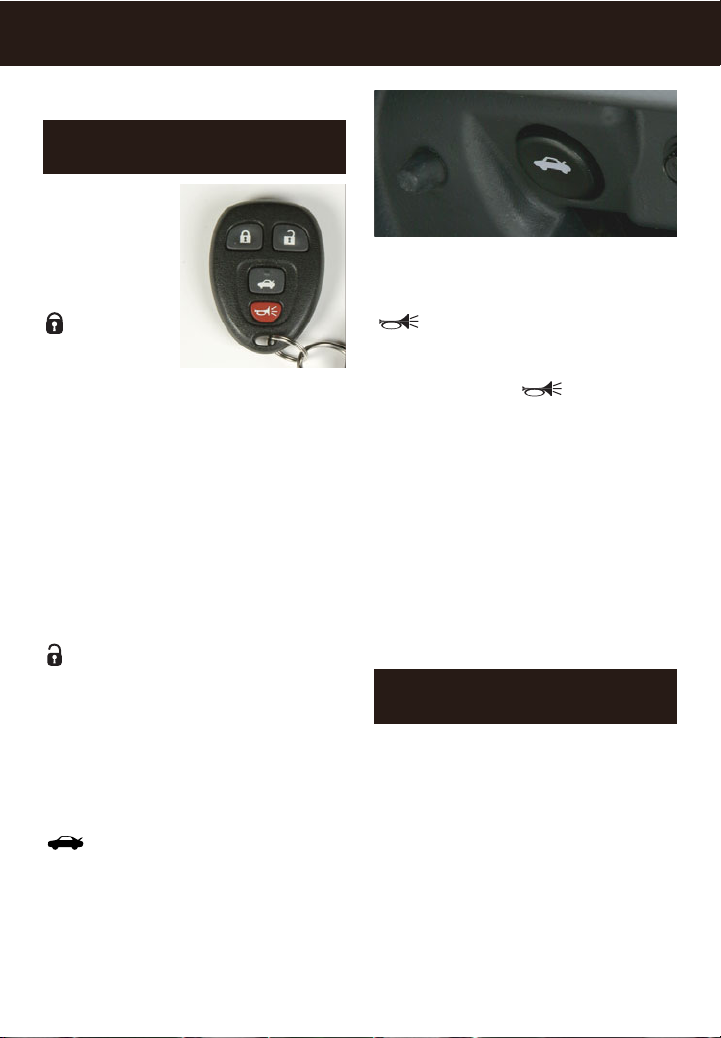
The Remote
Keyless Entry
(RKE) transmitter includes
the following
functions:
(Lock):
Press this button
when both doors
are closed to immediately lock them.
The interior lamps will also turn off. If
enabled through the Driver Information
Center (DIC), the parking lamps will
flash and/or the horn will chirp to indicate locking has occurred.
If the Lock button is pressed while any
door is open and the Delayed Lock feature is enabled, the doors will not lock.
Instead, a chime will sound. After both
doors are closed, the doors will lock. To
cancel this delay, press the Lock button
a second time within five seconds.
(Unlock): Press this button to unlock
the driver’s door. If the button is pressed
again within five seconds, all remaining
doors will unlock. The interior lamps will
illuminate and remain on for 20 seconds
or until the ignition is turned on. If
enabled through the DIC, the parking
lamps will flash and the horn will chirp to
indicate unlocking has occurred.
(Trunk/Buttress Release): Press
this button to release the trunk lid and
convertible top buttress. You can open
the trunk with the transmitter when the
vehicle is stationary.
Remote Keyless Entry
(if equipped)
The trunk and buttress may also be
unlatched using the Trunk Release
button located in the glove box.
(Vehicle Locator/Panic Alarm):
The vehicle must be turned off to use
this feature.
Press and hold the button for
approximately one second to locate your
vehicle. The horn will sound three times
and the parking lamps will flash three
times.
To sound the panic alarm, press and
hold the button for three seconds. The
horn will sound and the parking lamps
will flash for 30 seconds. Press the button again or turn the ignition key to any
position to cancel the panic alarm.
See Section 2 of your Owner Manual.
Your vehicle’s doors can also be locked/
unlocked using the key.
• To lock either door from the outside,
turn the key clockwise.
• To unlock either door from the outside, turn the key counterclockwise.
See Section 2 of your Owner Manual.
Door Lock and Unlock Functions
without the RKE Transmitter
Page 7

offers a variety of capabilities, such
as Remote Door Unlock, Automatic
Notification of Airbag Deployment, and
Hands-Free Calling. In addition, most
vehicles can get driving directions using
Turn-by-Turn Navigation. Press the
OnStar button to ask an OnStar Advisor
about the service plan you have or to
upgrade your plan.
For more information, refer to
your OnStar Owner’s Guide, call
1-888-4-ONSTAR (1-888-466-7827),
or visit onstar.com.
See Section 2 of your Owner Manual.
7
For your safety, all power door locks will
automatically lock when the shift lever is
moved out of Park with an automatic
transmission, or when the vehicle speed
is greater than 5 mph (8 km/h) with a
manual transmission.
This feature cannot be disabled; however,
if your vehicle has a Driver Information
Center and an automatic transmission,
you can personalize the unlock features.
See Section 2 of your Owner Manual.
Automatic Door Locks
(if equipped)
Your vehicle is equipped with a
Passenger Sensing System located in
the passenger seat for the passenger’s
front airbag, and a passenger airbag
status indicator located on the instrument panel center stack.
See Sections 1 and 3 of your Owner Manual.
Passenger Airbag Status
Indicator
Your vehicle may feature the OnStar
Safe & Sound Plan or the uplevel OnStar
Directions & Connections Plan, with one
year of OnStar service from the date you
purchased your new vehicle. OnStar
OnStar®(if equipped)
Emergency Trunk Release
The trunk
lid can be
opened
from inside
the trunk
by pulling
on the emergency trunk release handle
located on the driver’s side of the trunk.
See Section 2 of your Owner Manual.
Note: Because the interior of a convertible may not be as quiet as a fixed roof
vehicle, please note the following guidelines when using the OnStar speech
recognition function and when speaking
to an OnStar Advisor:
• Reduce background noise by raising
the convertible top or windows, or by
slowing down or stopping the vehicle.
• Speak clearly and naturally, and louder
if necessary, when using hands-free
calling.
• Say each digit separately and continuously when reciting phone numbers.
Page 8

Getting to Know Your Solstice
8
COMFORT
Forward or Rearward Adjuster
To move the seats forward or rearward,
lift and hold the lever under the front of
each seat and manually slide the seat;
then release the lever. Try to move the
seat to ensure it is locked in place.
Recliner
To recline the
front seats,
open the door
and rotate the
knob on the
outboard side
of the seat
until the seatback is in the
desired position.
Seatback Latch
Pull up the
latch on the
outboard
side of
the seat
near the
top of the
seatback
to fold
the seat
forward. This provides access to the
seatback map pocket.
Driver Seat Height Adjuster
(if equipped)
The power driver seat height adjuster
switch is located on the outboard side of
the driver’s seat. Adjust the seat position
before adjusting seat height. To raise or
lower the seat, hold the switch up or
down.
See Section 1 of your Owner Manual.
Seat Adjustments
To adjust the steering wheel position:
1. Pull down the lever located on the left
side of the steering column.
2. Adjust the wheel to a comfortable
position. The wheel can be moved up
or down.
3. Push the lever all the way up to lock
the wheel in place.
See Section 3 of your Owner Manual.
Tilt Steering Wheel
Temperature Control
Turn the temperature control knob (A) to
raise or lower the temperature setting.
(Air Conditioning) (if equipped):
Press the temperature control knob to
turn the air conditioning system on or
off. The indicator light will flash three
times and the air conditioning system
will not function if the fan is turned off.
Climate Controls
BAC
Page 9

Fan Speed
Turn the fan speed control knob (B) to
increase or decrease fan speed.
(Off): This position turns off the
system.
(Recirculation): Press the fan
speed control knob to turn the recirculation mode on or off. This mode keeps
outside air from entering the vehicle.
Airflow Modes
Turn the airflow control knob (C) to one
of the following five modes to change
the direction of the airflow:
(Vent): This mode directs air to the
instrument panel outlets.
(Bi-Level): This mode directs air to
the instrument panel outlets and floor
outlets.
(Floor): This mode directs most of
the air to the floor outlets and some air to
the side window outlets and windshield.
(Defog): This mode directs air to the
windshield, side window outlets and
floor outlets.
(Defrost): This mode directs most of
the air to the windshield and some air to
the side window outlets.
(Rear Window Defogger): Press
the airflow control knob to turn the rear
window defogger on or off. The defogger
will shut off automatically after a set
period of time. The defogger will remain
active, however, as long as the vehicle
speed is greater than 50 mph (80 km/h).
See Section 3 of your Owner Manual.
9
Note: Do not use the rear window
defogger when the convertible top is
stored.
ENTERTAINMENT
While most of the features on your radio
will look familiar, the following are some
that may be new:
(Power/Volume): Press this knob to
turn the system on or off. Turn the knob
to adjust the volume.
(Information): Press this button to
toggle the radio display between station
frequency and time. If equipped, it will
also display additional text information
related to the current FM-RDS or XM
station, or MP3 song.
(Tune): Turn this knob to select radio
stations or, when a CD is playing, to
select a track or MP3 file.
Press the knob to display the tone
control (bass/treble) or speaker control
(balance/fade) setting. Press the pushbutton under the desired label on the
display. Turn the knob to adjust the
setting.
FAV (Favorite): Press this button to go
through up to six pages of any combination (AM, FM, or XM, if equipped) of
preset favorite radio stations. On each
page, up to six stations are available by
using the six pushbuttons below the
radio display.
Radio and CD Operation
Page 10

Getting to Know Your Solstice
10
You can set up to six pages of any
combination (AM, FM, or XM,
if equipped) of favorite radio stations,
with up to six stations on each page.
To set up the number of favorite station
pages:
1. Press the MENU button to display the
radio setup menu.
2. Press the pushbutton located below
the FAV 1–6 label on the radio
display.
3. Select the desired number of favorite
station pages.
4. Press the FAV button. You may now
begin storing your favorite stations for
the chosen amount of numbered
pages.
To store favorite stations:
1. Tune in the desired radio station.
2. Press the FAV button to display the
page where the station is to be
stored.
3. Press and hold one of the six pushbuttons until a beep sounds to store
the station.
4. Repeat the steps for each pushbutton
on each page.
BAND: Press this button to switch to
AM, FM, or XM (if equipped). When
playing a CD or portable audio player,
press this button to switch to the radio.
(Seek/Scan): Press the right or left
arrow button to go to the next or previous radio station or, when a CD is playing, to the next track or MP3 file, or to
the start of the current track or MP3 file.
To enter the scan mode, press and hold
either arrow button for a few seconds (a
beep will sound). Radio stations will be
scanned. Press either arrow button
again to stop scanning.
(Reverse): Press and hold this
button to reverse playback quickly within
a track or MP3 file.
(Forward): Press and hold this
button to advance playback quickly within a track or MP3 file.
CD/AUX: Press this button to play a
CD instead of the radio. Press again
and the system will automatically search
for an auxiliary input device, such as a
portable audio player, connected to the
auxiliary input located on the lower-right
side of the radio.
EQ (Equalization): Press this button to
select preset equalization settings.
CAT (Category) (if equipped): Press
this button to find XM stations within a
desired category.
Setting Favorite Stations
Before setting your favorite stations,
shift your vehicle into Park (automatic
transmission) or into Neutral and set the
parking brake (manual transmission).
Note: Engaging in extended searching
for specific audio stations or songs by
using buttons and knobs — or giving
extended attention to entertainment tasks
— can lead you to look away from the
road frequently or longer than usual.
Looking away from the road for prolonged periods may cause you to miss
seeing things on the road that you need
to see. Avoid engaging in extended
searching for specific items while driving.
Page 11

11
Setting the Speed Compensated
Volume
With Speed Compensated Volume
(SCV), the radio automatically adjusts
the volume to compensate for road
noise as vehicle speed changes.
Press the MENU button to access the
SCV settings.
To set Speed Compensated Volume:
1. Set the radio volume to the desired
level.
2. Press the MENU button to display the
radio setup menu.
3. Press the pushbutton below the auto
volume label on the radio display.
4. Press the pushbutton under the
desired setting (Off, Low, Medium
or High) to select the level of
compensation.
5. The compensation will be set
once the display times out after 10
seconds.
Setting the Time
To set the time:
1. Turn on the radio.
2. Press the (Clock) button. Or,
if equipped, press the MENU button
until the clock option is displayed;
and then press the pushbutton located under the clock option label. The
HR, MIN, MM, DD, YYYY labels will
appear on the display.
3. Press the pushbutton under any of
the labels to be changed.
4. Press the pushbutton again or the
FWD button to increase the numbers.
Press the REV button to decrease
the numbers. Rotating the (Tune)
knob also will increase or decrease
the selected label.
5. Press the Clock or MENU button
again to set the currently displayed
time and date.
Portable Audio Player
A portable audio player can be connected to the auxiliary input jack located on
the radio. Press the CD/AUX button to
begin playing audio from the portable
player over the vehicle speakers.
MP3 Capability (if equipped)
If your AM/FM stereo with CD has MP3
playing capability, a CD-R or CD-RW
containing MP3 audio files will play
automatically when inserted into the CD
player. An MP3 label will be displayed.
Radio Data System (if equipped)
When you tune to a Radio Data System
(RDS) station, the station name and call
letters will appear on the display instead
of the frequency. RDS stations may also
provide the time of day, a program type
for current programming and the name
of the program being broadcast.
RDS features are available for use only
on FM stations that broadcast RDS
information. RDS relies on receiving
specific information from these stations
and will work only when the information
is available.
See Section 3 of your Owner Manual.
Page 12

The following
audio controls are
located on
the steering
wheel:
+ –
(Volume):
Press the
plus or minus button to increase or
decrease the volume.
To play a specific CD:
• Press the pushbutton under the arrow
label that corresponds to the loaded
CD number on the display.
To eject a CD:
• To eject the CD that is currently
playing, press the EJECT
button once.
• To eject all CDs, press and hold the
EJECT button for two seconds.
If a CD is not removed after several
seconds, it will be pulled back into the
player automatically.
See Section 3 of your Owner Manual.
Getting to Know Your Solstice
12
XM Radio offers more than 170
channels of digital-quality sound that
goes wherever you go — coast to coast.
After a free three-month trial period,
activation and service subscription
fees apply. Service is based in the
continental United States and Canada.
For more information, visit XM online
at www.XMradio.com or call
1-800-929-2100.
See Section 3 of your Owner Manual.
XM®Radio (if equipped)
Multiple-Disc CD Player
(if equipped)
With the in-dash 6-Disc CD Player, note
that you cannot directly load a CD as in
single-play systems.
To load a single CD:
• Press and release the LOAD
button. Wait for the display prompt to
load the CD.
To load multiple CDs:
• Press and hold the LOAD button
for two seconds. Follow the display
prompts to load each CD.
Note: CDs with any affixed labels may
jam in the CD player. Label a CD using
a permanent marker. If more than one
CD is inserted into the slot at a time,
or if scratched or damaged CDs are
played, the CD player could be damaged. When using the CD player, use
only CDs in good condition without
labels; load one CD at a time; and keep
the CD player and the loading slot free
of foreign materials, liquids or debris.
Audio Steering Wheel Controls
(if equipped)
Page 13

13
Speed-Sensitive Wipers
The speed-sensitive wipers lever is
located to the right of the steering
column. The headlamps and parking
lamps will turn on if the wipers are on for
more than 15 seconds. The lever can be
moved to each of the following positions:
(Mist): Move the lever down to this
position to turn the wipers on for a single
wipe. Hold the lever at this position for
additional wipes.
(Off): This position turns off the
windshield wipers.
(Intermittent): Move the lever up to
this position to have the wipers adjust
with vehicle speed. Wiper frequency
will increase as you drive faster and
decrease as you slow down. Rotate the
speed-sensitive adjustment band on the
lever to increase or decrease the delay
between wipes.
(Low): Move the lever up to this
position for steady, low-speed wipes.
(High): Move the lever up to this
position for rapid, high-speed wipes.
(Windshield Washer): Push the
button on the end of the wipers lever to
spray washer fluid on the windshield.
See Section 3 of your Owner Manual.
CONVENIENCE
(Next/Previous/End): Press
the up or down arrow to go to the next
or previous preset radio station or, when
a CD is playing, to the next or previous
track.
Press and hold the up or down arrow for
one second to advance to the next or
previous radio station in the selected
band or, when a CD is playing, to continue moving to the next or previous track
on the CD.
Press the (End) button to end or
reject an OnStar or Bluetooth call.
(Mute/Voice Recognition): Press
this button to silence the system. Press
it again to turn on the sound.
Press and hold the button for two
seconds to interact with the OnStar or
Bluetooth system.
See Section 3 of your Owner Manual.
Bluetooth®System
The in-vehicle Bluetooth system allows
users with a Bluetooth-enabled cell
phone to make and receive hands-free
phone calls using the vehicle’s audio
system, microphone and controls. The
Bluetooth-enabled cell phone must be
paired with the in-vehicle Bluetooth system before it can be used in the vehicle.
Not all phones will support all functions.
Visit www.pontiac.com/bluetooth
for more information.
See Section 3 of your Owner Manual.
Page 14

Getting to Know Your Solstice
14
To activate the Automatic Headlamp
System, turn the switch to the position again. The Automatic Headlamp
System is always turned on when the
vehicle is started.
The Daytime Running Lamps will turn off
when the lamp control switch is turned
to the position if the vehicle is in
Park or vehicle speed is less than 5 mph
(8 km/h) after the vehicle is started.
(Fog Lamps):
Press this button
on the center of
the instrument
panel to turn the
fog lamps on
or off.
See Section 3 of your Owner Manual.
Cruise Control (if equipped)
The following cruise control buttons are
located on the steering wheel:
(On/Off): Press this button to turn
the cruise control system on or off.
SET – (Set): Press this button to set
a speed, or to decrease the set speed
if the system is active. When the cruise
control speed is set, the Driver
Information Center will display the
Cruise Engaged message.
Your Solstice is equipped with an Automatic Headlamp System, which turns
on the Daytime Running Lamps during
daytime and the headlamps and other
exterior lamps at night or when necessary. The headlamps and parking lamps
also will turn on if the wipers are on for
more than 15 seconds.
Exterior Lamp Control Switch
The exterior lamps can be operated
manually using the control switch located on the lever to the left of the steering
column. The switch can be rotated to
each of the following positions:
(Headlamps): This position turns
on the headlamps, parking lamps and
taillamps.
(Parking Lamps):
This position
turns on the parking lamps and taillamps
only.
AUTO (Automatic Lamp Control): This
position automatically turns on Daytime
Running Lamps in the daytime, and
headlamps, parking lamps and taillamps
at night or when necessary.
(Off/On): When operating in the
AUTO position, a momentary turn of the
lamp control switch to the position
will turn off the Automatic Headlamp
System.
Exterior Lamps
Page 15

To limit wheelspin and help maintain
directional control, you should always
leave the system on. If your vehicle
becomes stuck and rocking the vehicle
is required, the system should be
turned off.
To turn off the
traction control
part of the system, press the
(StabiliTrak)
button located
on the center of
the instrument panel.
To turn off both the traction control and
stability enhancement systems, press
and hold the button for five seconds.
When either system is off, the
StabiliTrak light on the instrument panel
cluster will illuminate. Press the button
again to turn the system back on.
Competitive Driving Mode
The Competitive Driving Mode is a
performance handling mode designed to
be used only on a closed driving course.
While operating in this mode, traction
control is turned off and the amount of
intervention by the StabiliTrak system is
reduced.
To activate the Competitive Driving
Mode, press the button twice within
five seconds. Press the button again to
return to normal StabiliTrak operation.
See Section 4 of your Owner Manual.
15
Map Pockets
Map pockets are located on the front
seat cushions as well as the seatbacks
of both seats. Lift the latch near the top
of the seatback to release the seat and
fold it forward.
There also is a netted storage area
behind the driver’s seat.
See Section 1 of your Owner Manual.
PERFORMANCE & MAINTENANCE
StabiliTrak®– Stability Control
System (if equipped)
StabiliTrak is an advanced computercontrolled vehicle stability and traction
enhancement system that assists with
directional control of the vehicle in difficult driving conditions. It turns on every
time you start your vehicle.
RES + (Resume): Press this button to
resume a set speed, or to increase the
set speed if the system is active.
See Section 3 of your Owner Manual.
Page 16

Getting to Know Your Solstice
16
Lowering the Convertible Top
To lower the convertible top:
1. With an automatic transmission in
Park or a manual transmission in 1st
or Reverse and the parking brake set,
turn off the ignition.
Operating the Convertible Top
may notice an audible feedback noise
that could be interpreted as clunking or
rattling. This audible feedback noise is
normal and will not compromise the
reliability of the clutch, transmission or
differential.
See Section 2 of your Owner Manual.
Note: Before lowering the convertible
top, make sure nothing is stored in the
trunk on either side, or on top, of the
fuel tank. Do not lower or raise the
convertible top while the vehicle is
in motion.
The shift indicator positions on the
automatic transmission are PRND4IL.
Automatic Overdrive (D) is the best
position for normal driving. When driving
on hilly, winding roads and engine braking is needed, use the Intermediate (I)
position. The Low (L) position can be
used when driving slowly on very steep
hills, or in snow or mud.
See Section 2 of your Owner Manual.
Automatic Transmission
Operating Tips (if equipped)
Starting the Engine
To start the engine, fully depress the
clutch pedal before turning the key;
otherwise, the engine will not start. The
shift lever also should be in Neutral and
the parking brake should be engaged.
Reverse Operation
When shifting into Reverse, bring your
vehicle to a complete stop. Trying to
engage Reverse with the vehicle moving
could damage the transmission. If you
find it difficult to shift into Reverse,
return the shift lever to Neutral and
release the clutch pedal; then depress
the clutch pedal again and shift into
Reverse.
Parking the Vehicle
When parking your vehicle, shift the
manual transmission into 1st or Reverse
and set the parking brake. These are the
best positions for parking a manual
transmission-equipped vehicle.
Rear Axle
Your Solstice may be equipped with a
limited slip rear differential. This optional
differential is designed to provide maximum power and performance.
The Solstice driveline is designed to
transmit maximum engine torque to the
rear wheels as efficiently as possible,
which greatly enhances handling and
acceleration capabilities.
During an abrupt torque transfer (e.g.,
1st to 2nd gearshift at low engine
speeds, or abrupt de-clutching), you
Manual Transmission Operating
Tips (if equipped)
Page 17

17
2. Open the trunk lid.
3. Unlock the convertible top front latch,
located above the inside rearview
mirror, by pulling it down and turning
counterclockwise. Leave the latch
open and rotated to prevent damage
when storing the top.
4. Pull rearward on the side edge of
the convertible top and pull it off the
windshield frame.
5. Push the convertible top down into
the trunk.
6. Push evenly on the center of the top
to ensure that it is fully retracted and
securely stored.
7. Close the trunk from the rear of the
vehicle by pushing on the top center
of the trunk lid.
Raising the Convertible Top
1. With an automatic transmission in
Park or a manual transmission in 1st
or Reverse and the parking brake set,
lower the windows and then turn off
the ignition.
2. Open the trunk lid.
3. Pull the convertible top forward by
firmly gripping the side edge and
applying a brisk upward and forward
motion to get the top in the full-up
position.
4. Pull the front edge of the convertible
top forward from the outside of the
vehicle, or push the front edge of the
convertible top forward from the
inside of the vehicle.
5. Turn the top front latch handle clockwise to latch the convertible top.
6. Close the trunk from the rear of the
vehicle by pushing on the top center
of the trunk lid.
7. At the rear edge of the convertible
top, press down on the buttresses to
latch them into the top of the trunk.
Note: A clear Mylar®protective film has
been installed at the factory on the trunk
lid surface under the convertible top buttresses. This film is designed to help
prevent paint damage to the trunk lid
over time. Do not remove this protective
film. It is intended to remain permanently affixed to the trunk lid surface.
Note: When raising the convertible top,
make certain that the orange pin on
each side of the top is seated into the
hole inside the rubber molding to the
rear of the side window opening. Failure
to seat the pins may result in wind and
water concerns.
Page 18

Getting to Know Your Solstice
18
The Tire Pressure Monitor alerts you
when a significant reduction in pressure
occurs in one or more of your vehicle’s
tires by illuminating the (Low Tire
Pressure) warning light on the instrument panel cluster. The low tire pressure
warning light will remain on until you
correct the tire pressure. A CHECK TIRE
PRESSURE message may also appear
on the DIC (if equipped).
Correcting the Tire Pressure
When the low tire pressure warning light
illuminates, you must inflate the tire to
the proper tire pressure (just as you
must refuel the vehicle when the low
fuel warning light illuminates). The Tire
and Loading Information label shows the
correct tire pressure for the tires when
they’re cold. “Cold” means your vehicle
has been sitting for at least three hours
or driven no more than one mile.
You can temporarily clear the DIC message by acknowledging it with your DIC
controls. However, at the next vehicle
start-up, the DIC message will reappear if
the tire pressure has not been corrected.
During cooler conditions, the low tire
pressure warning light may appear when
the vehicle is first started and then turn
off as you start to drive. This could be
an early indicator that your tire pressures are getting low and the tires need
to be inflated to the proper pressure.
Tire Pressure Monitor
The convertible top should be cleaned
often. However, high pressure car washes may cause water to enter the vehicle.
After washing and thoroughly rinsing the
vehicle, let the top dry in direct sunlight.
A chamois or cloth may leave lint on
the top.
Cleaning the Chrome or Aluminum
Wheels
Keep the wheels clean using mild soap
and water and a soft, clean cloth. Strong
soaps and cleaners could damage the
surface of the wheels.
The chrome or aluminum wheels may
also be damaged if the vehicle is driven
through an automatic car wash that has
silicone carbide tire cleaning brushes.
Car Washing
Note: Before entering an automatic car
wash, ensure that there is the necessary amount of ground clearance
between the vehicle and the car wash
guide rails.
Convertible Top Care
To properly care for the convertible top,
keep in mind these precautions:
• High pressure car washes may cause
water to enter the vehicle.
• Do not lower the convertible top if
there are objects in the storage area.
• Dry off the top before lowering it.
Storing the top when it is wet can
cause stains and mildew.
• Do not lower the top in cold weather.
• Do not operate the rear defogger
when the top is stored.
• Always close the top when leaving
your vehicle outdoors.
See Section 2 of your Owner Manual.
See Section 5 of your Owner Manual.
Page 19

19
The Oil Life System calculates engine oil
life based on vehicle use and displays a
CHANGE OIL SOON message in the
Driver Information Center (DIC) when
it’s necessary to change your engine oil
and filter. The Oil Life System should be
reset to 100% only following an oil
change.
To reset the Oil Life System:
1. With the engine off, turn the ignition
to Run.
2. Press the (Information) and
(Reset) buttons on the DIC at the
same time to enter the personalization menu.
3. Press the button until the DIC
displays OIL LIFE RESET.
4. Press and hold the button for at
least one second.
5. An ACKNOWLEDGED message will
display when the system has been
reset.
See Section 5 of your Owner Manual.
Tire Inflator Kit
The tire inflator kit is located at the
back of the trunk on the driver’s side.
It includes an air compressor, a tire
sealant canister, an accessory plug and
an air pressure gauge. Refer to the tire
inflator kit instructions for complete
operating information.
See Section 5 of your Owner Manual.
Your vehicle was not designed to tow
a trailer.
It also was not designed to be towed
behind another vehicle with any of its
wheels on the ground; therefore, dinghy
towing also is not recommended.
See Section 4 of your Owner Manual.
Towing and Dinghy Towing
Resetting the Oil Life System
(if equipped)
Use premium unleaded gasoline with a
posted octane rating of 91 or higher for
best engine performance. You may also
use regular unleaded gasoline rated at
87 octane or higher, but your vehicle’s
performance may be slightly reduced.
Unleaded gasoline with an octane rating
below 87 is not recommended.
See Section 5 of your Owner Manual.
Premium Unleaded Gasoline
See Section 5 of your Owner Manual.
Note: The Tire Pressure Monitor can
alert you about low tire pressure, but it
doesn’t replace normal monthly tire
maintenance.
Page 20

Getting to Know Your Solstice
20
My GMLink
The Pontiac Owner Center at My GMLink
is a complimentary service for Pontiac
owners, a one-stop resource to enhance
your Pontiac ownership experience.
Exclusive member benefits include online
service reminders, vehicle maintenance
tips, online owner manual, special privileges and more. Sign up today at
www.mygmlink.com.
For prompt and efficient assistance when
calling, please provide the following information to the advisor:
• Location of the vehicle
• Telephone number and your location
• Vehicle model, year and color
• Vehicle mileage
• Vehicle Identification Number (VIN)
• Vehicle license plate number
Pontiac reserves the right to limit services
or reimbursement to an owner or driver
when, in Pontiac’s judgment, the claims
become excessive in frequency or type of
occurrence.
Roadside Assistance and OnStar
(if equipped)
If you have a current OnStar subscription,
press the OnStar button and the vehicle
will send your current GPS location to an
OnStar Advisor who will speak to you,
assess your problem, contact Roadside
Assistance and relay your exact location so
you will get the help you need.
OWNER INFORMATION
1-800-ROADSIDE
(1-800-762-3743)
TTY Users: 1-888-889-2438
As the owner of a new Pontiac vehicle,
you are automatically enrolled in the
Pontiac Roadside Assistance program.
This value-added service is intended to
provide you with peace of mind as you
drive in the city or travel the open road.
Pontiac’s Roadside Assistance toll-free
number is staffed by a team of technically
trained advisors who are available 24
hours a day, 365 days a year, to provide
minor repair information or make arrangements to tow your vehicle to the nearest
Pontiac dealer.
Pontiac will provide the following services
for 5 years/100,000 miles at no expense
to you:
• Fuel delivery
• Lockout service (identification required)
• Tow to nearest dealership for warranty
service
• Flat tire assistance
• Jump starts
In many instances, mechanical failures are
covered under Pontiac’s comprehensive
warranty. However, when other services
are utilized, our advisors will explain any
payment obligations you might incur.
Roadside Assistance
15899512 A
!15899512=A!
Certain restrictions, precautions and safety procedures apply to your vehicle. Please read your Owner
Manual for complete instructions. All information contained herein is based on information available at the
time of printing and is subject to change without notice. Copyright 2008 by GM Corp. All rights reserved.
 Loading...