

Page 1
Instrument Panel . . . . . . . . . . . . . . . . . . . . . . . . . .2
Instrument Panel Cluster . . . . . . . . . . . . . . . . . . .3
Vehicle Personalization . . . . . . . . . . . . . . . . . . . .4
Trip Computer . . . . . . . . . . . . . . . . . . . . . . . . . . . .5
Preventing Battery Rundown . . . . . . . . . . . . . . . .5
Power Seat Adjustments . . . . . . . . . . . . . . . . . . .6
Rear Seat Access . . . . . . . . . . . . . . . . . . . . . . . . .6
Tilt and Telescope Wheel . . . . . . . . . . . . . . . . . . .6
Door Lock Operation . . . . . . . . . . . . . . . . . . . . . . .7
Manual Transmission Shift Light . . . . . . . . . . . . .8
Exterior Lighting and
Interior Dimming Controls . . . . . . . . . . . . . . . . . .8
Turn Signal/Multifunction Lever . . . . . . . . . . . . . .8
Cruise Control . . . . . . . . . . . . . . . . . . . . . . . . . . . .9
Windshield Wipers/Washers . . . . . . . . . . . . . . . .9
Audio System . . . . . . . . . . . . . . . . . . . . . . . . . . .10
Congratulations on your purchase of a Pontiac GTO. Please read this information and your Owner Manual to
ensure an outstanding ownership experience. Note that your vehicle may not include all the features
described in this booklet. Place this booklet in your Owner Manual portfolio for easy reference.
Audio Steering Wheel Controls . . . . . . . . . . . . .12
Trunk Release . . . . . . . . . . . . . . . . . . . . . . . . . . .12
Fuel Door Release . . . . . . . . . . . . . . . . . . . . . . . .12
Frontal Air Bags . . . . . . . . . . . . . . . . . . . . . . . . .13
Accessory Power Outlet . . . . . . . . . . . . . . . . . . .13
Storage Areas . . . . . . . . . . . . . . . . . . . . . . . . . . .13
Theft Deterrent Systems . . . . . . . . . . . . . . . . . . .13
Keys — Replacement . . . . . . . . . . . . . . . . . . . . .14
Security Card . . . . . . . . . . . . . . . . . . . . . . . . . . . .14
Smoker’s Package . . . . . . . . . . . . . . . . . . . . . . . .14
Traction Control System (TCS) . . . . . . . . . . . . .14
Fuel . . . . . . . . . . . . . . . . . . . . . . . . . . . . . . . . . . . .15
Winter Driving Suggestions . . . . . . . . . . . . . . . .15
Roadside Assistance . . . . . . . . . . . . . . . . . . . . .16
My GMLink . . . . . . . . . . . . . . . . . . . . . . . . . . . . . .16
Page 2
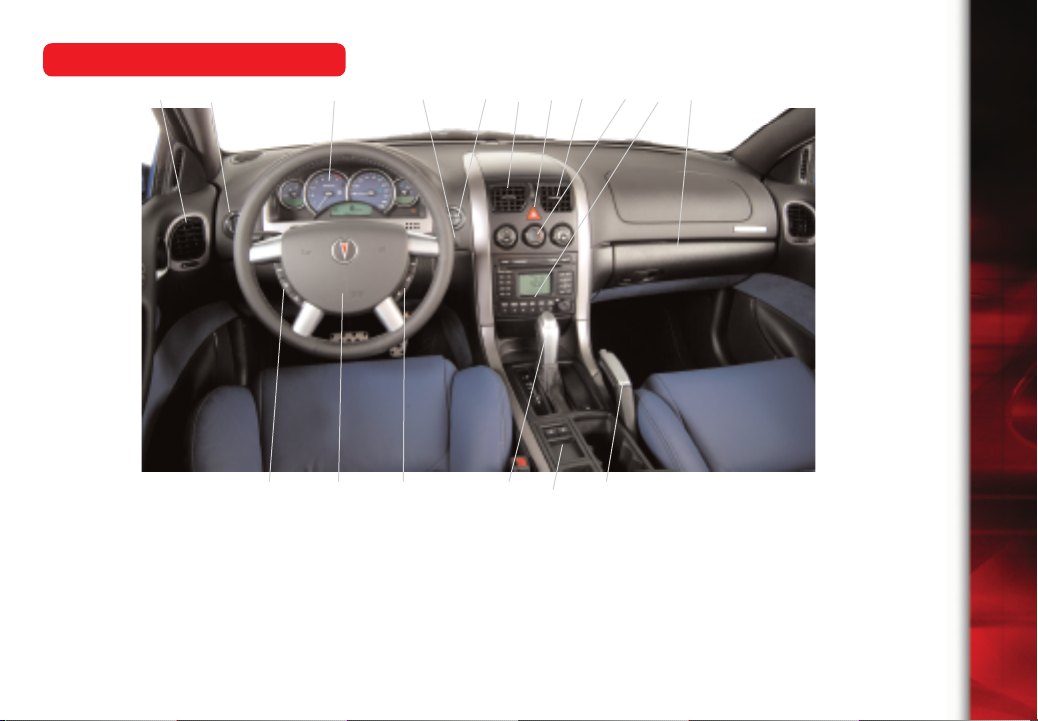
Instrument Panel
A
2
B
C
E
D
A
F
A G
I
H
Getting to Know Your GTO
A. Outlets
B. Headlamps Dial
C. Instrument Panel Cluster
D. Windshield Wiper Lever
E. Trip Computer Control
J
K
J
F. Hazard Warning Lights
G.Climate Controls
H. Audio System Controls
I. Glove Box
M
L
N
K. Horn
L. Shift Lever
M.Power Window Switches
N. Parking Brake
J. Audio Steering Wheel Controls
See Section 3 of your Owner Manual.
Page 3
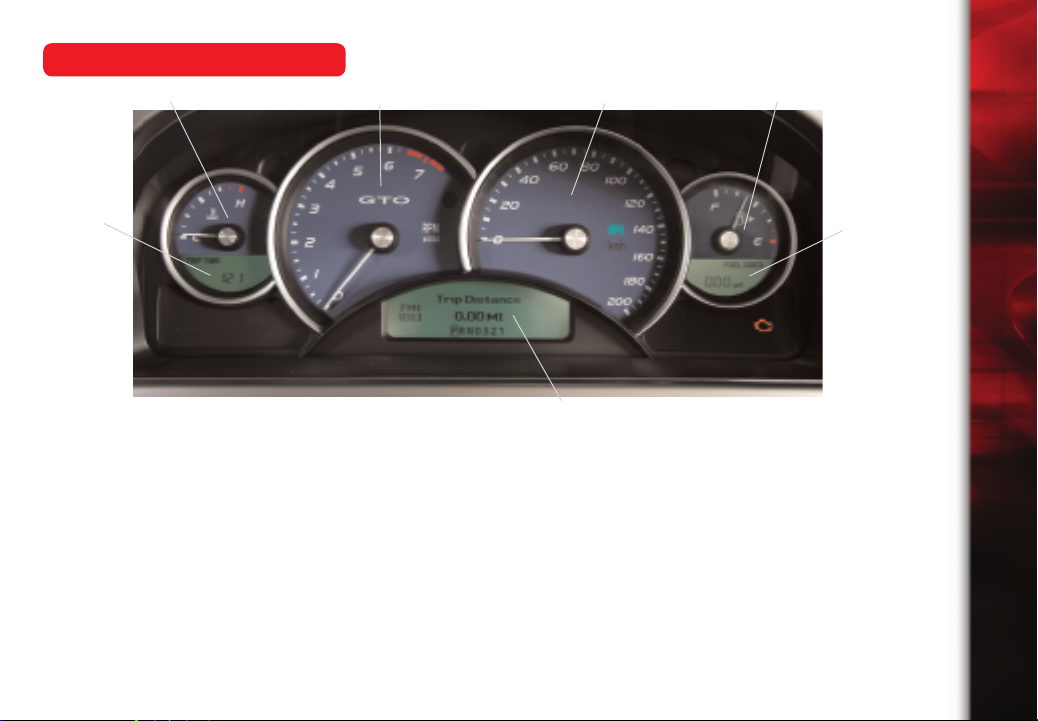
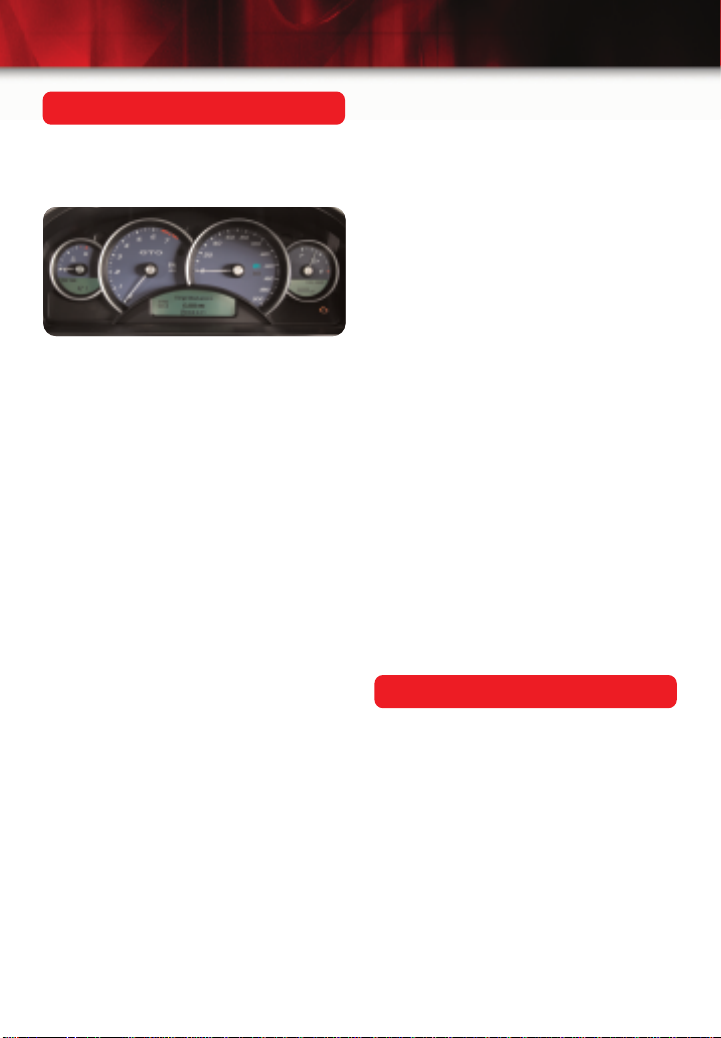
Instrument Panel Cluster
A
B
C D
E
Your vehicle’s instrument panel is
equipped with this cluster or one very
similar to it. The instrument panel
cluster includes these key features:
A. Engine Coolant Temperature
Gauge
B. Tachometer
C. Speedometer
D. Fuel Gauge
E. Trip Computer Displays
See Section 3 of your Owner Manual.
E
E
Important: The instrument panel
cluster is designed to let you know
about many important aspects of
your vehicle’s operation. It is
important to read your Owner Manual
and become familiar with the
information that is being relayed to
you by the cluster’s lights, gauges
and indicators, as well as what action
can be taken to ensure safety and to
prevent damage.
3
Page 4
4
Getting to Know Your GTO
Vehicle Personalization
Your GTO includes features that can be
personalized to your unique settings.
Please follow the instructions below to
set your preferences:
1. At each ignition cycle, the “Options
Menu” screen is automatically displayed for several seconds after the
“System Check” is completed.
2. Press the Up or Down arrow button
while the “Options Menu” is displayed
to enter the programming mode.
3. Scroll through the personalization
features by pressing the MODE
button. Help screens automatically
display after five seconds.
4. Change the Setting using the Up or
Down arrow.
5. Continue through the menu by
pressing the MODE button.
Programmable features include:
• Restore factory settings
• Underspeed chime
• Distance to arrival display
• Distance to arrival default miles
• Trip computer A & B
• Digital speedometer
• Rest reminder
• Stopwatch
• Radio display
• Confirmation beep
• Speed dependent volume
• Audio distortion limiter
• Headlights off delay time
• Headlights approach time
• Auto headlight sensitivity
• Courtesy lamp time out
• Ignition off courtesy lamp
• Two stage unlock
• Auto lock in Drive (not included
on manual transmissions)
• Door lock indication
• Exit option & menu
Settings are remembered until changed.
For an explanation of each feature, see Section
2 of your Owner Manual.
Page 5
5
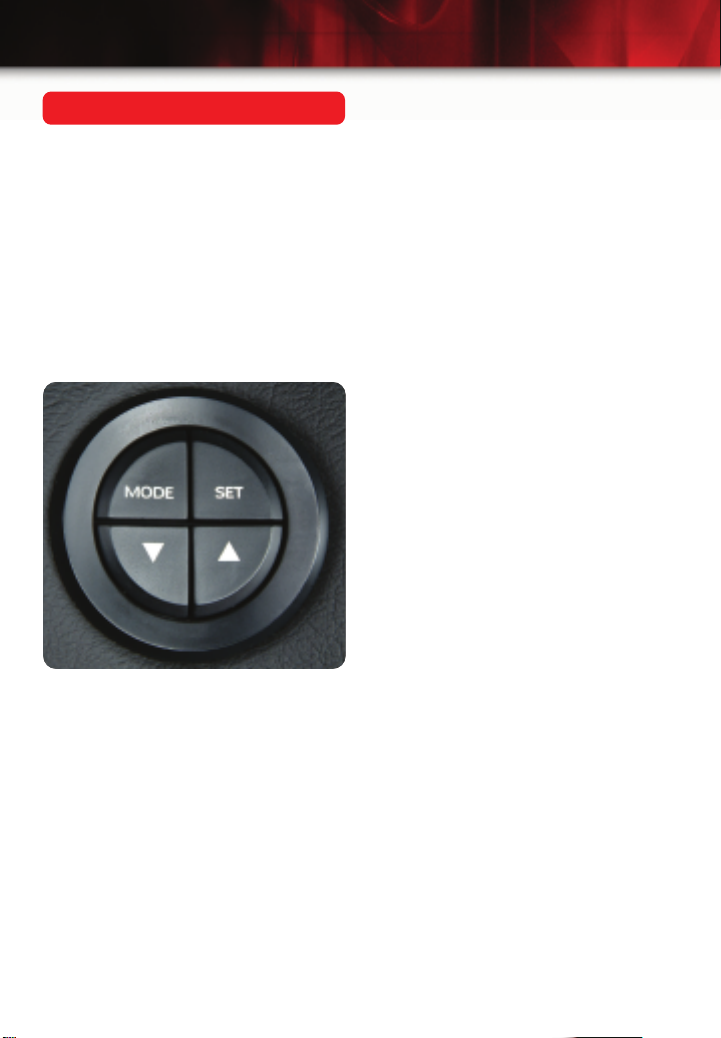
Trip Computer
The Trip Computer controls are located
to the right of the gauges. The displays
are located directly beneath the gauges.
To scroll through the menu items, tap
the MODE button. In general, speedrelated displays are shown in the left
window; distance-related displays in the
center window; and fuel-related displays
in the right window.
To reset menu items such as AVG
SPEED or TRIP TIME, press the “SET”
button for less than two seconds while
the item is displayed. To Reset the
Stopwatch, hold the “MODE” button for
more than four seconds.
Display modes include:
• Digital Speedometer
• Stopwatch
• Avg Speed, Odometer, Avg Fuel
• Trip Time A, Trip Dist A, Fuel Used A
• Trip Time B, Trip Dist B, Fuel Used B
• Overspeed, Dist to Empty, Inst Fuel
• English/Metric Unit Select
When one item is listed above, it is dis-
played in the center display. When three
items are listed, they are displayed in
the left, center and right displays.
Several of these items may be turned on
or off as described in the Vehicle
Personalization section of this booklet,
so not all items may be displayed on
your vehicle.
Trip Computer Warnings and
Messages
To acknowledge and clear many warnings and messages, press the Trip
Computer MODE button. (Note that
some messages cannot be cleared in
this manner until the condition is corrected. If a “Service Error Contact Dealer”
message is displayed, see your dealer
as soon as possible for service.)
Warnings/messages include:
• Airbag Fault
• Check Alternator
• Change Up Gear (manual trans)
• Brake (Brake System Malfunction)
• ABS Fault
• Engine Temp Hot
• Check Oil
• Low Coolant
• Low Fuel (LO)
• Very Low Fuel
• Cruise Enabled
• Traction Ctrl Off
See Section 3 of your Owner Manual.
Preventing Battery Rundown
When the ignition switch is turned from
Run to Off, be sure to remove the key
from the key cylinder; otherwise, some
accessories, such as the audio system,
will continue to use battery power. To
prevent sustained electrical draws, the
key should always be removed from the
ignition cylinder when the vehicle is not
in use. After removing the key, it can be
re-inserted in the cylinder, but the accessories will not receive power until the
key is turned in the cylinder.
See Section 2 of your Owner Manual.
Page 6

6
Getting to Know Your GTO
Power Seat Adjustments
• The power front seat controls are
located on the outboard side of the
driver and passenger seat. The
horizontal switch is used to adjust the
height, the tilt and the movement of
the seat forward and backward. The
vertical switch is used to adjust the
angle of the back of the seat.
• Adjust the manual lumbar control to
the desired amount of support in the
lower seatback by turning the knob on
the outboard side of the seat cushion.
• To adjust the height of the head
restraints, pull the head restraint up.
To reduce its height, push in the
locking clip at the base of the head
restraint and push the restraint down.
Front and rear head restraints are
height adjustable.
See Section 1 of your Owner Manual.
outboard shoulder of each front seat,
and tilt the seatback forward.
• To slide the seat forward: With
the seatback tilted forward, press
and hold the round button located
immediately below the lever.
Returning the Front Seatbacks:
• Ensuring that no objects are behind
the seat, tilt the seatback rearward
until the seatback latches upright.
• Press and hold the button under the
front-seat lever to return the seat to
its original position; the seat will
pause for two seconds when it
reaches its original position.
See Section 1 of your Owner Manual.
Tilt and Telescope Wheel
Rear Seat Access
Folding the Front Seatbacks Forward:
The front seatbacks fold forward and the
seats slide forward to allow access to
the rear seats.
• To fold the seatback: Lift the entry
lever, located near the top of the
Page 7

7
• To adjust the steering wheel position,
locate the adjustment lever under the
steering column. Hold the steering
wheel and rotate the lever down, then
move the steering wheel to the
desired position (the wheel can be
adjusted up/down and in/out). Rotate
the lever back up to lock the steering
wheel in place.
See Section 3 of your Owner Manual.
Door Lock Operation
Your GTO has several unique door
lock features. Two important points to
remember are:
• The doors cannot be locked if the
driver door is open. This helps
prevent “lockouts.”
• The vehicle uses the “Lock Knob”
located at the top of the door trim
panel as the power lock switch,
operating both door locks.
From Inside the Vehicle: To lock the
doors from inside the vehicle, push
down on the door lock knob with the
doors closed. To unlock the doors, pull
the knob up. There are no power door
lock switches on the armrests or center
console. Using the door lock knob activates both door locks in unison.
Automatic transmission vehicles
may lock the doors automatically when
in Drive (D). This feature is selectable as
described under Vehicle Personalization
of this booklet.
From Outside the Vehicle: Your vehicle
comes with a Remote Keyless Entry
transmitter built into the ignition key. Use
the transmitter as follows:
To Unlock the Driver’s Door, press
and release the UNLOCK button. To
unlock BOTH doors, press and HOLD
the UNLOCK button for more than one
second.
• If desired, both doors can be set to
Unlock with one initial press (see
Vehicle Personalization, Two Stage
Unlock, in this booklet).
T
o Lock the doors, press the LOCK
button on the transmitter with both doors
closed. This locks the doors and arms
the anti-theft system. Note:
• The doors cannot be locked if the
driver’s door is open.
• If the passenger door is open when
the Lock button is pressed, the
Passenger Door will NOT lock. The
horn will chirp several times in rapid
succession to alert the driver. The
horn will continue to chirp in this
manner every time the lock button is
pressed, UNTIL BOTH doors are
CLOSED, UNLOCKED, and then
LOCKED.
Lock/Unlock Confirmation: Your
GTO will flash its exterior lights to
confirm Keyless Entry operation. Lights
will flash one time for lock, and two
times for unlock. In addition, if set under
Personalization, the horn will also chirp
in the same manner. A series of rapid
chirps indicates that the passenger door
was open during the locking sequence
(see section above for details).
See Section 2 of your Owner Manual.
Page 8

8
Getting to Know Your GTO
Manual Transmission
Shift Light
( ) One-to-Four Shift Light (Manual
Transmission):
When this light comes
on you can only shift from First (1) to
Fourth (4) instead of First (1) to Second
(2). This helps you get the best possible
fuel economy. After shifting to Fourth (4),
the vehicle can then be shifted into a
lower gear, if desired. The light comes
on only when the engine coolant temperature is higher than 169 degrees F.
(76 degrees C.), at speeds of 15-19
mph (24-31 km/h) and when you are at
21 percent of throttle or less.
See Section 3 of your Owner Manual.
Exterior Lighting and Interior
Dimming Controls
Controls for exterior lighting and instrument panel dimming are located to the
left of the Instrument Panel Cluster.
Exterior Lights: Rotate the center knob
clockwise to change modes of exterior
lighting. Starting from the vertical position, the settings are: “Off” ( ), Park
Lamps ( ), Headlamps ( ), and
Auto (AUTO).
Fog Lamps: To turn the fog lamps On,
pull the rotating center switch OUT.
To turn the fog lamps Off, push the
switch IN.
Instrument Panel Brightness: When
exterior lights are ON, the brightness of
the illuminated
portions of the
Instrument Panel
can be adjusted.
To increase brightness, move the
small slider switch
to the right.
To decrease, move
the slider switch to the left.
See Section 3 of your Owner Manual.
Turn Signal/Multifunction Lever
The Turn Signal/Multifunction Lever on
the left side
of the steering column
controls the:
• Turn and
lanechange
signals.
• Headlamp High/Low Beam-Changer
(push forward for high beams; pull
back and release for low beams; pull
back and hold for flash-to-pass feature). A symbol on the instrument
cluster illuminates when high beams
are on.
Note: Arapidly flashing turn signal
arrow on the instrument cluster may
indicate a burned-out exterior turn signal
bulb. If the arrow fails to light when the
signal is activated, check the fuse for
burned-out bulbs. See Fuses and Circuit
Breakers in Section 5 of your Owner
Manual for more information.
See Section 3 of your Owner Manual.
Page 9

9
Cruise Control
Use the Cruise Control function for
steady driving on relatively straight,
uncrowded roads.
To turn the Cruise Control system On or
Off, press and release the ON-OFFCANCEL switch located on the Turn
Signal/Multifunction Lever. “Cruise
Enabled” will be momentarily displayed
in the Trip Computer window and the
“Cruise” indicator will remain displayed
while Cruise Control is enabled.
To set the speed, rotate the switch to the
SET-DECEL position. “Active” will then
be displayed next to “Cruise” in the Trip
Computer window, and the current vehicle speed will be maintained.
While Cruise Control is in the “Active”
mode, rotating the switch to the ACCEL
or DECEL position is designed to
increase or decrease the vehicle speed
the Cruise Control system maintains.
Pressing the brake pedal is designed
to cancel the “Active” Cruise Control.
A “Cruise Inactive” message will be
momentarily displayed in the Trip
Computer window and the “Active”
indicator will go out.
Rotating the switch to the RES
(Resume) position is designed to
reactivate the Cruise Control system to
the speed set before the brake pedal
was pressed. “Cruise” and “Active”
indicators will again be displayed in the
Trip Computer window.
See Section 3 of your Owner Manual.
Windshield Wipers/Washers
The lever on the right side of the steering column operates the windshield
wipers and washer.
Set the controls to the following desired
position:
( ) Off
INT (Intermittent): Push the lever up one
position to turn on the intermittent wipe
function. In the INT position the wiper
speed can be changed by rotating the
end of the lever. The wiper speed will
decrease as you rotate the control
upward:
1 (Low Speed): Move the lever to the
second position for slow, steady
wiping cycles.
2 (High Speed): Place the lever in the
third position for rapid wiping cycles.
To activate the windshield washer, pull
the lever toward you. The wipers will run
for a few cycles to clear the windshield.
See Section 3 of your Owner Manual.
Page 10

10
Getting to Know Your GTO
Audio System
Setting the Time: With the radio on,
press the TIME button for more than two
seconds. When TIME ADJ or SETTIME
is displayed, press the SEEK/TRACK
arrows to adjust the hours. Press the
TUNE arrows to adjust the minutes, and
then press the TIME button again to
save the setting.
CONTROLS:
ON OFF: Press this button to turn the
system on and off.
AUDIO: Turn the knob to increase or
decrease the volume. Pushing the knob
will access the following settings:
• BASS/TREBLE SETTINGS: Push
the AUDIO knob until BASS or
TREBLE appears on the display. Turn
the knob to increase/decrease. To
adjust a setting to the middle setting,
push and hold the AUDIO knob until
CENTERED appears on the display.
• BALANCE/FADE SETTINGS: Push
the AUDIO knob until BALANCE
appears on the display. Turn the knob
to adjust balance toward the left or
right speakers. Push the AUDIO knob
again until FADER appears on the
display, and turn the knob to move
the sound to the front or rear
speakers.
• BOOST: Press the AUDIO knob while
in any equalization setting, until
BOOST appears on the display. Turn
the knob to adjust the level of effect
of the equalization.
FM AM: Press this button to switch
between AM, FM1 and FM2.
TUNE DISC: Press the right or left
arrow to change radio frequencies or to
advance to the next CD.
SEEK TRACK: Press the right or left
arrow to go to the next or previous
station and stay there. For CDs, press
the left arrow once to return to the start
of the current track and the right arrow
to advance to the next track.
EQ: Press this button to choose
between bass and treble equalization
settings designed for different music
types or talk radio. To turn it off, press
the button until EQ OFF appears on the
display. To give the equalization setting
a boost, push the AUDIO knob once
while in any EQ setting and BOOST will
appear on the display. Turn the AUDIO
knob to select a boost level.
LOC (Local): Press this button to switch
the radio to local mode. “Local” will
appear on the display, and only stations
with strong signals and clear reception
will be found when using SEEK.
FR FF (Fast Reverse/Fast Forward):
Press and hold these buttons to move
quickly through a track on a CD. You will
hear sound at a reduced volume and the
display will show elapsed time.
Setting Radio Station Presets: With
the radio on, select the desired band
by pressing FM AM. You can save six
stations on each of AM, FM1 and FM2
for a total of 18 presets.
Page 11

11
Tune to the desired station; press EQ to
select the equalization. Press and hold
one of the six numbered pushbuttons
until a beep sounds. Repeat for each
pushbutton.
Automatic Station Memory (ASM):
ASM is toggled on and off by pressing
the ASM button (ASM will be displayed
when the feature is “on”). This feature
finds and temporarily saves stations with
the strongest signals as your presets. To
use this feature, select the desired band
and press the ASM button for more than
two seconds. SEARCH appears on the
display, and up to six of the strongest
stations are temporarily stored as your
presets. To again lock onto 6 stations
(after driving awhile, for instance), press
and hold the ASM button again. To
return to normal presets, press and
release ASM.
LOADING COMPACT DISCS:
To load a single disc:
• Press and release the LOAD button.
• Wait for INSERT DISC to appear on
the display and the indicator light at
the left of the CD slot to flash. If
beeps are turned on, the radio will
also beep. (See Section 3 of your
Owner Manual for “Confirmation
Beeps” details.)
• Insert the disc partway into the slot,
label side up; the player will pull the
disc in.
To load multiple CDs in the Six-Disc
CD Player:
A
B
• Turn the ignition on; then press and
hold the LOAD button (“A” above) for
two seconds. Wait for LOAD ALL to
appear on the display, and for the
light to the left of the slot to flash
(“B” above). If beeps are turned on,
the radio will also beep. (See Section
3 of your Owner Manual for
“Confirmation Beeps” details.)
• When the light stops flashing and
turns green, insert a disc partway,
label side up.
• The indicator light will begin flashing;
when it stops blinking and turns
green, load another disc.
• When more than one disc is loaded,
a number for each disc is displayed.
• To load more than one but fewer than
six discs, press the EJECT button
(“C” above) after loading the final CD.
• To play a specific CD, press the
numbered button that corresponds to
the CD that you want to hear.
• To eject a single CD, press and
release the EJECT button. To eject
all CDs, press and hold the EJECT
button until EJECTING ALL is shown
on the display.
See Section 3 of your Owner Manual.
C
Page 12
12
Getting to Know Your GTO
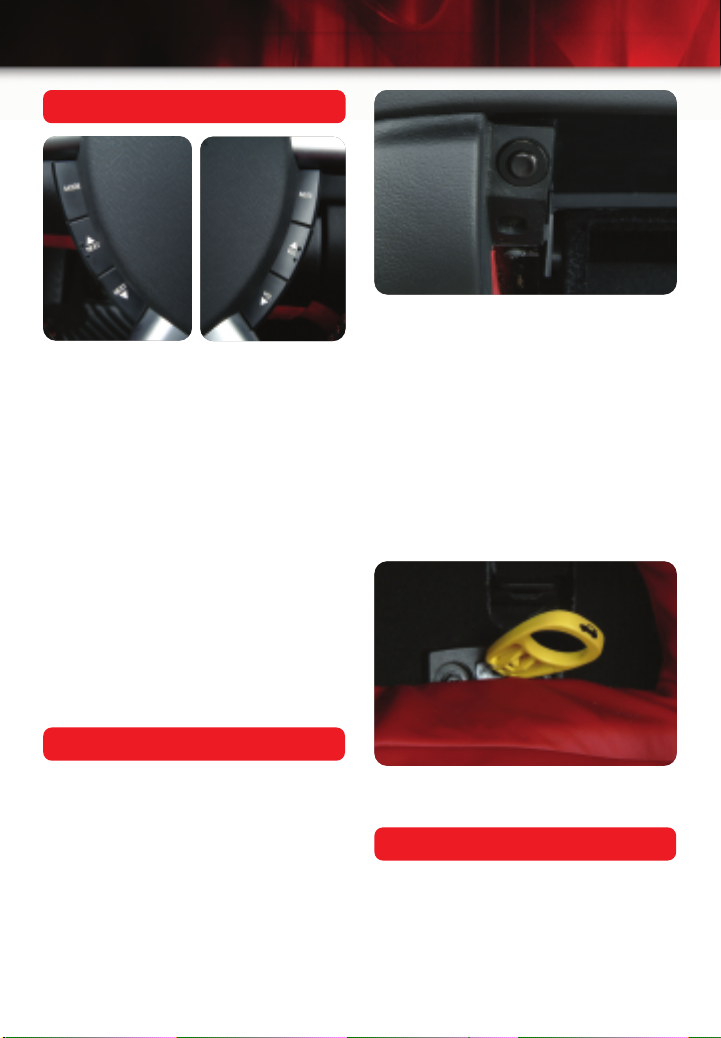
Audio Steering Wheel Controls
MODE: Press to choose AM, FM1, FM2,
or CD if a CD is loaded.
NEXT: Press to tune to the next or previ-
ous radio station. For CDs, press and
release the “Down” arrow to go to the
previous track; press and hold to go to
the previous disc. Press and release the
“Up” arrow to go to the next track; press
and hold to go to the next disc.
MUTE: Press this button to silence
the system. Press it again (or any radio
button) to enable the sound.
VOLUME: Press the “Up” arrow to
increase the volume and the “Down”
arrow to decrease the volume.
See Section 3 of your Owner Manual.
For added security, the trunk release
button is disabled when all the doors are
locked using the Remote Keyless Entry
transmitter LOCK button or through the
door lock knob.
Secondary Trunk Release Handle:A
secondary mechanical release handle is
located under the passenger-side rear
seat head restraint. To unlatch the trunk,
lift the head restraint and pull the yellow
ring (shown below) toward the front of
the vehicle.
Trunk Release
The vehicle’s trunk lid is not equipped
with a lock cylinder. To open the trunk,
do one of the following:
Remote Keyless Entry: Press the open
trunk symbol on the Remote Keyless
Entry transmitter.
In-Car Trunk Lid Release Button:
Press the trunk lid release button
located in the glove box.
See Section 2 of your Owner Manual.
Fuel Door Release
The fuel door release button is located
on the Instrument Panel, to the left of
the steering wheel.
See Section 5 of your Owner Manual.
Page 13

13
Frontal Air Bags
Your vehicle has frontal air bags — one
for the driver and one for the right-front
passenger. It is very important that the
driver and front passenger be properly
positioned when the air bags deploy in a
crash, so be certain to wear your safety
belts whenever the vehicle is in motion.
See your Owner Manual for full details
and cautionary information.
See Section 1 of your Owner Manual.
Accessory Power Outlet
A 12-volt accessory outlet is included for
use with electrical accessories such as
cell phones. The outlet is located in the
center console and is operational when
the ignition is turned to ON or ACCESSORIES. Remove the tethered cap to
use the outlet, and replace the cap
when the outlet is not in use. Refer to
your Owner Manual for important safety
information regarding the use of
Accessory Power Outlets.
See Section 3 of your Owner Manual.
Storage Areas
Glove Box:
Located on the passenger
side of the instrument panel, the glove
box has a dedicated key.
Front Storage Area: There is a front
storage compartment
located under
the audio system. Press
and release
the door to
open the bin.
Center Console: The Center Console
contains an armrest storage area with
an Accessory Power Outlet. To open the
armrest storage area, pull up on the
front edge of the lid. Another small storage compartment accessible from the
rear seat is located in the rear of the
center console.
Cupholders: Two cupholders are located in front of the center console storage
area. If desired, the small tray located at
the rear of the center console storage
can be used to neatly cover the
cupholders when not in use.
See Section 2 of your Owner Manual.
Theft Deterrent Systems
Your vehicle comes with two theft deterrent systems.
The first is an Engine Immobilizer that
disables engine starting if an incorrect
key is used to try to start the vehicle.
The second is a Content Protection system that arms when the doors are
locked with the Remote Keyless Entry
system. If a door or the trunk is
unlocked improperly, the alarm sounds
the horn and flashes the exterior lights.
As an added security feature, when the
Content Protection system is armed, the
alarm will sound if the trunk is left ajar,
and then the trunk lid is opened more
than 30 seconds later.
To turn off the alarm when it is sounding,
simply place the key in the ignition and
turn the switch to Run, or unlock the
doors with the Remote Keyless Entry
transmitter.
See Section 1 of your Owner Manual.
Page 14

14
Getting to Know Your GTO
Keys — Replacement
The ignition keys for the GTO incorporate several unique features, from the
shaft design, which makes theft more
difficult, to integrated Remote Keyless
Entry transmitters and encoded theft
deterrent electronics. For these reasons,
replacing keys will require more cost
and time than standard keys. We
recommend using GM dealers for any
replacement keys.
See Section 2 of your Owner Manual.
Security Card
Every GTO comes with a Security Card
that contains important information concerning the vehicle. The card contains
the Vehicle Identification Number (VIN),
Ignition and Glove Box Key Codes, and
your Radio Personal Identification
Number. Please store this card with
other important documents about your
new vehicle. If service work is ever
required, this information may be needed to enable proper operation.
Traction Control System (TCS)
Your GTO has a Traction Control
System (TCS) that limits your vehicle’s
wheelspin. This can be especially useful
on slippery roads.
The system is automatically activated
whenever the ignition is turned from
OFF to ON. When the system senses
that one or both of the rear wheels are
spinning or beginning to lose traction,
the system reduces engine power and
applies the brakes as necessary to
regain traction.
Traction control helps you to maintain
control of your vehicle and acts as
a reminder to match your driving to the
road conditions. When Traction Control
is activated, you may feel pulsing in
the accelerator pedal. ALow Traction
message is displayed on the Trip
Computer
If your vehicle is stuck in snow or mud,
and it is necessary to rock the vehicle to
free it, you can turn off the Traction
Control by pressing the T/C button
located on the center console.
Smoker’s Package
The GTO does not come with a standard cigarette lighter or ashtray. If
desired, your dealer can replace the
storage compartment below the radio
with an ashtray and cigarette lighter
assembly. See your dealer for
information.
See Section 3 of your Owner Manual.
Turn off TCS whenever you are using
traction devices on your vehicle’s rear
wheels (due to a lack of clearance, you
cannot use tire chains).
When the system is off, the Trip
Computer displays a “Traction Ctrl Off”
message, and after two seconds returns
Page 15

15
to the original display with a small
TRAC OFF icon on the right side of the
screen. To turn TCS back on, press the
T/C button again. The system will
automatically turn on the next time the
engine is started.
See Section 1 of your Owner Manual.
Fuel
Premium unleaded fuel with an octane
rating of 91 or higher is recommended
for best performance. Using regular or
middle-grade fuel of 87 octane or higher
is permissible, but the vehicle’s acceleration may be slightly reduced. If fuel
with an octane rating of less than 87 is
used, you may hear a heavy knocking
noise that can damage your engine. In
this instance, you should fill the fuel tank
with higher-octane fuel as soon as
possible.
After fueling, ensure that the gas cap
is installed correctly and tightly. If it
is loose or missing, the malfunction
indicator lamp will light steadily. If a
loose gas cap is the cause, a few
driving trips after properly tightening
the gas cap should cause the light to
go out. If the light remains on, have
the vehicle serviced.
See Section 5 of your Owner Manual.
Winter Driving Suggestions
Beware of “Wet Ice”
When temperatures hover around 32
degrees F. (0 degrees C.), “wet ice” can
form on the roadway. “Wet ice” is formed
at this temperature when freezing rain
begins to fall, and it offers even less
traction than very cold snow or ice. Try
to avoid driving on wet ice until salt and
sand crews can get there.
Winter Driving Techniques
In any low-traction situation, drive with
caution and keep the Traction Control
System (TCS) turned on. Do not use tire
chains — there isn’t enough clearance
(see your Owner Manual for full details).
Prepare for stops sooner than you would
if the road were dry. Allow greater following distances between your vehicle and
the vehicle ahead of you, and watch for
slippery spots. Sometimes the surface of
a curve or an overpass/bridge may be
icy when the surrounding roads are
clear. If you see a patch of ice ahead of
you, try to brake
before you are on it.
Try not to brake while you are actually
on the ice, and avoid any sudden steering maneuvers.
If You Become Stuck
If you become stuck in snow, ice, mud
or sand, you may be able to free your
vehicle by “rocking” it. Turn your steering
wheel left and then right to clear the
path around your front wheels. Turn off
the Traction Control System. Shift back
and forth between reverse and a forward
gear, spinning the wheels as little as
possible. Release the accelerator pedal
while you shift, and press lightly on the
accelerator pedal when the transmission
is in gear. This will cause a rocking
motion that may free your vehicle. See
your Owner Manual for full details.
See Sections 4 and 5 of your Owner Manual.
Page 16

16
Getting to Know Your GTO
Roadside Assistance
1-800-ROADSIDE (1-800-762-3743)
TTY Users: 1-888-889-2438
As the proud owner of a 2005 Pontiac
vehicle, you are automatically enrolled
in the Pontiac Roadside Assistance
program. This value-added service is
intended to provide you with peace of
mind as you drive in the city or travel
the open road.
Pontiac’s Roadside Assistance toll-free
number is staffed by a team of technically trained advisors, who are available
24 hours a day, 365 days a year. The
advisors can provide minor repair information or make arrangements to tow your
vehicle to the nearest Pontiac dealer.
We will provide the following services for
3 years/36,000 miles (60,000 km), at no
expense to you.
• Fuel delivery
• Lockout service (identification
required)
• Tow to nearest dealership for
warranty service
• Change a flat tire
• Jump starts
In many instances, mechanical failures
are covered under Pontiac’s comprehensive warranty. However, when other
services are utilized, our advisors will
explain any payment obligations you
might incur.
For prompt and efficient assistance
when calling, please provide the following information to the advisor:
• Location of the vehicle
• Telephone number and your location
• Vehicle model, year and color
• Vehicle mileage
• Vehicle Identification Number (VIN)
• Vehicle license plate number
Pontiac reserves the right to limit servic-
es or reimbursement to an owner or
driver when, in Pontiac’s judgment, the
claims become excessive in frequency
or type of occurrence.
My GMLink
The Pontiac Owner Center at My
GMLink is a complimentary service for
Pontiac Owners, a one-stop resource to
enhance your Pontiac ownership experience. Exclusive member benefits
include online service reminders, vehicle
maintenance tips, online owner manual,
special privileges and more. Sign up
today at www.mygmlink.com
Certain restrictions, precautions and safety procedures apply to your vehicle. Please read your Owner
Manual for complete instructions. All information contained herein is based on information available at
the time of printing and is subject to change without notice. Copyright 2004 by GM Corp.
All rights reserved.
OGTK A
05GT
 Loading...