

Page 1
Getting to Know Your 2005
G6
TABLE OF CONTENTS
REMOTE KEYLESS ENTRY SYSTEM
Remote Keyless Entry (RKE) . . . . . . . .2
Remote Vehicle Start System . . . . . . .3
RKE Transmitter Battery
Replacement . . . . . . . . . . . . . . . . . . . . .4
COMFORT FEATURES
Power Seat . . . . . . . . . . . . . . . . . . . . . . .5
Manual Lumbar Handle . . . . . . . . . . . .5
Heated Seat Controls . . . . . . . . . . . . . .5
Shoulder Belt Height Adjuster . . . . . .6
Tilt/Telescoping Steering Wheel . . . . .6
Adjustable Accelerator
and Brake Pedals . . . . . . . . . . . . . . . . .6
Power Mirrors . . . . . . . . . . . . . . . . . . . .6
AUDIO SYSTEM FEATURES
Audio System Features . . . . . . . . . . . .7
Audio Steering Wheel Controls . . . . .8
Multiple-Disc CD Player . . . . . . . . . . . .9
XM Radio . . . . . . . . . . . . . . . . . . . . . . . .9
INSTRUMENT PANEL FEATURES
Instrument Panel . . . . . . . . . . . . . . . . .10
Instrument Panel Cluster . . . . . . . . . .11
Congratulations on your purchase of a Pontiac G6. Please read this information about your vehicle’s features
and your Owner Manual to ensure an outstanding ownership experience. Note that your vehicle may not include
all the features described in this booklet. Place this booklet in your Owner Manual portfolio for easy reference.
Driver Information Center (DIC) . . . .12
CONVENIENCE FEATURES
Automatic Door Locks . . . . . . . . . . . .14
Automatic Transaxle with
Manual Shift Mode . . . . . . . . . . . . . .14
Speed-Sensitive Wipers . . . . . . . . . .14
Cruise Control . . . . . . . . . . . . . . . . . . .15
Climate Control Airflow Modes . . . . .15
Window Defogging . . . . . . . . . . . . . . .16
Exterior Lamps . . . . . . . . . . . . . . . . . . .16
60/40 Split Rear Seat . . . . . . . . . . . . . .17
Sunroof . . . . . . . . . . . . . . . . . . . . . . . . .17
Panoramic Roof . . . . . . . . . . . . . . . . . .17
Trunk Floor Cover . . . . . . . . . . . . . . . .18
MAINTENANCE FEATURES
Resetting the Oil Life System . . . . . .19
Securing the Fuel Cap . . . . . . . . . . . .19
Vehicle Symbols Glossary . . . . . . . . .19
OWNER INFORMATION
Roadside Assistance . . . . . . . . . . . . .20
My GMLink . . . . . . . . . . . . . . . . . . . . . .20
Page 2

REMOTE KEYLESS ENTRY SYSTEM
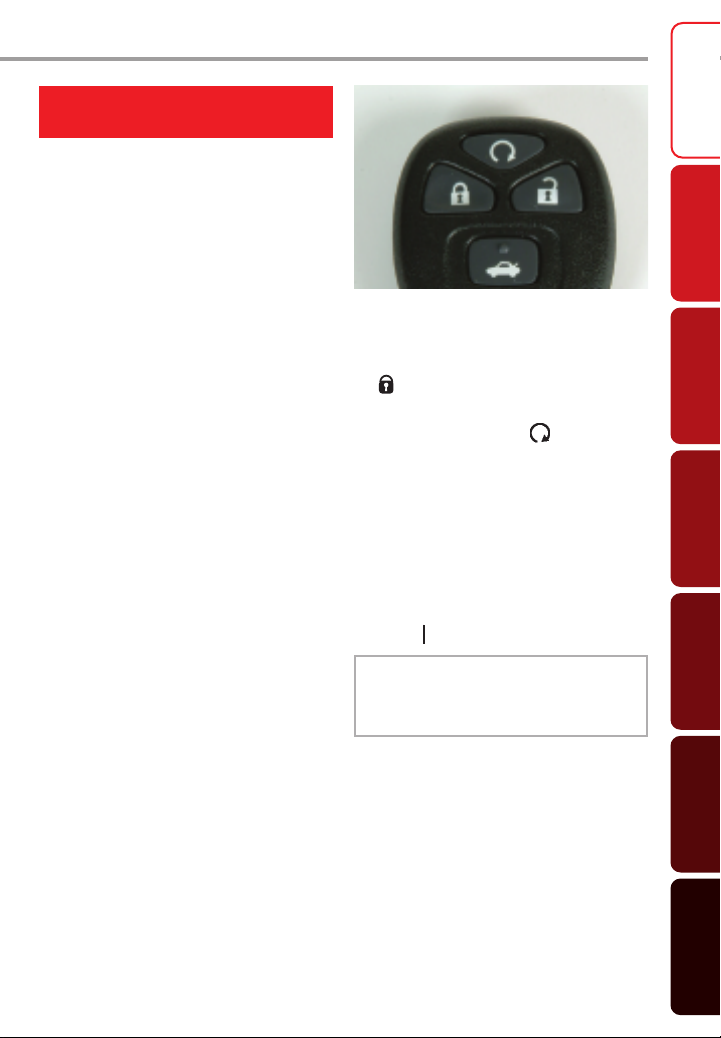
Remote Keyless Entry (RKE)
(Remote Start): If your vehicle has
this feature, it can be used to start the
engine. (See Remote Vehicle Start
System.)
(Lock): Press this button to lock all
the doors. The interior lamps will turn
off after a short delay once all doors are
closed. If enabled through the Driver
Information Center (DIC), the parking
lamps will flash once and/or the horn
will chirp to indicate locking has
occurred.
(Unlock): Press this button to unlock
the driver’s door. If the button is pressed
again within five seconds, all remaining
doors will unlock. The interior lamps
will illuminate and remain on for 10
seconds or until the ignition is turned
on. If enabled through the DIC, the parking lamps will flash twice and the horn
will chirp twice to indicate unlocking
has occurred.
(Trunk Release): The trunk will
unlatch when this button on the transmitter is pressed and held for approximately one second. You can open the
trunk with the transmitter when the
vehicle is stationary.
The trunk may also be opened using the
Trunk Release button located on the
driver-side door.
(Vehicle Locator/Panic Alarm):
A new Vehicle Locator feature has been
added to your car’s Remote Keyless
Entry.
Press and hold this button for approximately one second to locate your vehicle. The horn will sound three times and
the headlamps and parking lamps will
flash three times.
To sound the panic alarm, press and
hold the button for three seconds. The
horn will sound and the headlamps and
parking lamps will flash for two minutes. Press the button again to cancel
the panic alarm.
Unlock Functions without the RKE
Transmitter
Your vehicle’s passenger doors and
trunk can also be unlocked using the
driver’s door key.
With the key in the lock cylinder:
1. Turn the key toward the front of the
vehicle and back to center once to
unlock the driver’s door.
2. Turn the key toward the front of the
vehicle and back to center twice to
unlock all doors.
3. Turn the key toward the front of the
vehicle and back to center three
times to release the trunk.
See Section 2 of your Owner Manual.
2
Page 3
Remote Vehicle Start System
(if equipped)
This feature allows you to start the
engine from outside the vehicle by using
the Remote Keyless Entry transmitter.
(Normal transmitter range is within 200
feet of the vehicle.) The remote start
capability must be turned on using the
Driver Information Center in order for
the Remote Vehicle Start System to
function. (See Driver Information
Center.)
You can also set the vehicle’s climate
control system to heat or cool the vehicle interior before getting in. The engine
will run for about 10 minutes before
turning itself off, but can be extended
10 minutes more by performing another
remote start sequence at any time.
After two consecutive remote starts, no
additional remote starts are allowed
until the vehicle has been started with
the ignition key.
The remote start system will not operate if the hood is open or if the key is in
the ignition.
REMOTE KEYLESS ENTRY SYSTEM
Starting the Vehicle
1. Aim the transmitter at the vehicle.
2. Press and release the Lock button
on the transmitter
3. Immediately press and hold the
Remote Start button for about
two seconds.
4. When the vehicle starts, the parking
lamps will light and stay on while
the engine is running.
5. Repeat these steps for a 10-minute
time extension.
After a remote start, the key must be
inserted in the ignition and turned to
the Run ( ) position before driving.
Note: If the Check Engine light is illuminated
on the instrument panel cluster, the Remote
Vehicle Start System cannot be used. See
your dealer for the proper repairs.
Entry System
Remote Keyless
Comfort
Features
Features
Audio System
Instrument
Panel Features
Features
Convenience
3
Features
Maintenance
Owner
Information
Page 4
REMOTE KEYLESS ENTRY SYSTEM
Turning Off the Engine after
a Remote Start
If you wish to turn off the engine
instead of driving after a remote start,
perform one of the following functions:
• Press and hold the remote start
button until the parking lamps
turn off.
• Press and release the Hazard
Warning Flashers button inside the
vehicle. Press the button again to
turn off the flashers.
• Turn the key in the ignition switch
to the Run ( ) position and then
off ( ).
• The engine will automatically stop
when time expires.
Instructions for Remote Start are pro-
Note:
vided on a tag that can be attached to your
vehicle’s key chain.
See Section 2 of your Owner Manual.
RKE Transmitter Battery
Replacement
Under normal use, the battery in your
Remote Keyless Entry transmitter
should last about two years. You can
tell the battery is weak if the transmitter won’t work at the normal range in
any location. If you have to get close to
your vehicle before the transmitter
works, it’s probably time to change the
battery. Your Driver Information Center
will also advise you when the battery is
becoming weak.
Replace the Battery
1. Use a flat, thin object to separate
the bottom half from the top half of
the transmitter.
2. Remove the battery and replace it
with a new one. Make sure the
positive side of the battery faces up.
3. Put the two halves back together.
Make sure they are tightly secured.
Note: When replacing the battery, use one
three-volt CR2032 or equivalent battery. Use
care not to touch any of the transmitter circuitry. Static from your body transferred to
these surfaces may damage the transmitter.
See Section 2 of your Owner Manual.
4
Page 5
COMFORT FEATURES
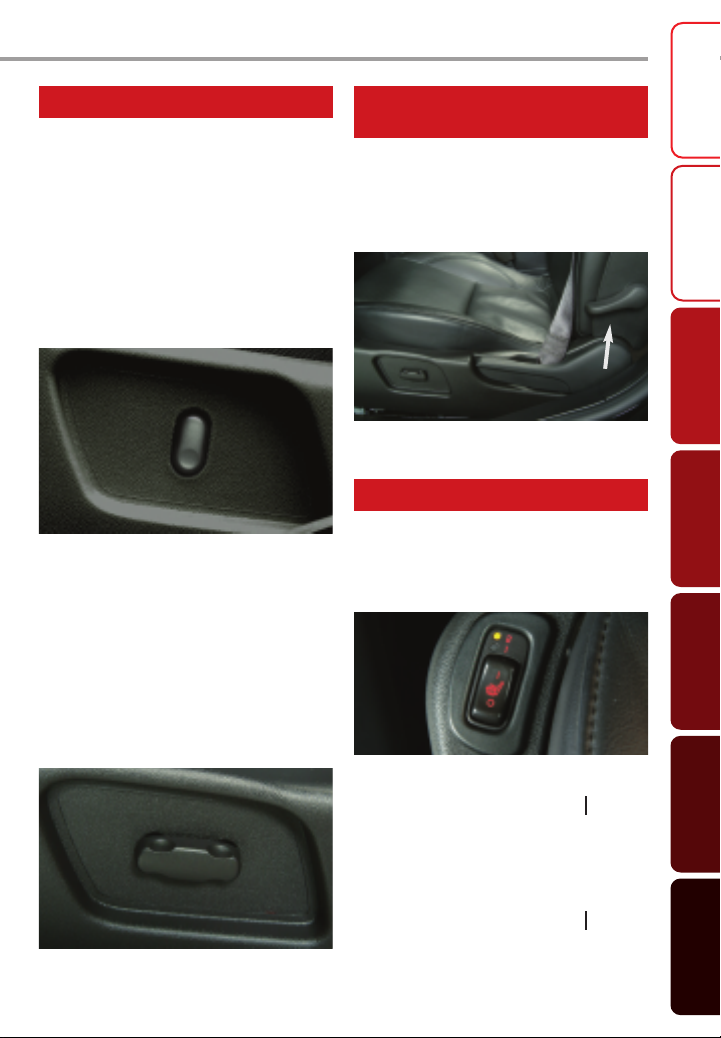
Power Seat (if equipped) Manual Lumbar Handle
The power seats can be manually
adjusted forward/rearward as well as
up/down using the power height
adjuster located on the outboard side
of the driver’s seat.
Move the Seat Forward or
(if equipped)
Adjust the lumbar support using the
lumbar handle located on the outboard
side of the driver’s seatback. Rachet the
handle down to increase support and up
to decrease support.
Rearward
• Lift and hold the bar under the
front of the seat to manually slide
the seat.
See Section 1 of your Owner Manual.
Heated Seat Controls (if equipped)
Entry System
Remote Keyless
Comfort
Features
Features
Audio System
Raise or Lower the Entire Seat
• Hold the height adjuster control up
or down.
Raise or Lower the Front or Rear of
the Seat Cushion (if equipped)
The 6-way power seats also feature
seat cushion adjustment.
• Hold the front or rear of the control
up or down.
See Section 1 of your Owner Manual.
The heated front seat controls are located on the outboard corner of the driver
and front passenger seats. The seats
feature a high and low heat setting.
High Setting
• Press the top of the switch ( ) once
to turn on the heated seat. It will
heat to the high setting (indicator
light number 2).
Low Setting
• Press the top of the switch ( ) twice
to turn on the seat to the low setting
(indicator light number 1).
5
Instrument
Panel Features
Features
Convenience
Features
Maintenance
Owner
Information
Page 6
COMFORT FEATURES
Off
• Press the bottom of the switch ( )
to turn the heated seat off.
See Section 1 of your Owner Manual.
Shoulder Belt Height Adjuster
(sedan only)
The shoulder belt can be adjusted to
the height that is right for you. Push the
Release button up or down to move the
height adjuster. Once in a comfortable
position, try to move the height adjuster
to make sure it is locked in place.
See Section 1 of your Owner Manual.
Tilt/Telescoping Steering Wheel
Adjusting the Steering Wheel
1. Pull down the lever located on the
left side of the steering column.
2. Adjust the wheel to a comfortable
position. The wheel moves up and
down as well as telescopes in and
out. Move the wheel up to a centered position or higher to make it
easier to telescope the wheel in and
out.
3. Push up the lever all the way to lock
the wheel in place.
See Section 3 of your Owner Manual.
6
Adjustable Accelerator and
Brake Pedals
The accelerator and brake pedals can
be adjusted to a comfortable and safe
operating position using the controls
located on the left side of the instrument panel. The vehicle must be in Park
in order to adjust the pedals.
Press the left arrow
to move the
3
pedals away from you and the right
arrow4to move the pedals toward
you.
See Section 2 of your Owner Manual.
Power Mirrors (if equipped)
The power outside rearview mirrors
may be adjusted using the controls
located on the door panel.
Use the bottom switch to select the
driver-side mirror or passenger-side
mirror; and then use the top switch to
adjust the selected mirror up, down or
side to side.
See Section 2 of your Owner Manual.
Page 7

AUDIO SYSTEM FEATURES
Audio System Features
While most of the features on your
radio will look familiar, following are
some that may be new.
Display
On radios with two-line displays, the
top line will be used to show radio frequency or time, and outside temperature. On radios with a single-line display, the Driver Information Center will
overwrite the radio information while in
use.
Left Controls
(Power): Press the center of this
knob to turn the power on or off.
(Volume): Turn the outside ring of
this knob to adjust the volume.
BAND (if equipped): Press this button
to switch between FM1, FM2, AM, or
XM1 and XM2 (if equipped).
SRCE (Source) (if equipped): Press this
button to change to the CD mode or an
auxiliary mode (if installed). Press the
BAND button to return to the radio mode.
AUTO
(Automatic Volume) (if equipped):
This feature automatically adjusts audio
volume based on vehicle speed to compensate for outside road noise. Press
this button to set the volume compensation level at Low, Medium or High.
(Seek/Scan): Press the up or
down arrow to go to the next or previous radio station or, when a CD is playing, to the next or previous track.
To enter the scan mode, press and hold
the up or down arrow for two seconds
(a beep will sound). Radio stations will
be scanned while in the radio mode and
CD tracks while in the CD mode. Press
and hold the up or down arrow for four
seconds to scan radio station presets.
Right Controls
DISP (Display): Press the center of
this knob to toggle the radio display
between station frequency and time.
It will also display song title and artist
information, if available in the
broadcast.
ADJ (Adjust): Turn the outside ring of
this knob to tune radio stations and to
adjust selected audio functions.
TONE: Press this button to display the
bass, midrange and treble levels. Turn
the ADJ knob to adjust each level.
BAL/FADE (Balance/Fade): Press this
button to display the balance between
the right and left speakers and the fade
between the front and rear speakers.
Turn the ADJ knob to adjust the sound
from the speakers.
AUTO TONE (Automatic
Equalization): Press this button to
select customized equalization settings.
Setting the Time
To set the clock:
1. Press and hold the Clock button for
two seconds to enter the Set Clock
mode.
2. Use the ADJ knob to select the hour.
3. Press the Clock button.
7
Entry System
Remote Keyless
Comfort
Features
Features
Audio System
Instrument
Panel Features
Features
Convenience
Features
Maintenance
Owner
Information
Page 8

AUDIO SYSTEM FEATURES
4. Use the ADJ knob to select the
minutes.
5. Press the Clock button again to complete the process.
Setting Preset Stations
Up to 30 preset stations (FM1, FM2,
AM, XM1, XM2 (if equipped) can be
programmed on the six numbered pushbuttons. To preset a station:
1. Turn on the radio.
2. Press the BAND button to select
FM1, FM2, AM, XM1 or XM2.
3. Tune in the desired station.
4. Press the AUTO TONE button to
select the equalization.
5. Press and hold one of the six numbered pushbuttons until you hear a
beep. The station is now preset.
See Section 3 of your Owner Manual.
Audio Steering Wheel Controls
(if equipped)
A number of audio controls can be
adjusted at the steering wheel. They
include:
(Seek/Scan): Press the up or
down arrow to go to the next or previous radio station or, when a CD is playing, to the next or previous track.
Press and hold the up or down arrow for
two seconds (a beep will sound) to
enter the scan mode. Radio stations will
be scanned while in the radio mode and
CD tracks while in the CD mode. Press
and hold the up or down arrow for four
seconds to scan radio station presets.
BAND: Press this button to switch
between FM1, FM2, AM, XM1 or XM2
(if equipped).
1–6 (Preset Pushbuttons): Press this
button to play stations that are programmed on the radio preset pushbuttons. When a CD is playing in the multiple-disc CD player, press this button to
go to the next available CD.
(Volume): Press the up or
down arrow to increase or decrease the
volume.
(Mute): Press this button to silence
the system. Press any audio system button to turn the sound on again.
SRCE (Source): Press this button to
change to the CD mode or an auxiliary
mode (if installed). Press the BAND button to return to the radio mode.
See Section 3 of your Owner Manual.
8
Page 9

AUDIO SYSTEM FEATURES
Multiple-Disc CD Player
(if equipped)
With the in-dash 6-Disc CD Player, note
that you cannot directly load a CD as in
single-play systems.
To load a single CD:
• Press and release the Load button.
Wait for the display prompt to load
the CD.
To load multiple CDs:
• Press and hold the Load button for
two seconds. Follow the display
prompts to load each CD.
To play a specific CD:
• Press the numbered pushbutton that
corresponds to the loaded CD number on the display.
Note: CDs with homemade labels may jam
in the Multi-Disc CD Player. MP3-formatted
CDs will not play in this CD player.
XM Radio (if equipped)
On equipped radios, two additional listening bands are available: XM1 and
XM2. To access these bands, press the
Band button until XM1 or XM2 appears
on the display.
XM Satellite Radio provides more than
120 channels of digital quality sound
that goes wherever you go — coast to
coast. Activation fee and service subscription are extra. (Available only in
the U.S. 48 contiguous states.)
For more information, contact XM at
www.XMradio.com or call
1-800-852-XMXM (9696).
See Section 3 of your Owner Manual.
Entry System
Remote Keyless
Comfort
Features
Features
Audio System
Instrument
Panel Features
Features
Convenience
See Section 3 of your Owner Manual.
9
Features
Maintenance
Owner
Information
Page 10

INSTRUMENT PANEL FEATURES
Instrument Panel
B
A
C
I
J
H
D
L M
K
N
E
M
L
A. Side Air Outlets
B. Side Window Outlets
C. Turn Signal/Multifunction Lever
D. Instrument Panel Cluster
E. Windshield Wiper/Washer Lever
F. Center Air Outlets
G. Hazard Warning Flashers Button
H. Adjustable Pedal Button
(if equipped)
I. Instrument Panel Brightness Control
G
F
O
P
Q
S
R
J. Fog Lamps Switch
K. Hood Release
L. Cruise Control (if equipped)
M. Audio Steering Wheel Controls
N. Horn
O. Ignition Switch
P. Shift Lever
Q. Climate Control System
R. Audio System
S. Glove Box
See Section 3 of your Owner Manual.
B
A
10
Page 11

Instrument Panel Cluster
A
B
INSTRUMENT PANEL FEATURES
C
D
E
Entry System
Remote Keyless
Comfort
Features
Features
Audio System
Your vehicle’s instrument panel is
equipped with this cluster or one very
similar to it.
The instrument panel cluster includes
these key features:
A. Tachometer
B. Speedometer
C. Odometer
D. Engine Coolant Temperature Gauge
E. Fuel Gauge
IMPORTANT: The instrument panel
cluster is designed to let you know
about many important aspects of your
vehicle’s operation. It is important to
read your Owner Manual and become
familiar with the information being
relayed to you by the lights, gauges
and indicators, as well as what action
can be taken to ensure safety and to
prevent damage.
See Section 3 of your Owner Manual.
11
Instrument
Panel Features
Features
Convenience
Features
Maintenance
Owner
Information
Page 12

INSTRUMENT PANEL FEATURES
Driver Information Center (DIC)
Your vehicle’s audio system not only
performs the standard audio functions,
but also has an integrated Driver
Information Center that provides vehicle
information, vehicle feature personalization and vehicle warning messages. To
operate the DIC, the ignition switch
must be in the Run ( ) position.
The DIC is controlled through three
buttons located to the left of the audio
system. The DIC messages will be
shown on your audio system display.
INFO: Use this button to scroll through
the vehicle information mode displays.
MENU: Use this button to scroll
through the personalization menu mode.
ENTER: Use this button to select a
menu option or to acknowledge a warning message.
Vehicle Information
Press the INFO button to scroll through
the following vehicle information:
• Trip A
• Trip B
• Fuel Range (until empty)
• Average Fuel Economy
• Average Speed
• Engine Oil Life
Press and hold the ENTER button to reset
the information while it is displayed.
Vehicle Feature Personalization
A variety of your vehicle’s features can
be personalized to your preference. To
personalize features:
1. Press MENU to scroll through the
available personalization features.
2. Press and hold ENTER for one
second to toggle between the
available options for each feature.
3. Press MENU to record your selection
and move to the next feature.
12
Page 13

INSTRUMENT PANEL FEATURES
Personalization features include (the
first option listed under each feature is
the factory setting):
• Oil Life
• Display Units of DIC, speedometer
and odometer
– English
– Metric
• Remote Start Capability
–On
– Off
• Lock Horn (Horn chirp during
RKE locking)
–On
– Off
• Unlock Horn (Horn chirp during
RKE unlocking)
– Off
–On
• Light Flash (Exterior light flash
during RKE locking and unlocking)
–On
– Off
• Delay Lock (Delays locking the
vehicle for five seconds)
–On
– Off
• Auto Unlock (Automatically unlocks
the vehicle doors)
– All Doors
– Driver’s Door
– None
• Unlock (Determines when Auto
Unlock will occur)
– Shift to Park
– Key Off
• Exterior Lights (Exterior perimeter
lighting during RKE unlock)
–On
– Off
• Security (Method used to arm the
security system)
– RKE arming — arms the system
60 seconds after RKE locking
– Passive — automatically arms
the system after 60 seconds
• Display Language (DIC information
can be displayed in several
languages)
– English
– French
– Spanish
– German
Note: Not all of these personalization
features may be available on your vehicle.
Warnings and Messages
This function provides a variety of messages (depending on optional equipment), such as door ajar and low fuel.
To acknowledge a message and clear it
from the display, press any of the three
DIC buttons: INFO, MENU or ENTER. If
the condition is still present after the
vehicle has been turned off and back on
again, the warning message will be displayed once again.
See Section 3 of your Owner Manual.
Entry System
Remote Keyless
Comfort
Features
Features
Audio System
Instrument
Panel Features
Features
Convenience
Features
Maintenance
Owner
Information
13
Page 14

CONVENIENCE FEATURES
Automatic Door Locks
For your safety, your vehicle is programmed at the factory to lock all doors
automatically when all doors are
closed, the ignition is on and the shift
lever is moved out of Park.
This feature cannot be disabled, you
can personalize the unlock features by
using the Driver Information Center.
See Section 2 of your Owner Manual.
Automatic Transaxle with
Manual Shift Mode
You can enjoy the sporty driving characteristics provided by a manual transaxle
with the Manual Shift Mode. This feature allows you to electronically shift
gears as you would with a manual
transaxle, but without using a clutch.
To enter the Manual Shift Mode, move
the gear shift lever to the Manual Shift
(M) position.
shift lever, the system features built-in
powertrain protection that will limit
engine speed to prevent any damage
from over-revving the engine.
Downshift
Select the next lower gear while driving
by tapping the gear shift lever rearward
(–). If current vehicle speed is too high
for the requested lower gear, the downshift will not occur.
The transaxle will automatically shift
down into first gear, if the driver does
not, when coming to a stop.
While operating in the Manual Shift
Mode, the current gear selection is displayed in the instrument panel cluster.
See Section 2 of your Owner Manual.
Upshift
Select the next higher gear while driving by tapping the gear shift lever forward (+). As vehicle speed increases,
the transaxle will not automatically
upshift. This is required by the driver in
the Manual Shift Mode. If the upshift is
not commanded by tapping the gear
14
Speed-Sensitive Wipers
The speed-sensitive wipers feature four
settings. The wipers lever is located to
the right of the steering column.
Page 15

CONVENIENCE FEATURES
: Move the lever up to this position
to have the wipers adjust with your
vehicle speed. Your wiper speed will
increase as you drive faster and
decrease when you slow down. Rotate
the speed-sensitive wiper control on
the lever to increase or decrease the
wiper delay.
: Move the lever up to this position
to turn the wipers on Low.
: Move the lever up to this position
to turn the wipers on High.
: Move the lever down to this posi-
tion to turn the wipers on for one wipe.
See Section 3 of your Owner Manual.
Cruise Control (if equipped)
The cruise control buttons are located
on the steering wheel.
(On/Off): Press this button to turn
the cruise control system on and off.
When the cruise control is engaged, the
cruise control symbol will illuminate in
the instrument cluster.
+ RES (Resume): Press this button to
resume a set speed, or to increase the
set speed, if the system is engaged.
– SET (Set): Press this button to set a
speed, or to decrease the set speed,
if the system is engaged.
Climate Control Airflow Modes
Turn the right mode knob to change the
direction of the airflow inside the vehicle. The knob can be turned to any of
the five settings as well as between
each setting for a wide range of airflow
adjustments.
(Vent): This mode directs air to the
instrument panel outlets.
(Bi-Level): This mode directs air to
the instrument panel outlets and floor
outlets.
(Floor): This mode directs most of
the air to the floor outlets and some
air to the side window outlets and
windshield.
(Defog): This mode directs air to the
windshield, side window outlets and
floor outlets. Recirculation will not function in this mode.
(Defrost): This mode directs most of
the air to the windshield and some air
to the side window outlets. Recirculation will not function in this mode.
See Section 3 of your Owner Manual.
Ç
Entry System
Remote Keyless
Comfort
Features
Features
Audio System
Instrument
Panel Features
Features
Convenience
Features
Maintenance
Ç
See Section 3 of your Owner Manual.
Ç
Owner
Information
15
Page 16

CONVENIENCE FEATURES
Window Defogging
(Defog): Use this mode to clear the
windows of moisture and to warm
passengers. This mode splits the air
delivery between the windshield and
the floor outlets.
(Defrost): Use this mode to
remove fog or frost from the windshield
more quickly. This mode directs most of
the air to the windshield.
When you select the defog or defrost
mode, the system automatically turns
off recirculation and runs the air-conditioning compressor. The recirculation
mode cannot be selected because
outside air is needed to remove interior
moisture from the vehicle.
For faster window defogging on very
humid, cool days, follow these tips:
1. Turn the climate control mode knob to
(Defrost).
2. Turn the temperature knob all the
way into the red (Hot) area.
3. Turn the fan knob to top speed (4).
See Section 3 of your Owner Manual.
Exterior Lamps
Automatic Lamp Control (ALC)
When you start the vehicle at night or
in a dark garage, the automatic head-
16
lamps will come on immediately. After
driving into daylight, the system will
switch to the DRLs after about a oneminute delay.
Also, when driving into dark tunnels or
garages, the system delays turning on
the headlamps to avoid unnecessarily
switching on and off for a short time.
ALC Light Sensor
The ALC system’s light sensor is located
on top of the instrument panel. To
ensure proper system operation, it’s
important to avoid placing any objects
on or near the sensor or covering up the
sensor, such as with an instrument
panel cover.
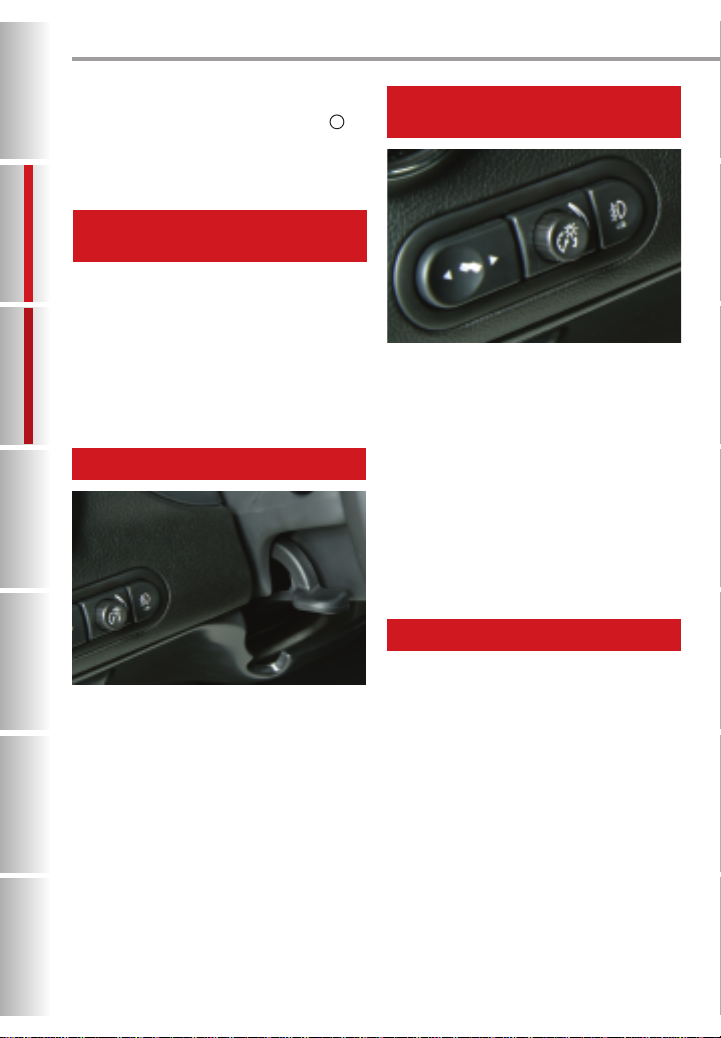
Exterior Lamp Control Switch
The exterior lamp control switch is
located on the lever to the left of the
steering column. The switch can be
rotated to each of the following four
positions:
(Headlamps): Turns on the head-
lamps, parking lamps, and taillamps.
(Parking Lamps): Turns on parking
lamps and taillamps only.
AUTO: Automatic Lamp Control
(ALC): Automatically turns on Daytime
Running Lamps (DRLs) in the daytime
and headlamps, parking lamps and taillamps at dusk.
(Off): When operating in the Auto
position, a momentary turn of the lamp
control switch to the Off position will
turn off the ALC and all of the exterior
lights. The DIC will display an Automatic
Lights Off message. To activate ALC,
turn the switch again. ALC is always
turned on when the vehicle is started.
See Section 3 of your Owner Manual.
Page 17

CONVENIENCE FEATURES
60/40 Split Rear Seat
(if equipped)
The split folding rear seatback permits
loading of longer items from the rear
cargo area.
Fold Down the Rear Seatback:
1. Open the trunk and locate the gray
handles on the upper side of the
trunk opening.
2. Position your hand over the top of
one or both of the handles and pull
toward you. The left handle opens
the larger seatback; the right handle
opens the smaller side.
3. Push the seatback open through the
trunk or pull it open from inside the
vehicle.
Return Seatback to Upright
Position:
1. Push the seatback up until you hear
a click.
2. Pull on the seatback to make sure it
is secure.
See Section 1 of your Owner Manual.
Sunroof (if equipped)
The control switch for the sunroof is
located on the headliner between the
sun visors. It will only operate while the
ignition is on.
Vent Position:
1. Open the sunshade by hand.
2. Press the rear part of the switch and
release it.
Fully Open Position:
1. Open the sunshade by hand.
2. Press the rear part of the switch
twice and release it. The roof will
express-open all the way.
Closed Position:
Press the front part of the switch and
hold it until the roof closes.
See Section 2 of your Owner Manual.
Panoramic Roof (if equipped)
The control switch for the panoramic
roof is located on the headliner
between the sun visors. It will only
operate while the ignition is on.
Press and hold the sunshade button to
open or close the sunshade.
Vent Positions:
• Turn the switch to to vent the
first glass panel.
• Turn the switch to 2 to open the first
two glass panels.
• Turn the switch to 3 to open the first
three glass panels.
17
Entry System
Remote Keyless
Comfort
Features
Features
Audio System
Instrument
Panel Features
Features
Convenience
Features
Maintenance
Owner
Information
Page 18

CONVENIENCE FEATURES
Fully Open Position:
• Turn the switch to to fully open
all glass panels.
To help reduce wind noise, press the
sunshade button once to move the sunshade forward one position.
Closed position:
• Turn the switch to to fully close
all glass panels.
When fully open, the sunshade will
start to close before the glass panels
close.
Note: Care should be taken when using a
self-service high-pressure car wash on the
panoramic roof to avoid forcing water
around the glass panel seals.
Trunk Floor Cover
The trunk cover features a pull handle
in the floor that, when pulled up, can
hang onto the upper edge of the trunk
opening weatherstrip. This holds the
trunk cover up to provide easy access to
the spare tire.
See Section 2 of your Owner Manual.
See Section 2 of your Owner Manual.
18
Page 19

MAINTENANCE FEATURES
Resetting the Oil Life System
The Oil Life System calculates engine
oil life based on vehicle use and displays Change Oil Soon in the Driver
Information Center (DIC) when it’s necessary to change your engine oil and filter. The Oil Life System should only be
reset to 100% following an oil change.
To Reset the Oil Life System:
1. Press MENU once. The DIC will display Oil Life Reset.
2. Press and hold ENTER for at least
one second.
3. An Acknowledged message will
display for three seconds when the
system has been reset.
See Section 5 of your Owner Manual.
Securing the Fuel Cap
If the Check Gas Cap message is displayed on the Driver Information Center
when the ignition is turned to Run or
Start, check that your fuel cap is
securely fastened. If the cap is not
secure, turn it clockwise until a clicking
sound is heard, indicating that it is
properly installed.
The Check Gas Cap message will turn
off after a few driving trips with the cap
properly installed.
See Section 3 of your Owner Manual.
Vehicle Symbols Glossary
Following are examples of symbols you
may find on your vehicle. It is important
to become familiar with them, as they
alert you to various vehicle operating
conditions.
Air Bag Readiness Light
Air Conditioning (A/C)
Antilock Brake System Warning
Light
BRAKE
Brake System Warning Light
Cruise Control Set
Headlamps
Instrument Panel Brightness
Control
Malfunction Indicator Lamp
(Check Engine Light)
Off
Off/On
On
Parking Lamps
Rear Window Defogger
Safety Belt Reminder Light
Security Light
Entry System
Remote Keyless
Comfort
Features
Features
Audio System
Instrument
Panel Features
Features
Convenience
Features
Maintenance
Traction Off Light
Owner
Information
19
Page 20

OWNER INFORMATION
Roadside Assistance
1-800-ROADSIDE
(1-800-762-3743)
TTY Users: 1-888-889-2438
As the proud owner of a new Pontiac
vehicle, you are automatically enrolled in
the Pontiac Roadside Assistance program.
This value-added service is intended to
provide you with peace of mind as you
drive in the city or travel the open road.
Pontiac’s Roadside Assistance toll-free
number is staffed by a team of technically trained advisors, who are available 24
hours a day, 365 days a year. The advisors can provide minor repair information
or make arrangements to tow your vehicle to the nearest Pontiac dealer.
We will provide the following services for
3 years/36,000 miles (60,000 km), at no
expense to you:
• Fuel delivery
• Lockout service
(identification required)
• Tow to nearest dealership for
warranty service
• Change a flat tire
• Jump starts
In many instances, mechanical failures
are covered under Pontiac’s comprehensive warranty. However, when other
services are utilized, our advisors will
explain any payment obligations you
might incur.
For prompt and efficient assistance when
calling, please provide the following
information to the advisor:
• Location of the vehicle
• Telephone number and your location
• Vehicle model, year and color
• Vehicle mileage
• Vehicle Identification Number (VIN)
• Vehicle license plate number
Pontiac reserves the right to limit services
or reimbursement to an owner or driver
when, in Pontiac’s judgment, the claims
become excessive in frequency or type of
occurrence.
My GMLink
The Pontiac Owner Center at My GMLink,
a complimentary service for Pontiac
Owners, is a one-stop resource to
enhance your Pontiac ownership experience. Exclusive member benefits include
online service reminders, vehicle maintenance tips, online owner manual, special
privileges and more. Sign up today at
www.mygmlink.com.
15225573
Certain restrictions, precautions and safety procedures apply to your vehicle. Please read your
Owner Manual for complete instructions. All information contained herein is based on information
available at the time of printing and is subject to change without notice. Copyright 2004 by GM Corp.
20
 Loading...