

Page 1
DE Gebrauchsanleitung
EN Operating instructions
FR Notice d'emploi
NL Gebruiksaanwijzing
ES Instrucciones de uso
PT Instruções de uso
IT Istruzioni d'uso
DA Brugsanvisning
NO Bruksanvisning
SV Bruksanvisning
FI Käyttöohje
HU Használati útmutató
PL Instrukcja użytkowania
CS Návod k použití
SK Návod na použitie
SL Navodila za uporabo
HR Uputa o upotrebi
RO Instrucţiuni de folosinţă
BG Упътване за употреба
UK Посібник з експлуатації
RU Руководство по эксплуатации
PondoSolar Island 250 Control
Page 2
- -
A
B
C
PSO0034
PSO0035
PSO0039
2
Page 3
- -
,
D
E F
PSO0037 PSO0038
PSO0036
3
Page 4
- DE -
- DE -
Original Gebrauchsanleitung
Hinweise zu dieser Gebrauchsanleitung
Mit dem Kauf des Produkts PondoSolar Island 250 Control haben Sie eine gute Wahl getroffen.
Lesen Sie vor der ersten Benutzung des Gerätes die Anleitung sorgfältig und machen Sie sich mit dem Gerät vertraut.
Alle Arbeiten an und mit diesem Gerät dürfen nur gemäß der vorliegenden Anleitung durchgeführt werden.
Beachten Sie unbedingt die Sicherheitshinweise für den richtigen und sicheren Gebrauch.
Bewahren Sie diese Anleitung sorgfältig auf. Bei Besitzerwechsel geben Sie bitte die Anleitung weiter.
Symbole in dieser Anleitung
A Verweis auf eine oder mehrere Abbildungen. In diesem Beispiel: Verweis auf Abbildung A.
Verweis auf ein anderes Kapitel.
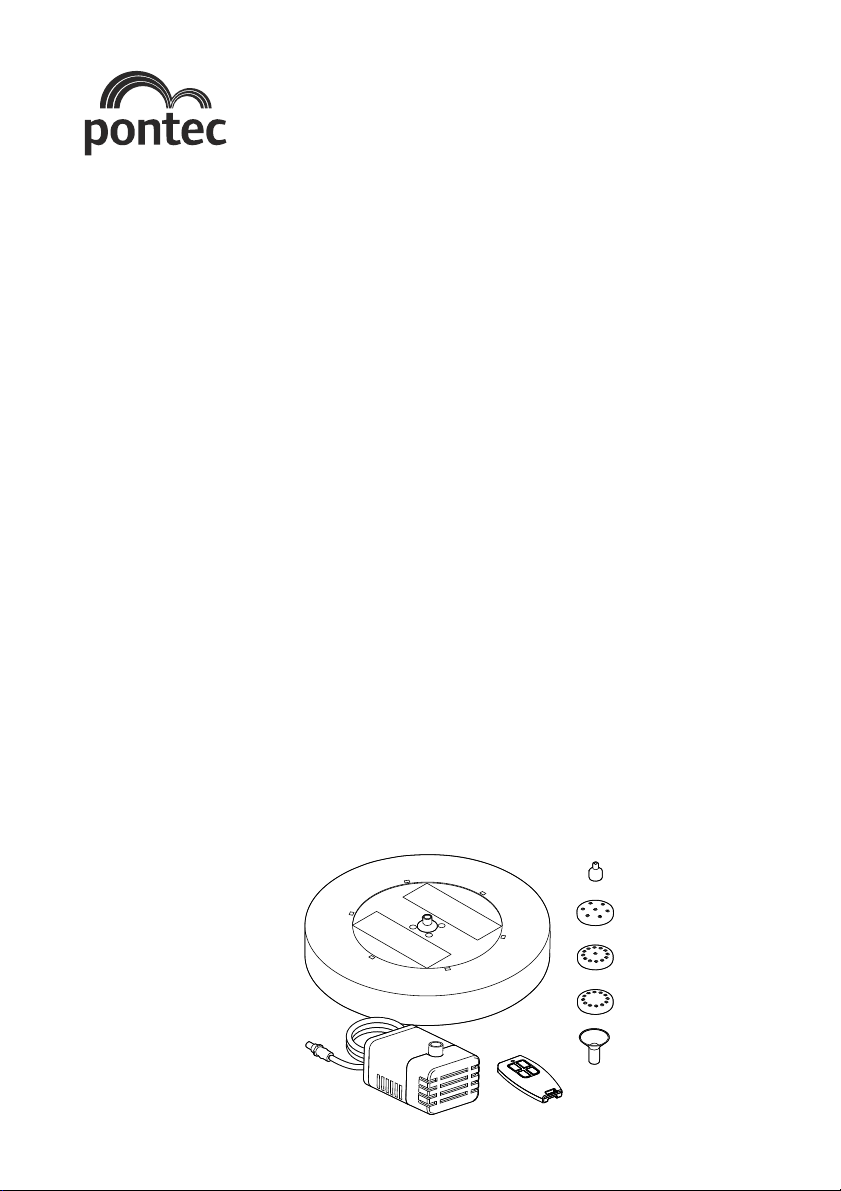
Lieferumfang
A Anzahl Beschreibung
1 1 Schwimmereinheit mit integriertem Solarmodul
2 4 Düsenaufsatz
3 1 Düsenhalterung
4 1 Pumpe mit Anschlussleitung
5 1 Fernbedienung
Bestimmungsgemäße Verwendung
PondoSolar Island 250 Control, im weiteren "Gerät" genannt, darf ausschließlich wie folgt verwendet werden:
Zur Erzeugung einer Wasserfontäne in Teichen.
Zum Betrieb mit sauberem Wasser.
Betrieb unter Einhaltung der technischen Daten.
Für das Gerät gelten folgende Einschränkungen:
Niemals ohne Wasserdurchfluss betreiben.
Niemals andere Flüssigkeiten als Wasser fördern.
Nicht in Verbindung mit Chemikalien, Lebensmitteln, leicht brennbaren oder explosiven Stoffen einsetzen.
Sicherheitshinweise
Dieses Gerät kann von Kindern ab 8 Jahren und darüber sowie von
Personen mit verringerten physischen, sensorischen oder mentalen
Fähigkeiten oder Mangel an Erfahrung und Wissen benutzt werden,
wenn sie beaufsichtigt oder bezüglich des sicheren Gebrauchs des
Gerätes unterwiesen wurden und die daraus resultierenden Gefahren verstehen. Kinder dürfen nicht mit dem Gerät spielen. Reinigung
und Benutzerwartung dürfen nicht von Kindern ohne Beaufsichtigung
durchgeführt werden.
4
Page 5

A
- DE -
Sicherer Betrieb
Tragen oder ziehen Sie das Gerät nicht an der elektrischen Leitung.
Verwenden Sie nur Original-Ersatzteile und -Zubehör für das Gerät.
Elektrische Geräte und Installationen mit Bemessungsspannung U > 12 V AC oder U >30 V DC, die im Wasser lie-
gen: Geräte und Installationen spannungsfrei schalten, bevor Sie ins Wasser greifen.
Betreiben Sie die Pumpe nur mit dem im Lieferumfang enthaltenen Solarmodul.
Lassen Sie die Pumpe nicht trockenlaufen.
Harte Stöße und Erschütterungen des Gerätes vermeiden.
Das Gerät mindestens 2-mal jährlich reinigen.
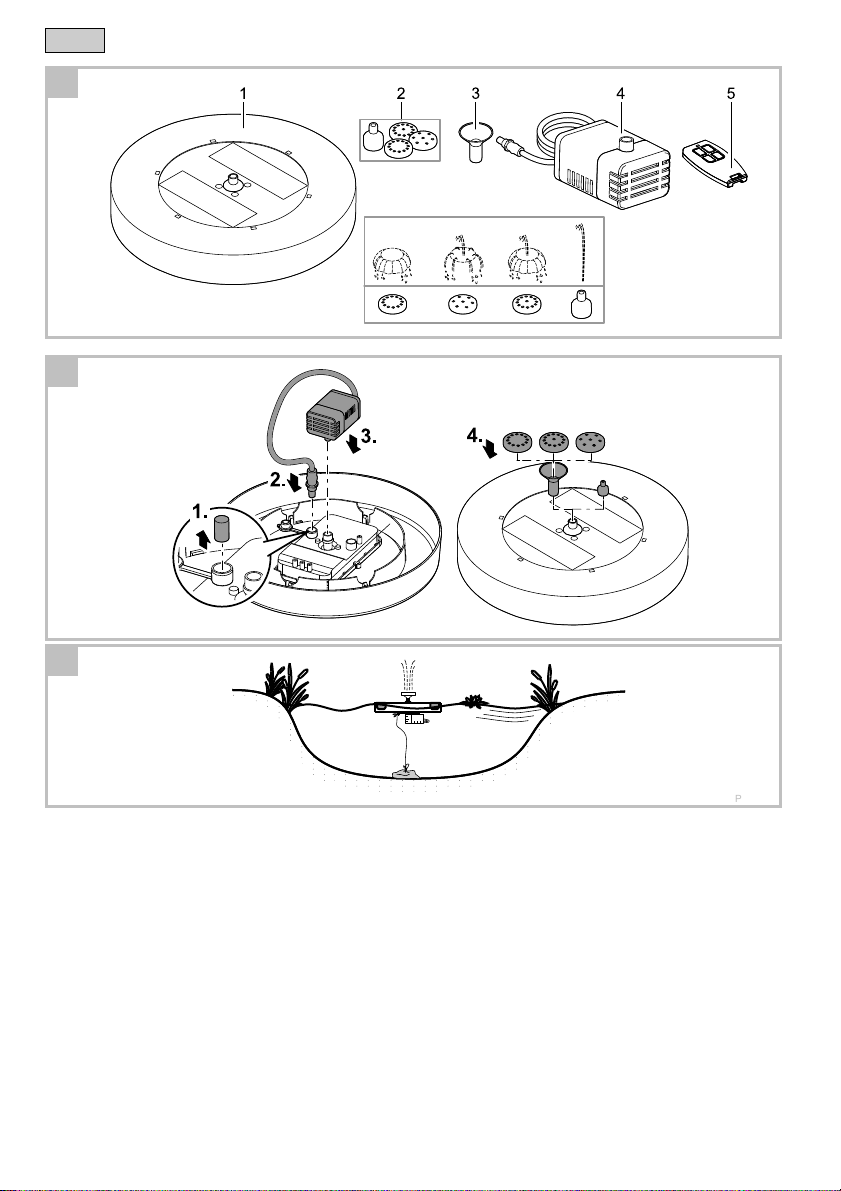
Aufstellen und Anschließen
So gehen Sie vor:
B, C
Stopfen aus Anschluss ziehen.
– Stopfen schützt Elektronik vor Wasser.
– Bei abgezogenem Stecker den Stopfen einstecken.
Anschlussleitung in Buchse stecken.
– Stecker bis zum Anschlag in die Buchse drücken, damit die Verbindung wasserdicht ist.
Pumpe auf Schwimmereinheit stecken.
Düseneinheit auf Schwimmereinheit stecken.
Schwimmereinheit auf Wasseroberfläche setzen.
Inbetriebnahme
So gehen Sie vor:
Der Akku des Geräts ist nicht geladen. Vor dem ersten Einsatz das Gerät einen Tag lang der Sonnenstrahlung ausset-
zen. Anschließend das Gerät mit der Fernbedienung bedienen.
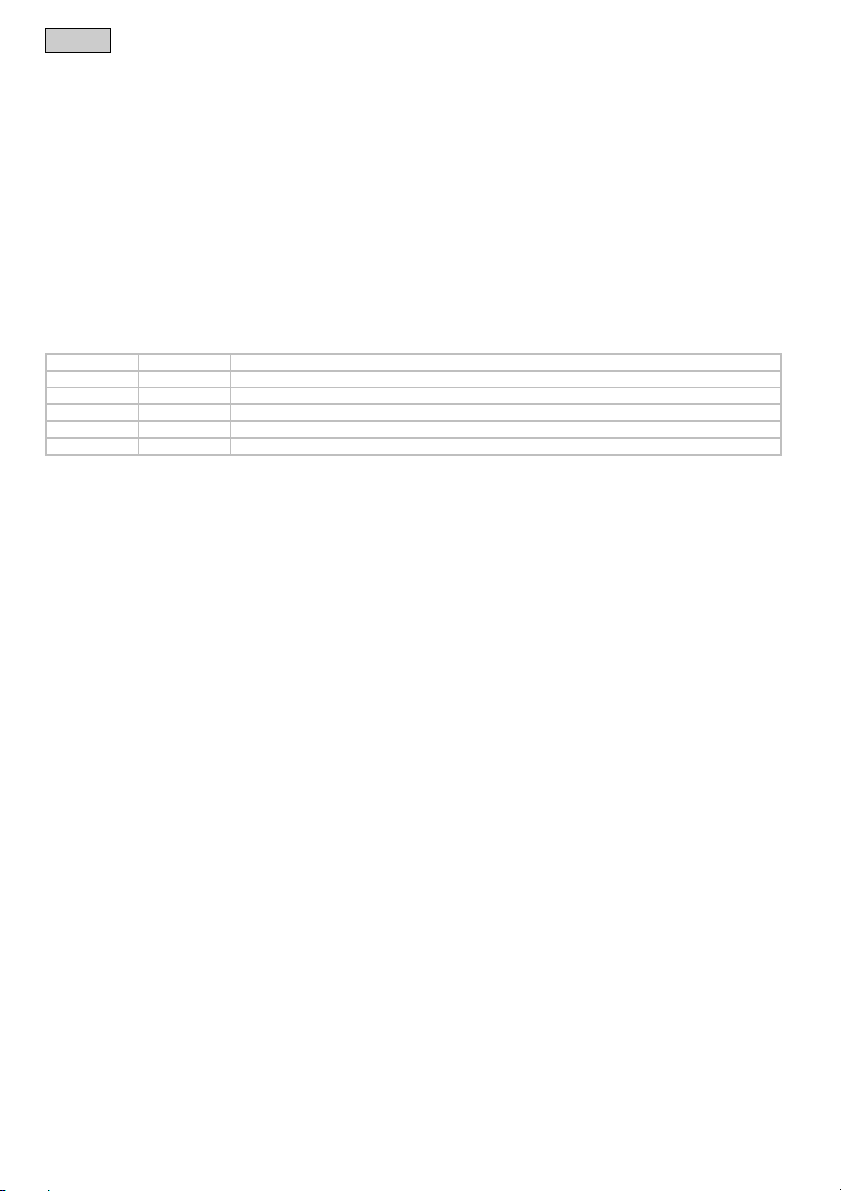
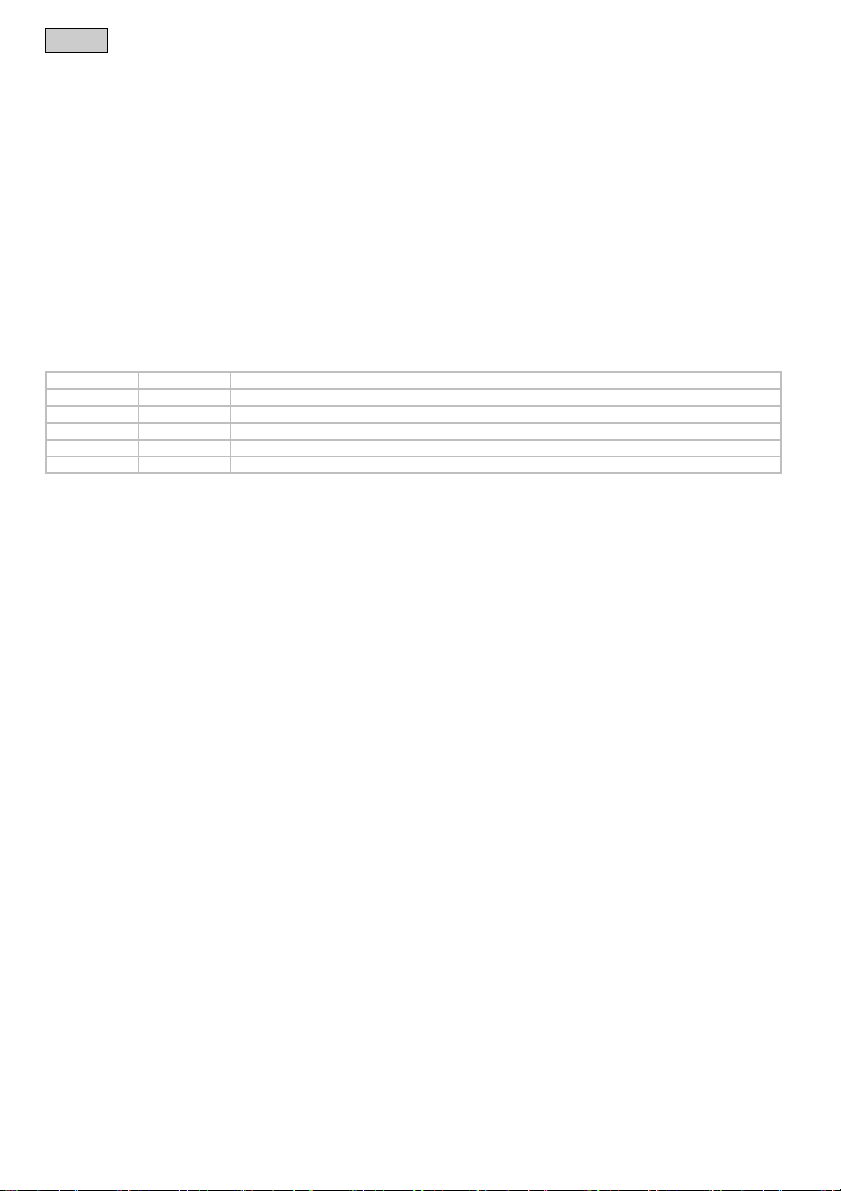
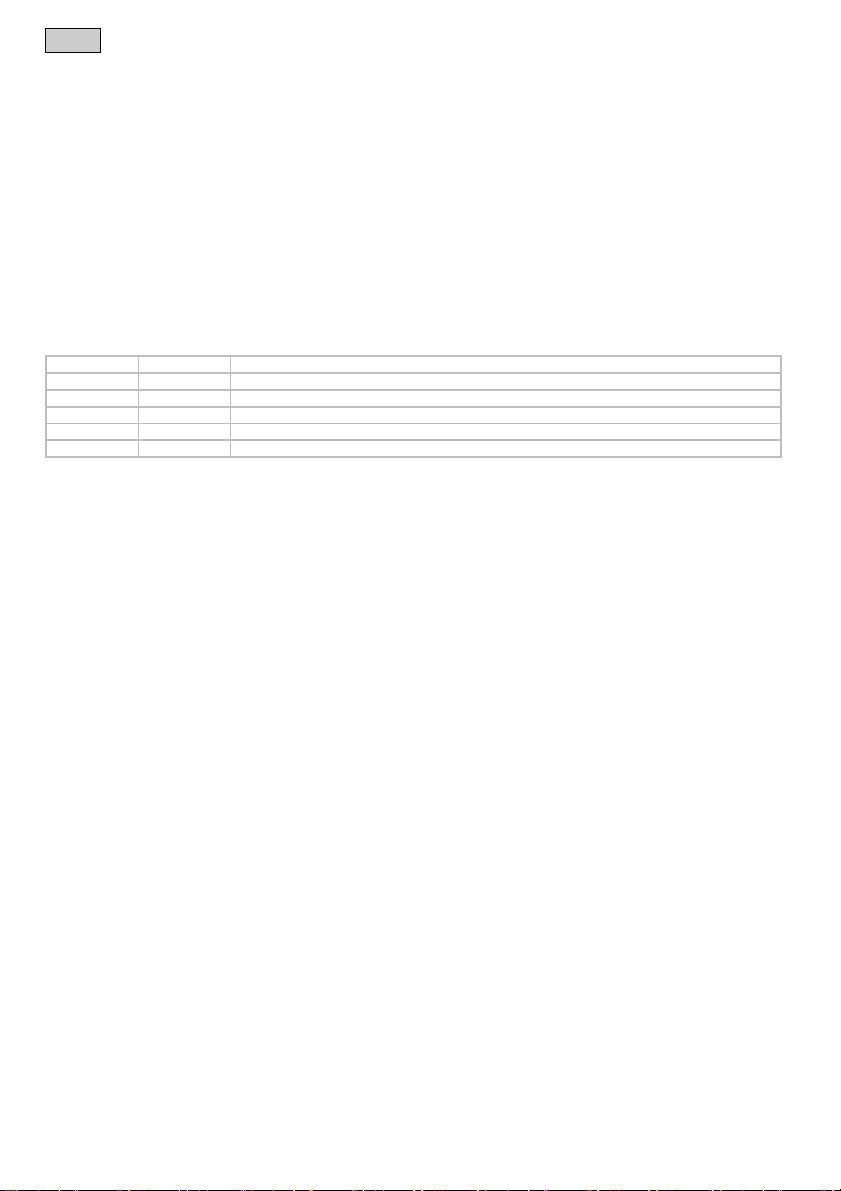
Fernbedienung
E
Die Reichweite der Fernbedienung beträgt maximal 10 m.
Beschreibung Funktion
B
C
D
Pumpenlaufzeit festlegen (max. 4 h).
Zum Überschreiben der aktuellen Einstellung Pumpe mit
Taste D ausschalten und dann mit Taste A neue Pumpen-
laufzeit festlegen. Pumpe läuft dann automatisch an
Ein- und Ausschaltern der LEDs (leuchten nur bei Dunkelheit)
Förderleistung der Pumpe einstellen (5 Stufen)
Taste für jede Stunde 1 langsam drücken. Die Anzeigediode blinkt entsprechend der jetzt eingestellten Pumpenlaufzeit.
Beispiel: Gewünschte Pumpenlaufzeit 3 h.
Taste A 3 langsam hintereinander drücken. Diode blinkt
mehrmals 3 hintereinander
Taste kurz drücken
Taste für jede Stufe 1 langsam drücken
Ein- und Ausschalten der Pumpe Taste kurz drücken
5
Page 6

- DE -
A
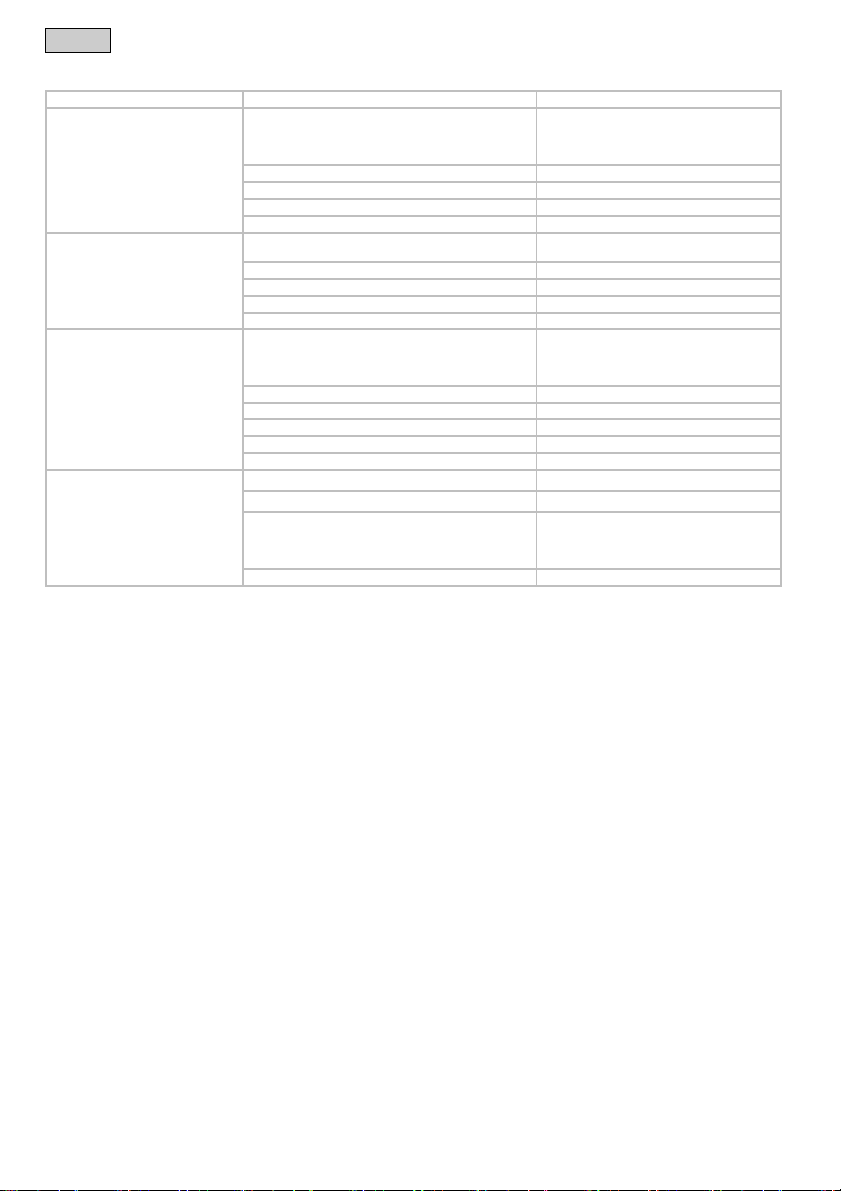
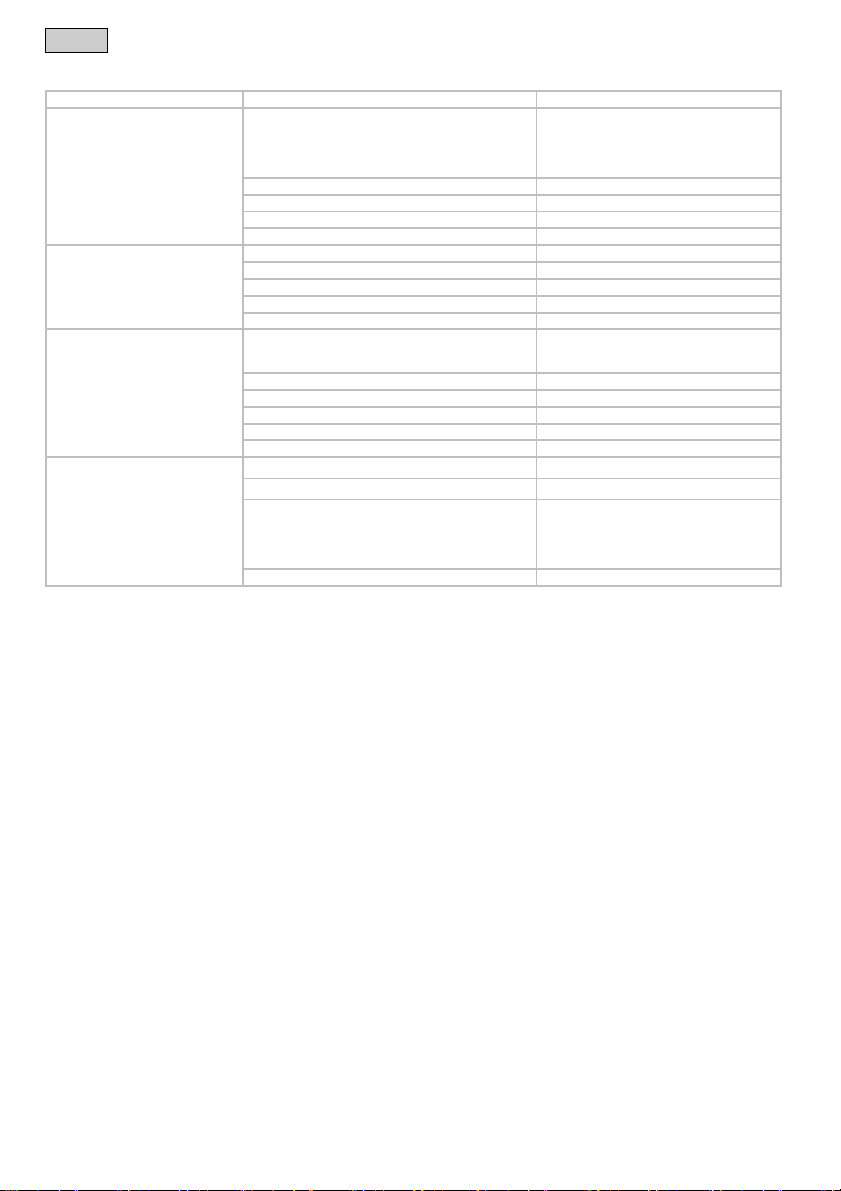
Störungsbeseitigung
Störung Ursache
Pumpe läuft nicht an Keine Verbindung Solarmodul
Solarmodul ist verschmutzt. Reinigen
Laufeinheit ist blockiert Reinigen
Akkukapazität ist erschöpft Akku min. 4 Stunden laden
Sonneneinstrahlung ist zu gering Solarmodul zur Sonne ausrichten
Pumpe fördert kaum oder nicht Filter ist verstopft Filtergehäuse abnehmen, Filter entnehmen
Düseneinheit ist verstopft Düseneinheit abziehen, reinigen
Laufeinheit ist abgenutzt Ersetzen
Sonneneinstrahlung ist zu gering Solarmodul zur Sonne ausrichten
Akkukapazität ist erschöpft. Akku mindestens 4 Stunden laden
LEDs leuchten nicht Keine Verbindung zum Solarmodul
LED Beleuchtung ist ausgeschaltet LED-Beleuchtung einschalten
Umgebung zu hell —
Akkukapazität ist erschöpft Akku min. 4 Stunden laden
LED Beleuchtung ist verschmutzt Reinigen
LED Beleuchtung ist defekt Entsorgen
Gerät lässt sich nicht einschalten Batterie der Fernbedienung erschöpft Ersetzen
Fernbedienung zu weit entfernt Reichweite der Fernbedienung beachten
Keine Verbindung zum Solarmodul
Reinigung und Wartung
Zum Reinigen oder Warten muss das Gerät aus dem Wasser genommen werden.
Gerät reinigen
Verwenden Sie auf keinen Fall aggressive Reinigungsmittel oder chemische Lösungen, da dadurch das Gehäuse
angegriffen oder die Funktion beeinträchtigt werden kann.
Empfohlene Reinigungsmittel bei hartnäckigen Verkalkungen:
– Essig- und chlorfreien Haushaltsreiniger.
So gehen Sie vor:
Gerät auseinanderbauen.
Akku ist defekt Gerät entsorgen
Filtergehäuse und Laufeinheit reinigen. (→ Laufeinheit ersetzen)
Düseneinheit auseinanderziehen.
Alle Teile reinigen.
– Zur Unterstützung eine weiche Bürste verwenden.
– Teile mit klarem Wasser abspülen.
Solarmodul mit einem feuchten Putztuch reinigen und trocken reiben.
Gerät in umgekehrter Reihenfolge zusammenbauen.
bhilfe
Verbindung zum Solarmodul überprüfen
Pumpe an Solarmodul anschließen
Stecker vollständig (bis zum Anschlag) in die
Buchse drücken
und reinigen
LED-Beleuchtung an Solarmodul anschlie-
ßen
Stecker vollständig (bis zum Anschlag) in die
Buchse drücken
Verbindung zum Solarmodul überprüfen
Pumpe an Solarmodul anschließen
Stecker vollständig (bis zum Anschlag) in die
Buchse drücken
6
Page 7

- DE -
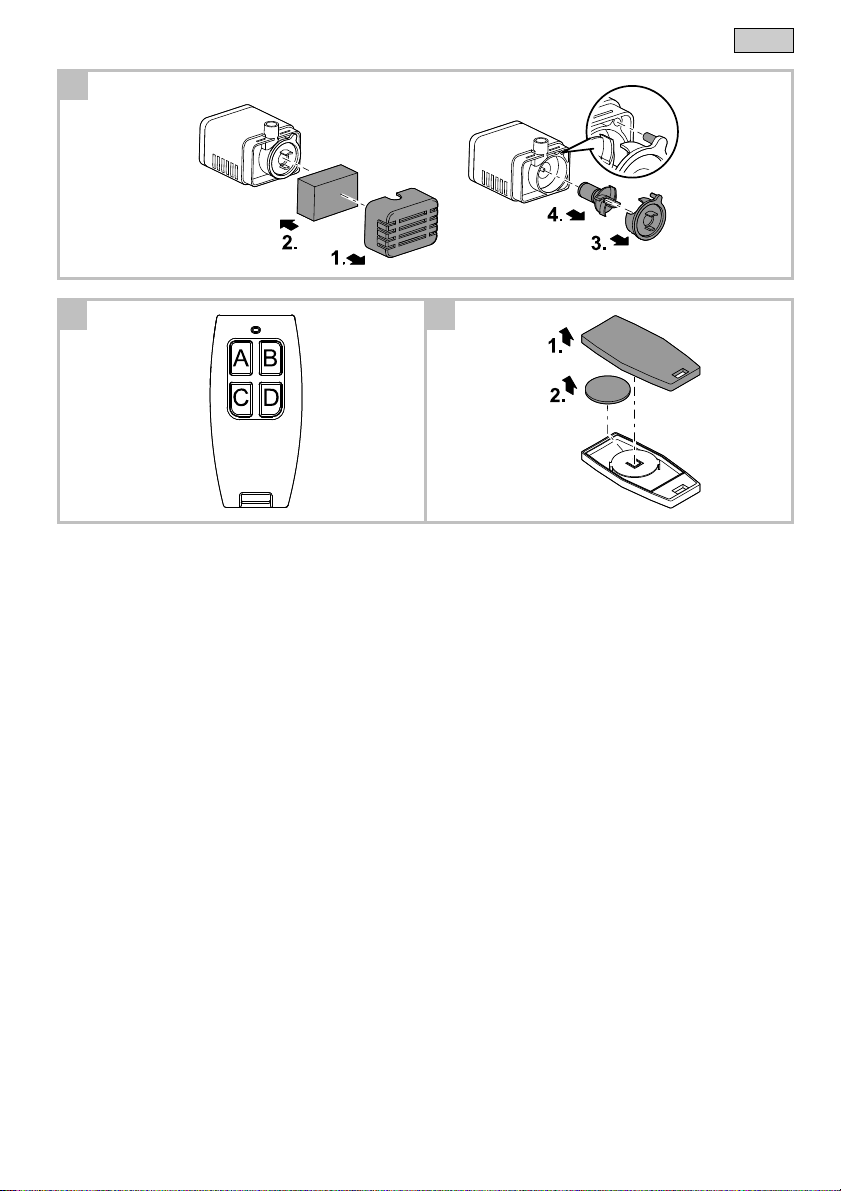
Laufeinheit ersetzen
So gehen Sie vor:
D
Filtergehäuse von der Pumpe abziehen.
Filterschwamm dem Filtergehäuse entnehmen und ausspülen.
Abdeckung der Laufeinheit abziehen (Steckverschluss, vorsichtig heraushebeln).
Laufeinheit herausziehen und reinigen oder ersetzen.
Gerät in umgekehrter Reihenfolge zusammenbauen.
Batterie wechseln
So gehen Sie vor:
F
Fernbedienung umdrehen und Abdeckung abheben.
Batterie ersetzen.
– Knopfzelle vom Typ CR 2032 verwenden.
Abdeckung wieder schließen.
Verschleißteile
Folgende Komponenten sind Verschleißteile und unterliegen nicht der Gewährleistung:
Laufeinheit und Filterschaum
Akkus/Batterien
Lagern/Überwintern
Beachten Sie den zulässigen Betriebstemperaturbereich. ( Technische Daten)
Bei Überschreiten oder Unterschreiten der Grenzwerte müssen Sie das Gerät deinstallieren. Führen Sie eine gründ-
liche Reinigung durch und prüfen Sie das Gerät auf Beschädigungen.
Pumpe getaucht und frostfrei lagern.
Entsorgung
Dieses Gerät enthält elektronische Bauteile und darf nicht als Hausmüll entsorgt werden! Nutzen Sie bitte das
dafür vorgesehene Rücknahmesystem. Entfernen Sie zum Austausch vorgesehene Akkus und Batterien aus
dem Gerät und entsorgen Sie diese separat.
Entsorgung von Batterien
Batterien gehören nicht in den Hausmüll. Entsorgen Sie verbrauchte Batterien nur über das dafür vorgesehene Rücknahmesystem.
Entsorgung von Batterien innerhalb der Europäischen Gemeinschaft
Als Verbraucher sind Sie gesetzlich verpflichtet, gebrauchte Batterien zurückzugeben. Die Rückgabe ist unentgeltlich.
Entsorgen Sie die Batterien entweder über die öffentlichen Rücknahme- und Recyclingsysteme in Ihrer Stadt oder Ge-
meinde oder geben Sie die Batterien dort zurück, wo sie gekauft wurden.
Diese Zeichen finden Sie auf schadstoffhaltigen Batterien:
Pb = Batterie enthält Blei
Cd = Batterie enthält Cadmium
Hg = Batterie enthält Quecksilber
Li = Batterie enthält Lithium
Garantiebedingungen
PfG gewährt 2 Jahre Garantie ab Verkaufsdatum auf nachweisbare Material- und Fabrikationsfehler. Voraussetzung
für die Garantieleistung ist die Vorlage des Kaufbeleges. Der Garantieanspruch erlischt bei unsachgemäßer Handhabung, elektrischer oder mechanischer Beschädigung durch missbräuchliche Anwendung sowie bei unsachgemäßer
Reparatur durch nicht autorisierte Werkstätten. Reparaturen dürfen nur von PfG oder von PfG autorisierten Werkstätten durchgeführt werden. Bei der Anmeldung von Garantieansprüchen senden Sie das beanstandete Gerät oder das
defekte Teil mit Fehlerbeschreibung und Kaufbeleg frei Haus an PfG. PfG behält sich vor Montagekosten in Rechnung
zu stellen. Für Transportschäden haftet PfG nicht. Diese müssen umgehend gegen den Transporteur geltend gemacht
werden. Weitergehende Ansprüche, gleich welcher Art, insbesondere für Folgeschäden, sind ausgeschlossen. Diese
Garantie berührt nicht die Ansprüche des Endkunden gegen den Händler.
7
Page 8

- EN -
- EN -
Translation of the original Operating Instructions
Information about these operating instructions
You made a good choice with the purchase of this product PondoSolar Island 250 Control.
Prior to commissioning the unit, please read the instructions of use carefully and fully familiarise yourself with the unit.
Ensure that all work on and with this unit is only carried out in accordance with these instructions.
Adhere to the safety information for the correct and safe use of the unit.
Keep these instructions in a safe place! Please also hand over the instructions when passing the unit on to a new
owner.
Symbols used in these instructions
A Reference to one or more figures. In this example: Reference to Fig. A.
Reference to another section.
Scope of delivery
A Quantity Description
1 1 Float unit with integrated solar module
2 4 Nozzle attachment
3 1 Nozzle holder
4 1 Pump with connection cable
5 1 Remote control
Intended use
PondoSolar Island 250 Control, referred to in the following as "unit", may only be used as specified in the following:
For creating a water fountain in a pond.
For operation with clean water.
Operation under observance of the technical data.
The following restrictions apply to the unit:
Never run the unit without water.
Never use the unit to convey fluids other than water.
Do not use in conjunction with chemicals, foodstuff, easily flammable or explosive substances.
Safety information
This unit can be used by children from the age of 8 and by persons
with physical, sensory or mental impairments or lack of experience
and knowledge, as long as they are supervised or instructed on how
to use the unit safely and are able to understand the potential hazards. Do not allow children to play with the unit. Do not allow children
to clean or maintain the unit without close supervision.
8
Page 9

A
- EN -
Safe operation
Do not carry or pull the unit by its electrical cable.
Only use original spare parts and accessories for the unit.
In the case of electrical units and installations with a rated voltage of U > 12 V AC or U >30 V DC located in the wa-
ter: Isolate the units and installations (switch off and disconnect from the power supply) before reaching into the water.
Only operate the pump together with the supplied solar module.
Do not allow the pump to run dry.
Protect the unit from knocks or vibration.
Clean the unit at least twice a year.
Installation and connection
How to proceed:
B, C
Pull the blind plug out of the connection.
– The blind plug protects the electronics from the ingress of water.
– Insert the blind plug as soon as the connection plug is removed.
Insert the connection cable into the socket.
– Push the plug into the socket as far as possible to ensure that the connection is watertight.
Fit the pump to the float unit.
Fit the nozzle unit to the float unit.
Place the float unit onto the surface of the water.
Commissioning/start-up
How to proceed:
The rechargeable battery of the unit is not charged. Expose the unit to sunlight for one day before using it for the first
time. Then use the remote control to operate the device.
Remote control
E
The remote control has a range of max. 10 m.
Description Function
B
C
D
Determines the pump operating time (max. 4 h).
To overwrite the current setting, switch off the pump with
key D and then set the new pump operating time with key
A. The pump will then start up automatically.
Switches the LEDs on and off (they are only lit when it is
dark)
For setting the flow rate of the pump (5 stages)
Press the key slowly 1 . The LED flashes according to the
newly set pump operating time.
Example: Desired pump operating time 3 h.
Press the key A 3 slowly. The LED flashes 3 several
times in a row.
Press the key briefly.
Press the key slowly 1 for each stage.
For switching the pump on and off Press the key briefly.
9
Page 10
- EN -
Remedy of faults
Malfunction Cause Remedy
Pump does not start. No connection to the solar module.
The solar module is soiled. Clean
The impeller unit is blocked. Clean
The battery capacity is exhausted. Charge the battery for at least 4 hours.
Insufficient sunlight Align the solar module to the sun.
Insufficient or no pump delivery The filter is clogged. Remove the filter housing, remove and clean
The nozzle unit is clogged. Remove and clean the nozzle unit.
The impeller unit is worn. Replace
Insufficient sunlight Align the solar module to the sun.
The battery capacity is exhausted. Charge the battery for at least 4 hours.
LEDs are not lit. No connection to the solar module.
The LED lighting is switched off. Switch on the LED lighting.
The surrounding area is too light. —
The battery capacity is exhausted. Charge the battery for at least 4 hours.
The LED lighting is soiled. Clean
The LED lighting is defective. Dispose of the LED lighting.
The unit cannot be switched on. The remote control battery capacity is exhausted. Replace
The remote control is too far away from the unit. Observe the range of the remote control.
No connection to the solar module.
Maintenance and cleaning
The unit has to be taken out of the water for cleaning or maintenance.
Cleaning the unit
Never use aggressive cleaning agents or chemical solutions. These could attack the housing surface or impair the
function.
Recommended cleaning agent for removing stubborn limescale deposits:
– Vinegar- and chlorine-free household cleaning agent.
How to proceed:
Disassemble the unit.
The rechargeable battery is defective. Dispose of the unit.
Clean the filter housing and impeller unit. (→ Replacing the impeller unit)
Pull the nozzle unit apart.
Clean all parts.
– Use a soft brush as an aid.
– Rinse parts in clean water.
Clean the solar module with a damp cloth and wipe dry.
Reassemble the unit in the reverse order.
Check the connection to the solar module.
Connect the pump to the solar module.
Push the plug completely into the socket (up
to the stop).
the filter.
Connect the LED lighting to the solar mo-
dule.
Push the plug completely into the socket (up
to the stop).
Check the connection to the solar module.
Connect the pump to the solar module.
Push the plug completely into the socket (up
to the stop).
10
Page 11

- EN -
Replacing the impeller unit
How to proceed:
D
Pull the filter housing from the pump.
Remove the foam filter from the filter housing and rinse it out.
Pull the cover off the impeller unit (push-fit fastening, lever out carefully).
Pull out the impeller unit and clean or replace.
Reassemble the unit in the reverse order.
Change battery
How to proceed:
F
Turn the remote control over and remove the cover.
Replace the battery.
– Use a button cell battery of the type CR 2032.
Close the cover.
Wear parts
The following components are wear parts and are excluded from the warranty:
Impeller unit and foam filter
Rechargeable batteries/batteries
Storage/Over-wintering
Observe the permissible operating temperature range. ( Technical data)
If the limit values are exceeded or gone below, it is necessary to remove the unit. Clean the unit thoroughly and
check it for damage.
Store the pump submerged and in a frost-free environment.
Disposal
This unit contains electronic components - do not dispose of this unit with domestic waste! For disposal purposes, please use the return system provided. Remove the replaceable rechargeable batteries and batteries
from the unit and dispose of them separately.
Disposal of batteries
Do not dispose of batteries with the household waste. Only dispose of dead batteries by using the return system provided for this purpose.
Disposal of batteries within the European Union
As a user, you are obligated by law to return used batteries. Return is free of charge.
Either dispose of batteries through the public return and recycling systems of your municipality or community, or return
the batteries to the place where they were bought.
Batteries containing harmful substances bear the following signs:
Pb = Battery contains lead
Cd = Battery contains cadmium
Hg = Battery contains mercury
Li = Battery contains lithium
Guarantee conditions
PfG grants a 2 year guarantee from the date of sale on proven material and manufacturing faults. Prerequisite for our
guarantee is the presentation of the purchase receipt. Our guarantee will become null and void if the unit is misused,
electrically or mechanically damaged by inappropriate use and improper repair by non-authorised workshops. Repairs
are reserved for workshops authorised by PfG or by PfG itself. In the case of warranty claims, please return the defective unit or part freight paid to PfG together with a description of the fault and the purchase receipt. PfG reserves the
right to invoice repair costs. PfG is not liable for transport damage. Any damage must be claimed against the carrier.
Further claims of whatever type, especially consequential damage, are excluded. This guarantee does not affect the
final customer’s claims against the dealer.
11
Page 12

- FR -
- FR -
Traduction de la notice d'emploi originale
Remarques relatives à cette notice d'emploi
Avec l'acquisition du produit, PondoSolar Island 250 Control vous avez fait le bon choix.
Avant la première utilisation de l'appareil, lire attentivement cette notice d'emploi et se familiariser avec l'appareil. Tous
les travaux effectués avec et sur cet appareil devront être exécutés conformément aux directives ci-jointes.
Respecter impérativement les consignes de sécurité relatives à une utilisation correcte et en toute sécurité.
Conserver soigneusement cette notice d'emploi. Lors d'un changement de propriétaire, prière de transmettre égale-
ment cette notice d'emploi.
Symboles dans cette notice d'emploi
A Renvoi à une ou à plusieurs illustrations. Pour cet exemple : renvoi à l'illustration A.
Renvoi à une autre section.
Pièces faisant partie de la livraison
A Nombre Description
1 1 Flotteur avec panneau solaire intégré
2 4 Embout d'ajutage
3 1 Support d'ajutage
4 1 Pompe avec câble de raccordement
5 1 Télécommande
Utilisation conforme à la finalité
PondoSolar Island 250 Control, appelé par la suite «appareil», doit être utilisé exclusivement comme suit :
Pour la réalisation d'une fontaine d'eau dans les pièces d'eau.
Pour une exploitation avec de l'eau propre.
Exploitation dans le respect des données techniques.
Les restrictions suivantes sont valables pour l'appareil :
Ne jamais utiliser sans débit d'eau.
Ne jamais refouler des liquides autres que de l'eau.
Ne pas utiliser en relation avec des produits chimiques, des produits alimentaires, des matériaux facilement in-
flammables ou explosifs.
Consignes de sécurité
Attention :
Dans le cas où cet appareil serait utilisé par des mineurs de moins
de 8 ans ainsi que par des personnes souffrant d'un handicap mental
ou plus généralement par des personnes manquant d'expérience, un
adulte averti devra être présent, qui renseignera le mineur ou la personne fragilisée concernée sur le bon emploi de ce matériel. Les enfants ne doivent pas jouer avec cet appareil. Ne pas laisser un enfant
sans surveillance pour le nettoyage ou l'entretien.
12
Page 13

A
- FR -
Exploitation sécurisée
Ni porter, ni tirer l'appareil par le câble électrique.
N'utiliser que des pièces de rechange et des accessoires d'origine pour l'appareil.
Appareils électriques et installations avec une tension assignée U > 12 V CA ou U >30 V CC, qui se trouvent dans
l'eau : couper la tension des appareils et des installations avant de mettre les mains dans l’eau.
Utiliser la pompe uniquement avec le panneau solaire fourni.
Ne pas laisser la pompe marcher à sec.
Eviter de soumettre l'appareil à des secousses et des impacts violents.
Nettoyer l'appareil au moins 2 fois par an.
Mis en place et raccordement
Voici comment procéder :
B, C
Enlever le capuchon de la prise.
– Le capuchon protège le système électronique de l'eau.
– Mettre le capuchon en place lorsque la fiche mâle est débranchée.
Brancher le câble de raccordement dans la douille.
– Enfoncer la fiche mâle jusqu'en butée dans la douille pour que la connexion soit étanche.
Fixer la pompe sur le flotteur.
Fixer l'unité d'ajutage sur le flotteur.
Déposer le flotteur sur la surface de l'eau.
Mise en service
Voici comment procéder :
La batterie de l'appareil n'est pas suffisamment chargée. Exposer l'appareil au rayonnement solaire pendant toute une
journée avant de le mettre en marche pour la première fois. Utiliser ensuite l'appareil avec la télécommande.
Télécommande
E
La portée de la télécommande est de 10 m maximum.
Description Fonctionnement
B
C
D
Déterminer la durée de pompage (max. 4 h).
Pour écraser le réglage actuel, déconnecter la pompe au
moyen de la touche D et déterminer ensuite une nouvelle
durée de pompage au moyen de la touche A. La pompe
démarre alors automatiquement
Allumage et extinction des LED (s'éclairent uniquement dans
l'obscurité)
Régler le débit de la pompe (5 niveaux)
Lentement appuyer 1 sur la touche pour chaque heure. La
diode d'affichage clignote conformément à durée de pompage maintenant réglée.
Exemple : Durée de pompage voulue 3 h.
Lentement appuyer sur la touche A successivement 3 .
La diode clignote plusieurs fois 3 successivement
Brièvement appuyer sur la touche
Lentement appuyer 1 sur la touche pour chaque niveau.
Mise en et hors circuit de la pompe Brièvement appuyer sur la touche
13
Page 14

- FR -
Élimination des dérangements
Défaut Cause Remède
La pompe ne démarre pas Pas de connexion avec le panneau solaire
Le panneau solaire est encrassé. Le nettoyer
L'unité de fonctionnement est bloquée La nettoyer
La capacité de la batterie est épuisée. Charger la batterie pendant 4 heures min.
Le rayonnement solaire est trop insuffisant Tourner le panneau solaire vers le soleil
La pompe refoule à peine ou pas du
tout
Le filtre est colmaté Ouvrir le corps de filtre, sortir le filtre et le net-
L'unité d'ajutage est colmatée Sortir l'unité d'ajutage et la nettoyer
L'unité de fonctionnement est usée La remplacer
Le rayonnement solaire est trop insuffisant Tourner le panneau solaire vers le soleil
La capacité de la batterie est saturée. Charger la batterie pendant 4 heures min.
Les diodes DEL ne s’allument pas Pas de connexion avec le panneau solaire
L’éclairage LED est hors circuit Mise en circuit de l’éclairage LED
Environnement pas assez sombre —
La capacité de la batterie est épuisée. Charger la batterie pendant 4 heures min.
L’éclairage LED est encrassé La nettoyer
L’éclairage LED est défectueux Mettre au rebut
L'appareil ne se laisse pas connecter Pile de la télécommande est usée Remplacer
Télécommande trop éloignée Tenir compte de la portée de la télécommande
Pas de connexion avec le panneau solaire
Nettoyage et entretien
Il est nécessaire de sortir l'appareil de l'eau pour le nettoyage ou l'entretien.
Nettoyage de l'appareil
N'utiliser en aucun cas des produits de nettoyage agressifs ou des solutions chimiques qui risqueraient d'attaquer le
boîtier ou d'entraver le fonctionnement.
Produits de nettoyage recommandés en cas d'entartrages tenaces :
– Détergents ménagers exempts de vinaigre et de chlore.
Voici comment procéder :
Désassembler l'appareil.
La batterie est défectueuse Mise au rebut de l'appareil
Nettoyer le corps du filtre et l'unité de fonctionnement (→ Remplacer l'unité de fonctionnement)
Désassembler l'unité d'ajutage.
Nettoyer toutes les pièces.
– Pour un meilleur nettoyage, utiliser une brosse douce.
– Rincer les pièces à l'eau claire.
Nettoyer le panneau solaire avec un chiffon humide et le sécher en frottant.
Remonter l'appareil en suivant l'ordre inverse.
Vérifier la connexion avec le panneau solaire
Raccorder la pompe au panneau solaire
Complètement enfoncer la fiche mâle (jus-
qu'en butée) dans la douille
toyer
Raccorder l'éclairage LED au panneau so-
laire
Complètement enfoncer la fiche mâle (jus-
qu'en butée) dans la douille
Vérifier la connexion avec le panneau solaire
Raccorder la pompe au panneau solaire
Complètement enfoncer la fiche mâle (jus-
qu'en butée) dans la douille
14
Page 15

- FR -
Remplacer l'unité de fonctionnement
Voici comment procéder :
D
Sortir le corps du filtre de la pompe.
Retirer la mousse filtrante du corps de filtre et la rincer.
Enlever le couvercle de l'unité de fonctionnement (tourner le verrouillage à baïonnette avec précaution).
Sortir l'unité de fonctionnement et la nettoyer ou la remplacer.
Remonter l'appareil en suivant l'ordre inverse.
Changer la pile
Voici comment procéder :
F
Retourner la télécommande et enlever le couvercle.
Remplacer la pile.
– Utiliser une pile bouton de type CR 2032.
Refermer le recouvrement.
Pièces d'usure
Les composants suivants sont des pièces d'usure et ne sont pas couverts par la garantie.
Unité de fonctionnement et mousse filtrante
Batteries/Piles
Stockage/entreposage pour l'hiver
Respecter la plage de température de service admissible. ( Caractéristiques techniques)
En cas de dépassement positif ou négatif des valeurs limites, désinstaller l'appareil. Effectuer un nettoyage minu-
tieux et contrôler l’appareil.pour déceler tout dommage éventuel.
Conserver la pompe immergée et à l'abri du gel.
Recyclage
Cet appareil contient des composants électroniques et son évacuation vers les ordures ménagères est interdite ! Prière d'utiliser le système de reprise prévu à cet effet. Pour les remplacer, sortir les batteries et les
piles prévues de l'appareil et séparément évacuer celles-ci vers la gestion des déchets.
Gestion des piles usagées
Les piles ne doivent pas être jetées dans les ordures ménagères. N'éliminer les piles usagées que par le biais du système de reprise prévu à cet effet.
Gestion des piles usagées à l'intérieur de la Communauté européenne
En tant que consommateur, vous êtes tenu par la loi de restituer les piles usagées. La restitution est gratuite.
Éliminer les piles par le biais des systèmes de reprise et de recyclage publics dans votre ville ou votre municipalité ou
rapporter les piles là où vous les avez achetées.
Vous trouverez ces symboles sur les piles contenant des substances nocives :
Pb = la pile contient du plomb
Cd = la pile contient du cadmium
Hg = la pile contient du mercure
Li = la pile contient du lithium
Conditions de garantie
PfG assure une garantie de 2 ans à partir de la date de vente pour tout défaut de matériel ou de fabrication. La garantie est valable uniquement sur présentation du bon d’achat. Le recours en garantie s’annule lors d’une manipulation
non conforme à la finalité, lors de dommage électrique ou mécanique entraîné par une utilisation abusive ainsi que lors
de réparation incorrecte effectuée par un atelier de réparation non autorisé. Les réparations ne doivent être effectuées
que par PfG ou par des ateliers de réparation habilités par PfG. Lors de la déclaration de recours en garantie, prière de
faire parvenir à PfG la pièce ou l’appareil défectueux avec une description du défaut ainsi que le bon d’achat franco
domicile. PfG se réserve le droit de facturer des coûts de main d'œuvre. PfG décline toute responsabilité pour des
dommages survenus pendant le transport. Ces derniers devront être immédiatement déclarés auprès du transporteur.
Toutes réclamations ultérieures, de quelque nature que ce soit, en particulier les dommages consécutifs, sont exclues.
Cette garantie n’a aucun effet sur les réclamations du consommateur final vis-à-vis du négociant.
15
Page 16

- NL -
- NL -
Vertaling van de oorspronkelijke gebruiksaanwijzing
Instructies betreft deze gebruiksaanwijzing
Met de aanschaf van het product PondoSolar Island 250 Control heeft u een goede keuze gemaakt.
Voordat u het apparaat in gebruik neemt dient u de gebruiksaanwijzing zorgvuldig door te lezen en zich met het ap-
paraat vertrouwd te maken. Alle werkzaamheden aan en met dit apparaat mogen uitsluitend verricht worden als ze
conform de onderhavige handleiding zijn.
Houdt u zich voor een juist en veilig gebruik stipt aan de veiligheidsvoorschriften.
Bewaar deze gebruiksaanwijzing zorgvuldig. Geef de gebruiksaanwijzing aan de nieuwe eigenaar wanneer het apparaat van eigenaar verwisselt.
Symbolen in deze handleiding
A Verwijst naar één of meer afbeeldingen. In dit voorbeeld: Verwijst naar afbeelding A.
Zie naar een ander hoofdstuk.
Leveringsomvang
A Aantal Omschrijving
1 1 Drijvereenheid met geïntegreerde zonne-energiemodule
2 4 Sproeieropzetstuk
3 1 Sproeierbeugel
4 1 Pomp met aansluitleiding
5 1 Afstandsbediening
Beoogd gebruik
PondoSolar Island 250 Control, verder "apparaat" genoemd, mag alleen als volgt worden gebruikt:
Voor waterfonteinen in vijvers.
Voor gebruik met schoon water.
Gebruik onder naleving van de technische gegevens.
De volgende inperkingen gelden voor het apparaat:
Nooit gebruiken zonder doorstromend water.
Transporteer nimmer andere vloeistoffen dan water.
Niet gebruiken in combinatie met chemicaliën, levensmiddelen, licht brandbare of explosieve stoffen.
Veiligheidsinstructies
Dit apparaat kan worden gebruikt door kinderen vanaf 8 jaar en
daarnaast door personen met verminderde fysieke, sensorische of
mentale vermogens of een gebrek aan ervaring en kennis, mits zij
onder toezicht staan of geïnstrueerd werden over het veilige gebruik
van het apparaat en de gevaren begrijpen, die hiermee
samenhangen. Kinderen mogen niet met het apparaat spelen.
Reiniging en onderhoud door de gebruiker mogen niet worden
uitgevoerd door kinderen, die niet onder toezicht staan.
16
Page 17

A
- NL -
Veilig gebruik
Het apparaat niet aan de leiding dragen of aan de leiding trekken.
Gebruik alleen oorspronkelijke vervangingsonderdelen en -toebehoren voor het apparaat.
Elektrische apparaten en installaties met meetspanning U > 12 VAC of U >30 VDC, die in het water liggen: Appara-
ten en installaties spanningloos schakelen voordat u in het water grijpt.
Gebruik de pomp alleen met de zonne-energiemodule die bij de leveringsomvang is inbegrepen.
Laat de pomp niet drooglopen.
Harde schokken en trillingen van het apparaat vermijden.
Het apparaat minstens 2 maal per jaar reinigen.
Plaatsen en aansluiten
Zo gaat u te werk:
B, C
Stop uit de aansluiting trekken.
– Stop beschermt de elektronica tegen water.
– Bij verwijderde stekker(s) de stop(pen) insteken.
Aansluitleiding in de bus steken.
– Stekker tot de aanslag in de bus drukken, zodat de verbinding waterdicht is.
Pomp op drijvereenheid steken.
Sproeiereenheid op drijvereenheid steken.
Drijvereenheid op het wateroppervlak zetten.
Ingebruikname
Zo gaat u te werk:
De accu van het apparaat is niet opgeladen. Laat het apparaat voor het eerste gebruik een dag lang in de zon staan.
Daarna het apparaat met de afstandsbediening bedienen.
Afstandsbediening
E
De reikwijdte van de afstandsbediening is maximaal 10 meter.
Omschrijving Functie
B
C
D
Pomplooptijd bepalen (max. 4 uur).
Voor het overschrijven van de actuele instelling de pomp
met toets D uitschakelen en dan met toets A de nieuwe
pomplooptijd instellen. De pomp start dan automatisch
In- en uitschakelen van de LED's (branden alleen in het donker)
Capaciteit van de pomp instellen (5 standen)
Toets voor elk uur 1 langzaam indrukken. De indicatiediode
knippert overeenkomstig de ingestelde pomplooptijd.
Voorbeeld: Gewenste pomplooptijd 3 h.
Toets A 3 langzaam opeenvolgend indrukken. Diode
knippert 3 achter elkaar
Knop kort indrukken:
Toets voor elke stand 1 langzaam indrukken.
In- en uitschakelen van de pomp Knop kort indrukken:
17
Page 18

- NL -
Storingen verhelpen
Storing Oorzaak Oplossing
Pomp start niet Geen verbinding zonne-energiemodule
Zonne-energiemodule is vervuild. Reinigen
Loopunit is geblokkeerd Reinigen
Accucapaciteit is uitgeput Accu minstens 4 uur laden
Te weinig zonnestraling Zonne-energiemodule op de zon richten.
Pomp transporteert weinig of geen
volume
Filter is verstopt Filterbehuizing afnemen, filter uitnemen en rei-
Sproeiereenheid is verstopt Sproeiereenheid aftrekken, reinigen
Rotor is versleten Vervangen
Te weinig zonnestraling Zonne-energiemodule op de zon richten.
Verminderde accucapaciteit. Accu minstens 4 uur laden.
LED's branden niet Geen verbinding met zonne-energiemodule
LED-verlichting is uitgeschakeld LED-verlichting inschakelen
Omgeving te helder —
Accucapaciteit is uitgeput Accu minstens 4 uur laden
LED-verlichting is vervuild Reinigen
LED-verlichting is defect Afvoeren
Apparaat kan niet worden ingeschakeld
Accu afstandsbediening op Vervangen
Afstandsbediening op te grote afstand Let op bereik van de afstandsbediening
Geen verbinding met zonne-energiemodule
Reiniging en onderhoud
Voor het reinigen of onderhouden moet het apparaat uit het water worden gehaald.
Apparaat reinigen
Gebruik in geen geval agressieve reinigingsmiddelen of chemische oplossingen omdat daardoor de behuizing of de
werking kan worden aangetast.
Aanbevolen reinigingsmiddelen bij hardnekkige kalkaanslag:
– Azijn- en chloorvrije huishoudreiniger.
Zo gaat u te werk:
Apparaat demonteren.
Accu is defect Apparaat afvoeren
Filterapparaat en rotor reinigen. (→ Rotor vervangen)
Sproeierunit demonteren
Alle onderdelen reinigen
– Ter ondersteuning een zachte borstel gebruiken.
– Onderdelen met schoon water afspoelen.
Zonne-energiemodule met een vochtige doek reinigen en droogwrijven.
Zet het apparaat in omgekeerde volgorde weer in elkaar.
Verbinding met zonne-energiemodule con-
troleren
Pomp op zonne-energiemodule aansluiten
Stekker volledig (tot de aanslag) in de bus
drukken
nigen
LED-verlichting op zonne-energiemodule
aansluiten
Stekker volledig (tot de aanslag) in de bus
drukken
Verbinding met zonne-energiemodule con-
troleren
Pomp op zonne-energiemodule aansluiten
Stekker volledig (tot de aanslag) in de bus
drukken
18
Page 19
- NL -
Rotor vervangen
Zo gaat u te werk:
D
Filterbehuizing van de pomp aftrekken.
Filterspons uit het filterhuis halen en uitspoelen.
Afdekking van de rotor aftrekken (steeksluiting, voorzichtig losmaken).
Rotor uittrekken en reinigen of vervangen.
Bouw het apparaat in omgekeerde volgorde samen.
Batterij vervangen
Zo gaat u te werk:
F
Afstandsbediening omdraaien en afdekking optillen.
Batterij vervangen.
– Knoopcel van type CR 2032 gebruiken.
Sluit de de afdekking weer.
Slijtagedelen
De volgende componenten zijn slijtageonderdelen en vallen niet onder de garantie:
Rotor en filterschuim
Accu´s/batterijen
Opslag en overwintering
Svp letten op het toegestane temperatuurbereik voor gebruik (Technische gegevens)
Bij het overschrijden of onderschrijden van de grenswaarden moet u het apparaat de-installeren. Voer een grondige
reiniging uit en controleer het apparaat op beschadigingen.
Pomp ondergedompeld en vorstvrij opslaan.
Afvoer van het afgedankte apparaat
Dit apparaat bevat elektronische onderdelen en mag niet met het huishoudelijk afval worden afgevoerd! Gebruik voor de verwijdering a.u.b. het hiervoor bedoelde retournagesysteem. Verwijder de te vervangen accu's
en batterijen uit het apparaat en voer deze afzonderlijk af.
Vewijdering van batterijen
Batterijen horen niet in het huisvuil. Verwijder gebruikte batterijen alleen via het daarvoor bestemde inleversysteem.
Verwijderen van batterijen binnen de Europese Gemeenschap
Als verbruiker bent u wettelijk verplicht, gebruikte batterijen in te leveren. Inleveren is kostenloos.
Verwijder de batterijen of via de openbare Inlever- en afvalverwerkingsystemen in uw plaats of gemeente of lever de
batterijen in waar u ze hebt gekocht.
Deze tekens vindt u op schadelijke stoffen bevattende batterijen:
Pb = Batterij bevat lood
Cd = Batterij bevat cadmium
Hg = Batterij bevat kwik
Li = Batterij bevat lithium
Garantievoorwaarden
PfG geeft vanaf de verkoopdatum gedurende 2 jaar garantie op aantoonbare materiaal- en fabricagefouten. Om
aanspraak te kunnen maken op garantie moet u in het bezit zijn van de kassabon. De aanspraak op garantie vervalt bij
onoordeelkundig gebruik, elektrische of mechanische beschadiging als gevolg van misbruik en tevens in geval van
onvakkundige reparatie door niet bevoegde monteurs. Reparaties mogen uitsluitend worden verricht door PfG of door
monteurs die door PfG hiervoor de bevoegdheid hebben gekregen. Om gebruik te maken van de garantie, kunt u het
beschadigde apparaat of het defecte onderdeel samen met een foutenbeschrijving en de kassabon opsturen aan PfG.
PfG behoudt zich het recht voor montagekosten aan te rekenen. PfG is niet aansprakelijk voor transportschade. Deze
dient u onmiddellijk te verhalen op het transportbedrijf. Andere aanspraken, om het even van welke aard, maar in het
bijzonder voor gevolgschade, zijn uitgesloten. Deze garantie is geen inbreuk op de aanspraken van de eindverbruiker
jegens de dealer.
19
Page 20

- ES -
- ES -
Traducción de las instrucciones de uso originales
Indicaciones sobre estas instrucciones de uso
La compra del producto PondoSolar Island 250 Control es una buena decisión.
Lea minuciosamente las instrucciones y familiarícese con el equipo antes de usar el mismo por primera vez. Todos los
trabajos en y con este equipo sólo se deben ejecutar conforme a estas instrucciones.
Tenga necesariamente en cuenta las indicaciones de seguridad para garantizar un uso correcto y seguro del equipo.
Guarde cuidadosamente estas instrucciones. Entregue estas instrucciones al nuevo propietario en caso de cambio de
propietario.
Símbolos en estas instrucciones
A Referencia a una o varias ilustraciones. En este ejemplo: Referencia a la ilustración A.
Referencia a otro capítulo.
Volumen de suministro
A Cantidad Descripción
1 1 Unidad de flotador con módulo solar integrado
2 4 Caperuza de la tobera
3 1 Soporte de tobera
4 1 Bomba con línea de conexión
5 1 Telemando
Uso conforme a lo prescrito
PondoSolar Island 250 Controlen lo sucesivo, "el equipo", solo puede utilizarse de la siguiente manera:
Para crear un surtidor de fuente en estanques.
Para la operación con agua limpia.
Operación observando los datos técnicos.
Para el equipo son válidas las siguientes limitaciones:
No opere nunca sin circulación de agua.
No transporte nunca otros líquidos que no sea el agua.
No emplee el equipo en combinación con productos químicos, alimentos y sustancias fácilmente inflamables o ex-
plosivas.
Indicaciones de seguridad
Este equipo se puede usar por niños a partir de 8 años así como por
personas con capacidades físicas, sensoriales o mentales
disminuidas o con escasas experiencias y conocimientos, si se
supervisan o se instruyen de forma segura en el uso del equipo y
han entendido los peligros que se pueden producir. Los niños no
deben jugar con el equipo. Los niños no deben limpiar ni mantener el
equipo sin supervisión.
20
Page 21
A
- ES -
Funcionamiento seguro
No transporte ni tire el equipo por la línea eléctrica.
Emplee sólo piezas de recambio y accesorios originales para el equipo.
Equipos eléctricos e instalaciones con tensión asignada U > 12 V CA o U >30 V CC que se encuentran en el agua:
Desconecte los equipos y las instalaciones de la tensión antes de tocar en el agua.
Opere la bomba sólo con el módulo solar contenido en el suministro.
No deje que la bomba funcione en seco.
Evite sacudidas y golpes fuertes del equipo.
Limpie el equipo como mínimo 2 veces al año.
Emplazamiento y conexión
Proceda de la forma siguiente:
B, C
Saque el tapón de la conexión.
– El tapón protege la electrónica del agua.
– Coloque el tapón cuando saque la clavija de enchufe.
Enchufe la línea de conexión en el conector.
– Presione la clavija de enchufe hasta el tope en el conector, para que la conexión esté impermeable.
Enchufe la bomba en la unidad del flotador.
Enchufe la unidad de tobera en la unidad del flotador.
Coloque la unidad del flotador sobre la superficie del agua.
Puesta en marcha
Proceda de la forma siguiente:
El acumulador del equipo no está cargado. Antes de emplear el equipo por primera vez expóngalo un día completo a
la radiación solar. Opere a continuación el equipo con el telemando.
Telemando
E
El alcance máximo del telemando es de 10 m.
Descripción Función:
B
C
D
Determinar el tiempo de marcha de la bomba (máx. 4 h).
Desconectar la bomba con la tecla D para reescribir el
ajuste actual y determinar después el nuevo tiempo de
marcha de la bomba con la tecla A. La bomba arranca automáticamente
Conexión y desconexión de los LEDs (sólo se iluminan
cuando está oscuro)
Ajustar la capacidad de transporte de la bomba (5 escalones)
Pulsar lentamente la tecla para cada hora 1 . El diodo de indicación parpadea en correspondencia al tiempo de marcha
de la bomba ahora ajustado.
Ejemplo: Tiempo de marcha deseado de la bomba 3 h.
Pulsar lenta y sucesivamente la tecla A 3 . El diodo parpadea varias veces 3 sucesivamente
Pulsar brevemente la tecla
Pulsar lentamente la tecla para cada escalón 1 .
Conexión y desconexión de la bomba Pulsar brevemente la tecla
21
Page 22

- ES -
A
Eliminación de fallos
Fallo Causa
La bomba no arranca Ninguna conexión módulo solar
El módulo solar está sucio. Limpiar
La unidad de rodadura está bloqueada Limpiar
La capacidad del acumulador está agotada. Cargar el acumulador 4 horas como mínimo.
Muy poca radiación solar Alinear el módulo solar al sol.
La bomba casi no transporta o no
transporta.
El filtro está obstruido Desmontar la carcasa del filtro, sacar el filtro y
La unidad de tobera está obstruida Sacar la unidad de tobera y limpiarla
La unidad de rodadura está desgastada Sustituir
Muy poca radiación solar Alinear el módulo solar al sol.
La capacidad del acumulador está agotada. Cargar el acumulador 4 horas como mínimo.
Los LEDs no se iluminan No hay conexión al módulo solar
La iluminación LED está desconectada Conectar la iluminación LED
Entorno muy claro —
La capacidad del acumulador está agotada. Cargar el acumulador 4 horas como mínimo.
La iluminación LED está sucia. Limpiar
La iluminación LED está defectuosa. Desechar
El equipo no se puede conectar. La batería del telemento está agotada Sustituir
Distancia al telemando muy lejos Tener en cuenta el alcance del telemando.
No hay conexión al módulo solar
Limpieza y mantenimiento
El equipo se tiene que sacar del agua para realizar los trabajos de limpieza y mantenimiento.
Limpieza del equipo
No emplee por ninguna razón productos de limpieza o soluciones químicas agresivas, porque se puede corroer la
carcasa o mermar el funcionamiento.
Productos de limpieza recomendados en caso de calcificaciones persistentes:
– Productos de limpieza domésticos sin vinagre y cloro.
Proceda de la forma siguiente:
Desmonte el equipo.
Acumulador defectuoso Desechar el equipo.
Limpie la carcasa del filtro y la unidad de rodadura. (→ Sustitución de la unidad de rodadura)
Separe la unidad de tobera.
Limpie todas las piezas.
– Emplee un cepillo suave para apoyar la limpieza.
– Enjuague las piezas con agua clara.
Limpie el módulo solar con un paño de limpieza húmedo y séquelo.
Monte el equipo en secuencia contraria.
cción correctora
Comprobar la conexión al módulo solar
Conectar la bomba en el módulo solar
Presionar la clavija de enchufe completa-
mente (hasta el tope) en el conector.
limpiarlo
Conectar la iluminación LED en el módulo
solar
Presionar la clavija de enchufe completa-
mente (hasta el tope) en el conector.
Comprobar la conexión al módulo solar
Conectar la bomba en el módulo solar
Presionar la clavija de enchufe completa-
mente (hasta el tope) en el conector.
22
Page 23

- ES -
Sustitución de la unidad de rodadura
Proceda de la forma siguiente:
D
Limpie la carcasa de filtro de la bomba.
Quite la esponja filtrante de la carcasa del filtro y enjuáguela.
Quite la cubierta de la unidad de rodadura (cierre de enchufe, sacar cuidadosamente).
Saque la unidad de rodadura y límpiela o sustitúyala.
Monte el equipo en secuencia contraria.
Cambio de la batería
Proceda de la forma siguiente:
F
Invierta el telemando y quite la cubierta.
Sustituya la batería.
– Emplee una pila botón del tipo CR 2032.
Cierre de nuevo la cubierta.
Piezas de desgaste
Los siguientes componentes son piezas de desgaste y no entran en la prestación de garantía:
Unidad de rodadura y esponja filtrante
Acumuladores/ baterías
Almacenamiento / Conservación durante el invierno
Tenga en cuenta la gama permisible de la temperatura de servicio. ( Datos técnicos)
Desinstale el equipo si los valores están por encima o por debajo de los valores límites. Limpie minuciosamente el
equipo y compruebe si está dañado.
Almacene la bomba sumergida y protegida contra heladas.
Desecho
Este equipo contiene componentes electrónicos y está prohibido desecharlo en la basura doméstica. Use
para esto el sistema de recogida previsto. Quite los acumuladores y baterías cambiables y deséchelos por
separado.
Desecho de las pilas usadas
No deseche las pilas en la basura doméstica. Deseche las pilas usadas sólo a través de un sistema de recogida de
pilas.
Desecho de las pilas dentro de la Comunidad Europea
Como consumidor Vd. está obligado legalmente a entregar las pilas usadas. La recogida es gratuita.
Deseche las pilas a través de los sistemas de recogida y reciclaje públicos en su ciudad o municipio o entregue las
pilas al lugar donde las compró.
Vd. encuentra este símbolo en las pilas que contienen sustancias nocivas:
Pb = La pila contiene plomo
Cd = La pila contiene cadmio
Hg = La pila contiene mercurio
Li = La pila contiene litio
Condiciones de garantía
PfG concede 2 años de garantía a partir de la fecha de venta por defectos de material y de fabricación comprobados.
La condición para la prestación de garantía es la presentación del comprobante de compra. El derecho a garantía
caduca en caso de una manipulación inadecuada, daños eléctricos o mecánicos debido a un uso indebido y trabajos
de reparación inadecuados realizados por talleres no autorizados. Los trabajos de reparación sólo se deben ejecutar
por PfG o talleres autorizados por PfG. En caso de presentación de derechos a garantía envíe el equipo reclamado o
el componente defectuoso con una descripción del defecto y el comprobante de compra franco domicilio a PfG. PfG
se reserva el derecho a reclamar los costes de montaje. PfG no se responsabiliza por los daños de transporte. Los
daños de transporte se tienen que reclamar de inmediato a la agencia de transporte. Quedan excluídos cualquier otro
derecho y especialmente los derechos por daños consecuenciales. Esta garantía no afecta los derechos del cliente
final frente al comerciante.
23
Page 24
- PT -
- PT -
Tradução das instruções de uso originais
Explicações necessárias às Instruções de uso
Com a aquisição do produto PondoSolar Island 250 Control tomou uma boa decisão.
Antes de utilizar pela primeira vez o aparelho, leia atentamente as instruções de uso e familiarize-se com a operação.
Todos os trabalhos com este aparelho poderão ser realizados exclusivamente conforme as presentes instruções.
Observe estritamente as instruções de segurança com respeito ao uso correcto e seguro do aparelho.
Guarde estas instruções de uso em local seguro. Se ceder o aparelho a outra pessoa, entregue-lhe as instruções de
uso.
Símbolos usados nestas instruções
A Nota remissiva a uma ou várias figuras. Neste caso: Nota remissiva à figura A.
Nota remissiva a outro capítulo.
Âmbito de entrega
A Número Descrição
1 1 Flutuador com módulo solar integrado
2 4 Adaptador de bico
3 1 Suporte de bico
4 1 Bomba com cabo de comunicação
5 1 Telecomando
Emprego conforme o fim de utilização acordado
PondoSolar Island 250 Control, doravante designado "aparelho", só pode ser utilizado do seguinte modo:
Para a criação de um repuxo de água em tanques/lagos de jardim.
Para a operação com água limpa.
Operação, sendo observadas as características técnicas.
O aparelho está sujeito a estas restrições:
Nunca operar a bomba sem que seja percorrida por água.
Nunca bombear outros líquidos que não a água.
Não utilizar em contacto com produtos químicos, géneros alimentícios, combustíveis ou substâncias explosivas.
Instruções de segurança
O aparelho pode ser utilizado por crianças com idade a partir de 8
anos e por pessoas com capacidade física, sensórica ou mental
reduzida ou falta de experiência e conhecimentos técnicos enquanto
forem vigiadas ou desde que tenham sido instruídas quanto ao uso
seguro do aparelho e aos riscos relacionados com o uso. O aparelho
não é brinquedo infantil. A limpeza e a manutenção não podem ser
feitas por crianças sem vigilância por pessoas adultas.
24
Page 25

A
- PT -
Operação segura
Não transporte nem puxe o aparelho pelo cabo eléctrico.
Utilize só peças sobresselentes originais e acessórios originais por serem compatíveis com o aparelho.
Aparelhos eléctricos e instalações eléctricas com uma tensão nominal de U > 12 V AC ou U >30 V DC, que se en-
contram na água: Antes de meter a mão na água, desligar a ficha eléctrica dos aparelhos e das instalações.
A bomba pode ser operada apenas com o módulo solar que faz parte do volume de entrega.
Não deixe a bomba a funcionar em seco.
Evitar choques violentos e vibrações do aparelho.
Limpar o aparelho pelo menos 2 vezes por ano.
Posicionar e conectar
Proceder conforme descrito abaixo:
B, C
Retirar o tampão da ligação.
– O tampão protege o sistema electrónico da água.
– Inserir o tampão com a ficha desligada.
Inserir o cabo de ligação na tomada.
– Introduzir a ficha totalmente na tomada até que encontre resistência para que a ligação fique impermeável à
água.
Ligar a bomba ao flutuador.
Ligar a unidade de bico ao flutuador.
Colocar o flutuador sobre a água.
Colocação em operação
Proceder conforme descrito abaixo:
O acumulador do do aparelho tem uma carga. Antes da primeira utilização do aparelho, expor um dia ao sol. Depois,
usar o telecomando para controlar o aparelho.
Telecomando
E
O alcance máximo do telecomando é de 10 m.
Descrição Função
B
C
D
Definir tempo de operação da bomba (máximo: 4 h).
Para corrigir o valor actual, desligar a bomba com a
tecla D e depois definir a nova duração mediante a
tecla .A A bomba arranca automaticamente.
Para cada hora, premir devagar 1 vez a tecla . O diodo indicador pisca conforme o novo tempo de operação da
bomba.
Exemplo: Tempo de operação desejado da bomba 3 h.
Premir devagar a tecla A 3 vezes seguidas. O diodo
pisca 3 vezes seguidas
Activar e desactivar os LEDs (acendem só na noite) Pressionar brevemente o botão
Corrigir a capacidade da bomba (5 estágios)
Para cada estágio, premir devagar 1 vez a tecla .
Ligar e desligar a bomba Pressionar brevemente o botão
25
Page 26
- PT -
Eliminação de anomalias
Avaria/Falha Causa Remédio
Bomba não arranca Ausência de comunicação com o módulo solar
O módulo solar está sujo. Limpar
Rotor bloqueado Limpar
A capacidade do acumulador esgotou-se Carregar o acumulador pelo menos 4 horas.
Radiação solar muito baixa Dirigir o módulo solar para o sol.
A bomba não funciona ou tem efeito
insuficiente
Filtro está entupido Retirar a carcaça-filtro, retirar o filtro e limpar.
Unidade de bico está entupida Retirar a unidade de bico, limpar
Rotor gasto Substituir
Radiação solar muito baixa Dirigir o módulo solar para o sol.
A bateria já não tem carga. Carregar a bateria durante pelo menos 4 horas
LEDs não funcionam Falta de comunicação com o módulo solar
A iluminação LED está desactivada. Activar a iluminação LED.
Escuridão insuficiente —
A capacidade do acumulador esgotou-se Carregar o acumulador pelo menos 4 horas.
A iluminação LED suja. Limpar
A iluminação LED tem defeito. Substituir
O aparelho não liga. A pilha do telecomando esgotou-se Substituir
O telecomando não se encontra dentro do alcance limite Observar o alcance máximo do telecomando
Falta de comunicação com o módulo solar
Limpeza e manutenção
Antes de cada limpeza ou manutenção, o aparelho deve ser tirado da água.
Limpar o aparelho
Não utilizar detergentes agressivos ou solventes químicos que possam destruir a carcaça ou influenciar negativa-
mente o funcionamento.
Solventes de limpeza adequados para remover aderências calcificadas resistentes:
– Detergente doméstico, desprovido de vinagre e cloro.
Proceder conforme descrito abaixo:
Desmontar o aparelho.
A bateria tem defeito Substituir
Limpar a carcaça-filtro e o rotor. (→ Substituir a unidade de rotor)
Desmontar a unidade de bico.
Limpar todas as peças.
– Usar uma escova macia para facilitar a limpeza.
– Limpar as peças com água limpa.
Limpar o módulo solar com um pano húmido e depois secar.
Montar o aparelho na ordem inversa à desmontagem.
Controlar a comunicação com o módulo so-
lar.
Conectar a bomba ao módulo solar.
Introduzir a ficha totalmente na tomada (até
que encontre resistência).
Conectar a iluminação LED ao módulo solar.
Introduzir a ficha totalmente na tomada (até
que encontre resistência).
Controlar a comunicação com o módulo so-
lar.
Conectar a bomba ao módulo solar.
Introduzir a ficha totalmente na tomada (até
que encontre resistência).
26
Page 27
- PT -
Substituir a unidade de rotor
Proceder conforme descrito abaixo:
D
Retirar a carcaça-filtro da bomba.
Tirar a espuma filtrante da carcaça e limpar com água.
Retirar a cobertura do rotor (fecho de encaixe, soltar com cuidado).
Tirar fora o rotor e limpar ou substituir.
Montar o aparelho na ordem inversa à desmontagem.
Substituir a pilha
Proceder conforme descrito abaixo:
F
Tirar a tampa do telecomando, no lado posterior.
Substituir a pilha
– Utilizar pilha tipo CR 2032.
Fechar a tampa.
Peças de desgaste
Estes componentes estão sujeitas a desgaste permanente, não sendo abrangidos pela garantia legal:
Unidade de rotor e espuma filtrante
Acumuladores/Pilhas
Guardar/Invernar o aparelho
Observe a gama de temperaturas de serviço admissível. ( Características técnicas)
Se os valores limite forem excedidos ou não forem atingidos, é necessário desinstalar o aparelho. Faça uma boa
limpeza e verifique a ausência de defeitos.
Guardar a bomba mergulhada na água e à prova de geada.
Descartar o aparelho usado
O aparelho não poderá ser eliminado com o lixo doméstico por conter componentes electrónicos! Deverá ser
entregue ao sistema de recolha selectiva de lixo. Tirar, do aparelho, os acumuladores e pilhas e entregar em
separado à recolha selectiva de lixo.
Eliminação de baterias usadas
As pilhas usadas não podem ser eliminadas com o lixo doméstico. Elimine as pilhas gastas só através do sistema de
recolha selectiva de lixo.
Eliminação de pilhas usadas nos estados-membros da Comunidade Europeia
Na qualidade de consumidor, cada cidadão tem a obrigação legal de retornar pilhas usadas. A devolução é gratuita.
Elimine as pilhas através dos sistemas públicas de recolha selectiva e reciclagem de materiais usados ou devolva-as
à loja na qual as comprou.
As pilhas que contêm substâncias contaminantes estão marcadas por estes símbolos:
Pb = A pilha contém chumbo
Cd = A pilha contém cádmio
Hg = A pilha contém mercúrio
Li = A pilha contém lítio
Condições de garantia
A PfG concede 2 anos de garantia a partir da data de aquisição, respondendo por defeitos de material e fabrico
comprovados. A prestação de garantia implica a apresentação do talão de caixa. O direito à garantia caduca em caso
de manejo incorrecto, danos eléctricos ou mecânicos provocados por uso fora do fim de utilização acordado ou reparação indevida por oficina não autorizada. Todas as reparações poderão ser executadas exclusivamente pela PfG ou
por uma oficina concessionária. Em cada caso abrangido pelo direito à garantia, envie o aparelho defeituoso ou o
componente defeituoso, franco domicílio, à PfG, incluindo breve descrição do defeito e talão de aquisição. A PfG
reserva-se o direito de reclamar o pagamento da reparação. A PfG denega a responsabilidade por danos ocasionados
durante o transporte do aparelho. O direito à indemnização de tais danos deve ser imediatamente dirigido à
companhia de transporte competente. Ficam excluídos quaisquer outros direitos, especialmente com respeito a outros
prejuízos resultantes de um determinado dano. Esta garantia não afecta eventuais direitos do cliente final contra o
revendedor.
27
Page 28
- IT -
- IT -
Traduzione delle istruzioni d'uso originali
Note sulle presenti istruzioni d'uso
Avete fatto un'ottima scelta acquistando il prodotto PondoSolar Island 250 Control.
Prima della messa in servizio leggere attentamente le istruzioni d'uso e familiarizzare con l'apparecchio. Eseguire tutte
le operazioni su e con questo apparecchio osservando sempre le presenti istruzioni.
Osservare attentamente le norme di sicurezza al fine di garantire un impiego corretto e sicuro dell'apparecchio.
Conservare accuratamente queste istruzioni d'uso. Consegnarle al nuovo acquirente in caso di cambio di proprietà.
Simboli utilizzati in queste istruzioni
A Rimando ad una o più figure. In questo esempio: rimando a figura A.
Rimando ad un altro capitolo.
Volume di fornitura
A Quantità Descrizione
1 1 Unità galleggiante con modulo solare incorporato
2 4 Attacco dell'ugello
3 1 Supporto dell'ugello
4 1 Pompa con cavo di allacciamento
5 1 Telecomando
Impiego ammesso
PondoSolar Island 250 ControlIl , chiamato "apparecchio" qui di seguito, può essere utilizzato solo nel modo seguente:
Per generare una fontana d'acqua in laghetti.
Per il funzionamento con acqua pulita.
Funzionamento in conformità alle caratteristiche tecniche.
Per l'apparecchio valgono le seguenti restrizioni:
Non utilizzarlo mai senza flusso d'acqua.
Non trasportare mai liquidi diversi dall'acqua.
Non utilizzarlo unitamente a prodotti chimici, generi alimentari, sostanze facilmente infiammabili o esplosive.
Norme di sicurezza
Questo apparecchio può essere utilizzato da bambini sopra gli 8 anni
e da persone con capacità fisiche, sensoriche o mentali ridotte o che
non dispongono di esperienza e cognizioni tecniche, però a condizione che vengano sorvegliate e siano state addestrate nell'uso corretto dell'apparecchio e siano in grado di capire i pericoli conseguenti. I bambini non possono giocare con l'apparecchio. Gli interventi di pulizia e manutenzione non possono essere eseguiti da bambini se questi non vengono sorvegliati.
28
Page 29

A
- IT -
Funzionamento sicuro
Non portare o trascinare l'apparecchio afferrando i cavi elettrici.
Utilizzare solo parti di ricambio e accessori originali per l'apparecchio.
Apparecchi elettrici e sistemi di installazione con tensione di taratura U > 12 V CA o U >30 V CC sistemati in acqua:
diseccitare apparecchi e sistemi prima di mettere le mani nell'acqua.
Utilizzare la pompa solo con il modulo solare in dotazione.
Non far funzionare la pompa a secco.
Non sottoporre l'apparecchio a urti violenti e vibrazioni.
Pulire l'apparecchio almeno due volte all'anno.
Installazione e collegamento
Procedere nel modo seguente:
B, C
Sfilare il tappo dall'attacco.
– Il tappo protegge il sistema elettronico contro l'acqua.
– Inserire il tappo quando il connettore è estratto.
Inserire la linea di allacciamento nella presa.
– Inserire la spina nella presa (fino alla battuta) in modo che il collegamento sia impermeabile all'acqua.
Inserire la pompa sull'unità galleggiante.
Infilare l'unità ugello sull'unità galleggiante.
Sistemare l'unità galleggiante sulla superficie dell'acqua.
Messa in funzione
Procedere nel modo seguente:
L'accumulatore dell'apparecchio non è caricato. Prima del primo utilizzo, esporre l'apparecchio per un giorno alla ra-
diazione solare. Comandare poi l'apparecchio con il telecomando:
Telecomando
E
La portata del telecomando è di max 10 m.
Descrizione Funzione
B
C
D
Determinare il tempo di funzionamento della pompa (max.
4 h).
Per sovrascrivere l'impostazione attuale, spegnere la
pompa con il tasto D e poi con il tasto A stabilire un nuovo
tempo di funzionamento della pompa. La pompa si avvia
poi automaticamente.
Accensione e spegnimento dei LED (si accendono solo in
caso di oscurità)
Regolare la portata della pompa (5 stadi).
Per ogni ora, premere lentamente per 1 il tasto. Il diodo di
visualizzazione lampeggia in funzione del tempo di funzionamento pompa impostato.
Esempio: Tempo di funzionamento pompa desiderato 3 h.
Premere lentamente e ripetutamente il tasto A 3 . Il diodo
lampeggià più volte per 3 volte di seguito.
Premere brevemente il tasto.
Per ogni stadio, premere lentamente per 1 il tasto.
Accensione e spegnimento della pompa. Premere brevemente il tasto.
29
Page 30

- IT -
Eliminazione di guasti
Anomalia Causa Intervento
La pompa non si avvia Nessun collegamento con il modulo solare
Modulo solare sporco. Pulire
L'unità rotante è bloccata Pulire
La capacità dell'accumulatore è esaurita. Caricare l'accumulatore almeno 4 ore.
Irradiazione solare insufficiente Orientare il modulo solare in direzione del sole.
La pompa trasporta a malapena o
non trasporta affatto
Filtro intasato Rimuovere la scatola del filtro, togliere il filtro e
Ugello intasato Sfilare l'ugello e poi pulirlo
Unità rotante usurata Sostituire
Irradiazione solare insufficiente Orientare il modulo solare in direzione del sole.
La capacità dell'accumulatore è esaurita. Caricare l'accumulatore almeno 4 ore
I LED non si illuminano Nessun collegamento con il modulo solare
L'illuminazione LED è spenta. Accendere l'illuminazione LED.
Ambiente troppo chiaro —
La capacità dell'accumulatore è esaurita. Caricare l'accumulatore almeno 4 ore.
L'illuminazione LED è sporca. Pulire
L'illuminazione LED è difettosa. Smaltire
Non è possibile avviare l'apparecchio.
Batteria del telecomando scarica. Sostituire
Telecomando troppo lontano Osservare la portata del telecomando.
Nessun collegamento con il modulo solare
Pulizia e manutenzione
Togliere l'apparecchio dall'acqua per eseguire la pulizia o la manutenzione.
Pulire l'apparecchio
Non utilizzare mai detergenti aggressivi o soluzioni chimiche per non corrodere il corpo o compromettere il funziona-
mento dell'apparecchio.
Detergenti consigliati per calcificazioni resistenti:
– Detergente per uso domestico senza aceto e cloro.
Procedere nel modo seguente:
Smontare completamente l'apparecchio.
L'accumulatore è difettoso Smaltimento dell'apparecchio
Pulire scatola del filtro e unità rotante (→ Sostituzione dell'unità rotante)
Scomporre l'ugello.
Pulire tutti i componenti.
– Utilizzare una spazzola morbida per facilitare la pulizia.
– Risciacquare i componenti con acqua limpida.
Pulire il modulo solare con un panno umido e poi asciugarlo.
Montare l'apparecchio seguendo l'ordine inverso.
Controllare il collegamento al modulo solare.
Collegare la pompa al modulo solare.
Inserire completamente la spina nella presa
(fino alla battuta).
poi pulirlo.
Collegare l'illuminazione LED al modulo so-
lare.
Inserire completamente la spina nella presa
(fino alla battuta).
Controllare il collegamento al modulo solare.
Collegare la pompa al modulo solare.
Inserire completamente la spina nella presa
(fino alla battuta).
30
Page 31

- IT -
Sostituzione dell'unità rotante
Procedere nel modo seguente:
D
Sfilare la scatola del filtro dalla pompa.
Estrarre la spugna filtrante dalla scatola del filtro e sciacquarla.
Sfilare la copertura dell'unità rotante (a innesto, sollevarla con premura).
Estrarre l'unità rotante e pulirla o sostituirla.
Montare l'apparecchio seguendo l'ordine inverso.
Sostituire la batteria
Procedere nel modo seguente:
F
Girare il telecomando e sollevare la copertura.
Sostituire la batteria.
– Usare una batteria a bottone tipo CR 2032.
Riapplicare la copertura.
Pezzi soggetti a usura
I seguenti componenti sono soggetti a usura e quindi non sono coperti da garanzia:
Unità rotante e filtro in espanso
Accumulatori/batterie
Magazzinaggio/messa al riparo per l'inverno
Osservare l'intervallo di temperatura d'esercizio ammissibile ( Caratteristiche tecniche)
Smontare l'apparecchio se i valori limite vengono superati per eccesso o per difetto. Eseguire una pulizia accurata e
poi controllare se l'apparecchio è danneggiato.
Conservare la pompa in posizione immersa e al riparo dal gelo.
Smaltimento
Non smaltire questo apparecchio gettandolo nei rifiuti domestici in quanto contiene componenti elettronici!
Utilizzare l'apposito sistema di ritiro. Estrarre gli accumulatori e le batterie esausti dall'apparecchio e smaltirli
separatamente.
Smaltimento delle batterie
Non gettare le batterie nei rifiuti domestici. Smaltire le batterie consumate solo attraverso l'apposito sistema di ritiro.
Smaltimento delle batterie nella Comunità Europea
I consumatori sono tenuti per legge a restituire le batterie consumate. La restituzione è senza ricompensa.
Smaltire le batterie attraverso il sistema di ritiro/riciclaggio pubblico approntato dalla città o dal comune oppure resti-
tuirle laddove sono state acquistate.
Questi caratteri sono riportati sulle batterie contenenti sostanze nocive:
Pb = la batteria contiene piombo
Cd = la batteria contiene cadmio
Hg = la batteria contiene mercurio
Li = la batteria contiene litio
Condizioni di garanzia
PfG concede 2 anni di garanzia a partire dalla data di vendita su difetti comprovabili di materiale e fabbricazione. Condizione per la prestazione della garanzia è la presentazione del documento di prova dell'acquisto. Il diritto di garanzia
si estingue in caso di uso non appropriato, danno elettrico o meccanico dovuto a impiego improprio nonché in caso di
riparazione non idonea da parte di officine non autorizzate. Le riparazioni possono venire eseguite solo da PfG o da
officine autorizzate da PfG. In caso di domanda di garanzia inviate franco domicilio a PfG l'apparecchio oggetto del
reclamo o la parte difettosa con la descrizione dei difetti ed il documento di prova dell'acquisto. PfG si riserva di fatturare le spese di montaggio. PfG non risponde per danni da trasporto. Questi vanno fatti valere immediatamente nei
confronti del trasportatore. Ulteriori diritti di qualsiasi genere, in particolare per danni indiretti, sono esclusi. Questa garanzia non tocca i diritti del cliente finale nei riguardi del rivenditore.
31
Page 32

- DA -
- DA -
Oversættelse af den originale brugsanvisning
Henvisninger vedrørende denne brugsanvisning
Med dit køb af PondoSolar Island 250 Control har du truffet et godt valg.
Inden du bruger apparatet første gang, er det vigtigt, at du læser brugsanvisningen grundigt igennem og gør dig fort-
rolig med apparatet. Alle arbejder på og med dette apparat må kun udføres iht. foreliggende vejledning.
Sikkerhedshenvisningerne skal ubetinget overholdes for korrekt og sikker anvendelse.
Opbevar denne brugsanvisning omhyggeligt. Ved ejerskifte, videregiv venligst brugsanvisningen.
Symboler i denne vejledning
A Henvisning til en eller flere illustrationer. I dette eksempel: Henvisning til Figur A.
Henvisning til et andet kapitel.
Leveringsomfang
A Antal Beskrivelse
1 1 Svømmerenhed med integreret solcellemodul
2 4 Dyseopsats
3 1 Dyseholder
4 1 Pumpe med tilslutningsledning
5 1 Fjernbetjening
Formålsbestemt anvendelse
PondoSolar Island 250 Control, herefter kaldet "enheden", må udelukkende anvendes på følgende måde:
Til frembringelse af et springvand i dammen.
Til brug med rent vand.
Drift ved overholdelse af de tekniske data.
Der gælder følgende restriktioner for apparatet:
Må aldrig betjenes uden gennemstrømning af vand.
Anvend aldrig andre væsker end vand.
Må ikke sættes i forbindelse med kemikalier, levnedsmidler, let brændbare eller eksplosive stoffer.
Sikkerhedsanvisninger
Dette apparat kan bruges af børn fra 8 år og derover og personer
med nedsatte fysiske, sensoriske eller mentale evner eller
manglende erfaring og viden, når de er under opsyn eller får
instruktion i sikker brug af apparatet og forstår de dermed forbundne
risici. Børn må ikke lege med apparatet. Rengøring og
vedligeholdelse må ikke udføres af børn uden opsyn.
32
Page 33

A
- DA -
Sikker drift
Bær eller træk ikke enheden i den elektriske ledning.
Brug kun originale reservedele og tilbehør til enheden.
Elektrisk udstyr og installationer med en nominel spænding på U> 12 V AC eller U> 30 V DC, der ligger i vand:
Udstyr og installationer skal være spændingsfri, før du sætter det i vand.
Betjen kun pumpen med det medfølgende solcellemodul.
Lad ikke pumpen køre tør.
Undgå, at enheden udsættes for hårde slag og rystelser.
Rengør enheden mindst 2 gange om året.
Opstilling og tilslutning
Sådan gør du:
B, C
Træk proppen ud af tilslutningen.
– Proppen beskytter de elektroniske dele mod vand.
– Sæt proppen i, når stikket er trukket ud.
Sæt tilslutningskablet i bøsningen.
– Tryk stikket ind i bøsningen indtil den stopper, således at forbindelsen er vandtæt.
Sæt pumpen på svømmerenheden.
Sæt dyseenheden på svømmerenheden.
Sæt svømmerenheden på vandoverfladen.
Ibrugtagning
Sådan gør du:
Apparatets batteri er ikke opladet. Lad apparatet så i sollyset en hel dag, før det tages i brug første gang. Betjen deref-
ter apparatet med fjernbetjeningen.
Fjernbetjening
E
Fjernbetjeningens rækkevidde er maksimalt 10 m.
Beskrivelse Funktion
B
C
D
Fastsæt pumpens driftstid (maks. 4 h).
Overskriv pumpens aktuelle indstilling ved at slukke for
pumpen med tasten D og derefter fastsætte pumpens nye
driftstid med tasten A. Derefter går pumpen i gang automatisk
Tryk 1 langsomt på tasten på for hver time. Indikatordioden
blinker svarende til den nu indstillede driftstid for pumpen.
Eksempel: Ønsket pumpedriftstid 3 h.
Tryk på tasten A 3 langsomt efter hinanden. Dioden blinker gentagne gange 3 efter hinanden
Til- og frakobling af LED'erne (lyser kun i mørke) Tryk kort på tasten
Indstilling af pumpens fødeeffekt (5 trin)
Tryk 1 langsomt på tasten på for hvert trin.
Til- og frakobling af pumpen Tryk kort på tasten
33
Page 34

- DA -
Å
Afhjælpning af fejl
Fejl
Pumpe går ikke i gang Ingen forbindelse til solcellemodulet
Pumpen kører næsten ikke eller er
stoppet
LED'er lyser ikke Ingen forbindelse til solcellemodulet
Apparatet kan ikke tændes Batteriet i fjernbetjeningen er opbrugt Udskift
Rengøring og vedligeholdelse
Ved rengøring eller eftersyn skal apparatet tages op af vandet.
Rengør apparatet
Brug under ingen omstændigheder aggressive rengøringsmidler eller opløsningsmidler, da disse skader huset eller
forringer funktionen.
Anbefalede rengøringsmidler ved genstridige tilkalkninger:
– Eddike- og klorfrit husholdningsrengøringsmiddel.
Sådan gør du:
Skil apparatet ad.
Rengør filterhuset og løbeenheden. (→ Udskiftning af løbeenhed)
Skil dyseenheden ad.
Rengør alle dele.
– Brug en blød børste til at støtte.
– Skyl delene med rent vand.
Rengør solcellemodulet med en fugtig klud og tør af.
Sæt apparatet sammen i omvendt rækkefølge.
rsag Udbedring
Kontroller forbindelsen til solcellemodulet
Slut pumpen til solcellemodulet
Tryk stikket helt i bøsningen (indtil det stop-
per)
Solcellemodulet er beskidt. Rengør
Løbeenheden er blokeret Rengør
Batteriets kapacitet er opbrugt Oplad batteriet i mindst 4 timer
Sollyset er for svagt Juster solcellen mod solen
Filteret er tilstoppet Tag filterhuset af, taget fileret ud, og rengør det
Dyseenheden er tilstoppet Tag dyseenheden af og rengør den
Løbeenhed er slidt Udskift
Sollyset er for svagt Juster solcellen mod solen
Batteriets kapacitet er opbrugt. Oplad batteriet i mindst 4 timer
Slut LED-belysningen til solcellemodulet
Tryk stikket helt i bøsningen (indtil det stop-
per)
LED-belysningen er slukket Tænd LED-belysningen
Omgivelserne er for lyse —
Batteriets kapacitet er opbrugt Oplad batteriet i mindst 4 timer
LED-belysningen er tilsmudset Rengør
LED-belysningen er defekt Bortskaf
Fjernbetjeningen er for langt væk Overhold fjernbetjeningens rækkevidde
Ingen forbindelse til solcellemodulet
Kontroller forbindelsen til solcellemodulet
Slut pumpen til solcellemodulet
Tryk stikket helt i bøsningen (indtil det stop-
per)
Batteriet er defekt Bortskaf apparatet
34
Page 35

- DA -
Udskiftning af løbeenhed
Sådan gør du:
D
Træk filterhuset fra pumpen.
Tag filtersvampen ud af filterhuset, og skyl den.
Træk afskærmningen af løbeenheden (stiklås, lirk forsigtigt ud).
Træk løbeenheden ud, og rengør eller udskift den.
Sæt apparatet sammen i omvendt rækkefølge.
Skift batteri
Sådan gør du:
F
Vend fjernbetjeningen om, og løft afskærmningen af.
Udskift batteriet.
– Anvend et knapbatteri af type CR 2032.
Luk for afdækningen igen.
Lukkedele
Følgende komponenter er sliddele og er ikke omfattet af garantien:
Løbeenhed og filterskum
Batterier
Opbevaring/overvintring
Vær opmærksom på den tilladte omgivelsestemperatur. ( Tekniske data)
Hvis grænseværdierne under- eller overskrides, skal apparatet afinstalleres. Udfør en grundig rengøring og tjek for
skader på udstyret.
Nedsænk pumpen, og opbevar den frostfrit.
Bortskaffelse
Dette apparat indeholder elektroniske komponenter og må ikke bortskaffes som husholdningsaffald! Benyt
venligst det dertil indrettede tilbagetagelsessystem. Fjern batterier beregnet til genbrug fra apparatet, og
bortskaf disse separat.
Bortskaffelse af batterier
Batterier må ikke smides ud sammen med husholdningsaffaldet. Batterier bør altid bortskaffes over et egnet recyclingsystem.
Bortskaffelse af batterier inden for Det Europæiske Fællesskab
Som forbruger er du ved lov forpligtet til at levere tomme batterier tilbage. Tilbageleveringen er vederlagsfri.
Bortskaf enten batterierne over de offentlige samlingspladser og recyclingcentre i din by eller din kommune, eller af-
levér batterierne der, hvor du har købt dem.
Disse tegn findes på batterier, der indeholder skadelige stoffer:
Pb = Batteri indeholder bly
Cd = Batteri indeholder cadmium
Hg = Batteri indeholder kviksølv
Li = Batteri indeholder litium
Garantibetingelser
PfG yder 2 års garanti fra salgsdatoen på dokumenterbare materiale- og fabrikationsfejl. Forevisning af købsdokumentationen er en forudsætning for garantiydelsen. Garantikravet bortfalder ved usagkyndig håndtering, elektrisk eller mekanisk beskadigelse på grund af ikke bestemmelsesmæssig anvendelse samt ved usagkyndig reparation udført af ikke
autoriserede værksteder. Reparationer må kun udføres af PfG eller af værksteder, der er autoriseret af PfG. Ved anmeldelse af garantikrav skal du sende apparatet, du klager over, eller den defekte del gratis til PfG sammen med en
beskrivelse af fejlen og købsdokumentation. PfG forbeholder sig ret til at fakturere monteringsomkostninger. PfG hæfter ikke for transportskader. Transportskader skal omgående gøres gældende over for transportøren. Yderligere krav,
uanset af hvilken art, særligt i forbindelse med følgeskader, er udelukket. Denne garanti berører ikke slutkundens krav
over for forhandleren.
35
Page 36

- NO -
- NO -
Oversettelse av den originale bruksanvisningen
Merknader til denne bruksanvisningen
Med kjøpet av produktet PondoSolar Island 250 Control har du gjort et godt valg.
Les denne bruksanvisningen nøye og gjør deg kjent med apparatet før du tar det i bruk første gang. Alt arbeid på og
med dette apparatet skal gjennomføres etter de anvisninger som foreligger.
Ta hensyn til sikkerhetsanvisningene for riktig og sikker bruk av apparatet.
Ta godt vare på denne bruksanvisningen. Hvis apparatet selges skal bruksanvisningen følge med.
Symboler i denne bruksanvisningen
A Det vises til en eller flere illustrasjoner. I dette eksempelet: Det vises til illustrasjon A.
Det vises til et annet kapittel.
Leveringsomfang
A Antall Beskrivelse
1 1 Flottørenhet med integrert solcellemodul
2 4 Dysemunnstykke
3 1 Dyseholder
4 1 Pumpe med tilkoblingsledning
5 1 Fjernkontroll
Tilsiktet bruk
PondoSolar Island 250 Control, i fortsettelsen kalt "utstyret", må kun brukes på følgende måte:
Til å skape en vannfontene i dammer.
Skal kun drives med rent vann.
Drift ved overholdelse av tekniske data.
Følgende restriksjoner gjelder for apparatet:
Skal aldri brukes uten vanngjennomstrømning.
Bruk aldri apparatet til å pumpe andre væsker enn vann.
Skal ikke brukes i forbindelse med kjemikalier, næringsmidler, lett brennbare eller eksplosive stoffer.
Sikkerhetsanvisninger
Dette apparatet kan brukes av barn som er 8 år eller eldre, samt av
personer med reduserte fysiske, sensoriske eller mentale begrensninger, eller som mangler erfaring og kunnskap, hvis de er under
oppsikt eller har fått opplæring i riktig bruk av apparatet, og forstår
farene forbundet med å bruke dette. Barn må ikke leke med apparatet. Rengjøring eller brukervedlikehold må ikke utføres av barn uten
at de er under oppsikt.
36
Page 37

A
- NO -
Sikker drift
Aldri bær eller dra apparatet etter ledningen.
Bruk kun originale reservedeler og tilbehør for apparatet.
Elektriske apparater og installasjoner med dimensjoneringsspenning U > 12 V AC eller U > 30 V DC som ligger i
vann: Koble apparater og installasjoner spenningsfritt før du berører vannet.
Pumpen skal bare drives med den medfølgende solcellemodulen.
La ikke pumpen tørrkjøre.
Unngå harde støt og rystelser av apparatet.
Rengjør apparatet minst 2 ganger årlig.
Installasjon og tilkobling
Slik går du frem:
B, C
Trekk ut plugg fra tilkobling.
– Pluggen beskytter det elektroniske mot vann.
– Sett inn pluggen når støpselet er trukket ut.
Sett tilkoblingsledningen i kontakten.
– Trykk støpselet helt inn i kontakten slik at forbindelsen er vanntett.
Sett pumpen på flottørenheten.
Sett dyseenheten på flottørenheten.
Sett flottørenheten på vannoverflaten.
Igangsetting
Slik går du frem:
Batteriet i apparatet er ikke ladet. Før apparatet tas i bruk første gang, lar man det stå uten i solen en hel dag. Koble
deretter apparatet sammen med fjernkontrollen.
Fjernkontroll
E
Rekkevidden til fjernkontrollen er maks. 10 m.
Beskrivelse Funksjon
B
C
D
Bestem pumpedriftstiden (maks. 4 t).
For overskriving av den aktuelle innstillingen av pumpen,
slå av med knappen D og fastsett deretter ny pumpedriftstid med knappen A. Pumpen starter deretter automatisk
Trykk knappen langsomt 1 gang for hver time. Lysdioden
blinker tilsvarende innstilt pumpedriftstid.
Eksempel: Ønsket pumpedriftstid 3 timer
Trykk knappen A langsomt 3 ganger etter hverandre.
Lysdioden blinker flere 3 ganger etter hverandre
Inn- og utkobling av lysdiodene (lyser bare når det er mørkt) Trykk kort på knappen
Still inn ytelsen til pumpen (5 trinn)
Trykk knappen langsomt 1 gang for hvert trinn.
Slå pumpen av og på Trykk kort på knappen
37
Page 38

- NO -
Å
Feilretting
Feil
Pumpen starter ikke Ingen forbindelse med solcellemodulen
Pumpen pumper knapt eller ikke Filter er tilstoppet Ta av filterhuset, ta ut filteret og rengjør
Lysdioder lyser ikke Ingen forbindelse med solcellemodulen
Apparatet kan ikke slås på Batteriet i fjernkontrollen er utladet Skift ut
Rengjøring og vedlikehold
I forbindelse med rengjøring og vedlikehold må apparatet tas ut av vannet.
Rengjøre apparatet
Du må ikke under noen omstendigheter bruke rengjøringsmidler eller løsemidler, da dette kan angripe huset eller
svekke apparatets funksjoner.
Anbefalt rengjøringsmiddel ved hårdnakkede forkalkninger:
– Eddik- og klorfritt husholdningsrengjøringsmiddel.
Slik går du frem:
Ta apparatet fra hverandre.
Rengjør filterhus og løpeenhet. (→ Skifte pumpehjul)
Trekk dyseenheten fra hverandre.
Rengjør alle deler.
– Bruk en myk børste til hjelp.
– Skyll delene med klart vann.
Rengjør solcellemodulen med en fuktig pusseklut og gni tørt.
Sett apparatet sammen igjen i omvendt rekkefølge.
rsak Utbedring
Kontroller forbindelsen til solcellemodulen
Koble pumpen til solcellemodulen
Trykk støpselet helt inn (så langt det går) i
kontakten
Solcellemodulen er forurenset. Rengjør
Løpeenheten er blokkert Rengjør
Batterikapasiteten er oppbrukt Lad batteriet min. 4 timer
Solinnstråling er for liten Juster solcellemodulen mot solen
Dyseenhet er tilstoppet Trekk av dyseenhet, rengjør
Løpeenhet er slitt Skift ut
Solinnstråling er for liten Juster solcellemodulen mot solen
Batterikapasiteten er oppbrukt. Lad batteriet i minst 4 timer
Koble LED-belysningen til solcellemodulen
Trykk støpselet helt inn (så langt det går) i
kontakten
LED-belysningen er slått av Slå på LED-belysningen
Det er for lyst —
Batterikapasiteten er oppbrukt Lad batteriet min. 4 timer
LED-belysningen er skitten Rengjør
LED-belysningen er defekt Deponering
Fjernkontrollen er for langt unna Vær oppmerksom på rekkevidden til fjernkon-
Ingen forbindelse med solcellemodulen
trollen
Kontroller forbindelsen til solcellemodulen
Koble pumpen til solcellemodulen
Trykk støpselet helt inn (så langt det går) i
kontakten
Batteriet er defekt Avhending av apparatet
38
Page 39

- NO -
Skifte pumpehjul
Slik går du frem:
D
Trekk av filterhuset fra pumpen.
Ta filtersvampen av filterhuset og skyll den.
Trekk av dekselet på pumpehjulet (vipp pluggkoblingen forsiktig ut).
Trekk ut pumpehjulet og rengjør eller skift.
Sett apparatet sammen igjen i omvendt rekkefølge.
Skifte batteri
Slik går du frem:
F
Drei fjernkontrollen og løft av dekslet.
Bytte batteri
– Bruk knappecelle av typen CR 2032.
Skyv dekselet tilbake på plass.
Slitedeler
Følgende komponenter er slitedeler og omfattes ikke av garantien:
Pumpehjul og filterskum
Oppladbare batterier/batterier
Lagring/overvintring
Vær oppmerksom på det tillatte driftstemperaturområdet. ( Tekniske data)
Ved overskridelse eller underskridelse av grenseverdiene må du demontere apparatet. Foreta en grundig rengjøring
og sjekk om apparatet er skadet.
Oppbevar pumpen nedsenket i vann og frostfritt.
Kassering
Dette apparatet inneholder elektroniske komponenter, og må ikke kastes som vanlig husholdningsavfall! Må
leveres inn til godkjent avfallshåndteringsfirma. Fjern oppladbare batterier og batterier som er beregnet for
utskifting fra apparatet og avhend dem separat.
Fjerning av batterier
Batterier må ikke kastes sammen med husholdningsavfall. Brukte batterier må fjernes gjennom fastsatte ordninger for
tilbakelevering.
Fjerning av batterier innenfor EU
Som forbruker er du lovmessig forpliktet til å levere tilbake brukte batterier. Tilbakeleveringen er gratis.
Fjern batteriene enten gjennom det offentlig tilbakeleverings- og gjenvinningssystemet i byen eller kommunen, eller
lever batteriene tilbake der du kjøpte dem.
Du finner disse merkelappene på batterier som inneholder miljøskadelige stoffer:
Pb = batteriet inneholder bly
Cd = batteriet inneholder kadmium
Hg = batteriet inneholder kvikksølv
Li = batteriet inneholder litium
Garantibetingelser
PfG gir en garanti på 2 år fra kjøpsdato ved påviselige material- og fabrikasjonsfeil. Ved garantikrav må kjøpsbevis
kunne fremlegges. Garantien bortfaller ved feil håndtering, elektriske eller mekaniske skader som følge av feil bruk, og
ved ikke forskriftsmessig reparasjon av ikke autoriserte verksteder. Reparasjoner må kun utføres av PfG eller av
verksteder autorisert av PfG. Ved garantikrav sender du inn apparatet som du vil reklamere på eller den defekte delen,
sammen med en beskrivelse av feilen og kjøpsbevis til PfG, som betaler forsendelsen. PfG forbeholder seg retten til å
fakturere monteringskostnader. PfG hefter ikke for transportskader. Krav i forbindelse med transportskader må rettes til
transportøren umiddelbart. Ytterligere krav, uansett art, og særlig i forbindelse med følgeskader dekkes ikke. Denne
garantien berører ikke krav fra sluttkunden overfor forhandleren.
39
Page 40

- SV -
- SV -
Översättning av originalbruksanvisningen
Information om denna bruksanvisning
Med din nya produkt PondoSolar Island 250 Control har du gjort ett bra val.
Läs igenom bruksanvisningen noggrant före första användningstillfället och ta reda på hur apparaten fungerar. Alla
slags arbeten som utförs på denna apparat får endast genomföras enligt föreliggande instruktioner.
Beakta noga säkerhetsanvisningarna, de är en förutsättning för korrekt och säker användning.
Förvara denna bruksanvisning på ett säkert ställe. Om apparaten byter ägare måste även bruksanvisningen följa med.
Symboler i denna bruksanvisning
B Hänvisning till en eller flera bilder. I detta exempel: Hänvisning till bild A.
Referens till ett annat kapitel.
Leveransomfattning
A Antal Beskrivning
1 1 Flottörenhet med integrerad solarmodul
2 4 Munstyckstillbehör
3 1 Munstyckshållare
4 1 Pump med anslutningsledning
5 1 Fjärrkontroll
Ändamålsenlig användning
PondoSolar Island 250 Control, som i denna dokumentation betecknas som apparat, får endast användas på följande
sätt:
För att skapa en vattenfontän i dammar.
För drift med rent vatten.
Drift under iakttagande av tekniska data.
För apparaten gäller följande begränsningar:
Kör aldrig utan vattengenomströmning.
Pumpa aldrig andra vätskor än vatten.
Använd inte kombination med kemikalier, livsmedel eller lättantändliga eller explosiva ämnen.
Säkerhetsanvisningar
Den här enheten kan användas av barn som är 8 år eller äldre samt
av personer med sänkt fysisk, sensorisk eller mental förmåga eller
brist på erfarenhet och kunskap förutsatt att de hålls under uppsikt
eller instrueras i hur de använder enheten säkert samt de risker som
kan uppstå. Barn får inte leka med enheten. Rengöring och
användarunderhåll får inte utföras av barn utan uppsikt.
40
Page 41

A
- SV -
Säker drift
Bär inte och dra inte apparaten i elkabeln.
Använd endast original reservdelar och tillbehör till apparaten.
Elektriska enheter och installationer med en nominell spänning U > 12 V AC eller U >30 V DC som ligger i vatten:
Gör enheter och installationer spänningsfria innan du griper ned i vattnet.
Använd pumpen endast med solarmodulen som medföljer.
Låt aldrig pumpen köra torrt.
Undvik att apparaten utsätts för hårda slag eller vibrationer.
Rengör apparaten minst 2 ggr/år.
Installation och anslutning
Gör så här:
B, C
Dra ut pluggen ur uttaget.
– Pluggen skyddar elektroniken mot vatten.
– Sätt in pluggen om stickkontakten har dragits ut.
Anslut anslutningsledningen till uttaget.
– Tryck in stickkontakten i uttaget tills det tar emot så att anslutningen blir vattentät.
Sätt pumpen på flottörenheten.
Sätt munstycksenheten på flottörenheten.
Sätt flottörenheten på vattnet.
Driftstart
Gör så här:
Batteriet i apparaten är inte laddat. Låt apparaten står i solljus under en hel dag innan den används för första gången.
Därefter kan apparaten styras med fjärrkontrollen.
Fjärrkontroll
E
Fjärrkontrollens räckvidd uppgår till max. 10 m.
Beskrivning Funktion
B
C
D
Bestäm pumpens körningstid (max. 4 tim).
Innan den aktuella inställningen kan skrivas över ska pum-
pen först slås ifrån med knappen D. Bestäm därefter den
nya pumpkörningstiden med knappen A. Pumpen startar
nu automatiskt
Tryck 1 långsamt på knappen för varje timme. Indikeringsdioden blinkar med hänsyn till den inställda körningstiden.
Exempel: Avsedd körningstid för pump 3 h.
Tryck A 3 långsamt på knappen. Dioden blinkar 3 flera
gånger efter varandra.
Slå på och ifrån lysdioderna (lyser endast i mörker) Tryck kort på knappen
Ställ in pumpens matningsprestanda (5 steg)
Tryck 1 långsamt på knappen för varje steg.
Slå på och ifrån pumpen Tryck kort på knappen
41
Page 42

- SV -
Å
Störningsåtgärder
Störning Orsak
Pumpen startar inte Ingen anslutning till solarmodulen
Solarmodulen är smutsig. Rengör
Drivenheten är blockerad Rengör
Batteriets kapacitet är förbrukad Ladda batteriet i minst 4 timmar
Solljuset är för svagt Rikta solarmodulen mot solen
Pumpen matar knappt eller inget vatten
Filtret har täppts till Ta av filterhuset, ta ut filtret och rengör därefter
Munstycksenheten har täppts till Dra av munstycksenheten, rengör därefter
Drivenheten är sliten Byt ut
Solljuset är för svagt Rikta solarmodulen mot solen
Batteriets kapacitet är förbrukad. Ladda batteriet i minst 4 timmar
Lysdioderna lyser inte Ingen anslutning till solarmodulen
LED-belysningen har slagits ifrån Slå på LED-belysningen
Omgivningen är för ljus —
Batteriets kapacitet är förbrukad Ladda batteriet i minst 4 timmar
LED-belysningen är smutsig Rengör
LED-belysningen är defekt Avfallshantera
Apparaten kan inte slås på Batteriet i fjärrkontrollen är tomt Byt ut
Fjärrkontrollen är för långt borta Beakta fjärrkontrollens räckvidd
Ingen anslutning till solarmodulen
Rengöring och underhåll
Om apparaten ska rengöras eller underhållas måste den först lyftas upp ur vattnet.
Rengöring av apparaten
Använd aldrig starka rengöringsmedel eller kemiska lösningar då dessa kan angripa apparatens kåpa eller leda till
att apparatens funktion försämras.
Rekommenderade rengöringsmedel vid svåra kalkavlagringar:
– Ättiks- och klorfritt hushållsrengöringsmedel.
Gör så här:
Ta isär apparaten.
Batteriet är defekt Avfallshantera apparaten
Rengör filterhuset och drivenheten. (→ Rengör drivenheten)
Dra isär munstycksenheten.
Rengör alla delar.
– Använd en mjuk borste för bättre rengöring.
– Skölj delarna med klart vatten.
Rengör solarmodulen med en fuktig putsduk och gnid torrt.
Sätt ihop apparaten i omvänd ordningsföljd.
tgärd
Kontrollera anslutningen till solarmodulen
Anslut pumpen till solarmodulen
Tryck in stickkontakten komplett i uttaget
(tills det tar emot)
Anslut LED-belysningen till solarmodulen
Tryck in stickkontakten komplett i uttaget
(tills det tar emot)
Kontrollera anslutningen till solarmodulen
Anslut pumpen till solarmodulen
Tryck in stickkontakten komplett i uttaget
(tills det tar emot)
42
Page 43

- SV -
Rengör drivenheten
Gör så här:
D
Dra av filterhuset från pumpen.
Ta ut filtersvampen ur filterhuset och spola sedan ur.
Dra av locket från drivenheten (stickanslutning, bänd ut försiktigt).
Dra ut drivenheten och rengör eller byt ut den.
Sätt ihop apparaten i omvänd ordningsföljd.
Batteribyte
Gör så här:
F
Vrid runt fjärrkontrollen och ta av locket.
Byt ut batteriet.
– Använd ett klockbatteriet av typ CR 2032.
Stäng höljet igen.
Slitagedelar
Följande komponenter är slitagedelar och ingår inte i garantin:
Drivenhet och filtersvamp
Batterier
Förvaring / Lagring under vintern
Beakta tillåtet drifttemperaturområde. ( Tekniska data)
Om gränsvärden överskrids eller underskrids ska apparaten avinstalleras. Rengör apparaten noggrant och kontrol-
lera om apparaten är skadad.
Förvara pumpen nedsänkt i vätska på frostfri plats.
Avfallshantering
Denna apparat innehåller elektroniska komponenter och får inte kastas i hushållssoporna! Följ föreskrifterna
för avfallshantering. Ta ut batterierna ur apparaten och avfallshantera dem separat.
Avfallshantering med batterier
Batterier hör inte hemma i soporna. Kassera använda batterier endast via det därför avsedda insamlingssystemet.
Avfallshantering med batterier inom EU
Som förbrukare är du enligt lag skyldig att återlämna använda batterier. Återlämningen är gratis.
Kassera batterier, antingen genom de offentliga retur- och återvinningssystemen i din stad eller kommun, eller lämna
tillbaka batterierna där de köptes.
Dessa beteckningar finns på batterier innehållande skadliga ämnen:
Pb = batteri innehåller bly
Cd = batteri innehåller kadmium
Hg = batteri innehåller kvicksilver
Li = batteri innehåller litium
Garantivillkor
Importören ger två års garanti från inköpsdatum på material- och fabrikationsfel som kan påvisas. En förutsättning för
att garantin ska kunna tas i anspråk är att köpebevis uppvisas. Anspråk på garanti upphör att gälla vid olämplig
hantering, elektriska eller mekaniska skador pga. felaktig användning samt vid ej ändamålsenliga reparationer som
utförts av ej behöriga verkstäder. Reparationer får endast utföras av importören eller av verkstäder som godkänts av
importören. Vid garantianspråk måste den reklamerade apparaten eller den defekta delen samt köpebevis och en
beskrivning av felet skickas till inköpsstället eller importören. Inköpsstället/importören förbehåller sig rätten att debitera
för monteringskostnader. Importören påtar sig inget ansvar för transportskador. Dessa måste genast anmälas till
transportföretaget. Ytterligare anspråk, oavsett vilken typ, särskilt följdskador, är uteslutna. Denna garanti berör inte
slutkonsumentens anspråk gentemot försäljaren.
43
Page 44

- FI -
- FI -
Alkuperäisen käyttöohjeen käännös
Ohjeita tähän käyttöohjeeseen
Tällä ostoksella PondoSolar Island 250 Control olette tehnyt hyvän valinnan.
Lukekaa tämä käyttöohje huolellisesti läpi ennen laitteen ensimmäistä käyttöä ja tutustukaa laitteeseen. Kaikki tätä lai-
tetta koskevat työt ja työt tällä laitteella saa suorittaa vain kyseessä olevan ohjeen mukaan.
Noudattakaa ehdottomasti oikean ja turvallisen käytön ohjeita.
Säilyttäkää tämä käyttöohje huolellisesti! Jos laite vaihtaa omistajaa, antakaa käyttöohje eteenpäin.
Tämän ohjeen symbolit
A Viittaus yhteen tai useampaan kuvaan. Tässä esimerkissä: Viittaus kuvaan A.
Viittaus toiseen kappaleeseen.
Toimituksen sisältö
A Määrä Kuvaus
1 1 Uimuriyksikkö integroidulla aurinkopaneelilla
2 4 Suutinsarja
3 1 Suuttimen pidike
4 1 Pumppu ja liitäntäjohto
5 1 Kaukosäädin
Määräystenmukainen käyttö
PondoSolar Island 250 Control, jota seuraavassa nimitetään "laitteeksi", saa käyttää ainoastaan seuraavasti:
Vesisuihkulähteen asennussarja lammikkoja varten.
Käyttöön puhtaan veden kanssa.
Teknisten tietojen käyttö ja noudattaminen.
Laitteelle ovat voimassa seuraavat rajoitukset:
Älä käytä koskaan ilman, että vettä virtaa läpi.
Älä koskaan siirrä muita nesteitä kuin vettä.
Ei käyttöön kemikaalien, elintarvikkeiden, helposti palavien tai räjähtävien aineiden yhteydessä.
Turvaohjeet
Tätä laitetta saavat käyttää yli 8-vuotiaat lapset, sekä henkilöt, joiden
fyysiset, aistimelliset tai henkiset kyvyt ovat vähentyneet tai joilla ei
ole tarvittavaa kokemusta ja tietoa, vain valvonnan alaisina ja kun
heille on annettu opastusta laitteen turvallisesta käytöstä ja kun he
ymmärtävät laitteen käytöstä mahdollisesti seuraavat vaarat. Lapset
eivät saa leikkiä laitteella. Puhdistus ja käyttäjän suorittama huolto
eivät saa tapahtua lasten toimesta ilman valvontaa.
44
Page 45

A
- FI -
Turvallinen käyttö
Laitetta ei saa kantaa tai vetää sähköjohdosta.
Laitteessa saa käyttää vain alkuperäisiä varaosia ja lisätarvikkeita.
Sähkölaitteet ja sähköasennukset, joiden nimellisjännite U > 12 V AC tai U >30 V DC, jotka ovat vedessä: Kytke
laitteet ja asennukset jännitteettömiksi, ennen kuin kosketat veteen.
Käytä pumppua vain toimitukseen sisältyvällä aurinkopaneelilla.
Pumppua ei saa käyttää kuivakäynnillä.
Laitteeseen ei saa kohdistaa kovia iskuja eikä sitä saa ravistaa.
Puhdista laite vähintään 2 kertaa vuodessa.
Paikalleen asettaminen ja kytkeminen
Toimit näin:
B, C
Irrota liitännän tulppa.
– Tulppa suojaa sähköosia vedeltä.
– Kiinnitä suojatulppa liitäntään aina, kun pistoke ei ole liitettynä.
Työnnä liitäntäjohto liittimeen.
– Paina pistoke vasteeseen saakka liittimeen, jotta liitäntä on vesitiivis.
Yhdistä pumppu uimuriyksikköön.
Yhdistä suutinyksikkö uimuriyksikköön.
Aseta uimuriyksikkö veden pinnalle.
Käyttöönotto
Toimit näin:
Laitteen akku ei ole ladattu. Ennen laitteen ensimmäistä käyttöä sen on annettava olla auringonvalossa yhden päivän
ajan. Sen jälkeen laitetta käytetään kaukosäätimellä.
Kaukosäädin
E
Kaukosäätimen toimintasäde on enintään 10 m.
Kuvaus Toiminta
B
C
D
Pumpun käyntiajan määritys (enint. 4 h).
Kytke tämänhetkisen säädön korvaamiseksi pumppu
painikkeella D pois päältä ja määritä sitten painikkeella A
uusi pumpun käyntiaika. Pumppu käynnistyy silloin automaattisesti
Paina painiketta jokaiselle tunnille 1 kerran hitaasti. Näyttödiodi vilkkuu nyt säädettyä pumpun käyntiaikaa vastaavasti.
Esimerkki: Paina haluamaasi pumpun käyntiaikaa 3 h.
painiketta A 3 hitaasti peräkkäin. Diodi vilkkuu useita
kertoja 3 peräkkäin
LED-valojen päälle- ja poiskytkentä (palavat vain pimeällä) Paina painiketta lyhyesti
Säädä pumpun pumppausteho (5 tehoa)
Paina painiketta jokaiselle teholle 1 kerran hitaasti
Pumpun päälle- ja poiskytkentä Paina painiketta lyhyesti
45
Page 46

- FI -
Häiriönpoisto
Häiriö Syy Korjaus
Pumppu ei käynnisty Ei yhteyttä aurinkopaneeliin
Aurinkopaneeli on likainen. Puhdista
Käyntiyksikkö on tukkeutunut Puhdista
Akun kapasiteetti on käytetty loppuun Lataa akkua väh. 4 tuntia
Liian heikko aurinkopaiste Kohdista aurinkopaneeli aurinkoa kohti
Pumppu ei pumppaa ollenkaan tai ei
tarpeeksi
Suodatin tukkeutunut Irrota suodatinkotelo, poista suodatin ja puhdi-
Suutinyksikkö on tukkeutunut Irrota suutinyksikkö, puhdista
Käyntiyksikkö on kulunut Vaihda
Liian heikko aurinkopaiste Kohdista aurinkopaneeli aurinkoa kohti
Akun kapasiteetti on käytetty loppuun. Lataa akkua väh. 4 tuntia
LEDit eivät pala Ei yhteyttä aurinkopaneeliin
LED-valot on kytketty pois päältä Kytke LED-valot päälle
Ympäristö on liian kirkas —
Akun kapasiteetti on käytetty loppuun Lataa akkua väh. 4 tuntia
LED-valo on likainen Puhdista
LED-valo on viallinen Hävitä
Laitetta ei voi kytkeä päälle Kaukosäätimen paristo on tyhjä Vaihda
Kaukosäädin on liian kaukana Ota huomioon kaukosäätimen toimintasäde
Ei yhteyttä aurinkopaneeliin
Puhdistus ja huolto
Nosta laite vedestä puhdistusta tai huoltoa varten.
Laitteen puhdistus
Älä missään tapauksessa käytä syövyttäviä puhdistusaineita tai kemiallisia liuottimia, koska ne voivat syövyttää ko-
teloa tai aiheuttaa toimintahäiriöitä.
Pinttyneisiin kalkkijäämiin suositeltu puhdistusaine:
– Yleispuhdistusaineet, jotka eivät sisällä etikkaa tai klooria.
Toimit näin:
Pura laite osiin.
Akku on viallinen Hävitä laite
Puhdista suodatinkotelo ja käyntiyksikkö. (→ Käyntiyksikön vaihto)
Pura suutinyksikkö osiin.
Puhdista kaikki osat.
– Käytä apuna pehmeää harjaa.
– Huuhtele osat puhtaalla vedellä.
Puhdista aurinkopaneeli kostealla liinalla ja kuivaa huolella.
Kokoa laite päinvastaisessa järjestyksessä.
Tarkasta yhteys aurinkopaneeliin
Yhdistä pumppu aurinkopaneeliin
Paina pistoke kokonaan (vasteeseen
saakka) liittimeen
sta
Yhdistä LED-valot aurinkopaneeliin
Paina pistoke kokonaan (vasteeseen
saakka) liittimeen
Tarkasta yhteys aurinkopaneeliin
Yhdistä pumppu aurinkopaneeliin
Paina pistoke kokonaan (vasteeseen
saakka) liittimeen
46
Page 47

- FI -
Käyntiyksikön vaihto
Toimit näin:
D
Irrota suodatinkotelo pumpusta.
Poista suodatinsieni suodatinkotelosta ja huuhtele.
Irrota käyntiyksikön kansi (pistoliitäntä, nosta varovasti pois).
Vedä käyntiyksikkö ulos ja puhdista tai vaihda se.
Kokoa laite päinvastaisessa järjestyksessä.
Paristojen vaihto
Toimit näin:
F
Käännä kaukosäädin toisin päin ja poista kansi.
Vaihda paristo.
– Käytä paristoja tyyppiä CR 2032.
Sulje kansi uudelleen.
Kuluvat osat
Seuraavat komponentit ovat kuluvia osia, eivätkä kuulu takuun piiriin:
Käyntiyksikkö ja suodatinvaahto
Akut/paristot
Varastointi/talvisäilytys
Noudata sallittua käyttölämpötila-aluetta. ( Tekniset tiedot)
Irrota laite asennuspaikasta, jos käyttölämpötila ylittää tai alittaa raja-arvot. Puhdista laite perusteellisesti ja tarkista,
että siinä ei ole vaurioita.
Säilytä pumppua kokonaan upotettuna ja paikassa, jossa se ei pääse jäätymään.
Hävittäminen
Tämä laite sisältää elektronisia rakenneosia, eikä sitä saa hävittää kotitalousjätteiden mukana! Käytä sitä
varten olemassaolevaa palautusjärjestelmää. Poista vaihtoa varten tarkoitetut akut ja paristot ja hävitä ne
erikseen.
Paristojen hävittäminen
Paristot eivät kuulu kotitalousjätteisiin. Vie käytetyt paristot ainoastaan niitä varten järjestettyihin keräyspisteisiin.
Paristojen hävittäminen Euroopan Yhteisön sisällä
Kuluttaja on lainsäädännön kautta velvoitettu toimittamaan käytetyt paristot asianmukaisiin keräyspisteisiin. Palautuksesta ei saa maksua.
Hävitä paristot joko kaupunkisi tai kuntasi yleisten vastaanotto- ja kierrätysjärjestelmien kautta tai palauta paristot takaisin liikkeeseen, josta ne ostettiin.
Nämä merkinnät löydät haitallisia aineita sisältävistä paristoista:
Pb = paristo sisältää lyijyä
Cd = paristo sisältää kadmiumia
Hg = paristo sisältää elohopeaa
Li = paristo sisältää litiumia
Takuuehdot
PfG antaa 2 vuoden takuun myyntipäivästä laskettuna, takuu koskee todistettavia materiaali- ja valmistusvirheitä.
Takuun edellytyksenä on ostokuitin esittäminen. Takuuvaatimus raukeaa epäasianmukaisen käsittelyn, väärinkäytön
aiheuttaman sähkö- tai mekaanisen vaurioitumisen sekä ei-valtuutettujen korjaamojen epäasianmukaisen korjauksen
seurauksena. Vain PfG tai PfG:n valtuutetut korjaamot saavat suorittaa korjauksia. Takuuvaatimusten voimaan
saattamiseksi on lähetettävä reklamoitu laite tai viallinen osa virheenkuvauksen ja ostokuitin kera PfG -yhtiölle vapaasti
tehtaan. PfG pidättää oikeuden laskuttaa asennuskustannukset. PfG ei vastaa kuljetusvahingoista. Ne on ilmoitettava
välittömästi kuljetusyhtiölle. Kaikki muunlaiset vaatimukset, erityisesti koskien seurauksena syntyneitä vahinkoja, on
suljettu pois. Tämä takuu ei koske loppuasiakkaan myyjäliikettä vastaan esittämiä vaatimuksia.
47
Page 48

- HU -
- HU -
Az eredeti használati útmutató fordítása
Információk ehhez a használati útmutatóhoz
Ön ezen termék PondoSolar Island 250 Control megvásárlásával jó döntést hozott.
Az első használatba vétel előtt olvassa el gondosan a használati útmutatót és ismerkedjen meg a készülékkel. Az kés-
zülékkel, vagy a készüléken végzett bármilyen munka esetén tartsa be a jelen útmutatóban leírtakat.
A készülék helyes és biztonságos haszálata érdekében feltétlenül vegye figyelembe a biztonsági előírásokat.
Őrizze meg gondosan a jelen használati útmutatót. Ha másnak adja a készüléket, adja oda ezt a használati útmutatót
is.
A jelen útmutatóban használt szimbólumok
A Hivatkozás egy vagy több ábrára. Ebben a példában: hivatkozás az A ábrára.
Hivatkozás egy másik fejezetre.
Csomagolás
A Darabszám Leírás
1 1 Úszó egység integrált szolár modullal
2 4 Fúvóka rátét
3 1 Fúvókatartó
4 1 Szivattyú csatlakozó vezetékkel
5 1 Távirányító
Rendeltetésszerű használat
PondoSolar Island 250 Control, a továbbiakban: „készülék”, kizárólag csak a következőképpen használható:
Szökőkutak kialakítására tavakban.
Tiszta vízzel történő üzemeltetésre.
Üzemeltetés a műszaki adatok betartása mellett.
A készülékre a következő korlátozások érvényesek:
Soha nem szabad vízátfolyás nélkül működtetni.
A készüléket soha nem szabad vízen kívül más folyadékkal használni.
Nem szabad vegyszerekkel, élelmiszerekkel, gyúlékony vagy robbanékony anyagokkal együtt alkalmazni.
Biztonsági utasítások
A jelen készüléket 8 évesnél idősebb gyermekek, valamint csökkent
fizikai, érzékszervi vagy mentális képességű, ill. hiányos
tapasztalattal és megfelelő tudással rendelkező személyek
kezelhetik, ha felügyelet alatt állnak, vagy a készülék biztonságos
használata vonatkozásában eligazításban részesültek, és
megértették az ebből eredő veszélyeket. Gyermekek nem
játszhatnak a készülékkel. Tisztítást és a felhasználó által végzendő
karbantartási munkákat nem végezhetnek olyan gyermekek, akik
nem állnak felügyelet alatt.
48
Page 49

A
- HU -
Biztonságos működés
Ne hordozza vagy húzza a készüléket a csatlakozó vezetéknél fogva!
Kizárólag eredeti pótalkatrészeket és tartozékokat használjon a készülékhez.
U > 12 V AC vagy U >30 V DC méretezési feszültségű elektromos készülékeket és szerelvényeket szabad has-
ználni, amelyek vízben vannak: Mielőtt a vízbe nyúlnak, feszültségmentesíteni kell a készülékeket és szerelvényeket.
A készüléket csak a csomagolásban mellékelt szolár modullal üzemeltesse.
Ne hagyja szárazon futni a szivattyút.
Kerülni kell a készüléket érő erős ütéseket és rázkódásokat.
A készüléket legalább évente 2-szer tisztítsa meg.
Felállítás és csatlakoztatás
Ez az alábbiak szerint végezhető el:
B, C
Húzza ki a dugót a csatlakozóból.
– A dugó védi meg az elektronikát a víztől.
– Kihúzott csatlakozódugónál dugja be a dugót.
Csatlakoztassa a csatlakozó vezetéket az aljzathoz.
– Nyomja a csatlakozódugót ütközésig az aljzatba, hogy a kapcsolat vízzáró legyen.
Illessze rá a szivattyút az úszó egységre.
Illessze rá a fúvóka egységet az úszó egységre.
Helyezze az úszó egységet a víz felszínére.
Üzembe helyezés
Ez az alábbiak szerint végezhető el:
A készülék akkumulátora nincs feltöltve. Az első használat előtt egy napig tegye ki a készüléket napsugárzásnak. Ezt
követően kezelje a készüléket a távirányítóval.
Távirányító
E
A távirányító hatótávolsága maximum 10 m.
Leírás Funkció
B
C
D
A szivattyú üzemidejének meghatározása (max. 4 óra).
Az aktuális beállítás felülírásához kapcsolja ki a szivattyút
a D gombbal, majd az Agombbal állítsa be a szivattyú új
üzemidejét. A szivattyú ezt követően automatikusan elindul.
A gombot minden órához nyomja meg 1 lassan. A kijelző
dióda a most beállított szivattyú-üzemidőnek megfelelően villog.
Példa: A szivattyú kívánt üzemideje 3 óra.
Nyomja meg az A gombot egymás után lassan 3 . A
dióda egymás után többször 3 villog.
A LED-ek be- és kikapcsolása (csak sötétben világítanak) A gomb lenyomása röviden
A szivattyú szállítási teljesítményének beállítása (5 fokozat)
A gombot minden fokozathoz nyomja meg 1 lassan.
A szivattyú be- és kikapcsolása A gomb lenyomása röviden
49
Page 50

- HU -
Zavarelhárítás
Hiba Ok Megoldás
A szivattyú nem indul el. Nincs kapcsolat a szolár modullal.
A szolár modul koszos. Tisztítsa meg.
A járóegység blokkolva van. Tisztítsa meg.
Az akku lemerült. Legalább 4 órát töltse az akkut.
A napsugárzás mértéke túl csekély. Állítsa be a szolár modult a Nap felé.
A szivattyú egyáltalán nem vagy nem
szállít.
A szűrő eldugult. Vegye le a szűrőházat, vegye ki a szűrőt és
A fúvóka egység eldugult. Húzza le és tisztítsa ki a fúvóka egységet.
A járóegység elkopott. Cserélje ki.
A napsugárzás mértéke túl csekély. Állítsa be a szolár modult a Nap felé.
Az akku lemerült. Legalább 4 órát töltse az akkut.
A LED-ek nem világítanak. Nincs kapcsolat a szolár modullal.
A LED világítás ki van kapcsolva. Kapcsolja be a LED világítást.
A környezet túl világos. —
Az akku lemerült. Legalább 4 órát töltse az akkut.
A LED világítás koszos. Tisztítsa meg.
A LED világítás meghibásodott. Ártalmatlanítsa.
A készüléket nem lehet bekapcsolni. A távirányító eleme lemerült. Cserélje ki.
A távirányító túl messze van. Vegye figyelembe a távirányító hatótávolságát.
Nincs kapcsolat a szolár modullal.
Tisztítás és karbantartás
Tisztításhoz vagy karbantartáshoz ki kell venni a készüléket a vízből.
Készülék tisztítása
Agresszív tisztítószerek, vagy vegyszeroldatok használata tilos, mivel ezek károsíthatják a burkolatot, vagy károsan
befolyásolhatják a működést.
Ajánlott tisztítószerek makacs vízkövesedés esetén:
– Ecet- és klórmentes háztartási tisztító.
Ez az alábbiak szerint végezhető el:
Szerelje szét a készüléket.
Az akku hibás. Ártalmatlanítsa az eszközt.
Tisztítsa meg a szűrőházat és a járóegységet. (→ A járóegység cseréje)
Húzza szét a fúvóka egységet.
Tisztítson meg minden alkatrészt.
– Segédeszközként használjon puha kefét.
– Tiszta vízzel mossa le az összes alkatrészt.
Tisztítsa meg a szolár modult nedves tisztítókendővel, és törölje szárazra.
Fordított sorrendben szerelje össze a készüléket.
Ellenőrizze a kapcsolatot a szolár modulhoz.
Csatlakoztassa a szivattyút a szolár modul-
hoz.
Nyomja a csatlakozódugót teljesen (üt-
közésig) az aljzatba.
tisztítsa meg.
Csatlakoztassa a LED világítást a szolár mo-
dulhoz.
Nyomja a csatlakozódugót teljesen (üt-
közésig) az aljzatba.
Ellenőrizze a kapcsolatot a szolár modulhoz.
Csatlakoztassa a szivattyút a szolár modul-
hoz.
Nyomja a csatlakozódugót teljesen (üt-
közésig) az aljzatba.
50
Page 51

- HU -
A járóegység cseréje
Ez az alábbiak szerint végezhető el:
D
Húzza le a szűrőházat a szivattyúról.
Vegye ki a szűrőszivacsot a szűrőházból és mossa ki.
Húzza le a járóegység borítását (dugaszos zár, óvatosan ki kell emelni).
Húzza ki, tisztítsa meg vagy cserélje ki a járóegységet.
Fordított sorrendben szerelje össze a készüléket.
Cserélje ki az elemet
Ez az alábbiak szerint végezhető el:
F
Fordítsa meg a távirányítót, és vegye le a burkolatot.
Cserélje ki az elemet.
– CR 2032 típusú gombelemet használjon.
Zárja vissza a borítást.
Kopóalkatrészek
A következő komponensek kopóalkatrészek, és rájuk nem vonatkozik a szavatosság:
Járóegység és szűrőhab
Akkuk/elemek
Tárolás / Telelés
Vegye figyelembe a megengedett üzemi hőmérséklet tartományt. ( Műszaki adatok)
A határértékek túllépése vagy azok el nem érése esetén le kell szerelni a készüléket. Alaposan tisztítsa meg a kés-
züléket, és ellenőrizze épségét.
A szivattyút vízbe merítve, fagymentes helyen kell tárolni.
Megsemmisítés
A készülék elektronikus részegységeket tartalmaz, és nem szabad háztartási hulladékként ártalmatlanítani!
Ehhez az erre kijelölt visszavételi helyeket használja. Távolítsa el a készülékből cserére szánt akkukat és elemeket, majd külön ártalmatlanítsa azokat.
Elemek ártalmatlanítása
Az elemeket ne dobja ki a háztartási szemétbe. A használt elemeket kizárólag az erre szolgáló visszavételi rendszeren
keresztül ártalmatlanítsa.
Elemek ártalmatlanítása az Európai Unión belül
Az összes felhasználó kötelezettsége, hogy visszavigye az elemeket. A visszaszolgáltatás ingyenes.
Az elemeket vagy a város, község nyilvános visszavételi-újrahasznosító rendszerének adja át, vagy vigye vissza őket
oda ahol vette.
Ezt a jelzést a károsanyag-tartalmú elemeken találja:
Pb = az elem ólmot tartalmaz
Cd = az elem kadmiumot tartalmaz
Hg = az elem higanyt tartalmaz
Li = az elem lítiumot tartalmaz
Garanciális feltételek
A PfG 2 év garanciát vállal a vásárlás dátumától bizonyítható anyag- és gyártási hibákra. A garanciavállalás feltétele
az eredeti vásárlást igazoló bizonylat. A garancia megszűnik szakszerűtlen kezelés, a visszaélésszerű használat által
bekövetkezett elektromos vagy mechanikus sérülés, valamint az arra fel nem jogosított szervizek által végzett szakszerűtlen javítások miatt. Javítást csak a PfG vagy az általa felhatalmazott szervizek végezhetnek. Garanciaigény bejelentése esetén küldje el a reklamált készüléket vagy a meghibásodott alkatrészt a hiba leírásával és a vásárlást igazoló bizonylattal a Pfg-hez. A PfG fenntartja magának a szerelési költségek kiszámlázásának jogát. A PfG nem felel a
szállításból keletkezett károkért. Ezeket azonnal a szállítóval szemben kell érvényesíteni. Bármilyen fajta további igény
– kiváltképpen a következményes károkat - kizárt. A garancia nem érinti a végfelhasználó kereskedővel szemben
támasztott igényeit.
51
Page 52

- PL -
- PL -
Tłumaczenie oryginalnej instrukcji użytkowania
Przedmowa do instrukcji użytkowania
Kupując PondoSolar Island 250 Control, dokonali Państwo dobrego wyboru.
Przed pierwszym uruchomieniem urządzenia należy uważnie przeczytać instrukcję użytkowania i zapoznać się z
zasadą działania urządzenia. Wszystkie prace dotyczące tego urządzenia mogą być wykonywane tylko zgodnie z zaleceniami dostarczonej instrukcji.
Bezwzględnie przestrzegać przepisów bezpieczeństwa pracy w odniesieniu do prawidłowego i bezpiecznego użytko-
wania.
Instrukcję użytkowania należy przechowywać w bezpiecznym miejscu. W przypadku sprzedaży urządzenia nowemu
właścicielowi należy przekazać również instrukcję użytkowania.
Symbole w niniejszej instrukcji
A Odnośnik do jednego lub kilku rysunków. W tym przykładzie: Odnośnik do rysunku A.
Odnośnik do innego rozdziału.
Zakres dostawy
A Ilość Opis
1 1 Pływak ze zintegrowanym ogniwem słonecznym
2 4 Nasadka dyszy
3 1 Oprawka dyszy
4 1 Pompa z przewodem podłączeniowym
5 1 Zdalne sterowanie
Zastosowanie zgodne z przeznaczeniem
PondoSolar Island 250 Control, zwany dalej "Urządzeniem", może być używany wyłącznie w następujący sposób:
Do tworzenia fontanny w stawach.
Do użytkowania z czystą wodą.
Eksploatacja w warunkach zgodnych z danymi technicznymi.
W stosunku do tego urządzenia obowiązują następujące ograniczenia:
Nigdy nie użytkować urządzenia bez przepływu wody.
Nigdy nie tłoczyć innych cieczy niż woda.
Nie użytkować połączeniu z chemikaliami, artykułami spożywczymi, substancjami łatwopalnymi lub wybuchowymi.
Przepisy bezpieczeństwa
Urządzenie może być używane przez dzieci od 8 lat i ponadto przez
osoby o ograniczonych fizycznych i umysłowych zdolnościach, albo
nie posiadających niezbędnego doświadczenia i wiedzy, gdy będą
one pod nadzorem osoby odpowiedzialnej za bezpieczeństwo
użytkowania tego urządzenia lub zostaną odpowiednio przez nią
poinstruowane i poinformowane o wynikających stąd zagrożeniach.
Dzieciom nie wolno bawić się tym urządzeniem. Czyszczenie ani
czynności serwisowe nie mogą być wykonywane przez dzieci bez
nadzoru osoby dorosłej.
52
Page 53

A
- PL -
Bezpieczna eksploatacja
Nie podnosić ani nie ciągnąć urządzenia za przewód elektryczny.
Stosować tylko oryginalne części zamienne i akcesoria przeznaczone do tego urządzenia.
Urządzenia i instalacje elektryczne o napięciu znamionowym U > 12 V AC lub U >30 V DC, zanurzone w wodzie:
Odłączyć urządzenia i instalacje od napięcia przed włożeniem rąk do wody.
Pompę należy użytkować tylko z ogniwem słonecznym dostarczonym w zestawie.
Pompę należy chronić przed pracą na sucho.
Urządzenie należy chronić przed mocnymi uderzeniami i wstrząsami.
Urządzenie czyścić co najmniej 2 razy w roku.
Ustawienie i podłączenie
Należy postępować w sposób następujący:
B, C
Wyciągnąć zatyczkę z przyłącza.
– Zatyczka chroni układ elektroniczny przed zalaniem wodą.
– Po wyjęciu wtyczki włożyć znów zatyczkę.
Wtyczkę przewodu podłączeniowego włożyć do gniazdka.
– Wtyczkę włożyć aż do oporu do gniazdka, żeby połączenie było wodoszczelne.
Nałożyć pompę na pływak.
Nałożyć moduł dyszy na pływak.
Położyć pływak na powierzchni wody.
Uruchomienie
Należy postępować w sposób następujący:
Akumulator urządzenia nie jest naładowany. Przed pierwszym uruchomieniem urządzenia poddać je działaniu pro-
mieni słonecznych przez jeden dzień. Następnie włączyć urządzenie pilotem zdalnego sterowania.
Zdalne sterowanie
E
Zasięg zdalnego sterowania wynosi maksymalnie 10 m.
Opis Funkcja
B
C
D
Ustalić czas pracy pompy (max. 4 h).
W celu wprowadzenia nowego ustawienia wyłączyć
pompę przyciskiem D i potem przyciskiem Austalić nowy
czas pracy pompy. Pompa uruchamia się automatycznie
Włączenie i wyłączenie oświetlenia LED (świecenie tylko w
ciemności)
Ustawienie wydajności pompy (5 stopni)
Powoli naciskać przycisk dla każdej 1 . Wskaźnik miga
odpowiednio do nastawionego czasu pracy pompy.
Przykład: Wymagany czas pracy pompy 3 h.
Przycisk A nacisnąć powoli kolejno 3 . Dioda miga kilka
razy 3 po kolei
Krótko nacisnąć przycisk
Powoli naciskać przycisk dla każdego stopnia 1
Włączenie i wyłączenie pompy Krótko nacisnąć przycisk
53
Page 54

- PL -
Usuwanie usterek
Usterka Przyczyna Środki zaradcze
Pompa nie uruchamia się Brak połączenia z ogniwem słonecznym
Ogniwo słoneczne jest zanieczyszczone. Czyszczenie
Zablokowany zespół wirnika Czyszczen ie
Pojemność akumulatora jest wyczerpana Akumulator ładować co najmniej 4 godziny
Za słabe napromieniowanie słoneczne Ogniwo słoneczne skierować odpowiednio do
Pompa nie tłoczy lub tylko z małą wydajnością
Filtr jest zatkany Zdjąć obudowę filtra, wyjąć filtr i wyczyścić
Moduł dyszy jest zatkany Ściągnąć moduł dyszy, oczyścić
Zużyty zespół wirnika Wymienić
Za słabe napromieniowanie słoneczne Ogniwo słoneczne skierować odpowiednio do
Pojemność akumulatora jest wyczerpana. Akumulator ładować co najmniej 4 godziny
Kontrolki nie świecą się Brak połączenia z ogniwem słonecznym.
Oświetlenie LED jest wyłączone Włączyć oświetlenie LED
Zbyt jasne otoczenie —
Pojemność akumulatora jest wyczerpana Akumulator ładować co najmniej 4 godziny
Oświetlenie LED jest zabrudzone Czyszczenie
Oświetlenie LED jest wadliwe Oddać do utylizacji
Urządzenia nie da się włączyć Bateria zdalnego sterowania jest wyczerpana Wymienić
Odległość przekracza zasięg zdalnego sterowania Uwzględnić zasięg zdalnego sterowania
Brak połączenia z ogniwem słonecznym.
Czyszczenie i konserwacja
W celu wyczyszczenia lub wykonania konserwacji urządzenie należy wyjąć z wody.
Czyszczenie urządzenia
Nie wolno stosować żadnych agresywnych środków czyszczących ani rozpuszczalników chemicznych, ponieważ
może to spowodować zniszczenie obudowy lub zakłócenie działania urządzenia.
W przypadku trudnych do usunięcia osadów wapna zaleca się stosowanie następujących środków czyszczących:
– Środek czyszczący dla gospodarstwa domowego nie zawierający octu ani chloru.
Należy postępować w sposób następujący:
Rozłożyć urządzenie na części.
Wadliwy akumulator Oddać urządzenie do utylizacji
Wyczyścić obudowę filtra i zespół wirnika. (→ Wymiana zespołu wirnika)
Rozłączyć moduł dyszy.
Oczyścić wszystkie części.
– Użyć miękkiej szczotki do czyszczenia.
– Wszystkie części spłukać czystą wodą.
Ogniwo słoneczne oczyścić wilgotną ścierką i wytrzeć do sucha.
Zmontować urządzenie, wykonując czynności opisane powyżej w odwrotnej kolejności.
Sprawdzić połączenie z ogniwem
słonecznym
Podłączyć pompę do ogniwa słonecznego
Wtyczkę włożyć całkowicie (aż do oporu) do
gniazdka
słońca
słońca
Podłączyć oświetlenie LED do ogniwa
słonecznego
Wtyczkę włożyć całkowicie (aż do oporu) do
gniazdka
Sprawdzić połączenie z ogniwem
słonecznym
Podłączyć pompę do ogniwa słonecznego
Wtyczkę włożyć całkowicie (aż do oporu) do
gniazdka
54
Page 55

- PL -
Wymiana zespołu wirnika
Należy postępować w sposób następujący:
D
Ściągnąć obudowę filtra z pompy.
Wyjąć piankę filtracyjną z obudowy filtra i wypłukać ją.
Ściągnąć pokrywę zespołu wirnika (połączenie wtykowe, ostrożnie podważyć).
Wyjąć zespół wirnika i wyczyścić go lub wymienić.
Zmontować urządzenie, wykonując czynności opisane powyżej w odwrotnej kolejności.
Wymienić baterie
Należy postępować w sposób następujący:
F
Odwrócić zdalne sterowanie i podnieść pokrywę.
Wymienić baterie.
– Zastosować ogniwo typu CR 2032.
Zamknąć pokrywę.
Części ulegające zużyciu
Niżej wymienione podzespoły to części ulegające zużyciu i dlatego nie są objęte gwarancją:
Zespół wirnika i pianka filtracyjna
Akumulatory / baterie
Magazynowanie / Przechowywanie w okresie zimowym
Uwzględnić dopuszczalny zakres temperatur. ( Dane techniczne)
W przypadku przekroczenia dolnej lub górnej wartości granicznej należy zdemontować urządzenie. Przeprowadzić
gruntowne oczyszczenie i skontrolować urządzenie pod względem uszkodzeń.
Pompę należy przechowywać w sposób zanurzony, w miejscu nienarażonym na działanie mrozu.
Usuwanie odpadów
Urządzenia zawiera podzespoły elektroniczne i nie wolno wyrzucać do pojemnika na odpady komunalne!
Urządzenia należy utylizować tylko poprzez przewidziany do tego system zwrotów. Wyjąć z urządzenia akumulatory i baterie będące częściami wymiennymi i oddać je osobno do utylizacji.
Utylizacja baterii
Baterii nie zalicza się do odpadów domowych. Baterie należy utylizować tylko poprzez przewidziany do tego system
zwrotów.
Utylizacja baterii w krajach Unii Europejskiej
Użytkownik jest ustawowo zobowiązany zwrócić zużyte baterie w sposób zgodny z przepisami. Zwrot jest darmowy.
Baterie należy zutylizować poprzez publiczny system zwrotów i recyklingu w mieście lub gminie użytkownika, bądź
oddać je do sklepu, w którym zostały kupione.
Poniższe symbole znajdują się na bateriach zawierających substancje szkodliwe:
Pb = bateria zawiera ołów
Cd = bateria zawiera kadm
Hg = bateria zawiera rtęć
Li = bateria zawiera lit
Warunki gwarancji
PfG udziela 2-letniej gwarancji licząc od daty zakupu, na wypadek wystąpienia udowodnionych wad materiałowych i
produkcyjnych. Warunkiem uzyskania świadczeń z tytułu gwarancji jest przedłożenie dowodu zakupu. Udzielona
gwarancja wygasa w przypadku nieprawidłowej obsługi, uszkodzeń elektrycznych lub mechanicznych na skutek
zastosowania sprzecznego z przeznaczeniem, a także nieprawidłowo wykonanych napraw przez nieautoryzowane
warsztaty. Do przeprowadzania napraw jest upoważniony tylko PfG lub warsztat autoryzowany przez PfG. W razie
zgłoszenia roszczeń z tytułu gwarancji należy przesłać - na zasadach franco siedziba PfG - zakwestionowane
urządzenie lub wadliwą część wraz z dołączonym opisem wady i dowodem zakupu. PfG zastrzega sobie prawo do
wystawienia rachunku za koszty montażu. PfG nie ponosi odpowiedzialności za szkody transportowe. Stwierdzone
szkody muszą zostać niezwłocznie zgłoszone i przejęte przez przewoźnika. Wszelkiego rodzaju dalsze roszczenia, a
szczególnie za szkody będące następstwem, są wykluczone. Niniejsza gwarancja nie obejmuje roszczeń odbiorcy
końcowego w stosunku do sprzedawcy.
55
Page 56

- CS -
- CS -
Překlad originálu Návodu k použití.
Pokyny k tomuto návodu k použití
Koupě tohoto výrobku PondoSolar Island 250 Control byla dobrou volbou.
Ještě před prvním použitím tohoto zařízení si pečlivě pročtěte návod k použití a dobře se s vaším novým zařízením
seznamte. Veškeré práce na tomto a s tímto přístrojem mohou být prováděny jen podle přiloženého návodu.
Bezpodmínečně dodržujte bezpečnostní pokyny pro správné a bezpečné používání.
Tento návod k použití pečlivě uschovejte. Při změnì vlastníka předejte i návod k použití.
Symboly použité v tomto návodu
A Odkaz na jeden nebo více obrázků. V tomto příkladu: Odkaz na obrázek A.
Odkaz k jiné kapitole.
Rozsah dodávky
A Počet Popis
1 1 Plováková jednotka s integrovaným solárním modulem
2 4 Nástavec trysky
3 1 Držák trysky
4 1 Přípojné vedení čerpadla
5 1 Dálkové ovládání
Použití v souladu s určeným účelem
PondoSolar Island 250 Control, dále jen přístroj, se smí používat výhradně podle níže uvedených pokynů:
K vytvoření vodní fontány v jezírku.
Pro provoz s čistou vodou.
Provoz při dodržení technických údajů.
Pro přístroj platí následující omezení:
Nikdy neprovozujte bez průtoku vody.
Nikdy nečerpejte jiné kapaliny než vodu.
Nepoužívat ve spojení s chemikáliemi, potravinami, lehce zápalnými nebo výbušnými látkami.
Bezpečnostní pokyny
Tento přístroj nesmí být používaný dětmi do 8 let a kromě toho i
osobami se sníženými fyzickými, senzorickými nebo mentálními
schopnostmi nebo nestatkem zkušeností a vědomostí, pokud nejsou
pod dohledem nebo nebyly poučeny o bezpečném používání
přístroje a mohou z tohoto důvodu vzniknout nebezpečí. Děti si
nesmí s přístrojem hrát. Čištění a uživatelská údržba nesmí být
prováděna dětmi bez dozoru.
56
Page 57

A
- CS -
Bezpečný provoz
Přístroj nenoste ani netahejte za elektrické vedení.
Pro přístroj používejte pouze originální náhradní díly a příslušenství.
Elektrické přístroje a instalace se jmenovitým napětím U > 12 V AC nebo U >30 V DC, které leží ve vodě: Než sáh-
nete do vody, uveďte přístroje a instalace do stavu bez napětí.
Čerpadlo provozujte pouze se solárním modulem obsaženým v dodávce.
Čerpadlo nenechávejte běžet nasucho.
Zamezte tvrdým nárazům a otřesům přístroje.
Přístroj vyčistěte nejméně 2x ročně.
Instalace a připojení
Postupujte následovně:
B, C
Z přípojky vytáhněte zátku.
– Zátka chrání elektroniku před vodou.
– V případě vytaženého konektoru zasuňte zátku.
Připojovací vedení zapojte do zásuvky.
– Konektor zasuňte až na doraz do zásuvky, aby byl spoj vodotěsný.
Čerpadlo nasaďte na jednotku plováku.
Jednotku trysky nasaďte na jednotku plováku.
Plovák položte na vodní hladinu.
Uvedení do provozu
Postupujte následovně:
Baterie přístroje není nabitá. Před prvním použitím vystavte přístroj na celý den slunečnímu záření. Přístroj ovládejte
pomocí dálkového ovladače.
Dálkové ovládání
E
Rozmezí dosahu dálkového ovládání činí 10 m.
Popis Funkce
B
C
D
Stanovit dobu čerpání (max. 4 h).
Pro přepsání aktuálního nastavení čerpadlo vypněte
pomocí tlačítka D a poté pomocí tlačítka Anastavte novou
dobu čerpání. Čerpadlo se automaticky rozběhne
Tlačítko pro každou hodinu 1 pomalu stiskněte. Indikační
dioda bliká podle nyní nastavené doby chodu čerpadla.
Příklad: Požadovaná doba čerpání 3 h.
Tlačítko stiskněte pomalu A 3 po sobě. Dioda víckrát
zabliká 3 po sobě
Zapnutí a vypnutí LED světel (svítí pouze ve tmě) Krátce stiskněte tlačítko
Nastavte čerpací výkon čerpadla (5 stupňů)
Tlačítko pro každou hodinu 1 pomalu stiskněte
Zapnutí a vypnutí čerpadla Krátce stiskněte tlačítko
57
Page 58

- CS -
Odstraňování poruch
Porucha Příčina Náprava
Čerpadlo se nerozbíhá Chybí spojení se solárním modulem
Solární modul je znečištěný. Vyčistěte
Jednotka oběžného kola je zablokovaná Vyčistěte
Kapacita akumulátoru je vyčerpaná Akumulátor nabíjejte min. 4 hodiny.
Sluneční záření je příliš malé Solární modul vyrovnejte ke slunci.
Čerpadlo sotva čerpá nebo nečerpá
vůbec
Filtr je ucpaný Těleso filtru sejměte, filtr vyjměte a vyčistěte
Jednotka trysky je ucpaná Jednotku trysky stáhněte a vyčistěte
Jednotka oběžného kola je opotřebená Vyměňte
Sluneční záření je příliš malé Solární modul vyrovnejte ke slunci.
Kapacita akumulátoru je vyčerpaná. Akumulátor nabíjejte minimálně 4 hodiny
LED nesvítí Není spojení se solárním modulem
LED osvětlení je vypnuté. Zapnout LED osvětlení
Okolí je příliš světlé —
Kapacita akumulátoru je vyčerpaná Akumulátor nabíjejte min. 4 hodiny.
LED osvětlení je znečištěné Vyčistěte
LED osvětlení je vadné Zlikvidujte
Přístroj nelze zapnout. Baterie dálkového ovládání je vyčerpaná Vyměňte
Dálkové ovládání je příliš vzdáleno Dbejte na dosah dálkového ovládání
Není spojení se solárním modulem
Čištění a údržba
K čištění nebo údržbě je nutné přístroj vyjmout z vody.
Vyčistit přístroj
V žádném případě nepoužívejte agresivní čisticí prostředky ani chemické roztoky, může se tím narušit kryt nebo
omezit funkčnost.
Doporučené čisticí prostředky při obtížně odstranitelném zvápenatění:
– Domácí čističe bez obsahu octa a chlóru.
Postupujte následovně:
Rozložení přístroje:
Akumulátor je defektní Přístroj zlikvidujte
Těleso filtru a jednotku oběžného kola vyčistěte. (→ Vyměňte jednotku oběžného kola)
Jednotku trysky roztáhněte.
Všechny díly očistěte.
– Použijte na podporu měkký kartáč.
– Opláchněte díly čistou vodou.
Solární modul očistěte vlhkým hadříkem a potom utřete dosucha.
Přístroj sestavte v opačném pořadí.
Zkontrolujte spojení se solárním modulem
Čerpadlo připojte na solární modul
Konektor zasuňte úplně (až na doraz) do
zásuvky
LED osvětlení připojte k solárnímu modulu
Konektor zasuňte úplně (až na doraz) do
zásuvky
Zkontrolujte spojení se solárním modulem
Čerpadlo připojte na solární modul
Konektor zasuňte úplně (až na doraz) do
zásuvky
58
Page 59

- CS -
Vyměňte jednotku oběžného kola
Postupujte následovně:
D
Těleso filtru stáhněte z čerpadla.
Filtrační houbičku vyjměte z pláště filtru a vypláchněte ji.
Kryt jednotky oběžného kola stáhněte (opatrně vyjměte zásuvný uzávěr).
Vytáhněte jednotku oběžného kola a vyčistěte ji, nebo ji vyměňte.
Přístroj sestavte v opačném pořadí.
Vyměňte baterie
Postupujte následovně:
F
Otočte dálkové ovládání a vyjměte kryt.
Vyměňte baterie.
– Knoflíková baterie, typ CR 2032.
Kryt opět zavřete.
Súčasti podliehajúce opotrebeniu
Následující komponenty jsou součásti, které podléhají opotřebení a nevztahuje se na ně záruka:
Jednotka oběžného kola a filtrační houbička
Akumulátory/baterie
Uložení / Přezimování
Dodržujte přípustný rozsah provozních teplot. ( Technické údaje)
Při překročení mezních hodnot nahoru nebo dolů musíte přístroj odinstalovat. Proveďte důkladné vyčištění a zkon-
trolujte poškození přístroje.
Čerpadlo skladujte ponořené a bez mrazu.
Likvidace
Toto zařízení obsahuje elektrické součástky nesmí být likvidováno společně s komunálním odpadem! Využijte
k tomu prosím určený systém odběru. Vyměňované akumulátory a baterie vyjměte z přístroje a zlikvidujte je
samostatně.
Likvidace baterií
Baterie nepatří do domovního odpadu. Použité baterie likvidujte pouze v rámci sběrného systému k tomu určeného.
Likvidace baterií v rámci Evropského společenství
Jako spotřebitelé jste ze zákona povinni spotřebované baterie odevzdat zpět. Vrácení je bezplatné.
Baterie odevzdejte buďto prostřednictvím veřejného odběrního a recyklačního systému ve vašem městě nebo obci,
nebo baterie odevzdejte tam, kde jste je zakoupili.
Na bateriích obsahujících škodliviny najdete tato označení:
Pb = baterie obsahuje olovo
Cd = baterie obsahuje kadmium
Hg = baterie obsahuje rtuť
Li = baterie obsahuje lithium
Záruční podmínky
PfG poskytuje záruku 2 roky od data prodeje na prokazatelné materiálové a výrobní vady. Předpokladem pro záruční
plnění je předložení dokladu o koupi. Nárok na záruku zaniká při nesprávné manipulaci, elektrickém nebo
mechanickém poškození nesprávným používáním a při neodborných opravách, prováděných neautorizovanými
dílnami. Opravy smějí být prováděny jen firmou PfG nebo firmou PfG autorizovanými opravnami. Při uplatnění
záručního nároku zašlete reklamovaný přístroj nebo defektní součástku s popisem závady a dokladem o koupi na
vlastní náklady firmě PfG. PfG si vyhrazuje právo účtovat montážní náklady. PfG neručí za škody vzniklé při
transportu. Tyto musí být neprodleně uplatněny vůči dopravci. Další nároky jakéhokoli druhu, zvláště následné škody,
jsou vyloučeny. Touto zárukou nejsou dotčeny nároky konečného zákazníka vůči prodejci.
59
Page 60

- SK -
- SK -
Preklad originálu Návodu na použitie
Pokyny k tomuto Návodu na použitie
S kúpou PondoSolar Island 250 Control ste urobili dobré rozhodnutie.
Pred prvým použitím prístroja si starostlivo prečítajte návod na použitie a oboznámte sa s prístrojom. Všetky práce na
tomto prístroji a s týmto prístrojom smú byt’ vykonávané len podľa priloženého návodu.
Bezpodmienečne dodržiavajte bezpečnostné pokyny pre správne a bezpečné používanie.
Tento návod na použitie starostlivo uschovajte. Pri zmene vlastníka, prosím odovzdajte ďalej aj návod na použitie.
Symboly v tomto návode
A Odkaz na jeden alebo viaceré obrázky. V tomto príklade: Odkaz na obrázok A.
Odkaz k inej kapitole.
Rozsah dodávky
A Počet Popis
1 1 Jednotka plaváka s integrovaným solárnym modulom
2 4 Nástavec dýzy
3 1 Držiak dýzy
4 1 Čerpadlo s prípojným vedením
5 1 Diaľkové ovládanie
Použitie v súlade s určeným účelom
PondoSolar Island 250 Control, ďalej nazývaný ”prístroj”, sa môže používať iba nasledovne:
Na vytvorenie vodnej fontány v jazierkach.
Pre prevádzku s čistou vodou.
Prevádzka pri dodržaní technických údajov.
Pro prístroj platia nasledujúce obmedzenia:
Nikdy neprevádzkujte bez prietoku vody.
Nikdy nečerpajte iné kvapaliny než vodu.
Nepoužívať v spojení s chemikáliami, potravinami, ľahko zápalnými alebo výbušnými látkami.
Bezpečnostné pokyny
Toto zariadenie môžu používať deti od 8 rokov, ako aj osoby
so zníženými fyzickými, zmyslovými či mentálnymi schopnosťami
alebo s nedostatočnými skúsenosťami a vedomosťami, ak s ním
pracujú za dohľadu alebo boli zaučené ohľadne bezpečného použitia
zariadenia a rozumejú nebezpečenstvám, ktoré z neho vyplývajú.
Deti sa so zariadením nesmú hrať. Čistenie a údržbu nesmú deti
vykonávať bez dohľadu.
60
Page 61

A
- SK -
Bezpečná prevádzka
Prístroj nenoste ani neťahajte za elektrické vedenie.
Používajte iba originálne náhradné diely a príslušenstvo pre daný prístroj.
Elektrické prístroje a inštalácie s menovitým napätím U > 12 V AC alebo U >30 V DC, ktoré sa nachádzajú vo vode:
Prístroje a inštalácie odpojte od napätia skôr, ako siahnete do vody.
Prevádzkujte čerpadlo len so solárnym modulom, ktorý ste obdržali spolu s dodávkou.
Nenechajte čerpadlo bežať nasucho.
Zabráňte silným úderom a otrasom prístroja.
Prístroj čistite minimálne 2-krát ročne.
Inštalácia a pripojenie
Postupujte nasledovne:
B, C
Vytiahnite zátku z prípojky.
– Zátka chráni elektroniku pred vodou.
– Pri vytiahnutej zástrčke zastrčte zátku.
Zastrčte pripojovacie vedenie do zdierky.
– Zástrčku zastrčte až na doraz do zdierky, aby bol spoj vodotesný.
Čerpadlo nasuňte na jednotku plaváka.
Jednotku dýzy nasuňte na jednotku plaváka.
Jednotku plaváka uložte na hladinu vody.
Uvedenie do prevádzky
Postupujte nasledovne:
Akumulátor nie je nabitý. Pred prvým použitím prístroja vystavte prístroj na jeden deň slnečnému žiareniu. Potom
prístroj ovládajte diaľkovým ovládaním.
Diaľkové ovládanie
E
Dosah diaľkového ovládania je maximálne 10 m.
Popis Funkcia
B
C
D
Určite dobu chodu (max. 4 h).
Na prepísanie aktuálneho nastavenia čerpadlo vypnite
tlačidlom D a potom tlačidlom A nastavte novú dobu
chodu čerpadla. Čerpadlo sa potom automaticky rozbehne.
Tlačidlo 1 pomaly stlačte pre každú hodinu. Indikačná
dióda bliká podľa teraz nastavenej doby chodu čerpadla.
Príklad: Želaná doba chodu čerpadla 3 h.
Tlačidlo A stlačte pomaly 3 po sebe. Dióda viackrát
blikne 3 po sebe
Zapnutie a vypnutie LED (svietia len za tmy) Krátko stlačte tlačidlo
Nastavenie dopravného výkonu čerpadla (5 stupňov)
Tlačidlo 1 pomaly stlačte pre každý stupeň.
Zapnutie a vypnutie čerpadla Krátko stlačte tlačidlo
61
Page 62

- SK -
Odstránenie porúch
Porucha Príčina Náprava
Čerpadlo sa nerozbieha Žiadne pripojenie k solárnemu modulu
Solárny modul je znečistený. Vyčistite
Rotor je zablokovaný Vyčistite
Kapacita akumulátora je vyčerpaná Akumulátor nabíjajte min. 4 hodiny
Slnečné žiarenie je príliš slabé Nasmerujte solárny modul k slnku
Čerpadlo nečerpá alebo čerpá len
veľmi málo
Filter je upchatý Vyberte teleso filtra, odoberte filter a vyčistite
Jednotka dýzy je upchatá Vytiahnite jednotku dýzy, vyčistite
Rotor je opotrebovaný Vymeňte
Slnečné žiarenie je príliš slabé Nasmerujte solárny modul k slnku
Kapacita akumulátora je vybitá. Akumulátor nabíjajte minimálne 4 hodiny
LED nesvietia Žiadne pripojenie k solárnemu modulu
LED osvetlenie je vypnuté Zapnite LED osvetlenie
Okolie príliš svetlé —
Kapacita akumulátora je vyčerpaná Akumulátor nabíjajte min. 4 hodiny
LED osvetlenie je znečistené Vyčistite
LED osvetlenie je chybné Zlikvidujte
Prístroj nie je možné zapnúť Batéria diaľkového ovládania je vybitá Vymeňte
Diaľkové ovládanie je príliš ďaleko Sledujte dosah diaľkového ovládania
Žiadne pripojenie k solárnemu modulu
Čistenie a údržba
Na čistenie alebo údržbu musí byť zariadenie vybraté z vody.
Vyčistenie prístroja
V žiadnom prípade nepoužívajte agresívne čistiace prostriedky ani chemické rozpúšťadlá, lebo tieto pôsobia na te-
leso prístroja agresívne alebo by mohli ovplyvniť funkciu prístroja.
Odporúčané čistiace prostriedky pri silnom usadzovaní vápnika:
– čistiaci prostriedok bez obsahu octu a chlóru.
Postupujte nasledovne:
Rozoberte prístroj.
Akumulátor je chybný Zlikvidujte prístroj
Vyčistite teleso filtra a rotor. (→ Výmena rotora)
Rozoberte jednotku dýzy.
Vyčistite všetky diely.
– Na uľahčenie použite mäkkú kefu.
– Diely opláchnite čistou vodou.
Solárny modul vyčistite vlhkou handričkou a vyutierajte dosucha.
Zostavte prístroj v opačnom poradí.
Skontrolujte spojenie so solárnym modulom
Čerpadlo pripojte na solárny modul
Úplne zastrčte zástrčku do zdierky (až na do-
raz)
Osvetlenie LED pripojte na solárny modul
Úplne zastrčte zástrčku do zdierky (až na do-
raz)
Skontrolujte spojenie so solárnym modulom
Čerpadlo pripojte na solárny modul
Úplne zastrčte zástrčku do zdierky (až na do-
raz)
62
Page 63

- SK -
Výmena rotora
Postupujte nasledovne:
D
Vytiahnite teleso filtra z čerpadla.
Filtračnú špongiu vyberte z telesa filtra a vypláchnite ju.
Stiahnite kryt rotora (zásuvný uzáver, opatrne vyberte).
Vytiahnite rotor a vyčistite ho alebo vymeňte.
Prístroj poskladajte v opačnom poradí pracovných krokov.
Vymeňte batériu
Postupujte nasledovne:
F
Otočte diaľkové ovládanie a nadvihnite kryt.
Vymeňte batériu.
– Používajte gombíkovú batériu typu CR 2032.
Kryt zase zatvorte.
Súčasti podliehajúce opotrebeniu
Nasledujúce komponenty sú diely podliehajúce opotrebovaniu a nevzt’ahuje sa na ne záruka:
Rotor a filtračná pena
Akumulátory/batérie
Uloženie / Prezimovanie
Dodržiavajte prípustný rozsah prevádzkovej teploty ( Technické údaje).
Pri prekročení alebo poklese pod hraničnú hodnotu musíte prístroj odinštalovať. Dôkladne vyčistite a skontrolujte
prístroj na poškodenie.
Skladujte čerpadlo ponorené a chráňte ho pred mrazom.
Likvidácia
Tento prístroj obsahuje elektronické súčiastky a nesmie sa likvidovať ako domový odpad! Na likvidáciu
využite na to určený systém spätného odberu. Z prístroja vyberte akumulátory a batérie určené na výmenu a
tieto osobitne zlikvidujte.
Likvidácia batérií
Batérie nepatria do domového odpadu. Opotrebované batérie likvidujte len prostredníctvom špecializovaných zberní.
Likvidácia batérií v Európskej Únii
Ako spotrebiteľ ste zo zákona povinný odovzdať opotrebované batérie. Odovzdanie je bezodplatné.
Batérie likvidujte buď prostredníctvom špecializovaných zberní a recyklačných systémov vo vašej obci alebo ich
odovzdajte na predajnom mieste.
Tieto znaky nájdete na batériách s obsahom škodlivých látok:
Pb = batéria obsahuje olovo
Cd = batéria obsahuje kadmium
Hg = batéria obsahuje ortuť
Li = batéria obsahuje lítium
Záručné podmienky
PfG poskytuje záruku 2 roky od dátumu predaja na dokázateľné materiálové a výrobné vady. Predpokladom pre
záručné plnenie je predloženie dokladu o kúpe. Nárok na záruku zaniká pri nesprávnej manipulácii, elektrickom alebo
mechanickom poškodení nesprávnym používaním a pri neodborných opravách, vykonávaných neautorizovanými
dielňami. Opravy smú byt vykonávané len firmou PfG alebo firmou PfG autorizovanými opravárenskými dielňami. Pri
uplatnení záručného nároku zašlite reklamovaný prístroj alebo defektnú súčiastku s popisom závady a dokladom o
kúpe na vlastné náklady firme PfG. PfG si vyhradzuje právo, účtovat montážne náklady. PfG neručí za škody vzniknuté
pri transporte. Tieto musia byt neodkladne uplatnené voči dopravcovi. Ďalšie nároky, akéhokoľvek druhu, obzvlášt
následné škody, sú vylúčené. Touto zárukou nie sú dotknuté nároky konečného zákazníka voči predajcovi.
63
Page 64

- SL -
- SL -
Prevod originalnih navodil za uporabo
Opozorila k navodilom za uporabo
Z nakupom tega izdelka PondoSolar Island 250 Control ste dobro izbrali.
Pred prvo uporabo natančno preberite navodila za uporabo naprave in dobro spoznajte napravo. Vsa dela na in z tem
aparatom se smejo izvajati samo v skladu s pričujočimi navodili za uporabo.
Obvezno upoštevajte varnostna navodila za varno in pravilno uporabo.
Navodila za uporabo skrbno shranite. V primeru menjave lastnika priložite napravi tudi navodila za uporabo.
Simboli v teh navodilih
A Referenca na eno ali več slik. V tem primeru: referenca na sliko A.
Referenca na neko drugo poglavje.
Vsebina pošiljke
A Število Opis
1 1 Enota plovca z vgrajenim solarnim modulom
2 4 Nastavek šob
3 1 Držalo šob
4 1 Črpalka s priključno napeljavo
5 1 Daljinsko upravljanje
Pravilna uporaba
PondoSolar Island 250 Control, v nadaljevanju imenovan »naprava«, je dovoljeno uporabljati samo, kot sledi:
Za ustvarjanje vodne fontane v ribnikih.
Za delo s čisto vodo.
Obratovanje ob upoštevanju tehničnih podatkov.
Za napravo veljajo naslednje omejitve:
Nikoli ne delajte brez pretoka vode.
Nikoli ne črpajte drugih tekočin kot samo vodo.
Ne uporabljajte v povezavi s kemikalijami, živili, lahko vnetljivimi ali eksplozivnimi materiali.
Varnostna navodila
To napravo lahko uporabljajo otroci od 8 let naprej in osebe z
zmanjšanimi fizičnimi, senzoričnimi ali duševnimi sposobnostmi ali
osebe s pomanjkanjem izkušenj in znanja, če so pod nadzorom ali so
bili poučeni o varni uporabi naprave in razumejo nevarnosti, ki pri
tem nastanejo. Otroci se ne smejo igrati z napravo. Čiščenja in
vzdrževanja ne smejo opravljati otroci brez nadzora.
64
Page 65

A
- SL -
Varna uporaba
Naprave ni dovoljeno prenašati ali je vleči za omrežni priključni kabel.
Uporabljajte le originalne nadomestne dele in opremo.
Električne naprave in instalacije z nazivno napetostjo U > 12 V AC ali U >30 V DC, ki so nameščene v vodi:
Naprave in instalacije izključite iz električnega omrežja, preden sežete v vodo.
Črpalko uporabljajte samo s solarnim modulom, ki ga vsebuje dobavljena pošiljka.
Črpalka naj ne deluje na suho.
Preprečite trde udarce in pretrese naprave.
Napravo očistite vsaj 2-krat letno.
Postavitev in priključevanje
Postopek je naslednji:
B, C
Izvlecite zamašek iz priključka.
– Zamašek elektroniko ščiti pred vodo.
– Pri izključenem vtiču vtaknite zamašek.
Priključno napeljavo vtaknite v dozo.
– Vtič do konca potisnite v dozo, da je povezava vodotesna.
Črpalko nataknite na enoto plovca.
Enoto šobe nataknite na enoto plovca.
Enoto plovca postavite na gladino vode.
Zagon
Postopek je naslednji:
Akumulator naprave ni napolnjen. Napravo morate pred prvo uporabo izpostaviti sončnim žarkom za en dan. Nato
napravo upravljajte z daljinskim upravljanjem.
Daljinsko upravljanje
E
Doseg daljinskega upravljanja znaša največ 10 m.
Opis Funkcija
B
C
D
Določite čas delovanja črpalke (maks. 4 h).
Za prepis trenutne nastavitve črpalke izvedite izklop s
tipko D in nato določite novi čas delovanja črpalke s
tipko A. Črpalka se nato zažene samodejno
Tipko morate za vsako uro počasi pritisniti 1 . Utripanje indikacijske diode je odvisno od trenutno nastavljenega časa
delovanja črpalke.
Primer: Želeni čas delovanja črpalke je 3 h.
Tipko A pritisnite počasi 3 zapored. Dioda večkrat
utripne 3 zapored.
Vklop in izklop svetlečih diod (sveti samo v temi) Na hitro pritisnite tipko
Nastavite moč črpanja črpalke (5 stopenj)
Tipko morate za vsako stopnjo počasi pritisniti 1
Vklop in izklop črpalke Na hitro pritisnite tipko
65
Page 66

- SL -
V
Odprava težav in motenj
Motnja
Črpalka se ne zažene Ni povezave solarnega modula
Črpalka komajda črpa ali ne črpa Filter je zamašen Snemite ohišje filtra, odstranite in očistite filter
Svetlobne diode ne svetijo Ni povezave do solarnega modula
Naprave ni mogoče vklopiti Baterija daljinskega upravljanja je izpraznjena Zamenjajte
Čiščenje in vzdrževanje
Za čiščenje ali vzdrževanje je treba napravo vzeti iz vode.
Očistiti napravo
Nikakor ne uporabljajte agresivnih čistil ali kemijskih raztopin, ker se s tem načne ohišje ali je delovanje naprave
lahko okrnjeno.
Priporočeno čistilno sredstvo pri trdovratnih poapnitvah:
– Hišna čistila, ki ne vsebujejo kisa ali klora.
Postopek je naslednji:
Razstavite napravo.
Očistite ohišje filtra in tekalno enoto. (→ Zamenjava tekalne enote)
Razstavite enoto s šobami.
Očistite vse dele.
– Za podporo uporabite mehko krtačo.
– Dele izperite s čisto vodo.
Solarni modul očistite z vlažno krpo in obrišite do suhega.
Sestavite napravo v obratnem vrstnem redu.
zrok Ukrep
Preverite povezavo s solarnim modulom
Črpalko priključite na solarni modul
Vtič popolnoma (do konca) potisnite v dozo
Solarni modul je umazan. Očistite ga.
Tekalna enota je blokirana Očistite ga.
Akumulator je prazen. Akumulator polnite vsaj 4 ure
Sončno sevanje je prešibko Solarni modul naravnajte proti soncu
Enota s šobami je zamašena Izvlecite in očistite enoto s šobami
Tekalna enota je obrabljena Zamenjajte
Sončno sevanje je prešibko Solarni modul naravnajte proti soncu
Akumulator je izpraznjen. Akumulator polnite vsaj 4 ure
LED osvetlitev priključite na solarni modul
Vtič popolnoma (do konca) potisnite v dozo
LED osvetlitev je izklopljena Vklopite LED osvetlitev
Okolica je preveč svetla —
Akumulator je prazen. Akumulator polnite vsaj 4 ure
LED osvetlitev je umazana Očistite ga.
LED osvetlitev je okvarjena. Zavrzite
Daljinsko upravljanje je preveč oddaljeno Upoštevajte doseg daljinskega upravljanja
Ni povezave do solarnega modula
Preverite povezavo s solarnim modulom
Črpalko priključite na solarni modul
Vtič popolnoma (do konca) potisnite v dozo
Akumulator je pokvarjen Zavrzite napravo
66
Page 67

- SL -
Zamenjava tekalne enote
Postopek je naslednji:
D
Ohišje filtra črpalke snemite.
Filtrirno peno vzemite iz ohišja filtra in jo izplaknite.
Snemite pokrovček tekalne enote (vtično zapiralo, previdno ga dvignite).
Odstranite tekalno enoto in jo očistite ali zamenjajte.
Sestavite napravo v obratnem vrstnem redu.
Baterijo zamenjajte
Postopek je naslednji:
F
Daljinsko upravljanje zavrtite in snemite pokrovček.
Zamenjajte baterijo.
– Uporabite gumbno baterijo tipa CR 2032.
Ponovno zaprete pokrov.
Deli, ki se obrabijo
Naslednje komponente so obrabni deli in ne spadajo v garancijo:
Tekalna enota in filtrirna pena
Akumulatorji/baterije
Skladiščenje / pozimi
Upoštevajte dovoljeno območje obratovalne temperature. ( Tehnični podatki)
Pri prekoračenju ali ne doseganju mejnih vrednosti je treba napravo demontirati. Napravo temeljito očistite in pre-
verite glede poškodb.
Črpalko skladiščite potopljeno in zaščiteno pred zmrzaljo.
Odlaganje odpadkov
Ta naprava vsebuje elektronske sestavne dele in se je ne sme zavreči med gospodinjske odpadke! Uporabite
za ta namen predviden sistem za recikliranje. Akumulator in baterije, ki jih želite zamenjati, odstranite iz
naprave ter jih zavrzite na ločen način.
Odlaganje baterij
Baterije ne spadajo v gospodinjske odpadke. Odložite porabljene baterije samo v zato predviden sistem prevzema.
Odlaganje baterij znotraj Evropske skupnosti
Kot uporabnik se zakonsko obvezujete, da porabljene baterije vrnete. Vračilo je brezplačno.
Odlagajte baterije bodisi v javni prevzemni in reciklirni sistem v vašem mestu ali občini bodisi dajte baterije nazaj tja,
kjer ste jih kupili.
Te znake najdete na baterijah, ki vsebujejo škodljive snovi:
Pb = baterija vsebuje svinec
Cd = baterija vsebuje kadmij
Hg = baterija vsebuje živo srebro
Li = baterija vsebuje litij
Garancijski pogoji
PfG daje 2 leti garancije od datuma nakupa na dokazljive napake v materialu in izdelavi. Pogoj za garancijsko storitev
je predložitev računa. Pravica iz garancije preneha pri nestrokovni rabi, električnih ali mehanskih poškodbah zaradi
zlorabe kot tudi pri nestrokovnih popravilih, ki jih niso opravile pooblaščene delavnice. Popravila sme opraviti le PfG ali
delavnice, ki jih je pooblastil PfG. Pri najavi garancijskega zahtevka pošljite aparat ali pokvarjen del z opisom napake in
računom nefrankirano v PfG. PfG si pridržuje pravico zaračunati stroške montaže. PfG ne jamči za poškodbe med
transportom. Te je potrebno nemudoma uveljaviti pri prevozniku. Nadaljnji zahtevki so izključeni, ne glede na vrsto, še
posebej pa za posredno škodo. Ta garancija ne zadeva zahtevka končnega kupca do trgovca.
67
Page 68

- HR -
- HR -
Prijevod originalnih uputa za uporabu
Savjeti uz ove upute za upotrebu
Kupnjom PondoSolar Island 250 Control učinili ste dobar izbor.
Prije prve upotrebe uređaja pažljivo pročitajte ovu uputu za upotrebu, te se upoznajte s uređajem. Svi radovi na ovom
uređaju i s ovim uređajem smiju se izvoditi samo prema ovim uputama.
U svrhu ispravne i sigurne upotrebe, obvezno se pridržavajte uputa za sigurnost.
Brižno čuvajte ovu uputu za upotrebu. Ako uređaj predate drugome korisniku, obvezno mu proslijedite i ove upute.
Simboli u ovim uputama
A Referenca na jednu ili više slika. U ovom primjeru: referenca na sliku A.
Referenca na neko drugo poglavlje.
Opseg isporuke
A Količina Opis
1 1 Plutajući sklop s integriranim solarnim modulom
2 4 Nastavak sapnice
3 1 Držač sapnice
4 1 Crpka s električnim kabelom
5 1 Daljinski upravljač
Namjensko korištenje
PondoSolar Island 250 Control, u daljnjem tekstu „uređaj“, smije se upotrijebiti isključivo na sljedeći način:
Za stvaranje vodene fontane u jezercima.
Za rad s čistom vodom.
Rad uz pridržavanje tehničkih podataka.
Za uređaj vrijede sljedeća ograničenja:
Nikada ne radite bez protoka vode.
Osim vode nikada ne crpite druge tekućine.
Ne primjenjujte u svezi s kemikalijama, namirnicama, lako zapaljivim ili eksplozivnim materijalima.
Sigurnosne napomene
Ovaj uređaj smiju upotrebljavati djeca starija od 8 godina i osobe sa
smanjenim tjelesnim, osjetilnim ili psihičkim sposobnostima ili s
nedovoljnim iskustvom i znanjem ako su pod nadzorom ili ako su
podučeni o sigurnoj upotrebi uređaja i razumiju opasnosti koje mogu
proizaći iz toga. Djeca se ne smiju igrati uređajem. Čišćenje i
održavanje uređaja ne smiju obavljati djeca bez nadzora.
68
Page 69

A
- HR -
Sigurno poduzeće
Uređaj ne nosite i ne povlačite za električni kabel.
Rabite samo originalne rezervne dijelove i originalni pribor uređaja.
Električni uređaji i instalacije s nazivnim naponom U > 12 V AC ili U >30 V DC koji su položeni u vodu: Isključite
uređaje i instalacije s napona prije nego što zahvatite u vodu.
Crpku rabite samo s isporučenim solarnim modulom.
Ne dopustite da crpka radi na suho.
Izbjegavajte snažne udarce i vibracije uređaja.
Uređaj čistite najmanje dvaput na godinu.
Postavljanje i priključivanje
Postupite na sljedeći način:
B, C
Izvadite čep iz priključka.
– Čep štiti elektronički sustav od vode.
– Ako je utikač izvučen, utaknite čep.
Utaknite električni kabel u utičnicu.
– Utikač do kraja pritisnite u utičnicu kako bi spoj bio vodonepropustan.
Nataknite crpku na plutajući sklop.
Nataknite sklop sapnice na plutajući sklop.
Stavite plutajući sklop na površinu vode.
Puštanje u rad
Postupite na sljedeći način:
Baterija uređaja nije napunjena. Prije prve uporabe ostavite uređaj jedan dan na sunčanoj svjetlosti. Zatim uređaj regu-
lirajte daljinskim upravljačem.
Daljinski upravljač
E
Maksimalan je doseg daljinskog upravljača 10 m.
Opis Funkcija
B
C
D
Zadajte vrijeme rada crpke (maks. 4 h).
Kako biste promijenili trenutnu postavku, isključite crpku
tipkom D, a zatim tipkom Azadajte novo vrijeme rada
crpke. Crpka će se zatim automatski pokrenuti
Polagano pritisnite tipku za svaki sat 1 . Signalna dioda
žmirka u skladu sa sada namještenim vremenom rada crpke.
Primjer: Željeno vrijeme rada crpke 3 sata.
Polagano pritisnite tipku A 3 zaredom. Dioda žmirka više
puta 3 zaredom.
Uključivanje i isključivanje žaruljica (svijetle samo u tami) Kratko pritisnite tipku
Namjestite kapacitet crpke (u 5 stupnjeva)
Polagano pritisnite tipku za svaki stupanj 1 .
Uključivanje i isključivanje crpke Kratko pritisnite tipku
69
Page 70

- HR -
Uklanjanje smetnji
Neispravnost Uzrok Rješenje
Crpka se ne pokreće Nema veze sa solarnim modulom
Solarni modul je prljav. Očistite
Rotor je blokiran Očistite
Kapacitet baterije je istrošen Punite bateriju najmanje 4 sata
Slabo sunčano zračenje Usmjerite solarni modul prema Suncu
Crpka nema protok ili je on slab Filtar je začepljen Demontirajte kućište crpke, izvadite i očistite fil-
Sklop sapnice je začepljen Sklop sapnice izvadite i očistite
Rotor je pohaban Zamijenite
Slabo sunčano zračenje Usmjerite solarni modul prema Suncu
Kapacitet baterije je istrošen. Punite bateriju najmanje 4 sata
Žaruljice ne svijetle Nema veze sa solarnim modulom
LED rasvjeta je isključena Uključite LED rasvjetu
Okolina je presvijetla —
Kapacitet baterije je istrošen Punite bateriju najmanje 4 sata
LED rasvjeta je prljava Očistite
LED rasvjeta nije ispravna Zbrinite
Uređaj se ne može uključiti Baterija daljinskog upravljača je istrošena Zamijenite
Daljinski upravljač je predaleko Vodite računa o dosegu daljinskog upravljača
Nema veze sa solarnim modulom
Čišćenje i održavanje
Uređaj se mora izvaditi iz vode radi čišćenja i održavanja.
Uređaj očistiti
Nipošto ne rabite agresivna sredstva za čišćenje ili kemijske otopine jer se time može oštetiti kućište ili negativno
promijeniti funkcioniranje samog uređaja.
Preporučena sredstva za čišćenje tvrdokornih naslaga vapnenca:
– Kućansko sredstvo za čišćenje bez octa i klora.
Postupite na sljedeći način:
Demontirajte uređaj.
Baterija nije ispravna Zbrinite uređaj
Očistite kućište filtra i rotor. (→ Zamjena rotora)
Rastavite sklop sapnice.
Očistite sve dijelove.
– Kao pomoć uporabite meku četku.
– Isperite dijelove čistom vodom.
Solarni modul očistite vlažnom krpom za čišćenje i istrljajte dok se ne osuši.
Uređaj sastavite obrnutim redoslijedom.
Provjerite vezu sa solarnim modulom
Priključite crpku na solarni modul
Utikač potpuno (do kraja) pritisnite u utičnicu
tar
Priključite LED rasvjetu na solarni modul
Utikač potpuno (do kraja) pritisnite u utičnicu
Provjerite vezu sa solarnim modulom
Priključite crpku na solarni modul
Utikač potpuno (do kraja) pritisnite u utičnicu
70
Page 71

- HR -
Zamjena rotora
Postupite na sljedeći način:
D
Skinite kućište filtra s crpke.
Izvadite filtarsku spužvu iz kućišta filtra i isperite je.
Skinite zaštitni pokrov s rotora (utični priključak, oprezno ga podignite).
Izvadite rotor, očistite ga ili zamijenite.
Uređaj sastavite obrnutim redoslijedom.
Promijeniti baterije
Postupite na sljedeći način:
F
Okrenite daljinski upravljač i podignite poklopac.
Zamijenite bateriju.
– Uporabite gumbastu bateriju CR 2032.
Zatvorite natraga poklopac.
Potrošni dijelovi
Sljedeće su komponente potrošni dijelovi i nisu obuhvaćene jamstvom:
Rotor i filtarska spužva
Baterije
Skladištenje / Prezimljavanje
Vodite računa o dopuštenom rasponu radne temperature. ( Tehnički podatci)
Ako je temperatura ispod ili iznad graničnih vrijednosti, demontirajte uređaj. Obavite temeljito čišćenje i provjerite da
uređaj nije oštećen.
Crpku skladištite uronjenu i nezaleđenu.
Zbrinjavanje
Ovaj uređaj sadržava elektroničke komponente i ne smije se odložiti u kućanski otpad! Uporabite
odgovarajući sustav prikupljanja otpada. Radi zamjene izvadite odgovarajuće baterije iz uređaja i zasebno ih
zbrinite.
Uklanjanje baterija
Baterije ne spadaju u smeće. Uklonite potrošene baterije samo kroz za to odgovarajući sustav prikupljanja.
Uklanjanje baterija unutar Europske zajednice
Kao potrošač ste zakonski obvezni vratiti potrošene baterije. Povrat je besplatan.
Uklonite baterije, bilo putem sustava javnog prikupljanja i recikliranja u Vašem gradu ili općini, ili vratite baterije tamo,
gdje ste ih kupili.
Ovi znakovi se mogu naći na baterijama sa štetnim tvarima:
Pb = baterija sadrži olovo
Cd = baterija sadrži kadmij
Hg = baterija sadrži živu
Li = baterija sadrži litij
Jamstveni uvjeti
PfG jamči 2 godine od datuma prodaje za dokazane greške u materijalu i proizvodnji. Preduvjet za izvođenje jamstvenih usluga je predočavanje potvrde o kupnji. Jamstvo prestaje vrijediti u slučajevima nestručnog rukovanja, električnih ili mehaničkih oštećenja nastalih zlouporabom kao i nestručnim popravcima od strane neovlaštenih radiona.
Popravke smiju vršiti samo PfG ili radione koje je PfG za to ovlastio. U slučaju reklamacije pošaljite neispravni uređaj ili
pokvareni dio zajedno s opisom greške i potvrdom o kupnji o našem trošku tvrtki PfG. PfG zadržava pravo obračuna-
vanja troškova montaže. PfG ne odgovara za oštećenja nastala pri transportu. Takva se oštećenja odmah moraju prija-
viti prijevozniku, koji za njih i odgovara. Sva ostala prava, a naročito pravo na nadoknadu posljedičnih šteta, su isključena. Ovo jamstvo se ne tiče obveza prodavača prema krajnjem kupcu uređaja.
71
Page 72

- RO -
- RO -
Traducerea instrucţiunilor de utilizare originale
Indicaţii privind aceste instrucţiuni de utilizare
Prin achiziţionarea produsului PondoSolar Island 250 Control aţi făcut o alegere bună.
Înainte de folosirea aparatului vă rugăm să citiţi cu atenţie instrucţiunile de utilizare şi să vă familiarizaţi cu aparatul.
Toate lucrările la nivelul şi cu acest echipament pot fi efectuate numai conform prezentelor instrucţiuni.
Respectarea indicaþiilor privind securitatea este obligatorie, în scopul unei utilizãri corecte ºi sigure.
Vă rugăm să păstraţi aceste instrucţiuni la loc sigur. În cazul schimbării proprietarului, înmânaţi-le acestuia.
Simboluri din prezentele instrucţiuni
A Trimitere la una sau mai multe imagini. În cazul acestui exemplu: Trimitere la figura A.
Referire la un alt capitol.
Conţinutul livrării
A Cantitate Descriere
1 1 Unitate de plutitor cu modul solar integrat
2 4 Ajutaj duză
3 1 Suport duză
4 1 Pompă cu conductor de racord
5 1 Telecomandă
Utilizarea în conformitate cu destinaţia
PondoSolar Island 250 Control, denumit în cele ce urmează "aparat", va fi utilizat exclusiv după cum urmează:
Pentru generarea unei fântâni cu jet de apă în iazuri.
Pentru utilizarea cu apă curată.
Operarea cu respectarea datelor tehnice.
Pentru aparat sunt valabile următoarele restricţii:
Nu se va utiliza niciodată fără debit de apă.
Nu pompaţi niciodată alte lichide în afară de apă.
NU utilizaţi în combinaţie cu substanţe chimice, alimente, substanţe uşor inflamabile sau explozive
Indicaţii privind securitatea muncii
Acest aparat poate fi folosit de copii începând cu vârsta de 8 ani,
precum şi de persoane cu capacităţi fizice, senzoriale sau mintale
diminuate sau cu experienţă şi cunoştinţe deficitare, dacă acestea
sunt supravegheate sau au fost instruite în ce priveşte folosirea în
siguranţă a aparatului şi dacă înţeleg pericolele rezultate. Copiii nu
au permisiunea de a se juca cu aparatul. Curăţarea şi întreţinerea de
către utilizator nu sunt permise copiilor fără supraveghere.
72
Page 73

A
- RO -
Funcţionare sigură
Nu transportaţi sau trageţi aparatul de conductorul electric.
Utilizaţi numai piese de schimb şi accesorii originale pentru aparat.
Aparate şi instalaţii electrice cu tensiunea nominală U > 12 V CA sau U >30 V CC, care se află în apă: Înainte să
introduceţi mâna în apă, scoateţi aparatele şi instalaţiile de sub tensiune.
Acţionaţi pompa numai cu modulul solar conţinut în pachetul de livrare.
Nu lăsaţi pompa să funcţioneze uscat.
Evitaţi şocurile puternice şi vibraţiile la aparat.
Curăţaţi aparatul cel puţin de 2 ori pe an.
Amplasarea şi racordarea
Procedaţi după cum urmează:
B, C
Scoateţi dopul din racord.
– Dopul protejează partea electronică împotriva apei.
– Introduceţi dopul cu fişa scoasă.
Introduceţi conductorul de racord în mufă.
– Introduceţi fişa până la opritor în mufă pentru ca legătura să fie etanşă la apă.
Introduceţi pompa pe unitatea plutitorului.
Introduceţi unitatea duzei pe unitatea plutitorului.
Aşezaţi unitatea plutitorului pe suprafaţa apei.
Punerea în funcţiune
Procedaţi după cum urmează:
Acumulatorul aparatului nu este încărcat. Înainte de prima utilizare, expuneţi aparatul timp de o zi la razele soarelui.
Apoi operaţi cu aparatul folosind telecomanda.
Telecomandă
E
Raza de acţiune a telecomenzii este de maxim 10 m.
Descriere Funcţia
B
C
D
Stabiliţi timpul de funcţionare a pompei (max. 4 h).
Pentru suprascrierea setărilor actuale, deconectaţi pompa
cu tasta D şi apoi stabiliţi noul timp de funcţionare a pom-
pei cu tastaA. Pompa va porni automat
Conectarea şi deconectarea LED-urilor (se aprind numai la
în condiţii de întuneric)
Reglaţi puterea de refulare a pompei (5 trepte)
Apăsaţi uşor tasta pentru fiecare oră 1 . Dioda de afişare se
aprinde intermitent conform timpului de funcţionare a pompei
reglat.
Exemplu: Timp de funcţionare al pompei dorit 3 h.
Apăsaţi uşor tasta A 3 succesiv. Dioda luminează intermitent de mai multe ori 3 succesiv
Apăsaţi scurt tasta
Apăsaţi uşor tasta pentru fiecare treaptă 1
Conectarea şi deconectarea pompei Apăsaţi scurt tasta
73
Page 74

- RO -
Înlăturarea defecţiunilor
Defecţiune Cauză Remediere
Pompa nu porneşte Lipsă legătură la modulul solar
Modulul solar este murdar. Curăţaţi
Unitatea mobilă este blocată Curăţaţi
Capacitatea acumulatorului este epuizată Încărcaţi acumulatorul cel puţin 4 ore
Radiaţia solară este prea scăzută Aliniaţi modulul solar faţă de soare
Pompa refulează puţin sau deloc Filtrul este înfundat Demontaţi carcasa filtrului, scoateţi filtrul şi
Unitatea duzei este înfundată Extrageţi unitatea duzei, curăţaţi
Unitatea mobilă este uzată Înlocuiţi
Radiaţia solară este prea scăzută Aliniaţi modulul solar faţă de soare
Capacitatea acumulatorului este epuizată. Încărcaţi acumulatorul cel puţin 4 ore
LED-urile nu se aprind Lipsă legătură la modulul solar
Sistemul de iluminare cu LED este deconectat Conectaţi sistemul de iluminat cu LED-uri
Mediul este prea luminos —
Capacitatea acumulatorului este epuizată Încărcaţi acumulatorul cel puţin 4 ore
Sistemul de iluminare cu LED este murdar Curăţaţi
Sistemul de iluminare cu LED este defect Eliminaţi ca deşeu
Aparatul nu poate fi conectat Bateria telecomenzii epuizată Înlocuiţi
Telecomanda este prea departe Ţineţi cont de raza de acţiune a telecomenzii
Lipsă legătură la modulul solar
Curăţarea şi întreţinerea
Pentru curăţarea sau întreţinerea curentă a aparatului, acesta trebuie scos din apă.
Curăţaţi aparatul
Nu utilizaţi în niciun caz agenţi de curăţare sau soluţii chimice agresive, deoarece astfel poate fi atacată carcasa sau
influenţată negativ funcţionarea.
Agenţi de curăţare recomandaţi în cazul depunerilor de calcar persistente:
– Detergent casnic fără oţet şi clor.
Procedaţi după cum urmează:
Dezasamblaţi aparatul.
Acumulatorul este defect Eliminarea ca deşeu a aparatului
Curăţaţi carcasa filtrului şi unitatea mobilă. (→ Înlocuirea unităţii mobile)
Desprindeţi unitatea duzei.
Curăţaţi toate componentele.
– Utilizaţi ca ajutor o perie moale.
– Clătiţi piesele cu apă curată.
Curăţaţi modulul solar cu o lavetă umedă şi uscaţi-l prin frecare.
Asamblaţi aparatul în ordine inversă.
Verificaţi conexiunea cu modulul solar
Racordaţi pompa la modulul solar
Împingeţi fişa complet (până la opritor) în
mufă
curăţaţi
Racordaţi sistemul de iluminat cu LED-uri la
modulul solar
Împingeţi fişa complet (până la opritor) în
mufă
Verificaţi conexiunea cu modulul solar
Racordaţi pompa la modulul solar
Împingeţi fişa complet (până la opritor) în
mufă
74
Page 75

- RO -
Înlocuirea unităţii mobile
Procedaţi după cum urmează:
D
Detaşaţi carcasa filtrului de pe pompă.
Extrageţi buretele de filtrare din carcasa filtrului şi spălaţi-l.
Desprindeţi capacul unităţii mobile (racord tip fişă, desprindeţi cu precauţie folosind o pârghie).
Scoateţi unitate mobilă şi curăţaţi-o sau înlocuiţi-o.
Asamblaţi aparatul în ordinea inversă.
Înlocuiţi bateria
Procedaţi după cum urmează:
F
Întoarceţi telecomanda şi desprindeţi capacul prin ridicare.
Înlocuiţi bateria.
– Utilizaţi o baterie tip buton de tip CR 2032.
Închideţi la loc capacul.
Consumabile
Următoarele componente sunt piese supuse uzurii şi nu fac obiectul garanţiei:
Unitatea mobilă şi buretele de filtrare
Acumulatori/ baterii
Depozitarea / depozitarea pe timp de iarnă
Acordaţi atenţie domeniului admis al temperaturii de lucru. ( Date tehnice)
În caz de depăşire superioară sau inferioară a valorilor limită trebuie să dezinstalaţi aparatul. Efectuaţi o curăţare
temeinică şi verificaţi aparatul referitor la deteriorări.
Depozitaţi pompa imersată şi ferită de îngheţ.
Îndepărtarea deşeurilor
Acest aparat conţine componentele electronice şi nu este permisă eliminarea sa ca deşeu menajer! Vă rugăm
să folosiţi sistemul de recuperare prevăzut pentru acesta. Înlăturaţi pentru schimbare acumulatorii şi bateriile
prevăzute din aparat şi eliminaţi-le ca deşeu separat.
Evacuarea bateriilor uzate
Bateriile nu fac parte din categoria deşeurilor menajere. Eliminaţi bateriile uzate numai prin sistemele de colectare
prevăzute în acest sens.
Eliminarea bateriilor uzate conform prevederilor Uniunii Europene
În calitate de consumator, aveţi obligaţia legală de a restitui bateriile uzate. Restituirea nu se recompensează.
Eliminaţi bateriile uzate fie la locurile de colectare şi reciclare publice din oraşul sau comuna dvs., fie restituiţi bateriile
acolo de unde au fost cumpărate.
Aceste simboluri le găsiţi pe bateriile care conţin substanţe dăunătoare:
Pb = bateria conţine plumb
Cd = bateria conţine cadmiu
Hg = bateria conţine mercur
Li = bateria conţine litium
Condiţii privind garanţia
PfG asigură o garanţie de 2 ani de la data vânzării pentru defecte dovedite de material sau manoperă. Condiţia pentru
garanţie este prezentarea documentului de achiziţie. Dreptul de garanţie se pierde în cazul manipulării neadecvate, a
deteriorării electrice sau mecanice prin utilizare abuzivă, precum şi prin reparaţii neadecvate efectuate de ateliere ne-
autorizate. Reparaţiile trebuie efectuate numai de către PfG sau atelierele autorizate de PfG. În cazul solicitării garanţiei vă rugăm să trimiteţi, la PfG - cu transport plătit, aparatul pentru care efectuaţi reclamaţia sau piesa defectă,
împreună cu o descriere a defecţiunii şi documentul de achiziţie. PfG îşi păstrează dreptul de a lua în calcul costurile
de montare. PfG nu îşi asumă răspunderea pentru deteriorările datorate transportului. Acestea trebuie revendicate
neîntârziat transportatorului. Orice alte drepturi, indiferent de natura acestora, în mod special pentru daune rezultate,
sunt excluse. Această garanţie nu lezează drepturile consumatorului final faţă de comerciant.
75
Page 76

- BG -
- BG -
Превод на оригиналното упътване за употреба
Инструкции към настоящото упътване за употреба
С покупката на продуктаPondoSolar Island 250 Control Вие направихте добър избор.
Преди първото използване на уреда внимателно прочетете Ръководството и се запознайте с уреда. Всички
работи по и с този уред трябва да се изпълняват в съответствие с настоящето ръководство.
Непременно спазвайте инструкциите за безопасност за правилното и безопасно ползване.
Грижливо съхранете това
Символите в това упътване
A Препратка към една или повече фигури. В този пример: Препратка към фигура A.
Препратка към друга глава.
Размер на доставката
A Брой Описание
1 1 Поплавък с вграден соларен модул
2 4 Накрайник за дюзи
3 1 Държач за дюзи
4 1 Помпа със захранващ проводник
5 1 Дистанционно управление
Употреба по предназначение
PondoSolar Island 250 Control, нататък наричан "уред", може да се използва само така, както е описано по-долу:
За създаване на водни фонтани в изкуствени езера.
Уредът се използва с чиста вода.
Експлоатация при спазване на техническите данни.
За уреда са валидни следните ограничения:
Никога не използвайте уреда без вода.
Никога не използвайте други течности освен вода.
Не използвайте уреда заедно с химикали, хранителни продукти, лесно запалими или взривоопасни
вещества.
Указания за безопасност
ръководство. При смяна на собственика, моля, предайте и ръководството.
Този уред може да се използва от деца над 8 години, както и от
лица с ограничени физически, сензорни или умствени
способности или от лица, на които липсват опит и познания, ако
това се извършва под надзор или те бъдат инструктирани
относно безопасната употреба на уреда и разбират
възникващите вследствие на това опасности. Деца не бива да
играят с уреда. Почистването и потребителската поддръжка не
могат да се извършват от деца, ако те са без надзор.
76
Page 77

A
- BG -
Безопасна работа
Не носете, съответно не теглете уреда за захранващия кабел.
Използвайте само оригинални резервни части и оригинални аксесоари за уреда.
Електрически уреди и инсталации с изчислено напрежение U > 12 V AC или U >30 V DC, които са във вода:
Изключете захранващото напрежение на уредите и инсталациите, преди да бъркате във водата.
Използвайте помпата само с
Не оставяйте помпата да работи на сухо.
Избягвайте силни удари и сътресения на уреда.
Почиствайте уреда най-малко 2 пъти годишно.
Монтаж и свързване
Процедирайте по следния начин:
B, C
Изтеглете тапата от съединението.
– Тапата предпазва електрониката от вода.
– При изваден щекер поставяйте тапата.
Вкарайте свързващия проводник в буксата.
– Вкарайте щекера до упор в буксата, за да бъде съединението водонепроницаемо.
Вкарайте помпата в поплавъка.
Вкарайте дюзата в поплавъка.
Поставете поплавъка върху водната повърхност.
Пускане в експлоатация
Процедирайте по следния начин:
Акумулаторът на устройството не е зареден. Преди да използвате уреда за първи път го оставете един ден на
слънце. След това задействайте уреда с дистанционното управление.
Дистанционно управление
E
Обхватът на работа на дистанционното управление е не повече от 10 м.
Описание Функция
B
C
D
Определяне на времето на работа на помпата (макс.
4 h).
За презаписване на актуалната настройка изключете
помпата с бутон D и след това определете с бутон A
новото време на работа на помпата. След това
помпата се включва автоматично
Включване и изключване на светодиодите (светят само
на тъмно)
Настройка на дебита на помпата (5 степени)
Включване и изключване на помпата Кратко натискане на бутона
включения в обема на доставката соларен модул.
За всеки час натиснете бавно бутон 1 . Индикаторният
диод мига в съответствие
за работа на помпата.
Пример: Желано време за работа на помпата 3 h.
Натиснете бавно последователно бутон A 3 . Диодът
мига многократно последователно 3
Кратко натискане на бутона
За всяка степен натиснете бавно бутон 1
с актуално настроеното време
77
Page 78

- BG -
Отстраняване на повреди
Повреда Причина Помощ за отстраняване
Помпата не тръгва Няма връзка към соларния модул
Соларният модул е замърсен. Почистете
Работният елемент е блокиран Почистете
Капацитетът на акумулатора е изчерпан Зареждайте акумулатора мин. 4 часа.
Прекалено малко слънчево лъчение Насочете соларния модул към слънцето
Помпата изпомпва малко или
никак
Филтърът е запушен Отворете корпуса на филтъра, извадете
Модулът на дюзата е запушен Изтеглете модула на дюзата, почистете
Работният елемент е износен Сменете го
Прекалено малко слънчево лъчение Насочете соларния модул към слънцето
Капацитетът на акумулатора е изчерпан. Зареждайте акумулатора поне 4 часа
Светодиодите не светят Няма връзка към соларния модул
Светодиодното осветление е изключено Включване на светодиодното осветление
Твърде светла околна среда —
Капацитетът на акумулатора е изчерпан Зареждайте акумулатора мин. 4 часа.
Светодиодното осветление е замърсено Почистете
Светодиодното осветление е дефектно Изхвърлете
Уредът не може да се включи Батерията на дистанционното управление е
изтощена
Дистанционното управление е прекалено далече Спазвайте обхвата на работа на
Няма връзка към соларния модул
Почистване и поддръжка
При почистване или пауза уредът трябва да се извади от водата.
Почистете уреда
В никакъв случай не използвайте агресивни почистващи препарати или химически разтвори, тъй като
корпусът може да се повреди или да се наруши начинът на функциониране.
Препоръчани почистващи препарати при упорити варовикови отлагания:
– Домакински почистващ препарат без съдържание на оцет и хлор.
Процедирайте по следния начин:
Разглобете уреда.
Батерията е дефектна Изхвърлете уреда
Почистете корпуса на филтъра и работния елемент. (→ Смяна на двигателя)
Разглобете модула на дюзата.
Почистете всички части.
– Помогнете си с мека четка.
– Изплакнете частите с чиста вода.
Почистете соларния модул с влажна кърпа и избършете до сухо.
Сглобете уреда в обратна последователност.
Проверка на свързването към соларния
модул
Свързване на помпата към соларния
модул
Вкарайте щекера напълно (до упор) в
буксата.
филтъра и почистете
Свързване на светодиодното осветление
към соларния модул
Вкарайте щекера напълно (до упор) в
буксата.
Сменете го
дистанционното управление
Проверка на свързването към соларния
модул
Свързване на помпата към соларния
модул
Вкарайте щекера напълно (до упор) в
буксата.
78
Page 79

- BG -
Смяна на двигателя
Процедирайте по следния начин:
D
Изтеглете корпуса на филтъра от помпата.
Свалете и изплакнете филтърната пяна на тялото на филтъра.
Изтеглете капака на работния елемент и извадете работния елемент (капачка, повдигнете внимателно).
Извадете двигателя и го почистете или сменете.
Сглобете уреда в обратна последователност.
Сменете батерията
Процедирайте по следния начин:
F
Завъртете дистанционното управление и вдигнете капака.
Сменете батерията.
– Използвайте батерия тип "копче" тип CR 2032.
Отново затворете капачето.
Бързо износващи се части
Следните компоненти са бързо износващи се части и не подлежат на гаранционно обслужване:
Двигател и филтърна пяна
Акумулатори/батерии
Съхранение/зазимяване
Съблюдавайте допустимия диапазон на работната температура. ( Технически данни)
При надвишаване на граничните стойности или падане под тях трябва да деинсталирате уреда. Почистете
основно и проверете уреда за повреди.
Съхранявайте помпата потопена на защитено от замръзване място.
Изхвърляне
Този уред съдържа електронни детайли и не бива да се изхвърля като битов отпадък! Моля,
използвайте предвидената за целта система за обратно приемане. За смяна, свалете акумулаторите и
батериите от уреда и ги изхвърлете според предписанията.
Отстраняване като отпадък на батерии
Батериите да не се изхвърлят при битовите отпадъци. Изхвърляйте употребените батерии само чрез
предвидената за целта система за обратно приемане.
Изхвърляне като отпадък на батерии в рамките на Европейската общност
Като потребител сте задължени от закона да връщате употребените батерии. Връщането обратно не се
заплаща.
Отстранете
рециклиране във Вашия град или община, или върнете батериите там, където сте ги купили.
Следните знаци ще намерите върху съдържащите вредни вещества батерии:
Pb = батерията съдържа олово
Cd = батерията съдържа кадмий
Hg = батерията съдържа живак
Li = батерията съдържа литий
Гаранционни условия
PfG предоставя гаранция за доказуеми дефекти в материалите и при производството от 2 години от датата на
продажба. Изискване за използване на гаранцията е да представите документа за закупуване. При неправилна
работа с уреда, при електрическа или механична повреда поради невнимателна работа с уреда, както и при
ремонт от неоторизирани лица и
PfG или от оторизирани от PfG сервизи. Когато имате заявка за използване на гаранцията, изпратете уреда
или дефектната част с описание на дефекта и документа за закупуване до офиса/завода на PfG. PfG си
запазва правото да Ви начисли разходите по
транспортиране. Рекламации за тях трябва да предявите незабавно към транспортната фирма. Изключват се
по-големи претенции, от всякакъв вид, и по-специално за последвали индиректни щети. Тази гаранция не
засяга правото на претенции на краен клиент срещу търговеца.
като отпадък батериите или с помощта на обществената система за обратно приемане и
сервизи правото на гаранция се губи. Ремонти могат да се извършват само от
монтажа. PfG не носи отговорност за повреди при
79
Page 80

- UK -
- UK -
Переклад оригінального посібника з експлуатації
Вказівки до цієї інструкції з експлуатації
Придбавши дану продукцію PondoSolar Island 250 Control, Ви зробили гарний вибір.
Перед першим використанням пристрою ретельно прочитайте інструкцію з експлуатації і ознайомтеся з
пристроєм. Всі роботи з даним приладом та на ньому дозволяється проводити тільки при дотриманні умов цієї
інструкції по експлуатації.
Обов’язково дотримуйтеся правил техніки безпеки для правильного та безпечного використання пристрою
Ретельно зберігайте цю інструкцію з експлуатації. У випадку зміни власника передайте йому інструкцію з
експлуатації.
Символи, що використані у цій інструкції з експлуатації
A Посилання на один або кілька малюнків. У цьому прикладі: посилання на малюнок A.
Посилання на іншу главу.
Об’єм поставок
A Кількість Опис
1 1 Блок поплавців із вбудованою сонячною батареєю
2 4 Насадка форсунки
3 1 Тримач форсунки
4 1 Насос зі з'єднувальним кабелем
5 1 Пульт дистанційного керування
Використання пристрою за призначенням
PondoSolar Island 250 Control, надалі «Пристрій», використовувати лише як описано нижче.
Для створення водяних фонтанів у ставках.
Для експлуатації з чистою водою.
Експлуатація з дотриманням технічних характеристик.
На прилад поширюються наступні обмеження:
Ніколи не експлуатувати без подачі води.
Забороняється перекачувати за допомогою пристрою інші рідини, крім води.
Не допускати контакту з хімікатами, харчовими продуктами, легкозаймистими та вибуховими матеріалами
Правила техніки безпеки
.
Цим пристроєм дозволяється користуватися дітям від 8 років, а
також особам з обмеженими фізичними, сенсорними або
розумовими можливостями, а також з недостатнім досвідом та
знаннями, лише під наглядом або за умови, що вони
проінструктовані щодо безпечного використання приладу і
розуміють пов'язані з ним ризики. Не дозволяйте дітям грати з
пристроєм. Діти не повинні виконувати очищення або
обслуговування пристрою без нагляду.
80
Page 81

A
- UK -
Надійна експлуатація
Переносити чи тягнути пристрій за електричний кабель заборонено.
Використовуйте лише оригінальні запасні частини й оригінальне приладдя до пристрою.
Електричні пристрої та вмонтовані модулі з номінальною напругою U > 12 В змінного струму або U >30 В
постійного струму, які знаходяться у воді: слід вимикати напругу на пристроях і вмонтованих модулях, перш
ніж занурювати
Експлуатуйте насос тільки з трансформатором, що входить у комплект поставки сонячної батареї.
Насос не можна запускати без подачі води.
Уникайте сильних ударів та струсів.
Очищуйте прилад щонайменше двічі на рік.
Встановлення та підключення
Необхідно виконати наступні дії:
B, C
Витягнути заглушку з гнізда.
– Заглушка захищає електроніку від води.
– Від’єднавши штекер, вставити заглушку.
Вставити з’єднувальний кабель у гніздо.
– Вставити штекер до упору в гніздо, щоб приєднання було водонепроникним.
Прикріпити насос до блока поплавців.
Підключити пристрій форсунки до блока поплавців.
Установити блок поплавців на поверхні води.
Введення в експлуатацію
Необхідно виконати наступні дії:
Акумулятор пристрою не заряджено. Перед першим використанням пристрій необхідно залишити на один день
під сонячним випромінюванням. Потім можна керувати пристроєм за допомогою пульту дистанційного
управління.
Пульт дистанційного керування
E
Робочий діапазон дистанційного керування становить максимум 10 м.
Опис Функція
B
C
D
у воду.
Задати тривалість експлуатації насоса (макс. 4 год).
Для перезапису дійсного налаштування вимкнути
насос кнопкою D, а потім за допомогою кнопки A
встановити новий час експлуатації насоса. Після цього
насос запускається автоматично.
Увімкнення й вимкнення (світяться тільки в темряві) Коротко натиснути кнопку
Встановити потужність насоса (5 рівнів)
Увімкнення та вимкнення насоса Коротко натиснути кнопку
Кожну годину 1 повільно натискати кнопку. Діод
сповіщення буде блимати відповідно до кожного
встановленого часу експлуатації насоса.
Приклад.
Щоб обрати бажаний вид експлуатації насоса
на кожні 3 год
послідовно натискати кнопку A 3 . Діод блимає
послідовно кілька разів підряд 3
Для кожного рівня 1 повільно натискати кнопку.
81
Page 82

- UK -
Усунення несправностей
Несправність Причина Усунення
Насос не запускається Немає з’єднання зі сонячною батареєю
Сонячна батарея забруднена Почистити
Турбіна заблокована Почистити
Об'єм акумулятора вичерпаний Акумулятор заряджається протягом мін.
Замале сонячне випромінювання Вирівняти сонячну батарею відносно сонця
Насос ледь працює або не працює Забився фільтр Зняти корпус фільтра, вийняти фільтр і
Забився пристрій форсунки Зняти пристрій форсунки, почистити
Турбіна зносилася Замінити
Замале сонячне випромінювання Вирівняти сонячну батарею відносно сонця
Об'єм акумулятора вичерпаний. Акумулятор заряджається щонайменше
Світлодіоди не світяться Немає з’єднання зі сонячною батареєю
Світлодіодне освітлення вимкнене Увімкнення світлодіодного освітлення
Забагато світла в навколишньому середовищі —
Об'єм акумулятора вичерпаний Акумулятор заряджається протягом мін.
Світлодіодне освітлення забруднене Почистити
Світлодіодне освітлення несправне Утилізувати
Пристрій не вмикається Об'єм батареї дистанційного обслуговування
вичерпано
Пульт дистанційного керування знаходиться надто
далеко
Немає з’єднання зі сонячною батареєю
Чистка і догляд
Для чистки або обслуговування пристрою його необхідно виймати з води.
Пристрій очистити
У жодному випадку не застосовуйте агресивні мийні засоби або хімічні розчини, тому що вони можуть
пошкодити корпус або негативно вплинути на функціонування приладу.
Рекомендовані засоби для чищення при стійкому вапняному відкладенні:
– Побутові засоби для чищення на основі оцтової кислоти та хлору.
Необхідно виконати наступні дії:
Розібрати пристрій.
Акумулятор несправний Утилізувати прилад
Почистити корпус фільтра й турбіну. (→ Заміна турбіни)
Розібрати пристрій форсунки.
Почистити всі деталі.
– Для допомоги можна застосувати м'яку щітку.
– Промити всі деталі чистою водою.
Почистити сонячну батарею вологою ганчіркою для пилу та витерти насухо.
Зібрати пристрій у зворотній послідовності.
Перевірити приєднання до сонячної
батареї
Приєднати насос до сонячної батареї
Вставити штекер повністю (до упору) в
гніздо
4 годин
почистити
4 години
Приєднати світлодіодне освітлення до
сонячної батареї
Вставити штекер повністю (до упору) в
гніздо
4 годин
Замінити
Звернути увагу на діапазон дистанційного
керування
Перевірити приєднання до сонячної
батареї
Приєднати насос до сонячної батареї
Вставити штекер повністю (до упору) в
гніздо
82
Page 83

- UK -
Заміна турбіни
Необхідно виконати наступні дії:
D
Зняти корпус фільтра з насоса.
Вийняти та промити фільтрувальну губку з корпуса фільтра.
Зняти кришку турбіни (замок, обережно привести в дію важіль).
Витягти й почистити турбіну або замінити її.
Зібрати пристрій у зворотній послідовності.
Замінити батарею
Необхідно виконати наступні дії:
F
Повернути пульт дистанційного керування та зняти кришку.
Замінити батарейку.
– Використати мініатюрний елемент живлення типу CR 2032.
Знову закрити кришку.
Деталі, що швидко зношуються
Указані компоненти відносяться до деталей, що швидко зношуються; дія умов гарантії на них не поширюється:
Турбіна та фільтр із піноматеріалу
Акумулятори/батареї
Збереження пристрою, в т. ч. взимку
Будь ласка, враховуйте зону дозволеної робочої температури : ( Технічні характеристики)
У випадку перевищення або недоліку межових значень необхідно демонтувати пристрій. Проведіть ретельне
очищення й перевірте пристрій на наявність ушкоджень.
Занурте насос у воду та забезпечте захист від замерзання.
Утилізація
Цей пристрій містить електронні деталі і його заборонено утилізувати разом із побутовими відходами!
Його слід утилізувати, звернувшись до спеціальної системи повернення. Необхідно видалити зі
пристрою акумулятори й батареї, придатні для заміни, та утилізувати їх окремо.
Утилізація акумуляторів
Акумулятори не можна викидати разом с побутовим сміттям. Утилізуйте використані акумулятори тільки через
передбачену для цього систему повернення.
Утилізація акумуляторів в межах Європейської співдружності
Як споживач ви за законом зобов’язані повертати використані акумулятори. Повернення є безкоштовним.
Утилізуйте акумулятора або через загальнодоступні системи повернення у вашому місті чи громаді
повертайте акумуляторі туди, де вони були придбані.
Такі позначення ви знайдете на акумуляторах, що містять токсичні речовини:
Pb = акумулятор містить свинець
Cd = акумулятор містить кадмій
Hg = акумулятор містить ртуть
Li = акумулятор містить літій
Умови гарантії
Компанія PfG надає 2 роки гарантії, починаючи від дати продажу, на всі доведені випадки дефектів у
матеріалах чи дефектів виробництва. Передумовою надання гарантійних послуг є пред’явлення документа,
який засвідчує факт придбання пристрою. Покупець втрачає право на гарантійне обслуговування у випадку
використання пристрою не за призначенням, електричного чи механічного пошкодження, яке виникло в
результаті неправильного використання, а також у випадку виконання ремонтних робіт в не уповноваженій
майстерні. Ремонтні роботи можуть виконуватися лише компанією PfG та уповноваженими нею майстернями.
Разом із заявкою на надання послуг у рамках гарантії необхідно відправити бракований пристрій або
компонент, опис пошкодження і документ, який засвідчує придбання (на умовах врахування вартості
додому). Компанія PfG залишає за собою право включити у рахунок вартість монтажу. Компанія PfG не
відповідає за пошкодження, які виникли у процесі транспортування. У таких випадках звертайтеся за
відшкодуванням збитків до перевізника. Інші претензії, незалежно від їхнього характеру, особливо на
відшкодування опосередкованих збитків, цією гарантією не передбачені. Ця гарантія не регулює
взаємовідносини
між покупцем і продавцем пристрою.
, або
доставки
83
Page 84

- RU -
- RU -
Перевод руководства по эксплуатации - оригинала
Указания к настоящему руководству по эксплуатации
Приобретя данную продукцию PondoSolar Island 250 Control, Вы сделали хороший выбор.
Перед первым использованием прибора тщательно прочитайте инструкцию по эксплуатации и ознакомьтесь с
прибором. Все работы с данным прибором и на нем разрешается проводить только при соблюдении условий
данного руководства по эксплуатации.
Для обеспечения правильной и безопасной эксплуатации обязательно соблюдайте инструкции по технике
безопасности
.
Тщательно храните данную инструкцию по эксплуатации. В случае изменения владельца, передайте ему также
и инструкцию по эксплуатации.
Символы, используемые в данном руководстве по эксплуатации
A Ссылка на один или несколько рисунков. В этом примере: ссылка на рис. А.
Ссылка на другую главу.
Объём поставок
A Количество Описание
1 1 Поплавковый узел со встроенным солнечным модулем
2 4 Насадка сопел
3 1 Держатель сопел
4 1 Насос с линией подсоединения
5 1 Дистанционное управление
Использование прибора по назначению
PondoSolar Island 250 Control, далее называемое "Устройство", разрешается использовать исключительно так,
как указано ниже:
Для выработки водяного фонтана в прудах.
Для эксплуатации с чистой водой.
Эксплуатация при соблюдении технических данных.
На прибор распространяются следующие ограничения:
Никогда не эксплуатируйте без протока воды.
Никогда на перекачивайте другие жидкости, кроме воды.
Не использовать в контакте с химикатами, пищевыми продуктами, легковоспламеняющимися или
взрывчатыми материалами.
Указания по мерам предосторожности
Дети от 8 лет и старше, а также люди с ограниченными физическими,
органолептическими или ментальными возможностями, люди с
небольшим опытом и объемом знаний могут пользоваться этим
устройством, находясь при этом под контролем взрослых или получив
от них советы по безопасному обращению с устройством и поняв
опасности при работе с ним. Дети не должны играть с устройством.
Дети не должны чистить или ремонтировать устройство без
надлежащего контроля со стороны взрослых.
84
Page 85

A
- RU -
Надёжная эксплуатация
Не переносите и не тяните устройство, держа его за электрический кабель!
Используйте только оригинальные запасные части и оригинальные комплектующие к устройству.
Электрические приборы и установки с расчетным номинальным напряжением U > 12 В переменного тока
или U > 30 В постоянного тока, которые находятся в воде: перед прикосновением к воде отключите
напряжение, подаваемое на
Эксплуатируйте насос только с солнечным модулем, входящим в комплект поставки.
Не оставляйте насос работать вхолостую!
Избегайте сильных ударов и сотрясений прибора.
Чистку прибора осуществляйте не менее 2 раз в год.
Установка и подсоединение
Необходимо выполнить следующие действия:
B, C
Снять пробку с соединения.
– Пробка защищает электронику от воды.
– Вставить пробку при вынутой вилке.
Вставить соединительный кабель в гнездо.
– Полностью вставить вилку в гнездо (до упора), чтобы соединение было водонепроницаемым.
Насадить насос на поплавковый узел.
Насадить узел сопел на поплавковый узел.
Разместить поплавковый узел на поверхности воды.
Пуск в эксплуатацию
Необходимо выполнить следующие действия:
Аккумулятор устройства не заряжен. Перед первым включением устройство примерно на 1 день оставить на
солнце. Затем управлять прибором с помощью дистанционного управления.
Дистанционное управление
E
Радиус действия дистанционного управления составляет не более 10 м.
Описание Функция
B
C
D
Установить время работы насоса (макс. 4 ч.).
Для переписывания текущих настроек выключить
насос кнопкой D и затем задать новое время работы
насоса с помощью кнопки A. Насос запускается
автоматически.
Включение и выключение светодиодов (горят только в
темноте)
Настроить подачу насоса (5 ступеней).
Включение и выключение насоса Коротко нажать на кнопку.
приборы и установки.
Медленно нажимать на кнопку для каждого часа 1 .
Диод индикатора мигает в соответствии с заданными
временем работы насоса.
Пример: Необходимо
Медленно последовательно нажмите на кнопку A 3 .
Диод мигает несколько раз подряд 3 .
время работы насоса 3 ч.
Коротко нажать на кнопку.
Медленно нажимать на кнопку для каждого этапа 1 .
85
Page 86

- RU -
Устранение неисправностей
Неисправность Причина Устранение неисправности
Насос не запускается Нет соединения с солнечным модулем
Солнечный модуль загрязнен Очистить
Рабочий узел заблокирован Очистить
Емкость аккумулятора исчерпана Заряжать аккумулятор не менее 4 часов.
Воздействие солнечных лучей слишком низкое Направить солнечный модуль к солнцу.
Насос с трудом перекачивает
жидкость или совсем не
перекачивает
Забит фильтр Снять корпус фильтра, достать и почистить
Забит узел сопел Извлечь узел сопел, почистить
Рабочий узел изношен Заменить
Воздействие солнечных лучей слишком низкое Направить солнечный модуль к солнцу.
Емкость аккумулятора исчерпана Заряжать аккумулятор не менее 4 часов.
Светодиоды не светятся Нет соединения с солнечным модулем
Светодиодное освещение выключено Включение светодиодного освещения
Вокруг слишком светло —
Емкость аккумулятора исчерпана Заряжать аккумулятор не менее 4 часов.
Светодиодное освещение загрязнено Очистить
Светодиодное освещение неисправно Выполнить утилизацию
Прибор не включается Емкость аккумулятора дистанционного управления
исчерпана
Пульт дистанционного управления слишком далеко Соблюдать радиус действия
Нет соединения с солнечным модулем
Очистка и уход
Устройство для чистки или техобслуживания должно быть извлечено из воды.
Прочистить прибор
Ни в коем случае не применяйте агрессивные моющие средства или химические растворы, так как они могут
разрушить корпус или отрицательно воздействовать на функционирование прибора.
Рекомендуемое чистящее средство при стойких отложениях извести:
– Бытовое моющее средство без содержания хлора и уксуса.
Необходимо выполнить следующие действия:
Разобрать прибор.
Аккумулятор поврежден Утилизация устройства
Очистить корпус фильтра и рабочий узел. (→ Замена рабочего узла)
Раздвинуть узел сопел.
Очистить все детали.
– Для этой цели использовать мягкую щетку.
– Промыть детали чистой водой.
Солнечный модуль почистить влажной тряпкой и вытереть насухо.
Собрать прибор в обратной последовательности.
Проверить соединение с солнечным
модулем.
Подключить насос к солнечному модулю.
Полностью вставить вилку в гнездо (до
упора).
фильтр.
Подключить светодиодное освещение к
солнечному модулю
Полностью вставить вилку в гнездо (до
упора).
Заменить
дистанционного управления.
Проверить соединение с солнечным
модулем.
Подключить насос к солнечному модулю.
Полностью вставить вилку в гнездо (до
упора).
86
Page 87

- RU -
Замена рабочего узла
Необходимо выполнить следующие действия:
D
Снять корпус фильтра с насоса.
Снять фильтрующую губку с корпуса фильтра и промыть.
Снять крышку рабочего узла (клапанный замок, осторожно извлечь).
Извлечь рабочий узел и почистить его или заменить.
Собрать прибор в обратной последовательности.
Заменить батарею
Необходимо выполнить следующие действия:
F
Перевернуть пульт дистанционного управления и снять крышку.
Заменить аккумулятор.
– Использовать кнопочный элемент типа CR 2032.
Снова закрыть крышку.
Изнашивающиеся детали
Следующие компоненты являются изнашивающимися частями, на них гарантия не распространяется:
Рабочий узел и поплавковая губка
Аккумуляторы/батарейки
Хранение прибора, в т.ч. зимой
Соблюдайте допустимый температурный диапазон! ( Технические данные)
При превышении либо недостижении пороговых значений разберите прибор. Выполните тщательную
очистку и проверьте прибор на наличие повреждений.
Храните насос погруженным в емкость с водой в защищенном от мороза месте.
Утилизация
Не утилизировать данный прибор вместе с домашним мусором, так как он содержит электрические
детали! Используйте предусмотренную для этого систему. Извлеките из прибора предназначенные
для замены аккумуляторы и батарейки и утилизируйте их отдельно.
Утилизация аккумуляторов
Аккумуляторы нельзя выбрасывать вместе с бытовым мусором. Утилизируйте использованные аккумуляторы
только через предусмотренную для этого систему возврата.
Утилизация аккумуляторов на территории Европейского сообщества
Как потребитель вы по закону обязаны возвращать использованные аккумуляторы. Возврат является
бесплатным.
Утилизируйте аккумуляторы либо через общедоступные системы возврата в вашем городе, либо возвращайте
аккумуляторы туда
Эти знаки вы найдете на аккумуляторах, содержащих токсичные вещества:
Pb = аккумулятор содержит свинец
Cd = аккумулятор содержит кадмий
Hg = аккумулятор содержит ртуть
Li = аккумулятор содержит литий
Гарантийные условия
Фирма PfG дает 2-годичную гарантию, начиная с даты продажи, на доказуемые дефекты материала и
изготовления. Условием предоставления гарантийных услуг является предъявление кассового чека.
Гарантийное требование теряется при ненадлежащем обращении, электрическом или механическом
повреждении в результате неправильного применения, а также при ненадлежащем ремонте, выполненном
неавторизованной мастерской. Ремонт разрешается выполнять только фирме PfG или мастерской
авторизованной фирмой PfG. При предъявлении гарантийных требований высылайте рекламационный прибор
или дефектную часть с описанием дефекта и кассовым чеком, включая стоимость доставки, на фирму PfG.
Фирма PfG оставляет за собой право выставить счет на монтажные работы. За повреждения, возникшие при
транспортировке, фирма PfG ответственности не несет. О них необходимо немедленно заявить транспортной
фирме. Другие
затрагивает требований конечного заказчика по отношению к дилерам.
, где они был приобретен.
,
притязания любого рода, в частности, косвенный ущерб, исключаются. Данная гарантия не
87
Page 88

A
let
tuur
ante
Température am-bi-
Omgevingstempera-
Ambient temperature
ente
Temperatura ambi-
Temperatura ambiente
Temperatura ambiente
tur
Omgivnings-tempera-
Környezeti hőmérsék-
tredia
Teplota prostředí
Teplota okolitého pros-
Temperatura ambiantă
середовища
температура
Температура
Окружающая
навколишнього
Околна температура
Water temperature
Fountain height
height
Max. head
Max. flow rate
Max. power
Température de l’eau
Hauteur de jet
d'eau
Colonne
Capacité de refou-lement
Rendement max.
Watertemperatuur
Fonteinhoogte
ater-kolom
eit W
Pompcapacit
Max. capaciteit
Temperatura del agua
La altura del surtidor
agua
Columna de
Capacidad de ele-vación
Potencia máxima
Temperatura da água
Altura do repuxo
Altezza della fontana Temperatura dell'ac-
água
Coluna de
Colonna d'ac-
Débito
Portata
Potenza max.
Potência máx.
qua
Teplota vody
Teplota vody
Vízhőmérséklet
Vattentemperatur
ænehøjde Vandtemperaturen Omgivelsestemperatur
Fontänhöjd
Szökőkút magasság
le Font
qua
Vannsøyle Fontenehøyde Vanntemperatur Omgivelsestemperatur
et
Kapasit
Matningsprestanda Vatten-pelare
Szállítási teljesítmény Vízoszlop
kt
ax. effekt
M
Maks. effe
Max. teljesítmény
Výška fontány
Vodní
Dopravní výkon
Max. výkon
Výška fontán
sloupec
Dopravný výkon Vodný stĺpec
Max. výkon
Înălţimea fântânii
Coloană de
Puterea max.
Temperatura apei
apă
Debit de pompare
водата
Температура води
Температура воды
Висота фонтана
Височина на фонтана Температурата на
Дебит Воден стълб
Макс. мощност
Высота фонтана
стовп
столб
Водяний
Водяной
Продуктивність
Производительность
Макс. мощность
Макс. продуктивність
≥ +4 °C
kspänning
ed voltage
ensions Rat
Dim
Abmessungen Bemessungsspannung Max. Leistung Förderleistung Wassersäule Fontänenhöhe Wassertemperatur Umgebungstemperatur
DE
EN
ension de mesure
ensions T
Dim
FR
NL
ensión asignad
ensiones T
Afmetingen Dimensioneringsspanning
Dim
ES
agem considerada
Volt
Dimensões
PT
espenning
erk
re mär
M
öv
Mål
Dimensioner Nominel spænding Maks. effekt Pumpekapacitet Vandsøj
D
NO
Mått
SV
Dimensioni Tensione di taratura
IT
namionowe Moc maks. Wydajność pompo-wania Słup wody Wysokość fontanny Temperatura wody Temperatura otoczenia
rt feszültség
ezovací napětí
enzačné napätie
dom
napięcie z
Wymiary
PL
Rozměry
CS
y dim
Rozmer
SK
k mé
Mitat mitoitusjännite Maksimiteho Pumpun teho Vesipatsas Suihkulähteen korkeus Veden lämpötila Ympäristön lämpötila
Mérete
FI
HU
Dimenzije dimenzionirana nape-tost Maks. zmogljivost Črpalna zmogljivost Vodni ste-ber Višina fontane Temperatura vode emperatura okolice
SL
Dimenzije gornji nazivni napon Maks. snaga Protočni kapacitet Vodeni stup Visina vodoskoka Temperatura vode Temperatura okoline
HR
ensiunea măsurată
ensiuni t
Dim
RO
6 V DC …8.5 V DC ≤ 250 l/h ≤ 0.6 m ≤ 0.6 m + 4 … + 35 °C
Размеры расчетное напряжение
RU
30 mm
60 mm×40 mm ×
Розміри розрахункова напруга
Размери номинално напрежение
BG
UK
5 V DC 1.4 W
mm
270
88
Page 89

IP 68
DE
EN
FR
NL
ES
PT
IT
DA
NO
SV
FI
HU
PL
CS
SK
SL
HR
RO
BG
UK
RU
Staubdicht. Wasserdicht bis 0.6 m Tiefe Nicht mit normalem Hausmüll entsorgen! Achtung!
Dust tight. Submersible to 0.6 m depth. Do not dispose of together with household
Imperméable aux poussières. Etanche à
l'eau jusqu'à une profondeur de 0.6 m
Stofdicht. Waterdicht tot een diepte van 0.6 m Niet bij het normale huisvuil doen! Let op!
A prueba de polvo. Impermeable al agua
hasta 0.6 m de profundidad
À prova de pó. À prova de água até 0.6 m
A tenuta di polvere. Impermeabile all'acqua
Prachotěsný. Vodotěsný do hloubky 0.6 m Nelikvidovat v normálním komunálním
Ne prepušča prahu. Vodotesno do globine
Ne propušta prašinu. Ne propušta vodu do
Пилонепроникний. Водонепроникний до
водонепроницаемый на глубине до 0.6 м
de profundidade.
fino a 0.6 m di profondità.
Støvtæt. Vandtæt ned til 0.6 m dybde Må ikke bortskaffes med det almindelige
Støvtett. Vanntett ned til 0.6 m dyp Ikke kast i alminnelig husholdningsavfall! NB!
Dammtät. Vattentät till 0.6 m djup Får inte kastas i hushållssoporna! Varning!
Pölytiivis. Vesitiivis 0.6 m syvyyteen asti. Älä hävitä laitetta tavallisen talousjätteen
Portömített. Vízálló 0.6 m-es mélységig A készüléket nem a normál háztartási
Pyłoszczelny. Wodoszczelny do 0.6 m
Prachotesný. Vodotesný do hĺbky 0.6 m Nelikvidovať v normálnom komunálnom
Etanş la praf. Etanş la apă până la o
Защитено от прах. Водоустойчив до
głębokości.
0.6 m.
0.6 m dubine.
adâncime de 0.6 m.
дълбочина 0.6 м
0.6 м
Пыленепроницаемый,
0.6 m
Ne pas recycler dans les ordures ména-
¡No deseche el equipo en la basura
Non smaltire con normali rifiuti domestici! Attenzione!
szeméttel együtt kell megsemmisíteni!
Nie wyrzucać wraz ze śmieciami
Ne zavrzite skupaj z gospodinjskimi
Nemojte ga bacati u običan kućni otpad! Pažnja!
Nu aruncaţi în gunoiul menajer ! Atenţie !
Не изхвърляйте заедно с обикновения
Не викидайте разом із побутовим
Не утилизировать вместе с домашним
waste!
gères !
doméstica!
Não deitar ao lixo doméstico! Atenção!
husholdningsaffald
kanssa!
domowymi!
odpadu!
odpade!
odpadki!
домакински боклук!
сміттям!
мусором!
Lesen Sie die Gebrauchsanleitung
Przeczytać instrukcję użytkowania!
Attention!
Read the operating instructions
Attention !
Lire la notice d'emploi
Lees de gebruiksaanwijzing
¡Atención!
Lea las instrucciones de uso
Leia as instruções de utilização
Leggete le istruzioni d'uso!
OBS!
Læs brugsanvisningen
Les bruksanvisningen
Läs igenom bruksanvisningen
Huomio!
Lue käyttöohje
Figyelem!
Olvassa el a használati útmutatót
Uwaga!
Pozor!
Přečtěte Návod k použití!
Pozor!
Prečítajte si Návod na použitie
Pozor!
Preberite navodila za uporabo!
Pročitajte upute za upotrebu!
Citiţi instrucţiunile de utilizare !
Внимание!
Прочетете упътването
Увага!
Читайте інструкцію.
Внимание!
Прочитайте инструкцию по
использованию
89
Page 90

90
PSO0057
Page 91

Page 92

PfG GmbH
Tecklenburger Straße 161
D - 48469 Hörstel
Germany
www.pontec.com
43346/09-15
 Loading...