


USER GUIDE
Part Number 370-0125-02
© 2002 PolyVision Corporation
All rights reserved
Printed in the USA

Information in this document is subject to change without notice.
Reproduction in any manner without written permission of
PolyVision Corporation is forbidden.
PolyVision Corporation reserves the right to make changes in
product design, or detail, and to discontinue any product or
material without notice.
Webster is a trademark of PolyVision Corporation, a Steelcase
Company. All other registered trademarks and trademarks used
herein are the property of their respective owners.

Overview . . . . . . . . . . . . . . . . . . . . . . . . . . . . . . . . . . . . . . . . . . . . . . . . . .1
What is Webster? . . . . . . . . . . . . . . . . . . . . . . . . . . . . . . . . . . . . . . . 1
Many Ways to Use Webster . . . . . . . . . . . . . . . . . . . . . . . . . . . . . 1
About This Manual . . . . . . . . . . . . . . . . . . . . . . . . . . . . . . . . . . . . . . 3
Installing the Webster TS Whiteboard . . . . . . . . . . . . . . . . . . . . . . . . . . 4
What Comes in the Box (TS Models Only). . . . . . . . . . . . . . . . . . . . 5
Mounting Your Webster TS Whiteboard on a Wall . . . . . . . . . . . . . 6
Connecting Your Webster TS Whiteboard . . . . . . . . . . . . . . . . . . . . 7
Installing the Webster LT Whiteboard . . . . . . . . . . . . . . . . . . . . . . . . . . 9
What Comes in the Box (LT Models Only) . . . . . . . . . . . . . . . . . . . 10
Mounting Your Webster LT Whiteboard on a Wall . . . . . . . . . . . . 11
Connecting Your Webster LT Whiteboard . . . . . . . . . . . . . . . . . . . 15
LT Whiteboard Automatic Power Down . . . . . . . . . . . . . . . . . . . . . 17
Installing Webster Software . . . . . . . . . . . . . . . . . . . . . . . . . . . . . . . . . .18
Whiteboard System Requirements . . . . . . . . . . . . . . . . . . . . . . . . 18
Installing Webster Software in Windows. . . . . . . . . . . . . . . . . . . . 19
Installing Webster Software on a Macintosh . . . . . . . . . . . . . . . . 19
Starting Webster Software . . . . . . . . . . . . . . . . . . . . . . . . . . . . . . . 20
LT Whiteboard Calibration . . . . . . . . . . . . . . . . . . . . . . . . . . . . . 20
Establishing Communication between the Board and Computer 20
Uninstalling Webster Software . . . . . . . . . . . . . . . . . . . . . . . . . . . 21
Using Multiple Whiteboards . . . . . . . . . . . . . . . . . . . . . . . . . . . . . 22
Multiple Whiteboards in Windows . . . . . . . . . . . . . . . . . . . . . . 22
Multiple Whiteboards on a Macintosh . . . . . . . . . . . . . . . . . . . 22
Register Webster. . . . . . . . . . . . . . . . . . . . . . . . . . . . . . . . . . . . . . . 23
Webster Basics . . . . . . . . . . . . . . . . . . . . . . . . . . . . . . . . . . . . . . . . . . . 24
How Webster Works . . . . . . . . . . . . . . . . . . . . . . . . . . . . . . . . . . . . 24
Writing on the Board . . . . . . . . . . . . . . . . . . . . . . . . . . . . . . . . . 24
Erasing the Board. . . . . . . . . . . . . . . . . . . . . . . . . . . . . . . . . . . . 25
Printing the Board . . . . . . . . . . . . . . . . . . . . . . . . . . . . . . . . . . . 26
Capturing a Snapshot of the Board. . . . . . . . . . . . . . . . . . . . . . 26
Getting Started with Webster Tools . . . . . . . . . . . . . . . . . . . . . . . . . . . 27
Webster Whiteboard Icons. . . . . . . . . . . . . . . . . . . . . . . . . . . . . . . 28
I

Sounds . . . . . . . . . . . . . . . . . . . . . . . . . . . . . . . . . . . . . . . . . . . . . . 29
Sounds on Webster TS Whiteboards . . . . . . . . . . . . . . . . . . . . 29
Sounds on Webster LT Whiteboards. . . . . . . . . . . . . . . . . . . . . 29
Getting to Know the Software . . . . . . . . . . . . . . . . . . . . . . . . . . . . 29
The Webster Software Main Window . . . . . . . . . . . . . . . . . . . . 30
The Webster Command Toolbar in Windows . . . . . . . . . . . . . . 31
The Webster Annotation Toolbar. . . . . . . . . . . . . . . . . . . . . . . . 32
The Annotation Toolbar in Full Screen View . . . . . . . . . . . . . . 33
Showing, Hiding, and Moving the Toolbars . . . . . . . . . . . . . . . 34
Whiteboard Pens and Eraser . . . . . . . . . . . . . . . . . . . . . . . . . . . . . 34
Writing and Erasing with Webster TS Models. . . . . . . . . . . . . . 35
Writing and Erasing with Webster LT Models . . . . . . . . . . . . . . 35
Writing and Erasing with Webster IPD and IRP Models . . . . . . 36
Using Webster with a Projector . . . . . . . . . . . . . . . . . . . . . . . . . . . . . . .37
Getting Started in Projection Mode . . . . . . . . . . . . . . . . . . . . . . . . 37
Alignment If You are Already in Projection Mode. . . . . . . . . . . 39
Using Webster in Projection Mode . . . . . . . . . . . . . . . . . . . . . . . . 39
The Projection Toolbar . . . . . . . . . . . . . . . . . . . . . . . . . . . . . . . . 40
Projection Mark-Ups. . . . . . . . . . . . . . . . . . . . . . . . . . . . . . . . . . . . 42
Snapshots in Other Applications . . . . . . . . . . . . . . . . . . . . . . . 42
Snapshots When Webster is the Active Application . . . . . . . . 43
Toggling Between Webster and Other Applications. . . . . . . . . . . 44
Using the On-Screen Keyboard . . . . . . . . . . . . . . . . . . . . . . . . . . . 44
Using Projection with PowerPoint . . . . . . . . . . . . . . . . . . . . . . . . . 45
Printing in Projection Mode . . . . . . . . . . . . . . . . . . . . . . . . . . . . . . 46
Working with Snapshots . . . . . . . . . . . . . . . . . . . . . . . . . . . . . . . . . . . .47
Creating a Snapshot. . . . . . . . . . . . . . . . . . . . . . . . . . . . . . . . . . . . 47
Taking Automatic Snapshots. . . . . . . . . . . . . . . . . . . . . . . . . . . 48
Viewing Snapshots. . . . . . . . . . . . . . . . . . . . . . . . . . . . . . . . . . . . . 49
Selecting Snapshots . . . . . . . . . . . . . . . . . . . . . . . . . . . . . . . . . . . 50
Working with Webster Files . . . . . . . . . . . . . . . . . . . . . . . . . . . . . . 50
Creating a File. . . . . . . . . . . . . . . . . . . . . . . . . . . . . . . . . . . . . . . 51
Saving a File . . . . . . . . . . . . . . . . . . . . . . . . . . . . . . . . . . . . . . . . 51
Opening a File. . . . . . . . . . . . . . . . . . . . . . . . . . . . . . . . . . . . . . . 52
Closing a File . . . . . . . . . . . . . . . . . . . . . . . . . . . . . . . . . . . . . . . 52
Password Protecting a File in Windows . . . . . . . . . . . . . . . . . . 52
Playing Back Snapshots. . . . . . . . . . . . . . . . . . . . . . . . . . . . . . . . . 53
II

Copying and Moving Snapshots . . . . . . . . . . . . . . . . . . . . . . . . . . 54
Exporting Snapshots . . . . . . . . . . . . . . . . . . . . . . . . . . . . . . . . . . . 55
Renaming Snapshots. . . . . . . . . . . . . . . . . . . . . . . . . . . . . . . . . . . 56
Deleting Snapshots . . . . . . . . . . . . . . . . . . . . . . . . . . . . . . . . . . . . 56
Editing Snapshots . . . . . . . . . . . . . . . . . . . . . . . . . . . . . . . . . . . . . 57
Printing Snapshots in Windows . . . . . . . . . . . . . . . . . . . . . . . . . . 58
Printing Colors in Windows . . . . . . . . . . . . . . . . . . . . . . . . . . . . 58
Customizing Headers and Footers in Windows . . . . . . . . . . . . 59
Printing Resolution. . . . . . . . . . . . . . . . . . . . . . . . . . . . . . . . . . . 62
Printing Snapshots on a Macintosh . . . . . . . . . . . . . . . . . . . . . . . 63
Adding a Backdrop to a Snapshot. . . . . . . . . . . . . . . . . . . . . . . . . 64
Creating a Backdrop File . . . . . . . . . . . . . . . . . . . . . . . . . . . . . . 65
Adding a Backdrop File to a Snapshot . . . . . . . . . . . . . . . . . . . 65
Inserting a Screen Shot as a Backdrop in Windows . . . . . . . . 66
Changing or Removing a Backdrop. . . . . . . . . . . . . . . . . . . . . . 67
Backdrops Provided with Webster . . . . . . . . . . . . . . . . . . . . . . 67
Sending a Snapshot via E-mail . . . . . . . . . . . . . . . . . . . . . . . . . . . 68
Publishing a Snapshot as HTML or Adobe PDF. . . . . . . . . . . . . . . 70
NetMeeting and Webster . . . . . . . . . . . . . . . . . . . . . . . . . . . . . . . . . . . .72
NetMeeting Requirements . . . . . . . . . . . . . . . . . . . . . . . . . . . . . . . 72
Using Webster in a NetMeeting Conference . . . . . . . . . . . . . . . . . 72
Sharing the Webster Software in NetMeeting . . . . . . . . . . . . . 72
Using Webster with the NetMeeting Whiteboard. . . . . . . . . . . 73
Using the Conference Control Center . . . . . . . . . . . . . . . . . . . . 74
Conference View Preferences . . . . . . . . . . . . . . . . . . . . . . . . . . 75
Using Webster Projection Mode with NetMeeting . . . . . . . . . . . . 76
Scrolling While Shared . . . . . . . . . . . . . . . . . . . . . . . . . . . . . . . 77
Troubleshooting NetMeeting. . . . . . . . . . . . . . . . . . . . . . . . . . . . . 77
Webster Options . . . . . . . . . . . . . . . . . . . . . . . . . . . . . . . . . . . . . . . . . . .79
Customizing General Options . . . . . . . . . . . . . . . . . . . . . . . . . . . . 79
Customizing Pens and Erasers . . . . . . . . . . . . . . . . . . . . . . . . . . . 80
Customizing Sounds (TS Models Only). . . . . . . . . . . . . . . . . . . . . 82
Customizing Image Export . . . . . . . . . . . . . . . . . . . . . . . . . . . . . . . 83
Customizing Projection Mode Settings. . . . . . . . . . . . . . . . . . . . . 85
Customizing Playback Options . . . . . . . . . . . . . . . . . . . . . . . . . . . 86
Customizing Backdrops on a Macintosh . . . . . . . . . . . . . . . . . . . 87
Changing Colors in Windows. . . . . . . . . . . . . . . . . . . . . . . . . . . . . 88
III

Troubleshooting, Care, and Maintenance . . . . . . . . . . . . . . . . . . . . . . 90
Getting On-Line Help . . . . . . . . . . . . . . . . . . . . . . . . . . . . . . . . . . . 90
Troubleshooting Hardware . . . . . . . . . . . . . . . . . . . . . . . . . . . . . . 91
Troubleshooting TS Whiteboard Hardware. . . . . . . . . . . . . . . . 91
Troubleshooting LT Whiteboard Hardware . . . . . . . . . . . . . . . . 92
Hardware Calibration . . . . . . . . . . . . . . . . . . . . . . . . . . . . . . . . . . . 93
TS Whiteboard Calibration. . . . . . . . . . . . . . . . . . . . . . . . . . . . . 93
LT Hardware Calibration. . . . . . . . . . . . . . . . . . . . . . . . . . . . . . . 95
Troubleshooting Software . . . . . . . . . . . . . . . . . . . . . . . . . . . . . . . 97
Technical Support. . . . . . . . . . . . . . . . . . . . . . . . . . . . . . . . . . . . . . 98
Care and Maintenance . . . . . . . . . . . . . . . . . . . . . . . . . . . . . . . . . . 99
Caring for the TS Whiteboard. . . . . . . . . . . . . . . . . . . . . . . . . . . 99
Caring for the LT Whiteboard. . . . . . . . . . . . . . . . . . . . . . . . . . 100
Caring for the Markers, Stylus and Eraser . . . . . . . . . . . . . . . 100
Warranty . . . . . . . . . . . . . . . . . . . . . . . . . . . . . . . . . . . . . . . . . . . . 101
What is Not Covered. . . . . . . . . . . . . . . . . . . . . . . . . . . . . . . . . 101
How to Get Warranty Service . . . . . . . . . . . . . . . . . . . . . . . . . . 102
Limitation of Damages and Implied Warranties. . . . . . . . . . . 102
How State Law Relates to the Warranty . . . . . . . . . . . . . . . . . 103
FCC Regulations . . . . . . . . . . . . . . . . . . . . . . . . . . . . . . . . . . . . . . 103
IV
Overview
Welcome to the Webster Interactive Whiteboard. This manual
provides instructions for installing Webster TS (touch sensitive) and
LT (laser tracking) electronic whiteboards, and for operating the TS,
LT, IRP (interactive rear projection), and IPD (interactive plasma
display) systems.
What is Webster?
The Webster board is an interactive electronic whiteboard that
connects to your Windows PC or Macintosh PC. Capture anything you
write or draw on the board by printing it or by saving it on the
computer. The Webster software records all whiteboard activity for
you to save, use in other applications, print, or distribute.
Tools
Forward
Back
Print
Snapshot
Show Board
Projection
Red Pen
Black Pen
Green Pen
Blue Pen
Narrow Erase
Wide Erase
Snapshot
Erase All
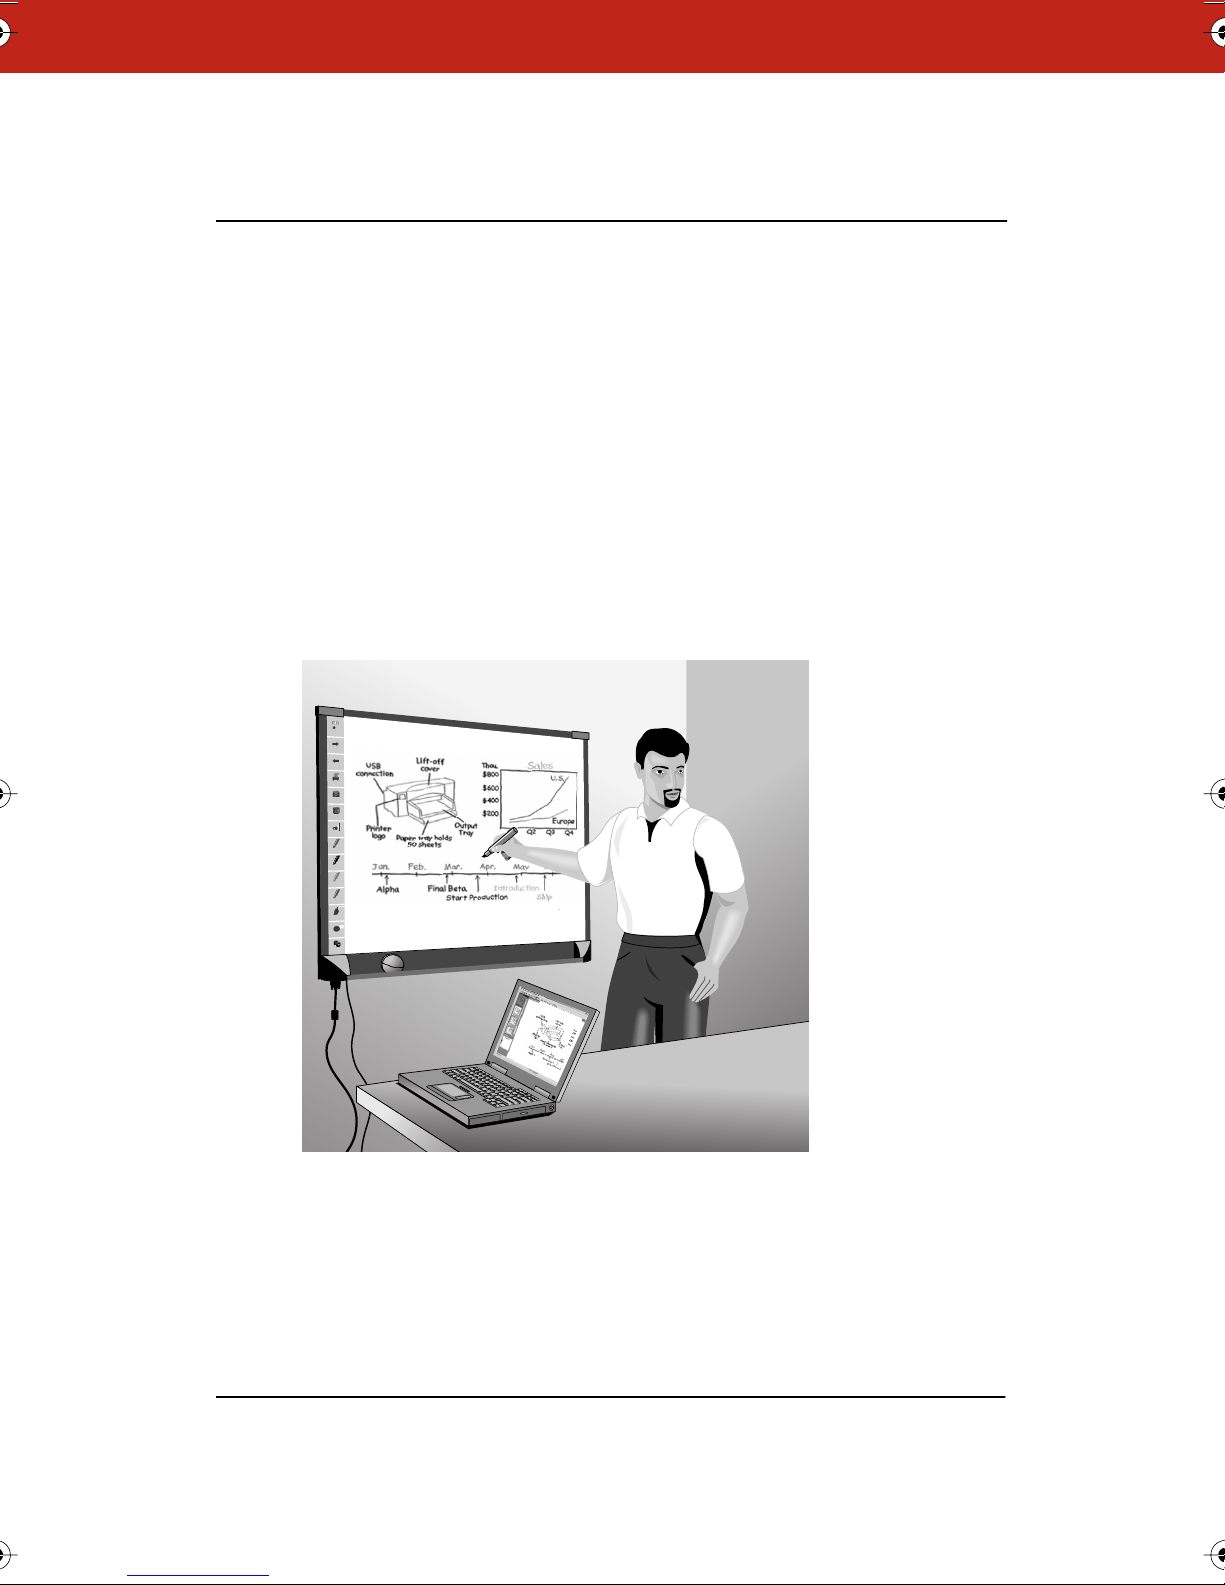
Many Ways to Use Webster
Use Webster during a presentation or meeting to capture notes and
ideas. You can remain at the whiteboard; Webster gives you the tools
you need to write, erase, print, or capture a copy of the board.
1
The most basic way to use Webster is to print copies of the board
during your meeting using a printer that is also connected to the
computer.
In addition, the Webster software records what you write or draw, so
you can capture your whiteboard notes on the connected computer.
This enables you to add or erase, save, print, or distribute the
captured image using the features of the Webster software at any
time, even when the whiteboard is not turned on or connected to the
computer.
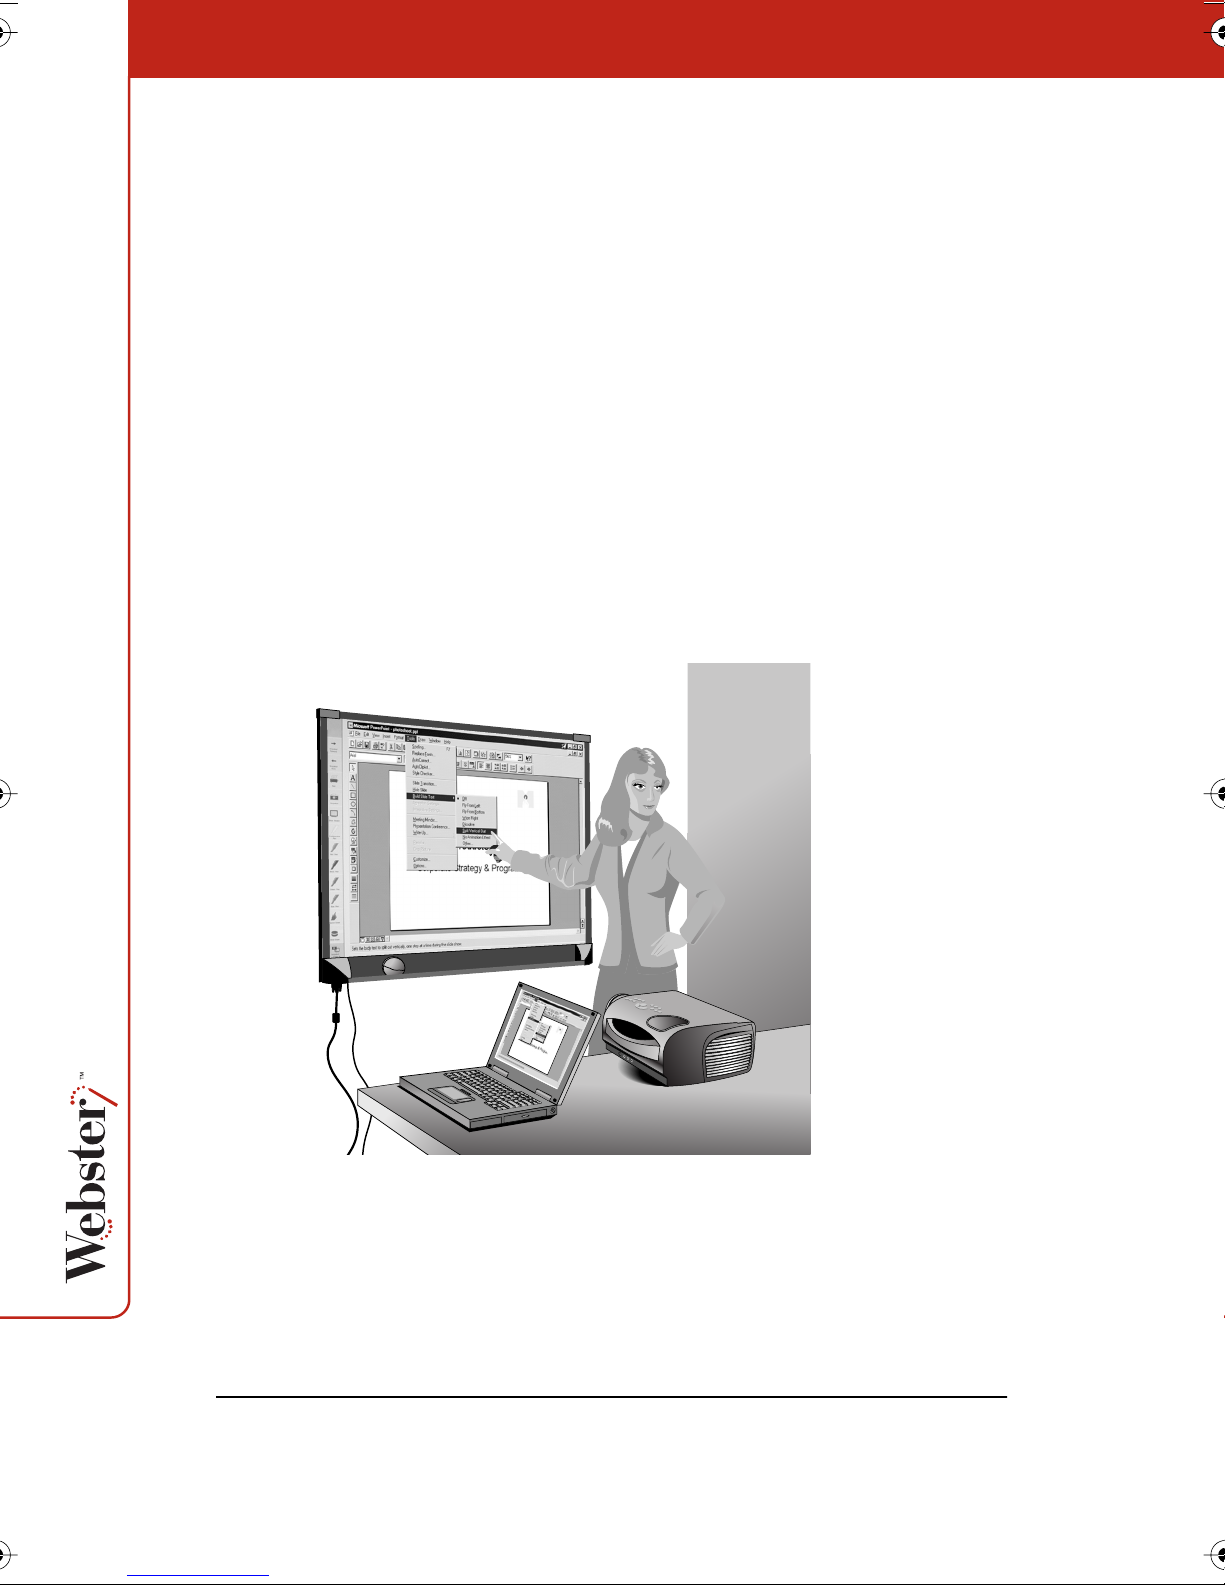
If you connect a projector to your system, the whiteboard becomes a
giant, interactive touch screen that enables you to operate your
computer while standing at the whiteboard. For instance, you can
control a presentation (using software such as PowerPoint) on your
computer while standing at the whiteboard simply by using a finger
or stylus as the mouse.
Since you can operate your computer and any software on it from the
whiteboard, you can write on the whiteboard to make notes next to
the projected computer image, and capture everything on the board
(both notes and projected image) using the Webster software.
2

In Microsoft Windows, Webster is also compatible with Microsoft
NetMeeting, giving you fully interactive teleconferencing capabilities
from your Webster board.
About This Manual
This manual describes how to install and operate the Webster TS and
LT interactive whiteboards. This manual also describes operation of
Webster IRP and IPD interactive systems, although installation is
described separately.
3

Installing the Webster TS Whiteboard
To install the Webster TS (touch sensitive) whiteboard models, follow
the steps in this section. If you have the Webster LT (laser tracking)
whiteboard, refer to “Installing the Webster LT Whiteboard” on
page 9. If you have one of the IRP or IPD models, the installation
instructions are provided separately.
Three installation options are available for the Webster TS
whiteboards, depending on your model.
• You can hang the TS 400 from a cubicle divider using the hang-
ers provided.
• You can mount it to a mobile stand available from your Webster
dealer. Installation instructions are provided with the mobile
stand. If you use this option, follow the mounting instructions
provided with the mobile stand, then proceed to “Connecting
Your Webster TS Whiteboard” on page 7.
• You can also mount any Webster TS whiteboard to a wall using
the instructions provided here.
4
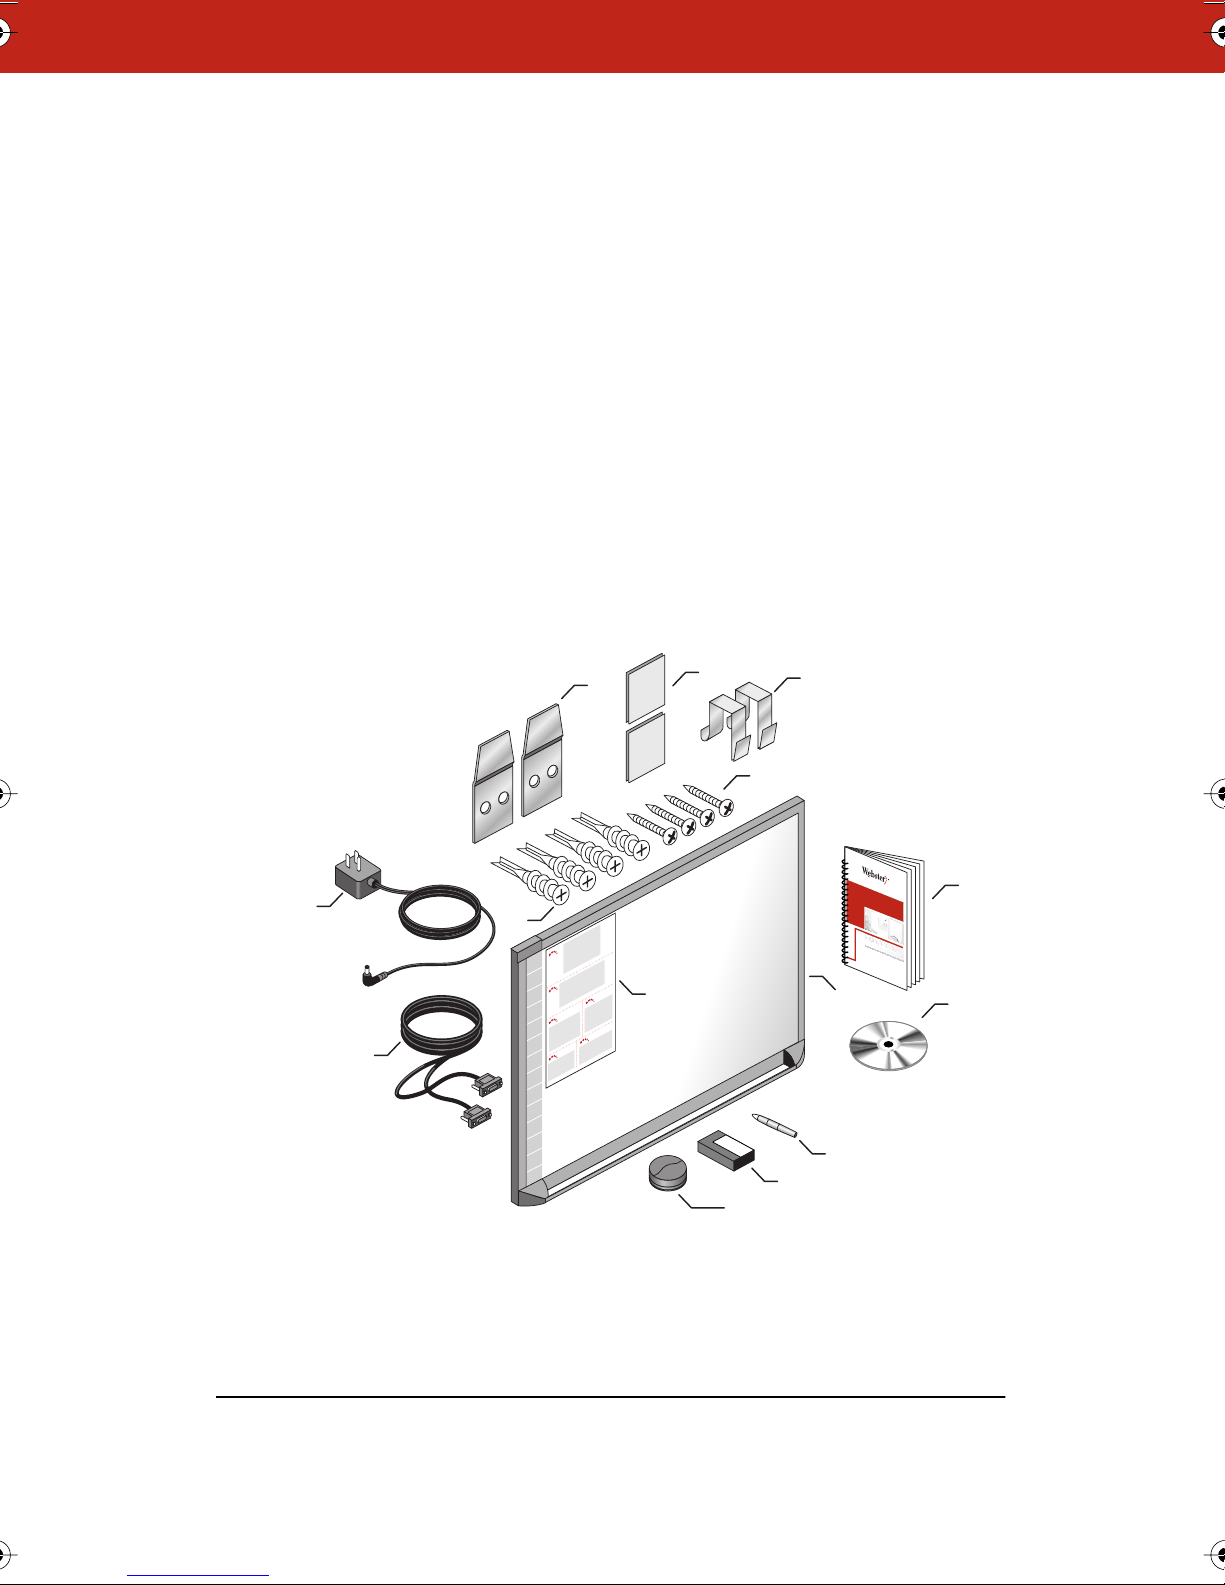
What Comes in the Box (TS Models Only)
1 1 Webster TS whiteboard
2 1 Webster TS whiteboard stylus
3 1 box of four dry-erase markers
4 1 Webster round eraser
5 1 AC power cord
6 1 serial port cable (12’ or 25’, depending on your model)
7 4 self-tapping sheet rock anchors (vary by model)
8 2 mounting brackets
9 4 Phillips screws
10 2 Velcro strips
11 1 Webster software CD (Mac/Windows)
12 1 user guide
13 1 peel-off quick start
14 2 cubicle hanging hooks (for some models)
8
10
14
9
12
5
6
7
1
2
3
6
5
13
4
1
11
2
3
4
5
Mounting Your Webster TS Whiteboard on a Wall
You will need a tape measure, Phillips screwdriver, and drill.
To mount the Webster TS whiteboard on a wall:
1 Choose a location with convenient access to your computer, an
AC power outlet, and any network connections or projectors you
are using.
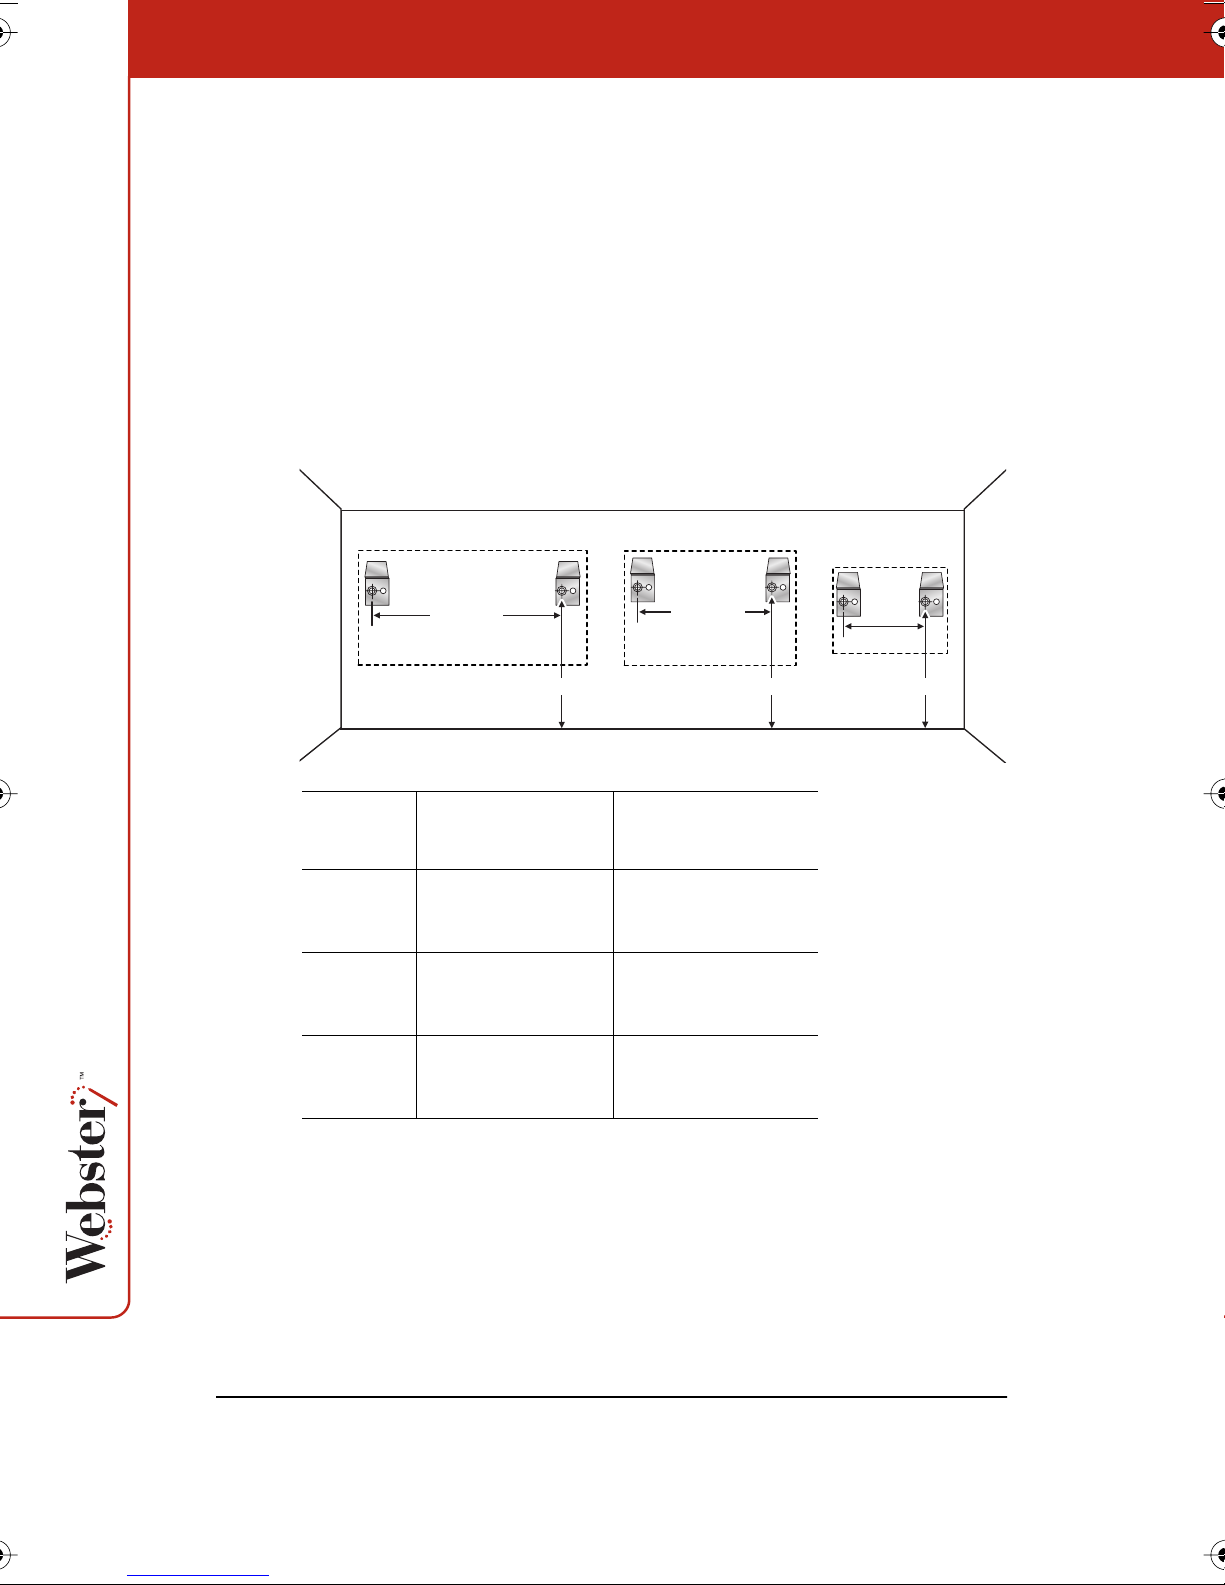
2 Carefully mark two drill hole locations as indicated below, based
on your Webster TS whiteboard model:
TS 800 TS 600 TS 400
92"
(2335 mm)
Model
Distance from the
floor to the holes
TS 400 74"
(1880 mm)
TS 600 77”
(1950 mm)
TS 800 77"
(1950 mm)
77" (1950 mm)
62"
(1575 mm)
77" (1950 mm)
Distance between
hole locations
42"
(1070 mm)
62"
(1575 mm)
92"
(2335 mm)
42"
(1070 mm)
74" (1880 mm)
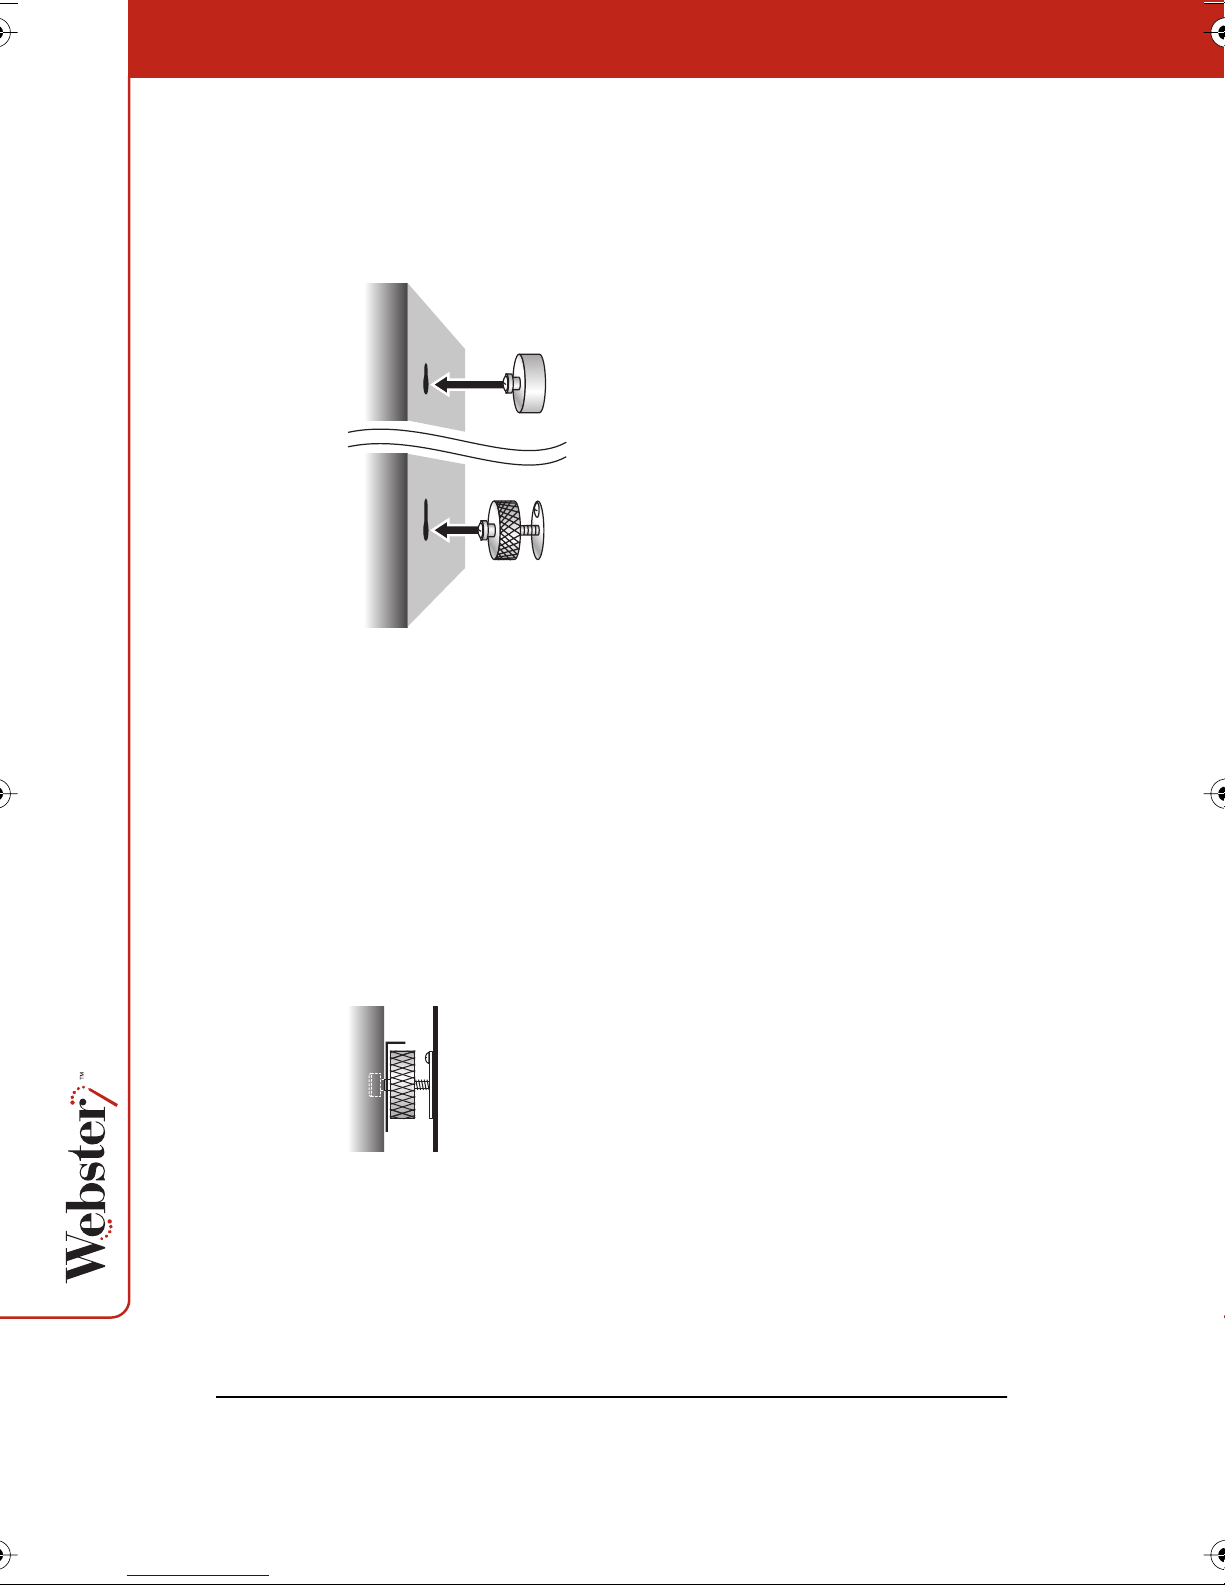
3 Using the mounting plates as a template, mark two additional
drill hole locations that are 3/4" (19 mm) from the original hole.
4 For sheet rock walls, screw the self-tapping sheet rock anchors
into the wall using a power driver, if available. Wall anchors for
6
note:NOTE:
the TS 400 are plastic. Wall anchors for TS 600 and TS 800 are
metal.
If you are not installing on a sheet rock wall, you must provide your
own fasteners.
5 Attach the mounting bracket to the wall anchors on the wall
using the four Phillips screws provided. Assure that the screws
are snug.
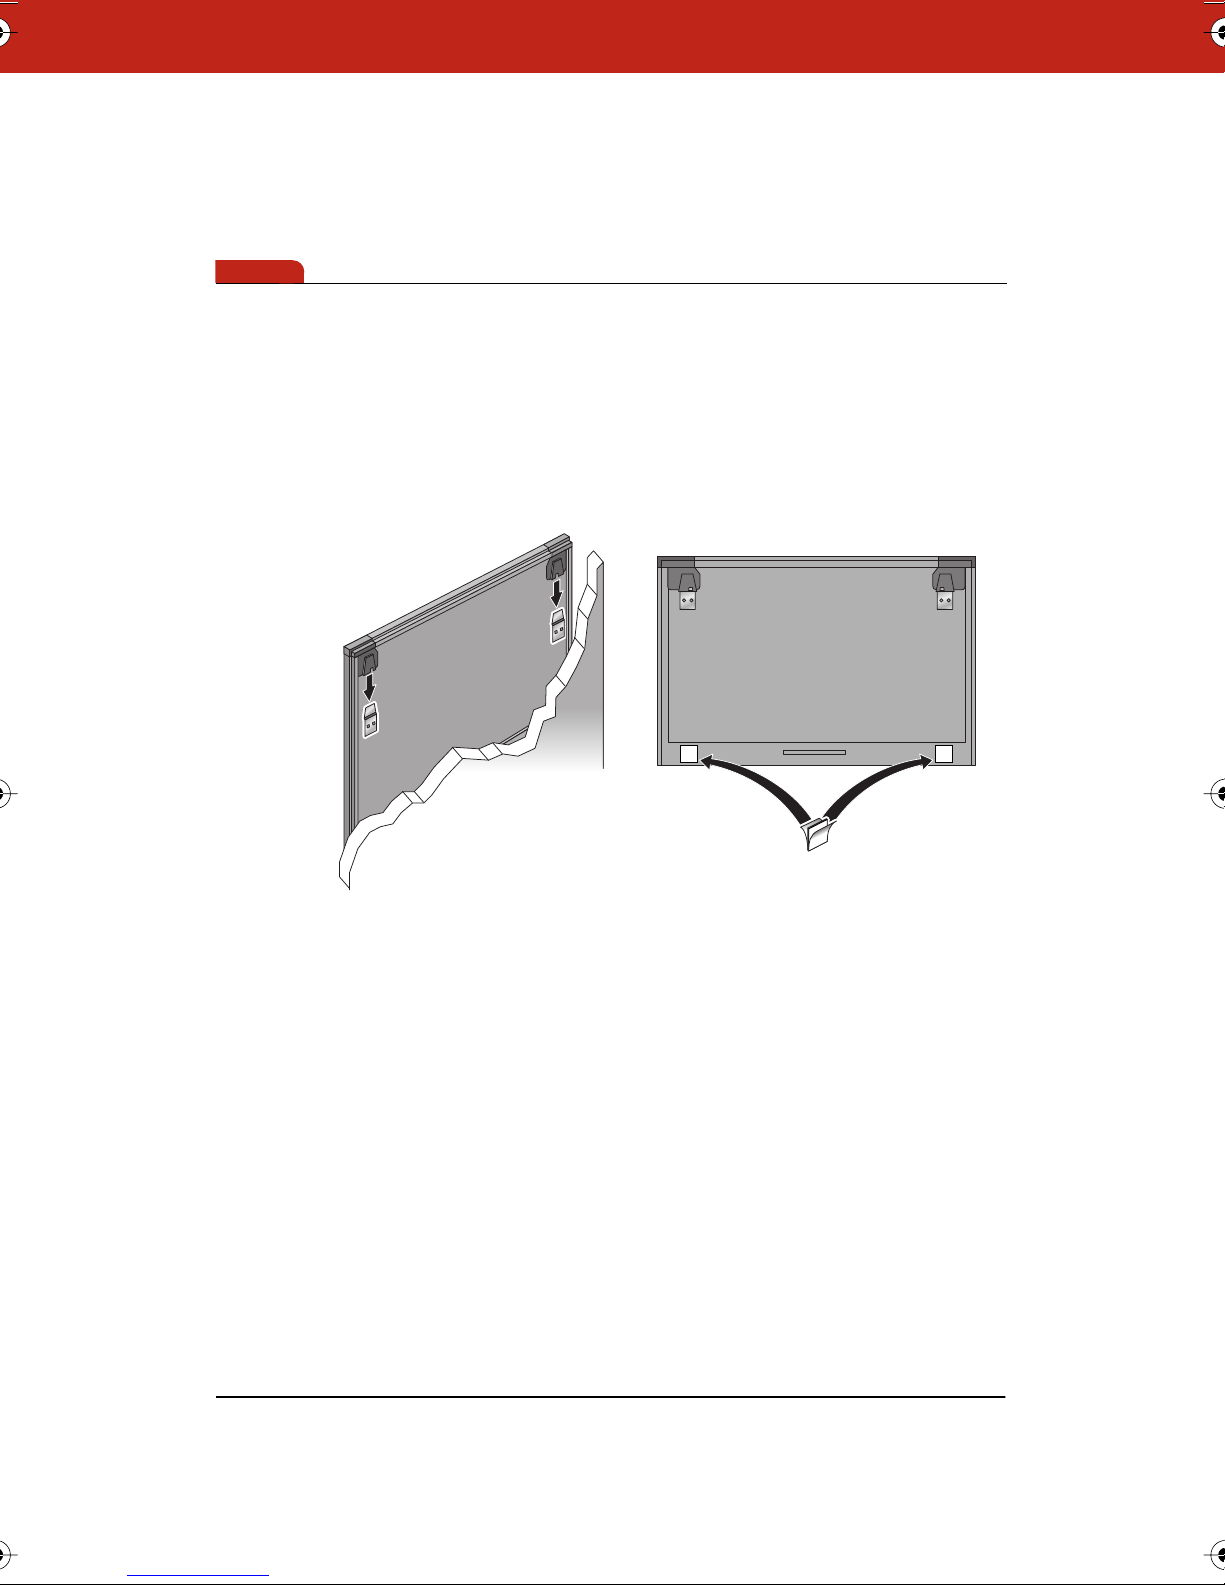
6 With the help of an assistant, lift the board and hang it on the
mounting plates using the slots at the top corners of the board.
Velcro
7 Peel the backing off the front and back of the two Velcro strips.
8 Attach Velcro strips to lower right and left corners on the back of
whiteboard and press against the wall.
To mount your whiteboard on an optional stand or easel, see the
instructions included with your stand or easel, or visit
www.polyvision.com.
Connecting Your Webster TS Whiteboard
Ensure that both your computer and whiteboard are powered off
before you make connections.
7
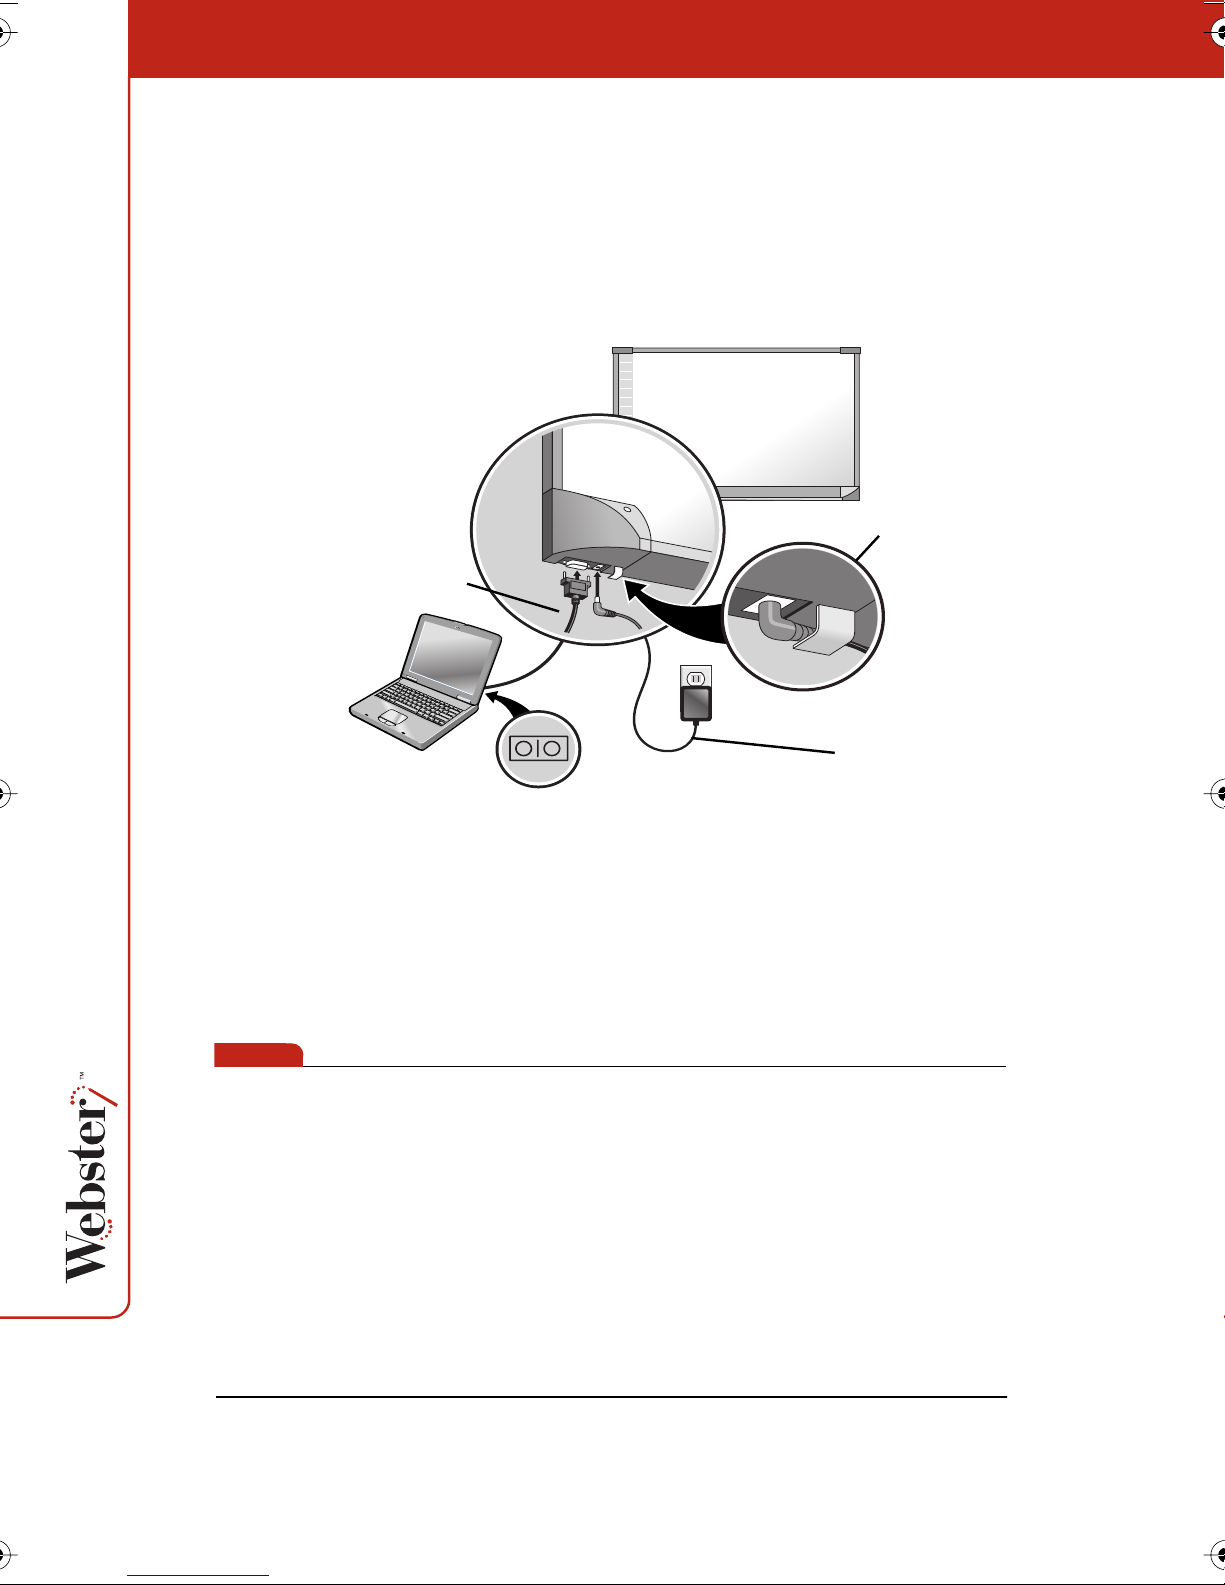
To connect the whiteboard to your computer:
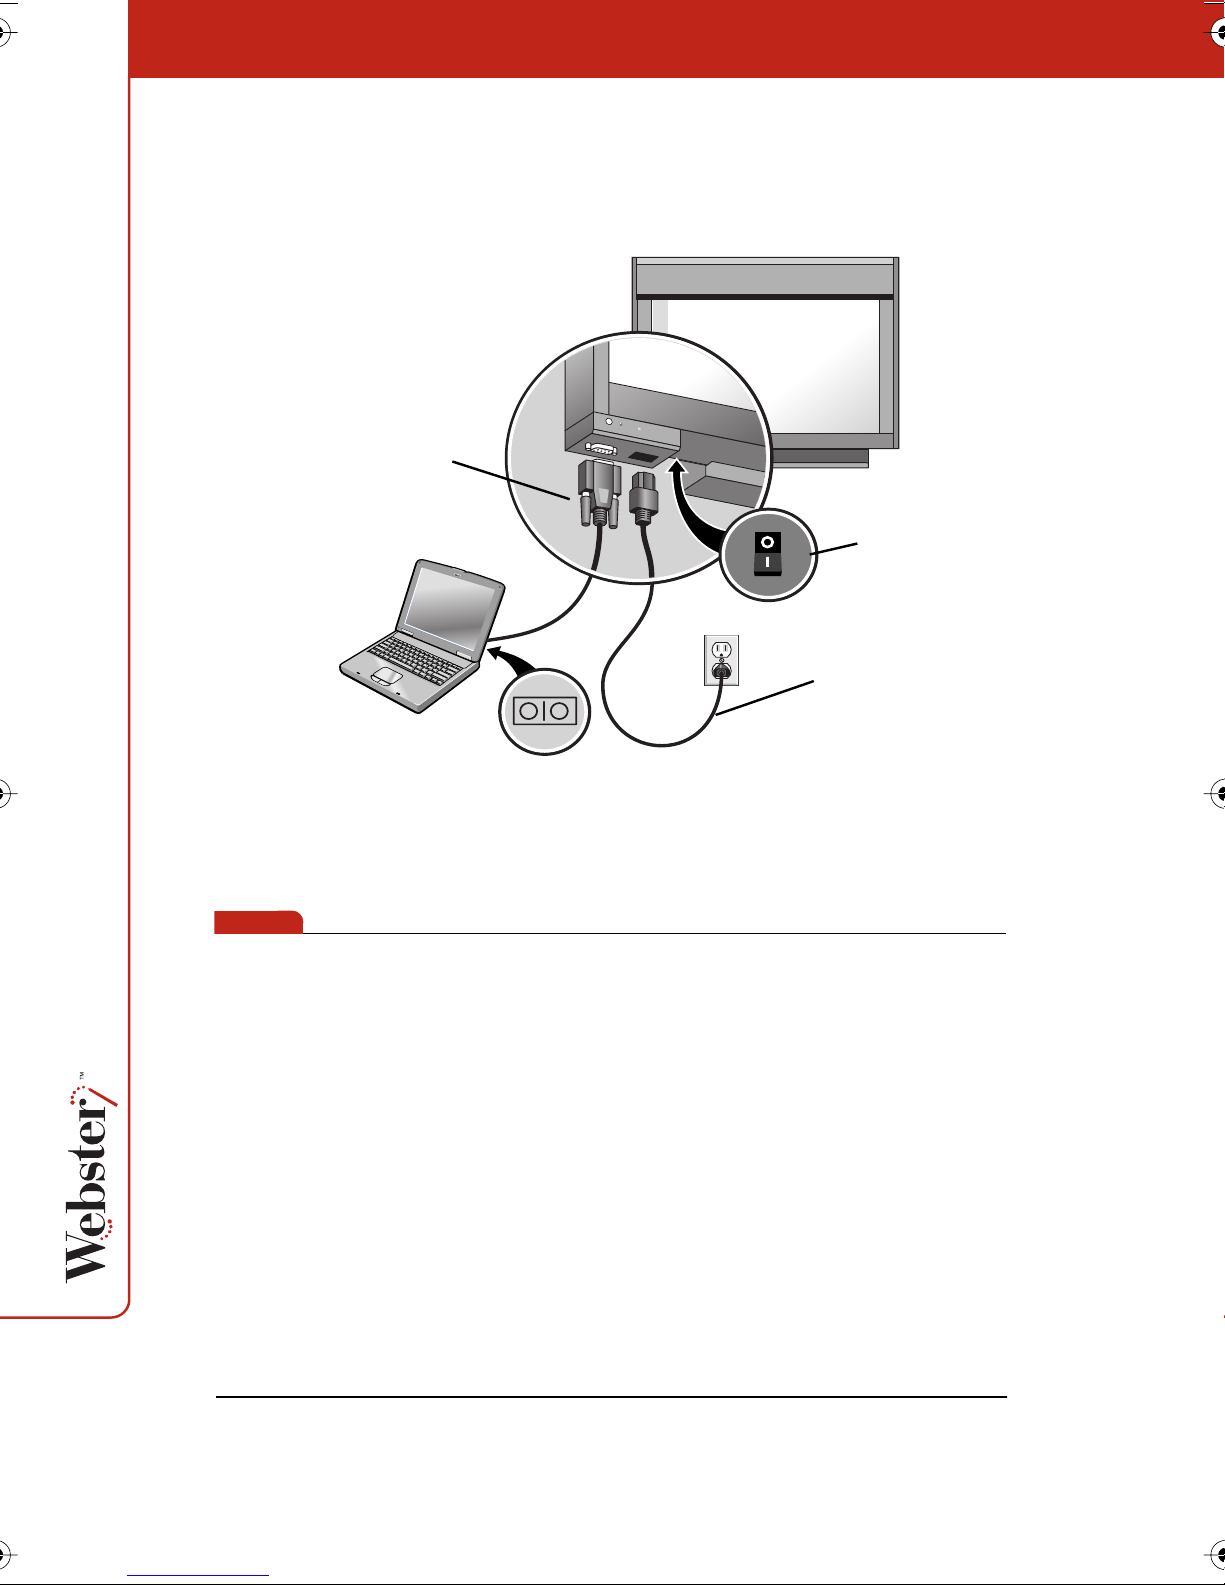
1 Plug the AC power cord into the power connector on the bottom
of the whiteboard, next to the serial port.
2 Twist the cord behind the cable bracket.
cable bracket
9-pin serial cable
AC power cord
note:NOTE:
3 Plug the power cord into an electrical outlet.
4 Plug the 9-pin male end of the serial port cable into the
whiteboard and tighten the screws.
5 Plug the other end into your computer’s serial port (if necessary,
use a USB to 9-pin serial adapter available from your Webster
dealer).
The maximum serial port cable length is 25 feet (7.5 meters). For
greater distances, a serial amplifier is required (available at
computer networking suppliers).
8

Installing the Webster LT Whiteboard
To install the Webster LT (laser tracking) whiteboard models, follow
the steps in this section. If you have the Webster TS (touch sensitive)
whiteboard, refer to “Installing the Webster TS Whiteboard” on
page 4. If you have the IRP or IPD models, the installation
instructions are provided separately.
Any of the Webster whiteboards can be mounted on a wall using the
instructions provided here. The LT 4000 and LT 5000 models fit on a
mobile stand, enabling it to be easily moved from one room to
another. If you use that option, follow the instructions provided with
the mobile stand and then skip to “Connecting Your Webster LT
Whiteboard” on page 15.
The LT whiteboard is a combination of high-precision mechanical,
optical, and electronic components. If not installed properly, it may
not operate reliably, or it may not operate at all.
9

What Comes in the Box (LT Models Only)
1 1 Webster LT whiteboard
2 1 magnetic whiteboard icon strip
3 1 Webster LT whiteboard stylus
4 1 box of four dry-erase markers
5 1 Webster small eraser
6 1 Webster large eraser
7 2 studded brackets
8 2 lower mounting spindles
9 2 upper mounting spindles
10 4 wall anchors
11 4 wall screws
12 1 serial port cable
13 1 AC power cord
14 1 user guide
15 1 Webster software CD (Mac/Windows)
16 2 V-slotted spacers
17 1 peel-off quick start
1 calibration kit (inside the header cover; not shown)
10
11
9
8
7
16
12
13
14
1
2
1
2
Tools
3
Forward
5
Back
Print
Show Board
Projection
Snapshot
Snapshot
570-0183-00
Erase All
17
4
6
15
3
4
6
5
10

note:NOTE:
Mounting Your Webster LT Whiteboard on a Wall
You will need a tape measure, Phillips screwdriver, and drill.
To mount the Webster LT whiteboard on a wall:
1 Choose a wall with convenient access to your computer, an AC
power outlet, and any network connections or projectors you are
using. Ensure that the selected wall is of solid construction, flat
and vertical to within 1/4" (6 mm) over the entire mounting area,
and free of any significant vibrations that might result from the
operation of nearby heavy equipment.
If you are not installing on a sheet rock wall, you must provide your
own fasteners.
11
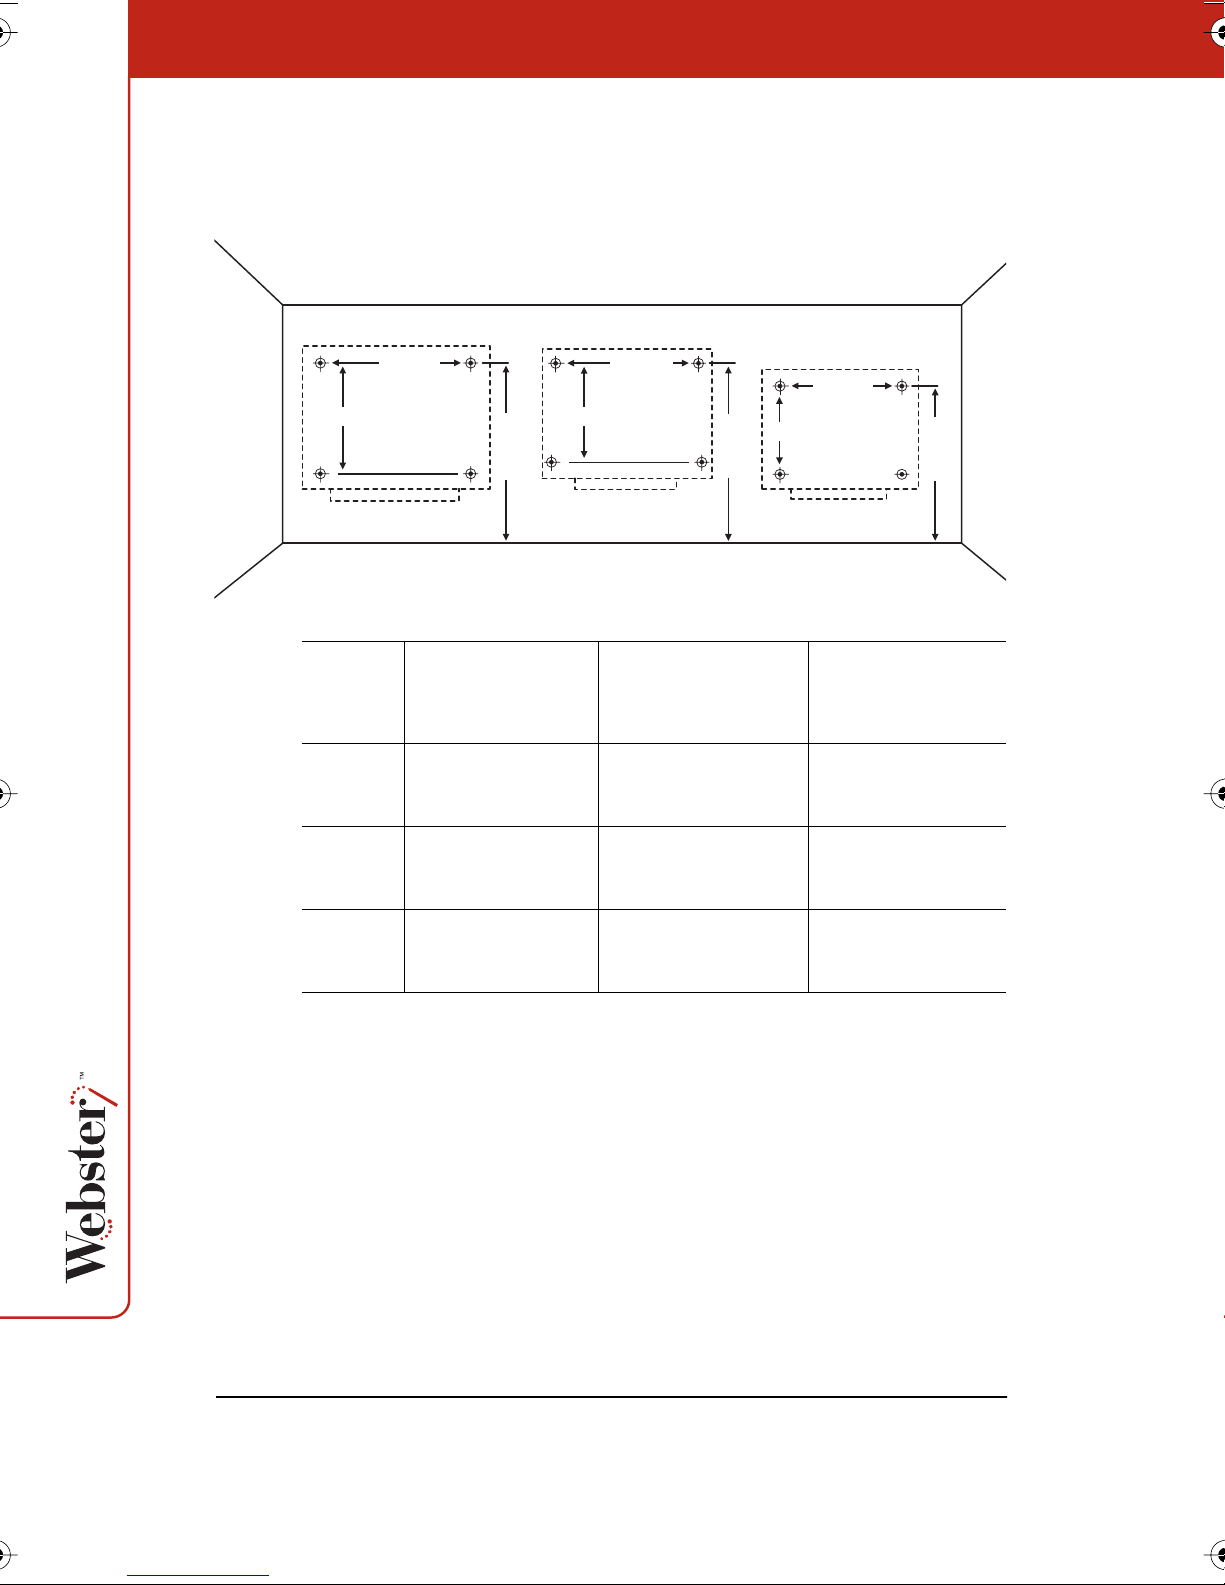
2 Carefully mark four drill hole locations as indicated below,
based on your Webster LT whiteboard model.
LT 6000
65 5/16"
(1660 mm)
43 13/16" (1112 mm)
Distance from the
Model
floor to the top
LT 4000 76"
(1930 mm)
LT 5000 80"
(2025 mm)
80"
holes
37 3/8" (949 mm)
(2025 mm)
LT 5000 LT 4000
56 1/2"
(1435 mm)
80"
(2025 mm)
Horizontal distance
between holes
49 5/16"
(1252 mm)
31 15/16" (811 mm)
Vertical distance
between holes
49 5/16"
(1252 mm)
56 1/2"
(1435 mm)
76"
(1930 mm)
31 15/16"
(811 mm)
37 3/8"
(949 mm)
12
LT 6000 80"
(2025 mm)
65 5/16"
(1660 mm)
43 13/16"
(1112 mm)
3 Drill the holes as marked, using an 11/32" or 3/8" (9 mm or
9.5 mm) drill bit.
4 Insert the wall anchors into the holes and tap them into place
flush with the wall.
5 Insert the screws into the wall anchors and tighten them firmly,
taking care not to let the wall anchors turn in the wall while
tightening the screws. Remove the screws prior to the next step
and discard the black washers used to help tighten the screws.
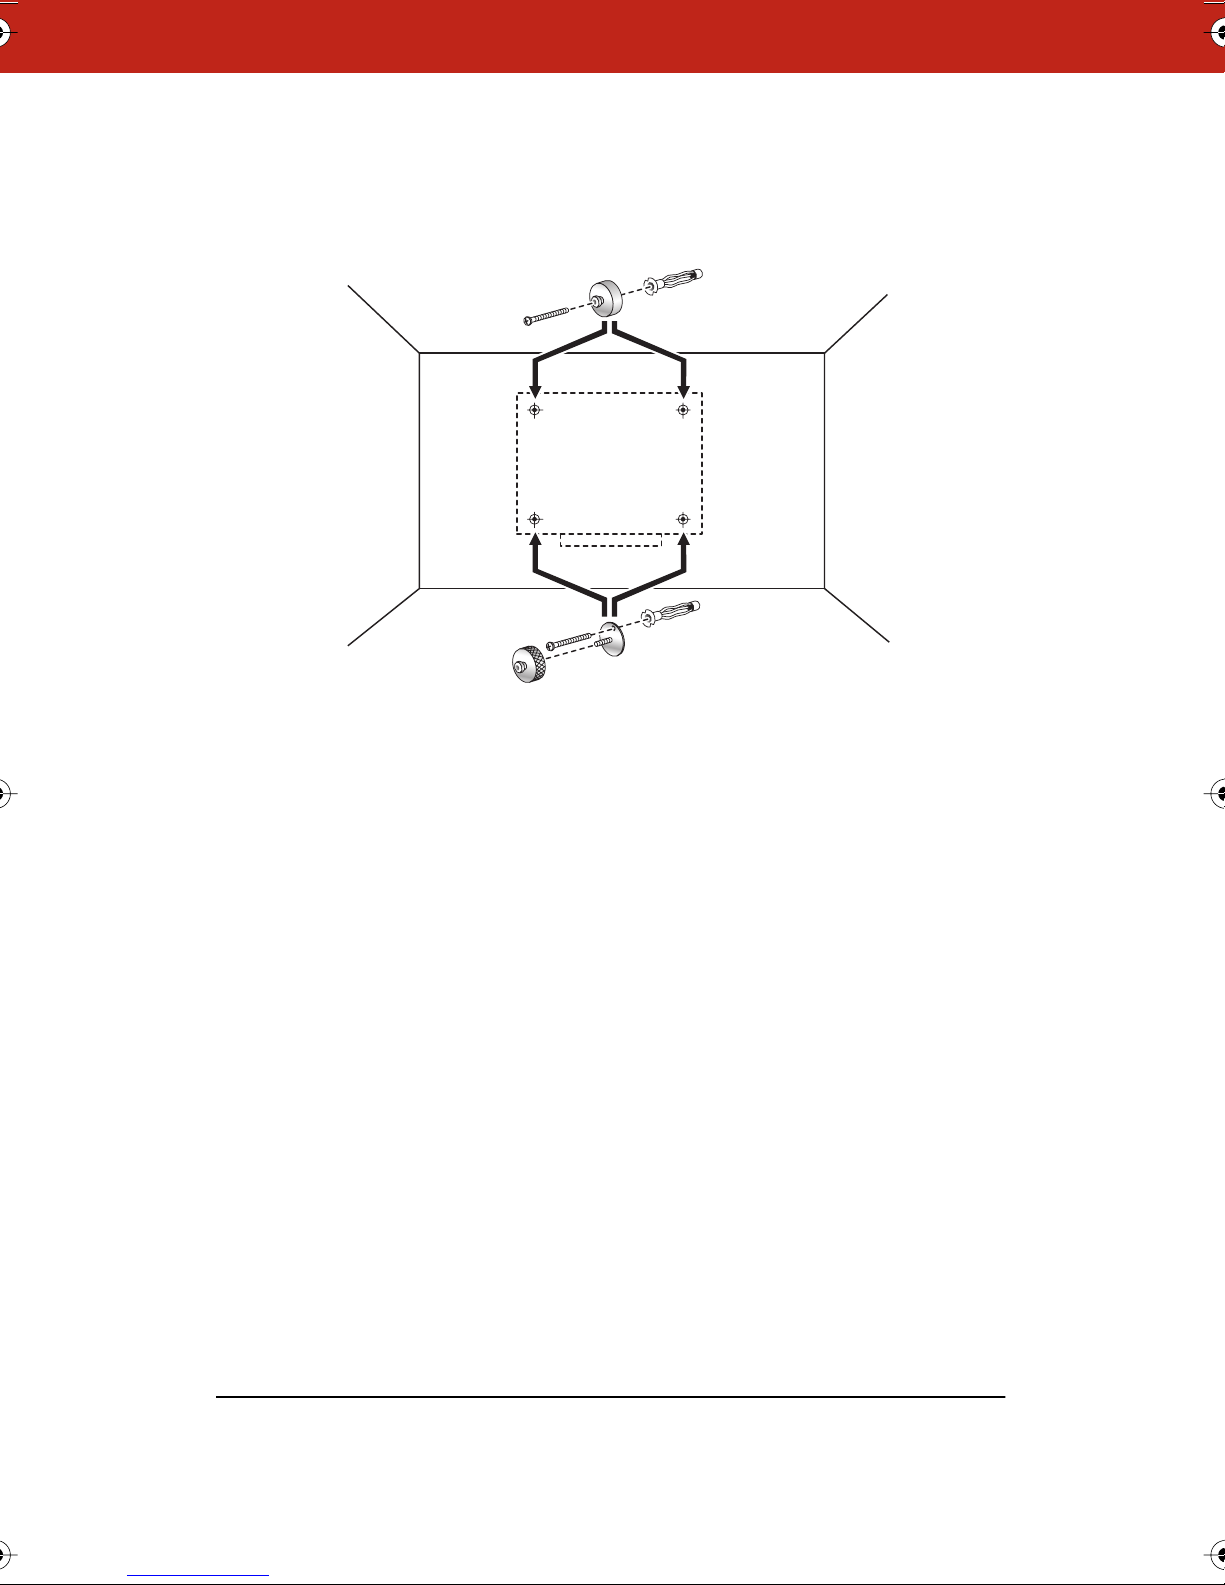
6 Insert two screws through the two upper mounting spindles and
into the upper holes in the wall. Tighten the screws to the wall.
7 Insert the remaining two screws through the two studded
mounting brackets and into the lower holes in the wall. Tighten
the screws to the wall.
8 Thread the two lower mounting spindles onto the studded
mounting brackets and tighten until 1/2" (12 mm) of thread
shows between the mounting brackets and the spindles.
9 By sight, or by using a carpenter’s level or plumb line, vertically
align the upper and lower spindles.
13
10 With the help of an assistant, lift the board and position it so
that the slotted holes in the back of the board are directly in
front of the spindles on the wall.
First push the lower slotted holes over the lower spindles. Then
push the upper slotted holes over the upper spindles and ease
the board down onto all the spindles at once. The board should
come to rest, without force, on the top spindles. The two bottom
spindles should be floating about halfway up in their slotted
holes.
14
11 Check that the board is flat by sighting across the front of the
board or using your carpenter’s level or plumb line. If the board
is not flat, ensure all spindles are properly located in their
slotted holes and turn the lower spindles in or out to make the
board vertical.
side view
12 Check both lower mounting spindles for end-play by pressing
with the heel of your hand against each lower corner of the
board. If there is noticeable end-play, slip one of the provided
mounting spindle spacers between the back of the board and

the face of the lower spindle. Position the V slot of the spacer
down and to both sides of the spindle to take up the slack
space.
rear view
13 Apply the magnetic whiteboard icon strip to one of the four
corners of the board.
14 To enable and specify the location of the icon strip, first install
the Webster software as described (refer to “Installing Webster
Software” on page 18) and then refer to “Customizing General
Options” on page 79 for instructions on telling the software
where the icon strip is located.
To mount your whiteboard on an optional mobile stand, see the
instructions included with your mobile stand or visit
www.polyvision.com.
Connecting Your Webster LT Whiteboard
Ensure that both your computer and whiteboard are powered off
before you make connections.
To connect the whiteboard to your computer:
1 Plug the AC power cord into the connector on the bottom of the
whiteboard, next to the serial port.
2 Plug the power cord into an electrical outlet.
15
3 Plug the 9-pin male end of the serial port cable into the
whiteboard and tighten the screws.
9-pin serial cable
on/off switch
AC power cord
note:NOTE:
4 Plug the other end into your computer’s serial port (if necessary,
use a USB to 9-pin serial adapter available from your Webster
dealer).
The maximum serial cable length is 25 feet (7.5 meters). For greater
distances, a serial amplifier is required (available at computer
networking suppliers).
5 Turn on the whiteboard power switch to confirm your
connections. The power LED illuminates yellow.
You are now ready to install the Webster software (see “Installing
Webster Software” on page 18).
16

LT Whiteboard Automatic Power Down
The whiteboard automatically powers down after a specified period
of inactivity. The board signals a warning beep one minute before the
power down occurs and the “Ready” LED goes out when the board is
powered down.
The default period of inactivity is 60 minutes. To specify a different
time, refer to “Customizing General Options” on page 79.
To power up Webster after an automatic power down, move the
mouse.
17

Installing Webster Software
The following software installation instructions apply to all Webster
models and sizes. You can install Webster under Microsoft Windows
operating system versions 98, NT 4.0, ME, 2000, or XP; or on a
Macintosh with OS 8.6, 9.x, or X.
note:NOTE:
If you are using a USB to 9-pin serial adapter, make sure you install
the software that came with your adapter before you install the
Webster software.
Whiteboard System Requirements
• 64 MB RAM (128 MB preferred)
• 20 MB available disk space
• CD-ROM drive
• 800 x 600 monitor or better
• 1 available serial (COM) port (or 1 USB port and a USB to 9-pin
serial adapter available from your Webster dealer)
note:NOTE:
18
• Internet Explorer 4.0 or higher or Netscape 4.0 or higher (exclud-
ing Netscape 6.0) to view Webster on-line Help
Windows:
• Windows® compatible PC (Pentium II or faster required;
Pentium III recommended)
• Windows® 98, NT 4.0, ME, 2000, or XP
If you are using Windows NT 4.0, be sure Service Pack 6 is installed.
Macintosh:
• Apple® Macintosh® Power PC (G3 or higher recommended)
• OS 8.6 or higher

Installing Webster Software in Windows
Installation in Windows requires “Administrative Privileges.” To
install Webster software in Windows:
1 Turn on your computer and wait for Windows to start. For best
results, make sure no applications are running.
2 Place the Webster software CD in your CD-ROM drive. The setup
program starts. If the setup program does not start, open
Windows Explorer and double-click “Setup.exe” on the CD.
3 Follow the prompts to install the software.
The setup program detects the COM port to which your whiteboard is attached. To manually identify the COM port, see
“Establishing Communication between the Board and Computer” on page 20.
If your computer is permanently connected to an IRP or IPD system, we recommend that you check the “Run Webster at Startup” option during installation.
4 Restart, if prompted.
note:NOTE:
Installing Webster Software on a Macintosh
To install Webster software on a Macintosh:
1 On the Macintosh, place the Webster software CD in your
CD-ROM drive.
2 Double-click the Webster installer icon on the CD.
3 Follow the prompts to accept the license agreement and install
the software.
Under OS 8.6 or OS 9, you may need to install QuickTime 5 (provided
on the Webster installation CD) or above in order to support the
graphic import/export features described in this manual. Make sure
you use the “Recommended Install” option for QuickTime.
19

note:NOTE:
Starting Webster Software
To start Webster software in Windows:
1 Plug in and turn on your whiteboard, if necessary.
2 Start your computer, if necessary.
3 On the Windows taskbar, choose “Programs” from the Start
menu and choose “Webster” from the Webster group. The
software launches and detects your connected whiteboard.
To start Webster software on a Macintosh:
1 Plug in and turn on your whiteboard, if necessary.
2 Start your computer, if necessary.
3 Open the Webster folder from its installation location and
double-click the Webster application icon. The software
launches and detects your connected whiteboard.
At startup, Webster software detects If you are using the Webster IRP
or IPD system and automatically initiates projection mode alignment.
LT Whiteboard Calibration
High-precision lasers in the LT whiteboard sometimes require
calibration. When you install Webster software and establish
communication between the whiteboard and the computer, a
calibration check is performed automatically.
If Webster software displays a warning stating that your LT
whiteboard requires calibration, refer to “Hardware Calibration” on
page 93.
Establishing Communication between the Board and Computer
Webster automatically detects the whiteboard connected to your
computer’s COM or USB port. However, in some circumstances you
may need to identify the port manually (for example, if you add,
move, or remove a serial device such as a modem, laptop, PDA or
input device).
20

To establish communication between the board and the computer:
1 Make sure the whiteboard is plugged in and turned on, and
properly connected to your computer, if necessary.
2 Launch the Webster software.
3 Choose “Find Whiteboard” from the Edit menu. The software
locates and displays the port connection for the board.
4 Click a board in the “Find Whiteboard” list or click “Check All” to
establish communication with all boards connected to your
computer and wait while the status changes.
5 When communication is established, click “OK” to close the
window.
Uninstalling Webster Software
Uninstalling the software removes only the application. Your Webster
document files are not deleted.
To uninstall Webster software in Windows:
1 Exit all applications, including Webster.
2 On the Windows taskbar, choose “Programs” from the Start
menu and choose “Uninstall Webster” from the Webster group.
3 Click “Yes” to remove all application components. You may have
to delete some application files manually after you uninstall
Webster.
To uninstall Webster software on a Macintosh:
1 Drag the Webster application folder to the trash.
2 If you use OS 8.6 through 9.x, drag the Webster System Menu
extension to the Trash. (The Webster System Menu extension is
located in the Extensions folder which is located inside the
System folder.)
3 If you use OS 8.6 through 9.x, drag the Webster Preferences file
to the Trash. (The Webster Preferences file is located in the
Extensions folder.)
21

If you use OS X, select the Webster Preferences icon and hold
down the command key while pressing the Delete key. To locate
the Webster Preferences icon, click the “Home” icon at the top of
any OS X Finder window, then select the “Library” folder, and
choose the “Preferences” folder.
Using Multiple Whiteboards
You can use Webster with multiple whiteboards connected to your
computer.
Multiple Whiteboards in Windows
To use multiple whiteboards in Windows:
1 Launch Webster once for each whiteboard you have connected.
2 To identify which board is associated with which instance of
Webster, choose “Find Whiteboard” from the Edit menu in each
Webster window and note the board and COM port.
Each application is independent. You can customize the options for
each board individually by choosing “Options” in the Edit menu of
the Webster application associated with that board. “Options” are
saved in the same order that you launched the Webster applications.
22
After you close the applications, the order you reopen them
determines which options are associated with a board.
Multiple Whiteboards on a Macintosh
To use multiple boards on a Macintosh:
1 Locate the Webster application in the Webster folder.
2 Create one copy of the application for each board connected to
the computer.
3 Rename the applications. (For example, use Webster1,
Webster2, etc. as in the instructions below. Or rename the
applications as needed to differentiate them in a meaningful
way for your circumstances.)
4 Launch Webster1.

5 Choose “Find Whiteboard” from the Edit menu. The application
finds all the boards connected to your computer.
6 Choose one board to associate with Webster1.
7 Leaving Webster1 running, launch Webster2.
8 Choose “Find Whiteboard” from the Edit menu. Webster2 finds
only the whiteboards not already assigned to Webster1.
9 Choose one board to associate with Webster2.
10 Continue launching Webster applications and choosing “Find
Whiteboard” until you have associated each board with an open
Webster application.
11 Write on the board and capture snapshots as usual. The
snapshots are part of the open file in the Webster application
that is associated with it.
Each application is independent. You can customize the preferences
for each board individually by choosing “Preferences” in the Edit
menu of the Webster application associated with that board.
“Preferences” are saved in the same order that you launched the
Webster applications.
After you close the applications, reopen them in the same order and
associate them with the same boards to maintain customized
preferences for each board.
Register Webster
By registering your product, you will receive enhanced customer
service, as well as information on product development and
software upgrades.
To register Webster:
• Choose “Register Webster” from the Webster Help menu with an
Internet browser installed and a connection established, or go
to www.websterboards.com/support/register.html.
• Complete and mail the self-addressed Registration Card found
with the Webster installation package.
23

Webster Basics
When the Webster software is running on a computer connected to
the board, anything you write or draw on the board is also displayed
on the computer.
How Webster Works
To use Webster:
1 Make sure the board is plugged in and turned on, if necessary.
2 On the computer connected to the whiteboard, start the Webster
application. If the Webster software is not installed on the
computer, or if the software does not automatically detect the
whiteboard, refer to “Installing Webster Software” on page 18.
3 Choose a pen.
4 Write or draw on the board. Your work appears in the Webster
software window. Refer to “Writing on the Board” on page 24.
note:NOTE:
5 To erase, choose an eraser tool and erase. Refer to “Erasing the
Board” on page 25.
6 To print the contents of the board on a printer connected to the
computer, tap the Print icon. Refer to “Printing the Board” on
page 26.
7 To capture a copy of the board in the software, tap the Snapshot
icon. Refer to “Capturing a Snapshot of the Board” on page 26.
Writing on the Board
The whiteboard sends writing data to your computer by detecting a
single point of pressure or of reflected light. Whenever you write on
the whiteboard, make sure there is only one point of contact at a
time.
Use only the recommended markers, stylus, and erasers.
24

note:NOTE:
note:NOTE:
Webster TS models: The whiteboard's surface can be damaged by
sharp objects, such as ballpoint pens and rulers. Scratches can
cause permanent ink stains and data loss due to electrical
malfunctions.
To write:
1 Choose a pen (TS and LT models) or stylus (IRP and IPD models).
2 Select a pen color on the whiteboard icon strip (TS models) or in
the projection toolbar (IRP and IPD models). The software
records your writing in the color you choose.
3 Use firm consistent pressure as you write.
Webster TS models: As you write, the whiteboard provides audible
feedback, and the green LED glows brighter to indicate that it
recognizes your strokes.
Erasing the Board
Erase functions are based on a calculated circle around a single
point. Always use the erasers that are provided with the Webster
board. Erasing depends upon which Webster model you use.
To erase on Webster TS models:
• Large areas: Tap the Wide Erase icon on the board. Use the
eraser felt flat against the whiteboard.
• Small areas: Tap the Narrow Erase icon on the board and erase
with your finger or the edge of the round eraser.
To erase on Webster LT models:
• Use the large or small eraser with the felt flat against the white-
board. Do not cover the reflective strip around the perimeter of
the eraser. Never use the narrow edge of the eraser on the
whiteboard.
25

To erase on Webster IRP and IPD models:
• Tap the Wide or Narrow Erase button in the projection toolbar.
Use the stylus to erase.
Printing the Board
You can print an image of the board at any time using a printer that is
connected to the computer.
To print an image of the current board:
• Tap the Print icon on the whiteboard icon strip (TS and LT mod-
els), or in the projection toolbar (IRP and IPD models). The
whiteboard sends an image of the board to the printer using the
current “Print Setup” settings in the Webster software.
Capturing a Snapshot of the Board
The Webster software records all the activity on the whiteboard.
To capture an image of the current board that you can save or use on
the computer:
• TS and LT models: Tap a Snapshot icon on the whiteboard.
• IRP and IPD models: Tap a Snapshot button in the projection
toolbar.
The Webster software captures an image of the current board and
adds it to the Webster file that is open. You can continue writing on
the board, or erase and continue.
26

Getting Started with Webster Tools
Webster is easy to operate either from the board or from the attached
computer running the Webster software. Icons that appear along the
edge of the board on TS and LT models control functions that are
duplicated in the software.
IRP and IPD models are rear projection systems and thus always
operate in Webster’s projection mode in which the whiteboard icon
strip is unnecessary.
27

Webster Whiteboard Icons
Webster TS and LT whiteboards include an icon strip with the
following functions: (On LT models, the order is slightly different.)
Projection toolbar: In projection mode, display or hide the
Tools
Forward
Back
Print
projection tools.
Forward arrow: In projection mode, scroll forward through
snapshots or PowerPoint slides.
Back arrow: In projection mode, scroll backward through
snapshots or PowerPoint slides.
Print: Print the contents of the board to the currently active
printer without capturing a snapshot.
Snapshot
Show Board
Projection
Red Pen
Black Pen
Green Pen
Blue Pen
Narrow Erase
Wide Erase
Snapshot: Capture a snapshot of the board.
Show Webster: In projection mode, bring the Webster software
to the front or send it to the rear.
Projection: Enter or exit projection mode.
Red Pen: In the software, record the active pen as red.
(TS models only.)
Black Pen: In the software, record the active pen as black.
(TS models only.)
Green Pen: In the software, record the active pen as green.
(TS models only.)
Blue Pen: In the software, record the active pen as blue.
(TS models only.)
Narrow Erase: Erase in a narrow band using a finger or the edge
of the eraser. (TS models only.)
Wide Erase: Erase in a wide band using the wide surface of the
eraser. (TS models only.)
Snapshot
Erase All
28
Snapshot/Erase All: Capture a snapshot of the board, clear the
software’s current board pane, and set the board for erasing.

note:NOTE:
Webster LT models: There are no pen or eraser icons on the
whiteboard icon strip, since the laser automatically detects your
tools.
Sounds
Webster TS and LT models provide audible feedback during normal
use.
Sounds on Webster TS Whiteboards
On Webster TS models, audible feedback indicates which tool you
are using. The whiteboard emits the following sounds:
• Fanfare: on startup and shutdown
• Beep: selecting a tool (pen or eraser)
• Hum: using an eraser function
• Clicks: touching or writing on the whiteboard
For information about changing Webster TS whiteboard sounds, refer
to “Customizing Sounds (TS Models Only)” on page 82.
Sounds on Webster LT Whiteboards
On Webster LT models, the sounds are as follows:
• Three beeps: on startup
• Two beeps: initiating recording
• One beep: button press
• Single warning beep: one minute before automatic power down
(Refer to “LT Whiteboard Automatic Power Down” on page 17.)
On Webster LT models, sounds cannot be modified.
Getting to Know the Software
Webster software enables you to edit, print, save, and distribute
board images that you have captured. These images are called
“snapshots.”
29

Snapshots are copies of the whiteboard (or computer screen) that
you can capture at any time. Snapshots are part of a Webster file that
you can save to disk. You can work with individual snapshots even
when the whiteboard is turned off or disconnected. Refer to
“Working with Snapshots” on page 47.
The Webster Software Main Window
When you launch Webster software, the main window appears.
Features of the main window are described below.
Snapshot Pane
Shows all snapshots
in the open file with
date/time taken.
Command Toolbar
Contains file, view, and
help tools and includes
annotation tools on a
Macintosh.
Selection Pane
Shows currently
selected snapshot or
board.
Current Board Pane
Shows contents of
current board.
30
Status Bar
Displays tips (left) and
status messages (right).
Annotation Toolbar
Contains pen, erase, and
zoom tools. On a
Macintosh, these tools
are in the command
toolbar.

The Snapshot pane is a scrolling list of snapshots in the currently
open Webster file. The Current Board pane displays whatever is
currently on the board, regardless of whether it is captured as a
snapshot. The Selection pane provides an enlarged view of one
snapshot or the current board. You can view and edit the image in
the Selection pane.
To view a snapshot or the current board in the Selection pane:
• Click a thumbnail image in the Snapshot pane or in the Current
Board pane.
The Webster Command Toolbar in Windows
The command toolbar provides shortcut access to projection mode,
playback, help (Windows only), NetMeeting (Windows only), and to
alternative views in Webster. On a Macintosh, the command toolbar
also includes annotation tools.
1 Standard Windows tools: New, Open Folder, Save, Print, Cut,
Copy, and Paste (or choose the same items from the File and Edit
menu). On a Macintosh, these buttons absent.
2 Views: Current Board, Normal, Snapshots, Selection, or Full
Screen (or choose the same items from the View menu). On a
Macintosh, view options are accessed on tabs in the main
window.
3 Projection Mode: Click to enter or exit projection mode (or
choose “Projection” from the Edit menu).
4 NetMeeting: Click to enter or exit a NetMeeting conference
(Windows only).
5 Help: Click to get help or context-sensitive help (Windows only).
31

6 Playback: Click to play, pause, stop, loop, play all snapshots, or
specify playback preferences.
The Webster Annotation Toolbar
Use the annotation tools:
• To edit an existing snapshot whether or not the whiteboard is
connected or turned on
• To edit the image of the current board in the software
On TS and LT models, annotation tools provide software shortcuts to
many of the tools that are also found on the whiteboard icon strip.
For example, you can capture a snapshot by tapping the Snapshot
icon on the whiteboard icon strip, or by clicking the Snapshot button
in the annotation toolbar.
On a Macintosh, the annotation tools are part of the command
toolbar at the top of the window. In Windows, the annotation toolbar
is a floating toolbar that can be docked on any edge of the program
window. The annotation toolbar includes the following functions:
32
1 Snapshot: Capture a snapshot of the current whiteboard
contents.
2 Snapshot/Erase All: Capture a snapshot of the current
whiteboard and erase the current board in the software.
3 Pen Color: Choose a pen color to add writing to an existing
snapshot or current board.
4 Erasers: Choose a wide or narrow eraser for erasures on the
snapshot or current board.
5 Pen Size: Choose the pen width that is recorded in the software.
6 Zoom: Zoom in or out of the software image of the board.
7 Fit to Window: Resize the image to fit the window.

The Annotation Toolbar in Full Screen View
In Full Screen view, the annotation toolbar
includes these functions:
1 Esc: Escape or exit Full Screen view.
2 Current board: Show the current
board.
3 Print: Print the image of the board
using the printer connected to the
computer without creating a
snapshot.
4 Zoom: Enlarge or shrink the image.
5 Fit to Window: Make the image fill the
screen.
6 Playback: Play, Pause, Stop, Loop,
Play All Snapshots, Playback
preferences.
7 Pen size: Large, medium, or small pen
width.
8 Erasers: Wide or narrow eraser.
9 Pen color: Pen color recorded in the
software.
10 Selection cursor: (Macintosh only)
With multiple monitors connected,
use this cursor to drag images between monitors.
11 Snapshot, Snapshot/Erase All: Capture an image of the board in
the software and continue, or capture the image and erase the
current board.
12 Forward/Back: Scroll through snapshots in the open Webster
file.
33

Showing, Hiding, and Moving the Toolbars
You can hide or move Webster toolbars.
To hide or show toolbars in Windows:
• Choose “Toolbar,” “Annotation Bar,” or “Status Bar” from the
View menu to show or hide the Webster command toolbar,
annotation toolbar, and status bar.
• Click the Webster icon in System Tray Menu and choose “Projec-
tion Toolbar” to show or hide the projection toolbar.
• To quickly close a floating toolbar, click the Close button on the
toolbar.
To hide or show toolbars on a Macintosh:
• Choose “Projection Toolbar” from the System Tray Menu in the
upper right corner of the desktop to show or hide the projection
toolbar.
• Click the Close box in the title bar to close the Full Screen anno-
tation toolbar and projection toolbar.
• Drag the size box in the Full Screen annotation toolbar to show
or hide the toolbar.
To move a toolbar in Windows:
• Drag the move handle on a docked toolbar, or the title bar of a
floating toolbar, to the new location.
To move a toolbar on a Macintosh:
• Drag the title bar or edge of the projection toolbar or the Full
screen annotation toolbar to the new location.
Whiteboard Pens and Eraser
The tool you use to write on the board depends upon which Webster
model you have.
34

note:NOTE:
Writing and Erasing with Webster TS Models
The Webster TS whiteboard is touch sensitive and sends writing data
to your computer by detecting a single point of pressure. Use
standard dry-erase markers to write on the board. Specify the color
that is recorded in the software by tapping the corresponding pen
color icon on the board.
The active pen color is indicated by the LED next to the pen icon on
the board. The default pen color recorded in the software is black. To
change the default color at startup, see “Customizing Pens and
Erasers” on page 80.
When you choose a pen color and write, sounds from the board
provide audible feedback to confirm that the software is recording. A
selected pen color (or eraser) stays in effect until you select a
different one.
If the whiteboard is inactive for 45 seconds after erasing, Webster
automatically switches to the last used pen to protect your work. To
turn this feature off or to change the delay time, see “Customizing
Pens and Erasers” on page 80.
Erase the board using the large circular felt eraser provided, or using
your finger for small erasures. To record erasures in the software, tap
the Wide or Narrow Eraser icon on the board before you erase.
Writing and Erasing with Webster LT Models
The LT whiteboard uses two intersecting lasers to detect reflected
light from the pen, stylus, or eraser. The reflected light causes a
message to be sent to the computer so the Webster software
automatically detects which pen color or eraser tool you are using.
Always use Webster LT dry-erase markers and erasers with reflective
bands to write and erase on the board. Although regular dry-erase
markers will not damage your board, they will not be recorded by the
Webster software. Make sure that you do not block the reflective
bands or the lasers.
35

Erase using the large or small circular felt eraser provided. Use only
the flat side of the eraser, with the felt pad flat against the surface of
the board.
Writing and Erasing with Webster IPD and IRP Models
The IPD and IRP models are screens for projected computer images
and thus always operate in projection mode. (Refer to “Using
Webster with a Projector” on page 37.) These models use two
intersecting lasers to detect strokes of the stylus on the board.
Always use the battery operated infrared stylus to point and
annotate on the board.
To begin writing:
1 Choose a pen color on the projection toolbar.
2 Write on the board with the stylus.
To erase writing on the board:
• Tap the small or large eraser button in the projection toolbar
before you erase with the stylus.
36

Using Webster with a Projector
With a projector connected to your Webster TS or LT system, a variety
of powerful options becomes available. When you project the
computer desktop onto the board, the board acts as though it were a
large touch-sensitive computer monitor. Webster IRP and IPD models
always display your computer screen, so these models always
operate in projection mode.
You can use the stylus or your finger (on TS models) as a mouse to
control your computer and all the software on it, thus freeing you to
focus entirely on the whiteboard.
From the whiteboard, you can control interactive presentations using
software such as PowerPoint. Webster enables you to write over the
image displayed on the board and capture the resulting image as a
snapshot. You can:
• Use Webster as a touch screen to control your computer
• Run slide presentations entirely from the front of the room
• Capture and mark up any image from your computer
Getting Started in Projection Mode
Before using projection mode, install Webster software on your
computer and connect the computer to the whiteboard. Refer to
“Installing Webster Software” on page 18 if these steps are not yet
completed.
To enter projection mode:
1 Connect your computer to the projector and turn on the
projector, the Webster hardware, and the computer.
2 If you are using the Webster TS or LT models, move the projector
so that the image of the computer desktop projects squarely
onto your whiteboard’s white area, without covering the icon
strip or whiteboard frame. The projected image need not fill the
white area completely.
3 Launch the Webster software.
37

4 Choose “Projection” from the Edit menu; click the projection
button in the command toolbar; or tap the Projection icon in the
whiteboard icon strip (Webster TS and LT models). The following
alignment window is projected from the software onto the
board:
note:NOTE:
If the alignment window does not appear, it might be because
another user selected an option in Webster to use the previous
alignment when starting up. To change that option and view the
alignment window, choose “Options” (or “Preferences”) from the
Edit menu. On the Projection tab, uncheck “Remember alignment
points.” Repeat Step 4.
5 On the board, touch each of the four corners of the projected
image, following the instructions you see on the screen. If you
use the Webster TS models, you can use your fingertip or the
stylus provided to tap the four points. If you use the Webster LT,
IRP, or IPD models, use the reflective stylus provided to tap the
four points.
At the completion of this procedure, the Webster system is in
projection mode, the projection toolbar appears, and you are ready
to use the whiteboard as a touch screen to control your computer.
38

Refer to “The Projection Toolbar” on page 40 for information about
the projection toolbar. Refer to “Customizing Projection Mode
Settings” on page 85 for additional projection mode options.
To exit projection mode:
• In the command toolbar click the projection button; choose
“Projection” from the Edit menu; or tap the Projection icon in
the whiteboard icon strip (Webster TS and LT models).
Alignment If You are Already in Projection Mode
Generally, you align projection only when you enter projection mode.
However, if you move the projector or whiteboard, you might need to
re-align while you are in projection mode.
You know that you need to re-align the board if the cursor does not
align with the point you touch on the board.
To re-align in projection mode:
1 On the computer, click the Align button in the projection toolbar.
note:NOTE:
2 Follow the instructions you see on the board.
If you still have trouble with alignment after using this procedure, try
to position the projector so that the image is more squarely projected
onto the board. (Some projectors improperly correct “keystoned”
displays.)
Using Webster in Projection Mode
In projection mode, use the stylus (or your finger in Webster TS
models only) as a mouse to control the software projected on the
board.
39

To use the stylus (or your finger in Webster TS models) as a mouse:
• Tap the whiteboard once to click.
• Tap the whiteboard twice rapidly to double-click.
• Hold your finger or the stylus down and pull it across the surface
to simulate a click-and-drag operation (e.g., to move a dialog
box).
• In Windows, for a right click, tap the “Right Click” button on the
projection toolbar, then tap the whiteboard. To right click on
Webster IRP or IPD models, hold the bottom button on the stylus
as you tap the board.
Right Click button
on IRP and IPD stylus
The Projection Toolbar
When you enter projection mode, a new toolbar appears with a
single row of tools. A second row of tools appears when Webster is
not the active window. The projection toolbar provides the following
tools:
40

1 Snapshot: Capture the board image as a snapshot in the
Webster software. The projected computer screen and writing on
the board are both included when Webster is not the active
application.
2 Screen Snapshot: Capture only the projected computer screen
as a snapshot.
3 Esc: Performs the equivalent to the “ESC” keystroke in the active
application.
4 Re-align: Re-align the projected image.
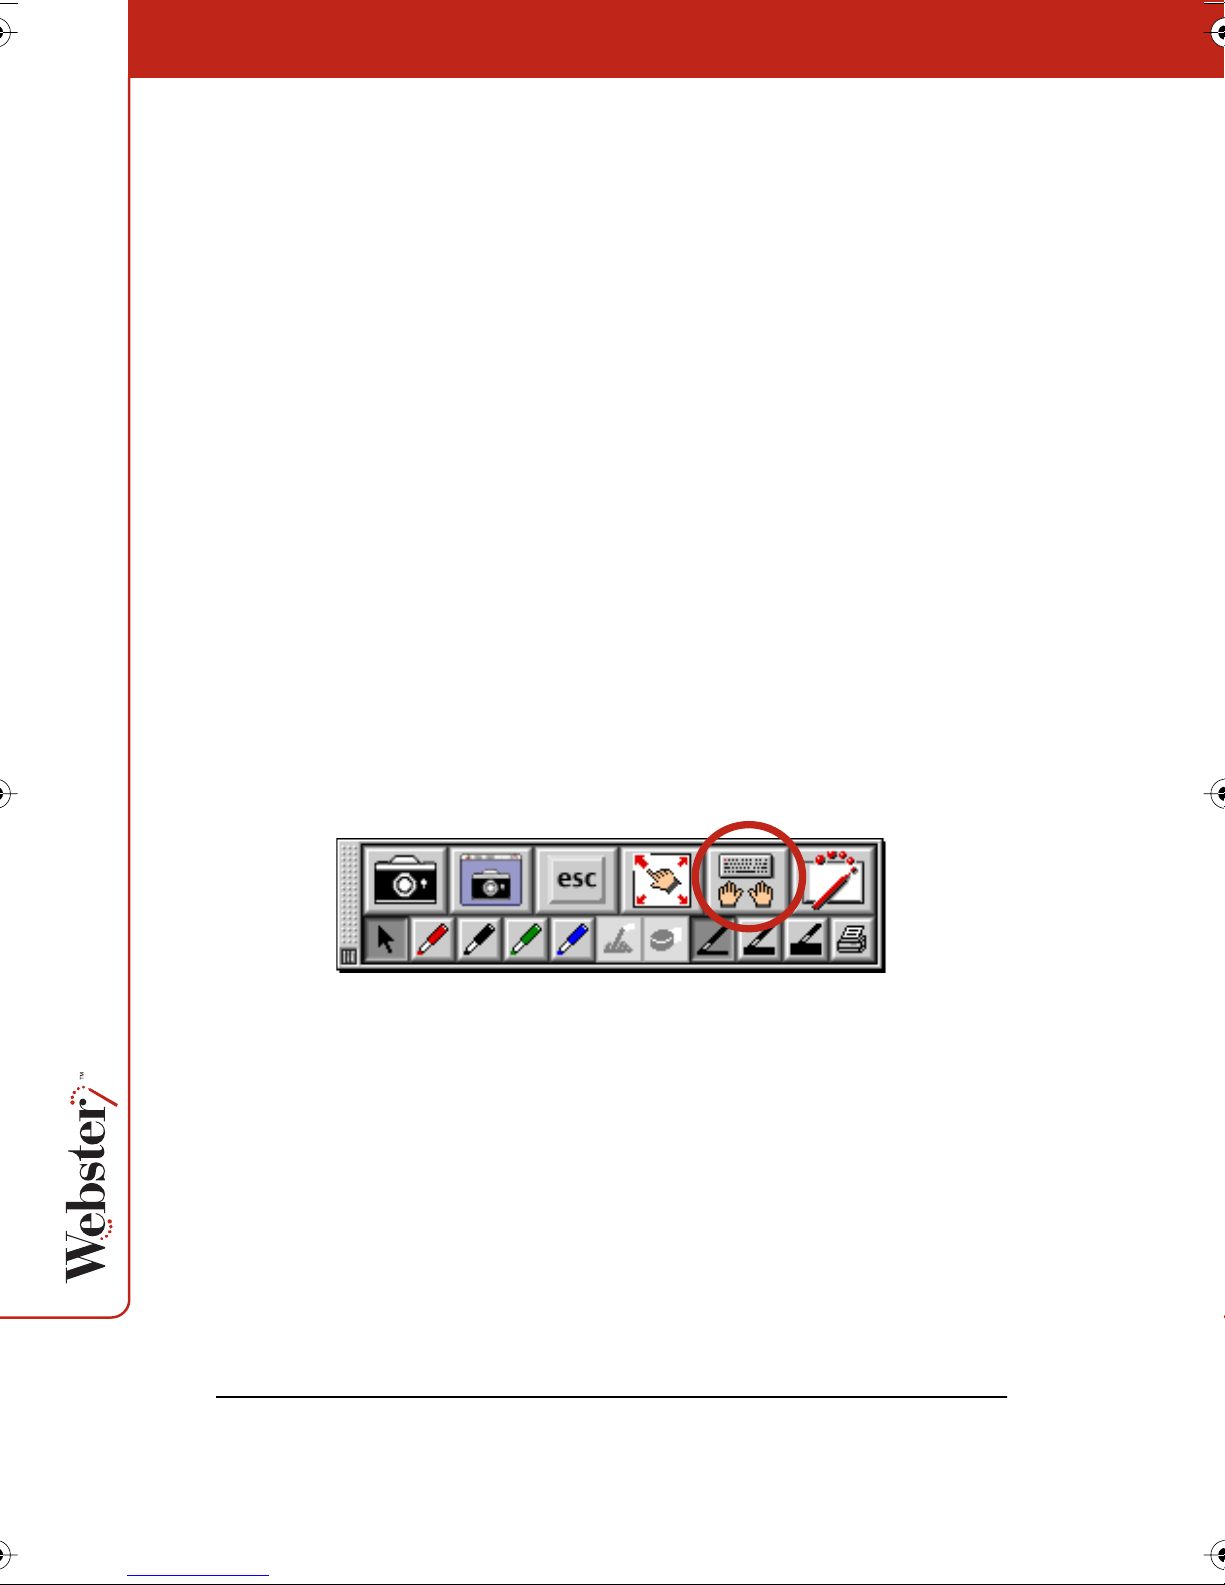
5 Keyboard: Show and hide the on-screen keyboard.
6 Right Click (Windows only): For a right mouse click, tap this
button, then tap the board.
Show Webster (Macintosh only): Bring the Webster window to
the front.
7 Selection Tool: Move the cursor instead of writing on the board.
Click to stop projection mark-up and return to pointing the
mouse.
8 Pen Color: Mark up the projected image.
9 Erasers: Erase the projection mark-ups.
10 Pen Width: Change pen width for mark-ups.
11 Print: Print the current board image, including the projected
image, on the default printer connected to the computer.
41

Projection Mark-Ups
In projection mode, you can mark up the projected computer screen.
For example, you can mark up PowerPoint slides on the whiteboard
during your presentation:
To mark up a projected image:
1 Using the stylus, tap a pen color button on the projection
toolbar. (Refer to “The Projection Toolbar” on page 40.) This
freezes the current screen so your strokes produce writing
instead of moving the selection tool.
2 Write on the projected computer screen with the stylus. Webster
records your writing.
3 Tap the Snapshot button in the projection toolbar to capture the
contents of the board.
4 When done, tap the Selection Tool button in the projection
toolbar to erase your mark-ups and resume using the cursor.
Snapshots in Other Applications
In projection mode when Webster is not the active application, you
can capture a snapshot that includes both the projected computer
screen and the writing, or a snapshot that includes just the projected
computer screen. Refer to “Working with Snapshots” on page 47.
42

note:NOTE:
To capture a snapshot of the projected computer screen, projection
mark-ups, and writing on the board:
• Tap the Snapshot button in the projection toolbar, tap the Snap-
shot icon on the whiteboard (TS and LT models), or choose
“Snapshot” in the Edit menu.
To capture a snapshot that includes only the projected computer
screen and projection mark-ups:
• Tap the Screen Snapshot button in the projection toolbar. Refer
to “The Projection Toolbar” on page 40.
The projected image and writing are recorded in Webster, not in the
original application file (e.g., PowerPoint).
For more information on using PowerPoint with Webster, see “Using
Projection with PowerPoint” on page 45.
Snapshots When Webster is the Active Application
In projection mode when Webster is the active application, you can
capture a snapshot of the current board or a snapshot of the
projected computer screen.
To capture a snapshot including the writing on the current board (but
not the projected Webster application screen):
• Tap the Snapshot button in the projection toolbar, tap the Snap-
shot icon on the whiteboard (TS and LT models), tap the Snapshot icon on the annotation toolbar, or choose “Snapshot” in
the Edit menu.
To capture a snapshot of the projected computer screen:
• Tap the Screen Snapshot button in the projection toolbar. Refer
to “The Projection Toolbar” on page 40.
43
Toggling Between Webster and Other Applications
In projection mode, you can work with multiple software
applications that are all projected on the board.
To bring the Webster application to the front:
• TS and LT models only: Tap the Show Webster icon on the white-
board icon strip. Tap again to send Webster to the back.
• Windows only (any Webster model): Choose “Webster applica-
tion” from the system task bar or choose “Go To Webster” from
the System Tray Menu.
• Macintosh only (any Webster model): Tap the Show Webster but-
ton on the projection toolbar, or choose “Go To Webster” from
the System Menu in the menu title bar.
Using the On-Screen Keyboard
In projection mode, Webster provides an on-screen keyboard that
enables you to enter text from the whiteboard.
To launch the on-screen keyboard, tap the Keyboard button on the
projection toolbar.
Use the on-screen keyboard for entering text and performing
keyboard functions as follows:
• To enter text, move the cursor to a text entry location (e.g., in a
word processor, web browser, or dialog box), then tap the keys
of the on-screen keyboard.
• To use Shift, Ctrl, Alt, Caps, Command, or Option, tap the pro-
jected key (it changes color), then the key it modifies (e.g., Ctrl +
s to save). The Caps key remains active until you tap it again.
• To perform keyboard actions, tap a key (e.g., F1 for Help).
44

note:NOTE:
• In Windows, to change the keyboard size, tap the “Small,”
“Medium,” or “Large” key on the right.
• To move the keyboard, tap and drag the title bar or the keyboard
background and release it in the desired location.
• To hide the keyboard, tap the Keyboard button on the projection
toolbar.
When using the Webster on-screen keyboard to enter text in a dialog,
the keyboard automatically positions itself to maximize the dialog’s
visibility.
Using Projection with PowerPoint
In projection mode, you can control a Microsoft PowerPoint
presentation from the whiteboard with no need for a mouse or
keyboard to navigate the slides.
To use Webster in projection mode with PowerPoint:
1 Enter projection mode in Webster. (Refer to “Using Webster in
Projection Mode” on page 39.)
2 Launch PowerPoint and begin the slide presentation.
To move forward and backward through PowerPoint slides (Webster
TS and LT models only):
• Tap the Forward and Back icons on the whiteboard icon strip.
To mark up a slide:
• Tap a pen button in the projection toolbar and begin writing.
To capture all the board contents, which may include writing on the
board, the projected slide, and projection mark-ups:
• Tap the Snapshot button in the projection toolbar.
• TS and LT models only: Tap the Snapshot or Snapshot/Erase All
icon on the whiteboard icon strip.
To capture only the projected image and projection mark-ups:
• Tap the Screen Snapshot button in the projection toolbar.
45

Printing in Projection Mode
In projection mode, you can print a copy of the board and projected
image using a printer connected to your computer.
To print a copy of the board:
• TS and LT models only: Tap the Print icon on the whiteboard icon
strip. (Prints to the default printer.)
• Tap the Print button in the projection toolbar. (Prints to the
default printer.)
• Choose “Print” from the Webster File menu. (Opens the Print
dialog, where you can change printers.)
46

Working with Snapshots
A snapshot captures the current image of the board in the Webster
software. Taking a snapshot does not change the image; it simply
inserts the image into a Webster file.
Snapshots can be:
• Edited
• Saved
• Printed
• Sent in e-mail
• Exported
• Published as HTML or Adobe Acrobat PDF files
Creating a Snapshot
To capture a snapshot:
• TS and LT models: Tap the Snapshot icon on the whiteboard icon
strip. Refer to “Webster Whiteboard Icons” on page 28.
• Click the Snapshot button in the annotation toolbar. Refer to
“The Webster Annotation Toolbar” on page 32.
• Choose “Snapshot” from the Edit menu.
• In projection mode, tap either the Snapshot or Screen Snapshot
button in the projection toolbar. Refer to “The Projection Toolbar” on page 40.
To capture a snapshot and start over with a blank current board in
the software:
• TS and LT models: Tap the Snapshot/Erase All icon on the white-
board icon strip. Refer to “Webster Whiteboard Icons” on
page 28.
• Click the Snapshot/Erase All button on the annotation toolbar.
• Choose “Snapshot/Erase All” from the Edit menu.
47

note:NOTE:
To erase the current board without capturing a snapshot:
• Choose “Erase All” from the Edit menu.
The snapshot and erase all functions are disabled if you made no
changes on the whiteboard or the current board (either writing or
erasing).
Choose “Save” from the File menu to save all your snapshots in a
Webster file on the hard drive. Refer to “Working with Webster Files”
on page 50.
Taking Automatic Snapshots
Webster can automatically capture snapshots, enabling you to
continue through a presentation with no distractions. Webster
detects periods of inactivity and captures the contents of the board
after a specified duration.
To take snapshots automatically:
1 Choose “Options” (Windows) or “Preferences” (Macintosh) from
the Edit menu.
2 Click the “General” tab.
3 Check “Auto-Snapshot.”
4 Enter the duration of inactivity that triggers the snapshot.
5 Click “OK.”
This option does not create duplicate snapshots; if no change is
made during the specified interval, no snapshot is taken.
48

Viewing Snapshots
When you capture a snapshot of the board, a miniature “thumbnail”
image appears in the Webster software in the Snapshot pane.
Snapshots appear in the order you create them and include a
caption with the date and time they were created.
• To view and edit a larger image of a snapshot in the Selection
pane, click the snapshot.
• To scroll through the snapshots, use the Snapshots pane scroll
bar located on the right edge of the Snapshot pane or choose
“Next Snapshot” or “Previous Snapshot” from the View menu.
• To fill the window with a snapshot, double-click the snapshot or
click a snapshot and choose “Selection” from the View menu.
• To view all snapshots in the currently open Webster file, click the
Snapshots view button in the toolbar (Windows) or view tab
(Macintosh), or choose “Snapshots” from the View menu
.
• To zoom in on the Selection pane, click the zoom in button in
the annotation toolbar or choose “Zoom In” from the View
menu, then click an area in the Selection pane.
49

• To zoom out on the Selection pane, click the zoom out button in
the annotation toolbar or choose “Zoom Out” from the View
menu.
• To return the snapshot to its original size after zooming in or out,
click the Fit to Window button on the annotation toolbar or
choose “Fit to Window” from the View menu.
Selecting Snapshots
You can view, edit, copy, move, rename, publish, playback, add a
backdrop to, or export the selected snapshot(s). You can also send
snapshots via e-mail.
To select a snapshot:
• Click the snapshot in the Snapshot pane.
To select all snapshots:
• Choose “Select All” from the Edit menu.
To select a range of snapshots:
• In Windows: Click the first snapshot, then press the Shift key
and click the last snapshot or drag a selection rectangle around
the snapshots.
50
• On a Macintosh: Drag a selection rectangle around the snap-
shots.
To select several non-sequential snapshots:
• In Windows: Hold down the Ctrl key and click all desired snap-
shots.
• On a Macintosh: Hold down the Shift key and click all desired
snapshots.
Working with Webster Files
When you capture a board image as a snapshot in the Webster
software, the image becomes part of a Webster file. (In Windows,
these files have the file extension .wbd.) Snapshots are not saved
until you save the Webster file.

A Webster file records all pen and eraser strokes. All writing and
erasing activity during a session is recorded in the same file unless
you open a different one. In Windows, whenever the software is
running, one file (either a saved or an untitled file) must be open.
When you launch the Webster software, you can choose whether a
blank Webster file opens or the last used file opens. (Refer to
“Customizing General Options” on page 79.)
Here are some ways to keep your files organized:
• Create a folder for each topic and a Webster file for each ses-
sion.
• Create a Webster file for each topic.
• Create a Webster file for each day or time period.
Creating a File
To create a new Webster file:
• Choose “New” from the File menu. If the existing file contains
unsaved changes, you are prompted to save the file.
When you open a new file, Webster options enable you to choose
whether or not the contents of the current board remain visible in the
new file. (Refer to “Customizing General Options” on page 79.)
Saving a File
Activity is recorded as long as the system is on and the Webster
software is running. Snapshots that you capture are not saved to
disk until you save the currently open file.
To save the file:
1 Choose “Save As” from the File menu.
2 Enter a name for the file.
3 Browse to the file destination.
4 Click “OK.”
51

Opening a File
To open an existing Webster file:
1 Choose “Open” from the File menu.
2 Select the file in the standard dialog that appears.
In Windows, you can also choose a recently-opened file from the list
at the bottom of the File menu.
When you open a file, you are prompted to save if the current file
includes unsaved data.
Closing a File
To close a Webster file:
• Choose “Close” from the File menu.
• (Macintosh) Click the Close box in the upper left corner of the
Webster window.
If the file contains unsaved data, you are prompted to save it.
In Windows, closing a Webster file opens a new untitled file, because
Webster must always have an open file.
To close a file and quit Webster:
• Choose “Exit” (Windows) or “Quit” (Macintosh) from the File
menu.
• (Windows) Click the Close box in the upper right corner of the
Webster window.
If the file contains unsaved data, you are prompted to save it.
Password Protecting a File in Windows
In Windows, you can password protect a Webster file. A password
protected file can only be opened by entering the correct password.
If you create a password, it applies only to the current Webster file.
After you define a password for a file, you can continue working, but
once you close it, you must enter the password to open it again.
When a file that is password protected is open, you can change or
delete the password without knowing the existing password.
52

To password protect a file in Windows:
1 Open the Webster file.
2 Choose “Password” from the File menu. The following dialog
appears.
3 Enter a password.
4 Enter the password a second time as confirmation.
5 Click “OK” to apply your password and close the dialog.
6 Save the file.
Playing Back Snapshots
Webster software records all writing and erasing in a snapshot and
enables you to review everything you did in the order it occurred. In
addition, you can play back a sequence of snapshots. To play them
back in another order, reorganize the snapshots. Refer to “Copying
and Moving Snapshots” on page 54.
Webster playback shortcuts appear on the command toolbar.
1 Play: Click to play back the selected snapshot, or choose “Play”
from the Playback menu.
2 Pause: Click to pause playback, or choose “Pause” from the
Playback menu. Click again to continue playback.
3 Stop: Click to stop playback, or choose “Stop” from the Playback
menu. Click Play to continue playback.
53

4 Loop: To repeat playback in a continuous loop, click the Loop
button or choose “Loop” in the Playback menu, then click Play.
To return to normal playback, click Loop again.
5 Play All: To playback all the snapshots in the Webster file (not
just the selected snapshots), click the Play All button or choose
“Play All” in the Playback menu, then click Play. To return to
normal playback, click Play All again.
6 Timing: Click to specify playback timing; or choose “Options”
(Windows) or “Preferences” (Macintosh) from the Edit menu and
click the Playback tab. Refer to “Customizing Playback Options”
on page 86.
Copying and Moving Snapshots
You can move or copy snapshots:
• Within the current Webster file
• Into another Webster file
• Into another application
To move one or more snapshots within an open Webster file:
• Drag the selected snapshot(s) to reposition them within the
Snapshot pane.
To copy one or more snapshots within the same Webster file:
• Select the snapshot(s) and choose “Duplicate” from the Edit
menu.
To copy one or more snapshots to another Webster file:
1 Select the snapshot(s).
2 Choose “Copy” from the Edit menu.
3 Open another Webster file.
4 Click the Snapshot pane.
5 Choose “Paste” from the Edit menu.
54

To move a snapshot into another application:
• Click and drag the selected snapshot(s) into another open appli-
cation. (Windows only: Refer to “Customizing Image Export” on
page 83 to choose bitmap or Windows metafile format for the
image you drop into another application in Windows.)
To copy a snapshot to another application:
1 Select the snapshot(s).
2 Choose “Copy” from the Edit menu in Webster.
3 Choose “Paste” from the Edit menu in the other application.
Exporting Snapshots
Webster enables you to export a snapshot as a graphic file that you
can use in other applications.
In Windows, you can export a snapshot in bitmap (.bmp), Windows
metafile (.wmf), JPEG (.jpg), Adobe PDF (.pdf) and TIFF (.tif) formats.
On a Macintosh with QuickTime installed, you can export a snapshot
in bitmap, compressed PICT, JPEG, MacPaint, Photoshop, PNG,
QuickTime image, SGI, TGA, Adobe PDF, and TIFF formats.
note:NOTE:
QuickTime is included on your Webster installation CD. Use the
“Recommended Install” or “Full Install” option to assure full support
of the Webster export functions.
To export a snapshot for use in other applications:
1 Open the Webster file.
2 Select the snapshot(s). Refer to “Selecting Snapshots” on
page 50.
3 Choose “Export Image” from the File menu.
4 Browse to the location for the exported file and enter a file
name.
5 Select the desired export file format from the drop-down list.
55

note:NOTE:
6 Click “Export” (Windows) or “Save” (Macintosh).
If you selected multiple snapshots to export, the exported files have
the file name you provided followed by a sequential number. For
example, if you named the export file Myfile, the snapshots are
named Myfile1, Myfile2, Myfile3, etc.
If you selected multiple snapshots for export in Adobe PDF format,
the result is one Adobe PDF file that includes all the snapshots.
To change default settings for exported images, see “Customizing
Image Export” on page 83.
Renaming Snapshots
In the Snapshot pane, each snapshot is named with a caption
indicating the date and time it was created. When you print a
snapshot, this caption is included as a header (Macintosh) or footer
(Windows).
To change a snapshot caption:
note:NOTE:
1 Select the snapshot. The snapshot and caption are highlighted.
2 Click the caption to select the text.
3 Enter the new caption.
4 Press Enter or click anywhere outside the caption.
Deleting Snapshots
You can delete a snapshot without affecting the current board image.
In Windows, Webster has no undo for individual actions; however,
you can revert to the last saved file by choosing “Revert” from the File
menu. On a Macintosh, choose “Undo” in the Edit menu to undo the
last action.
To delete one or more snapshots:
1 Select the snapshot(s).
56

note:NOTE:
2 Press Delete (or choose “Delete” from the Edit menu).
Editing Snapshots
After you capture a board image as a snapshot, you can edit the
snapshot in Webster software by writing or erasing using the tools in
the annotation toolbar. You can also edit the current board using the
tools in the annotation toolbar prior to printing or capturing it as a
snapshot.
In Windows, when you edit a snapshot in the software, the changes
you make are permanent. However, you can revert the file to its
contents at the last save by choosing “Revert” from the file menu. On
a Macintosh, you can undo the last action by choosing “Undo” from
the Edit menu.
To edit a snapshot:
1 Select a snapshot. An enlarged view appears in the Selection
pane.
2 Choose a pen color and pen size, or choose the eraser from the
annotation toolbar.
3 Draw or erase on the snapshot in the Selection pane.
4 To save the changes, save the Webster file.
To edit the image of the current board:
1 Select the Current Board pane.
2 Choose a pen color and pen size, or choose an eraser from the
annotation toolbar.
3 Draw or erase on the current board in the Selection pane.
4 To capture the changes in a snapshot, click the Snapshot button
in the annotation toolbar.
57

Printing Snapshots in Windows
You have the option to print the board image at any time. In
Windows, you can customize the printed colors and the header and
footer. For information about printing on the Macintosh, refer to
“Printing Snapshots on a Macintosh” on page 63.
To print a snapshot in Windows:
1 Select the snapshot(s) to print, or the current board.
2 Choose “Print” from the File menu or click the Print button in the
Webster command toolbar. The following dialog appears:
58
3 Specify the following print options:
• Printer name and printer properties
• Which items to print (snapshots and/or current board)
• Number of copies
• How to print colors
• Orientation
• Header and/or footer formats
Printing Colors in Windows
The Print dialog enables you to specify the colors used for the
printed copy.

• Print pen colors as black: Select this option when printing to a
black and white printer to print pen colors in solid black. On
black and white printers, colors are normally differentiated
using shades of gray.
• Print white background: Use this option to print a white back-
ground regardless of the background color specified using “Colors” in the Edit menu. If this option is unchecked, your nonwhite background prints in color.
Customizing Headers and Footers in Windows
By default, snapshot printouts include the following footers:
Projected sales Webster notes Snapshot taken 2/31/03
• Webster file name
• Webster notes
• Date of snapshot
You can edit, delete, or format the header or footer by changing the
options in the Print dialog.
To customize headers or footers in Windows:
1 Choose “Print” from the File menu.
59

2 Click in a header/footer field and clear the field.
3 To add or format a header/footer, click in a field and click
“Commands.” A list of commands appears. Add or change
header or footer information by selecting commands from the
list.
Command
Snapshot Date
(Short Format)
Snapshot Date
(Long Format)
Snapshot Time &H or &h Inserts the time the snapshot was
Snapshot Caption &M or &m Inserts the snapshot caption.
Current Date (Short
Format)
Current Date (Long
Format)
Current Time &T or &t Inserts the current time.
Filename &F or &f Inserts the file name.
Total Pages &N or &n Inserts the total number of pages in
Keyboard
Shortcut
&g Inserts the date the snapshot was
taken in the format 01/01/00.
&G Inserts the date the snapshot was
taken in the format January 1, 2000.
taken.
&d Inserts the current date in the format
01/01/00.
&D Inserts the current date in the format
January 1, 2000.
the file.
Description
Page Number &P or &p Inserts the page number on each
Ampersand && Inserts the ampersand character (&).
Bold Text &B or &b Formats all the following text in the
Italic Text &I or &i Formats all the following text in the
Underline Text &U or &u Underlines all the following text in
60
page.
field in boldface type.
field in italic type.
the field.
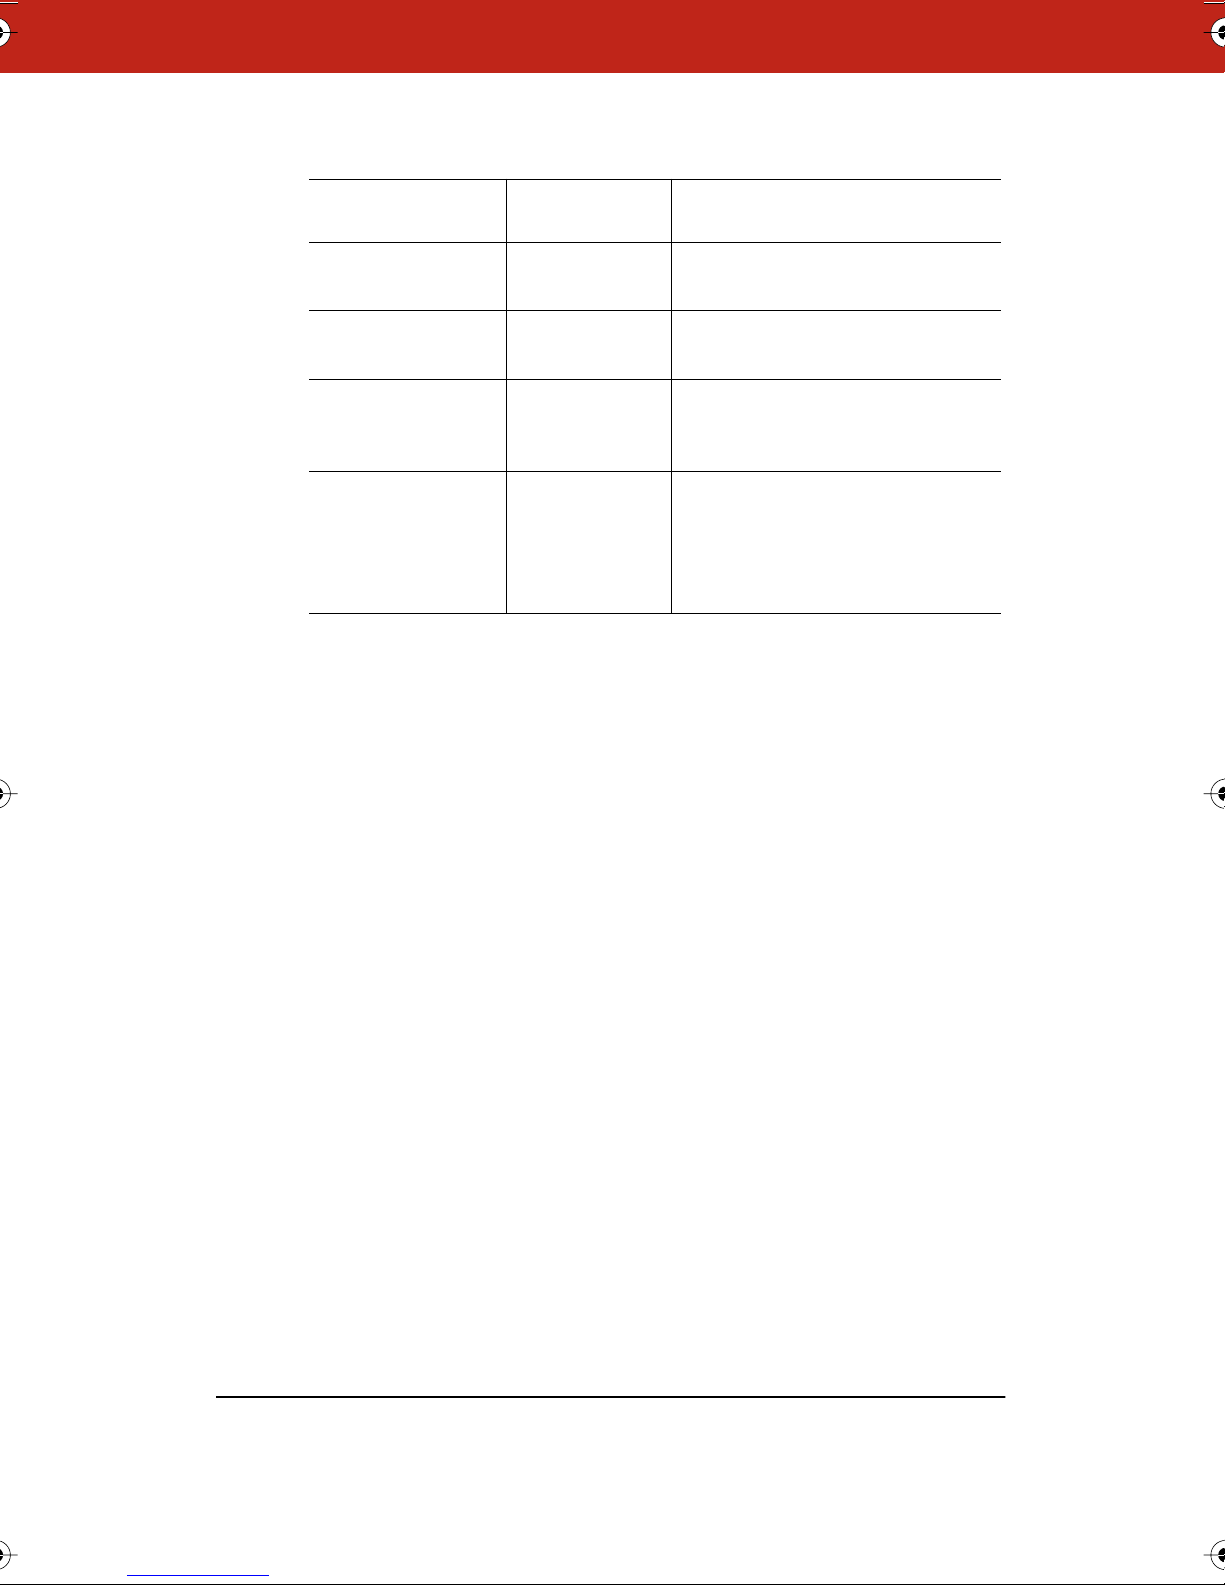
Command
Strike Out Text &S or &s Strikes out all the following text in
Default Font &Z or &z Returns all the following text to the
Font Size &nn Sets the point size of all the follow-
Font Name &"font name" Sets all the following text in the
Keyboard
Shortcut
Description
the field.
default font (Arial).
ing text to the number you specify in
nn (e.g., 08, 12, 18).
specified font. Include the quotation
marks and type the font name
exactly as it appears in the font
folder.
Use the following guidelines when applying header/footer
commands:
• Always place commands immediately before the text to which
they apply. For example, to print the word Company in bold and
italics, enter &B&ICompany.
• You can use multiple commands in a field. Place a comma
between computer-generated data (e.g., file name, page number) and custom data (e.g., font name, boldface).
• If you use more than one command in a field and the commands
conflict, the one closest to the text takes precedence. For example, if you enter &“Courier”&“Arial”Company, the word Company prints in Arial.
61

To preview the snapshot before it prints:
1 Choose “Print Preview” from the File menu. The following dialog
appears:
2 View each of your snapshots using the navigation buttons and
scroll bar.
3 Click “Print” to open the Print dialog, or click “Close” to close
the window and return to the main window.
Printing Resolution
The vector-based data that the software records are output at the
resolution of the output device, for example, 72 dpi for a typical
monitor or 1200 dpi for a 1200 dpi printer. Because the data are
independent of resolution, the higher the resolution of the monitor
or printer, the smoother the output.
62

Printing Snapshots on a Macintosh
You have the option to print the board image at any time. For
information about printing in Windows, refer to “Printing Snapshots
in Windows” on page 58.
To print snapshot(s) on a Macintosh:
1 Select a snapshot(s) to print or the current board.
2 Choose “Print” from the File menu. The Print dialog for your
printer opens. A sample Print dialog is shown below.
3 Choose “Webster” from the drop down list.
4 To specify the items to print, click a radio button beside “All
Snapshots and Current Board,” “Selected Snapshot(s),” or
“Current Board.”
5 Click “OK.”
To view a preview of the printed snapshot on a Macintosh:
1 Choose “Print Preview” from the File menu.
2 To scroll through all the snapshots in the Webster file, click the
navigation buttons at the top right corner of the window.
3 To specify the items to print, click “Selection.” The Print Settings
dialog opens and you can choose between printing “All
63

Snapshots and Current Board,” “Selected Snapshot(s),” or
“Current Board.”
4 Click “Print” to open the Print dialog, or click “Cancel” to close
the window and return to the main window.
Each snapshot printout contains a footer that includes the file name,
the snapshot caption, and the page number. To change the footer,
rename the snapshot. Refer to “Renaming Snapshots” on page 56.
Adding a Backdrop to a Snapshot
To help you create custom snapshots that include a repeated image
or design, Webster enables you to add a backdrop to your snapshots.
Backdrops are image files that you created in another application or
in Webster. You can use backdrops:
• As grids or patterns for repeated use (such as music paper)
• As forms (such as patient admission forms)
• For headers or footers (for example, to incorporate a logo as
shown below)
Backdrops can be reused even after the whiteboard is erased. You
can remove a backdrop at any time, and only one backdrop can be
used in a snapshot at a time. Backdrops are not available for
snapshots taken in projection mode. Refer to “Using Webster with a
Projector” on page 37.
64

Creating a Backdrop File
A backdrop can be a Webster file or any file in the following formats:
• Bitmap (.bmp)
• JPEG (.jpg)
• TIFF (.tif)
• Windows metafile (.wmf) (Windows only)
• Compressed PICT (Macintosh only)
• MacPaint (Macintosh only)
• Photoshop (Macintosh only)
• PNG (Macintosh only)
• QuickTime Image (Macintosh only)
• TGA (Macintosh only)
To create a backdrop file:
1 Using any application that can create a file type from the list
above, create a file that contains the image you want to add to a
snapshot.
2 Save the file. (Hint: use a file name that is easy to recognize for
later use, such as Backdrop.tif.)
Adding a Backdrop File to a Snapshot
You can add a backdrop file to one or more snapshots in your current
Webster file at any time.
To add a backdrop to a snapshot in Windows:
1 (optional) Select the snapshot(s) to which you want to add the
backdrop.
2 Choose “Add” from the Backdrop menu.
3 Click “Browse” to locate the backdrop file.
4 To add the backdrop to the selected snapshot(s), click “Add to
Selection.”
5 To add the backdrop to all snapshots in the file, click “Add to
All.”
65

To add a backdrop to a snapshot on a Macintosh:
1 Select a snapshot or the current board.
2 Choose “Add” from the Backdrop menu.
3 Browse to locate the backdrop file. The backdrop file can be any
file in one of the supported formats. (Refer to “Creating a
Backdrop File” on page 65.)
4 Click “Open.” The backdrop is added to the selected snapshot or
current board.
Inserting a Screen Shot as a Backdrop in Windows
In Windows, you can add a screen shot of the computer desktop to a
snapshot as a backdrop. Use this feature, for example, to annotate:
• Your desktop
• A Webster window
• A window from another application
To insert a screen shot as a backdrop:
note:NOTE:
1 (optional) Select the snapshot(s) to which you want to add the
backdrop.
2 Choose “Add from Screen” from the Backdrop menu.
3 Arrange the screen contents as desired (including opening or
closing other applications).
To avoid capturing the Webster software, minimize it first.
4 Press F11. Although there is no visible or audible feedback, the
screen shot is added to the snapshot(s).
5 View the snapshot with the new backdrop in Webster.
66

Changing or Removing a Backdrop
A snapshot can contain only one backdrop at a time.
To change a backdrop in a snapshot:
• Add a backdrop to the snapshot. You are prompted to replace
the existing backdrop.
To remove a backdrop from a snapshot:
1 Click a snapshot in the Snapshot pane to display it in the
Selection pane.
2 To remove the selected backdrop, choose “Remove” from the
Backdrop menu. To remove backdrops from all snapshots in the
open file, choose “Remove All” from the Edit menu.
3 Click “Yes” to confirm the removal.
Backdrops Provided with Webster
Webster software includes a folder of backdrops. The folder is
located in Program Files/Webster folder (Windows) and the Webster
application folder (Macintosh). Within the Backdrop folder,
backdrops are organized by model for Webster TS and LT systems.
Backdrops included are:
• Graph paper
• Ruled sheets
• Penmanship lines
• Music staves
• Grid lines
• Sports grids
• Maps
Additional backdrops may be downloaded from
www.polyvision.com.
67

note:NOTE:
Sending a Snapshot via E-mail
On a Macintosh, you can send snapshots via e-mail as an Adobe PDF
file. In Windows, you can send snapshots via e-mail in the following
file formats:
• Bitmap (.bmp)
• Windows metafile (.wmf)
• Webster file (.wbd)
• Adobe PDF (.pdf)
Webster software must be installed on the recipient’s computer for
them to be able to read the Webster file.
In Windows, Webster uses your standard MAPI-enabled e-mail
application (e.g., Microsoft Outlook) to send the Webster file as an email attachment. On the Macintosh, Webster uses AppleScript to
support a variety of e-mail applications including AOL, Mailsmith,
Eudora, OS X Mail, Microsoft Outlook, and Microsoft Entourage.
Certain Internet Service Providers cannot handle large file sizes (e.g.,
in excess of 1000 KB). If your e-mail system cannot accommodate
large files, send several smaller ones. By default, the software warns
you before you send files larger than 1000 KB. You can specify a
different maximum file size or deactivate the warning. (Refer to
“Customizing General Options” on page 79.)
68
To send all or part of a Webster file in e-mail in Windows:
1 (optional) Select the snapshot(s).
2 Choose “Send Mail” from the File menu.
3 Specify what items to send: “All Snapshots and Current Board,”
“Selected Snapshot(s).” or “Current Board.”
4 Choose the e-mail attachment file type: Webster file, Bitmap file,
Adobe Acrobat PDF, or Windows metafile.
5 Click “OK.”

6 A new e-mail message opens containing the snapshot(s) as an
attachment ready for you to address and send using your default
e-mail application.
7 Address and send the e-mail.
To send all or part of a Webster file in e-mail on a Macintosh:
1 (optional) Select the snapshot(s).
2 Choose “Send Mail” from the File menu. The following dialog
appears on a Macintosh.
3 Specify:
• “Orientation”: Choose from “Landscape” or “Portrait” orien-
tation for the Adobe PDF e-mail attachment.
• “Images”: Choose the image quality and file size for the
Adobe PDF e-mail attachment.
• Items to send: Choose from “All Snapshots and Current
Board,” “Selected Snapshot(s).” or “Current Board.”
4 Click “OK.”
5 A new e-mail message opens containing the snapshot(s) as an
Adobe PDF attachment ready for you to address and send using
your default e-mail application.
6 Address and send the e-mail.
69

note:NOTE:
Publishing a Snapshot as HTML or Adobe PDF
You can publish a snapshot in HTML or Adobe PDF format, posting it
on the Worldwide Web or saving it on your computer.
In Windows, before using this feature, make sure the Microsoft Web
Publishing Wizard is installed. If necessary, you can download the
wizard at www.microsoft.com/windows/software/webpost.
If you are using Windows 2000 or XP, Microsoft Office Professional is
necessary.
To publish a snapshot as HTML or Adobe PDF:
1 (optional) Select the snapshot(s) to be published.
2 Choose “Publish” from the File menu. The following dialog
appears.
3 To choose a destination for the resulting file, click a radio button
beside “Local Disk” or “Web.”
4 Click “Publish As.”
5 If you clicked the “Web” radio button, a dialog opens where you
can enter the file name, server, path, user ID, and password
(optional) of the web host FTP site, then click “OK.” The resulting
file is published to the specified site.
If you clicked the “Local” radio button, a dialog opens where you
70

note:NOTE:
can browse to the file destination on your computer and click
“Save.” The resulting file is saved to your hard disk at that
location.
6 Click a radio button to select the desired option under “Format,”
“Orientation,” “Images,” and “Selection.”
7 (Optional) Enter a heading that appears at the top of the
published Adobe PDF (Windows only) or HTML file.
8 If you are publishing directly to the web, make sure your
computer is connected to the Internet.
9 Click “Publish.”
In Windows, the designated URL is specified in the Microsoft Web
Publishing Wizard. See your Windows documentation or contact your
network administrator for more information.
71

NetMeeting and Webster
In Windows, Microsoft NetMeeting® provides tools for video, voice,
and data conferencing sessions with remote users via:
• Local or Wide Area Network (LAN/WAN)
• Internet
• Modem-to-modem connection
By sharing the Webster software through a NetMeeting conference,
all participants can share the use of a Webster whiteboard. You and
the other participants can share the annotation and projection tools.
(No conferencing tools are provided on the Macintosh version of
Webster.)
note:NOTE:
For more information about NetMeeting, visit
www.microsoft.com/netmeeting or view the built-in Help system in
the NetMeeting application.
NetMeeting Requirements
• A LAN/WAN, Internet or direct modem connection
• NetMeeting 2.0 or higher
Using Webster in a NetMeeting Conference
You can use Webster with NetMeeting in two ways:
• Sharing a view of the Webster software in NetMeeting
• Using Webster to drive the NetMeeting whiteboard
Sharing the Webster Software in NetMeeting
To share the Webster software in NetMeeting, giving all participants
the ability to write on the current board:
1 Establish a NetMeeting conference with a remote participant.
72

2 Follow the NetMeeting instructions to select Webster as a shared
application (see the NetMeeting documentation). Choose
“Sharing” from the Tools menu in NetMeeting.
3 Make sure the NetMeeting button in the Webster command
toolbar is not pressed.
NetMeeting button
4 Bring Webster to the front.
Using Webster with the NetMeeting Whiteboard
You can connect the Webster whiteboard and the NetMeeting
whiteboard so all writing is recorded on both applications’ windows
simultaneously.
To connect the Webster and NetMeeting whiteboards:
1 Choose “Options” from the Edit menu.
2 Click the “NetMeeting” tab. The following dialog appears:
3 Click “Enable NetMeeting,” then click both “Enable” buttons to
permit information transfer between Webster and the
NetMeeting application.
73

note:NOTE:
note:NOTE:
To transmit but not receive in a NetMeeting conference, click the
“Disable” button under “Copy from NetMeeting into Webster.”
4 Click “OK” to apply the setting and close the dialog.
5 Start or join a NetMeeting conference (see your NetMeeting
documentation).
If the Webster status bar indicates “Cannot find NetMeeting
Whiteboard,” click “Whiteboard” in NetMeeting to open the
NetMeeting whiteboard.
6 To write on the shared whiteboard, tap the Webster pen and
eraser buttons. All participants see the results on the
NetMeeting whiteboard.
7 Choose “Join” from the Webster Conference menu.
8 To close connections so others can no longer see or talk to you,
choose “Leave” from the Webster Conference menu.
note:NOTE:
Annotations using the NetMeeting shape tools (squares, circles, etc.)
are not recorded in Webster.
Using the Conference Control Center
Webster includes a control center to provide easy access to
information about the status of conference participants and to hide
or show your whiteboard in the conference.
74

To use the control center:
1 Choose “Control Center” from the Conference menu to view the
status of all users in the conference. You see the following
dialog.
2 To stop sharing your whiteboard activity in the conference, click
“Hide.”
3 To share your whiteboard activity in the conference, click “Start.”
4 If you are disconnected from a conference or want to join a
conference in progress, click “Join Conference.”
5 To view the status of individual remote whiteboards, click the
“Remote Whiteboards” tab and click “Show.”
Conference View Preferences
Webster enables you to control whether remote viewers see
everything, new writing, or just your current whiteboard.
75

To control remote viewer access:
1 Choose “Preferences” from the Conference menu. You see the
following dialog.
2 Click beside your view preference:
• “New drawing only”: Remote users can see only new writing
you add to the board.
• “Current whiteboard contents only”: Remote users see the
current whiteboard contents but not new writing.
• “Everything”: Remote users see the current board and every-
thing you write.
• “Don’t prompt me when remote users try to see my white-
board”: Check to receive no message when a remote user
requests to look at your board.
76
Using Webster Projection Mode with NetMeeting
If you are in projection mode and connected to a NetMeeting
conference, note the following:
• The Show Webster button toggles between the NetMeeting
whiteboard (not Webster) and the current screen.
• To check how the software is recording data, maximize the Web-
ster window, then tap Show Webster to return to the NetMeeting
whiteboard (Webster minimizes itself).
• It is better to use the stylus, not the markers, to annotate the
whiteboard.

Scrolling While Shared
If your computer has a higher resolution than other computers in
your NetMeeting conference, its scrolling area is limited by the
computer with the lowest resolution. Some edge areas of windows
may not be visible.
You can set up scrolling in NetMeeting to allow lower resolution
computers to display all Webster windows properly as follows:
1 In NetMeeting, choose “Tools” from the Options menu.
2 Click the “General” tab.
3 Check the “Scroll Entire Screen” option, or to scroll only the
shared windows, check “Scroll Shared Windows Only.”
Troubleshooting NetMeeting
Problem Cause Solution
Participants cannot see
the Webster whiteboard
NetMeeting “Share”
menu is grayed out
The software appears
gray or patterned to
other users
Cannot save or print in
Webster
Two-way communication is disabled
No NetMeeting call set upHost or join a NetMeeting
The software window is
overlapped on your
desktop or not shared
The software is being
hosted by another computer
Enable communication
with NetMeeting (see
“Using Webster in a NetMeeting Conference” on
page 72).
call.
Minimize all windows
except Webster or exit all
programs except Webster
and NetMeeting. Share
the Webster software
from NetMeeting’s
“Tools” menu.
File menu commands
are functional only on
the computer hosting the
Webster software.
77

Problem Cause Solution
Edges of the Webster
window are hidden
The software is being
hosted by another computer with a higher resolution
Increase your monitor’s
resolution or ask the Webster host to set up scrolling (see “Scrolling While
Shared” on page 77).
78

Webster Options
Software options enable you to customize your use of Webster.
Customizing General Options
Options on the General tab enable you to specify settings that apply
to features throughout Webster.
To customize General options:
1 Choose “Options” (Windows) or “Preferences” (Macintosh) from
the Edit menu.
2 Click the “General” tab. The following dialog appears.
“Remember window positions”: Check to remember the window size
and location on the screen when you next launch Webster or create a
new file.
“Open last file at startup”: Check to return to the last file you were
working in when you launch Webster software. Leave unchecked to
open a new untitled file each time.
“Remember whiteboard contents”: Check to retain the Current Board
pane contents when you open a new file. Leave unchecked to start
with a blank Current Board pane when you open a new file.
79

note:NOTE:
“Override screen saver”: In Windows in projection mode, a screen
saver running on your computer may interfere with your work. Check
to keep the screen saver from starting in Webster without having to
change display settings for the computer. The cursor on your screen
flickers slightly to indicate that the option is activated.
“Override screen saver” is not available in Windows NT.
“E-mail enclosure warning”: Check to have Webster warn you if your
e-mail enclosure exceeds a specified file size when you use “Send
Mail” in the File menu. Refer to “Sending a Snapshot via E-mail” on
page 68.
“Auto-save files”: Check to have Webster automatically save the
open file at specified intervals, then enter the desired interval.
“Auto-snapshot”: Check to have Webster automatically capture a
snapshot after a specified interval of inactivity, then enter the
desired interval of inactivity.
“Power down after n minutes of inactivity”: For Webster LT models,
specify the period of inactivity of the whiteboard that will trigger
automatic power down.
80
“Icon strip enabled”: Check to enable the whiteboard icon strip on
Webster LT models. In the diagram of the board shown in the General
tab, click the corner representing the location you placed the icon
strip. Refer to “Installing the Webster LT Whiteboard” on page 9.
To restore factory default options:
• Click “Restore Defaults.”
Customizing Pens and Erasers
Options on the “Pens” tab enable you to customize the pen and
eraser width, default pen color, pen shape, and the amount of time
before the tool automatically switches to the default pen.
To customize Pen options:
1 Choose “Options” (Windows) or “Preferences” (Macintosh) from
the Edit menu.

2 Click the “Pens” tab. The following dialog appears.
“Pen width”: Enter the desired pen width for the smallest pen. The
medium and large pen widths are multiples of the smallest pen
width. Changes apply only to all future strokes.
“Eraser widths (LT models only)”: Specify the eraser width for the
large or small eraser.
“Pen shape”: (Macintosh only) Two pen shapes are available: round
and square. Use the round shape for better quality strokes. Use the
square shape when you need faster recording.
“TS models only”:
• “Startup pen color”: Choose a color from the drop down list
to specify the default pen color that is active when you first
launch Webster and begin writing on the board. This color is
also used when the software automatically switches back to
the pen tool.
• “Automatic pen selection”: The software can detect inactivity
following use of an eraser and automatically switch back to
the default pen. This feature protects your work if your last
action was an erasure and you forgot to specify a new pen
color before continuing to write on the board. Enter the
amount of time (in seconds) to elapse before the software
switches to the default pen. If you do not use this option, the
tool you select (pen or eraser) stays in effect until you select
a different one.
81

• “Eraser widths”: Erasures are based on a calculated diame-
ter around a single point of contact on the board. Specify the
eraser width for the large or small eraser.
To restore factory default options:
• Click “Restore Defaults.”
Customizing Sounds (TS Models Only)
Audible feedback on Webster TS models indicates which tool you are
using. (Webster LT sounds cannot be customized.) By default, the TS
whiteboard emits sounds:
• On startup and shutdown
• Selecting a tool (pen or eraser)
• Using an eraser function
• Touching or writing on the whiteboard
You can change the sounds associated with functions or turn them
off.
note:NOTE:
If you turn sounds off, the board no longer provides audible feedback
that a particular tool is in use, that the whiteboard is communicating
with your computer or that an error exists. We recommend that you
not customize sound settings until you are thoroughly familiar with
Webster.
To customize Sound settings:
1 Choose “Options” (Windows) or “Preferences” (Macintosh) from
the Edit menu.
82

2 Click the “Sounds” tab.
3 Select a sound from the drop down menus. On a Macintosh,
click the speaker icon to hear the sound.
4 Click “OK” to apply the settings and close the dialog.
To restore factory default options:
• Click “Restore Defaults.”
Customizing Image Export
You can specify the default characteristics for images that you
export. (Refer to “Exporting Snapshots” on page 55.)
To customize export settings:
1 Choose “Options” (Windows) or “Preferences” (Macintosh) from
the Edit menu.
83

2 Click the “Export” tab. The following dialog appears.
“Export image”: Choose the default exported image file type. This
file type appears as the default in the “Export Image” dialog.
“Exported bitmap and backdrops” (Windows), “Export Image
Dimensions” (Macintosh): Define the default pixel width and height
of the resulting image when you export in one of the bitmap formats.
“Exported metafiles”: In Windows, define the width and height in
inches or centimeters of the resulting image when you export a
snapshot as a metafile. Check “Transparent background” if you want
the background of the resulting metafile to be transparent.
Otherwise the background is filled.
84
“Drag and drop file”: Choose the file type of the resulting image
when you drag and drop a snapshot into another application. In
Windows, the options are bitmap or metafile. On a Macintosh, the
options are picture, bitmap, Compressed PICT, JPEG, MacPaint,
Photoshop, PNG, QuickTime Image, SGI, TGA, Adobe PDF, and TIFF
formats.
“Backdrop export”: (Windows only) When you export a snapshot or
the current board to use as a backdrop, check to make the resulting
image file “8-bit color,” which saves memory and “Match source
resolution,” which retains the resolution of the original source
graphic rather than filling the board’s dimensions.

To restore factory default options:
• Click “Restore Defaults.”
Customizing Projection Mode Settings
You can specify features that are available in projection mode. (Refer
to “Using Webster with a Projector” on page 37.)
To customize projection mode settings:
1 Choose “Options” (Windows) or “Preferences” (Macintosh) from
the Edit menu.
2 Click the “Projection” tab. The following dialog appears:
“Turn on projection at startup”: Check to enter projection mode
automatically whenever you launch Webster. This setting is
recommended for permanently connected Webster IRP and IPD
models.
“Remember alignment points”: If your whiteboard and projector
remain in the same positions, check this box to use the same
projection alignment each time. No alignment screen displays when
you enter projection mode.
“Remember monitor selection”: (Macintosh only) If your computer is
connected to multiple monitors, check this box to remember which
monitor to use when you next enter projection mode. Click “Choose”
85

to open the “Select Projection Monitor” dialog which lists all the
connected monitors. Click to select the monitor that should be used
for projection mode.
“Projection toolbar position”: Choose the corner of the screen for the
projection toolbar to appear when Webster first enters projection
mode. You can drag the toolbar to any position on the screen.
To restore factory default options:
• Click “Restore Defaults.”
Customizing Playback Options
You can specify preferences for the timing used during playback of
snapshots. Refer to “Playing Back Snapshots” on page 53.
To change playback speed and delays:
1 Choose “Options” (Windows) or “Preferences” (Macintosh) from
the Edit menu.
2 Choose the “Playback” tab. The following dialog appears.
“Real-time”: Check to play back all pen strokes, erasures, and
pauses at the same speed that they were created, including any
pause that occurred between strokes.
“Optimized”: Check to optimize playback speed, so that pauses
between strokes are eliminated.
86

“Maximum delay between strokes”: For optimized playback, enter a
maximum delay between strokes. If there was a pause between
strokes longer than the value you specify, playback will pause for
only the amount of time you specify.
“After playing snapshot”: For optimized playback, choose:
• “Continue”: Click to repeat playback in a loop with no inter-
ruption.
• “Pause”: Click to pause after playback of one snapshot in a
loop is complete. Click the “Pause” button on the toolbar to
continue the loop.
• “Delay”: Click to enter a delay after playback of an entire
snapshot is complete, before playback of the next snapshot
in a loop, then specify the delay.
To restore factory default options:
• Click “Restore Defaults.”
Customizing Backdrops on a Macintosh
When you create a backdrop on a Macintosh, you can specify to
preserve the aspect ratio and to display a backdrop indicator. Refer
to “Adding a Backdrop to a Snapshot” on page 64.
To specify backdrop options (on a Macintosh):
1 Choose “Preferences” from the Edit menu.
87

2 Choose the “Backdrops” tab. The following dialog appears.
“Preserve Aspect Ratio”: Check to maintain the aspect ratio of the
original backdrop art. Uncheck to cause the backdrop to stretch to fit
your board shape.
“Show Backdrop Indicator”: Check to display a solid colored tip at
the upper right corner of snapshots to indicate that a backdrop is
included.
88
To restore factory default options:
• Click “Restore Defaults.”
Changing Colors in Windows
In Windows, you can change the four default pen colors from red,
black, green, and blue, to any of 16 colors. You can also change the
background color from white to any of 16 colors.
The default colors are:
• Pens: Red, Black, Green, Blue
• Background: White
For Webster TS and LT models, the default pen colors correspond to
the colors of the pen icons on the whiteboard icon strip and the
supplied markers.

To change the default colors in Windows:
1 Choose “Color” from the Edit menu. The following dialog
appears.
2 Select a new pen and/or background color from one or more of
the drop down menus.
3 Specify:
• “Change Selection”: Click to apply the new colors to the
selected snapshot(s) or current board.
• “Change All”: Click to apply changes to all snapshots and the
current board in the open file.
• “Use for New Files”: Click to apply changes to the current file
and new files that you create. Otherwise changes apply only
to the currently open file.
To restore factory default options:
• Click “Restore Defaults.”
89

Troubleshooting, Care, and Maintenance
This section contains suggestions to help you care for, maintain, and
troubleshoot Webster. It also includes technical support and
warranty information.
Getting On-Line Help
On-line Help is available whether or not Webster is running. Webster
Help requires Internet Explorer 4.0 or higher or Netscape 4.0 or
higher (excluding Netscape 6.0).
Option Procedure
Help file From the Windows taskbar, choose Programs
from the Start menu and choose Help from the
Webster menu. On the Macintosh, choose
“Webster Help” from the Webster Help menu.
Help topics In the Windows software, choose “Topics” from
the Help menu or click the Help button on the
command toolbar. On the Macintosh, press the
Help button on the keyboard when the Webster
application is active, if available.
90
Context-sensitive Help for a
specific feature
Context-sensitive Help for a
dialog
Brief description of a feature In Windows, hold your cursor over the feature
In Windows, press F1 or click the Help question
button on the command toolbar, then click on
the feature or dialog. (Not available on the
Macintosh.)
In Windows, in the dialog, press F1 or click the
Help button. On a Macintosh, click the question mark icon at the bottom left corner of a
dialog box.
and read the bottom left corner of the Webster
main window. Not available on the Macintosh.

Troubleshooting Hardware
Troubleshooting TS Whiteboard Hardware
Problem Cause Solution
Green LED off No power Plug in the whiteboard
power cord and check
your power outlet.
Green LED blinking No communication with
the software
Green LED blinking
rapidly
Green LED very bright Whiteboard is being
Cannot establish
communication properly with the whiteboard
Power supply problem Unplug the whiteboard
touched
COM port conflict Confirm cable connec-
Make sure your computer
is on. Re-specify the port
for the whiteboard in
Webster (see “Establishing Communication
between the Board and
Computer” on page 20).
power cable and plug it
back in.
Make sure nothing is
touching or leaning
against the whiteboard.
tions. Choose “Find
Whiteboard” in the Edit
menu to search for the
correct port. In Windows,
check the COM ports in
use by Webster for conflict with other device
software. If you are using
a serial to USB converter,
make sure you install and
activate the software that
comes with the converter.
91

Problem Cause Solution
note:NOTE:
No sound Sounds turned off;
Insufficient pressure
while writing
Turn sounds on (see “Customizing Sounds (TS
Models Only)” on
page 82).
Maintain firm, consistent
pressure while writing.
For more information on troubleshooting COM ports and serial
devices, see your computer’s documentation.
Troubleshooting LT Whiteboard Hardware
Problem Cause Solution
Buzzing sound Laser beam is blocked
or the board needs
hardware calibration
Remove any objects on the
board surface, such as magnets. Hardware calibration
may be needed. Refer to
“Hardware Calibration” on
page 93.
92
Yellow Power LED is
off
Blinking yellow LED
in the header cover
Blinking red LED in
the header cover
Communication with
the board not established or not possible
No communication with
the software or “Find
Whiteboard” in
progress
Error condition Could indicate a hardware
Start the Webster software or
click on the Webster software to wake up the board.
Watch status of software
download in “Find Whiteboard” dialog, or re-specify
the port for the whiteboard
in Webster (see “Establishing Communication between
the Board and Computer” on
page 20).
problem.

W
Problem Cause Solution
arning
Warning beep One minute before
automatic power down
No operating lights Fuse Replace fuse in the power
Draw something on the
board, click on the Webster
application, or extend the
time limit for automatic
power down. Refer to “Customizing General Options”
on page 79.
entry module beside the
power connector using T2A/
250V slow blow fuse.
Hardware Calibration
Under some circumstances, the whiteboard may require recalibration by a trained Webster service representative. To help
diagnose hardware calibration issues, your technical support
representative may refer you to the “Hardware Calibration” option of
the Edit menu.
note:NOTE:
Use the “Hardware Calibration” option in the Edit menu with caution.
Specific instructions are available from a technical support
representative. Permanent damage to the board may result from
unsupervised use.
TS Whiteboard Calibration
To calibrate the TS whiteboard:
1 Download TS calibration sheets as a PDF file from the PolyVision
web site at www.polyvision.com.
2 Print and cut the one that matches your board’s size, as
described on the calibration sheet.
Make sure that you use the template that is appropriate for your
board size.
93

3 Place the calibration template in the lower left corner of the
whiteboard making certain to butt it up against the inside lip of
the frame and the top of the tray.
4 With a marker, make a dot on the board at the top right corner of
the calibration template.
5 Place the calibration template in the upper right corner of the
whiteboard making certain to butt it up against the inside lip of
the top and right frames.
6 With a marker, make a dot on the board at the bottom left corner
of the calibration template. Remove the calibration sheet.
7 Choose “Hardware Calibration” from the Edit menu. You will see
the following dialog.
94
8 Select the board to calibrate.
9 Click “Calibrate.” A dialog appears from which you identify the
dimensions and orientation of your whiteboard.
10 Choose the appropriate size and orientation from the drop down
list.
11 Click “OK.” A dialog appears requesting that you tap a
calibration point at a specific location on the board.
12 Tap the board at the lower left mark you made.
13 Tap the board at the upper right mark you made.
 Loading...