


Walk-and-Talk
User Guide
™
Part number 370-0199-01
©2008 PolyVision Corporation
All rights reserved

Information in this document is subject to change without notice.
Reproduction in any manner without written permission of PolyVision
Corporation is forbidden.
PolyVision is a registered trademark of Steelcase, Inc. Walk-and-Talk
and Lightning are trademarks of PolyVision Corporation. Webster is a
registered trademark of PolyVision Corporation.
This product is covered by one or more of the following patents:
Canada 2,100,624; EPO 600,576; EPO 871,935; Germany
69,321,445; WO 98/14888; US 4,777,329; US 5,248,856; US
5,327,161; US 5,434,370; US 5,583,323; US 5,585,605; US
5,623,129; US 5,665,942; US 5,790,114; US 5,838,309 US
6,353,193; US 6,355,895; US 6,445,384; US 6,667,739; Other
patents pending.
PolyVision Corporation reserves the right to make changes in product
design, or detail, and to discontinue any product or material without
notice.
Flash™ Player, Shockwave® Player, and Authorware® Player are
owned by Adobe Systems.

Table of Contents
Welcome . . . . . . . . . . . . . . . . . . . . . . . . . . . . . . . . . . . . . . . . . . . . . . . . . . 3
What are Walk-and-Talk Products? . . . . . . . . . . . . . . . . . . . . . . . . . . . 4
Operating Your Walk-and-Talk Product . . . . . . . . . . . . . . . . . . . . . . . . . . . 5
Using the Remote Control . . . . . . . . . . . . . . . . . . . . . . . . . . . . . . . . . . 5
Remote Control Options. . . . . . . . . . . . . . . . . . . . . . . . . . . . . . . . . . 5
Remote Control Functions . . . . . . . . . . . . . . . . . . . . . . . . . . . . . . . . 6
Cursor Control in Projection Mode . . . . . . . . . . . . . . . . . . . . . . . . . . . . 9
Marking-Up Computer Projections . . . . . . . . . . . . . . . . . . . . . . . . . . . 10
Printing and Saving Mark-ups . . . . . . . . . . . . . . . . . . . . . . . . . . . . 13
Choosing Mark-up Pen Styles . . . . . . . . . . . . . . . . . . . . . . . . . . . . 13
Erasing Mark-ups. . . . . . . . . . . . . . . . . . . . . . . . . . . . . . . . . . . . . . 14
Using the On-Screen Keyboard . . . . . . . . . . . . . . . . . . . . . . . . . . . . . 14
The Walk-and-Talk Driver . . . . . . . . . . . . . . . . . . . . . . . . . . . . . . . . . . . . . 15
Windows System Requirements . . . . . . . . . . . . . . . . . . . . . . . . . . . . . 15
Macintosh System Requirements . . . . . . . . . . . . . . . . . . . . . . . . . . . . 15
Driver Installation . . . . . . . . . . . . . . . . . . . . . . . . . . . . . . . . . . . . . . . . 15
Configuring Walk-and-Talk Options . . . . . . . . . . . . . . . . . . . . . . . . . . 17
General Options . . . . . . . . . . . . . . . . . . . . . . . . . . . . . . . . . . . . . . . 19
Save Options . . . . . . . . . . . . . . . . . . . . . . . . . . . . . . . . . . . . . . . . . 20
Draw Options. . . . . . . . . . . . . . . . . . . . . . . . . . . . . . . . . . . . . . . . . 21
Print Options . . . . . . . . . . . . . . . . . . . . . . . . . . . . . . . . . . . . . . . . . 22
Projection Options . . . . . . . . . . . . . . . . . . . . . . . . . . . . . . . . . . . . . 23
Hardware Options . . . . . . . . . . . . . . . . . . . . . . . . . . . . . . . . . . . . . 24
Using the On-Screen Remote Control . . . . . . . . . . . . . . . . . . . . . . . . 26
Getting Help . . . . . . . . . . . . . . . . . . . . . . . . . . . . . . . . . . . . . . . . . . . . 26
Viewing a Tutorial . . . . . . . . . . . . . . . . . . . . . . . . . . . . . . . . . . . . . . . . 26
Checking for Updates. . . . . . . . . . . . . . . . . . . . . . . . . . . . . . . . . . . . . 26
Using Webster . . . . . . . . . . . . . . . . . . . . . . . . . . . . . . . . . . . . . . . . . . 27
Quitting the Walk-and-Talk Driver . . . . . . . . . . . . . . . . . . . . . . . . . . . . 27
To Uninstall the Walk-and-Talk Driver in Windows . . . . . . . . . . . . . . . 28
To Uninstall the Walk-and-Talk Driver on a Macintosh . . . . . . . . . . . . 28
Using Multiple Walk-and-Talk Products . . . . . . . . . . . . . . . . . . . . . . . 28
Using Walk-and-Talk Products with Multiple Monitors . . . . . . . . . . 29
Using Walk-and-Talk Interactive Whiteboards . . . . . . . . . . . . . . . . . . . . . . 31
Using Dry-Erase Markers . . . . . . . . . . . . . . . . . . . . . . . . . . . . . . . . . . 31
Projecting Your Computer onto the Whiteboard . . . . . . . . . . . . . . . . . 32
Getting Started with Your Projector . . . . . . . . . . . . . . . . . . . . . . . . 32
Writing Notes Next to a Projected Image . . . . . . . . . . . . . . . . . . . . 35
Using TS and TSL Interactive Whiteboards . . . . . . . . . . . . . . . . . . . . . . . . 36
The TS and TSL Interactive Whiteboard Icon Strip . . . . . . . . . . . . . . . 36
™
Walk-and-Talk
Table of Contents i

Cleaning Your Whiteboard . . . . . . . . . . . . . . . . . . . . . . . . . . . . . . . . . . . . 38
Daily Care and Maintenance. . . . . . . . . . . . . . . . . . . . . . . . . . . . . . 38
Removing Permanent Marker . . . . . . . . . . . . . . . . . . . . . . . . . . . . . 38
Using Walk-and-Talk Wireless . . . . . . . . . . . . . . . . . . . . . . . . . . . . . . . . . . 39
Technical Support . . . . . . . . . . . . . . . . . . . . . . . . . . . . . . . . . . . . . . . . . . . 42
Index . . . . . . . . . . . . . . . . . . . . . . . . . . . . . . . . . . . . . . . . . . . . . . . . . . . . 43
™
Walk-and-Talk
ii
ELCOME
W
Congratulations on your purchase of a PolyVision® Walk-and-Talk™
product, a sleek and simple solution for interactivity with your computer.
This manual describes how to use the Walk-and-Talk driver with these
interactive products:
•
Walk-and-Talk interactive whiteboard (WT)
•
Walk-and-Talk Lightning™ interactive whiteboard (WTL)
•
Walk-and-Talk Interactive Panel (IP)
Walk-and-Talk Cordless Lectern (CL)
•
Walk-and-Talk Flat-Screen Module (FSM)
•
•
TS Interactive Whiteboard (TS)
•
TS Lightning Interactive Whiteboard (TSL)
It also provides information about using Walk-and-Talk Wireless, the option
that provides infrared wireless communication between your interactive
whiteboard and your computer. For information on installing your Walkand-Talk product, see the corresponding installation and operation guides
For information about installing and using the Bluetooth wireless option,
refer to the
WT BT Installation and Operation
manual.
Welcome 3
™
Walk-and-Talk
W
HAT ARE WALK-AND-TALK PRODUCTS
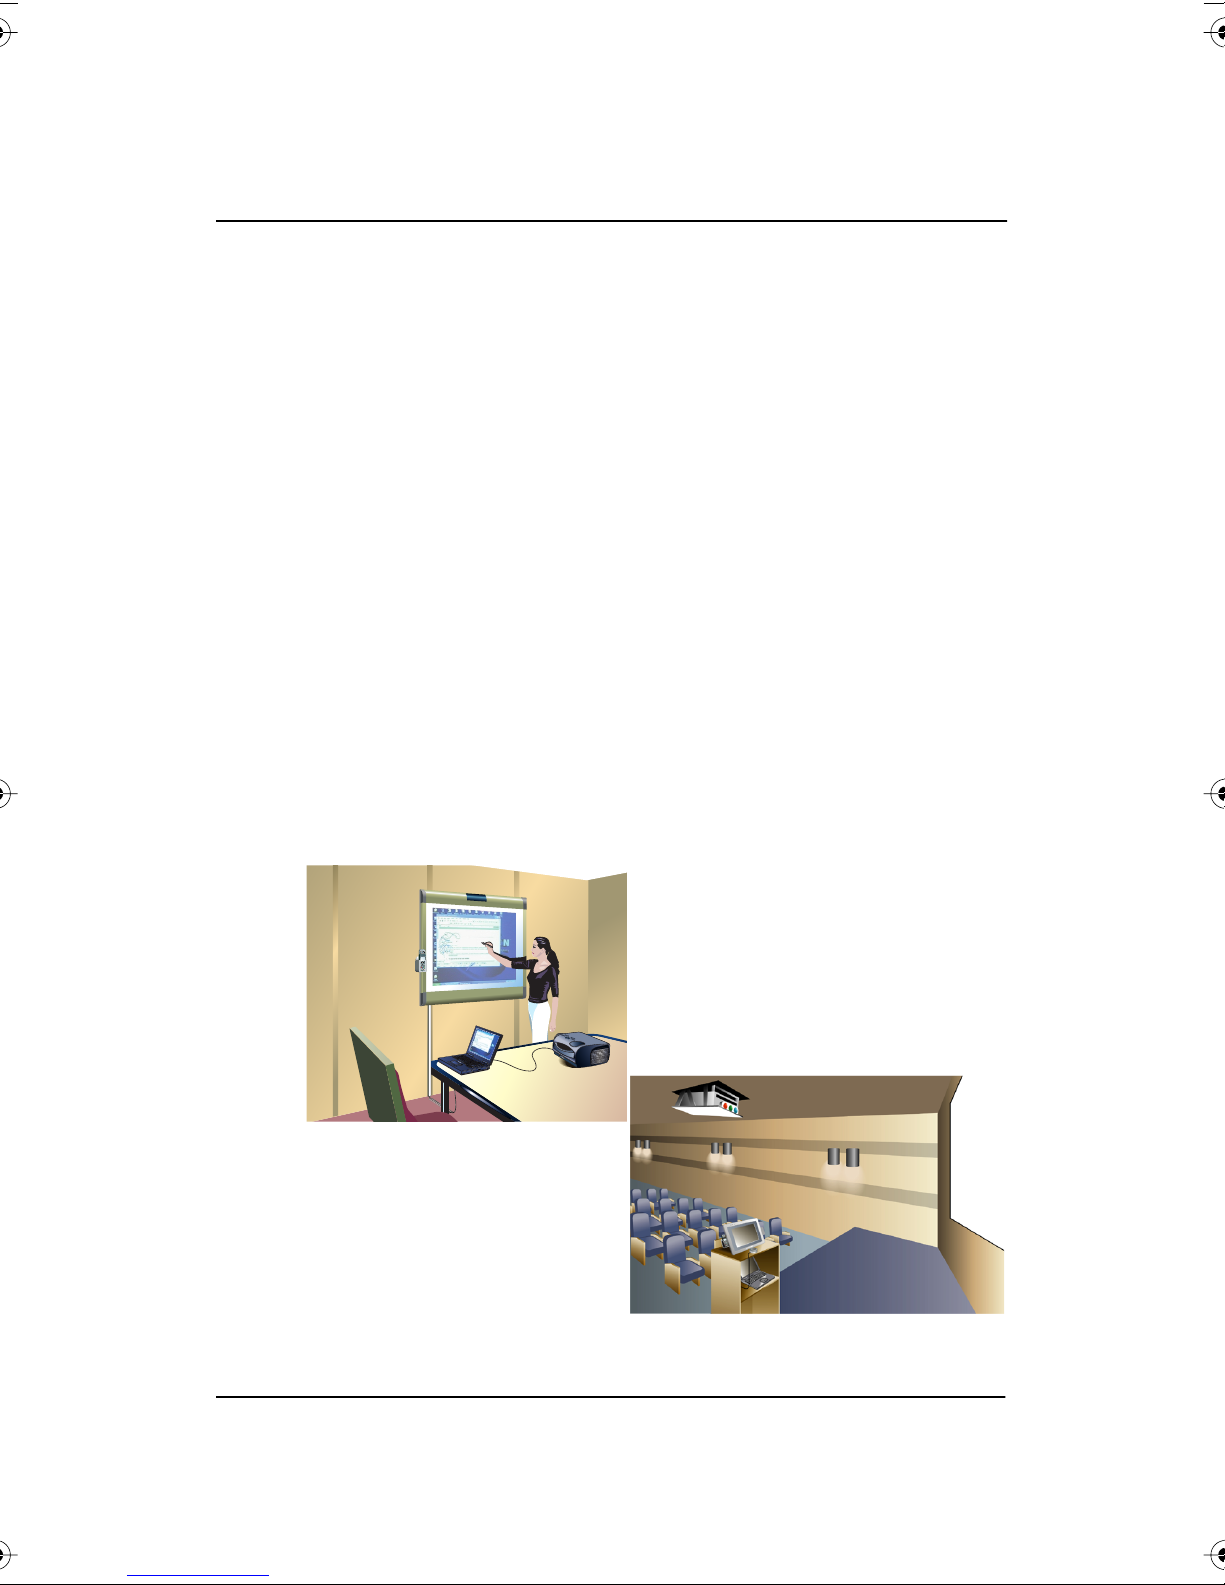
Walk-and-Talk products are remote control-operated interactive systems
that connect to your computer. You can capture a snapshot of anything
you write or project by pressing Print or Save on the remote control. Your
digital snapshot prints using the default printer connected to your
computer, or it is saved as a file on your computer, just as a digital image
from a camera would be.
?
™
With the Walk-and-Talk driver installed on your computer and your
computer connected to a projector, you have the ability to operate your
computer using the Walk-and-Talk product as a touch screen. You can
operate your computer from the product using your finger or stylus, or you
can roam freely about the room and operate your computer using the
remote control touch pad and buttons.
Walk-and-Talk
4 User Guide

PERATING YOUR
O
U
SING THE REMOTE CONTROL
The Walk-and-Talk remote control operates at a distance of up to 40 feet
(12 m) from any of the Walk-and-Talk products. Always point the remote
control toward the infrared receiver on your product.
When your computer is projected on the Walk-and-Talk product, the
remote control enables you to roam freely about the room while you give
your presentation. Use the remote control to move the computer cursor,
click and double-click, and launch an on-screen keyboard to enter text into
dialog boxes. The remote control also has buttons that enable you to print
or save a snapshot of your presentation.
Always point the remote control toward the infrared receiver in your Walkand-Talk product: at the top of the interactive whiteboard, in the center of
your flat-screen module, or at the remote control receiver that comes with
your interactive panel.
R
EMOTE CONTROL OPTIONS
ALK-AND-TALK PRODUCT
W
note:NOTE:
The remote control functions equally well from these locations:
•
Place the remote control in the holster. The touch pad and buttons are
easily accessible from the holster. (The Flat-Screen Module has no
holster.)
•
Carry the remote control with you using the wrist or neck lanyard
provided.
•
Place the remote control near you on a desk or table top pointed
toward the infrared receiver.
If you are using a TS interactive whiteboard, a touch-sensitive icon strip
along the edge of the board functions in place of the Walk-and-Talk remote
control. Refer to “Using TS and TSL Interactive Whiteboards” on page 36
™
Walk-and-Talk
Operating Your Walk-and-Talk Product 5

R
EMOTE CONTROL FUNCTIONS
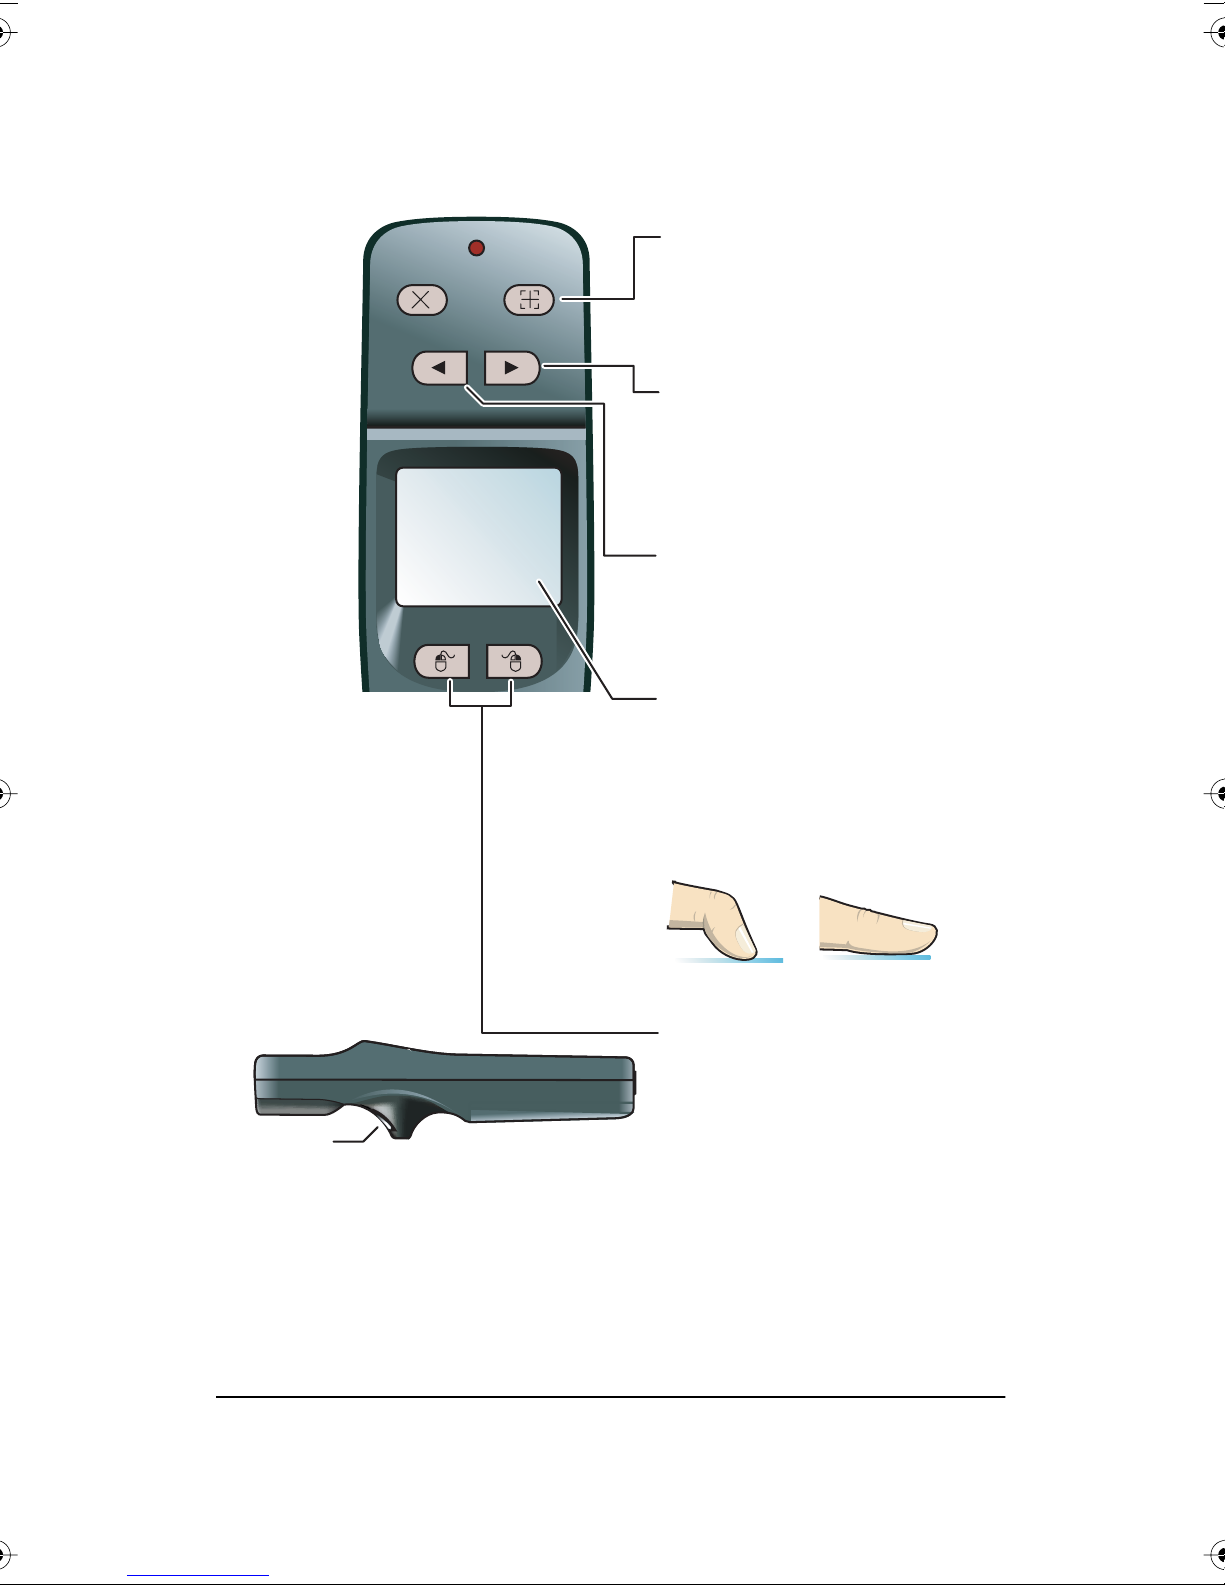
Erase All
Erase everything and
start fresh. All writing,
in dry-erase marker
or projection mark-up,
is erased from memory.
Ink Color
To write on the board,
choose a dry-erase pen
and press the button that matches
the color. In projection mode,
press one of these buttons
to quickly change the color
of mark-ups.
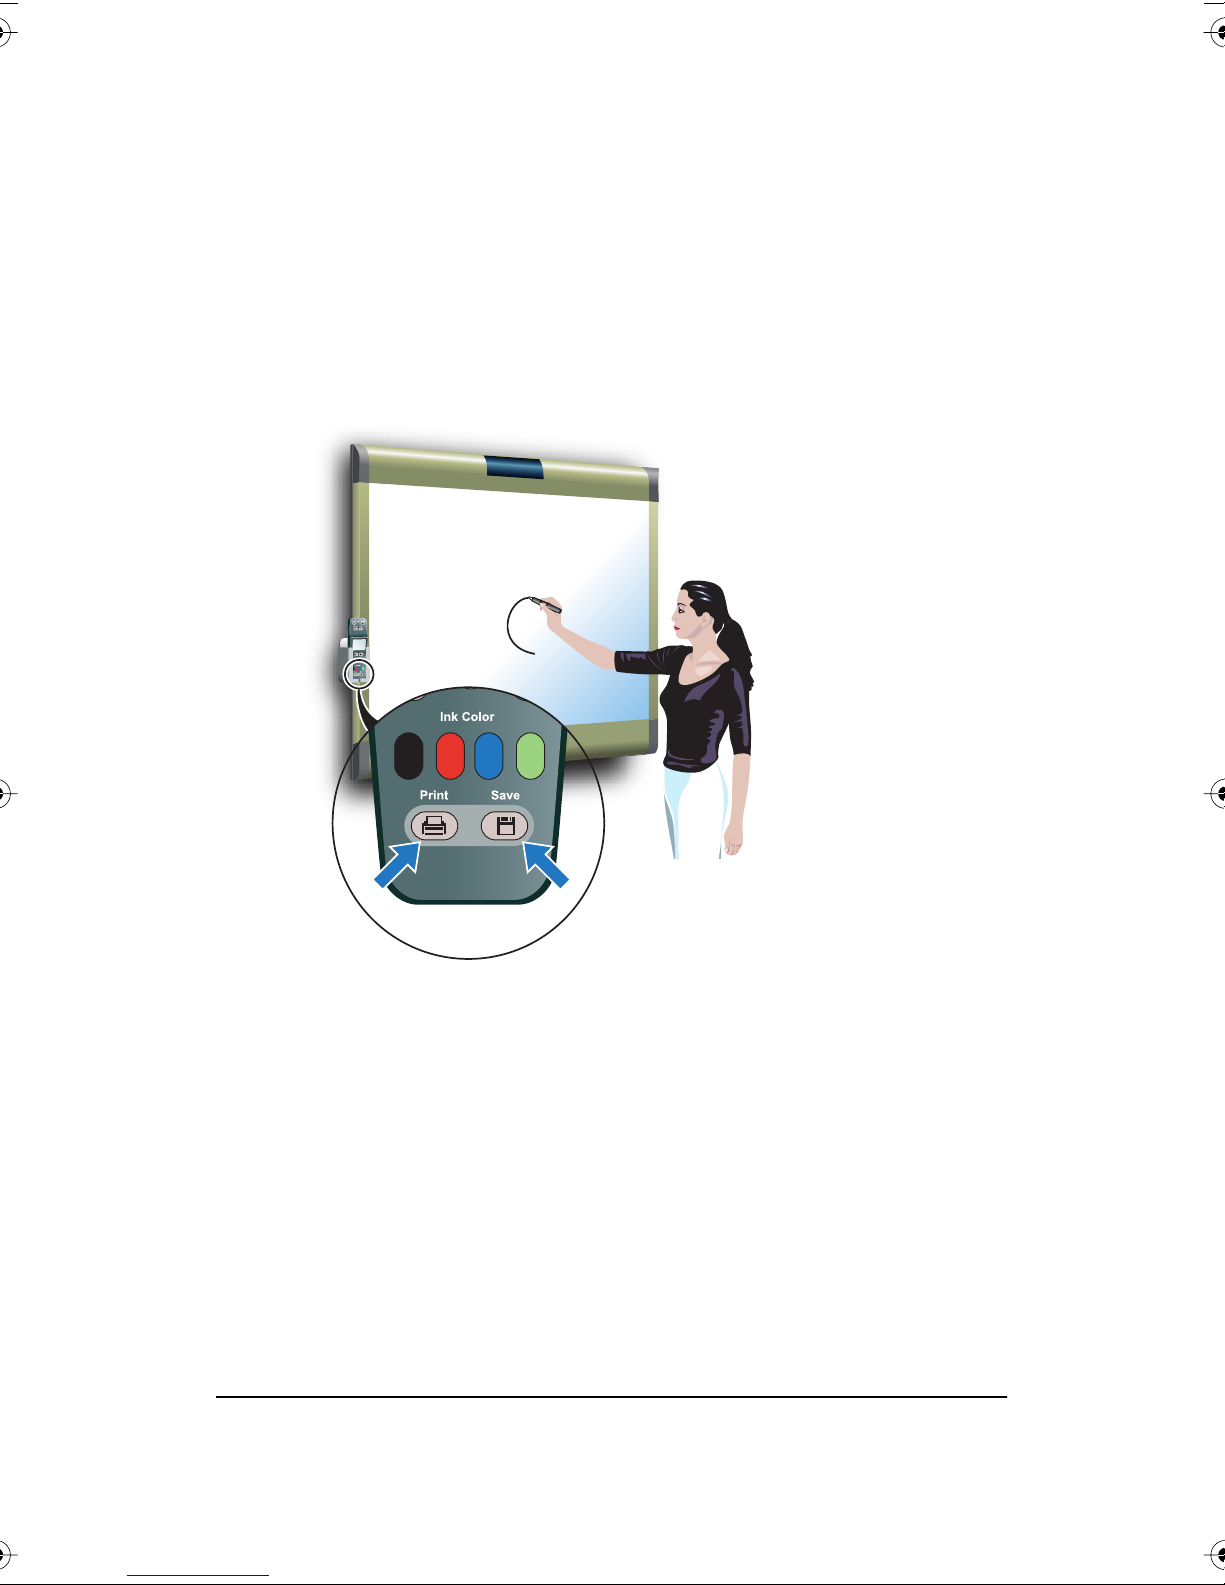
Print
Print a snapshot of the board
using the default printer connected
to your computer.
Erase All
Previous
Pen Style Keyboard
Print Save
Projection
Next
L R
Cursor Pen
Ink Color
™
Save
Save a snapshot of your board
as a file on your computer.
The file can be in PDF, JPEG,
TIFF, PNG, BMP and other formats.
Walk-and-Talk
6 User Guide
Erase All
Previous
Projection
Next
L R
Projection
When a projector is connected
to your computer and focused on
the board, press this button to
enter projection mode so you can
control the computer from the board.
Next
When the cursor is active, press this
button to page down or move to
the next slide or web page.
When the pen is active, this button
returns to the computer screen.
Previous
When the cursor is active, press this
button to page up or move
to the previous slide or web page.
When the pen is active, press this button
to display a blank canvas.
Touch pad
In projection mode, use the touch pad
to control your computer cursor just as
you would on a laptop computer
touch pad. Tap once to click and twice
to double-click. Always use the tip of your
thumb or your forefinger. Never use the
flat of your thumb.
YES
L and R
In projection mode, press L for
a left mouse click and R for a
right mouse click (Windows) or
Click trigger
Operating Your Walk-and-Talk Product 7
control click (Macintosh). You
can also use the click trigger on
the bottom of the remote
control for a left mouse click or
double-click.
NO
™
Walk-and-Talk
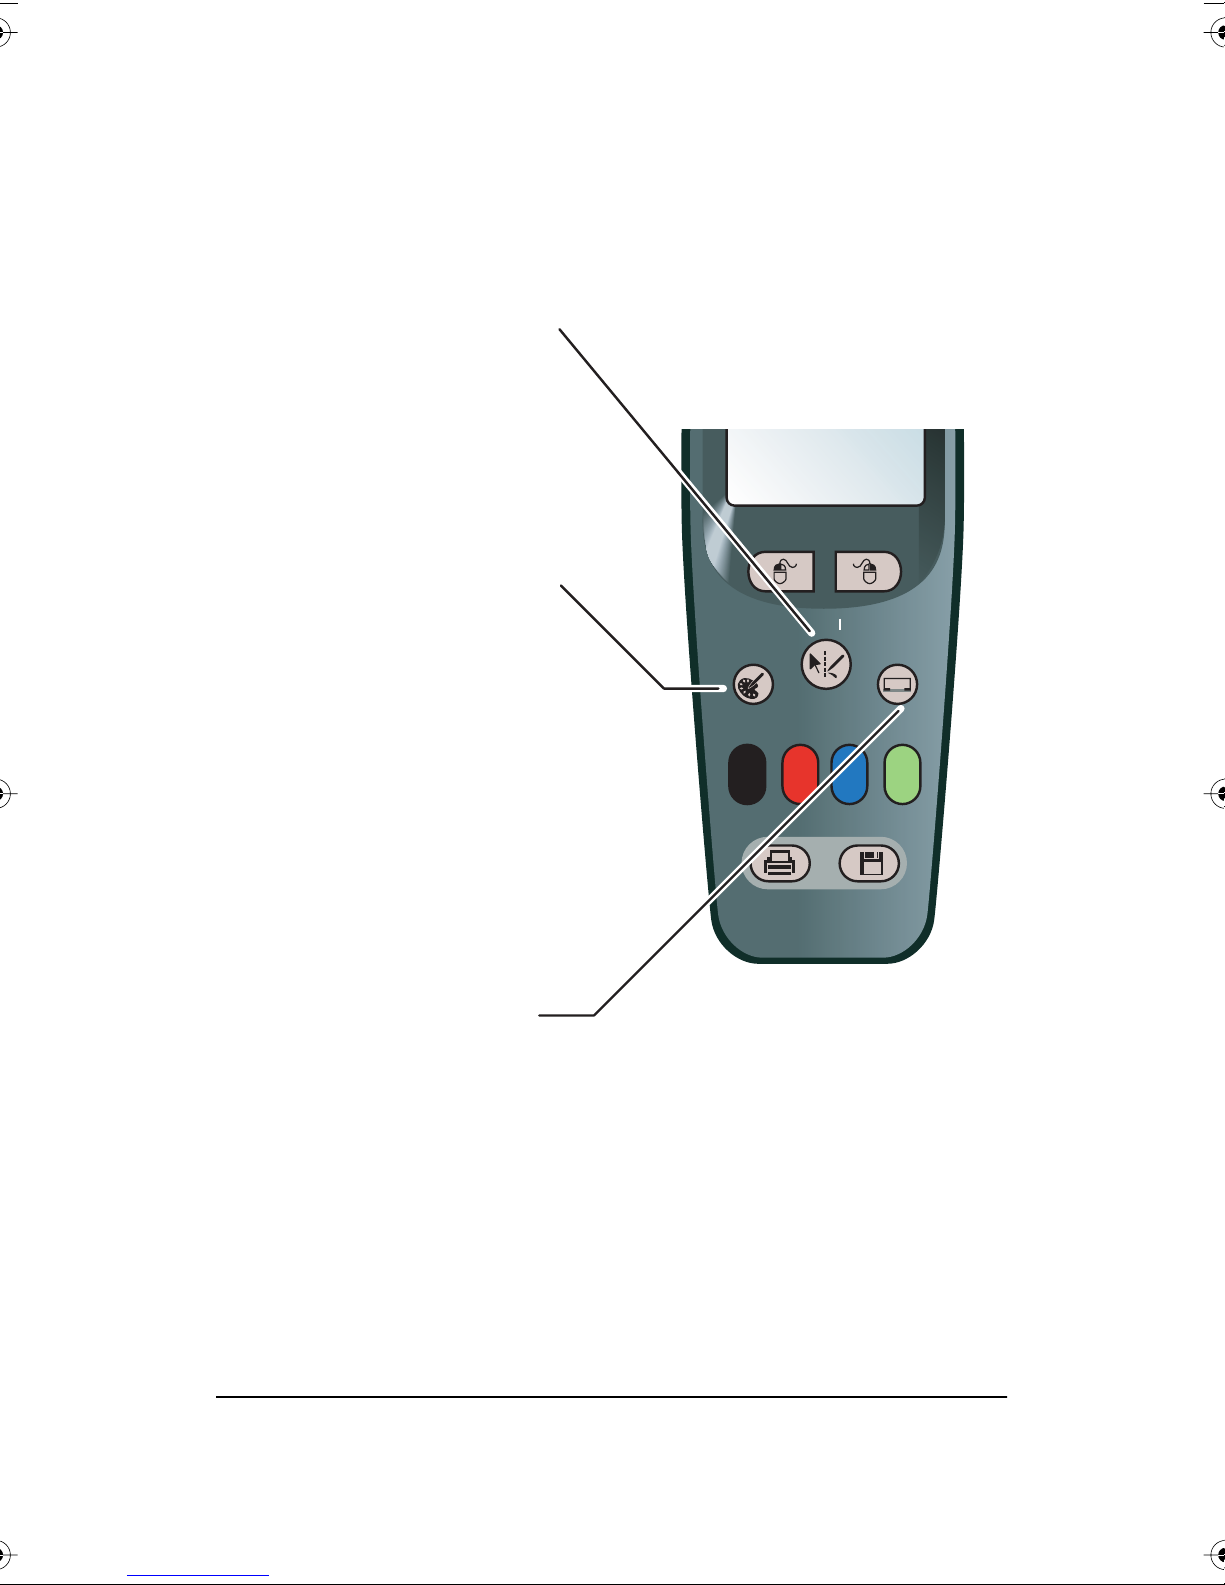
Cursor/Pen
In projection mode, press this button to toggle
between controlling the cursor
and marking-up the image.
™
Pen Style
Press this button in
projection mode
to choose a new type
of mark-up pen
(color, width, and style).
Keyboard
In projection mode, press this button
to toggle on and off the display of
the on-screen keyboard.
You can use the keyboard
to enter text at the current
text cursor position. Drag the
keyboard to move it.
L R
Cursor Pen
Pen Style Keyboard
Ink Color
Print Save
Walk-and-Talk
8 User Guide

note:NOTE:
C
URSOR CONTROL IN PROJECTION MODE
Interactive whiteboard users: refer to “Using Walk-and-Talk Interactive
Whiteboards” on page 31 for information about using your board and
placing it in “projection mode” to control your projected computer image.
The following information assumes that your Walk-and-Talk product is
already in “projection mode”.
Walk-and-Talk products display your projected computer image and enable
you to control your computer using:
•
your finger (if you have an interactive whiteboard),
•
the stylus, or
•
the remote control.
When you want to control your computer using the Walk-and-Talk product,
always touch the Walk-and-Talk product’s display screen inside the borders
of the projected computer image:
•
To click, tap the display once.
To double-click, tap the display twice rapidly.
•
For a right-click (Windows) or control-click (Macintosh), hold your
•
finger or the stylus to the display for one second.
With the remote control, you can roam freely about the room and control
the projected computer. To operate your computer with the remote control,
point it toward the infrared receiver on the Walk-and-Talk product:
To click or double-click, press the “L” button or the click trigger once
•
or twice, or tap once or twice on the remote control touch pad.
For a right-click (Windows) or control-click (Macintosh), press the “R”
•
button.
To page up or down through a document, press the “Next” or
•
“Previous” button (for example, if PowerPoint is the active window,
press “Next” to move to the next slide).
When using the stylus with your Walk-and-Talk Interactive Panel, the stylus
does not need to touch the display. It operates when the stylus is hovering
within an inch or so of the display.
•
To click, tap the display once.
™
Walk-and-Talk
Operating Your Walk-and-Talk Product 9

• To double-click, tap the display twice rapidly or hover the stylus over
L
R
the display and press the stylus button furthest from the tip.
• For a right-click (Windows) or control-click (Macintosh), hold the stylus
to the display for one second, or hover the stylus over the display and
press the stylus button near the tip.
MARKING-UP COMPUTER PROJECTIONS
While your Walk-and-Talk product displays a projected computer image,
the Walk-and-Talk driver enables you to draw, highlight, and write over the
projected image. This type of writing is called “mark-up” and it is part of the
projected image, not physical ink.
To mark-up the projected computer image:
1 Press the “Cursor/Pen” button on the remote control. The cursor
changes from an arrow to a pen. (To return to mouse operations,
press the “Cursor/Pen” button again.)
Cursor Pen
Pen Style Keyboard
2 Write over the projected computer image using your finger or the
stylus as shown above on the right.
To quickly change the color of markups:
• Press the black, red, blue, or green “Ink Color” button on the remote
control.
The red “Ink Color” button on the remote control has three optional
functions which you can configure:
• red pen color for mark-ups
• spotlight
• reveal
Walk-and-Talk™
10 User Guide
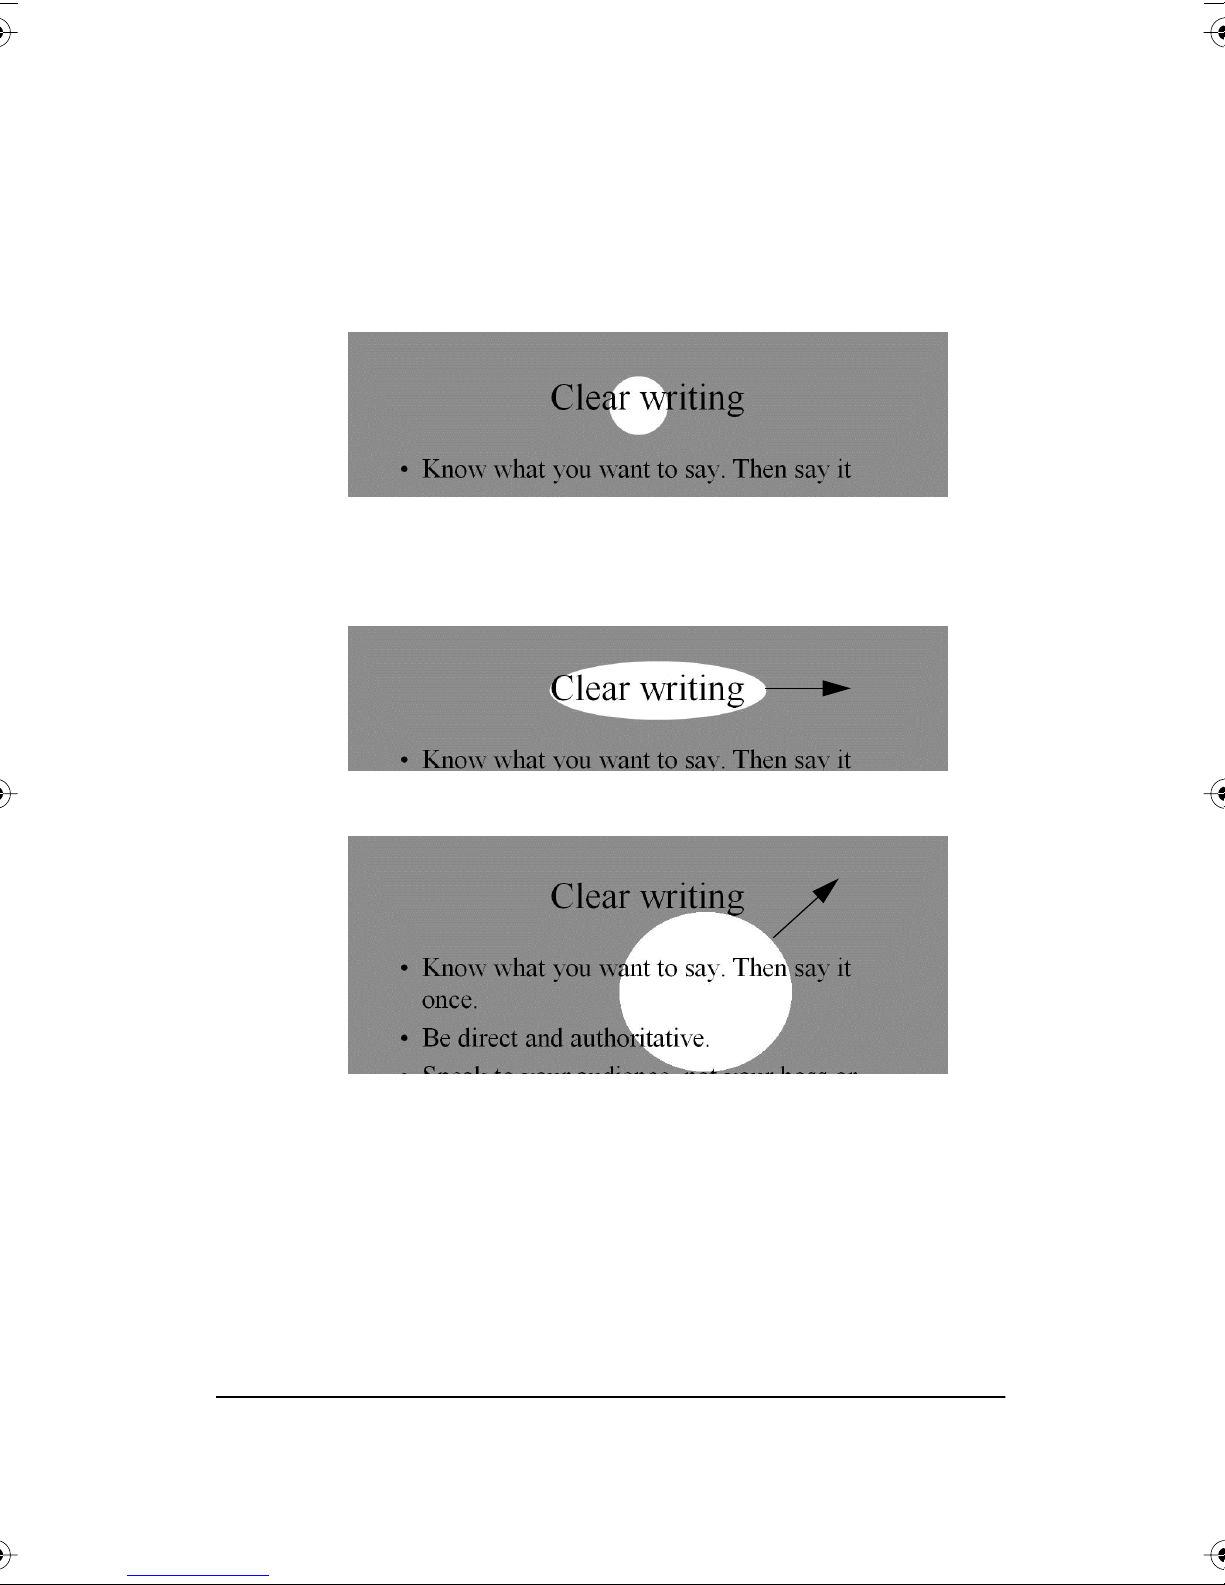
To use the spotlight:
1 Configure the red button for the spotlight option. (Refer to “Projection
Options” on page 23.
2 Press the red “Ink Color” button on the remote control. The screen
becomes grayed except one circle of light.
3 Drag the spotlight around the screen to focus attention on that portion
of the screen.
4 To re-shape the spotlight into an ellipse, drag the circle from any of the
four cardinal points around the edge of the circle.
5 To enlarge or shrink the circle, drag it from any point around the edge
except the four cardinal points.
To remove the spotlight:
• Press the red “Ink Color” button on the remote control again.
To use the reveal tool:
1 Configure the red button for the reveal option. (Refer to “Projection
Options” on page 23.
Walk-and-Talk™
Operating Your Walk-and-Talk Product 11
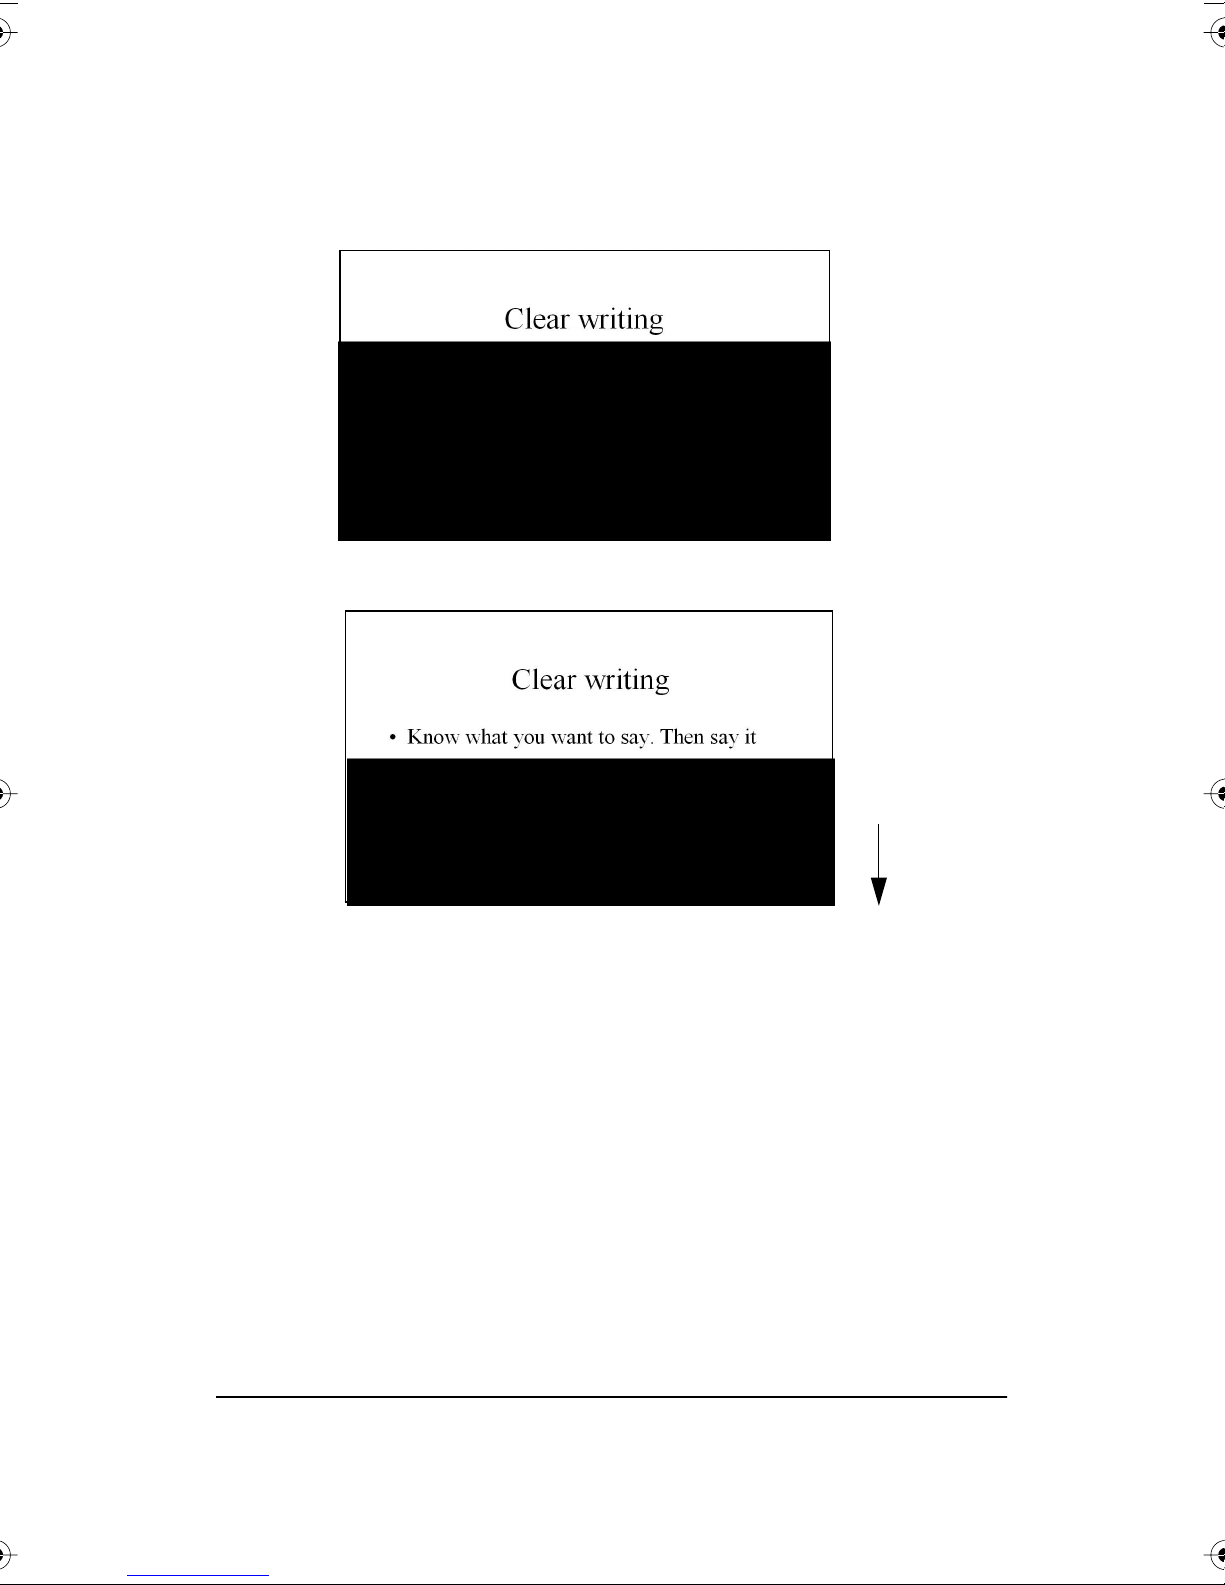
1 Press the red “Ink Color” button on the remote control. The projected
screen becomes black except one strip at the top.
2 Drag the strip down to reveal more of the screen.
Walk-and-Talk™
To reveal the entire projected screen and continue your presentation:
• Press the red “Ink Color” button on the remote control again.
If you prefer to write on a clean display, you can change to a blank canvas
to continue writing.
To display a blank canvas for mark-ups:
• Press the “Previous” button on the remote control.
To return to the projected computer image:
• Press the “Next” button.
12 User Guide
PRINTING AND SAVING MARK-UPS
Walk-and Talk enables you to capture snapshots that include your
computer screen and the mark-ups you added. Mark-ups leave no ink, but
they are part of the snapshot.
To capture a snapshot of the display:
• Press the “Print” or “Save” button on the remote control.
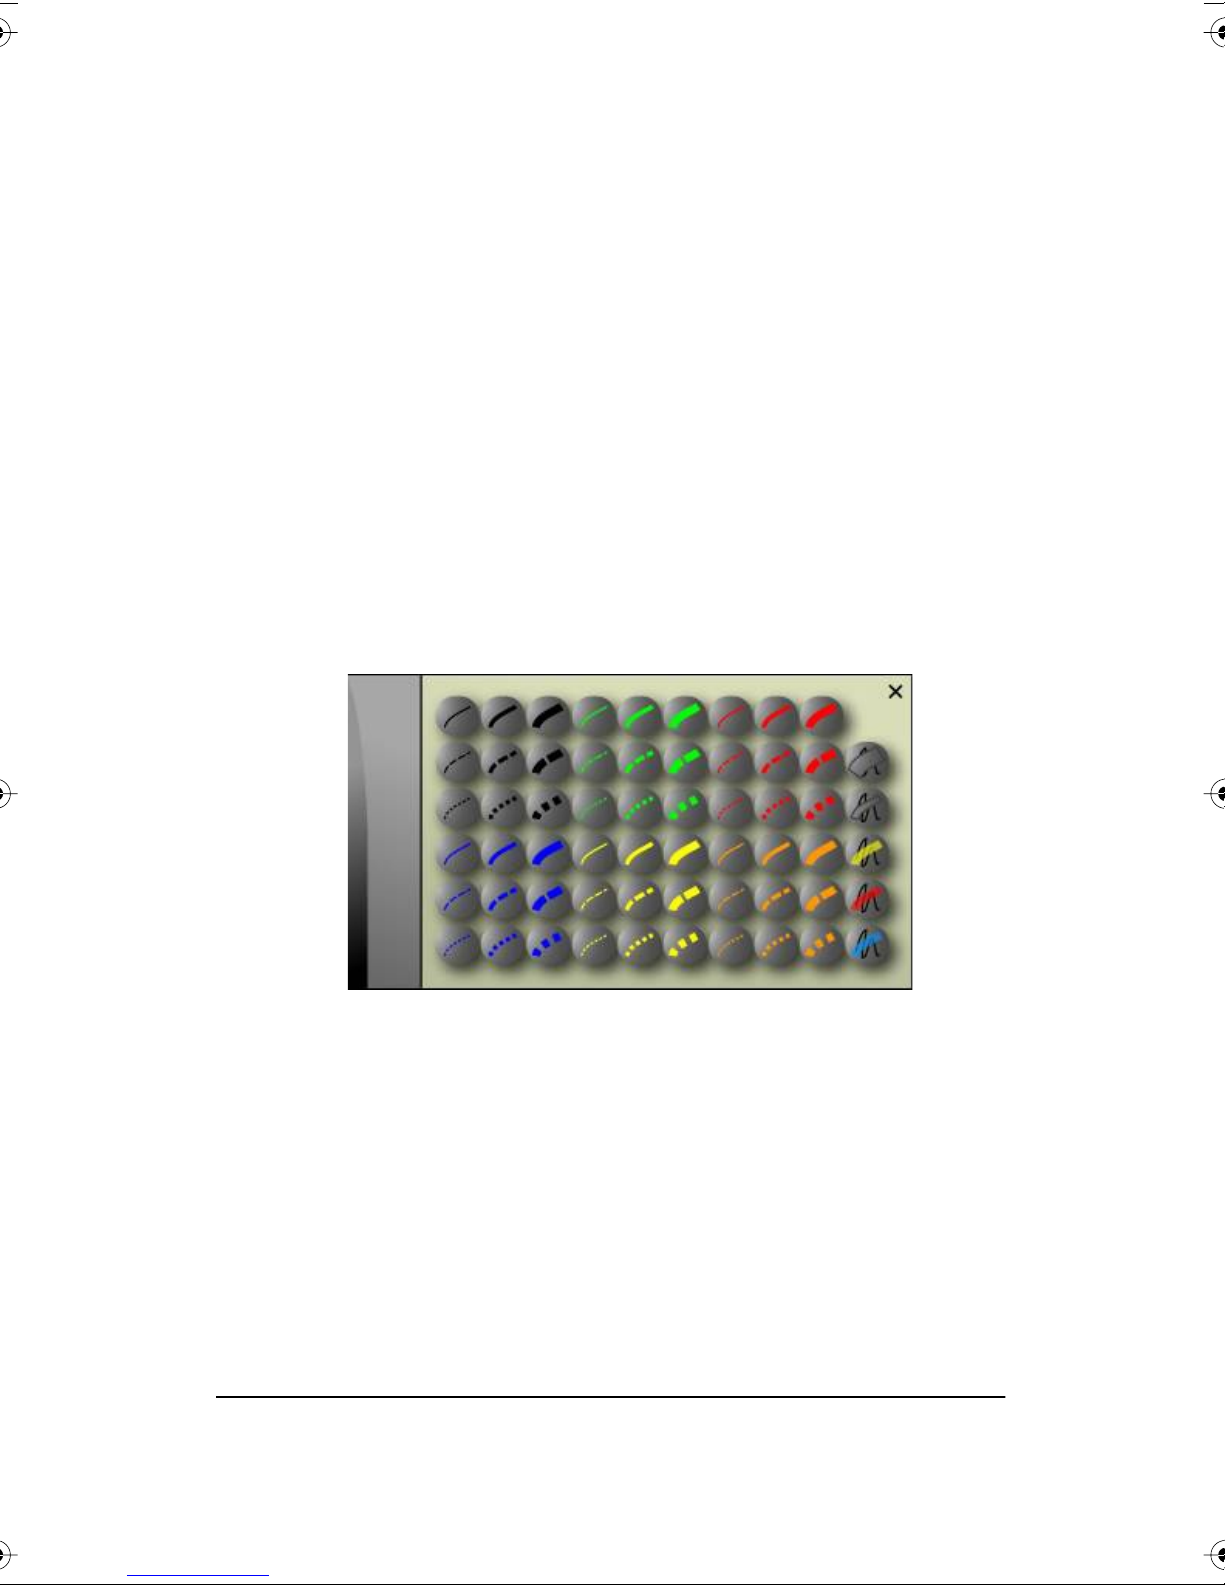
CHOOSING MARK-UP PEN STYLES
While marking-up the computer image, you can choose from 54 unique
pen styles (six colors, three line widths, and three dash styles) plus three
highlighter pen colors and two mark-up eraser widths.
To change your mark-up pen style:
1 Press the “Pen Style” button on the remote control. A palette of
options appears.
2 To change the pen style, tap an option in the palette. The palette
closes when you tap a pen style option and the new pen style appears
in future mark-ups.
3 To move the palette, drag it with your finger or the stylus.
4 To close the palette without changing pen style, you can either tap the
“close” button at the upper corner of the palette, tap anywhere on the
screen, press the “Pen Style” button on the remote control, or begin
writing with a dry-erase marker outside the projected computer
screen.
Operating Your Walk-and-Talk Product 13
Walk-and-Talk™

ERASING MARK-UPS
Your mark-ups remain available until you erase them.
To erase mark-ups:
• Choose the wide or narrow eraser option in the Pen Style palette and
erase with your finger or the stylus.
• Erase with the circular eraser (Walk-and-Talk or Walk-and-Talk
Lightning Interactive Whiteboard only).
• Press the “Erase All” button on the remote control to erase everything
in the display and start fresh.
USING THE ON-SCREEN KEYBOARD
Walk-and-Talk products provide quick access to your operating system’s
on-screen keyboard so you can enter text in a dialog box or other
projected computer window as an alternative to typing from your
computer’s keyboard.
To use the on-screen keyboard:
1 Press the “Keyboard” button on the remote control. The on-screen
keyboard appears.
2 Tap the board to place the cursor where you want to enter text. (If you
use an interactive whiteboard, you can tap with your finger or with the
stylus.)
3 To enter text, tap keys on the on-screen keyboard.
4 To move the keyboard, drag the title bar to another location.
5 To close the keyboard, tap the “close” button (X) at the upper corner of
the window or press the “Keyboard” button on the remote control.
Walk-and-Talk™
14 User Guide

THE WALK-AND-TALK DRIVER
WINDOWS SYSTEM REQUIREMENTS
To use Walk-and-Talk products, your Windows-based computer must
have:
• Windows 98SE, ME, 2000, XP, Tablet XP, or Vista
• VGA HD-15 video port for projectors or interactive panels
• One USB port (two for the interactive panel)
MACINTOSH SYSTEM REQUIREMENTS
To use Walk-and-Talk products, your Macintosh computer must have:
• PowerPC G3 or higher or Intel-based processor
• Mac OS 10.2 or higher
• VGA HD-15 video port for projectors or interactive panels
• One USB port (two for the interactive panel)
DRIVER INSTALLATION
Walk-and-Talk products are always close at hand. You need no installation
disk or CD-ROM unless you are using Windows 98. (A CD-ROM is
included for Windows 98 users.) Installing the Walk-and-Talk driver takes
place when you connect the PolyKey on the Walk-and-Talk USB cable to
your computer’s USB port.
To install the Walk-and-Talk driver on your computer if you are not using
Windows 98:
1 Locate the PolyKey on the USB cable.
The Walk-and-Talk Driver 15
Walk-and-Talk™

2 Connect the PolyKey on the USB cable to your computer’s USB port.
Instant
Plug and Play
Technology
PolyKey
TM
3 Installation should begin automatically. If it does not:
Windows XP and Tablet XP: double-click “My Computer” on your
desktop and double-click the removable disk drive named “PolyKey.”
Installation begins.
Macintosh: double-click the PolyKey icon on your desktop, doubleclick the Macintosh folder, and double-click “Walk-and-Talk
Installation.” Installation begins.
Walk-and-Talk™
4 Follow the prompts you see on the screen to complete the installation.
On a Macintosh, you must re-boot your system.
To install the Walk-and-Talk driver on a computer using Windows 98:
1 Turn on your computer and wait for Windows to start. For best results,
make sure no applications are running.
2 Place the Walk-and-Talk CD in your CD-ROM drive. The setup
program starts. If the setup program does not start, open Windows
Explorer and double-click “Setup.exe” on the CD.
3 Follow the prompts to install the driver.
4 Restart, if prompted.
When installation is complete, a message appears on your computer
screen and the Walk-and-Talk icon appears in your system tray (Windows)
or system menu (Macintosh).
16 User Guide

To start using Walk-and-Talk products:
1 Disconnect the PolyKey.
2 If you are using the Walk-and-Talk wireless option, refer to “Using
Walk-and-Talk Wireless” on page 39. If you are using the WT BT
(Bluetooth) option, refer to the WT BT Installation and Operation
manual. Otherwise, connect the USB cable to your computer’s USB
port and the other cable end to the Walk-and-Talk interactive
whiteboard. The whiteboard’s Power/Status light should turn green.
In
s
ta
n
t
P
lu
g
a
n
T
d
e
P
c
l
h
a
n
y
o
lo
g
y
PolyKey
TM
The Walk-and-Talk driver runs unobtrusively in the background whenever
your computer is on and connected to the Walk-and-Talk interactive
whiteboard.
CONFIGURING WALK-AND-TALK OPTIONS
The Walk-and-Talk driver is ready to use as soon as it is installed. However,
you can change the default options at any time.
To configure Walk-and-Talk options:
1 Click the Walk-and-Talk icon in the system tray (Windows) or system
menu (Macintosh).
Walk-and-Talk™
The Walk-and-Talk Driver 17

2 The Walk-and-Talk menu appears.
3 Choose “Configure Walk-and-Talk.” The Configure Options dialog box
appears. (Shown below on the left for Macintosh users and on the
right in Windows.)
Walk-and-Talk™
4 Options are organized in tabs. Each tab includes these buttons:
“Help”: Click “Help” (Windows) or “?” (Macintosh) to view information
about the options on a tab.
“OK”: Click “OK” to save your changes and close the dialog box.
“Apply”: Click “Apply” (Windows) to save your changes and leave the
dialog box open.
“Cancel”: Click “Cancel” to close the dialog box and make no
changes to options.
“Restore Defaults”: Click “Restore Defaults” to restore factory
defaults.
18 User Guide

GENERAL OPTIONS
To configure general options:
• Click the “General” tab. You see the following options:
“Make sounds”: Check this box to enable sounds as you press
buttons on the remote, or sounds that indicate system status.
“Enable Per User Settings”: Check this box to save settings so they
apply to all users who connect to this board. When this box is
unchecked, settings apply to individual users.
“Enable automatic checks for updates”: Check this box if you
want the Walk-and-Talk driver to connect automatically to the
PolyVision web site and check for driver updates.
“Change drawing cursor for left handed person”: (Windows only)
Switches the cursor for ease-of-use for left-handed users.
“Enable desktop alert window”: Check this box if you want to see
an alert window appear on your computer desktop while you draw on
the device with the pen tool. The alert window shows what you are
drawing. As soon as you stop drawing, the window fades off.
Walk-and-Talk™
The Walk-and-Talk Driver 19

SAVE OPTIONS
To configure Save options:
• Click the “Save” tab. You see these options:
Walk-and-Talk™
“Save File As”: Specify the format of the snapshot file saved on your
computer when you press “Save” on the remote control. Options
include PDF, JPEG, TIFF, PNG, or BMP. In Windows, you can also
save as GIF. On a Macintosh, you can also save as PICT, Photoshop,
SGI, TGA, and Quicktime Image formats. By default, snapshot files are
saved in JPEG format (Windows) or PDF (Macintosh). If you save PDF
files, you can save them in portrait or landscape orientation. To save
PDF files in landscape orientation, check the “Save PDF files in
landscape” box.
“Save image size”: Specify the width (in pixels) of the image that is
created when you save. (The height is automatically determined by
your whiteboard size.) Options include 2048, 1600, 1024, 800, and
“Monitor Resolution” which saves images set to the width of your
monitor.
“Save to Directory”: Specify the directory where snapshot files are
saved. Click “Browse” to locate a directory. By default, snapshot files
are saved to your “My Documents” (Windows) or “Documents”
(Macintosh) folder.
20 User Guide

DRAW OPTIONS
To configure pen options:
• Click the “Draw” tab. You see these options:
“Startup Pen Style”: To specify the pen style that is used when you
start up the Walk-and-Talk driver on your computer, check
“Remember Last Used.” Otherwise, click “Choose Startup Style.” The
factory default pen style is a medium black line.
The Walk-and-Talk Driver 21
Walk-and-Talk™

PRINT OPTIONS
To configure print options:
• Click the “Print” tab. You see these options:
Walk-and-Talk™
“Print To”: Specify the printer used when you press the “Print” button
on the remote control. In Windows, the drop down list includes
printers currently installed on your computer and you can click
“Properties” to specify options for the selected printer. By default, your
system default printer is used.
22 User Guide

PROJECTION OPTIONS
To configure projection alignment options that apply when your Walk-andTalk Interactive Whiteboard or Flat-Screen Module enters projection mode:
• Click the “Projection” tab. You see these options:
“Alignment Points”: Choose between three levels of projection
alignment: 4-point, 8-point, and 16-point. The more points you
choose, the more accurately the cursor will be controlled from the
whiteboard in projection mode. (This option is not available for Walkand-Talk Lightning Interactive Whiteboards.)
“Fixed projector (remember last alignment)”: If your whiteboard
and projector remain in the same positions, check this box to use the
same projection alignment each time. No alignment screen displays
when you enter projection mode if this box is checked.
“Red Button”: Choose an option from the drop-down list to re-assign
the function of the remote control button for drawing with red ink.
Options are: “Pen Color” for drawing with red ink; “Spotlight” for
focusing attention on one part of the screen using a spotlight that you
can drag around the screen; or “Reveal” for gradually revealing screen
contents from top to bottom. Refer to “Marking-Up Computer
Projections” on page 10.
“Replay Strokes”: When you check this box, pen strokes are
Walk-and-Talk™
The Walk-and-Talk Driver 23

remembered when you switch from pen mode to cursor mode, and
back to pen mode. Pen strokes accumulate until you erase all.
“Desktop alert window size”: If you have enabled the desktop alert
window in the Configure Options “General” tab, you can choose
between a large or small alert windows size.
HARDWARE OPTIONS
To configure hardware options:
• Click the “Hardware” tab. You see these options:
“Installed Hardware”: The communicating Walk-and-Talk
whiteboards and their status appear in the list.
“Change Remote ID”: Click this button to assign one of the remote
control slide switch settings to a whiteboard. The slide switch has
three positions corresponding to “A,” “B,” or “C.” If you choose “A,”
“B,” or “C,” the selected board responds to the remote control when
the slide switch on the remote is in the corresponding position. If you
choose “A/B/C” the board responds regardless of the position of the
slide switch on the remote control. (Refer to “Using Multiple Walk-andTalk Products” on page 28.)
To assign a slide switch position to one of the installed whiteboards on
Walk-and-Talk™
24 User Guide

a Macintosh, select a board in the “Installed Hardware” list then click
“Change Remote ID” repeatedly to cycle through “A,” “B,” “C,” or “A/
B/C” until your choice is displayed by the hardware. In Windows,
select a Walk-and-Talk product in the “Installed Hardware” list then
click “Change Remote ID.” You see this dialog box:
Select the desired remote ID from the drop-down list. The default is A/
B/C.
“Find Serial Whiteboards”: If a whiteboard is connected to your
computer via the serial port, Walk-and-Talk Wireless, or WT BT
(Bluetooth), click this button to establish communication between the
computer and the board. When you click “Find Serial Whiteboards”
the Walk-and-Talk driver searches all serial ports for attached boards
and adds them to the list. Refer to “Using Walk-and-Talk Wireless” on
page 39 or to the WT BT Installation and Operation manual.
The Walk-and-Talk Driver 25
Walk-and-Talk™

note:NOTE:
USING THE ON-SCREEN REMOTE CONTROL
In the event that your remote control is lost, you can operate your Walkand-Talk product using an on-screen remote control.
If your remote control is available, use it instead since the on-screen
remote can be distracting to others.
To use the on-screen remote:
1 Click the Walk-and-Talk icon in the system tray (Windows) or system
menu (Macintosh). The Walk-and-Talk menu appears.
2 Choose “Show On-Screen Remote Control” from the menu to toggle
on and off the display of a functional on-screen remote control.
3 Tap the on-screen remote control buttons using your finger or the
stylus. (The on-screen L and R buttons, and touchpad are nonfunctional.)
GETTING HELP
Choose “Help” from the Walk-and-Talk menu for information about using
Walk-and-Talk products.
Walk-and-Talk™
VIEWING A TUTORIAL
Choose “Tutorial” from the Walk-and-Talk menu to start a video tutorial on
using the board.
CHECKING FOR UPDATES
Walk-and-Talk driver updates are available via the Internet. Registered
users receive notice when updates are available. The Walk-and-Talk driver
can check for updates automatically (refer to “General Options” on
page 19) or you can check for updates at any time.
To update the Walk-and-Talk driver:
1 Click the Walk-and-Talk icon in the system tray (Windows) or system
menu (Macintosh). The Walk-and-Talk menu appears.
2 Choose “Check for Updates” from the menu when your computer is
connected to the Internet. A system check reveals whether the version
26 User Guide

number available on the web agrees with the version installed on your
system. If the version numbers are not the same, you can choose to
initiate the download and automatic installation of the update. You can
also enable automatic updates. Refer to “General Options” on
page 19.
USING WEBSTER
Advanced users can download a copy of the Webster® software from
www.polyvision.com. If you would prefer to use the advanced features of
Webster instead of the ease and simplicity of the Walk-and-Talk driver, you
can start Webster.
To use Webster software instead of the Walk-and-Talk driver:
1 Click the Walk-and-Talk icon in the system tray (Windows) or system
menu (Macintosh). The Walk-and-Talk menu appears.
2 Choose “Open Webster” from the menu. Webster opens.
3 Choose “Find Board” from the Edit menu.
4 Select the Walk-and-talk product that you want to use with Webster.
To return to using the Walk-and-Talk driver, quit Webster.
note:NOTE:
Only Webster versions 3.6 and higher are capable or sharing boards with
Walk-and-Talk. Check the PolyVision web site at www.polyvision.com for
compatibility with your product.
QUITTING THE WALK-AND-TALK DRIVER
To shut down the Walk-and-Talk driver:
1 Click the Walk-and-Talk icon in the system tray (Windows) or system
menu (Macintosh). The Walk-and-Talk menu appears.
2 Choose “Exit Walk-and-Talk” (Windows) or “Quit Walk-and-Talk”
(Macintosh) from the menu. The Walk-and-Talk driver closes.
To resume capturing snapshots or operating the board using the remote
control:
• Windows: choose “Walk-and-Talk” from the Start/Programs/
PolyVision menu.
• Macintosh: double-click “Walk-and-Talk” in the Applications folder.
Walk-and-Talk™
The Walk-and-Talk Driver 27

TO UNINSTALL THE WALK-AND-TALK DRIVER IN WINDOWS
To uninstall the Walk-and-Talk driver in Windows:
1 Click “Start” at the lower left corner of the task bar.
2 Choose “Programs” from the menu.
3 Choose “PolyVision” from the menu.
4 Choose “Remove Walk-and-Talk.”
TO UNINSTALL THE WALK-AND-TALK DRIVER ON A
ACINTOSH
M
You have two ways to uninstall the Walk-and-Talk driver on a Macintosh,
based on whether you have access to the PolyKey. If you have access to
the USB cable with the PolyKey:
1 Insert the PolyKey located at one end of the USB cable in the USB
port of your computer.
2 Double-click the PolyKey icon that appears on the computer desktop.
3 Click “Walk-and-Talk Installer.”
4 Use the “Uninstall” option.
Walk-and-Talk™
If you do not have access to the USB cable and PolyKey, drag the following
files to the Trash and then restart your computer:
1 Navigate to “Applications” and then to “Walk-and-Talk.”
2 Launch “PolyVision Uninstaller.app.”
3 Follow the prompts as directed.
note:NOTE:
To delete these files, you need to enter an administrator password.
USING MULTIPLE WALK-AND-TALK PRODUCTS
If your room includes multiple Walk-and-Talk products, you can operate up
to three of them with the same computer and remote control. Multiple
devices can be associated with the same computer, but multiple
computers cannot be associated with one device.
One remote control can operate up to three Walk-and-Talk products
connected to your computer, but only one at a time. To determine which
28 User Guide

product is active, the remote control includes a three-position switch on the
left side.
Board A/B/C
Three-position switch (A/B/C)
By default, your Walk-and-Talk product responds to the remote control
whether it is set to A, B, or C. However, if you use multiple Walk-and-Talk
products with the same remote control, you must assign one remote
control switch position to each device.
To use multiple devices:
1 Connect the devices to your computer’s USB ports.
2 Click the Walk-and-Talk icon in the system tray (Windows) or the
system menu (Macintosh).
3 Choose “Configure Walk-and-Talk” from the menu.
4 Click the “Hardware” tab.
5 Click “Change Remote ID.”
6 Slide the switch on the remote to position “A.”
7 Point the remote to one device and click “Projection.”
8 Repeat for up to two additional devices connected to your computer,
choosing the “B” and “C” switch positions on the remote control.
When a device has been assigned the A, B, or C position on the remote
control switch, it remains associated with that switch position until you
change the connections to your USB ports, even if you re-boot your
computer or attach the Walk-and-Talk product to another computer.
Using Walk-and-Talk Products with Multiple Monitors
The Walk-and-Talk driver supports up to three projectors on the same
computer showing separate parts of the computer’s desktop. You may
need to add an additional video card(s) to use multiple projectors.
Walk-and-Talk™
The Walk-and-Talk Driver 29

Since all the Walk-and-Talk products connected to your computer are
communicating via the Walk-and-Talk driver, you have the option of
pointing the remote at the active device or at the most convenient of the
communicating devices.
To use the remote control with multiple devices:
1 Write or project a computer display on any or all of the connected
devices.
2 To capture a snapshot or use other remote control functions, slide the
switch to the position that matches the device you want to capture or
operate.
3 Point the remote to any of the Walk-and-Talk products and press the
desired button. Any of the connected devices can receive infrared
commands from your remote, but the function will take place only on
the device that is associated with the remote control.
Snapshots that you save on your computer with multiple products
connected continue to be numbered sequentially, regardless of which
Walk-and-Talk product is captured.
Each Walk-and-Talk product operates independently, so device “A” can
capture a red marker while device “B” captures a blue marker.
Walk-and-Talk™
30 User Guide

USING WALK-AND-TALK INTERACTIVE WHITEBOARDS
USING DRY-ERASE MARKERS
Your Walk-and-Talk interactive whiteboard senses writing and erasing by
detecting pressure.
• Use only the eraser provided with your whiteboard.
• Use firm consistent pressure when you write and erase.
• Make sure there is only one point of contact on the board at a time.
note:NOTE:
The whiteboard surface can be damaged by sharp objects, such as
ballpoint pens and rulers. Scratches can cause permanent ink stains and
data loss due to electrical malfunctions.
To write on the board so you can save or print a snapshot
1 Choose a dry-erase marker.
2 Press the “Ink Color” button on the remote control corresponding to
the marker color.
3 Write on the board.
While you write, the red “Ink Recorded” LED glows to indicate that the
computer is detecting your writing.
Power/Status
Ink Recorded
Pen Mode Active
Projection
Walk-and-Talk™
Using Walk-and-Talk Interactive Whiteboards 31

To erase the board:
• Use the eraser provided.
To erase everything and start fresh:
• Press the “Erase All” button on the remote control.
PROJECTING YOUR COMPUTER ONTO THE WHITEBOARD
While using your interactive whiteboard in projection mode with a projector
connected to your computer, a variety of powerful options become
available. The Walk-and-Talk driver enables you to:
• Control your computer using your finger, the stylus, or the remote
control.
• Run slide presentations and other software either from the whiteboard
or using the remote control.
• Mark-up and capture snapshots of your computer screen plus any
writing on the board.
GETTING STARTED WITH YOUR PROJECTOR
Walk-and-Talk™
Cable connections between your computer and the projector enable you to
control your computer from the interactive whiteboard or remote control.
The Projection LED at the lower left corner of the board glows yellow while
you are in projection mode.
After you set up your computer to interact with the whiteboard, getting
started in projection mode is simply a matter of connecting your projector
32 User Guide

to your computer and then pressing the “Projection” button on the remote
control (or tapping the “Projection” icon on TS or TSL whiteboards).
To align the projected image with a Walk-and-Talk Lightning (WTL)
whiteboard:
1 Assure that at least half of the projected image is actually projected
onto the board.
2 Press the “Projection” button on the remote control one time.
To align the projected image with a Walk-and-Talk whiteboard (WT) without
Lightning technology:
1 Make sure your computer is connected to the board and Walk-and-
Talk software is installed. The Power/Status LED on the lower left
corner board should be green.
2 Move the projector physically so that the entire solid-colored
background is positioned inside the borders of the whiteboard.
Walk-and-Talk™
Using Walk-and-Talk Interactive Whiteboards 33

3 Press the “Projection” button on the remote control. The following
alignment window projects from the computer to the board.
4 Using your finger or the stylus, touch the board exactly on each corner
of the projected screen, following instructions you see on the board.
(By default, you touch the four corner points of the projected screen.
But your board may be configured so that you touch four, eight, or 16
points.) Refer to “Projection Options” on page 23.
Walk-and-Talk™
When alignment is complete, you are ready to begin using your
computer and whiteboard in projection mode.
To exit projection mode when you are finished operating your computer
from the board:
• Press the “Projection” button on the remote control again (or tap the
“Projection” icon on TS or TSL whiteboards).
34 User Guide

WRITING NOTES NEXT TO A PROJECTED IMAGE
While in projection mode, you can also use a dry-erase marker to write
notes on the board beside the projected image from your computer.
Snapshots include everything you see, including any writing with the dryerase marker, the computer projection, and mark-ups.
Using Walk-and-Talk Interactive Whiteboards 35
Walk-and-Talk™

USING TS AND TSL INTERACTIVE WHITEBOARDS
THE TS AND TSL INTERACTIVE WHITEBOARD ICON STRIP
You can operate the TS and TSL Interactive Whiteboard with the Walk-andTalk driver installed on your computer just as you would other products
described in this manual.
The TS Interactive Whiteboard includes a touch-sensitive icon strip along
the edge of the board that functions in place of the Walk-and-Talk remote
control.
When you use the TS or TSL Interactive Whiteboard with the Walk-and-Talk
driver, the icon strip on the TS or TSL board is mapped to correspond to
buttons on the Walk-and-Talk remote control. The equivalent of each
button on the remote control is available in the icon strip, as shown on the
next page.
Walk-and-Talk™
36 User Guide

TS Icon Remote Control Button Equivalent
Pen Style
Tools
Next
Forward
Previous
Back
Print
Print
Snapshot
Show Board
Projection
Red Pen
Black Pen
Green Pen
Blue Pen
Narrow Erase
Wide Erase
Save
Pen/Cursor
Projection
Ink color: Red
Ink color: Black
Ink color: Green
Ink color: Blue
Narrow Eraser (finger width)
Large Eraser (physical eraser size)
Snapshot
Erase All
Erase All
Using TS and TSL Interactive Whiteboards 37
Walk-and-Talk™

CLEANING YOUR WHITEBOARD
Daily Care and Maintenance
1 Wipe your board with a clean cloth moistened by a commercially
available whiteboard cleaner such as PolyVision EV1.
2 Rinse with clear water. This step is simple but very important to avoid
future smearing.
3 Wipe dry with a clean cloth.
Some dry-erase markers may leave more residue on the surface than
others. If your board is used daily, the cleaning may be needed more often.
Removing Permanent Marker
Permanent marker should not be used on your Walk-and-Talk board, but if
it is by accident, use the following steps to clean it from the board.
1 Moisten a clean, dry cloth with isopropyl alcohol.
2 Wipe the board in a circular motion to loosen marker residue.
Walk-and-Talk™
3 Rinse with clear water.
4 Wipe dry with a clean cloth.
5 Repeat these steps as often as necessary to remove all residue.
note:NOTE:
Do not let water or alcohol seep into the sensitive Walk-and-Talk
electronics. Your warranty does not cover damage caused by liquid.
38 User Guide

USING WALK-AND-TALK WIRELESS
The Walk-and-Talk™ Wireless option provides infrared wireless
communication between your interactive whiteboard and your computer.
Walk-and-Talk Wireless components replace the USB cable connection
between your interactive whiteboard and computer, giving you the freedom
to position your computer up to 24 feet (7 m) away.
Infrared communication is designed to reflect from the ceiling and walls,
enabling it to bounce over the heads of people writing on the board or
sitting near the computer, so a direct line of sight between the board and
the transmitter is not needed.
Walk-and-Talk™
Using Walk-and-Talk Wireless 39

note:NOTE:
Hardware requirements:
• One serial port or one USB port and serial-to-USB adapter, available
from PolyVision.
All Walk-and-Talk whiteboards, including Lightning models, require a power
supply to work with Walk-and-Talk Wireless.
If you are using the wireless option with Walk-and-Talk Lightning interactive
whiteboard, be sure to connect the power supply provided with the
wireless components to your board and to a power outlet.
The reflected infrared light can fill a standard size conference room or
classroom to provide a very stable communication link between the board
and your computer.
To establish a wireless communication link between the whiteboard and
your computer:
1 Position the wireless transmitter so the curved edge faces the board.
Walk-and-Talk™
Erase All
Projection
Laser
Next
Previous
L R
Cursor Pen
Pen Style Keyboard
Ink Color
Print Save
To Computer
2 Adjust the position of the transmitter until the LED on it turns green.
3 If you are using the wireless option with a serial-to-USB adapter, install
the software for the adapter first.
If you are connecting the wireless transmitter to the serial (COM) port
on your computer, not using a serial-to-USB adapter, configure the
Walk-and-Talk driver to communicate with your computer serial port
as follows: click the Walk-and-Talk icon in your computer’s system tray
(Windows) or system menu (Macintosh), choose “Configure Walk-andTalk,” click the “Hardware” tab and click the “Find Serial Whiteboards”
40 User Guide

button. The Walk-and-Talk driver searches all serial ports for attached
boards and adds them to the list. Select your board and click OK.
4 Test the wireless communication link by standing in front of the
wireless transmitter. If the LED on the transmitter turns from green to
amber, try moving the transmitter or other features in the room until the
LED remains green even if someone stands in front of it. (Rooms with
high ceilings or with few walls may require line-of-sight to operate
Walk-and-Talk Wireless.)
Using Walk-and-Talk Wireless 41
Walk-and-Talk™

TECHNICAL SUPPORT
If reviewing the above sections fails to resolve your hardware or driver
problem, contact PolyVision North American Technical Support:
• Phone: 1.800.620.POLY (7659), 678.542.3100
Technical support representatives are available Monday through
Friday from 8 AM Eastern time to 8 PM Eastern time.
• E-mail: support@polyvision.com
• Internet: www.polyvision.com
Or, outside North America contact PolyVision Europe/Asia Technical
Support:
• Phone: +32 (0)89 32 31 30
• E-mail: business.center@polyvision.be
• Internet: www.polyvision.com
Walk-and-Talk™
42 User Guide

INDEX
A
A/B/C switch on remote control 28
aligning the computer image with the board
34
alignment options 23
Alignment Points 23
B
Bluetooth 25
C
Change drawing cursor for left handed
person 19
Check for Updates 26
cleaning the board 38
click trigger 7
clicking using the remote control 7, 9
computer operation from a whiteboard 9
configuration options 18, 40
Cordless lectern 3
cursor movement from a whiteboard 9
Cursor/Pen 10
D
desktop alert window
enable or disable 19
size 24
Desktop alert window size 24
double-clicking using the remote control 7,
9
Draw options 21
driver 15
installation 15
installation for Windows 98 16
menus and options 18, 40
updates 26
E
Enable automatically check for updates 19
Enable desktop alert window 19
Enable Per User Settings 19
erasing
erase all button 14, 32
mark-ups 14
Walk-and-Talk™
Exit Walk-and-Talk 27
F
file name 20
Find Serial Whiteboards 25, 40
find snapshot on computer 20
flat-screen module 3
infrared receiver 5
projection mode options 23
G
get started
installing the driver 15
projecting your computer 32
using multiple products 28
using the wireless option 39
H
Hardware options 24
highlighter 13
I
infrared light
reflecting from walls and ceiling 39
infrared receiver 5
Ink Color 10
options 10
ink color
in your snapshot 31
ink color black 37
ink color blue 37
ink color green 37
ink color red
TS Boards 37
Installed Hardware 24
installing the driver 15
Interactive panel 3
interactive panel
infrared receiver 5
interactive whiteboard 3
projection alignment options 23
Index 43

K
keyboard
remote control button
using the on-screen keyboard 8, 14
14
L
large eraser
TS boards
Lightning 3
37
M
Make Sounds 19
markers
31
using
mark-up 10
getting started 10
pen style 13
pen styles 13
menu options 18, 40
mouse clicks 7
multiple products
getting started 28
status 24
N
name of snapshot file 20
narrow eraser
TS boards 37
Next 9, 12
next
TS boards 37
O
Open Webster 27
operating distance 39
options 18, 23, 40
file location 20
file type 20
printer used 22
overview
projecting and using computer 4
save or print snapshot 4
pen style 8, 13
for mark-up 13
TS boards 37
Pen/Cursor
TS boards
pen/cursor button 10
pens
using 31
Permanently-Mounted Projector 23
PolyKey
for driver installation 15
Previous 9, 12
previous
TS boards 37
print 13
options 22
remote control button 6
TS boards 37
Print To 22
projecting your computer 7
projection alignment
number of alignment points 23
options 23
projection botton
using 34
projection mode
alignment 33
entering 7, 34
entering text 14
exiting 34
mark-up 10
moving the mouse 9
options 23
tools 8
TS boards 37
37
R
Red Button 23
options 10
P
page up or page down 9
palette of pen colors 13
pen color 31
Walk-and-Talk™
44 Index

remote control
A/B/C switch
carrying with lanyards 5
cursor/pen button 8, 10
erase all button 6, 14, 32
holster 5
infrared receiver 5
ink color button 6
keyboard button 8, 14
L and R buttons 7, 9
lost 26
maximum operating distance 5
next and previous buttons 9
pen style button 8, 13
previous and next buttons 7
print button 6
projection button 7, 34
save button 6
table-top use 5
using on-screen version 26
using the touch pad 7
Replay Strokes 23
requirements 15
reveal 11
reveal entire screen 12
right-click 7, 9
on the board 9
using the remote 9
28
S
save 13
TS boards 37
save button 6
Save File As 20
Save image size 20
Save to Directory 20
show on screen remote control 26
snapshot 13
file location 20
file name 20
in projection mode 13, 35
printing 22
saving 20
saving or printing 6
snapshot/erase all
whiteboard icon
37
software
installation for Windows 98
menus 18, 40
options 18, 40
requirements 15
sounds
turning on or off
spotlight 11
drag to ellipse 11
enlarge or shrink 11
removing 11
Start Walk-and-Talk 27
Startup Pen Style 21
stylus
using
10
with interactive panel 9
system requirements 15
19
16
T
technical support 42
text entry
in projection mode 14
touch pad
using 7
TS Interactive Whiteboard 3, 5
mapping remote buttons 36
TS Lightning Interactive Whiteboard 3
Tutorial 26
U
uninstall Walk-and-Talk driver
Macintosh 28
Windows 28
USB cable
connection 39
PolyKey 15
using the on-screen keyboard 14
W
Walk-and-Talk menu 26
Webster 27
whiteboard cleaning 38
wireless option 39
with Lightning 40
wireless transmitter
positioning
testing 41
40
Walk-and-Talk™
index 45

writing
beside projected computer
color on the board and in snapshots
31
on the board 31
over computer projections 10
35
Walk-and-Talk™
46 Index
 Loading...