

PolyVision ?no play Installation And Operation Manual

PolyVision® ēno® play
Installation and Operation Guide
Part number 2002480-001 Rev C
©2012 PolyVision Corporation
All rights reserved

ēno play
Table of contents
Overview ........................................................................................................................................................ 3
What is ēno play? ....................................................................................................................................... 3
Register your PolyVision product ................................................................................................................ 3
Install ēno play ............................................................................................................................................... 4
Important considerations ............................................................................................................................ 4
Driver pack positioning ............................................................................................................................ 4
Amplifier positioning ................................................................................................................................. 4
Power and audio input cable length considerations ................................................................................. 4
Cable routing options to the amplifier ....................................................................................................... 4
Adjustable height mobile stand and wall mount considerations ............................................................... 5
Fixed wall mount considerations .............................................................................................................. 5
What comes in the box ............................................................................................................................... 6
Prepare the ēno classic whiteboard ............................................................................................................ 7
Plan power and audio input cable routing ................................................................................................... 7
Cable routing for whiteboards mounted directly to the wall ...................................................................... 8
Cable routing for adjustable height mobile stand or wall mount options ................................................... 9
Install the driver packs .............................................................................................................................. 10
Install the driver pack with driver pack offset kit ........................................................................................ 12
Install the amplifier .................................................................................................................................... 16
Connect driver pack cables to the amplifier .............................................................................................. 16
Add cable ties and tape ............................................................................................................................ 17
Install cable ties for the driver pack cables ............................................................................................. 17
Install the amplifier cable tie ................................................................................................................... 18
Install a cable tie at the center of the whiteboard ................................................................................... 19
Install a cable tie between the center and bottom of the board .............................................................. 20
Install cable ties for power or audio cable routing options ...................................................................... 21
Tape cables to the back of the whiteboard ............................................................................................ 22
Option: Cable management for adjustable height systems ....................................................................... 23
Option: Install whiteboard wall bracket extenders for fixed wall mounts .................................................... 27
Connect cables and verify amplifier operation ........................................................................................... 29
Add foam strips to prevent unwanted vibrations .................................................................................... 29
Removing and replacing the cable tie holders, driver packs or amplifier.................................................... 30
Install the PolyVision driver ........................................................................................................................... 31
System requirements ................................................................................................................................ 31
PolyVision driver installation ...................................................................................................................... 31
Operating ēno play ....................................................................................................................................... 33
Software options ...................................................................................................................................... 33
Volume controls ........................................................................................................................................ 33
Amplifier LED status ................................................................................................................................. 33
Using the guest audio input connector ..................................................................................................... 34
Warranty ...................................................................................................................................................... 35
What Is Covered .................................................................................................................................... 35
What Is Not Covered ............................................................................................................................. 35
How to Get Warranty Service ................................................................................................................ 35
Limitation of Damages and Implied Warranties ...................................................................................... 36
How State Law Relates to the Warranty ................................................................................................ 36
Specifications ............................................................................................................................................... 37
Index ............................................................................................................................................................ 38
2 of 38 2002480-001 Rev C Installation and Operation Guide

ēno play
Overview
Congratulations on your purchase of the PolyVision® ēno® play option to provide audio with your ēno
classic interactive whiteboard. This manual describes how to install and operate ēno play.
What is ēno play?
ēno play enables you to control audio directly from your ēno classic interactive whiteboard using
PolyVision driver options on your computer. The ēno play components include an amplifier and two
driver packs that produce audio by vibrating against the back of the ēno whiteboard.
The ēno play provides audio for these ēno classic whiteboards and mounting options:
• ēno classic 2610
• ēno classic 2810
• ēno classic 2615
• ēno classic 2815
• ēno classic 2610/2810 or ēno classic 2615/2815 with all ēno one products (i.e. adjustable mobile
stand, adjustable wall mount, or fixed wall mount)
The PolyVision driver version 2.2.2 or higher is required on the computer you use for ēno play and
interactive whiteboard features. Refer to “Install the PolyVision driver”.
Register your PolyVision product
By registering your product, you receive enhanced customer service with information on software
upgrades.
To register your PolyVision product visit: http://register.polyvision.com
PolyVision 2002480-001 Rev C 3 of 38

ēno play
Install ēno play
Important considerations
Driver pack positioning
There is only one correct position for the ēno play driver packs that you install on the back of the
whiteboard. Determine the correct driver pack location using the template and instructions provided.
Refer to “Install the driver packs”.
Amplifier positioning
There are two optional positions for the ēno play amplifier that you install on the back of the
whiteboard. Position the amplifier in the lower left or the lower right corner only. Consider the
distance and routing to a power outlet and the audio input source when choosing which location to
install the ēno play amplifier. Refer to “Plan power and audio input cable routing”.
Note: Use care when mounting the ēno play amplifier and driver packs to the back of the
whiteboard. The supplied adhesive is intended to be permanent. If you need to remove or reposition
the components, additional supplies are provided. Refer to “Removing and replacing the cable tie
holders, driver packs or amplifier”.
Power and audio input cable length considerations
PolyVision provides a audio input cable with ēno play. Determine the cable path from the ēno play
amplifier to the audio source. If the distance to your audio source is longer or considerably shorter,
obtain alternate audio input cables from a third party.
PolyVision provides a 6 ft (1829mm) power cable and a 10 ft (3048mm) extension for the amplifier.
Before installing the amplifier, consider which edge of the whiteboard provides optimum access to a
power outlet.
If installing ēno play with any of the ēno one adjustable height solutions, make sure to account for
raising and lowering the whiteboard when you determine the required cable lengths. Refer to “Plan
power and audio input cable routing”. Do not proceed with ēno play installation until you are sure
you have the appropriate cable lengths for your installation.
Cable routing options to the amplifier
The ēno play amplifier includes cable connections for:
• two ēno play driver packs mounted to the back of the whiteboard
• a power outlet
• a permanent or a guest audio input source
The cable routing between the amplifier and the two driver packs is important. Cables must be
routed and secured as described in “Add cable ties and tape”.
The ēno play amplifier provides two audio input connectors: one guest connector and one
permanent connector. The guest connector faces away from the whiteboard for easy access. Refer
to “Using the guest audio input connector”. The permanent connector faces the center of the
whiteboard. Cable routing and cable management between the amplifier and a permanent audio
input source is important. Refer to “Plan power and audio input cable routing”.
4 of 38 2002480-001 Rev C Installation and Operation Guide

ēno play
Adjustable height mobile stand and wall mount considerations
If the ēno classic whiteboard is mounted using some older adjustable height solutions, PolyVision
provides a driver pack offset kit that must be added to the driver packs before they are fastened to
the whiteboard. Refer to “Install the driver pack with driver pack offset kit ”.
Fixed wall mount considerations
Whenever adding ēno play to a whiteboard that is mounted to the wall, you must first install bracket
extenders to the whiteboard wall brackets to allow space for the ēno play components behind the
whiteboard. Do not add bracket extenders when adding ēno play to a whiteboard that is mounted to
an adjustable height system. Refer to “Option: Install whiteboard wall bracket extenders”.
PolyVision 2002480-001 Rev C 5 of 38
ēno play
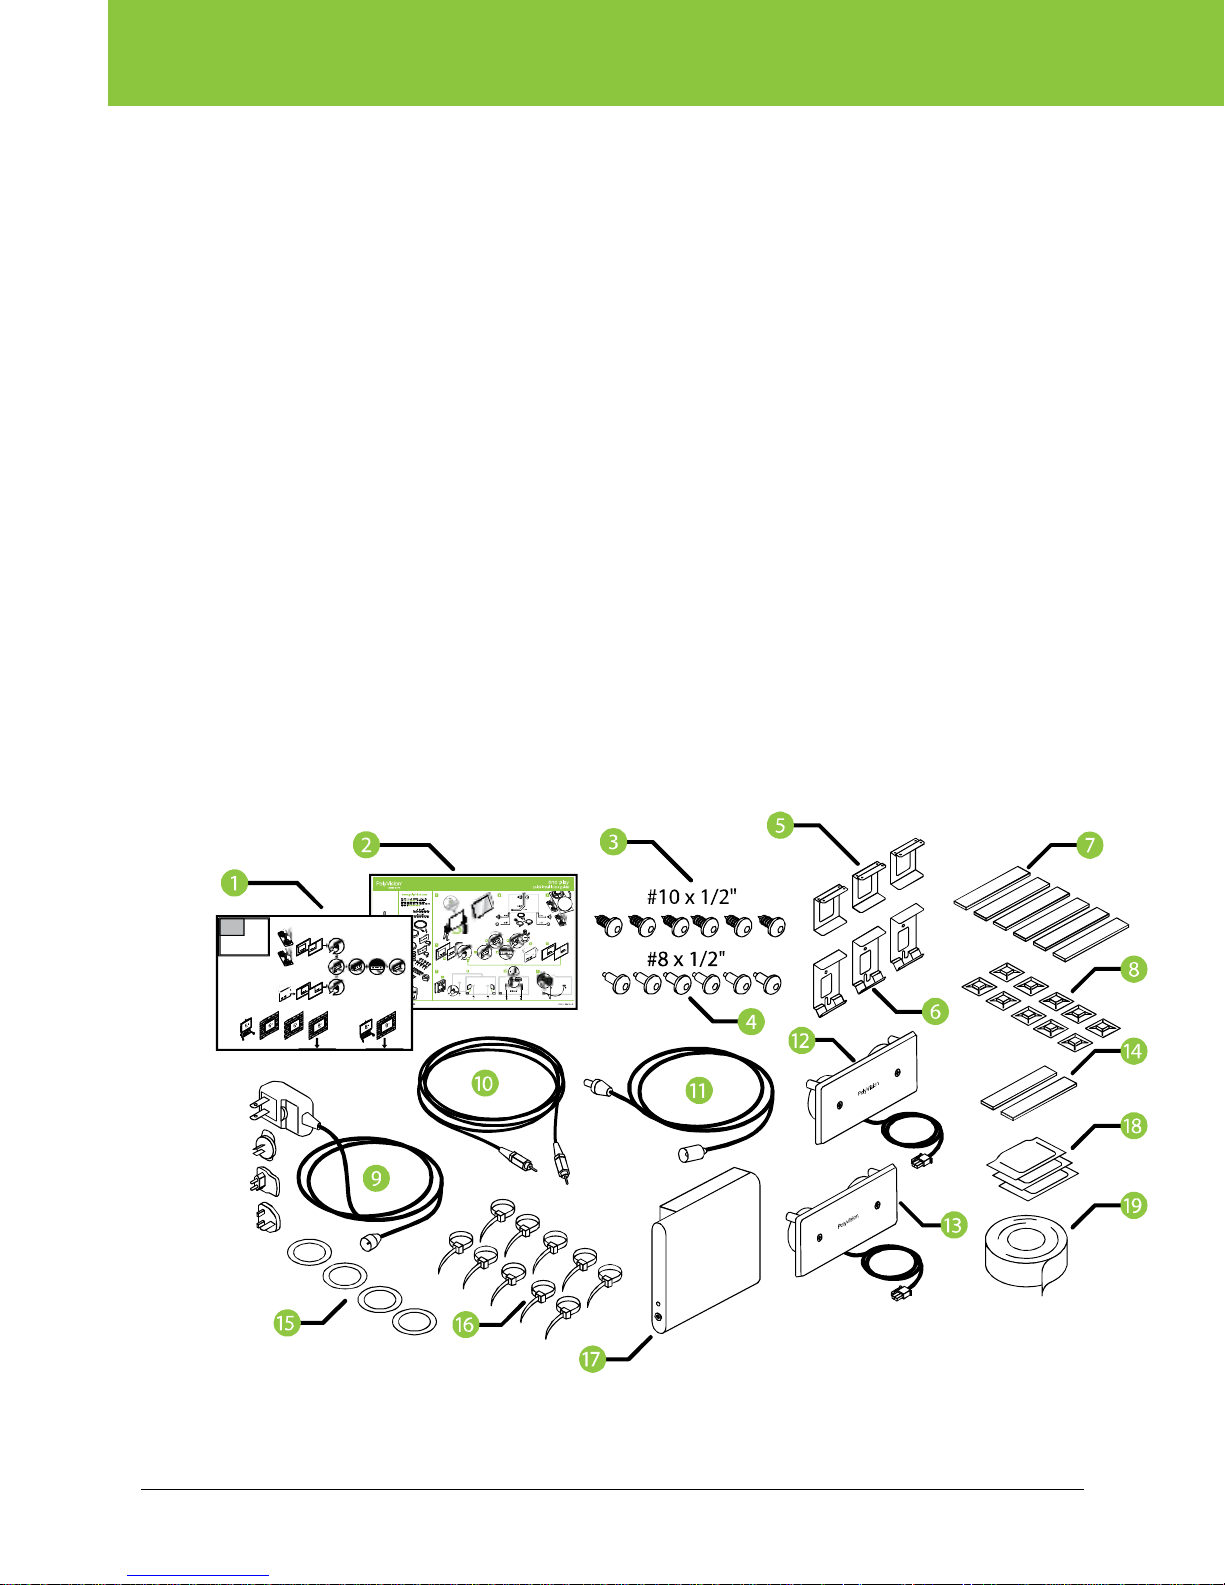
What comes in the box
1 Driver pack mounting template
2 ēno play Quick Reference Guide
3 #10 x 1/2” fasteners (x6)
4 #8 x 1/2” fasteners (x6)
5 Upper whiteboard bracket extender
6 Lower whiteboard bracket extender
7 Foam pads
8 Cable tie holders (x10)
9 Power cable and adapters
10 3.5mm stereo male to male audio input cable 25 ft (7629mm)
11 Power cable extension
12, 13 Driver packs (x2)
14 Replacement amplifier self-adhesive strips (2)
15 Replacement driver pack self-adhesive rings (x4)
16 Cable ties (x10)
17 Amplifier
18 Alcohol wipes
19 Tape
6 of 38 2002480-001 Rev C Installation and Operation Guide
ēno play
Prepare the ēno classic whiteboard
Before beginning to install the ēno play components:
1. If installing ēno play on a new ēno classic whiteboard, unpack the whiteboard and wall
brackets.
Or
1. If installing ēno play on an ēno classic whiteboard that is already mounted to a wall or other
mounting solution, unfasten the screws holding the whiteboard to the mounting brackets and
remove the whiteboard.
2. Lean the ēno whiteboard against a wall with the back facing you.
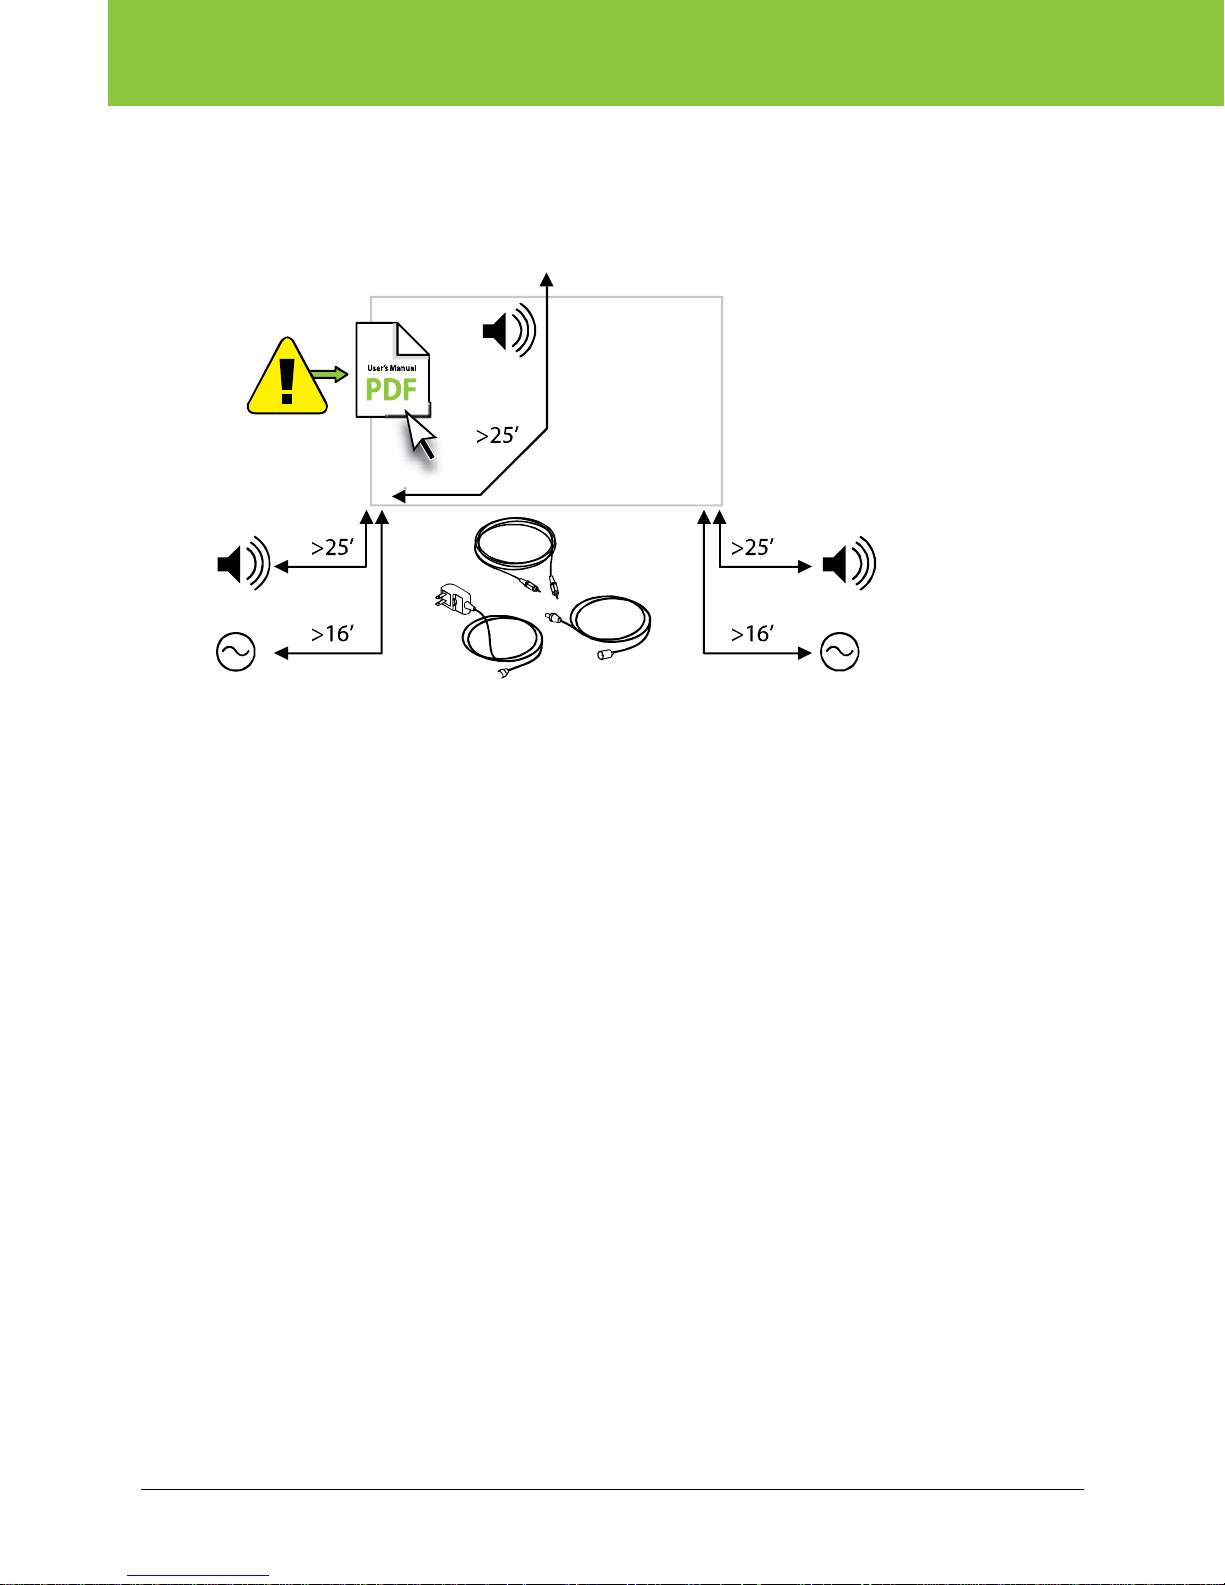
Plan power and audio input cable routing
Important Note: Cable management is important. The cables between the driver packs and the
amplifier and any other cables routed against the back of the whiteboard must be secured by
cable ties as described in “Add cable ties and tape”.
PolyVision 2002480-001 Rev C 7 of 38
ēno play
Before beginning to install the ēno play components, measure and plan cable routing for the ēno
play amplifier power source and audio input. PolyVision provides a 25 ft (7629 mm) audio input
cable, and a power connector with a 6 ft (1829mm) cable plus a 10 ft (3048mm) power cable
extension.
Cable routing considerations include:
• Where is the closest AC power outlet?
• Will the ēno play installation support a guest or a permanent audio input source, or both? If using
the guest audio input connector, refer to “Using the guest audio input connector”.
• If using a permanent audio input source, Where is the source located? Is it above, below or to one
side of the whiteboard?
• How is the whiteboard mounted: directly to a wall, or to an adjustable height system?
Cable routing for whiteboards mounted directly to the wall
To route the amplifier power or permanent audio input cable for whiteboards that will be mounted
directly to the wall:
1. Consider the locations of the power and audio sources to determine cable length
requirements and whether to mount the amplifier on the left or right lower corner of the
whiteboard.
2. Connect the permanent audio input cable and power cable to the amplifier at the same time
that you connect the driver pack cables.
3. As appropriate and to the extent possible, route the power and audio cables in the same
cable bundle as the driver pack cables across the back of the whiteboard.
4. Add tie holders, cable ties and tape as necessary to secure all cables where they cross the
back of the whiteboard.
Note: For more details, refer to “Add cable ties and tape”.
8 of 38 2002480-001 Rev C Installation and Operation Guide

ēno play
Cable routing for adjustable height mobile stand or wall mount options
Note: When installing ēno play on a whiteboard that will be mounted using an adjustable height
system, do not connect the power or permanent audio input cable to the amplifier until after
cable routing is complete.
The adjustable height mobile stand and adjustable height wall mount provide a variety of cable
routing options for the power and permanent audio input cable, including:
• routing cables to sources above the whiteboard through the lift system turret within a split
corrugated conduit that is provided with the mounting solution
• routing cables from sources below the whiteboard
• for the adjustable height mobile stand, routing the audio input cable from a laptop tray fastened to
the back of the lift system
For more cable routing details relating to these options, refer to the installation and operation
manuals for your whiteboard mounting solution.
To route the amplifier power or permanent audio input cable when the whiteboard is mounted to an
adjustable height system:
1. Consider the locations of the power and audio sources to determine cable length
requirements, routing options, and whether to mount the amplifier on the lower left or lower
right corner of the whiteboard.
2. If the source is located above the whiteboard, route the cable down through the lift system
turret. Then route the cable from the turret base to the amplifier by passing the cable between
the lift system tubular structure and the whiteboard.
3. If the source is located below the whiteboard, route the cable from the source to the amplifier
by passing the cable between the lift system tubular structure and the whiteboard.
4. Add a cable tie to the base of the lift system, assuring a service loop between the cable tie
and the amplifier:
• ēno 2610 requires 27” (685mm) audio and power service loop
• ēno 2810 requires 35” (889mm) audio and power service loop
Note: For details, refer to “Option: Cable management for adjustable height systems”.
PolyVision 2002480-001 Rev C 9 of 38
ēno play
Install the driver packs
Important Note: If your ēno classic whiteboard is mounted using some older adjustable
height mobile stands and adjustable height wall mounts, PolyVision provides driver pack
offset kit. If ēno play components include the driver pack offset kit, skip to “Install the
driver pack with driver pack offset kit ”.
Assure that your adjustable height lift system looks like the one shown below on the left
before installing the driver pack without the offset kit.
Offset kit not required
Offset kit required
Locate and have ready to use:
• driver packs (x2)
• alcohol wipes (x2)
• driver pack mounting template
• tape
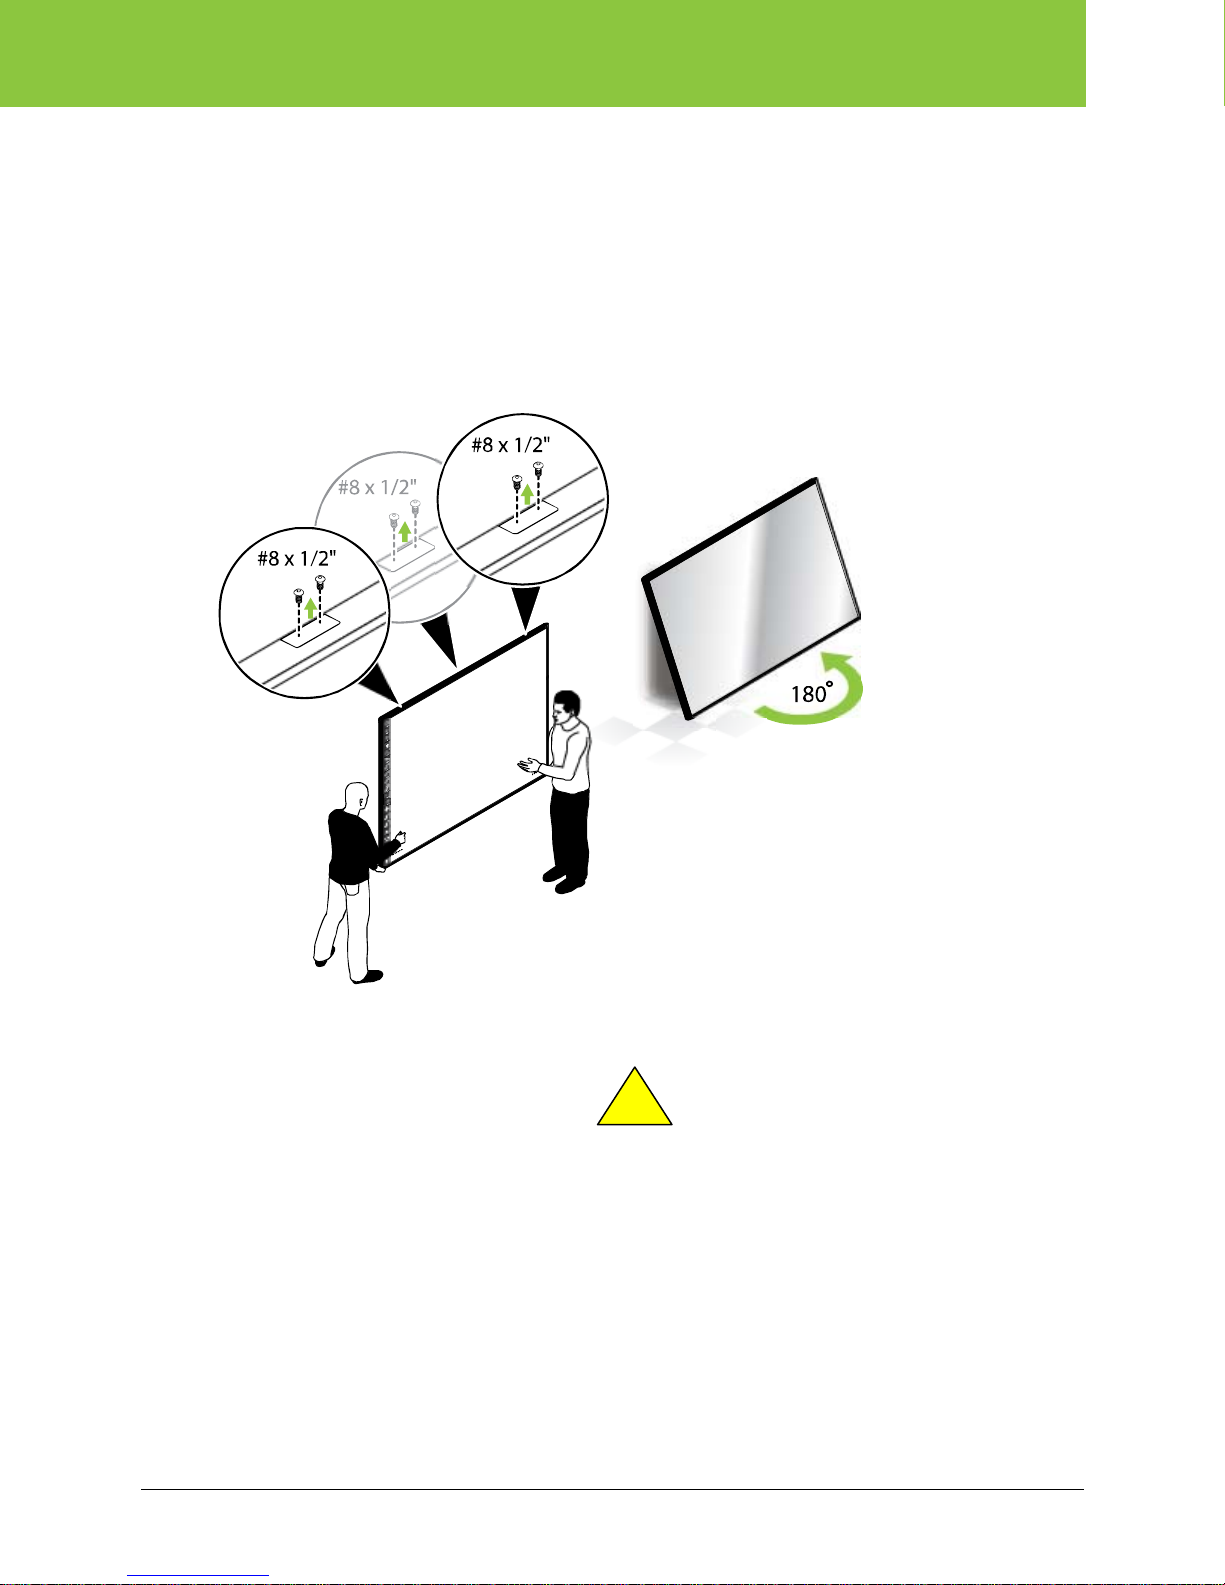
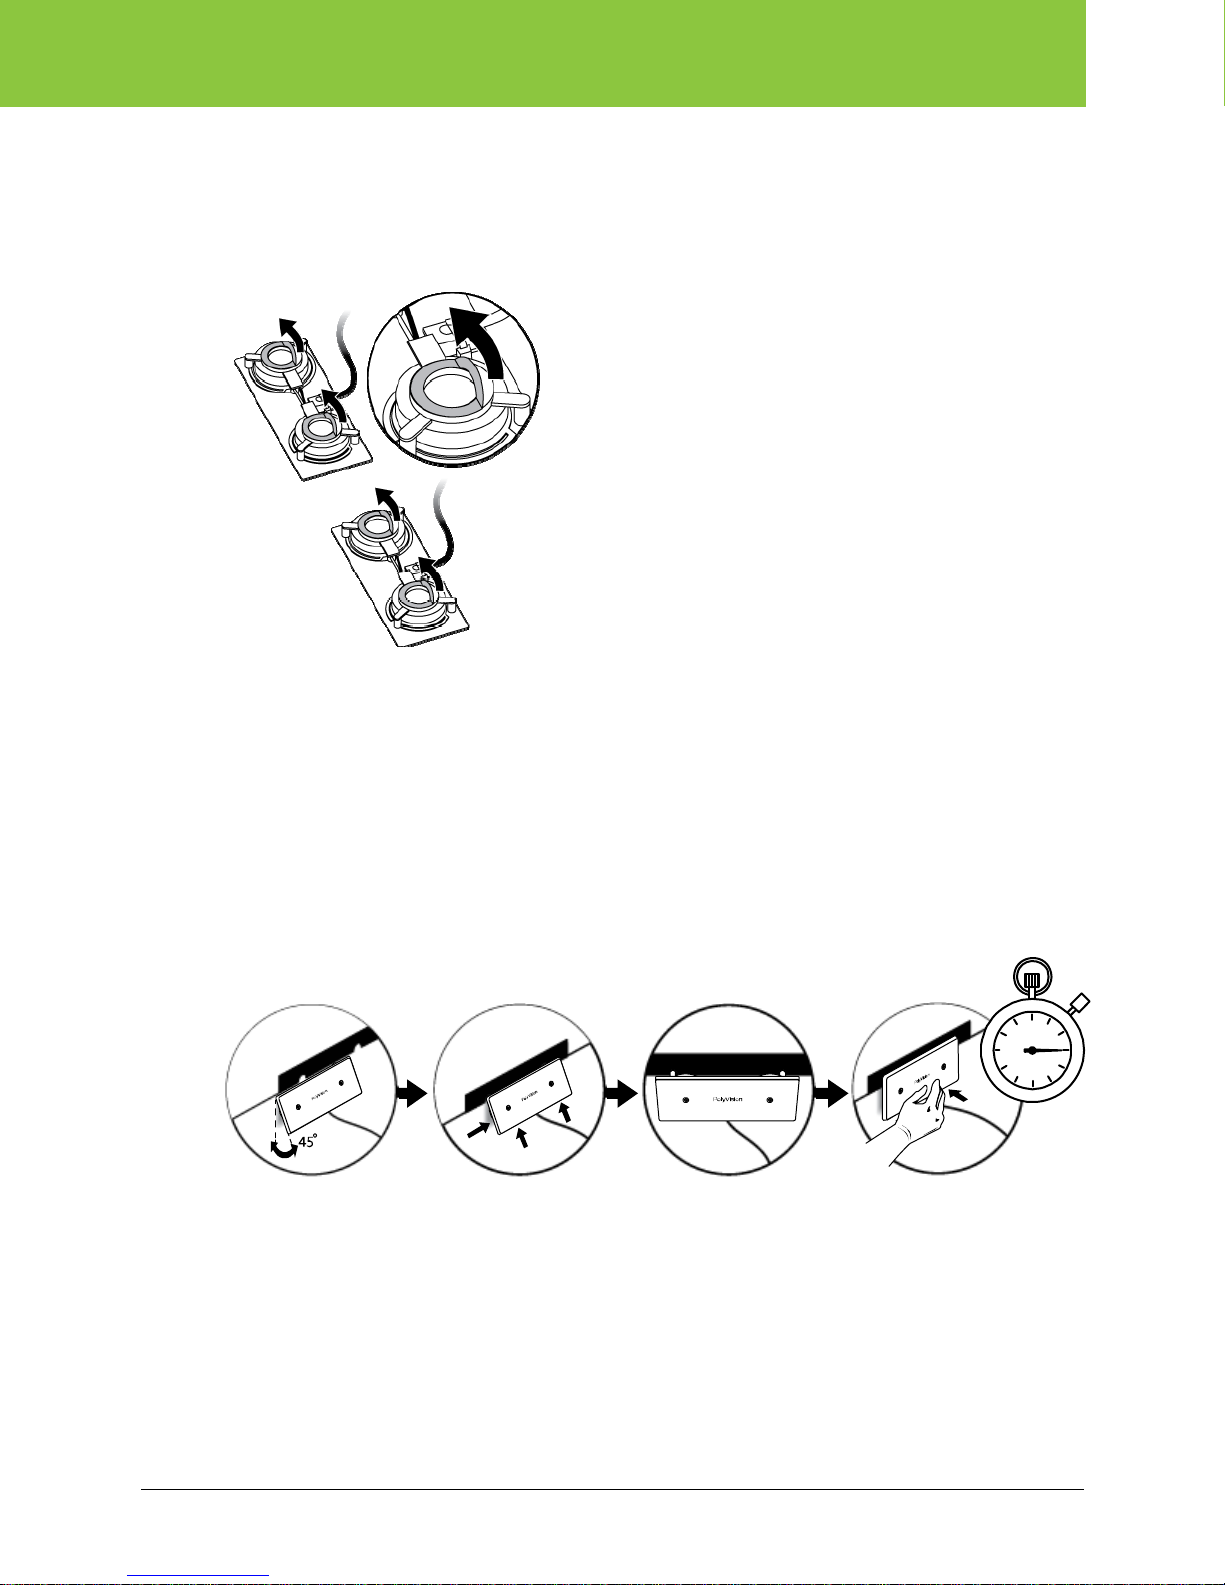
To install the driver packs:
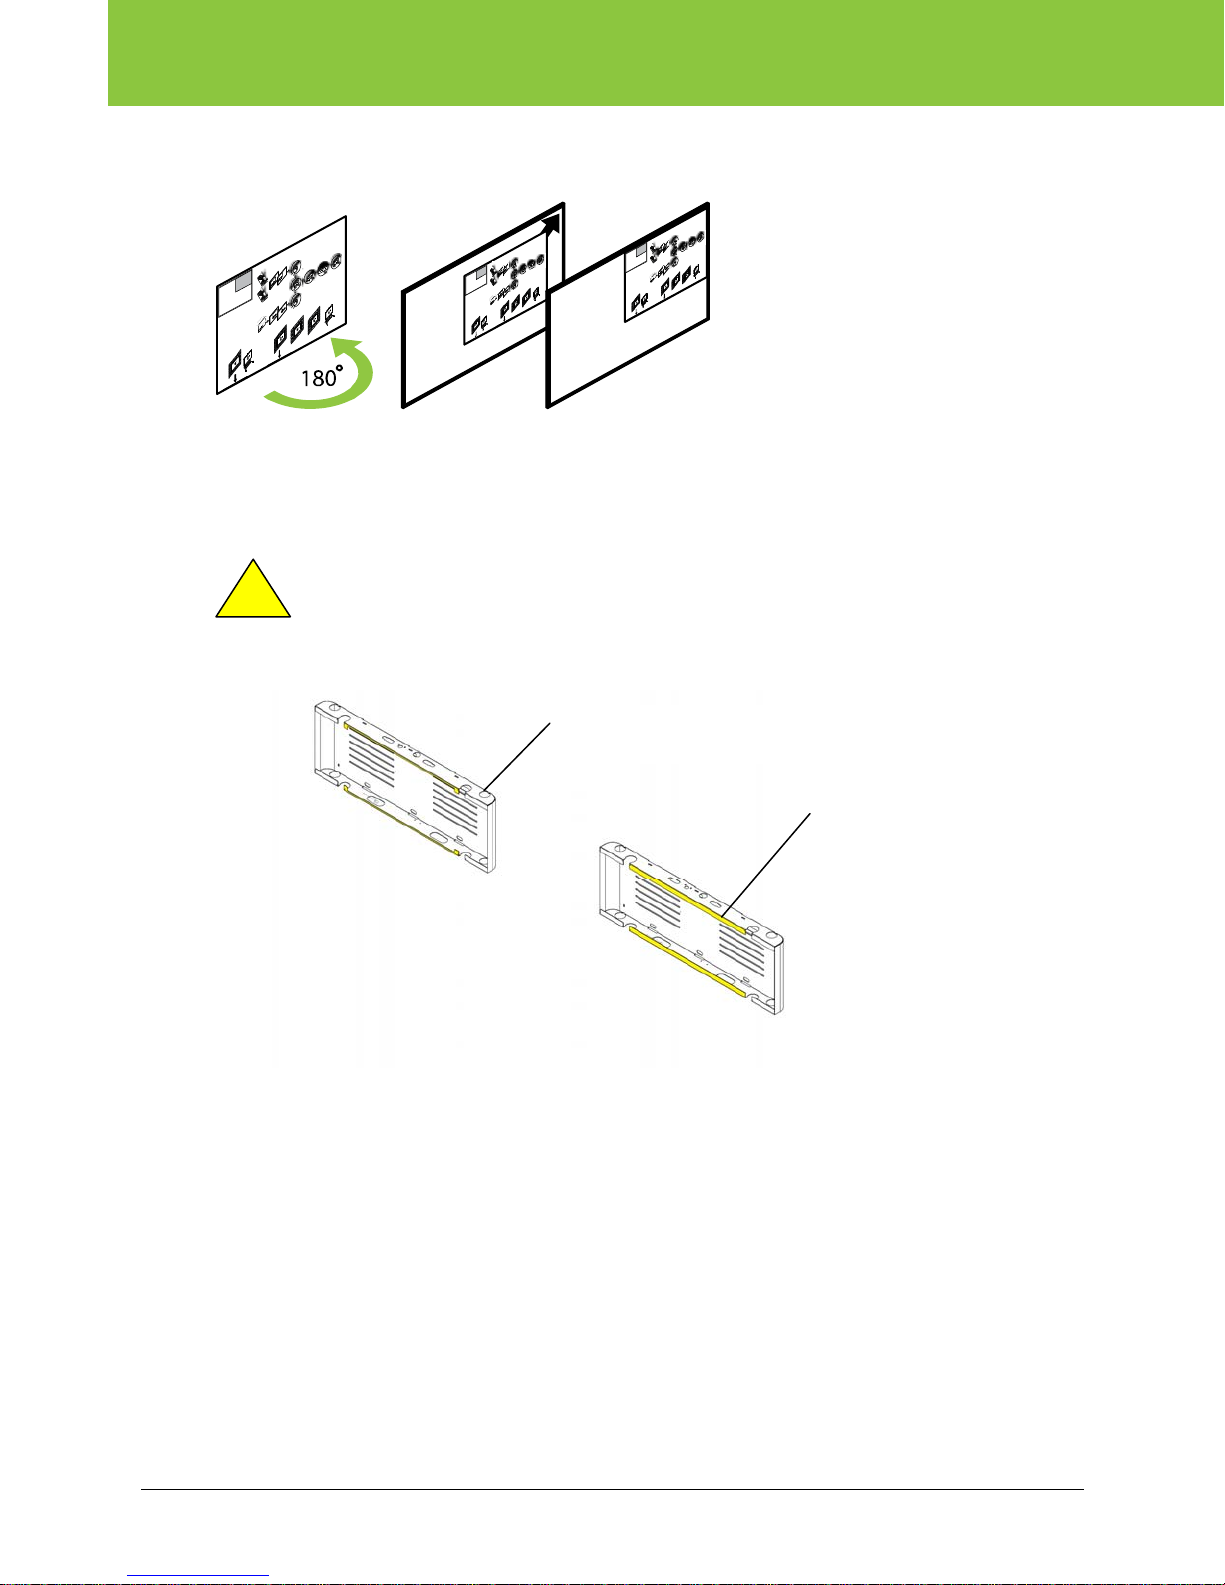
1. Slide the driver pack mounting template to the upper left corner of whiteboard and tape it in
place.
Note: The template has a front and back side. Be sure to use the template front in the upper
left corner.
10 of 38 2002480-001 Rev C Installation and Operation Guide
ēno play
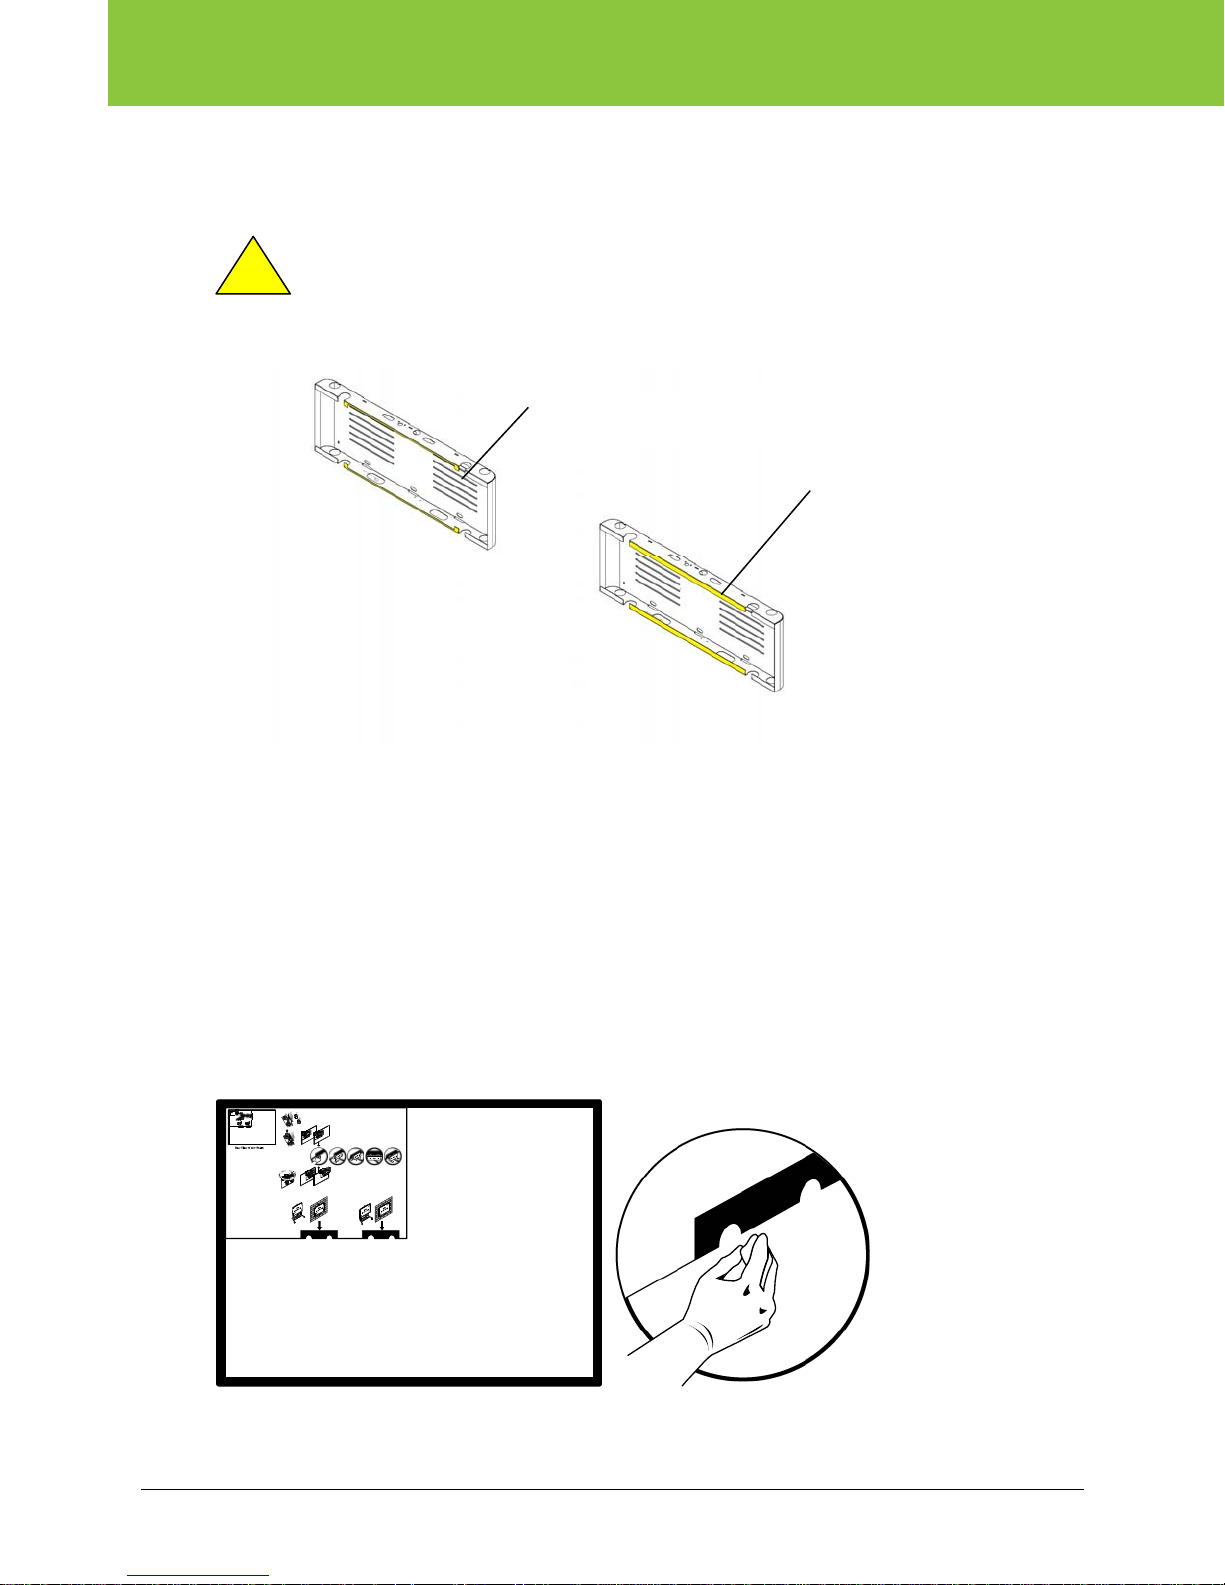
2. Use the illustrations on the template to select the template notches that are appropriate for the
type of whiteboard mounting solution in your installation.
3. Using an alcohol wipe, clean the area about 3” (76mm) below the correct template location.
4. Remove the two self-adhesive backings from a driver pack.
Note: Use care when mounting the ēno play amplifier and drive packs to the back of the
whiteboard. The supplied adhesive is intended to be permanent. If you need to remove or
reposition the components, additional supplies are provided. Refer to “Removing and
replacing the cable tie holders, driver packs or amplifier”.
5. Orient the driver pack with the wires facing the floor. Note the two tabs at the top of the driver
pack.
6. The driver packs are magnetized. Position the driver pack against the template notches at a
0
to 450 angle without touching the adhesive to the board.
30
Important Note: Make sure the registration is correct before proceeding. Magnets in the driver
packs will pull the assembly to the board.
7. While holding the driver pack tabs against the template notches, rotate the drive pack
adhesive into contact with the whiteboard.
8. Press hard on the driver pack for 15 seconds.
PolyVision 2002480-001 Rev C 11 of 38
ēno play
9. Reverse the template and tape it to the upper right corner of the whiteboard.
10. Repeat steps 1 through 8 to install the second driver pack.
Install the driver pack with driver pack offset kit
Important Note: If your ēno classic whiteboard is mounted using some older adjustable
height mobile stands and adjustable height wall mounts, PolyVision provides driver pack
offset kit. If ēno play components include the driver pack offset kit, use the steps below
to install the driver packs.
Assure that your adjustable height lift system looks like the one shown below on the right
before installing the driver pack with the offset kit.
Locate and have ready to use:
• driver pack spacers (x4)
• driver pack offset template
• driver packs (x2)
• alcohol wipes (x2)
• tape
Offset kit not required
Offset kit required
12 of 38 2002480-001 Rev C Installation and Operation Guide
 Loading...