


Part number 2002083-001 Rev A
©2011 PolyVision Corporation
All rights reserved
ēno flex
Installation Guide

ēno flex Installation Guide
Table of contents
Overview ........................................................................................................................................................ 3
Important considerations ............................................................................................................................ 3
Tools and supplies ......................................................................................................................................... 4
What comes in the box............................................................................................................................... 4
Required items ........................................................................................................................................... 5
Suggested hardware per mounting application..................................................................................................6
Phase 1 – Installing tray and wall hardware .................................................................................................... 7
Step 1: Measure the wall ............................................................................................................................ 7
Unpack wall hardware ................................................................................................................................ 7
Step 2: Position the chalk tray .................................................................................................................... 8
Step 3: Pre-drill clearance holes in the center chalk tray............................................................................. 9
Step 4: Fasten the center chalk tray to the wall ........................................................................................ 10
Step 5: Add the left and right chalk tray sections...................................................................................... 11
Step 6: Fasten “L” clips to the wall ........................................................................................................... 11
Phase 2 – Installing panels ........................................................................................................................... 13
Step 7: Position the center panel on the chalk tray ................................................................................... 13
Step 8: Fasten the center panel................................................................................................................ 14
Step 9: Install left and right panels ............................................................................................................ 14
Install end caps............................................................................................................................................... 15
Lock the tray together.....................................................................................................................................16
Step 10: Install the map rail tack material, map clips, and flag holder ....................................................... 16
Install the PolyVision driver........................................................................................................................ 17
Index ............................................................................................................................................................ 18
2 Installation and Operation Guide
ēno flex Installation Guide
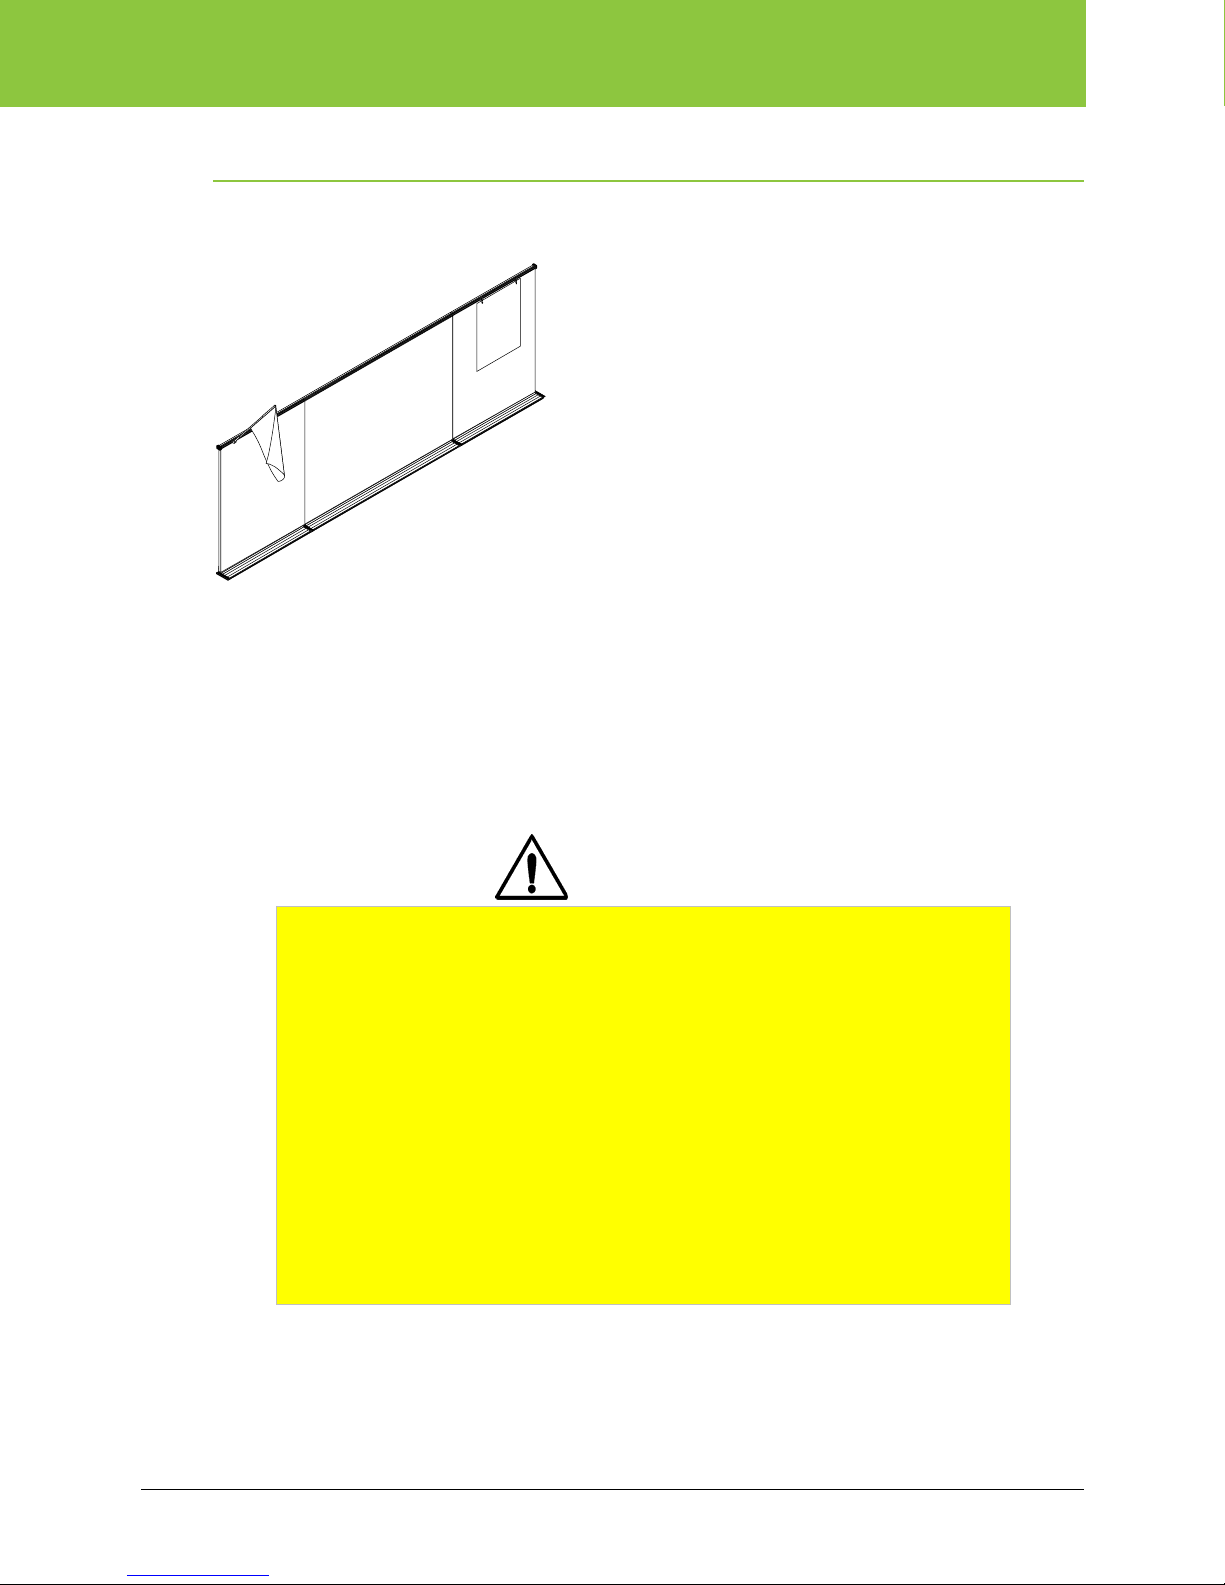
Overview
The PolyVision ēno flex is a combination interactive whiteboard product that incorporates marker
panels, tack panels and the ēno interactive whiteboard all in one complete assembly.
Important considerations
• Two people are recommended to ensure a safe installation.
• Mounting hardware is not included with this product. Check local code for hardware requirements.
• No unauthorized modifications or additions are to be made to the system.
• Tighten all screws securely to ensure a safe installation.
CAUTION
FAILURE TO FOLLOW THESE INSTRUCTIONS COULD RESULT IN PROPERTY
DAMAGE OR PERSONAL INJURY.
Read the entire Assembly Direction before beginning installation or assembly.
Building construction varies greatly and is outside PolyVision’s control. The
Building’s Engineer of record is responsible for the design of studs, backing,
reinforcement, supporting members etc. which the units are attached to and must
verify the adequacy of the mounting hardware. These instructions and any
hardware provided by PolyVision are for convenience only and are not an
indication of what may be required by your local Code.
The building owner or designated agent is responsible for verifying that the
installation is in compliance with all local Codes and regulations.
If you have a problem, question, or request, call your local dealer or PolyVision at
800.620.POLY (7659) 678.542.3100 +32.089.32.31.30
PolyVision 3
ēno flex Installation Guide
Tools and supplies
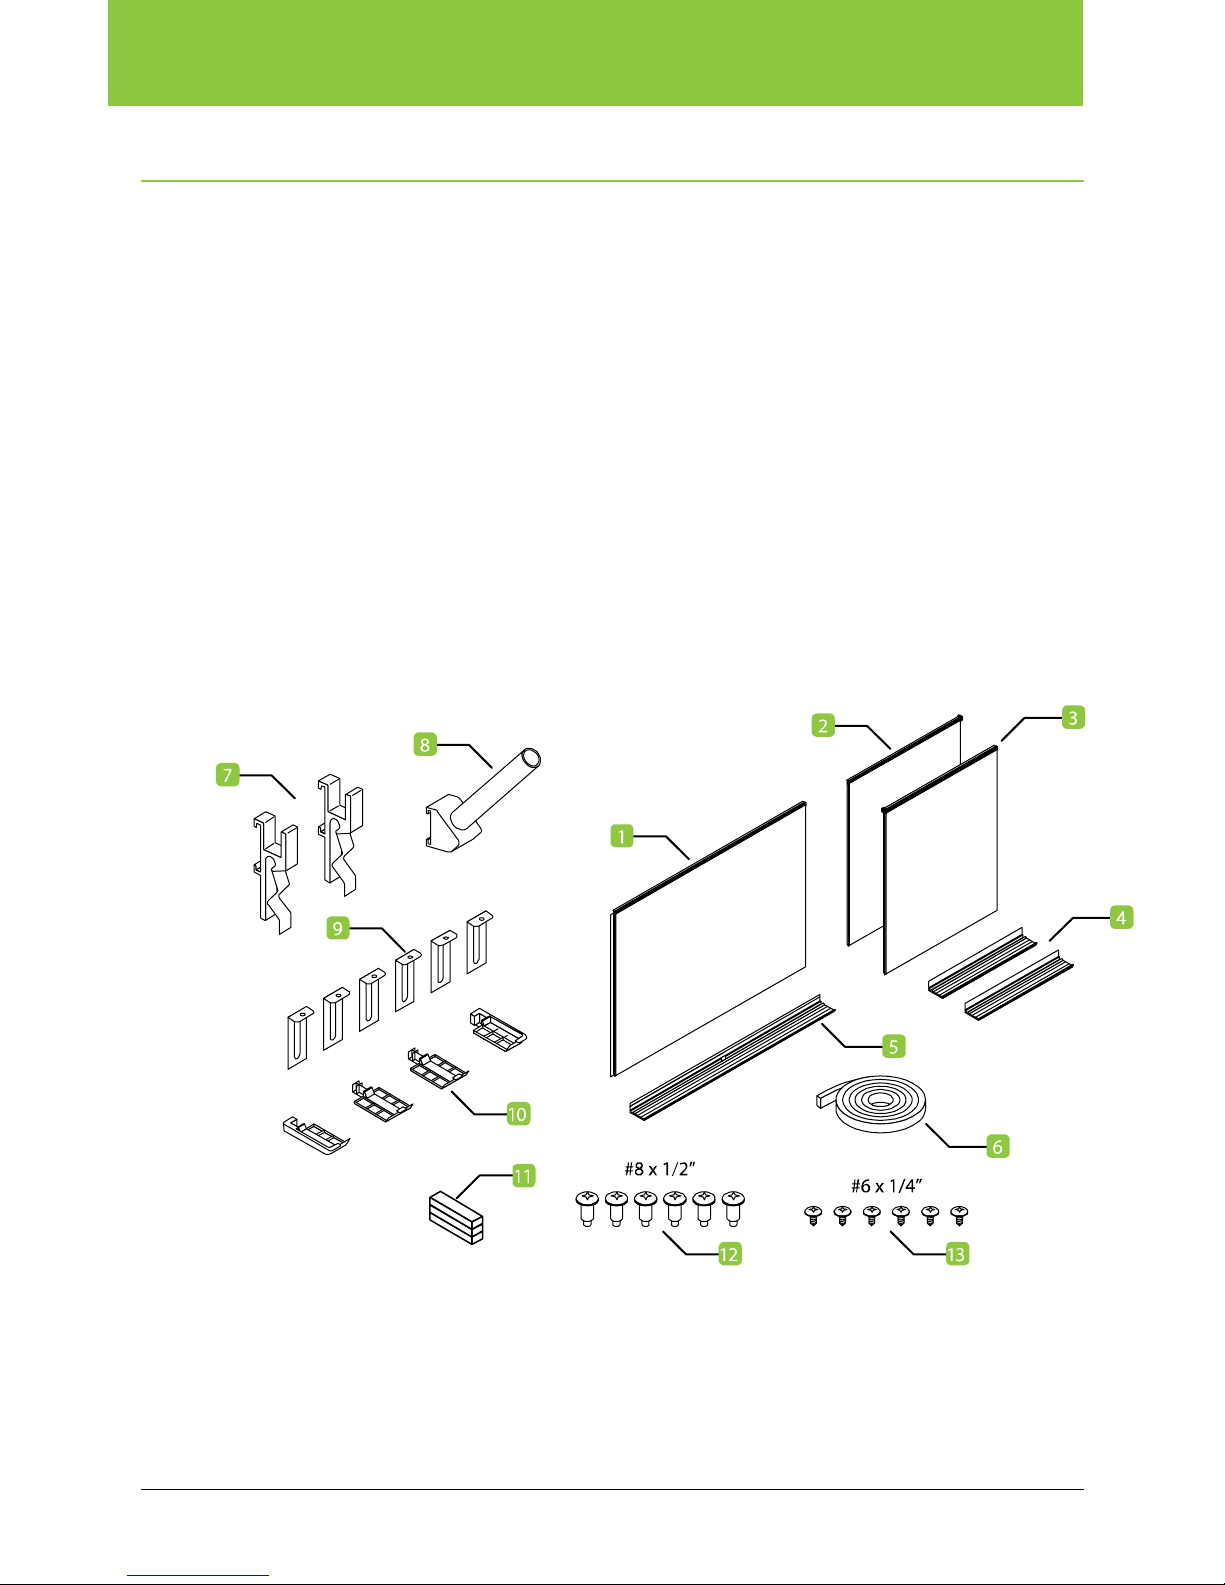
What comes in the box
1 ēno interactive whiteboard assembly
2 Left panel assembly (Marker or Tack)
3 Right panel assembly (Marker or Tack)
4 Left and right chalk tray sections
5 Center chalk tray sections
6 Map rail tack material (roll)
7 Map clips (x2)
8 Flag holder
9 “L” Clips (x6)
10 Chalk tray connectors (x2) and end caps (x2)
11 Shims
12 #8 x 1/2” fasters (x6)
13 #6 x 1/4” fasters (x6)
4 Installation and Operation Guide
ēno flex Installation Guide
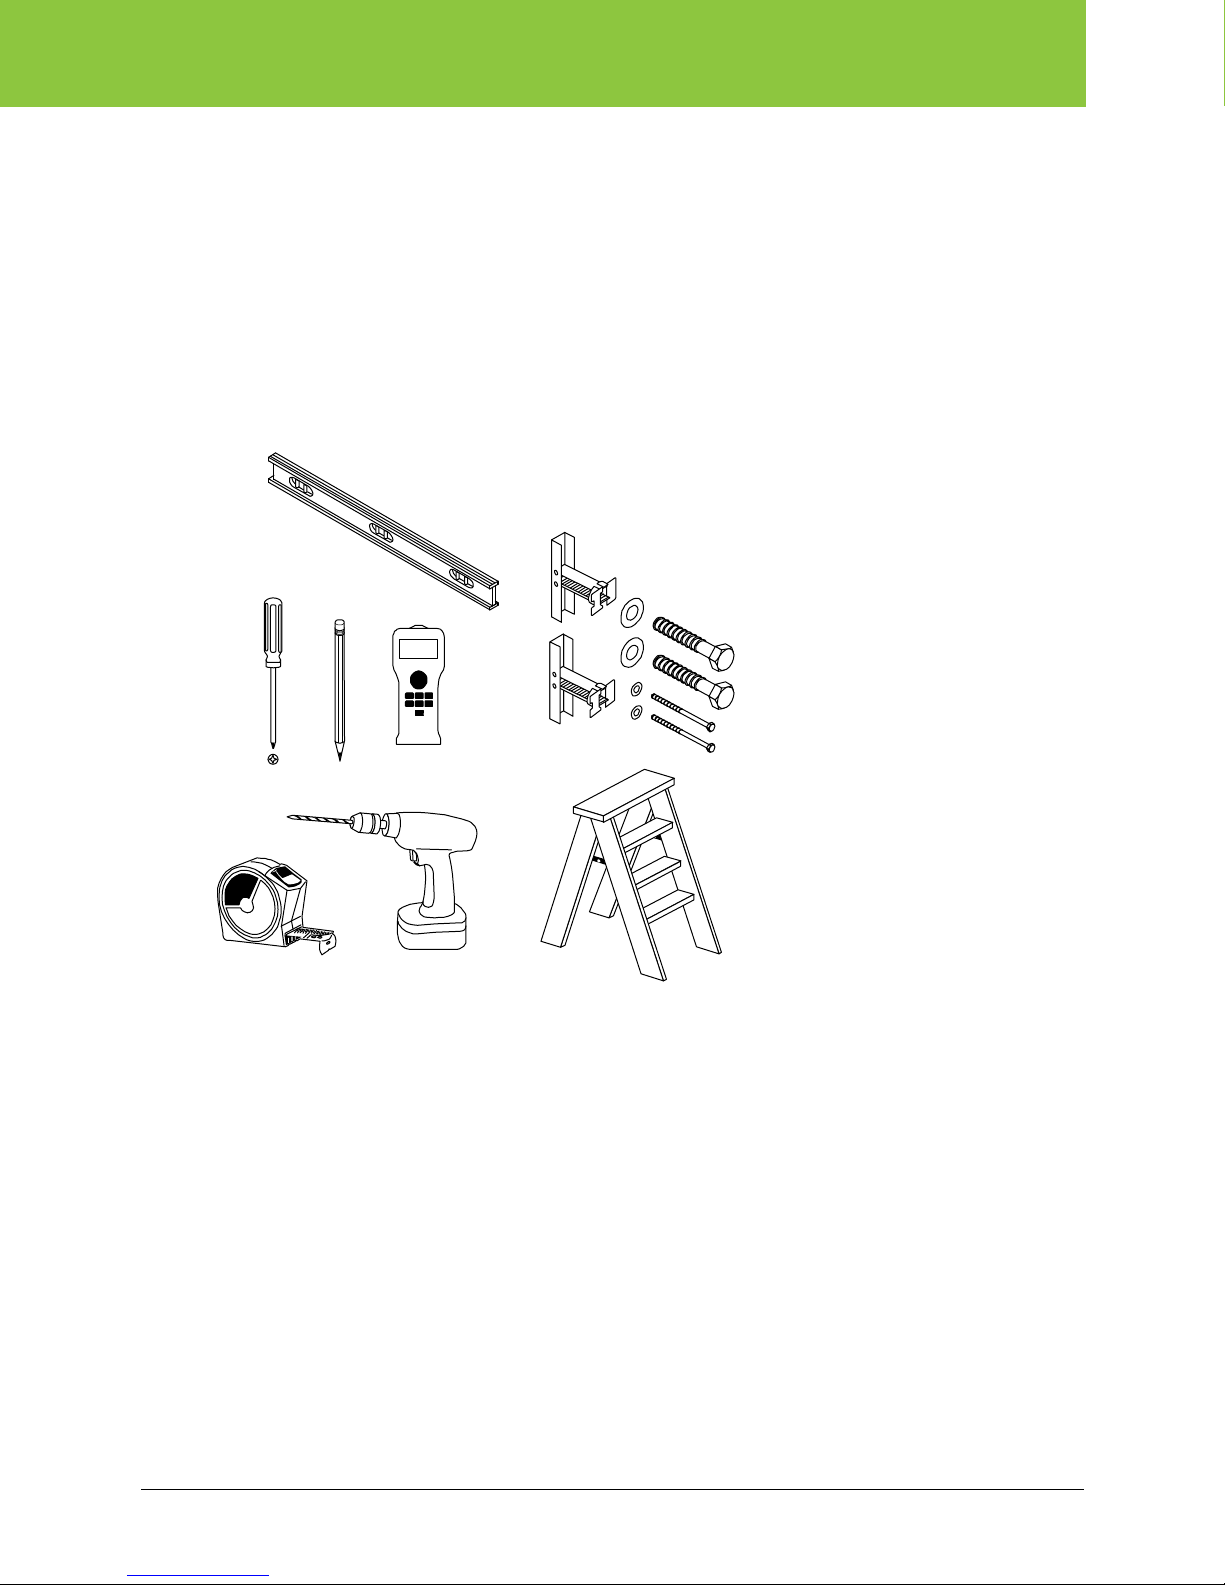
Required items
Level
#2 Phillips screw driver
Pencil
Stud finder (for sheetrock walls)
Measuring tape
Power Drill and/or Hammer drill
Ladder
Appropriate fasteners for wall material
#2
PolyVision 5
ēno flex Installation Guide
Suggested hardware per mounting application
NOTE:
The following is a suggested hardware component list. All local codes and protocols should be
reviewed and followed when installing this product.
Follow all manufacturer directions and local code requirements for hardware instillation.
If mounting to a wood stud wall
• ¼” lag screw with 7/16” hex head (11mm), 2.5” (64mm) long (for mounting to wood stud)
• ¼ - 20 Toggle bolts 2.5” (64mm) long (for mounting to sheetrock)
If mounting to a metal stud wall
• ¼ - 20 Toggle bolts 2.5” (64mm) long (for mounting to metal stud or sheetrock)
If mounting to a hollow concrete block or hollow brick wall
• ¼ - 20 Toggle bolts 2.5” (64mm) long (for mounting to hollow block)
If mounting to a solid concrete and solid brick wall
:
:
:
:
• ¼” Concrete wall anchors 1-3/4” (45mm) long
-or-
• 0.145” (3.68mm) diameter x 1” (25.4mm) long Ram Set anchors
6 Installation and Operation Guide

ēno flex Installation Guide
Phase 1 – Installing tray and wall hardware
Step 1: Measure the wall
Measure the desired installation wall to ensure that enough clearance has been provided to install
the ēno flex product. The 16 foot (4.88 m) assemble requires at least 198” (5.03m) in width. The 12
foot (3.66 m) assemble requires at least 150 inches (3.81m) in width. Both products require at least
84” (2.13m) from floor to ceiling for proper installation.
Unpack wall hardware
1. Place the ēno flex box on the floor with the PolyVision logo facing upwards.
2. Locate the three tray sections, a bag of hardware and an installation guide. Unwrap and lay out
the contents to prepare for installation.
PolyVision 7

ēno flex Installation Guide
Step 2: Position the chalk tray
1. Using a tape measure, locate and mark the desired center location for the board.
2. Using a level, mark a level line 38” (968 mm) off the floor for adults or 32” for children. The line
should be 144 inches (3.658 m) or 192 inches (4.877 m) wide off the center mark depending on
the model being installed.
* (32” / 813mm)
* (38” / 965mm)
NOTE: This line locates the top edge of the chalk tray. Ensure that the line is level and visible to
ensure level installation.
NOTE: Where possible install mounting hardware into wall studs for maximum retention.
8 Installation and Operation Guide

ēno flex Installation Guide
Step 3: Pre-drill clearance holes in the center chalk tray
1. Locate the center chalk tray section, identified by the rectangular notch cutout in the center of
the tray as shown below:
2. Mark the top edge of the tray every 18” (457 mm). Center the first mark, and add the remaining
marks 18” out in each direction for ēno-Flex-A-2xx. Add the marks at 11” for the outside edges
for ēno-Flex-A-1xx.
3. Drill clearance holes through the chalk tray at those locations using a drill bit size based on the
bolt hardware appropriate for your wall material.
PolyVision 9

ēno flex Installation Guide
Step 4: Fasten the center chalk tray to the wall
1. Position the center tray section on the wall with the top edge of the tray on the marked level line
and the center notch feature aligned with the center mark on the wall.
2. Fasten the center tray section to the wall every 18”:
Sheetrock walls: Capture the wall stud where possible using hardware suggested on page 6.
Hollow concrete/brick wall installation: Use toggle bolts. Ensure that the toggle bolts enter
the hollow portion of the cinder blocks and not the mortar or center joint.
10 Installation and Operation Guide

ēno flex Installation Guide
Step 5: Add the left and right chalk tray sections
To install the left and right chalk tray sections:
1. Locate one of the smaller tray sections and a tray connector bracket as shown below.
2. Install the tray connector bracket between the center tray and the left tray section.
3. Align the left chalk tray section to the level line drawn on the wall.
4. Repeat the steps you used for the center tray section to mark and drill clearance holes in the
chalk tray every 18” (457mm), as applicable to your installation. Center the first bolt, with the
remaining bolts 18” out in each direction, using three bolts for each side tray section.
5. Fasten the chalk tray to the wall with three bolts using the same process as for the center tray
section.
18”
18”
18”
18”
6. Shim behind the left and right tray sections as needed to correct for uneven walls. Shims are
provided in the hardware kit.
7. Repeat for the right tray section.
Step 6: Fasten “L” clips to the wall
Install two “L” clips per panel section for a total of six “L” clips.
PolyVision 11

ēno flex Installation Guide
To install “L” clips:
1. Using a tape measure and level, mark a level line 45” (1.14 m) above the top of the chalk tray all
along the length of the tray.
2 Along that chalk line, mark “L” clip locations as follows:
For 12’ (3.66 m) ēno flex products –1.5’ (0.46 m), 4’ (1.22 m) and 5’ (1.52 m) from the
center in both directions. Where possible, capture wall studs on sheetrock walls.
For 16’ (4.88 m) ēno flex products –2’ (0.6 m), 5’ (1.5 m) and 7’ (2.1 m) from center in both
directions. Where possible, capture wall studs on sheetrock walls.
3. Fasten the “L” clip to the wall in the marked locations using hardware appropriate to your wall
material. Hardware should only be finger tight.
12 Installation and Operation Guide

ēno flex Installation Guide
Phase 2 – Installing panels
Step 7: Position the center panel on the chalk tray
Caution
This is a critical step. Ensure that the center ēno interactive whiteboard panel is properly located and
seated in the tray before proceeding. The center panel is keyed to ensure it is centered. All panels
should sit flat in the tray.
To install the center panel:
1. Remove and unwrap all panel assemblies from the main box compartment.
2. Locate the center ēno interactive whiteboard panel. This panel assembly should be the biggest
in the box with trim installed on three sides.
3. Place the center ēno interactive whiteboard panel into the center tray section, matching the set
screw on the back of the panel assembly to the “key” in the center tray section to ensure the
panel is centered left/right with the tray.
PolyVision 13

ēno flex Installation Guide
Step 8: Fasten the center panel
1. Gently tap the two center panel “L” clips down so they are flush onto the top trim of the ēno
interactive whiteboard panel. Ensure that the panel is flush with the wall.
#8 x 1/2
2. Fasten the “L” clip into the top trim to lock the panel section into place using self tapping #8 x
1/2” screws (provided in the hardware kit).
Step 9: Install left and right panels
This is a critical step. Ensure that the left panel and center panel map rails are perfectly aligned.
To install the left panel:
1. Place the left panel assembly into the left tray section so it is 2” (50mm) from the center ēno
whiteboard section. The panel should sit flat in the tray.
Caution
14 Installation and Operation Guide

ēno flex Installation Guide
2. Slowly slide the panel to the right and align the left map rail and center map rail sections. The
dowel pin in the center panel map rail should engage the left map rail and provide proper
alignment.
NOTE: The panel may need to be tapped gently to help the dowel pin engagement.
4. Tap the two “L” clips on the wall down so they are flush with the top map rail trim of the left
panel. Ensure that the panel is flush with the wall.
5. Fasten the “L” clip into the top trim to lock the panel section into place using self tapping #8 x
1/2” screws (provided in the hardware kit).
6. Repeat this process for the right panel assembly.
Install end caps
To install end caps:
1. Fasten end caps to each end of the tray as shown below.
PolyVision 15

ēno flex Installation Guide
Lock the tray together
To lock the tray together:
1. Fasten the three tray sections together using six pan head #6 x 1/4" (6.4 mm) screws (provided
in the hardware kit) into the tray from the bottom. The tray is pre-drilled for each screw location,
as shown below.
Step 10: Install the map rail tack material, map clips, and flag holder
1. Locate the roll of forbo tack materal, two map clips, and flag holder from the main box
compartment.
2. Remove the left or right map rail endcap by unscrewing the Phillips screw from the side face.
3. Gently feed the forbo tack material into the channel.
4. Cut away the excess tack materail so that it is flush with the side trim.
NOTE: Ensure that the trim is fully installed and behind the endcaps before cutting to ensure
rough edges are hidden.
16 Installation and Operation Guide

ēno flex Installation Guide
5. Slide the two map clips and flag holder over the map rail.
6. Reinstall the map rail end cap and fasten it in place with the screw. The cap may need to be
pressed inward to compress the tack material before installing the screw.
Install the PolyVision driver
Refer to the ēno interactive whiteboard installation and operation guide to continue preparing the
ēno flex for use.
PolyVision 17

ēno flex Installation Guide
Index
Center panel installation, 13
Center tray section, 9
End cap installation, 15
Left-right chalk tray installation, 11
Left-right panel installation, 14
Lock tray sections, 16
Map rail tack installation, 16
Position the chalk tray, 8
Sheet rock wall installations, 10
Wall clip installation, 12
Wall dimensions required, 7
Wall hardware location, 7
18 Installation and Operation Guide
 Loading...