

Page 1

Impulse™ LTX Multimedia Whiteboard System
User Guide
Part number 370-0148-04
©2005 PolyVision Corporation
All rights reserved
Page 2

Information in this document is subject to change without notice.
Reproduction in any manner without written permission of PolyVision
Corporation is forbidden.
PolyVision Corporation reserves the right to make changes in product
design, or detail, and to discontinue any product or material without
notice.
The Bluetooth trademarks are owned by Bluetooth SIG, Inc., USA.
Page 3

TABLE OF CONTENTS
Welcome to Impulse™ LTX Multimedia Whiteboard . . . . . . . . . . . . . . . . . . 3
Impulse Whiteboard Quick Start . . . . . . . . . . . . . . . . . . . . . . . . . . . . . . . . . 4
What to Expect . . . . . . . . . . . . . . . . . . . . . . . . . . . . . . . . . . . . . . . . . . 4
Three Ways to Capture: Three Levels of Operation. . . . . . . . . . . . . . . . 4
What is Included With Your Impulse WhiteBoard . . . . . . . . . . . . . . . . . 5
Impulse Whiteboard System Overview . . . . . . . . . . . . . . . . . . . . . . . . . . . . 6
How it Works . . . . . . . . . . . . . . . . . . . . . . . . . . . . . . . . . . . . . . . . . . . . 6
Laser Technology. . . . . . . . . . . . . . . . . . . . . . . . . . . . . . . . . . . . . . . 6
Built-In Archive and Web Server. . . . . . . . . . . . . . . . . . . . . . . . . . . . 6
Built-In Software . . . . . . . . . . . . . . . . . . . . . . . . . . . . . . . . . . . . . . . 6
About the Markers and Erasers . . . . . . . . . . . . . . . . . . . . . . . . . . . . . . 8
Getting Help With the Control Panel . . . . . . . . . . . . . . . . . . . . . . . . . . . 9
Impulse Whiteboard Operation . . . . . . . . . . . . . . . . . . . . . . . . . . . . . . . . . 10
Three Ways to Operate the Board . . . . . . . . . . . . . . . . . . . . . . . . . . . 10
Capturing Images. . . . . . . . . . . . . . . . . . . . . . . . . . . . . . . . . . . . . . . . 10
Capturing Images on the Printer. . . . . . . . . . . . . . . . . . . . . . . . . . . 10
Capturing Images on a Floppy Diskette . . . . . . . . . . . . . . . . . . . . . 11
Capturing Images on the Website/Archive . . . . . . . . . . . . . . . . . . . 13
Capturing Images in any Combination . . . . . . . . . . . . . . . . . . . . . . 14
Clearing the Board’s Temporary Memory . . . . . . . . . . . . . . . . . . . . . . 14
Projecting Archived Images on the Impulse Board . . . . . . . . . . . . . . . 15
Setting up the Projector . . . . . . . . . . . . . . . . . . . . . . . . . . . . . . . . . 15
Reviewing Archived Images . . . . . . . . . . . . . . . . . . . . . . . . . . . . . . 16
Using the Impulse System With Your Laptop . . . . . . . . . . . . . . . . . . . 21
System Requirements . . . . . . . . . . . . . . . . . . . . . . . . . . . . . . . . . . 21
Setting up the Laptop Computer and Projector . . . . . . . . . . . . . . . 21
Operating Your Laptop from the Impulse Board. . . . . . . . . . . . . . . 23
Choosing a Projection Mode . . . . . . . . . . . . . . . . . . . . . . . . . . . . . . . 25
Separate Mode . . . . . . . . . . . . . . . . . . . . . . . . . . . . . . . . . . . . . . . 25
Merged Mode . . . . . . . . . . . . . . . . . . . . . . . . . . . . . . . . . . . . . . . . 26
Merged and Separate Mode Function Summary . . . . . . . . . . . . . . 28
Password Protecting Images . . . . . . . . . . . . . . . . . . . . . . . . . . . . . . . 29
The Impulse System Audio and Volume Control . . . . . . . . . . . . . . . . . 30
The Impulse Web Server . . . . . . . . . . . . . . . . . . . . . . . . . . . . . . . . . . . . . . 31
Accessing Your Impulse Web Server . . . . . . . . . . . . . . . . . . . . . . . . . 31
Impulse™ LTX Multimedia Whiteboard System
Table of Contents 1
Page 4

Using the Images Section . . . . . . . . . . . . . . . . . . . . . . . . . . . . . . . . . . 32
Working With Images on the Website. . . . . . . . . . . . . . . . . . . . . . . 33
Viewing Password Protected Images on the Website . . . . . . . . . . . 34
Deleting Images from the Web Server . . . . . . . . . . . . . . . . . . . . . . 36
Using the Admin Section . . . . . . . . . . . . . . . . . . . . . . . . . . . . . . . . . . 37
The Admin Network Subsection . . . . . . . . . . . . . . . . . . . . . . . . . . . 38
The Admin Date/Time Subsection . . . . . . . . . . . . . . . . . . . . . . . . . 41
The Admin Password Subsection. . . . . . . . . . . . . . . . . . . . . . . . . . 42
The Admin Images Subsection. . . . . . . . . . . . . . . . . . . . . . . . . . . . 43
The Impulse System Maintenance . . . . . . . . . . . . . . . . . . . . . . . . . . . . . . . 47
Troubleshooting . . . . . . . . . . . . . . . . . . . . . . . . . . . . . . . . . . . . . . . . . . . . 50
Compliance . . . . . . . . . . . . . . . . . . . . . . . . . . . . . . . . . . . . . . . . . . . . . . . 54
Warranty . . . . . . . . . . . . . . . . . . . . . . . . . . . . . . . . . . . . . . . . . . . . . . . . . . 55
The Admin Update Subsection. . . . . . . . . . . . . . . . . . . . . . . . . . . . 44
The Admin Install Subsection . . . . . . . . . . . . . . . . . . . . . . . . . . . . . 45
Using the Info Section. . . . . . . . . . . . . . . . . . . . . . . . . . . . . . . . . . . . . 46
Cleaning the Board. . . . . . . . . . . . . . . . . . . . . . . . . . . . . . . . . . . . . . . 47
Daily Care and Maintenance. . . . . . . . . . . . . . . . . . . . . . . . . . . . . . 47
Removing Crayon and Tape. . . . . . . . . . . . . . . . . . . . . . . . . . . . . . 47
Removing Permanent Marker . . . . . . . . . . . . . . . . . . . . . . . . . . . . . 48
Website Maintenance . . . . . . . . . . . . . . . . . . . . . . . . . . . . . . . . . . . . . 49
Printer Maintenance . . . . . . . . . . . . . . . . . . . . . . . . . . . . . . . . . . . . . . 49
How to Obtain Replacement Parts . . . . . . . . . . . . . . . . . . . . . . . . . . . 49
Laser Safety . . . . . . . . . . . . . . . . . . . . . . . . . . . . . . . . . . . . . . . . . . . . 51
LED and Status Messages . . . . . . . . . . . . . . . . . . . . . . . . . . . . . . . . . 52
LED Status Indicators. . . . . . . . . . . . . . . . . . . . . . . . . . . . . . . . . . . 52
Technical Support . . . . . . . . . . . . . . . . . . . . . . . . . . . . . . . . . . . . . . . 53
FCC compliance. . . . . . . . . . . . . . . . . . . . . . . . . . . . . . . . . . . . . . . . . 54
IEC Laser Product . . . . . . . . . . . . . . . . . . . . . . . . . . . . . . . . . . . . . . . 54
Impulse™ LTX Multimedia Whiteboard System
2
Page 5
ELCOME TO IMPULSE
W
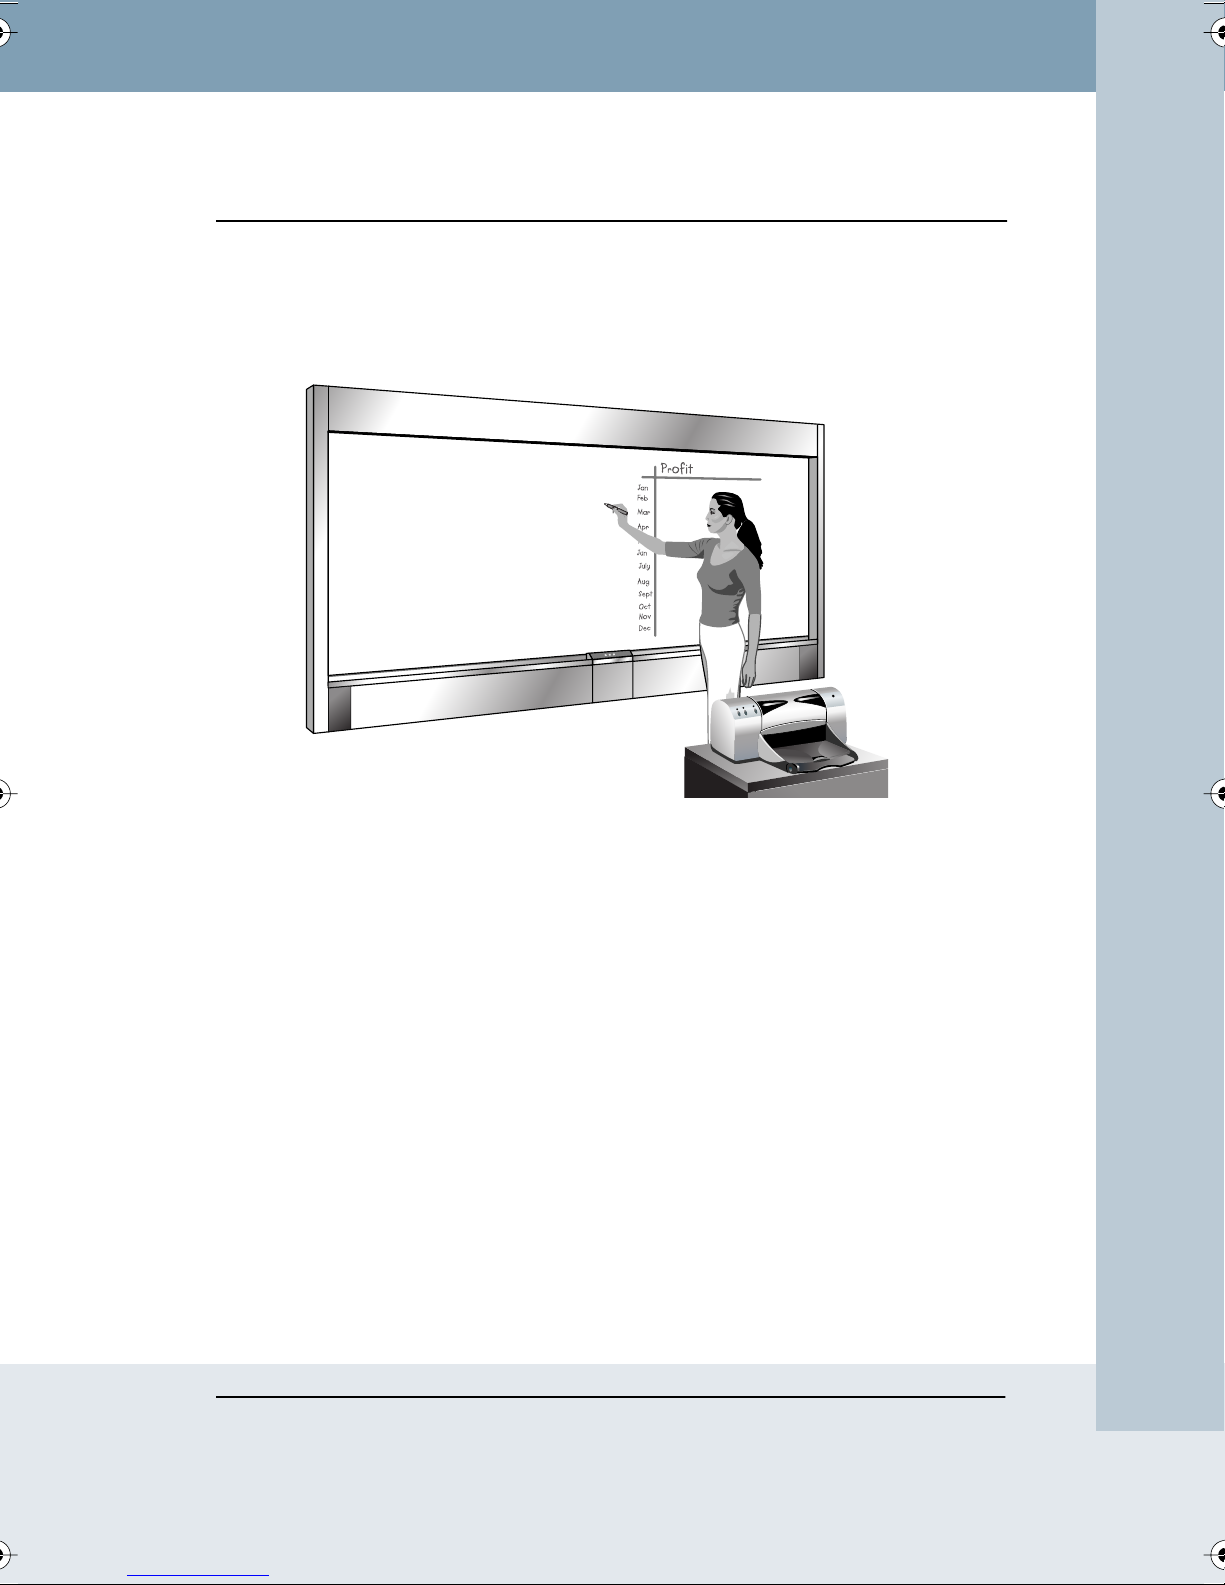
Welcome to the PolyVision™ Impulse™ LTX multimedia whiteboard system
that enables you to capture board images in three simple ways, while
providing powerful interactivity using a projector and your laptop computer.
™ LTX M
ULTIMEDIA
HITEBOARD
W
Welcome to Impulse™ LTX Multimedia Whiteboard 3
Impulse™ LTX Multimedia Whiteboard System
Page 6

TART
MPULSE
I
UICK
HITEBOARD
W
Step 1: Write on the board.
Step 2: Press a button on the control panel.
Step 3: You’re done!
The Impulse system captures the board and you can continue your
presentation without interruption.
Q
S
XPECT
E
TO
HAT
W
You will hear an audible message when the boar
can then erase the board and continue writing.
When you use the printer or fl
print or save the file, but you can continue using the boar
as well.
If the Impulse system encounters a problem, audible messages describe
the problem. Refer to “Troubleshooting” on page 50. You can hear an
audible description of the control panel buttons at any time by pressing the
Help button. Refer to “Getting Help W
APTURE
C
TO
AYS
W
HREE
T
The Impulse system gives you a choice of three ways to capture images of
your whiteboard:
by printing
•
by saving on a floppy diskette
•
by saving on the website/archive
•
Refer to “Capturing Images” on page 10 for details.
In addition, you have three ways to operate the board:
oppy diskette, it may take a few seconds to
ith the Control Panel” on page 9.
EVELS
L
HREE
: T
d image is captured. You
d during that time
PERATION
O
OF
write on the board and capture your writing
•
add a projector to review captured writing
•
add a laptop and projector for multimedia interactivity
•
Refer to “Impulse Whiteboard Operation” on page 10.
Impulse™ LTX Multimedia Whiteboard System
4 Impulse Whiteboard Quick Start
Page 7
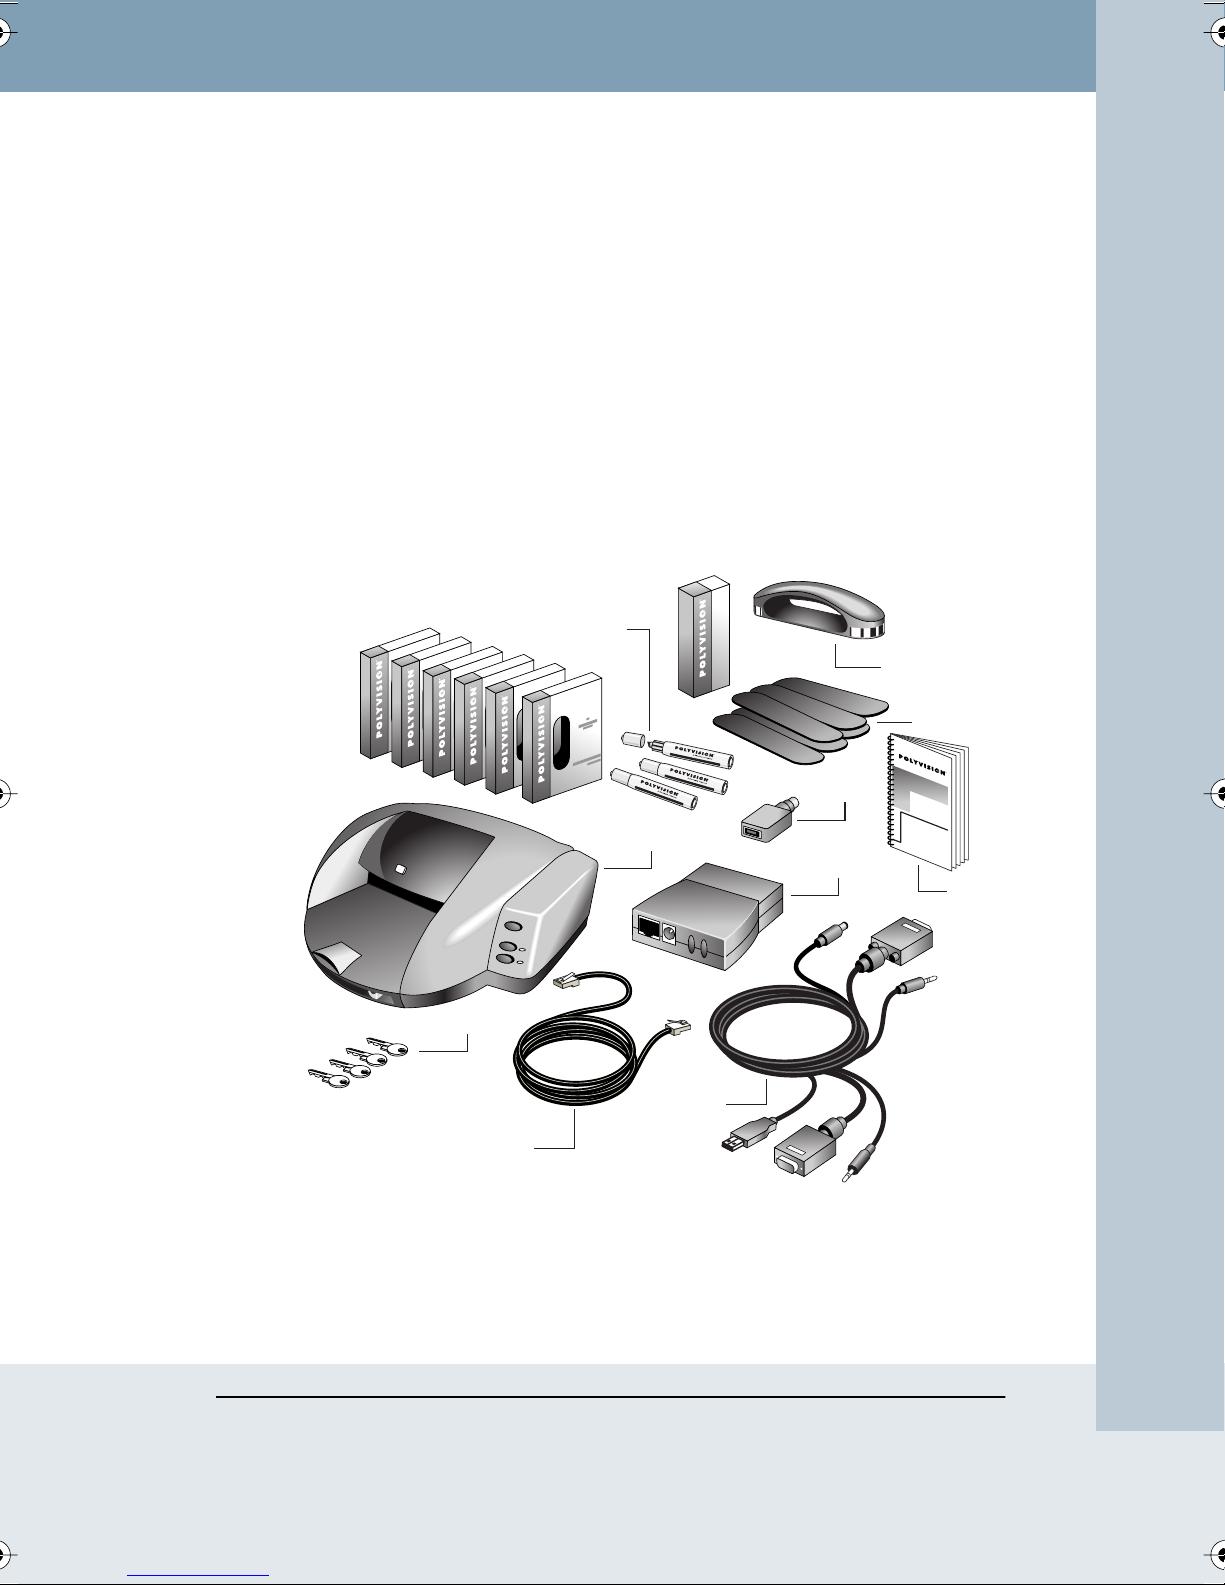
HAT IS INCLUDED WITH YOUR IMPULSE WHITEBOARD
W
1
96 stylus markers (six boxes) that also work for pointing
2
one rectangular eraser
3
one box of six rectangular eraser pads
4
USB to PS/2 adapter
5
network print server adapter
6
this user guide
7
color printer with one set of ink cartridges and a power cord
8
four door keys
9
15-foot Ethernet cable
10
30-foot cable for connection to a laptop computer
1
DRY ERASE MARKER
DRY ERASE MARKER
DRY ERASE MARKER
2
3
4
7
5
6
8
10
9
Impulse Whiteboard Quick Start 5
Impulse™ LTX Multimedia Whiteboard System
Page 8

I
MPULSE
W
HITEBOARD SYSTEM OVERVIEW
H
OW IT WORKS
Impulse multimedia whiteboard laser technology provides the most
accurate writing capture that you can buy.
Laser Technology
The Impulse system can “see” your marker by reflecting two invisible laser
beams off of the marker’s barrel. The Impulse system can distinguish
between the strokes of a marker, stylus, or eraser and determine the
marker color by reading bar codes located around the marker’s barrel.
Refer to “Laser Safety” on page 51.
Whenever you use the board, make sure there is only one tool in contact
with the board at a time, and use only the recommended markers and
erasers.
Refer to “About the Markers and Erasers” on page 8.
Built-In Archive and Web Server
The Impulse system can either print or save your writing and projected
images as an electronic file. Captured images are saved in an archive on
the board and on a web page through a built-in web server.
You can limit access to saved images by adding password protection.
Refer to “Password Protecting Images” on page 29.
Built-In Software
With the Impulse system, you never need to install software.
Images that you save are available to be reviewed simply by projecting
them back onto the whiteboard using a projector connected to the board.
On-screen tools appear on the board along with your saved images,
enabling you to scroll, zoom in and out, and print.
For instance, you can capture images of the board while you give a
presentation, then scroll through them afterward. You can even mark up
those images and recapture new images including all the new mark ups.
Impulse™ LTX Multimedia Whiteboard System
6 Impulse Whiteboard System Overview
Page 9
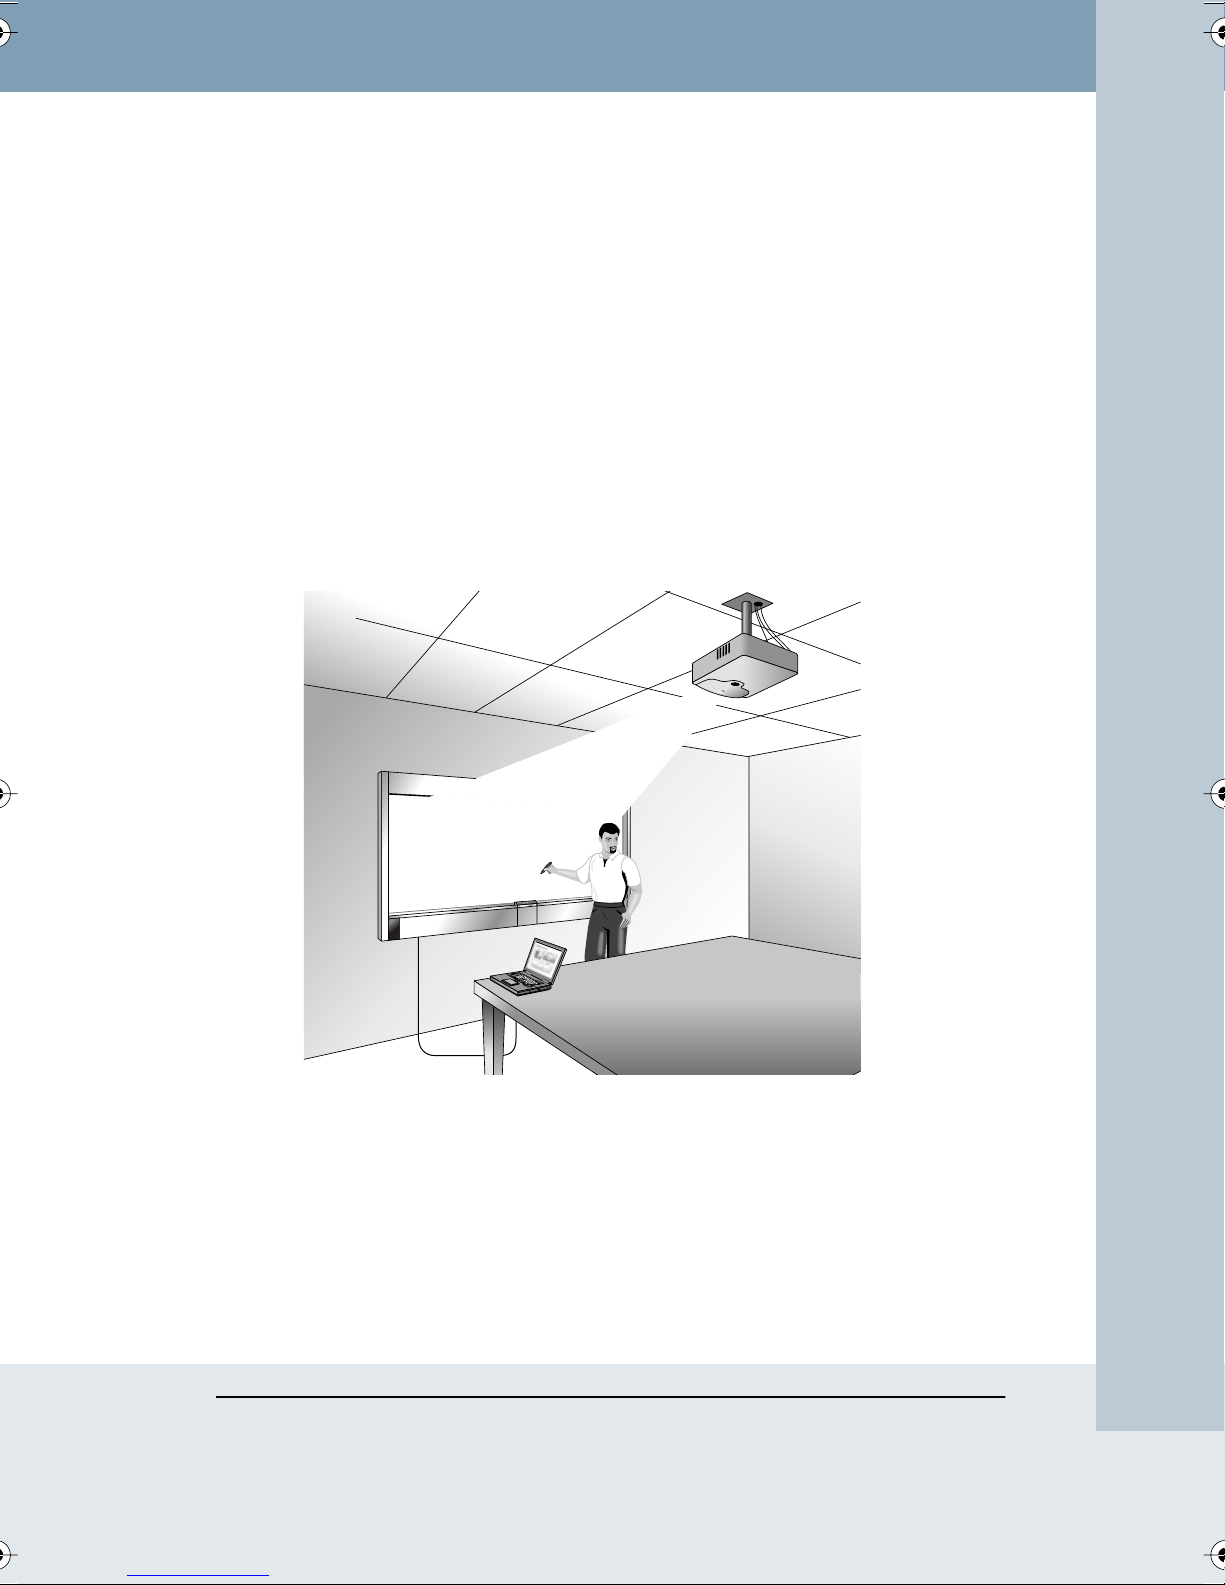
While your laptop computer and a projector are connected to the Impulse
system, you can project anything from your computer onto the board. In
addition, you can control your computer directly from the board. Nothing is
stored or changed on your laptop and there is no software to install.
The cable connections between the board and your laptop enable the
Impulse system to display and control your computer. Using markers, you
can also write notes over or beside the projected computer screen and
capture images at any time.
For instance, you can control a presentation on your computer (using
software such as PowerPoint) while standing at the whiteboard, simply by
using a marker (leaving the stylus cap on) as your mouse.
Refer to “Using the Impulse System With Your Laptop” on page 21.
com
.
ion
.polyvis
w
w
w
Impulse Whiteboard System Overview 7
Impulse™ LTX Multimedia Whiteboard System
Page 10
A
BOUT THE MARKERS AND ERASERS
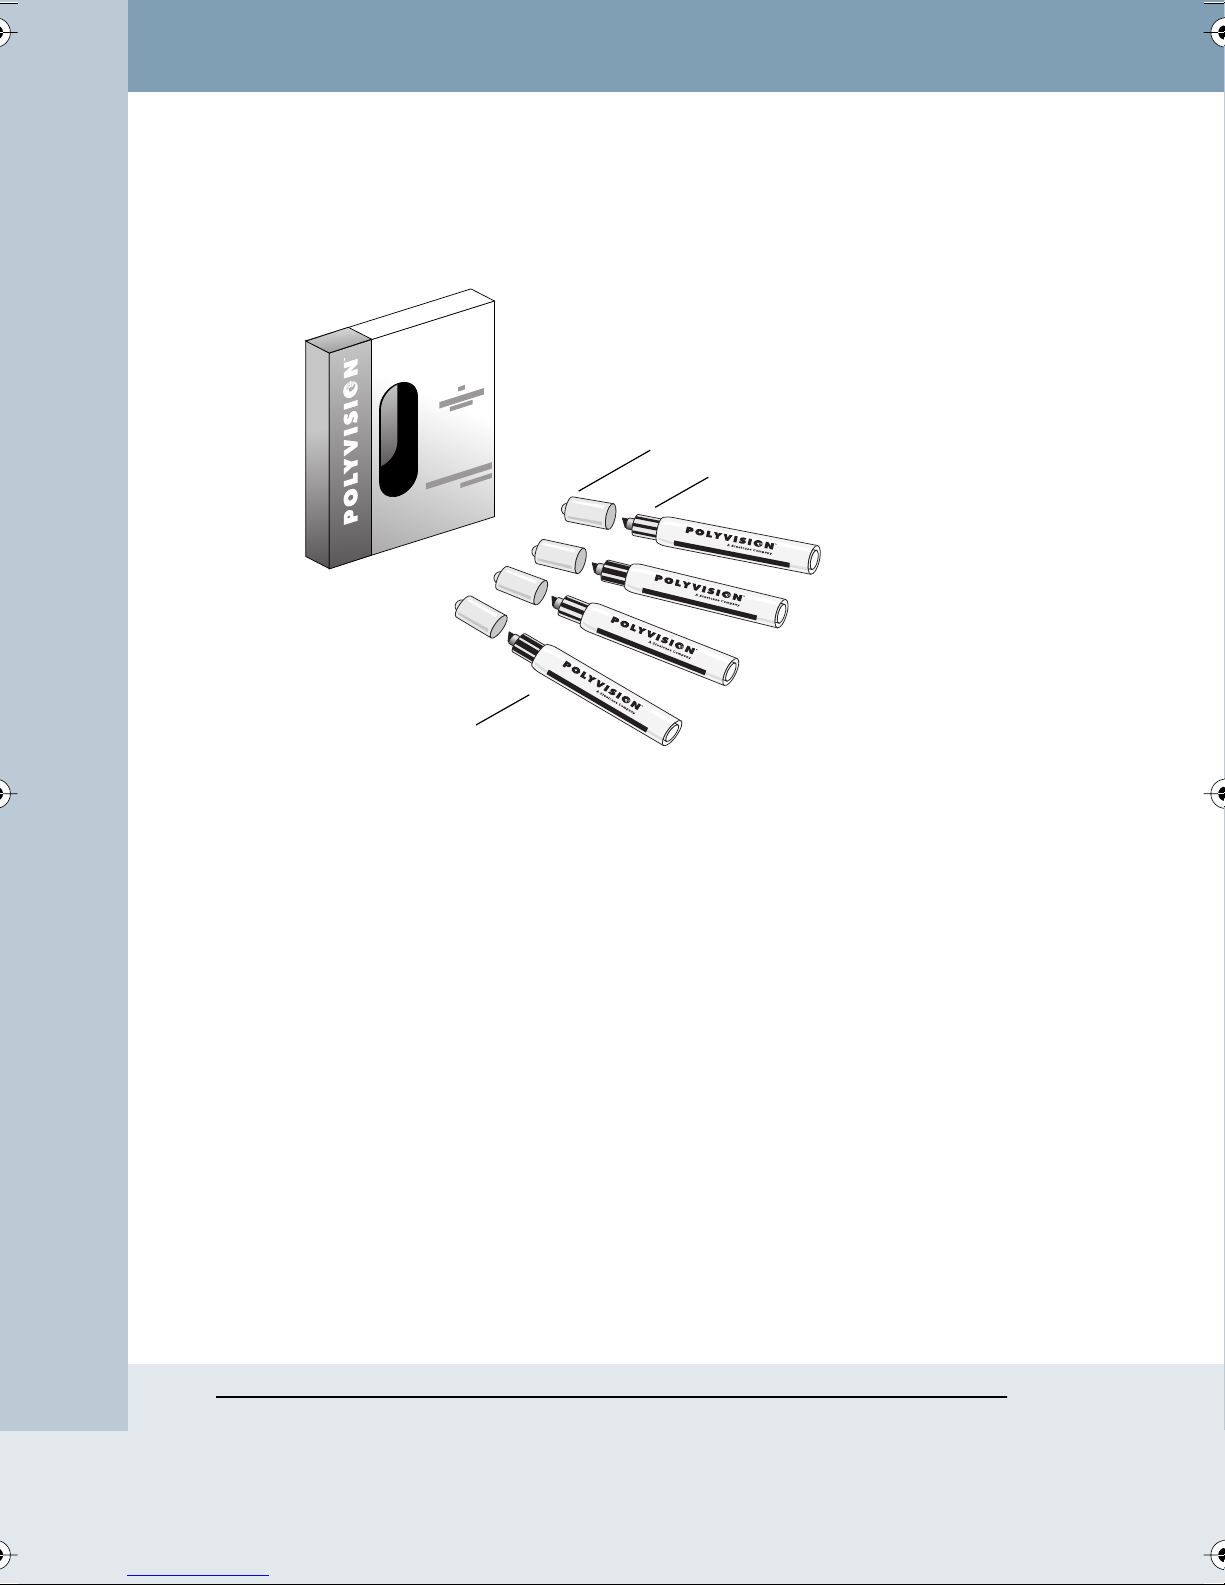
The whiteboard sends data to its internal computer by detecting a reflected
laser beam from the marker, stylus, or eraser.
DRY ERASE MARKER
marker
stylus cap
reflective band
DRY ERASE MARKER
DRY ERASE MARKER
DRY ERASE MARKER
The Impulse system can distinguish marker color by reading the reflective
band on the marker. When the marker’s cap is in place, the marker
becomes a stylus.
While projecting captured images or your laptop computer, use the
markers to write anywhere on the board. Use the stylus as a mouse to
operate the on-screen functions. Two mouse modes are available. Refer to
“Choosing a Projection Mode” on page 25.
The Impulse system includes a large rectangular eraser. A reflective band
on the eraser identifies it as an eraser to the Impulse system.
Whenever you use the board, make sure there is only one point of contact
at a time, and use only the recommended markers and erasers. A bin
below the board stores a large supply of markers. Ninety-six markers are
included with the board and more can be ordered from your dealer or from
PolyVision. (Refer to “How to Obtain Replacement Parts” on page 49.)
Impulse™ LTX Multimedia Whiteboard System
8 Impulse Whiteboard System Overview
Page 11
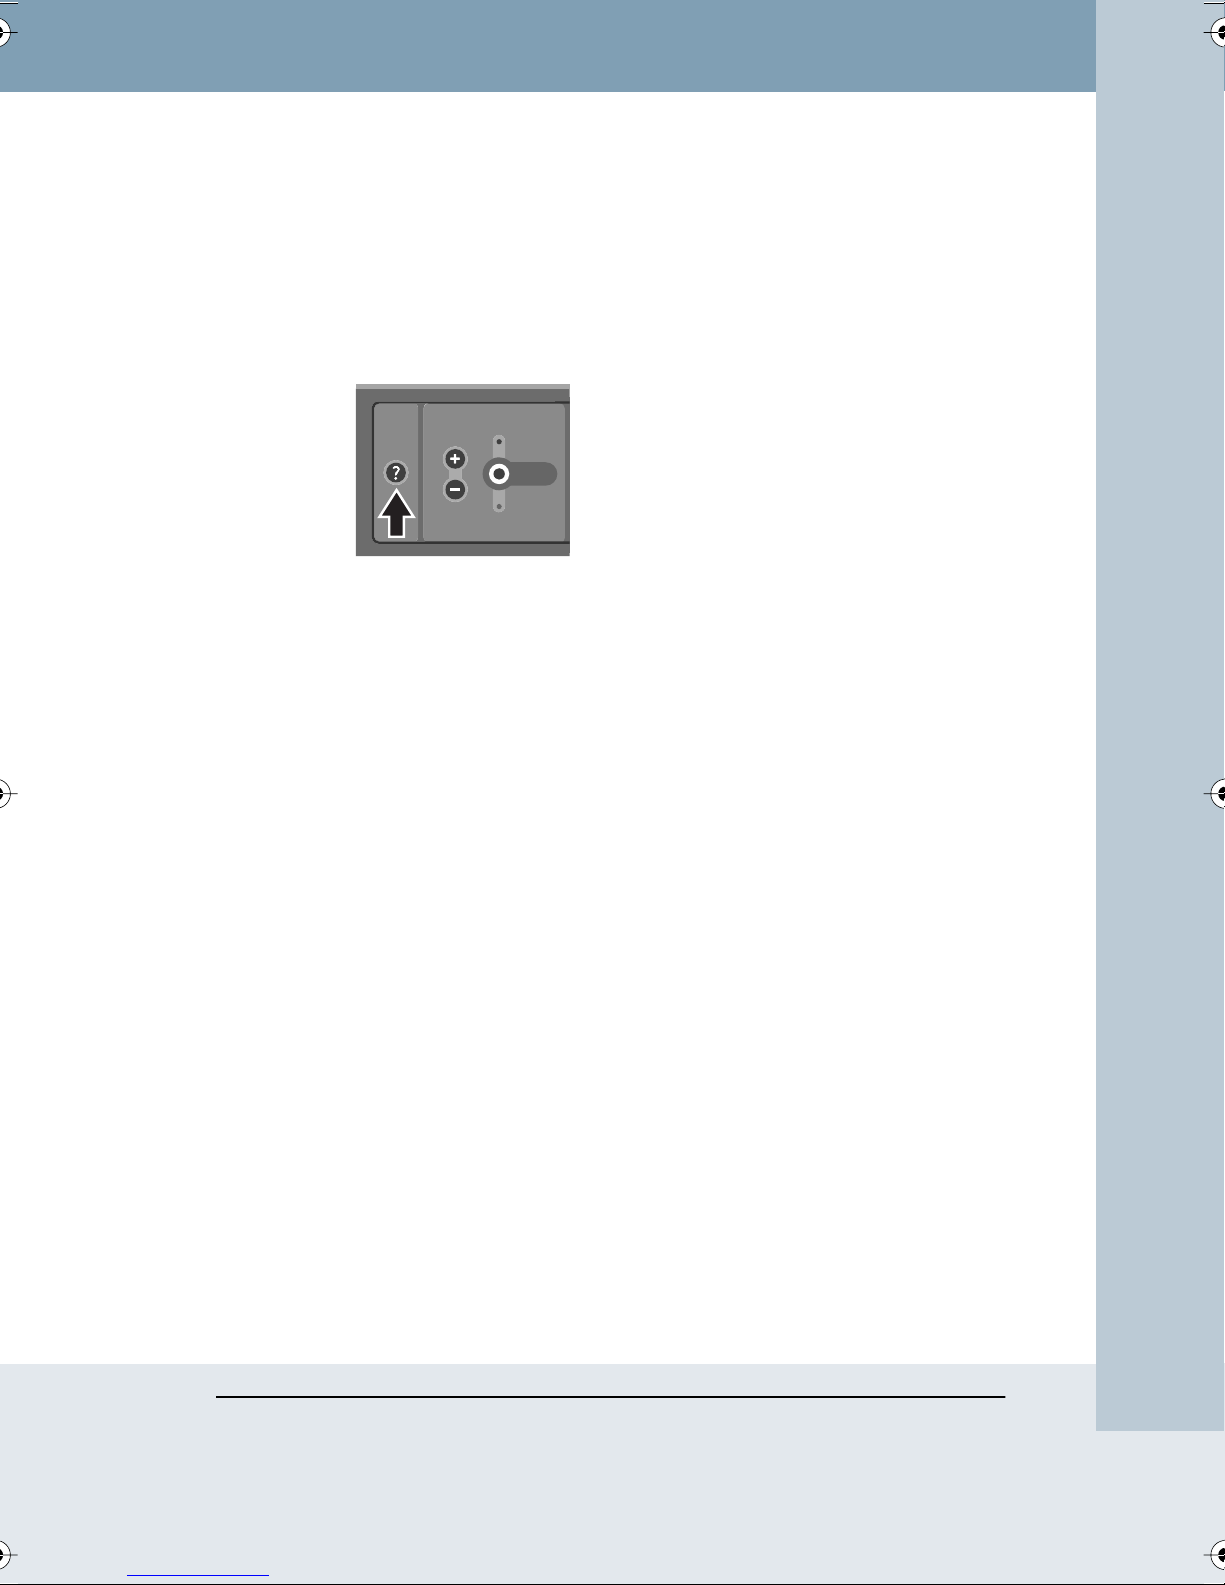
ETTING HELP WITH THE CONTROL PANEL
G
The Impulse system control panel includes a Help button to provide audible
information about the use of any of the other buttons.
To get help:
1
Press Help on the control panel.
WhiteboardHelp
Ready
Start
In Use
Volume Memory
2
Then, press any other button on the control panel to hear an audible
message providing information about the function of that button.
3
To control the message volume, press the control panel Volume
buttons. Refer to “The Impulse System Audio and Volume Control” on
page 30.
4 To return the control panel to normal operation, press Help again. If no
button is pressed within five seconds of pressing Help, the control
panel returns to normal operation automatically.
Impulse Whiteboard System Overview 9
Impulse™ LTX Multimedia Whiteboard System
Page 12

IMPULSE WHITEBOARD OPERATION
THREE WAYS TO OPERATE THE BOARD
The Impulse system provides three ways to operate the board:
• simply walk up, write on the board, and capture images on the printer,
floppy diskette, or website/archive as described below
• connect a projector and scroll through captured images that are
saved to the archive as described on page 15
• connect your laptop computer and projector to the Impulse system for
multimedia interactivity as described on page 21
note:NOTE:
When you walk up to use an Impulse board, it is a good idea to press the
Start button before you begin to write. This clears the internal memory of
any writing from a previous user.
CAPTURING IMAGES
Whether the board contains writing, projected images from the board’s
archive, or your projected computer screen, the Impulse system gives you
a choice of three ways to capture images of the whiteboard:
• on the printer
• on a floppy diskette
• on the website/archive
You can capture images in any combination. Refer to “Capturing Images in
any Combination” on page 14.
Capturing Images on the Printer
The Impulse system comes with its own printer, which can be networked
over an Ethernet network or connected through wireless transmission,
depending on how your system was purchased. The Ethernet network
printer receives data via the Ethernet print server adapter connected to the
same local area network (LAN) as the Impulse system.
Impulse™ LTX Multimedia Whiteboard System
10 Impulse Whiteboard Operation
Page 13
The wireless color printer receives its data using Bluetooth wireless
technology. The Impulse system emits radio signals to the printer’s
antenna, so no physical connection is required between them. The printer
should be within 30 feet (10m) of the Impulse board, but it does not need to
be in the same room. If a wall is between Impulse board and the printer, the
antenna range may be reduced.
To print an image of the board:
1 Be sure the printer is turned on, and has paper and ink.
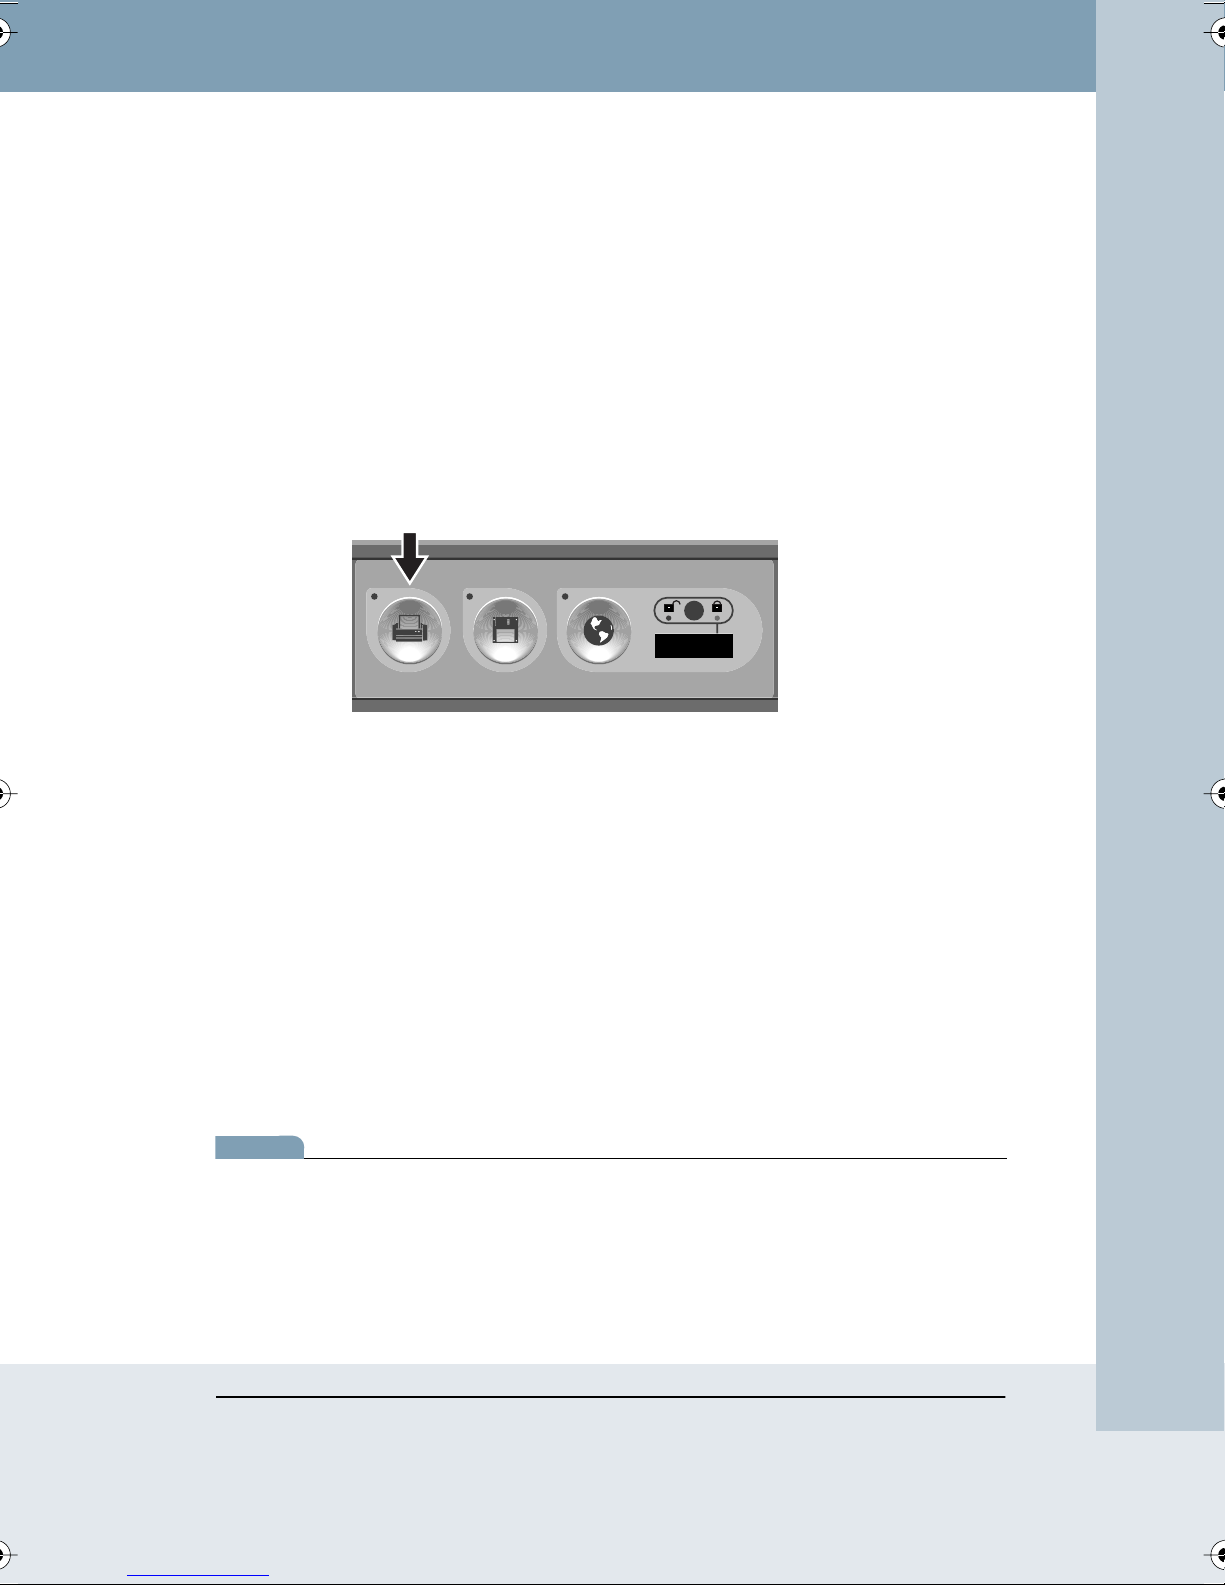
2 When you are ready to capture, press Printer once for each copy you
want to print. You will hear an audible message state “one copy,” “two
copies,” and so on for each copy.
note:NOTE:
Quick Capture
Printer Disk Website / Archive
Password Protection
IP
A
CCESS NUMBER
3 Continue your presentation. The Printer LED flashes green until
printing is complete.
Capturing Images on a Floppy Diskette
You can capture an image of the board on a floppy diskette as an Adobe®
Acrobat® PDF file (.pdf). One floppy diskette holds 10 to 15 images (or as
few as one, if a projected image is also captured), depending on the
complexity of the images. Files are named with the date and time of
capture.
The Impulse system uses only formatted MS-DOS high-density 3.5" floppy
diskettes. Formatted floppy diskettes are available from most office supply
stores.
The Impulse system will not erase files on a diskette, so be sure that the
diskette you use has sufficient space for your files.
Impulse Whiteboard Operation 11
Impulse™ LTX Multimedia Whiteboard System
Page 14
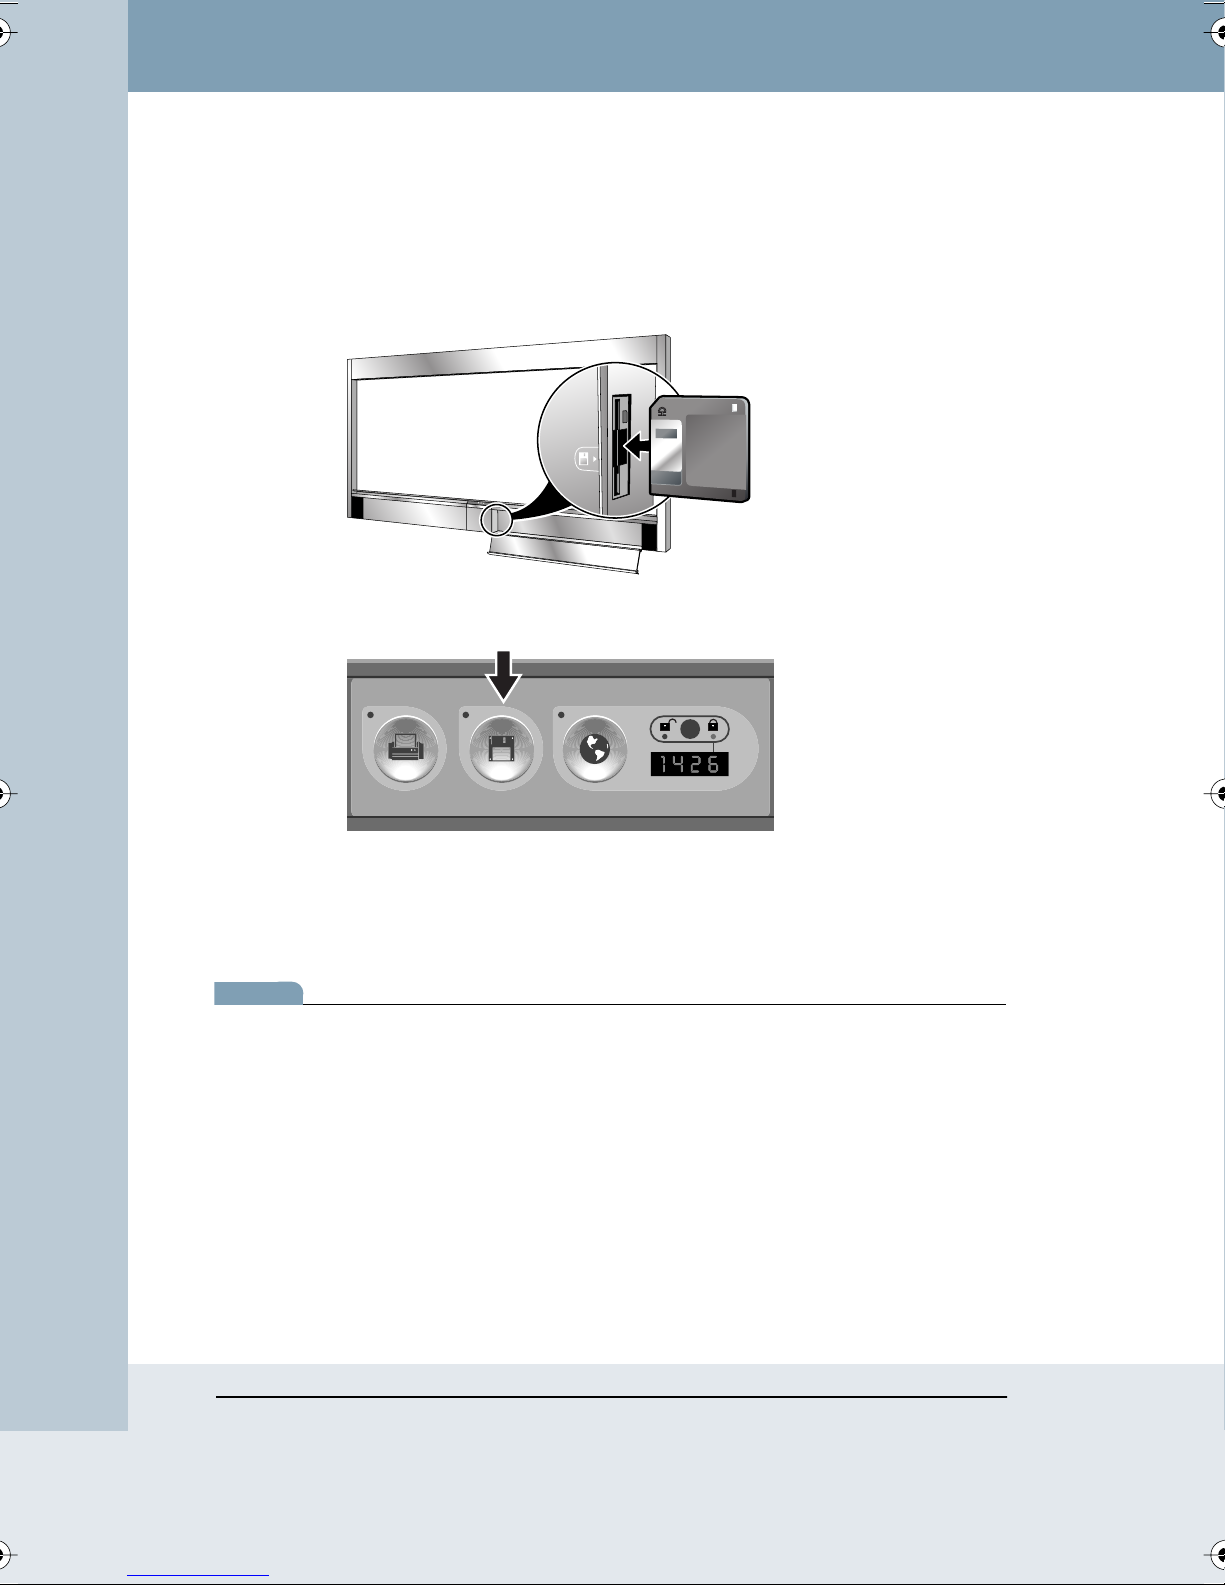
To capture images on a floppy diskette:
1 Open the right storage bin, exposing the floppy drive on the right side
of the control panel.
2 Insert a formatted diskette in the floppy drive.
3 When you are ready to capture, press Disk.
note:NOTE:
Quick Capture
Printer Disk Website / Archive
Password Protection
A
CCESS NUMBER
4 Continue your presentation after you hear the “camera shutter.” The
Disk LED flashes green until the save is complete. The disk drive
begins to write almost immediately. Writing to disk can take up to 30
seconds, depending upon the complexity of the image.
If the LED blinks yellow, no diskette is inserted in the diskette drive. If the
LED blinks red, one of the following may have occurred:
• A bad or unformatted diskette is inserted in the control panel.
• The diskette is full.
The voice prompt provides additional information.
To remove the floppy diskette:
1 Wait until the LED stops blinking.
Impulse™ LTX Multimedia Whiteboard System
12 Impulse Whiteboard Operation
Page 15

note:NOTE:
2 Press the eject button on the diskette drive.
eject button
Most computers can read the Adobe Acrobat PDF file (.pdf) format images
on the floppy diskette. (If you do not have Adobe Acrobat Reader, you can
download it from the Adobe website at www.acrobat.com.) Simply insert
the diskette in your computer, browse to the floppy diskette drive and
double-click the image file to view it. Images can be mailed to others,
printed, or saved on your computer for reference.
Capturing Images on the Website/Archive
You can also capture an image of the board and store it as a file on the
built-in Impulse archive and web server.
To capture an image of the board and save it on the board’s archive and
web server:
1 When you are ready to capture, press Website/Archive.
Quick Capture
Printer Disk Website / Archive
Password Protection
A
CCESS NUMBER
2 Continue your presentation. The Website/Archive LED flashes green
until the image file is saved.
Impulse™ LTX Multimedia Whiteboard System
Impulse Whiteboard Operation 13
Page 16

WARNING
The captured image is added to the board’s built-in archive and added to
the web page for this Impulse board. You can access these saved images
in either of two ways:
• Connect a projector to the Impulse system and use the on-screen
display to scroll through archived images. Refer to “Projecting
Archived Images on the Impulse Board” on page 15.
• With any computer sharing the same Local Area Network (LAN),
browse to the built-in Impulse web server. The computer can be a
Windows-based computer, a Macintosh, or any other computer with
web access. All you need is a web browser such as Internet Explorer
or Netscape Navigator. Refer to “The Impulse Web Server” on
page 31 for information about how to access the web server.
The archive and web server can hold approximately 100 images at a time,
depending on their complexity. When the web server becomes full, the
oldest images disappear as new ones are added. Images remain on the
web server and archive until they are replaced by newer ones or until you
delete them, even if there is a power outage.
Unless password protected, images saved to the board archive and web
server can be seen (and deleted from the web) by anyone in your
organization who has access to the LAN or who scrolls through the
archive. Refer to “Password Protecting Images” on page 29.
Capturing Images in any Combination
You can use the Impulse whiteboard buttons in any order to print and save
images of the board. For example, if you want to print ten copies of the
board during your presentation for the purpose of distributing them to your
class, and you also want to capture the image on a floppy diskette to use
later in a word processing document, press the Printer button five times,
then press the Disk button once. The same image appears on the ten
printed copies and the diskette.
CLEARING THE BOARD’S TEMPORARY MEMORY
As you write and erase on the board, the Impulse system saves these
actions in memory. In some circumstances, you might want to clear the
board’s memory. For instance, if you walk up to use a board and suspect
that the memory might contain something from a previous user, you can
Impulse™ LTX Multimedia Whiteboard System
14 Impulse Whiteboard Operation
Page 17
clear the board’s memory. Alternatively, if you need to be certain you are
leaving no confidential information in the board’s memory, you can clear it.
Images saved in the archive are not affected.
When the Impulse system believes the board memory is clear, the green
Ready LED is on. When the system memory contains data, the red In Use
LED is on.
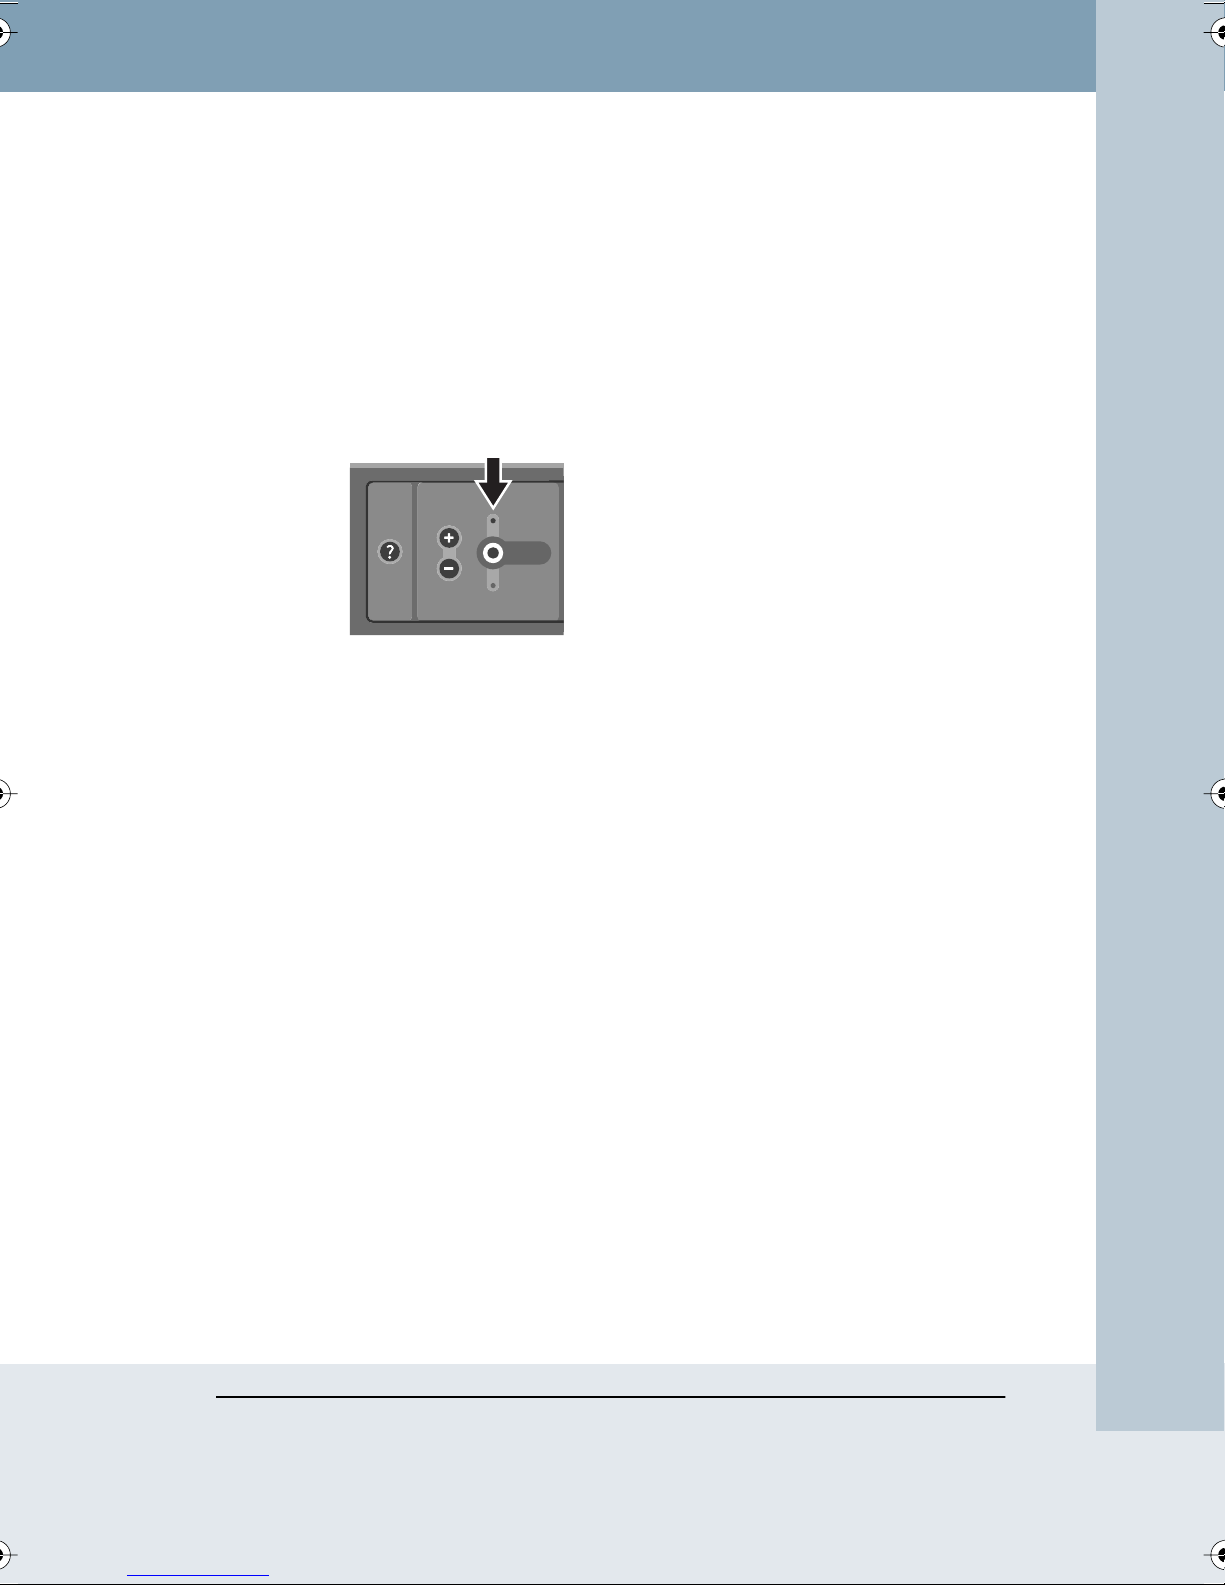
To clear the Impulse memory:
• Press Start on the control panel.
WhiteboardHelp
Ready
Start
In Use
Volume Memory
PROJECTING ARCHIVED IMAGES ON THE IMPULSE BOARD
When you press the control panel Website/Archive button, the Impulse
system saves an image of the board in the board’s built-in archive. (At the
same time, the Impulse system captures the image as a file on its built-in
web server. Refer to “The Impulse Web Server” on page 31 for information
about working with files on the Impulse web server.) You can review images
saved in the archive by projecting them back onto the Impulse board.
Setting up the Projector
To review images from the board’s archive, connect a projector to the
Impulse board using a projector cable. A projector may already be
connected to the Impulse system. If this is the case, proceed to “Reviewing
Archived Images” on page 16.
Impulse Whiteboard Operation 15
Impulse™ LTX Multimedia Whiteboard System
Page 18
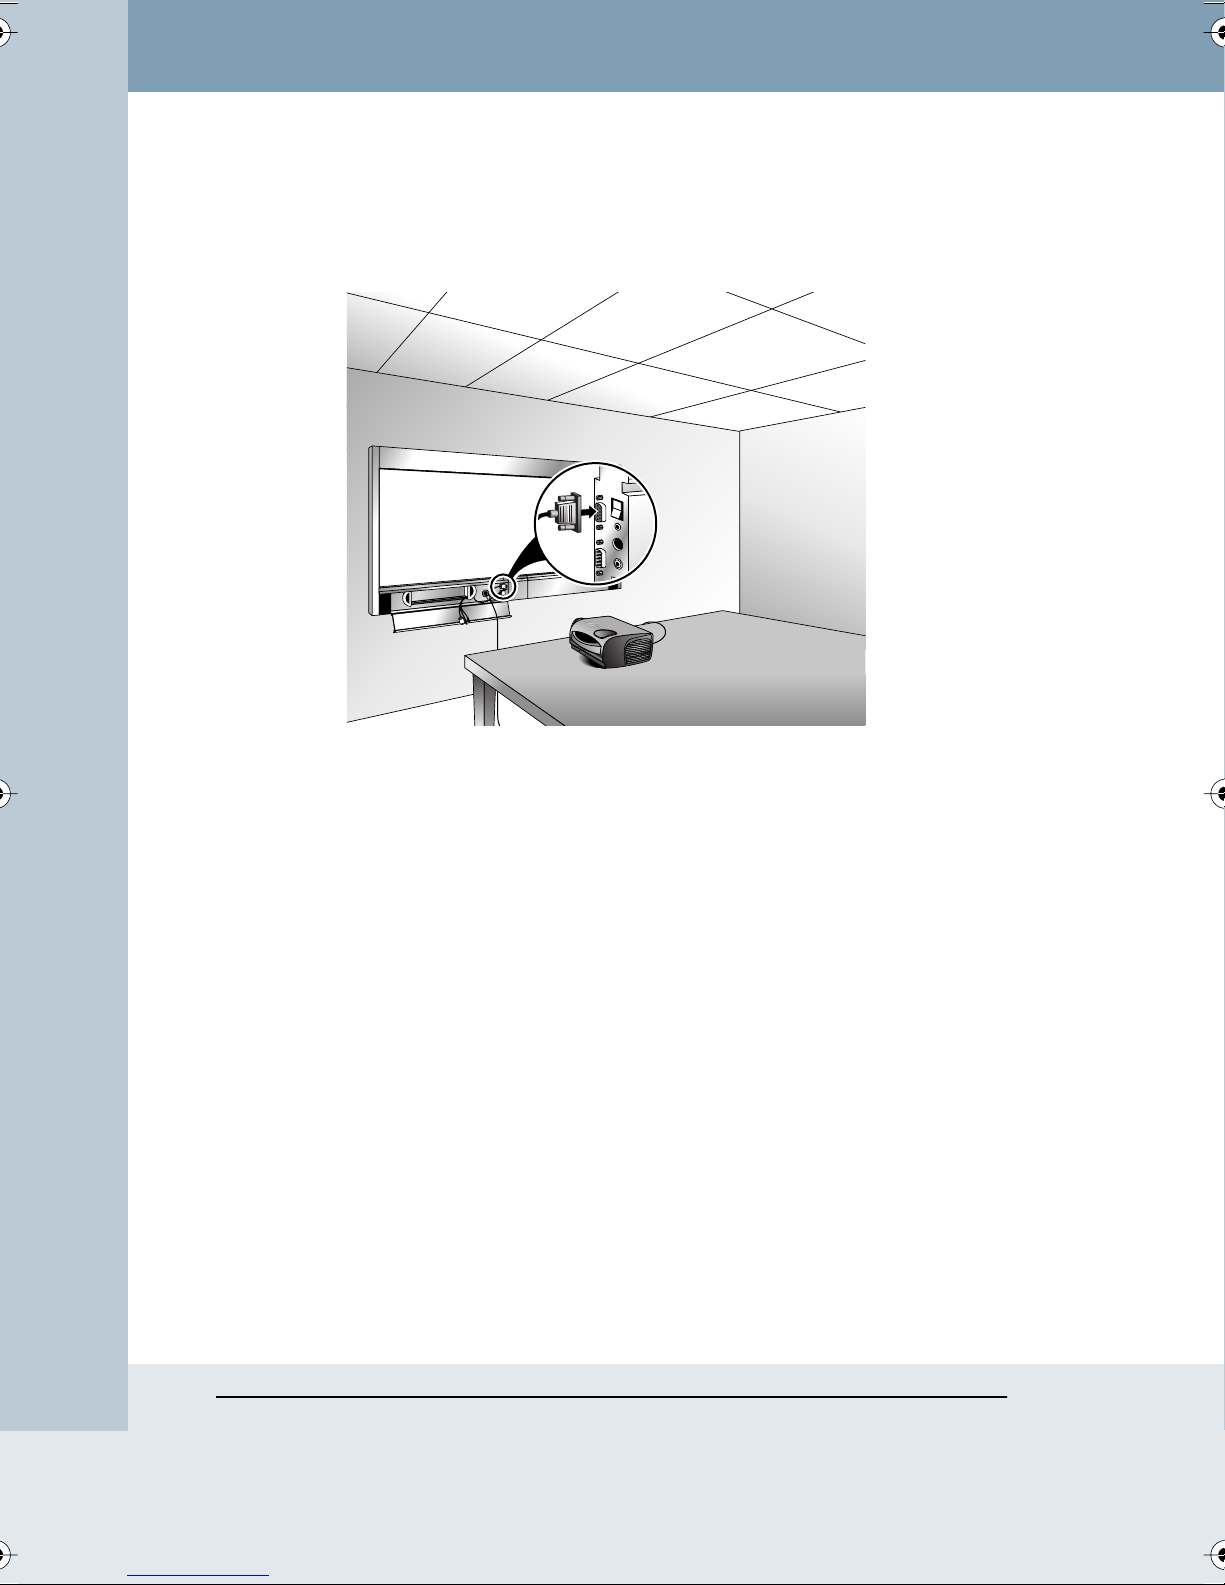
To set up the projector:
1 Locate a projector video cable and connect it to the Impulse control
panel projector connector inside the lower left door.
2 Connect the projector video cable to the projector.
3 Connect the projector’s power cord to an outlet.
4 Turn on the projector and move (or adjust) the projector so the image
projects squarely onto your whiteboard. The projected image need not
fill the white area completely.
Reviewing Archived Images
With a projector connected to the Impulse system, the board acts as
though it were a large interactive screen. The built-in software provides onscreen tools that enable you to scroll, select, and zoom in and out on
captured images using the stylus as a mouse.
Impulse™ LTX Multimedia Whiteboard System
16 Impulse Whiteboard Operation
Page 19
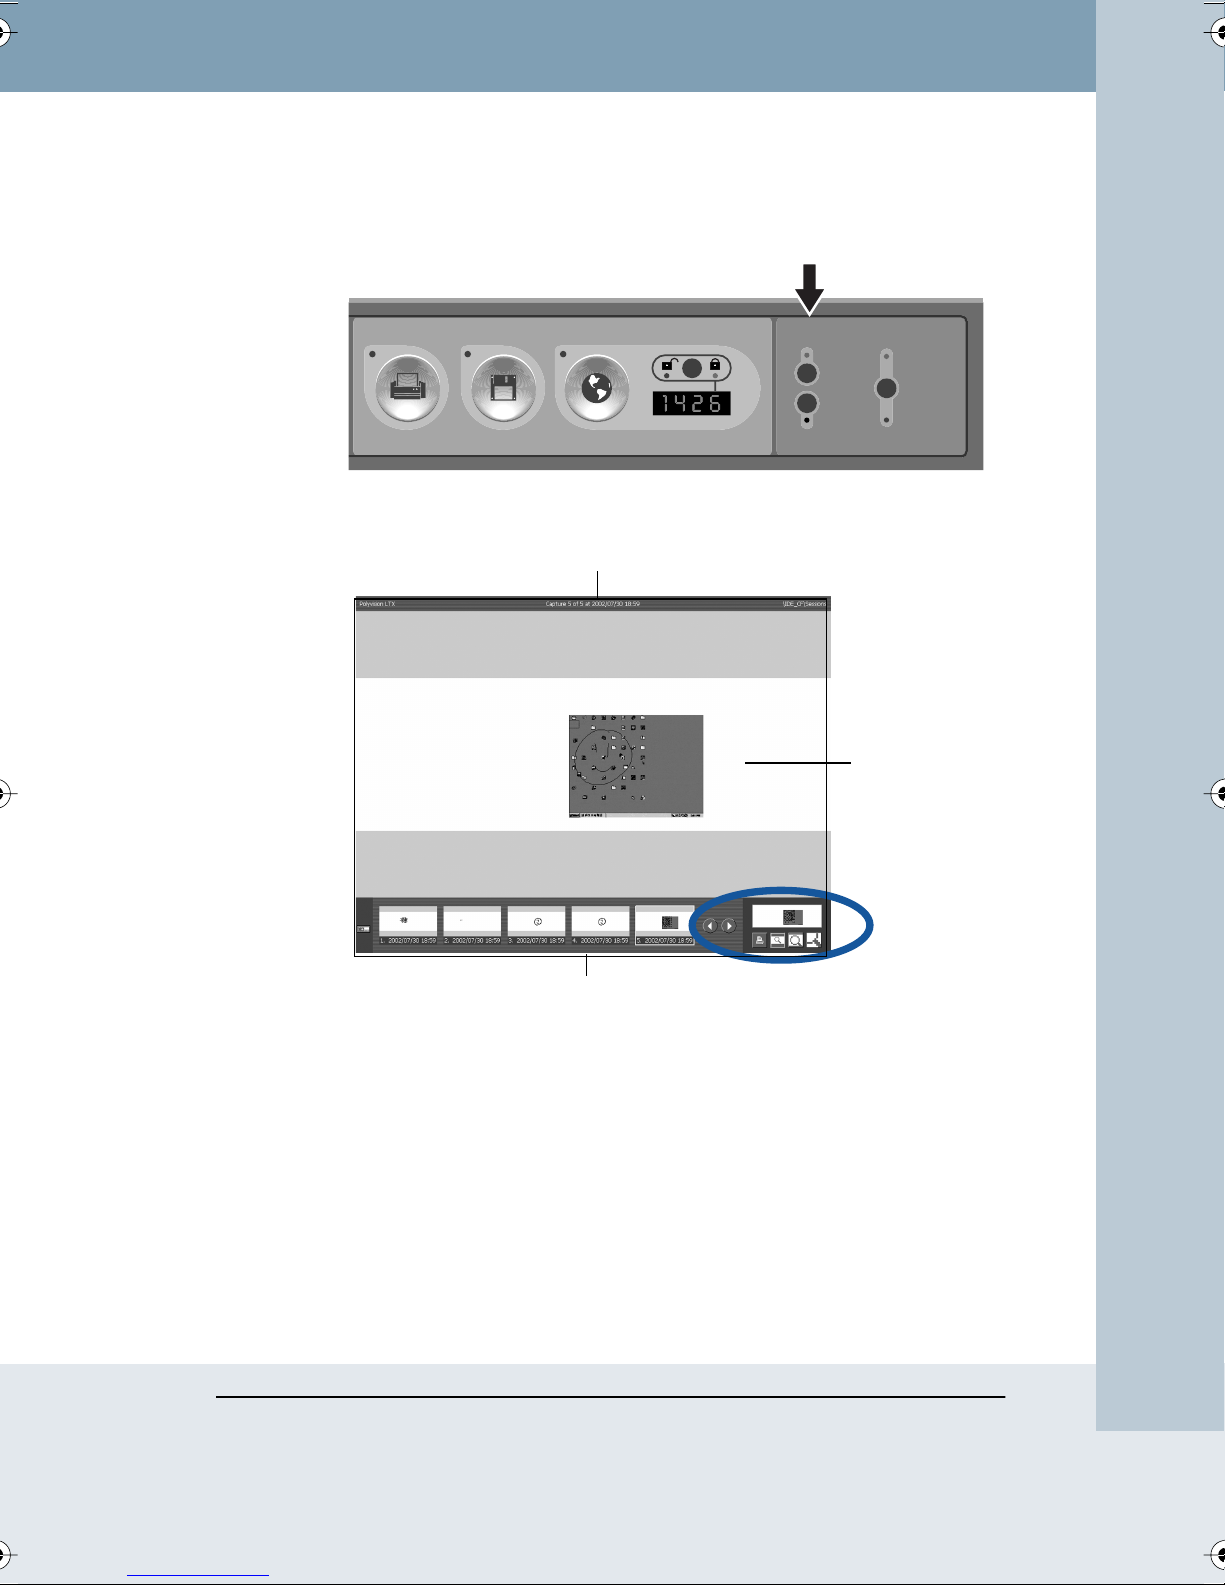
To review captured images from the board’s archive:
1 Press Archive on the control panel.
Quick Capture
Printer Disk Website / Archive
The on-screen display appears.
File Name
Password Protection
A
CCESS NUMBER
Projection
Archive
Laptop
Source Mode
Merged
Writing and
Projection
Separate
Full-size
Display
Tools
Thumbnails
While projecting images on the board, you can choose between
Merged and Separate Projection Modes. This determines whether:
• the stylus can point directly at the projected computer screen, to
control the computer as if using a touch screen monitor (absolute
pointing), or,
• the stylus always controls the computer’s cursor from a distance, as
if using a mouse (relative pointing).
Refer to “Choosing a Projection Mode” on page 25 for more
information.
Impulse Whiteboard Operation 17
Impulse™ LTX Multimedia Whiteboard System
Page 20
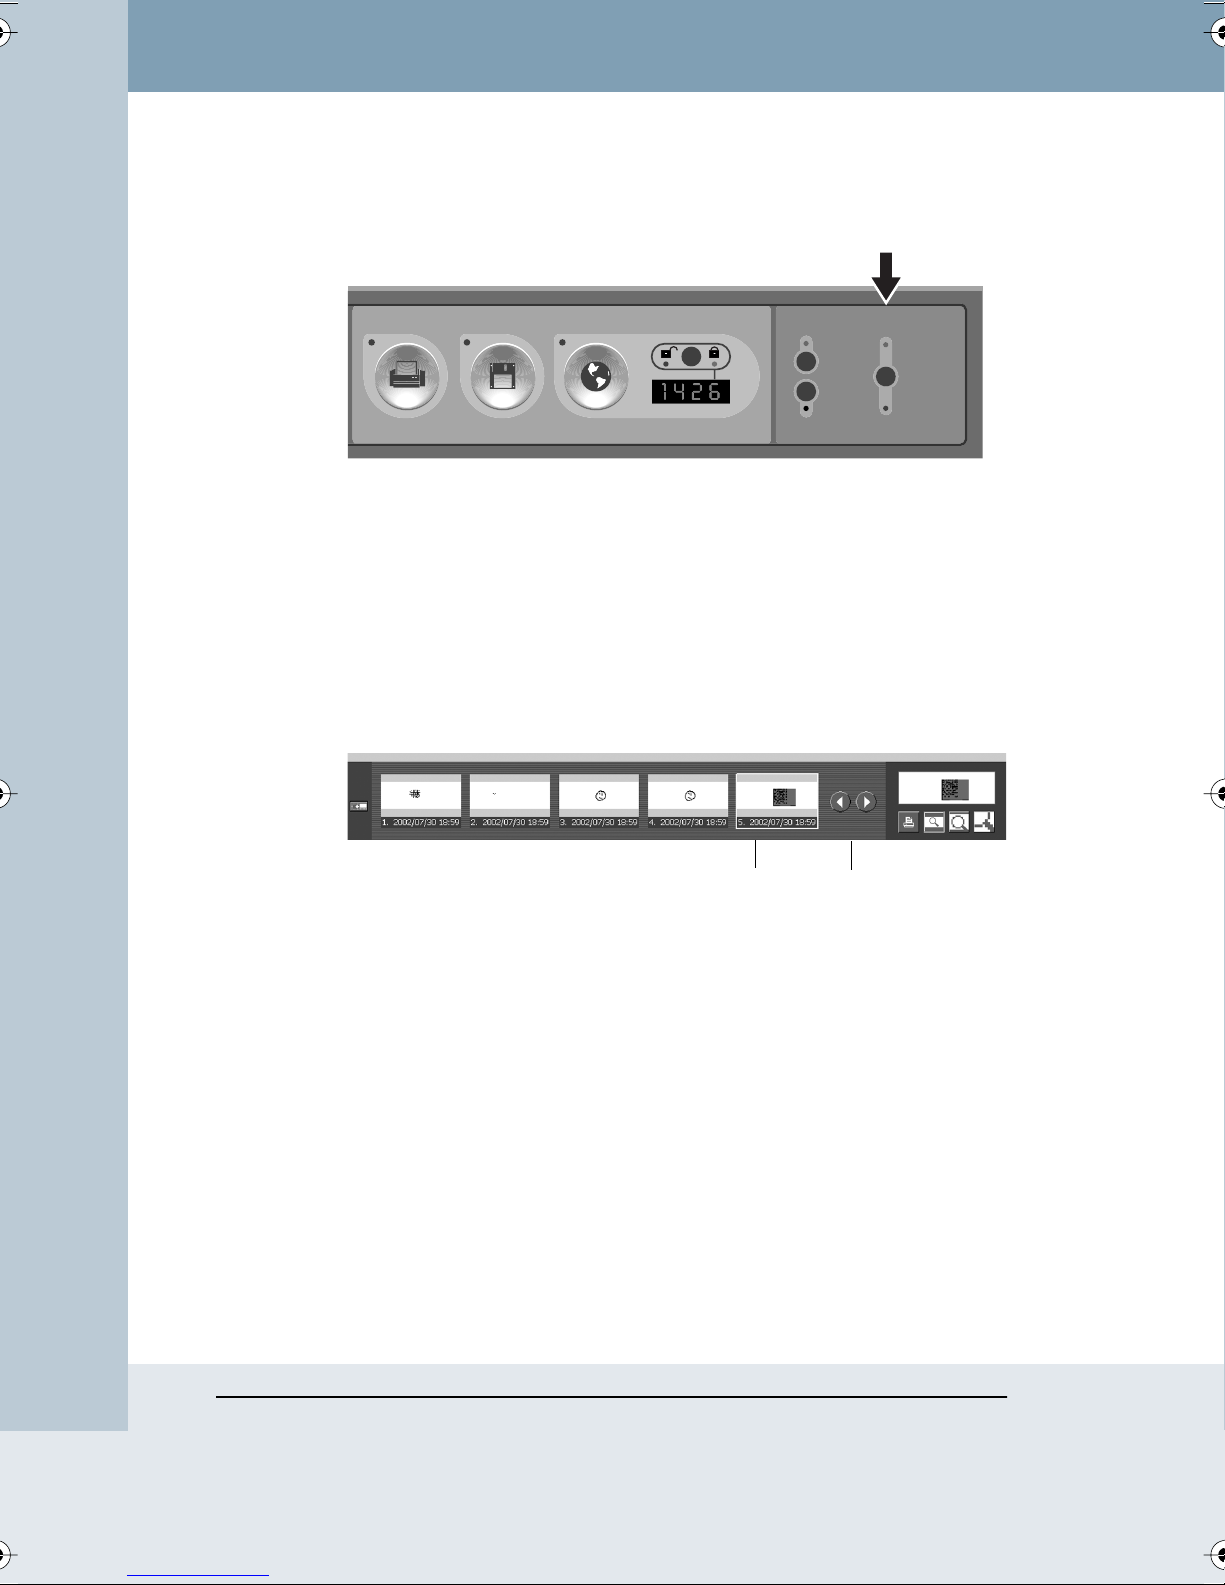
2 To change projection mode, press the Writing and Projection button
on the control panel until the Merged or Separate LED lights.
Quick Capture
Printer Disk Website / Archive
Password Protection
A
CCESS NUMBER
Projection
Archive
Laptop
Source Mode
Merged
Writing and
Projection
Separate
The on-screen display includes a miniature or “thumbnail” of each
saved image. (If a saved image is password protected, a lock icon
appears instead of a thumbnail image and the image may be viewed
only from the website. Refer to “Viewing Password Protected Images
on the Website” on page 34.)
3 To scroll through the saved images, use the stylus to tap the left and
right scroll arrows. Tap a thumbnail to select it. The selected thumbnail
is highlighted and it appears in the full-size display.
Highlighted
Thumbnail
Scroll Arrows
Impulse™ LTX Multimedia Whiteboard System
18 Impulse Whiteboard Operation
Page 21
note:NOTE:
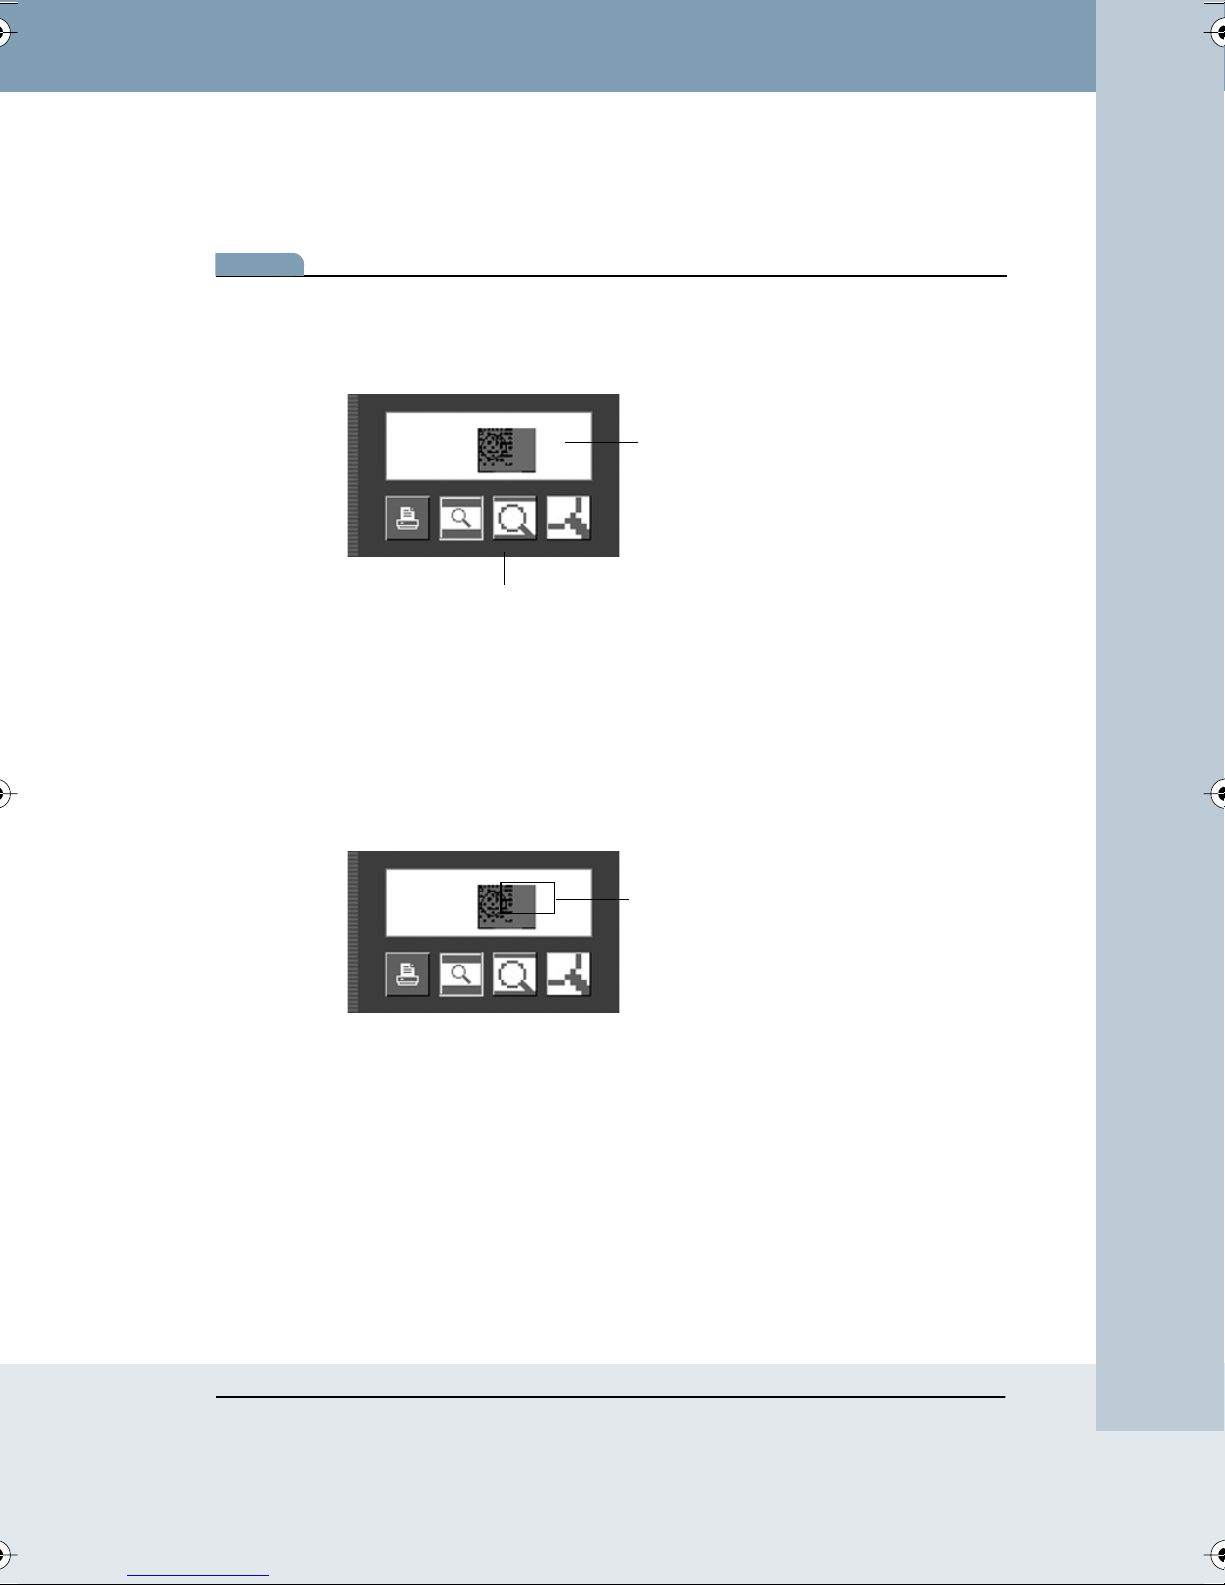
4 To zoom in and out, use the stylus to tap one of the three zoom
buttons in the on-screen display tools.
Merged Mode includes three levels of magnification. Separate Mode
includes two levels. Refer to “Choosing a Projection Mode” on page 25 for
more information about Merged and Separate Modes.)
Navigation Window
Zoom Buttons
In the middle and highest levels of magnification, portions of the image
might not fit in the full-size display. A red box in the navigation window
indicates which portion of the selected thumbnail appears in the fullsize display.
5 To control which portion of the magnified image appears in the display,
use the stylus to drag the red navigation box.
Navigation Box
Impulse™ LTX Multimedia Whiteboard System
Impulse Whiteboard Operation 19
Page 22
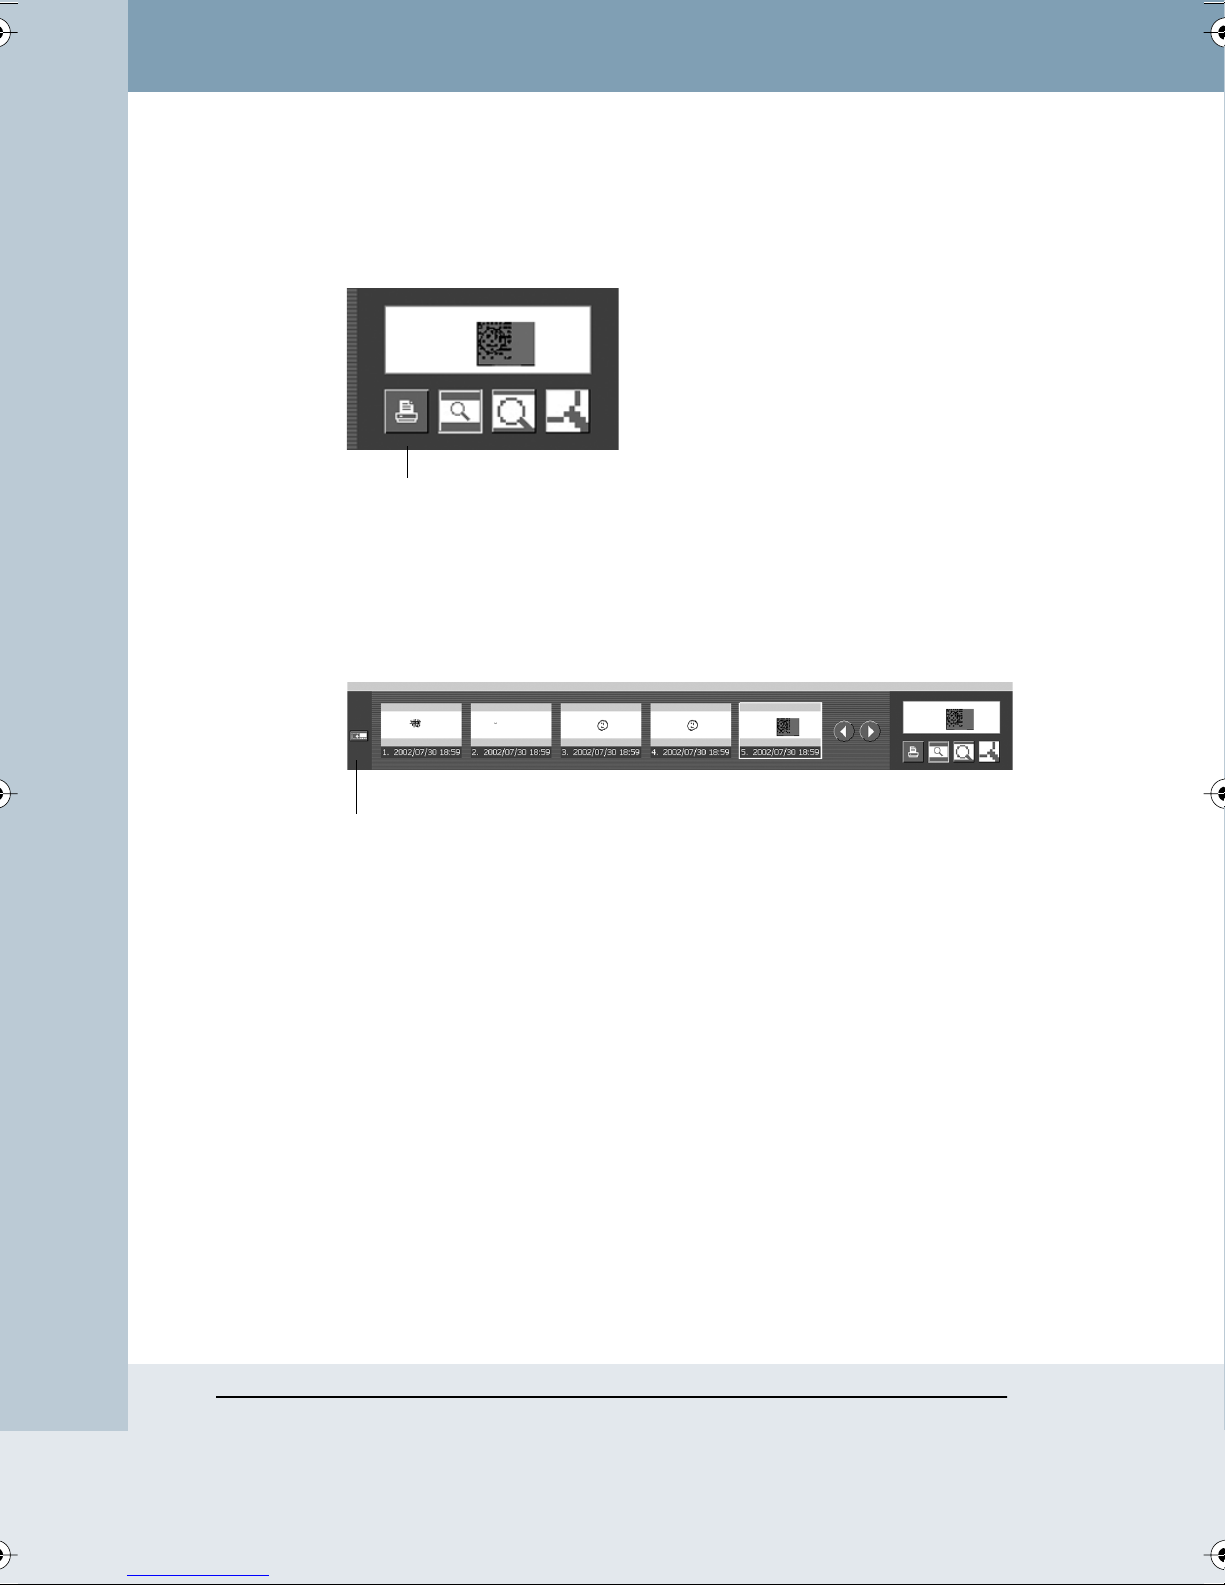
6 To print the image (excluding writing you might have added to the
board while projecting the image) use the stylus to tap the Print button
in the on-screen display tools.
Print Button
7 If you prefer to stand on the left side of the projected image, you can
toggle the tools between the lower left or lower right edge of the
display. To switch the tool position, tap the tools switch in the onscreen display.
Tools Switch
8 You can use a marker to write over or beside the projection on the
board. You can then capture a new image that includes the writing and
the projection by pressing the Print, Disk, or Website/Archive button
on the control panel. The new image includes the writing and
projection either merged or separate, depending on the projection
mode. Refer to “Choosing a Projection Mode” on page 25.
9 To delete an image from the board’s archive, access the board’s
website and delete the image from there. (Refer to “Accessing Your
Impulse Web Server” on page 31.) You cannot delete images using
the Archive display.
Impulse™ LTX Multimedia Whiteboard System
20 Impulse Whiteboard Operation
Page 23

USING THE IMPULSE SYSTEM WITH YOUR LAPTOP
With a laptop computer and projector connected to your Impulse board, a
variety of powerful options become available without changing or adding
anything to your computer. The Impulse system’s built-in intelligence
enables you to:
• use the Impulse system to control your computer
• use the Impulse system speakers for computer audio
• run slide presentations entirely from the front of the room
• mark up and capture any image from your computer
System Requirements
Your laptop must have:
• Windows 98, ME, 2000, or XP; Macintosh OS 9 or higher; or Linux
2.4
• VGA HD-15 video port, or DB-15 video port and DB-15 to HD-15
video adapter
• PS/2 or USB port
• video display resolution of 640 x 480 to 1280 x 1024
• up to 75 Hz screen refresh rate (60 Hz @ 1280 x 1024)
• line out or headphone jack (optional) for computer audio on the
Impulse system speakers
Setting up the Laptop Computer and Projector
The Impulse system includes a cable to connect the board to your laptop.
The cable connections between the board, the projector, and your laptop
enable the Impulse system to display and control your computer, and
capture images from it.
Impulse™ LTX Multimedia Whiteboard System
Impulse Whiteboard Operation 21
Page 24
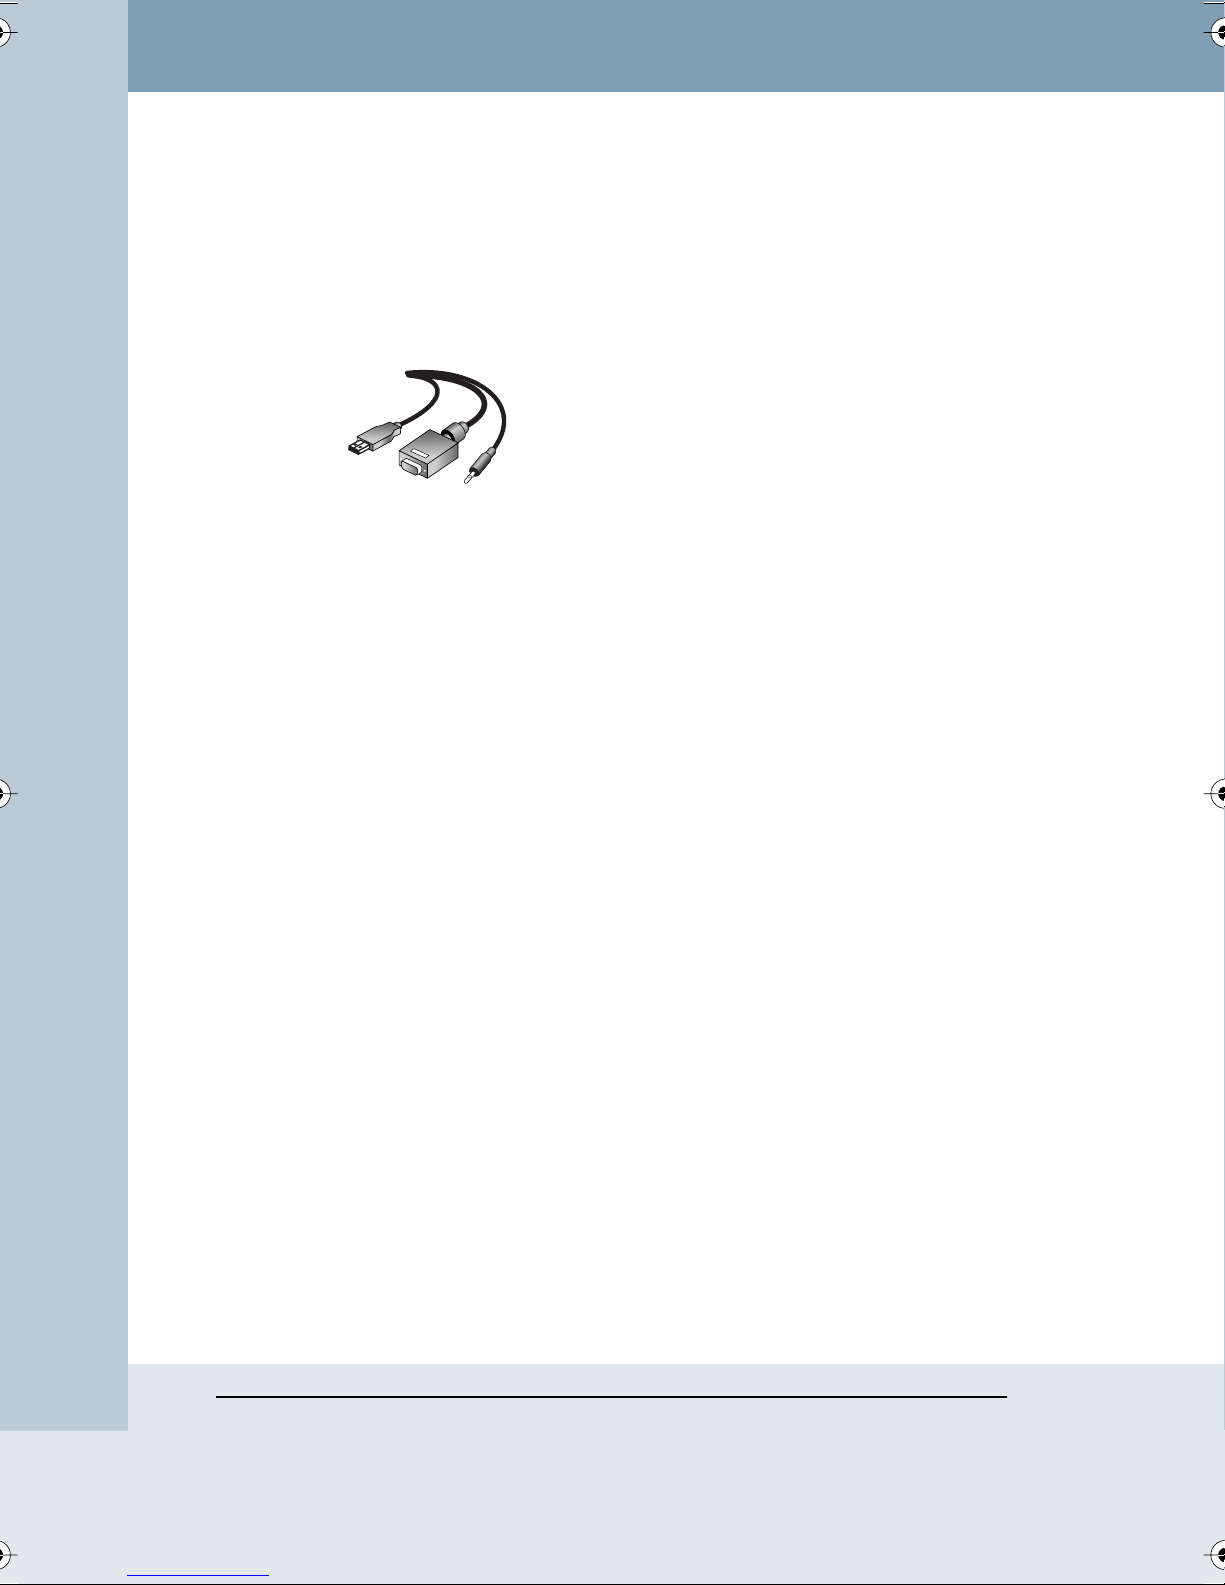
To connect your laptop computer to the Impulse board:
1 Locate the 30 foot long laptop cable provided in the Impulse cable bin
beneath the board on the left side. This cable is permanently
connected to the board and has three connectors to plug into to your
laptop: video, USB, and audio.
2 Connect the video connector to the video jack or adapter on your
laptop.
3 Connect the USB connector into the USB jack on your laptop. (If you
do not have a USB jack on your laptop, connect the USB to PS/2
adapter (provided) to the end of the USB connector. Then connect the
adapter’s PS/2 connector to the PS/2 jack on your computer.
Although you can control the laptop from the board, you will be unable
to use the mouse in absolute pointing mode.)
4 To play audio from your computer over the Impulse speakers, connect
the 1/8” mini jack to the laptop line out or headphone jack.
5 If it is not already on, start your computer.
A projector may already be connected to the Impulse system. If this is the
case, proceed to “Operating Your Laptop from the Impulse Board” on
page 23.
Impulse™ LTX Multimedia Whiteboard System
22 Impulse Whiteboard Operation
Page 25
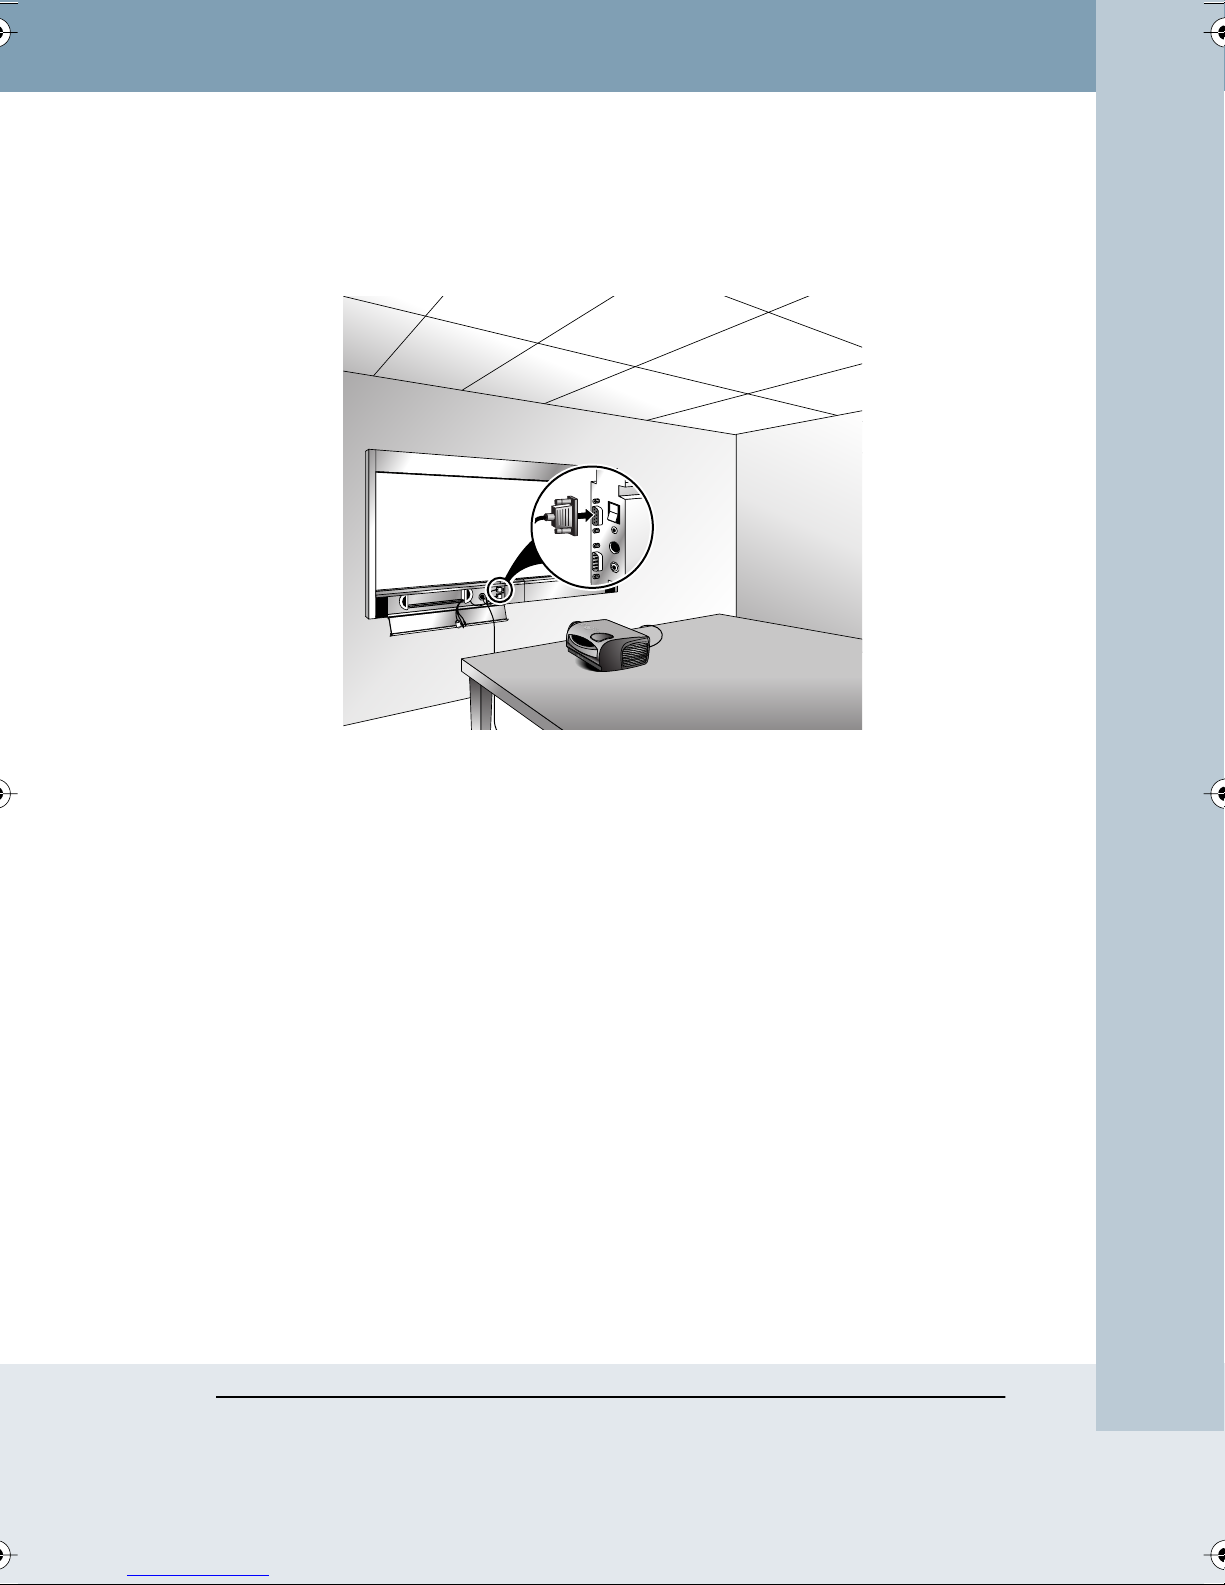
To connect and set up a projector:
1 Locate a projector video cable and connect it to the Impulse control
panel projector connector inside the lower left door.
2 Connect the video cable to the projector.
3 Connect the projector’s power cord to an outlet.
4 Turn on the projector and move the projector so that the image
projects squarely onto your whiteboard. The projected image need not
fill the white area completely.
Operating Your Laptop from the Impulse Board
To project the computer screen onto the board:
1 Assure that your laptop is generating video signal. (You may need to
press Fn - F5 or Fn - F8 on your laptop to enable video output.)
Impulse™ LTX Multimedia Whiteboard System
Impulse Whiteboard Operation 23
Page 26
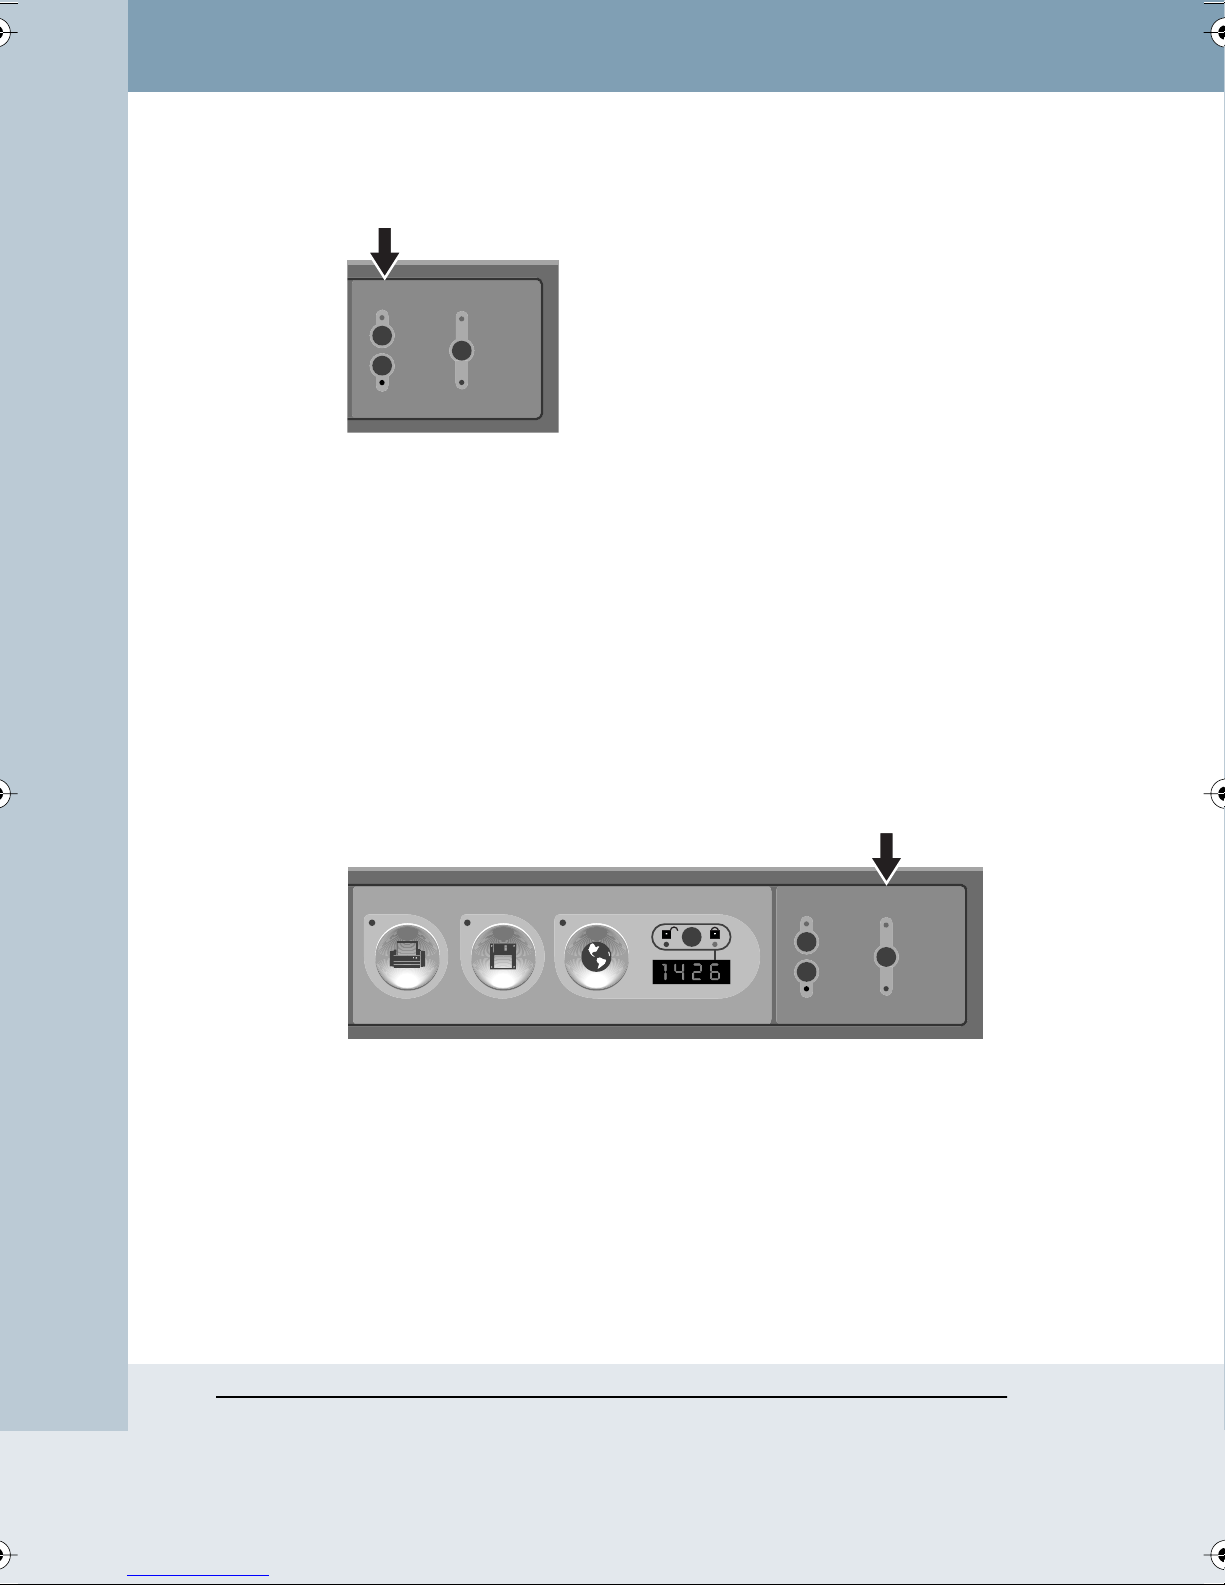
2 Press Laptop on the control panel.
Projection
Projection
Merged
Archive
Archive
Laptop
Laptop
Source Mode
Source Mode
Merged
Writing and
Ink and
Projection
Projection
Separate
Separate
3 While projecting images on the board, you can choose between
Merged and Separate Projection Mode to operate the computer from
the board. This determines whether:
• the stylus can point directly at the projected computer screen, to
control the computer as if using a touch screen monitor (absolute
pointing, Merged Mode), or,
• the stylus always controls the computer’s cursor from a distance, as
if using a mouse (relative pointing, Separate Mode).
Refer to “Choosing a Projection Mode” on page 25 for more
information about relative and absolute pointing. To change projection
mode, press Writing and Projection on the control panel until the
Merged or Separate LED is on.
Quick Capture
Printer Disk Website / Archive
Password Protection
A
CCESS NUMBER
Projection
Archive
Laptop
Source Mode
Merged
Writing and
Projection
Separate
While your laptop screen is projected onto the board, you can operate the
computer and its software from the board using the stylus. This frees you
to focus entirely on activity at the whiteboard.
Impulse™ LTX Multimedia Whiteboard System
24 Impulse Whiteboard Operation
Page 27

To use the stylus to operate your computer:
• leave the stylus cap on a marker
• tap the whiteboard once to click
• tap the whiteboard twice rapidly to double-click
• pull the stylus across the surface to simulate a click-and-drag
operation (e.g., to move a dialog box)
• in Windows, for a right click, hold the stylus to the board for one
second
From the whiteboard, you can control interactive presentations using
software such as PowerPoint. The Impulse system enables you to write
over or beside the projected computer screen and capture the writing and
projection by pressing Print, Disk, or Website/Archive on the control panel.
The saved or printed image includes the writing and the projected screen
either merged or separate, depending on the projection mode. Refer to
“Choosing a Projection Mode”.
CHOOSING A PROJECTION MODE
While projecting archived images or your computer screen onto the board,
you can choose between two modes of stylus function and image saving:
Separate Mode and Merged Mode.
note:NOTE:
Merged Mode (absolute pointing) is unavailable when using a Macintosh or
Linux OS.
Separate Mode
In Separate Mode, the action of the stylus is relative; the stylus controls
cursor movement in the same way that your computer mouse controls the
cursor from your mouse pad. For example, to click a button on the
projected computer screen, stand to one side of the projected image, drag
the stylus across the board to move the cursor until it is over the button,
and tap the stylus while the cursor is over the button. Using Separate
Mode, you can stand away from the projected image rather than standing
directly in front of it.
Impulse Whiteboard Operation 25
Impulse™ LTX Multimedia Whiteboard System
Page 28
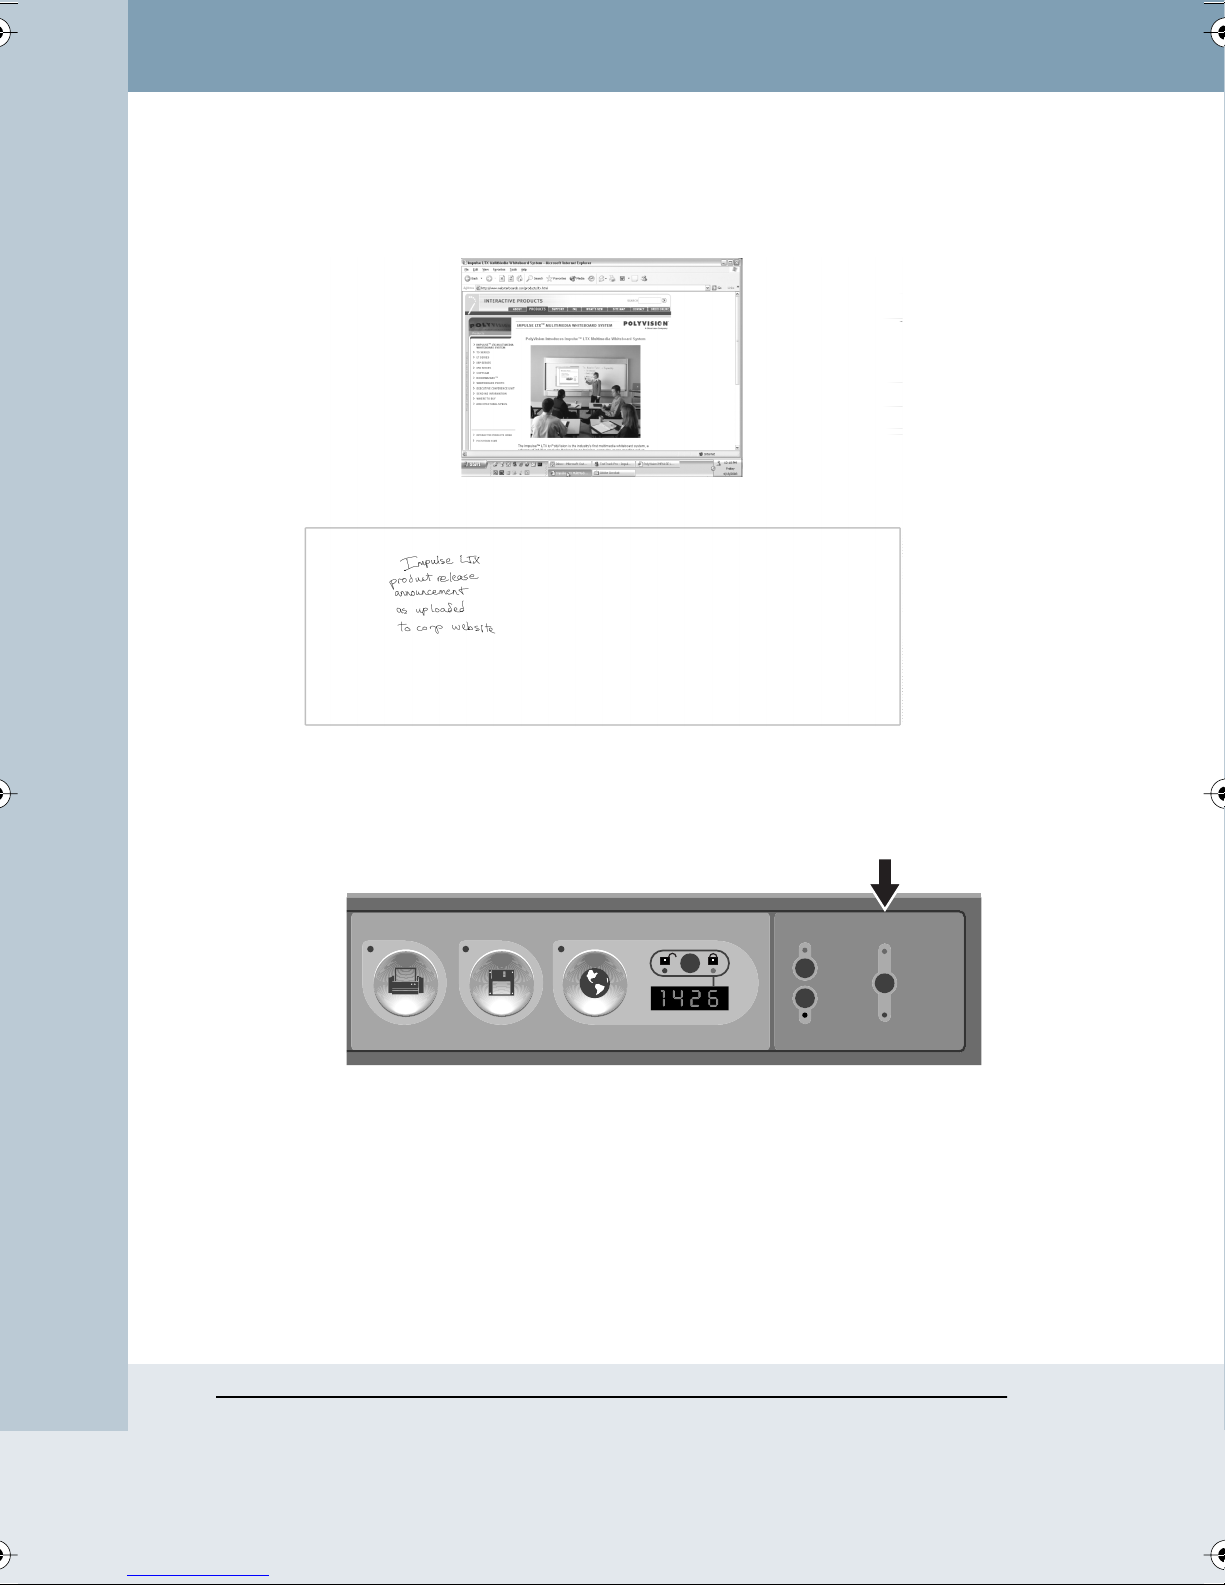
When you capture an image in Separate Mode, the projection and writing
on the board are saved together, but they are shown (or printed) separately.
To use Separate Mode:
• Press Writing and Projection on the control panel until the Separate
LED is on.
Quick Capture
Printer Disk Website / Archive
Password Protection
A
CCESS NUMBER
Projection
Archive
Laptop
Source Mode
Merged
Writing and
Projection
Separate
Merged Mode
In Merged Mode, the action of the stylus on the projected image is
absolute; the stylus and the cursor point at the same location. For example,
to click a button on the projected computer screen, touch the stylus to the
board where the image of the button appears. In addition, use the stylus
Impulse™ LTX Multimedia Whiteboard System
26 Impulse Whiteboard Operation
Page 29
note:NOTE:
outside the projected image to control the computer’s cursor from a
distance, as if using a mouse (relative pointing).
If you are using a Macintosh or Linux OS, Merged Mode is unavailable.
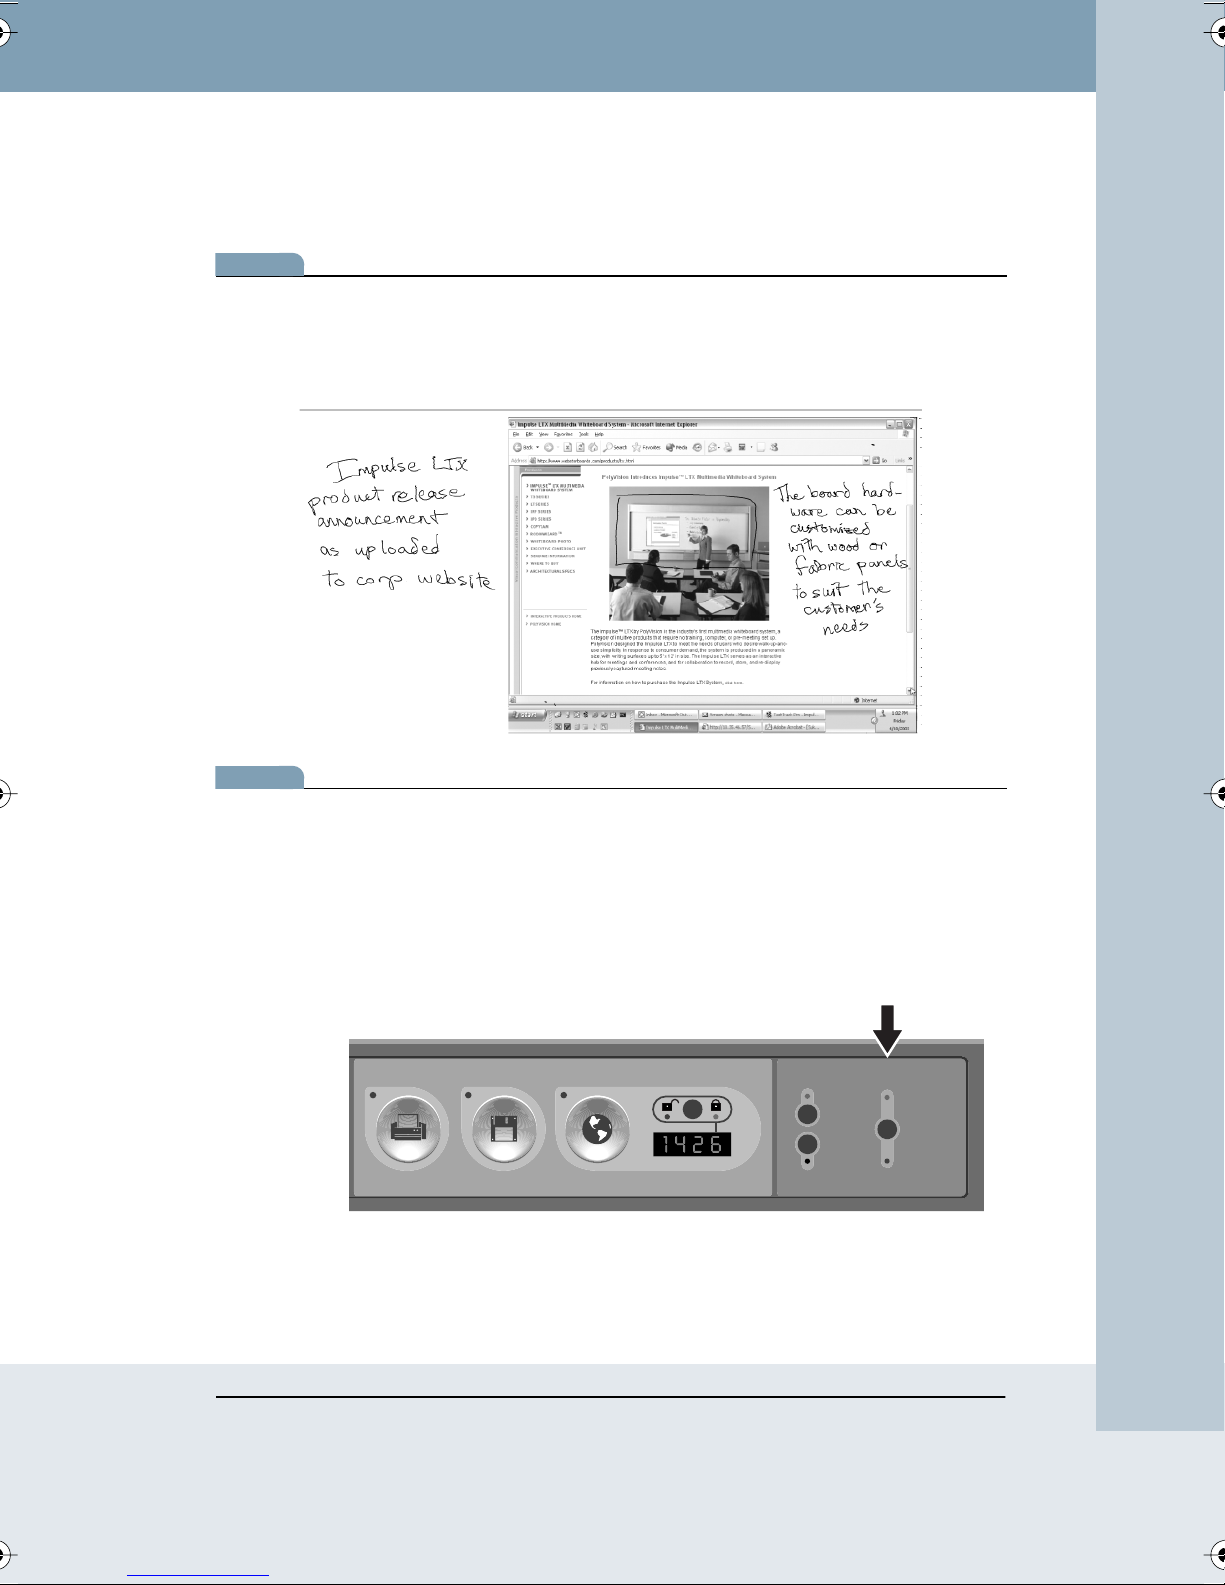
When you capture an image in Merged Mode, the projection and any
writing on the board are merged into one captured image.
note:NOTE:
If the mouse connection from your laptop to the Impulse system is PS/2,
the action of the stylus is relative, not absolute. Refer to “Merged and
Separate Mode Function Summary” on page 28.
To use Merged Mode:
1 Press Writing and Projection on the control panel until the Merged LED
is on.
Quick Capture
Printer Disk Website / Archive
Password Protection
A
CCESS NUMBER
Projection
Archive
Laptop
Source Mode
Merged
Writing and
Projection
Separate
Impulse™ LTX Multimedia Whiteboard System
Impulse Whiteboard Operation 27
Page 30
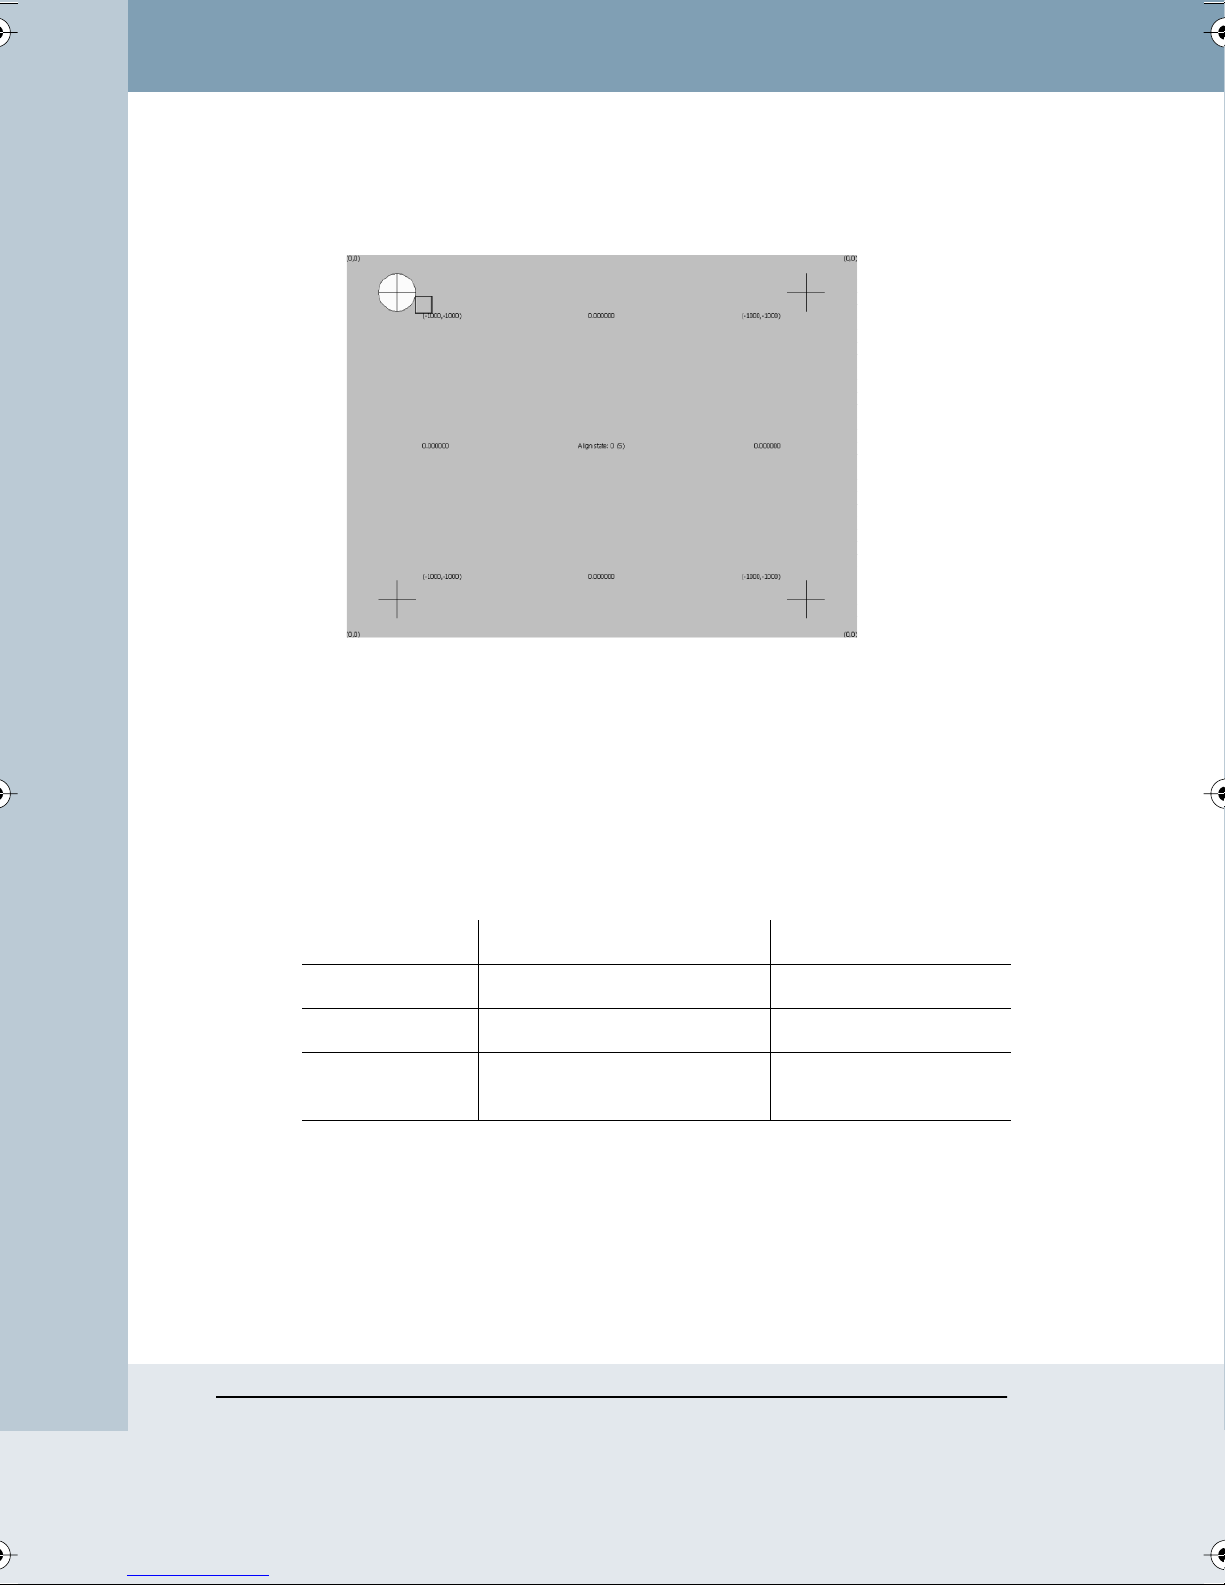
2 To use Merged Mode, projection alignment may be necessary. The
following display is projected on the board.
3 Using the stylus, touch the targets in order as prompted by
instructions on the board. The targets disappear when alignment is
complete. You are ready to project in Merged Mode.
Merged and Separate Mode Function Summary
The table below summarizes the relationship of Merged and Separate
Mode with your laptop mouse connection and the resulting captured
images.
MERGED MODE SEPARATE MODE
USB MOUSE Absolute and Relative pointing Relative pointing
PS/2 MOUSE Relative pointing Relative pointing
CAPTURED
IMAGE
Projection merged with writing Projection separate from
writing
Impulse™ LTX Multimedia Whiteboard System
28 Impulse Whiteboard Operation
Page 31
PASSWORD PROTECTING IMAGES
The Impulse system enables you to add password protection to images
that you capture using the Website/Archive button so that only people with
the password can access them.
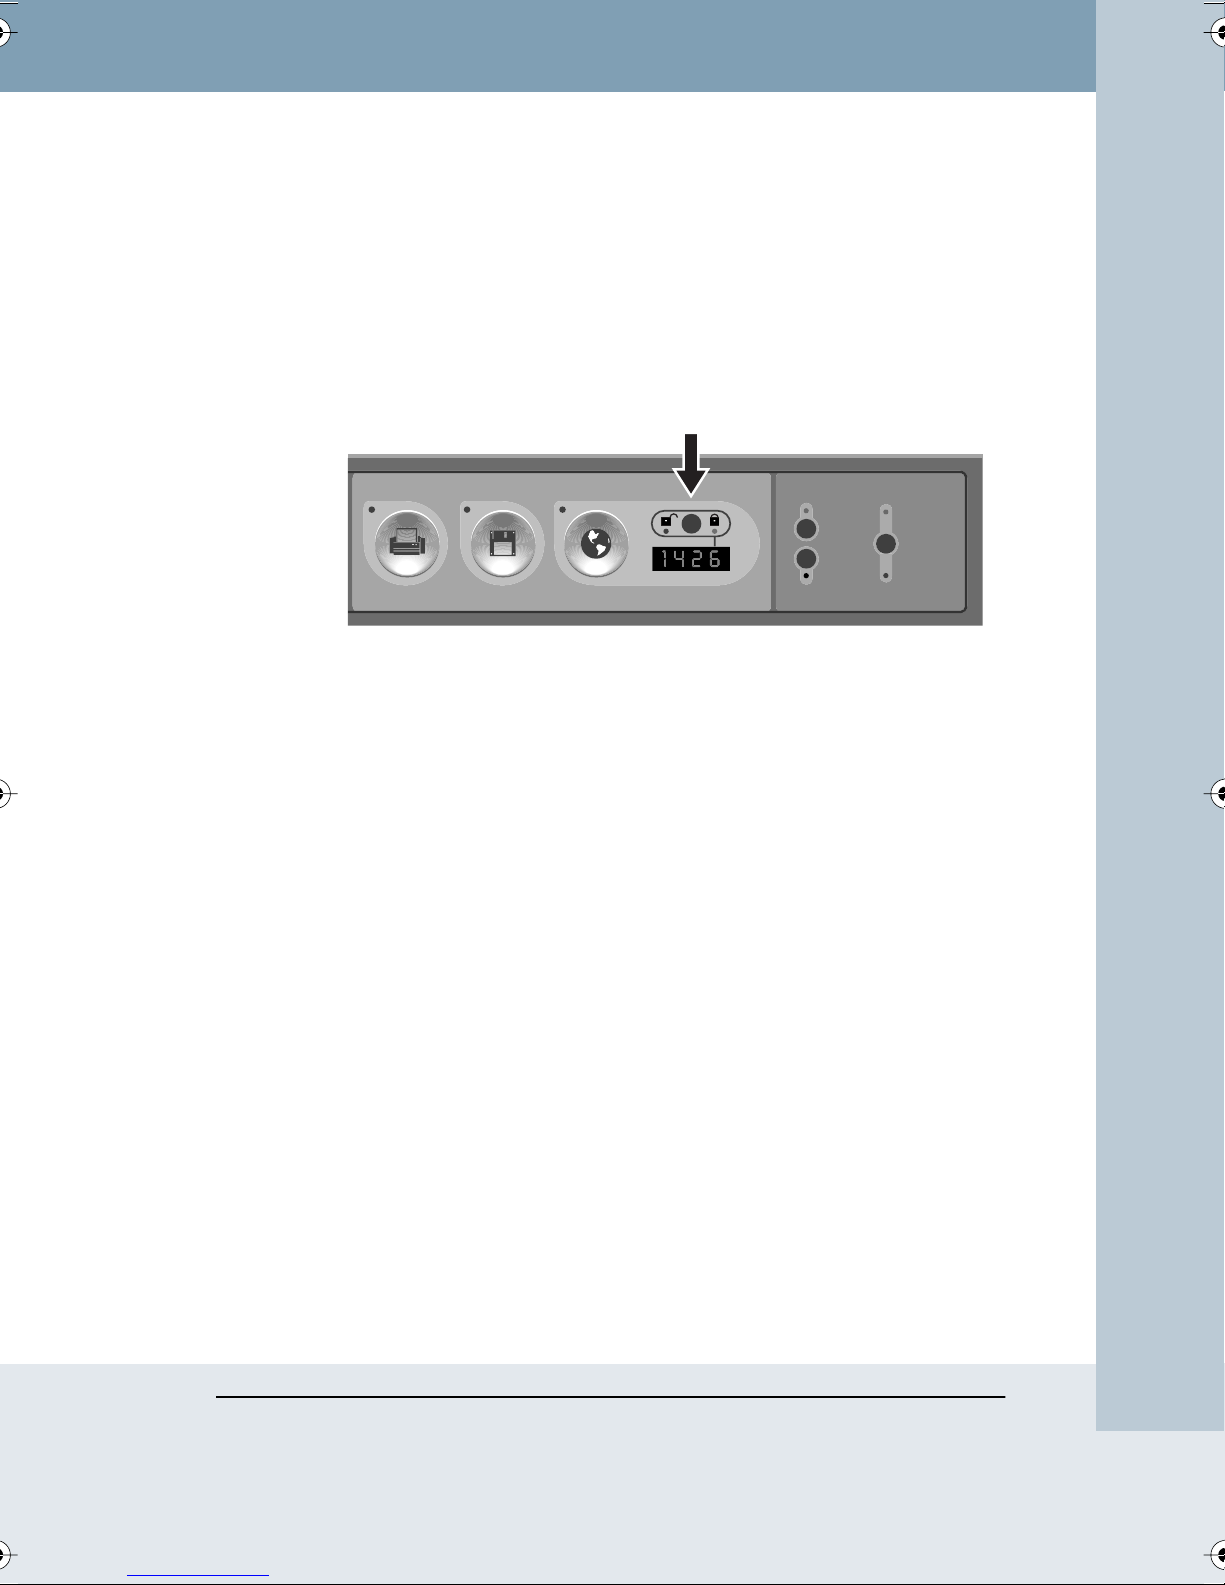
To protect (lock) images:
1 Press Password Protection on the control panel until the lock LED is
on. An Access Number appears.
Quick Capture
Printer Disk Website / Archive
Password Protection
A
CCESS NUMBER
Projection
Archive
Laptop
Source Mode
Merged
Writing and
Projection
Writing and
Projection
Separate
When the open-lock LED is on, images you capture using the
Website/Archive button are unlocked and accessible to anyone.
When the closed-lock LED is on and a four-digit number appears in
the Access Number display, images you capture using the Website/
Archive button are locked with a password. To view locked images on
the web page, you must first enter the access number.
2 To review your locked images from the board’s archive, connect a
projector and scroll through images using the on-screen display.
3 When you are finished capturing locked images, write down the four-
digit access number. You must enter this number to access your
locked images on the Impulse web server.
4 Press the Password Protection button until the open-lock LED is on.
This keeps others from viewing your locked images in the board’s
archive and hides your access number.
To view locked images, you can:
• review images from the board’s archive while the same four-digit
access number appears in the LED display, that is, before you press
the Password Protection button to hide the access number
• access the Impulse website from a computer connected to the same
LAN, identify your images based on the date and time they were
Impulse Whiteboard Operation 29
Impulse™ LTX Multimedia Whiteboard System
Page 32
note:NOTE:
captured, click the lock icon for your captured images, and enter the
four-digit access number
If you capture images that you don’t want others to view but have forgotten
to add password protection, you can delete them from the board’s archive
by deleting them from the website. Refer to “Deleting Images from the Web
Server” on page 36.
THE IMPULSE SYSTEM AUDIO AND VOLUME CONTROL
To relay audio from your computer through the Impulse speakers:
• Connect the Impulse laptop cable’s 1/8" audio connector to your
laptop’s “line-out” or headphone jack.
To control volume:
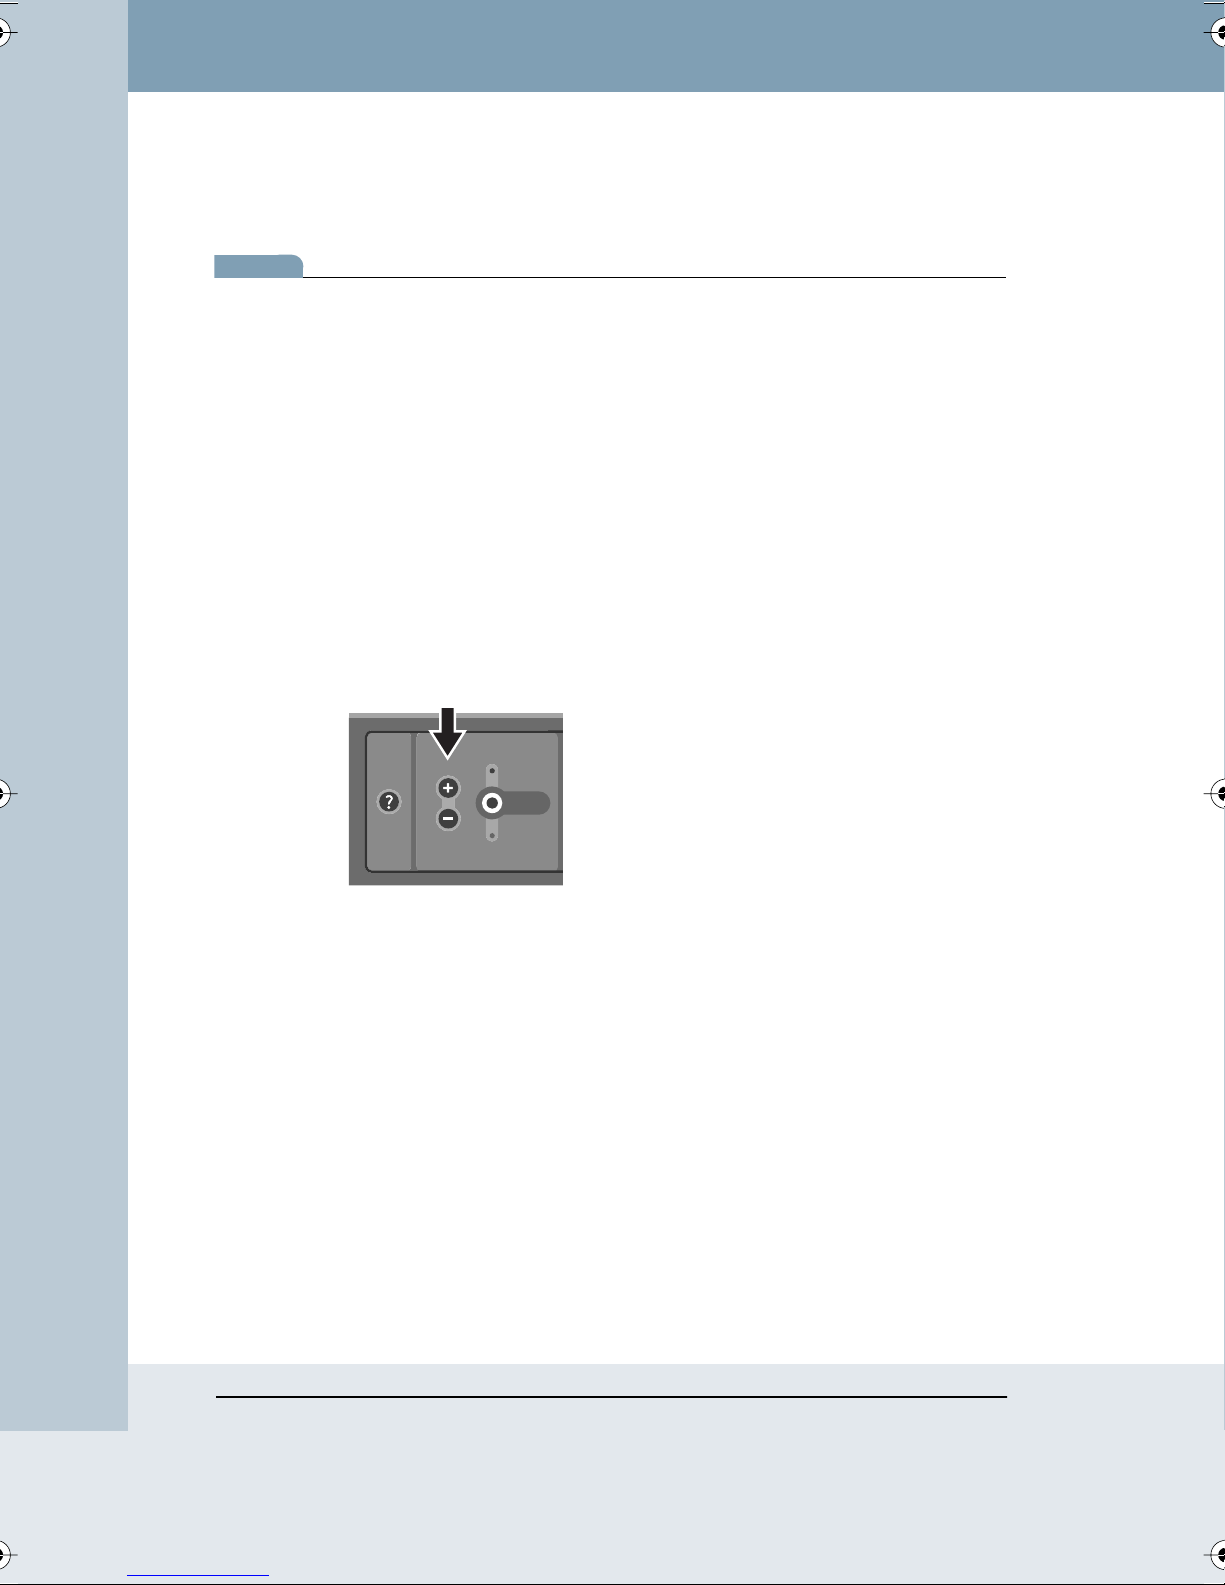
• Press the plus or minus Volume button on the control panel.
WhiteboardHelp
Ready
Start
In Use
Volume Memory
The volume buttons also control the volume of help and error messages.
Impulse™ LTX Multimedia Whiteboard System
30 Impulse Whiteboard Operation
Page 33

THE IMPULSE WEB SERVER
ACCESSING YOUR IMPULSE WEB SERVER
Each Impulse board has a unique web address that appears inside the left
door on an instruction label. (If the web address is not written there,
contact your IT administrator.)
To view captured images on the web server:
1 Write down the Impulse web address found inside the left door.
2 Turn on a computer that shares the same LAN as the Impulse system.
3 Run a web browser application such as Internet Explorer or Netscape
Navigator.
4 Enter the web address in the “Address” field and press Enter.
The Impulse website opens.
note:NOTE:
If your Impulse has a host name, you can add the Impulse website to your
Favorites or create a shortcut. (In most browsers, you can drag the
address to a “Links” area, and it will create a shortcut for you.)
The Impulse Web Server 31
Impulse™ LTX Multimedia Whiteboard System
Page 34

USING THE IMAGES SECTION
On the Impulse website, the “Images” section enables you to view and
work with images that you captured from the board by pressing the
Website/Archive button.
To view captured images:
1 Locate your images based on the date and time they were captured.
You can choose from either “Calendar View” or “List View” (on the left)
to identify your images.
note:NOTE:
If you need to correct the board’s date and time, refer to “The Admin Date/
Time Subsection” on page 41.
Impulse™ LTX Multimedia Whiteboard System
32 The Impulse Web Server
Page 35

2 In calendar view, click a calendar date and block of time to identify
your images.
Miniature, “thumbnail” copies of your images appear labeled with the
date and time they were captured.
3 To view the corresponding full-size image, click a thumbnail, or click a
check in the box by one or more images and click “download
selected.” The full-size images are Adobe Acrobat PDF files and
Adobe Acrobat Reader (or equivalent) is required to view them.
If an image is password protected, the thumbnail image is replaced by a
folder with a lock icon. Refer to “Viewing Password Protected Images on
the Website” on page 34.
Working With Images on the Website
The images on the website are stored as Adobe Acrobat PDF files which
can easily be printed or sent in e-mail. If an image on the web will be
valuable in the future, preserve it by:
• saving it to your computer’s hard disk, or
• printing it from Adobe Acrobat Reader
The Impulse Web Server 33
Impulse™ LTX Multimedia Whiteboard System
Page 36

note:NOTE:
When the web server becomes full, the oldest images disappear as new
ones are added. Images will be replaced unless they are saved to the
computer’s hard disk.
To save a copy to your computer’s hard disk:
1 Click a thumbnail to view the full-size image in Adobe Acrobat Reader.
2 Click the Save icon (which looks like a diskette) on the Adobe Acrobat
Reader toolbar.
3 Browse to the location on your hard disk where you want to save the
file.
4 Click “Save.”
You can print a copy from the website. To print a copy with your default
printer:
1 Click a thumbnail to view the full-size image in Adobe Acrobat Reader.
2 Click the print icon in the Adobe Acrobat toolbar or choose “Print”
from the File menu and click “OK.” The copy will print on the default
printer for that computer.
Viewing Password Protected Images on the Website
When you use the Website/Archive button, the Impulse system enables
you to add password protection to captured images. In the Impulse
website “Images” section, password protected images appear as folders
with lock icons. Images inside each folder have the same access number.
note:NOTE:
If you capture images that you don’t want others to view but have forgotten
to add password protection, you can remove them from the board’s
website and archive by deleting them from the website. Refer to “Deleting
Images from the Web Server” on page 36.
Impulse™ LTX Multimedia Whiteboard System
34 The Impulse Web Server
Page 37
To view locked images:
1 Click the lock icon. The password prompt appears.
2 Enter the four-digit access number that appeared in the control panel
display while you captured the images.
3 Click “Login.”
4 The website displays thumbnails of your locked images.
5 Click a thumbnail to view the full-size image in Adobe Acrobat Reader.
6 While the locked images are displayed in Adobe Acrobat, you can
print, save to disk, or delete them.
Impulse™ LTX Multimedia Whiteboard System
The Impulse Web Server 35
Page 38
Deleting Images from the Web Server
To delete an image from the website and archive:
1 Check the box below the thumbnail of the image or images you want
to delete.
2 Click “delete selected.”
Impulse™ LTX Multimedia Whiteboard System
36 The Impulse Web Server
Page 39

USING THE ADMIN SECTION
The web server “Admin” section enables you to view and change important
Impulse web settings.
The “Admin” section is password protected. To enter the “Admin” section:
1 Click the “Admin” tab. A password dialog appears.
2 Enter a user name and password. The factory default user name and
password are both “admin.” To change the password, refer to “The
Admin Password Subsection” on page 42.
The “Admin” subsections are presented below.
The Impulse Web Server 37
Impulse™ LTX Multimedia Whiteboard System
Page 40

The Admin Network Subsection
Host Name: Enter a name for the website associated with this Impulse
board. This name can be entered as an alternate to the numerical IP
address in the browser’s “Address” line when you want to go to this
Impulse board’s website. (Host Name requires a local DNS Server. If you do
not have one on your network, you may need to use the numerical IP
address to access the web site instead of using a host name.) The host
name cannot contain any spaces or special punctuation such as periods,
commas, or slashes.
Use DHCP to get these: Check this box if your LAN uses DHCP protocol.
Remove the check mark if your LAN uses fixed IP addressing. Consult your
system administrator if you are unsure. Fixed IP addressing is often
preferred, since the IP address of the board may occasionally change if
DHCP is used.
IP Address: During configuration, the Impulse web server IP address is
determined automatically by DHCP, or you may assign it here manually if
the “Use DHCP” check box is not checked.
Impulse™ LTX Multimedia Whiteboard System
38 The Impulse Web Server
Page 41

Subnet Mask: This network reference is determined automatically by
DHCP, or you may assign it manually here if the “Use DHCP” check box is
not checked.
Default Gateway: The Impulse system uses this gateway address only
when you update firmware over the Internet. It is determined automatically
through DHCP, or you may assign it manually here if the “Use DHCP”
check box is not checked.
DNS: Enter the address of the local DNS server. It is determined
automatically through DHCP, or you may assign it manually here if the “Use
DHCP” check box is not checked.
Domain name: Enter the domain name of the network which includes the
Impulse system. It is determined automatically through DHCP, or you may
assign it manually here if the “Use DHCP” check box is not checked.
Hostname registration [X] Use DNS server. (Reboot to take effect):
To register the host name with the DNS server and reboot the Impulse
system, check this box and click “Save Changes.”
Print through: The Impulse system comes with its own color printer. The
factory default printer includes a network print server adapter with an
Ethernet connector for plugging into the same LAN as the Impulse system,
although Bluetooth wireless color printing is also supported. You can also
print to any PCL-4 compatible printer connected directly to your network.
Bluetooth printer channel: This field displays the Bluetooth device
address of the optional wireless color printer for this board. If you need to
change the wireless color printer:
1 Find your printer’s Bluetooth device address. Consult the
documentation for your printer or adapter for instructions on obtaining
this information.
2 Enter the Bluetooth device address in the “Bluetooth Printer Channel”
field.
3 Click “Save changes.”
Network printer address: To print to a networked printer, enter the
networked printer IP address in this field. If you need to change printers:
1 Find your network printer’s IP address. Some printer network adapters
(including the one provided with the Impulse board) require you to load
the adapter configuration software on a Windows PC and obtain the
address from there.
Impulse™ LTX Multimedia Whiteboard System
The Impulse Web Server 39
Page 42

2 Enter the network printer’s IP address in the “Network Printer Address”
field.
3 Click “Save changes” to save the change.
RoomWizard address: If you enter the host name or IP address of a
RoomWizard, then whenever you capture password protected images, the
Impulse system names the protected files with the meeting name from the
RoomWizard, rather than with the date and time as usual.
Projector Style: Choose the projector configuration used for this board.
The Impulse system can be installed with a projector permanently wired to
the board. Alternatively, you can connect a portable projector using cables
provided in the bins beneath the board. Click “None” to disable projection
for this board. If the projector is permanently mounted, the Impulse system
does not prompt for projector alignment each time you enter Merged
Projection Mode. If the projector is portable, the Impulse system prompts
each time you enter Merged Projection Mode, in case the projector has
been moved.
Click “Save changes” to implement any changes.
Impulse™ LTX Multimedia Whiteboard System
40 The Impulse Web Server
Page 43

The Admin Date/Time Subsection
Set the correct date, time and time zone. When you capture an image of
the board to the website/archive, the file name is based on the date and
time it was captured.
Click “Save Settings” to implement any changes.
Impulse™ LTX Multimedia Whiteboard System
The Impulse Web Server 41
Page 44
The Admin Password Subsection
The admin section is password protected. The factory default password is
“admin.”
Status: If the password is changed, the status is shown here.
To change the administration password:
1 Enter the new password.
2 Enter it again to confirm.
3 Click “Submit changes.”
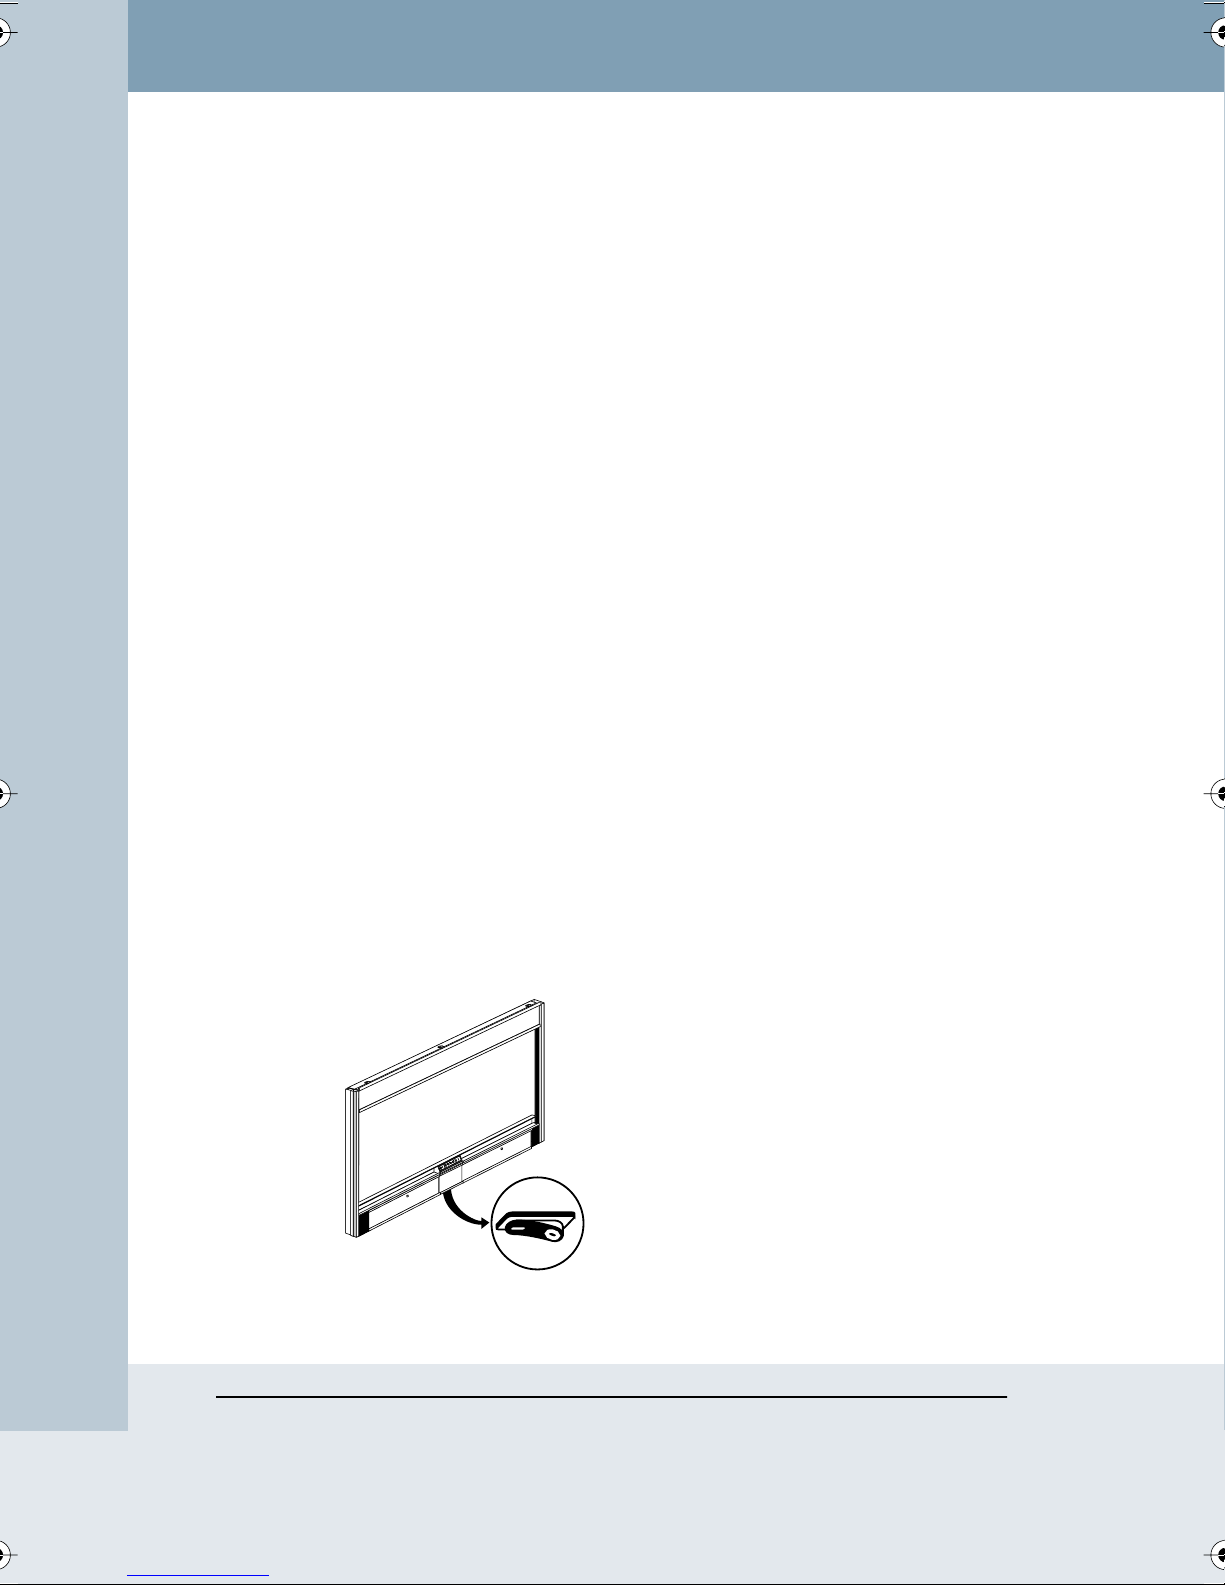
4 Reboot the Impulse system by cycling the power switch located
beneath the center control panel.
Impulse™ LTX Multimedia Whiteboard System
42 The Impulse Web Server
Page 45

The Admin Images Subsection
To delete all images, whether password protected or not, from the web
page and whiteboard archive, click “Delete all images.”
The Impulse Web Server 43
Impulse™ LTX Multimedia Whiteboard System
Page 46

The Admin Update Subsection
Update Status: Registered users receive information about free firmware
updates from PolyVision. This message indicates the status of the update
currently under way.
Update file: To update Impulse firmware:
1 On a computer with Internet access sharing the same LAN as your
Impulse board, enter the path to the PolyVision firmware update file, or
click ”Browse” to locate a firmware update file.
2 Click “Upload.” Files are automatically unzipped and loaded into the
Impulse system internal memory. After the update files are loaded onto
the Impulse system, a message appears indicating that you are ready
for the next step.
WARNING
Do not disconnect the power while the Impulse firmware is updating.
Permanent damage may result.
3 Click “Reboot Whiteboard.”
4 After the update is complete, click the browser’s “Back” button to
return to the Impulse web page. (Do NOT click the browser’s “Refresh”
button, as this will initiate the upgrade again.
5 Repeat for any additional update files sent by PolyVision.
Impulse™ LTX Multimedia Whiteboard System
44 The Impulse Web Server
Page 47

The Admin Install Subsection
For use only by those who install the Impulse system.
The Impulse Web Server 45
Impulse™ LTX Multimedia Whiteboard System
Page 48

USING THE INFO SECTION
The web server “Info” section provides a summary of information about the
Impulse system. Print this page for a record of the board’s settings.
Serial Number: The serial number that uniquely identifies your Impulse
board.
Network Host Name: The host name, entered from the “Admin Network”
subsection, associated with this Impulse system.
Network IP Address: The IP address, entered from the “Admin Network”
subsection, associated with this Impulse system.
Printer Bluetooth Address: Address of the associated Bluetooth printer.
Software Service Pack: The version number of the master firmware is
listed here.
Software Website Version: The version number of the web application is
listed here.
Software Detailed Version Info: The Impulse system operates with a
series of firmware modules. The version number of each module is listed
when you click here.
Status WhiteBoard Activity: Indicates the date and time of the last
whiteboard activity.
Impulse™ LTX Multimedia Whiteboard System
Status Pen Tracking Systems: Indicates if the pen status.
46 The Impulse Web Server
Page 49

THE IMPULSE SYSTEM MAINTENANCE
CLEANING THE BOARD
Wipe the control panel with a soft damp cloth.
To clean the ceramicsteel marker board surface, see instructions below or
refer to www.cleanmyboard.com.
Daily Care and Maintenance
1 For the initial cleaning, wipe your board with a clean cloth moistened
by a liquid cleanser.
2 Rinse with clear water. This step is simple but very important.
note:NOTE:
Do not let water seep into the sensitive Impulse electronics. Your warranty
does not cover damage caused by water.
3 Wipe dry with a clean cloth.
4 If your board is used daily, the cleaning should be performed at least 2
to 3 times a week. More thorough cleaning may be required if writing is
left on the board for more than 2 days.
Removing Crayon and Tape
The same procedure is used to remove both crayon and tape.
1 Dampen a clean, dry cloth with water.
2 Sprinkle a small amount of non-abrasive cleaner, such as Scrub Soft,
onto the cloth.
3 Begin cleaning a small, manageable area using a back and forth
horizontal motion. Use normal pressure as if you were cleaning a
window.
4 Wipe off all residue with a dry cloth.
5 Rinse well with clear water. Please note that the rinsing and drying
steps are very important.
6 Wipe dry with a clean cloth.
The Impulse System Maintenance 47
Impulse™ LTX Multimedia Whiteboard System
Page 50

WARNING
note:NOTE:
7 Follow the same procedure for the remainder of the board.
•
Although most harsh cleansers won’t damage the whiteboard
surface, they can scratch the Impulse enclosure. Be sure to keep
cleansers on the whiteboard surface.
• Do not let water seep into the sensitive Impulse electronics. Your
warranty does not cover damage caused by water.
Removing Permanent Marker
Permanent marker should not be used on your Impulse board, but if it is by
accident, use the following steps to clean it from the board.
1 Moisten a clean, dry cloth with isopropyl alcohol.
2 Wipe the board in a circular motion to loosen marker residue.
3 Rinse with clear water.
Do not let water seep into the sensitive Impulse electronics. Your warranty
does not cover damage caused by water.
4 Dry the board with a clean cloth.
5 Repeat these steps as often as necessary to remove all residue.
Impulse™ LTX Multimedia Whiteboard System
48 The Impulse System Maintenance
Page 51

WEBSITE MAINTENANCE
Regularly save and delete image files as needed to prevent them from
being overwritten.
PRINTER MAINTENANCE
Refer to the printer manual for maintenance information. (Printer manuals
are also available on-line at the manufacturer’s website.)
HOW TO OBTAIN REPLACEMENT PARTS
Replacement parts are available directly from PolyVision. Call 1-800-620POLY (7659) in the USA, 770-447-5043 from elsewhere in North America,
or +32 (0)89 32 31 30 in Europe. Or, send e-mail to [email protected].
The Impulse System Maintenance 49
Impulse™ LTX Multimedia Whiteboard System
Page 52

TROUBLESHOOTING
ISSUE RESOLUTION
When the Printer button is
pressed, the Impulse voice
prompt says “printer
problem.”
The optional Bluetooth
wireless printer sometimes
stops in the middle of a
printout.
• Confirm that the printer is powered on and
loaded with ink and paper.
• The Impulse system may be unable to find your
printer. For Ethernet network printers, make
sure the Ethernet network print server adapter
is plugged in to the printer and has power. For
Bluetooth wireless printers, move the printer
closer to the Impulse board.
• Verify that the proper IP address (for network
printers0 or Bluetooth address (for Bluetooth
printers) is entered on the board’s admin
section. Refer to “The Admin Network
Subsection” on page 38.
• For Ethernet network printers, make sure the
network print server adapter has not
overheated. Unplug the adapter and then plug
it in again. Remove any paper or other material
that may be restricting ventilation. Lower the
temperature in the surrounding environment.
• For Bluetooth wireless printers, check for
interfering devices, such as microwave ovens,
wireless telephones, and other network devices
operating at 2.4 GHz.
• The printer may be too far away. Move the
printer closer to the Impulse board.
• Check for interfering devices, such as
microwave ovens, wireless telephones, and
other network devices operating at 2.4 GHz.
An image access number has
been lost or forgotten.
Impulse™ LTX Multimedia Whiteboard System
50 Troubleshooting
If an image access number is lost or forgotten,
protected (locked) images remain on the website
until they are replaced by newer images.
Page 53
WARNING
LASER SAFETY
Do not attempt to open the laser unit housings that are located under the
header cover, as laser energy up to 5mW at 780 nm and up to 7 mW at
650 nm may be accessible inside.
The Class II warning shown below appears on the inside header cover and
applies to the red beam used during alignment of the lasers. Do not
attempt to stare directly into that beam.
CAUTION!
LASER RADIATION WHEN OPEN
DO NOT LOOK INTO BEAM
The Class IIIB warning shown below appears on each laser unit cover and
applies only to the laser energy present inside the laser unit. The Class IIIB
energy is not accessible unless the cover of the laser unit housing is
opened, which is unnecessary for any procedure and should not be
attempted.
WARNING
CAUTION!
CLASS 3B VISIBLE AND INVISIBLE
LASER RADIATION WHEN OPEN
AVOID EXPOSURE TO THE BEAM
Caution: use of controls or adjustments or performance of procedures
other than those specified herein may result in hazardous radiation
exposure.
Impulse™ LTX Multimedia Whiteboard System
Troubleshooting 51
Page 54
LED AND STATUS MESSAGES
The Impulse system gives you both LED and audible feedback to indicate
the status of your capture.
LED Status Indicators
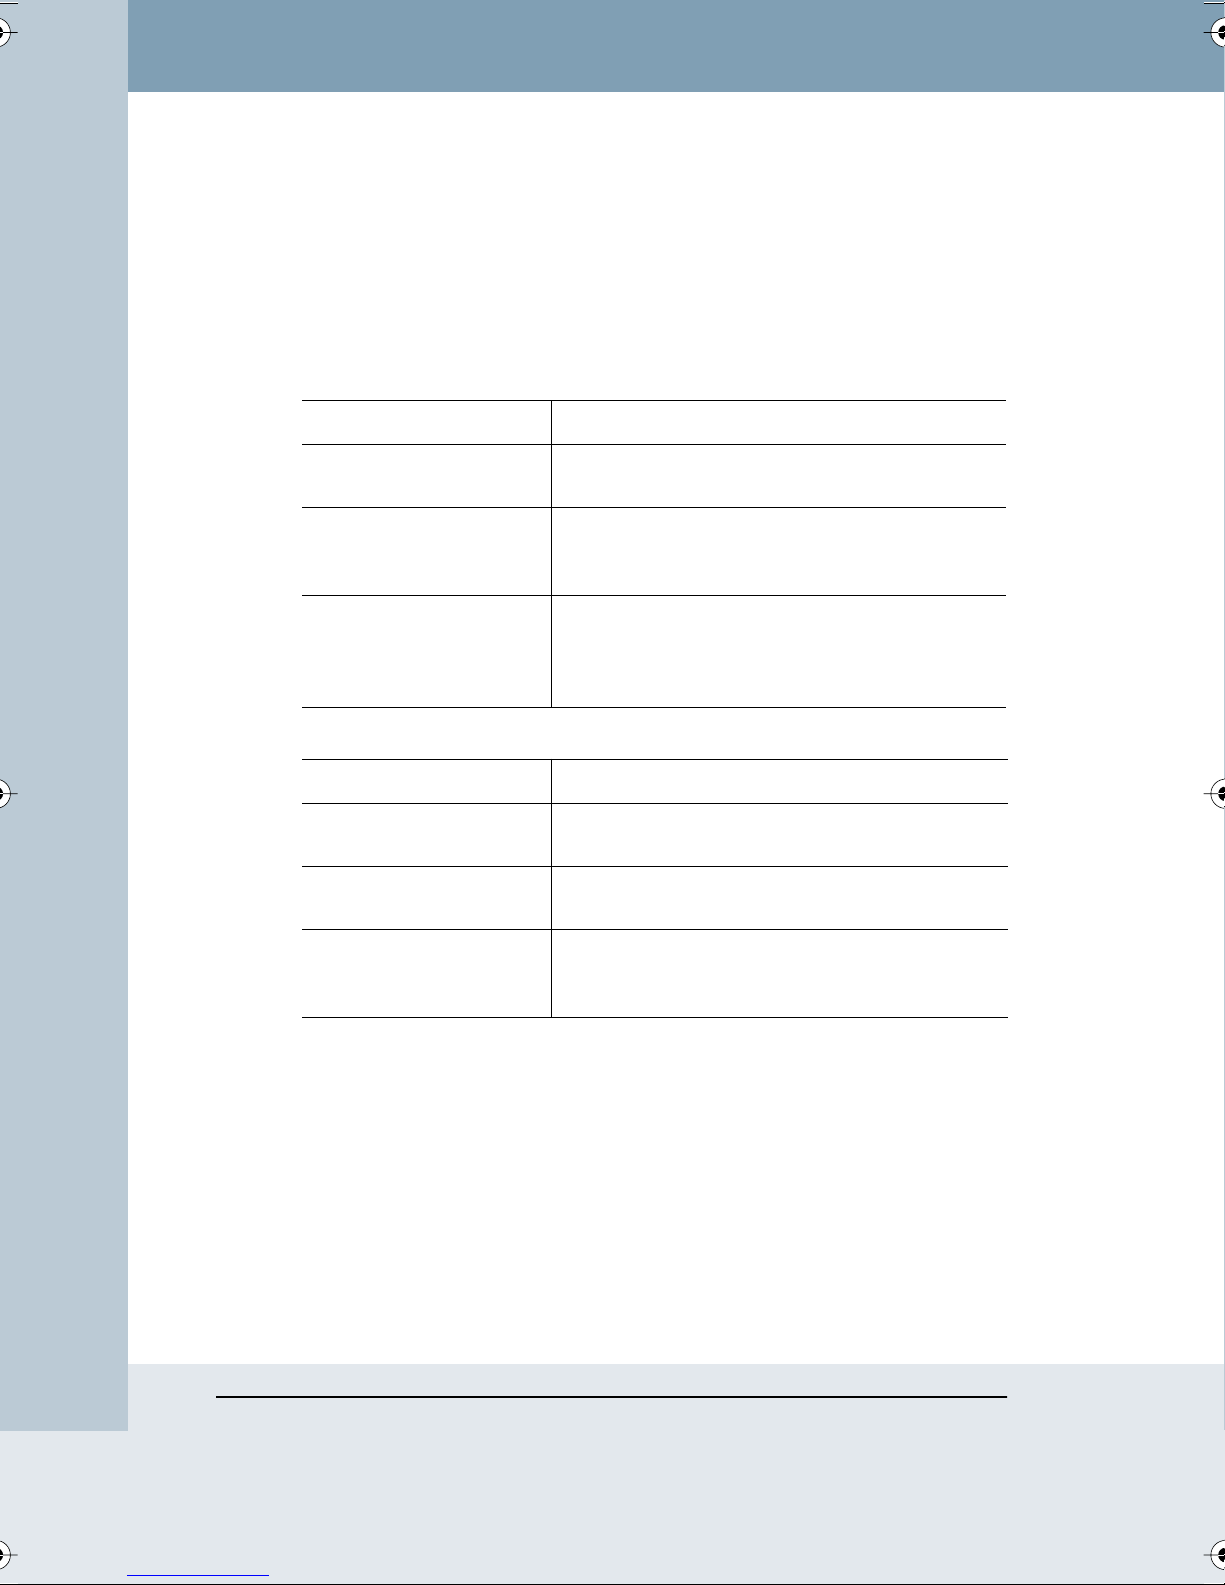
The table below explains the LED status indicator for the Printer button.
LED INDICATOR SYSTEM STATUS
Blinking green Copy is being printed. You may continue writing on
the board.
Blinking yellow No printer has been configured. (The voice prompt
provides additional information.) Refer to “The
Admin Network Subsection” on page 38.
Blinking red There is a printing error. The printer may be out of
paper, not powered on, or other attention is
required. (The voice prompt provides additional
information.)
The table below explains the LED status indicator for the Disk button.
LED INDICATOR SYSTEM STATUS
Blinking green Copy is being saved. You may continue writing on
the board.
Blinking yellow No diskette in the floppy drive. (The voice prompt
provides additional information.)
Blinking red There is a problem with the diskette, or the diskette
is full. (The voice prompt provides additional
information.)
Impulse™ LTX Multimedia Whiteboard System
52 Troubleshooting
Page 55
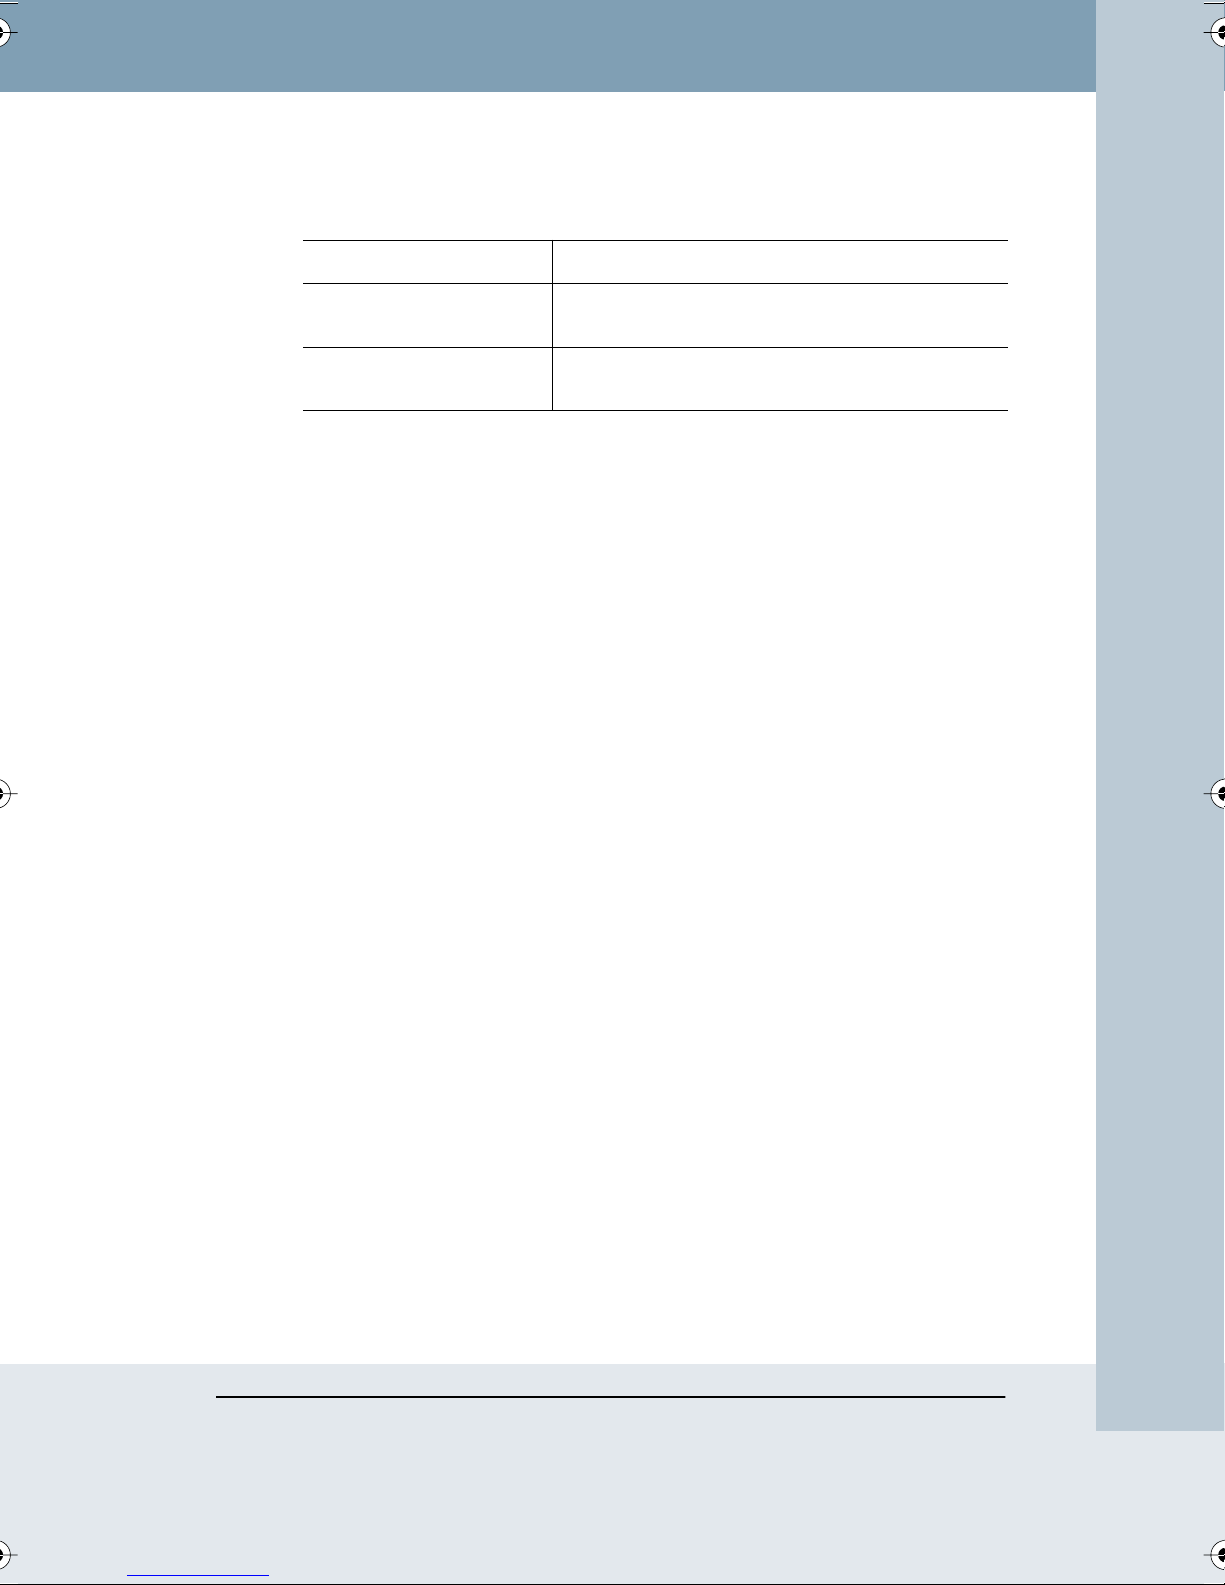
The table below explains the LED status indicator for the Website/Archive
button.
LED INDICATOR SYSTEM STATUS
Blinking green Copy is being saved. You may continue writing on
the board.
Blinking red There is an internal error saving to the website/
archive. Contact PolyVision technical support.
TECHNICAL SUPPORT
If reviewing the above sections fails to resolve your hardware or software
problem, contact PolyVision USA Technical Support:
• Phone: 800-620-POLY (7659)
Technical support representatives are available Monday through Friday from 8 AM Eastern time to 5 PM Pacific time.
• E-mail: [email protected]
• Internet: www.polyvision.com
Or, outside the USA, contact PolyVision Europe/Asia Technical Support:
• Phone: +32 (0)89 32 31 30
• Fax: +32 (0)89 32 31 31
• E-mail: [email protected]
• Internet: www.polyvision.com
Impulse™ LTX Multimedia Whiteboard System
Troubleshooting 53
Page 56

COMPLIANCE
FCC COMPLIANCE
The Bluetooth Radio used in this product has been authorized as a mobile
device. While powered on, users and nearby persons are cautioned to
maintain at least a 20 cm (8 inch) distance from the antenna.
This equipment has been tested and found to comply with the limits for a
Class A digital device, pursuant to Part 15 of the FCC Rules. These limits
are designed to provide reasonable protection against harmful interference
when the equipment is operated in a commercial environment. This
equipment generates, uses, and can radiate radio frequency energy and, if
not installed and used in accordance with the instruction manual, may
cause harmful interference to radio communications. Operation of this
equipment in a residential area is likely to cause harmful interference in
which case the user will be required to correct the interference at his own
expense. Changes or modifications not expressly approved by the party
responsible for compliance could void the user’s authority to operate the
equipment.
IEC LASER PRODUCT
CLASS 1 LASER PRODUCT
PER
IEC 60825-1:1993+A1:1997+A2:2001
EN 60825-1:1994_A11:1996+A2:2001
Impulse™ LTX Multimedia Whiteboard System
54 Compliance
Page 57

WARRANTY
What is Covered
PolyVision Corporation warrants to the original consumer or other end-user
purchaser that this product is free from defects in material and workmanship for a
period of two years (one year for the printer) from the date of purchase. PolyVision
Corporation further warrants for the lifetime of the original installation under normal
conditions of use, that the porcelain enamel finish writing surface, shall not exhibit
excessive fading of color, crazing, cracking or flaking.
During the warranty period, and upon proof of purchase, the product will be repaired
or replaced (with the same or similar model) at our option, without charge for either
parts or factory labor. Shipping costs will apply. Please keep your original sales
receipt or invoice for proof of purchase. Without proof of the purchase date, your
warranty will be defined as beginning on the date of manufacture, which is recorded
by serial number at the factory. This warranty applies only to the first end-user
purchaser and only when the product is used in a country for which it is labeled for
sale. Some factory-reconditioned parts may be used in the assembly of this product.
This warranty includes all minor software upgrades (software bug fixes) that are
released during the warranty period for this product. In order to receive software
upgrades, the product must have an Ethernet connection to the Internet and
appropriate network gateways to allow outbound FTP access. Software upgrades
must be initiated from a web browser connected to the product’s web site by the
end-user. Software upgrades cannot be performed remotely.
What is Not Covered
Any product that is sold or used outside of North America unless the product
1
was specifically labeled for sale in that country.
2 Any product on which the serial number has been defaced, modified, or
removed.
3 Damage, deterioration, or malfunction resulting from, but not limited to:
• Accident, misuse, abuse, neglect, fire, water, lightning or other acts of
nature, unauthorized product modification, or failure to follow instructions
supplied with the product.
• Use of unintended writing implements such as (but not limited to) ballpoint
pens, pencils, fountain pens, or non-dry-erase markers.
• Use of non-approved cleaning materials or solvents.
• Repair or attempted repair by anyone not authorized by PolyVision.
• Any damage incurred in shipping.
• Removal or installation of the product.
Warranty 55
Impulse™ LTX Multimedia Whiteboard System
Page 58

• Any other cause that does not relate to a product defect.
4 Cartons, carrying cases, pens, external cabinets, or any accessories used in
connection with the product.
5 On-site labor, including removal and/or installation
6 Shipping charges to and from our factory, dealer, or authorized repair depot.
7 Major software upgrades that include new product features.
How to Get Warranty Service
If you experience a problem with this product, contact PolyVision Technical Support
(1-800-620-POLY (or 770-447-5043) in North America, or +32 (0)89 32 31 30 in
Europe) to resolve the problem. Support is available during normal business hours. A
response is guaranteed within 24 hours of contact. If the product is diagnosed as
being defective, you may be asked to ship defective parts directly to PolyVision in
exchange for new parts. If you are directed to return parts directly to PolyVision, you
must obtain a Return Materials Authorization (RMA) number from PolyVision. All
parts returned to PolyVision must have an RMA number assigned, regardless of
reason for return. The RMA number must be clearly marked on the outside of the
shipping carton; any unit without an RMA number will be returned to the sender. In
North America, please call
1-800-620-POLY (or 770-447-5043).
Outside North America, please call +32 (0)89 32 31 30 o obtain an RMA number.
Limitation of Damages and Implied Warranties
POLYVISION WARRANTS THAT THE PRODUCT WILL OPERATE SUBSTANTIALLY
IN CONFORMITY TO THE POLYVISION DOCUMENTATION AND PUBLISHED
SPECIFICATIONS FOR A PERIOD OF TWO YEARS AFTER CONSUMER
PURCHASE, PROVIDED IT IS USED IN ACCORDANCE WITH POLYVISION’S USER
INSTRUCTIONS. POLYVISION’S SOLE AND EXCLUSIVE LIABILITY, AND YOUR
EXCLUSIVE REMEDY, FOR ANY BREACH OF THIS WARRANTY IS THAT, IF THE
BREACH IS REPORTED TO POLYVISION IN WRITING WITHIN THE TWO-YEAR
WARRANTY PERIOD, POLYVISION WILL CORRECT THE NONCONFORMITY,
EITHER BY CORRECTING THE PRODUCT OR (WHERE APPROPRIATE)
DOCUMENTATION; REPLACING THE PRODUCT; OR, WHERE POLYVISION
DETERMINES THAT CORRECTION OR REPLACEMENT IS NOT FEASIBLE,
REFUNDING THE FEE ACTUALLY PAID FOR THE PRODUCT. NO OTHER REMEDY
SHALL BE AVAILABLE TO YOU. EXCEPT AS EXPRESSLY SET FORTH HEREIN,
POLYVISION MAKES NO WARRANTY OF ANY KIND, EXPRESSED OR IMPLIED.
POLYVISION DISCLAIMS ANY IMPLIED WARRANTY OF MERCHANTABILITY OR
FITNESS FOR A PARTICULAR PURPOSE. POLYVISION SHALL HAVE NO
LIABILITY BEYOND THE OBLIGATIONS SET FORTH ABOVE. IN NO EVENT SHALL
POLYVISION BE LIABLE FOR ANY INDIRECT DAMAGES, WHETHER INCIDENTAL,
CONSEQUENTIAL, OR OTHERWISE (AND EXPRESSLY INCLUDING LOST
PROFITS AND LOSS OF DATA) OR FOR ANY DAMAGES IN EXCESS OF THE
Impulse™ LTX Multimedia Whiteboard System
56 Warranty
Page 59

PURCHASE PRICE OF THIS PRODUCT UNDER THIS OR RELATED
AGREEMENTS, WHICH DAMAGES ARISE OUT OF THE USE OF THE HARDWARE,
IRRESPECTIVE OF WHETHER POLYVISION SHALL HAVE BEEN INFORMED OF
THE POSSIBILITY OF SUCH DAMAGES AND IRRESPECTIVE OF THE CAUSE OF
DAMAGE, INCLUDING NEGLIGENCE. SOME STATES OR COUNTRIES RESTRICT
THE RIGHT TO EXCLUDE CERTAIN WARRANTIES, THEREFORE, THE ABOVE
EXCLUSIONS MAY NOT APPLY TO YOU.
How State Law Relates to the Warranty
In the USA, this warranty gives you specific legal rights, and you may also have other
rights, which vary from state to state. PolyVision Corporation products are warranted
in accordance with the terms of the applicable PolyVision Corporation limited
warranty. Product performance is affected by system configuration. Software, the
application, customer data, and operator control of products are considered to be
compatible with many systems. The specific suitability of a product for a specific
purpose or application must be determined by the customer and is not warranted by
PolyVision Corporation.
Warranty 57
Impulse™ LTX Multimedia Whiteboard System
Page 60

www.touchboards.com
205 Westwood Ave.
Long Branch, NJ 07740
1-866-942-6273
Impulse™ LTX Multimedia Whiteboard System
[email protected]
58 Warranty
 Loading...