


Instruction Manual
Collaborative ToolBar

Install the ToolBar
on Your Board
1
Prior to setting up your accessory ToolBar, we recommend you
perform an initial cleaning on your writing board following the
directions on page 6.
2
Next, remove the ToolBar from the package and place it on your
magnetic writing board. You can place the ToolBar three dierent
ways. The open side should always face the board (see page 2).
Choose the one that its you best!
3
Remove the round, magnetic eraser from the package, place in
the docking system of the ToolBar.
4
Remove your writing tools from the bag and place them in the
“ingers” of the ToolBar.
Your accessory kit is ready to use!
01Collaborative ToolBar Instruction Manual
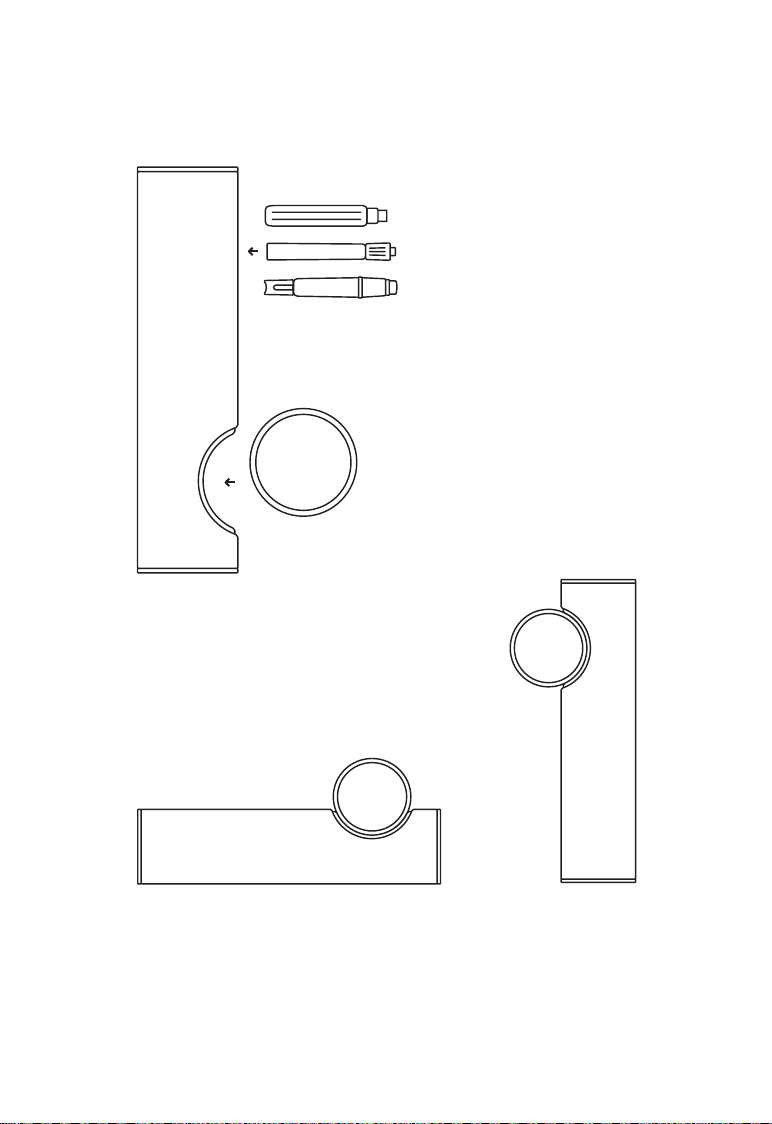
Aligned on the left
side of the board
A
ToolBar
B
Round
Magnetic
Eraser
Writing Tools
C
Aligned on the lower
side of the board
Aligned on the right
side of the board
02Collaborative ToolBar Instruction Manual

Keep Your
Eraser Clean
Your eraser is already assembled with a microiber cloth. To
maximize the erasability of your writing board, keep your eraser
clean and free of residue. In your ToolBar Kit, you have been
provided two additional microiber cloths to switch out when
one gets worn or dirty. Once removed, microiber cloths can be
washed for reuse. When you’re ready for a fresh microiber cloth
follow the steps on page 4.
Eraser
B
Base
Round
A
Magnetic
Eraser
Round
C
Microiber
Cloth
Closure
D
Ring
03Collaborative ToolBar Instruction Manual

21
Turn the eraser upside down
and rotate counterclockwise
to unlock the ring
3 4
Replace the used cloth
with a fresh cloth
5 6
Remove the ring
Center the cloth
on the eraser
Push the ring back
onto the eraser
Rotate clockwise to
lock the ring
04Collaborative ToolBar Instruction Manual

Cleaning Your
Writing Board
Initial cleaning
1
If present, remove the protective ilm.
Wipe writing board with a clean cloth moistened with a high-
2
quality whiteboard cleaner.
3
Dry surface with a clean cloth.
For chalk surfaces: Apply chalk to the entire surface using the
long side of the chalk. Erase the board. Keep erasers clean and
dry. Clean the surface with warm water and rinse well, wiping the
surface with a window stripper or squeegee. Allow the surface to
dry before use.
Boards used moderately should be cleaned two to three times a
week. Boards used more intensely may require daily cleaning.
05Collaborative ToolBar Instruction Manual

Cleaning +
Maintenance
Daily cleaning
1
Wipe surface with a clean cloth moistened with warm water.
Dry surface with a clean cloth.
2
For chalk surfaces: use a window stripper or squeegee and allow
the surface to dry completely before use.
Weekly cleaning
1
Wipe surface with a clean cloth moistened with a high-quality
whiteboard cleaner. Note: Using a non-appropriate cleaner
may result in poor dry erasability due to the build-up of
residues from the cleaner on the surface.
2
Dry surface with a clean cloth.
For chalk surfaces: use a window stripper or squeegee and
allow the surface to dry completely before use.
06Collaborative ToolBar Instruction Manual

Remove Markings +
Residue
Cleaning diicult marks
To remove hard to clean stains moisten a clean, dry cloth with water
and apply a small amount of abrasive cleaner to the cloth. Work in
small sections cleaning the area using a back and forth motion with
gentle pressure. Wipe o all reside with a dry cloth.
Soap residues on the surface will result in decreased dry erasability.
Rinse well with clean water and wipe dry with a clean cloth.
To quickly and easily remove permanent marker, go over the top
of the writing with a dry erase marker. Then, simply erase. In most
cases, this will remove the marker.
For chalk surfaces, clean the surface with clean, warm water. (Use
5% Extran MA 02 or phosphate-containing cleaner in water and rub
well with a kitchen sponge when necessary.) Rinse well with clean
water and wipe the surface with a window stripper or squeegee.
Allow the surface to dry completely before use.
For warranty information visit polyvision.com/warranty
07Collaborative ToolBar Instruction Manual

Order New
Tools
Order another set of writing tools or spare parts through
your local dealer or our customer service team.
Standard MarkersEraser
Neon Markers
Chalk Sticks
ToolBar
Round
Magnetic
Eraser
Microiber
Cloth
Americas + Asia Paciic
Contact your local Steelcase dealer to place an order.
Europe, Middle East, Africa
Place an order through our customer service representatives:
EMEAsupport@polyvision.com +32.89.32.31.30
08Collaborative ToolBar Instruction Manual

Collaborate.
polyvision.com
©2019 PolyVision Corporation. All rights reserved. Trademarks used herein are the trademarks
of PolyVision Corporation or their respective owner. PolyVision Corporation reserves the right
to make changes in product design, construction or detail, and to discontinue any product or
material without notice.
 Loading...